

Page 1
II linear
Setup Guide
Page 2

Welcome to the Syrp family
Before you start filming, there are a few simple steps
to follow to ensure your Genie II is assembled
correctly and you’re sliding smoothly.
This guide will walk you through the correct Genie II
set up, as well as some helpful tips.
Additional resources can be found at
support.syrp.co.nz
Page 3
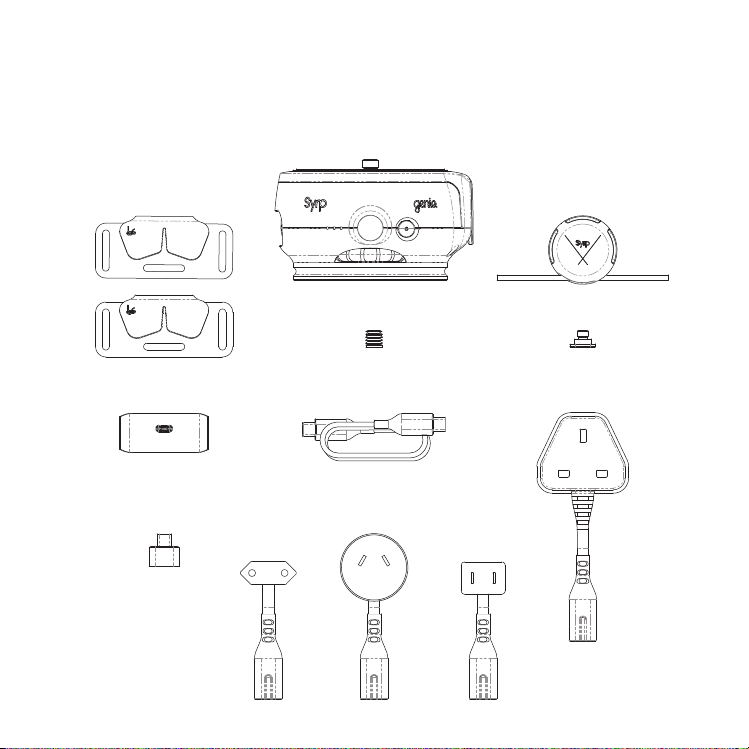
What’s in the Box
Genie II Linear (Battery + QR Plate Incl.)
Rope Hooks
Charger
USB Adapter
Euro Plug
1/4" - 3/8" Adapter
USB-C Charge Cable
AU/NZ Plug
Capstan
1/4" Camera Screw
UK Plug
USA Plug
Page 4
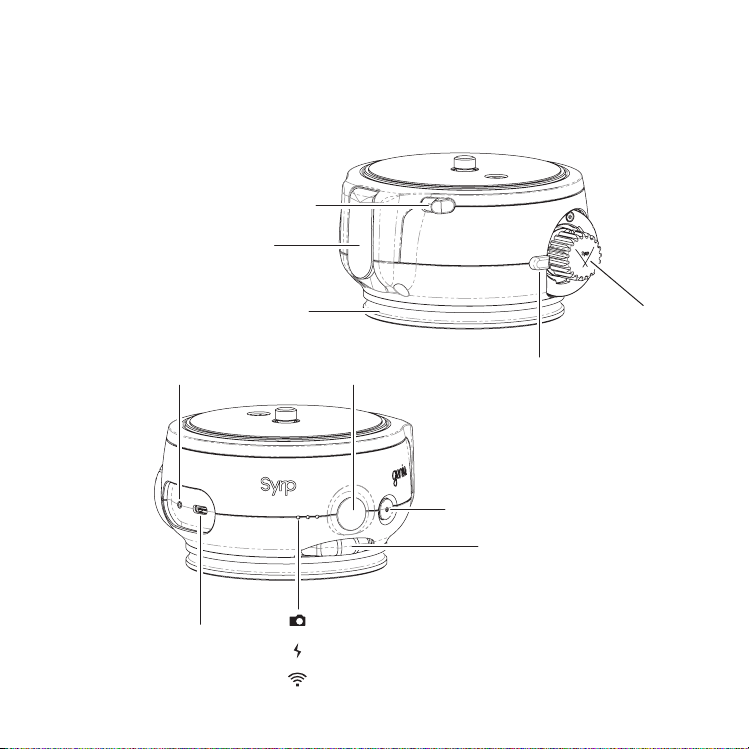
Quick Release Button
Quick Release Lock
Genie II Linear
Linear Base 90mm
Camera Port
USB-C Port
Joystick
Power Button
Camera recording light
Charging light
Wireless connection light
Capstan Drive Gear
Capstan release button
Tightening Wheel
Page 5
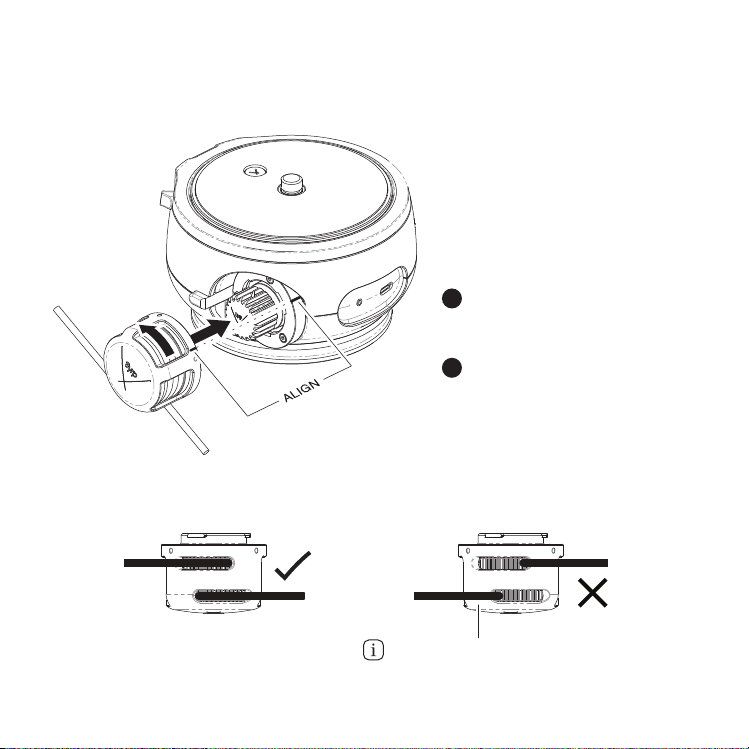
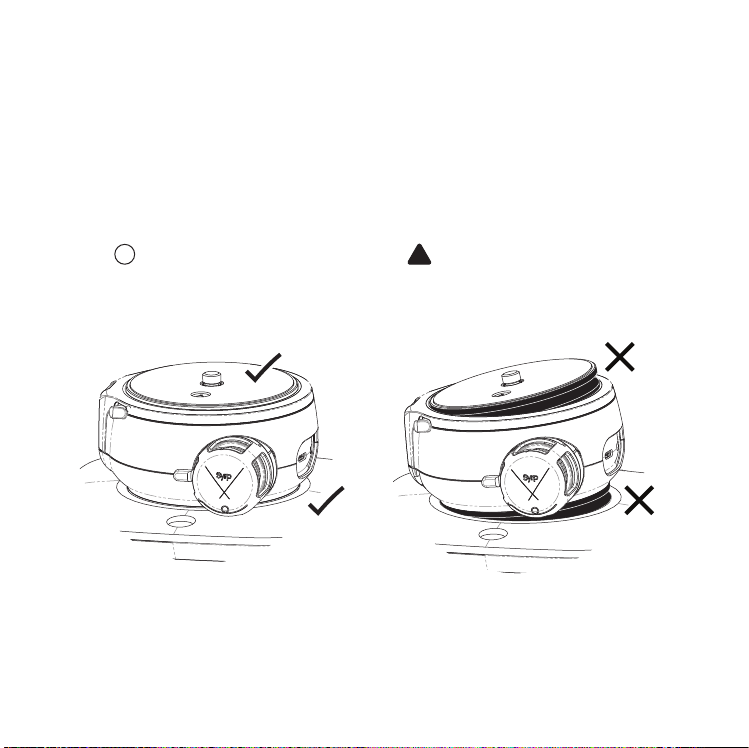
Install the Capstan
Align the markings and insert
1
the Capstan.
Turn the capstan counter
2
clockwise until you hear a
CLICK!
Correct Rope Direction Incorrect Rope Direction
The rope shouldn’t exit
the channels and cross
back over itself.
Page 6

1
UNLOCK
Open the Quick
Release Lock
Quick Release Plate
Pull out the 90mm Quick Release Plate and screw
to the base of your ballhead or video head.
Push Quick Release
3
button across and pull
the plate up to remove
2
SWAP
PULL
TO RELEASE
Pull the Thread Release
to swap between 3/8” &
1/4” Camera Screws.
Page 7

Push the 90mm Quick Release Plate down into the Genie II
7
Linear. You will hear a click when it’s flush and engaged.
Close the Quick Release Lock.
!
IMPORTANT
Do not lift the Genie and or
attached equipment by the
camera. Always detach first
and transport separately.
Always lock the Quick
Release once the plate
is installed.
Mount Camera
1
2
LOCK
Page 8

Mount the Genie
Magic Carpet PRO
Push the Genie II Linear
directly down into the Quick
Release Base and lock it.
Tightening Wheel
can also be used
to screw to base
!
Always lock the Quick
Release once the plate
is installed.
Standard Slider
Screw the Genie II Linear
clockwise onto a 3/8 thread
and fully tighten.
Page 9
Mounting Warning
You must ensure the Quick Releases are installed correctly.
7
Incorrect installation could result in your equipment
detaching and cause harm to your equipment or others.
!
IMPORTANT
Ensure the Quick Release
Plate and the Linear Base is
fully inserted. They should
be flush.
WARNING
!
Always ensure the Quick
Release Plate & Genie are
not partially inserted
Page 10
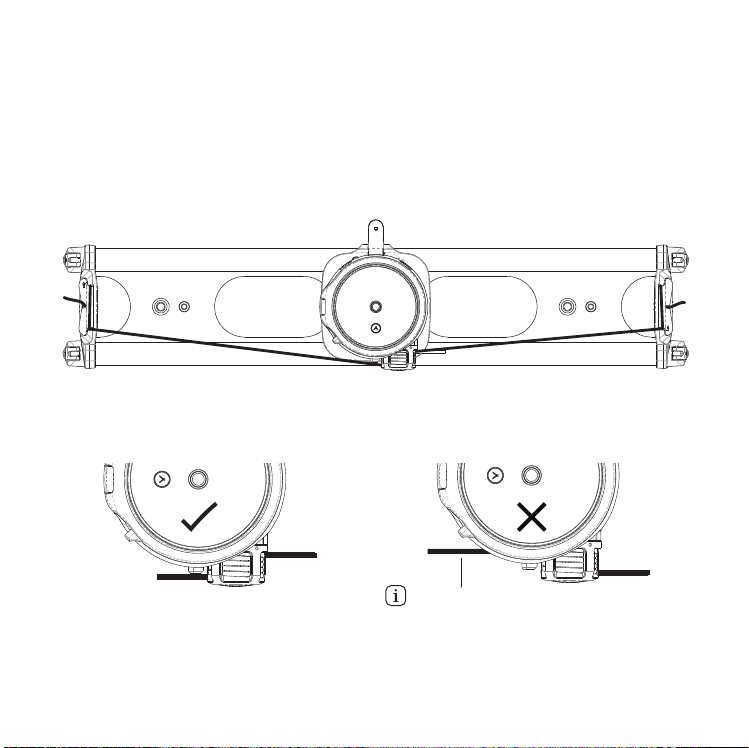
Tie off the Genie Rope
Tie off the Genie rope to both ends of your track using the
7
supplied rope hooks. Make note of the correct direction of
the rope as illustrated.
Correct Rope Direction Incorrect Rope Direction
Rope should not
pass through on
the inside of the
Genie II Linear.
Page 11

Remove / Install Battery
1
Before you use the Genie
for the first time you must
remove the battery tape
3
2
UNLOCK
Push the Quick
Release button
and lift the lock.
Page 12

Camera Control
The shutter cable
is not required for
video recording
Plug the 2.5mm jack end of your
1
Syrp Link Cable into the Camera
Port.
Connect the opposite end of your
2
Syrp Link Cable into the remote port
of your camera.
If you have a USB shutter
cable for your camera you
can use the supplied USB
adaptor to connect it to the
Genie
Page 13

Connect to Genie
Turn on the Genie, press the on
1
button once.
2
Turn Bluetooth on in your mobile
device settings.
Download the Syrp Genie App
3
4
Open the Syrp Genie App.
Continued overleaf.
Page 14

App Connect
CONNECTION
GENIE II
Linear
CONNECTION
GENIE II
Linear
OK
Tap the CONNECT icon.
1
2
Select your Genie or multiple
Genies to link to more than
one Genie.
Tick confirms Connection.
3
4
Press “OK”.
Page 15

Joystick Drive
The Genie Linear can be driven manually left and right and
7
into position with Joystick.
Page 16

Charging
Select your country’s plug and connect to the Charger.
7
Connect the USB-C charging cable to the charger and to
one of the Genie’s USB ports.
AU/NZ USA EURO UK
!
IMPORTANT
Use only Syrp
supplied chargers
and cables
Charger
3hrs
Orange light indicates
charging, green is
charged
Page 17

UNLOCK
Remove the Capstan
Push in the Capstan Release
1
Button and hold in.
Turn the capstan clockwise
2
and pull it out to remove.
Page 18

Wind 4x around
Thread the Capstan
Holding the Capstan
1
with the bayonet end
down, thread the rope in
through the bottom
channel from the right to
the left.
4x
3x
2x
1x
2
Thread the rope around
the Capstan until you
can count 4 rope winds
through the capstan
window.
Pull the rope up out
3
through the top channel.
The Capstan is pre-wound,
avoid removing unless
absolutely necessary
Page 19

Genie Quick Tips
When recording photographs always set your camera and
lens to manual focus (MF), if set to Auto Focus (AF) the
camera can misfire leading to missed frames.
Turn image review OFF on your camera. On some cameras
image review can cause missed frames in your time-lapse.
Page 20

Firmware Tips
If you’re having difficulty updating the Firmware try
theses tips.
• Try to update on a different device, if it works you can go
back to using your original device.
• Do not connect to other Bluetooth devices while updating,
it's best to turn off other nearby Bluetooth devices
completely, or the update may fail.
• Try the update from a different location, in some situations
unknown interference can cause a failed update.
For more information visit support.syrp.co.nz
Page 21

User Warnings
In this guide you’ll learn how to operate the Genie II Linear
correctly. Your safety is our top priority so please ensure you read this
entire guide fully and understand it before you go filming.
We also suggest that you keep this guide for future reference.
DISCLAIMER
Syrp has made every effort to provide clear and accurate information in this guide, which is
provided solely for your, information. However to the maximum extent permitted by law Syrp shall
Syrp reserves the right to revise the design and specifications of the Genie II Linear and this guide and
make changes from time to time including, without limitation, as a result of changes in any applicable
laws or regulations. Syrp will upload any changes to this guide on its website (https://syrp.co.nz).
- You have read this Disclaimer, Product Warnings, Product Safety Instructions, Battery Warnings,
- You understand and agree to abide by all the terms and conditions in this guide;
- You are solely responsible for your own conduct and safety while using the Genie II Linear;
- You will only use the Genie II Linear for the purpose that it was designed and safely
instructions, warnings, practices, policies and guidelines that Syrp has or may
not be liable for any errors or discrepancies in this guide.
By using the Genie II Linear, you agree that:
Battery Safety Instructions and full guide carefully.
and in accordance with all applicable laws, rules and regulations, and all
make available from time to time including, without limitation, by way of
video tutorials and guides on Syrp’s website (https://syrp.co.nz/) and
Youtube / Vimeo channels.
Page 22

Stay in Touch
We hope that the Genie II helps to expand your creativity
7
and assists in making better films. Please stay in touch
with us, join our community and show us your work.
www.syrp.co
youtube.com/syrptube
vimeo.com/syrp
instagram.com/syrp_
facebook.com/syrp.co.nz
twitter.com/syrp_
syrp@syrp.co.nz
32 Crummer Rd
Auckland 1021
New Zealand
Ph.+64 9 360 9570
Page 23

User Warnings
In this guide you’ll learn how to operate the Genie II Linear
correctly. Your safety is our top priority so please ensure you read this
entire guide fully and understand it before you go filming.
We also suggest that you keep this guide for future reference.
DISCLAIMER
Syrp has made every effort to provide clear and accurate information in this guide, which is
provided solely for your, information. However to the maximum extent permitted by law Syrp shall
Syrp reserves the right to revise the design and specifications of the Genie II Linear and this guide and
make changes from time to time including, without limitation, as a result of changes in any applicable
laws or regulations. Syrp will upload any changes to this guide on its website (https://syrp.co.nz).
- You have read this Disclaimer, Product Warnings, Product Safety Instructions, Battery Warnings,
- You understand and agree to abide by all the terms and conditions in this guide;
- You are solely responsible for your own conduct and safety while using the Genie II Linear;
- You will only use the Genie II Linear for the purpose that it was designed and safely
instructions, warnings, practices, policies and guidelines that Syrp has or may
not be liable for any errors or discrepancies in this guide.
By using the Genie II Linear, you agree that:
Battery Safety Instructions and full guide carefully.
and in accordance with all applicable laws, rules and regulations, and all
make available from time to time including, without limitation, by way of
video tutorials and guides on Syrp’s website (https://syrp.co.nz/) and
Youtube / Vimeo channels.
Page 24

Subject to any express warranty listed on the support page at
www.syrp.co.nz, to the maximum extent permitted by law, in no event
shall Syrp, its directors, employees, contractors or authorised agents be
liable to you or anyone else for any loss, damage, fines, penalties, injury,
solicitor-client costs, loss of profits, loss of business or damage to goodwill, or any
indirect or consequential or special loss or damage arising under or in connection with:
- Your use of the Genie II Linear; and
- The use of any technical or operational information contained in this guide.
Syrp makes no guarantees for your recordings / images. In the event that content was not recorded or
images taken, due to a fault related to the Genie II Linear during use, please understand that no
compensation can be provided and Syrp will not be held responsible in any way.
Subject to any express warranty given by Syrp at www.syrp.co.nz/support, to the fullest extent possible
at law, Syrp does not make any representations or give any express or implied warranties of any kind in
If the Genie II Linear is being used by you for business purposes as that term is defined in the New
Zealand Consumer Guarantees Act 1993 then pursuant to the provisions of that Act the terms and
guarantees of that Act do not apply to your purchase of the Genie II Linear.
For the full User Manual and Operating Instructions, head to support.syrp.co.nz
The Genie II Linear was manufactured and designed to be used for motion control
time-lapse photography and video. Never use the Genie II Linear without fully
understanding the functions and safety precautions.
relation to the Genie II Linear.
PRODUCT WARNINGS
Page 25

You must ensure that the Genie II Linear is only used for its
purpose and in accordance with this guide. Please read the Product
Warnings and Safety Instructions carefully before using.
WARNING: To reduce the risk of fire or electric shock, do not expose this
equipment to rain or moisture. To reduce the risk of fire or electric shock hazard, keep
this equipment away from all liquids. Use and store only in locations which are not
exposed to the risk of dripping or splashing liquids, and do not place any liquid containers
WARNING: Always keep the product and all accessories including, connection cable and all
packaging out of reach of babies and small children.
WARNING: Do not use this product near water. The unit is not waterproof and cannot be used under
water. If you accidentally drop the device into water, promptly contact Syrp.
WARNING: Never use any 3rd party rope as a replacement for the Genie Rope.
WARNING: Never attempt to disassemble the Genie II Linear Components to repair, fix or replace parts.
CAUTION: Do not carry, jar, swing, or shake the unit by any attached accessories including the
Genie II Linear, Ballhead, Slider or Camera. Any strong jolt may damage the unit, attached
CAUTION: Do not lift the Genie II Linear by its body when a tripod or other equipment is
attached. When a tripod or other equipment accessory is attached, its weight will also
affect the Genie II Linear’s handling, possibly causing it to break, as well as
possibly hurting the user. Instead always detach the Genie II Linear from the
on top of the equipment.
equipment’s or result in personal injury.
accessory and transport separately.
Page 26

CAUTION: To reduce the risk of fire or electric shock and
annoying interference, use the recommended accessories only.
CAUTION: Danger of explosion or fire if battery is tampered with or mistreated.
Do not dispose of the Genie II Linear and/or the battery in fire. Do not store the Genie
II Linear and/or the battery in temperatures over 50°C (104°F) or below -20°C (-4°F). Do
not expose the Genie II Linear and/or battery to excessive heat such as sunshine, fire or the
CAUTION: Do not use or charge the device in temperatures below 2°C (35°F), or above 30°C (86°F).
CAUTION: To maintain adequate ventilation, do not install or place this Genie II Linear in a bookcase,
built-in cabinet or any other confined space. To prevent risk of electric shock or fire hazard due to
overheating, ensure that is not covered by anything that may obstruct the ventilation.
CAUTION: Do not cover or wrap the Genie II Linear or AC adapter with a cloth or any other material.
CAUTION: Do not leave the Genie II Linear in direct contact with the skin for long periods of time when
in use. Low temperature burn injuries may be suffered if the high temperature parts of this Genie II
Linear are in direct contact with the skin for long periods of time. When using the equipment for long
CAUTION: Do not exceed the weight limitations stated below for the Genie II Linear and QR plate:
like. Always use the specified charger to recharge the battery.
Doing so may trap heat within and cause the casing to deform or catch fire.
periods of time, make use of tripods or other equipment accessories.
Horizontal operation max 7.4kg (16lbs)
Vertical operation max 2.5kg (5.5lbs)
Upside down or sideways operation max 4kg (8.8lbs)
Vertical counter weighted operation max 4kg (8.8lbs)
Page 27

IMPORTANT PRODUCT SAFETY INSTRUCTION
READ THESE INSTRUCTIONS. KEEP THESE INSTRUCTIONS.
- Do not use the Genie II Linear for anything other than creating motion control
- Never use the Genie II Linear above people or animals or close to motor vehicles, railway
stations, highways, railway lines, schools, city centres or other public or sensitive areas. The
Genie II Linear could fall and cause personal injury or damage.
- Always ensure the Genie II Linear is securely attached to support accessories.
- Never operate when Genie II Linear’s Quick Release is not fully locked. The plate should be fully
- Always ensure the Quick Release plate is level and fully inserted in the Quick Release Base.
- Never use the Genie II Linear hanging upside down.
- Always ensure when attaching the Genie II Linear to a tripod, slider or other accessory that it is
- Never put any object or body part in the path of the Genie II Linear movement.
- Avoid storing the Genie II Linear where there are corrosive chemicals such as a
- Never leave the Genie II Linear near anything having a strong
magnetic field such as a magnet or electric motor. Also avoid
FOLLOW THEM CAREFULLY.
time-lapse photography and video.
submerged into the Genie II Linear.
fully secured.
darkroom or chemical lab.
- Clean only with a dry cloth.
using or leaving the Genie II Linear near anything
emitting strong radio waves such as a
large antenna.
Page 28

- If the Genie II Linear is suddenly brought in from the cold into
a warm room, condensation may form on the Genie II Linear. Do not
use the Genie II Linear. This is to avoid damaging it. If there is condensa-
tion, remove any accessories and wait until the condensation has evaporated
- Do not use paint thinner, benzene, or other organic solvents to clean the equipment. Doing
- Only use attachments/accessories specified by Syrp.
- Refer all servicing to qualified service personnel.
- Servicing is required when the Genie II Linear has been damaged in any way, such as power-supply
cord or plug is damaged, liquid has been spilled, objects have fallen onto the Genie II Linear, the Genie
II Linear has been exposed to rain or moisture, does not operate normally, or has been dropped.
- Do not store the equipment in dusty or humid places
- Do not use the Genie II Linear in hospitals or airplanes. Electromagnetic waves emitted by the Genie
II Linear may interfere with the planes instruments or medical equipment.
You must read these safety instructions and warnings before using or charging your
batteries. Lithium Polymer and Li-ion batteries are volatile. Failure to read and follow the
below instructions may result in fire, personal injury and damage to property if
before using again.
so may cause fire or a health hazard.
BATTERY WARNINGS
charged or used improperly.
Page 29

WARNING: Do not disassemble or modify the battery. The
battery contains safety and protection devices, which, if damaged,
may cause the battery to generate heat, explode or ignite.
WARNING: Do not pierce the battery with nails, strike the battery with a hammer, step
CAUTION: Do not carry or store battery together with necklaces, hairpins or other metal objects.
CAUTION: Do not expose battery to water or salt water, or allow the battery to get wet.
CAUTION: Do not place the battery in or near fire, on stoves or other high temperature locations.
CAUTION: The AC adapter is designed to operate at the following AC voltages and frequencies only;
100-240V ~ 50-60Hz 0.5A. The rated output voltage and current is 3.6-6.5V/3A, 6.5-9V/2A,
- Never charge batteries unattended. Always monitor charging process to assure batteries are
on the battery or otherwise subject it to strong impacts or shocks.
WARNING: Do not use a battery that’s shows any signs of physical damage.
9-12V/1.5A 18W Max
IMPORTANT BATTERY SAFETY INSTRUCTIONS
READ THESE INSTRUCTIONS. KEEP THESE INSTRUCTIONS.
FOLLOW THEM CAREFULLY.
being charged properly. Failure to do so may result in fire.
- Never use 3rd party batteries
- If at any time you witness a battery starting to balloon, swell up, smoke or
become hot, discontinue charging process immediately, disconnect the
battery and observe it in a safe place for approximately 15
minutes. This reaction with may cause the chemicals to
ignite, resulting in fire.
Page 30

- Let battery cool down to ambient temperature before charging.
- Only use Genie II specific Lithium charger, USB charging cable and Power
plug. Never use any 3rd party chargers or cables as a replacement for the Genie
- Ensure you use the correct power plug for your country.
- If battery leakage contacts your eyes, skin, or clothing, flush the affected area with lots of clean
water without rubbing it. See a physician immediately.
- During recharging, keep the equipment away from the reach of children. The cord can accidentally
- Do not leave any cords near a heat source. It can deform the cord or melt the insulation and cause a
- Do not drop the batteries or use batteries that have been dropped.
- Charging the battery every 2 months to keep it fresh if you don't use it.
- Do not place the battery in direct sunlight, or use or store the battery inside cars in hot weather.
- Storing the Genie II Linear and/or the battery in temperatures over 50°C (104°F) or below
-20°C (-4°F) for extended periods of time (more than 2 hours) may cause damage to battery
II Linear charger or cables.
choke the child or give an electrical shock.
fire or electrical shock.
and possible fire.
- Always keep battery away from children.
Page 31

COPYRIGHT AND TRADEMARKS
Copyright laws in your country may prohibit the use of recorded images of
people, places or other subjects for public or private enjoyment. Also be
aware that certain public performances, exhibitions or other events may prohibit
Syrp, the Syrp logo and the Genie logo are trademarks or registered trademarks of Syrp Ltd in
New Zealand and/or other countries. All trademarks, trade names, icons, logos, written material,
images, code, and product names used in association with this product are copyrights,
trademarks, or other intellectual property exclusively owned and controlled by Syrp Ltd. Syrp Ltd
All other company, brand and product names are trademarks or registered trademarks of their
respective holders. Syrp has no affiliation to, is not associated or sponsored with, and has no express
recording images.
also has patents pending.
rights in third-party trademarks.
© 2018 Syrp Ltd. All rights reserved.
Page 32

 Loading...