

Page 1

syride
®
SYS’Evolution
User manual
EN
1
Page 2

Foreword
Welcome to Syride community! You are maybe owning the best instrument of Syride range!
Your SYS’Evolution belongs to a new generation of flying instrument, we call it a “flight computer”.
Let’s move on and stop reading this boring preamble! If you want to take benefit of all the
features of your instrument, read this user manual!
Syride team wishes you great flights…
0
Page 3

I. SETUP SYRIDE COMMUNICATION SOFTWARE ......................................................................................... 2
II. TURN ON AND OFF THE FLIGHT COMPUTER............................................................................................ 3
III. CHARGE THE BATTERY ........................................................................................................................... 4
IV. PLACE THE INSTRUMENT IN FLIGHT ........................................................................................................ 5
V. GENERAL ERGONOMICS ......................................................................................................................... 6
VI. THE 3 MAIN MENUS ............................................................................................................................... 8
VII. PARAMETERS : SYSTEM INFORMATION .................................................................................................. 9
VIII. PARAMETERS : WI-FI AND BLUETOOTH SETUP ...................................................................................... 10
IX. PARAMETERS : ONLINE FUNCTIONS ..................................................................................................... 12
X. PARAMETERS : GNSS SETUP ................................................................................................................. 15
XI. PARAMETERS : FLIGHTBOOK ................................................................................................................ 17
XII. PARAMETERS : ADVANCED PARAMETERS (INSTRUMENT) ..................................................................... 18
XIII. NAVIGATION : GOTO MENU ................................................................................................................. 20
XIV. NAVIGATION : ADD/EDIT/DELETE WAYPOINTS MENU .......................................................................... 21
XV. NAVIGATION : LOAD A ROUTE MENU ................................................................................................... 22
XVI. NAVIGATION : ADD/EDIT/DELETE A ROUTE MENU ............................................................................... 23
XVII. NAVIGATION : AIRSPACES MENU ......................................................................................................... 30
XVIII. ADVANCED SETUP (SOFTWARE) ........................................................................................................... 33
XIX. CUSTOMIZE THE FLIGHT SCREEN AND THE VARIO ................................................................................. 34
XX. TRANSFER YOUR FLIGHTS .................................................................................................................... 48
XXI. SUGGESTION OF USE ........................................................................................................................... 52
1
Page 4
10:39
I. Setup Syride communication software
This software is strongly suggested. It is called the « SYS PC Tool », and enables you to update your
instrument, fine-tune the settings, download your flights (and optionnaly send them to Syride online
flightbook), upload routes, waypoints, etc…
Please be aware that the SYS’Evolution is also compatible with GPSDump software (Please make sure
to use the latest version available on http://www.gpsdump.no/
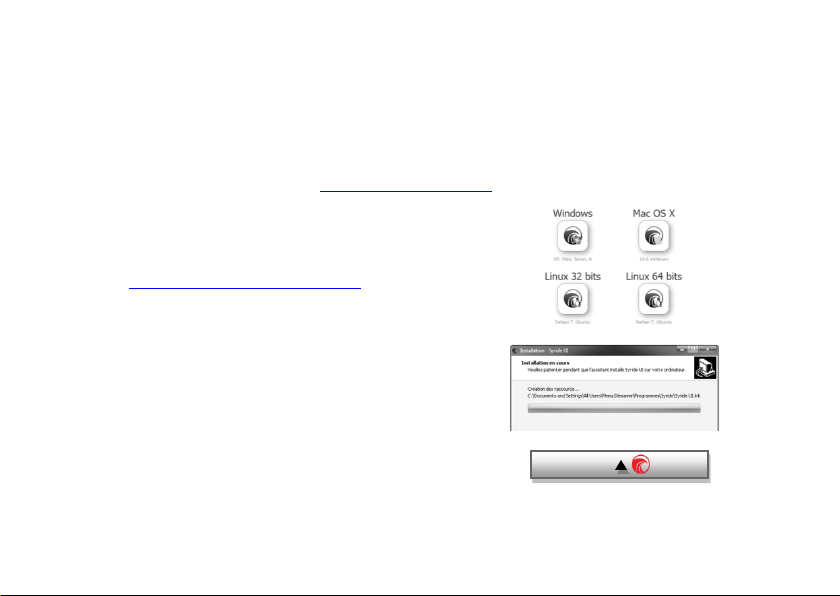
1. Download the lastest version of the
2. Follow the instructions to install it on
3. Once installed, an icon shows in the task
4. The software will automatically start with
2
SYS PC Tool by checking the following
webpage :
http://www.syride.com/en/logiciel
your computer
bar. It detects when your instrument is
connected.
your operating system.
).
Page 5
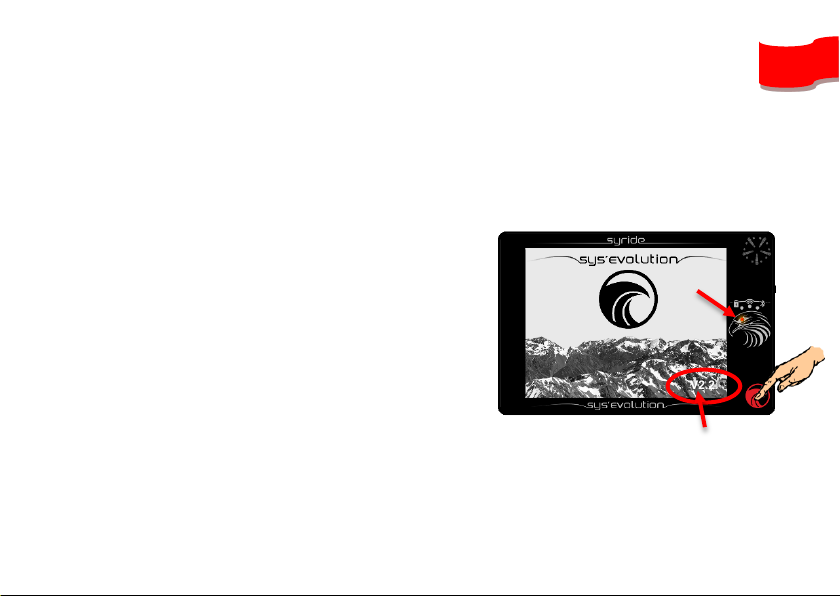
Instrument software version
II. Turn ON and OFF the flight computer
It is important to know that compared to other displays, the one the SYS’Evolution is using does not
require any power to keep an image displayed. This is why when you received it, some information may
already be displayed on the screen!
1. To turn ON your flight computer, press the
START button once. A small red light
turns-on in the eye of the eagle to
indicate that the instrument is ON.
The boot sequence lasts a few seconds to
initialize all the sensors. The "GPS booster"
is then activated to minimize the time of
reception of the GPS signal. As soon as the
reception is sufficient, the instrument will
automatically switch to the flight screen.
2. The instrument will be automatically turned
OFF after 20 minutes of inactivity (no
ground speed nor vario). To manually turn it
OFF, press the START button during 2
seconds, until the display wipes out.
(Also visible in the Info menu, see page 9)
EN
V2.20
3
Page 6
III. Charge the battery
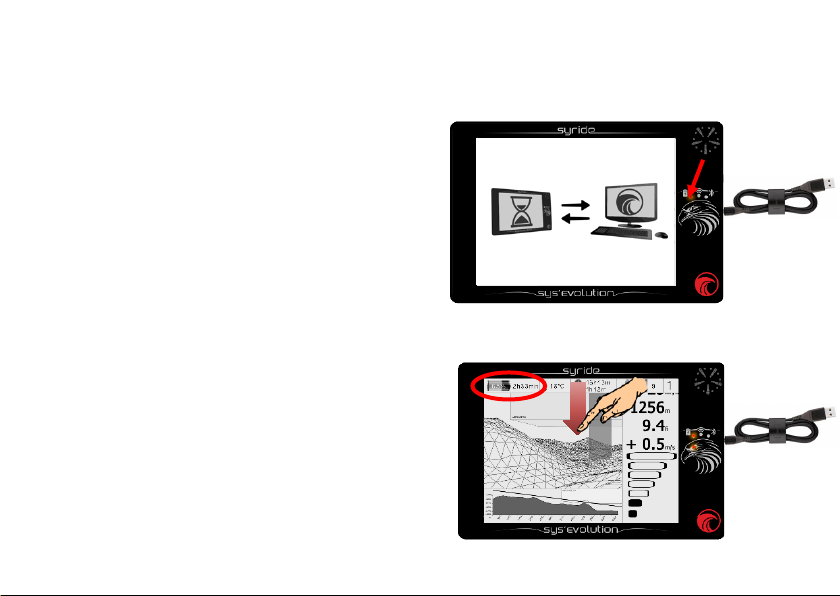
1. In order to charge the instrument, just
use any mini-USB cable that you could
connect to any power supply (computer,
phone charger, cigarette lighter..). A red
light on the battery icon indicates the
flight computer is charging. A full charge
from an empty battery takes up to 8
hours. It is NOT recommended to
charge through a USB hub device.
2. If the instrument is connected to a
computer a screen symbolizes it. You
can disconnect it at any time.
3. In running mod, draw a “slide-down”
movement on the screen with your finger
in order to display the top banner during
a few seconds.
4. Disconnect the instrument to stop
charging it. The Li-ion battery isn’t
affected by a memory effect.
4
Page 7
EN
IV. Place the instrument in flight
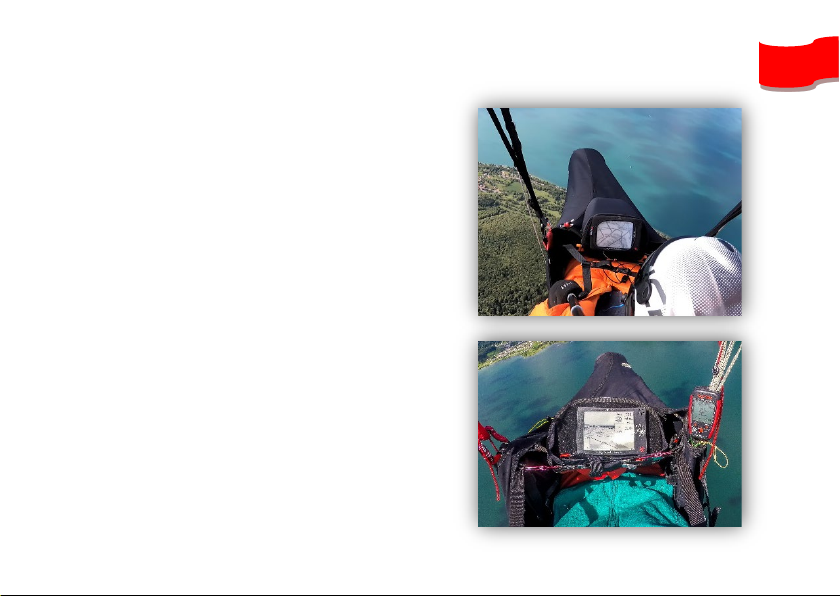
1. Syride suggest to place the
SYS’Evolution on a cockpit.
Two adhesive velcro bands are included
and can be sticked on the back of the
instrument.
Please take care not to obstruct the
Reboot hole with the velcro.
2. The size of the flight computer permits
to place it on a ventral rescue parachute.
3. You can secure the SYS’Evolution using
the lanyard.
4. For more comfort, a neoprene protection
housing with velcros is sold separately.
5
Page 8
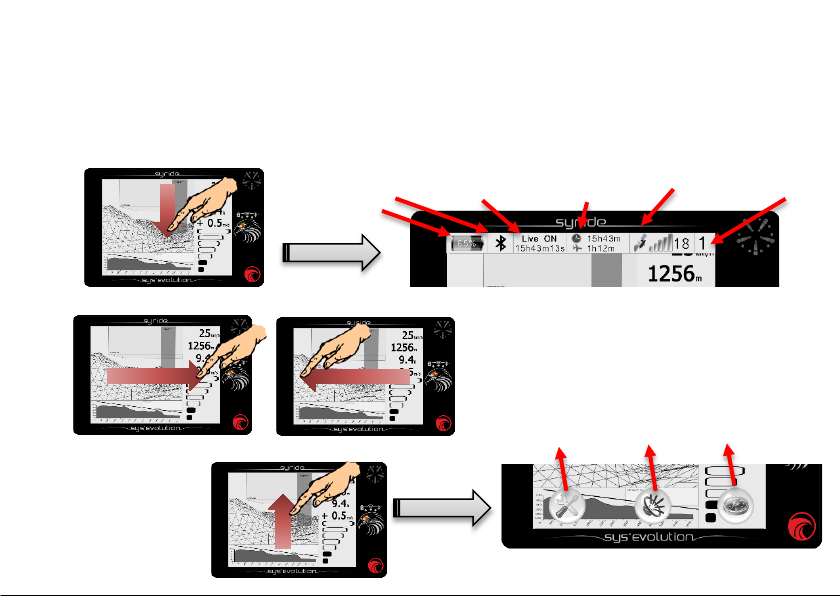
Live Status (including
last update time)
Time and flight
Number of satellites
Screen number
Parameters menu
Audio menu
Navigation menu
Battery level
Connection status
You can also add previous/next screen
V. General ergonomics
While the instrument is running, the whole display is dedicated to flight items. In order to make the
menus appear, draw a slide-down or slide-up movement with your finger, By applying a slight pressure
on the screen :
- The top banner appears during a few seconds by sliding down :
(Bluetooth/Wifi/none)
- Slide left or right in order to go to next or previous flight screen :
- Slide UP to display menus :
6
shortcuts on your flight screens when
customizing them.
time
GNSS
Page 9

EN
For your information :
- A slight pressure must be applied to use the SYS'Evolution touchscreen. This
technology allows to use this instrument with gloves
- The take-off is automatically detected and starts the log. The flight time in the top
banner appears after take-off.
- The touch-screen is designed to be used with or without gloves.
- Any flight item that requires GPS needs at least 3 satellites. Otherwise, a “NO GPS”
message may show up instead of the item.
- The first GPS fix can take several minutes in case of long power-off or in case
of significant change in position. Any first GPS fix should be done outside. We
recommend you to turn ON the instrument a few minutes before taking-off.
- The temperature only indicates the temperature of the electronics. This cannot be
used as a reference for ambient temperature.
- A 3.5mm jack socket is available on the right side of the device. Plugging a headset
automatically transfers any sound from the speaker to the headset (and cuts-off the
speaker).
7
Page 10
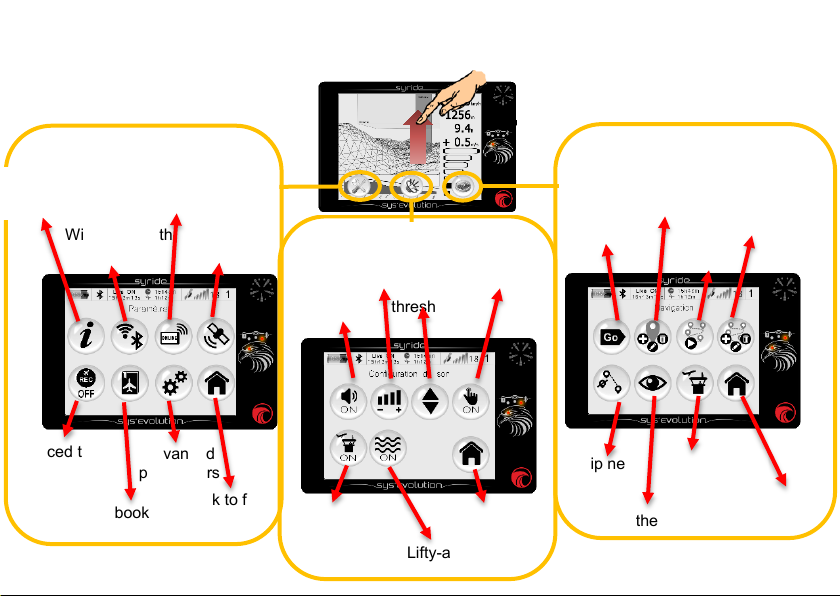
Wifi / Bluetooth
setup
Volume
Vario
thresholds
Lifty-air
ON/OFF
GO TO
waypoint
Load a
route
Add/Edit
Routes
View the map
Back to flight
screens
Parameters menu
Navigation menu
Audio menu
Online
features
GNSS
setup
Flightbook
Advanced
parameters
Back to flight
screens
Sound
ON/OFF
Airspace alarm
ON/OFF
Back to flight
screens
System
information
Forced track
recording
Skip next
waypoint
Touch
sounds
Add/Edit
Waypoints
Airspaces list
VI. The 3 main menus
8
Page 11

EN
Back to
« Parameters menu »
VII. Parameters : System information
To reach this page, slide up from a flight screen to make the menus appear, then click the « Parameters
menu » button, then click the « System information » button.
This pages displays all information about your SYS’Evolution. If a Syride account has been associated,
these information also display.
9
Page 12
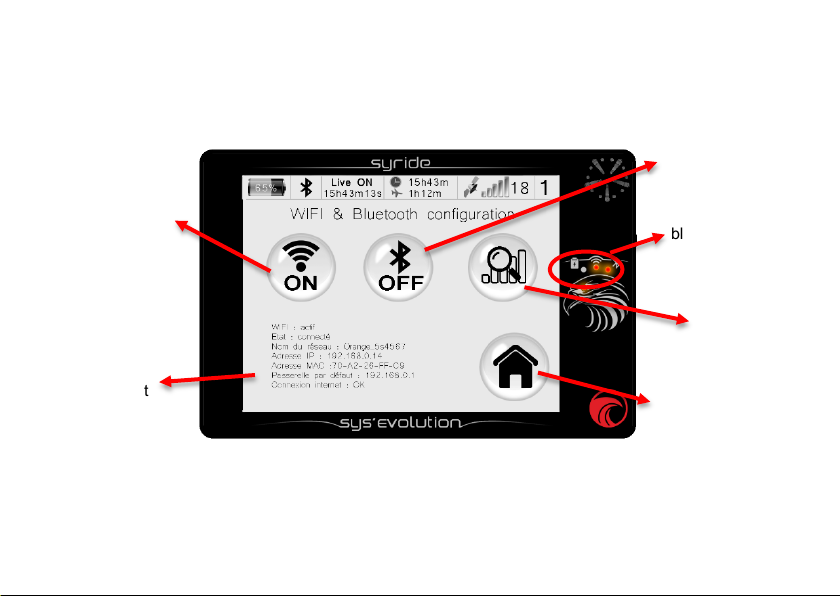
Back to
parameters
Enables or
Wi-Fi
Enables or disable
Bluetooth
Visible if Wi-Fi of
Connection status:
on = connected
Information
connection
VIII. Parameters : Wi-Fi and Bluetooth setup
To reach this page, slide up from any flight screen to make menus appear, then click « Parameters
menu » button, then click the « Wi-Fi/Bluetooth setup » button.
disables
blinking = searching
about the
current
10
Bluetooth is enabled:
Scan available
networks or devices
Page 13

EN
About connectivity:
- Online connectivity brings new features: Live Tracking, Real time wind reports, SMS
messaging… (For more info, please read chapter “Parameters: Online Functions”)
- IMPORTANT: For Bluetooth connection to work properly with your phone, you must enable
both Bluetooth AND Bluetooth Internet connection sharing (“Bluetooth tethering” on some
phones): See this tutorial video
- Whereas Wifi significantly reduces battery life and therefore should only be used on the
ground, Bluetooth is highly energy efficient and should be the connectivity used in
flight.
(Standby weather forecast only use Wifi to update its data)
- After your flight, if you have filled your credentials in the Sys’Evolution (Parameters >
Advanced Parameters > Pilot credentials), the flight will automatically be uploaded to your
Syride online profile.
- WIFI with WEP keys are currently not supported by the Sys’Evolution (Most Wifi networks use
WPA/WPA2 keys nowadays).
- Wifi and Bluetooth cannot be used simultaneously. Activating Bluetooth will disable the wifi
and vice versa.
- On most phones, you will have to be on a specific page to be visible by other devices
(including the Sys’Evolution) on Bluetooth (That’s usually the Bluetooth scan page).
.
11
Page 14
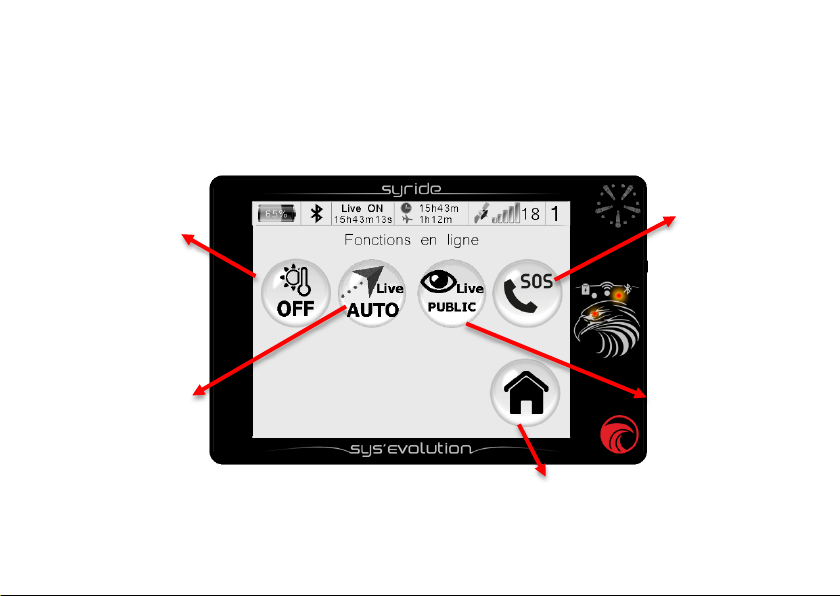
Live tracking
Back to Parameters
SMS Alerts menu
(see next page)
Activate live tracking
always off
Standy-by mode
(ON/OFF)
IX. Parameters : Online functions
To reach this page, slide up from any flight screen to make menus appear, click « Parameters menu »
button, then click the « Online functions » button. These functions will only work if your instrument
is connected (see previous chapter).
Weather station
(Only works if you’ve
entered your credentials
and if the instrument is
online)
Auto: Live tracking only
while a flight is detected
ON: Live tracking
always on
OFF: Live tracking
12
Public: visible by all.
Private: only visible when
connected on the website
or by users who have
your private link (see
« My account »page on
Syride.com).
Page 15
EN
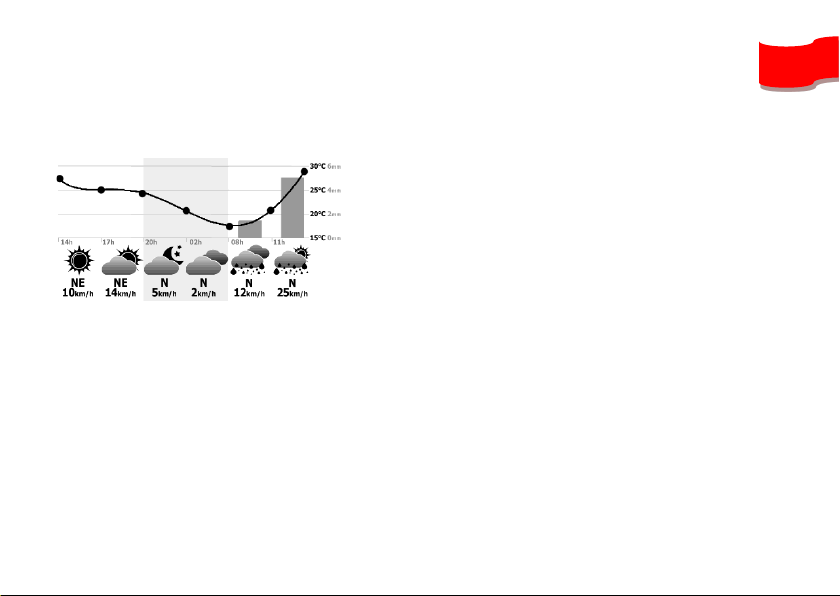
About the standby mode weather station:
This screen, available in stand-by mode, displays weather forecasts updated on a regular basis. Wifi
must be set up to use this feature.
- The weather station show data using your last GPS
position.
- Syride use its subscription to openweathermap.org to
download weather forecasts.
- Weather forecasts only use energy to update.
Display doesn’t use any energy.
- Customization of this screen will come at a later
stage.
13
Page 16
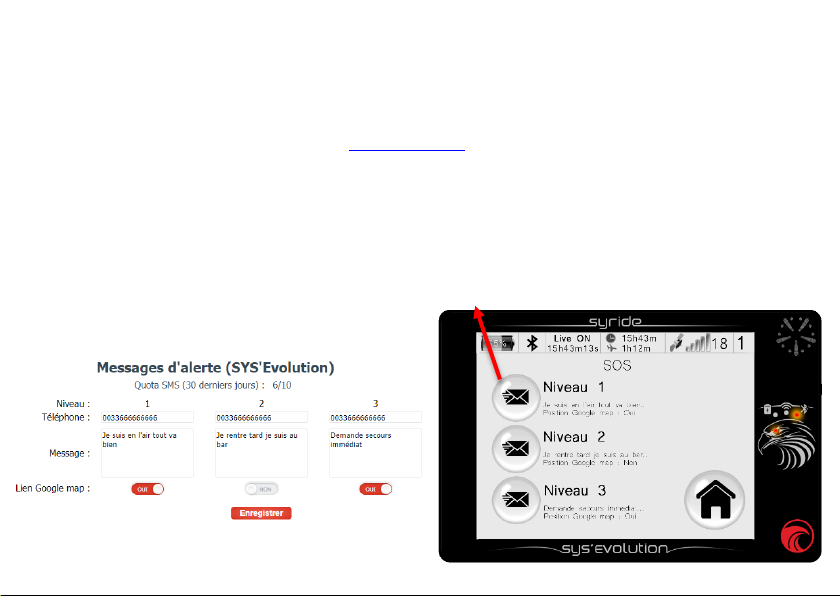
Send an SMS
« My account » page on Syride.com :
View on the instrument :
About emergency messages:
The emergency icon only appears if:
- Your instrument is connected with your smartphone and has Internet access.
- You have a Syride account on www.syride.com
(See chapter XIII).
- You have setup the messages and a list of recipients on the “My account” page on Syride.com
You are entitled to a free 10 SMS credit over a rolling 30 days period (remaining credits can be checked
on “My account” page on Syride.com).
An SMS will be sent (if data connection is available) as soon as you press an emergency button. You
can add shortcuts on your flight screens for a quicker access to this function.
14
and typed your credentials in the instrument
Page 17
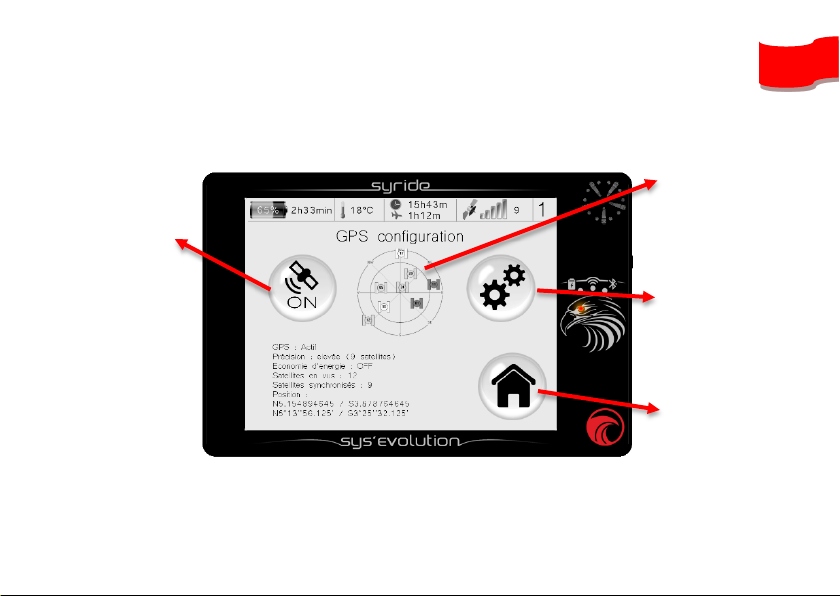
Enables or
GNSS
Visible if GNSS
parameters of GNSS
Visible if GNSS
satellites
Back to
parameters
X. Parameters : GNSS setup
To reach this page, slide up from any flight screen to make menus appear, then click « Parameters
menu » button, then click the « GPS setup » button.
Disables
Displays synchronized
Enabling GNSS is mandatory for track recording and displaying a lot of items (like the Route, the drift,
GPS altitude, etc…). Your current GPS position is displayed in the status area on the bottom of the
page.
EN
enabled:
enabled:
Advanced
15
Page 18
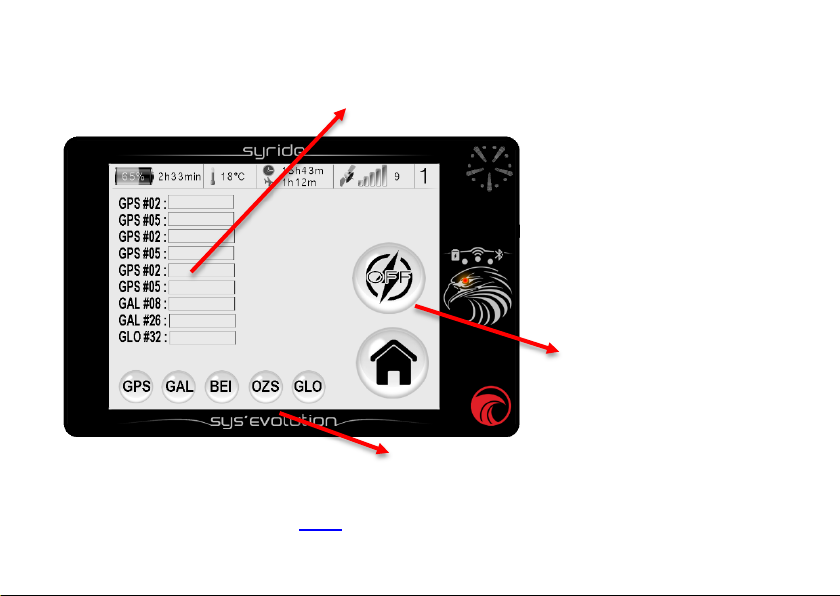
Energy saving mode allows you to
reception.
Choose the GNSS you want to use with the SYS'Evolution. At most 3 can be activated simultaneously:
The satellite-based augmentation (SBAS) of the SYS'Evolution GNSS chip is active by default.
Advanced settings let you know the signal strength of each satellite. The gray bars show the signals
received by the SYS'Evolution but not used for the calculation. The black bars show a signal used to
locate you.
limit the consumption of the GPS
receiver when you have a good
GPS : Navstar (USA), GAL : Galileo (European), BEI : Beidou (Chinese), QZS : Quasi-Zenith Satellite
(Japanese), GLO : Glonass (Russian).
16
Page 19

The « cloud » icon indicates this flight has been synchronised with
Syride Online Flightbook (through SYS PC Tool, Wi-Fi or Bluetooth).
Back to
parameters
Next flight
Previous flight
Delete this flight
XI. Parameters : flightbook
To reach this page, slide up from any flight screen to make menus appear, then click « Param eters
menu » button, then click « flightbook » button. On this page, you will find all information about your
flights. In case you enabled the synchronisation with Syride online flightbook, removing a flight from the
instrument will not remove it from the website.
EN
17
Page 20

Change Syride account
Change the language
Reset instrument to
counter)
Back to
parameters
Change Time zone
information
XII. Parameters : advanced parameters (instrument)
To reach this page, slide up from any flight screen to make menus appear, then click « Param eters
menu » button, then click « advanced parameters » button.
login information
18
factory defaults
(Except total time of use
Page 21

EN
1 2 3 4 5
About the « reset to factory defaults » button:
The first step after a reset to factory defaults consists
in calibrating the touchscreen. This is done by clicking
on each of the 5 crosses.
See a video explaining a touchscreen reset
.
Then comes the calibration of the magnetometer. This
is done by turning the instrument in all possible
directions (360° vertically and horizontally). Click
anywhere on the screen once done.
This step is important because it will highly influence
the precision of the magnetometer.
See a video explaining the magnetometer reset
.
19
Page 22

Back to
Navigation menu
Starts a
Moves a page backward
Moves 10 pages
backward
Moves 10 pages
forward
Moves a page forward
XIII. Navigation : GOTO Menu
To reach this page, slide up from any flight screen to make menus appear, then click « Navigation
menu » button, then click « GOTO » button. This feature allows the pilot to easily create a one-waypoint
route. The waypoints are ordered by distance from the current position. Please note that activating a
GOTO waypoint instantly stops the previous route, if ever one was activated.
navigation to
this waypoint
20
Page 23

Delete a waypoint
Add a waypoint
Edit a
waypoint
Moves a page backward
Moves 10 pages
backward
Moves 10 pages
forward
Moves a page forward
Back to
Navigation menu
XIV. Navigation : Add/Edit/Delete waypoints menu
To reach this page, slide up from any flight screen to make menus appear, then click « Navigation
menu » button, then click “Add/Edit/Delete Waypoints” icon.
Waypoints are ordered alphabetically.
EN
21
Page 24

Moves a page backward
Moves 10 pages
backward
Moves 10 pages
forward
Moves a page forward
Back to
Navigation menu
Start a
route
XV. Navigation : Load a route Menu
To reach this page, slide up from any flight screen to make menus appear, then click « Navigation
menu » button, then click « Load a Route » button. Routes are ordered by last modification date.
navigation
22
Page 25

Moves a page backward
Moves 10 pages
backward
Moves 10 pages
forward
Moves a page forward
Back to
Navigation menu
Edit a
route
Delete a route
Add a route
XVI. Navigation : Add/Edit/Delete a route Menu
To reach this page, slide up from any flight screen to make menus appear, then click « Navigation
menu » button, then click « Add/Edit/Delete a route » button. Routes are ordered by last modification
date.
EN
23
Page 26

Notes about navigation routes:
- Creating a route is only possible if at least 1 waypoint is available in the instrument.
- Creating a waypoint requires a name, its GPS coordinates, and its altitude. The
altitude is not mandatory, but is required to display the “glide ratio to waypoint” item.
- If you already have a waypoints file, it is possible to send this file with the
SYS PC Tool by clicking the “Send a file to the instrument” icon.
Waypoint files should be in Oziexplorer or CompeGPS .wpt format.
- Using GPSDump software
0.24 for Linux) is also an alternative solution. GPSDump supports more
waypoints file formats, and handles waypoints more efficiently. Please
note that GPSDump will not erase existing waypoints in the instruments whereas SYS PC
Tool will.
- To skip a waypoint before reaching it, and switch to the next one, you can click
one the “Switch to the next waypoint” icon in the navigation menu (only visible
when a route is active)
- To be able to follow your route, you must insert dedicated items, such as
“waypoint information” in your screen configuration file (See
“Customize the flight screen and vario”)
(above versions 5.28 for PC, 0.52 for Mac and
24
Page 27

About the online “Route Maker” tool:
Out of competition, the simplest way to create a route or a list of waypoints is to use our online tool,
called « Route maker ». Simple, fast and efficient, you can create a route in a few minutes.
To build a route with the online tool « Route maker » :
1) Go to the webpage http://www.syride.com/fr/route
PC TOOL .
2) This online tool allows to define waypoints,
cylinders… When your route is ready, click on
the Download the route file button to save it
on your computer, or on the Directly upload
the route to your instrument button to send it
to your instrument which should be connected
and turned on).
Please note that only the first method will allow you to keep a backup of your route file on
your computer. Direct upload might not be available on all
Operating System and browsers.
3) If you’ve downloaded the route file to your computer, turn on your
SYS’Evolution and connect it to your computer, then click on the
“send a file to the instrument” icon in SYS PC TOOL
or click on the Syride Tools menu in SYS
25
EN
Page 28

Here are the steps to create a route in the instrument :
First you will have to give your route a name, and define if it is a Competition route or not. This
choice is important as it will allow specific waypoint types for competition, such as ESS, SSS,
Goal…
For a competition route, you will be asked the kind of task. This choice will impact the start
validation conditions.
26
Page 29

EN
Here are the waypoint types available in competition mode:
Take-Off: This waypoint is optionnal and can only be set as the first waypoint of the route. It’s not
used for navigation, but allows to display the full length of the task.
Start of Speed Section (SSS): This waypoint is mandatory in a competition route creation. It can
be validated by entering it (enter) or exiting it (exit). A start time must be defined.
- SSS in a Race to goal task: With an Exit Start, if the pilot is inside the cylinder at the
Start time, the Start is validated, and the Sys’Evolution switch the navigation to the next
waypoint. With an Enter Start, if the pilot is inside the cylinder at the Start time, the
waypoint will only be validated upon cylinder entry crossing after the start time. In both
cases, the competition time will begin as of the start time (SSS validated or not).
- SSS in an Elapsed time task: unlike in race to goal tasks, the competition time will only
start after crossing the Start cylinder (Enter or Exit direction) after the start time. It is
possible to cross as many times as desired the start cylinder, the competition time being
reset each time you cross it, as long as you haven’t validated the next waypoint.
- SSS in Race to Goal with multiple starts tasks: In addition to classic Race to Goal
tasks information, you will have to enter the number of gates and the time intervals
between these gates. Here’s an example of tasks using multiple starts: A task with 5
27
Page 30

28
starts at 13:00 / 13:20 / 13:40 / 14:00 / 14:20 should be input with a 13:00 start time, 5
gates with 20 minutes interval. The time taken will be that of the start before your last
crossing of the waypoint. If I cross the SSS cylinder at 13:25, the start will be 13:20 and
your competition time will be 5min. If you cross the start again at 13:41, your competition
time will be 1min.
Page 31

EN
End Speed Section (ESS) : ESS waypoint is only available after a SSS has been put in the route.
It defines when your competition time ends. However, the task will only be finished if you make it to
the goal. Please note: you will not be able to end your competition route without defining an
ESS.
Conical End Speed Section (ESS) : Same as classic ESS except that you will have to enter the cone’s
incline instead of its radius (PWC rules define a 0.4 incline by default).
Goal cylinder : This is the last waypoint to put in a route. It’s optional.
Goal line : Same as before, the goal line is a finish line (displayed as half a circle). The default virtual
goal line (according to PWC rules) extends to 100 m each side of the GPS goal coordinates, to a total
of 200 m, and is perpendicular to the line between the goal point and the previous turnpoint coordinates.
The minimum length of the line is 50m.
29
Page 32

Enables or
airspace
Back to
navigation menu
XVII. Navigation : airspaces menu
To reach this page, slide up from any flight screen to make menus appear, then click « Navigation
menu » button, then click « Airspaces » button. When approaching an airspace, an audible and visual
alarm appears : « pre-violation + airspace name » appears on the bottom of the. If you enter this
airspace, a new alarm triggers and a message « violation + airspace name » displays.
This menu allows the pilot to enable or disable an airspace alarm. A disabled airspace will be ignored
in all airspace-related items, including the MAP item and audio warnings.
30
A shorcut is also available in the screen configuration tool and allow to deactivate in one click
the closest restricted Airspace area.
disables an
Page 33

Here’s how to update airspaces in the SYS’Evolution :
1) Go to this page : https://www.syride.com/en/airspace
Syride Tools menu in SYS PC TOOL
2) Select the countries you need from Syride online tool, then download the
OpenAir file to your computer.
3) Turn-on and connect your SYS’Evolution to your computer.
4) On the SYS PC Tool, click on the “send a file to the instrument” icon.
5) Select the previously downloaded OpenAir file.
A few useful tips and informations about airspaces :
- The data provided in the airspace files that you can download from Syride are not
official, and you should not use your SYS'Evolution as a main navigation reference. Please
refer to the official sources of aeronautical information (for example:
civile.gouv.fr/ for France). These files are usually provided free of charge by the federations,
the information they contain is not guaranteed and we shall not be liable for the consequences
of their uses
- We advise you to check the version of the file you intend to load. Airspace evolves on regular
basis. In addition, zones can change class depending on the time of the year and time
of day and may not be visible on the instrument (for example: Chambery TMA which passes
from a class D to a class E).
- A knowledge of aeronautical rules an a flight briefing are mandatory to correctly use the
information given by the instrument.
or click on the
http://www.sia.aviation-
EN
31
Page 34

- Some temporary forbidden zones may exist. They are signaled by NOTAM (Notice to
Airmen) and cannot be handled by the instrument.
- In France, VFR flights without radio contact are limited to Flight Level 115 (about 3450
m). It is allowed to fly above this limit in zones called Class E LTA (Vanoise, Bauges, Mont
Blanc…). You should consult each countries regulation to learn about local rules.
- You can add your own airspace files, as long as they respect the Openair format.
- For ease of calculation and readability, airspaces that are 5000ft above your current
altitude will not be listed in the menu nor displayed on the 3D and map. The refresh of
the list is done every 2 minutes.
- Airspaces with more than 150 polygon points can not be technically represented on the
3d view.
- Airspaces that are based on altitude above ground (AGL) can have a different
representation than reality on the 3d view. However, violation alarms will be triggered
correctly.
32
Page 35

EN
XVIII. Advanced setup (software)
Connect your SYS’Evolution to the SYS PC Tool in order to get access to advanced options. From
these advanced options, you can, for example :
- Change the averaging time of the vario.
- Change the G-force alarm threshold value
- Change airspace pre-violation vertical and horizontal distances.
To access these advanced parameters :
1) Turn-on and connect your SYS’Evolution to your computer.
2) On the SYS PC Tool software, click on the “Parameters” icon
to open the setting window.
3) Modify any value.
4) Click on « Send parameters »
33
Page 36
XIX. Customize the flight screen and the vario
With the SYS’Evolution, you can customize each flight screen, and the sound of the vario.
To customize your flight screens :
1) Go to this webpage : http://www.syride.com/fr/ssctool/Evo
2) Customize the flight screens by selecting an items and its unit, then selecting a text font and
size. Drag and drop to change the item’s position.
3) Turn-on and connect your instrument to your computer.
4) Download the screen setup file.
5) On the SYS PC Tool, click on the “Send a file to my instrument” icon.
6) Select the previously downloaded file and click Open
The vario sound setup works on the same basis. A video shows the process here :
https://www.youtube.com/watch?v=5Mom0qx6bgE
Don’t hesitate to share your flight screen to your friends, or create a folder with different setups.
34
Page 37

Left dynamic
vario graphbar
Thermal
core
Groundspeed
and altitude
Shortcuts : previous page /
Mute / next page
Battery status
48h weather
forecast
Instrument internal
temperature
Weather of St Hilaire
Free text
« Battery »
% Battery
level
Flight time
and time
Altitude
History
Details about the default flight screens :
Standby (weather) screen (in progress) : Flight screen N°1 :
EN
35
Page 38

Transition
Assistant
Augmented
Reality
Name and
airspace
Heading
MAP
Shortcuts :
closest airspace / next page
Name and
airspace
Previous page
Next page
Gri : instant
goal
Next Waypoint
information
GOTO menu
shortcut
Flight screen N°2 : Flight screen N°3 :
36
previous page / Deactivate
distance fo the
horizontally
closest
distance fo the
vertically
closest
Glide Ratio
(GR)
Grw : GR to
waypoint
GRG : GR to
Page 39

EN
Details about items of the SSCTool, Syride Screen Configuration Tool (A "NO GPS" on an item
means that it is waiting for GPS signal reception to display the information) :
GNSS Altitude : is given by the GNSS. It is the vertical distance between you and the mean sea level.
This is a reliable altitude but can be inaccurate in case of bad GPS signal reception (electromagnetic
disturbance caused by radio, Phone relay antenna, other instruments…).
Federation (FAI) advocates the use of pressure altitude (QNH see below).
QNH altitude : This altitude initially uses the GPS signal until the vertical accuracy is less than 6m.
Then it uses the ambient pressure to calculate your altitude. If you mount your instrument by one meter
with your hand, the altitude will rise by one meter (which will not be necessarily the case with GPS
altitude). This altitude is accurate, but may become less reliable if you are flying a long time or traveling
a long distance.
QNE altitude : is your current pressure altitude, supposing the current pressure at mean sea level is
1013.25 hPa. This information is required for airspaces that are described in “flight level”.
Vario : is your vertical speed (ascent or descent). Vario smoothing is possible from the Settings page
of the SYSPCTOOL software.
International Aeronautical
37
Page 40

Altitude history : is a graphic that shows the 2’30 last minutes of your
altitude. The black curve is the recorded altitude, the gray area is the
recorded topography at the recorded position.
Vario history : is a graphic that shows the 2’30 last minutes of your vario.
Graphical dynami c vario : is a graphic that shows your current vario. The termed “dynamic”
refers to the fact that the MAX and MIN vario displayed is not fixed, and depends on the MAX
and MIN vario of the last minutes.
Gmeter : displays the current force applied to your body. Without any movement, the G force is 1.0g.
Gain since takeoff : is the vertical distance between your current altitude and your takeoff altitude. A
positive value means you are above takeoff, while a negative value indicates you are below takeoff.
Pressure : is the current pressure, in hPa.
Distance since takeoff : is the horizontal distance from your takeoff to your current position.
38
Page 41

Instant glide ratio : is noted « GRI » for « Glide Ratio Instant ». This item shows your current glide
ratio. GRI = Ground speed / Vario.
Smoothering the glide ratio value is possible through the advanced parameters from the SYS PC
Tool (menu « Option / Setup / Instrument / Advanced parameters ».
Heading : is your current instrument’s magnetic orientation. Note that this indicator is corrected by the
magnetic declination, which depends on your current position. As a consequence, this item displays the
true heading instead of magnetic heading.
Course : is your current course. Without wind, the course equals the heading.
Drift angle : is the difference between your course and your heading. Drift angle = Course – Heading.
Temperature : gives the internal temperature of the instrument.
Back to previous thermal : the SYS’Evolution always keep track of the previous thermal. Fly
in the direction the arrow is pointing to go back to the previous thermal.
39
EN
Page 42

Wind - graphical : in order to get the speed and direction of
the wind, fly a 360° turn at constant speed and glide ratio,
within 10 to 30 seconds. The instrument will compute the drift
and will be able to display the wind direction and speed. The
wind direction represented by the arrow is dependent on your
current course.
Wind direction : indicates where the wind comes from, using the
cardinal points. It is displayed in letters, as N for North, NE for North-East, E for East, SE for SouthEast, S for South, SW for South-West, W for West and NW for North-West.
Vertical airspace name and distance : these items show the name and distance to the nearest vertical
airspace at your current position.
40
Page 43

Horizontal airspace name and distance : these items show the name and distance to the nearest
horizontal airspace at your current altitude.
EN
41
Page 44

Augmented reality : represents the forward world in 3D, waypoints, airspaces, etc..
Transition assistant : is a side view of the topography (which is dependent of your current course),
plus your current glide ratio. Click on the item to change its range.
42
Page 45

200,400 or 600m
Thermal core : This aims to show you quickly the most efficient ascent zone
around your. As soon as you get a positive vario, it will show your path and its
vario. The higher the vario, the darker the track. The circle indicates the position
of the highest vario. Click on the item to change its scale.
Back to the last thermal : an arrow will show you the heading to follow to go back to the last thermal
automatically saved in the instrument. Distance is also displayed.
Competition time : this item will display a countdown before the competition start time, and the
competition time after the start time has been reached (Race to Goal tasks) or the
elapsed time after the start waypoint has been crossed (Elapsed time tasks)
Waypoint information : is the most useful item to follow fly a path in a minimum
time. As soon as a route is started, this item will display next waypoint’s name,
distance and optimum course, as well as your current course. The optimum course
takes the 2
Black arrow shows the optimized route, white arrow shows the route to the center of the waypoint. On
the example, you’re currently fying towards 321°, and should fly towards 342°to make “Dent de
Crolles” waypoint 1.4km ahead.
nd
next waypoint into account.
EN
43
Page 46

Optimized Route
Route
Optimized Point
Turnpoint center
Your position
Glide ratio to waypoint : is noted « GRW » for « Glide Ratio to Waypoint ». This item indicates the
required glide ratio to reach next waypoint’s optimized point (see below). Altitude used for the glide
ratio computation is altitude of the topography at the optimized point (not the one of the center of the
waypoint).
Glide Ratio to Goal : is noted « GRG » for « Glide Ratio to Goal ». This item indicates the required glide
ratio to reach the goal (i.e the last waypoint) of the current route, passing by the optimized points of the
remaining waypoints (if any). Please be aware that wind could change and impact your ground glide ratio.
Graphical options : ables you to draw boxes, add text, etc..
Weather station : shows the next 24h weather forecast in standby
mode.
44
Page 47

Wind reports: enables you to get in-flight wind reports. To get these informations,
an internet connection is required (Wifi or Bluetooth with Internet sharing enabled
and data coverage).
As soon as the data are available, you will have all the last wind report, including
station name, altitude, time of report, wind speed and direction... When adding this
item, you will have the choice between a list of weather stations, or “the nearest
station”.
MAP : displays a top view of the map. This includes, depending
on the level of the zoom and on your settings: Your position, your
GPS track, cities names, roads, topography, airspaces,
waypoints, loaded routes (including waypoints, cylinders, and
optimized route), Syride takeoff sites… It is possible to have
several maps with different settings in the instrument!
45
EN
Page 48

North or
Heading up
Topography
Road map
City names
Airspace borders
Thermal database
(coming soon)
Take-off database
Loaded route
Waypoints in
Reachable point
Back to the map
GPS track
FAI Triangle Assistant
Clicking the “Settings” icon of the map will display the map settings menu:
history
device’s memory
46
from syride.com
(according to ground speed)
Page 49

Save your current poisition in a
route
Display the GOTO menu
ghost displays
Buttons : Take shortcuts by adding action buttons directly in your screen configurations ! Here are a
few examples :
waypoint (named by the date and
time of creation)
Activate or deactivate the sound
Turn the instrument off
Skip next waypoint in the loaded
Activate or deactivate the airspace
currently warning for pre-violation or
violation
Activate or deactivate thermal sniffer
sound.
Full screen refresh to clean the
EN
47
Page 50

10:39
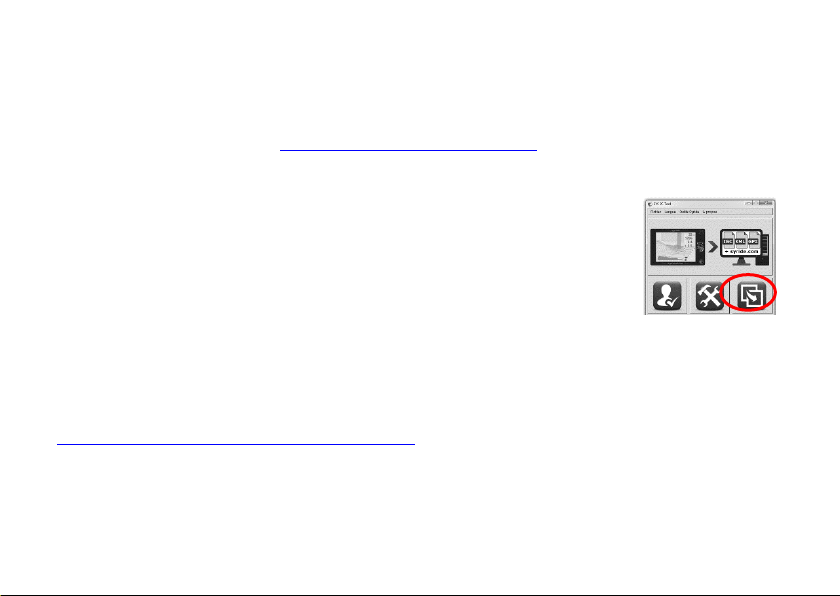
XX. Transfer your flights
1. Be sure you previously installed the SYS
PC Tool on your computer.
2. Turn on and connect your instrument
with the USB cable.
3. Click on the “Account configuration”
icon.
4. The IGC/GPX and KML files are
systematically duplicated on your
computer. In order to use the flight
logbook on syride.com, you must enter
your email and password of your Syride
account (you can create one on
https://www.syride.com/en/register
Check the login, and press OK to save.
48
)
Page 51

EN
5. Press the “Download recorded flights”
button, and your flights will be sent from
the instrument, to the online flight book.
You can have access to the files on your
computer by clicking on File/open local
directory.
6. You can modify your flight information
(e.g. name, used glide, take off site and
the type of flight) by clicking on the red
pen and validate your modification with
the green arrow.
7. To watch your track, click on the picture.
8. You can make your flight invisible for the
Syride community by clicking on the eye
icon on the top right. It will stay on your
profile but the Syride users won’t be able
to see it.
49
Page 52

9. You can look at your personal evolution on the flight page through location and time. You
can also compare your stats and performances to the other riders.
50
Page 53

More information about the online flightbook :
- The online flightbook is optional.
- Published flights can be automatically set to “private” (see « My account » webpage).
- Flights can be sent to your online flightbook through Wi-Fi or Bluetooth if your login
information has been set correctly: you must have set you login details on the
instrument in the “Parameters / Advanced Parameters” menu.
- If for any reason a flight hasn’t been transferred to the website, and you’d like to add
it manually, it is possible by following the answer to the questions [Instrument] Some
flights are missing on my online flightbook and [Instrument] Where are my flights on
my computer ? in our FAQ: https://www.syride.com/en/support
- It is not possible to send a flight from Syride website to your instrument. As a
consequence, a deleted flight on your instrument cannot be recovered.
- The picture in the instrument logbook means the flight has already been
transferred to Syride online logbook.
EN
51
Page 54

XXI. Suggestion of use
• We suggest you to turn-on your instrument while preparing your flight in order to be
sure you get the GPS fix before starting your flight.
• Polarized glasses and sun-glasses helps reducing the sun reflection on the display
• Use the lanyard in order to secure your SYS’Evolution while flying.
• Electromagnetic perturbations, such as VHF (from radios antennas) and magnets (used
for example in some harness), can disturb GPS signal and the magnetic compass.
• Internal protection automatically shuts down the instrument's battery power in case of
excessive temperature (the instrument may not start if it is left too long in direct sunlight or
in a vehicle). In flight the relative wind will allow the restart of the device.
• If the SYS’Evolution is very hot and you fly in very cold air, fog can appear on the screen. It
will dissipate within a few minutes.
• Never turn ON the Wi-Fi if your don’t use it, as it drastically reduces battery life.
52
Page 55

EN
• A Factory Reset from SYS PC Tool (menu Option Advanced) allows you to get your
instrument back to default state (every recorded flight will be deleted…). You can also
use the Parameters / Advanced Parameters menu in the instrument (see XII)
• When you connect your instrument to a USB charger, the battery will start charging, even if
the instrument is turned-off.
53
Page 56

Notes
Important : Safety Notices and Warnings
Precautions of use for the SYS’Evolution
Never leave your SYS ’Evolution unattended
Take care of your equipment by cleaning with a soft cloth regularly. Do not
open the product, the screws are tight with a certain degree which
guarantees the seal of the unit. This action would cancel your guarantee.
If water were introduced by inadvertency int o your SYS, open the USB
cache to air it and wait until it is dry before lighting it. Do not expose your
device to too high or too low temperat ures, which risk damaging it for good.
Avoid leaving it in full sun as an ornament, or putting it in t he freezer! The
soaring in the Antarctic is not guaranteed!!
Ensure that the product is well in position before taking off. Syride cannot
be held responsible for the loss of the product during the flight (takeoff
included).
We give great importance to constantly improve the treatment results of
sessions. We can provide an estimate of the indicators. If y our results are
not consistent with reality, please let us know so we can improve our data
processing.
Battery
This product uses a lithium-ion bat tery. Do not expose to temperatures
above 50 ° C (120 ° F). The SYS tells the user if it detects a temperature
above 50 ° C (120 ° F) when in function. Risk of fire, explosion or
burning.
If leakage and contact with liquid leaking from the battery, clean thoroughly
with water and seek medic al advice immediately. For safety reasons and
to extend battery life, charging can be done in an ambient temperature
range.
Temperatures: Standard operati on: 0 ° C (32 ° F) to +45 ° C (113 ° F) shortterm storage: -20 ° C (-4 ° F) at 60 ° C (140 ° F) Storage long term -20 ° C
(-4 ° F) at 25 ° C (77 ° F).
Do not check out, or do not attempt to rem ove the battery, which is not user
replaceable. If battery problem, please cont act Syride support.
54
Notice to users regarding collection and
disposal of batteries and electrical and
electronic equipment.
LITHIUM-ION BATTERY AND ELECTRONIC CIRCUIT IN
HOUSEHOLD WASTE. To allow proper recycling, please bring it to a
collection point f or.
Directive 2002/96/EC applies withi n the European Union. For the
procedure applicable in countries outside the European Union, please
check with local authorities
DO NOT ATTEMPT RECHARGING THE DEVICE WITH A DIFFERENT
USB CORD THAN THE ONE PROVIDED. RATING: 5VDC 500mA.
GPS (Global positioning System).
The GPS is a Global Positioning System satellit e that is controlled by the
Government of the United States of Am erica. Syride not responsible for the
availability and accuracy of GPS
CE Mark
This product meets the requirements of the CE mark as part of a
residential, commercial or light i ndustrial.
About this document
The greatest care was taken in the preparation of this document. However,
due to the commercial developm ent of the product, some information may
not be quite up to date. The information in this document is subject to
change without notice. Syride not responsible for any omissions or
technical or editorial errors in this manual, in the event of incident al or
consequential damages resulting from the content or use of this document.
THIS PRODUCT CAN NOT BE ADDED T O THE
Page 57

www.syride.com
5.0 /150719
55
 Loading...