

Page 1

1
Table of Contents
Safety Information
WARNINGS AND CAUTIONS
Important Safety Precautions
AV INPUT
S-VIDEO INPUT
PC
HDMI
Y Pb Pr
PICTURE
SOUND
LCD TV Bracket assemble
Front/Back panel diagram
Battery Installation
Install LCD TV
Remote Controller
Systems Connection
INPUT
INPUT
INPUT
Brightness
Contrast
Color
Tint
Sharpness
Picture Mode
Colour Temp
Aspect
3D NR
Volume
Bass
Treble
Balance
Sound Mode
Surround
AV L
Equalizer
ADVANCE
OSD
9 WIN
Using the Remote Control
Set your LCD TV
Connect Antenna and power
Turn On LCD TV
2
4
5
6-7
8
9-11
12
12
12
TUNE
Channel Edit
Auto Scan
Manual Scan
Exchange
PIP
Multi Window
Sub Source
Size
Border Color
Sound Source
Swap
PIP Position
GEOMETRY (PC)
H Position
V Position
Clock
Phase
SOURCE
RESOLUTION
NICAM (Optional)
HELP
13
13
13
14
14
14
15
Page 2

2
Safety Information
Warning
The lightning flash with arrowhead symbol
within an equilateral triangle, is intended to
alert the user to the presence of uninsulated
dangerous voltage within the product s
enclosure that may be of sufficient magnitude
to constitute a risk of electric shock to persons.
If the LCD TV for any changes or coarse adjustment, electric shocks to be
hurt, Do not attempt to open a machine-maintenance, customer contact
centres needed overhaul.
CAUTION
RISK OF ELECTRIC SHOCK
DO NOT OPEN
The exclamation point within an equilateral
Triangle is intended to alert the user to the
presence of important operating and
maintenance (servicing) instructions in the
literature accompanying the appliance.
TO REDUCE THE RISK OF ELECTRIC
SHOCK, DO NOT REMOVE COVER
(OR BACK) NO USER SERVICEABLE
PARTS INSIDE, REFER SERVICING
TO QUALIFIED SERVICE PERSONNEL
Page 3

3
Important Safety Precautions
Read these instructions.
Keep these instructions.
Heed all warnings.
Follow all instructions.
Do not use this apparatus near water.
Clean only with dry cloth.
Do not block any ventilation openings. Install in accordance with the manufacturer's
instructions.
Do not install near any heat sources such as radiators, heat registers, stoves or other
apparatus
(including amplifiers) that produce heat.
Do not defeat the safety purpose of the polarized or grounding-type plug. A polarized
plug has two blades with one wider than the other. A grounding type plug has two blades
and a third grounding prong. The wide blade or the third prong is provided for your safety.
If the provided plug does not fit into your outlet, consult an electrician for replacement
of the obsolete outlet.
Protect the power cord from being walked on or pinch particularly at plugs, convenience
receptacles, and the point where they exit from the apparatus.
Only use attachments/accessories specified by the manufacturer.
Unplug this apparatus during lightening storms or when unused for long periods of time.
Refer all servicing to qualified service personnel. Servicing is required when the apparatus
has been damaged in any way, such as power supply cord or plug is damaged. Liquid has
been exposed to rain or moisture, does not operate normally or has been dropped.
This appliance shall not be exposed to dripping or splashing water and that no object
filled with liquid such as vases shall be placed on the apparatus.
Page 4

LCD TV Bracket assemble
4
Fix the LCD TV on the wall
1 First put the LCD TV on the table smoothly and put some soft close on the table to avoid
scratching the screen.
2 User the screw driver to take off the 5pcs screws which are fixed on the bottom stand(the
direction of the arrow, refer to the photo 1).And take out the bottom stand(please keep the
screws and bottom stand carefully)
3 Make one bracket which can fix on the wall according to the size of arrow direction of
picture 2 and picture 3.
4 Drill four holes on the proper wall(the size only for reference) and put into four screws.
(optional parts)Drill four holes on the proper wall(the size only for reference) and put into
four screws.(optional parts)
5 According to the step 4,use the screwdriver to lock the screw on the back of the LCD TV,
then hang the LCD TV on the wall.
Wall
Wall
NOTE:
1 The bracket fixed on the wall is optional part.
2 When you assemble the LCD TV, there should be no other articles on the around and front
and please keep the distance from other articles.
3 When assemble the LCD TV, please ask the careerman to fix in order to avoid the danger.
4 The fixing picture is only for reference.
Bracket
Cement bolt
Page 5

1.SOURCE Source select
2.MENU Into or exit from menu
Use CH+/- button select item,
VOL+/- button adjust item
3.CH+/- Select channel
4.VOL+/- Adjust Volume
5.Main power switch Turn on/off
LCD TV main power.
6.Standby Turn on/off
LCD TV .
Main power switch
Front/Back panel diagram
7
8
15
9 1110
5
12
16
AV L R
AV OUTPUT
AV1 L R
AV INPUT
S-VIDEO
Y Cb/Pb
INPUT
AV2 L R
AV INPUT
Cr/Pr
HDMI VGA PC INPUT
ANT 75
100-240V~
50/60Hz,200W
13 14
1
2
3
4
5
7. Power Socket
8. ANTENNA
9. AV1 Input
10. S-VIDEO Input
11.AV2 Input
12.HDMI Input
13. VGA Input
14. PC Audio Input
15. AV Output
16. Y Pb/Cb Pr/Cr
Standby
6
Page 6

6
1. POWER
Turn the power on when pressed.
2. 0-9 Numerical button
Numerical button.
Press the button unit the screen
display - -- or --- then
0-9 numerical buttons to enter a
channel number.
3. PMODE
Adjust the picture mode.
4. CHANNEL SELECT
Channel up and down.
5. MENU/DIRECTION SELECT
Into or exit menu, use the direction
button select item .
6. RECALL
Switch to the last channel.
7. I/II
Nicam function.
8. S.S
Select sound system.
Remote Controller
Battery Installation:
Remove the battery compartment lid
on the rear of the remote control by
sliding the lid down, then off. Put
two AAA batteries inside the battery
compartment with their + and - ends
aligned as indicated.
Do not mix old and new batteries or
different types of batteries Replace
the battery compartment lid. Slide the
lid until you hear it click into place.
1
2
4
3
5
8
7
6
Page 7

7
9. PIP FUNCTION
ON/OFF First time pressing the
button open PIP, Second time
pressing the button open POP,
Third time pressing the button
exit PIP function.
SWAP PIP / Main picture position
swap.
SOURCE PIP input mode select.
SCAN Nine picture scan.
10. SMODE
Adjust the sound mode.
11. FREEZE
Freeze picture.
12. SLEEP
Set the sleep time.
13. DISPLAY
Call out info menu.
14. VOL+/ -
Volume up and down.
15. INPUT
Input source selection .
16. MUTE
Mute ON/OFF.
Remote Controller
Using the Remote Control:
Unless stated otherwise, the remote
control can operate all the features
of the LCD TV.
Always point the remote control
directly at the remote sensor in the
front of the LCD TV.
10
14
15
16
12
13
11
9
NOTE Remote linear distance
of eight meters, about 30 degrees
a distance of 6 meters.
Page 8

8
10cm
10cm10cm
Set your LCD TV
To put your LCD TV in a firm place
which can bear the weight of the
LCD TV.
To avoid danger, please don't expose
the LCD TV near water or heating
place(such as light, candle, heating
machine), do not block the ventilation
at the back of LCD TV.
Connect Antenna and power
1. Connect the antenna cable to the
antenna socket on the back of the
LCD TV and the your antenna socket.
2. To plug the power cord of LCD TV
(100-240V~ 50/60Hz)
3. Opened the bottom of the Power
on TV Guan.
TV ANTTV ANT
FM ANTFM ANT
TV signal output
1
2
3
4
Turn On LCD TV
4. Press the power button of the Tv
the indication light will turn to green.
If the LCD TV is in standby mode(the
light is red), press the power button
on the remote control or top of the TV.
Install LCD TV
NOTE Picture for reference
purposes only.
Page 9

AV L R
AV OUTPUT
AV1 L R
AV INPUT
S-VIDEO
Y Cb/Pb
INPUT
AV2 L R
AV INPUT
Cr/Pr
HDMI VGA PC INPUT
ANT 75
100-240V~
50/60Hz,200W
AV L R
AV OUTPUT
AV1 L R
AV INPUT
S-VIDEO
Y Cb/Pb
INPUT
AV2 L R
AV INPUT
Cr/Pr
HDMI VGA PC INPUT
ANT 75
100-240V~
50/60Hz,200W
Systems Connection
1.AV INPUT
Video / Audio input, use the SOURCE button select AV 1 AV 2 on the remote control .
9
Note: the first import or export good after connecting cable connecting power.
DVD AV1 OUTPUT
S-VIDEO
L
R
VIDEO
2.S-VIDEO INPUT
S-VIDEO input, use the SOURCE button select S-VIDEO on the remote control .
S-VIDEO
L
R
VIDEO
DVD S-VIDEO AUDIO OUTPUT
DVD AV2 OUTPUT
S-VIDEO
L
R
VIDEO
Page 10
AV L R
AV OUTPUT
AV1 L R
AV INPUT
S-VIDEO
Y Cb/Pb
INPUT
AV2 L R
AV INPUT
Cr/Pr
HDMI VGA PC INPUT
ANT 75
100-240V~
50/60Hz,200W
Systems Connection
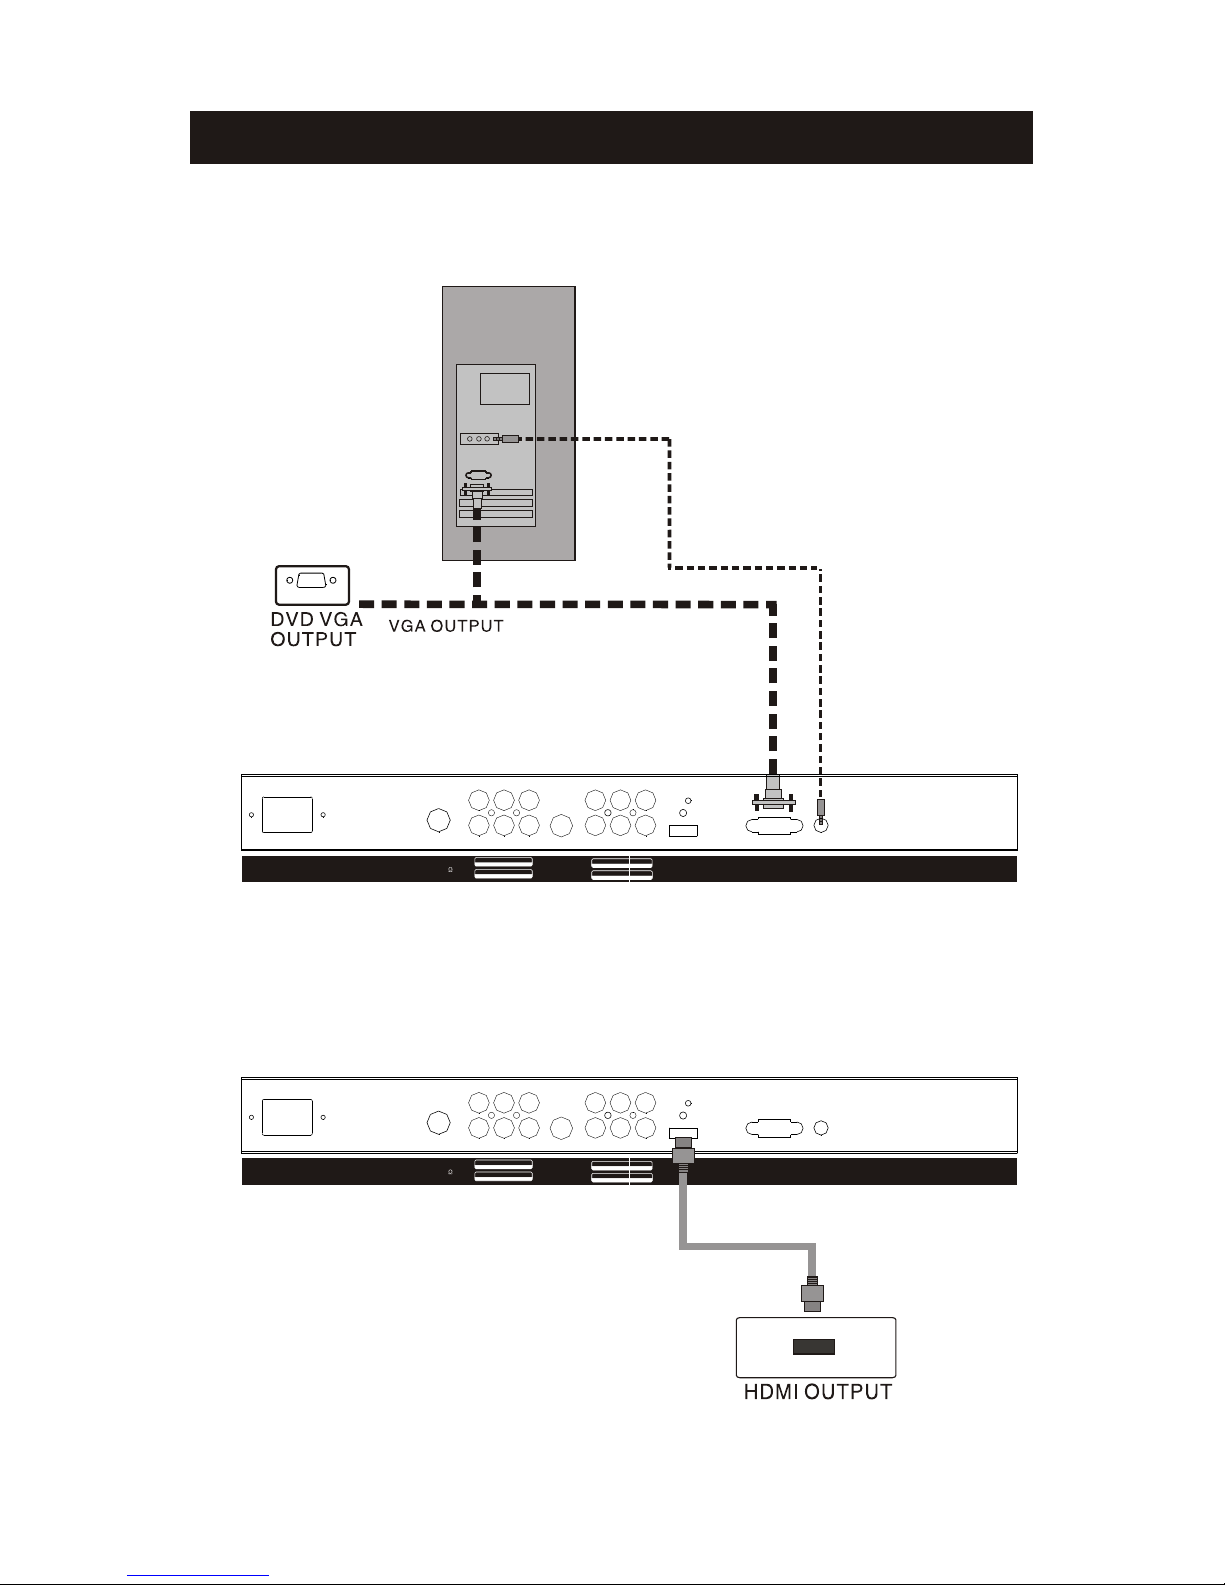
3.PC INPUT
PC (VGA) input, use the SOURCE button select PC on the remote control .
VGA OUTPUT
10
PC AUDIO
OUTPUT
4.HDMI INPUT
HDMI input, use the SOURCE button select HDMI on the remote control .
AV L R
AV OUTPUT
AV1 L R
AV INPUT
S-VIDEO
Y Cb/Pb
INPUT
AV2 L R
AV INPUT
Cr/Pr
HDMI VGA PC INPUT
ANT 75
100-240V~
50/60Hz,200W
Page 11

AV L R
AV OUTPUT
AV1 L R
AV INPUT
S-VIDEO
Y Cb/Pb
INPUT
AV2 L R
AV INPUT
Cr/Pr
HDMI VGA PC INPUT
ANT 75
100-240V~
50/60Hz,200W
Systems Connection
5.Y Pb Pr Input
Y Pb Pr input, use the SOURCE button select Y Pb Pr on the remote control.
Y
Cb/Pb
Cr/Pr
L
R
Y Pb Pr
OUTPUT
AUDIO
OUTPUT
11
Page 12
64
Brightness
62
Color
75
Tint
0
Sharpness
Picture Mode
Contrast
Color Temp
Aspect
3D NR
79
User
Normal
Full
Auto
:SEL
:EXIT
:ADJ
MENU
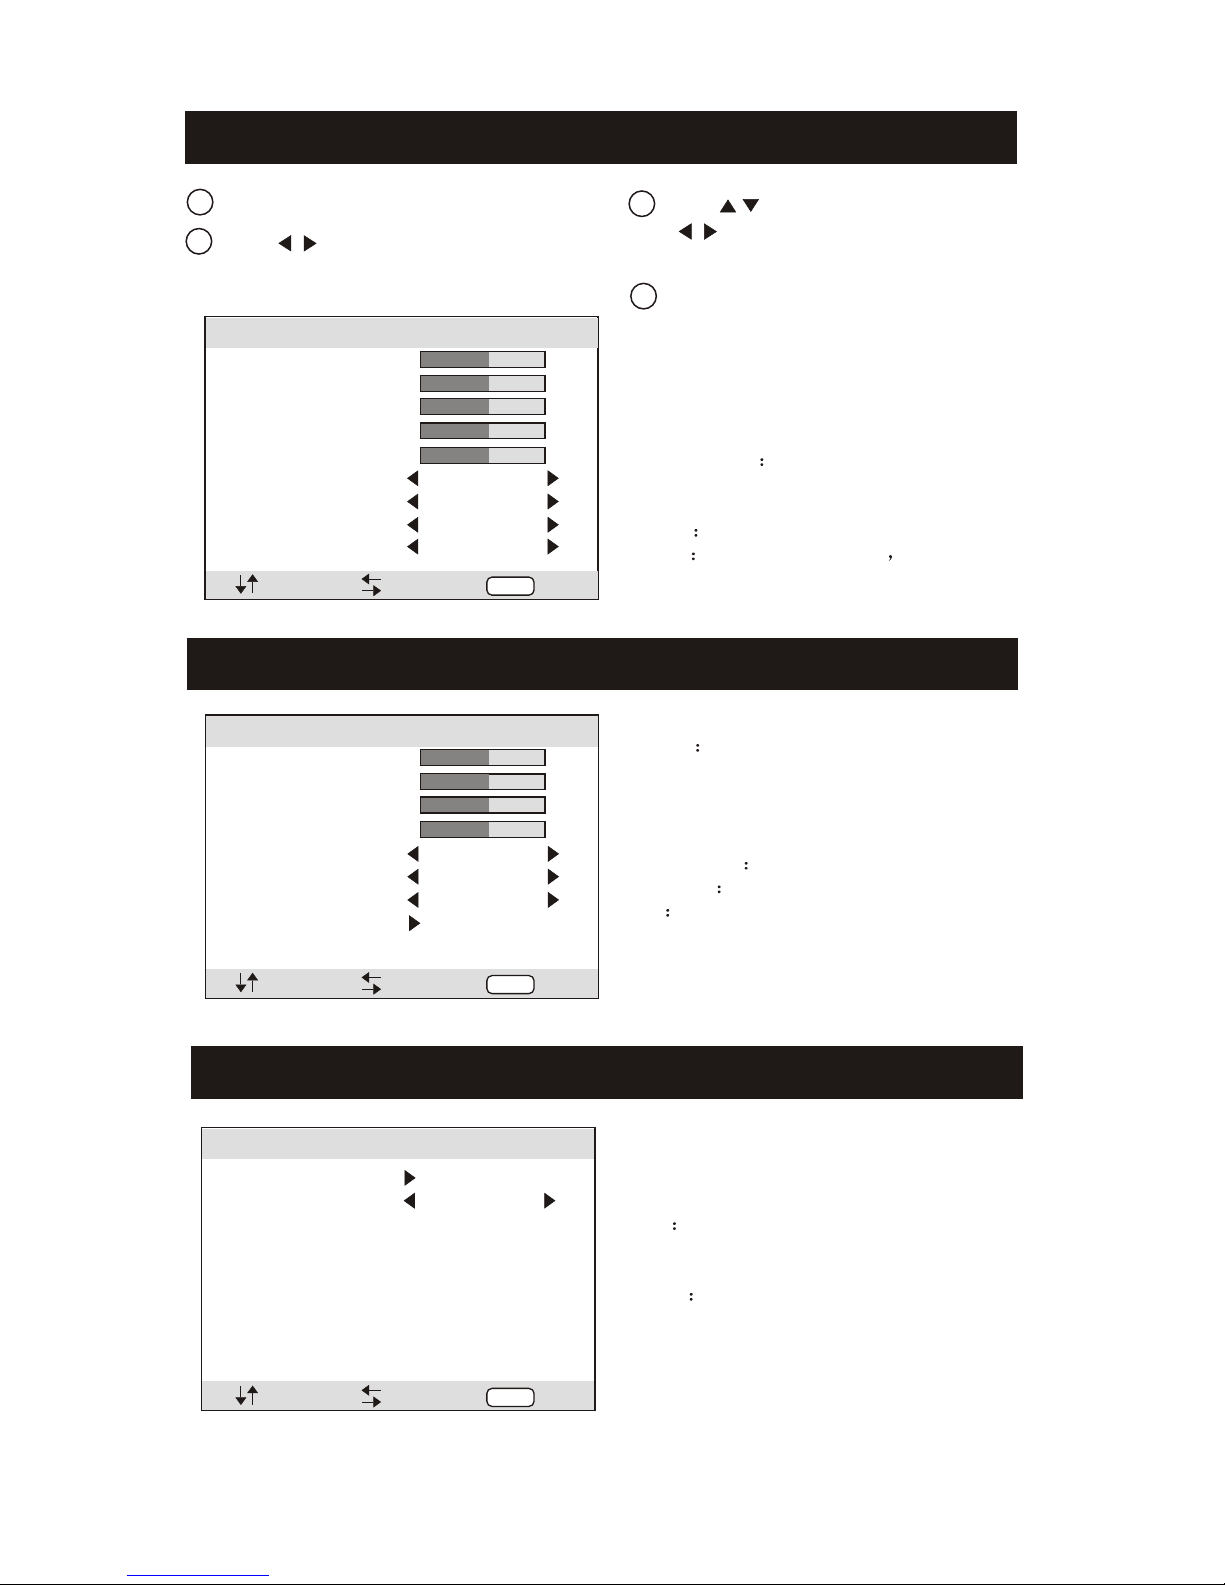
PICTURE
12
Brightness: Adjust picture brightness.
Contrast: Adjust picture contrast.
Color: Adjust picture color.
Tint: Adjust NTSC colour signal.
Sharpness: Adjust picture sharpness.
Picture Mode Select the picture mode.
Colour Temp: Adjust picture colour temp:
cool, normal, warm mode.
Aspect Select picture aspect.
3D NR Adjust 3D NR auto low, mid,
high and off.
PICTURE
SOUND
Volume Adjust speaker volume level.
Bass: Adjust bass volume.
Treble: Adjust treble volume.
Balance: Adjust the balance of sound
between left and right speakers.
Sound Mode Select the sound mode.
Surround Select surround function.
AV L Auto Volume Level function on or off.
Equalizer: Into equalizer menu select and
adjust.
ADVANCE
OSD Into OSD menu select OSD Language,
OSD H-Position, OSD V-Position, OSD
Duration, OSD Halftone and All reset.
9 WIN Select nine picture function
on or off.
50
Volume
50
Treble
50
Balance
0
Sound Mode
Surround
Bass
AVL
Equalizer
Hall
Off
SOUND
Standard
OSD
9 WIN
Off
ADVANCE
:SEL
:EXIT
:ADJ
MENU
:SEL
:EXIT
:ADJ
MENU
Use button select item on
remote Controller.
Press the MENU button exit menu.
4
2
Use button select item and
button adjust item on the
remote Controller.
Press the MENU button into menu.
1
3
Page 13
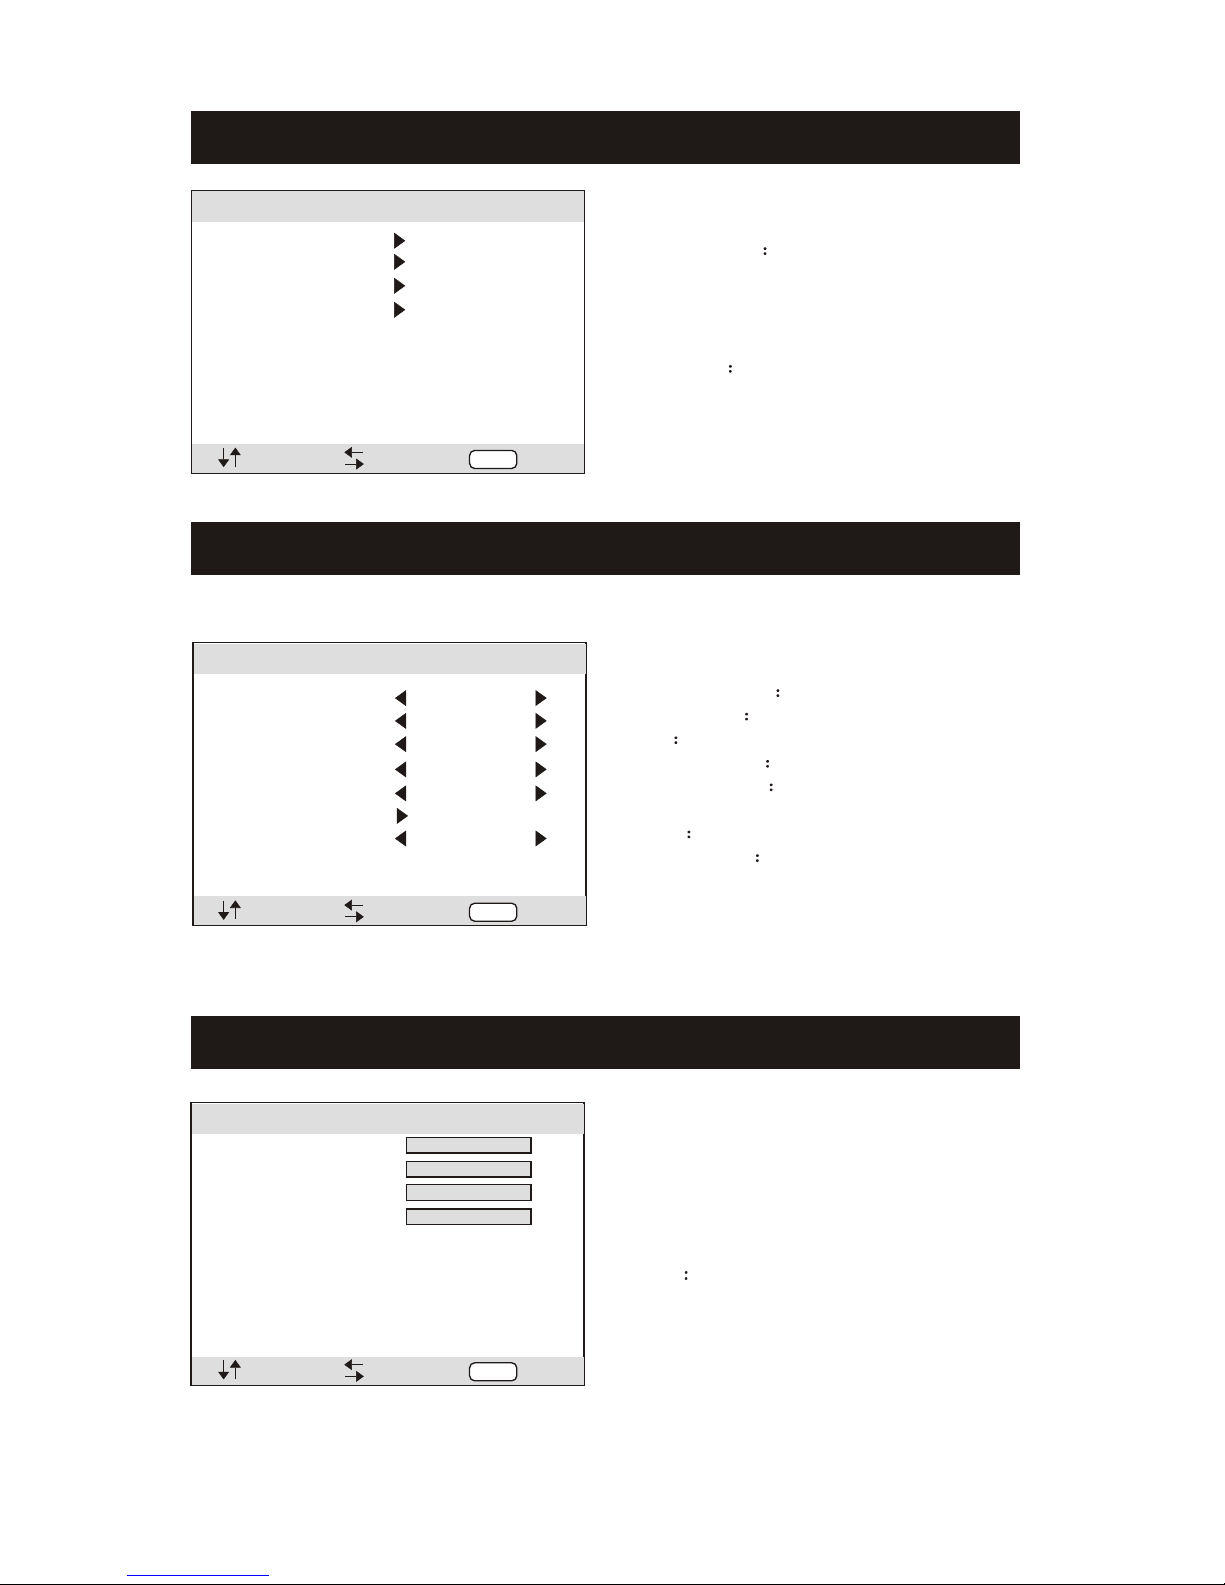
TUNE
13
Channel Edit
Auto Scan
TUNE
Manual Scan
Exchange
Channel Edit Into menu select Channel,
Skip, Color System, Sound System, AFC,
Fine tune and Frequency.
Auto Scan: Auto search TV channel.
Manual Scan: Manual search TV channel.
Exchange Channel exchange function.
GEOMETRY
H Position: Adjust the H Position of the
PC signal.
V Position: Adjust the V Position of the
PC signal.
Clock Adjust the clock of the PC signal.
Phase: Adjust the phase of the PC signal.
100
H-Position
100
Clock
100
Phase
100
V-Position
GEOMETRY
PIP
Multi Window
Sub Source
Size
Border Color
YPBPR
Large
PIP
PIP
Blue
Sound Source
Main
Swap
PIP Position
Left Up
Multi Window PIP function on or off.
Sub Source PIP input mode select.
Size Adjust PIP picture size.
Border Color Select PIP border color.
Sound Source Select main picture or
other input audio.
Swap PIP / Main picture position swap.
PIP Position Adjust PIP picture display
position.
:SEL
:EXIT
:ADJ
MENU
:SEL
:EXIT
:ADJ
MENU
:SEL
:EXIT
:ADJ
MENU
Page 14

SOURCE
1
Use the SOURCE button into source menu
on the Remote controller.
Press the button select input mode.
Press the button enter.
2
3
14
60/75
60/75
640x480
800x600
60/75
1024x768
Resolution
Vertical frequency Hz
RESOLUTION
60
480i
60
480p50576i
50
576p
50/60
1080i/p
50/60
720p
60
480i
60
480p50576i
50
576p
50/60 50/60
720p
SOURCE
TV
AV1
S-VIDEO
AV2
YPBPR
HDMI
PC
:OK
NOTE:
-- The LCD TV also can be used as computer monitor. Electromagnetic
interference in the environment May appear slight diagonal line interference.
But this does not affect the quality of TV.
-- In order to obtain better quality, with a recommendation of the use of high
quality high noise isolation filter Quality HDMI / VGA cables.
NICAM (Optional)
Press the I/II button:
Usually set to stereo to provide the best reproduction, but if reception deteriorates or if the
service is not Available then switch to Mono.
Mono (M1) and (M2) can also be selected if a mono signal is being transmitted.
1080i/p
Resolution
Vertical frequency Hz
Resolution
Vertical frequency Hz
Page 15

15
HELP
No picture and no sound
Check power supply and cable connection
Make sure the power button is ON
Check for correct setting for brightness and
contrast ratio
Check audio cable and audio volume
Make sure TV was not muted
Has picture but no sound
Adjust color setting
Check if the TV tuner format selection is
correct
Picture in black and white or
color problem
Picture or sound interference
Check if TV is too close to other electronic
devices for potential interference.
No signal display
Check if selected input source and connection
Check if the selected input source is working
Check battery
Remote dose not aim at TV remote signal
receiver
Remote is too far away form TV or the angel is
too sharp
Check if there is obstacle between remote and
TV
Remote control problem
Adjust antenna location and angel for better
reception
Check antenna location and angel for better
reception
Snowy picture with noise
Check PC or the connected device for correct
frequency and bandwidth
NOTE
This user manual is for reference only. Specifications are subject to change without
notice.
Page 16

75-L1009701-02
 Loading...