

Page 1
SUPER HIGH TORQUE
DJ TURNTABLEDJ TURNTABLE
P 1 ... 5 English
P 7 ... 11 Français
P 13 ... 17 Nederlands
P 19 ... 23 Deutsch
P 24 ... 28 Espanol
WWW.SYNQ-AUDIO.COM
V 2.0
Copyright © 2003 - 2004 by BEGLEC cva.
Reproduction or publication of the content, even sportions, in any manner, without express permission of the publisher, is prohibited.
Page 2

1/29
Congratulations and thank you for buying this SYNQ product. Please read through these
operating instructions so you will know how to operate this product properly. After you
have finished reading the instructions, put them in a safe place for future reference.
• Very High Torque platter motor
• Extremely fast start, adaptable from 0.2 to 6 seconds.
• Extremely fast stop, adaptable from 0.2 to 6 seconds.
• 3 speeds: 33, 45, 78 rpm with quartz lock
• 3 Pitch adjustment ranges: +/-10% ; +/-20% ; +/-50%
• Forward / reverse play
• 2 Start / stop buttons for maximum flexibility
• Unbreakable white LED target light
• Phono / Line output selector on backside
• Original Stanton cartridge included
• All metal S-shaped tone arm assembly with:
• Counterweight
• Height adjustment with locking
• Anti-skating adjustment
• Lever lift with height adjustment
• Adjustable large feet for perfect leveling
Check that the following parts are included in the package with the main unit:
• Turntable platter
• Slip mat
• 45-rpm adapter
• Counterweight
• Head shell
• Operating instructions
• Cartridge
• Connecting cord cinch/cinch
2/29
SAFETY INSTRUCTIONS:
CAUTION: To reduce the risk of electric shock,
do not remove any cover. No user-serviceable
parts inside. Refer servicing to qualified service
personnel only.
The lightning flash with arrowhead symbol within the equilateral triangle is
intended to alert the use or the presence of un-insulated “dangerous voltage”
within the product’s enclosure that may be of sufficient magnitude to
constitute a risk of electric shock.
The exclamation point within the equilateral triangle is intended to alert the
user to the presence of important operation and maintenance (servicing)
instructions in the literature accompanying this appliance.
To prevent fire or shock hazard, do not expose this appliance to rain or moisture.
Do not place metal objects or spill liquid inside the turntable. Electric shock or malfunction
may result.
INSTALLATION GUIDELINES:
• Install the turntable in a well-ventilated location where it will not be exposed to high
temperatures or humidity.
• Placing and using the turntable for long periods near heat-generating sources such as
amplifiers, spotlights, etc. will affect its performance.
• When the turntable is used in a loud-sound environment, for example near speakers,
sound skip and feedback may occur.
• Install the unit on a perfectly horizontal and very stable surface. A concrete or marble
surface is perfect. A wooden surface is a bad choice while it amplifies vibrations.
• Be sure the turntable, including its audio and mains cords, does not touch any
vibrating materials. Take special care when using the unit while it is installed in a
carrying case.
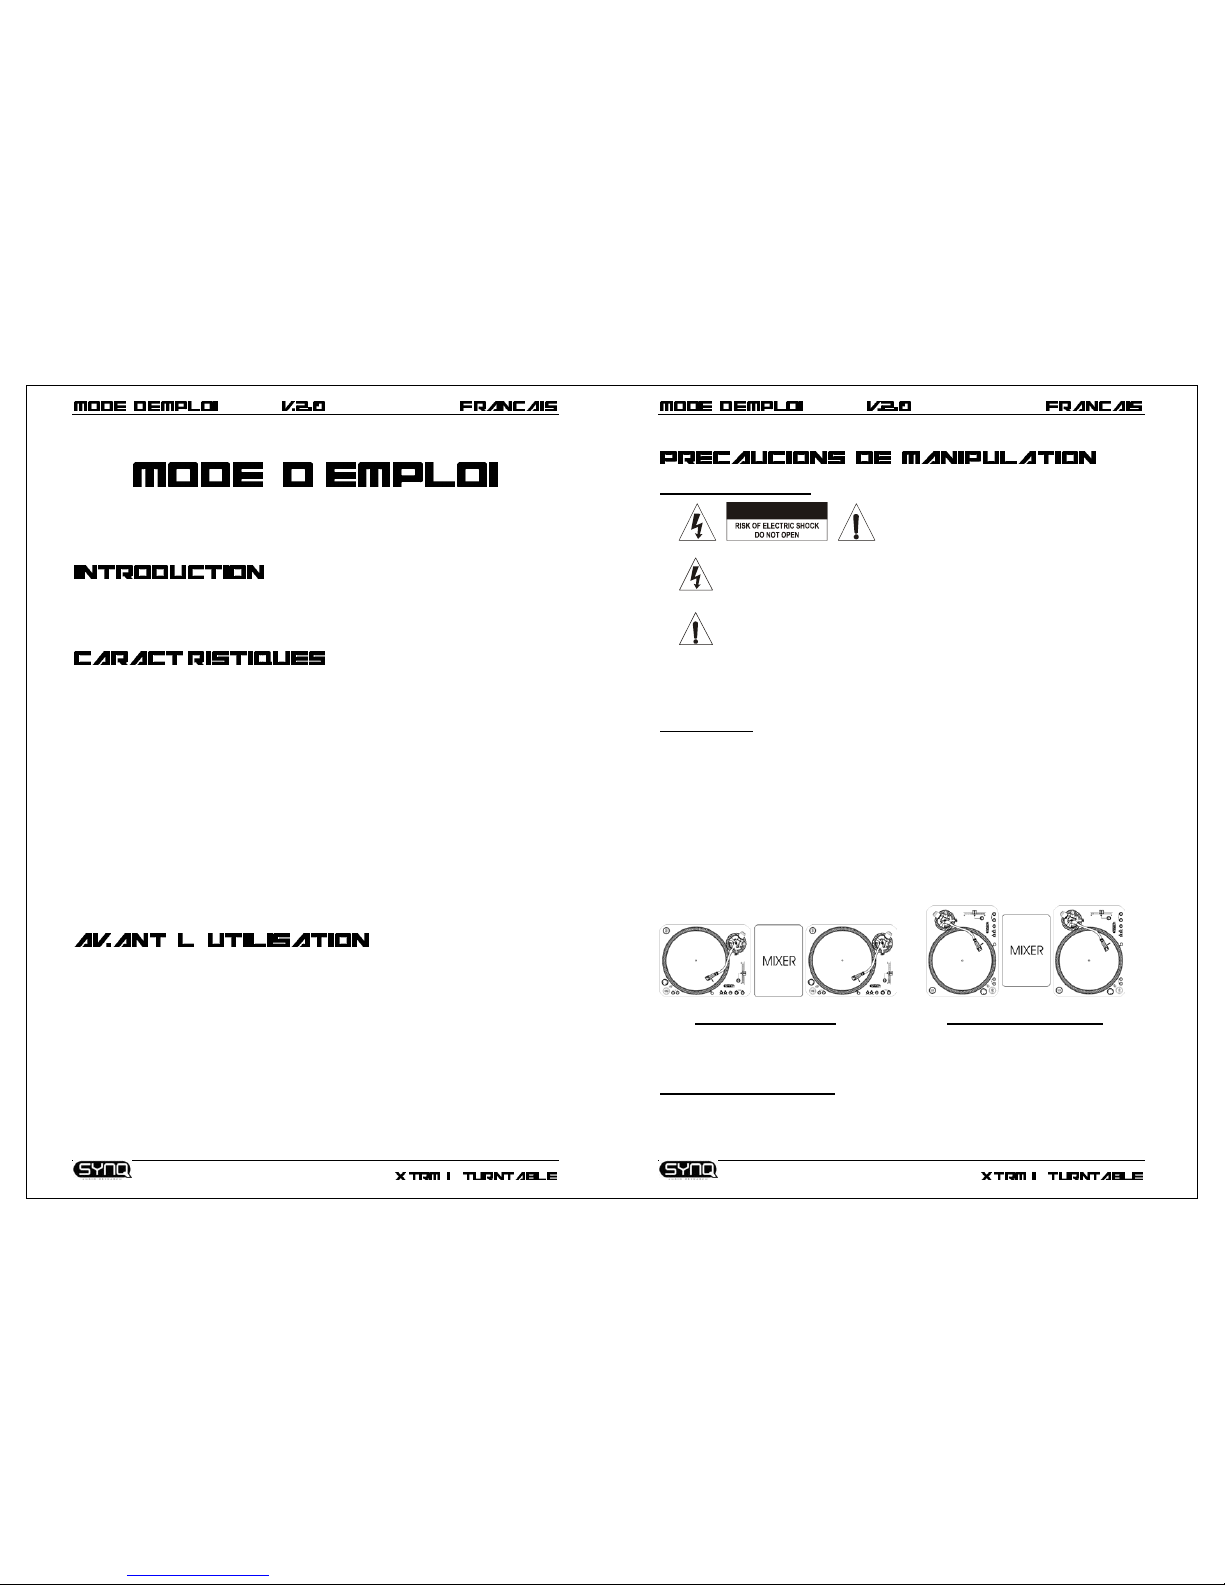
• Because of its two start/stop buttons the X-TRM1 turntable can be used in both
traditional and battle style setups:
Traditional setup:
Battle style setup:
Mostly used in discotheques. Mostly used for scratching and
Best for all round mixing. other aggressive mixing techniques
CLEANING THE TURNTABLE:
Clean by wiping with a cloth slightly dipped with water. Avoid getting water inside the unit.
Do not use volatile liquids such as benzene or thinner which will damage the unit.
CAUTION
Page 3
3/29
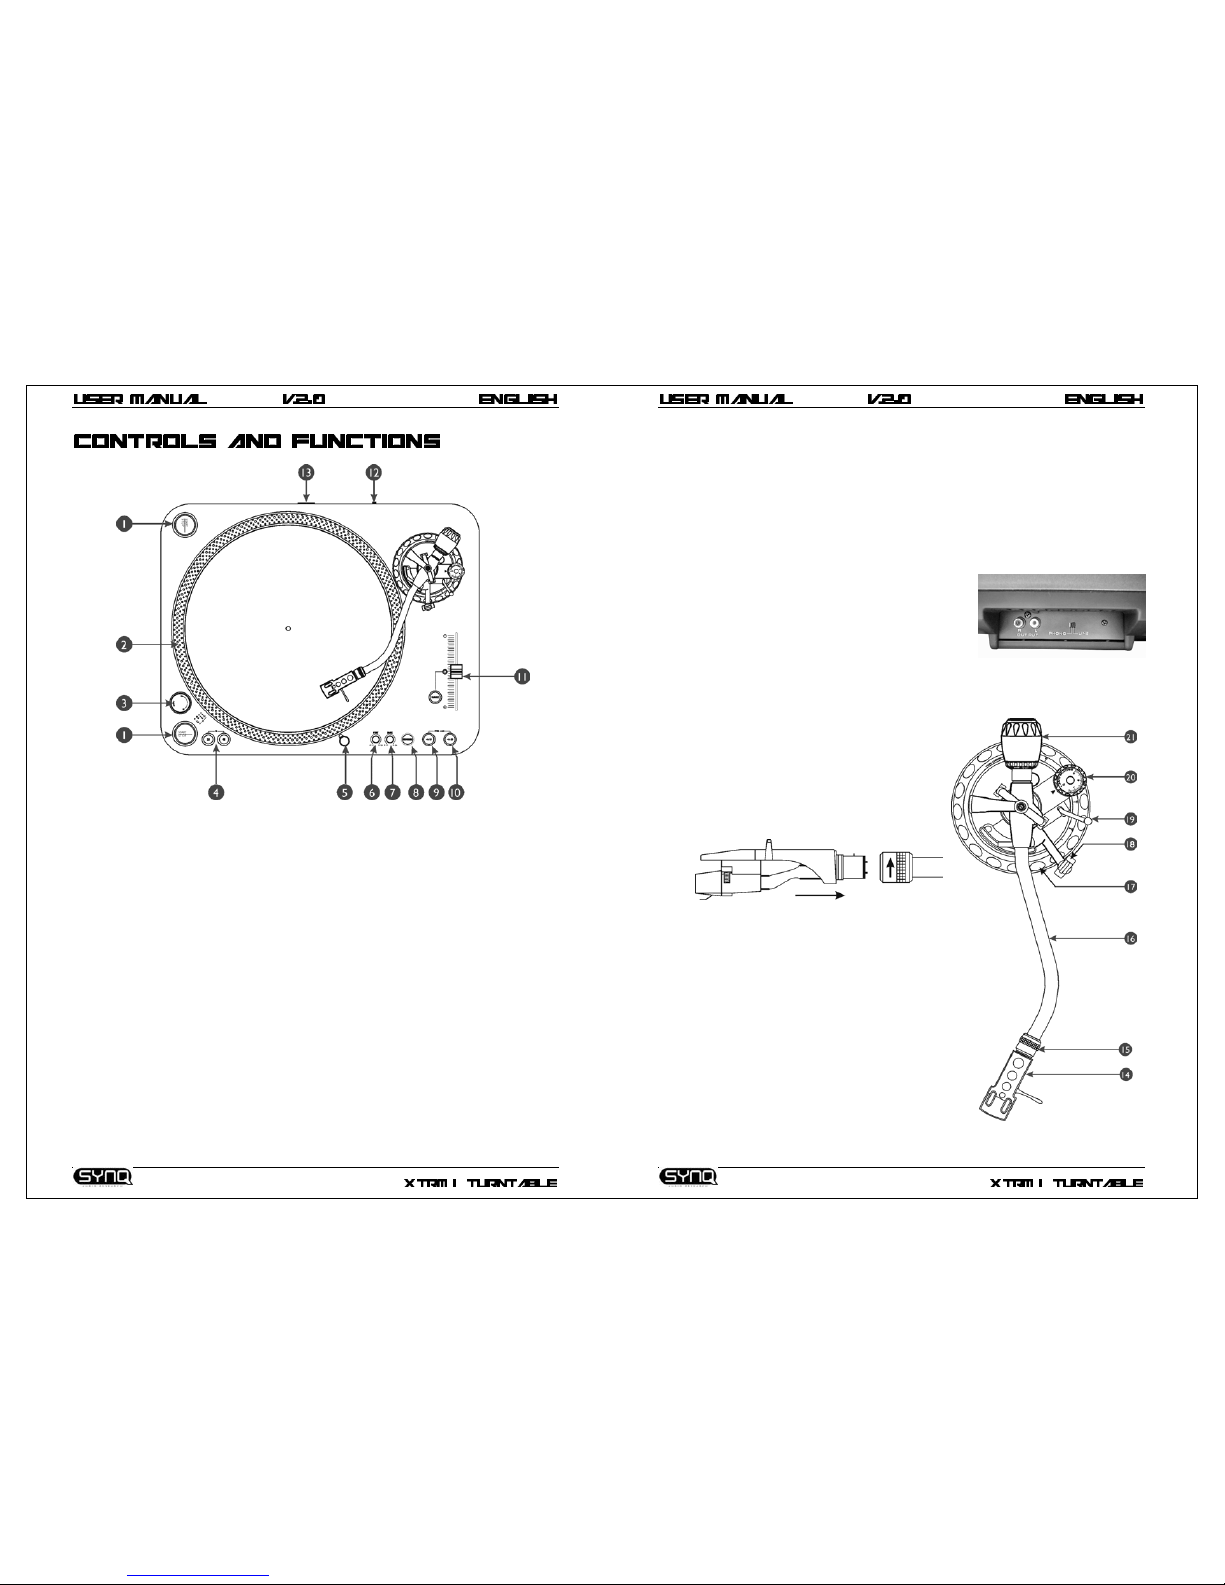
1. START / STOP Button: Press this button to start or stop the platter.
2. STROBE DOTS: The dots around the edge of the platter are used in conjunction
with the light located inside the power switch. While the platter rotates, the dots
help to indicate the speed. The dots flow to the right when the platter speed is
lower than the selected (33, 45, 78. When the dots flow to the left, the platter
speed is higher. When the dots seem to be stationary, the platter is rotating at the
exact speed. Use the Pitch slider (12) to adjust the speed.
3. POWER ON/OFF SWITCH: Used to turn the turntable on an off.
4. SPEED SELECT Buttons: Used to select the desired speed.
• Press the “33” button to select the 33rpm speed.
• Press the “45” button to select the 45rpm speed.
• Press “33” and “45” buttons simultaneously to select the 78rpm speed.
5. TARGET LIGHT: White led target light used to locate the exact place on your
record when used in a dark place.
6. STARTUP TIME: Used to adjust the time it takes to reach the proper platter speed.
Startup time is minimal when the potentiometer is completely turned to the left.
(proper speed attained after 0.2sec) Startup time is maximum when the
potentiometer is completely turned to the right. (proper speed attained after 6sec)
7. BRAKE TIME: Used to adjust the time it takes to completely stop the platter. Break
time is minimal when the potentiometer is completely turned to the left. (complete
stop after 0.2sec) Break time is maximum when the potentiometer is completely
turned to the right. (complete stop after 6sec)
8. REVERSE Button: Press this button to reverse the platter rotation, press this
button again to end the reverse mode.
4/29
9. PITCH RANGE +/-10% Button: Press this button to adjust the range of the pitch
slider to +/-10%. Used when precise speed adjustments are needed. (beat mixing)
10. PITCH RANGE +/-20% Button: Press this button to adjust the range of the pitch
slider to +/-20%. Press the +/-10% and +/-20% buttons simultaneously to adjust
the range of the pitch slider to +/-50%. Used to obtain special effects.
11. PITCH SLIDER & QUARTZ Button: Use the pitch slider to change the actual
speed of the platter. The Range depends on the Pitch Range buttons (9+10).
When the slider is in its middle position, a led will turn on to indicate that the
turntable is locked to the exact center speed. When the QUARTZ Button is
pressed, the exact center speed is enforced, even when the slider is not in the
middle.
12. PHONO/LINE Output: Depending on the position
of the phono/line switch, you can connect the
turntable to any phono or line input, using the
supplied cinch/cinch cable. (a “cinch connector” is
often also called “RCA-connector”)
13. POWER CORD Connector: Used to connect to
the mains, using the supplied power cord.
14. HEAD SHELL: Install the cartridge here. When installing a cartridge, refer to the
installation instructions supplied by the manufacturer of that cartridge. During
installation, attach the stylus protector to guard the stylus tip from damage.
Attach wires as follows:
White (L+) Left channel +
Blue (L-) Left channel Red (R+) Right channel +
Green (R-) Right channel -
15. HEAD SHELL LOCKING NUT: Attach the
head shell by inserting it into the front end of
the tone arm and then turn the locking nut
clockwise.
16. TONE ARM: This is a fully manual S-shaped
tone arm. To start playback, gently place the
stylus on the record using the head shell
finger support. Do not drop the stylus onto
the record as this may cause damage to the
diamond tip and to the record.
17. TONE ARM LIFT: Used to adjust the height
of the tone arm. Put a vinyl record on the
platter and put the needle somewhere on the
record. Gently unlock the tone arm lift by
turning a small knob located on the tone arm
base, next to the ANTI SKATING knob for
about 90° counter clockwise. Turn the base
ring clockwise to lift the tone arm or counter
clockwise to lower it until the tone arm is
horizontal. Relock the tone arm lift again by
turning the small knob for 90° clockwise.
Page 4
5/29
18. TONE ARM BASE: The tone arm base includes the height adjustment and tone
arm rest.
19. TONE ARM LEVER: Controls the up and down action of the tone arm.
20. ANTI-SKATE Knob: When a record is playing, side forces are generated, pushing
the stylus towards the center or the outside of the record. You can use the antiskate knob to offset this force and keep the needle centered in the groove. For
standard playback simply turn the anti-skate knob to the same number as the
stylus pressure reads in grams. (Stylus pressure = 3gr. Æ anti-skate = 3)
21. COUNTERWEIGHT: Use the counterweight to balance the tone arm and to adjust
the stylus pressure. For the correct stylus pressure, please refer to the user
manual of your cartridge.
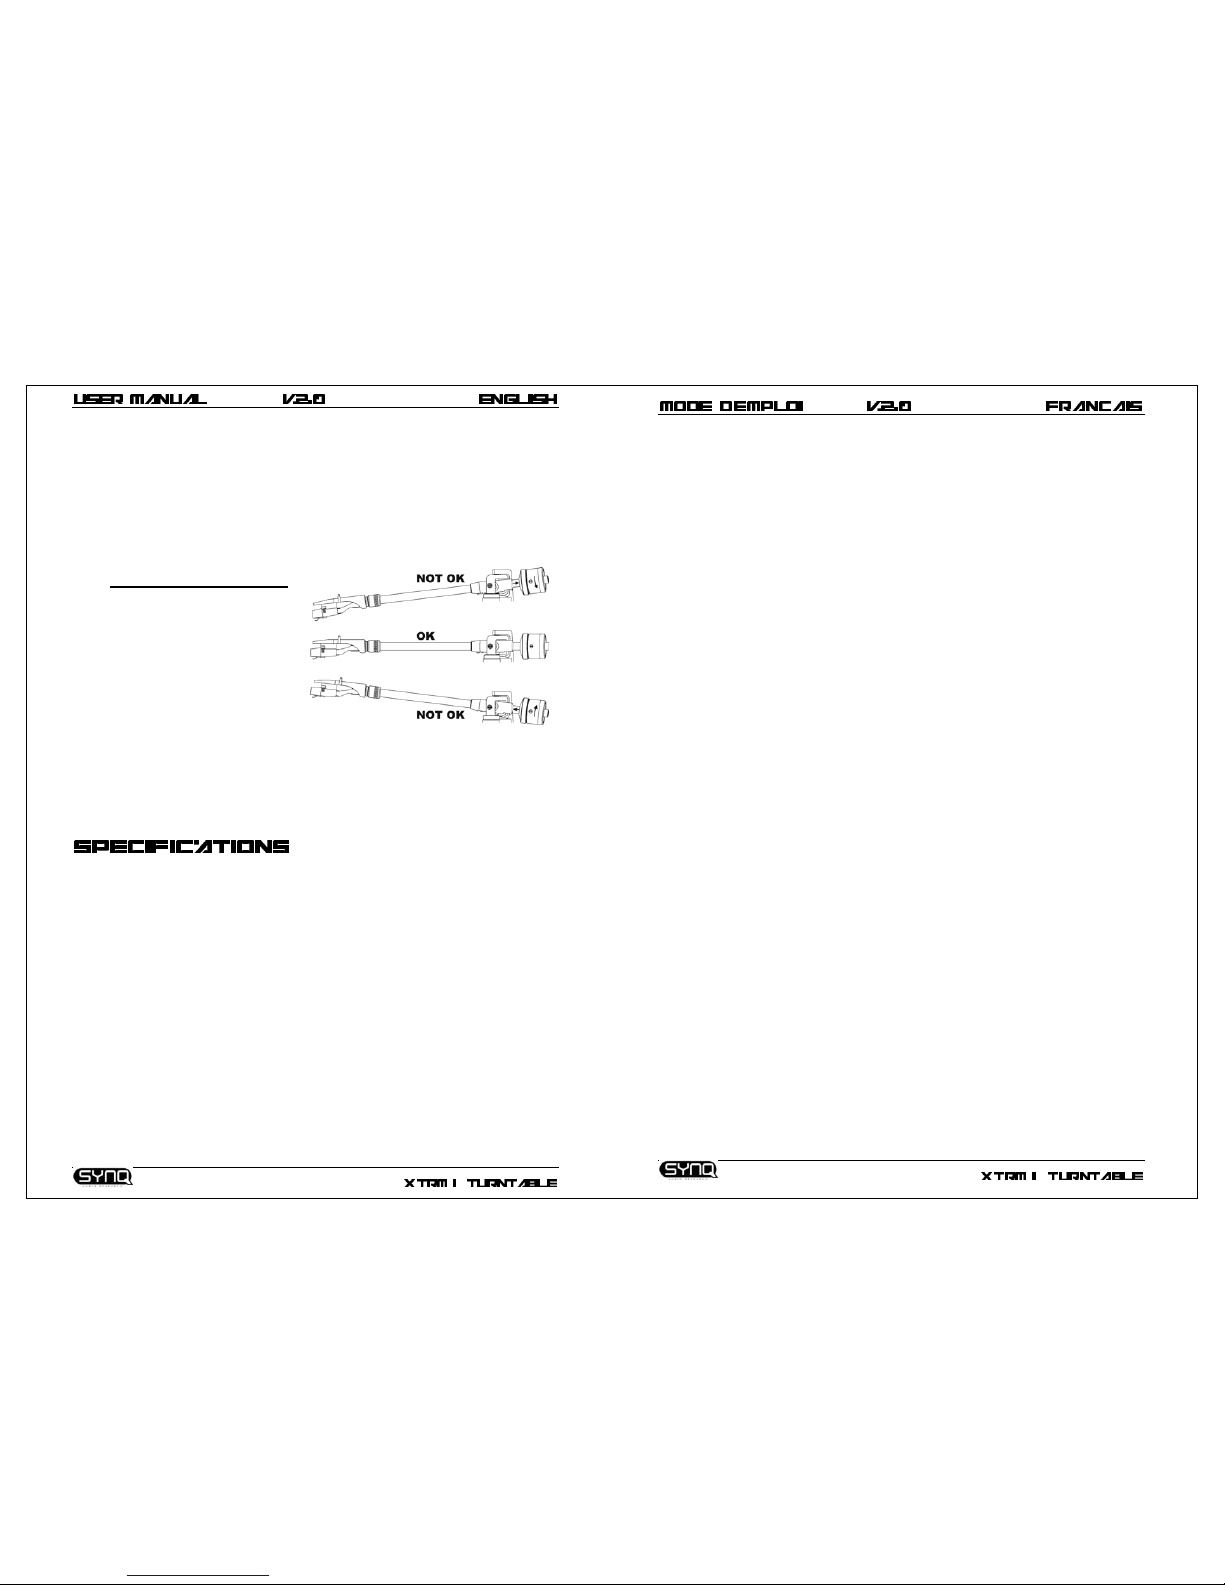
Setting up the stylus pressure:
Make sure the cartridge is well
fitted and its needle protector is
removed. Put a record on the
platter and make sure the antiskate is set to zero. Put the tone
arm lever in “down” position. Take
the tone arm and turn the counterweight until the tone arm is in
perfect balance Æ It floats
horizontally above the record
surface, see “OK” picture at the right. Now set the “stylus pressure ring” (front
section of the counterweight with markings) to zero by turning the ring while you
take care that the counterweight doesn’t move. Next, turn the complete
counterweight clockwise until the “stylus pressure ring” indicates the correct needle
pressure. Don’t forget to put the anti-skate back in place.
Motor: 16 pole, 3phase, brushless DC motor
Driving Method: Direct Drive
Starting Torque: More than 4.5kg / cm
Starting Time: 0,20 ~ 6,00 seconds (adjustable)
Braking Time: 0,20 ~ 6,00 seconds (adjustable electronic brake)
Speed selection: 33
1/3
~ 45 ~ 78 RPM
Speed adjustment: +/-10% ~ +/-20% ~ +/-50%
Wow & Flutter: less than 0,1% WRMS (JIS WTD)
Tone arm type: Static balanced S-shaped tone arm.
Tracking Error angle: Less than 3°
Cartridge weight: 13~18g.
Anti-skate range: 0~3g.
Power supply: 230V~ 50Hz.
Power consumption: 13Watts
Dimensions: 450 x 353 x 86mm (WxDxH)
Weight : 11kg.
6/29
Page 5
7/29
'
Nous vous remercions et félicitons pour l'achat de ce produit SYNQ. Nous vous prions de
lire ce mode d'emploi afin d'utiliser cet appareil convenablement. Apres l'avoir lu gardezle pour une éventuelle future consultation.
• Démarrage x-trêmement rapide, réglable de 0.2 a 6 secondes.
• Arrêt x-trêmement rapide, réglable de 0.2 a 6 secondes.
• 3 vitesses: 33, 45, 78 rpm avec verrou quartz
• 3 gammes de vitesse possibles: +/-10% ; +/-20% ; +/-50%
• Lecture des disques inversée
• 2 boutons Start / Stop assurent un maximum de flexibilité
• Eclairage blanc de la cellule (incassable)
• Selecteur de sortie phono/line à l'arrière
• Cellule Stanton originale incluse
• Bras métallique en forme de 'S' assemblé avec :
• Contrepoids
• Lève-bras avec verrou
• Contrôle Anti-skating
• Elévation du bras avec réglage de hauteur
• Pieds de support réglables pour mettre la platine à niveau
'
Vérifier la présence des composants suivants:
• Plateau
• Feutrine
• Adaptateur 45 tours
• Contrepoids
• Porte cellule
• Mode d'emploi
• Cellule
• Câbles de connexion cinch/cinch
8/29
CONSEILS DE SECURITE:
ATTENTIÓN: Afin d'éviter tout risque
d'électrocution, ne pas ouvrir l'appareil. En cas
de problème, mettez-vous en contact avec
votre revendeur.
Cette flèche dans un triangle met l'utilisateur en garde de la présence dans
l'appareil de haut voltage sans isolation qui peut causer un risque
d'électrocution.
Un point d'exclamation dans un triangle prévient de la présence d'instructions
de fonctionnement et de maintenance fournies avec l'appareil.
Afin d'éviter tout risque d'électrocution ou d'incendie, n'exposez pas la platine aux
intempéries ou à l'humidité.
Ne pas insérer d'objets métalliques et ne pas laisser couler de liquide dans l'appareil. Des
électrocutions ou disfonctionnements peuvent s'en suivre.
INSTALLATION:
• Installer la platine dans un endroit bien ventilé afin de ne pas l'exposer a des
températures trop élevées ou a de l'humidité.
• Utiliser la platine pendant une longue période dans un endroit chaud (à coté
d'amplificateurs, spots,…) peut diminuer son rendement.
• Eviter les vibrations sonores (haut-parleurs,…) pour ne pas avoir d'effet de feed-back.
• Installer la platine sur une surface stable et horizontale. Préférer des surfaces en
béton ou en marbre plutôt que le bois qui amplifierait les vibrations.
• S'assurer que ni la platine, ni ses câbles n'entrent en contact avec des sources
provocant des vibrations. Etre particulièrement prudents lors de l'utilisation avec un
flightcase.
• Grâce à ses 2 boutons de démarrage, la platine X-TRM1 peut être utilisée de manière
traditionnelle ou lors de compétitions.
Installation traditionelle:
Installation pour concours:
La plus part du temps en discothèques. Plus aisé pour scratcher et pour les
Convient pour des mixages passifs. Techniques de mix's plus agressifs.
NETTOYAGE DE LA PLATINE:
Nettoyer avec un tissu légèrement humide. Ne pas renverser d'eau à l'intérieur de la
platine.
Ne pas utiliser de produits abrasifs (alcool,…) qui puissent endommager la platine.
CAUTION
Page 6

9/29
1. Bouton START / STOP: Pousser pour démarrer ou arrêter le plateau.
2. Indication stroboscopique: La lumière située dans l'interrupteur ON/OFF éclaire
cette ligne de pointillés. Lors de la rotation du plateau, ces points indiquent la
vitesse. Les points se dirigent vers la droite si la vitesse actuelle est inférieure à la
vitesse sélectionnée (33,45,78). Les points se dirigent vers la gauche si la vitesse
actuelle est supérieure à la vitesse sélectionnée. Les points ont l'air immobiles
lorsque la vitesse est exacte. Utiliser le curseur Pitch (12) pour régler la vitesse.
3. Interrupteur ON/OFF: Allumer / éteindre la platine.
4. Boutons de sélection de vitesse: Sélection de la vitesse souhaitée.
• Pousser sur le bouton “33” pour sélectionner la vitesse de 33 tours.
• Pousser sur le bouton “45” pour sélectionner la vitesse de 45 tours.
• Pousser sur les boutons “33” et “45” en même temps pour sélectionner la
vitesse de 78 tours.
5. Eclairage de la capsule: Lumière blanche très utile pour localiser un endroit
précis sur le disque dans un environnement sombre.
6. Démarrage: Réglage du temps que va mettre le plateau pour atteindre sa vitesse
normale. Avec le potentiomètre totalement à gauche, la durée de démarrage est
minimale (0,2sec). Avec le potentiomètre totalement à droite, la durée est
maximale (6sec).
7. Arrêt: Réglage du temps que va mettre le plateau pour s'arrêter complètement.
Avec le potentiomètre totalement à gauche, la durée de freinage est minimale
(0,2sec). Avec le potentiomètre totalement à droite, la durée est maximale (6sec).
10/29
8. Bouton de lecture inversée: Pousser pour inverser le sens de rotation du
plateau. Re-pousser pour revenir en mode de lecture normal.
9. Bouton PITCH RANGE +/-10%: Pousser pour ajuster la gamme de vitesse du
curseur à +/-10%. Utiliser dans le cas de mixages précis (sur le beat).
10. Bouton PITCH RANGE +/-20%: %: Pousser pour ajuster la gamme de vitesse du
curseur à +/-20%. Pousser simultanément les boutons +/-10% y +/-20% pour
ajuster la vitesse du curseur à +/-50%. Utiliser de manière à obtenir des effets
spéciaux.
11. Curseur PITCH & bouton QUARTZ: Le curseur permet d'ajuster la vitesse du
plateau. La gamme dépend des boutons 9 et 10. Quand le curseur est positionné
au centre, un LED s'allume pour indiquer que la vitesse est juste. Le bouton
QUARTZ permet de mettre la platine a vitesse
exacte même si le curseur n'est pas centré.
12. Sortie PHONO/LINE: Suivant la position du
sélecteur, vous pouvez brancher la platine sur une
entrée phono ou line à l'aide du câble cinch/cinch
inclus. (les câbles "cinch" peuvent aussi porter le
nom de “RCA")
13. Câble secteur: brancher sur du 220V AC avec le câble fourni.
14. Porte cellule: Se référer aux instructions du fabricant de la capsule. Laisser la
protection sur la cellule pendant la manipulation.
Connecter les fils comme suit:
Blanc (L+) Canal gauche+
Bleu (L-) Canal gaucheRouge (R+) Canal droit+
Vert (R-) Canal droit-
15. Verrou du porte cellule: Insérer le porte
cellule dans le bras et tourner le verrou
comme indiqué ci-dessous.
16. Bras: Bras en forme de 'S', totalement
manuel. Pour démarre la lecture, positionner
l'aiguille sur le disque en se servant du
support du porte capsule. Manipuler la cellule
prudemment afin de n'abîmer ni le diamant,
ni le disque.
17. Elévation du bras: Permet de régler la
hauteur du bras. Débloquer le bras en
tournant de 90° vers la gauche le bouton
situé à côté de l'anti-skating. Tourner
l'anneau de base vers la droite pour élever le
bras et vers la gauche pour le descendre.
Bloquer le bras en tournant le bouton de 90°
vers la droite.
18. Base du bras: La base du bras inclus le
réglage de la hauteur.
19. Levier lève-bras: Permet de lever ou
descendre le bras.
Page 7

11/29
20. Bouton an ti-skating: Pendant la lecture d'un disque, la force centrifuge tend à
déporter la cellule vers le centre du disque. Ce bouton permet d'éliminer ce
problème en maintenant l'aiguille au centre du sillon. Pour les lectures simples,
régler ce bouton sur la valeur équivalente a la pression de la cellule (Pression de
la cellule = 3gr. Æ anti-skating = 3).
21. Contrepoids: Permet de régler la pression nécessaire à la cellule. Pour connaître
la pression idéale, il faut se référer aux instructions du fabricant de la cellule.
Installation de la cellule:
S'assurer que la cellule est bien
installée dans le bras. Mettre un
disque et positionner l'anti-skating
sur zéro. Abaisser le lève-bras.
Tourner le contrepoids jusqu'à ce
que le bras flotte en équilibre (OK
sur le dessin). Mettre l'anneau
gradué en position zéro en faisant
attention de ne pas bouger le
contrepoids. Tourner le contrepoids
complet jusqu'à obtention de la
pression adéquate. Ne pas oublier de remettre l'anti-skating à la position
correspondente.
Moteur: 16 pole, 3phase, brushless DC motor
Driving Method: Direct Drive
Puissance du moteur: Plus de 4.5kg / cm
Durée de démarrage: 0,20 ~ 6,00 secondes (ajustable)
Durée de freinage: 0,20 ~ 6,00 secondes (frein électronique ajustable)
Sélection de vitesse: 33
1/3
~ 45 ~ 78 tours
Réglage de vitesse: +/-10% ~ +/-20% ~ +/-50%
Wow & Flutter: Moins de 0,1% WRMS (JIS WTD)
Type de bras: Static balanced S-shaped tone arm.
Tracking Error angle: Moins de 3°
Poids de la cellule: 13~18g.
Valeur Ant-skating: 0~3g.
Allimentation: 230V~ 50Hz.
Consommation: 13Watts
Dimensions: 450 x 353 x 86mm (WxDxH)
Poids: 11kg.
12/29
Page 8

13/29
Hartelijke dank en gefeliciteerd met de aankoop van dit SYNQ product. Gelieve deze
handleiding aandachtig te lezen zodat U dit product perfect kan bedienen. Wij raden U
aan om deze handleiding nadien veilig op te bergen zodat U ze later nog kan raadplegen.
• Motor met extreem hoog aandrijfkoppel
• Extreem snelle start, regelbaar tussen 0.2 en 6 seconden.
• Extreem snelle stop, regelbaar tussen 0.2 en 6 seconden.
• 3 snelheden: 33, 45, 78 rpm met kwarts stabilisatie
• 3 instelschalen voor snelheidsregeling: +/-10% ; +/-20% ; +/-50%
• Voorwaarts / achterwaarts afspelen van de plaat
• 2 start / stop drukknoppen voor maximale flexibiliteit
• Onverslijtbare naaldverlichting met witte LED
• Phono/line schakelaar op de achterzijde
• Originele Stanton cel inbegrepen
• Metalen S-vormige toonarm met:
• Tegengewicht
• Hoogteregeling met vergrendeling
• Anti-skate regeling
• Toonarm lift met hendeltje
• Grote, regelbare voeten voor een perfecte stabiliteit
Kijk even na of, naast de basis, onderstaande onderdelen in de verpakking aanwezig zijn:
• Draai plateau
• Slipmat
• 45-toeren adapter
• Tegengewicht van de toonarm
• Celhouder
• Handleiding
• Bijgeleverde Cel + naald
• Cinch/cinch audiokabel
14/29
VEILIGHEIDSVOORSCHRIFTEN:
OPGELET: Gelieve, om het risico van
elektrische schokken te vermijden, het apparaat
niet zelf te openen. Binnenin vindt U geen
onderdelen die U zelf kan vervangen. Voor
reparaties doet U best uitsluitend beroep op degelijk opgeleid personeel.
De driehoek met bliksem symbool waarschuwt U dat er in dit apparaat
ongeïsoleerde spanning aanwezig is die bij aanraking een elektrische schok
kan veroorzaken.
De driehoek voorzien van een uitroepteken waarschuwt U dat er belangrijke
gebruikersinstructies in de bijbehorende handleiding te vinden zijn.
Om elektrische schokken te voorkomen mag dit apparaat niet aan regen en vocht worden
blootgesteld. Breng geen metalen voorwerpen in de draaitafel en zorg ervoor dat er geen
vloeistoffen in het apparaat terecht kunnen komen. Elektrische schokken of slechte
werking kunnen het gevolg zijn.
INSTALLATIEVOORSCHRIFTEN:
• Plaats de draaitafel in een goed geventileerde ruimte waar zij niet blootgesteld is aan
hoge temperaturen of vocht.
• Het plaatsen en het gebruik van de draaitafel gedurende een lange periode in de
nabijheid warmtebronnen zoals versterkers, spots, enz. zal zijn werking beïnvloeden.
• Wanneer de draaitafel gebruikt wordt in een zeer lawaaierige omgeving, bijvoorbeeld
naast klankkasten, kan de naald verspringen en kan er terugkoppeling ontstaan.
• Plaats het toestel op een perfect horizontale en stabiele ondergrond. Een harde of
marmeren ondergrond is perfect. Een houten oppervlak is een slechte keuze daar dit
de trillingen versterkt.
• Vermijd dat de audiokabels en voedingskabel in contact komen met trillende
voorwerpen. In een draagkoffer kan de draaitafel best niet direct in contact staan met
de wanden van de koffer.
• Dankzij zijn 2 start/stop toetsen kan de X-TRM1 draaitafel zowel op een traditionele
als op een “battle” manier opgesteld worden:
Traditionele opstelling:
Battle opstelling:
Meestal toegepast in discotheken. Meestal toegepast bij het scratchen
Het beste voor allround mixen. of andere agressieve mixtechnieken
REINIGING VAN DE DRAAITAFEL:
Reinig de draaitafel met een vochtig doek. Vermijd dat er water in het toestel komt.
Gebruik nooit vluchtige vloeistoffen zoals benzeen of thinner welke het toestel kunnen
beschadigen.
CAUTION
Page 9

15/29
1. START / STOP Toets: Druk op deze toets om het draaien van het draaiplateau te
starten of te stoppen.
2. STROBE Stippen: De stippen op het draaiplateau worden samen met het licht dat
in de voedingsschakelaar is ingebouwd gebruikt. Terwijl de plateau draait geven
de stippen de snelheid weer. De stippen vloeien naar rechts als de snelheid lager
ligt dan de gekozen initiale snelheid (33, 45, 78). Wanneer de stippen naar links
vloeien ligt de snelheid hoger. Als de stippen lijken stil te staan is de snelheid juist.
Gebruik de Pitch schuifregelaar (12) om de snelheid aan te passen.
3. VOEDINGSSCHAKELAAR: Gebruik deze knop om het toestel aan of uit te zetten.
4. SNELHEIDSKEUZE toetsen: Gebruik deze toetsen om de snelheid in te stellen.
• Druk op “33” om een snelheid van 33tpm in te stellen.
• Druk op “45” om een snelheid van 45tpm in te stellen.
• Druk gelijktijdig op “33” en “45” om een snelheid van 78tpm in te stellen.
5. NAALDVERLICHTING: De witte naaldverlichting (led) kan gebruikt worden om de
juiste plaats op de plaat te vinden bij het gebruik in een donkere ruimte.
6. START: Gebruik deze knop om de opstarttijd in te stellen. De opstarttijd is
minimaal als de knop volledig naar links gedraaid is. (De ingestelde snelheid wordt
na 0.2sec bereikt) De opstarttijd is maximaal als de knop volledig naar rechts
gedraaid is. (De ingestelde snelheid wordt na 6sec bereikt)
7. BRAKE: Gebruik deze knop om de uitlooptijd in te stellen. De uitlooptijd is
minimaal als de knop volledig naar links gedraaid is. (Volledige stilstand na 0.2sec)
De uitlooptijd is maximaal als de knop volledig naar rechts gedraaid is. (Volledige
stilstand na 6sec)
16/29
8. REVERSE Toets: Druk op deze toets om de rotatie van de draaiplateau om te
keren, druk nogmaals op deze toets om het omgekeerd draaien te annuleren.
9. PITCH RANGE +/-10% Toets: Druk op deze toets om het bereik van de Pitch
schuifregelaar in te stellen op +/-10%. Wordt gebruikt bij het uitvoeren van
precieze snelheidsregelingen. (beat mixen)
10. PITCH RANGE +/-20% Button: Druk op deze toets om het bereik van de Pitch
schuifregelaar in te stellen op +/-20%. Druk tegelijkertijd op de +/-10% en +/-20%
toetsen om het bereik van de Pitch schuifregelaar in te stellen op +/-50%. Dit wordt
meestal gebruikt om speciale effecten te creëren.
11. PITCH Regelaar & QUARTZ Toets: Gebruik de Pitch schuifregelaar om de
snelheid van de draaiplateau in te stellen. Het bereik hiervan hangt af van de
“Pitch Range” toetsen (9+10). Wanneer de schuifregelaar in zijn middenpositie
staat licht er een led op om aan te tonen dat de snelheid is vergrendeld op de
juiste gemiddelde snelheid. Bij het indrukken van de QUARTZ Toets wordt de
juiste gemiddelde snelheid afgedwongen, zelfs al staat de schuifregelaar niet in
zijn middenpositie.
12. PHONO/LINE uitgang: Afhankelijk van de stand
van de keuzeschakelaar kan U deze draaitafel op
een phono of line ingang van de mengtafel
aansluiten. (een “cinch” aansluiting wordt soms ook
een “RCA” aansluiting genoemd)
13. VOEDINGSKABEL Aansluiting: gebruik deze om de meegeleverde
voedingskabel aan te sluiten.
14. CELHOUDER: Installeer de cel hierop. Let
hiervoor op de aanwijzingen van de
Celconstructeur. Laat tijdens het monteren de
naaldbescherming op de cel, dit om de
beschadiging van de naald te voorkomen.
Verbind de draden als volgt:
Wit (L+) Linkerkanaal +
Blauw (L-) Linkerkanaal Rood (R+) Rechterkanaal +
Groen (R-) Rechterkanaal -
15. CELHOUDER VERGRENDELING: Breng de
celhouder in de toonarm en draai de ring aan
om de celhouder te vergrendelen.
16. TOONARM: Dit is een volledig S-vormige
toonarm. Om de weergave te starten: plaats de
naald voorzichtig op de plaat door middel van
de vingersteun op de celhouder. Laat de naald
niet op de plaat vallen, dit kan zowel de
diamant van de naald alsook de vinylplaat
beschadigen.
17. TOONARM LIFT: Gebruik dit om de hoogte
van de toonarm in te stellen. Leg een vinylplaat
op de draaitafel en plaats de naald ergens op
Page 10

17/29
de plaat. Ontgrendel voorzichtig de toonarm lift door de kleine zwarte knop aan de
basis van de toonarm, vlakbij de ANTI SKATING knop ongeveer 90° in tegen
wijzerzin te draaien. Draai de basisring in uurwerk wijzerzin om de toonarm hoger
te brengen of in tegen wijzerzin om de toonarm lager te brengen. Zorg ervoor dat
de toonarm horizontaal staat. Vergrendel opnieuw de toonarm lift door de kleine
zwarte knop ongeveer 90° in wijzerzin te verdraaien.
18. TOONARM BASIS: Te toonarm basis beschikt over een hoogteregeling en een
toonarm steun.
19. TOONARM HEFBOOM: Hiermee kan men de opwaartse en neerwaartse toonarm
bewegingen controleren om de naald op de vinylplaat te zetten.
20. ANTI-SKATE Kno p: Bij het afspelen van een plaat worden er zijdelingse krachten
ontwikkeld die de naald naar de binnenkant of naar de buitenkant drukken. Men
kan de anti-skate knop gebruiken om deze krachten tegen te werken en zo de
naald in het midden van de groef houden. Voor een gewone weergave zet men
meestal de anti-skate knop op dezelfde waarde als de neerwaartse druk die men
op de naald geeft (in gr.) vb. (Naalddruk = 3gr. Æ anti-skate = 3)
21. TEGENGEWICHT: Gebruik het tegengewicht om de neerwaartse naalddruk in te
stellen. Raadpleeg hiervoor de gebruiksaanwijzing van de naaldconstructeur.
Instellen van de naalddruk:
Controleer of de cel goed vast op
de celhouder staat en dat de naald
beschermingskap verwijderd is.
Leg een vinylplaat op de draaitafel
en zorg ervoor dat de anti-skate op
nul staat. Zet de toonarm hefboom
in de benedenstand. Neem de
toonarm en draai aan het tegengewicht tot de toonarm perfect in
balans is Æ Hij zweeft horizontaal
boven het draaiplateau (zie “OK”
afbeelding rechts) Zet nu de drukring (voorkant van het tegengewicht met
markeringen) op de nul positie terwijl U het tegengewicht goed vast houdt zodat
het niet beweegt. Draai vervolgens het geheel tegelijkertijd (tegengewicht + ring
met markeringen) tot men de gewenste naalddruk afleest op de ring met
markeringen. Vergeet niet de anti-skate knop terug juist in te stellen.
Motor: 16-polige, 3fase, borstelloze DC motor
Aandrijving: Direct Drive
Aandri jfkopp el: Meer dan 4.5kg / cm
Starttijd: 0,20 ~ 6,00 seconden (regelbaar)
Braking Time: 0,20 ~ 6,00 seconden (regelbare elektronische rem)
Snelheidskeuze: 33
1/3
~ 45 ~ 78 RPM
Snelheidsregeling: +/-10% ~ +/-20% ~ +/-50%
Wow & Flutter: minder dan 0,1% WRMS (JIS WTD)
Toonarm type: Statisch gebalanceerde S-vormige toonarm.
Tracking Error angle: Minder dan 3°
Gewicht v/d cel: 13~18g.
Anti-skate draagwijdte: 0~3g.
Voeding: 230V~ 50Hz.
Verbruik: 13Watt
Afmeting en: 450 x 353 x 86mm (BxDxH)
Gewicht: 11kg.
18/29
Page 11

19/29
Danke, das Sie sich für ein SYNQ-Produkt entschieden haben. Bitte lesen Sie sich diese
Bedienungsanleitung durch, um dieses Produkt richtig bedienen und handhaben zu
können. Wenn Sie sich die Anleitung durchgelesen haben, bewahren Sie diese an einem
sicheren Ort auf, um jederzeit nachschlagen zu können.
• Sehr starker High Torque Direct Drive Motor
• Sehr schneller Start, einstellbar von 0,2 bis 6 Sekunden
• Sehr schneller Stop, einstellbar von 0,2 bis 6 Sekunden
• 3 Geschwindigkeiten: 33, 45, 78 rpm mit Quartz Lock-Funktion
• 3 Pitch-Bereiche: +/-10%, +/-20%, +/-50%
• Vorwärts/Rückwärts Abspielmöglichkeit
• 2 Start/Stop Tasten für hohe Flexibilität
• Phono/Line Ausgangs-Wahlschalter auf der Rückseite.
• Robustes weisses LED Target Light
• Originales Stanton Tonabnehmersystem inkludiert
• Metallischer S-förmiger Tonarm mit:
• Kontergewicht
• Höhenverstellung mit Verriegelung
• Anti-skating Einstellung
• Tonarmlift mit Höheneinstellung
• Einstellbare Tonarmabsenkung für ideale Einpegelung
Kontrollieren Sie, ob folgende Teile im Karton enthalten sind:
• Plattenteller
• Slipmat
• 45-rpm Adapter
• Tonarmgewicht
• Headshell
• Bedienungsanleitung
• Tonabnehmersystem
• Chinch-Chinch Kabel
20/29
SICHERHEITSVORSCHRIFTEN:
ACHTUNG: Um sich nicht der Gefahr eines
elektrischen Schlags auszusetzen, entfernen
Sie keines der Gehäuseteile. Im Geräteinneren
befinden sich keine vom Benutzer
reparierbaren Teile. Überlassen Sie Reparaturen dem qualifizierten
Kundendienst!
Das Blitzsymbol im Dreieck weist den Benutzer darauf hin, das eine
Berührungsgefahr mit nicht isolierten Teilen im Geräteinneren, welche eine
gefährliche Spannung führen, besteht. Die Spannung ist so hoch, das hier die
Gefahr eines elektrischen Schlags besteht.
Das Ausrufezeichen im Dreieck weist den Benutzer auf wichtige Bedienungsund Wartungshinweise in den Dokumenten hin, die dem Gerät beiliegen.
Um Feuer oder elektrische Schläge vorzubeugen, setzen Sie dieses Gerät niemals Nässe
und Feuchtigkeit aus! Stellen Sie keine Behälter mit Flüssigkeiten in die Nähe des
Gerätes, es ist nicht wasserdicht und könnte beschädigt werden.
INSTALLATIONSANLEITUNG:
• Stellen Sie den Plattenspieler in einem gut belüfteten Raum auf, wo er nicht hohen
Temperaturen und Feuchtigkeit ausgesetzt ist.
• Platzieren und benutzen Sie den Plattenspieler für längere Zeiten neben sehr warmen
Geräten wie Verstärker, Lampen, etc., könnte es die Funktion des Gerätes
beeinträchtigen.
• Wenn der Plattenspieler in der Nähe von Lautsprechern oder bestimmten anderen
Geräten steht, kann es zu akustischen Beeinträchtigungen kommen (Rückkopplung).
• Stellen Sie den Plattenspieler auf einer ebenen und sehr stabilen Oberfläche auf. Eine
rein hölzerne Oberfläche ist keine gute Wahl, da hier Vibrationen entstehen können.
• Seien Sie sicher, das der Plattenspieler mit den Netz- und Audioanschlüssen nicht
irgendwelche vibrierende Oberflächen berührt. Passen Sie besonders auf, wenn das
Gerät in einem Plattenspieler-Case eingebaut ist.
• Da der Plattenspieler zwei Start/Stop Tasten hat, kann er für den herkömmlichen
Gebrauch und im senkrechten Battle-Style betrieben werden:
TRADITIONELLER STYLE:
BATTLE STYLE:
Meist verwendete Art in Diskotheken. Meist verwendete Art für Scratchen
Geeignet für Allround-Mixing. und andere aggressive Mixing-Arten
CAUTION
Page 12

21/29
REINIGUNG UND PFLEGE DES GERÄTES:
Reinigen Sie das Gerät mit einem feuchten Tuch. Vermeiden Sie Wassereintritt in das
Geräteinnere. Verwenden Sie keine scharfen Reinigungsmittel wie Reinigungsbenzin
oder ähnliches, Sie könnten sonst das Gerät zerstören.
1. START/STOP Tasten: Drücken Sie diese Taste zum Starten oder Stoppen des
Plattentellers.
2. STROBE PUNKTE: Die Punkte rund um den Plattenteller werden in Verbindung
mit der Lampe im Power On/Off Schalter genutzt. Während der Plattenteller rotiert,
helfen diese Punkte die Geschwindigkeit anzuzeigen. Diese Plattentellerpunkte
wandern nach rechts, wenn die Geschwindigkeit langsamer ist als eingestellt
wurde (33, 45, 78). Wenn diese Punkte nach links laufen, ist sie schneller. Wenn
diese Punkte still stehen, dann stimmt die Geschwindigkeit exakt mit der
eingestellten überein. Verwenden Sie die Pitch-Taste (12) zum Einstellen der
Geschwindigkeit.
3. POWER ON/OFF TASTE: Schalten Sie den Plattenspieler hier ein und aus.
4. GESCHWINDIGKEITSAUSWAHL-TASTEN: Wählen Sie aus:
• Drücken Sie “33” für Auswahl 33rpm.
• Drücken Sie “45” für Auswahl 45rpm.
• Drücken Sie “33” und “45” gleichzeitig für Auswahl 78rpm.
5. TARGET LIGHT: Dieses weisse LED Target Light dient dazu, um einen genauen
Punkt auf der Schallplatte auch an dunklen Orten zu lokalisieren.
6. STARTZEIT: Hier können Sie einstellen, wie schnell der Plattenteller die
eingestellte Geschwindigkeit erreicht. Startzeit ist auf Minimum, wenn der Regler
22/29
ganz nach links gedreht wird (min 0,2 sek). Startzeit ist auf Maximum, wenn der
Regler ganz nach rechts gedreht wird (max 6 sek).
7. STOPZEIT: Hier können Sie einstellen, wie schnell der Plattenteller von der
eingestellten Geschwindigkeit zum vollständigen Stillstand kommt. Stopzeit ist auf
Minimum, wenn der Regler nach links gedreht wird (Stop nach 0,2 sek). Stopzeit
ist auf Maximum, wenn der Regler nach rechts gedreht wird (Stop nach 6 sek).
8. REVERSE Taste: Drücken Sie diese Taste, um die Abspielrichtung umzudrehen.
Durch nochmaliges Drücken kommen Sie wieder in den normalen Abspielmodus
zurück.
9. PITCH BEREICH +/-10% Taste: Drücken Sie diese Taste, um den Pitch-Bereich
auf +/-10% einzustellen. Verwendung für präzise Geschwindigkeitseinstellungen.
10. PITCH BEREICH +/-20% Taste: Drücken Sie diese Taste, um den Pitch-Bereich
auf +/-20% einzustellen. Drücken Sie die +/-10% und +/-20% Taste gleichzeitig,
um den Pitch-Bereich auf +/-50% einzustellen. Verwendung für spezielle Effekte.
11. PITCH FADER & QUARTZ Taste: Verwenden Sie den Pitch-Fader, um die
Geschwindigkeit zu verändern. Der Pitch-Bereich basiert auf den Pitch-BereichTasten (9+10). Wenn der Fader in der Mittelposition steht, leuchtet eine LED auf,
welche genau die exakte Mittelgeschwindigkeit signalisiert. Wenn die Quartz-Taste
gedrückt wird, geht das Gerät wieder auf die exakte Mittel-Geschwindigkeit zurück,
auch wenn sich der Pitch-Fader nicht in der Mittenstellung befindet.
12. PHONO/LINE Ausgang: Abhängig von der Position
des Phono/Line Schalters, können Sie den
Plattenspieler an jeden Phono oder Line Eingang
mit dem mitgelieferten Chinchkabel anschließen.
(wird auch RCA-Connector genannt).
13. POWER CORD Anschluss: Dieser Anschluss ist
der Netzanschluss (Strom), achten Sie auf die
Spannungsangabe beim Netzanschluss.
14. HEADSHELL: Installieren Sie hier das
Tonabnehmersystem, achten Sie aber bei der
Installation auf die Herstellerangaben dieses
Tonabnehmersystems. Lassen Sie die
Nadelschutzabdeckung während der Montage
auf dem System. Folgende Anschlüsse sind
gegeben:
Weiss (L+) Linker Kanal +
Blau (L-) Linker Kanal Rot (R+) Rechter Kanal +
Grün (R-) Rechter Kanal -
15. HEADSHELL VERSCHLUSS: Montieren Sie
das System, indem Sie es auf das vordere Ende
des Tonarmes stecken und den
Bajonettverschluss im Uhrzeigersinn verriegeln.
16. TONARM: Dieser ist ein manueller s-förmiger
Tonarm. Um die Wiedergabe zu starten,
platzieren Sie den Tonarm vorsichtig mit dem
Finger am Hebearm des Headshells auf die
Page 13

23/29
Schallplatte, andernfalls können Sie die Schallplatte zerkratzen oder die Nadel
beschädigen.
17. TONARM LIFT: Diese Funktion dient zur Höhenverstellung des Tonarms. Legen
Sie eine Schallplatte auf und platzieren Sie den Tonarm irgendwo darüber.
Entriegeln Sie den Tonarmlift vorsichtig anhand dem kleinen Rad, neben dem Anti
Skating Rad 90° im Uhrzeigersinn. Drehen Sie das grosse Rad, um den Tonarm
zu heben oder zu senken, um die waagrechte richtige Position zu erreichen. Nun
verriegeln Sie die Tonarmhöhenverstellung wieder anhand des Rades wieder (90°)
18. TONARMBASIS: Die Tonarmbasis enthält die Höhenverstellung und die
Tonarmauflage.
19. TONARMHEBEL: Kontrolliert die Auf- und Abwärtsbewegung des Tonarmes.
20. ANTI-SKATE RAD: Wenn eine Schallplatte spielt, wirken verschiedene Kräfte auf
den Tonarm Richtung Platteninneres oder Richtung ausserhalb. Das Anti-Skate
Rad dient dazu, diese Kräfte konstant zu halten, egal wo der Tonarm sich gerade
auf der Schallplatte bewegt. Stellen Sie einfach Anti Skate gleich wie den
Auflagedruck der Systemnadel ein (zB. Gewicht 3gr – Anti Skate auf 3 stellen).
21. KONTERGEWICHT: Benutzen Sie das Kontergewicht (Tonarmgewicht), um die
Balance des Tonarmes und somit auch den Auflagedruck zu verstellen. Für den
korrekten Auflagedruck lesen Sie sich die
Herstellerangaben des Systems durch.
Einstellung des Auflagedrucks:
Vergewissern Sie sich, das das System in
Ordnung ist und die Schutzabdeckung der
Nadel entfernt wurde. Legen Sie eine
Platte auf und stellen Sie das Anti Skate
auf Null. Stellen Sie den Tonarmhebel
hinunter. Jetzt stellen Sie das
Kontergewicht so ein, bis der Tonarm perfekt balanciert. Nun stellen Sie den Ring
auf dem Kontergewicht auf Null zurück. Jetzt können Sie das Gewicht des
Systems nach Herstellerangabe einstellen. Vergessen Sie nicht, den Anti-Skate
wieder dementsprechend einzustellen.
Motor: 16 Pole, 3 Phasen, bürstenloser DC Motor
Antrie bsmethode: Direktgetrieben
Start Drehmoment: Mehr als 4,5 kg/cm
Startzeit: 0,20 ~ 6,00 sek. (justierbar)
Stopzeit: 0,20 ~ 6,00 sek. (justierbare elektronische Bremse)
Geschwindigkeiten: 33
1/3
~ 45 ~ 78 RPM
Pitch-Bereiche: +/-10% ~ +/-20% ~ +/-50%
Klirrfaktor: Weniger als 0,1% WRMS (JIS WTD)
Tonarmtyp: Fester ausbalancierter s-förmiger Tonarm
Tracking Fehler: Weniger als 3°
Systemgewicht: 13~18 g
Anti-Skate Bereich: 0~3 g
Netzanspeisung: 230V~ 50Hz
Leistungsaufnahme: 13 Watt
Dimensionen: 450 x 353 x 86mm (BxTxH)
Gewicht: 11kg
24/29
Le felicitamos y le agradecemos por la adquisicion de este producto SYNQ. Leá
atentamente las siguientes instrucciones para saver como utilizar este producto de
manera correcta. Recoja este manual en un sitio seguro para volver a consultarlo
ulteriormente.
• Arranque x-tremamente rápido, ajustable de 0.2 a 6 segundos.
• Frenado x-tremamente rápido, ajustable de 0.2 a 6 segundos.
• 3 velocidades: 33, 45, 78 rpm con cerrojo quartz
• 3 gamas de velocidad posibles: +/-10% ; +/-20% ; +/-50%
• Lectúra inversada
• 2 botones de arranque Start / Stop para flexibilidad máxima
• Iluminación de capsula de color blanco)
• Selector de salida phono/line en la parte trasera.
• Capsula Stanton original incluida
• Brazo metalico en forma de 'S' incorporando :
• Contra peso
• Ajuste de elevación con cerrojo
• Control anti deslizante (Anti-skating)
• Elevación del brazo con ajuste de altura
• Pies de soporte regulables para poner la unidad a nivel
Comprobar que los componentes siguientes estén presentes:
• Platillo
• Patinador
• Adaptador 45 rpm
• Contrapeso
• Porta capsula
• Instrucciones de funcionamiento
• Capsula
• Cables de conexión cinch/cinch
Page 14

25/29
26/29
INSTRUCCIONES DE SEGURIDAD:
ATENCIÓN: Para evitar todo riesgo de
electrocución, no abrir el tape. En caso de
problema, pongase en contacto con su
vendedor.
Esta flecha en un triangulo suele avisar de la presencia en el tape de "voltaje
peligroso" sin isolación que puede ser sufciente para causar un riesgo de
electrocución.
El punto de exclamación en un triangulo suele avisar al usuario de la
presencia de instrucciones de funcionamiento y de mantenimiento
importantes en el manual que acompaña este producto.
Para evitar riesgos de electrocución o incendio, evitar la exposición a la lluvia o
humedad.
No introducir objetos metalicos ni derramar liquido en la platina. Esto puede producir
disfuncionamientos.
INSTALACION:
• Instalar la platina en un sitio con buena ventilación para no exponerla a altas
temperaturas o humedad.
• Colocar y utilizar la platina mucho tiempo en sitios calientes (al lado de
amplificadores, focos,…) puede afectar sus prestaciones.
• Evitar las vibraciones sonoras, por ejemplo de altavoces, porque puede producirse
zumbido.
• Colocar la platina de manera estable y horizontal. Colocar de preferencia sobre un
zócalo de hormigón o de marbol y evitar la madera que amplificará las vibraciones.
• Asegurese que ni la platina ni sus cables estén en contacto directo con una fuente de
vibraciones. Tener cuidado al usar la platina con un flying case.
• Gracias a sus 2 botones de arranque 'start/stop', la platina X-TRM1 puede ser
utilizada de manera tradicional o para concursos:
Uso tradicional:
Uso en competición:
Habitualmente en discotecas . Facilíta el 'scratching' y las técnicas
Conviene para mezclas pasivas. de mezclas más agresivas
LIMPIEZA DE LA PLATINA:
Límpiar con un trapo lijeramente humedo. No derramar agua en el interior de la unidad.
No utilizar productos abrasivos (alcohol,…) que puedan dañar la platina.
CAUTION
Page 15

27/29
1. Botón START / STOP: Pulsar para arrancar o parar el platillo.
2. Puntos estroboscópicos: La luz situada en el interruptor de encendido ilumina
esta linea de puntos. Mientras el platillo está girando, los puntos indican la
velocidad. Los puntos se dirigen hacia la derecha si la velocidad actual es inferior
a la velocidad seleccionada (33, 45, 78). Los puntos se dirigen hacia la izquierda si
la velocidad actual es superior. Los puntos parecen inmoviles si la velocidad es
exacta. Utilizar el deslizande Pitch (12) para ajustar la velocidad.
3. Interruptor de encendido ON/OFF: Encender / apagar la platina.
4. Botones de selección de velocidad: Selección de le velocidad deseada.
• Pulsar el botón “33” para seleccionár la velocidad 33rpm.
• Pulsar el botón “45” para seleccionár la velocidad 45rpm.
• Pulsár los botones “33” y “45” al miso tiempo para seleccionár la velocidad
78rpm.
5. Iluminación de la capsula: Luz blanca muy util para utilización de la platina en
sitios oscuros.
6. Arranque: Ajuste del tiempo que necesita el platillo para alcanzár su velocidad
normal. Con el potenciometro hacia la izquierda, el tiempo de arranque es mínimo
(velocidad normal alcanzada en 0.2seg.). Con el potenciometro hacia la derecha,
el tiempo de arranque es máximo. (velocidad normal a los 6 sec)
7. Frenado: Ajuste del tiempo que necesita el platillo para pararse completamente.
Con el potenciometro hacia la izquierda, el tiempo es mínimo (velocidad normal
alcanzada a los 0.2seg.). Con el potenciometro hacia la derecha, el tiempo es
máximo.
28/29
8. Botón de inversión: Pulsar para poner el platillo en modo inversado. Pulsar de
nuevo para volver al modo de lectura normal.
9. Botón PITCH RANGE +/-10%: Pulsar para ajustar la gama de velocidad del
deslizante a +/-10%. Utilizar para mezcles precisas.
10. Botón PITCH RANGE +/-20%: Pulsar para ajustar la gama de velocidad del
deslizante a +/-20%. Pulsar al mismo tiempo los botones +/-10% y +/-20% para
ajustar la gama de velocidad del deslizante a +/-50%. Utilizar de manera a obtener
efectos especiales.
11. Deslizante PITCH & botón QUARTZ: El deslizante permite cambiar la velocidad
del platillo. La gama depende de los botones 9 y 10. Con el deslizante en su
posición media, un testigo se enciende para indicar que la velocidad está en
posición exacta. Pulsando el botón QUARTZ, la platina se pone en velocidad
exacta mismo si el deslizante no está centrado.
12. Salida PHONO/LINE: Segün la posición del
selector,pueden conectar el plato sobre una entrada
phono o line gracias al cable cinch/cinch incluido.
(Los cables "cinch" pueden ser denominados “RCA")
13. Cable de alimentación: conectar a una fuente
220V AC con el cable de alimentacíon.
14. Porta capsula: Referirse a las instrucciones del fabricante de la capsula. Dejar la
protección sobre la capsula durante la instalación para evitar daños.
Conectar los hilos de esta manera:
Blanco (L+) Canal izquierdo+
Azúl (L-) Canal izquierdoRojo (R+) Canal derecho+
Verde (R-) Canal derecho-
15. Cerrojo de porta capsula: Insertar el porta
capsula en el brazo y girar el cerrojo como
indicado en este dibujo.
16. Brazo: Brazo de forma 'S' totalmente
manual. Para empezar la lectura, colacar la
capsula sobre el disco usando el soporte del
porta capsula. Colocar la capsula
cuidadosamente de manera a no dañar el
diamante y el disco.
17. Elevación del brazo: Permite ajustar la
altura del brazo. Colocar la aguja sobre sobre
un disco. Desblocar el brazo girando de 90°
hacia la izquierda el botón situado al lado del
anti deslizante. Girar el anillo de base hacia
la derecha para elevar el brazo o hacia la
izquierda para bajarlo hasta su posición
horizontal. Bloquear el brazo girando el botón
de 90° hacia la derecha.
18. Base del brazo: La base del brazo incluye el
ajuste de altura.
19. Palanca de elevación del brazo: Permite subir y bajar el brazo.
Page 16

29/29
20. Botón anti deslizante: Durante la lectura de un disco, fuerzas centrífugas
empuján la aguja hacia el centro del disco. Este boton permite eliminar esas
fuerzas. Para lecturas simples, ajustar este control de equivalente valor a la
presión de la capsula (Pressión de capsula = 3gr. Æ anti deslizante = 3).
21. Contra peso: Permite ajustar la presión necesaria a la capsula. Para saber
exactamente la presión ideal, referirse a las instrucciones de su capsula.
Instalación de la capsula:
Asegurese que la capsula esté
bien colocada sobre el brazo.
Poner un disco y asegurarse quel
anti deslizante esté en cero. Poner
la palanca de elevación en posición
baja. Girar el contrapeso hasta
quel brazo esté perfectamente
equilibrado Æ el brazo flota como
en la posición “OK” del dibujo.
Poner la graduación del anillo de
presión sobre cero cuidando no
mover el contrapeso. Girar el contrapeso completo hasta que la graduación se
quedé sobre la presión deseada. Volver a poner el anti deslizante en la
posición corespondiente.
Motor: 16 pole, 3phase, brushless DC motor
Driving Method: Direct Drive
Starting Torque: Mas de 4.5kg / cm
Tiempo de arranque: 0,20 ~ 6,00 segundos (ajustable)
Tiempo de freno: 0,20 ~ 6,00 segundos (freno electronico ajustable)
Selección de velocidad: 33
1/3
~ 45 ~ 78 RPM
Ajuste de velocidad: +/-10% ~ +/-20% ~ +/-50%
Wow & Flutter: Menos de 0,1% WRMS (JIS WTD)
Tipo de brazo: Static balanced S-shaped tone arm.
Tracking Error angle: Menos de 3°
Peso de capsula: 13~18g.
Valor Anti deslizante: 0~3g.
Alimentación: 230V~ 50Hz.
Consumición: 13Watts
Dimensiones: 450 x 353 x 86mm (WxDxH)
Peso : 11kg.
 Loading...