

Page 1
Digital effects
AUDIO MIXERAUDIO MIXER
P 1 ... 12 English
P 13 ... 25 Français
P 26 ... 38 Nederlands
P 39 ... 51 Deutsch
P 52 ... 63 Espanol
V1.0
Page 2

USER MANUAL ENGLISH
SYNQ 1/63 SMX-1 DJ-MIxer
USER MANUAL
INTRODUCTION
Congratulations and thank you for buying this SYNQ product. Please read these
operating instructions carefully so you will know how to operate this product properly.
After you have finished reading the instructions, put them in a safe place for future
reference.
FEATURES
• 13inputs on 6 Channels (2mic + 4channels on fader)
• 2 Master outputs:
o Master with signal trimming (XLR, balanced)
o Zone output “master 2” (cinch, unbalanced)
• 3-band tone controls with kill function -30dB on all channels
• Special, user replaceable, high quality faders
• User replaceable VCA controlled cross fader
• Easy A/B channel selection for cross fader
• Cross fader start control for compatible CD-players
• 3 Beat synchronized Cross fader mixing effects
• Adjustable Cross fader curve (soft sharp cutoff)
• Full automatic beat counters
• 8 Beat synchronized digital effects:
o Echo
o Autopan
o Flanger
o Manual filter
o Auto filter
o Reverb
o Trans
o Pitch Shifter
• Preprogrammed effect presets
• LCD display with back-light for effects and beat counters
• Effect Cue function
• Coaxial digital out for recording
• Microphone talk-over function
• High power Phones output with “split cue” and “cue/pgm mixing” possibility
• Selectable (cue/pgm) LED VU-meter with peak memory.
• Very compact design.
Page 3
USER MANUAL ENGLISH
SYNQ 2/63 SMX-1 DJ-MIxer
BEFORE USE
Check that the following parts are included in the package with the main unit:
• SMX-1 mixer
• Mains cable
• Operating instructions
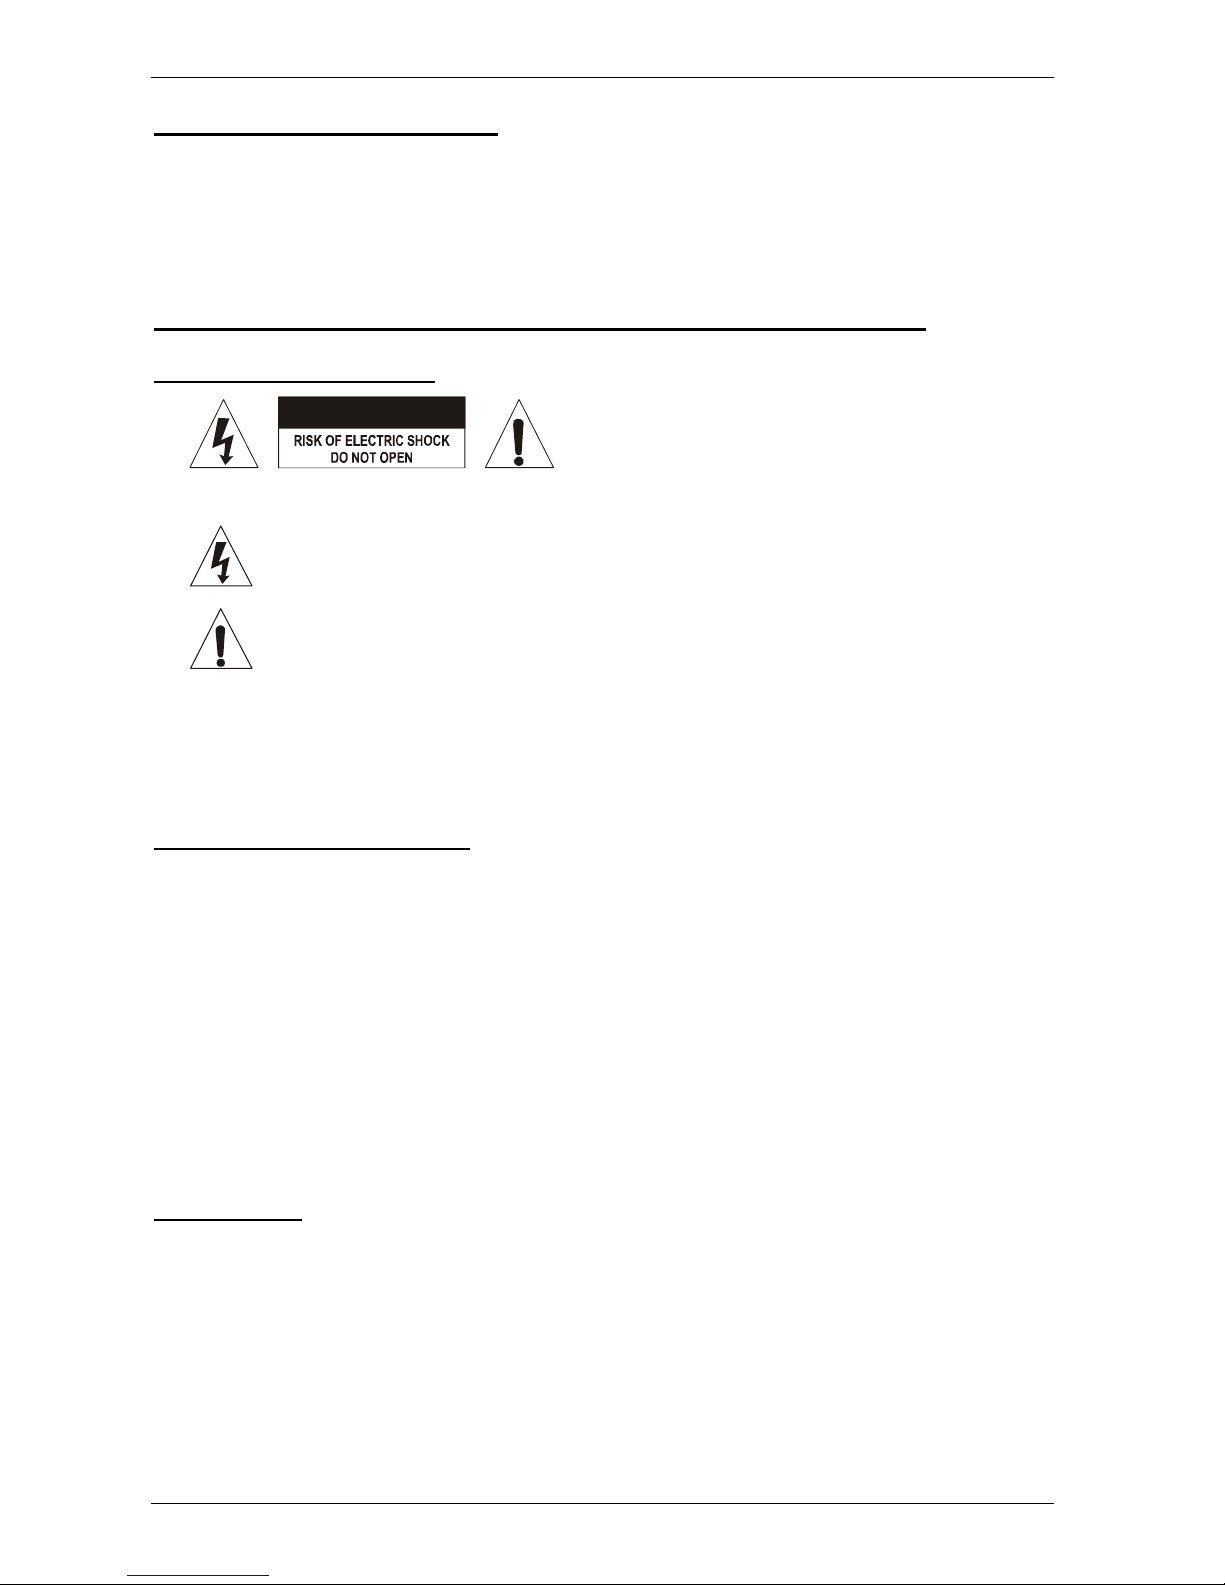
CAUTIONS REGARDING HANDLING
SAFETY INSTRUCTIONS:
CAUTION: To reduce the risk of electric shock,
do not remove any cover. No user-serviceable
parts inside. Refer servicing to qualified service
personnel only.
The lightning flash with arrowhead symbol within the equilateral triangle is
intended to alert the use or the presence of un-insulated “dangerous voltage”
within the product’s enclosure that may be of sufficient magnitude to
constitute a risk of electric shock.
The exclamation point within the equilateral triangle is intended to alert the
user to the presence of important operation and maintenance (servicing)
instructions in the literature accompanying this appliance.
To prevent fire or shock hazard, do not expose this appliance to rain or moisture.
Do not place metal objects or spill liquid inside the unit. Electric shock or malfunction may
result.
INSTALLATION GUIDELINES:
• Install the unit in a well-ventilated location where it will not be exposed to high
temperatures or humidity.
• Placing and using the unit for long periods near heat-generating sources such as
amplifiers, spotlights, etc. will affect its performance and may even damage the unit.
• The unit can be mounted in 19-inch racks. Attach the unit using the 4 screw holes on
the front panel. Be sure to use screws of the appropriate size. (screws not provided)
Take care to minimize shocks and vibrations during transport.
• When installed in a booth or flight case, please make sure to have good ventilation to
improve heat evacuation of the unit.
• To avoid condensation to be formed inside, allow the unit to adapt to the surrounding
temperatures when bringing it into a warm room after transport. Condense sometimes
prevents the unit from working at full performance.
CLEANING THE MIXER:
Clean by wiping with a polished cloth slightly dipped with water. Avoid getting water inside
the unit. Do not use volatile liquids such as benzene or thinner which will damage the unit.
CAUTION
Page 4
USER MANUAL ENGLISH
SYNQ 3/63 SMX-1 DJ-MIxer
CONTROLS AND FUNCTIONS
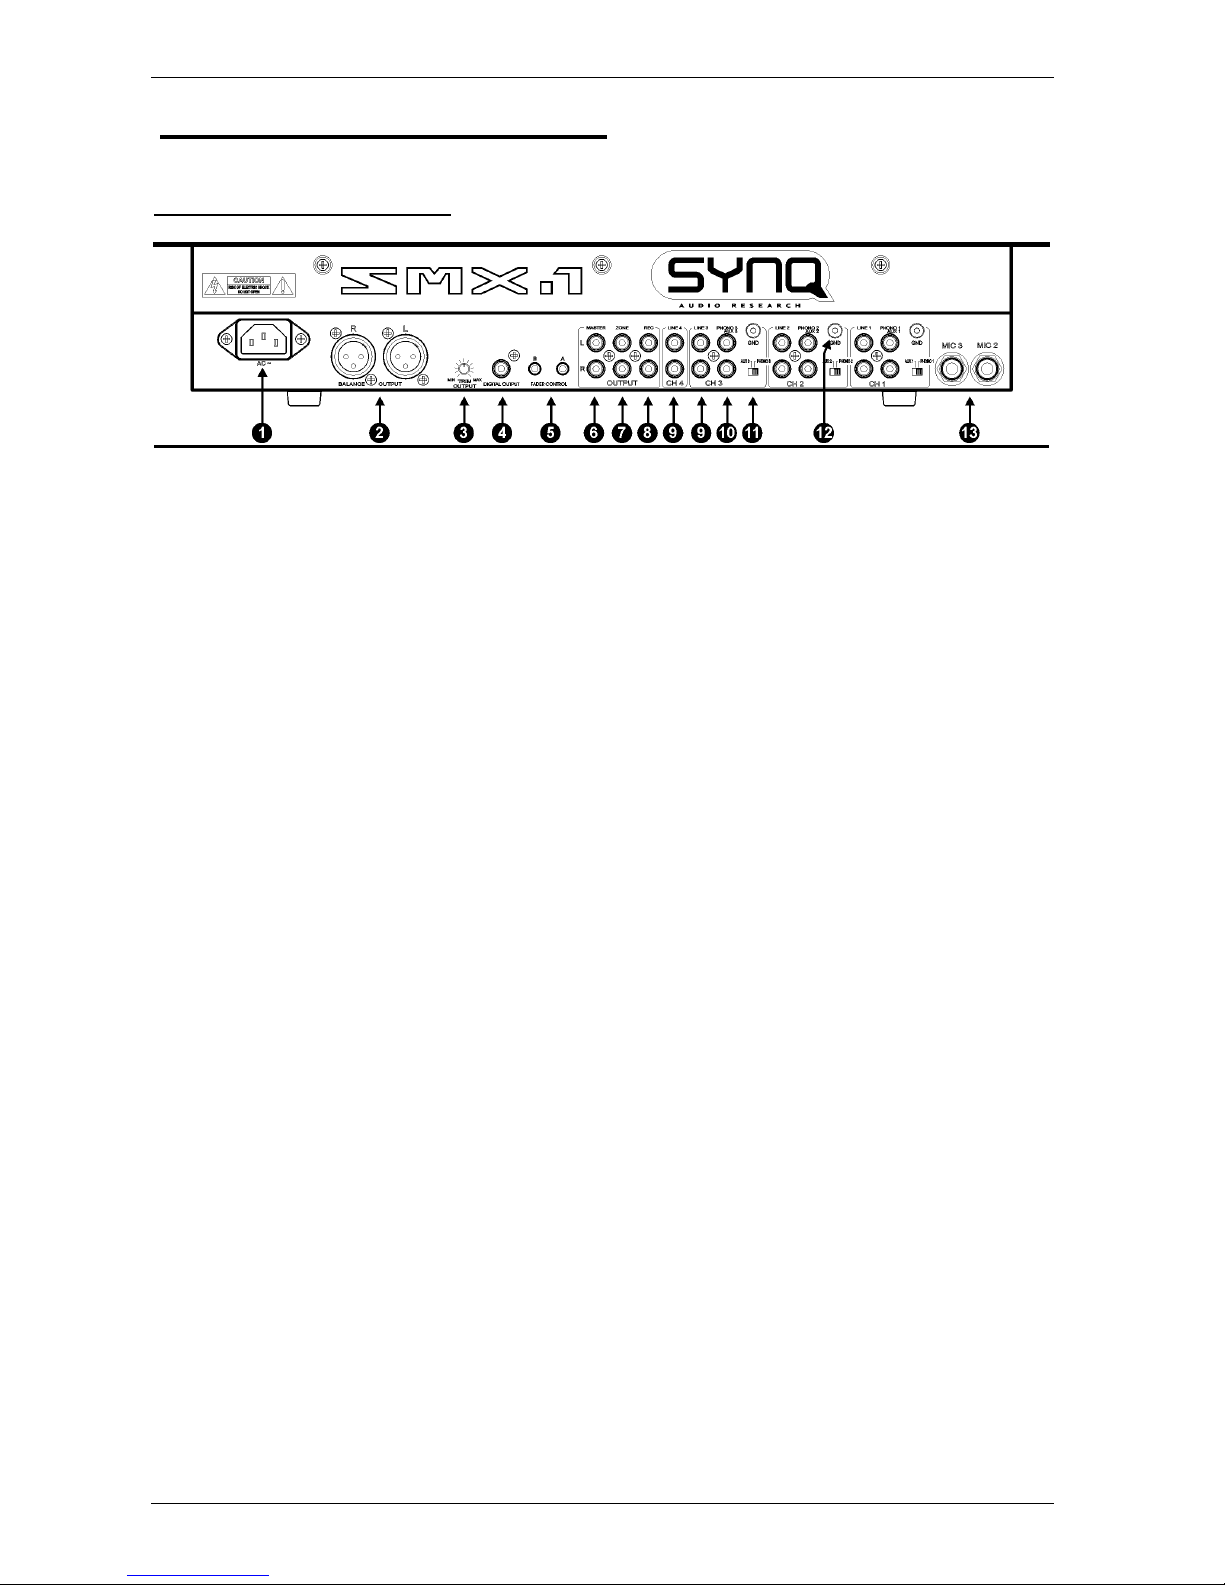
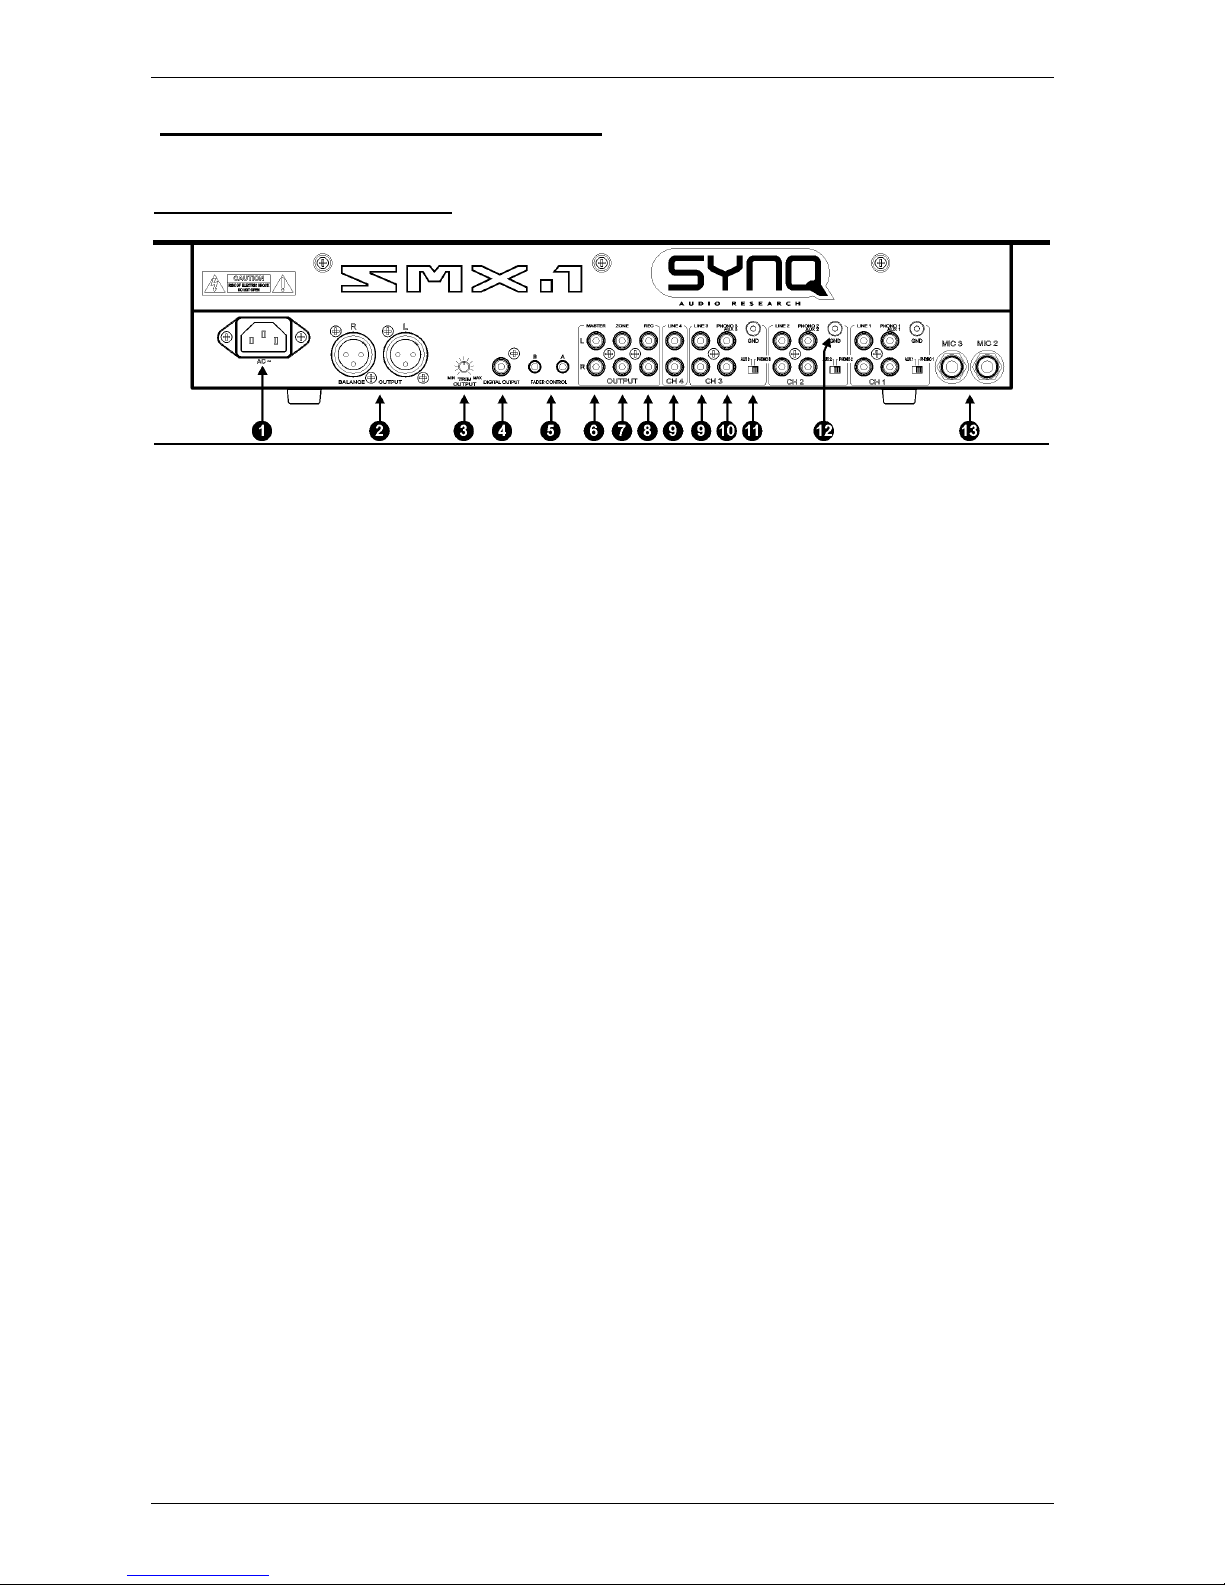
CONTROLS ON THE BACK:
1. MAINS INPUT: Use the supplied mains cable to connect this input to the mains.
2. MASTER1 BALANCED OUTPUT: The XLR-connectors can be used to connect
the SMX-1 to the PA, using special balanced signal cables.
3. TRIM OUTPUT: This potentiometer is used to reduce the output level of the mixer
to protect the connected amplifiers and speaker cabinets. (Attention: the output
level can be reduced to zero. If you don’t have any signal on the master output,
first check if this potentiometer is accidentally put to zero.)
4. DIGITAL OUTPUT: This digital output makes it possible to make digital recordings
on any connected digital recorder. The output is not affected by the master fader.
5. FADER CONTROL: When connected to these inputs, compatible CD-players can
be controlled by the fader starts and cross fader effects of the SMX-1.
6. MASTER1 UNBALANCED OUTPUT: The same output signal as on the balanced
master output(2) but unbalanced. Can be used to connect unbalanced amplifiers.
7. ZONE OUTPUT: Also called master2 with separate level control, used to connect
extra amplifiers.
8. RECORD OUTPUT: Carries the same signal as the master outputs but is not
influenced by the master level, balance and mono/stereo controls. Used to connect
analog recording equipment.
9. LINE INPUT: Used to connect any line level unit you have (CD, tuner, MD, …)
10. PHONO/AUX INPUT: Normally used to connect a turntable but, when you put the
“phono/aux” switch(11) in the right position, you can also connect any line level
unit.
11. PHONE/AUX SWITCH: Used to choose the input level of the “phono/aux
input”(10).
12. GROUND (GND) CONNECTION: Many Turntables have a GND-connection. It is
preferable to connect this signal ground to the GND-connector.
13. MIC 2&3 INPUTS: Used to connect 2 extra unbalanced microphones.
Page 5
USER MANUAL ENGLISH
SYNQ 4/63 SMX-1 DJ-MIxer
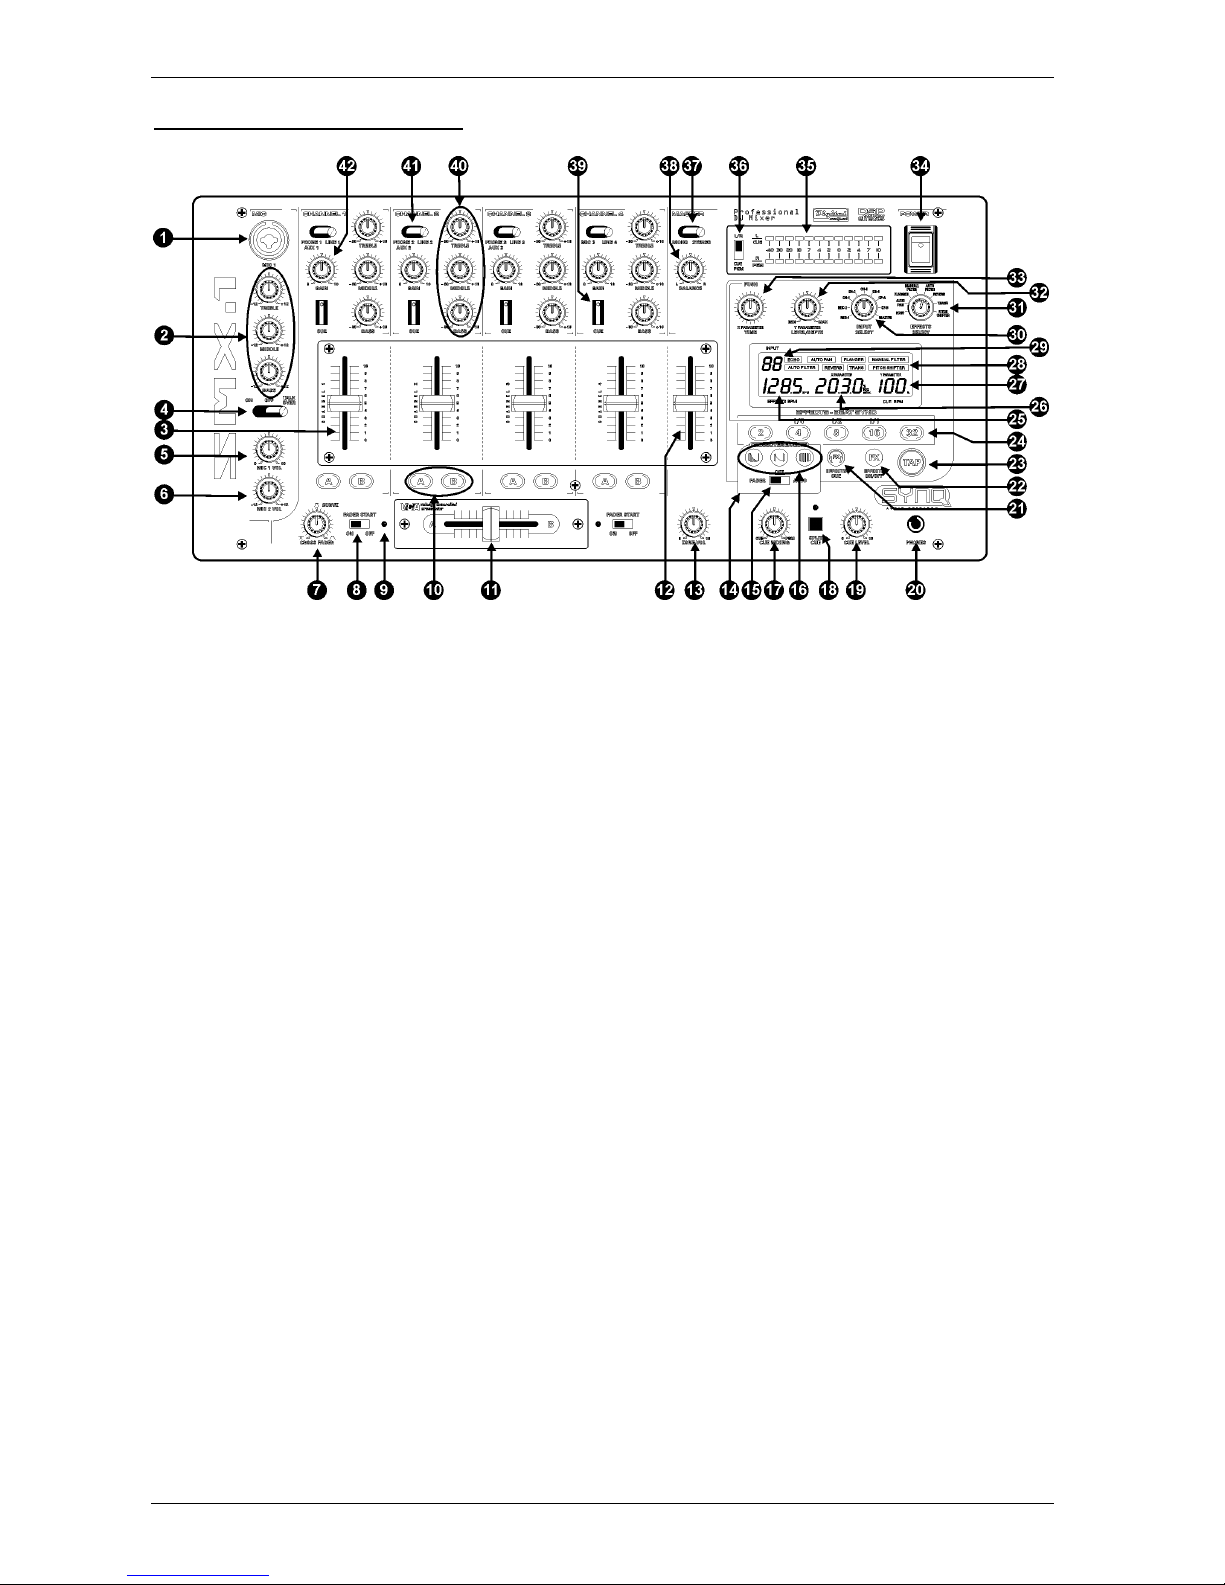
CONTROLS ON THE FRONT:
1. MIC INPUT JACK: Combo jack. Accepts either a balanced microphone with an
XLR connector or an unbalanced microphone with 1/4” mono jack. This input is
mainly used as DJ-microphone. The talk over does not affect the signal level of this
input.
2. 3-BAND TONE CONTROL: The frequency of both Mic1 & Mic2 can be controlled
over a +/-12dB range: Treble@13kHz ~ Middle@1kHz ~ Bass@70Hz.
3. CHANNEL FADERS: Used to control the level of each channel. These high quality
faders can be changed by the user, even when the mixer is working! (on another
channel of course ☺) For instructions, please read the “Changing the faders”
section.
4. MIC ON/OFF/TALK OVER SWITCH: Used to switch the microphones:
• OFF: Both mic1 & mic2 are switched off.
• ON: Both mic1 & mic2 are switched on.
• TALK OVER: mic1 & 2 are switched on; the sound level of all the other
channels will decrease to around -14dB.
5. MIC1 VOL: Used to adjust the input level of micro 1.
6. MIC2 VOL: Used to adjust the input level of micro 2.
7. CROSS FADER: Adjusts the curve of the cross fader:
• LEFT POSITION: you can make a nice, smooth cross fade between 2
channels. Excellent for beat mixing.
• RIGHT POSITION: you can make very sharp “switch like” cuts. Excellent for
scratching and other aggressive mixing techniques.
• POSITIONS INBETWEEN: you can adjust the cross fader curve to your
taste. Any curve between the 2 extremities can be selected.
8. FADER START ON/OFF SWITCH: When you have a compatible CD-player
connected to the fader control connectors, you can control its start/stop (re-cue)
functions with the cross fader of your SMX-1. With this switch you can turn the
fader start control on and off.
9. FADER START INDICATORS: During the Effect mix mode the indicators display
the output of sounds from the channels selected with the CROSS FADER ASSIGN
A OR B buttons.(10)
Page 6

USER MANUAL ENGLISH
SYNQ 5/63 SMX-1 DJ-MIxer
10. CROSS FADER ASSIGN BUTTONS: The left side of the cross fader is named
“A”, the right side is named “B”. Every input channel has 2 assign buttons, also
named “A” and “B”. You can easily determine if the signal of a certain channel will
be routed to the left or right side of the cross fader, just by pushing the assign
button with the corresponding name: “A” or “B”. The selected button will be lit.
11. CROSS FADER: Used to mix the signals from the 2 channels assigned to A and B
by the cross fader assign buttons.(10)
12. MASTER OUTPUT FADER: Adjusts the output level of the master output.
(Attention: the “trim output” on the back of the mixer can reduce the maximum
output level of the master output fader. Check this trimmer if the maximum output
level is below normal. In this case please also check if the talk over is switched off)
13. ZONE LEVEL: Used to adjust the level of the ZONE output on the rear panel. Its
level is not affected by the master volume (12) and master balance (37). This
output can be used as a second master.
14. CROSSOVER EFFECTS UNIT: To take full advantage of the crossover effects it is
absolutely necessary to connect a compatible CD-player to the fader output
connectors (see previous chapter n°5). The 3 effects give you additional
possibilities for perfect, beat synchronized mixing! Please read the text below to be
sure you fully understand how it works!
IMPORTANT:
• You must put the “fader start on/off switches” (8) in ON-position.
• You must assign two channels to A and B with the assign buttons (10)
15. CROSSOVER EFFECT MODE SWITCH: Used to select the desired crossover
effect mode:
• FADER: In this mode you can use the cross fader to control the crossover
effects and perform start/stop (recue) functions.
• OFF: Crossover effects are disabled.
• AUTO: In this mode you don’t have to use the cross fader: simply push one
of the buttons and the mix will be done automatically in full beat sync!
16. CROSSOVER EFFECT SELECT/START BUTTONS: Used to select the type of
Effect Mix desired, 3 functions (Echo, Zip and Roll) are available:
• ECHO EFFECT: This effect can be used in FADER and AUTO mode:
• FADER MODE: Press the echo effect button and move the cross fader
from one end to the other. A part of the music is sampled and
constantly looped while the volume decreases until the other player
starts automatically. The echo effect is fully beat synchronized. The
length of the loop can be adapted with the “Preset” buttons (24). You
can use the following presets: ¼ ~ ½ ~ 1/1 ~ 2 ~ 4 ~ 8 beats. The
effects display shows the length of the sampled loop.
Hint: If you just move the cross fader a little from the end position, you can repeat a
small portion of the music to the rhythm of the beat. (Depending on the preset you
choose) You can move the cross fader back to the same end position to stop the
repeated sounds without actually mixing two channels.
• AUTO MODE: While the music is playing, press the “echo effect”
button. The music starts playing in a loop while the volume decreases
automatically until the other player starts. The length of the complete
fade over is shown on the effects display. It can be adapted with the
“preset” buttons (24) and/or the “time parameter knob” (33).
Page 7

USER MANUAL ENGLISH
SYNQ 6/63 SMX-1 DJ-MIxer
• ZIP EFFECT: This effect can be used in FADER and AUTO mode:
• FADER MODE: Press the Zip effect button and move the cross fader
from one end to the other. The pitch of the music will lower until it
becomes distorted. When the cross fader lever reaches the other side,
the other player starts automatically. Depending on the position of the
cross fader lever, the effects display shows a number from 0 to 99.
• AUTO MODE: While the music is playing, press the “Zip effect” button.
The pitch of the music lowers automatically to zero until the other
player starts. The length of the complete fade over is shown on the
effects display. It can be adapted with the “preset” buttons (24) and/or
the “time parameter knob”(33).
• ROLL EFFECT: This effect can be used in FADER and AUTO mode:
• FADER MODE: Press the Roll effect button and move the cross fader
from one end to the other. First the music will be looped in 1/1beats
(effects display shows “1”) after this the loop is reduced to ½beats
(display shows “2”) until it finally becomes a loop with a length of
1/8beats (display shows “4”). When the cross fader lever reaches the
other side, the volume decreases and the other player starts playing.
Note that the “presets” and “time parameter knob” are not accessible!
• AUTO MODE: While the music is playing, press the “Roll effect”
button. The music starts playing in a beat synchronized loop until the
other player starts. The length of the complete fade over is shown on
the effects display. It can be adapted with the “preset” buttons (24)
and/or the “time parameter knob” (33). Depending on the length of the
fade over you selected, the roll pattern will be adapted and divided in
1/1, ½, ¼ and 1/8 beat loops.
17. CUE MIXING KNOB: With this control you can mix the master output with the cue
signals from the different channels and the effect unit. Turn this control complete
to the right if only want to hear the master output. Turn it completely to the left and
you will only hear the cue signals that are selected with the cue buttons (21, 39). At
any position in between you will hear a mix of both signals.
18. SPLIT CUE BUTTON: Normally you hear a stereo signal in your headphones.
When you press this button, you will hear 2 different mono signals:
• LEFT: Cue signals, selected with the cue buttons (21, 39).
• RIGHT: Signal on the master output.
Note that the Cue mixing knob must be in the center position!
19. CUE LEVEL: Used to adjust the output level of the Headphones. Note that, due to
the high output power, you can permanently damage your ears! Do not play at high
volume!
20. HEADPHONES OUTPUT: Used to connect any headphones with ¼” jack plug.
21. EFFECTS CUE: This is the cue button for the effects unit. When switched on you
can check the effect before it is mixed in your master mix.
22. EFFECTS ON/OFF BUTTON: This button switches the output of the effects unit on
and off.
23. TAP BUTTON: Almost all effects are beat synchronized. Therefore the SMX-1 has
a full automatic built-in beat counter. In some rare cases the automatic beat
counter doesn’t count as it should do (beats are out of the normal range or there’s
simply no beat to detect). In these cases you can help the beat counter by
manually tapping this button to the rhythm of the beat. When you use this button it
starts flashing to indicate that the automatic beat counter is shut off. If you want the
automatic beat counter to take over again, simply push for some seconds on the
TAP button until it stops flashing.
Page 8

USER MANUAL ENGLISH
SYNQ 7/63 SMX-1 DJ-MIxer
24. PRESET BUTTONS: These buttons are used as presets for the different effects.
Depending on the selected effect, these presets can be settings related to the
beat, filter frequencies, percentage of pitch change, etc… Each button has one of
the following inscriptions: 2 – 4 – 8 – 16 – 32. These digits are related to the
measured beat. Once the preset is selected, it lights up. You can also select the
additional presets by pushing the “time parameter knob” (33) while you select the
presets 4 – 8 or 16. In that case the preset button starts flashing to indicate that the
indication above the button (1/4 – ½ or 1/1) is selected. It’s good to know that the
presets are preserved when you change to another effect.
Example: if the “echo” effect is selected and you choose for preset “2”, you will
notice that the sound is repeated every 2 beats. If you choose “4”, the sound
repeats every 4 beats. Select the ½-preset if you want the music to be repeated
every half beat.
25. EFFECTS BPM DISPLAY: Indicates the BPM (Beats Per Minute) of the effects
unit. When the beat counter is unable to count the beats, the BPM display starts
flashing until the BPM counter is able to continue.
26. TIME (X) PARAMETER: for certain effects the display shows time information
(mSec) for other effects the display shows percents (%) or cutoff frequencies
(kHz). You can change these parameters with the preset buttons (24) and with the
“time parameter knob”(33) if you need fine tuning.
27. CUE BPM / DEPTH (Y) PARAMETER DISPLAY: Displays the BPM value for the
cue signals coming from one of the 4 input channels, (CH-1 to CH-4) selected
using one of the CUE-buttons (39). When you adjust the depth (Y) parameter
knob(32), the new value will be displayed (%).
28. EFFECTS DISPLAY: Shows which effect you selected.
29. EFFECTS INPUT DISPLAY: Shows which signal you selected using the “input
select knob”(30).
30. INPUT SELECT KNOB: Used to select which signal goes to the input of the
effects unit. This can be one of the following:
• One of the input channels.
• One of the channels you selected with the “cross fader assign
buttons”(10). This can be the left side “A” or the right side “B” of the cross
fader.
• If you select master, the effects will be used on the mixed master sound.
31. EFFECTS SELECTOR: Used to select the desired effect:
IMPORTANT!
The crossover effects and the multi-effects unit cannot be used together!
Before you can use the multi effects, you have to switch the crossover
effects off (see n°:15 for more information)
• ECHO: produces repeated sounds. You can easily mix beat synchronized
echos while selecting the desired “preset”(24). These presets can be
tuned with the “Time parameter knob”(33) in a range from 2mSec up to
2Sec. With the “Level parameter knob”(32) you can change the balance
between the original and the delayed sound.
• AUTO PAN: Sweeps the music from left to right and back to the rhythm of
the beat. With the “presets”(24) you can choose how fast the music
sweeps from one side to the other. (example: With preset “2” it will take
2beats to go from left to right and back) The presets can be tuned with the
“Time parameter knob”(33) in a range from 30mSec up to 16Sec. With the
“Level parameter knob”(32) you can adjust how quick the music will be
panned to the opposite side: you can choose for a gently pan or an
aggressive one.
Page 9

USER MANUAL ENGLISH
SYNQ 8/63 SMX-1 DJ-MIxer
• FLANGER: This effect is best described as “putting a jet engine in the
music”. It’s as if the music turns around due to phase shifting. You can
easily change the flanger time (cycle) with the “presets”(24). These
presets can be tuned with the “Time parameter knob”(33) in a range from
100mSec up to 16Sec. With the “Level parameter knob”(32) you can
change the flanger feedback level.
Hint: Every time you push the same preset button(24) you will restart the flanger cycle.
This gives a nice “extra touch” to the effect.
• MANUAL FILTER: This is a very effective digital frequency cutter. You
can easily change the cutoff frequency of the filter with the “presets”(24):
o Preset “2” (LPF @ 50Hz) All frequencies above 50Hz are
filtered. You will only hear the very deep sub bass.
o Preset “4” (LPF @ 2030Hz) All frequencies above 2030Hz
are filtered. Sounds like an old AM radio.
o Preset “8” (LPF @ 20000Hz) All frequencies above 20kHz
are filtered. Music sounds normal.
o Preset “16” (HPF @ 210Hz) All frequencies below 210Hz
are filtered. All the deep bass sounds are filtered, sounds like a
small FM transistor radio.
o Preset “32” (HPF @ 510Hz) All frequencies below 510Hz
are filtered. The same as preset “16” but the FM transistor
radio seems to be a lot smaller.
The presets(24) can be tuned with the “Time parameter knob”(33) in a
range from low pass filter (LPF) @ 50Hz (display shows: L 0.05kHz) up to
high pass filter (HPF) @ 21.1kHz (display shows: H 21.1kHz). With the
“Level parameter knob”(32) you can change the filter resonance level.
(This is the Q-factor of the filter, it changes the impact of the filter on a
selected frequency)
• AUTO FILTER: This is an automatic low pass filter (LPF). The cutoff
frequency varies in cycles from 20kHz down to 50Hz. With the preset
buttons(24) you can select filter cycles that are beat synchronized.
(example: press the preset called “8” it will take 8beats for the filter to
change its cutoff frequency from 20kHz to 50Hz and back) The presets
can be tuned with the “Time parameter knob”(33) in a range from
100mSec up to 16Sec. With the “Level parameter knob”(32) you can
change the filter resonance level. (This is the Q-factor of the filter, it
changes the impact of the filter on a selected frequency)
• REVERB: This effect is best described as the “church effect”. Imagine you
play music in a church or in a very big, empty hall: the reverb you get from
all kinds of reflections against the walls is digitally simulated with this
effect. With the preset buttons(24) you can select 5 predefined reverb
times. These reverb times can be tuned with the “Time parameter
knob”(33) in a range from 0% to 100% in steps of 1%. With the “Level
parameter knob”(32) you can change the balance between the original
and the reverb sound.
• TRANS: Automatically cuts the sound to the rhythm of the beat. With the
“presets”(24) you can choose the length of the cutting cycles. (example:
With preset “1/4” (remember to push the “time parameter knob”(33) while
you select the preset button called “4”) the music will be cut in ¼beat
slices) The presets can be tuned with the “Time parameter knob”(33) in a
range from 25mSec up to 16Sec. With the “Level parameter knob”(32) you
can adjust the “cutting time”. When completely turned to the left (display
Page 10

USER MANUAL ENGLISH
SYNQ 9/63 SMX-1 DJ-MIxer
reads “0%) cutting time is zero so no cutting effect will be heard. Turn the
“level parameter knob to the right, the cutting time becomes bigger until
you only hear very small slices of the original sound.
Hint: this effect needs some practice! You obtain the best results with constant beats,
very small cutting cycles (1/4 and 1/2beats) and larger cutting times of 50% and more.
• PITCH SHIFTER: Shifts the pitch of the sound up or down while the beat
stays unchanged. (in fact this is the opposite of what the “master tempo”
on certain CD-players tries to obtain: same pitch with changing
speed/beat) With the preset buttons(24) you can select 5 predefined pitch
shifts. (preset “8” is 0%, the music stays unchanged) With the “Time
parameter knob”(33) you can change the pitch in a range from -100% to
+100% in steps of 1%. With the “Level parameter knob”(32) you can
change the balance between the original and the shifted sound.
Hint: use the pitch shifter on a micro and you have a voice changer. (with pitch at -100%
you obtain voices from the “dark side of this world”
☺
)
32. LEVEL (Y) PARAMETER KNOB: Used to adjust the “Y” parameter of the effects.
Please read section 31 while its function is different for each effect.
33. TIME (X) PARAMETER KNOB: Used to adjust the “X” parameter of the effects.
Mostly this is the time parameter but please read section 31 for more information.
This knob has an integrated push button that can be used in two ways:
• Push the knob while you select one of the “presets”(24) to obtain extra
presets: 1/4beat – 1/2beat – 1/1beat.
• Push the knob while turning it: in most cases you will be able to change
the time parameter of the effects more rapidly.
34. POWER SWITCH: Used to switch the mixer on and off.
35. LED VU METER: Accurate level meter with peak level memory: peak levels stay
on the display for a short time. Very important: If you want a nice and clean
sound, please pay attention the VU-meter. Most DJs use this important instrument
as a “flashy light effect”. They try to push the meter constantly to its maximum.
Let’s be clear: a good DJ wants a clean, undistorted sound. Levels over 0dB mean
“distortion” so please keep an eye on the meter! ☺
36. VU METER SELECTOR SWITCH: Used to select the working mode of the VUmeter(35).
• L/R-mode: the VU-meter shows the stereo master signal on both led bars.
• CUE/PGM-mode: the VU-meter shows the master signal on one led bar
and a selected CUE-signal(39) on the other led bar. This makes it possible
to compare both signals.
37. MONO/STEREO SWITCH: Used to switch the master output in mono or stereo.
38. MASTER BALANCE: Adjusts the left-right balance of the master output.
39. CUE / BPM COUNTER SELECTOR: Used to select the source (CH-1 to CH-4) to
be monitored via the headphones output. Pressing multiple Cue-buttons makes it
possible to derive a mixed sound from the selected sources. The BPM of the
selected channel (CH-1 to CH-4) is displayed on the CUE BPM display (27).
Attention: the BPM will not be displayed correctly if 2 or more channels have been
selected!
40. 3-BAND TONE CONTROLS: The frequency of each channel can be controlled
separately over a range from -30dB to +10dB: Treble@13kHz ~ Middle@1kHz ~
Bass@70Hz. In the center position the tone control is flat. (switched off)
41. INPUT SOURCE SELECTOR: Used to select the correct input on each channel:
Phono, line, aux or mic. On some channels there are additional input selectors on
the back, near the input connectors!
Hint: Line, Aux, CD, Tuner, etc… are different names for inputs with almost the same signal levels.
Page 11
USER MANUAL ENGLISH
SYNQ 10/63 SMX-1 DJ-MIxer
42. GAIN LEVEL: Adjusts the input level on each channel, range goes from zero to
maximum. Use this control to adjust the level on the VU-meter at about 0dB.
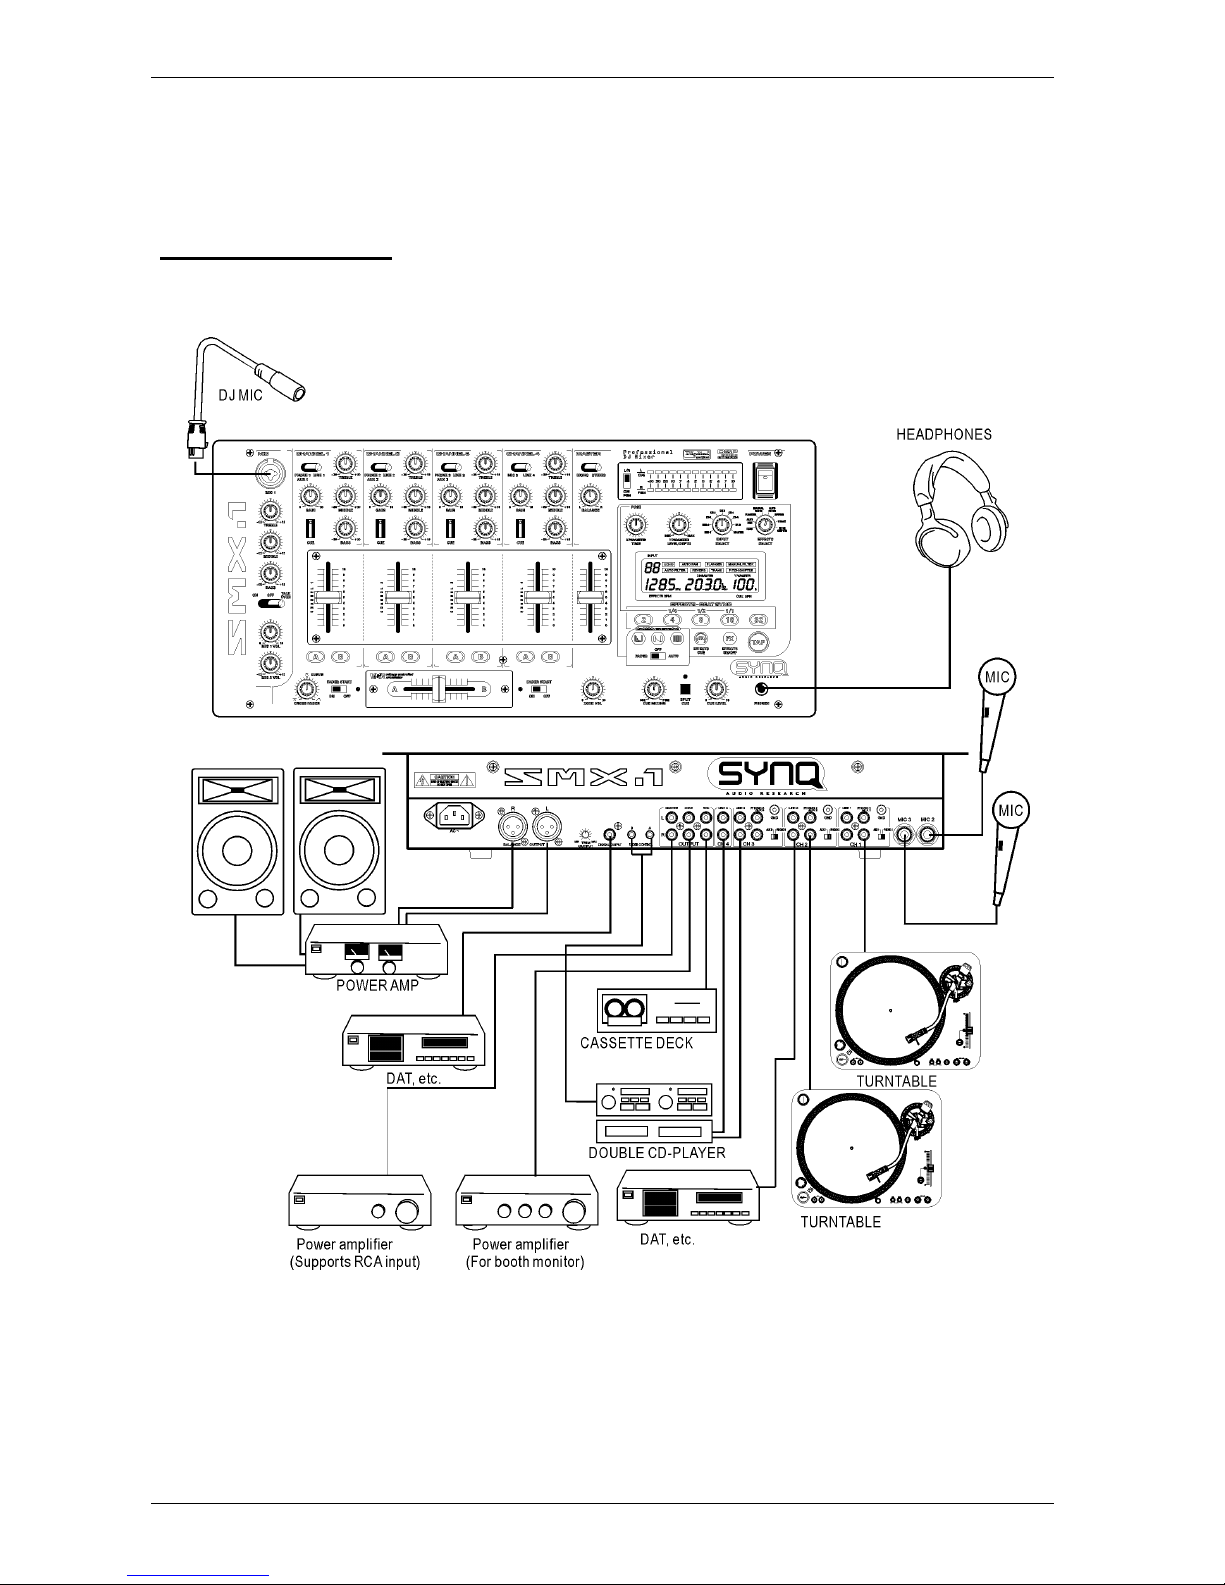
CONNECTIONS
When connecting or changing connections, always turn off the units before.
This connection diagram is just an example of what is possible. Many other connections
are possible. Just keep the following remarks in mind:
• Always connect cinch cables in the same way:
o white or black cinch connector left channel
o red cinch connector right channel
Page 12
USER MANUAL ENGLISH
SYNQ 11/63 SMX-1 DJ-MIxer
• When you connect a CD-player, Cassette deck, MD-player, tuner, video recorder etc.
to one of the inputs, don’t forget to put the source selector of that channel to “LINE” or
“AUX”.
• When connecting a microphone to channel 4, switch the source selector to “MIC”.
• When you connect a turntable to one of the inputs, don’t forget to put the source
selector of that channel to “PHONO”. (attention: newer turntables may have a line
output, read the user manual of your turntable to be sure)
• Many Turntables have a GND-connection. It is preferable to connect this signal ground
to the SMX-1. Use the GND-connections, close to the signal input connectors.
• The Record input of an analog recording device can be connected to the record output
of the SMX-1 to make analog recordings.
• If you have a digital recorder, connect it to the coaxial digital output of the mixer. You
can obtain outstanding digital recordings.
• To ensure the best possible sound quality, short-circuit pins are installed on all unused
phono inputs. When connecting a turntable to the SMX-1, first remove the short-circuit
pins of the input you want to use. Keep these short-circuit pins in a safe place for
eventual later use.
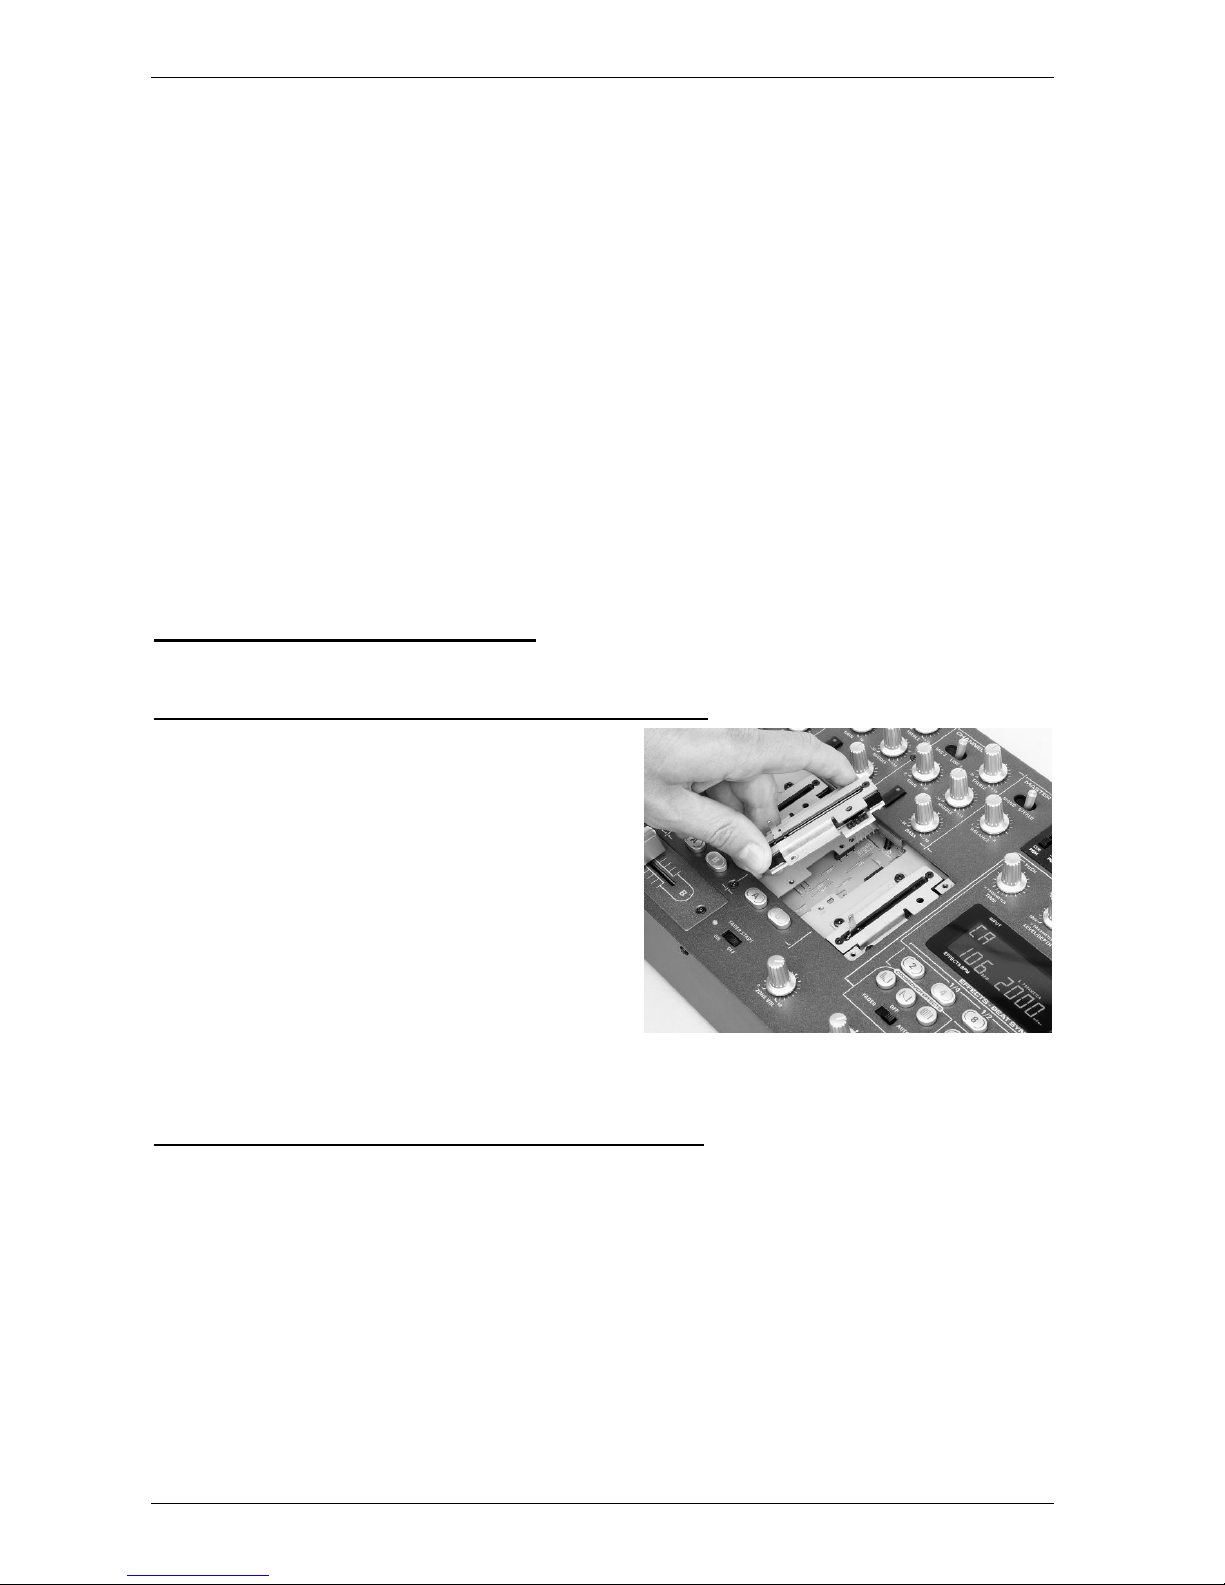
CHANGING THE FADERS
One of the big advantages of this mixer is the possibility to change the channel faders,
even while the mixer is in use.
This is what you must do to change a channel fader:
• Remove the fader knobs from the faders.
• Remove the 4 screws that hold the small
front panel around the faders.
• Remove the 3 screws of the fader you want
to change.
• Gently remove the fader from its position.
• Put the new fader gently in place. Be sure
to fit the contacts into the connector on the
mixer PCB-board.
• Put the 3 screws from the fader back in
place
• Put the small front plate back in place with
the 4 screws.
Done!
This is what you must do to change the cross fader:
• Remove the fader knob from the cross fader.
• Remove the 2 screws that keep the cross fader in place.
• Gently remove the fader and the cover plate from their position.
• Unplug the cross fader from the cable (unplug the cable by pulling the connector,
NOT the cable!)
• Press the new cross fader on the cable.
• Put the cross fader back in place with the small cover plate and the 2 screws.
Done!
Page 13

USER MANUAL ENGLISH
SYNQ 12/63 SMX-1 DJ-MIxer
SPECIFICATIONS
Input/output impedance & sensitivity (EQ flat, max. gain, level meter = 0dB)
Line input: 340mV @ 20kΩ (max = +4dBV)
Aux input: 340mV @ 47kΩ (max = +4dBV)
Phono input: 3,4mV @ 47kΩ (max = -40dBV)
Mic inputs: 1,7mV @ 2,2kΩ (max = -42dBV)
Record output: 775mV @ 1kΩ
Master unbalanced: 1,55V @ 100Ω
Master balanced: 3,00V @ 200Ω
Zone output: 1,55V @ 100Ω
Headphones: 3,00V @ 33Ω
Digital output 1,00V @ 75Ω
Maximum output (EQ flat, max. gain, FX off, THD=1%, load is 100kΩ )
Master: More than +18dBV (8,0V)
Zone: More than +18dBV (8,0V)
Phones: More than + 9,5dBV (3V) @ 32Ω
Frequency response (EQ flat, max. gain, level meter = 0dB, load is 100kΩ )
Line + aux: 25 – 20.000Hz +/-1dB
Phono: 25 – 20.000Hz +/-1dB (RIAA)
Mic : 25 - 20.000Hz +/-1dB
THD + Noise (EQ flat, max. gain, level meter = 0dB, load is 100kΩ )
Line + aux: less than 0,015% (25 – 20.000Hz)
Channel Crosstalk (EQ flat, max. gain, Master = 0dBV)
More than 75dB @ 1kHz
Tone controls:
Mic: -12dB / +12dB @ 70Hz – 1kHz – 13kHz.
Input channels: -30dB / +10dB @ 70Hz – 1kHz – 13kHz.
General specs:
Power supply: 230V~ 50Hz.
Power consumption: 34Watts
Dimensions: 482 x 221 x 87.5mm (WxDxH)
Weight : 5.25kg.
Page 14

MODE D'EMPLOI FRANCAIS
SYNQ 13/63 SMX-1 DJ-MIxer
MODE D'EMPLOI
INTRODUCTION
Nous tenons à vous remercier et vous féliciter pour l'acquisition de ce produit SYNQ.
Veuillez lire ces instructions attentivement afin de maîtriser correctement l'utilisation de
cet appareil. Veuillez les garder pour pouvoir les consulter ultérieurement.
CARACTERISTIQUES
• 13 entrées sur 6 canaux (2mic + 4canaux sur curseurs)
• 2 sorties Master:
o Master avec délimitation (trim) de signal (XLR, balancé)
o Sortie Zone “master 2” (cinch, non balancé)
• Contrôle de tonalité 3-bandes avec fonction 'kill' -30dB sur tous les canaux
• Curseurs spéciaux de grande qualité, remplaçable par l'utilisateur
• Crossfader controlé par VCA, remplaçable par l'utilisateur
• Canal de sélection A/B pour crossfader
• 'Start control' sur crossfader pour démarrage des CD sur lecteurs compatibles
• 3 Effets de mixage 'Beats synchro' sur crossfader
• Courbe du crossfader ajustable (fondu doux vif)
• Compteurs de beats totalement automatique
• 8 Effets digital 'Beat synchro':
o Echo
o Autopan
o Flanger
o Filtre manuel
o Filtre automatique
o Reverbération
o Trans
o Variateur de ton (pitch)
• Sélection d'effets pré-programmés
• Ecran LCD rétro-éclairé pour les effets et le compteur de beats
• Fonction 'effet Cue'
• Sortie digitale Coaxiale pour l'enregistrement
• Fonction 'talk-over' pour micro
• Sortie puissante pour casques avec possibilité “split cue” et “cue/pgm mixing”
• Sélection cue/pgm pour le VU-meter (LED) avec mémorisation du niveau peak.
• Design très compact.
Page 15
MODE D'EMPLOI FRANCAIS
SYNQ 14/63 SMX-1 DJ-MIxer
AVANT L'UTILISATION
Vérifier que les parties suivantes se retrouvent dans la boîte:
• Table SMX-1
• Câble d'alimentation
• Mode d'emploi
INSTRUCTIONS CONCERNANT LA MANIPULATION
CONSEILS DE SECURITE:
ATTENTION: Afin d'éviter tout risque
d'électrocution, ne pas soulever le châssis de
l'appareil. L'intérieur ne contient aucune pièce
remplaçable par l'utilisateur. Confier l'appareil à
un service technique compétent..
Ce symbole attire l'attention de l'utilisateur sur la présence de 'voltage
dangereux' à l'intérieur du couvercle. Se voltage est suffisamment élevé pour
constituer un risque d'électrocution.
Ce symbole vous averti de la présence d'instructions importantes concernant
l'utilisation et l'entretient accompagnant cet appareil.
Afin de prévenir tout risque d'incendies et d'électrocutions, ne pas exposer ce appareil à
la pluie ou à l'humidité.
Ne pas insérer d'objets métalliques et ne pas verser de liquides dans l'appareil. Il pourrait
en résulter des électrocutions ou des dysfonctionnements.
CONSEILS D'INSTALLATION:
• Installer l'appareil dans un lieu bien aéré, à l'abri de l'humidité et des fortes
températures.
• Placer et utiliser l'appareil à proximité de sources de chaleur telles que spots,
amplis,… pourrait affecter ses performances et même endommager l'appareil.
• L'appareil peut s'installer sur un rack de 19''. Fixer l'appareil en utilisant les 4 trous
pour vis sur la face avant. Assurez-vous d'utiliser des vis de la bonne dimension (vis
non fournies). Essayez d'éviter les vibrations et les coups lors du transport.
• En cas d'installation dans un 'flight case', assurer une bonne ventilation afin d'évacuer
la chaleur produite par l'appareil.
• Pour éviter la condensation à l'intérieur, laisser l'appareil s'adapter à la nouvelle
température ambiante après le transport. La condensation peut altérer les
performances de l'appareil.
NETTOYAGE:
Nettoyer en frottant à l'aide d'un chiffon doux très légèrement humide. Eviter de verser de
l'eau dans l'appareil. Ne pas utiliser de liquides abrasifs qui pourraient endommager
l'appareil.
CAUTION
Page 16
MODE D'EMPLOI FRANCAIS
SYNQ 15/63 SMX-1 DJ-MIxer
CONTROLES ET FONCTIONS
CONTROLES A L'ARRIERE:
1. ALIMENTATION: Utiliser le câble d'alimentation fourni.
2. SORTIE MASTER1 BALANCEE: les connecteurs XLR peuvent être utilisés pour
connecter la SMX-1 à l'ampli en utilisant des câbles de signal balancé spéciaux.
3. SORTIE TRIM: Ce potentiomètre permet de délimiter et donc de réduire le niveau
de sortie de la table afin d'éviter d'endommager l'ampli ou les haut-parleurs.
(Attention: le niveau de sortie peut descendre jusqu'à zéro. S'il n'y a pas de signal
sur la sortie master, vérifier que ce potentiomètre n'ai pas été mis accidentellement
sur zéro.)
4. SORTIE DIGITALE: Permet l'enregistrement digital sur tout enregistreur digital
connecté. Le curseur Master n'affecte pas cette sortie.
5. CONTROLE FADER: En connectant des lecteurs CD compatibles à cette entrée,
le démarrage de ces derniers peut être contrôlé par le curseur et le crossfader de
la SMX-1.
6. SORTIE MASTER1 NON BALANCEE: Idem que la sortie MASTER1 balancée (2)
mais avec un signal non balancé. Peut être utilisé pour connecter des amplis non
balancés.
7. SORTIE ZONE: Egalement appelée master2 avec contrôle de niveau séparé.
Permet de connecté des amplis supplémentaires.
8. SORTIE RECORD: Véhicule le même signal que la sortie master mais sans être
influencée par le niveau du master, de balance et du contrôle mono/stéréo. Peut
être connecté à un enregistreur analogique.
9. ENTREE LINE: Permet de connecter tout type d'appareils avec niveau "ligne" (CD,
tuner, MD, …)
10. ENTREE PHONO/AUX: Utilisé en général pour connecter un tourne-disque, vous
pouvez toutefois connecter un appareil avec niveau "ligne" en mettant l'interrupteur
“phono/aux” (11) à droite.
11. INTERRUPTEUR PHONE/AUX: Permet de choisir le signal de l'entrée “phono/aux
”(10).
12. CONNEXION GROUND (GND): La plupart des tourne-disques ont une connexion
de masse (GND). Il est préférable de connecter ce signal de masse à ce
connecteur.
13. ENTREES MIC 2&3: Permet de connecter 2 micros non balancés
supplémentaires.
Page 17

MODE D'EMPLOI FRANCAIS
SYNQ 16/63 SMX-1 DJ-MIxer
CONTROLES A L'AVANT:
1. ENTREE JACK MICRO: Combo jack. Accepte aussi bien un micro balancé avec
XLR qu'un micro non balancé avec jack 1/4” mono. Cette entrée est
principalement utilisée pour les micros DJ. Le talk-over n'affecte pas le niveau du
signal de cette entrée.
2. CONTROLEUR DE TONALITE 3-BANDES: La fréquence des micros 1&2 peut
être contrôlée sur une gamme de +/-12dB: Hautes@13kHz ~ Moyennes@1kHz ~
Basses@70Hz.
3. CURSEURS DES CANAUX: Contrôle le niveau de chaque canal. Ces curseurs de
très grande qualité peuvent être changés par l'utilisateur, même lorsque l'appareil
est en fonctionnement! (sur un autre canal évidemment ☺) Pour plus
d'informations, voir la section “Changement des curseurs”.
4. INTERRUPTEUR MICRO ON/OFF/TALK OVER: Voici les 3 fonctions:
• OFF: les 2 micros mic1 & mic2 sont coupés.
• ON: les 2 micros mic1 & mic2 sont allumés.
• TALK OVER: mic1 & 2 sont allumés; le niveau de tous les autres canaux
diminue d'environ -14dB.
5. MIC1 VOL: Ajustement du niveau d'entré du micro1.
6. MIC2 VOL: Ajustement du niveau d'entré du micro2.
7. CROSS FADER: Ajustement de la courbe de fondu du crossfader:
• POSITION GAUCHE: pour réaliser un mixage en douceur entre les 2
canaux. Idéal pour mixer des beats.
• POSITION DROITE: permet de réaliser des 'cuts' plus vifs, plus brusques à
la manière d'un interrupteur. Idéal pour "scratch" et autres techniques de
mixage plus agressives.
• POSITIONS INTERMEDIAIRE: entre les 2 extrémités, vous pouvez
sélectionner une courbe à votre manière.
8. INTERRUPTEUR FADER START ON/OFF: Il est possible de connecter un lecteur
CD compatible au connecteur 'fader control'. Vous pouvez contrôler son
démarrage/arrêt (re-cue) à l'aide du crossfader de votre SMX-1.Grâce à cet
interrupteur, vous pouvez mettre en fonctionnement ou en arrêt la fonction "fader
start".
Page 18

MODE D'EMPLOI FRANCAIS
SYNQ 17/63 SMX-1 DJ-MIxer
9. INDICATEURS DE CURSEURS: Durant le mode "Effect mix", ceux-ci indiquent la
sortie sonore provenant des canaux sélectionnés avec l'assignation du crossfader
A ou B (10).
10. ASSIGNATION DU CROSSFADER: Le côté gauche du cross est nommé “A”, le
droit “B”. Chaque canal d'entrée possède 2 boutons d'assignation également
appelés “A” & “B”. Vous pouvez aisément affecter le signal d'un canal au côté
gauche ou droit du crossfader en pressant le bouton d'assignation avec le nom
correspondant: “A” ou “B”. Le bouton sélectionné s'allume.
11. CROSSFADER: Permet de mixer 2 sources provenant des canaux assignés à A &
B à l'aide des boutons d'assignation (10).
12. CURSEUR DE SORTIE MASTER: Ajustement du niveau de la sortie master.
(Attention: le délimiteur “trim" à l'arrière de la table peut réduire le niveau de sortie
maximal du curseur de sortie master. Vérifier ce délimiteur (trim) si le niveau de
sortie maximal est plus bas que la normale.
13. NIVEAU ZONE: Ajustement du niveau de la sortie ZONE à l'arrière de la table. Ce
niveau n'est pas influencé par le volume master (12) ni par la balance master (37).
Cette sortie peut être utilisée comme second master.
14. UNITE D'EFFETS CROSSOVER: Afin de bénéficier pleinement des avantages
des effets du crossover, il est absolument nécessaire de connecter un lecteur de
CD compatible aux connecteurs de sortie fader (voir chapitre précédent n°5). Les 3
effets vous offrent des possibilités supplémentaires pour synchroniser parfaitement
votre mixage sur le beat! Lisez le texte ci-dessous pour prendre connaissance de
son fonctionnement!
IMPORTANT:
• Mettre l'interrupteur “fader start on/off ” (8) sur ON.
• Affecter 2 canaux A & B avec les boutons d'assignation (10)
15. INTERRUPTEUR D'EFFET CROSSOVER: Permet de sélectionner le mode d'effet
crossover désiré:
• FADER: Ce mode permet d'utiliser le crossfader pour contrôler l'effet
crossover & la fonction démarrage/arrêt (re-cue).
• OFF: La table n'est pas en mode d'effet crossover.
• AUTO: Dans ce mode, vous ne devez même pas utiliser le crossfader.
Presser simplement un des boutons et le mixage se fera en parfaite synchro
sur le beat!
16. BOUTONS D'EFFE T CROSSOVER SELECT/START: Permet de sélectionner le
type d'effet souhaité, 3 fonctions (Echo, Zip et Roll) sont possibles:
• ECHO: Cet effet peut être utilisé en mode FADER et AUTO:
• MODE FADER: Pousser sur le bouton d'effet Echo et bouger le
crossfader d'une extrémité à l'autre. Une partie de la musique est
échantillonnée (samplée) et constamment répétée en loop pendant
que le volume diminue, jusqu'à ce que l'autre lecteur démarre
automatiquement. L'effet d'écho est parfaitement synchronisé sur le
beat. La longueur du loop peut être adaptée grâce aux boutons de
présélection “Beat sync” (23). Vous avez le choix entre ces différentes
présélections: ¼ ~ ½ ~ 1/1 ~ 2 ~ 4 ~ 8 beats. L'écran d'effets indique la
longueur de l'échantillon en loop.
Conseil: En bougeant le crossfader juste un peu, vous pouvez répéter une petite
partie de la musique en la calant sur le rythme. (En fonction de la présélection de
beat sync choisie) Il est possible de ramener le crossfader à sa position de départ
pour arrêter la répétition sans pour autant mixer les 2 canaux.
• MODE AUTO: Pendant que la musique joue, pousser sur le bouton
“Echo effect”. La musique se met à jouer en loop pendant que le
Page 19

MODE D'EMPLOI FRANCAIS
SYNQ 18/63 SMX-1 DJ-MIxer
volume diminue automatiquement, jusqu'à ce que l'autre lecteur
démarre. La durée totale du fondu (fade) est indiquée sur l'écran. Elle
peut être adaptée à l'aide des boutons de présélections “beat sync”
(24) et/ou le bouton “time parameter ” (33).
• EFFET ZIP: Cet effet peut être utilisé en mode FADER et AUTO:
• MODE FADER: Pousser sur le bouton d'effet Zip et bouger le
crossfader d'une extrémité à l'autre. Le ton (pitch) de la musique
diminue jusqu'à distorsion. Lorsque le crossfader atteint l'autre
extrémité, l'autre lecteur CD démarre automatiquement. Selon la
position du crossfader, l'écran d'effets indiquera un chiffre de 0 à 99.
• MODE AUTO: Pendant que la musique joue, pousser sur le bouton
“Zip effect". Le ton de la musique diminue automatiquement jusqu'à
atteindre zéro, ceci jusqu'à ce que l'autre lecteur démarre. La durée
totale du fondu (fade) est indiquée sur l'écran. Elle peut être adaptée à
l'aide des boutons de présélections “beat sync” (24) et/ou le bouton
“time parameter ” (33).
• EFFET ROLL: Cet effet peut être utilisé en mode FADER et AUTO de:
• MODE FADER: Pousser sur le bouton d'effet Roll et bouger le
crossfader d'une extrémité à l'autre. Premièrement, la musique est
bouclée (loop) à 1/1beat (l'écran d'effets indique “1”). Ensuite, le loop
est réduit à ½beats (l'écran indique “2”) jusqu'à ce que finalement le
loop atteigne une longueur de 1/8beats (l'écran indiquera alors “4”).
Quand le crossfader atteint l'autre extrémité, le volume diminue et
l'autre lecteur démarre. Il est important de noter que les présélections
“beat sync” et le bouton “time parameter ” ne sont pas accessibles!
• MODE AUTO: Pendant que la musique joue, pousser sur le bouton
“Roll effect". La musique se met à jouer en loop synchronisé sur le
beat jusqu'à ce que l'autre lecteur démarre. La durée totale du fondu
(fade) est indiquée sur l'écran. Elle peut être adaptée à l'aide des
boutons de présélections “beat sync” (24) et/ou le bouton “time
parameter ” (33). En fonction de la durée du fondu sélectionnée,
l'échantillon roll sera adapté et divisé en loops de 1/1,1/2, 1/4 et 1/8
beats.
17. BOUTON CUE MIXING: A l'aide de ce contrôle, vous pouvez mixer la sortie
master avec les signaux cue des différents canaux et de l'unité d'effets. Tourner
complètement ce bouton vers la droite pour entendre uniquement la sortie master.
Tournez-le complètement à gauche pour entendre uniquement les signaux cue
sélectionnés à l'aide des boutons cue (21, 39). Dans les positions intermédiaires,
vous entendrez un mixage des 2 signaux.
18. BOUTON SPLIT CUE: Normalement vous entendez un signal stéréo dans vos
casques. En poussant ce bouton, vous entendrez 2 signaux mono:
• GAUCHE: Signaux cue, sélectionnés avec les boutons cue (21, 39).
• DROITE: Signal de la sortie master.
A noter que le bouton Cue mixing doit être dans sa position centrale!
19. NIVEAU CUE: Ajustement du niveau de sortie des casques. Il est important de
noter qu'à cause de sa grande puissance de sortie, vous pouvez à tout moment
endommager vos oreilles! Ne mettez pas le volume au maximum!
20. SORTIE CASQUES: Connecter des casques avec jack ¼”.
21. CUE EFFECTS: Ceci est le bouton cue pour l'unité d'effets. Il vous permet
d'écouter l'effet avant qu'il soit mixé sur le master.
22. BOUTON EFFECTS ON/OFF: Allume et éteint la sortie de l'unité des effets.
Page 20

MODE D'EMPLOI FRANCAIS
SYNQ 19/63 SMX-1 DJ-MIxer
23. BOUTON TAP: Quasi tous les effets sont synchronisés sur le beat. Pour ce faire,
la SMX-1 est équipée d'un compteur de beats totalement automatique. Dans de
rares occasions, le compteur ne compte pas correctement (les beats sont hors de
la gamme habituelle ou simplement aucun beat n'est détecté). Dans ces cas, il
vous est possible d'aider manuellement le compteur en tapant sur ce bouton au
rythme du beat. Quand vous l'utilisez, il clignote pour vous indiquer que le
compteur automatique est éteint. Pour rallumer le compteur automatique,
maintenez simplement le bouton TAP enfoncé durant quelques secondes jusqu'à
ce qu'il s'éteigne.
24. BOUTONS DE PRESELECTION BEAT SYNC: Ces boutons sont utilisés comme
présélections pour les différents effets. En fonction des effets choisis, ces
présélections peuvent se rapporter au beat, aux filtres de fréquences, au % du ton
(pitch), etc… Les chiffres sur les boutons (2 – 4 – 8 – 16 – 32) se réfèrent à la
mesure du beat. Une fois la présélection choisie, cette dernière clignote. Il est
également possible de sélectionner les présélections supplémentaires en poussant
le bouton "time parameter” (33) pendant que vous choisissez les présélections 4 –
8 ou 16. Dans ce cas, le bouton de présélection clignote pour indiquer que 1/4, 1/2
ou 1/1 est sélectionné. Il est bon de noter que les présélections sont préservées
lorsque vous changez vers un autre effet.
Exemple: Si vous avez sélectionné l'effet "Echo" la présélection "2", vous noterez
que le son est répété tous les 2 beats. Si vous choisissez "4", le son est répété
tous les 4 beats. Pour répéter le son tous les 1/2beats, sélectionnez "½".
25. ECRAN D'EFFETS BPM: Indique le BPM (Beats Par Minute) de l'unité d'effets.
Cet écran clignote lorsqu'il est incapable de compter le BPM et s'arrête dés qu'il en
est à nouveau capable.
26. ECRAN DE DUREE (X): Pour certains effets, l'écran indique des informations sur
la durée (en mSec). Pour d'autres effets, celui-ci indique des % ou des fréquences
de coupures (en kHz). Vous pouvez modifier ces paramètres à l'aide des boutons
de présélections (24) et du bouton “time parameter”(33).
27. ECRAN DE CUE BPM / PROFONDEUR (Y): Indique la valeur BPM du signal cue
provenant d'un des 4 canaux d'entrée, sélectionné grâce à l'un des boutons CUE
(39). Quand vous ajustez le bouton de paramètre de profondeur (Y) (32), la
nouvelle valeur est indiquée (%).
28. ECRAN D'EFFETS: Indique l'effet sélectionné.
29. ECRAN D'ENTREE D'EFFETS: indique le signal sélectionné à l'aide du bouton
“input select”(30).
30. BOUTON INPUT SELECT: Permet de sélectionner le signal qui va entrer dans
l'unité d'effets. Il peut s'agir de l'un des suivants:
• L'un des canaux d'entrée
• L'un des canaux sélectionnés avec le bouton d'assignation du crossfader
(10). Ca peut être le côté (CF-B) droit ou gauche (CF-A) du crossfader.
• Si vous sélectionnés le master, les effets seront utilisés sur le son mixé du
master.
31. SELECTEUR D'EFFETS: Permet de sélectionner l'effet désiré:
IMPORTANT!
Les effets crossover et les muti-effets ne peuvent pas être utilisés ensemble!
Pour pouvoir utiliser le multi-effets, il faut d'abord désactiver les effets
crossover (voir n°:15 pour plus d'informations)
• ECHO: produit des répétitions sonore. Il vous est aisément possible de
mixer des échos synchronisés sur le beat en choisissant la présélection
"beat sync" (24). Ajustez les présélections avec le "Time Parameter" (33)
Page 21

MODE D'EMPLOI FRANCAIS
SYNQ 20/63 SMX-1 DJ-MIxer
dans une gamme de 2mSec à 2Sec. A l'aide du "level Parameter" (32),
modifiez la balance entre le son original et le son retardé.
• AUTO PAN: Envoie la musique de gauche à droite et vice-versa, sur le
rythme du beat. Grâce aux présélections "beat sync" (24), choisissez la
rapidité du balancement (Exemple: Avec la présélection "2", ça prendra 2
beats pour balancer la musique de gauche à droite et l'inverse). Modifiez
les présélections grâce au bouton "time Parameter" (33) dans une gamme
de 30mSec à 16Sec. Le "Time Parameter" (32) vous permet d'ajuster la
rapidité à laquelle la musique sera envoyé d'un côté à l'autre. Vous avez
donc le choix entre une balance plus douce ou plus agressive.
• FLANGER: Cet effet donne un "son électronique" à la musique. C'est
comme si la musique tournait en rond à cause d'une inversion de phase.
Vous pouvez aisément changer la durée de flanger (cycle) à l'aide des
présélections(24). Ces présélections peuvent être modifiées grâce au
“Time parameter ”(33) dans une gamme de 100mSec à 16Sec. Avec le
“Level parameter ”(32), changez le niveau de feedback du flanger.
Conseil: Chaque fois que vous pressez la même présélection (24) vous redémarrez
le cycle du flanger. Ceci peut donner une touche supplémentaire à l'effet.
• MANUAL FILTER: Il s'agit d'un filtre digital à coupure de fréquences très
efficace. Vous pouvez facilement changer la fréquence de coupure du
filtre à l'aide des présélections "beat sync" (24).:
o Présélection “2” (LPF @ 50Hz) Les fréquences
supérieures à 50Hz sont filtrées. Vous n'entendez que les subbass très profondes.
o Présélection “4” (LPF @ 2030Hz) Les fréquences
supérieures à 2030Hz sont filtrées. Le son ressemble à celui
d'une vieille radio AM.
o Présélection “8” (LPF @ 20000Hz) Les fréquences
supérieures à 20KHz sont filtrées. Son musical normal.
o Présélection “16” (HPF @ 210Hz) Les fréquences
inférieures à 210Hz sont filtrées. Les bass profondes sont
filtrées. Le son ressemble à celui d'un petit transistor radio.
o Présélection “32” (HPF @ 510Hz) Les fréquences
inférieures à 510Hz sont filtrées. Idem que pour la présélection
"16" mais le transistor paraît beaucoup plus petit.
Les présélections(24) peuvent être modifiées à l'aide du "Time Parameter"
(33) dans une gamme allant du filtre passe-bande bas (LPF) @ 50Hz
(l'écran indique: L 0.05kHz) jusqu'au filtre passe-bande haut (HPF) @
21.1kHz (l'écran indique: H 21.1kHz). Grâce au “Level parameter”(32)
vous pouvez modifier le niveau de résonance du filtre (Il s'agit du facteur
Q du filtre, celui-ci modifie l'impact du filtre sur la fréquence sélectionnée).
• AUTO FILTER: Il s'agit d'un filtre passe-bande bas automatique. La
fréquence de coupure varie dans des cycles de 20KHz à 50Hz. Les
présélections (24) permettent de choisir des cycles qui soient
synchronisés sur le beat (exemple: pousser sur la présélection "8"ça
prendra au filtre la durée de 8 beats pour changer sa fréquence de
coupure de 20KHz à 50Hz et l'inverse). Modifiez les présélections grâce
au "Time Parameter" (33) dans une gamme de 100mSec à 16Sec. Grâce
au “Level parameter”(32) vous pouvez modifier le niveau de résonance du
filtre (Il s'agit du facteur Q du filtre, celui-ci modifie l'impact du filtre sur la
fréquence sélectionnée).
Page 22

MODE D'EMPLOI FRANCAIS
SYNQ 21/63 SMX-1 DJ-MIxer
• REVERB: Cet effet de réverbération vous donne l'impression de jouer
votre musique dans une église ou dans un grand hall vide: La
réverbération obtenue par réflexion du son sur les différents murs est ici
simulée de façon digitale. Vous avez le choix entre 5 présélections (24) de
durées de réverbération. Celles-ci peuvent être ajustés à l'aide du "Time
Parameter" (33) dans une gamme de 0% à 100% par paliers de 1%. Le
"Level Parameter" (32) permet de faire la balance entre le son original et
la réverbération.
• TRANS: Coupure automatique du son sur le rythme du beat. Le "beat
sync" (24) peremet de choisir la longueur des cycles (Exemple: avec la
présélection "1/4" (pousser "Time Parameter" (33) tout en sélectionnant la
présélection "4")
, la musique sera coupée par tranches de 1/4beats). Les
présélections peuvent être ajustées à l'aide du "Time Parameter" (33)
dans une gamme de 25mSec à 16Sec. Le "Level Parameter" (32) permet
d'ajuster le temps de coupure. En position gauche(écran indique 0%), le
temps de coupure est nul. En tournant le bouton vers la droite, le temps
de coupe devient de + en + grand jusqu'à n'entendre plus que des petits
fragments de la musique originale.
Conseil: cet effet nécessite un certain entraînement! Les meilleurs résultats s'obtiennent
avec des beats réguliers, des petits cycles de coupure (1/4 & 1/2beats) et des temps de
coupure de 50% et plus.
• PITCH SHIFTER: Modifie le ton de la musique vers le haut ou vers le bas
tandis que le tempo reste inchangé. (Il s'agit en fait du contraire de ce que
le "master tempo" de certains lecteurs de CD essaye d'obtenir, à savoir un
ton identique et un tempo différent). Vous pouvez choisir entre 5
présélections (24) de modifications de ton. (Présélection "8"=0%, la
musique reste inchangée). Le "Time Parameter" (33) permet de faire
varier le ton dans une gamme de -100% à 100% par paliers de 1%. Le
"Level Parameter" (32) permet de faire la balance entre le son original et
le son modifié.
Conseil: utiliser cet effet sur un micro pour modifier le ton de la voix. (avec une
modification à -100%, vous obtenez des voix venant "du côté obscur de ce monde”
☺
)
32. BOUTON LEVEL (Y) PARAMETER: Ajustement du paramètre “Y” des effets.
Veuillez lire la section 31 car sa fonction diffère avec les effets.
33. BOUTON TIME (X) PARAMETER: Ajustement du paramètre “X” des effets. En
général il sert à paramétrer la durée mais veuillez lire la section 31 pour plus
d'informations. Ce bouton intègre un bouton "push" qui peut être utilisé de 2
façons:
• Pousser sur le bouton tout en sélectionnant une présélection (24) à fin
d'obtenir des présélections supplémentaires: 1/4beat – 1/2beat – 1/1beat.
• Pousser sur le bouton tout en le tournant: en général, ceci permet de
changer plus rapidement les paramètres de durée des effets.
34. INTERRUPTEUR D'ALLUMAGE: Permet d'allumer/éteindre la table.
35. VU METER A LED: VU-Mètre précis avec mémorisation du niveau peak: les
niveaux peak restent affichés un court instant. Très important
: Pour avoir un son
propre et net, prêtez attention au VU-Mètre. Beaucoup de DJ's utilisent cet
instrument important à tort en essayant de le pousser au maximum. Soyons clair:
un bon Dj veut avant tout un son clair et sans distorsion. Les niveaux supérieurs à
0dB produisent de la distorsion, gardez donc un œil sur le VU-Mètre! ☺
36. SELECTEUR DE VU METER: Permet de choisir le mode du VU-Mètre (35).
• Mode L/R: le VU-Mètre indique le signal master stéréo sur les 2 barres.
Page 23

MODE D'EMPLOI FRANCAIS
SYNQ 22/63 SMX-1 DJ-MIxer
• Mode CUE/PGM: le VU-Mètre indique le signal master sur une barre et le
signal CUE (39) sélectionné sur l'autre. Ceci permet de comparer les 2
signaux.
37. INTERRUPTEUR MASTER MONO/STEREO: Permet de mettre la sortie master
en mono ou en stéréo.
38. BALANCE MASTER: Ajustement de la balance gauche/droite de la sortie master.
39. SELECTEUR DE COMPTEUR CUE / BPM: Permet de choisir la source (Canal 1
à 4) qui passera par la sortie casque. En poussant sur plusieurs boutons Cue, il
est possible de faire provenir un son mixé des sources sélectionnées. Le BPM des
canaux sélectionnés (Canal 1 à 4) apparaît sur l'écran CUE BPM (27). Attention:
le BPM sera incorrect si 2 canaux ou plus ont été sélectionnés!
40. CONTROLEUR DE TONALITE A 3 BANDES: La fréquence de chaque canal peut
être contrôlée séparément dans une gamme de -30dB à +10dB: Hautes@13kHz ~
Moyennes@1kHz ~ Basses@70Hz. En position centrale, la tonalité est plate (flat).
41. SELECTEUR DE SOURCE D'ENTREE: permet de sélectionner l'entrée
appropriée sur chaque canal: Phono, line, aux ou mic. Sur certains canaux, des
sélecteurs d'entrée supplémentaires se trouvent à l'arrière, à côté des connecteurs
d'entrée!
Conseil: Malgré leur nom différent, Line, Aux, CD, Tuner, etc…ont à peu près les mêmes niveaux
de signal.
42. NIVEAU DE GAIN: Ajustement du niveau d'entrée de chaque canal. A utiliser pour
ajuster le niveau du VU-Mètre aux alentours de 0dB.
Page 24

MODE D'EMPLOI FRANCAIS
SYNQ 23/63 SMX-1 DJ-MIxer
CONNECTIONS
Avant de connecter ou changer des connections, toujours éteindre l'appareil.
Ce schémas est un exemple de connexion possible. Il existe des tas d'autres possibilités.
Gardez juste les remarques suivantes à l'esprit:
• Toujours connecter les câbles cinch de la manière suivante:
o Connecteurs cinch blanc ou noir canal gauche
o Connecteur rouge canal droit
• En connectant un CD, cassette, MD, radio, vidéo, etc. à une entrée, mettre le sélecteur
de ce canal sur LINE ou AUX.
• En connectant un micro sur le canal 4, mettre le sélecteur d'entrée sur MIC.
• En connectant une platine tourne-disque à une entrée, mettre le sélecteur de ce canal
sur PHONO. (attention: il arrive que certaines platines possèdent une sortie LINE, lire
le mode d'emploi de votre platine.)
Page 25

MODE D'EMPLOI FRANCAIS
SYNQ 24/63 SMX-1 DJ-MIxer
• Beaucoup de platines possèdent un connecteur de masse GND. Il est préférable de
connecter ce signal à la SMX-1 (à côté des connecteurs d'entrée).
• L'entrée Record d'un enregistreur analogique peut être connecté à la sortie Record de
la SMX-1 pour faire des enregistrements analogiques.
• Un enregistreur digital peut être connecté à la sortie digitale coaxiale de la table. Vous
obtiendrez ainsi des enregistrements digitaux remarquables.
• Afin d'assurer la meilleure qualité de son possible, des ponts de court-circuit sont
installés sur toutes les entrées phono non-utilisées. Pour connecter une platine, retirer
le ponts de l'entrée que vous désirez utiliser. Conservez ce dernier dans un lieu sûr
pour une future utilisation.
CHANGEMENT DES CURSEURS
Un grand avantage de cette table est de pouvoir changer les curseurs des canaux, même
durant l'utilisation de la table.
Voici la procédure pour changer les curseurs des canaux
:
• Retirer les boutons des curseurs.
• Retirer les 4 vis du panneau frontal qui
entoure les curseurs.
• Retirer les 3 vis du curseur que vous
souhaitez changer.
• Retirez délicatement le curseur de son
emplacement.
• Mettez délicatement en place le nouveau
curseur. Assurez-vous que les contacts
touchent le connecteur du tableau PCB de la
table.
• Mettez les 3 vis du curseur en place.
• Remettez le petit panneau frontal en place à l'aide des 4 vis.
C'est fait!
Voici la procédure pour changer le crossfader
:
• Retirer les boutons du crossfader.
• Retirez les 2 vis qui maintiennent le crossfader.
• Retirez délicatement le curseur et le plateau de leur emplacement.
• Débranchez le câble du crossfader (tirez sur le connecteur, PAS sur le câble!)
• Branchez le nouveau crossfader sur le câble.
• Remettre le crossfader et son petit plateau en place à l'aide des 2 vis.
C'est fait!
Page 26

MODE D'EMPLOI FRANCAIS
SYNQ 25/63 SMX-1 DJ-MIxer
SPECIFICATIONS
Impédance & sensibilité entrée/sortie (EQ flat, max. gain, level meter = 0dB)
Line input: 340mV @ 20kΩ (max = +4dBV)
Aux input: 340mV @ 47kΩ (max = +4dBV)
Phono input: 3,4mV @ 47kΩ (max = -40dBV)
Mic inputs: 1,7mV @ 2,2kΩ (max = -42dBV)
Record output: 775mV @ 1kΩ
Master unbalanced: 1,55V @ 100Ω
Master balanced: 3,00V @ 200Ω
Zone output: 1,55V @ 100Ω
Casques: 3,00V @ 33Ω
Digital output 1,00V @ 75Ω
Sortie maximum (EQ flat, max. gain, FX off, THD=1%, load is 100kΩ )
Master: Plus de +18dBV (8,0V)
Zone: Plus de +18dBV (8,0V)
Casques: Plus de + 9,5dBV (3V) @ 32Ω
Réponse en fréquence (EQ flat, max. gain, level meter = 0dB, load is 100kΩ )
Line + aux: 25 – 20.000Hz +/-1dB
Phono: 25 – 20.000Hz +/-1dB (RIAA)
Mic : 25 - 20.000Hz +/-1dB
THD + Bruit (EQ flat, max. gain, level meter = 0dB, load is 100kΩ )
Line + aux: moins de 0,015% (25 – 20.000Hz)
Crosstalk Canal (EQ flat, max. gain, Master = 0dBV)
Plus de 75dB @ 1kHz
Contrôleur de tonalité:
Mic: -12dB / +12dB @ 70Hz – 1kHz – 13kHz.
Input channels: -30dB / +10dB @ 70Hz – 1kHz – 13kHz.
Spécifications générales:
Power supply: 230V~ 50Hz.
Consommation: 34Watts
Dimensions: 482 x 221 x 87.5mm (WxDxH)
Poids : 5.25kg.
Page 27

GEBRUIKSAANWIJZING NEDERLANDS
SYNQ 26/63 SMX-1 DJ-MIxer
GEBRUIKSAANWIJZING
INTRODUCTIE
Hartelijke dank en gefeliciteerd met de aankoop van dit SYNQ product. Gelieve deze
handleiding aandachtig te lezen zodat U dit product perfect kan bedienen. Wij raden U
aan om deze handleiding nadien veilig op te bergen zodat U ze later nog kan raadplegen.
KENMERKEN
• 13 ingangen op 6 kanalen (2mic + 4 kanalen op fader)
• 2 Master uitgangen:
o Master met extra signaal begrenzing (XLR, symmetrisch + cinch, asymm.)
o Zone uitgang “master 2” (cinch, asymmetrisch)
• 3-bands toonregeling met “kill functie -30dB” op alle kanalen
• Speciale, door de gebruiker te vervangen, kanaalfaders van zeer hoge kwaliteit.
• VCA controlled crossfader (gemakkelijk door de gebruiker te vervangen)
• A/B kanaal selectie voor de crossfader
• Crossfader startcontrole voor compatible CD-spelers
• 3 Beat gesynchroniseerde crossfader mixeffecten
• Aanpasbare crossfader curve (geleidelijke zeer scherpe mixcurve)
• Volautomatische beatcounters
• 8 Beat gesynchroniseerde digitale effecten:
o Echo
o Autopan
o Flanger
o Manual filter
o Auto filter
o Reverb
o Trans
o Pitch Shifter
• Voorgeprogrammeerde effect toetsen
• LCD scherm met achtergrondbelichting op de effect/beatcounter module
• Effect voorbeluistering
• Coaxiale digitale uitgang voor digitale opnames
• Microfoon talkover functie
• Hoogvermogen koptelefoonuitgang met “split cue” en “cue/pgm mixing”
• Omschakelbare (cue/pgm) LED VU-meter met geheugen voor piekwaarden.
• Zeer compacte behuizing.
Page 28

GEBRUIKSAANWIJZING NEDERLANDS
SYNQ 27/63 SMX-1 DJ-MIxer
VOOR GEBRUIK
Kijk even na of onderstaande onderdelen in de verpakking aanwezig zijn:
• SMX-1 mixer
• Stroomkabel
• Handleiding
INSTALLATIE EN GEBRUIK
VEILIGHEIDSVOORSCHRIFTEN:
OPGELET: Gelieve, om het risico op
elektrische schokken te vermijden, het apparaat
niet zelf te openen. Binnenin vindt U geen
onderdelen die U zelf kan vervangen. Voor
reparaties doet U best uitsluitend beroep op degelijk opgeleid personeel.
De driehoek met bliksem symbool waarschuwt U dat er in dit apparaat
ongeïsoleerde spanning aanwezig is die bij aanraking een elektrische schok
kan veroorzaken.
De driehoek voorzien van een uitroepteken waarschuwt U dat er belangrijke
gebruikersinstructies in de bijbehorende handleiding te vinden zijn.
Om elektrische schokken te voorkomen mag dit apparaat niet aan regen en
vocht worden blootgesteld. Breng geen metalen voorwerpen in de mengtafel en zorg
ervoor dat er geen vloeistoffen in het apparaat terecht kunnen komen. Elektrische
schokken of slechte werking kunnen het gevolg zijn.
INSTALLATIEVOORSCHRIFTEN:
• Plaats de mengtafel in een goed geventileerde ruimte waar zij niet blootgesteld is aan
hoge temperaturen of vocht.
• Het plaatsen en het gebruik van de mengtafel gedurende een lange periode in de
nabijheid warmtebronnen zoals versterkers, spots, enz. zal zijn werking beïnvloeden.
• De mixer kan in een 19” kast gemonteerd worden. Monteer de behuizing door middel
van de 4 montageopeningen op de frontplaat. Gebruik hiervoor bouten van de juiste
dikte! (deze zijn niet inbegrepen) Probeer sterke schokken en vibraties tijdens het
transport zo veel mogelijk te vermijden.
• Zorg, bij inbouw in een vaste installatie of flightcase, voor een goede ventilatie om de
warmte optimaal te kunnen afvoeren.
• Zorg ervoor, om inwendige vorming van condensatie te voorkomen, dat de mengtafel
zich na transport kan aanpassen aan de warme binnentemperatuur. Condensatie kan
de goede werking soms verhinderen.
REINIGING VAN DE MENGTAFEL:
Reinig de mengtafel met een vochtig doek. Vermijd dat er water in het toestel komt.
Gebruik nooit vluchtige vloeistoffen zoals benzeen of thinner welke het toestel kunnen
beschadigen.
CAUTION
Page 29

GEBRUIKSAANWIJZING NEDERLANDS
SYNQ 28/63 SMX-1 DJ-MIxer
BEDIENINGEN EN FUNCTIES
ONDERDELEN OP DE ACHTERZIJDE:
1. NETSTEKKER: gebruik deze om de meegeleverde voedingskabel aan te sluiten.
2. MASTER1 GEBALANCEERDE UITGANG: Deze XLR-connectoren worden
gebruikt om de SMX-1, door middel van gebalanceerde audiokabels op een PA
installatie aan te sluiten.
3. UITGANGSBEGRENZING: Om de aangesloten versterkers en luidsprekers te
beschermen kan U deze potentiometer gebruiken om de maximum
uitgangsspanning van Master1 te beperken. (Opgelet: De uitgangsspanning kan
tot nul beperkt worden. Als U geen uitgangssignaal op Master1 detecteert, gelieve
dan even na te kijken of de uitgangsbegrenzing per ongeluk op nul staat.)
4. DIGITALE UITGANG: Deze digitale uitgang maakt het mogelijk om rechtstreeks
digitale opnames te maken. Hij wordt niet beïnvloed door de volumeregeling van
de master uitgang.
5. FADER START: Via deze aansluitingen kunnen de faderstarts en crossfader
effecten de aangesloten (compatible) CD-speler(s) bedienen.
6. MASTER1 ONGEBALANCEERDE UITGANG: Dit is exact hetzelfde signaal als
op de gebalanceerde master1 uitgang(2). Het signaal is echter asymmetrisch en
kan dus gebruikt worden om versterkers met ongebalanceerde (cinch) ingangen
aan te sturen.
7. ZONE UITGANG: Ook master 2 genoemd, bezit een afzonderlijke volumeregeling.
De zone uitgang is asymmetrisch en wordt gebruikt om extra versterkers aan te
sturen.
8. RECORD UITGANG: Dit signaal is identiek aan dat van de masters maar wordt
niet beïnvloed door de volume en balansregeling van de master en de
mono/stereo schakelaar. Wordt gebruikt om analoge opnameapparatuur aan te
sluiten.
9. LINE INGANG: hierop kan U ieder audiosignaal met lijnniveau (CD, tuner, MD, …)
aansluiten.
10. PHONO/AUX INGANG: Normaal gebruikt om draaitafels aan te sluiten maar, via
de “phono/aux” schakelaar(11) kan U ook apparaten met lijnniveau aansluiten.
11. PHONE/AUX SCHAKELAAR: Wordt gebruikt om de ingang van de “phono/aux
ingang”(10) om te schakelen.
12. AARDINGSCONNECTOR (GND): Vele draaitafels hebben een afzonderlijke
aansluiting voor de aarding (GND). U kan deze aarding hier aansluiten.
13. MIC 2&3 INGANGEN: voorzien om 2 extra (ongebalanceerde) micro’s aan te
sluiten.
Page 30

GEBRUIKSAANWIJZING NEDERLANDS
SYNQ 29/63 SMX-1 DJ-MIxer
BEDIENING OP DE VOORZIJDE:
1. MIC INGANG: Combo stekker: U kan hier een gebalanceerde (XLR connector) of
ongebalanceerde (1/4” jack) microfoon aansluiten. Deze ingang wordt meestal
voor de DJ-microfoon gebruikt. De talkover(4) heeft geen invloed op deze ingang.
2. 3-BANDS TOONREGELING: De toonregeling van Mic1 en Mic2 heeft een
regelbereik van +/-12dB: Treble@13kHz ~ Middle@1kHz ~ Bass@70Hz.
3. KANAALFADERS: worden gebruikt om het volume van ieder kanaal in te stellen.
Deze faders hebben een zeer hoge kwaliteit en kunnen door de DJ zelf vervangen
worden, zelfs terwijl de mengtafel in gebruik is! (op een ander kanaal natuurlijk ☺)
Voor de exacte werkwijze verwijzen we U naar het hoofdstuk “faders vervangen”.
4. MIC ON/OFF/TALK OVER SCHAKELAAR: wordt gebruikt voor micro’s 1 & 2:
• OFF: mic1 & mic2 zijn uitgeschakeld.
• ON: mic1 & mic2 zijn aangeschakeld.
• TALK OVER: mic1 & 2 zijn aangeschakeld waarbij het geluidsniveau van de
andere kanalen met 14dB verminderd wordt.
5. MIC1 VOL: Wordt gebruikt voor het aanpassen van het volume van micro1.
6. MIC2 VOL: Wordt gebruikt voor het aanpassen van het volume van micro2.
7. CROSSFADER: Wordt gebruikt om de curve van de crossfader aan te passen:
• LINKSE POSITIE: U kan de beide kanalen zacht in elkaar laten overvloeien.
Perfect voor beat mixing.
• RECHTSE POSITIE: het overvloeien gebeurt zéér abrupt (bijna als een
schakelaar). Perfect voor scratchen en andere agressieve mix technieken.
• IEDERE TUSSENPOSITIE: U kan de crossfader curve volgens uw
persoonlijke smaak instellen. Iedere curve, tussen de vorige 2 extremen, kan
gekozen worden.
8. FADER START ON/OFF SCHAKELAAR: Met de crossfader van de SMX-1 kan U
de start/stop (re-cue) functies van CD-spelers met compatible faderstarts
bedienen. Met deze schakelaar kan u deze functie aan/uitschakelen.
9. FADER START INDICATORS: Tijdens de effect mix mode geven deze indicatoren
de status aan van de kanalen die met de cross fader assign toetsen A of B(10)
geselecteerd werden.
10. CROSSFADER TOEWIJZINGSTOETSEN: De linker zijde van de crossfader
draagt het label “A”, de rechter zijde draagt het label “B”. Ieder kanaal heeft 2
Page 31

GEBRUIKSAANWIJZING NEDERLANDS
SYNQ 30/63 SMX-1 DJ-MIxer
toewijzingstoetsen, eveneens “A” en “B” genaamd. Door de toets “A” of “B” onder
het ingangskanaal in te drukken zal deze oplichten en kan U bepalen of dit kanaal
naar de linker of rechter zijde van de crossfader geleid wordt.
11. CROSSFADER: Wordt gebruikt om 2 ingangskanalen gemakkelijk met elkaar te
mixen. U moet bij deze kanalen dan wel de A/B toewijzingstoetsen(10) juist
instellen.
12. MASTER VOLUMEREGELAAR: Bepaalt het uitgangsvolume van Master1.
(Opgelet: de uitgangsbegrenzing, aan de achterzijde van de mengtafel, kan het
uitgangsvolume sterk beperken. Kijk even naar de stand van deze potentiometer
als het uitgangsvermogen te laag is. Kijk ook even of de talkover uitgeschakeld is)
13. ZONE VOLUME: Bepaalt het uitgangsniveau van de ZONE uitgang. Wordt niet
beïnvloed door het master volume(12) en master balans(37). Deze uitgang wordt
vaak als 2de master gebruikt.
14. CROSSOVER EFFECTEN: Om deze effecten ten volle te kunnen benutten is het
absoluut noodzakelijk dat een CD-speler, waarvan het faderstart system
compatible is, op de faderstarts wordt aangesloten. (zie vorig hoofdstuk nr.5). De 3
effecten geven U heel wat extra mogelijkheden in het maken van een perfecte,
beat gesynchroniseerde mix! Lees onderstaande tekst aandachtig zodat U volledig
begrijpt hoe deze effecten werken!
BELANGRIJK:
• U moet de “faderstart on/off schakelaars” (8) in ON-positie zetten.
• U moet 2 kanalen met de toewijzingstoetsen (10) aan A en B toewijzen.
15. CROSSOVER EFFECT SCHAKELAAR: Met deze schakelaar kiest U het
gewenste crossover effect:
• FADER: In deze stand gebruikt U de crossfader om de crossover effecten en
de bijbehorende start/stop (recue) functies te bedienen.
• OFF: De crossover effecten zijn uitgeschakeld.
• AUTO: In deze stand hoeft U geen gebruik van de crossfader te maken: druk
één van de toetsen in zodat de mix volledig automatisch en in het ritme van
de beat verloopt!
16. CROSSOVER EFFECT SELECT/START TOETSEN: Hiermee kiest U het
gewenste crossover effect. Drie effecten (Echo, Zip en Roll) staan ter beschikking:
• ECHO EFFECT: Dit effect kan in FADER en AUTO mode gebruikt worden:
• FADER MODE: Selecteer het echo effect en beweeg de crossfader
van de ene zijde naar de andere. Een deel van de muziek wordt
gememoriseerd en in kleine lussen herhaald. De muziek neemt in
volume af tot de andere CD-speler automatisch start. Het echo effect
loopt volledig synchroon met het ritme van de beat. De lengte van de
lussen kan met de “Preset” toetsen(24) worden aangepast. U kan de
volgende beat sync voorinstellingen gebruiken: ¼ ~ ½ ~ 1/1 ~ 2 ~ 4 ~ 8
beats. De effect display toont de lengte van de gememoriseerde lus.
Tip: Door de crossfader slechts een stukje van zijn eindpositie te verwijderen, kan U
kleine, beat gesynchroniseerde lussen creëren. (De lengte van de lus hangt af van
de gekozen “preset”) Nadien kan U de crossfader terug naar zijn startpositie brengen
zonder dat U echt een mix tussen 2 kanalen hoeft uit te voeren.
• AUTO MODE: Druk de “echo effect” toets terwijl de muziek speelt. De
muziek begint in lussen te spelen. Het volume neemt hierbij geleidelijk
af tot de andere CD-speler automatisch start. De lengte van deze
complete procedure kan op de effect display worden afgelezen en kan
bovendien met de “preset” toetsen(24) en/of de “time parameter
knop”(33) worden aangepast.
• ZIP EFFECT: Dit effect kan in FADER en AUTO mode gebruikt worden:
Page 32

GEBRUIKSAANWIJZING NEDERLANDS
SYNQ 31/63 SMX-1 DJ-MIxer
• FADER MODE: Selecteer het zip effect en beweeg de crossfader van
de ene zijde naar de andere. De toonhoogte van de muziek zal
verlagen tot volledige vervorming. Als de crossfader volledig aan de
andere zijde staat dan start de andere CD-speler automatisch.
Afhankelijk van de stand van de crossfader toont de display een getal
van 0 tot 99.
• AUTO MODE: Druk de “Zip effect” toets terwijl de muziek speelt. De
toonhoogte van de muziek verlaagt tot nul terwijl de andere CD-speler
automatisch start. De display toont de lengte van de complete
procedure. De lengte kan met de “preset” toetsen(24) en/of de “time
parameter knop”(33) worden aangepast.
• ROLL EFFECT: Dit effect kan in FADER en AUTO mode gebruikt worden:
• FADER MODE: Selecteer het roll effect en beweeg de crossfader van
de ene zijde naar de andere. Eerst zal de muziek in lussen met een
lengte van 1beat spelen. (display toont “1”) Nadien wordt de lengte van
de lus verkort tot ½beat (display toont “2”) De lus wordt tenslotte
slechts 1/8beat lang (display toont “4”). Zodra de crossfader aan de
andere zijde staat verlaagt het muziekvolume en start de andere CDspeler automatisch. Opgelet, de “presets” en “time parameter knop”
zijn niet toegankelijk!
• AUTO MODE: Druk de “Roll effect” toets terwijl de muziek speelt. De
muziek speelt in steeds kleinere beat gesynchroniseerde lussen tot de
andere CD-speler automatisch start. De display toont de lengte van de
complete procedure. De lengte kan met de “preset” toetsen(24) en/of
de “time parameter knop”(33) worden aangepast. Afhankelijk van de
gekozen lengte zal het “roll patroon” worden aangepast in 1/1, ½, ¼ en
1/8 beat lussen.
17. CUE MIXING KNOP: Wordt gebruikt om in de koptelefoon het uitgangssignaal met
de voorbeluistering van de effect module en van de verschillende kanalen te
mengen. Draai deze knop volledig naar rechts als U enkel het uitgangssignaal wil
beluisteren. Draai de knop volledig naar links en U zal enkel de voorbeluistering
horen die geselecteerd werd met de CUE-toetsen (21, 39). Op elke tussenstand
hoort u een mix van beide signalen.
18. SPLIT CUE TOETS: Normaal hoort u een stereo signaal in uw koptelefoon. Druk
deze toets in en U hoort 2 verschillende mono signalen:
• LINKS: Voorbeluistering, gekozen met de CUE-toetsen (21, 39).
• RECHTS: Uitgangssignaal zoals op de master.
Opgelet, de CUE mixing knop(17) moet in de middenstand staan!
19. CUE LEVEL: Hiermee wordt het volume van de koptelefoon geregeld. Opgelet,
door het hoge uitgangsvermogen kan, bij slecht gebruik, gehoorbeschadiging
optreden! Matig het uitgangsvermogen!
20. KOPTELEFOON UITGANG: Hier kan elke koptelefoon voorzien van een ¼” jack
worden aangesloten.
21. EFFECTS CUE: Gebruik deze toets om een gekozen effect te beluisteren voor U
het met het originele geluid mengt.
22. EFFECTS ON/OFF TOETS: Hiermee kan U de uitgang van de effect module aan
en uitschakelen.
23. TAP TOETS: Bijna alle effecten zijn beat gesynchroniseerd. Daarom is de SMX-1
uitgerust met een volautomatische digitale beatcounter. In sommige, geïsoleerde
gevallen kan het zijn dat de automatische beatcounter niet correct telt. (beats
vallen buiten het bereik van de counter of er is gewoon geen beat om te tellen) In
deze gevallen kan U de beatcounter helpen door manueel in het ritme van de beat
Page 33

GEBRUIKSAANWIJZING NEDERLANDS
SYNQ 32/63 SMX-1 DJ-MIxer
op de TAP-toets te drukken. Zodra U dit doet zal de toets oplichten om aan te
geven dat de automatische beatcounter werd uitgeschakeld. De automatische
beatcounter wordt terug ingeschakeld door de TAP-toets gedurende enkele
seconden in te drukken.
24. PRESET TOETSEN: Onder deze toetsen zitten per effect voorinstellingen
geprogrammeerd. Afhankelijk van het geselecteerde effect hebben deze
voorinstellingen betrekking op het aantal beats, filter frequenties, percentages van
de toonhoogte, enz… Deze toetsen hebben één van volgende markeringen: 2 – 4
– 8 – 16 – 32. Deze waarden staan in verhouding tot de gemeten beat. Bij het
indrukken van een preset zal deze oplichten. Door de “time parameter knop”(33)
ingedrukt te houden terwijl U de presets 4 – 8 of 16 selecteert, kan U extra presets
oproepen. In dat geval zal de ingedrukte preset knipperen om aan te geven dat de
opdruk boven de toets (1/4 – ½ or 1/1) gekozen werd. Bij het overschakelen naar
andere effecten zal de effect module de laatst gekozen instelling van het vorige
effect blijven onthouden.
Voorbeeld: als het “echo” effect ingeschakeld is en U kiest voor preset “2” dan zal
U merken dat de muziek iedere 2 beats herhaald wordt. Als U preset “4” kiest dan
herhaalt de muziek zich iedere 4 beats. Kies de ½-preset als U de muziek iedere
halve beat wenst te herhalen.
25. EFFECTS BPM DISPLAY: Toont het ritme (of BPM: Beats Per Minute) van de
muziek aan de ingang van de effect module. Als de beatcounter om een bepaalde
reden de beats niet kan tellen dan zal de display knipperen tot het tellen kan
hernemen.
26. TIME (X) PARAMETER: afhankelijk van het gekozen effect zal de display
tijdsinformatie (mSec), percenten (%) of filterfrequenties (kHz) tonen. Indien nodig
kan U deze waarden met de preset toetsen (24) en/of met de “time parameter
knop”(33) bijregelen.
27. CUE BPM / DEPTH (Y) PARAMETER DISPLAY: Toont de BPM-waarde van de
ingangskanalen, (CH-1 to CH-4) die met de CUE-toetsen(39) geselecteerd
werden. Bij het aanpassen van de “depth (Y) parameter” knop(32), zal de nieuwe
waarde (%) op de display getoond worden.
28. EFFECT DISPLAY: Toont welk effect u gekozen heeft.
29. EFFECTS INPUT DISPLAY: Toont welk signaal U met de “input select knop”(30)
naar de ingang van de effect module stuurt.
30. INPUT SELECT KNOP: Hiermee kiest u welk signaal er naar de effect module
wordt gestuurd. Dit zijn de verschillende mogelijkheden:
• Eén van de ingangskanalen.
• Eén van de kanalen die U selecteerde met de “cross fader assign
toetsen”(10). Dit kan de linker kant “CF-A” of de rechter kant “CF-B” van
de crossfader zijn.
• Als U “master” kiest dan werken de effecten op de uitgang.
31. EFFECTS SELECTOR: Hiermee wordt een bepaald effect gekozen:
BELANGRIJK!
De crossover effecten en de multi-effect module kunnen niet samen gebruikt
worden! Om de multi effecten te kunnen gebruiken moet U de crossover
effecten uitschakelen (zie nr.15 voor meer informatie)
• ECHO: produceert een repeterend geluid. Kies de juiste “preset”(24) om
de beat gesynchroniseerde echo’s gemakkelijk met het originele geluid te
mixen. Indien nodig kan U de voorinstellingen met de “Time parameter
knop”(33) over een bereik van 2mSec tot 2Sec bijregelen. Met de “Level
parameter knop”(32) kan U de verhouding tussen het effect en het
originele geluid instellen.
Page 34

GEBRUIKSAANWIJZING NEDERLANDS
SYNQ 33/63 SMX-1 DJ-MIxer
• AUTO PAN: Verplaatst de muziek van links naar rechts en omgekeerd op
het ritme van de beat. Met de “presets”(24) kan U instellen hoe snel dit
gebeurt. (voorbeeld: Met preset “2” zal de muziek zich op 2beats van links
naar rechts en terug bewegen.) Indien nodig kan U de voorinstellingen
met de “Time parameter knop”(33) over een bereik van 30mSec tot 16Sec
aanpassen. Met de “Level parameter knop”(32) kan U instellen hoe snel
de muziek van zijde verandert: u kan voor een zachte of agressieve
overgang kiezen.
• FLANGER: Dit effect kan best omschreven worden als een straaljager die
door de muziek raast. Door faseverschuivingen lijkt het alsof de muziek
ronddraait. De flanger tijd (periode) kan met de “presets”(24) gemakkelijk
geselecteerd worden. Indien nodig kan U de voorinstellingen met de “Time
parameter knop”(33) over een bereik van 100mSec tot 16Sec bijregelen.
Met de “Level parameter knop”(32) kan U de feedback parameter van de
flanger bijregelen.
Tip: Telkens als U dezelfde preset toets(24) opnieuw indrukt zal de flanger cyclus
herstarten. Dit geeft een subtiel extraatje aan het effect.
• MANUAL FILTER: Dit is een zeer effectieve digitale frequentie filter. Met
de “presets”(24) kan U de filterfrequentie erg gemakkelijk aanpassen:
o Preset “2” (LPF @ 50Hz) Alle frequenties boven 50Hz
worden gefilterd. Enkel een erg diepe sub bass is hoorbaar.
o Preset “4” (LPF @ 2030Hz) Alle frequenties boven 2030Hz
worden gefilterd. Dit klinkt als een oude AM radio.
o Preset “8” (LPF @ 20000Hz) Alle frequenties boven 20kHz
worden gefilterd. De muziek klinkt normaal.
o Preset “16” (HPF @ 210Hz) Alle frequenties onder 210Hz
worden gefilterd. Alle diepe bass tonen zijn verdwenen, het
geluid klinkt als een kleine FM transistor radio.
o Preset “32” (HPF @ 510Hz) Alle frequenties onder 510Hz
worden gefilterd. Hetzelfde als preset “16” maar de FM
transistor radio lijkt nog een stuk kleiner.
De presets(24) kunnen met de “Time parameter knop”(33) worden
bijgeregeld. Dit gebeurt in een bereik van laagdoorlaat filter (LPF) @ 50Hz
(display toont: L 0.05kHz) tot hoogdoorlaat filter (HPF) @ 21.1kHz (display
toont: H 21.1kHz). Met de “Level parameter knop”(32) kan de resonantie
van de filter worden aangepast. (Dit is de Q-factor, die de effectiviteit van
de filter bij een bepaalde frequentie voorstelt)
AUTO FILTER: Dit is een automatische laagdoorlaat filter (LPF). Tijdens
de filtercyclus varieert de filterfrequentie van 20kHz tot 50Hz. Met de
preset toetsen(24) kan de lengte van de filtercyclus worden ingesteld.
Deze cyclus staat in relatie tot het gemeten ritme. (voorbeeld: druk op
toets “8” het duurt nu 8beats om de filter zijn volledige cyclus, van
20kHz tot 50Hz en terug, te laten doorlopen) Indien nodig kan U de
voorinstellingen met de “Time parameter knop”(33) over een bereik van
100mSec tot 16Sec aanpassen. Met de “Level parameter knop”(32) kan
de resonantie van de filter worden aangepast. (Dit is de Q-factor, die de
effectiviteit van de filter bij een bepaalde frequentie voorstelt)
• REVERB: (of galm) kan het best als het “kerk effect” omschreven worden.
Stel dat U muziek in een kerk of in een grote, lege zaal speelt: de galm,
die het resultaat is van allerlei reflecties, wordt hier digitaal gesimuleerd.
Met de preset toetsen(24) kunnen 5 voorgeprogrammeerde reverb tijden
gekozen worden. Met de “Time parameter knop”(33) kan U deze over een
bereik van 0% tot 100% bijregelen. (in 1% stappen). Met de “Level
Page 35

GEBRUIKSAANWIJZING NEDERLANDS
SYNQ 34/63 SMX-1 DJ-MIxer
parameter knop”(32) kan U de verhouding tussen het effect en het
originele geluid instellen.
• TRANS: Kapt het geluid automatisch, op het ritme van de beat, in
stukken. Met de “presets”(24) kan U het ritme, waarop de stukjes muziek
gekapt worden, bepalen. (voorbeeld: met preset “1/4” (vergeet niet om de
“time parameter knop”(33) in te drukken terwijl U preset toets “4” indrukt)
wordt de muziek in 1/4beats gekapt.) De presets kunnen met de “Time
parameter knop”(33) over een bereik van 25mSec tot 16Sec worden
bijgeregeld. Met de “Level parameter knop”(32) kan de lengte van de
blanco’s bepaald worden. Met de knop volledig naar links (display toont
“0%) is de lengte van de blanco’s gelijk aan nul het effect zal dus niet
hoorbaar zijn. Draai de “level parameter knop”(32) naar rechts, om de
lengte van de blanco’s te vergroten. Uiteindelijk zal U nog maar heel
kleine stukjes van de originele muziek horen.
Tip: Dit effect vraagt een beetje oefening! U verkrijgt de beste resultaten met monotone
dansmuziek, kleine kap cyclus (1/4 en 1/2beats) en langere blanco’s van 50% en meer.
• PITCH SHIFTER: Terwijl het ritme (snelheid) van de muziek ongewijzigd
blijft kan de toonhoogte van de muziek naar boven en/of naar beneden
gebracht worden. (dit is het tegengestelde van wat de “master tempo” op
bepaalde CD-spelers probeert te bereiken: dezelfde toonhoogte behouden
bij een wisselende snelheid/beat) Met de preset toetsen(24) kan één van
de 5 vooringestelde “pitch shifts” gekozen worden. (preset “8” is 0%, de
toonhoogte wordt niet gewijzigd) Met de “Time parameter knop”(33) kan
de toonhoogte precies worden ingesteld van -100% tot +100% in stappen
van 1%. Met de “Level parameter knop”(32) kan U de verhouding tussen
het effect en het originele geluid instellen.
Tip: U verkrijgt een stemvervormer door de pitch shifter op een microfoon te gebruiken.
(met de pitch op -100% hoort U stemmen “uit de duistere onderwereld”
☺
)
32. LEVEL (Y) PARAMETER KNOP: Hiermee wordt de “Y” parameter van de effecten
aangepast. De functie van deze knop is voor elk effect verschillend, lees punt 31
voor meer informatie.
33. TIME (X) PARAMETER KNOP: Hiermee wordt de “X” parameter van de effecten
aangepast. Meestal is dit een tijdsparameter, gelieve echter voor meer informatie
punt 31 te lezen. Deze draaiknop heeft ook een ingebouwde druktoets met 2
mogelijke functies:
• Druk deze toets in terwijl U één van de “presets”(24) selecteert om extra
presets op te roepen: 1/4beat – 1/2beat – 1/1beat.
• U kan de draaiknop indrukken terwijl U hem verdraait: in de meeste
gevallen kan U de parameters veel sneller instellen.
34. POWER SCHAKELAAR: dient om de mengtafel in en uit te schakelen.
35. LED VU METER: Precieze niveau meter, voorzien van een piekwaarde geheugen:
piekwaarden blijven gedurende korte tijd op het scherm staan.
Zeer belangrijk: Als U een perfect geluid wenst, hou dan rekening met de VU-
meter! De meeste DJ’s gebruiken dit belangrijke instrument als een “mooi
lichteffect”. Het is een sport om de meter zo ver mogelijk in het rood te jagen. Laat
ons duidelijk zijn: een goede DJ wil een perfect, onvervormd en dynamisch geluid.
Waarden boven 0dB betekenen “vervorming”, hou de meter dus onder controle! ☺
36. VU-METER SCHAKELAAR: wordt gebruikt om de ingangen van de VU-meter(35)
te selecteren:
• L/R-mode: de VU-meter toont enkel het stereo uitgangssignaal.
• CUE/PGM-mode: de VU-meter toont het uitgangssignaal op één ledbar
en het signaal van de voorbeluistering “CUE-toets(39)” op de andere
ledbar. Dit maakt het mogelijk om beide signalen te vergelijken.
Page 36

GEBRUIKSAANWIJZING NEDERLANDS
SYNQ 35/63 SMX-1 DJ-MIxer
37. MONO/STEREO SCHAKELAAR: schakelt de master om tussen mono en stereo.
38. MASTER BALANS: stelt de links/rechts balans van de master in.
39. CUE / BPM COUNTER SELECTIE: Wordt gebruikt om het kanaal (CH-1 tot CH-4)
te selecteren dat via de koptelefoon kan worden voorbeluisterd. Als meerdere
CUE-toetsen samen worden ingedrukt dan is het mogelijk om deze kanalen samen
voor te beluisteren. De BPM-waarde van het geselecteerde kanaal (CH-1 tot CH-4)
wordt op de CUE BPM display(27) weergegeven. Opgelet: de BPM-waarde wordt
niet correct weergegeven als er meer dan 1 ingangskanaal geselecteerd is!
40. 3-BANDS TOONREGELING: De frequenties kunnen op ieder kanaal afzonderlijk
ingesteld worden over een bereik van -30dB tot +10dB: Treble@13kHz ~
Middle@1kHz ~ Bass@70Hz. In de middenstand is de toonregeling uitgeschakeld.
41. INGANGSKEUZESCHAKELAAR: Hiermee wordt de juiste geluidsbron per kanaal
gekozen: Phono, line, aux of mic. Op een aantal kanalen zijn er extra
keuzeschakelaars op de achterzijde, naast de ingangsconnectoren!
Tip: Line, Aux, CD, Tuner, enz… zijn verschillende namen voor ingangen met ongeveer dezelfde
ingangsgevoeligheid .
42. GAIN LEVEL: Regelt de ingangsgevoeligheid op ieder kanaal van nul tot
maximum. Gebruik deze draaiknop om het ingangssignaal op +/-0dB af te regelen.
Page 37

GEBRUIKSAANWIJZING NEDERLANDS
SYNQ 36/63 SMX-1 DJ-MIxer
AANSLUITINGEN
Schakel bij het wisselen van onderlinge verbindingen steeds alle apparaten uit.
Dit schema is enkel een voorbeeld met enkele mogelijkheden. Vele andere aansluitingen
zijn mogelijk. Hou gewoon rekening met volgende opmerkingen:
• Sluit de cinch kabels altijd op dezelfde manier aan:
o Witte of zwarte cinch connector linker kanaal
o Rode cinch connector rechter kanaal
• Als U een CD-player, cassette deck, MD-speler, tuner, videorecorder enz. op één van
de ingangen aansluit, vergeet dan niet om de ingangskeuzeschakelaar van dat kanaal
op “LINE” of “AUX” te zetten.
• Als U een micro op kanaal 4 aansluit, zet de ingangskeuzeschakelaar dan op “MIC”.
• Als U een draaitafel op één van de ingangskanalen aansluit, zet de keuzeschakelaar
dan op “PHONO”. (opgelet: nieuwere draaitafels hebben soms een uitgang op lineniveau, lees de handleiding van uw draaitafel om dit na te kijken)
Page 38

GEBRUIKSAANWIJZING NEDERLANDS
SYNQ 37/63 SMX-1 DJ-MIxer
• Vele draaitafels hebben een GND-aansluiting (aarding). U sluit deze best op aan op de
SMX-1. Gebruik hiervoor de GND-aansluiting juist naast de betreffende audio-ingang.
• Analoge opnameapparatuur kan op de recorduitgang van de SMX-1 worden
aangesloten om analoge opnames te maken.
• Als U digitale opname apparatuur heeft, sluit deze dan aan op de digitale uitgang van
de SMX-1. Dit resulteert in perfecte, digitale opnames!
• Op de ingangsconnectoren van de ongebruikte phono ingangen staan kleine zwart
topjes. Deze sluiten de ingang kort om zo de best mogelijke geluidskwaliteit te
bekomen. Als U een draaitafel op de SMX-1 aansluit dan dient U eerst dit zwarte topje
te verwijderen. Als U de draaitafel nadien afkoppelt dan zet U deze zwart topjes best
terug.
FADERS VERVANGEN
Eén van de grote voordelen van deze mengtafel zijn de kanaalfaders die door de
gebruiker zelf kunnen vervangen worden, zelfs als de mengtafel in werking is.
Werkwijze voor het vervangen van een kanaalfader:
• Verwijder de plastiek kapjes van alle kanaalfaders.
• Verwijder de kleine, rechthoekige frontplaat
rond de kanaalfaders met de 4 vijsjes.
• Verwijder de 3 vijsjes van de kanaalfader
die U wenst te vervangen.
• Verwijder de kanaalfader voorzichtig.
• Zet de nieuwe kanaalfader in de plaats.
Zorg ervoor dat de contacten van de fader
mooi in de connector op de PCB passen.
• Bevestig de 3 vijsjes van de kanaalfader
opnieuw.
• Plaats de kleine, rechthoekige frontplaat
terug en bevestig ze met de 4 vijsjes.
• Plaats de plastiek kapjes terug op de kanaalfaders.
Afgelopen!
Werkwijze voor het vervangen van de crossfader
:
• Verwijder het plastiek kapje van de crossfader.
• Verwijder de 2 vijsjes waarmee de crossfader vastzit.
• Verwijder de crossfader en het metalen plaatje voorzichtig.
• Maak de crossfader los van het elektrische kabeltje (trek bij het verwijderen aan de
connector, NIET aan het kabeltje!)
• Verbind de nieuwe crossfader met het kabeltje.
• Bevestig de nieuwe crossfader, samen met het metalen frontplaatje opnieuw met
behulp van de 2 vijsjes.
Afgelopen!
Page 39

GEBRUIKSAANWIJZING NEDERLANDS
SYNQ 38/63 SMX-1 DJ-MIxer
SPECIFICATIES
Ingangs/uitgangs impedantie & gevoeligheid (EQ op 0, max. gain, level meter= 0dB)
Line ingang: 340mV @ 20kΩ (max = +4dBV)
Aux ingang: 340mV @ 47kΩ (max = +4dBV)
Phono ingang: 3,4mV @ 47kΩ (max = -40dBV)
Mic ingang: 1,7mV @ 2,2kΩ (max = -42dBV)
Record uitgang: 775mV @ 1kΩ
Master asymmetrisch: 1,55V @ 100Ω
Master symmetrisch: 3,00V @ 200Ω
Zone uitgang: 1,55V @ 100Ω
Koptelefoon: 3,00V @ 33Ω
Digitale uitgang: 1,00V @ 75Ω
Maximum uitgang (EQ op 0, max. gain, FX off, THD=1%, belasting = 100kΩ )
Master: More than +18dBV (8,0V)
Zone: More than +18dBV (8,0V)
Phones: More than + 9,5dBV (3V) @ 32Ω
Frequentie bereik (EQ op 0, max. gain, level meter = 0dB, belasting = 100kΩ )
Line + aux: 25 – 20.000Hz +/-1dB
Phono: 25 – 20.000Hz +/-1dB (RIAA)
Mic : 25 - 20.000Hz +/-1dB
THD + Ruis (EQ = 0, max. gain, level meter = 0dB, belasting = 100kΩ )
Line + aux: minder dan 0,015% (25 – 20.000Hz)
Kanaal overspraak (EQ = 0, max. gain, Master = 0dBV)
Meer dan 75dB @ 1kHz
Toonregelingen:
Mic: -12dB / +12dB @ 70Hz – 1kHz – 13kHz.
Ingangskanalen: -30dB / +10dB @ 70Hz – 1kHz – 13kHz.
Algemene specificaties:
Voeding: 230V~ 50Hz.
Verbruik: 34Watts
Afmetingen: 482 x 221 x 87.5mm (WxDxH)
Gewicht: 5.25kg.
Page 40

BEDIENUNGSANLEITUNG DEUTSCH
SYNQ 39/63 SMX-1 DJ-MIxer
BEDIENUNGSANLEITUNG
EINLEITUNG
Vielen Dank das Sie sich für ein SYNQ - Produkt entschieden haben. Bitte lesen Sie sich
diese Bedienungsanleitung aufmerksam durch, um dieses Produkt richtig bedienen und
handhaben zu können. Wenn Sie sich die Anleitung durchgelesen haben, bewahren Sie
diese an einem sicheren Ort auf, um jederzeit nachschlagen zu können.
FUNKTIONEN
• 13 Eingänge auf 6 Kanälen (2 Mikrofone und 4 Kanalfader)
• 2 Master Ausgänge
• Master Ausgang mit Pegelabschwächer (XLR, symmetrisch)
• Zonen-Ausgang „Master 2“ (CINCH, unsymmetrisch)
• 3-fach Klangeinstellung mit Kill-Funktion -30dB auf allen Kanälen
• Spezielle, vom Benutzer auswechselbare, hoch qualitative Fader
• Vom Benutzer auswechselbarer VCA-gesteuerter Crossfader
• Einfache A/B Kanalzuordnung des Crossfaders
• Crossfader Start für kompatible CD-Player
• 3 Beat synchronisierte Crossfader Mixing Effekte
• Einstellbarer Crossfaderkurve (weicher -> harter Übergang)
• Automatischer Beat-Counter
• 8 Digital Effekte
o Echo
o Autopan
o Flanger
o Manueller Filter
o Auto Filter
o Reverb
o Trans
o Pitch Shifter
• Vorprogrammierte Effekt Einstellungen
• Hintergrundbeleuchtetes LCD Display für Effekte und Beat Counter
• Effekt CUE Funktion
• Digitaler koaxialer Ausgang für Aufnahmegeräte
• Mikrofon Talk-Over Funktion
• Leistungsstarker Kopfhörerausgang mit „Split CUE“ und „CUE/PGM Mixing) möglich
• Einstellbare (Vorhörsignal/Ausgang) LED Aussteuerung mit Spitzenpegelanzeige.
• Sehr kompaktes Design
Page 41

BEDIENUNGSANLEITUNG DEUTSCH
SYNQ 40/63 SMX-1 DJ-MIxer
VOR INBETRIEBNAHME
Kontrollieren Sie, ob folgende Teile im Karton enthalten sind:
• SMX-1 Mischpult
• Netzanschlusskabel
• Bedienungsanleitung
VORSICHTSMASSNAHMEN ZUR BEDIENUNG
SICHERHEITSVORSCHRIFTEN:
ACHTUNG: Um sich nicht der Gefahr eines
elektrischen Schlags auszusetzen, entfernen
Sie keines der Gehäuseteile. Im Geräteinneren
befinden sich keine vom Benutzer
reparierbaren Teile. Überlassen Sie Reparaturen dem qualifizierten
Kundendienst!
Das Blitzsymbol im Dreieck weist den Benutzer darauf hin, das eine
Berührungsgefahr mit nicht isolierten Teilen im Geräteinneren, welche eine
gefährliche Spannung führen, besteht. Die Spannung ist so hoch, das hier die
Gefahr eines elektrischen Schlags besteht.
Das Ausrufezeichen im Dreieck weist den Benutzer auf wichtige Bedienungsund Wartungshinweise in den Dokumenten hin, die dem Gerät beiliegen.
Um Feuer oder elektrische Schläge vorzubeugen, setzen Sie dieses Gerät niemals Nässe
und Feuchtigkeit aus! Stellen Sie keine Behälter mit Flüssigkeiten in die Nähe des
Gerätes, es ist nicht wasserdicht und könnte beschädigt werden.
INSTALLATIONSANLEITUNG:
• Stellen Sie das Mischpult in einem gut belüfteten Raum auf, wo es nicht Feuchtigkeit
und hohen Temperaturen ausgesetzt wird.
• Plazieren und benutzen Sie das Mischpult für eine längere Zeit neben sehr warmen
Geräten wie Verstärker, Lampen, etc., könnte es die Funktion des Gerätes
beeinträchtigen.
• Das Gerät kann in 19“ Racks eingebaut werden. Benutzen Sie dafür die in der
Frontblende eingelassenen Löcher.
• Sollte das Gerät in ein Flightcase eingebaut werden, achten Sie auf eine gute
Luftzirkulation.
• Wenn das Mischpult aus einer kalten Umgebung an einem warmen Ort aufgestellt
wird, kann sich Kondenswasser bilden. Um Fehlfunktionen zu vermeiden, sollten Sie
das Gerät für ca. 1 Stunde vom Stromnetz trennen.
REINIGEN DES MISCHPULTES:
Entfernen Sie Staub und Schmutz mit einem weichen, trockenen Tuch. Achten Sie
darauf, dass keine Flüssigkeit in das Geräteinnere gelangen kann. Benutzen Sie keinen
Verdünner, Benzin oder andere chemische Mittel für das Mischpult. Die Oberfläche des
Gerätes könnte zerstört werden.
CAUTION
Page 42

BEDIENUNGSANLEITUNG DEUTSCH
SYNQ 41/63 SMX-1 DJ-MIxer
ANSCHLÜSSE UND FUNKTIONEN
ANSCHLÜSSE AUF DER RÜCKSEITE:
1. NETZANSCHLUSS: Nutzen Sie das beigelegte Netzkabel zum Anschluss des
Mischpultes an das Stromnetz.
2. MASTER1 BALANCED AUSGANG: XLR-Ausgang zum Anschluss des
Mischpultes an einen prof. Verstärker. Nutzen Sie hierfür symmetrisch,
abgeschirmte Kabel.
3. TRIM AUSGANG: Dieser Einsteller senkt den Ausgangspegel des Mischpultes,
um angeschlossene Verstärker und Lautsprecher vor hohen Eingangssignalen zu
schützen. (Achtung: Der Ausgangspegel kann bis auf 0 reduziert werden. Sollten
Sie kein Signal auf dem Ausgang anliegen haben, überprüfen Sie zuerst diesen
Einsteller!)
4. DIGITAL AUSGANG: Der digitale Ausgang ermöglicht es Ihnen Aufnahmen mit
einem Digitalrecorder o.ä. anzufertigen. Der Ausgangspegel ist unabhängig vom
Master-Fader.
5. FADER CONTROL: An diesen Buchsen können Fader-Start kompatible CD-Player
angeschlossen werden, die dann über den SMX-1 gesteuert werden können
6. MASTER1 AUSGANG: An dieser Buchse liegt das gleiche (allerdings
unsymmetrisch) Ausgangssignal wie an MASTER1 BALANCE OUTPUT (2) an.
7. ZONE AUSGANG: MASTER2 mit separaten Regler, zum Anschluss eines zweiten
Verstärkers.
8. REC AUSGANG: Hier liegt das gleiche Signal wie an MASTER1. Der
Ausgangspegel ist unabhängig vom Master-Fader, Stereo/Mono Schalter und
Balance-Regler. Hier können Sie ein analoges Aufnahmegerät anschließen.
9. LINE EINGANG: Zum Anschluss von Geräten mit LINE Pegel (CD, Radio, MD…)
10. PHONO/AUX EINGANG: Zum Anschluss eines Plattenspielers. Wenn der
PHONO/AUX Schalter (11) auf der rechten Position steht, können auch Geräte mit
LINE Pegel angeschlossen werden.
11. PHONO/AUX SCHALTER: Schaltet den PHONO/AUX EINGANG (10) zwischen
PHONO und LINE Pegel um.
12. MASSE (GND) ANSCHLUSS: Einige Plattenspieler benötigen einen MASSE
Anschluss. Es ist sehr empfehlenswert die Masseverbindung hier anzuschließen.
13. MIKROFON 2 & 3 EINGANG: Buchsen zum Anschluss von 2 weiteren
Mikrofonen.
Page 43

BEDIENUNGSANLEITUNG DEUTSCH
SYNQ 42/63 SMX-1 DJ-MIxer
BEDIENELEMENTE AUF DER FRONTBLENDE:
1. MIC EINGANG: Kombi-Buchse. Mikrofonbuchse für XLR Anschluss (symmetr.)
und Klinke ¼“ (unsymmetr.). Dieser Eingang kann als Mikrofoneingang für den DJ
benutzt werden. Der Talk Over wirkt sich nicht auf das Eingangssignal aus.
2. 3- BAND KLANGEINSTELLUNG: Dreiklangregelung (+-12dB) für Mikrofon1 und
Mikrofon2 Höhen@ 13kHz – Mitten@ 1kHz – Bass@ 70Hz
3. KANAL FADER: Fader zur Lautstärkeneinstellung. Diese qualitativ hochwertigen
Fader können während des Betriebes ausgetauscht werden (Natürlich nur, wenn
der Kanal nicht aktiv ist ☺ ) Mehr unter „FADERTAUSCH“
4. MIC ON/OFF/TALKOVER SCHALTER: Mikrofonschalter
• OFF: Mikrofon1 und Mikrofon2 ausgeschaltet
• ON: Mikrofon1 und Mikrofon2 eingeschaltet
• TALK OVER: MIKROFON1 und MIKROFON2 sind eingeschaltet.
Die Lautstärke aller anderen Kanäle wird um ca. 14dB abgesenkt.
5. MIC1 Vol.: Regelt die Lautstärke von MIKROFON1
6. MIC2 Vol.: Regelt die Lautstärke von MIKROFON2
7. CROSS FADER: Einstellung der Crossfaderkurve
• LINKE POSITION: Schöner, weiche Crossfaderübergang zwischen zwei
Kanälen. Ideal zum BEAT MIXING.
• RECHTE POSITION: Harter, „SWITCH LIKE“ Cut. Ideal für Scratching und
andere aggressive Mix-Techniken.
• POSITION DAZWISCHEN: Einstellung der eigenen individuellen
Crossfaderkurve.
8. FADER START ON/OFF SCHALTER: Wenn Sie einen Fader-Start kompatiblen
CD-Player an den FADER START Control Buchsen angeschlossen haben, können
Sie mit dem Crossfader des SMX-1 den CD-Player starten bzw. stoppen. Mit
diesem Schalter können Sie diese Funktion ein- bzw. ausschalten.
9. FADER ANZEIGE: Befindet sich der SMX-1 im Effekt Mix Modus, zeigen die LEDs
links und rechts des Crossfader, die mit den A und B Tasten (10) zugeordnete
Signalstärke an.
10. CROSS FADER ASSIGN TASTEN: Die linke Seite des Crossfader ist
gekennzeichnet mit „A“, die rechte mit „B“. Jeder Eingangskanal hat 2 ASSIGN
Page 44

BEDIENUNGSANLEITUNG DEUTSCH
SYNQ 43/63 SMX-1 DJ-MIxer
Tasten, genannt „A“ und „B“. Mit diesen Tasten kann das Signal auf die Crossfader
„A“ oder „B“ Seite geroutet werden. Die ausgewählte Taste leuchtet auf.
11. CROSS FADER: Verbindet die eingestellten Kanäle „A“ und „B“.
12. MASTER AUSGANG FADER: Fader zum Einstellen der Gesamtlautstärke.
(ACHTUNG: Die Lautstärke kann zusätzlich über den „TRIM OUPUT“ auf der
Rückseite des Gerätes reguliert werden. Überprüfen Sie diesen Einsteller, wenn
das Ausgangssignal zu niedrig ist)
13. ZONE LEVEL: Lautstärkereinsteller des Zonen Ausgangs. Das Ausgangssignal ist
unabhängig von der Master Lautstärke (12) und der Master Balance (37). Dieser
Ausgang kann auch als zweiter Masterausgang verwendet werden.
14. CROSSOVER EFFEKT EINHEIT: Um die Crossover Effekte voll nutzen zu
können, ist es notwendig einen geeigneten CD Player an die Fader Output
Buchsen anzuschließen. Die 3 eingebauten Effekte geben Ihnen zusätzlich die
Möglichkeit für perfektes BEAT MIXING. Bitte lesen Sie dazu den nachfolgenden
Text aufmerksam durch.
WICHTIG:
• „Fader Start ON/OFF“ Schalter (8) muss auf Position „ON“ stehen.
• Sie müssen jeweils einen Kanal auf „A“ zuweisen und den anderen
Kanal auf „B“ (10)
15. CROSSOVER EFFEKT MODE SCHALTER: Schalter zum Auswählen des
gewünschten Effekt- Modus.
• FADER: In diesem Modus nutzen Sie den Crossfader zur Steuerung der
CROSSOVER Effekte, sowie der Start/Stopp Funktion des CD-Players.
• OFF: Crossover Effekt ist deaktiviert.
• AUTO: In diesem Modus benötigen Sie den Crossfader nicht. Drücken Sie
einfach eine der Tasten und der Übergang ist automatisiert.
16. CROSSOVER EFFEKT AUSWAHL/START TASTE: Es stehen 3 Effekt Mix
Funktionen zur Verfügung: (Echo, Zip und Roll)
• ECHO EFFEKT: Dieser Effekt kann im FADER und AUTO Modus genutzt
werden:
• FADER MODE: Drücken Sie die ECHO Effekt Taste und bewegen Sie
den Crossfader von einem Ende zum anderen Ende. Ein Teil der
Musik wird gespeichert, wiederholt, immer leiser werdend
wiedergegeben. Der andere Player beginnt automatisch mit der
Wiedergabe. Der Echo Effekt ist Beat synchronisiert. Die Länge der
Wiederholung kann auch mit den „BEAT SYNC PRESET“ Tasten (23)
bearbeitet werden. Folgende SYNC Voreinstellungen stehen zur
Verfügung: ¼ - ½ - 1/1 – 2 – 4 – 8 Takte. Das Effekt Display zeigt die
Länge des gespeicherten Loops.
TIPP: Wenn Sie den Crossfader nicht ganz von einem zu anderen Ende bewegen,
können Sie nur einen kleinen Teil des Liedes speichern.
(Abhängig vom eingestellten BEAT SYNC PRESET). Sie können den Crossfader
wieder in die andere Richtung bewegen um die gespeicherte Wiedergabe zu stoppen
und wieder normal zwei Quellen miteinander zu mixen.
• AUTO MODE: Während der Musikwiedergabe, drücken Sie die
„ECHO“ Taste. Ein Teil der Musik wird gespeichert, wiederholt, immer
leiser werdend wiedergegeben, während der andere Player
automatisch mit seiner Wiedergabe beginnt. Die Länge des Übergangs
wir im Display angezeigt. Der Echo Effekt ist Beat synchronisiert. Die
Länge des Übergangs kann auch mit den „BEAT SYNC PRESET“
Tasten (24) und/oder mit dem „TIME PARAMETER“ Knopf (33)
bearbeitet werden.
Page 45

BEDIENUNGSANLEITUNG DEUTSCH
SYNQ 44/63 SMX-1 DJ-MIxer
• ZIP EFFEKT: Dieser Effekt kann im FADER und AUTO Modus genutzt werden:
• FADER MODE: Drücken Sie die ZIP Effekt Taste und bewegen Sie
den Crossfader von einem zum anderen Ende. Die Tonhöhe der Musik
wird tiefer. Wenn der Crossfader zum Ende geschoben wird, beginnt
der andere CD-Player automatisch mit seiner Wiedergabe. Je nach
Lage des Crossfaders zeigt das Display eine Zahl von 0 bis 99.
• AUTO MODE: Drücken Sie während der Wiedergabe die „ZIP Effekt“
Taste. Die Tonhöhe der Musik senkt sich automatisch ab und der
andere CD-Player starte automatisch seine Wiedergabe. Die Länge
des kompletten Fades wird im Effekt Display angezeigt. Sie kann
durch die Tasten „BEAT SYNC PRESET“ (24) und dem „TIME
PARAMETER KNOPF“ (33) beeinflusst werden.
• ROLL EFFEKT: Dieser Effekt kann im FADER und AUTO Modus genutzt
werden:
• FADER MODE: Drücken Sie die ROLL Effekt Taste und bewegen Sie
den Crossfader von einem zum anderen Ende. Zuerst wird die Musik
als ganzer Takt „1/1 Beat“ wiederholt (Effekt Display zeigt „1“), danach
als ½ Takt (Display zeigt „2“, und zum Ende eine Wiederholung mit
einer Länge eines 1/8 Takts (Display zeigt „4“). Wenn der Crossfader
die andere Seite erreicht hat, reduziert sich die Lautstärke und der
andere CD-Player beginnt automatisch mit seiner Wiedergabe.
Beachten Sie bitte das die „BEAT SYNC PRESET“ Tasten, sowie der
„TIME PARAMETER KNOPF“ ohne Funktion sind!
• AUTO MODE: Drücken Sie während der Wiedergabe die „ROLL
Effekt“ Taste. Ein taktgenauer Loop wird gestartet und der andere CDPlayer beginnt automatisch mit seiner Wiedergabe. Die Länge des
kompletten Fades wird im Display angezeigt und kann mit den „BEAT
SYNC PRESET“ Tasten (24) und/oder mit dem „TIME PARAMETER
KNOPF“ (33) beeinflusst werden.
17. CUE MIXING KNOPF: Mit diesem Knopf bestimmen Sie das auf dem
Kopfhörerausgang anliegende Signal. Drehen Sie den Knopf nach rechts, hören
Sie nur das Ausgangssignal. Drehen Sie den Knopf nach links, hören Sie das, mit
den CUE Tasten (21, 39) eingestellte Signal. Drehen Sie den Knopf in die
Mittelstellung hören Sie einen Mix aus Vorhör- und Ausgangssignal.
18. SPLIT CUE TASTE: Normalerweise hören Sie auf dem Kopfhörerausgang ein
STEREO - Signal. Drücken Sie diese Taste erhalten Sie 2 verschiedene MONO Signale:
• LINKS: Vorhörsignal, einstellbar mit den CUE- Tasten (21,39)
• RECHTS: MASTER Ausgangssignal
Beachten Sie das der CUE MIXING KNOPF in der mittleren Position stehen muss!
19. CUE L EVEL: Einstellung der Kopfhörerlautstärke. Beachten Sie, dass zu hohe
Lautstärken Ihr Gehör schädigen kann.
20. KOPFHÖRER AUSGANG: Schließen Sie hier Ihren Kopfhörer mit 6,35mm
Klinkenstecker an.
21. EFFEKT CUE: Das ist die CUE Taste für die Effekt Sektion. Wenn dieser Schalter
gedrückt ist, können Sie das Effektsignal vorhören.
22. EFFEKT ON/OFF TASTE: Taste zum Ein-/Ausschalten des Effektsignals.
23. TAP TASTE: Alle Effekte sind Taktsyncron. Der SMX-1 hat einen eingebauten,
automatischen BEAT Counter. In einigen Fällen (bei ruhigen Tracks) kann es sein,
das der eingebauter BEAT Counter den Takt nicht erkennen kann. In diesen Fällen
können Sie mit Hilfe der TAP Taste den Takt manuell eingeben. Wenn Sie die
Taste drücken, blinkt die Taste auf und der eingebaute BEAT Counter ist
Page 46

BEDIENUNGSANLEITUNG DEUTSCH
SYNQ 45/63 SMX-1 DJ-MIxer
ausgeschaltet. Soll der automatische, eingebaute BEAT Counter wieder
eingeschaltet werden, halten Sie die Taste einige Sekunden gedrückt. Die TAP
Taste hört auf zu blinken.
24. BEAT SYNC PRESET TASTEN: Diese Tasten werden als Voreinstellungen für die
unterschiedlichen Effekte benutzt. Abhängig von dem vorgewählten Effekt können
diese Voreinstellungen die Einstellungen sein, die bezogen werden auf den Beat,
Filter, Prozentsatz des Pitchs, etc. Jede Taste hat eine der folgenden Beschriftung:
2 – 4 – 8 – 16 – 32. Haben Sie eine Taste angewählt, leuchtet sie auf. Sie können
die zusätzlichen Voreinstellungen auch vorwählen, indem Sie den „TIME
PARAMETER KNOPF“ (33) drücken, während Sie die Voreinstellungen 4 – 8 oder
16 vorwählen. In diesem Fall blinkt die Taste um anzuzeigen, dass die Anzeige
über der Taste (1/4 - ½ oder 1/1) vorgewählt wird. Die Voreinstellungen werden
gespeichert, wenn Sie zu einem anderen Effekt wechseln.
Beispiel: Haben Sie den „ECHO“ Effekt gewählt und haben sich für PRESET „2“
entschieden, hören Sie das das der Sound sich alle 2 Takte wiederholt. Wählen
Sie PRESET „4“, wiederholt sich der Sound alle 4 Takte. Wählen Sie PRESET
„1/2“ hören Sie dass sich der Sound jeden halben Takt wiederholt.
25. EFFEKT BPM DISPLAY: Anzeige der BPM (Beats Per Minute = Takte pro Minute)
der Effekt Einheit. Wenn der BPM Counter keinen Takt erkennen kann, blinkt das
BPM Display bis zum Erkennen eines Taktes.
26. TIME (X) PARAMETER: Bei bestimmten Effekten zeigt das Display eine
Zeitinformation (msek), bei anderen Effekten eine Prozentangabe (%) oder eine
CUTOFF Frequenz (kHz) an. Sie können diese Parameter mit einer der PRESET
Tasten (24) ändern und mit dem „TIME PARAMETER KNOPF“ (33) eine
Feineinstellung durchführen.
27. CUE BPM / DEPTH (Y) PARAMTER ANZEIGE: Zeigt den ermittelten BPM Wert
eines der, mit den CUE - Tasten ausgewählten, 4 Eingangskanäle, (Kanal 1 bis
Kanal 4). Wenn Sie den Einsteller DEPTH (Y) Parameter (32) betätigen, wir der
neue Wert (%) im Display angezeigt.
28. EFFEKT DISPLAY: Anzeige des gewählten Effekts
29. EFFEKT INPUT DISPLAY: Anzeige des Eingangssignals. Auswahl über
Eingangswahlschalter (30).
30. EINGANGSWAHLSCHALTER: Mit diesem Drehschalter wählen Sie aus, welches
Eingangssignal mit einem Effekt versehen werden soll. Sie können zwischen
folgenden Einstellungen wählen:
• Einen der Eingangskanäle
• Eines der Kanäle welches mit den „CROSSFADER ASSIGN TASTEN“
zugeordnet wurde. Dies kann die linke Seite „CF-A“ oder die rechte Seite
„CF-B“ sein.
• Wenn Sie „MASTER“ gewählt haben, wird der Effekt auf den
Masterausgang gelegt.
31. EFFEKT WAHLSCHALTER: Einstellen des gewünschten Effekts.
WICHTIG: Der Crossover-Effekt und der Multi-Effekt können nicht gemeinsam
genutzt werden! Bevor Sie den Multi-Effekt nutzen können, müssen Sie zuerst den
Schalter des Crossover-Effekts ausschalten (Schauen Sie unter „15“ für weitere
Informationen)
• ECHO: Produziert Wiederholungen. Sie können taktgenaue, synchrone
Echos beim Vorwählen der gewünschten "BEAT SYNC PRESET" Tasten
(24) leicht mischen. Diese Voreinstellungen können mit dem "TIME
PARAMETER KNOPF"(33) von 2mSek. bis zu 2Sek. Beeinflusst werden.
Mit dem „LEVEL PARAMETER KNOPF“ können Sie die Balance
zwischen dem Original und dem verzögerten Ton ändern.
Page 47

BEDIENUNGSANLEITUNG DEUTSCH
SYNQ 46/63 SMX-1 DJ-MIxer
• AUTO PAN: Automatische Überblendung vom linken zum rechten Kanal
im Takt der Musik. Mit den „BEAT SYNC PRESET“ Tasten können Sie
einstellen wie schnell die Überblendung stattfinden soll. (Beispiel: Mit
PRESET „2“ stellen Sie 2 Überblendtakte ein.) Die „PRESETS“ können
mit dem „TIME PARAMETER KNOPF“ (33) von 30mSek. Bis 16 Sek.
Beeinflusst werden. Mit dem „LEVEL PARAMETER Knopf“ (32) können
Sie die Überblendgeschwindigkeit einstellen: Sie haben die Wahl
zwischen einem leichtem oder aggressiven Übergang.
• FLANGER: Diesen Effekt kann man mit einem „startenden, musikalischen
Düsentriebwerk“ bezeichnen. Es ist, als ob die Musik sich in der Phase
verschiebt. Mit den „BEAT SYNC PRESET TASTEN“ (24) können Sie
ganz einfach die Flanger Zeit einstellen. Die Voreinstellung kann mit dem
„TIME PARAMETER KNOPF“ (33) von 100mSek. Bis 16 Sek. beeinflusst
werden. Mit dem „LEVEL PARAMETER KNOPF“ können Sie den
FLANGER Feedback Pegel einstellen.
TIPP: Jedes mal, wenn Sie die gleiche PRESET Taste (24) drücken, startet der
FLANGER Zyklus von vorne. Das gibt einen netten Extra Effekt!
• MANUELLER FILTER: Das ist ein sehr effektiver digitaler Frequenz-
Cutter. Sie können die „CUTOFF“ Frequenz ganz einfach mit den „BEAT
SYNC PRESET TASTEN“ (24) auswählen:
o PRESET „2“ (Tiefpass 50 Hz) -> Alle Frequenzen über 50 Hz
werden rausgefiltert. Sie werden einen sehr tiefen Bass hören.
o PRESET „4“ (Tiefpass 2030 Hz) -> Alle Frequenzen über
2030 Hz werden rausgefiltert. Die Musik klingt wie ein altes
Mittelwellen Radio.
o PRESET „8“ (Tiefpass 20000 Hz) -> Alle Frequenzen über
20000 Hz werden rausgefiltert. Die Musik klingt normal.
o PRESET „16“ (Hochpass 210 Hz) -> Alle Frequenzen unter
210 Hz werden rausgefiltert. Alle tiefen Frequenzen werden
gefiltert. Die Musik klingt wie aus einem kleinen UKW Radio.
o PRESET „32“ (Hochpass 510 Hz) -> Alle Frequenzen unter
510 Hz werden rausgefiltert. Der gleiche Klang wie bei
„PRESET“ 16, aber das Radio ist noch etwas kleiner.
Die PRESETS (24) können mit dem "TIME PARAMETER KNOPF"(33)
von (LPF) 50Hz (Anzeige: L 0.05kHz) bis (HPF) 21.1kHz (Anzeige: H
21.1kHz) eingestellt werden. Mit dem "LEVEL PARAMETER KNOPF“
"(32) können Sie das Filterresonanzniveau ändern.
(dieses ist der Q-Faktor des Filters, es ändert die Auswirkung des Filters
auf eine vorgewählte Frequenz)
• AUTO FILTER: Das ist ein automatischer Low Pass Filter (LPF). Die
Grenzfrequenz variiert in Zyklen von 20 kHz bis 50 Hz. Mit den „PRESET
TASTEN“ (24) können Sie ein taktsyncronen Filterzyklus einstellen.
(Beispiel: Drücken Sie die PRESET TASTE „8“ ->Es benötigt 8 Takte zum
Ändern der Grezfrequenz von 20 KHz bis 50 Hz und zurück.) Die
PRESETS können mit dem „TIME PARAMETER KNOPF“ (33) von
100mSek. Bis 16 Sek. eingestellt werden. Mit dem „LEVEL PARAMETER
KNOPF“ (32) können Sie Filterresonanzniveau ändern.
(dieses ist der Q-Faktor des Filters, es ändert die Auswirkung des Filters
auf eine vorgewählte Frequenz)
• REVERB: Dieser Effekt erklärt man am besten mit dem Hall in einer
Kirche. Stellen Sie sich vor, sie spielen Ihre Musik in einer Kirche oder
einer sehr großen, leeren Halle: Der Hall wird durch Reflexionen an den
Page 48

BEDIENUNGSANLEITUNG DEUTSCH
SYNQ 47/63 SMX-1 DJ-MIxer
Wänden digital simuliert. Mit den „PRESET TASTEN“ (24) können Sie aus
5 vordefinierten Hallzeiten wählen. Die Nachhallzeit können Sie mit dem
„TIME PARAMETER KNOPF“ (33) in 1% Schritten von 0% bis 100%
einstellen. Mit dem „LEVEL PARAMETER KNOPF“ (32) können Sie die
Balance zwischen Original und Effektanteil einstellen.
• TRANS: Schneidet automatisch Sounds im Takt der Musik. Mit den
„BEAT SYNC PRESET TASTEN“(24) können Sie die Länge des
Schnittzyklus einstellen. (Beispiel: Mit Preset ¼ (Drücken Sie den „TIME
PARAMETER KNOPF (33) während Sie drehen) erhalten Sie einen ¼
Cut. Die Presets können mit dem „TIME PARAMETER KNOPF (33) von
25mSek. Bis 16 Sek. eingestellt werden. Mit dem „LEVEL PARAMETER
KNOPF“ (32) können Sie die „CUT“ Zeit einstellen. Wenn Sie den Knopf
ganz nach links drehen (Display zeigt 0%) ist die „CUT“ Zeit auf 0 und
kein Effekt zu hören. Drehen Sie den „LEVEL PARAMETER KNOPF“(32)
nach rechts, wird die CUT Zeit größer und Sie hören nur kleine Spitzen
der Musik.
TIPP: Dieser Effekt benötigt einige Übung. Sie erreichen die besten Ergebnisse bei
konstanten Rhythmus, sehr kleinen „CUT“ Zeiten (¼ und ½ Takte) und langen CUT
Zeiten von 50% und mehr.
• PITCH SHIFTER: Verschiebung der Tonhöhe, während die
Geschwindigkeit gleich bleibt. (Tatsächlich ist das genau das
Gegengesetze wie das „MASTER TEMPO“ bei einigen CD-Playern:
Verändern der Geschwindigkeit ohne Tonhöhenänderung) Mit den
PRESET Tasten (24) können Sie aus 5 vordefinierten PITCHs wählen.
(PRESET „8“ ist 0%, die Musik ändert sich nicht) Mit dem „ZEIT
PARAMETER KNOPF“ (33) können Sie die Tonhöhe in 1% Schritten von 100% bis + 100% beeinflussen. Mit dem „LEVEL PARAMETER KNOPF“
(32) können Sie die Balance zwischen Original und Effektanteil einstellen.
TIPP: Benutzen Sie den Pitch Shifter mit einem Mikrofon haben Sie einen VOICE
CHANGER. (Mit Pitch -100% erreichen Sie eine Stimme „aus der anderen Welt“
☺
)
32. LEVEL (Y) PARAMETER KNOPF: Mit diesem Drehknopf stellen Sie den „Y“
Parameter ein. Lesen Sie bitte unter 31 weiter. Diese Funktion ist für jeden Effekt
verschieden.
33. TIME (X) PARAMETER KNOPF: Mit diesem Drehknopf stellen Sie den „X“
Parameter ein. Meistens stellen Sie mit diesem Knopf die Zeitkonstante ein. Lesen
Sie jedoch für weitere Informationen unter 31 weiter. Dieser Drehknopf hat einen
integrierten Druck-Knopf für zwei weitere Funktionen:
• Drücken Sie diesen Knopf um extra „BEAT SYNC PRESETS“ (24) zu
erhalten: ¼ Beat - ½ Beat – 1/1 Beat.
• Drücken Sie diesen Knopf während des Drehens: In den meisten Fällen
können Sie den Zeit Parameter der Effekte viel schneller einstellen.
34. NETZSCHALTER: Mit diesem Schalter schalten Sie das Gerät ein bzw. aus.
35. LED VU METER: Exakte Aussteuerungsanzeige mit HOLD – Funktion
(Spitzenpegel leuchten einige Zeit weiter) Sehr wichtig: Möchten Sie einen klaren
und sauberen Klang, achten Sie auf dieses wichtige Anzeigeninstrument. Die
meisten DJ’s nutzen diese Anzeige als „blinkender Lichteffekt“ und steuern diese
Anzeige komplett aus. Klarstellung: Ein guter DJ benötigt einen klaren und
sauberen Klang. Pegel über 0dB neigen zur Übersteuerung. Also: Halten Sie ein
Auge auf die Aussteuerungsanzeige. ☺
36. VU METER WAHLSCHALTER: Umschalter für die Aussteuerungsanzeige (35)
• L/R - Mode: Das VU - Meter zeigt das Stereo Ausgangssignal auf beiden
LED-Ketten an.
Page 49

BEDIENUNGSANLEITUNG DEUTSCH
SYNQ 48/63 SMX-1 DJ-MIxer
• CUE/PGM – Mode: Das VU – Meter zeigt das Ausgangssignal auf einer
LED-Kette und das CUE - Signal (39) auf der anderen LED-Kette an.
Dadurch ist es möglich beide Signale gleichzeitig zu überprüfen.
37. MASTER MONO/STEREO SCHALTER: Mit diesem Umschalter schalten Sie den
Masterausgang zwischen MONO und STEREO.
38. MASTER BALANCE: Einstellung der MASTER Balance links - rechts.
39. CUE / BPM COUNTER WAHLSCHALTER: Zur Auswahl der Quelle (Kanal 1 –
Kanal 4), die mittels Kopfhörer überwacht werden soll. Das Drücken mehrerer CUE
- Tasten ermöglicht es Ihnen mehrere Quellen gleichzeitig zu überwachen. Der
BPM Wert des gewählten Kanals (Kanal 1 – Kanal 4) erscheint im CUE BPM
Display (27)
Achtung: Wählen Sie mehr als einen Kanal an, wird der BPM Wert nicht korrekt
angezeigt!
40. 3-BAND TON EINSTELLUNG: Die Frequenz jeden Kanals kann separat in einem
Bereich von -30dB bis +10dB eingestellt werden: Höhen@13kHz ~ Mitten@1kHz ~
Bass@70Hz. In der Mittenposition sind die Frequenzeinsteller ausgeschaltet.
41. EINGANGSWAHLSCHALTER: Nutzen Sie diese Schalter zur Wahl des richtigen
Eingangssignals. (PHONO, LINE, AUX oder Mikrofon). An einigen Kanälen sind, in
der Nähe der Eingangs Chinch - Buchsen, auf der Rückseite noch zusätzliche
Eingangswahlschalter.
TIPP: LINE, AUX, CD, Tuner, etc... sind verschiedene Bezeichnungen für die Eingangskanäle mit
gleichem Signal Pegel.
42. GAIN LEVEL: Einstellung der Eingangssignalstärke für jeden Kanal. Benutzen Sie
diesen Einsteller zur Justierung der Aussteuerungsanzeige auf ca. 0dB
Page 50

BEDIENUNGSANLEITUNG DEUTSCH
SYNQ 49/63 SMX-1 DJ-MIxer
ANSCHLÜSSE
Wenn Sie Verbindung herstellen oder ändern, schalten Sie das Gerät bitte aus.
Dieses Anschluss-Diagramm zeigt Ihnen, was alles möglich ist. Viele andere
Verbindungen sind möglich. Bitte beachten Sie folgende Hinweise:
• Verbinden Sie CHINCH Kabel immer in die gleiche Richtung:
o Chinch - Stecker weiß oder schwarz -> Linke Seite
o Chinch - Stecker rot -> Rechte Seite
• Wenn Sie einen CD-Player, Kassetten-Deck, MD-Player, Tuner, Video Recorder etc.
an einen der Eingänge anschließen, vergessen Sie nicht den Eingangswahlschalter
des Kanals auf „AUX“ oder „LINE“ zu stellen.
• Wenn Sie ein Mikrofon an Kanal 4 anschließen möchten, stellen Sie den
Eingangswahlschalter auf „MIC“.
• Wenn Sie einen Plattenspieler an einen der Eingänge anschließen möchten, stellen
Sie den Eingangswahlschalter auf „PHONO“.
Page 51

BEDIENUNGSANLEITUNG DEUTSCH
SYNQ 50/63 SMX-1 DJ-MIxer
• (Achtung: Einige neuere Plattenspieler haben einen LINE - Ausgang. Lesen Sie hierzu
die Bedienungsanleitung des Plattenspielers)
• Einige Plattenspieler besitzen ein GND-Anschluss. Es ist erforderlich, diesen Masse Anschluss mit dem SMX-1 zu verbinden.
• Um analoge Aufnahmen zu erhalten müssen Sie den Record - Eingang eines analogen
Aufnahmegerätes mit dem Record – Ausgang des SMX-1 verbinden.
• Um digitale Aufnahmen zu erhalten können Sie Ihr digitales Aufnahmegerät, an den
koaxialen Ausgang des SMX-1 anschließen.
• Um die bestmöglichste Soundqualität zu erhalten, sind auf allen Unbenutzen PHONO Eingänge Kurzschlussstecker montiert. Entfernen Sie einen Kurzschlussstecker wenn
Sie den Eingang mit einem Plattenspieler verbinden möchten. Verwahren Sie die
Kurzschlussstecker für einen späteren Gebrauch an einem sicheren Ort.
WECHSELN DER FADER
Der große Vorteil des SMX-1 liegt darin, das Sie während Gebrauch des Mischpultes die
Kanalfader wechseln können.
Das müssen Sie bei Wechsel des Kanalfaders beachten:
• Entfernen Sie den Knopf des Faders.
• Lösen Sie die 4 Schrauben, mit der die
Faderblende gehalten wird.
• Lösen Sie die 3 Schrauben, die den zu
wechselnden Fader halten.
• Entfernen Sie den defekten Fader.
• Montieren Sie den neuen Fader in die
Halterung. Stellen Sie sicher, dass die
Kontakte fest in die Buchse auf der
Hauptplatine gesteckt werden.
• Befestigen Sie den Fader wieder mit den 3
Schrauben.
• Befestigen Sie die Faderblende wieder mit
den 4 Schrauben.
Fertig!
Das müssen Sie bei Wechsel des Crossfaders beachten:
• Entfernen Sie den Knopf des Faders.
• Lösen Sie die 2 Schrauben, mit denen der Crossfader befestigt ist.
• Entfernen Sie den defekten Fader, sowie die Abdeckung.
• Lösen Sie das Kabel durch Ziehen des Steckers vom Crossfader.
(Ziehen Sie am Stecker, nicht am Kabel!)
• Stecken Sie den Stecker in den neuen Crossfader.
• Montieren Sie den Crossfader wieder mit den 2 Schrauben.
Fertig!
Page 52

BEDIENUNGSANLEITUNG DEUTSCH
SYNQ 51/63 SMX-1 DJ-MIxer
TECHNISCHE SPEZIFIKATION
Eingang/Ausgang Impedanz & Empfindlichkeit (EQ linear, max.Gain, Aussteuerung = 0dB)
LINE Eingang: 340mV/20 kΩ (max = + 4dBV)
AUX Eingang: 340mV/47 kΩ (max = + 4dBV)
Phono Eingang: 3,4mV/47 kΩ (max = - 40dBV)
Mikrofon Eingang: 1,7mV/2,2 kΩ (max = - 42dBV)
Record Ausgang: 775mV/1 kΩ
Master unsymmetrisch: 1,55V/100 Ω
Master symmetrisch: 3,00V/200 Ω
Zonen Ausgang: 1,55V/100 Ω
Kopfhörer: 3,00V/33 Ω
Digital Ausgang: 1,00V/75 Ω
Maximaler Ausgang (EQ linear, max. Gain, Effekt aus, THD=1%, Last ist 100kOhm)
Master: Mehr als +18dBV (8,0V)
Zone: Mehr als +18dBV (8,0V)
Kopfhörer: Mehr als + 9,5dBV (3V) @ 32Ω
Frequenzbereich (EQ linear, max. Gain, Aussteuerung = 0dB, Last ist 100 kOhm)
Line + aux: 25 – 20.000Hz +/-1dB
Phono: 25 – 20.000Hz +/-1dB (RIAA)
Mikrofon: 25 - 20.000Hz +/-1dB
THD + Rauschen (EQ linear, max. Gain, Aussteuerung = 0dB, Last ist 100 kOhm)
Line + aux: Weniger als 0,015% (25 – 20.000Hz)
Kanal Übersprechen (EQ linear, max. Gain, Aussteuerung = 0dB, Last ist 100 kOhm)
Mehr als 75dB @ 1kHz
Klangeinstellung:
Mikrofon: - 12 dB / + 12 dB @ 70 Hz – 1 kHz – 13 kHz
Eingangskanäle: - 30 dB / + 10 dB @ 70 Hz – 1 kHz – 13 kHz
Allgemeine Spezifikationen:
Netzspannung: 230V~ 50 Hz
Leistungsaufnahme: 34 Watt
Abmessungen: 482 x 221 x 87,5mm (BxTxH)
Gewicht: 5,25 kg
Page 53

MANUAL DE INSTRUCCIONES ESPANOL
SYNQ 52/63 SMX-1 DJ-MIxer
MANUAL DE INSTRUCCIONES
INTRODUCCION
Le felicitamos y le agradecemos por la adquisicion de este producto SYNQ. Leá
atentamente las siguientes instrucciones para saver como utilizar este producto de
manera correcta. Recoja este manual en un sitio seguro para volver a consultarlo
ulteriormente.
CARACTERISTICAS
• 13 entradas sobre 6 canales (2mícros + 4 canales con deslizantes)
• 2 salidas Master:
o Master con limitación (trim) de señal (XLR, balanceado)
o Salida Zone “master 2” (cinch, sin balancear)
• Controlador de tonalidad 3-bandas con funcion 'kill' -30dB sobre cada canal
• Deslizantes especiales de alta cualidad, replazable por el utilizador
• Crossfader controlado por VCA, replazable por el utilizador
• Canal de selección A/B para crossfader
• 'Start control' sobre crossfader para arranque de las platinas de CD's compatibles
• 3 Efectos de mezcla 'Beats sincro' sobre el crossfader
• Curva de crossfader ajustable (fundido suave duro)
• Contador BPM (Beats por minuto) totalemente automatico
• 8 Efectos digital 'Beats sincro':
o Eco
o Autopan
o Flanger
o Filtro manual
o Filtro automatico
o Reverbération
o Trans
o Variación de tono (pitch)
• Selección de efectos pre-programados
• Pantalla rétro-iluminada para los efectos y el contador BPM
• Funcion 'efeto Cue'
• Salida digital coaxial para gravadores
• Función 'talk-over' para micrófono
• Salida potente para cascos con posibilidad “split cue” y “cue/pgm mixing”
• Selección cue/pgm para el VU-meter (LED) con memoria peak.
• Diseño muy compacto.
Page 54

MANUAL DE INSTRUCCIONES ESPANOL
SYNQ 53/63 SMX-1 DJ-MIxer
PRELIMINAR
Verificar la presencia en la caja de los siguientes elementos:
• Mezcladora SMX-1
• Cable de alimentation
• Manual de instrucciones
INSTRUCCIONES RELATIVAS A LA MANIPULATION
CONSEJOS DE SEGURIDAD:
ATENCION: Para evitar todo riesgo de
electrocución, no avrir la tapa. El interior no
contiene piezas replazables por el utilizador.
En caso de problema, pongase en contacto
con su vendedor.
Esta flecha en un triangulo suele avisar de la presencia en la tapa de "voltaje
peligroso" sin isolación que puede ser sufiziente para causar un riesgo de
electrocución.
El punto de exclamación en un triangulo suele avisar el utilizador de la
presencia de instrucciones de funcionamiento y de mantenimiento
importantes en el manual que acompaña este producto.
Para evitar riesgos de electrocución o incendio, evitar la exposición a la lluvia o
humedad.
No insertar objetos metalicos ni dejar caerse liquido en el aparato. Elecctrocuciones o
disfuncionamientos pueden ocurrir.
CONSEJOS DE INSTALACION:
• Instalar la platina en un sitio con buena ventilación para no exponerla a altas
temperaturas o humedad.
• No colocar y utilizar la platina mucho tiempo en sitios calientes (al lado de
amplificadores, focos,…) puede afectar sus prestaciones.
• El aparato puede ser colocado el un rack de 19”. Fijar el aparato gracias a los 4
agujeros para tornillos del panel frontal. Asegurarse de la dimension correcta de los
tornillos (no provistos). Evitar las vibraciones y los golpes durante el transporte.
• Para evitar la condensación en el aparato, dejarlo adaptarse a la nueva temperatura
despues del transporte. La condensación puede alterar las prestaciones de este
aparato.
LIMPIEZA:
Límpiar con un trapo lijeramente humedo. No dejar caerse agua en el interior de la
unidad.
No utilizar productos abrasivos (alcohol,…) que puedan dañar la platina.
CAUTION
Page 55

MANUAL DE INSTRUCCIONES ESPANOL
SYNQ 54/63 SMX-1 DJ-MIxer
CONTROLES Y FUNCIONES
CONTROLES DE LA PARTE TRASERA:
1. ALIMENTACION: Utilizar el cable de alimentación provisto.
2. SALIDA MASTER1 BALANCEADA: los conectores XLR pueden ser utilizados
para conectar la SMX-1 al amplificador utilizando cables especiales de señal
balanceada.
3. SALIDA TRIM: Este potenciometro permite reducir el nivel de salida de la mesa
para evitar dañar el amplificador o los altavoces. (Atención: el nivel puede
disminuirse hasta zero. Si no hay señal sobre la salida master, verificar quel nivel
de este potenciometrole no esté en zero.)
4. SALIDA DIGITAL: Permite gravar de manera digital sobre cualquier gravador
digital conectado. El deslizante Master no afecta esta salida
5. CONTROLE FADER: Conectando platinas de CD's compatibles a esta entrada, el
arranque del CD puede ser controlado por el deslizante y el crossfader de la SMX-
1.
6. SALIDA MASTER1 SIN BALANCEAR: Identica a la MASTER1 balanceada (2)
pero con señal sin balancear. Puede ser utilizada para conectar amplificadores sin
balancear.
7. SALIDA ZONE: Tambien llamada master2 con control de nivel separado. Permite
conectar amplificadores suplementarios.
8. SALIDA RECORD: Transmite la misma señal que la salida master pero sin ser sin
influencia del nivel master, balance, controlador mono/estereo. Puede conectarse
a un gravador analógico.
9. ENTRADA LINE: Permite conectar todo típo de aparatos con nivel de linea (CD,
tuner, MD, …).
10. ENTRADA PHONO/AUX: Generalmente utilizada para conectar un tocadiscos.
Poniendo el interruptor “phono/aux” (11) hacia la derecha, se puede conectar un
aparato con nivel de linea.
11. INTERRUPTOR PHONE/AUX: Permite elejir la señal de la entrada “phono/aux
”(10).
12. CONEXIÓN GROUND (GND): Muchos tocadiscos tienen una conexión de masa
(GND). Es preferible conectar esa señal de masa a este conectador.
13. ENTRADAS MIC 2&3: Permite conectar 2 micros sin balancear suplementarios.
Page 56

MANUAL DE INSTRUCCIONES ESPANOL
SYNQ 55/63 SMX-1 DJ-MIxer
CONTROLES DEL PANEL FRONTAL:
1. ENTRADA JACK MICRO: Combo jack. Accepta micro balanceado con XLR o
micro sin balancear con jack 1/4” mono. Esta entrada es principalmente utilizada
para micros DJ. El talk-over no afecta el nivel de la señal de esta entrada.
2. CONTROLADOR DE TONALIDADES 3-BANDAS: La frecuencia de los micros
1&2 puede ser controlada en una gama de +/-12dB: Altas@13kHz ~
Medias@1kHz ~ Bajas@70Hz.
3. DESLIZANTES DE CANALES: Controla el nivel de cada canal. Estos deslizantes
de alta cualidad pueden ser replazados por el utilizador… ¡mismo con la mesa en
funcionamiento! (¡sobre otro canal evidentemente! ☺) Referirse a la sección
“Cambiar los deslizantes”.
4. INTERRUPTOR MICRO ON/OFF/TALK OVER: Estas son las 3 funciones:
• OFF: los 2 micros mic1 & mic2 cortados.
• ON: los 2 micros mic1 & mic2 encendidos.
• TALK OVER: mic1 & 2 encendidos; el nivel de todos los otros canales
disminuye de -14dB.
5. MIC1 VOL: Controla el nivel de entrada del du micro1.
6. MIC2 VOL: Controla el nivel de entrada del micro2.
7. CROSS FADER: Permite ajustar la curva de fundido del crossfader:
• POSICION IZQUIERDA: para realizar una mezcla suave entre los 2 canales.
Ideal para mezclar beats.
• POSICION DERECHA: permite realizar 'cuts' mas vivos, mas secos a la
manera de un interruptor. Ideal para "scratching" y otras técnicas mas
agresivas.
• POSICIONES INTERMEDIAS: entre las 2 extremidades, se puede
selectionar la curva deseada.
8. INTERRUPTOR FADER START ON/OFF: Se puede conectar una platina de CD
compatible al conectador 'fader control'. Su arranque/interrupción (re-cue) pueden
ser controlados con el crossfader de la SMX-1. El interruptor permite poner en
funcionamiento o interrumpir la función "fader start".
9. INDICADORES DE DESLIZANTES: Durante el modo "Effect mix", indícan la
salida audio que proviene de los canales seleccionados con la asignación del
crossfader A ou B (10).
Page 57

MANUAL DE INSTRUCCIONES ESPANOL
SYNQ 56/63 SMX-1 DJ-MIxer
10. ASSIGNACION DEL CROSSFADER: El lado izquierdo del crossfader va con la
letra “A”, el derecho con la “B”. cada canal de entrada posee 2 botones de
asignación “A” & “B”. Así, se puede asignar sencillamente la señal de un canal al
lado izquierdo o derecho del crossfader pulsando la tecla de asignación
correspondiente. La tecla seleccionada se enciende.
11. CROSSFADER: Permite mezclar señales de 2 canales asignados con las teclas
de asignación (10).
12. DESLIZANTE DE SALIDA MASTER: Controla el nivel de salida master.
(Atención: El limitador “trim" en la parte trasera puede reducir el nivel de salida
master. Verificar este limitatador si el nivel de salida máximo es inferior a la
normal).
13. NIVEAL ZONE: Controla el nivel de la salida ZONE de la parte trasera. Este nivel
no es influenciado por el deslizante master (12) ni por el balance master (37). Esta
salida puede ser utilizada como segunda salida master.
14. UNIDAD DE EFECTOS CROSSOVER: Para sacar el mejor provecho de los
efectos del crossover, es absolutamente necesario conectar una platina CD
compatible (referirse al capitulo n°5). Los 3 efectos ofrecen posibilidades
suplementarias para sincronizar perfectamente su mezcla sobre el rítmo musical
(beat). ¡Léan las instrucciones de funcionamiento siguientes!
IMPORTANTE:
• Colocar el interruptor “fader start on/off ” (8) sobre ON.
• Asignar 2 canales A & B con las teclas de asignación (10)
15. INTERRUPTOR DE EFECTO CROSSOVER: Permite seleccionar el modo de
efecto crossover deseado:
• FADER: Este modo permite utilizar el crossfader para controlar el efecto
crossover y actuar la función arranque/interrupción (re-cue) del CD.
• OFF: La mesa no está en modo de efecto crossover.
• AUTO: En este modo no se deve ni utilizar el crossfader. ¡Pulsar
simplemente uno de los botones y la mezcla se hace sola en perfecta
sincronización sobre el beat!
16. TECLAS DE EFECTO CROSSOVER SELECT/START: Permite seleccionar el
típo de efecto deseado, 3 funciones (Echo, Zip y Roll) son posibles:
• ECHO: Este efecto puede ser utilizado en modo FADER y AUTO:
• MODO FADER: Pulsar la tecla de efecto Echo y mover el crossfader
de una extremidad a otra. Una parte de la musica se almacena
(sample) y se repite en bucle (loop) mientras el nivel disminuye, hasta
quel otro CD arranque automaticamente. El efecto de eco está
perfectamente sincronizado sobre el beat. La duración del bucle puede
ser controlada con los botones de preselección “Beat sync” (23).
Existén 6 preselecciones: 1/4 ~ 1/2 ~ 1/1 ~ 2 ~ 4 ~ 8 beats. La pantalla
de efectos indíca la duración del bucle.
Consejo: Moviendo el crossfader un poco, se consigue la repetición (al rítmo de la
musica) de una parte musical pequeña. (Dependiendo de la preselección beat sync
elejida)Es posible llevar el crossfader a su posición inicial sin mezclar los 2 canales.
• MODO AUTO: Mientras la musica esta tocando, pulsar la tecla “Echo
effect”. La musica se pone en bucle mientras el volumen disminuye
hasta quel otro CD arranque automaticamente. Se puede visualizar la
duración total del fundido (fade) en la pantalla. Esta puede ser
correjida con los botones de preselección “beat sync” (24) y/o el botón
“time parameter” (33).
• EFECTO ZIP: Este efecto puede ser utilizado en modo FADER y AUTO:
Page 58

MANUAL DE INSTRUCCIONES ESPANOL
SYNQ 57/63 SMX-1 DJ-MIxer
• MODO FADER: Pulsar el botón Zip y mover el crossfader de una
extremidad a otra. El tono (pitch) de la musica disminuye hasta
distorsion. En cuanto el crossfader alcanze la otra extremidad, el otro
CD arranca automaticamente. Según la posición del crossfader, la
pantalla de efectos indica una cifra de 0 a 99.
• MODO AUTO: Mientras que la musica esta tocando, pulsar la tecla
“Zip effect". El tono de la musica disminuye automaticamente hasta
zero, hasta quel otro CD arranque. Se puede visualizar la duración
total del fundido (fade) en la pantalla. Esta puede ser correjida con los
botones de preseleccion “beat sync” (24) y/o el botónl “time parameter”
(33).
• EFECTO ROLL: Este efecto puede ser utilizado en modo FADER y AUTO:
• MODO FADER: Pulsar el botón Roll y mover el crossfader de una
extremidad a otra. Primero, la musica se pone en bucle a 1/1beat (la
pantalla de efectos indica “1”). A continuación, el bucle se reduce a
½beat (la pantalla indica “2”) hasta finalmente alcanzar 1/8beats (la
pantalla indica “4”). En cuanto el crossfader alcanze la otra
extremidad, el volumen disminuye y el otro CD arranca
automaticamente. ¡Es importante señalar que las preselecciones “beat
sync” y el botón “time parameter ” no son accesibles!
• MODO AUTO: Mientras la musica esta tocando, pulsar la tecla “Roll
effect". La musica se pone en bucle sincronizado sobre el beat hasta
quel otro CD arranque. Se puede visualizar la duración total del
fundido (fade) en la pantalla. Esta puede ser correjida con los botones
de preseleccion “beat sync” (24) y/o el botónl “time parameter” (33).
Dependiendo de la duración del fundido seleccionado, la musica
almacenada sera dividida en bucles de 1/1,1/2, 1/4 y 1/8 beats.
17. BOTON CUE MIXING: Este controlador permite mezclar la salida master con las
señales Cue de los diferentes canales y de la unidad de efectos. Girar
completamente este botón hacia la derecha para oír unicamente el master. Girarlo
hacia la izquierda para oír unicamente la señal cue (21, 39). En las posiciones
intermedias, se podra oír la mezcla de las 2 señales.
18. BOTON SPLIT CUE: Normalemente los cascos permiten oír una señal
estereo.Pulsando este botón, se podrán oír 2 señales mono:
• IZQUIERDA: Señales cue, seleccionadas con los botones cue(21, 39).
• DERECHA: Señal de la salida master.
¡El botón Cue mixing deve estar colocado en su posición central!
19. NIVEL CUE: Control del nivel de salida de los cascos. ¡Cuidado: su gran potencia
de salida puede en cualquier momento dañar sus oídos! Evitar poner el volumen al
máximo.
20. SALIDA CASCOS: Conectar cascos con jack ¼”.
21. CUE EFFECTS: Este es el boton cue para la unidad de efectos. Permite escuchar
el efecto antes de mezclarlo sobre el master.
22. BOTON EFFECTS ON/OFF: Enciende/apaga la salida de la unidad de efectos.
23. BOTON TAP: La mayoria de los efectos son sincronizados sobre el beat. Por eso,
la SMX-1 está equipada de un contador de beats totalemente automatico. En
ciertas ocasiones, el contador no funciona correctamente (beat fuera de la gama
habitual o simplemente no se detecta ningún beat). En estos casos, se puede
ayudar el contador manualmente pegando este botón al rítmo de la musica. Este
botón se enciende entonces de manera intermitente para señalar quel contador
automatico está interrumpido. Para volver a encenderlo, mantener el botón TAP
unos segundos hasta que se apague
Page 59

MANUAL DE INSTRUCCIONES ESPANOL
SYNQ 58/63 SMX-1 DJ-MIxer
24. BOTONES DE PRESELECCION BEAT SYNC: Preselecciones para los diferentes
efectos. Según los efectos, estas preselecciones pueden referirse al beat, a los
filtros de frecuencias, al % del tono (pitch), etc… Las cifras de los botones (2 – 4 –
8 – 16 – 32) se refieren a la medida del beat. La preselección elejida se enciende
de manera intermitente. Tambien se pueden elejir preselecciones suplementarias
pulsando "time parameter” (33) y al mismo tiempo una de las preselecciones 4 – 8
o 16. El botón de preselección se enciende entonces de manera intermitente para
señalar la selección de 1/4, 1/2 o 1/1. Al cambiar hacia otro efecto, las
preselecciones quedan preservadas.
Ejemplo: Al seleccionar el efecto "Echo" y la preselección "2", el sonido se repite
cada 2 beats. Al seleccionar la "4", el sonido se repite cada 4 beats. Para repetirlo
cada 1/2 beat, seleccionar "½".
25. PANTALLA DE EFECTOS BPM: Indica el BPM (Beat Por Minuto) de la unidad de
efectos. Esta panatalla se enciende de manera intermitente si es incapaz de
contar el BPM y se apaga cuando vuelve a poder contar.
26. PANTALLA DE DURACION (X): Según los efectos, esta pantalla indica
informaciones sobre la duración (en mSec), el percentage (%) o las frecuencias de
corte (en kHz). Estos parámetros pueden modificarse con los botones de
preselección (24) y el botón “time parameter”(33).
27. PANTALLA CUE BPM / PROFUNDIDAD (Y): Indica el valor BPM de las señales
cue de uno de los 4 canales de entrada, seleccionado con los botones CUE (39).
Al ajustar el botón de parámetro de profundidad (Y) (32), la pantalla indica el
nuevo valor (%).
28. PANTALLA DE EFECTOS: Indica el efecto seleccionado.
29. PANTALLA DE ENTRADA DE EFECTOS: Indica la señal seleccionada con el
botón “input select”(30).
30. BOTON INPUT SELECT: Permite seleccionar una señal entrante en la unidad de
efectos. Puede ser una de las siguientes:
• Uno de los canales de entrada
• Uno de los canales seleccionado con la tecla de asignación de
crossfader(10). Puede ser el lado derecho o izquierdo del crossfader
• Seleccionando el master, los efectos serán utilizados sobre el sonido
mezclado del master.
31. SELECTADOR DE EFECTOS: Selección del efecto deseado:
¡IMPORTANTE!
Los efectos crossover y los multi-efectos no pueden ser utilizados juntos.
Para utilizar los multi-efectos, desactivar primero los efectos crossover
(referirse al n°:15 para informaciones suplementarias)
• ECHO: produce repeticiones. Es fácil mezclar ecos síncronizados sobre
el beat escojiendo la preselección "beat sync" (24). Ajustar las
preselecciones con el "Time Parameter" (33) en una gama de 2mSec a
2Sec. Con el "level Parameter" (32), se puede modificar el equilibrio entre
el sonido original y el sonido retrasado.
• AUTO PAN: Envia la musica de izquierda a derecha y viceversa, al rítmo
del beat. Con las preselecciones "beat sync" (24), escojer la rapidez del
movimiento (Ejemplo: Con la preselección "2", el movimiento de izquierda
a derecha y viceversa se hace en 2 beats). Modificar las preselecciones
con "time Parameter" (33) en una gama de 30mSec a 16Sec. El "Time
Parameter" (32) permite ajustar la rapidez del movimiento de la musica de
un lado al otro. El movimiento puede ser dulce o agresivo.
• FLANGER: Este efecto le da un sonido "electronico" a la musica. Suena
como si la musica diera vueltas por causa de una inversión de fase. La
Page 60

MANUAL DE INSTRUCCIONES ESPANOL
SYNQ 59/63 SMX-1 DJ-MIxer
duración del flanger (ciclo) puede cambiarse con las preselecciones (24).
Esas preselecciones pueden modificarse con el “Time parameter ”(33) en
una gama de 100mSec a 16Sec. Con el “Level parameter ”(32), se puede
cambiar el nivel de feedback del flanger.
Consejo: Cada vez que se vuelva a pulsar la misma preselección (24) se vulve a iniciar
el ciclo del flanger. Esto puede dar un toque supplementario al efecto.
• MANUAL FILTER: Filtro digital corta-frecuencias muy eficaz. La
frecuencia de corte del filtro puede ser cambiada muy sencillamente con
las preselecciones "beat sync" (24).:
o Preselección “2” (LPF @ 50Hz) Frecuencias superiores a
50Hz filtradas. Solo se oien las sub-bass muy profundas.
o Preselección “4” (LPF @ 2030Hz) Frecuencias superiores
a 2030Hz filtradas. Sonido similar al de una antigua radio AM.
o Preselección “8” (LPF @ 20000Hz) Frecuencias
superiores a 20KHz filtradas. Sonido musical normal.
o Preselección “16” (HPF @ 210Hz) Frecuencias inferiores
a 210Hz filtradas. Frecuencias bajas profundas filtradas.
Sonido de un pequeño transistor de radio.
o Preselección “32” (HPF @ 510Hz) frecuencias inferiores a
510Hz filtradas. Sonido identico a la preselección "16" pero
con un transistor mas pequeño.
Las preselecciones(24) pueden modificarse con el "Time Parameter" (33)
en una gama de filtro pasa-banda bajo (LPF) @ 50Hz (pantalla indica: L
0.05kHz) hasta filtro pasa-banda alto (HPF) @ 21.1kHz (pantalla indica: H
21.1kHz). El “Level parameter”(32) permite modificar el nivel de
resonancia del filtro (La resonancia es el factor Q del filtro. Este factor
modifica el impacto del filtro sobre la frecuencia seleccionada).
• AUTO FILTER: Filtro pasa-banda bajo automatico. Variación de la
frecuencia de corte en ciclos de 20KHz a 50Hz. Las preselecciones (24)
permiten elejir ciclos síncronizados sobre el beat (ejemplo: pulsar sobre la
preselección "8" El tiempo necesario al filtro para cambiar su frecuencia
de corte de 20KHz a 50Hz y viceversa será de 8 beats). Modificación de
las preselecciones con "Time Parameter" (33) en una gama de 100mSec
a 16Sec. El “Level parameter”(32) permite modificar el nivel de resonancia
del filtro (La resonancia es el factor Q del filtro. Este factor modifica el
impacto del filtro sobre la frecuencia seleccionada).
• REVERB: Este efecto de reverberación da la impresión de oír la musica
en una iglesia: simulación digital de la reverberación obtenida por refexión
del sonido sobre las paredes. Existén 5 preselecciones (24) de duración
de reverberación. Estas pueden ser ajustadas con el "Time Parameter"
(33) en una gama de 0% a 100% por niveles de 1%. Con el "level
Parameter" (32), se puede modificar el equilibrio entre el sonido original y
el sonido retrasado.
• TRANS: Corte automatico del sonido al rítmo de la musica. El "beat sync"
(24) permite elejir la duración de los cíclos (Ejemplo: con la preselección
"1/4" (pulsar "Time Parameter" (33) y al mismo tiempo la preselección
"4"), la musica se corta por fragmentos de 1/4beats). Las preselecciones
pueden ajustarse con el "Time Parameter" (33) en una gama de 25mSec
a 16Sec. El "Level Parameter" (32) permite ajustar el tiempo de corte. En
posición izquierda (pantalla indica 0%), el tiempo de corte es nulo.
Girando el botón hacia la derecha, el tiempo de corte va aumentando
hasta no oír mas que fragmentos pequeños de la musica original.
Page 61

MANUAL DE INSTRUCCIONES ESPANOL
SYNQ 60/63 SMX-1 DJ-MIxer
Consejo: ¡este efecto necesita practica! Los mejores resultados se obtienen con beats
regulares,ciclos de corte pequeños(1/4 & 1/2beats) y tiempos de corte de 50% y mas.
• PITCH SHIFTER: Modifica el tono de la musica hacia arriva o abajo
mientras el tempo queda igual. (Es el contrario del "master tempo" de
algunas platinas de CD, que permiten modificar el tempo y guardar un
tono identico). Existen 5 preselecciones (24) de modificación del tono.
(Preselección "8"=0%, la musica queda sin cambiar). El "Time Parameter"
(33) permite modificar el tono en una gama de -100% a 100% por niveles
de 1%. Con el "level Parameter" (32), se puede modificar el equilibrio
entre el sonido original y el sonido retrasado.
Consejo: utilizar este efecto sobre un mícro para modificar el tono de la voz. (con una
modificación de -100% se pueden obtener vozes monstruosas
☺
)
32. BOTON LEVEL (Y) PARAMETER: Permite ajustar el parámetro “Y” de los
efectos. Leér la seccíon 31 porque su función es diferente según los efectos.
33. BOTON TIME (X) PARAMETER: Permite ajustar el parámetro “X” de los efectos.
De manera general, sirve de parámetro de duración, referirse a la sección 31 para
mas informaciones. Este botón incorpora una tecla "push" que puede utilizarse de
2 maneras:
• Pulsar el botón y al mismo tiempo seleccionar una preselección (24) para
obtener preselecciones suplementarias: 1/4beat – 1/2beat – 1/1beat.
• Pulsar el botón y girarlo: de manera general, permite cambiar mas rapido
los parámetros de duración de los efectos.
34. INTERRUPTOR DE ENCENDIDO: Permite encender/apagar la mesa.
35. VU METER (LED): VU-Meter preciso con memorización del nivel peak: los niveles
peak quedan unos instantes en la pantalla. Muy importante: Para obtener un
sonido límpio, vigilar el VU-Meter. Muchos DJ's utilizan mal este instrumento
intentando llevarlo al máximo. ¡Un buen DJ deveria mantener el nivel del VU-Meter
alrededor de 0dB para evitar distorsión! ☺
36. SELECTADOR DE VU-METER: Permite elejir el modo de travajo del VU-Meter
(35).
• Modo L/R: el VU-Meter indica la señal master estereo sobre las 2 barras.
• Modo CUE/PGM: el VU-Meter indica la señal master sobre una barra y la
señal Cue (39) sobre la otra. Esto permite comparar las 2 señales.
37. INTERRUPTOR MASTER MONO/STEREO: Permite poner la salida master en
mono o estereo.
38. BALANCE MASTER: Ajuste del balance izquierda/derecha de la salida master.
39. SELECTADOR DE CONTADOR CUE / BPM: Permite elejir el canal (1 a 4) que
pasa por los cascos. Pulsando varios botones cue, es posible obtener el sonido
mezclado de los canales seleccionados. El BPM de los canales seleccionados
(Canal 1 a 4) aparece sobre la pantalla CUE BPM (27). Atención: ¡Si 2 canales o
mas son seleccionados, el BPM sera incorrecto!
40. CONTROLADOR DE TONALIDAD DE 3 BANDAS: La frecuencia de cada canal
puede ser controlada separadamente en una gama de -30dB a +10dB:
Altas@13kHz ~ Medias@1kHz ~ Bajas@70Hz. En posición central, controlador
sin efecto (flat).
41. SELECTADOR DE FUENTE DE ENTRADA: permite seleccionar la fuente
apropriada sobre cada canal: Phono, line, aux o mic. ¡Algunos canales poséen
selectadores de entrada suplementarios en la parte trasera, al lado de los
conectadores de entrada!
Consejo: Line, Aux, CD, Tuner, etc…tienen mas o menos los mismos niveles de señall.
42. NIVEL DE GANANCIA: Permite ajustar el nivel de entrada de cada canal.
Utilizarlo para posicionar el nivel del VU-Meter alrededor de 0dB.
Page 62

MANUAL DE INSTRUCCIONES ESPANOL
SYNQ 61/63 SMX-1 DJ-MIxer
CONECXIONES
Antes de conectar o cambiar conexiones, siempre apagar la mesa.
Este dibujo es un ejemplo de conexión posible. Existen muchas otras posibilidades. Solo
aconsejamos memorizar los siguientes consejos:
• Siempre conectar los cables cinch de la manera siguiente:
o Cinch blanco o negro canal izquierdo
o Cinch rojo canal derecho
• Conectando un CD, cassette, MD, radio, video, etc. a una entrada, poner el selectador
del canal sobre LINE o AUX.
• Conectando un micro al canal 4, poner el selectador de entrada sobre MIC.
• Conectando un tocadiscos a una entrada, poner el selectador de la entrada sobre
PHONO. (atención: algunas platinas tienen una salida LINE, leer las instrucciones del
toca-discos)
Page 63

MANUAL DE INSTRUCCIONES ESPANOL
SYNQ 62/63 SMX-1 DJ-MIxer
• Muchos tocadiscos tienen un conectador de masa (GND). Es preferible conectarlo a la
SMX-1 (al lado de los conectadores de entrada).
• La entrada Record de un gravador analógico puede conectarse a la salida Record de
la SMX-1 para gravar de manera analógica.
• Un gravador digital puede conectarse a la salida digital coaxial de la mesa para
obtener gravaciones digitales impresionantes.
• Para asegurar la mejor cualidad sonora, las entradas phono sin utilizar están previstas
de puentes cortacircuitos Antes de conectar un tocadiscos, quitar este puente.
Guardarlo en un sitio seguro para una utilización ulterior.
CAMBIAR LOS DESLIZANTES
Una gran ventaja de esta mesa es de poder cambiar sus deslizantes durante su
utilización.
Etapas para cambiar los deslizantes de los canales:
• Quitar los botones de los deslizantes.
• Quitar los 4 tornillos del panel frontal
alrededor de los deslizantes
• Quitar los 3 tornillos del deslizante
deseado.
• Descolocar cuidadosamente el deslizante.
• Colocar cuidadosamente el nuevo
deslizante. Asegurarse que los contactos
toquén el conectador del tablero PCB de la
mesa.
• Colocar los 3 tornillos.
• Colocar el panel frontal con los 4 tornillos.
¡Ya está!
Etapas para cambiar el crossfader:
• Quitar los botonesdel crossfader.
• Quitar los 2 tornillos que mantienen el crossfader.
• Descolocar cuidadosamente el deslizante y su panel.
• Desenchufar el cable del crossfader (¡tirar sobre el conectador, NO sobre el cable!)
• Enchufar el nuevo crossfader al cable.
• Colocar el crossfader y su panel con los 2 tornillos.
¡Ya está!
Page 64

MANUAL DE INSTRUCCIONES ESPANOL
SYNQ 63/63 SMX-1 DJ-MIxer
ESPECIFICACIONES
Impedencia & sensibilidad de entradasalida (EQ flat, max. gain, level meter = 0dB)
Line input: 340mV @ 20kΩ (max = +4dBV)
Aux input: 340mV @ 47kΩ (max = +4dBV)
Phono input: 3,4mV @ 47kΩ (max = -40dBV)
Mic inputs: 1,7mV @ 2,2kΩ (max = -42dBV)
Record output: 775mV @ 1kΩ
Master unbalanced: 1,55V @ 100Ω
Master balanced: 3,00V @ 200Ω
Zone output: 1,55V @ 100Ω
Cascos: 3,00V @ 33Ω
Digital output 1,00V @ 75Ω
Maximo de Salida (EQ flat, max. gain, FX off, THD=1%, load is 100kΩ )
Master: Plus de +18dBV (8,0V)
Zone: Plus de +18dBV (8,0V)
Cascos: Plus de + 9,5dBV (3V) @ 32Ω
Respuesta en frecuencias (EQ flat, max. gain, level meter = 0dB, load is 100kΩ )
Line + aux: 25 – 20.000Hz +/-1dB
Phono: 25 – 20.000Hz +/-1dB (RIAA)
Mic : 25 - 20.000Hz +/-1dB
THD + Ruido (EQ flat, max. gain, level meter = 0dB, load is 100kΩ )
Line + aux: menos de 0,015% (25 – 20.000Hz)
Crosstalk Canal (EQ flat, max. gain, Master = 0dBV)
Mas de 75dB @ 1kHz
Controlador de tonalidad:
Mic: -12dB / +12dB @ 70Hz – 1kHz – 13kHz.
Input channels: -30dB / +10dB @ 70Hz – 1kHz – 13kHz.
Especificaciones generales:
Power supply: 230V~ 50Hz.
Consumo: 34Watts
Dimensiones: 482 x 221 x 87.5mm (WxDxH)
Peso : 5.25kg.
Page 65

WWW.SYNQ-AUDIO.COM
Copyright © 2003 by BEGLEC cva.
Reproduction or publication of the content, even portions, in any manner, without express permission of the publisher, is prohibited.
 Loading...