

Page 1
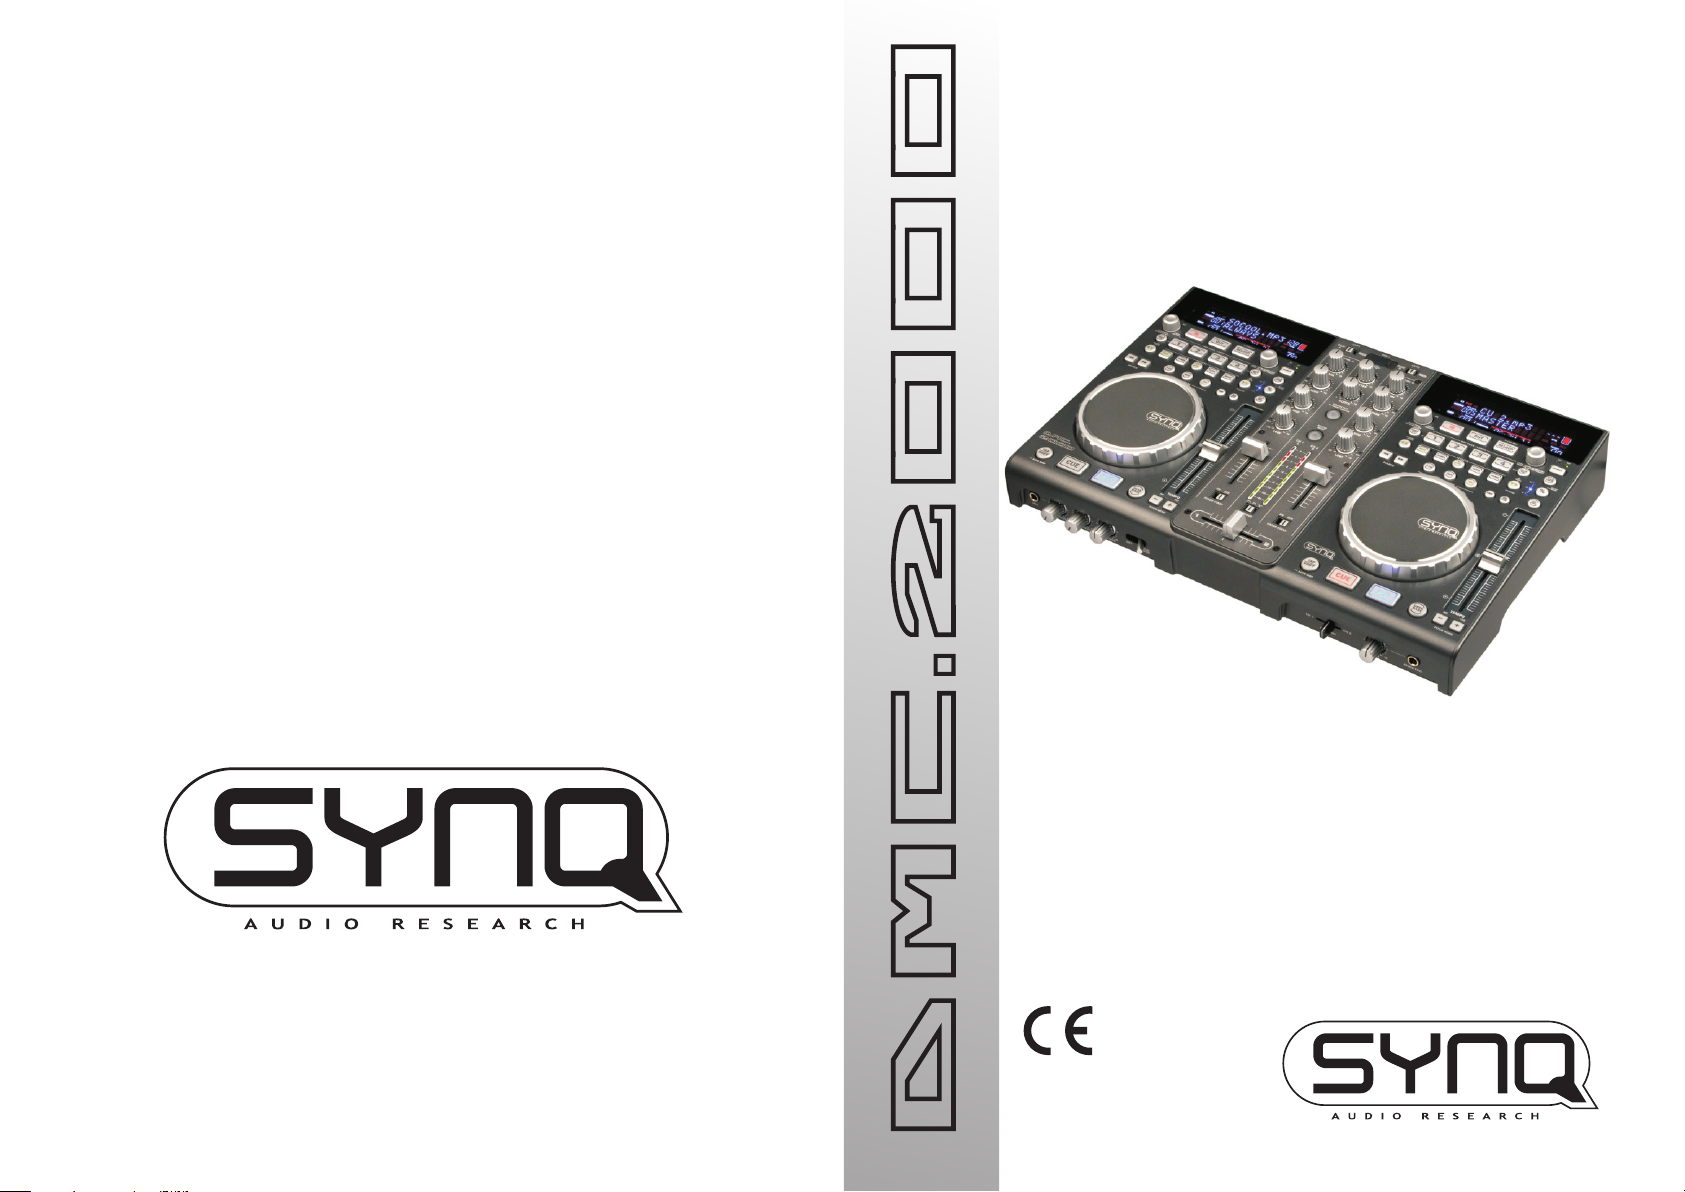
Multifunctional
Multifunctional
Media controller
Media controller
WWW.SYNQ-AUDIO.COM
Copyright © 2011 by BEGLEC NV
‘t Hofveld 2C ~ B1702 Groot-Bijgaarden ~ Belgium
Reproduction or publication of the content in any manner, without express permission of the publisher, is prohibited.
V1.0
Operation Manual
Mode d'emploi
Gebruiksaanwijzing
Bedienungsanleitung
Manual de instrucciones
EN
FR
NL
DE
ES
Page 2
EN - DISPOSAL OF THE DEVICE
Dispose of the unit and used batteries in an environment friendly manner
according to your country regulations.
FR - DÉCLASSER L’APPAREIL
Débarrassez-vous de l’appareil et des piles usagées de manière écologique
Conformément aux dispositions légales de votre pays.
NL - VERWIJDEREN VAN HET APPARAAT
Verwijder het toestel en de gebruikte batterijen op een milieuvriendelijke
manier conform de in uw land geldende voorschriften.
DU - ENTSORGUNG DES GERÄTS
Entsorgen Sie das Gerät und die Batterien auf umweltfreundliche Art und
Weise gemäß den Vorschriften Ihres Landes.
ES - DESHACERSE DEL APARATO
Reciclar el aparato y pilas usadas de forma ecologica conforme a las
disposiciones legales de su pais.
PT - COMO DESFAZER-SE DA UNIDADE
Tente reciclar a unidade e as pilhas usadas respeitando o ambiente e em
conformidade com as normas vigentes no seu país.
Page 3

ENGLISH OPERATION MANUAL
OPERATION MANUAL
Congratulations and thank you for buying this SYNQ®product. Please read these operating instructions
carefully so you will know how to operate this product properly. After you have finished reading the
instructions, put them in a safe place for future reference.
DON’T FORGET TO REGISTER YOUR NEW SYNQ
REMINDER WHEN NEW SOFTWARE UPDATES ARE AVAILABLE!
SURF TO: WWW.SYNQ-AUDIO.COM/REGISTER/
FEATURES
This unit is radio-interference suppressed. This appliance meets the requirements of the current European
and national guidelines. Conformity has been established and the relevant statements and documents have
been deposited by the manufacturer.
This professional digital media controller offers an extremely compact all-in-one solution that will even satisfy
the most demanding DJs! All you need is a pair of powered speakers to get the party rolling!
The unit is packed with tons of features like:
Music from different sources can be played and mixed seamlessly:
Two internal USB-players share the same USB-hard disk/USB-stick to play any WAV or MP3 file.
Different analog inputs like turntables, extra CD-players, etc.
Controls all popular MIDI DJ-software you can imagine, free Deckadance-LE software included!
Two microphones with talkover can be used simultaneously.
Q-DBase system: smart, fully featured database lookup system to find your tracks very easily, even on big
hard disks, up to 500GB!
Free Windows Q-DBase-builder software included.
The digital effects (echo, flange, filter, brake) can be used manually or fully beat synchronized with presets.
Seamless loops with real-time loop edit function
PCMS (Permanent Cue Memory System): for each track up to 4 cue points and seamless loops can be
stored/recalled at any moment
High precision scratch function and pitch bend, thanks to the touch sensitive jog wheels
Several jog wheel modes: vinyl, CDJ and A.CUE scratch!
DJ-software can use coded vinyl disks to control playback and scratch your MP3/WAV files.
2x 10character alphanumeric VFD-displays show all information, including ID3-tags.
SMART RANDOM: random play can be limited to 1 genre or artist (ex. play only slows!)
Original, upgradeable, Synq firmware: guarantees user-friendly, sophisticated functionality not found
elsewhere.
Fully customizable setup menu for MIDI and other functions.
Pitch control (+/-6%, 10%, 16%, +16%/-100%)
Pitch lock (Master Tempo)
Full featured 2channel digital mixer with customizable crossfader, balanced output and booth master.
PFL headphone monitor with CH1/CH2 mixing and adjustable volume.
Many more …
BEFORE USE
Before you start using this unit, please check if there’s no transportation damage. Should there be any, do
not use the device and consult your dealer first.
Important: This device left our factory in perfect condition and well packaged. It is absolutely necessary
for the user to strictly follow the safety instructions and warnings in this user manual. Any damage caused
by mishandling is not subject to warranty. The dealer will not accept responsibility for any resulting defects
or problems caused by disregarding this user manual.
To protect the environment, please try to recycle the packing material as much as possible.
®
PRODUCT. YOU WILL AUTOMATICALLY RECEIVE A
ENGLISH OPERATION MANUAL
Keep this booklet in a safe place for future consultation. If you sell the unit, be sure to add this user
manual.
Check the contents:
Check that the carton contains the following items:
DMC2000 unit
Operating instructions
1 USB cable
1 AC power cord
SAFETY INSTRUCTIONS:
CAUTION
The lightning flash with arrowhead symbol within the equilateral triangle is intended to alert the
use or the presence of un-insulated “dangerous voltage” within the product’s enclosure that may
be of sufficient magnitude to constitute a risk of electric shock.
The exclamation point within the equilateral triangle is intended to alert the user to the presence
of important operation and maintenance (servicing) instructions in the literature accompanying
this appliance.
This symbol means: indoor use only
This symbol means: Read instructions
This symbol means: Safety Class II appliance
To prevent fire or shock hazard, do not expose this appliance to rain or moisture.
To avoid condensation to be formed inside, allow the unit to adapt to the surrounding temperatures when
bringing it into a warm room after transport. Condense sometimes prevents the unit from working at full
performance or may even cause damages.
This unit is for indoor use only.
Don’t place metal objects or spill liquid inside the unit. No objects filled with liquids, such as vases, shall be
placed on this appliance. Electric shock or malfunction may result. If a foreign object enters the unit,
immediately disconnect the mains power.
No naked flame sources, such as lighted candles, should be placed on the appliance.
Don’t cover any ventilation openings as this may result in overheating.
Prevent use in dusty environments and clean the unit regularly.
Keep the unit away from children.
Inexperienced persons should not operate this device.
Maximum save ambient temperature is 40°C. Don’t use this unit at higher ambient temperatures.
Minimum distances around the apparatus for sufficient ventilation is 5cm.
Always unplug the unit when it is not used for a longer time or before you start servicing.
The electrical installation should be carried out by qualified personal only, according to the regulations for
electrical and mechanical safety in your country.
Check that the available voltage is not higher than the one stated on the rear panel of the unit.
The socket inlet shall remain operable for disconnection from the mains.
The power cord should always be in perfect condition. Switch the unit immediately off when the power cord
is squashed or damaged. It must be replaced by the manufacturer, its service agent or similarly qualified
persons in order to avoid a hazard.
Never let the power-cord come into contact with other cables!
When the power switch is in OFF position, this unit is not completely disconnected from the mains!
In order to prevent electric shock, do not open the cover. Apart from the mains fuse there are no user
serviceable parts inside.
Never repair a fuse or bypass the fuse holder. Always replace a damaged fuse with a fuse of the same
type and electrical specifications!
In the event of serious operating problems, stop using the appliance and contact your dealer immediately.
Please use the original packing when the device is to be transported.
Due to safety reasons it is prohibited to make unauthorized modifications to the unit.
CAUTION: To reduce the risk of electric shock, do not
remove the top cover. No user-serviceable parts inside.
Refer servicing to qualified service personnel only.
SYNQ
®
1/120 DMC2000
SYNQ
®
2/120 DMC2000
Page 4
ENGLISH OPERATION MANUAL
ENGLISH OPERATION MANUAL
INSTALLATION GUIDELINES:
Placing and using the unit for long periods near heat-generating sources such as amplifiers, spotlights,
etc. will affect its performance and may even damage the unit.
Take care to minimize shocks and vibrations during transport.
When installed in a booth or flight case, please make sure to have good ventilation to improve heat
evacuation of the unit.
To avoid condensation to be formed inside, allow the unit to adapt to the surrounding temperatures when
bringing it into a warm room after transport. Condense sometimes prevents the unit from working at full
performance.
Choose the place where you put your installation very carefully. Avoid presence of heat sources. Avoid
places with vibrations or places that are dusty and humid.
To prevent fire or shock hazard, do not expose this appliance to rain or moisture.
In order to prevent electric shock, do not open the top cover. If a problem occurs, contact your dealer.
Do not place metal objects or spill liquid inside the player. Electric shock or malfunction may result.
The player should not be adjusted or repaired by anyone except properly qualified service personnel.
This unit may cause interference to radio and television reception.
CLEANING THE PLAYER:
Clean by wiping with a polished cloth slightly dipped with water. Avoid getting water inside the unit. Do not
use volatile liquids such as benzene or thinner which will damage the unit.
CONTROLS AND FUNCTIONS
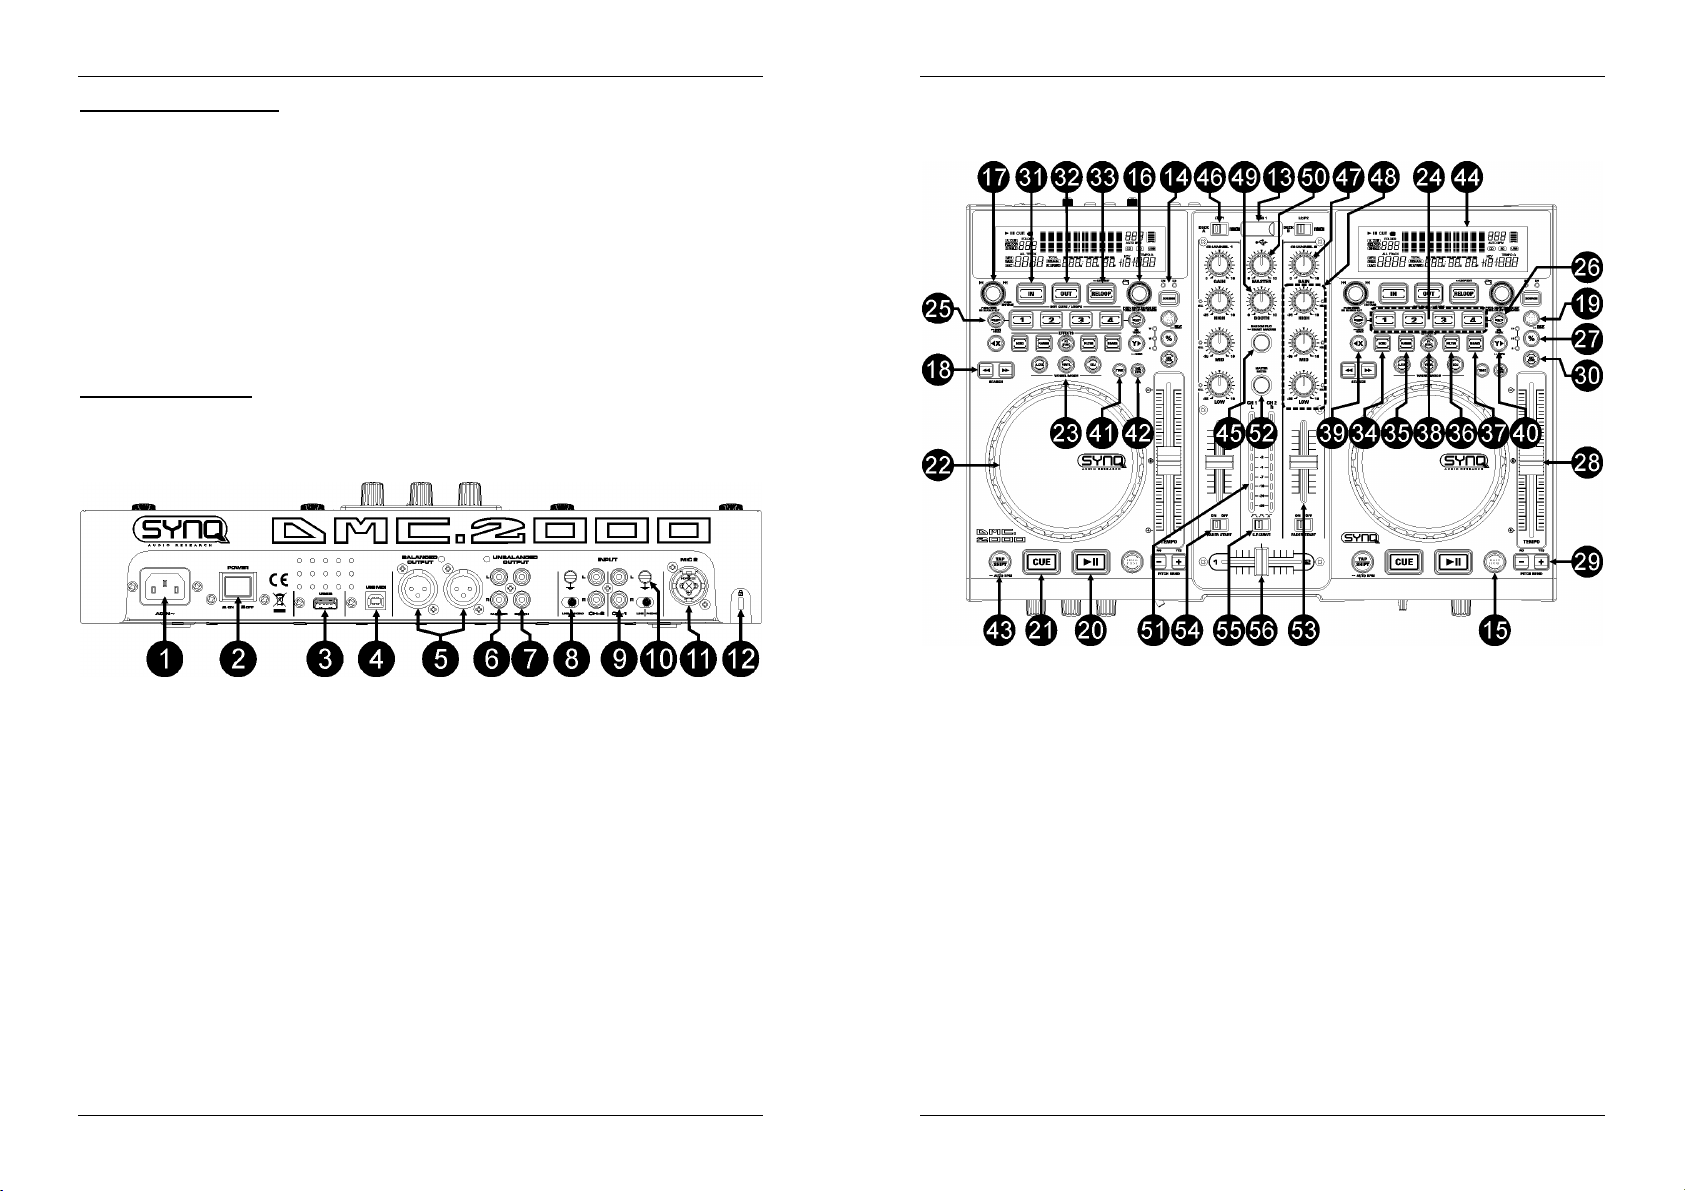
1. MAINS input: connect the unit to the 100-240V AC mains, using the supplied power-cord.
2. POWER ON/OFF switch: switches the unit on and off.
3. USB2 connection: this is the second (type-A) USB-connection, used to connect any USB mass storage
device that was formatted in FAT or FAT32. By default this input is used to connect a hard disk. (see
chapter “connections”)
4. MIDI / LINK USB connection: this (type-B) USB-connection is used to connect the player to a computer
with MIDI DJ-software. Please check the chapter “connections” for more information.
5. MASTER BALANCED OUTPUT: The XLR-connectors can be used to connect this mixer to any
balanced amplifier input or powered speakers, using special balanced signal cables.
6. MASTER UNBALANCED OUTPUT: The “master” output has the same output signal as the balanced
master output(5) but unbalanced.
7. BOOTH MASTER OUTPUT: The “booth master” output carries the same signal as the master but can
be controlled independently by the booth master (49). Use the outputs to connect unbalanced amplifiers
or connect a sound recorder.
8. PH/LINE SWITCH: This switch makes it possible to switch between the Phono and the Line input level
for this channel.
9. ANALOG INPUT: to both mixer channels you can connect turntables or extra CD-players that can be
mixed simultaneously with tracks from the DMC2000 players and DJ-software from your PC/MAC.
10. GROUND (GND) CONNECTION: Many Turntables have a GND-connection. It is preferable to connect
this signal ground to the GND-connector. If your turntable does not have a ground wire, you don’t have
to use this connector.
11. DJ MIC INPUT JACK: Combo jack. Accepts either a balanced microphone with an XLR connector or an
unbalanced microphone with 1/4” mono jack. This input is mainly used as DJ-microphone. The talkover
does not affect the signal level of this input.
12. KENSINGTON SECURITY SLOT: can be used to protect the DMC2000 from opportunist theft. Keep in
mind that this is absolutely not a 100% anti-theft protection! You can buy a compatible “Kensington”
security cable from almost every computer store.
13. USB1 connection: this is the first (type-A) USB-connection, used to connect any USB mass storage
device that was formatted in FAT or FAT32. By default this input is used to connect an occasional USBdrive like USB-sticks etc.
14. SOURCE SELECT switch: use this button to select the desired audio source: USB1 or USB2.
15. DATABASE / NEXT TRACK button: a very important button if you want to find your next track easily
and fast, even while the previous track is still playing! This button works in two different ways:
NEXT TRACK function: will be used while searching on mass storage devices that don’t have the
“Q-DBase system” files installed. You can only search on track and folder numbers.
DATABASE function: will be used while searching mass storage devices that have the “Q-DBase
system” files installed. You can alphabetically search on artist, track title, genre or album. Very fast
and no need for you to know where your files are located!
Once you have found the desired song, just press the LOAD TRACK-button (19) to load the track.
For both functions, please refer to chapter “HOW TO USE” for more information.
16. FOLDER knob: this knob has different functions:
No Q-Dbase: turn this knob to browse the folders of USB-drive while you don’t use the Q-Dbase
system.
During Q-Dbase search: press while you turn the knob to select the first character of the search key
you’re looking for. Turn the knob to go to the next search key that starts with the same character.
Press the knob to show the search key on the 2ndtext line of the display.
Setup menu: turn the knob to browse the different menu options.
Please refer to chapters “HOW TO USE” & “SETUP MENU” for more information.
17. TRACK knob: this knob has different functions:
No Q-Dbase: turn this knob to browse the tracks inside a folder of a storage device while you don’t
use the Q-Dbase system.
Q-Dbase search: two options:
SYNQ
®
3/120 DMC2000
SYNQ
®
4/120 DMC2000
Page 5

ENGLISH OPERATION MANUAL
ENGLISH OPERATION MANUAL
Turn the knob to browse all files with the same first character that was first selected with the
FOLDER button.
Press the knob while you turn it to change the search key in the database, you can search
the keys:
Art: search for “artist names” in alphabetical order (default search key)
Alb: search for “album names” in alphabetical order
Gen: search for “Genres” in alphabetical order
During playback: press the knob to see the different ID3-tags on the display:
Setup menu: turn the button to change the settings of the selected menu option.
Please refer to chapter “HOW TO USE” for more information.
18. SEARCH buttons: used to search quickly inside a track.
19. LOAD TRACK button: this button has different functions:
Load a track: that was found using the database/next track function.
Open setup menu: press the LOAD TRACK button for about 3seconds.
Close setup menu: press the LOAD TRACK button shortly to leave setup.
Please refer to chapters “HOW TO USE” & “SETUP MENU” for more information.
20. PLAY/PAUSE button: every time you press the PLAY/PAUSE button the player changes from play to
pause or from pause to play. The button blinks as long as the player is set to pause.
21. CUE button: Pressing the CUE button during playback provides an immediate return to the position at
which play was started. Playback starts immediately from the programmed cue point for as long as the
CUE button is pressed. The player jumps back to the cue point as soon as the CUE button is released.
Also with the unit in pause mode (Play/Pause button blinks) the jog wheel is used to set a different start
point. By pressing "PLAY/PAUSE" or “LOOP IN” button followed by "CUE", you can confirm this new
cue point.
22. TACTILE JOG-WHEEL: The jog-wheel on this player has 2 parts:
Tactile center part: to match the vinyl feel as close as possible and largely improve scratch
Outer ring: silver colored part of the jog wheel which is not touch sensitive. Regardless of the
23. WHEEL MODE button: toggles between 3 different modes for the tactile jog-wheel. The tactile center
part and outer ring behave differently:
VINYL-mode: used for extremely realistic scratching of any MP3 file played on the internal players
CDJ-mode: this is the standard mode, used by most DJ players. Both the tactile center part and the
A.CUE SCRATCH-mode: very similar to VINYL mode but scratching always starts from the actual
Std: don’t use the Q-Dbase system, just folders and tracks manually.
Press 1x: Album name of the current track is shown
Press 2x: Genre of the current track is shown
Press 3x: Bitrate information of the current track is shown
performance, the central part of the jog-wheel uses a patented touch-sensitive technology. With the
WHEEL MODE buttons (23) you can change the behavior of this central part. Check the description
of the WHEEL MODE buttons (23) for more information.
selected wheel mode the outer ring can be always be used for pitch bending, except while using one
of the digital effects.
or DJ-software from your computer.
Tactile center part: During playback, the music stops immediately when you touch the jog-
wheel: playback speed and direction are now fully controlled by the movements of your hand.
In pause mode you can easily set a new cue point.
Outer ring: During playback you can use the outer ring for pitch bending to synchronize the
beats of 2 tracks. In pause mode you will hear the typical very small loops that give you the
possibility to set a cue point with 1frame (1/75seconds) accuracy.
outer ring behave identically. While the track is playing, the jog wheel temporarily bends the pitch of
the music up to +/-100% by rotating the wheel clockwise to speed it up or counterclockwise to slow it
down. The amount of pitch change is determined by the speed of rotation. In pause mode you will
hear the typical very small loops that give you the possibility to set a cue point with 1frame
(1/75seconds) accuracy.
cue point, the behavior of the outer ring is identical to that of vinyl mode:
Tactile center part: During playback, the music stops immediately and returns to the actual
cue point each time you touch the jog-wheel: playback speed and direction are now fully
controlled by the movements of your hand. In pause mode you can easily set a new cue point
but the player first returns to the actual cue point.
Outer ring: During playback you can use the outer ring for pitch bending to synchronize the
beats of 2 tracks. In pause mode you will hear the typical very small loops that give you the
possibility to set a cue point with 1frame (1/75seconds) accuracy.
24. HOT CUE buttons: 4 programmable buttons where you can store ordinary cue points and/or loops.
When a normal cue point is stored, the corresponding button is green, when a loop is stored the
corresponding button turns red. All stored cue points and loops can be backed up to permanent memory
for future use. This feature is called “PCMS Permanent Cue Memory System”. Check the chapter “HOW
TO USE” for more information on how to program cue points etc.
25. RECORD CUE button: press this button prior to one of the 4 HOT CUE buttons (24) to save a new cue
point or loop. See the chapter “HOW TO USE” to learn how you save cue points and loops.
Saving cues to permanent memory: the hot cue system uses 2 kinds of memory: temporary “track
memory” and “permanent” memory. New hot cues are only saved to the temporary “track memory”. If
you want to keep the hot cues for future use you must save the information to permanent memory.
To save the cues to permanent memory, just press the RECORD CUE-button until the display shows
“Saving”.
Saving personal settings: Press the RECORD CUE-button and X/SYNC-button (39) together to
save different personal parameters that are currently in use (pitch range, single/cont, standard time
display, jog wheel setting, auto cue, auto BPM-mode, pitch on/off, database search key and
starttime/brake time)
26. DELETE CUE: this button has several functions:
DELETE 1 HOT CUE: press the DELETE CUE button, followed by the HOT CUE button that you
want to delete from track memory. The deleted button will turn black.
DELETE 4 HOT CUES: press the DELETE CUE button for about 2seconds to erase all 4 hot cues
from track memory.
DELETE TRACK: press the DELETE CUE button and Y/RATIO-button (40) together to delete the
hot cues for the entire track from permanent memory. Because there will be no way back, the display
first asks you if you're sure: using the PITCH BEND buttons (29) you can choose YES or NO.
Please refer to the chapter “HOW TO USE” for more information.
27. TEMPO RANGE button: press this button to select the different available speed ranges: +/-6%, +/-10%,
+/-16%, +16/-100%. The lower ranges make the SPEED-fader (28) more precise, the higher ranges are
suitable for special effects. To turn the speed function off simply press the button for 1second, until the
speed indicators turn off. Press the button again to re-activate speed control.
28. SPEED-fader: used to adjust the playback speed of the playing track. You can turn the speed function
on/off or change the range with the TEMPO RANGE-button (27)
29. PITCH BEND buttons: The speed rises while the “+ button” is pressed and returns to the original pitch
when the button is released. The speed drops when the “– button” is pressed and returns to the original
pitch when the button is released. These buttons can be used to synchronize the beats of 2 tracks. They
are also used to confirm (or not) the questions that are sometimes shown on the display.
30. KEY LOCK Button: (Master tempo) activates the Pitch Lock function. This function allows you to make
adjustments to a tracks speed using the SPEED-fader without altering the tonal pitch.
31. LOOP IN button: Allows you to set a new cue point without stopping playback (CUE ON THE FLY). This
button also sets the beginning of a seamless loop: marks the beginning of the loop, you have to press
the LOOP OUT button to mark the end of the loop and start playback in loop mode.
Please refer to the chapter “HOW TO USE” for more information.
32. OUT/EXIT button: Used to set the endpoint when looping music. The player starts seamless loop
playback until you press this button again to exit. W hen a loop is programmed but not active you can
also restart the loop. The point where you press the button will be memorized as the new end point of
the loop. In loop edit mode pressing the OUT/EXIT button stops the loop editing and saves the new loop
endpoint.
33. RELOOP/STUTTER button: This button has 3 functions:
RELOOP: When a loop was programmed and you have hit the OUT/EXIT button, press the reloop
button to enter the loop again. To exit the loop press the OUT/EXIT button. (intro and end points of
the loop are unchanged)
STUTTER: When a loop is playing you can press this button to restart the loop at once. You can also
press this button when a track is not playing in loop. Every time the RELOOP/STUTTER button is
pressed, it will restart the music from the actual cue point. The stutter effect adds extra creativity to
your performance.
ENTER EDIT LOOP MODE: When a loop is programmed (LOOP IN and OUT/EXIT buttons are on)
you can enter loop edit mode by pressing the RELOOP/STUTTER button until the display shows
“OUT EDIT”. While in loop edit mode you toggle between “OUT EDIT” and “IN EDIT”.
SYNQ
®
5/120 DMC2000
SYNQ
®
6/120 DMC2000
Page 6

ENGLISH OPERATION MANUAL
ENGLISH OPERATION MANUAL
34. ECHO EFFECT button: press this button to activate the echo effect. Depending on the sync-mode
(manual or beat synchronized), different settings are possible:
Manual mode: the FX-SYNC button (38) is dark. You can set all parameters manually, use the
following controls:
Jog-wheel (22): used to set the echo time from 1ms to 2000ms.
Y/RATIO button (40): as long as the Y/RATIO-button is blinking you can use the jog-wheel
(22) to change the impact (dry/wet) of the effect.
Beat synchronized mode: the FX-SYNC button (38) is lit. You can use the following controls:
EFFECT SYNC-buttons (39+40): choose one of the beat synchronized echo presets.
Y/RATIO button (40): as long as the Y/RATIO-button is blinking you can use the jog-wheel
(22) to change the impact (dry/wet) of the effect.
35. FLANGER EFFECT button: press this button to activate the flanger effect. Depending on the sync-
mode (manual or beat synchronized), different settings are possible:
Manual mode: the FX-SYNC button (38) is dark. You can set all parameters manually, use the
following controls:
Jog-wheel (22): used to manually change the effect.
Y/RATIO button (40): as long as the Y/RATIO-button is blinking you can use the jog-wheel
(22) to change the impact (dry/wet) of the effect.
Beat synchronized mode: the FX-SYNC button (38) is lit. You can use the following controls:
EFFECT SYNC-buttons (39+40): choose one of the beat synchronized sweep presets.
Y/RATIO button (40): as long as the Y/RATIO-button is blinking you can use the jog-wheel
(22) to change the impact (dry/wet) of the effect.
36. FILTER EFFECT button: press this button to activate the filter effect. Depending on the sync-mode
(manual or beat synchronized), different settings are possible:
Manual mode: the FX-SYNC button (38) is dark. You can set all parameters manually, use the
following controls:
Jog-wheel (22): used to manually change the cutoff frequency of the filter.
Y/RATIO button (40): as long as the Y/RATIO-button is lit you can use the jog-wheel (22) to
change the impact (Q-factor) of the filter.
Beat synchronized mode: the FX-SYNC button (38) is lit. You can use the following controls:
EFFECT SYNC-buttons (39+40): choose one of the beat synchronized sweep presets.
Y/RATIO button (40): as long as the Y/RATIO-button is lit you can use the jog-wheel (22) to
change the impact (Q-factor) of the filter.
37. BRAKE button: press this button to activate the brake effect. Now you can determine the
acceleration/deceleration speed of the music while using the PLAY/PAUSE button (20). You can set the
parameters with buttons (39+40), see below.
38. FX SYNC button: press this button to toggle between manual and beat synchronized effect mode!
Please refer to points (34+35+36) for more information.
39. EFFECT SYNC/START-button: this button has several functions, depending on the effect mode:
BPM-Synced effects: when an effect is used in beat synchronized mode, this button is lit. You can
now choose how you want the effect to be synchronized to the beat. Use this button to cut the
current BPM-parameter in half.
BRAKE effect: press this button to change the acceleration time (time from zero to full speed).
While the button is lit, you can use the jog-wheel (22) to change the time from 0,0s (instant start) to
almost 10s. (very slow start)
40. EFFECT SYNC/STOP/Y/RATIO-button: this button has several functions, depending on the effect
mode:
BPM-Synced effects: when an effect is used in beat synchronized mode, this button is lit. You can
now choose how you want the effect to be synchronized to the beat. Use this button to double the
current BPM-parameter.
BRAKE effect: press this button to change the deceleration time (time from full speed to zero).
While the button is lit, you can use the jog-wheel (22) to change the time from 0,0s (instant stop) to
almost 10s. (very slow stop)
IMPACT parameter: while one of the 3 DSP-effects is activated, press the button until it starts
blinking. Now you can adapt the impact of the selected effect, also see EFFECT buttons (34+35+36).
41. TIME Button: The TIME button switches between elapsed playing time, remaining time of the selected
track.
42. SGL/CTN: You can choose between “single track mode” and “continuous play”.
Continuous play: all tracks will be played without interruption. (mostly used in pubs)
Single track: player stops at the end of each track and waits at the beginning of the next track.
(mostly used by deejays)
Push the SGL/CNT button for more than 1second to switch between normal and “auto cue” mode. In
“auto cue” mode the player waits at the first music note of each track. This means that badly indexed
tracks will not interfere with the instant start capabilities of the player. This is a very useful feature for
deejays!
43. TAP/SHIFT button: this button has two functions:
TAP-function: This player has a full automatic BPM-counter. In some rare cases the automatic beat
counter doesn’t count as it should do (beats are out of the normal range or there’s simply no beat to
detect). In these cases you can help the beat counter by manually tapping this button to the rhythm
of the beat. You can switch back to the automatic beat counter by pressing the TAP button until the
“AUTOBPM” in the right upper corner of the display turns on.
SHIFT-function: only used while the player is used as a MIDI controller. The shift function doubles
the functions of each control: press the shift button while using another control to obtain an extra,
secondary, function. See the chapter “MIDI MAP” for more information.
44. VFD DISPLAY: Shows all important information needed during playback.
45. RANDOM button: you can select 2 different random play functions.
TOTAL random: press the RANDOM button shortly until the LED is lit. Player 1 now plays tracks,
randomly selected from the complete USB-mass storage. While player 1 is playing in random mode,
player 2 can still be used to play any track you like.
SMART random: you can choose to play only tracks from a certain directory, only tracks from a
certain genre, or even only tracks from a certain album or artist:
Play tracks only from 1 directory: first choose “search-key = Std” (folders/tracks). Now you
have to select a directory, then press the RANDOM button for +/-2seconds until the LED starts
blinking. Player 1 now plays only tracks from the selected directory.
Play tracks only from a certain genre/artist/album: choose the right search-key and select a
track that corresponds to the desired genre, artist or album. After pressing the RANDOM button
for +/-2seconds, the player will only play tracks with the same genre, artist or album as the track
you’re currently playing. (Avoids mix-up of 2 completely different music styles: perfect for bars,
46. INPUT SOURCE SELECTOR: Used to select the correct input on both channels: internal player, MIDI-
47. GAIN LEVEL: Adjusts the input level on both channels. Use this control to adjust the level on the VU-
48. 3-BAND TONE CONTROLS: The frequency of each channel can be controlled separately over a range
49. BOOTH MASTER LEVEL: Used to adjust the level of the unbalanced booth master output.
50. MASTER LEVEL: Used to adjust the level of the balanced Master output.
51. VU METER: Each channel has its own LED VU-meter so you can adjust the gain level (47) very quickly.
52. MASTER METER button: when this button is dark, the VU-meters indicate the levels of individual
53. CHANNEL FADER: Used to set the level of each channel separately.
54. FADER START switch: when switched to ON the internal players can be started/stopped by moving the
55. CROSS FADER CURVE: Adjusts the curve of the cross fader from sharp (left position) to smooth (right
56. CROSSFADER: With this fader you can mix over between both channels. The crossfader only works
clubs, restaurants, …) See chapter “HOW TO USE” for examples.
control for DJ-software on computer or external analog phono/line inputs (there are also additional input
selectors (8) on the back).
meter at about 0dB.
from -35dB to +10dB. You can kill (completely remove) the high, mid and/or low frequencies by pressing
the corresponding knob(s). In the center position the tone control is flat. (switched off)
Make sure the levels do not exceed 0dB (or 100%). The audio risks to be distorted when the signal level
comes in the red zone of the VU-meter. While the MASTER METER-button (52) is lit the VU-meters
indicate the ouput level on the master.
channels. Press the button to light it up: the VU-meters now indicate the output level of the master.
crossfader.
position).
when you move the selected channel faders (53) to the desired level!
SYNQ
®
7/120 DMC2000
SYNQ
®
8/120 DMC2000
Page 7
ENGLISH OPERATION MANUAL
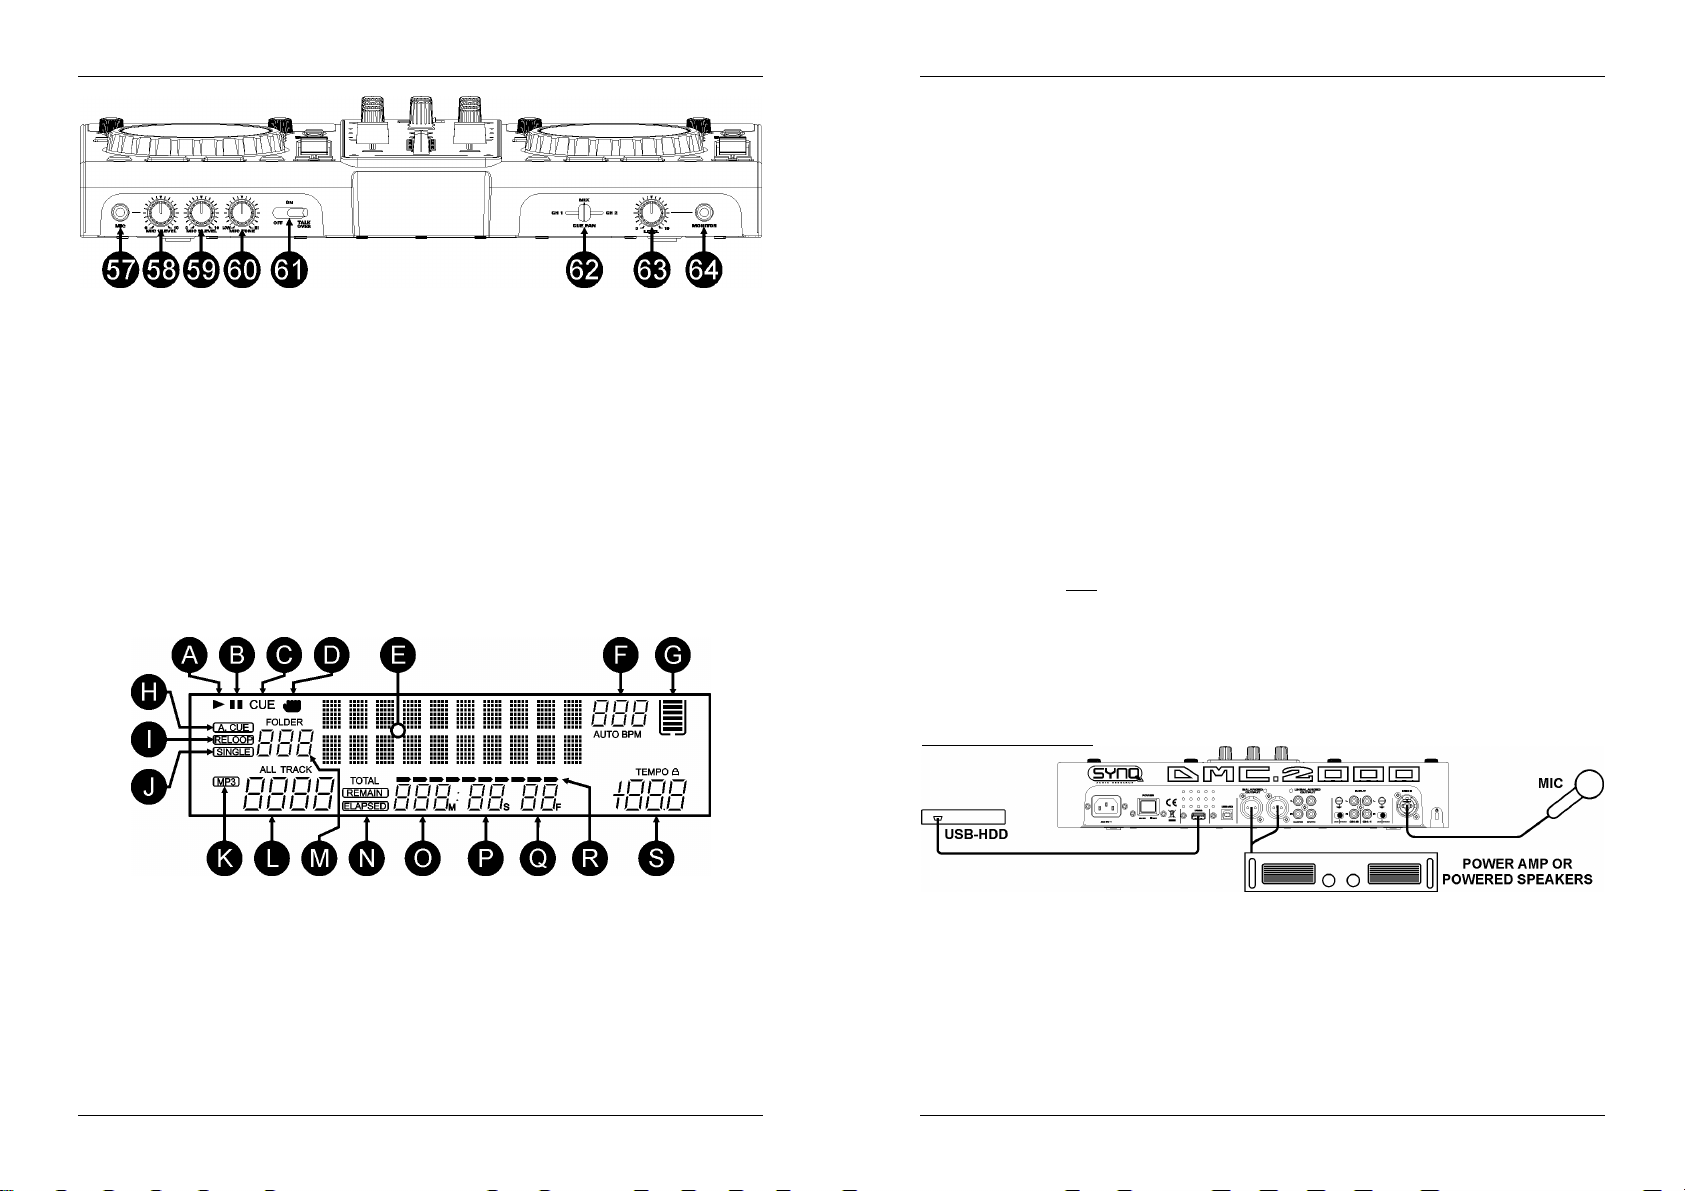
57. DJ MIC INPUT JACK: Accepts either an unbalanced microphone with 1/4” mono jack. This input is
mainly used as DJ-microphone. The talkover does not affect the signal level of this input.
58. MIC1 VOL: Used to adjust the input level of micro 1.
59. MIC2 VOL: Used to adjust the input level of micro 2.
60. MIC TONE: used to adapt the sound of both microphone inputs.
61. MIC ON/OFF/TALK OVER SWITCH: Used to switch the microphones:
OFF: Both mic1 & mic2 are switched off.
ON: Both mic1 & mic2 are switched on.
TALK OVER: mic1 & 2 are switched on; the sound level of all the other channels will decrease to
around -20dB.
62. CUE MIX: With this knob you can mix the the input channels through the headphone output (64):
Put the knob in the extreme left position to hear channel1.
Put the knob in the extreme right position to hear channel2.
Put the knob in any other position to hear a mix of the two signals.
This option makes it possible to check your mix before you put it on the master output.
63. HEADPHONE VOLUME: controls the sound level of the headphone output.
64. HEADPHONE output: if you like you can connect your headphone here.
VFD DISPLAY
ENGLISH OPERATION MANUAL
H. AUTO CUE: appears when the “auto cue” function is active. See SGL/CTN button (42).
I. RELOOP: shows when a loop is programmed. (repeating a particular area)
RELOOP Flashing: Loop is programmed and currently playing.
RELOOP on: Loop is programmed but not playing.
J. SINGLE: appears when the unit is set to play just one track at a time. When it is not shown, all tracks are
played without interruption. The function is controlled by the SGL/CTN button (42).
K. MP3 indicator: appears when an MP3-file is playing.
L. TRACK indicator: shows the number of tracks available in your current selection.
Standard lookup: (no Q-Dbase) the track numbers in the current folder (M) are shown.
Q-Dbase lookup: the track numbers that correspond to your Q-Dbase pre-selection.
M. FOLDER/SEARCH KEY indicator: the information depends on the lookup mode you selected.
Standard lookup: (no Q-Dbase) the current folder number is shown.
Q-Dbase lookup: the current search key (Art, Alb or Gen) is shown.
N. ELAPSED, TOTAL REMAIN: indicates that the time shown on the display is the track elapsed, remaining
or total remaining time.
O. MINUTE: Shows “minutes” time information of current track.
P. SECOND: Shows “seconds” time information of current track.
Q. FRAME: Shows “frame” time information of current track. (1 frame = 1/75thsec.)
R. TIME BAR: has 2 functions:
During normal playback: shows either time remaining or elapsed depending on the setting of the
TIME button. Starts flashing at the end of each track to alert the user to take action.
During loop playback: shows the time remaining until the end of the loop. This visual aid helps you
to see where and when the seamless loop starts again.
S. PITCH DISPLAY: Shows the actual percentage of speed change, selected with the SPEED slider (28).
The small red colored padlock is shown when the pitch lock function (Master Tempo) is active.
CONNECTIONS
Some important notes for the USB-storage devices that you will connect:
Note 1: the hard disk must be formatted in FAT32! A hard disk formatted in NTFS (mostly drives with big
capacity) will NOT be recognized: such hard disk should be re-formatted in FAT32! (this can be done under
Windows, support can be found on the DMC2000 product page)
Note 2: the USB-slots on this player can each deliver 1A power to the connected hard disk. However we
suggest using a hard disk with separate power supply for better reliability.
Note 3: only WAV and MP3 files are recognized and can be played.
Note 4: for your convenience we strongly advice using the Q-DBASE indexer software, it simply mazkes life
a lot easier!
A. PLAY: appears while the unit is playing a track.
B. PAUSE: appears while the player is in pause or cue mode.
C. CUE: appears when the player is waiting at the CUE-point.
D. TOUCH INDICATOR: appears when the touch sensitive part of the jog wheel is active.
E. ALPHANUMERIC DISPLAY: Shows all kinds of important information like effect parameters, loop
information, ID3-tags, …
F. BPM DISPLAY: the automatic beat counter shows the number of Beats Per Minute on the display. In
manual mode the display shows “BPM”. In automatic mode the display shows “AUTOBPM”. (press the
TAP button for 2seconds to switch to automatic mode)
G. MEMORY BUCKET: shows the status of the buffer memory needed for anti-shock and some special
functions. Each bar of the bucket represents 2seconds buffer memory.
®
SYNQ
9/120 DMC2000
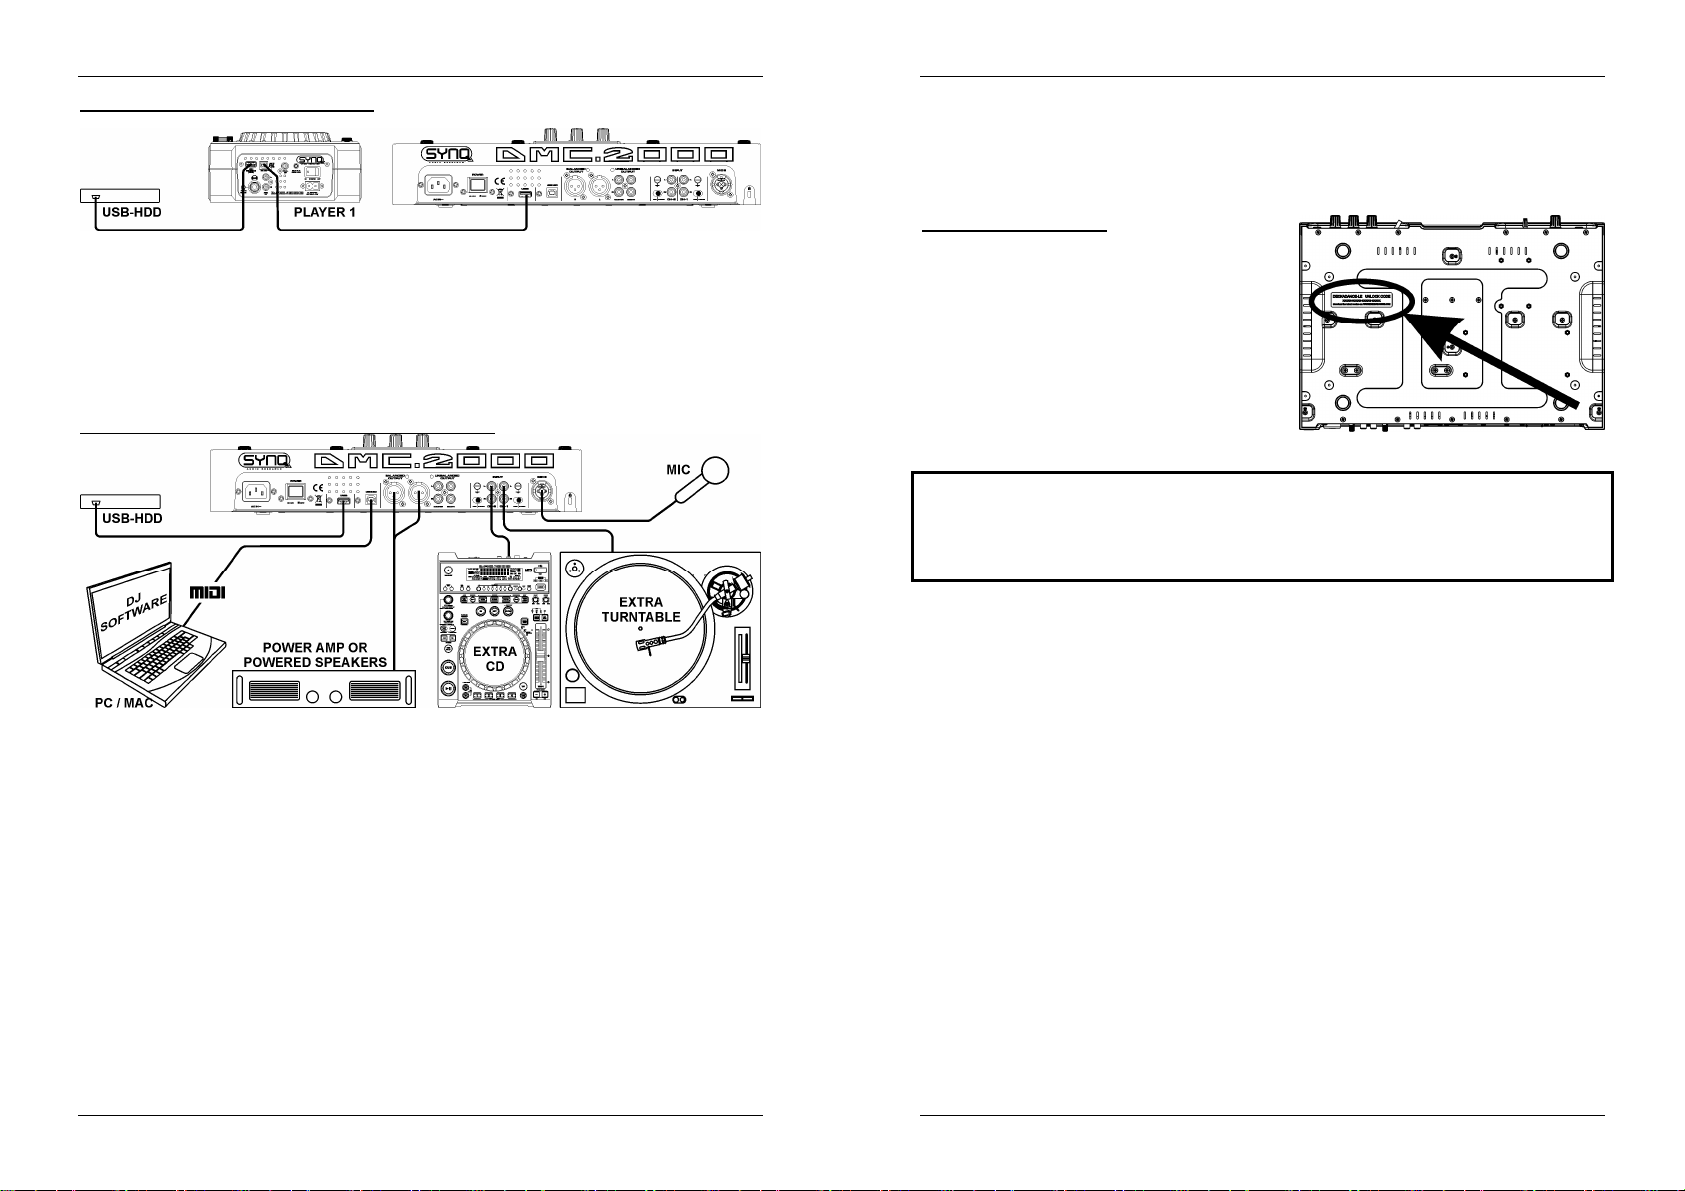
SIMPLE SETUP – 1 DECK
Connect the balanced(5) or unbalanced(6) master to a power amplifier or powered speaker cabinets.
Connect a USB-stick to USB1-input (13) or USB-harddisk to the USB2-input (3).
If needed, connect a microphone to the mic1 (57) or mic2 (11) input.
Connect the supplied power cord between the mains input (1) on the player and the mains socket.
You are ready to play and mix the MP3/WAV files on your USB-storage. Have fun!
®
SYNQ
10/120 DMC2000
Page 8
ENGLISH OPERATION MANUAL
ENGLISH OPERATION MANUAL
SETUP – WITH DMC1000 for harddisk share
Connect a USB hard disk to the USB2-connection of the DMC1000.
Make sure that the USB-link on the DMC1000 is set to “LINK”.
Use the USB-cable, supplied with DMC1000, to connect the USB-link connection of the player to the
USB2-connection (3) of the DMC2000.
Use the SOURCE SELECT button (14) to select USB2 on the DMC2000: both the DMC1000 and
DMC2000 players will connect to hard disk.
You can now play MP3 and WAV files from the connected hard disk.
IMPORTANT: for good, stable performance only use a good quality USB-cable with a maximum
length of 1meter!
SETUP – COMPLETE SETUP, INCLUDING MIDI CONTROLLER
The drawing shows a complete setup, including the MIDI-controller function.
You can connect up to 2 external audio sources (turntable or line) to turn your DMC2000 into a
multifunctional DJ-unit. All you have to do is switch the inputs on top of the 2 mixer channels!
If you only want to use the MIDI controller function, you just have to connect the computer with DJ-
software via the supplied USB-cable to the USB-MIDI output (4) on the DMC2000: the controller will be
recognized and the drivers will be automatically installed.
Put both mixer channel inputs (46) in MIDI-mode: most controls on the DMC2000 will send out MIDI.
For specific MIDI-settings please refer to the chapter “SETUP MENU”.
Depending on the DJ-sofware you’re using, you will have to load the desired MIDI-mappings. On some
DJ-software the DMC2000 mapping will be loaded automatically, on other DJ-software you will have to
download the MIDI mapping from our site or from the download section of the DJ-software. If the
DMC2000 is not supported by the DJ-software you can make your own MIDI-mapping but this entirely
depends on the software you’re using. Please note that the installation and the use of different DJ-software
is very specific and therefore not supported by Synq!
The DMC2000 as internal sound cards: the music of your mix will come throught the master outputs (5+6).
MIDI function mixer: The setup of the DMC2000 is such that you can easily mix music from all inputs with
eachother. You can even mix music from the DJ-software with music coming from the internal players or a
connected turntable. To be able to do this you must switch the MIDI-function of the internal mixer off. (see
setup menu)
VINYL scratching option on DJ-software: with the DMC2000 you can even use the very powerful “vinyl
scratch function” available on some highend DJ-software. This means that you can scratch and manipulate
the audio tracks played on your DJ-software by using a special coded vinyl disc! Just connect a turntable
to one of the audio inputs: the signals from the special coded vinyl disc will be sent to the DJ-software.
Note1: first check if your DJ-software can use this feature. If yes, follow the instructions of the
software to setup this function.
Note2: a special vinyl scratch disc is optionally available from Synq, it uses a “time dephased 1kHz
stereo signal” which can be used on different DJ-software.
DECKADANCE-LE software
The DMC2000 comes with a free license for
Deckadance-LE, the unlock code for this free license is
fixed to the back of the DMC2000 (see drawing).
To assure that you always have the latest version, the
program is only available through download, please
download the demo version for your operating system:
WINDOWS: http://windemo.deckadance.com
MAC OS: http://macdemo.deckadance.com
Install the demo-software and use the unlock code to
unlock it to the LE-version of Deckadance. You can use
this free software and upgrade to newer versions when
they come available!
Installation and user manuals can be downloaded from: http://deckadance.image-line.com/downloads.html
IMPORTANT: we strongly advise you to register your software on the Deckadance website:
You will gain access to the user forum, receive a newsletter and get full support from their support team. You
will also receive 30% discount while upgrading to the HOUSE and CLUB edition of Deckadance. On the
Deckadance site you can find a feature list with differences between the 3 versions. Please note that support
for the Deckadance DJ-software goes exclusively through the Deckadance website (www.deckadance.com).
They have a very well-developed support section with a user forum, video tutorials, …
SETUP MENU
For maximum flexibility this unit is highly customizable. Therefore a lot of parameters can be set via the
setup menu. To be able to enter the setup menu, the player should NOT be in MIDI mode.
To enter the SETUP menu, press the LOAD TRACK button (19) for about 3seconds.
Use the FOLDER knob (16) to browse the different menu options.
Use the TRACK knob (17) to browse the sub menus (if any)
Use the JOG WHEEL (22) to change the settings (parameters) of the selected menu option.
To save your settings: choose menu option E (EXIT & SAVE) and press the TRACK knob (17) or
press the RECORD CUE button (25).
1. MIDI CHANNEL: used to set the MIDI-channels of the 3 different parts of the DMC2000. The display
shows 3 groups of 2 digits: 01-02-03:
First 2 digits: MIDI-channel for the controls of player1 + channel1 of the mixer.
Second 2 digits: MIDI-channel for the controls of the mixer, except the controls of the 2 input
channels (gain+high/mid/low+fader)
Third 2 digits: MIDI-channel for the controls of player2 + channel2 of the mixer.
Turn the TRACK knob (17) to browse the three 2digit groups
Turn the JOG WHEEL (22) to change the MIDI-channel.
2. MIDI SETUP:
Note: the 3 parts should have different MIDI-channels.
There are 2 submenus: turn the TRACK knob (17) to select a submenu.
o
Submenu 1 – SHIFT button (43) functionality: you can choose how the SHIFT-button
works in MIDI-mode.
Turn the JOG WHEEL (22) to select the desired setting:
TAP = HOLD: similar to the SHIFT-key on your PC-keyboard the MIDI-
code of a button/knob changes only when you use it while the SHIFT-button
(43) is pressed.
SYNQ
®
11/120 DMC2000
SYNQ
®
12/120 DMC2000
Page 9

ENGLISH OPERATION MANUAL
FUNCTION
ENGLISH OPERATION MANUAL
TAP = TOGGLE : similar to the CAPS LOCK-key on your PC-keyboard
press the SHIFT-button (43) to turn the shift-function on: as long as the
display shows “SHIFT” the MIDI-code of most buttons/knobs changes so
they get a second (double) function.
o
Submenu 2 – MIDI message display: you can select if the MIDI I/O messages should
appear on the display or not. This can be helpful while making MIDI configuration files.
Turn the JOG WHEEL (22) to select the desired setting:
I/O = Hide : don’t show MIDI messages that are sent / received
I/O = DIS. : show MIDI messages that are sent / received
3. MIXER-mode: used to switch the mixer between MIDI and non-MIDI mode.
Turn the JOG WHEEL (22) to select the desired setting:
MIDI : use this setting when the DMC2000 is exclusively used to control DJ
software. The mixer of the DJ software will be controlled.
NO MIDI : use this setting if you want to mix different audio sources (DJ
software, external inputs, internal players) with each other, the levels of all
audio sources can be easily matched using the gain knobs (47).
Note: with this setting the mixer is not sending any MIDI, instead it works as
a normal audio mixer.
4. LOAD HOTCUES: you can choose if the saved hot cues of a track should be recalled automatically.
Turn the JOG WHEEL (22) to select one of the 2 possibilities:
o
First Ask: when a track contains hot cues, the display asks if you want to load the hot cues
or not. You can reply with the YES/NO buttons (29).
o
Autoload: when a track contains hot cues, they will be loaded automatically.
5. CROSS FADER: switches the cross fader of the audio mixer on/off, this has no effect on the MIDI
function of the crossfader.
Turn the JOG WHEEL (22) to select one of the 2 possibilities:
o
On: crossfader (56) is activated, ready to be used.
o
Off: if you don’t like using the crossfader, use this option.
6. REVERSE CROSS FADER: switches the cross fader of the audio mixer in reverse mode, this has no
effect on the MIDI function of the crossfader.
Turn the JOG WHEEL (22) to select one of the 2 possibilities:
o
On: crossfader (56) is working in reverse mode, channel1 is audible while the crossfader is
in the right position.
o
Off: crossfader (56) is working in normal mode, channel2 is audible while the crossfader is
in the right position.
7. DISPLAY TIME: you can select how long a message is shown before the display returns to normal
operation.
Turn the JOG WHEEL (22) to select the desired value: 0,5sec 12,0sec.
8. SCROLL SPEED: you can select how fast the text scroll on the display.
Turn the JOG WHEEL (22) to select the desired value: 50 2000ms (50ms=fast/2000ms=slow).
9. Sensitivity: you can change the sensitivity of the tactile jog wheel to optimize the jog wheel performance.
Turn the JOG WHEEL (22) to select one of the 41 possibilities:
o
ADJ. = 0: neutral setting (default setting, OK in most cases)
o
ADJ. = -20: lowest sensitivity
o
ADJ. = +20: highest sensitivity
A. INTENSITY: used to adapt the brightness of the VFD-display.
Turn the JOG WHEEL (22) to select one of the 4 possibilities.
o
ADJ. = 1 4: 1 = low brightness, 4 = high brightness (default)
B. A.CUE Level: the auto cue function detects where the music really starts, this avoids blanks when a track
is not well indexed. You can select one of eight detection level presets:
Turn the JOG WHEEL (22) to select one of the 8 possibilities.
o
ADJ. = -78dB -36dB: the default setting = -48dB
C. Firmware version / upgrading: use this option to check and/or upgrade the firmware versions.
Turn the TRACK knob (17) to select the 4 firmware parts:
o
CON: xx: shows the version of the control firmware
o
DSP: xx: shows the version of the DSP firmware
o
Upgrade: blinks when the unit is ready to check if there are new firmware versions
available. See “FIRMWARE UPGRADING” for more information.
D. Load defaults: as you already noted this unit is highly configurable but that means also that you can
mess up a lot of settings as well. If you really messed up things, you can still reload the default setting!
While “Enter Load” is blinking in the display: press the TRACK knob (17) to load the defaults.
E. Exit & Save: if you want your changes to the setup menu to be permanently saved (also after switching
the unit off) you MUST use this option!
Press the TRACK knob (17) : the display shows “Saving” and exits the setup menu.
Note: alternatively you can also press the RECORD CUE-button (25) to save settings permanently.
FIRMWARE UPGRADING
We strongly suggest to register your player on our website (www.synq-audio.com/register/) so we can inform
you if new firmware updates are available. Upgrading firmware should always be done very carefully!
Download the file containing the upgrade file(s)
Read the instructions and follow them strictly, otherwise you could damage your equipment…
Put the files on an EMPTY (important!) USB-stick.
Press the LOAD TRACK button (19) for about 3seconds to enter the setup menu.
Use the FOLDER knob (16) to browse to menu option “C. Version”.
Turn the TRACK knob (17) until the display shows “Upgrade”.
Use the SOURCE SELECT button (14) to select USB1 input (13).
Insert the USB-stick with firmware files in USB1-input (13)
Upgrading will start automatically: WAIT (!) until the upgrading process is finished. NEVER turn the
player off while upgrading the software!!!
If the display asks you to turn off the unit: turn the unit off, wait 3seconds and turn it back on.
Check if the software version corresponds to the version marked in the readme file that came with the
update.
MIDI MAP (default settings)
FUNCTION Type
SW/ENC 05/17 44/56 05/27 44/66
SW/ENC 01/16 40/55 01/26 40/65
IN SW/LED 02/02 D-1 41 02/02 D-1 41
OUT SW/LED 03/03 D#-1 42 03/03 D#-1 42
SW/LED 04/04 E-1 43 04/04 E-1 43
SOURCE
SELECT
RECORD CUE SW/LED 07/07 G-1 46 07/07 G-1 46
1
1
2
2
3
3
4
4
SW 06 45 06 45
SW/LED
(RED)
SW/LED
(GREEN)
SW/LED
(RED)
SW/LED
(GREEN)
SW/LED
(RED)
SW/LED
(GREEN)
SW/LED
(RED)
SW/LED
(GREEN)
FUNCTION
CODE
(DECK A)
08/08 G#-1 47 08/08 G#-1 47
08/05 F-1 47 08/05 F-1 47
09/09 A-1 48 09/09 A-1 48
09/06 F#-1 48 09/06 F#-1 48
0A/0A A# -1 49 0A/0A A#-1 49
0A/15 A0 49 0A/15 A0 49
0B/0B B-1 4A 0B/0B B-1 4A
0B/16 A #0 4A 0B/16 A#0 4A
NOTE
SHIFT
(Hold
TAP)
FUNCTION
CODE
(DECK B)
NOTE
SHIFT
(Hold
TAP)
CODE
(CENTER
DECK)
NOTE
SHIFT
(Hold TAP)
ACTION
7FH:ON
00H:OFF
7FH:ON
00H:OFF
7FH:ON
00H:OFF
7FH:ON
00H:OFF
7FH:ON
00H:OFF
7FH:ON
00H:OFF
7FH:ON
00H:OFF
7FH:ON
00H:OFF
7FH:ON
00H:OFF
7FH:ON
00H:OFF
7FH:ON
00H:OFF
7FH:ON
00H:OFF
7FH:ON
00H:OFF
7FH:ON
00H:OFF
7FH:ON
00H:OFF
SYNQ
®
13/120 DMC2000
SYNQ
®
14/120 DMC2000
Page 10

ENGLISH OPERATION MANUAL
LEVEL
VR/SW/
30/08/
CUE PAN
CUE PAN
ENGLISH OPERATION MANUAL
DELETE CUE SW/LED 0C/0C C0 4B 0C/0C C0 4B
LOAD TRACK SW/LED 0D/0D C#0 4C 0D/0D C#0 4C
TIME X SW/LE D 0E/0E D0 4D 0E/0E D0 4D
ECHO SW/LED 0F/0F D#0 4E 0F/0F D#0 4E
FLANGER SW/LED 10 /10 E0 4F 10/10 E0 4F
HOLD SW/LED 11/11 F0 50 11/11 F0 50
FILTER SW/LED 12/12 F#0 51 12/12 F#0 51
BRAKE SW/LED 13/13 G0 52 13/13 G0 52
RATIO Y SW/LED 14/14 G#0 53 14/14 G#0 53
% SW 15 54 15 54
SW 16 55 16 55
SW 17 56 17 56
A.Cue
scratch
VINYL SW/LED 19/19 C#1 58 19/19 C#1 58
CDJ SW/LED 1A/1A D1 59 1A/1A D1 59
Time SW 1B 5A 1B 5A
SGL/CTN SW 1C 5B 1C 5B
JOG SW/ENC 27/18 66/57 27/28 66/67
TAP/SHIFT SW 1E 5D 1E 5D
CUE SW/LED 1F/1F G1 5E 1F/1F G1 5E
DATABASE SW/LED 21/21 A1 60 21/21 A1 60
Pitch Silder VR/CE NTER
GAIN VR 11 50 21 60 VR:00~7F
HIGH VR/SW/CEN TER/LED 12/24/29/24 C2 51/63/68 2 2/24/29/24 C2 61/63/68 VR:00~7F
MID VR/SW/CEN TER/LED 13/25/2A /25 C# 2 52/64/69 23/25/2A/25 C#2 62/64/69 VR:00~7F
LOW VR/SW/CENTER/LED 14/26/2B/26 D2 53/65/6A 24/26/2B/26 D2 63/65/6A VR:00~7F
Channel Fader VR 10 4F 20 5F VR:00~7F
U1 LED 17 B0 17 B0
U2 LED 1B D#1 1B D#1
SW/LED 18/18 C1 57 18/18 C1 57
SW/LED 1D/1D F1 5C 1D/1D F1 5C
SW/LED 20/20 G#1 5F 20/20 G#1 5F
SW 22 61 22 61
SW 23 62 23 62
PITCH
BEND/28
PITCH
67
BEND/28
67
7FH:ON
00H:OFF
7FH:ON
00H:OFF
7FH:ON
00H:OFF
7FH:ON
00H:OFF
7FH:ON
00H:OFF
7FH:ON
00H:OFF
7FH:ON
00H:OFF
7FH:ON
00H:OFF
7FH:ON
00H:OFF
7FH:ON
00H:OFF
7FH:ON
00H:OFF
7FH:ON
00H:OFF
7FH:ON
00H:OFF
7FH:ON
00H:OFF
7FH:ON
00H:OFF
7FH:ON
00H:OFF
7FH:ON
00H:OFF
7FH:ON
00H:OFF
7FH:ON
00H:OFF
7FH:ON
00H:OFF
7FH:ON
00H:OFF
7FH:ON
00H:OFF
7FH:ON
00H:OFF
7FH:ON
00H:OFF
7FH:ON
00H:OFF
7FH:ON
00H:OFF
7FH:ON
00H:OFF
7FH:ON
00H:OFF
16 LED 1C E1 1C E1
10 LED 1E F#1 1E F#1
6 LED 22 A#1 22 A#1
METER LED
RANDOM SW/LED 2C/2C G#2 6B
MASTER
METER
MASTER VR 31 70 VR:00~7F
BOOTH VR 32 71 VR:00~7F
Cross Fader
MIC1 LEVEL VR 35 74 VR:00~7F
MIC2 LEVEL VR 36 75 VR:00~7F
SLIDER
LEVEL
Fader Start
ON(L)
Fader Start
OFF(L)
Fader Start
ON(R)
Fader Start
OFF(R)
C.F CURVE
(L)
C.F CURVE
(CENTER)
C.F CURVE
(R)
LEVEL LED 1 1 00H~7FH *
SW/LED 2D/2D A2 6C
SW/CENTER
VR 34 73 VR:00~7F
VR 33 72 VR:00~7F
SW 1 40
SW 2 41
SW 3 42
SW 4 43
SW 7 46
SW 6 45
SW 5 44
09/0A
6F/47/48/49 VR: 00~7F
7FH:ON
00H:OFF
7FH:ON
00H:OFF
7FH:ON
00H:OFF
7FH:ON
00H:OFF
7FH:ON
00H:OFF
7FH:ON
00H:OFF
7FH:ON
00H:OFF
7FH:ON
00H:OFF
7FH:ON
00H:OFF
7FH:ON
00H:OFF
7FH:ON
00H:OFF
7FH:ON
00H:OFF
CC-ABSOLUTE (VR, LEVEL METER LED) TYPE
Control Change messages are sent with status 0xBn, where n is the channel, for the specified CC
controller. Thus the controller MIDI ID is indicated with the channel along with the CC number. The value
from 0x00 to 0x7F, directly related to the location of the controller.
* LEVEL METER LEDS
00~0B => ALL LEDS OFF
0C~17=>LED(-30) ON
18~23=>LED(-30, -20) ON
24~2F=>LED(-30, -20, -10) ON
30~3B=>LED(-30, -20, -10, -7) ON
3C~47=>LED(-30, -20, -10, -7, -4) ON
48~53=>LED(-30, -20, -10, -7, -4, -2) ON
54~5F=>LED(-30, -20, -10, -7, -4, -2, 0) ON
60~6B=>LED(-30, -20, -10, -7, -4, -2, 0, +2) ON
6C~77=>LED(-30, -20, -10, -7, -4, -2, 0, +2, +4) ON
78~7F=> ALL LEDS ON (-30, -20, -10, -7, -4, -2, 0, +2, +4, +7)
CC-RELATIVE (ENC) TYPE
Control Change messages are status 0xBn, where n is the channel, for the specified CC controller. Thus
the controller MIDI ID is indicated with the channel along with the CC number. The value 0x40 is the
reference value of the controller. This is an offset to 0x40 “one’s complement” notation.
A message with data 0x43 indicates a positive change of 3.
A messages with data 0x31 indicates a negative change of 15.
SYNQ
®
15/120 DMC2000
SYNQ
®
16/120 DMC2000
Page 11
ENGLISH OPERATION MANUAL
ENGLISH OPERATION MANUAL
SWITCH ON/OFF (SW,CENTER)
These messages are used for switches.
Control Change messages are sent with status 0x9n, SWITCH On and Off value are 0x7F and 0x00,
where n is the channel.
LED ON/OFF (LED)
These messages are used for LED.
Control Change messages are sent with status 0x9n, LED On and Off value are 0x7F and 0x00, where n
is the channel.
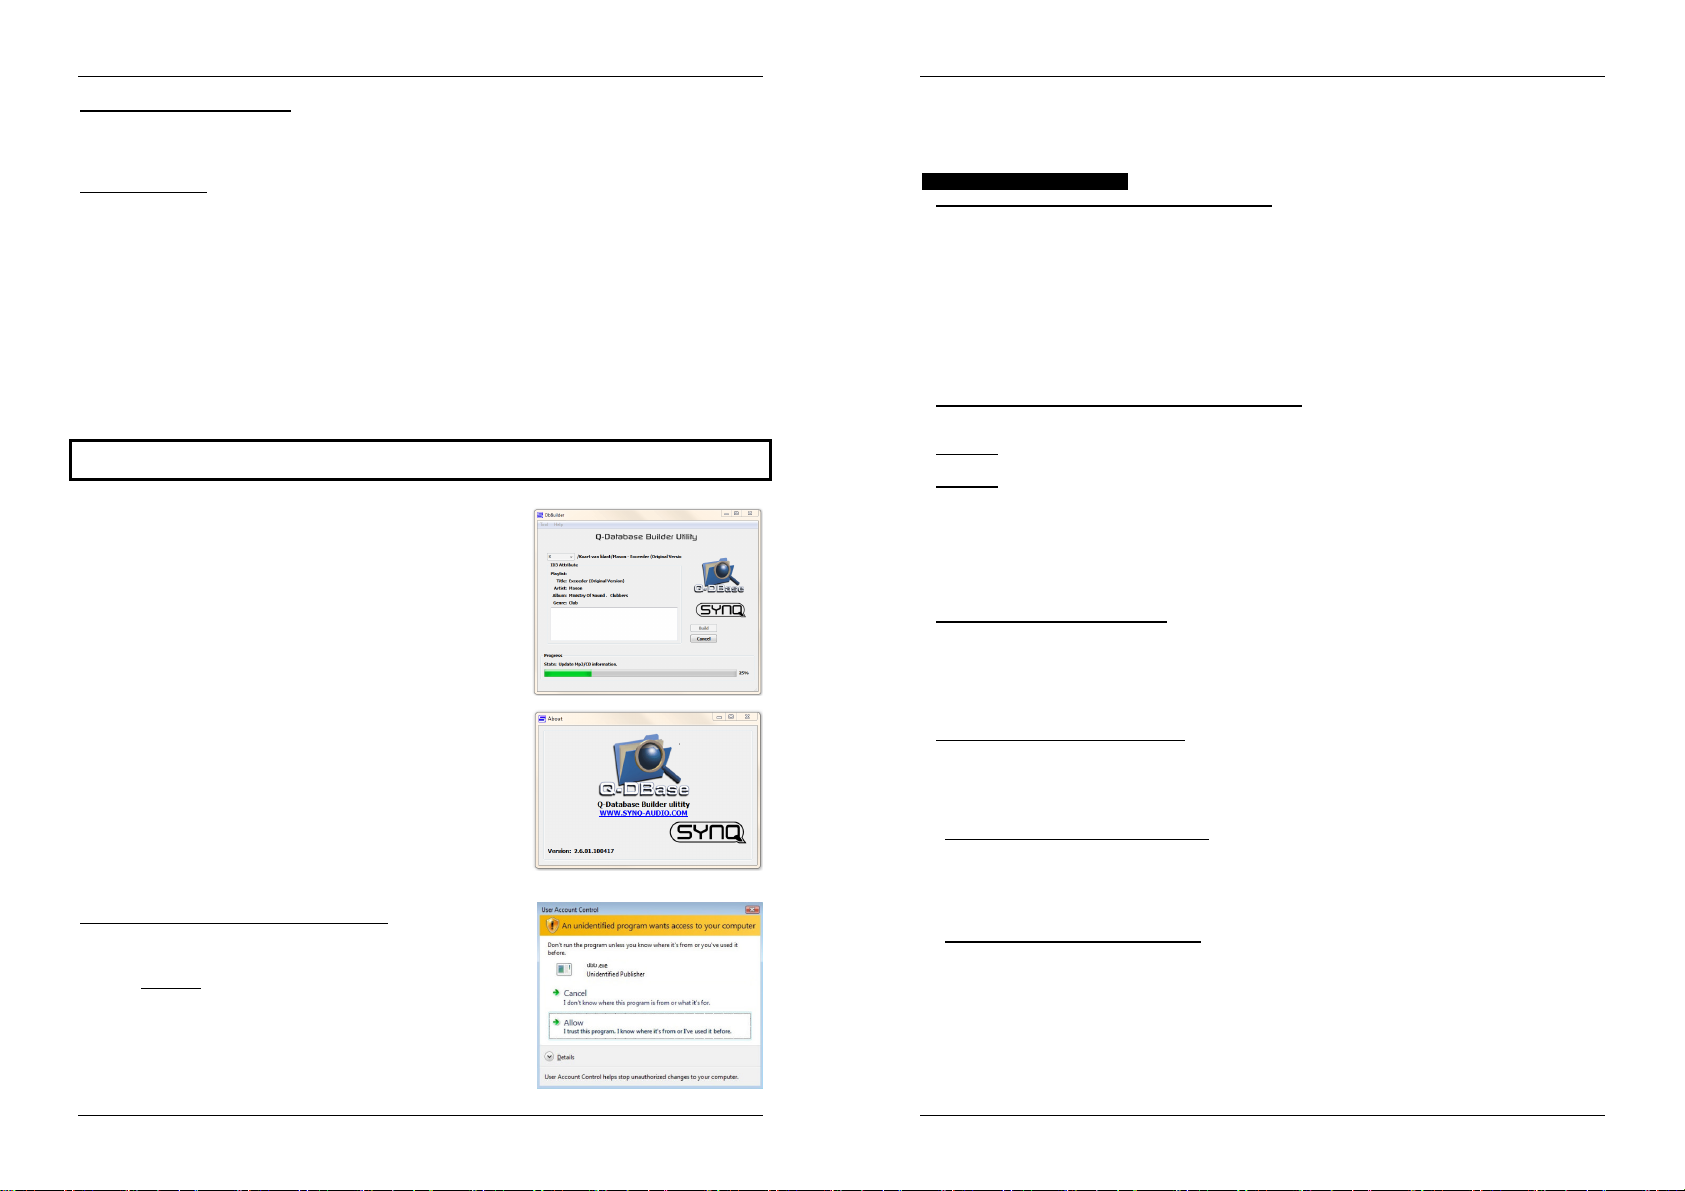
INSTALLING THE Q-DBASE SOFTWARE
The DMC2000 works perfectly without the Q-DBASE database files but if you want to search your tracks
easily and lightning fast than you should install the Q-DBASE software on your computer! Please note that
the program currently only works under Windows (XP, Vista, Win7). To be sure that you always have the
latest version, you can download the software from our website (check the download section on the
DMC2000 product page). Installing the program is very easy: just double-click the file and follow the
instructions on your screen.
USING THE Q-DBASE SOFTWARE
Each time you add or remove tracks from your USB hard disk,
you must run the Q-DBASE software again to update the database files!
After the installation you will see a new program directory called
“SYNQ”. In this directory you will find 2 files:
- Uninstall (to uninstall the software)
- Q-DBASE (to start the software)
Connect your USB-hard drive to your PC and check which drive
letter was assigned to it.
Click on the Q-DBASE icon to start the software: the main screen is
shown.
In the upper left corner choose your USB-drive.
Press the BUILD-button on the right side.
The software starts scanning the USB-drive for compatible
audio files and extracts the ID3-tags to build the Q-DBASE
files, needed to speed up the search function on player. Once
the progression bar on the bottom is full, the database building
process is finished and a short summary is shown.
The program wrote the Q-DBASE files (file extensions: .DBH + .dat
+ .DBX) to the USB-drive so now you can remove it from your PC
and connect it to the DMC2000.
To achieve the best results, please always use the latest version of
the database software. You can find the software version at the
bottom left of the “About” screen.
! IMPORTANT MESSAGE FOR VISTA USERS !
Many Vista users will not be able to run the Q-DBASE software. This
problem is caused by the UAC (User Account Control) limitation, a
security option limiting the user privileges in Vista. To overcome this
problem, right-click the Q-DBASE program icon and choose “Run as
administrator” in the popup menu. Windows will respond with the
window shown on the right: just click “Allow”.
HOW TO USE …
Most of the common functions are explained in the previous chapter “controls and functions” In this chapter
we talk about the functions that need a little more explanation.
SOME GENERAL FUNCTIONS:
SEARCH A TRACK WITH THE Q-DBASE SYSTEM:
Important: before you can use the Q-DBASE system, you should scan your USB-drive so it contains the
necessary files.
You can choose the search key at any moment by pressing the TRACK-knob (17) while you turn it. You
can search for Art(artist), Alb(album) or Gen(genre).
Press the DATABASE-button (15) to start the lookup function the first character of the list you want
to search is blinking in the display.
Turn the FOLDER knob (16) to change the first character.
Turn the JOG WHEEL (22) to browse the list that corresponds to your demand at high speed. If you
want to search more precisely track by track, you can also turn the TRACK knob (17).
Once you have found the right track: press the LOAD TRACK-button (19).
SEARCH A TRACK WITHOUT THE Q-DBASE SYSTEM:
Press and turn the TRACK-knob (17) to select Std(standard lookup system). If the USB-drive has no QDBASE files, the player automatically selects the standard lookup system. You have Two options:
Option 1:
Simply use the FOLDER and TRACK knobs to browse the different directories.
Option 2:
Press the DATABASE-button (15) to start the lookup function both the FOLDER and TRACK
displays start blinking.
Turn the FOLDER knob (16) to browse the folders.
Turn the JOG W HEEL (22) to browse the selected folder at high speed. If you want to search more
precisely track by track, you can also turn the TRACK knob (17).
Once you have found the right track: press the LOAD TRACK-button (19).
TOTAL RANDOM ON A USB-drive:
This is the simple random function where any track on your USB-drive can be played randomly on player1:
Open the fader (53) for player1 on the audio mixer.
Press the SOURCE SELECT-button (14) of player1 to choose one of the USB-drives.
Press the RANDOM-button (45) shortly until it is lit.
Press the PLAY-button (20) of player1 to start random playback.
“SMART” RANDOM ON A USB-drive:
This is the “smart” random function where you have full control over which folder, genre, album or artist
you want to play in your random selection, perfect for background music in restaurants, shops, clubs &
bars without a dj. This is how it works:
Open the fader (53) for player1 on the audio mixer.
Press the SOURCE SELECT-button (14) of player1 to choose one of the USB-drives.
PLAY ONLY TRACKS FROM 1 FOLDER
Press & turn the TRACK-knob (17) to select the “Std” search-key.
Press the FOLDER knob (16), the display will show the currently selected directory name.
Turn the FOLDER knob (16) to select the directory you want to play files from.
Press the RANDOM-button (45) for about 2seconds until the LED starts blinking.
Press the PLAY-button (20) to start random playback only from the selected folder.
PLAY ONLY TRACKS FROM 1 GENRE
Press & turn the TRACK-knob (17) to select the “Genre” search-key.
Press the FOLDER knob (16), the display will show the currently selected genre.
Press and turn the FOLDER knob (16) to select the first letter of the genre you want to choose.
If needed, turn the JOG WHEEL (22) while you keep the FOLDER knob (16) pressed to browse the
different genres starting with the same letter.
Press the RANDOM-button (45) for about 2seconds until the LED starts blinking.
Press the PLAY-button (20) to start random playback only from the tracks of the selected genre.
SYNQ
®
17/120 DMC2000
SYNQ
®
18/120 DMC2000
Page 12

ENGLISH OPERATION MANUAL
ENGLISH OPERATION MANUAL
Remark1: to play only tracks from a certain artist or album, just repeat the actions but select the artist
or album search-key.
Remark2: please note that the “SMART” random function will only work properly on condition that you
ID3-tags are well maintained. A perfect “freeware” ID3-tag editor for this task is called “MP3TAG” and
can be downloaded from www.mp3tag.de !
ABOUT LOOPS:
CREATE A LOOP:
While a track is playing, press LOOP IN button (31) to program the starting point of the loop. Now press
the OUT button (32) to program the endpoint of the loop. The seamless loop starts playing at once. (With
some practice you will be able to create perfect loops!) While the loop is playing, you can press the OUT
button (32) again to exit the loop and continue the rest of the track.
It is possible to program a new loop, even when the current loop is still playing. While the loop is playing,
simply press the LOOP IN button (31) to set the starting point of the new loop. Now enter the endpoint by
pressing the OUT button (32). Your new loop is programmed and playing.
RESTART A LOOP:
This can be done in 3 ways:
When a loop is programmed and you left it by pressing the OUT button (32), just press RELOOP (33)
to restart the loop.
When a loop is programmed and you left it by pressing the OUT button (32), just press OUT again to
restart the loop. The point where you pressed OUT is now programmed as the new endpoint of the
loop.
When the loop is still playing, press the RELOOP button (33) to restart the loop immediately. You can
repeat this several times to create a “Stutter” effect.
EDIT A LOOP:
When a loop is programmed, press the RELOOP button (33) for about 2 seconds to enter “loop edit” mode.
While the loop is seamlessly playing, the alphanumerical display shows the time information of the loop
endpoint. Use the jog wheel to set the new loop endpoint. To make things very easy you can hear your
modifications to the loop endpoint continuously. If you also want to edit the loop intro point, press the
RELOOP-button (33) to toggle between the loop start and endpoint. W hen the loop is perfect, press the
LOOP OUT button (32) to save the new loop endpoint.
ABOUT EFFECTS:
In the description of the effects you can already find a lot of information, don’t forget to also check that part!
USE THE EFFECTS IN BEAT SYNCHRONIZED MODE:
Press the FX-SYNC button (38) so it’s lit.
While music is playing you can press any of the 3 effects: the effect works in beat synchronized mode.
Use the EFFECT SYNC X/Y buttons (39+40) to choose different beat presets. Press the RATIO-button
(40) until it starts blinking to adapt the impact of the effect.
USE THE EFFECTS IN MANUAL MODE:
Press the FX-SYNC button (38) so it’s dark.
While music is playing you can press any of the 3 effects: use the JOG WHEEL (22) to change the effect
in real-time. Press the RATIO-button (40) until it starts blinking to adapt the impact of the effect.
ABOUT MEMORY:
DIFFERENT MEMORIES:
Before we talk about using the memory, we have to know the difference between “track memory” and
“permanent memory”:
Track Memory: This is the memory where the DMC2000 stores a set of up to four cue points and/or
loops for one track. You can set up a “track memory” for every single track on a USB-drive.
Example: your USB-drive contains 5000 tracksfor every track you can store up to 4 cue points
and/or loops. This makes a total of 5000 x 4 = 20000 cue points and/or loops on one USB-drive!
Permanent Memory: This is the large memory where all the cue points and loops are permanently
stored. In fact it’s an indexed collection of “track memories”. When you recall previously stored cue
points of a certain track, you make a transfer from “permanent memory” to “track memory”.
Note: all cue points are stored in database files on your USB-drive. If you connect the drive to another
DMC2000 or DMC1000, all cue points can also be used immediately on this player.
USING THE “TRACK MEMORY”:
STORING A M ASTER CUE POINT:
There are 2 ways to set a master cue point:
Press the LOOP IN (31) button during normal playback to set the new cue point (“CUE on the fly”).
Put the player in pause and use the jog/shuttle wheel to search for the exact location for the cue point.
Once this location is found, press LOOP IN button (31) to set the new cue point. (or press
PLAY/PAUSE button)
Once the cue point is programmed, just press the CUE button (21) to recall it.
STORING A SIMPLE CUE POINT TO THE “HOT CUE” BUTTONS:
First press the RECORD CUE button (25) to make the unit enter hot cue memory mode (RECORD CUE
button is on):
Press one of the four HOT CUE buttons (24) at the right moment during normal playback: the HOT
CUE button you just pressed changes to green color to indicate that the desired cue point is stored.
(“Cue on the fly”).
Put the player in pause and use the jog/shuttle wheel to search for the exact location for the cue point.
Once this location is found, press one of the four HOT CUE buttons to set the new cue point: the HOT
CUE button you just pressed changes to green color to indicate that the desired cue point is stored.
Once the cue point is programmed, just press the HOT CUE button to start playback from the stored cue
point.
STORING A LOOP TO THE “HOT CUE” BUTTONS:
This is very similar to storing a simple cue point. The only difference is that you have to put the DMC2000
in loop mode first. When the loop is playing, you press the RECORD CUE button (25) to make the player
enter hot cue memory mode (RECORD CUE button is on). After this press one of the four HOT CUE
buttons (24): the HOT CUE button you just pressed changes to red color to indicate that the loop, playing
at that moment, is stored. You can store up to 4 loops per track!
DELETE THE “HOT CUE” BUTTONS:
You can easily delete the contents of a HOT CUE button by pressing the DELETE CUE button (26),
followed by the HOT CUE button you want to delete. Or simply store a new cue point or loop to this HOT
CUE button. You can also erase all four HOT CUE buttons together by pushing the DELETE CUE button
(26) for more than 2 seconds. You will notice that all 4 HOT CUE buttons turn dark to indicate that the
HOT CUE buttons are empty.
USING THE “PERMANENT MEMORY”:
For security reasons the cue points and loops stored in the HOT CUE buttons are not automatically stored
to the permanent memory. This means that if you recall a set of cue points and loops from permanent
memory to the HOT CUE buttons (which is track memory), you can change, edit and delete them as much
as you want. The permanent memory will not be affected until you make a backup of the HOT CUE
buttons to permanent memory.
STORING TO “PERMANENT MEMORY”:
Press the RECORD CUE button (25) until the display shows “Now saving” to indicate that the cue points
and loops in the HOT CUE buttons for that track are stored to permanent memory.
DELETE A TRACK IN “PERMANENT MEMORY”:
Select the track that you want to delete. Press the “DELETE CUE” (26) and “SYNC/Y” (40) buttons
together. The display asks “DEL TRACK?” if you press the YES button (PITCH BEND+ button), the track
information will be deleted in the permanent memory.
RECALLING “HOT CUE POINTS/LOOPS” FROM PERMANENT MEMORY:
Because it takes some seconds to load the permanent cue points, they are not automatically restored.
Sometimes you simply don’t need them so why would you wait for them? Below we explain how
everything works:
No cue points stored: When you select a track that has no cue points or loops stored in permanent
memory, nothing happens: you can start playback right away.
Cue points stored: When you select a track where cue points or loops are stored in permanent
memory, the DMC2000 shows “Load Cues?” and wants to know if you want to load the cue points.
This is what you can do:
SYNQ
®
19/120 DMC2000
SYNQ
®
20/120 DMC2000
Page 13

ENGLISH OPERATION MANUAL
ENGLISH OPERATION MANUAL
You press the YES button: Press yes (pitch bend + button) to load the pre-stored cue points
and loops. The display shows RECALL while the Hot cue buttons are filled up.
You press the NO button: the cue points are not loaded and the display becomes normal.
You can start playback right away.
You do nothing: after some seconds the display becomes automatically normal and of
course the cue points are not loaded.
Note: in the setup menu (point4) you can choose to load the cue points automatically (autoload). In
that case the player asks nothing but simply loads the cue points.
SPECIFICATIONS
Power Supply: AC 100 - 240V, 50/60Hz
Power Consumption: 21W
Reference input level / impedance:
Line: 47kΩ /-14dBV (200mV) +/-0.1dB
Phono: 47kΩ /-51dBV (2.8mV) +/-0.1dB
Mic: 10kΩ /-56dBV (1.5mV) +/-0.1dB
Maxi input: (1kHz, THD=1%, EQ flat, max. gain, load=100kΩ)
Line: > +0dBV
Phono: > -38dBV
Mic: > -42dBV
Talkover: -20dB +/-2dB
Frequency response: (EQ flat, max. gain, load = 100kΩ)
Line: 20Hz - 20kHz +/-2dB
Phono: 20Hz - 20kHz +2/-3dB (RIAA)
Mic: 20Hz - 20kHz +2/-3dB
THD+N: (EQ flat, max. gain, w/20kHz LPF, A-weighted, load = 100kΩ)
Line: < 0.06% @ 1 KHz
Phono: < 0.08% @ 1 KHz
Mic: < 0.15% @ 1 KHz
Output level / impedance:
Master unbalanced: 1kΩ /3.8dBV (1.55V) +/-2dB
Master balanced (load=600Ω): 600Ω /+6dBm (1.55V) +/-3dB
Booth master: 1kΩ /3.8dBV (1.55V) +/-2dB
Headphones (load=32Ω): 33Ω /0dBV (1V) +/-2dB
Max. output: (1kHz, THD=1%, EQ flat, max. gain, load = 100kΩ)
Master: > +18dBV (8V) load=100kΩ
Headphones: > +4dBV (1,6V) load=32Ω
USB FORMAT:
File System: FAT12/16/32
Max. Hard disk capacity: 500GB
Max. Folders: 999
Max. Tracks / Folder: 999
Max. Q-DBASE track capacity: 9999
WAV FORMAT: PCM, 1411kbps.
MP3 FORMATS:
MPEG1 Layer3 (ISO/IEC11172-3): mono / stereo sampled at: 32 - 44,1 - 48kHz
Bitrates: 32 – 320 Kbps
Bitrate modes: CBR (Constant Bitrate) or VBR (Variable Bitrate)
MPEG2 Layer3 (ISO/IEC13818-3): mono / stereo sampled at: 16 – 22,05 - 24kHz
Bitrates: 32 – 160 Kbps
Bitrate modes: CBR (Constant Bitrate) or VBR (Variable Bitrate)
MPEG2,5 Layer3: mono / stereo sampled at: 8 – 11,025 - 12kHz
Bitrates: 32 – 160 Kbps
Q-DBASE Software :
Dimensions: 299(D) x 420(W) x 89(H) mm
Weight: 4,42kg
Bitrate modes: CBR (Constant Bitrate) or VBR (Variable Bitrate)
File extensions : .DBH + .dat + .DBX
System requirements : RAM 512MB
100MB free disk space
Microsoft®Win XP SP3 ~ Win Vista SP2 ~ Win 7
SYNQ
You can download the latest version of this user manual on our website: www.beglec.com
®
21/120 DMC2000
SYNQ
®
Every information is subject to change without prior notice
22/120 DMC2000
Page 14
FRANCAIS MODE D’EMPLOI
ATTENTION:
MODE D’EMPLOI
Nous vous remercions d’avoir acheté ce produit SYNQ®. Veuillez lire ce mode d’emploi très attentivement
afin de pouvoir exploiter toutes les possibilités de cet appareil. Conservez ce manuel dans un endroit sûr
pour toute consultation future..
N'OUBLIEZ PAS D'ENREGISTRER VOTRE NOUVEL ACHAT SYNQ. VOUS RECEVREZ
AUTOMATIQUEMENT UN RAPPEL QUAND LES NOUVELLES MISES À JOUR DE
LOGICIEL SERONT DISPONIBLES!
SURFEZ SUR: WWW.SYNQ-AUDIO.COM/REGISTER/
CARACTERISTIQUES
Cet appareil ne produit pas d’interférences radio. Il répond aux exigences nationales et européennes. La
conformité a été établie et les déclarations et documents correspondants ont été déposés par le fabricant.
Ce contrôleur digital professionnel de médias propose une solution "tout en un" extrêmement compacte qui
est en mesure de donner satisfaction même aux DJ les plus exigeants ! Tout ce dont vous avez besoin en
plus pour animer un événement, c'est une paire de haut-parleurs actifs !
En effet, cet appareil est bourré d'une foule de caractéristiques intéressantes, comme, par exemple :
De la musique en provenance de différentes sources peut être jouée et mixée sans raccord audible.
Deux lecteurs USB internes partagent le même disque dur USB et/ou le même stick USB, dont ils
peuvent lire n'importe quel fichier WAV ou MP3 ;
Présence de différentes entrées analogiques comme des tourne-disque, des lecteurs CD
supplémentaires, etc …
L'appareil est capable de contrôler tous les softwares MIDI populaires pour DJ ; quant au software
Deckadance LE, il est inclus à la livraison !
Possibilité d'utiliser 2 micros avec fonction talkover en même temps.
Q-DBase system: Système de recherche doté de toutes les fonctions existantes pour retrouver aisément
un morceau, et ce, même sur des disques durs de grande capacité jusqu’à 500GB!
Software Windows Q-DBase-builder inclus.
Les effets digitaux (écho, flanger, filtre, brake) peuvent être utilisé en fonction manuelle ou réagir de
manière synchronisée au rythme de nombreuses présélections.
Fonction d'édition des boucles sans raccord en temps réel !
PCMS (Permanent Cue Memory System): Pour chaque morceau, quatre points de cue et boucles sans
raccord peuvent être mémorisés et rappelés à tout moment
Fonction scratch et pitch bend, tous deux de haute précision grâce à la molette sensible au toucher
La molette possède plusieurs modes : vinyl, CDJ et A.CUE scratch!
Un software pour DJ peut utiliser des disques en vinyle codés pour contrôler la lecture et produire des
effets de scratch sur les fichiers WAV et MP3.
Ecrans VFD (afficheur luminescent sous vide) de 2 x 10 caractères affichant toutes les informations utiles,
y compris les tags ID3.
SMART RANDOM : la lecture aléatoire peut être limitée à un genre ou à un artiste (par exemple, ne jouer
que des slows !).
Firmware Synq original pouvant être mis à jour, et qui garantit une fonctionnalité aussi sophistiquée que
conviviale.
Menu de configuration totalement adaptable pour les fonctions MIDI et autres.
Pitch control (+/-6%, 10%, 16%, +16%/-100%)
Pitch lock (Master Tempo)
Mixer digital à 2 canaux possédant toutes les fonctions utiles, avec cross fader réglable, sorties
symétriques et booth master.
Casque de monitoring PFL permettant de mélanger les canaux 1 et 2 et avec ajustement du volume.
Et il y a encore beaucoup d'autres atouts à découvrir …
FRANCAIS MODE D’EMPLOI
AVANT L’UTILISATION
Quelques instructions importantes:
Avant d’utiliser cet appareil, assurez-vous de l’absence de dommages liés au transport. En cas de
dommages, n’utilisez pas l’appareil et contactez le vendeur.
Important: Cet appareil a quitté notre usine en parfaite condition et bien emballé. Il est primordial que
l’utilisateur suive les instructions de sécurité et avertissements inclus dans ce manuel. La garantie ne
s’applique pas en cas de dommage lié à une utilisation incorrecte. Le vendeur ne prend pas la
responsabilité des défauts ou de tout problème résultant du fait de n’avoir pas tenu compte des mises en
garde de ce manuel.
Conservez ce manuel dans un endroit sûr pour toute consultation future. Si vous vendez l’appareil,
assurez-vous d’y joindre ce manuel également.
Afin de protéger l’environnement, merci de recycler les emballages autant que possible.
Vérifiez le contenu:
Vérifiez si l'emballage contient bien les articles suivants :
Le DMC2000
mode d’emploi
1 câble USB
1 câble d’alimentation
INSTRUCTIONS DE SECURITE:
CAUTION
La flèche dans un triangle met l'utilisateur en garde contre la présence de haute tension sans
isolation dans l'appareil, ce qui peut causer un risque d'électrocution.
Un point d'exclamation dans un triangle prévient de la présence d'instructions relatives au
fonctionnement et à la maintenance se trouvant dans le manuel fourni avec l'appareil.
Ce symbole signifie: uniquement pour usage à l'intérieur.
Ce symbole signifie : Lire le mode d’emploi.
Ce symbole signifie: appareil construit selon les normes de sécurité classe II
Afin d’éviter tout risque d’incendie ou de décharge électrique, ne pas exposer cet appareil à la pluie ou
l’humidité.
Pour éviter la formation de condensation à l’intérieur de l’appareil, patientez quelques minutes pour laisser
l’appareil s’adapter à la température ambiante lorsqu’il arrive dans une pièce chauffée après le transport.
La condensation empêche l'appareil de fonctionner de manière optimale, et elle peut même causer des
dommages.
Cet appareil est destiné à une utilisation à l’intérieur uniquement.
Ne pas insérer d’objet métallique ou renverser de liquide dans l’appareil. Aucun objet contenant un liquide,
tels que des vases, ne peut être placé sur cet appareil. Cela risquerait de provoquer une décharge
électrique ou un dysfonctionnement. Si un corps étranger est introduit dans l’appareil, déconnectez
immédiatement de la source d’alimentation.
Aucune source de flamme nue, telle que des bougies allumées, ne peut être placée sur l'appareil.
Ne pas couvrir les orifices de ventilation, un risque de surchauffe en résulterait.
Ne pas utiliser l'appareil dans un environnement poussiéreux et le nettoyer régulièrement.
Ne pas laisser l'appareil à portée des enfants.
Les personnes non expérimentées ne doivent pas utiliser cet appareil.
La température ambiante maximale d’utilisation de l’appareil est de 40°C. Ne pas l’utiliser au-delà de cette
température.
n’enlevez jamais le couvercle de l’appareil. Il n’y a aucune
pièce à l’intérieur de l’appareil que vous puissiez
remplacer vous-même. Confiez l’entretien uniquement à
des techniciens qualifiés.
afin de réduire le risque d’électrocution,
SYNQ
®
23/120 DMC1000
SYNQ
®
24/120 DMC1000
Page 15
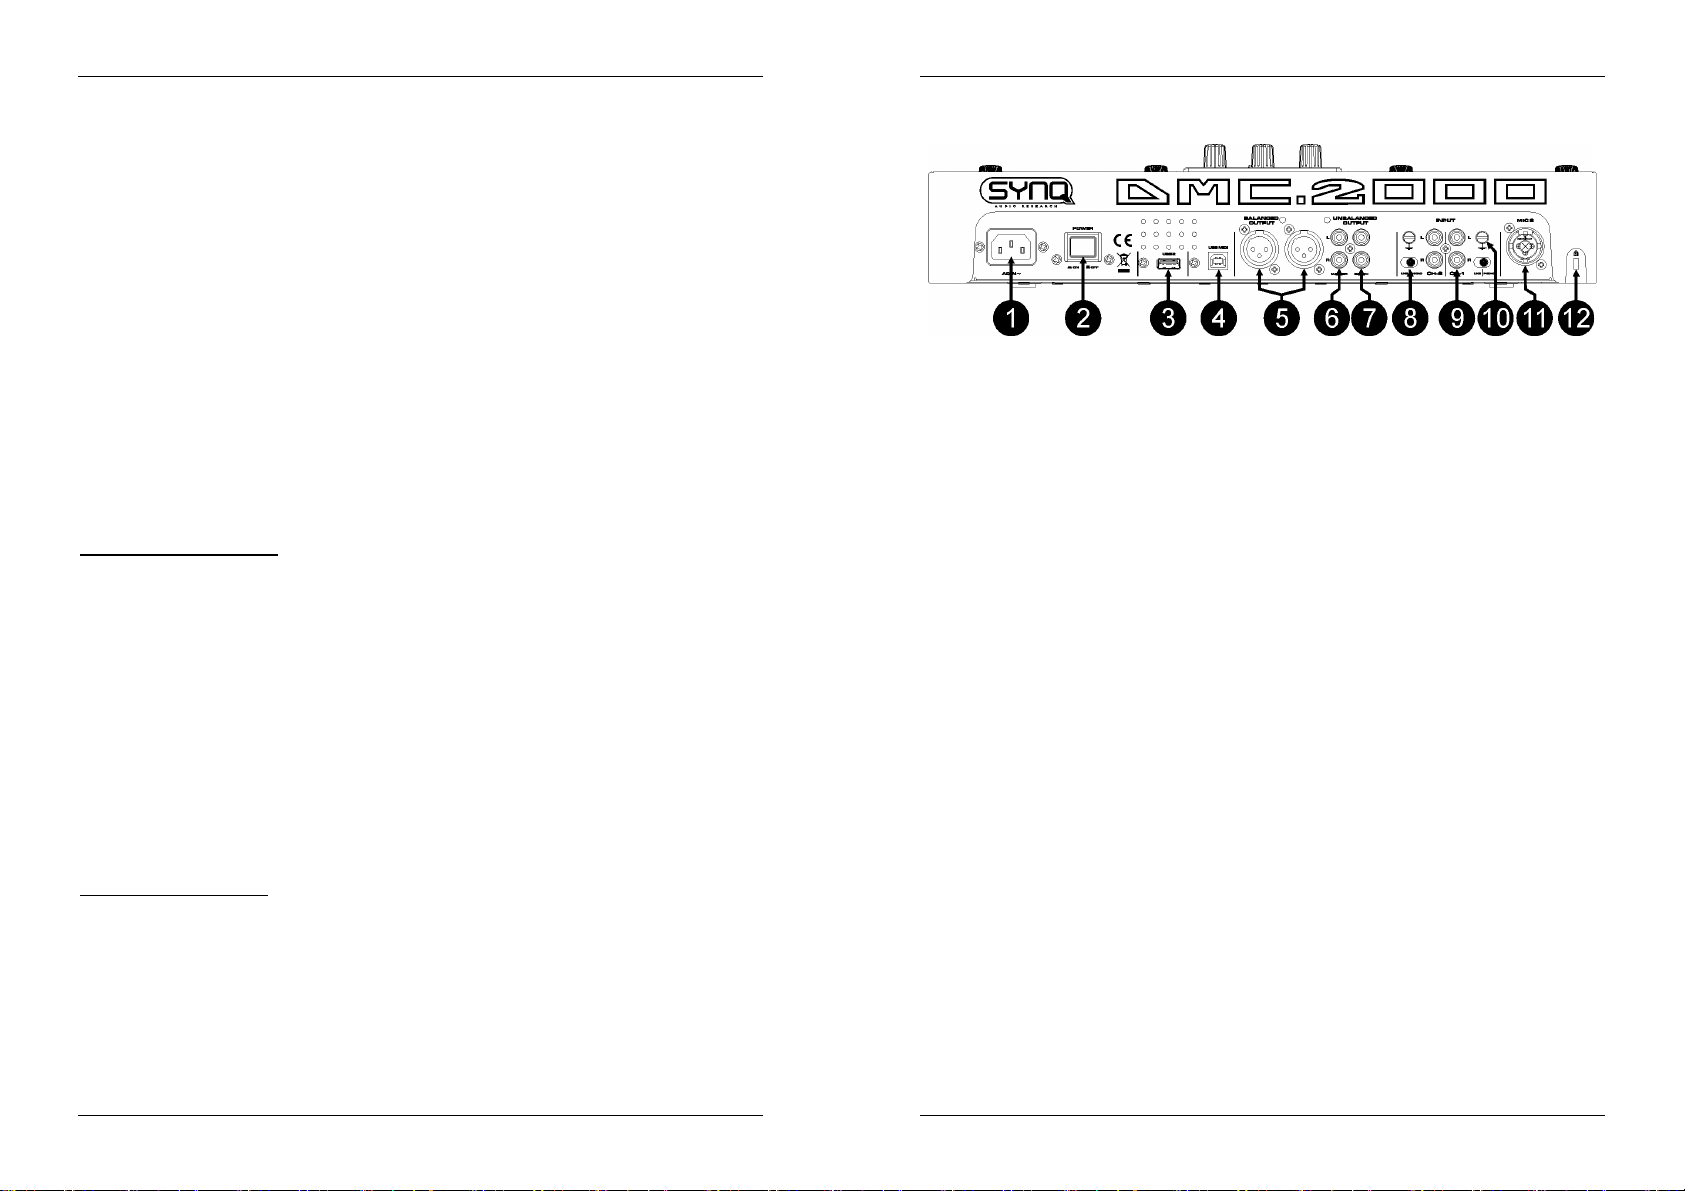
FRANCAIS MODE D’EMPLOI
FRANCAIS MODE D’EMPLOI
Rien ne doit se trouver contre l'appareil : la distance minimum pour en permettre une ventilation suffisante
est de 5cm.
Débranchez toujours l’appareil si vous ne l’utilisez pas de manière prolongée ou avant d’entreprendre des
réparations.
Les installations électriques ne peuvent être faites que par du personnel qualifié et conformément aux
règlements de sécurité électrique et mécanique en vigueur dans votre pays.
Assurez-vous que la tension d’alimentation de la source d’alimentation de la zone dans laquelle vous vous
trouvez ne dépasse pas celle indiquée à l’arrière de l’appareil.
La prise doit toujours être accessible pour que le cordon secteur puisse être enlevé à tout moment.
Le cordon d’alimentation doit toujours être en parfait état. Mettez immédiatement l’unité hors tension si le
cordon devait être écrasé ou endommagé. Pour éviter tout risque de choc électrique, le cordon doit être
remplacé par le constructeur, son agent ou un technicien qualifié.
Ne laissez jamais le cordon d’alimentation entrer en contact avec d’autres câbles !
Quand l’interrupteur principal est en position OFF, cet appareil n'est pas complètement isolé du courant
230V !
Utilisez toujours des câbles appropriés et certifiés lorsque vous installez l’appareil.
Pour éviter toute décharge électrique, ne pas ouvrir l’appareil. En dehors du fusible principal, il n’y a pas
de pièces pouvant être changées par l’utilisateur à l’intérieur.
Ne jamais réparer ou court-circuiter un fusible. Remplacez systématiquement un fusible endommagé par
un fusible de même type et ayant les mêmes spécifications électriques !
En cas de problèmes de fonctionnement sérieux, arrêtez toute utilisation de l’appareil et contactez votre
revendeur immédiatement.
Utilisez l’emballage d’origine si l’appareil doit être transporté.
Pour des raisons de sécurité, il est interdit d’apporter une quelconque modification à l’appareil non
spécifiquement autorisée par les parties responsables.
CONSEILS D'INSTALLATION:
Placer ou utiliser l’appareil pendant de longues périodes à proximité de sources de chaleur tel des
amplificateurs, des Spot’s, etc. peut entraver le bon fonctionnement de l’appareil et peut même
l’endommager.
Evitez au maximum les chocs et les vibrations pendant le transport.
Si l’appareil est fixé dans un rack ou un flight case, faites attention à ce qu’il soit bien ventilé, afin
d’assurer l’évacuation de la chaleur de l’appareil.
Pour éviter la formation de condensation à l’intérieur de l’appareil, laissez le s’adapter à la température
ambiante si vous l’installez dans un endroit chaud après l’avoir transporté à l’extérieur. La condensation
peut parfois empêcher l’appareil de fonctionner correctement.
Choisissez avec prudence l’endroit ou vous allez placer l’appareil. Evitez la présence de sources de
chaleur. Evitez des endroits assujettis aux vibrations, des endroits poussiéreux ou humides.
Pour éviter des incendies ou l’électrocution, n’exposez jamais l’appareil à la pluie où a l’humidité.
Pour éviter l’électrocution, n’ouvrez pas le couvercle de protection. Si un problème surgit, contactez votre
revendeur.
N’insérez jamais d’objets métalliques et ne renversez jamais de liquide dans l’appareil. L’électrocution ou
le mal fonctionnement peuvent en résulter.
Le lecteur ne devrait être réglé ou réparé que par des personnes qualifiées du service après vente
Cet appareil peut causer des interférences à la réception des radios ou télévisions.
NETTOYAGE DU LECTEUR:
Nettoyez l’appareil à l’aide d’un chiffon doux, légèrement humide. Evitez d’introduire de l’eau à l’intérieur de
l’appareil. N’utilisez pas de produits volatiles tels le benzène ou le thinner qui peuvent endommager
l’appareil.
CONTRÔLES ET FONCTIONS
1. ALIMENTATION: Connectez l’appareil au 100-240V AC, en utilisant le câble d’alimentation fourni avec
l’appareil.
2. POWER (Interrupteur de mise sous tension): Si l’interrupteur est enfoncé, l’appareil est mis sous
tension.
3. Connexion USB 2 : il s'agit de la seconde connexion USB (de type A), utilisée pour connecter n'importe
quel appareil USB de stockage de masse qui a été formaté aux formats FAT ou FAT32. Par défaut, cette
entrée est destinée à connecter un disque dur
4. Connexion USB MIDI / LINK : cette connexion USB (de type B) est utilisée pour connecter le lecteur à
un ordinateur muni d'un software MIDI destiné aux DJ. Se référer au chapitre 'Adressage' pour de plus
amples informations.
5. SORTIE SYMETRIQUE MASTER: les connecteurs XLR peuvent être utilisés pour connecter cette table
de mixage à n’importe quelle entrée symétrique d’amplificateur ou à des haut-parleurs actifs en utilisant
un câble spécifique pour signal symétrique.
6. SORTIES MASTER ASYMETRIQUE: la sortie “master” transmet le même signal de sortie que la sortie
master symétrique (5), mais est dans ce cas asymétrique.
7. SORTIE 'BOOTH MASTER' : la sortie “booth master” transmet le même signal de sortie que la sortie
master, mais il peut être réglé indépendamment par le potentiomètre Booth (49). Utilisez ces sorties
pour connecter des amplificateurs asymétriques ou connectez y un enregistreur audio.
8. INTERRUPTEUR PH/LINE : Utilisez l’interrupteur pour changer l’entrée Ligne en entrée Phono (platine
vinyl)
9. ENTREE ANALOGIQUE : on peut connecter des tourne-disque ou des lecteurs de CD externes aux
deux canaux du mixer ; ceux-ci peuvent être mixés en même temps avec des pistes provenant des
lecteurs internes du DMC2000 et/ou de softwares pour DJ venant de votre PC ou de votre MAC.
10. GROUND (GND) CONNECTION: Beaucoup de platines vinyle sont équipés d’un connecteur de masse
(GND). Il est conseillé de connecter ce signal de masse au connecteur GND. Si votre platine vinyle ne
dispose pas d’un câble de masse, vous ne devez pas utiliser ce connecteur.
11. DJ MIC INPUT JACK: jack Combo. Accepte les micros symétriques pourvus d’un connecteur XLR, ainsi
que les micros asymétriques pourvus d’un connecteur jack mono de 1/4”. Cette entrée est
principalement utilisée pour le micro DJ. Le talkover n’affecte pas le niveau du signal de cette entrée.
12. ORIFICE DE SECURITE 'KENSINGTON' : ce dispositif peut être employé pour protéger le DMC2000
contre le vol d'un opportuniste malpensant. Il faut néanmoins garder en tête qu'il ne s'agit absolument
pas d'un dispositif antivol sûr à 100 % ! On peut se procurer un câble de sécurité Kensington dans
pratiquement n'importe quel magasin d'informatique.
SYNQ
®
25/120 DMC1000
SYNQ
®
26/120 DMC1000
Page 16
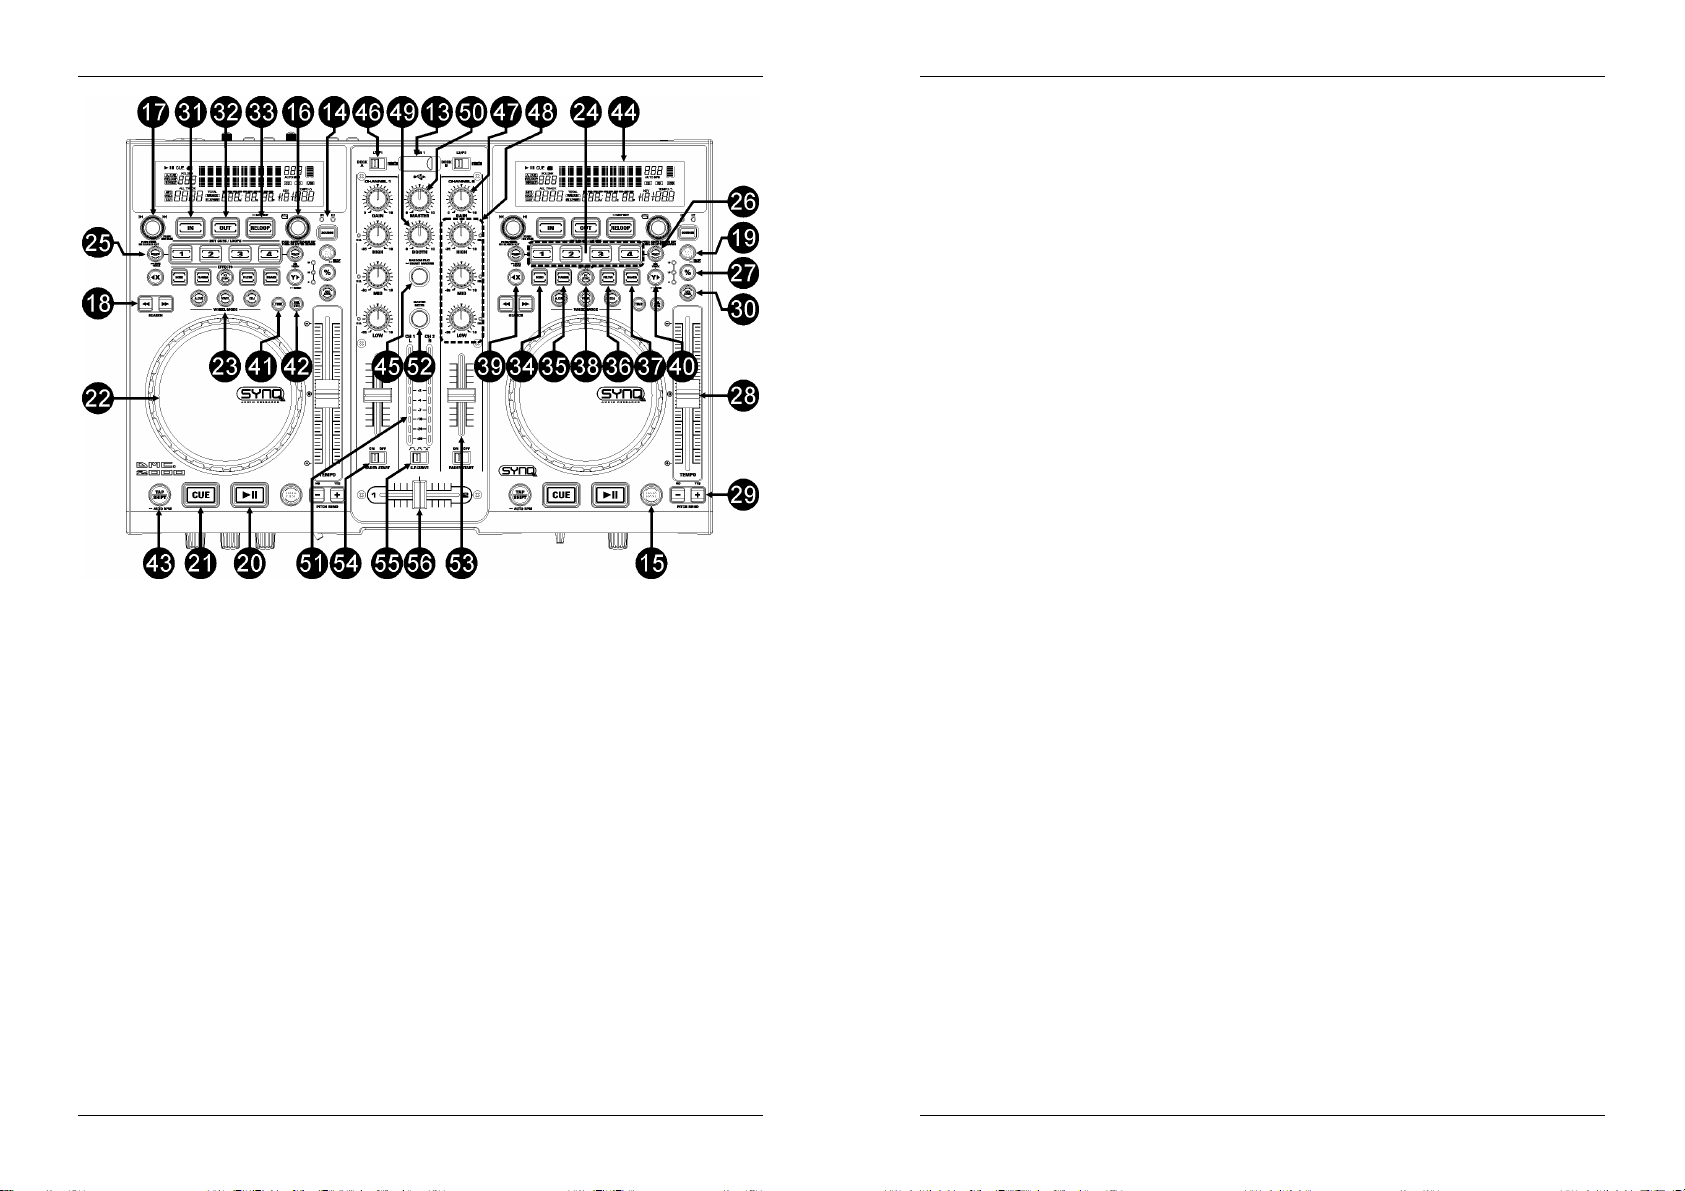
FRANCAIS MODE D’EMPLOI
13. Connexion USB 1 : il s'agit de la première connexion USB (de type A), utilisée pour connecter n'importe
quel appareil USB de stockage de masse qui a été formaté aux formats FAT ou FAT32. Par défaut, cette
entrée est utilisée pour connecter une mémoire de masse USB occasionnelle, comme les sticks usb, etc
14. INVERSEUR DE SELECTION DE LA SOURCE : utilisez cette touche pour sélectionner la source audio
désirée : USB1 ou USB2.
15. Touche DATABASE / NEXT TRACK : voici une touche très importante lorsqu'il s'agit de trouver le
morceau suivant facilement et rapidement, même lorsque la piste précédente est toujours en phase de
lecture. Cette touche fonctionne de deux manières différentes:
fonction NEXT TRACK : cette fonction est utilisée pour entamer une recherche sur un appareil de
stockage de masse qui n'est pas équipé du système 'Q-DBase system'. Les recherches ne peuvent
avoir pour objet que des nombres correspondant à des morceaux ou à des dossiers.
Fonction DATABASE : cette fonction est utilisée pour entamer une recherche sur des appareils de
stockage de masse sur lesquels sont installés les fichiers du système 'Q-DBase system'. Vous
pouvez faire des recherches alphabétiques sur le nom des artistes, le titre des morceaux, le genre
ou le nom des albums. C'est très rapide et vous n'avez pas besoin de savoir à quel endroit vos
fichiers se trouvent.
Une fois que le morceau recherché est localisé, il suffit d'appuyer sur la touche LOAD TRACK (19) pour
charger la piste en question.
Pour ces deux fonctions, prière de se reporter au chapitre 'Utilisation' pour de plus amples informations.
16. Bouton FOLDER (dossier) : Ce bouton possède plusieurs fonctions :
Si vous faites une recherche sur un appareil sans Q-DBASE : faites tourner ce bouton pour naviguer
parmi les dossiers d'un appareil de stockage de masse lorsque vous n'utilisez pas le système QDBASE.
Si vous faites une recherche avec Q-DBASE : appuyez en même temps que vous faites tourner le
bouton afin de sélectionner le premier caractère de la clé de recherche que vous désirez trouver.
Faites tourner le bouton pour aller à la clé de recherche suivante qui commence par le même
caractère. Appuyez sur le bouton pour afficher la clé de recherche sur la seconde ligne de texte de
l'écran.
Si vous êtes dans le menu de configuration : faites tourner ce bouton pour naviguer parmi les
différentes options de ce menu.
FRANCAIS MODE D’EMPLOI
Pour de plus amples informations, prière de se reporter aux chapitres 'UTILISATION' et 'MENU DE
CONFIGURATION'.
17. Bouton TRACK : Ce bouton possède plusieurs fonctions :
Si vous faites une recherche sur un appareil sans Q-DBASE : faites tourner ce bouton pour naviguer
parmi les morceaux contenus dans un dossier d'un appareil de stockage de masse lorsque vous
n'utilisez pas le système Q-DBASE.
Si vous faites une recherche avec Q-DBASE, deux options sont possibles :
faites tourner le bouton pour naviguer parmi tous les fichiers qui commencent tous par la
même lettre (celle qui avait été sélectionnée juste avant au moyen de la touche FOLDER) ;
Appuyez sur le bouton pendant que vous le faites tourner pour modifier la clef de recherche
dans la base de données ; vous pouvez choisir les clefs de recherche suivantes :
Art : recherche basée sur les noms des artistes, par ordre alphabétique (clef par défaut) ;
Alb : recherche basée sur les noms des albums, par ordre alphabétique ;
Gen : recherche basée sur les gentes de musique, par ordre alphabétique ;
Std : recherche n'utilisant pas le système Q-DBASE : on recherche simplement les
dossiers et les morceaux en "mode manuel".
Pendant la lecture : Appuyez sur le bouton pour visionner les différents tags ID3 à l'écran :
Si vous appuyez sur le bouton une fois : Le nom de l'album du morceau en cours est affiché ;
Si vous appuyez sur le bouton deux fois : Le nom du genre musical du morceau en cours est
affiché ;
Si vous appuyez sur le bouton trois fois : La vitesse d'échantillonnage du morceau en cours
est affichée ;
Si vous êtes dans le menu de configuration : faites tourner le bouton pour changer les
réglages de l'option sélectionnée dans ce menu.
Pour de plus amples informations, prière de se reporter au chapitre 'UTILISATION'.
18. Touches SEARCH: sont utilisées pour effectuer des recherché rapides dans la plage.
19. Touche LOAD TRACK : Ce bouton possède plusieurs fonctions :
Charger un morceau : ce dernier est le résultat d'une recherche ayant utilisé la touche database/next
track ;
Ouvrir le menu de configuration : il faut appuyer environ 3 secondes sur la touche pour accéder à ce
menu ;
Fermer le menu de configuration : il faut appuyer brièvement sur la touche pour quitter le menu de
configuration.
Pour de plus amples informations, prière de se reporter aux chapitres 'UTILISATION' et 'MENU DE
CONFIGURATION'.
20. Touche PLAY/PAUSE: chaque fois que vous appuyez sur la touche PLAY/PAUSE le lecteur passera
du mode lecture au mode pause ou du mode pause au mode lecture. La touche clignote aussi
longtemps que le lecteur est en mode pause.
21. Touche CUE: Si vous appuyez sur la touche CUE pendant la lecture vous obtiendrez un retour
immédiat vers la position de départ de la lecture initiale. La lecture démarre immédiatement à partir du
point de départ programmé (CUE point) et continuera tant que vous tenez cette touche enfoncée. Le
lecteur retourne à nouveau au point de départ « CUE point » dès que vous relâchez la touche CUE. Si le
lecteur est en mode pause (la touche Play/Pause clignote) la roue “jog wheel” peut être utilisée pour
définir un nouveau point de départ. En appuyant sur la touche "PLAY/PAUSE" ou « LOOP IN » puis sur
la touche "CUE", vous pouvez confirmer ce nouveau point de départ.
22. MOLETTE TACTILE : La molette de ce lecteur comporte deux parties distinctes :
Partie centrale tactile : pour se rapprocher du "toucher vinyle" le plus possible, mais aussi pour
améliorer la performance au niveau du scratch, la partie centrale de la molette fait appel à une
technologie déposée réagissant au toucher. Grâce aux touches WHEEL MODE (23), il vous est
loisible de modifier les réactions de cette partie centrale ; prière de se reporter à la description des
touches WHEEL MODE (23) pour de plus amples informations.
Bord extérieur : il s'agit de la partie de la molette qui est de couleur argentée, et qui n'est pas
sensible au toucher : cette surface ne tient pas compte du mode sélectionné pour la molette : le bord
extérieur peut donc toujours être utilisé pour le pitch bending, sauf quand on utilise un des effets
digitaux.
23. Touche WHEEL MODE : elle permet de désigner l'un des trois modes disponibles de la molette tactile ;
la partie centrale tactile et le bord extérieur réagissent différemment quand elle est utilisée avec des
musiques en provenance des lecteurs internes ou des softwares pour DJ de votre ordinateur.
SYNQ
®
27/120 DMC1000
SYNQ
®
28/120 DMC1000
Page 17

FRANCAIS MODE D’EMPLOI
FRANCAIS MODE D’EMPLOI
Mode VINYL : à utiliser pour son scratch extrêmement réaliste, sur n'importe quel fichier MP3.
Partie centrale tactile : Pendant la lecture, la musique s'arrête immédiatement dès que vous
touchez la molette : la vitesse et la direction de lecture sont à ce moment totalement
contrôlées par les mouvements de votre main. En mode pause, il est très facile de déterminer
un nouveau point de cue.
Bord extérieur : Pendant la lecture, vous pouvez utiliser le bord extérieur pour le pitch
bending, ce qui permet de synchroniser le rythme de deux morceaux différents. En mode
pause, vous entendrez les boucles, très courtes et très typiques, qui donnent la possibilité de
fixer un point de cue avec une précision d'un 75ème de seconde.
Mode CDJ : il s'agit du mode standard, utilisé par la plupart des lecteurs destinés aux DJ. Les deux
parties, que ce soit la partie centrale tactile ou le bord extérieur, se comportent de manière
identique. Pendant la lecture d'une piste, la molette est à même de modifier la vitesse de la musique
jusqu'à environ 100 %, et ce, en faisant tourner la molette dans le sens des aiguilles d'une montre
pour accélérer la vitesse, ou dans le sens contraire des aiguilles d'une montre pour la ralentir. La
proportion du changement de vitesse est déterminée par la vitesse de rotation. En mode pause,
vous entendrez les boucles, très courtes et très typiques, qui donnent la possibilité de fixer un point
de cue avec une précision d'un 75ème de seconde.
Mode A.CUE SCRATCH : ce mode est très semblable au mode vinyle, mais le scratch commence
toujours à partir du point de cue, et les réactions du bord extérieur sont similaires à celle du mode
vinyle :
Partie centrale tactile : pendant la lecture, la musique s'arrête immédiatement, et elle
retourne au point de cue actif chaque fois que l'on touche la molette : la vitesse et la direction
de lecture sont à ce moment totalement contrôlées par les mouvements de votre main. En
mode pause, on peut facilement fixer un nouveau point de cue, mais tout d'abord, le lecteur
retourne au point de cue actif.
Bord extérieur : Pendant la lecture, vous pouvez utiliser le bord extérieur pour le pitch
bending, ce qui permet de synchroniser le rythme de deux morceaux différents. En mode
pause, vous entendrez les boucles, très courtes et très typiques, qui donnent la possibilité de
fixer un point de cue avec une précision d'un 75ème de seconde.
24. Touches HOT CUE : il s'agit de quatre touches programmables qui peuvent enregistrer des points de
cue ordinaires et/ou des boucles. Lorsqu'un point de cue ordinaire est enregistré, la touche
correspondante est verte, et quand une boucle est enregistrée, la touche correspondante est rouge.
Tous les points de cue et les boucles enregistrés peuvent être stockés dans la mémoire permanente
pour une utilisation future. Cette possibilité est appelée “PCMS", soit Permanent Cue Memory System.
Prière de se reporter au chapitre 'UTILISATION' pour de plus amples informations concernant la
programmation des points de cue, etc …
25. RECORD CUE (enregistrer un point de cue) : appuyez sur cette touche avant de faire de même sur
l'une des 4 touches HOT CUE (24) afin d'enregistrer un nouveau point de cue ou une nouvelle boucle.
Pour apprendre comment enregistrer un nouveau point de cue ou une nouvelle boucle, prière de se
reporter au chapitre 'UTILISATION'.
Pour enregistrer les cues vers la mémoire permanente : le système HOT CUE utilise deux sortes
de mémoires : la "mémoire de piste", temporaire, et la mémoire permanente. Les nouveaux hot cues
ne sont enregistrés que sur la mémoire de piste temporaire. Si vous voulez garder en mémoire
permanente les hot cues pour un usage ultérieur, il faut enregistrer ces informations vers la mémoire
permanente. Pour enregistrer les cues vers la mémoire permanente, il suffit de maintenir la touche
RECORD CUE jusqu'à ce que l'écran affiche le message "Saving".
Pour enregistrer des réglages personnels : Il faut appuyer en même temps sur les touches
RECORD CUE et X/SYNC (39) pour enregistrer certains paramètres personnels qui sont en cours
d'utilisation, comme : niveau du pitch, lecture simple ou continue, affichage du temps normal,
réglages de la molette, auto cue, mode BPM auto, pitch en ou hors service, clef de recherche dans
la base de données, vitesse de démarrage et de frein.
26. Touche DELETE CUE (supprimer un point de cue) : Ce bouton possède plusieurs fonctions :
DELETE 1 HOT CUE (supprimer 1 point de hot cue) : appuyez sur la touche DELETE CUE, puis
appuyez ensuite sur la touche HOT CUE que vous voulez supprimer de la mémoire de piste. Le
bouton concerné va s'éteindre.
DELETE 4 HOT CUE (supprimer 4 points de hot cue) : appuyez sur la touche DELETE CUE
pendant environ 2 secondes afin de supprimer tous les hot cues de la mémoire de piste.
DELETE TRACK (supprimer la piste) : appuyez en même temps sur la touche DELETE CUE et la
touche Y/RATIO (40) afin de supprimer les hot cues présents sur la piste et enregistrés dans la
mémoire permanente. Etant donné qu'il n'est pas possible de revenir en arrière, l'écran vous
demande d'abord si vous êtes sûr de vous : en recourant aux touches de PITCH BEND (29), vous
pouvez choisir entre YES et NO.
Pour de plus amples informations, prière de se reporter au chapitre 'UTILISATION'.
27. Touche TEMPO RANGE : appuyez sur ce bouton pour sélectionner les différentes fourchettes de
vitesse disponibles : +/-6%, +/-10%, +/-16%, +16/-100%. Les fourchettes inférieures rendent le speed
fader (28, curseur de vitesse) plus précis, quant aux vitesses supérieures, elles sont surtout indiquées
pour réaliser des effets spéciaux. Pour mettre cette fonction hors service, il suffit d'appuyer sur la touche
pendant environ une seconde, jusqu'à ce que les indicateurs de vitesse s'éteignent. Appuyez de
nouveau sur la touche pour réactiver le contrôle de vitesse.
28. Curseur SPEED (de vitesse) : utilisé pour régler la vitesse de lecture du morceau en cours de lecture.
Vous pouvez mettre en ou hors service la fonction de contrôle de vitesse ou changer sa fourchette avec
la touche TEMPO RANGE (27)
29. Touches PITCH BEND: La vitesse augmente si vous appuyez sur la touche “+” et retourne à sa vitesse
initiale dès que vous la relâchez. La vitesse de lecture diminue si vous appuyez sur la touche “– ” et
retourne à sa vitesse initiale dès que vous la relâchez. Ces touches peuvent être utilisées pour
synchroniser le tempo des 2 lecteurs. Elles sont aussi utilisées pour confirmer (ou non) les questions qui
sont parfois affichées à l’écran.
30. Touche KEY LOCK: (Master tempo) active la fonction Pitch Lock. Cette fonction vous permet de faire
des réglages de vitesse de lecture en utilisant le curseur SPEED, mais sans altérer la tonalité (hauteur
du son).
31. Touche LOOP IN: Vous permet de définir le point CUE sans arrêter la lecture (CUE VOLANT).
Cette touche définit également le début d’une boucle sans fin (seamless loop): fixe le repère du début de
la boucle ; il faut appuyer sur la touche LOOP OUT pour fixer le repère de fin de boucle et démarrer la
lecture en mode loop (boucle).
Pour de plus amples informations, prière de se reporter au chapitre 'UTILISATION'.
32. OUT/EXIT button: est utilisée pour déterminer la fin de la boucle pendant la création de boucles (loops).
Le lecteur CD reproduira la boucle sans fin jusqu'à-ce que vous appuyez a nouveau sur cette touche
pour sortir de la boucle et continuer la lecture normale. Quand une boucle est programmée mais pas
activé vous pouvez également redémarrer la boucle avec cette touche. L’endroit où vous appuyez sur la
touche pendant la lecture sera mémorisé comme nouveau point de sortie de la boucle. Chaque fois que
vous appuyez sur la touche OUT/EXIT pendant que vous êtes en mode d’édition de boucle, vous sortez
du mode d’édition de boucle et vous sauvez en même temps le nouveau point de sortie de boucle.
33. Touche RELOOP/STUTTER: Cette touche a 3 fonctions:
RELOOP: quand une boucle à été programmée et que vous avez appuyé sur la touche OUT/EXIT,
appuyez sur la touche reloop pour réactiver la boucle. Pour sortir de la boucle appuyez sur la
touche OUT/EXIT. (les points de départ et de sortie de la boucle restent inchangés)
STUTTER: Quand une boucle est activée (en lecture) vous pouvez appuyer sur cette touche pour
redémarrer instantanément la boucle à partir de son point de départ. Vous pouvez également
appuyer sur cette touche quand une plage n’est pas reproduite en boucle. Chaque fois que vous
appuyez sur la touche RELOOP/STUTTER, vous redémarrez la musique à partir de son point de
départ programmé.
L’effet “stutter” (bégaiement) vous permet d’ajouter une touche de créativité supplémentaire à votre
prestation.
ENTRER DANS LE MODE D’EDITION DE BOUCLE: quand une boucle est programmée (les
touches LOOP IN et OUT/EXIT sont allumées) vous pouvez entrer dans le mode d’édition de
boucle en appuyant sur la touche RELOOP/STUTTER jusqu’à ce que “ OUT EDIT ” soit affiché
à l’écran. Pendant que vous êtes en mode d'édition de boucle, vous pouvez passer de “ OUT EDIT
” à “ IN EDIT ” et vice versa.
34. Touche ECHO EFFECT : appuyez sur cette touche pour activer l'effet d'écho. Suivant le statut du mode
SYNC (manuel ou synchronisé au rythme), différents réglages sont possibles :
Mode manuel : la touche FX-SYNC (38) reste éteinte. Vous pouvez régler tous les paramètres
manuellement en utilisant les contrôles suivants :
Molette (22) : à utiliser pour régler le temps d'écho entre 1 ms et 2000 ms.
Touche Y/RATIO (40) : tant que la touche Y/RATIO clignote, on peut utiliser la molette (22)
pour changer la balance (entre son non traité et son traité) de l'effet.
Mode synchronisé au rythme : la touche FX-SYNC (38) est allumée. Vous pouvez utiliser les
contrôles suivants :
SYNQ
®
29/120 DMC1000
SYNQ
®
30/120 DMC1000
Page 18

FRANCAIS MODE D’EMPLOI
FRANCAIS MODE D’EMPLOI
Touches EFFECT SYNC (39+40) : choisissez une des présélections d'écho synchronisé au
rythme.
Touche Y/RATIO (46) : tant que la touche Y/RATIO clignote, on peut utiliser la molette (22)
pour changer la balance (entre son non traité et son traité) de l'effet.
35. Touche FLANGER EFFECT : appuyez sur cette touche pour activer l'effet de flanger. Suivant le statut
du mode SYNC (manuel ou synchronisé au rythme), différents réglages sont possibles :
Mode manuel : la touche FX-SYNC (38) reste éteinte. Vous pouvez régler tous les paramètres
manuellement en utilisant les contrôles suivants :
Molette (22) : à utiliser pour modifier l'effet manuellement.
Touche Y/RATIO (40) : tant que la touche Y/RATIO clignote, on peut utiliser la molette (22)
pour changer la balance (entre son non traité et son traité) de l'effet.
Mode synchronisé au rythme : la touche FX-SYNC (38) est allumée. Vous pouvez utiliser les
contrôles suivants :
Touches EFFECT SYNC (39+40) : choisissez une des présélections de balayage
synchronisé au rythme.
Touche Y/RATIO (40) : tant que la touche Y/RATIO clignote, on peut utiliser la molette (22)
pour changer la balance (entre son non traité et son traité) de l'effet.
36. Touche FILTER EFFECT : appuyez sur cette touche pour activer l'effet de filtre. Suivant le statut du
mode SYNC (manuel ou synchronisé au rythme), différents réglages sont possibles :
Mode manuel : la touche FX-SYNC (38) reste éteinte. Vous pouvez régler tous les paramètres
manuellement en utilisant les contrôles suivants :
Molette (22) : à utiliser pour modifier manuellement la fréquence de coupure du filtre.
Touche Y/RATIO (40) : tant que la touche Y/RATIO reste allumée, on peut utiliser la molette
(22) pour changer la profondeur (facteur Q) de l'effet de filtre.
Mode synchronisé au rythme : la touche FX-SYNC (38) est allumée. Vous pouvez utiliser les
contrôles suivants:
Touches EFFECT SYNC (39+40) : choisissez une des présélections de balayage
synchronisé au rythme.
Touche Y/RATIO (40) : tant que la touche Y/RATIO reste allumée, on peut utiliser la molette
(22) pour changer la profondeur (facteur Q) de l'effet de filtre.
37. Touche BRAKE: appuyez sur cette touché pour active l’effet de frein. Vous pouvez dès à présent
déterminer la vitesse d’accélération / décélération de la musique quand vous activez la touche
PLAY/PAUSE (20). Vous pouvez régler les paramètres à l’aide des touches (39+40), voir ci-dessous.
38. Touche FX SYNC : appuyez sur cette touche pour traiter les effets soit en mode manuel, soit en mode
synchronisé au rythme ! Pour de plus amples informations, prière de se reporter aux points (34+35+36).
39. Touche EFFECT SYNC/START: cette touche possède plusieurs fonctions, dépendant de l’effet choisi:
Effets synchronisés: La touche est allumée quand un effet, synchronisé au rythme de la musique,
est utilisé. Vous pouvez maintenant choisir comment vous voulez que l’effet soit synchronisé au
rythme de la musique. Utilisez cette touché pour diviser le tempo par 2.
Effet BRAKE: appuyez sur cette touché pour modifier le temps d’accélération (temps nécessaire
pour passer de l’arrêt à la vitesse maximale). Quand la touche est allumée, vous pouvez utiliser la
molette JOG (22) pour modifier la durée de 0,0s (démarrage instantané) à 10s. (démarrage très lent)
40. Touche EFFECT SYNC/STOP/Y/RATIO: cette touche possède plusieurs fonctions, dépendant de l’effet
choisi:
Effets synchronisés: La touche est allumée quand un effet, synchronisé au rythme de la musique,
est utilisé. Vous pouvez maintenant choisir comment vous voulez que l’effet soit synchronisé au
rythme de la musique. Utilisez cette touche pour doubler le tempo.
Effet BRAKE: appuyez sur cette touché pour modifier la durée de décélération (temps nécessaire
pour passer de la vitesse maximale à l’arrêt). Quand la touche est allumée, vous pouvez utiliser la
molette JOG (22) pour modifier la durée de 0,0s (arrêt instantané) à 10s. (temps d’arrêt très long)
Paramètre d’IMPACT: quand un des 3 effets DSP est activé, vous pouvez appuyer sur la touché
jusqu’à ce qu’elle commence à clignoter. Vous pouvez maintenant régler l’impact de l’effet
sélectionné. Voir également la description des touches EFFECT (34+35+36).
41. Touche TIME: La touche TIME vous permet de choisir entre l’affichage du temps de lecture écoulé
(elapsed) et le temps restant d’une plage (remaining/track))
42. SGL/CTN: Vous pouvez choisir entre “single track mode” et “continuous play”.
Continuous play: toutes les plages seront reproduites sans interruption. (le plus souvent utilisé
dans les tavernes)
Single track: La lecture s’arrête à la fin de la plage et attends au début de la plage suivante. (le
plus souvent utilisé par les deejays)
Appuyez sur la touche SGL/CNT pendant plus d’une seconde pour passer du mode normal au mode
“auto CUE” ou inversement. En mode “auto CUE” le lecteur attendra à la première note musicale de la
plage. Ce qui veut dire que les morceaux mal indexés ne poseront pas de problèmes aux capacités de
démarrage instantané du lecteur. Ceci est une caractéristique très utile pour les deejays!
43. Touche TAP/SHIFT: Cette touche possède deux fonctions :
Fonction TAP : Ce lecteur possède un compteur automatique de BPM. Dans quelques rares cas il
se pourrait que le compteur automatique n’arrive pas à calculer le tempo comme il devrait le faire
(tempo irrégulier ou simplement pas de battement à détecter). Dans ces cas vous pouvez aider le
compteur de tempo en tapant manuellement sur cette touche au rythme de la musique. Vous pouvez
retourner au compteur de tempo automatique en appuyant sur la touche TAP jusqu’à ce que
“AUTOBPM” s’allume dans le coin supérieur droit de l’écran.
Fonction SHIFT : cette touche n'est utilisée qua dans le cas où le lecteur est utilisé en tant que
contrôleur MIDI. La fonction SHIFT double les fonctions de chaque contrôle : maintenez la touche
SHIFT enfoncée pendant que vous utilisez un autre contrôle, et vous obtiendrez une fonction
supplémentaire secondaire. Pour de plus ample informations, se reporter au chapitre
"IMPLEMENTATION MIDI".
44. Ecran VFD: Affiche toutes les informations importantes, nécessaires pendant la lecture du CD.
45. Touche RANDOM: vous pouvez sélectionner 2 modes de lecture aléatoire différents.
TOTAL random: appuyez brièvement sur la touche RANDOM jusqu'à ce que la LED s'allume ; dans
ce mode, le lecteur 1 lit des pistes sélectionnées au hasard et se trouvant sur l'ensemble des
appareils USB de stockage de masse. Pendant que le lecteur 1 est en train de lire en mode
aléatoire, le lecteur 2 peut toujours être utilisé pour lire n'importe quelle piste de votre choix.
SMART random: ici, vous ne pouvez choisir de jouer que des pistes en provenance d'un dossier
déterminé, d’un genre déterminé, ou mème d’un certain album ou artieste:
Jouer des pistes d’un seul dossier spécifique: sélectionnez d’abord “search-key = Std”
(folders/tracks). Ensuite, sélectionnez un dossier, puis appuyez sur la touche RANDOM
pendant environ 2 secondes, jusqu'à ce que la LED se mette à clignoter. A ce moment là, le
lecteur 1 ne jouera que des pistes contenues dans le dossier sélectionné.
Jouer des pistes d’un certain genre/artiste/album: choisissez la clef de recherche souhaitée et
sélectionnez une piste qui corresponds au genre, artiste ou album désiré. Si vous appuyez sur
la touche RANDOM pendant +/-2 secondes, le lecteur ne jouera que des pistes du même
genre, artiste ou album que celle qui est lue actuellement. (Ce qui évite de mélanger deux ou
plusieurs styles de musiques complètement différents : c'est exactement ce qu'il faut pour un
bar, un club, un restaurant, etc …). Prière de se reporter au chapitre 'UTILISATION' pour des
exemples.
46. SELECTEUR DE SOURCE D’ENTRÉE: est utilisé pour sélectionner la source d’entrée exacte pour les
deux canaux: lecteur interne, contrôle via MIDI des softwares pour DJ sur ordinateur, ou encore entrées
analogiques phono / line pour appareils externes (il y a des sélecteurs d’entrées (8) supplémentaires à
l’arrière de la table de mixage).
47. GAIN LEVEL: règle le niveau d’entré des deux canaux. Utilisez ce bouton pour régler le niveau jusqu'à
ce que vous atteigniez les 0dB sur le VU-mètre.
48. Réglage de TONALITÉ à 3 bandes: la fréquence de chaque canal peut être réglée séparément dans
une plage allant de -35dB à +10dB. Vous pouvez "tuer" ('kill' en anglais, comprenez : "supprimer
complètement") les aiguës, les médiums et/ou les basses en appuyant sur les touches correspondantes.
Dans la position centrale, le contrôle de tonalité est neutre. (éteint)
49. NIVEAU BOOTH MASTER: est utilisé pour régler le niveau de la sortie asymétrique booth master.
50. NIVEAU MASTER: est utilisé pour régler le niveau de la sortie symétrique Master.
51. VU MÈTRE: chaque canal possède son propre VU-mètre LED ce qui vous permet de régler le niveau
gain (47) très rapidement. Faites attention que les niveaux ne dépassent pas 0dB (ou 100%). Le signal
audio risque d’être déformé si le niveau du signal entre dans la zone rouge du VU-mètre. Quand la
touche MASTER METER (52) est allumée, les VU-mètres montrent le niveau de sortie du mix général.
52. Touche MASTER METER : quand cette touche est éteinte, les VU-mètres indiquent les niveaux des
canaux individuels. Appuyez sur cette touche pour l'allumer : les VU-mètres indiquent maintenant le
niveau du mix général.
53. CURSEUR / CANAL: sont utilisés pour régler le niveau de chaque canal séparément.
54. Interrupteur FADER START : quand cette fonction est active, les lecteurs internes peuvent être mis en
route ou arrêtés en déplaçant le cross fader.
SYNQ
®
31/120 DMC1000
SYNQ
®
32/120 DMC1000
Page 19

FRANCAIS MODE D’EMPLOI
FRANCAIS MODE D’EMPLOI
55. CROSS FADER CURVE: Règle la courbe du cross fader : transition douce = position droite, transition
brusque = position gauche.
56. CROSS FADER: avec ce curseur vous pouvez mixer les deux canaux. Le cross fader ne fonctionnera
que si vous avez réglé les curseurs des canaux (53) sélectionnés au niveau désiré !
57. DJ MIC INPUT JACK: Accepte les micros asymétriques pourvus d’un connecteur jack mono de 1/4”.
Cette entrée est principalement utilisée pour le micro DJ. Le talkover n’affecte pas le niveau du signal de
cette entrée.
58. MIC1 VOL: Ajustement du niveau d'entré du micro1.
59. MIC2 VOL: Ajustement du niveau d'entré du micro2.
60. TONALITE DU MICRO : à utiliser pour adapter le son des deux entrées pour micro.
61. INTERRUPTEUR MICRO ON/OFF/TALK OVER:
OFF: les 2 micros mic1 & mic2 sont coupés.
ON: les 2 micros mic1 & mic2 sont allumés.
TALK OVER: mic1 & 2 sont allumés; le niveau de tous les autres canaux diminue d'environ -20dB.
62. CUE MIX: avec ce bouton vous pouvez mixer n’importe quel canal d’entré dans la sortie casque (64):
Tournez le bouton complètement à gauche pour entendre le canal 1.
Tournez le bouton complètement à droite pour entendre le canal 2.
Mettez le bouton dans une autre position pour écouter le mixage des deux signaux.
Cette option vous permet de vérifier votre mixage avant que vous l’envoyiez vers la sortie master.
63. VOLUME DU CASQUE : Ce bouton contrôle le niveau du son de la sortie du casque.
64. Sortie CASQUE : Si vous le désirez, c'est ici que vous pouvez connecter votre casque.
ECRAN VFD
F. BPM DISPLAY: le compteur de tempo automatique affiche le nombre de battements par minute.
En mode manuel, “BPM” est affiché. En mode automatique, “AUTOBPM” est affiché. (appuyez
pendant 2 secondes sur la touche TAP pour passer en mode automatique)
G. MEMOIRE TAMPON : affiche le statut de la mémoire tampon nécessaire au dispositif antichocs
et à certaines fonctions spécifiques. Chaque tiret affiché représente 2 secondes de mémoire
tampon.
H. AUTO CUE: apparaît quand la fonction “auto CUE” est activée. voir touche SGL/CTN (42).
I. RELOOP: vous montre quand le CD joue une boucle. (répétant une partie spécifique)
RELOOP Clignote: une boucle est programmée et est lue.
RELOOP allumé: une boucle est programmée mais n’est pas reproduite.
J. SINGLE: apparaît quand l’appareil est réglé pour jouer uniquement une plage à la fois. Quand
Single n’est pas affiché, toutes les pistes sont jouées sans interruption. La fonction est contrôlée
par la touche SGL/CTN (42).
K. Indicateur de MP3 : est affiché quand un fichier de type MP3 est en cours de lecture.
L. Indicateur de piste : montre le nombre de pistes disponibles dans votre sélection en cours :
Vue standard : sans système Q-DBASE : l'écran affiche le nombre de pistes présentes
dans le dossier en cours (M) ;
Vue avec système Q-DBASE : l'écran affiche le nombre de pistes qui correspond à votre
M. Indicateur FOLDER/SEARCH KEY : l'information affichée dépend du mode d'affichage que
N. ELAPSED, TOTAL REMAIN: indique si le temps affiché à l’écran est le temps écoulé (elapsed),
O. MINUTE: Vous montre les “minutes” de la plage en cours d’exécution.
P. SECOND: Vous montre les “secondes” de la plage en cours d’exécution.
Q. FRAME: vous montre le “frame” de la plage en cours d’exécution. (1 frame = 1/75
R. TIME BAR: possède 2 fonctions:
S. AFFICHAGE DU PITCH : l'écran montre le pourcentage en cours du changement de rythme
présélection Q-DBASE.
vous avez sélectionné :
Vue standard : sans système Q-DBASE : l'écran affiche le numéro du dossier en cours ;
Vue avec système Q-DBASE : l'écran affiche le mode de recherche en cours (Art, Alb ou
Gen).
le temps restant total du disque (total) ou le temps restant de la plage (remain).
éme
sec.)
Pendant la lecture normale: montre soit le temps restant soit le temps écoulé, selon
l’option choisie avec la touche TIME. Cette barre se met à clignoter à la fin de chaque
plage pour prévenir l’utilisateur qu’il est grand temps de passer à l’action.
Pendant la lecture d’une boucle: affiche le temps restant jusqu’à la fin de la boucle.
Cette aide visuel vous aide repérer ou et quand la boucle redémarrera.
sélectionné par le curseur de vitesse (30). Un petit cadenas rouge est affiché quand la fonction
de blocage de tonalité (Master Tempo / pitch lock) est activée.
A. PLAY: apparaît quand la lecture d’une plage est activée.
B. PAUSE: apparaît pendant que le lecteur est en mode pause ou CUE.
C. CUE: s'affiche quand le lecteur est en attente, au point de CUE.
D. INDICATEUR DE TOUCHER : est affiché quand la fonction tactile de la partie sensible au
toucher de la molette est active.
E. ECRAN ALPHANUMERIQUE : Il affiche toutes sortes d'informations importantes comme les
paramètres des effets, des informations sur les boucles, les tags ID3, etc …
®
SYNQ
33/120 DMC1000
CONNEXIONS
Voici quelques indications importantes pour les appareils USB de mémoire de masse que vous serez
amené à connecter :
Note 1 : le disque dur doit absolument être formaté au standard FAT32 ! En effet, un disque dur formaté au
standard NTFS (le choix pour la plupart des disques à haute capacité) NE sera PAS reconnu : un tel disque
dur devrait être reformaté au standard FAT32 ! (Cela peut être réalisé sous Windows, des explications se
trouvent sur la page produit du DMC2000).
Note 2 : les emplacements USB de ce lecteur peuvent chacun fournir un ampère de puissance au disque
dur qui y est raccordé. Cependant, nous suggérons d'utiliser un disque dur avec une alimentation propre
pour améliorer la fiabilité du système.
Note 3 : seuls les fichiers aux formats WAV et MP3 sont reconnus et sont donc en mesure d'être lus.
Note 4 : pour votre propre facilité, nous vous recommandons vivement d'utiliser le software d'indexation Q-
DBASE : il vous rendra la vie drôlement plus facile, tout simplement !
®
SYNQ
34/120 DMC1000
Page 20

FRANCAIS MODE D’EMPLOI
FRANCAIS MODE D’EMPLOI
CONFIGURATION MINIMALE - UN LECTEUR
Connectez les sorties master symétriques (5) ou asymétriques (6) à un amplificateur de puissance ou à
des haut-parleurs actifs.
Connectez un stick USB à l'entrée USB 1 (13) ou un disque dur USB à l'entrée USB 2 (3).
Si nécessaire, connectez un micro à l'entrée MIC 1 (57) ou MIC 2 (11).
Raccordez le câble d'alimentation secteur fourni à l'entrée de l'alimentation secteur (1) du lecteur et à une
prise d'alimentation secteur.
Vous êtes dès lors prêt à lire et à mixer les fichiers WAV et MP3 qui se trouvent sur votre mémoire de
masse USB. Amusez-vous bien !
CONFIGURATION – LE DMC1000 ASSOCIE A UN DISQUE DUR
Raccordez un disque dur USB à la connexion USB2 du DMC1000
Assurez-vous que la liaison USB est bien réglée sur 'LINK' au niveau du DMC1000.
Utilisez le câble USB (fourni avec le DMC1000) pour raccorder la liaison USB Link du lecteur à la
connexion USB2 (3) du DMC1000.
Utilisez la touche SOURCE SELECT (14) pour sélectionner l'USB2 sur le DMC2000: ainsi, les deux
lecteurs, DMC1000 et DMC2000, seront connectés au disque dur.
Vous êtes donc maintenant en mesure de lire des fichiers MP3 et WAV en provenance du disque dur
auquel vous venez de connecter vos lecteurs.
IMPORTANT : pour assurer des performances stables et de bonne qualité, utilisez uniquement des
câbles USB de bonne qualité et ayant au maximum un mètre de long !
CONFIGURATION – INSTALLATION COMPLETE INCLUANT UN CONTRÔLEUR MIDI
La figure montre une installation complète, y compris un contrôleur MIDI.
On peut connecter jusqu'à 2 sources audio externes (de niveau Phono ou ligne) de manière à transformer
ainsi votre DMC2000 en un appareil multifonctionnel pour DJ. Tout ce que vous avez à faire pour cela, c'est
de connecter les entrées en plus des 2 canaux du mixer !
Si vous ne voulez utiliser que la fonction de contrôleur MIDI, il vous suffit de connecter l'ordinateur
contenant des softwares pour DJ via le câble USB (fourni) à la sortie USB-MIDI (4) du DMC2000 : le
contrôleur sera reconnu et les pilotes seront installés automatiquement.
Réglez les 2 entrées des canaux du mixer (46) en mode MIDI : la plupart des contrôles sur le DMC2000
vont envoyer des signaux MIDI.
Pour ce qui est des réglages MIDI spécifiques, prière de se reporter au chapitre "MENU DE
CONFIGURATION".
Selon le software pour DJ que vous allez utiliser, vous allez devoir charger les mappings MIDI désirés.
Avec certains softwares pour DJ, le mapping du DMC2000 va se charger automatiquement ; avec d'autres
softwares pour DJ, vous allez devoir charger le mapping MIDI depuis notre site ou depuis la section de
téléchargement du software pour DJ. Si le DMC2000 n'est pas compatible avec le software pour DJ, vous
pouvez réaliser votre propre mapping MIDI, mais cela dépend entièrement du software que vous utilisez.
Veuillez noter que l'installation et l'utilisation de divers softwares pour DJ sont très spécifiques ; c'est la
raison pour laquelle tous ne sont pas supportés par Synq !
Quand le DMC2000 fait usage de sa carte son interne, la musique de votre mix arrivera sur les sorties
master (5 + 6).
Mixer via fonction MIDI : La configuration du DMC2000 est ainsi faite qu'elle vous permet de mixer de la
musique venant de toutes les entrées. Vous pouvez même mixer de la musique en provenance du
software pour DJ avec de la musique venant des lecteurs internes ou d'un tourne-disque s'il est connecté.
Pour être en mesure de travailler de telle sorte, vous devez régler la fonction MIDI du mixer interne sur la
position OFF. (prière de se reporter au MENU DE CONFIGURATION).
Option ' vinyl scratching' sur le software pour DJ : grâce au DMC2000, vous pouvez aussi utiliser une
fonction très puissante, la “vinyl scratch function”, présente sur certains softwares pour DJ particulièrement
sophistiqués. Cela veut dire que vous êtes en mesure de scratcher et de manipuler les pistes audio jouées
via votre software pour DJ en utilisant un disque vinyle spécialement codé ! Il suffit de connecter un
tourne-disque à l'une des entrées audio : les signaux du disque vinyle spécialement codé seront envoyés
vers le software pour DJ.
Note 1 : vérifiez tout d'abord si votre software pour DJ supporte cette fonction. Si oui, suivez les
instructions du software pour régler cette fonction.
Note 2 : un disque spécial en vinyle pour le scratch est disponible en option chez Synq : il utilise un
signal stéréo de type "time dephased 1 KHz" qui est compatible avec différents softwares pour DJ.
Software DECKADANCE-LE
Le DMC2000 est livré avec une licence gratuite pour
Deckadance-LE, le code de déblocage pour cette
licence gratuite est fixé au dos du DMC2000 (prière de
se reporter à la figure ci-contre).
Pour être sûr que vous êtes toujours en possession de
la dernière version du software, le programme n'est
disponible que via un téléchargement ; veuillez
télécharger la version de démonstration adaptée à votre
système d'exploitation :
pour WINDOWS : http://windemo.deckadance.com
pour MAC OS : http://macdemo.deckadance.com
Installez la version de démonstration et utilisez le code
de déblocage pour débloquer la version LE de Deckadance. Vous pouvez utiliser ce software gratuit et
passer à des versions plus récentes dès qu'elles sont disponibles !
Les manuels d'installation et du propriétaire peuvent être téléchargés à l'adresse suivante :
http://deckadance.image-line.com/downloads.html
SYNQ
®
35/120 DMC1000
SYNQ
®
36/120 DMC1000
Page 21

FRANCAIS MODE D’EMPLOI
FRANCAIS MODE D’EMPLOI
IMPORTANT : nous vous incitons vivement à enregistrer votre software sur le site de Deckadance :
vous aurez ainsi accès au forum des utilisateurs, vous recevrez régulièrement une lettre d'information, et
vous serez aidé par leur équipe de support. Vous aurez aussi droit à une ristourne de 30 % quand vous
passerez aux versions HOUSE et CLUB de Deckadance. Sur le site de Deckadance, vous allez trouver une
Veuillez également noter que le support concernant le software pour DJ Deckadance fonctionne
exclusivement via le site de Deckadance (www.deckadance.com). Ce site comporte une section réservée au
support et elle est particulièrement bien développée : on y trouve un forum des utilisateurs, des vidéos
pédagogiques, etc …
liste de caractéristiques avec les différences entre les 3 versions.
MENU DE CONFIGURATION
Afin de proposer une flexibilité optimale, cet appareil peut être personnalisé de manière très pointue. C'est
pour cette raison qu'un grand nombre de paramètres peut être configuré via le menu de configuration. Pour
être en mesure de pénétrer dans le menu de configuration, le lecteur NE doit PAS être en mode MIDI.
Pour pénétrer dans le menu de configuration, appuyez sur la touche LOAD TRACK (17) pendant 3
secondes environ.
Utilisez la touche FOLDER (16) pour naviguer parmi les différentes options de ce menu.
Utilisez la touche TRACK (17) afin de naviguer dans les sous-menus (s'il y en a).
Utilisez la molette (22) pour modifier les réglages (paramètres) de l'option choisie dans le menu.
Pour enregistrer vos réglages : choisissez l'option E du menu (EXIT & SAVE) et appuyez sur la
touche TRACK (17) ou appuyez sur la touche RECORD CUE (25).
1. CANAL MIDI : à utiliser pour régler les canaux MIDI des 3 sections du DMC2000. L'écran affiche 3
groupes de 2 caractères : 01-02-03 :
Les 2 premiers caractères : il s'agit du canal MIDI pour les contrôles du lecteur 1 + du canal 1 du
mixer ;
Les 2 caractères du milieu : il s'agit du canal MIDI pour les contrôles du mixer, sauf pour les
contrôles des 2 canaux d'entrée (gain + basses, médiums, aiguës + curseur) ;
Les 2 derniers caractères : il s'agit du canal MIDI pour les contrôles du lecteur 2 + du canal 2 du
mixer ;
Faites tourner le bouton TRACK (17) pour passer d'un groupe de caractères à l'autre ;
Faites tourner la molette (22) pour changer le canal MIDI.
2. REGLAGES MIDI :
3. MODE MIXER : à utiliser pour faire passer le mixer du mode MIDI au mode "non MIDI" et vice versa.
Remarque : les 3 sections du DMC2000 devraient avoir des canaux MIDI différents.
Il y a 2 sous-menus : faites tourner le bouton TRACK (17) pour sélectionner un sous-menu.
o
Sous-menu 1 - fonctionnalité de la touche SHIFT (43) : vous pouvez choisir la manière
dont doit fonctionner la touche SHIFT en mode MIDI.
Faites tourner la molette (22) pour sélectionner le réglage désiré :
TAP = HOLD : action similaire à la touche SHIFT de votre clavier de PC
le code MIDI d'une touche ou d'un bouton ne change que quand on l'utilise
en maintenant la touche SHIFT (43) enfoncée en même temps.
TAP = TOGGLE : action similaire à la touche SHIFT LOCK (majuscules
bloquées) de votre clavier de PC maintenez la touche SHIFT (43)
enfoncée afin d'activer la fonction SHIFT : tant que l'écran affiche SHIFT, le
code MIDI de la plupart des touches et des boutons est modifié : ainsi, ils
o
Sous-menu 2 - affichage des messages MIDI : vous pouvez choisir d'afficher ou non à
l'écran les messages MIDI d'entrée et de sortie. Cela peut être très utile quand on élabore
les fichiers de configuration MIDI.
Faites tourner la molette (22) pour sélectionner le réglage désiré :
Faites tourner la molette (22) pour sélectionner le réglage désiré:
endossent une seconde fonction.
I/O = Hide (cacher) : dans ce cas, les messages MIDI émis et reçus ne sont
pas affichés ;
I/O = DIS. : dans ce cas, les messages MIDI émis et reçus sont affichés.
MIDI : utilisez ce réglage quand le DMC2000 sert uniquement à contrôler le
software pour DJ. Le mixer du software pour DJ passera sous contrôle.
NO MIDI : utilisez ce réglage si vous voulez mixer différentes sources audio
(software pour DJ, entrées pour appareils externes, lecteurs internes) ; les
niveaux de toutes les sources audio peuvent être facilement adaptées en
vous servant des boutons de gain (47).
Remarque : réglé de telle sorte, le mixer n'envoie aucun signal MIDI ; en
4. Chargement des HOT CUES : vous pouvez choisir si les hot cues enregistrés dans un morceau doivent
être rappelés automatiquement.
Faites tourner la molette (22) pour sélectionner l'une des 2 possibilités.
o
Première question : quand un morceau contient des hot cues, l'écran demande si vous
voulez charger les hot cues ou non. Vous pouvez répondre au moyen des touches YES et
NO (29).
o
5. CROSS FADER : cette fonction met en ou hors service le cross fader du mixer audio ; cela n'a pas d'effet
sur la fonction MIDI du cross fader.
Faites tourner la molette (22) pour sélectionner l’une des 2 possibilités:
6. CROSS FADER INVERSE : cette fonction met le cross fader du mixer audio en mode 'reverse' ; cela n'a
pas d'effet sur la fonction MIDI du cross fader.
Faites tourner la molette (22) pour sélectionner l’une des 2 possibilités:
7. TEMPS D'AFFICHAGE : vous pouvez régler la durée pendant laquelle un message sera affiché avant
que l'écran ne retourne à son affichage normal.
Faites tourner la molette (22) pour sélectionner la valeur désirée: 0,5sec 12,0sec.
8. VITESSE DE LA FONCTION SCROLL : vous pouvez sélectionner la vitesse de défilement du texte
passant sur l'écran.
Faites tourner la molette (22) pour sélectionner la valeur désirée: 50 2000ms
9. Sensibilité : vous pouvez modifier la sensibilité de la partie tactile de la molette afin d'optimiser les
performances de la molette.
Faites tourner la molette (22) pour sélectionner l'une des 41 possibilités.
A. INTENSITE : à utiliser pour adapter la brillance de l'écran VFD.
Faites tourner la molette (22) pour sélectionner l'une des 4 possibilités.
B. Niveau A.CUE : la fonction auto cue détecte l'endroit où la musique commence réellement, ce qui
permet d'éviter des "blancs" quand un morceau n'est pas bien indexé. Vous pouvez sélectionner l'une
des huit présélections de niveau de détection :
Faites tourner la molette (22) pour sélectionner l'une des 8 possibilités.
C. Firmware version / upgrading: cette option sert à vérifier et à mettre à jour les versions du firmware.
Faites tourner le bouton TRACK (17) pour sélectionner les 4 parties du firmware:
D. Load defaults: comme vous l'avez déjà remarqué, cet appareil permet de configurer un maximum
d'éléments. Mais cela veut aussi dire que vous courez le risque de modifier pas mal de réglages jusqu'à
Autoload : quand un morceau contient des hot cues, ils seront chargés automatiquement.
o
On : le cross fader (56) est activé, prêt à être utilisé.
o
Off : si vous ne désirez pas utiliser le cross fader, choisissez cette option.
o
On : le cross fader (56) fonctionne en mode 'reverse' : le canal 1 est audible quand le
cross fader est en position côté droit.
o
Off : le cross fader (56) fonctionne en mode normal : le canal 2 est audible quand le cross
fader est en position côté droit.
(50ms=rapide/2000ms=lent).
o
ADJ. = 0 : réglage neutre (réglage par défaut, OK dans la plupart des cas)
o
ADJ. = -20 : la sensibilité la plus basse
o
ADJ. = +20 : la sensibilité la plus haute.
o
ADJ. = 1 4 : 1 = faible luminosité, 4 = forte luminosité (valeur par défaut).
o
ADJ. = -78 dB -36 dB : le réglage par défaut = -48 dB.
o
CON: xx: montre la version du firmware de contrôle
o
DSP: xx: montre la version du firmware du DSP
o
Upgrade: l'affichage clignote quand l'appareil est prêt à vérifier s'il y a de nouvelles
versions disponibles du firmware. Pour de plus amples informations, prière de se reporter
au chapitre “MISE A JOUR DU FIRMWARE”.
lieu et place, il fonctionne comme un mixer audio "normal".
SYNQ
®
37/120 DMC1000
SYNQ
®
38/120 DMC1000
Page 22

FRANCAIS MODE D’EMPLOI
FUNCTION
FRANCAIS MODE D’EMPLOI
les détériorer ! Si vraiment vous ne vous y retrouvez plus, il vous est toujours possible de recharger les
paramètres par défaut!
Pendant que "Enter Load" clignote à l'écran : appuyez sur le bouton TRACK (17) pour charger les
réglages par défaut.
E. Exit & Save (quitter et enregistrer): si vous voulez que les modifications du menu de configuration
soient enregistrées dans la mémoire permanente (donc, même après avoir coupé l'alimentation de
l'appareil), il est obligatoire de recourir à cette option!
Appuyez sur le bouton track (17) : l'écran affiche "Saving" (enregistrement) et l'appareil sort du
menu de configuration.
Remarque : de temps à autre, vous pouvez aussi appuyer sur la touche RECORD CUE (25) pour
enregistrer les réglages de façon permanente.
MISE A JOUR DU FIRMWARE
Nous recommandons vivement d'enregistrer votre appareil sur notre site web (www.synqaudio.com/register/) de manière à ce que nous puissions vous informer quand de nouvelles mises à jour du
firmware sont disponibles. La mise à jour du firmware doit toujours être exécutée avec un maximum de
précautions !
Téléchargez le fichier contenant le(s) fichier(s) de mise à jour.
Lisez les instructions et suivez-les à la lettre, sinon vous pourriez endommager votre équipement …
Placez les fichiers dans une clé USB vide (très important !)
Appuyez sur la touche LOAD TRACK (19) pendant 3 secondes environ pour accéder au menu de
configuration.
Utilisez la touche FOLDER (16) pour naviguer vers l'option du menu appelée “C. Version”.
Faites tourner le bouton TRACK (17) jusqu'à ce que l'écran affiche le mot "Upgrade".
Utilisez la touche SOURCE SELECT (14) pour sélectionner l'entrée USB1 (13).
Insérez la clef USB contenant les fichiers du firmware dans l'entrée USB1 (13)
la mise à jour démarrera automatiquement. Attendez (!) jusqu'à ce que le processus de mise à jour soit
terminé. NE JAMAIS mettre le lecteur hors tension pendant que l'on met le software à jour !
Si l'écran vous demande de mettre l'appareil hors tension, faites-le, attendez 3 secondes et remettez-le
sous tension.
Vérifiez si le N° de version du software correspond bien à celui annoncé dans le fichier 'read me' qui
accompagne la mise à jour.
IMPLEMENTATION MIDI (réglages par défaut)
FUNCTION Type
SW/ENC 05/17 44/56 05/27 44/66
SW/ENC 01/16 40/55 01/26 40/65
IN SW/LED 02/02 D-1 41 02/02 D-1 41
OUT SW/LED 03/03 D#-1 42 03/03 D#-1 42
SW/LED 04/04 E-1 43 04/04 E-1 43
SOURCE
SELECT
RECORD CUE SW/LED 07/07 G-1 46 07/07 G-1 46
1
1
2
SW 06 45 06 45
SW/LED
(RED)
SW/LED
(GREEN)
SW/LED
(RED)
FUNCTION
CODE
(DECK A)
08/08 G#-1 47 08/08 G#-1 47
08/05 F-1 47 08/05 F -1 47
09/09 A-1 48 09 /09 A-1 48
NOTE
SHIFT
(Hold
TAP)
FUNCTION
CODE
(DECK B)
NOTE
SHIFT
(Hold
TAP)
CODE
(CENTER
DECK)
NOTE
SHIFT
(Hold TAP)
ACTION
7FH:ON
00H:OFF
7FH:ON
00H:OFF
7FH:ON
00H:OFF
7FH:ON
00H:OFF
7FH:ON
00H:OFF
7FH:ON
00H:OFF
7FH:ON
00H:OFF
7FH:ON
00H:OFF
7FH:ON
00H:OFF
7FH:ON
00H:OFF
2
3
3
4
4
DELETE CUE SW/LED 0C/0C C0 4B 0C/0C C0 4B
LOAD TRACK SW/LED 0D/0D C#0 4C 0D/0D C#0 4C
TIME X SW/LE D 0E/0E D0 4D 0E/0E D0 4D
ECHO SW/LED 0F/0F D#0 4E 0F/0F D#0 4E
FLANGER SW/LED 10 /10 E0 4F 10/10 E0 4F
HOLD SW/LED 11/11 F0 50 11/11 F0 50
FILTER SW/LED 12/12 F#0 51 12/12 F#0 51
BRAKE SW/LED 13/13 G0 52 13/13 G0 52
RATIO Y SW/LED 14/14 G#0 53 14/14 G#0 53
% SW 15 54 15 54
A.Cue
scratch
VINYL SW/LED 19/19 C#1 58 19/19 C#1 58
CDJ SW/LED 1A/1A D1 59 1A/1A D1 59
Time SW 1B 5A 1B 5A
SGL/CTN SW 1C 5B 1C 5B
JOG SW/ENC 27/18 66/57 27/28 66/67
TAP/SHIFT SW 1E 5D 1E 5D
CUE SW/LED 1F/1F G1 5E 1F/1F G1 5E
DATABASE SW/LED 21/21 A1 60 21/21 A1 60
Pitch Silder VR/CEN TER
GAIN VR 11 50 21 60 VR:00~7F
HIGH VR/SW/CEN TER/LED 12/24/29/24 C2 51/63/68 2 2/24/29/24 C2 61/63/68 VR:00~7F
SW/LED
(GREEN)
SW/LED
(RED)
SW/LED
(GREEN)
SW/LED
(RED)
SW/LED
(GREEN)
SW 16 55 16 55
SW 17 56 17 56
SW/LED 18/18 C1 57 18/18 C1 57
SW/LED 1D/1D F1 5C 1D/1D F1 5C
SW/LED 20/20 G#1 5F 20/20 G#1 5F
SW 22 61 22 61
SW 23 62 23 62
09/06 F#-1 48 09/06 F#-1 48
0A/0A A# -1 49 0A/0A A#-1 49
0A/15 A0 49 0A/15 A0 49
0B/0B B-1 4A 0B/0B B-1 4A
0B/16 A #0 4A 0B/16 A#0 4A
PITCH
BEND/28
PITCH
67
BEND/28
67
7FH:ON
00H:OFF
7FH:ON
00H:OFF
7FH:ON
00H:OFF
7FH:ON
00H:OFF
7FH:ON
00H:OFF
7FH:ON
00H:OFF
7FH:ON
00H:OFF
7FH:ON
00H:OFF
7FH:ON
00H:OFF
7FH:ON
00H:OFF
7FH:ON
00H:OFF
7FH:ON
00H:OFF
7FH:ON
00H:OFF
7FH:ON
00H:OFF
7FH:ON
00H:OFF
7FH:ON
00H:OFF
7FH:ON
00H:OFF
7FH:ON
00H:OFF
7FH:ON
00H:OFF
7FH:ON
00H:OFF
7FH:ON
00H:OFF
7FH:ON
00H:OFF
7FH:ON
00H:OFF
7FH:ON
00H:OFF
7FH:ON
00H:OFF
7FH:ON
00H:OFF
7FH:ON
00H:OFF
7FH:ON
00H:OFF
7FH:ON
00H:OFF
7FH:ON
00H:OFF
7FH:ON
00H:OFF
SYNQ
®
39/120 DMC1000
SYNQ
®
40/120 DMC1000
Page 23

FRANCAIS MODE D’EMPLOI
LEVEL
VR/SW/
30/08/
CUE PAN
CUE PAN
FRANCAIS MODE D’EMPLOI
MID VR/SW/CEN TER/LED 13/25/2A /25 C# 2 52/64/69 23/25/2A/25 C#2 62/64/69 VR: 00~7F
LOW VR/SW/CENTER/LED 14/26/2B/26 D2 53/65/6A 24/26/2B/26 D2 63/65/6A VR:00~7F
Channel Fader VR 10 4F 20 5F VR:00~7F
U1 LED 17 B0 17 B0
U2 LED 1B D#1 1B D#1
16 LED 1C E1 1C E1
10 LED 1E F#1 1E F#1
6 LED 22 A#1 22 A#1
METER LED
RANDOM SW/LED 2C/2C G#2 6B
MASTER
METER
MASTER VR 31 70 VR:00~7F
BOOTH VR 32 71 VR:00~7F
Cross Fader
MIC1 LEVEL VR 35 74 VR:00~7F
MIC2 LEVEL VR 36 75 VR:00~7F
SLIDER
LEVEL
Fader Start
ON(L)
Fader Start
OFF(L)
Fader Start
ON(R)
Fader Start
OFF(R)
C.F CURVE
(L)
C.F CURVE
(CENTER)
C.F CURVE
(R)
LEVEL LED 1 1 00H~7FH *
SW/LED 2D/2D A2 6C
SW/CENTER
VR 34 73 VR:00~7F
VR 33 72 VR:00~7F
SW 1 40
SW 2 41
SW 3 42
SW 4 43
SW 7 46
SW 6 45
SW 5 44
09/0A
6F/47/48/49 VR: 00~7F
7FH:ON
00H:OFF
7FH:ON
00H:OFF
7FH:ON
00H:OFF
7FH:ON
00H:OFF
7FH:ON
00H:OFF
7FH:ON
00H:OFF
7FH:ON
00H:OFF
7FH:ON
00H:OFF
7FH:ON
00H:OFF
7FH:ON
00H:OFF
7FH:ON
00H:OFF
7FH:ON
00H:OFF
7FH:ON
00H:OFF
7FH:ON
00H:OFF
MESSAGES DE TYPE CC-ABSOLUTE (VR, LEVEL METER LED)
Les messages de Control Change sont envoyés sous le statut 0xBn (n étant le canal) vers le contrôleur
CC spécifié. Donc, l'identification du contrôleur MIDI est indiquée avec le canal, tout comme le N° du CC.
La valeur allant de 0x00 à 0x7F est en relation directe avec la localisation du contrôleur.
* LED DES LEVEL METERS
00~0B => toutes les LED sont éteintes
0C~17 => LED (-30) ON
18~23 => LED (-30, -20) ON
24~2F => LED (-30, -20, -10) ON
30~3B => LED (-30, -20, -10, -7) ON
3C~47 => LED (-30, -20, -10, -7, -4) ON
48~53 => LED (-30, -20, -10, -7, -4, -2) ON
54~5F => LED (-30, -20, -10, -7, -4, -2, 0) ON
60~6B => LED (-30, -20, -10, -7, -4, -2, 0, +2) ON
6C~77 => LED (-30, -20, -10, -7, -4, -2, 0, +2, +4) ON
78~7F => toutes les LED sont allumées (-30, -20, -10, -7, -4, -2, 0, +2, +4, +7)
CC-RELATIVE (ENC)
Les messages de Control Change ont le statut 0xBn (n étant le canal) et sont destinés au contrôleur CC
spécifié. Donc, l'identification du contrôleur MIDI est indiquée avec le canal, tout comme le N° du CC.
0x40 est la valeur de reference du contrôleur. Il s'agit d'un décalage (offset) allant de 0 à 40 qui est le
complément de ses propres données.
Un message avec les données 0x43 indique un changement positif de 3.
Un message avec les données 0x31 indique un changement négatif de 15.
SWITCH ON/OFF (SW,CENTER)
Ces messages sont utilisés pour les switchs.
Les messages de Control Changes sont envoyés sous le statut 0x9, la valeur des switchs On et Off sont
0x7F and 0x00 (n étant le canal).
LED ON/OFF (LED)
Ces messages sont utilisés pour les LED.
Les messages de Control Changes sont envoyés sous le statut 0x9, la valeur des LED On et Off sont
0x7F and 0x00 (n étant le canal).
INSTALLATION DU SOFTWARE Q-DBASE
Le DMC 2000 fonctionne parfaitement sans les fichiers de la base de données Q-DBASE, mais si vous
désirez faire des recherches faciles et extrêmement rapides, cela vaut alors la peine d'installer le software
Q-DBASE sur votre ordinateur ! Veuillez noter que ce programme ne fonctionne que sous Windows (XP,
Vista et Win7). Afin d'être certain que vous êtes toujours en possession de la dernière version, vous pouvez
télécharger le software depuis notre site web (prière de se reporter à la section de téléchargement présente
sur la page produit du DMC2000). L'installation du programme est un jeu d'enfant : il suffit de double-cliquer
sur le fichier et de suivre les instructions sur votre écran.
UTILISATION DU SOFTWARE Q-DBASE
Chaque fois que vous ajoutez ou supprimez des pistes de votre disque dur USB,
vous devez de nouveau faire fonctionner le software Q-BASE,
et ce, afin de mettre à jour les fichiers de la base de données !
Après l'installation, vous verrez un nouveau dossier de programmes
ayant pour nom 'SYNQ3'. Dans ce dossier, vous trouverez deux
fichiers :
- Uninstall (pour désinstaller le software) ;
- Q-DBASE (pour faire démarrer le software)
Connectez votre disque dur USB à votre PC et vérifiez quelle lettre
lui a été attribuée.
Cliquez sur l'icône Q-DBASE pour faire démarrer le software :
l'écran principal s'affiche.
Dans le coin supérieur gauche, choisissez votre disque USB.
Appuyez sur la touche BUILD située du côté droit.
Le software démarre en scannant le disque USB à la recherche
de fichiers audio compatibles et extrait les tags ID3 pour
élaborer les fichiers Q-DBASE : ces derniers sont nécessaires
pour augmenter la vitesse de la fonction de recherche du
lecteur. Une fois que la barre de progression (située en
dessous) est complète, le processus d'élaboration de la base
de données est terminé, et un petit résumé s'affiche à l'écran.
Le programme a créé les fichiers Q-DBASE (extensions des fichiers
: .DBH + .dat + .DBX) sur le disque USB, et donc, dès à présent,
vous pouvez le déconnecter de votre PC pour le connecter ensuite
au DMC 2000.
SYNQ
®
41/120 DMC1000
SYNQ
®
42/120 DMC1000
Page 24

FRANCAIS MODE D’EMPLOI
FRANCAIS MODE D’EMPLOI
Pour bénéficier des meilleurs résultats, veuillez s'il vous plait toujours utiliser la dernière version en date du
software de la base de données. Vous pouvez trouver la version de ce software en bas à gauche de l'écran
"About".
! MESSAGE IMPORTANT POUR LES UTILISATEURS DE VISTA !
Un grand nombre d'utilisateurs de Vista ne seront pas en mesure de
faire fonctionner le software Q-DBASE. Ce problème est dû aux limites
fixées par les UAC (User Account Control), une option de sécurité
dans Vista qui tend à limiter les privilèges de l'utilisateur. Afin de régler
ce problèmes, cliquez du bouton droit sur l'icône du programme QDBASE et choisissez l'option 'Run as administrator' dans le menu
popup. Windows répondra en déployant une fenêtre située à droite: il
suffit alors de cliquer sur le mot 'Allow'.
UTILISATION …
La plupart des fonctions les plus utilisées sont expliquées dans le chapitre précédent “contrôles et
fonctions” Dans ce chapitre nous parlerons des fonctions qui nécessitent un peu plus
d’explications.
VOICI QUELQUES FONCTIONS GENERALES :
RECHERCHE D'UNE PISTE AVEC LE SYSTEME Q-DBASE :
Important : avant de pouvoir utiliser le système Q-DBASE, il est impératif de scanner votre disque USB
de manière à ce que les fichiers nécessaires y soient présents.
A tout moment, vous pouvez choisir la clef de recherche en appuyant sur le bouton TRACK (17) pendant
que vous le faites tourner. Ces clefs sont les suivantes : Art (artist), Alb (album) or Gen (genre).
Appuyez sur la touche DATABASE (15) pour faire démarrer la fonction de recherche le premier caractère de
la liste à rechercher est en train de clignoter sur l'écran.
Faites tourner le bouton FOLDER (16) pour modifier le premier caractère.
Faites tourner la molette (22) pour naviguer à grande vitesse dans la liste qui correspond à votre demande. Si
vous voulez chercher de manière plus précise, piste par piste, vous pouvez aussi faire tourner le bouton TRACK
(17).
Une fois que vous avez trouvé la piste recherchée, appuyez sur la touche LOAD TRACK (19).
RECHERCHE D'UNE PISTE SANS LE SYSTEME Q-DBASE :
Appuyez sur le bouton TRACK (17) et faites-le tourner pour sélectionner Std (standard lookup system). Si
le disque USB ne contient pas les fichiers Q-DBASE, le lecteur choisit automatiquement le système de
recherche standard. Vous disposez de deux options :
Option 1 :
Utilisez simplement les boutons FOLDER et TRACK pour naviguer dans les différents dossiers.
Option 2 :
Appuyez sur la touche DATABASE (15) pour faire démarrer la fonction de recherche les deux
boutons FOLDER et TRACK se mettent à clignoter.
Faites tourner le bouton FOLDER (16) pour naviguer dans les dossiers.
Faites tourner la molette (22) pour naviguer à grande vitesse dans le dossier sélectionné. Si vous
voulez chercher de manière plus précise, piste par piste, vous pouvez aussi faire tourner le bouton
TRACK (17).
Une fois que vous avez trouvé la piste recherchée, appuyez sur la touche LOAD TRACK (19).
FONCTION 'TOTAL RANDOM' SUR UN DISQUE USB :
Il s'agit de la fonction aléatoire simple, où n'importe quelle piste présente sur votre disque USB peut être
jouée sur le lecteur 1 de manière aléatoire :
Montez le curseur (53) correspondant au lecteur 1 sur la table de mixage ;
Appuyez sur la touche SOURCE SELECT (14) du lecteur 1 afin de choisir l'un des disques USB ;
Appuyez brièvement sur la touche RANDOM (45) jusqu'à ce qu'elle s'allume ;
Appuyez sur la touche PLAY (20) du lecteur 1 pour entamer la lecture aléatoire.
FONCTION 'SMART RANDOM' SUR UN DISQUE USB:
Il s'agit de la fonction aléatoire 'intelligente', où vous avez le contrôle total pour décider dans quel dossier,
ou de quel genre, album ou artiste vous voulez lire des pistes pour votre sélection aléatoire. C'est la
solution parfaite pour diffuser de la musique dans des restaurants, des magasins, des discothèques et des
bars sans recourir à un DJ. Voici comment cela fonctionne:
Montez le curseur (53) correspondant au lecteur 1 sur la table de mixage.
Appuyez sur la touche SOURCE SELECT (14) du lecteur 1 afin de choisir l'un des disques USB.
LECTURE DE PISTES D’UN SEUL DOSSIER
Appuyez sur la touche TRACK (17) et tournez-la en même temps pour sélectionner la clef de
recherche standard “Std”.
Appuyez sur la touche FOLDER (16), l’écran affiche le nom du dossier actif.
Tournez le bouton FOLDER (16) pour sélectionner le nom de dossier dont vous voulez que les
pistes soient jouées.
Appuyez sur la touche RANDOM (45) pendant environ deux secondes jusqu'à ce que la LED se
mette à clignoter.
Appuyez sur la touche PLAY (20) pour faire démarrer la lecture aléatoire de pistes provenant
uniquement du dossier que vous avez choisi.
LECTURE DE PISTES D’UN SEUL GENRE
Appuyez sur la touche TRACK (17) et tournez-la en même temps pour sélectionner la clef de
recherche “Genre”.
Appuyez sur la touche FOLDER (16), l’écran affiche le nom du dossier actif.
Appuyez sur la touche FOLDER (16) et tournez-la en même temps pour sélectionner la première
lettre du genre que vous voulez sélectionner.
si nécessaire, faites tourner la molette (22) pendant que vous maintenez enfoncée la touche
FOLDER (16) pour passer en revue les différents genres commençant par la même lettre.
Appuyez sur la touche RANDOM (45) pendant environ deux secondes jusqu'à ce que la LED se
mette à clignoter.
Appuyez sur la touche PLAY (20) pour faire démarrer la lecture aléatoire de pistes du genre
sélectionné.
Remarque 1: pour jouer des pistes d’un certain artiste ou album, vous pouvez répéter les mêmes
actions et sélectionner la clef de recherche artiste ou album.
Remarque 2: notez que la fonction aléatoire “INTELLIGENTE” ne fonctionnera correctement que si
vos ID3-tags sont correctement nommés. Un bon logiciel gratuit pour éditer vos ID3-tag est le
“MP3TAG” qui peut être téléchargé du site www.mp3tag.de!
A PROPOS DES BOUCLES (LOOPS):
CRÉATION DE BOUCLES:
Pendant qu’une plage est lue, appuyez sur la Touche LOOP IN (31) pour programmer le point de départ
de la boucle. Appuyez ensuite sur la touche OUT (32) pour programmer le point de fin de boucle. La
boucle sans fin se met à jouer immédiatement. (Avec un peu d’entraînement vous arriverez à créer des
boucles parfaites!) Pendant qu’une boucle est en cours de lecture, vous pouvez appuyer une nouvelle
fois sur la touche OUT (32) pour sortir de la boucle et continuer la lecture normale.
Il est possible de créer une nouvelle boucle, même quand une boucle est toujours en train de jouer.
Pendant que la boucle joue, appuyez simplement sur la Touche LOOP IN (31) pour définir le point de
départ d’une nouvelle boucle. Entrez ensuite le point de la fin de la boucle en appuyant sur la touche OUT
(32). Votre nouvelle boucle est enregistrée et reproduite.
REDÉMARRER UNE BOUCLE:
Ceci peut être fait de 3 façons:
Quand une boucle est programmée et que vous l’avez quittée en appuyant sur la touche OUT (32),
appuyez juste sur la touche RELOOP (33) pour redémarrer la lecture de la boucle.
Quand une boucle est programmée et que vous l’avez quittée en appuyant sur la touche OUT (32),
appuyez juste à nouveau sur la touche OUT pour redémarrer la boucle. L’endroit ou vous avez appuyé
sur la touche OUT est maintenant programmé comme nouveau point de fin de boucle.
Quand une boucle est lue, appuyez sur la touche RELOOP (33) pour redémarrer la boucle
immédiatement. Vous pouvez répéter cette action plusieurs fois de suite afin de créer un effet de
« bégaiement ».
SYNQ
®
43/120 DMC1000
SYNQ
®
44/120 DMC1000
Page 25

FRANCAIS MODE D’EMPLOI
FRANCAIS MODE D’EMPLOI
ADAPTER UNE BOUCLE:
Quand une boucle est programmée, appuyez sur la touche RELOOP (33) pendant environ 2 secondes
pour entrer dans le mode d’édition de boucle “loop edit”. Quand une boucle est lue, le cadran
alphanumérique affiche l’information en temps du point de fin de boucle. Utilisez la roue « jog » pour
définir un nouveau point de fin de boucle. Pour vous faciliter la tâche vous pouvez entendre vos
modifications sur la fin de boucle continuellement. Si vous voulez également éditer le point de départ de la
boucle, appuyez sur la touche RELOOP (33) pour passer du point de départ au point de fin de la boucle et
vice versa.. Quand la boucle est parfaite, appuyez sur la touche LOOP OUT (32) pour enregistrer le
nouveau point de fin de boucle.
CONCERNANT LES EFFETS :
Dans la description des effets, vous pouvez déjà trouver une grande quantité d'informations, donc,
n'oubliez pas de lire également cette partie du manuel !
UTILISATION DES EFFETS EN MODE SYNCHRONISÉ AU RYTHME :
Appuyez sur la touche FX-SYNC (38) pour qu'elle s'allume.
Pendant que la musique se fait entendre, vous pouvez appuyer sur les touches correspondant aux trois
effets : l'effet choisi fonctionnera en mode synchronisé au rythme. Utilisez les touches EFFECT SYNC X/Y
(39+40) pour choisir différentes présélections de rythme. Appuyez sur la touche ratio (40) jusqu'à ce
qu'elle commence à clignoter afin d'adapter l'intensité de l'effet.
UTILISATION DES EFFETS EN MODE MANUEL :
Appuyez sur la touche FX-SYNC (38) pour qu'elle reste éteinte.
Pendant que la musique se fait entendre, vous pouvez appuyer sur les touches correspondant aux trois
effets : utilisez la molette (22) pour modifier l'effet en temps réel. Appuyez sur la touche ratio (40) jusqu'à
ce qu'elle commence à clignoter afin d'adapter l'intensité de l'effet.
A PROPOS DES MÉMOIRES:
DIFFERENTES MEMOIRES:
Avant de parler de l’utilisation de la mémoire, nous devons connaître la différence entre la mémoire de
plage “track memory” et la mémoire permanente “permanent memory”:
Track Memory: ceci est la mémoire ou le DMC2000 enregistre un set allant jusqu’à 4 points de
démarrage (CUE Points) et/ou boucles par plage. Vous pouvez régler la mémoire “track memory” pour
chaque plage d'un support USB.
Par Exemple: votre support USB contient 5000 plages (morceaux)pour chaque plage vous pouvez
enregistrer jusqu’à 4 points CUE et/ou boucles. Ceci fait un total de 5000 x 4 = 20000 points CUE et/ou
boucles sur un seul support USB!
Permanent Memory: ceci est la grande mémoire ou tous les points CUE et les boucles sont
enregistrés de façon permanente En fait c’est une collection indexée de “track memories”. Quand vous
rappelez des points CUE d’une certaine plage qui on été installés précédemment, vous faites un
transfert de la mémoire permanente à la mémoire de plage.
Remarque : tous les points de cue sont stockés dans les fichiers de la base de données, sur votre disque
USB. Si vous connectez le disque à un autre DMC2000 ou DMC1000, tous les points de cue peuvent
aussi être utilisés immédiatement avec ces autres appareils.
UTILISATION DU “TRACK MEMORY”:
ENREGISTRER UN « MASTER CUE POINT »:
Il y a 2 façons pour programmer le point CUE principal:
Appuyez sur la touche LOOP IN (31) pendant la lecture normale pour définir un nouveau point CUE
(“CUE volant”).
Mettez le lecteur en Pause et utilisez les roues jog/shuttle pour rechercher l’endroit exact du nouveau
point CUE. Si vous avez repéré l’endroit exact, appuyez sur la touche LOOP IN (31) pour enregistrer
votre nouveau point CUE. (ou appuyez sur la touche PLAY/PAUSE)
Une fois ce point CUE enregistré, appuyez juste sur la touche CUE (21) pour le rappeler.
ENREGISTRER UN SIMPLE POINT CUE DANS LES TOUCHES “HOT CUE”:
Appuyez d’abord sur la touche RECORD CUE (25) pour entrer dans le mode hot cue memory (la touche
RECORD CUE est allumée):
Appuyez sur une des quatre touches HOT CUE (24) au bon moment pendant la lecture normale d’une
plage: la touche HOT CUE sur laquelle vous venez d’appuyer devient verte pour indiquer que le point
CUE est enregistré. (CUE volant).
Mettez le lecteur en mode pause et utilisez les roues jog/shuttle pour rechercher l’endroit exact du
nouveau point CUE. Si vous avez repéré l’endroit exact, appuyez sur une des quatre touches HOT
CUE pour enregistrer le nouveau point CUE: la touche HOT CUE sur laquelle vous venez d’appuyer
devient verte pour indiquer que le point CUE est enregistré.
Dès que ce point CUE est enregistré, il suffit d’appuyer sur la touche HOT CUE pour démarrer la lecture à
partir du point CUE enregistré.
ENREGISTRER UNE BOUCLE DANS LES TOUCHES “HOT CUE”:
Ceci est pratiquement identique à l’enregistrement d’un point CUE. La seule différence est que vous
devez d’abord mettre le DMC2000 en mode boucle. Quand une boucle est lue, appuyez sur la touche
RECORD CUE (25) pour entrer dans le mode Hot Cue Memory (la touche RECORD CUE s’allume).
Après cela, appuyez sur une des quatre touches HOT CUE (24): la touche HOT CUE sur laquelle vous
venez d’appuyer devient rouge pour indiquer que la boucle qui joue est enregistrée. Vous pouvez
enregistrer jusqu’à 4 boucles par plage!
EFFACER LES MÉMOIRES DES TOUCHES “HOT CUE”:
Vous pouvez facilement effacer le contenu d’une touche HOT CUE en appuyant sur la touche DELETE
CUE (26), puis en appuyant ensuite sur la touche HOT CUE que vous voulez effacer. Ou vous pouvez
simplement enregistrer un nouveau point de cue ou une boucle via cette touche HOT CUE. Vous pouvez
également effacer le contenu des quatre touches HOT CUE en appuyant sur la touche DELETE CUE (26)
pendant plus de deux secondes. Vous remarquerez que l’éclairage des touches s’éteint pour indiquer que
la mémoire des HOT CUE est vide.
UTILISATION DE LA MÉMOIRE PERMANENTE :
Pour des raisons de sécurité les points CUE et les boucles qui sont enregistrés dans les touches HOT
CUE ne sont pas automatiquement enregistrés dans la mémoire permanente. Cela signifie que si vous
rappelez un set de points CUE et de boucles de la mémoire permanente vers les touches HOT CUE (qui
sont la mémoire de plage), vous pouvez les changer, modifier ou effacer autant que vous voulez. La
mémoire permanente ne sera pas affectée jusqu’à ce que vous fassiez un « back up » des touches HOT
CUE vers la mémoire permanente.
ENREGISTRER DANS LA MÉMOIRE PERMANENTE:
Appuyez la touche RECORD CUE (26) jusqu’à ce que l’écran VFD affiche « Now saving » pour indiquer
que les points CUE et les boucles des touches HOT CUE buttons sont enregistrées dans la mémoire
permanente.
EFFACER UNE PLAGE DANS LA MÉMOIRE PERMANENTE:
Choisissez la plage que vous voulez effacer. Appuyez en même temps sur les touches DELETE CUE (26)
et “SYNC/Y” (40). L’écran affiche “Del Track?” Si vous appuyez sur la touche YES (touche PITCH
BEND+), les informations de cette plage seront effacées de la mémoire permanente.
RAPPELER LES 'HOT CUE POINTS/LOOPS' DE LA MEMOIRE PERMANENTE :
Etant donné que cela prend quelques secondes de charger les points de cue permanents, ils ne sont pas
restaurés automatiquement. A certains moments, vous n'en aurez pas besoin, alors, pourquoi se soucier
d'eux ? Ci-dessous, nous expliquons comment cela fonctionne :
S'il n'y a pas de points de cue enregistrés : Quand vous sélectionnez une piste qui n'a pas de point
de cue ou de boucle enregistré en mémoire permanente, il ne se passe rien : vous pouvez démarrer la
lecture directement.
S'il y a des points de cue enregistrés : Quand vous sélectionnez une piste qui a des points de cue
ou des boucles enregistrés en mémoire permanente, le DMC 2000 affiche le message 'Load Cues ?' :
il veut savoir si vous voulez charger les points de cue. Voici les choix possibles :
Vous appuyez sur la touche YES : Appuyez sur YES (pitch bend + touche) pour charger les
points de cue et les boucles préenregistrés. L'écran affiche le message 'Loading Cue Points'
pendant que les touches HOT CUE se chargent.
Vous appuyez sur la touche NO : les points de cue ne sont pas chargés et l'écran n'affiche
aucun message spécifique : vous pouvez démarrer la lecture directement.
SYNQ
®
45/120 DMC1000
SYNQ
®
46/120 DMC1000
Page 26

FRANCAIS MODE D’EMPLOI
FRANCAIS MODE D’EMPLOI
Vous ne faites rien : après quelques secondes, l'écran redevient automatiquement normal,
et bien entendu, les points de cue ne sont pas chargés.
Remarque : dans le menu de configuration (point 4), vous pouvez choisir de charger les points de cue
automatiquement (autoload). Dans ce cas, le lecteur ne demande rien, mais charge simplement les
points de cue.
CARACTERISTIQUES TECHNIQUES
Alimentation : CA 100 - 240 V, 50/60 Hz
Consommation : 21 W
Niveau et impédance d'entrée de référence :
Ligne : 47kΩ /-14dBV (200mV) +/-0.1dB
Phono : 47kΩ /-51dBV (2.8mV) +/-0.1dB
Micro : 10kΩ /-56dBV (1.5mV) +/-0.1dB
Entrée max. : (à 1 kHz, THD = 1 %, EQ neutre, gain max., charge = 100 kΩ)
Ligne : > +0dBV
Phono : > -38dBV
Micro : > -42dBV
Talkover : -20dB +/-2dB
Réponse en fréquence : (EGALISATION neutre, gain max., charge = 100 kΩ)
Ligne : 20Hz - 20kHz +/-2dB
Phono : 20Hz - 20kHz +2/-3dB (RIAA)
Micro : 20Hz - 20kHz +2/-3dB
THD + N : (EQ neutre, gain max., avec filtre PB à 20 KHz, A-weighted, charge = 100 kΩ)
Ligne : < 0.06% @ 1 KHz
Phono : < 0.08% @ 1 KHz
Micro : < 0.15% @ 1 KHz
Niveau et impédance de sortie :
Master asymétrique : 1kΩ /3.8dBV (1.55V) +/-2dB
Master symétrique (charge = 600 Ω) : 600Ω /+6dBm (1.55V) +/-3dB (entre HOT et COLD)
Booth master : 1kΩ /3.8dBV (1.55V) +/-2dB
Casque (charge = 32 Ω) : 33Ω /0dBV (1V) +/-2dB
Sortie max. : (à 1 kHz, THD = 1%, EQ neutre, gain max., charge = 100 kΩ)
Master : > +18dBV (8V) load=100kΩ
Casque : > +4dBV (1,6V) load=32Ω
FORMATS USB :
Système de fichiers : FAT 12/16/32
Capacité max. du disque dur : 500 GB
Max. de dossiers : 999
Max. de pistes par dossier : 999
Capacité max. de pistes Q-DBASE : 9999
FORMAT WAV : PCM, 1411 kbps.
FORMATS MP3 :
MPEG1 Layer3 (ISO/IEC11172-3) : mono / stereo, échantillonné à : 32 - 44,1 - 48kHz
Vitesses d'échantillonnage : 32 – 320 Kbps
Modes de vitesses d'éch. : CBR (vitesse d'éch. constante) ou VBR (vitesse d'éch.
variable)
MPEG2 Layer3 (ISO/IEC13818-3) : mono / stereo, échantillonné à : 16 – 22,05 - 24kHz
Vitesses d'échantillonnage : 32 – 160 Kbps
Modes de vitesses d'éch. : CBR (vitesse d'éch. constante) ou VBR (vitesse d'éch.
variable)
MPEG2,5 Layer3: mono / stereo, échantillonné à : 8 – 11,025 - 12kHz
Vitesses d'échantillonnage : 32 – 160 Kbps
Modes de vitesses d'éch. : CBR (vitesse d'éch. constante) ou VBR (vitesse d'éch.
variable)
Software Q-DBASE :
Extensions de fichiers possibles : .DBH + .dat + .DBX
Système minimum nécessaire : RAM 512 MB
100 MB d'espace disque libres
Microsoft®Win XP SP3 ~ Win Vista SP2 ~ Win 7
Dimensions : 299 (P) x 420 (L) x 89 (H) mm
Poids : 4,42 kg
Chacune de ces informations peut être modifiée sans avertissement préalable. Vous pouvez
télécharger la dernière version de ce mode d’emploi de notre site Web: www.beglec.com
SYNQ
®
47/120 DMC1000
SYNQ
®
48/120 DMC1000
Page 27

NEDERLANDS HANDLEIDING
GEBRUIKSAANWIJZING
Hartelijk dank voor de aankoop van dit SYNQ®product. Om ten volle te kunnen profiteren van alle
mogelijkheden en voor uw eigen veiligheid: gelieve de aanwijzingen zorgvuldig te lezen voor U het apparaat
begint te gebruiken.
VERGEET NIET UW SYNQ AANKOOP TE REGISTREREN. ZO ONTVANGT U
AUTOMATISCH EEN BERICHT BIJ NIEUWE SOFTWARE UPDATES!
SURF NAAR: WWW.SYNQ-AUDIO.COM/REGISTER/
KARAKTERISTIEKEN
In dit apparaat is radio-interferentie onderdrukt. Dit product voldoet aan de gangbare Europese en nationale
voorschriften. Het is vastgesteld dat het apparaat er zich aan houdt en de desbetreffende verklaringen en
documenten zijn door de fabrikant afgegeven.
Deze professionele digitale media controller biedt u een zeer compacte alles-in-één oplossing aan welke
zelfs de meest veeleisende DJ’s zal bekoren! Sluit hem aan op een paar gepowerde klankkasten en u bent
klaar om het feest te beginnen!
Het toestel beschikt over een enorme hoeveelheid aan mogelijkheden:
U kunt probleemloos muziek van verschillende bronnen spelen en mixen:
De twee ingebouwde USB spelers kunnen van dezelfde USB-harddisk/USB-stick WAV of MP3 files
spelen.
De DMC2000 beschikt over meerdere analoge ingangen voor draaitafels, extra CD spelers, enz.
Controleert alle populaire MIDI DJ-software, gratis Deckadance-LE software inbegrepen!
Twee microfoons met talkover kunnen tegelijkertijd gebruikt worden.
Q-DBase system: Handig database gestuurd opzoeksysteem voor het snel terugvinden van tracks, zelfs
op grote harde schijven, tot 500GB!
Gratis Windows Q-DBase-builder software inbegrepen.
De digitale effecten (echo, flanger, filter, brake) kunnen zowel manueel als automatisch synchroon op het
ritme van de beat gebruikt worden met heel wat presets.
Naadloze loops met real-time bewerking.
PCMS (Permanent Cue Memory System): Voor elke track kunt u op het even welk moment tot 4 cue
punten en naadloze loops opslaan/oproepen
Zeer precieze scratch functie en pitch bend, dankzij de aanraakgevoelige jog wielen
Verschillende werkmodi voor het jog wiel: vinyl, CDJ en A.CUE scratch!
De DJ-software kan gebruikt worden met gecodeerde vinylplaten om de weergave en het scratchen van
uw MP3/WAV files aan te sturen.
De alfanumerische VFD schermen met 2 x 10 karakters tonen alle informatie, waaronder de ID3-tags.
SMART RANDOM: de random weergave kan beperkt worden tot één genre of artiest (bvb. Speel alleen
slows !)
Originele, opwaardeerbare, Synq firmware: staat voor gebruiksvriendelijkheid en gesofistikeerde
functionalieteit welke u nergens anders zult vinden.
Volledig aanpasbaar setup menu voor MIDI en andere functies.
Pitch controle (+/-6%, 10%, 16%, +16%/-100%)
Pitch lock (Master Tempo)
Volledig uitgeruste 2 kanaals digitale mixer met regelbare crossfader, symmetrische uitgangen en booth
master.
PFL koptelefoonmonitor met mixing van kanaal1 & kanaal2 + regelbaar volume.
En nog veel meer …
NEDERLANDS HANDLEIDING
EERSTE INGEBRUIKNAME
Belangrijke instructies:
Controleer voor het eerste gebruik van het apparaat of het tijdens het transport beschadigd werd. Mocht er
schade zijn, gebruik het dan niet, maar raadpleeg eerst uw dealer.
Belangrijk: Dit apparaat verliet de fabriek in uitstekende staat en goed verpakt. Het is erg belangrijk dat
de gebruiker de veiligheidsaanwijzingen en raadgevingen in deze gebruiksaanwijzing uiterst nauwkeurig
volgt. Elke schade veroorzaakt door verkeerd gebruik van het apparaat valt niet onder de garantie. De
dealer aanvaardt geen verantwoordelijkheid voor mankementen en problemen die komen door het
veronachtzamen van deze gebruiksaanwijzing.
Bewaar deze brochure op een veilige plaats om hem in de toekomst nogmaals te kunnen raadplegen.
Indien U ooit het apparaat verkoopt mag u niet vergeten om de gebruiksaanwijzing bij te voegen.
Om het milieu te beschermen, probeer zoveel mogelijk het verpakkingsmateriaal te recycleren.
Controleer de inhoud:
Kijk na of de verpakking volgende onderdelen bevat:
De DMC2000
Handleiding
1 USB kabel
1 voedingskabel
VEILIGHEIDSVOORSCHRIFTEN:
WAARSCHUWING: Om het risico op elektrocutie zoveel
CAUTION
De bliksempijl die zich in een gelijkbenige driehoek bevindt is bedoeld om u te wijzen op het
gebruik of de aanwezigheid van niet-geïsoleerde onderdelen met een “gevaarlijke spanning” in
het toestel die voldoende kracht heeft om een risico van elektrocutie in te houden.
Het uitroepteken binnen de gelijkbenige driehoek is bedoeld om de gebruiker erop te wijzen dat
er in de meegeleverde literatuur belangrijke gebruik en onderhoudsinstructies vermeld staan
betreffende dit onderdeel.
Dit symbool betekent: het apparaat mag enkel binnenhuis worden gebruikt.
Dit symbool betekent: Lees de handleiding!
Dit symbool betekent: Klasse II apparaten
Stel dit apparaat niet bloot aan regen of vocht, dit om het risico op brand en elektrische schokken te
voorkomen.
Om de vorming van condensatie binnenin te voorkomen, laat het apparaat aan de omgevingstemperatuur
wennen wanneer het, na het transport, naar een warm vertrek is overgebracht. Condensatie kan het
toestel soms verhinderen perfect te functioneren. Het kan soms zelfs schade aan het apparaat
toebrengen.
Gebruik dit apparaat uitsluitend binnenshuis.
Plaats geen stukken metaal en mors geen vocht binnen in het toestel om elektrische schokken of storing
te vermijden. Objecten gevuld met water, zoals bvb. Vazen, mogen nooit op dit apparaat worden geplaatst.
Indien er toch een vreemd voorwerp of water in het apparaat geraakt, moet U het direct van het lichtnet
afkoppelen.
Open vuur, zoals brandende kaarsen, mogen niet op het apparaat geplaatst worden.
Bedek geen enkele ventilatieopening om oververhitting te vermijden.
Zorg dat het toestel niet in een stoffige omgeving wordt gebruikt en maak het regelmatig schoon.
Houd het apparaat uit de buurt van kinderen.
Dit apparaat mag niet door onervaren personen bediend worden.
De maximum veilige omgevingstemperatuur is 40°C. Gebruik het apparaat dus niet bij hogere
temperaturen.
mogelijk te vermijden mag u nooit de behuizing
verwijderen. Er bevinden zich geen onderdelen in het
toestel die u zelf kan herstellen. Laat de herstellingen
enkel uitvoeren door een bevoegde technicus.
SYNQ
®
49/120 DMC2000
SYNQ
®
50/120 DMC2000
Page 28

NEDERLANDS HANDLEIDING
NEDERLANDS HANDLEIDING
De minimum afstand rondom dit apparaat om een goede koeling toe te laten is 5cm.
Trek altijd de stekker uit wanneer het apparaat gedurende langere tijd niet wordt gebruikt of alvorens met
de onderhoudsbeurt te beginnen.
De elektrische installatie behoort uitsluitend uitgevoerd te worden door bevoegd personeel, volgens de in
uw land geldende regels betreffende elektrische en mechanische veiligheid.
Controleer dat de spanning niet hoger is dan die aangegeven op de achterzijde van het toestel.
Het stopcontact zal steeds vrij toegankelijk blijven zodat de stroomkabel op elk moment kan worden
uitgetrokken.
De elektrische kabel behoort altijd in uitstekende staat te zijn. Zet het apparaat onmiddellijk af als de
elektrische kabel gekneusd of beschadigd is. De kabel moet vervangen worden door de fabrikant zelf, zijn
dealer of vergelijkbare bekwame personen om een brand te voorkomen.
Laat de elektrische draad nooit in contact komen met andere draden.
Als de netschakelaar zich in OFF (uit) positie bevindt dan is dit apparaat niet volledig van het lichtnet
gescheiden!
Om elektrische schokken te voorkomen, moet U de behuizing niet openen. Afgezien van de zekering zitten
er geen onderdelen in die door de gebruiker moeten worden onderhouden.
Repareer nooit een zekering en overbrug de zekeringhouder nooit. Vervang een beschadigde zekering
steeds door een zekering van hetzelfde type en met dezelfde elektrische kenmerken.
Ingeval van ernstige problemen met het bedienen van het toestel, stopt U onmiddellijk het gebruik ervan.
Contacteer uw dealer voor een eventuele reparatie.
Gebruik best de originele verpakking als het toestel vervoerd moet worden.
Om veiligheidsredenen is het verboden om ongeautoriseerde modificaties aan het toestel aan te brengen.
INSTALLATIEVOORSCHRIFTEN:
Het plaatsen en het gebruiken van het toestel tijdens lange periodes in de nabijheid van warmtebronnen
zoals versterkers, spot’s, enz. zullen de prestaties van het toestel negatief beïnvloeden en kunnen het
toestel zelfs beschadigen.
Wanneer het toestel ingebouwd is in een cabine of een flight case moet u er wel voor zorgen dat het
toestel goed geventileerd wordt, zodanig dat de warmte die het toestel ontwikkeld goed geëvacueerd
wordt.
Om condensvorming te voorkomen na het transport moet u het toestel de tijd laten om zich aan te passen
aan de omgevingstemperatuur, vooral als het toestel vanuit een koele plaats naar een warmere ruimte
overgeplaatst wordt. Condens verhindert soms de goede werking van het toestel.
Wees voorzichtig in de keuze van de plaats waar u het toestel wilt installeren. Vermijdt de nabijheid van
warmtebronnen. Vermijd ondergronden die onderhevig zijn aan trillingen of stoffige en vochtige plaatsen.
Om brand en elektrocutie te vermijden mag u dit toestel nooit blootstellen aan regen of vocht.
Om elektrocutie te vermijden mag u nooit het deksel van het toestel openmaken. W endt u tot uw dealer
als er zich een probleem voordoet.
Plaats nooit metalen voorwerpen of mors nooit vloeistoffen in het toestel. Elektrocutie en een slechte
werking kunnen hieruit resulteren.
De speler mag door niemand geregeld of hersteld worden, uitgezonderd door een ervaren technicus.
Dit toestel kan storingen veroorzaken bij radio en televisieontvangst.
CONTROLE EN FUNCTIES
1. NETAANSLUITING: verbind het toestel met het net (100-240V AC) door middel van de bijgeleverde
voedingskabel.
2. POWER ON/OFF schakelaar: hiermee kan u het toestel aan/uit schakelen.
3. USB 2 aansluiting: dit is de tweede (type-A) USB aansluiting, welke kan gebruikt worden om om het
even welk USB opslagmedia aan te sluiten, geformatteerd in FAT of FAT32. Meestal wordt deze ingang
gebruikt om een hard disc aan te sluiten. (zie hoofdstuk “aansluitingen”)
4. MIDI / LINK USB aansluiting: deze (type-B) USBaansluiting wordt gebruikt om de speler te verbinden
met een computer met MIDI DJ-software. Lees hoofdstuk “aansluitingen” voor meer info.
5. MASTER SYMMETRISCHE UITGANG: de XLR aansluitingen kunnen gebruikt worden om deze
mengtafel met om het even welke symmetrische versterkeringang of versterkte luidsprekers te verbinden
door middel van speciaal symmetrische signaalkabels (microfoonkabels).
6. MASTER ASYMMETRISCHE UITGANG: De “master” uitgang heeft hetzelfde uitgangssignaal als de
symmetrische master uitgang (5) maar is dan wel asymmetrisch.
7. BOOTH MASTER UITGANG: De “booth master” uitgang draagt hetzelfde signaal als de master, maar
kan onafhakelijk gecontroleerd worden door de booth master (49). Gebruik deze uitgang om
asymmetrische versterkiers of een geluidsrecorder aan te sluiten.
8. PH/LINE SCHAKELAAR: Gebruik de schakelaar om te kiezen tussen een lijningang niveau of een
draaitafel (phono) niveau.
9. ANALOGE INGANG: op beide kanalen kunt u draaitafels of extra CD spelers aansluiten welke kunnen
gemixt worden met nummers van de DMC2000 spelers en DJ software van uw PC/MAC.
10. GROUND (GND) VERBINDING: vele draaitafels zijn voorzien van een aardingaansluiting (GND). Het is
aangewezen deze signaalaarding te verbinden met de GND aansluiting. Indien uw draaitafel niet
voorzien is van een aardingskabel dan moet u deze aansluiting niet gebruiken.
11. DJ MIC INPUT JACK: Combo jack. Aanvaardt zowel symmetrische microfoons met een XLR aansluiting
als asymmetrische microfoons met een 1/4” mono jack. Deze ingang wordt meestal gebruikt voor de DJ
microfoon. De talkover beïnvloed het signaalniveau van deze ingang niet.
12. KENSINGTON SLOT: diefstalbeveiliging voor de DMC2000. Let wel: dit beschermt u niet voor 100%! U
kunt een compatibele “Kensington” kopen welke u praktisch in elke computershop vindt.
ONDERHOUD
Reinig het toestel met een zacht, lichtjes bevochtigd doek. Vermijd water te morsen in het toestel. Gebruik
nooit vluchtige producten zoals benzeen of thinner, dit kan het toestel beschadigen.
®
SYNQ
51/120 DMC2000
SYNQ
®
52/120 DMC2000
Page 29

NEDERLANDS HANDLEIDING
13. USB 1 aansluiting: dit is de eerste (type-A) USB aansluiting, welke kan gebruikt worden om om het
even welk USB opslagmedia aan te sluiten, geformatteerd in FAT of FAT32. Meestal wordt deze ingang
gebruikt om bvb USB sticks aan te sluiten.
14. SOURCE SELECT schakelaar: gebruik deze toets om de gewenste audiobron te kiezen: USB1 of
USB2.
15. DATABASE / NEXT TRACK toets: een zeer belangrijke toets indien u het volgende nummer snel en
eenvoudig wil terugvinden, zelfs terwijl het vorige nummer nog steeds speelt ! Deze toets werkt op 2
verschillende manieren:
NEXT TRACK functie: zal gebruikt worden bij het doorzoeken van USB apparatuur welke niet
beschikken over het “Q-DBase” systeem. U kunt alleen zoeken op muzieknummers en folder
nummers.
DATABASE functie: zal gebruikt worden bij het doorzoeken van USB opslagmedia welke
aangemaakt zijn met het “Q-DBase” systeem. U kan in alfabetische volgorde zoeken naar artiesten,
muziektitels, genre of album. Dit werkt zeer snel en u hoeft niet te weten waar uw files precies
opgeslagen zijn !
Wanneer u het juiste nummer gevonden heeft moet u alleen nog op de LOAD TRACK toets (19)
drukken om het muzieknummer op te laden.
Gelieve voor beide functies het hoofdstuk “HOE GEBRUIKEN” te lezen voor meer info.
16. FOLDER toets: deze toets heeft verschillende functies:
Geen Q-Dbase: draai aan deze knop om de mappen van een USB opslagmedium te overlopen
wanneer u geen gebruik maakt van het Q-Dbase systeem.
Zoeken via de Q-Dbase functie: draai aan de knop om het eerste karaketer te kiezen van de
zoeksleutel die u wenst te gebruiken. Draai aan de knop om naar de volgende zoeksleutel over te
gaan die met hetzelfde karakter begint. Druk op de knop om de zoeksleutel op de 2de tekstlijn van
het scherm weer te geven.
Setup menu: draai aan de knop om de verschillende menuopties te overlopen.
Zie hoofdstukken “HOE GEBRUIKEN” & “SETUP MENU” voor meer info.
17. TRACK toets: deze toets heeft verschillende functies:
NEDERLANDS HANDLEIDING
Geen Q-Dbase: draai aan de knop om de nummers in een map van een opslagmedium te
overlopen, wanneer u geen gebruik maakt van het Q-Dbase systeem.
Q-Dbase doorzoeken: twee opties:
Draai aan de knop om alle files met hetzelfde eerste karakter (welk u gekozen heeft met de
FOLDER toets) te overlopen.
Druk op de knop terwijl u er aan draait om de zoeksleutel in de database te wijzigen, u kunt
zoeken op:
Art: zoek de “Artiestennaam” in alfabetische volgorde (default search key)
Alb: zoek “Albumnamen” in alfabetische volgorde
Gen: zoek “Genres” in alfabetische volgorde
Std: gebruik het Q-Dbase system niet, doorzoek de mappen en nummers manueel.
Tijdens de weergave: druk op de knop om de verschillende ID3-tags op de display te zien:
Druk 1x: Album naam van het huidige nummer wordt weergegeven
Druk 2x: Genre van het huidige nummer wordt weergegeven
Druk 3x: Bitrate informatie van het huidige nummer wordt weergegeven
Setup menu: draai aan de knop om de instellingen van de gekozen menuoptie te wijzigen.
Lees hoofdstuk “HOE GEBRUIKEN” voor meer info.
18. SEARCH toetsen: worden gebruikt om snel in een nummer te zoeken.
19. LOAD TRACK toets: deze toets heeft verschillende functies:
Een nummer laden: dat u net gevonden heeft met behulp van de database/next track functie.
Open setup menu: druk gedurende ongeveer 3 seconden op de LOAD TRACK toets.
Sluit setup menu: druk heel even op de LOAD TRACK toets om de setup te verlaten.
Zie hoofdstukken “HOE GEBRUIKEN” & “SETUP MENU” voor meer info.
20. PLAY/PAUSE toets: Telkens u op de PLAY/PAUSE toets drukt zal de speler overgaan van afspelen
naar pauze of van pauze naar afspelen. De toets knippert zolang de speler in pauze staat.
21. CUE toets: Als u op de CUE toets drukt tijdens de weergave, dan veroorzaakt dit een onmiddellijke
terugkeer naar de positie waar de weergave gestart werd. De weergave start onmiddellijk vanaf het
geprogrammeerde Cue punt, en duurt verder zolang de CUE toets ingedrukt blijft. De speler springt
terug naar het Cue punt zodra de CUE toets losgelaten wordt. Wanneer het toestel in pauze modus
staat (Play/Pause LED knippert) kan het Search en/of het Jog wiel gebruikt worden om een ander
startpunt te kiezen. Door op de "PLAY/PAUSE" of “LOOP IN” toets te drukken en daarna op de "CUE"
toets, kunt u dit nieuwe Cue punt bevestigen.
22. TACTIEL JOG-WIEL: het jog wiel op deze speler bestaat uit 2 delen:
Aanraakgevoelig middelste deel: om het gevoel van vynyl zo goed mogelijk na te bootsen, wat het
uitoefenen van het scratchen zeker ten goede komt, is het middelste gedeelte van het JOG wiel
uitgerust met een gepatenteerde aanraakgevoelige technologie. Met de WHEEL MODE toetsen (23)
kunt u het gedrag van dit centrale deel aanpassen. Zie de beschrijving van de WHEEL MODE
toetsen (23) voor meer info.
Buitenring: het zilvergekleurde deel van het wiel, welk niet tactiel is. Welke ook de gekozen
wielmodus is, de buitenste ring kan steeds gebruikt worden voor Pitch Bending (tijdelijk versnellen of
vertragen), behalve wanneer u de digitale effecten aan het gebruiken bent.
23. WHEEL MODE toets: hiermee kiest u één van de 3 verschillende werkmodi van het tactiele jog wiel.
Het tactiele middelste gedeelte en de buitenring reageren op verschillende manieren:
VINYL-mode: voor het uiterst realistisch scratchen van om het even welke MP3 file via de
geintegreerde spelers of DJ-software van uw computer.
Tactiel gedeelte in het midden: tijdens de weergave van een nummer stopt de muziek
onmiddellijk wanneer u het jog wiel aanraakt: de weergavesnelheid en richting worden nu
alleen gecontroleerd door de beweging van uw hand. In pauze stand kunt u gemakkelijk een
nieuw cue punt instellen.
Buitenring: tijdens de weergave van een nummer kunt u de buitenste ring gebruiken voor
Pitch bending (tijdelijke versnelling of vertraging van de weergave) zodat u de beats van 2
nummers kunt synchroniseren. In pauze mode zult u de typische heel korte loops horen welke
u toelaten om het cue punt tot op 1frame (1/75eseconde) nauwkeurig kunt instellen.
CDJ-mode: dit is de standaard modus welke door de meeste DJ spelers gebruikt wordt. Zowel het
middelste gedeelte van het wiel als de buitenring reageren op exact dezelfde manier. Tijdens de
weergave van een nummer zal het jog wiel de snelheid van de weergave tijdelijk wijzigen tot +/100% ; draai het wiel in uurwerkwijzerzin om de snelheid te verhogen, of draai in tegenwijzerzin om
de snelheid van de weergave te verlagen. De snelheid waarmee u aan het wiel draait bepaalt hoe
sterk de weergavesnelheid moet aangepast worden. In pause mode zult u de typische heel korte
SYNQ
®
53/120 DMC2000
SYNQ
®
54/120 DMC2000
Page 30

NEDERLANDS HANDLEIDING
NEDERLANDS HANDLEIDING
loops horen welke u toelaten om het cue punt tot op 1frame (1/75e seconde) nauwkeurig kunt
instellen.
A.CUE SCRATCH-mode: lijkt zeer sterk op de VINYL modus, maar het scratchen start altijd vanaf
het actuele cue punt, het gedrag van de buitenring is identiek aan dat van de vinyl modus:
Tactiele middelste gedeelte: tijdens de weergave zal de muziek onmiddellijk stoppen en
terugkeren naar het actuele cue punt, telkens wanneer u het jog wiel aanraakt: de
weergavesnelheid en richting worden nu alleen gecontroleerd door de beweging van uw hand.
In pauze mode kunt u gemakkelijk een nieuw cue punt instellen maar de speler keert eerst
weer naar zijn actuele cue punt.
Buitenring: Tijdens de weergave kunt u de buitenste ring gebruiken voor pitch bending
(tijdelijke versnelling of vertraging van de weergave) zodat u de beats van 2 nummers kunt
synchroniseren. In pause mode zult u de typische heel korte loops horen welke u toelaten om
24. HOT CUE buttons: 4 programmeerbare toetsen waarin u gewone Cue punten en/of Loops kunt
opslaan. Deze toetsen kleuren groen als er een gewoon cue punt werd opgeslagen en kleuren rood als
er een loop werd opgeslagen. Alle opgeslagen Cue punten en Loops kunnen opgeslagen worden in het
permanente geheugen om later opnieuw gebruikt te worden. Deze eigenschap noemt men “PCMS
Permanent Cue Memory System”. Zie hoofdstuk “HOE GEBRUIKEN” voor verdere informatie over het
programmeren van Cue punten, enz.
25. RECORD CUE toets: druk op deze toets vooraleer u op een van de 4 HOT CUE toetsen (24) drukt om
een nieuw cue punt of loop op te slaan. Zie hoofdstuk “HOE GEBRUIKEN” om te leren hoe u cue punten
en loops kan opslaan.
26. DELETE CUE: deze toets heeft verschillende functies:
Zie hoofdstuk “HOE GEBRUIKEN” voor meer info.
27. TEMPO RANGE toets: druk op deze toets om een van de beschikbare snelheidsbereiken te kiezen: +/-
6%, +/-10%, +/-16%, +16/-100%. Bij lage waarden is de SPEED-fader (28) preciezer, de hoge waarden
zijn meer gepast voor speciale effecten. Om de snelheidsfunctie uit te zetten moet u gewoon gedurende
1 seconde op de toets drukken, tot de snelheidsindicatoren uit gaan. Druk opnieuw op de toets om de
snelheidscontrole opnieuw aan te zetten.
28. SPEED-fader: wordt gebruikt om de snelheid van het weergegeven nummer aan te passen. U kunt deze
functie aan/uit zetten of het bereik veraderen met de TEMPO RANGE toets (27)
29. PITCH BEND toetsen: De snelheid verhoogt wanneer men op de “+ toets” drukt en keert weer naar zijn
oorspronkelijke snelheid wanneer de toets losgelaten wordt. De snelheid daalt wanneer men op de “–
toets” drukt en keert weer naar zijn oorspronkelijke snelheid wanneer de toets losgelaten wordt. Deze
toetsen kunnen gebruikt worden om de beats van 2 nummers op elkaar af te stellen. Zij worden ook
gebruikt voor het bevestigen (of annuleren) van vragen die soms getoond worden op het scherm.
30. KEY LOCK toets: (Master Tempo) activeert de Pitch Lock functie. Deze functie laat u toe de snelheid
van een nummer te regelen door middel van de SPEED-fader zonder de toonhoogte te wijzigen.
31. LOOP IN toets: Laat u toe het Cue punt in te stellen zonder de weergave van de CD te stoppen (CUE
ON THE FLY). Deze toets bepaalt ook het beginpunt van een naadloze Loop: duid het beginpunt van de
loop aan, u moet daarna op de LOOP OUT toets drukken om het eindpunt van de loop vast te leggen,
het cue punt tot op 1frame (1/75eseconde) nauwkeurig kunt instellen.
Cue punten opslaan in het permanente geheugen: het hot cue systeem gebruikt 2 soorten
geheugens: het tijdelijke “track memory” geheugen en het “permanente” geheugen. Nieuwe hot cues
worden alleen opgeslagen in het tijdelijke geheugen “track memory”. Wanneer u de hot cues wilt
bijhouden zodat u deze later weer kan gebruiken, dan moet u de informatie opslaan in het
permanente geheugen. Om de CUE punten op te slaan in het permanente geheugen moet up
gewoon op de RECORD CUE toets drukken tot “Saving” op de display verschijnt.
Persoonlijke instellingen opslaan: druk tegelijkertijd op de RECORD CUE toets en op de X/SYNC
toets (39) om de vershillende parameterinstellingen, welke in gebruik zijn, op te slaan (pitch range,
single/cont, standard time display, jog wheel setting, auto cue, auto BPM-mode, pitch on/off,
database search key en starttime/brake time)
DELETE 1 HOT CUE: druk op de DELETE CUE toets, en daarna op de HOT CUE toets die u wilt
wisen in de “track memory”. De gewiste toets zal uit gaan.
DELETE 4 HOT CUES: druk gedurende ongeveer 2 seconden op de DELETE CUE toets om de 4
hot cues te wissen uit de track memory.
DELETE TRACK: druk tegelijkertijd op de DELETE CUE toets en de Y/RATIO toets (40) om de hot
cues voor het gehele nummer uit het permanente geheugen te wissen. Aangezien er geen weg
meer terug is om de handeling ongedaan te maken zal de display u eerst vragen of u zeker bent om
door te gaan: gebruik de PITCH BEND toetsen (29) om YES of NO te antwoorden.
zodat het spelen van de loop kan beginnen. Gelieve het hoofdstuk “HOE GEBRUIKEN” te lezen voor
meer info.
32. OUT/EXIT toets: Wordt gebruikt om het eindpunt van een Loop te bepalen wanneer u een loop maakt.
De speler start het afspelen van de naadloze Loop tot wanneer u terug op deze toets drukt om de Loop
te verlaten. Wanneer een Loop geprogrammeerd is maar niet afgespeeld wordt kan men zo ook het
aflezen van de Loop herstarten. De plaats in het nummer waar u op deze toets gedrukt heeft zal
opgeslagen worden als nieuw eindpunt van de Loop. Als U in “loop edit” mode bent dan zal het
indrukken van de OUT/EXIT toets het bewerken van de loop beëindigen en wordt het nieuwe loop
eindpunt opgeslagen.
33. RELOOP/STUTTER toets: Deze toets heeft 3 functies:
RELOOP: Als een Loop geprogrammeerd was en u hebt op de OUT/EXIT toets gedrukt, druk dan
op de Reloop toets om terug over te gaan naar het afspelen van de Loop. Druk op de OUT/EXIT
toets om de Loop terug te verlaten. (start en eindpunt van de Loop blijven onveranderd)
STUTTER: Wanneer een Loop afgespeeld wordt kunt u op deze toets drukken om de Loop
onmiddellijk te herstarten. U kunt ook op deze toets drukken wanneer een nummer geen loop
afspeelt. Telkens u op de RELOOP/STUTTER toets drukt herstart de muziek vanuit zijn
geprogrammeerd Cue punt. Het stotter effect (stutter) laat u toe extra creatief te zijn met uw
prestatie.
ENTER EDIT LOOP MODE: Als er een loop geprogrammeerd is (LOOP IN en OUT/EXIT toetsen
lichten op) dan kan U de “loop edit” functie starten door de RELOOP/STUTTER toets in te drukken
tot er op het scherm “OUT EDIT” verschijnt. In loop edit modus gaat u van “OUT EDIT” naar “IN
EDIT”, en omgekeerd.
34. ECHO EFFECT toets: druk op deze toets om het echo effect in te schakelen. Afhakelijk van de sync-
mode (manueel of synchroon met de beat), zijn verschillende instellingen mogelijk:
Manual mode: de FX-SYNC toets (38) is uit. U kan alle parameters manueel instellen, gebruik de
volgende controles:
Jog-wiel (22): wordt gebruikt om een echo tijd te kiezen van 1ms tot 2000ms.
Y/RATIO toets (40): zo lang de Y/RATIO toets knippert, kunt u het jog-wiel (22) gebruiken om
het impact (dry/wet) van het effect in te stellen.
Beat synchronized mode: de FX-SYNC toets (38) is aan. U kan de volgende controles gebruiken:
EFFECT SYNC toetsen (39+40): gebruik een van de beat gesynchroniseerde echo presets.
Y/RATIO toets (40): zo lang de Y/RATIO knippert kunt u het jog-wiel (22) gebruiken om het
35. FLANGER EFFECT toets: druk op deze toets om het flanger effect in te schakelen. Afhankelijk van de
sync-mode (manueel of synchroon met de beat), zijn verschillende instellingen mogelijk:
36. FILTER EFFECT toets: druk op deze toets om het filter effect in te schakelen. Afhankelijk van de sync-
mode (manueel of synchroon met de beat), zijn verschillende instellingen mogelijk:
37. BRAKE toets: druk op deze toets om het remeffect in te schakelen. U kunt nu de de snelheid van het
opstarten/stilvallen van de muziek bij gebruik van de PLAY/PAUSE toets (20) instellen. U kunt de
parameters instellen met de toetsen (39+40), zie volgende pagina.
impact (dry/wet) van het effect signaal te beïnvloeden.
Manual mode: de FX-SYNC toets (38) is uit. U kan alle parameters manueel instellen, gebruik de
volgende controles:
Jog-wiel (22): wordt gebruikt om het effect manueel in te stellen.
Y/RATIO toets (40): zo lang de Y/RATIO toets knippert kunt u het jog-wiel (22) gebruiken om
het impact (dry/wet) van het effect signaal te beïnvloeden.
Beat synchronized mode: de FX-SYNC toets (38) is aan. U kan de volgende controles gebruiken:
EFFECT SYNC toetsen (39+40): gebruik een van de beat gesynchroniseerde sweep presets.
Y/RATIO toets (40): zo lang de Y/RATIO toets knippert kunt u het jog-wiel (22) gebruiken om
het impact (dry/wet) van het effect signaal te beïnvloeden.
Manual mode: de FX-SYNC toets (38) is uit. U kan de parameters manueel instellen, gebruik de
volgende controles:
Jog-wheel (22): wordt gebruikt om manueel de afsnijfrequentie van de filter in te stellen.
Y/RATIO toets (40): zo lang de Y/RATIO toets aan is kunt u het jog wiel (22) gebruiken om
het impact (Q-factor) van de filter in te stellen.
Beat synchronized mode: de FX-SYNC toets (38) is aan. U kunt de volgende controles gebruiken:
EFFECT SYNC toetsen (39+40): kies een van de beat gesynchroniseerde sweep presets.
Y/RATIO toets (40): zo lang de Y/RATIO toets aan is kunt u het jog wiel (22) gebruiken om
het impact (Q-factor) van de filter in te stellen.
SYNQ
®
55/120 DMC2000
SYNQ
®
56/120 DMC2000
Page 31

NEDERLANDS HANDLEIDING
NEDERLANDS HANDLEIDING
38. FX SYNC toets: druk op deze toets om te navigeren tussen de manuele en beat synchrone effect
modus! Zie punten (34+35+36) voor meer informatie.
39. EFFECT SYNC/START toets: deze toets heeft verschillende functies, afhankelijk van de effect modus:
BPM-synchrone effecten: wanneer een effect gebruikt wordt in beat synchrone modus, dan is deze
toets aan. U kunt nu kiezen hoe het effect synchroon moet werken met de beat. Gebruik deze toets
om de huidige BPM parameter in 2 te delen.
BRAKE effect: druk op deze toets om de opstarttijd te veranderen (tijd van stilstand naar volle
snelheid). Wanneer de toets aan is kunt u het jog wiel (22) gebruiken om de tijd in te stellen van 0,0s
(snelle start) tot bijna 10s. (zeer trage start)
40. EFFECT SYNC/STOP/Y/RATIO toets: deze toets heeft verschillende functies, afhankelijk van de effect
modus:
BPM- synchrone effecten: wanneer een effect gebruikt wordt in beat synchrone modus, dan is
deze toets aan. U kunt nu kiezen hoe het effect synchroon moet werken met de beat. Gebruik deze
toets om de huidige BPM parameter te verdubbelen.
BRAKE effect: druk op deze toets om de tijd voor het stilvallen te veranderen (tijd van volle snelheid
naar stilstand). Wanneer de toets aan is kunt u het jog wiel (22) gebruiken om de tijd in te stellen van
0,0s (snelle stop) tot bijna 10s. (zeer trage stop)
IMPACT parameter: terwijl één van de 3 DSP effecten actief is kunt u op de toets drukken tot deze
begint te knipperen. Nu kunt u het impact van het gekozen effect instellen, zie ook EFFECT toetsen
(34+35+36).
41. TIME toets: De TIME toets laat u toe over te schakelen naar het weergeven van de reeds verstreken
tijd, of van de resterende tijd van het nummer.
42. SGL/CTN: U kunt kiezen tussen “single track mode” en “continuous play”.
Continuous play: alle nummers zullen afgespeeld worden zonder onderbreking. (meestal gebruikt in
taverne’s)
Single track: de speler stopt aan het einde van elk nummer en wacht aan het begin van het volgende
nummer. (meestal gebruikt door deejays)
Druk op de SGL/CNT toets gedurende meer dan 1seconde om over te schakelen van de normale naar
de “auto cue” modus (of omgekeerd). In “auto cue” modus zal de speler wachten aan de eerste
muzikale noot van elk nummer. Dit betekent dat slecht geïndexeerde nummers geen hindernis vormen
voor de onmiddellijke startmogelijkheden van deze speler. Dit is een zeer nuttige eigenschap voor
deejays!
43. TAP/SHIFT toets: deze toets heeft 2 functies:
TAP functie: deze speler heeft een volledig automatische BPM-counter. In sommige uitzonderlijke
gevallen kan de automatische beat counter niet werken zoals het hoort (onregelmatige beats of
eenvoudigweg geen beats te bespeuren). In dit geval kunt u de beat counter helpen door manueel
op deze toets te tokkelen op het ritme van de muziek. Na het gebruik van de TAP functie kan U de
BPM-counter terug in automatische mode zetten door de TAP toets in te drukken tot er in de rechter
bovenhoek van het scherm terug “AUTOBPM” verschijnt.
SHIFT functie: wordt alleen gebruikt wanneer de speler dienst doet als MIDI controller. De shift
functie verdubbelt de functies van elke controleknop: druk op de shift toets terwijl u een andere
controle gebruikt voor een extra functie. Zie hoofdstuk “MIDI MAP” voor meer informatie.
44. VFD DISPLAY: toont alle belangrijke informatie tijdens het gebruik.
45. RANDOM toets: u kunt 2 verschillende Random weergavefuncties kiezen.
TOTAL random: druk even op de RANDOM toets tot de LED aan is. Speler 1 speelt nu nummers
welke willekeurig over het hele USB opslagmedium gekozen worden. Terwijl speler 1 in random
mode speelt kan speler 2 gebruikt worden om een ander nummer te spelen.
SMART random: u kunt er voor kiezen dat alleen nummers uit één bepaalde map of van één
bepaalde artiest, album of genre gebruikt worden:
Speel alleen nummers uit één enkele map: kies eerst “search-key = Std” (folders/tracks).
Kies nu een map, druk daarna gedurende +/- 2 seconden op de RANDOM toets tot de LED
begint te knipperen. Speler 1 speelt nu alleen nummers uit de gekozen map.
Speel alleen nummers van één bepaald genre/artiest/album: kies de exacte keuzesleutel en
kies een nummer dat overeenkomt met het gewenste genre, de gewenste artiest or het
gewenste album. Druk gedurende ongeveer 2 seconden op de RANDOM toets: de speler zal
alleen nummers weergeven van hetzelfde genre, album of van de gewenste artiest als dat van
het nummer dat op dat moment weergegeven wordt. (zo kunt u vermijden dat totaal
verschillende stijlen door elkaar gemixt worden: perfect voor bars, clubs, restaurants, …) Zie
hoofdstuk “HOE GEBRUIKEN” voor voorbeelden.
46. INGANGSKEUZESCHAKELAAR: wordt gebruikt om de juiste ingang voor beide kanalen te kiezen:
ingebouwde spelers, MIDI-controle voor DJ-software op computer of externe analoge phono/line
ingangen (er zijn ook supplementaire ingangskeuzeschakelaars (8) op de achterzijde van het toestel).
47. GAIN NIVEAU: regelt het ingangsniveau van beide kanalen. Gebruik deze regeling om het niveau op de
VU-meters in te stellen op ongeveer 0dB.
48. 3-BANDS TOONREGELING: de frequentie van elk kanaal kan afzonderlijk ingesteld worden binnen een
bereik gaande van -35dB tot +10dB. U kunt de hoge, midden en/of lage frequenties volledig
onderdrukken (Kill functie) door op de overeenkomstige knop(pen) te drukken. In de middenpositie is de
toonregeling neutraal. (uitgeschakeld)
49. BOOTH MASTER NIVEAU: wordt gebruikt om het uigangsniveau van de asymmetrische booth master
uitgang in te stellen.
50. MASTER NIVEAU: wordt gebruikt om het niveau van de symmetrische master uitgang te regelen.
51. VU METER: elk kanaal heeft zijn eigen LED VU-meter zodat u het Gain niveau (47) zeer snel kunt
instellen. Let erop dat de niveaus de 0dB (of 100%) niet overschrijden. Het geluid zou vervormd kunnen
worden wanneer het signaalniveau in de rode zone van de VU-meter komt. Als de MASTER METER
toets (52) aan is geven de VU-meters het uitgangsniveau van de master weer.
52. MASTER METER toets: als deze toets uit is geven de VU-meters het niveau van de individuele kanalen
weer. Druk op de knop tot deze aan gaat: de VU-meters geven nu het uitgangsniveau van de master
weer.
53. KANAALFADER: wordt gebruikt om het niveau van elk kanaal apart in te stellen.
54. FADER START schakelaar: wanneer deze aan staat (ON) kunt u de ingebouwde spelers
starten/stopppen via de crossfader.
55. CROSS FADER CURVE: past de curve van de crossfader aan van harde (linkse positie) tot zachte
(rechtse positie) overgangen.
56. CROSSFADER: met deze fader kunt u mixen over beide kanalen. De crossfader zal enkel werken
wanneer u de geselecteerde kanaalschuifregelaars (53 op het gewenste niveau hebt ingesteld!
57. DJ MIC INPUT JACK: voor asymmetrische microfoons met een 1/4” mono jack. Deze ingang wordt
meestal gebruikt voor de DJ microfoon. De talkover beïnvloed het signaalniveau van deze ingang niet.
58. MIC1 VOL: wordt gebruikt om het ingangsniveau van micro 1 in te stellen.
59. MIC2 VOL: wordt gebruikt om het ingangsniveau van micro 2 in te stellen.
60. MIC TONE: wordt gebruikt om het geluid van beide microfoons in te stellen.
61. MIC ON/OFF/TALK OVER SCHAKELAAR:
OFF: mic1 & mic2 zijn uitgeschakeld.
ON: mic1 & mic2 zijn ingeschakeld.
TALK OVER: mic1 & 2 zijn ingeschakeld. Het geluidsniveau van alle andere kanalen zal met -20dB
afnemen.
62. CUE MIX: met deze knop kunt u de ingangskanalen mixen in de koptelefoon (64):
Zet de knop in uiterst linkse positie om kanaal 1 te horen.
Zet de knop in uiterst rechtse positie om kanaal 2 te horen.
Zet de knop in eender welke andere positie om een mix van de 2 kanalen te horen.
Met deze optie kunt u uw mix voorbeluisteren alvorens deze door de master uitgang te sturen.
63. HEADPHONE VOLUME: regelt het uitgangsniveau van de koptelefoon uitgang.
64. HEADPHONE uitgang: hier kunt u uw koptelefoon aansluiten.
SYNQ
®
57/120 DMC2000
SYNQ
®
58/120 DMC2000
Page 32

NEDERLANDS HANDLEIDING
NEDERLANDS HANDLEIDING
VFD DISPLAY
A. PLAY: verschijnt tijdens het afspelen van een nummer.
B. PAUSE: verschijnt wanneer de speler in pause of in cue modus staat.
C. CUE: verschijnt wanneer de speler wacht aan een CUE punt.
D. TOUCH INDICATOR: verschijnt wanneer het tactiele gedeelte van het Jog wiel actief is.
E. DISPLAY: geeft allerlei belangrijke informatie weer zoals effect parameters, loop informatie,
ID3-tags, …
F. BPM UITLEZING: de automatische beat counter geeft het aantal Beats Per Minuut weer op het
scherm. In manuele modus toont het scherm “BPM”. Als de beat counter in automatische modus
werkt dan toont het scherm “AUTOBPM”. (druk de TAP toets gedurende +/-2sec. in om naar
automatische modus over te schakelen)
G. GEHEUGENTANK: geeft de staat van het buffergeheugen weer, welke nodig is voor de anti-
chock functie en enkele andere speciale toepassingen. Elke streep van de tank stelt 2 seconden
buffergeheugen voor.
H. AUTO CUE: verschijnt wanneer de “auto cue” functie geactiveerd is. Zie SGL/CTN toets (42).
I. RELOOP: wijst u erop dat een Loop wordt afgelezen. (herhaalt een bepaald deel van een
nummer)
RELOOP Flitst: een Loop is geprogrammeerd en wordt afgespeeld.
RELOOP blijft aan: een Loop is geprogrammeerd maar wordt niet afgespeeld.
J. SINGLE: verschijnt wanneer men gekozen heeft om slechts één nummer te lezen. Wanneer
Single niet verschijnt, zullen alle nummers gelezen worden zonder onderbreking. Deze functie
wordt ingesteld door middel van de SGL/CTN toets (42).
K. MP3 indicator: verschijnt wanneer een MP3 file speelt.
L. TRACK indicator: toont het aantal beschikbare tracks in uw huidige selectie.
Standard lookup: (geen Q-Dbase) de track van de huidig folder (M) worden
weergegeven.
Q-Dbase lookup: de “track” nummers die overeenstemmen met uw Q-Dbase préselectie.
M. FOLDER/SEARCH KEY indicator: de informatie hangt af van de zoekmodus die u gekozen
heeft.
Standard lookup: (geen Q-Dbase) het nummer van de huidige map wordt weegegeven.
Q-Dbase lookup: de gebruikelijke opzoekmethode (Art, Alb of Gen) wordt weegegeven.
N. ELAPSED, TOTAL REMAIN: toont aan dat de tijd die weergegeven is op het scherm de
verstreken tijd (elapsed), de totaal resterende tijd van de CD (total) of de resterende tijd van het
nummer (remain) is.
O. MINUTE: Geeft de tijdsinformatie van het lopende nummer weer in “minuten”.
P. SECOND: Geeft de tijdsinformatie van het lopende nummer weer in “seconden”.
Q. FRAME: Geeft de tijdsinformatie van het lopende nummer weer in “frames” (1 frame = 1/75
sec.)
R. TIME BAR: heeft 2 functies:
Tijdens normale weergave: toont u ofwel de verstreken tijd, ofwel de resterende tijd,
afhankelijk van de keuze die gemaakt werd door middel van de TIME toets. De Time Bar
begint te flitsen aan het eind van elk nummer om de gebruiker te verwittigen dat het hoog
tijd is om tot de actie over te gaan.
Tijdens het afspelen van een loop: toont de tijd tot het einde van de loop. Deze
S. PITCH DISPLAY: toont de procentuele afwijking van de afspeelsnelheid, ingesteld met de
aanduiding helpt U bij het bepalen wanneer een naadloze loop opnieuw begint.
snelheidsregelaar (28). Een klein, rood hangslot wordt getoond als de pitch lock functie (Master
Tempo) actief is.
AANSLUITINGEN
Enkele belangrijke opmerkingen betreffende de USB opslagmedia die u zult gebruiken:
Opmerking 1: de hard disk moet geformatteerd zijn in FAT32! Een harddisk die geformatteerd is in NTFS
(meestal hard discs met een zeer hoge capaciteit) zal NIET herkend worden: deze harddisk moeten opnieuw
geformatteerd worden in FAT32! (dit kunt u doen onder Windows, u vindt ondersteuning op de
productpagina van de DMC2000 op onze website)
Opmerking 2: de USB-slots op deze spelers geven elk 1A aan de aangesloten hard disk. Het is echter
aangeraden een harddisk te gebruiken welke beschikt over een aparte voeding.
Note 3: alleen WAV en MP3 files kunnen herkend en gespeeld worden.
Note 4: voor uw gebruiksgemak raden wij u ten sterkeste aan de Q-DBASE indexer software te gebruiken,
dit maakt het opzoeken van nummers zo veel gemakkelijker!
EENVOUDIGE OPSTELLING – 1 DECK
Sluit de symmetrische (5) of asymmetrische (6) master uitgang aan op een versterker of gepowerde
klankkasten.
Sluit een USB-stick aan op de USB1 ingang (13) of een USB-harddisk op de USB2 ingang (3).
Indien nodig kunt u een microfoon aansluiten op de mic1 (57) of de mic2 (11) ingang.
Sluit de meegeleverde voedingskabel aan op de stroomingang (1) van de speler.
U bent nu klaar om MP3/WAV files van uw USB opslagmedium te spelen en te mixen. Have fun!
OPSTELLING – MET DE DMC1000 voor harddisk sharing
Sluit een USB hard disk aan op de USB2 aansluiting van de DMC1000.
Let er op dat de USB-link van de DMC1000 ingesteld staat op “LINK”.
Gebruik de USB kabel welke met de DMC1000 geleverd werd om de USB-link connector van de speler
aan te sluien op de USB2 connector (3) van de DMC2000.
Gebruik de SOURCE SELECT toets (14) om USB2 te kiezen op de DMC2000: zowel de DMC1000 als de
th
DMC2000 zullen zich verbinden met de harddisk.
U kunt nu MP3 en WAV files lezen van de aangesloten harddisk.
BELANGRIJK: om een goede stabiele werking te verkrijgen moet u USB kables gebruiken van een
goed kwaliteit, met een maximum lengte van 1 meter!
SYNQ
®
59/120 DMC2000
SYNQ
®
60/120 DMC2000
Page 33

NEDERLANDS HANDLEIDING
NEDERLANDS HANDLEIDING
SETUP – VOLLEDIGE OPSTELLING, INCLUSIEF MIDI CONTROLLER
De afbeelding toont u de volledige opstelling, waaronder de MIDI controller functie.
U kunt tot 2 externe audio bronnen (draaitafel of line) aansluiten en zo uw DMC2000 omtoveren tot een
multifunctionele DJ-unit. U kunt de ingangen gemakkelijk omschakelen met behulp van de 2 schakelaars die
zich boven de 2 mix kanalen bevinden!
Als u alleen de MIDI controller functie wenst te gebruiken, dan moet u gewoon de computer met DJ-
software via de meegeleverde USB kabel aansluiten op de USB-MIDI connector (4) van de DMC2000: de
computer zal de controller herkennen en zal de drivers automatisch installeren.
Zet beide kanalen van de mixer (46) in MIDI modus: de meeste controles van de DMC2000 zulen MIDI
uitsturen.
Voor specifieke MIDI instellingen kunt u terecht in het hoofdstuk “SETUP MENU”.
Afhankelijk van de DJ sofware die u gebruikt zult u de gewenste MIDI-mappings moeten installeren. Met
bepaalde DJ-software programma’s zal de mapping voor de DMC2000 automatisch opgeladen worden,
voor andere DJ-software programma’s zult u deze moeten downloaden van onze website of van de
download sectie van de desbetreffende DJ-software. Als de DMC2000 niet ondersteud wordt door de DJsoftware kunt u uw eigen MIDI-mapping maken maar dit hangt volledig af van de software welke u
gebruikt. De installatie en het gebruik van DJ-software is zeer specifiek en kan dus niet ondersteund
worden door Synq!
De DMC2000 heeft ingebouwde geluidskaarten: u zult de mix van uw muziek horen op de master
uitgangen (5+6).
MIDI functie van de mixer: De setup van de DMC2000 is dusdanig uitgevoerd dat u gemakkelijk muziek
van alle ingangen met elkaar kunt mixen. U kunt zelfs muziek van de DJ-software met muziek van de
interne spelers of de aangesloten draaitafel mixen. Hiervoor moet u de MIDI-functie van de mixer uit
zetten. (zie setup menu)
VINYL scratch optie op DJ-software: met de DMC2000 kunt u zelfs de zeer krachtige “vinyl scratch
function” gebruiken welke op bepaalde highend DJ-software beschikbaar is. Dit betekent dat u kunt
scratchen en de audio tracks van uw DJ software kunt manipuleren via een speciaal gecodeerde vinyl
plaat! Sluit gewoon een draaitafel aan op één van de audio ingangen van de DMC2000: de signalen van
de speciaal gecodeerde vinyl plaat zullen naar de DJ-software gestuurd worden.
Opmerking 1: kijk eerst na of uw DJ-software deze functie kan gebruiken. Indien ja, volg dan de
instructies van de software om deze functie in te stellen.
Opmerking 2: er is eveneens een speciale vinyl scratch plaat beschikbaar bij Synq, deze gebruikt
een “1kHz stereo signaal met faseverschil tussen beide kanalen” welke kan gebruikt worden met
verschillende types DJ-software.
DECKADANCE-LE software
De DMC2000 wordt geleverd met een gratis
Deckadance-LE licentie, de ontgrendelingscode voor
deze licentie bevindt zich onderaan de DMC2000 (zie
afbeelging).
Opdat u steeds over de laatste versie zou beschikken is
het programma alleen beschikbaar via download,
gelieve de gepaste demo versie te downloaden,
afhakelijk van uw systeem:
WINDOWS: http://windemo.deckadance.com
MAC OS: http://macdemo.deckadance.com
Installeer de demo-software en gebruik de
ontgrendelcode om uw LE-versie van Deckadance te
ontgrendelen. U kunt deze gratis software gebruiken en
upgraden wanneer er een recentere versie beschikbaar wordt!
Installatievoorschriften en handleidingen kunt u bekomen op: http://deckadance.image-
line.com/downloads.html
BELANGRIJK: vergeet niet uw DJ software te registreren op de Deckadance website:
Zo hebt u toegang tot het gebruikersforum, ontvangt u nieuwsberichten en krijgt u volledige ondersteuning
van hun support team. U krijgt eveneens 30% korting indien u wilt overschakelen naar de HOUSE of CLUB
editie van Deckadance. Op de Deckadance site vindt u een eigenschappenlijst met de verschillen tussen de
3 versies.
Let wel: de ondersteuning voor de Deckadance DJ-software kan alleen gebeuren via de Deckadance
website (www.deckadance.com). Zij beschikken over een zeer uitgebreide support sectie met een
gebruikersforum, video tutorials enz.
SETUP MENU
Voor een maximale flexibiliteit is het toestel in vele mate aanpasbaar. Heel wat parameters kunnen via het
setup menu ingesteld worden. Om het setup menu te kunnen betreden mag de speler NIET in MIDI modus
staan.
Druk gedurende ongeveer 3 seconden om de LOAD TRACK toets (19) om het SETUP menu te betreden.
Gebruik de FOLDER knop (16) om de verschillende menu opties te overlopen.
Gebruik de TRACK knop (17) om de sub menu’s te overlopen (indien aanwezig)
Gebruik het JOG WIEL (22) om de instellingen (parameters) van de gekozen menu optie aan te passen.
Om uw instellingen te bewaren: kies menuoptie E (EXIT & SAVE) en druk op de TRACK knop (17) of
op de RECORD CUE toets (25).
1. MIDI CHANNEL: wordt gebruikt om de MIDI kanalen van de 3 vershillende onderdelen van de DMC2000
in te stellen. Het scherm toont 3 groepen van 2 karakters: 01-02-03:
De eerste 2 karakters: MIDI kanaal voor de controle van speler1 + kanaal1 van de mixer.
Tweede 2 karakters: MIDI kanaal voor de controle van de mixer, behalve de controles van de 2
ingangskanalen (gain+high/mid/low+fader)
Derde 2 karakters: MIDI kanaal voor de controle van speler2 + kanaal2 van de mixer.
Draai aan de TRACK knop (17) om de 3 groepen met 2 karakters te overlopen
Draai aan het JOG WIEL (22) om de MIDI kanalen te wijzigen.
2. MIDI SETUP: voor een maximum aan flexibiliteit kunnen heel wat MIDI parameters ingesteld worden:
Opmerking: de 3 groepen moeten verschillende MIDI kanalen hebben.
Er zijn 2 submenu’s: draai aan de TRACK knop (17) om een submenu te kiezen.
o
Submenu 1 – werking van de SHIFT toets (43): u kunt kiezen hoe de SHIFT toets in
MIDI moet reageren.
Draai aan het JOG WIEL (22) om de gewenste instelling te kiezen:
TAP = HOLD: vergelijkbaar met de SHIFT toets op een PC klavier de
MIDI code van een toets/knop verandert alleen wanneer u het gebruikt
wanneer er op de SHIFT toets (43) gedrukt wordt.
SYNQ
®
61/120 DMC2000
SYNQ
®
62/120 DMC2000
Page 34

NEDERLANDS HANDLEIDING
FUNCTION
NEDERLANDS HANDLEIDING
TAP = TOGGLE : vergelijkbaar met de CAPS LOCK toets op een PC klavier
druk op de SHIFT toets (43) om de shift functie aan te zetten: zolang
“SHIFT” op het scherm staat zal de MIDI code van de meeste
knoppen/toetsen veranderen zodat ze een tweede (dubbele) functie krijgen.
o
Submenu 2 – MIDI message display: u kan kiezen of de MIDI I/O berichten op de display
moeten verschijnen of niet. Dit kan best handig zijn wanneer u MIDI configuratie files
aanmaakt.
Draai aan het JOG WIEL (22) om de gewenste instelling te kiezen:
I/O = Hide : de MIDI berichten die verzonden/ontvangen worden niet tonen.
I/O = DIS. : de MIDI berichten die verzonden/ontvangen worden tonen
3. MIXER-mode: wordt gebruikt om de mixer wel of niet in MIDI modus in te stellen.
Turn the JOG WHEEL (22) to select the desired setting:
MIDI: gebruik deze instelling wanneer de DMC2000 alleen gebruikt wordt
om DJ software aan te sturen. De mixer van de DJ software zal aangestuurd
worden.
NO MIDI: gebruik deze instelling wanneer u verschillende audio bronnen
met elkaar wilt mixen (DJ software, externe ingangen, interne spelers), de
niveaus van alle audio bronnen kunnen gemakkellijk aangepast worden via
de gain knoppen (47).
Opmerking: in deze configuratie stuurt de mixer geen MIDI signaal uit, hij
zal in dit geval werken als een gewone audio mixer.
4. LOAD HOTCUES: u kunt kiezen of de opgeslagen hot cues van een nummer automatisch terug moeten
opgeroepen worden.
Draai aan het JOG WIEL (22) om een van de 2 mogelijkheden te kiezen:
o
First Ask: wanneer een nummer (track) hot cues bevat zal de display u vragen of u deze
hot cues wilt opladen of niet. U kan antwoorden met de YES/NO toetsen (29).
o
Autoload: wanneer een nummer (track) hot cues bevat zullen deze automatisch
opgeladen worden.
5. CROSS FADER: schakelt de cross fader van de audio mixer aan/uit, dit heeft geen effect op de MIDI
functie van de crossfader.
Draai aan het JOG WIEL (22) om een van de 2 mogelijkheden te kiezen:
o
On: de crossfader (56) is actief, klaar voor gebruik.
o
Off: kies deze optie als u de crossfader niet wenst te gebruiken.
6. REVERSE CROSS FADER: schakelt de cross fader van de audio mixer in reverse (omgekeerde) modus,
dit heeft geen effect op de MIDI functie van de crossfader.
Draai aan het JOG WIEL (22) om een van de 2 mogelijkheden te kiezen:
o
On: de crossfader (56) staat in reverse modus, kanaal1 is hoorbaar wanneer de crossfader
in zijn rechter positie staat.
o
Off: de crossfader (56) werkt in de normale modus, kanaal2 is hoorbaar wanneer de
crossfader in zijn rechter positie staat.
7. DISPLAY TIME: u kunt instellen hoe lang een bericht moet getoond woden voor de display terug naar de
normale werking over gaat.
Draai aan het JOG WIEL (22) om de gewenste waarde te kiezen: 0,5sec 12,0sec.
8. SCROLL SPEED: u kunt kiezen hoe snel de tekst mag voorbijlopen op de display.
Draai aan het JOG WIEL (22) om de gewenste waarde te kiezen: 50 2000ms (50ms=snel /
2000ms=traag).
9. Sensitivity: u kunt de gevoeligheid van het tactiele jog wiel aanpassen naargelang uw behoefte.
Draai aan het JOG WIEL (22) om een van de 41 mogelijkheden te kiezen.
o
ADJ. = 0: neutrale instelling (standaard instelling, OK in de meeste gevallen)
o
ADJ. = -20: laagste gevoeligheid
o
ADJ. = +20: hoogste gevoeligheid
A. INTENSITY: wordt gebruikt om de helderheid van de VFD-display in te stellen.
Draai het JOG WIEL (22) om een van de 4 mogelijkheden te kiezen.
o
ADJ. = 1 4: 1 = lage helderheid, 4 = hoge helderheid (standaard instelling)
B. A.CUE Level: de auto cue functie detecteert waar de muziek precies start, dit om leegten te vermijden
wanneer een nummer niet goed geïndexeerd is. U kan één van de 8 detectieniveaus instellen:
Draai aan het JOG WIEL (22) om één van de 8 mogelijkheden te kiezen.
o
ADJ. = -78dB -36dB: de standaard instelling = -48dB
C. Firmware version / upgrading: gebruik deze optie om de firmware versie te controleren of op te
waarderen.
Draai aan de TRACK knop (17) om de 4 firmware delen te kiezen:
o
CON: xx: toont de versie van de controle firmware
o
DSP: xx: toont de versie van de DSP firmware
o
Upgrade: knippert wanneer het toestel klaar is om te controleren of er nieuwe firmware
versies beschikbaar zijn. Zie “FIRMWARE OPWAARDEREN” voor meer info.
D. Load defaults: zoals u al opgemerkt heeft is dit toestel uiterst aanpasbaar in vele opzichten, wat ook
betekent dat er heel wat verkeerde instellingen kunnen gemaakt worden… Moest het helemaal uit de
hand lopen, dan kunt u steeds de fabrieksinstellingen terug oproepen!
Terwijl “Enter Load” op de display knippert: druk op de TRACK knop (17) om de standaard
instellingen terug op te laden.
E. Exit & Save: indien u wenst dat uw veranderingen aan het setup menu permanent worden bewaard (ook
nadat u het toestel heeft uitgezet) dan MOET u deze optie gebruiken!
Druk op de TRACK knop (17) : de display toont “Saving” en verlaat het setup menu.
Opmerking: u kunt ook op de RECORD CUE toets drukken (25) om instellingen permanent op te slaan.
FIRMWARE OPWAARDEREN
Het is sterk aanbevolen uw toestel te registreren op onze website (www.synq-audio.com/register/) zodat wij
u kunnen op de hoogte brengen wanneer nieuwe firmware updates zouden beschikbaar zijn. Bij het
opwaarderen van de firmware moet u steeds zeer voorzichtig te werk gaan!
Download de file die de opwaardeer file(s) bevat
Lees de instructies en volg deze heel nauwkeurig, anders loopt u het risico uw apparatur te beschadigen…
Zet de files op een LEGE (belangrijk!) USB-stick.
Druk gedurende ongeveer 3 seconden op de LOAD TRACK toets (19) om het setup menu te betreden.
Gebruik de FOLDER knop (16) om de menu optie “E. Version” te overlopen.
Draai aan de TRACK knop (17) tot op de display “Upgrade” verschijnt.
Gebruik de SOURCE SELECT toets (14) om de USB1 ingang (13) te kiezen.
Steek de USB-stick met de firmware files in de USB1 ingang (13)
Het opwaarderen start automatisch: WACHT (!) tot het volledige opwaarderingsproces is afgewerkt. Zet
NOOIT het toestel uit terwijl het opwaarderingsproces aan de gang is!!!
Als de display u vraagt om het toestel uit te zetten: zet het toestel uit, wacht 3 seconden en zet het toestel
weer aan.
Controleer of de software versie overeenstemt met de versie die aangeduid staat in de “readme” file die u
ontvangen heeft met de firmware file.
MIDI MAP (standaard instellingen)
FUNCTION Type
SW/ENC 05/17 44/56 05/27 44/66
SW/ENC 01/16 40/55 01/26 40/65
IN SW/LED 02/02 D-1 41 02/02 D-1 41
OUT SW/LED 03/03 D#-1 42 03/03 D#-1 42
SW/LED 04/04 E-1 43 04/04 E-1 43
SOURCE
SELECT
RECORD CUE SW/LED 07/07 G-1 46 07/07 G-1 46
1
SW 06 45 06 45
SW/LED
(RED)
FUNCTION
CODE
(DECK A)
08/08 G#-1 47 08/08 G#-1 47
NOTE
SHIFT
(Hold
TAP)
FUNCTION
CODE
(DECK B)
NOTE
SHIFT
(Hold
TAP)
CODE
(CENTER
DECK)
NOTE
SHIFT
(Hold TAP)
ACTION
7FH:ON
00H:OFF
7FH:ON
00H:OFF
7FH:ON
00H:OFF
7FH:ON
00H:OFF
7FH:ON
00H:OFF
7FH:ON
00H:OFF
7FH:ON
00H:OFF
7FH:ON
00H:OFF
SYNQ
®
63/120 DMC2000
SYNQ
®
64/120 DMC2000
Page 35

NEDERLANDS HANDLEIDING
LEVEL
VR/SW/
30/08/
CUE PAN
CUE PAN
NEDERLANDS HANDLEIDING
1
2
2
3
3
4
4
DELETE CUE SW/LED 0C/0C C0 4B 0C/0C C0 4B
LOAD TRACK SW/LED 0D/0D C#0 4C 0D/0D C#0 4C
TIME X SW/LE D 0E/0E D0 4D 0E/0E D0 4D
ECHO SW/LED 0F/0F D#0 4E 0F/0F D#0 4E
FLANGER SW/LED 10 /10 E0 4F 10/10 E0 4F
HOLD SW/LED 11/11 F0 50 11/11 F0 50
FILTER SW/LED 12/12 F#0 51 12/12 F#0 51
BRAKE SW/LED 13/13 G0 52 13/13 G0 52
RATIO Y SW/LED 14/14 G#0 53 14/14 G#0 53
% SW 15 54 15 54
A.Cue
scratch
VINYL SW/LED 19/19 C#1 58 19/19 C#1 58
CDJ SW/LED 1A/1A D1 59 1A/1A D1 59
Time SW 1B 5A 1B 5A
SGL/CTN SW 1C 5B 1C 5B
JOG SW/ENC 27 /18 66/57 27/28 66/67
TAP/SHIFT SW 1E 5D 1E 5D
CUE SW/LED 1F/1F G1 5E 1F/1F G1 5E
DATABASE SW/LED 21/21 A1 60 21/21 A1 60
SW/LED
(GREEN)
SW/LED
(RED)
SW/LED
(GREEN)
SW/LED
(RED)
SW/LED
(GREEN)
SW/LED
(RED)
SW/LED
(GREEN)
SW 16 55 16 55
SW 17 56 17 56
SW/LED 18/18 C1 57 18/18 C1 57
SW/LED 1D/1D F1 5C 1D/1D F1 5C
SW/LED 20/20 G#1 5F 20/20 G#1 5F
SW 22 61 22 61
SW 23 62 23 62
08/05 F-1 47 08/05 F -1 47
09/09 A-1 48 09 /09 A-1 48
09/06 F#-1 48 09/06 F#-1 48
0A/0A A# -1 49 0A/0A A#-1 49
0A/15 A0 49 0A/15 A0 49
0B/0B B-1 4A 0B/0B B-1 4A
0B/16 A #0 4A 0B/16 A#0 4A
7FH:ON
00H:OFF
7FH:ON
00H:OFF
7FH:ON
00H:OFF
7FH:ON
00H:OFF
7FH:ON
00H:OFF
7FH:ON
00H:OFF
7FH:ON
00H:OFF
7FH:ON
00H:OFF
7FH:ON
00H:OFF
7FH:ON
00H:OFF
7FH:ON
00H:OFF
7FH:ON
00H:OFF
7FH:ON
00H:OFF
7FH:ON
00H:OFF
7FH:ON
00H:OFF
7FH:ON
00H:OFF
7FH:ON
00H:OFF
7FH:ON
00H:OFF
7FH:ON
00H:OFF
7FH:ON
00H:OFF
7FH:ON
00H:OFF
7FH:ON
00H:OFF
7FH:ON
00H:OFF
7FH:ON
00H:OFF
7FH:ON
00H:OFF
7FH:ON
00H:OFF
7FH:ON
00H:OFF
7FH:ON
00H:OFF
7FH:ON
00H:OFF
7FH:ON
00H:OFF
7FH:ON
00H:OFF
7FH:ON
00H:OFF
Pitch Silder VR/CE NTER
GAIN VR 11 50 21 60 VR:00~7F
HIGH VR/SW/CEN TER/LED 12/24/29/24 C2 51/63/68 2 2/24/29/24 C2 61/63/68 VR: 00~7F
MID VR/SW/CEN TER/LED 13/25/2A /25 C# 2 52/64/69 23/25/2A/25 C#2 62/64/69 VR: 00~7F
LOW VR/SW/CENTER/LED 14/26/2B/26 D2 53/65/6A 24/26/2B/26 D2 63/65/6A VR:00~7F
Channel Fader VR 10 4F 20 5F VR:00~7F
U1 LED 17 B0 17 B0
U2 LED 1B D#1 1B D#1
16 LED 1C E1 1C E1
10 LED 1E F#1 1E F#1
6 LED 22 A#1 22 A#1
METER LED
RANDOM SW/LED 2C/2C G#2 6B
MASTER
METER
MASTER VR 31 70 VR:00~7F
BOOTH VR 32 71 VR:00~7F
Cross Fader
MIC1 LEVEL VR 35 74 VR:00~7F
MIC2 LEVEL VR 36 75 VR:00~7F
SLIDER
LEVEL
Fader Start
ON(L)
Fader Start
OFF(L)
Fader Start
ON(R)
Fader Start
OFF(R)
C.F CURVE
(L)
C.F CURVE
(CENTER)
C.F CURVE
(R)
LEVEL LED 1 1 00H~7FH *
SW/LED 2D/2D A2 6C
SW/CENTER
VR 34 73 VR:00~7F
VR 33 72 VR:00~7F
SW 1 40
SW 2 41
SW 3 42
SW 4 43
SW 7 46
SW 6 45
SW 5 44
PITCH
BEND/28
PITCH
67
BEND/28
67
09/0A
6F/47/48/49 VR: 00~7F
7FH:ON
00H:OFF
7FH:ON
00H:OFF
7FH:ON
00H:OFF
7FH:ON
00H:OFF
7FH:ON
00H:OFF
7FH:ON
00H:OFF
7FH:ON
00H:OFF
7FH:ON
00H:OFF
7FH:ON
00H:OFF
7FH:ON
00H:OFF
7FH:ON
00H:OFF
7FH:ON
00H:OFF
7FH:ON
00H:OFF
7FH:ON
00H:OFF
7FH:ON
00H:OFF
CC-ABSOLUTE (VR, LEVEL METER LED)
Controlewijziging berichten (Control Change) worden verzonden met status 0xBn, waarbij n staat voor het
kanaal van de gespecifieerde CC controller. Aldus het MIDI ID van de controller aangegeven wordt met
het kanaal naast het CC nummer. Waarde 0x00 tot 0x7F is onmiddellijk gerelateerd aan de locatie van de
controller.
* NIVEAUMETER LED’S
00~0B => ALLE LED’S UIT
0C~17=>LED(-30) AAN
18~23=>LED(-30, -20) AAN
24~2F=>LED(-30, -20, -10) AAN
30~3B=>LED(-30, -20, -10, -7) AAN
SYNQ
®
65/120 DMC2000
SYNQ
®
66/120 DMC2000
Page 36

NEDERLANDS HANDLEIDING
NEDERLANDS HANDLEIDING
3C~47=>LED(-30, -20, -10, -7, -4) AAN
48~53=>LED(-30, -20, -10, -7, -4, -2) AAN
54~5F=>LED(-30, -20, -10, -7, -4, -2, 0) AAN
60~6B=>LED(-30, -20, -10, -7, -4, -2, 0, +2) AAN
6C~77=>LED(-30, -20, -10, -7, -4, -2, 0, +2, +4) AAN
78~7F=> ALLE LED’S AAN (-30, -20, -10, -7, -4, -2, 0, +2, +4, +7)
CC-RELATIVE (ENC)
Controlewijziging berichten (Control Change) hebben status 0xBn, waarbij n staat voor het kanaal van de
gespecifieerde CC controller. Aldus het MIDI ID van de controller aangegeven wordt met het kanaal naast
het CC nummer. Waarde 0x40 is de referentiewaarde van de controller. Dit is een afgeleide waarde van
de 0x40 “one’s complement” notatie.
Een bericht met de gegevens 0x43 duidt op een positieve wijziging van 3.
Een bericht met de gegevens 0x31 duidt op een negatieve wijziging van 15.
SWITCH ON/OFF (SW,CENTER)
Deze berichten worden gebruikt voor schakelaars.
Controlewijziging berichten (Control Change) worden verzonden met status 0x9n, SWITCH On en Off
waarden zijn 0x7F en 0x00, waarbij n het kanaal is.
LED ON/OFF (LED)
Deze berichten worden gebruikt voor de LED’s.
Controlewijziging berichten (Control Change) worden verzonden met status 0x9n, LED On en Off waarden
zijn 0x7F and 0x00, waarbij n het kanaal is.
DE Q-DBASE SOFTWARE INSTALLEREN
De DMC2000 kan perfect werken zonder de Q-DBASE database files, maar indien u uw nummers
gemakkelijk en vliegensvlug wilt terugvinden, dan installeert u best de
Q-DBASE software op uw computer! Het programma werkt alleen onder Windows (XP, Vista, Win7). Om
zeker over de laatste versie te beschikken kunt u deze best downloaden van onze website (raadpleeg de
download sectie van onze DMC2000 product pagina). Het programma is zeer gemakkelijk te installeren:
dubbelklik gewoon op de file en volg de instructies op uw scherm.
GEBRUIK VAN DE Q-DBASE SOFTWARE
Telkens u nummers toevoegt of wegneemt van uw USB hard disk
moet u de Q-DBASE software weer gebruiken om de database files up to date te houden!
na de installatie zal u een nieuw programma zien met de naam
“SYNQ”. In deze directory vindt u 2 files:
- Uninstall (om de software te verwijderen van uw pc)
- Q-DBASE (om de software te starten)
Sluit uw USB-hard drive aan op uw PC en controleer welke drive
letter hieraan werd toegewezen.
Klik op het Q-DBASE icoon om de software te starten: het
hoofdscherm wordt weergegeven.
Kies uw USB-drive in de linker boven hoek.
Druk op de BUILD toets aan de rechter zijde.
De software begint uw USB-drive te scannen om compatibele
audio files te vinden en de ID3-tags te gebruiken om de QDBASE files op te bouwen, welke de opzoekfunctie heel wat
practischer en sneller zal maken. Als de voortgangsbalk
onderaan vol is betekent dit dat de opbouw procedure van de
database afgewerkt is; er verschijnt een kort overzicht.
Het programma heeft de Q-DBASE files (file extensions: .DBH + .dat
+ .DBX) weggeschreven naar de USB-drive. U kan deze nu
loskoppelen van uw PC en hem aansluiten op uw DMC-2000.
Om de beste resultaten te bekomen gebruikt u best steeds de laatste versie van de database software. U
vindt de software versie onderaan links in het “About” scherm.
! BELANGRIJK BERICHT VOOR VISTA GEBRUIKERS !
Veel Vista gebruikers zullen de Q-DBASE software niet kunnen
gebruiken. Dit probleem wordt veroorzaakt door begrenzing van de
gebruikersinstellingen in Vista. Om dit probleem te verhelpen moet u
rechts klikken op het icoon van het Q-DBASE programma en “Run as
administrator” kiezen in het popup menu. Windows zal antwoorden met
het scherm dat u hiernaast ziet: klik gewoon op “Allow” (toestaan).
HOE GEBRUIKEN …
De meeste algemene functies warden uitgelegd in het vorige hoofdstuk
“controles en functies” In dit hoofdstuk praten we over de functies die wat meer uitleg vergen.
ENKELE ALGEMENE FUNCTIES:
ZOEK EEN NUMMER MET HET Q-DBASE SYSTEEM:
Belangrijk: alvorens u het Q-DBASE system kunt gebruiken moet u uw USB-drive scannen zodat het alle
nodige files bevat.
U kunt op om het even welk ogenblik het type opzoeksysteem kiezen dat u wenst door aan de TRACK
knop (17) te draaien terwijl u er op drukt. U kunt kiezen op Art(artiest), Alb(album) of Gen(genre).
Druk op de DATABASE toets (15) om de zoekfunctie te starten het eerste karakter van de lijst
waarin u wilt zoeken knippert in de display.
Draai aan de FOLDER knop (16) om het eerste karakter te wijzigen.
Draai aan het JOG Wiel (22) om de lijst dat overeenstemt met uw aanvraag aan hoge snelheid te
overlopen. Indien u meer precies (nummer na nummer) wilt zoeken, dan kunt u ook aan de TRACK
toets (17) draaien.
Wanneer u het juiste nummer gevonden heeft: druk dan op de LOAD TRACK toets(19).
ZOEK EEN NUMMER ZONDER HET Q-DBASE SYSTEEM:
Draai aan de TRACK knop (17) terwijl u er op drukt om Std (standard lookup system) te kiezen. Als uw
USB drive niet over Q-DBASE files beschikt, dan zal de speller automatisch het standard opzoeksysteem
kiezen. U heeft 2 opties:
Optie 1:
Gebruik gewoon de FOLDER en TRACK knoppen om de verschillende directories te overlopen.
Optie 2:
Druk op de DATABASE toets (15) om de zoekfunctie te starten de FOLDER en TRACK displays
beginnen te knipperen.
Draai aan de FOLDER knop (16) om de folders te overlopen.
Draai aan het JOG WIEL (22) om de gekozen map aan hoge snelheid te overlopen. Indien u meer
precies (track by track) wilt zoeken kunt u ook aan de TRACK knop (17) draaien.
Druk op de LOEAD TRACK toets (19) van zodra u het juiste nummer gevonden heeft.
TOTAL RANDOM OPEEN USB-drive:
Dit is de eenvoudigste random functie waarbij om het even welk nummer van uw USB-drive in willekeurige
volgorde afgespeeld wordt op speler 1:
Open de fader (53) van speler 1 op de audio mixer.
Druk op de SOURCE SELECT toets (14) van speler 1 om één van de USB apparaten te kiezen.
Druk even op de RANDOM toets (45) tot deze aan gaat.
Druk op de PLAY toets (20) van speler 1 tot de random weergave start.
“SMART” RANDOM OP EEN USB-drive:
Dit is de “intelligente” random functie waarbij u de volledige controle behoudt over de artiest, het genre,
het album of de map waaruit de nummers gekozen kunnen worden, wat ideaal is voor achtergrondmuziek
in restaurants, winkels, clubs & bars waar geen dj aanwezig is. Het werkt als volgt:
Open de fader (53) van speler 1 op de audio mixer.
Druk op de SOURCE SELECT toets (14) van speler 1 om één van de USB apparaten te kiezen.
SYNQ
®
67/120 DMC2000
SYNQ
®
68/120 DMC2000
Page 37

NEDERLANDS HANDLEIDING
NEDERLANDS HANDLEIDING
SPEEL ALLEEN NUMMERS UIT 1 FOLDER
Druk en draai aan de TRACK knop (17) om “Std” te kiezen als zoeksleutel.
Druk op de FOLDER knop (16), de display toont de actuele map naam.
Draai aan de FOLDER knop (16) om de map te kiezen waaruit de nummers moeten afgespeeld
worden.
Druk gedurende ongeveer 2 seconden op de RANDOM toets (45) tot de LED begint te knipperen.
Druk op de PLAY toets (20) om de willekeurige weergave van nummers uit deze specifieke map te
starten.
SPEEL ALLEEN NUMMERS UIT 1 GENRE
Druk en draai aan de TRACK knop (17) om “Genre” te kiezen als zoeksleutel.
Druk op de FOLDER knop (16), de display toont het actuele genre.
Druk en draai aan de FOLDER knop (16) om de eerste letter van het genre dat u wenst te kiezen in
te stellen.
Draai indien nodig aan het JOG WIEL (22) terwijl u de FOLDER knop (16) ingedrukt houdt om de
verschillende genres die met dezelfde letter beginnen te overlopen.
Druk gedurende ongeveer 2 seconden op de RANDOM toets (45) tot de LED begint te knipperen.
Druk op de PLAY toets (20) om de willekeurige weergave te starten van nummers uit het gekozen
genre.
Opmerking 1: om alleen nummers van een bepaalde artiest of van een bepaald album te lezen moet
u gewoon bovenstaande acties opnieuw uitvoeren en artiest of album als zoeksleutel in te stellen.
Opmerking 2: de “intelligente” random functie zal alleen goed werken als de ID3-tags correct ingevuld
werden. Een uitstekende “freeware” ID3-tag editor voor deze taak is de “MP3TAG” welke u kunt
downloaden via www.mp3tag.de !
LOOPS:
MAAK EEN LOOP:
Druk op de LOOP IN toets (31) om het startpunt van de Loop te programmeren terwijl de muziek
afgespeeld wordt. Druk daarna op de OUT toets (32) om het eindpunt van de Loop te programmeren. De
weergave van de naadloze lus (seamless loop) start onmiddellijk. (Met wat ervaring zult u perfecte Loops
kunnen programmeren!) Tijdens het afspelen van de Loop kunt u terug op de OUT toets (32) drukken om
de loop te verlaten en terug over te gaan naar de normale weergave van de rest van het nummer. Het is
mogelijk om een nieuwe Loop te programmeren, zelfs wanneer een Loop weergegeven wordt. Druk terwijl
de Loop speelt gewoon op de LOOP IN toets (31) om het startpunt van de nieuwe Loop te bepalen. Breng
nu het eindpunt in door op de OUT toets (32) te drukken. Uw nieuwe Loop is nu geprogrammeerd en
wordt afgespeeld
HERSTART EEN LOOP:
Dit kan gedaan worden op 3 manieren:
Wanneer een Loop geprogrammeerd is en u deze verlaten hebt door op de OUT toets (32) te drukken,
druk dan gewoon op de RELOOP toets (33) om de Loop opnieuw te starten.
Wanneer een Loop geprogrammeerd is en u deze verlaten hebt door op de OUT toets (32) te drukken,
druk dan gewoon weer op OUT om de loop opnieuw te starten. De plaats waar u op de OUT toets
gedrukt hebt is nu geprogrammeerd als nieuw eindpunt van de Loop.
Wanneer de Loop wordt afgespeeld, druk dan op de RELOOP toets (33) om de Loop onmiddellijk
terug te starten. U kunt dit verschillende keren na elkaar doen om een «stotter» effect te creëren.
EEN LOOP BEWERKEN:
Wanneer er al een loop geprogrammeerd is, druk dan gedurende ongeveer 2 seconden op de RELOOP
toets (33) om de loop te kunnen bewerken. Terwijl de loop naadloos wordt weergegeven kunt u op het LCD
scherm de tijdinformatie van het eindpunt van de lus aflezen. Gebruik het jog wiel om een nieuw eindpunt
voor de lus in te stellen. Om dit te vergemakkelijken hoort u continu wat u precies aan het eindpunt
veranderde. Als u ook het beginpunt van de loop wilt bewerken, druk dan op de RELOOP toets (33) om te
switchen tussen het startpunt en het eindpunt van de loop. Wanneer de loop perfect is, druk dan op de
OUT toets (32) om het nieuwe eindpunt van de loop op te slaan.
OVER EFFECTEN:
In de beschrijving van de effecten vindt u al heel wat informative, vergeet dat gedeelte ook niet te lezen!
GEBRUK DE EFFECTEN IN DE BEAT GESYNCHRONIZEERDE MODUS:
Druk op de FX-SYNC toets (38) zodat deze aan gaat.
Terwijl de muziek speelt kunt u op een van de 3 effecten drukken: het effect op de beat van de muziek.
Gebruik de EFFECT SYNC X/Y toetsen (39+40) om verschillende beat presets te kiezen. Druk op de
RATIO toets (40) tot deze begint te knipperen om het impact van het effect in te stellen.
GEBRUIK DE EFFECTEN IN MANUELE MODUS:
Druk op de FX-SYNC toets (38) zodat deze uit gaat.
Terwijl de muziek speelt kunt u op een van de 3 effecten drukken: gebruik het JOG WIEL (22) om het
effect in real-time te veranderen. Druk op de RATIO toets (40) tot deze begint te knipperen om het impact
van het effect aan te passen.
HET GEHEUGEN:
VERSCHILLENDE GEHEUGENS:
Voor wij over het gebruik van het geheugen spreken moeten u het onderscheid kunnen maken tussen
“track memory” (geheugen van het nummer) en “permanent memory” (het permanente geheugen):
Track Memory: Dit is het geheugen waarin de DMC2000 een set van maximum 4 Cue punten en /of
Loops van een nummer opslaagt. U kunt een “track memory” instellen voor elk nummer van een USBdrive.
Voorbeeld: uw USB-drive bevat 5000 nummersvoor elk nummer kunt u tot 4 Cue punten en/of
Loops opslagen. Dit maakt een totaal van 5000 x 4 = 20000 Cue punten en/of Loops op één enkele
USB-drive!
Permanent Memory: Dit is het grote geheugen waarin alle Cue punten en Loops permanent worden
opgeslagen. Het is in feite een geïndexeerde verzameling van “track memories”. Wanneer u vooraf
opgeslagen Cue punten oproept van een bepaald nummer, dan maakt u een overdracht van
permanent geheugen “permanent memory” naar de “track memory”.
Opmerking: alle cue punten woden opgeslagen in database files op uw USB-drive. Als u de USB drive
aanluit op een andere DMC2000 of DMC1000 kunnen alle cue punten ook onmiddellijk met deze speler
gebruikt worden.
GEBRUIK VAN DE “TRACK MEMORY”:
OPSLAAN VAN EEN MASTER CUE PUNT:
Er zijn 2 manieren om een Master Cue punt te bepalen:
Druk op de LOOP IN (31) toets tijdens de normale weergave om het nieuwe Cue punt te bepalen
(“CUE on the fly”).
Zet de CD speler in pause stand en gebruik het jog/shuttle wiel om de exacte plaats van het Cue punt
te bepalen. Eenmaal u dit gevonden hebt, druk dan op de LOOP IN toets (31) om het nieuwe Cue punt
te programmeren. (of druk op de PLAY/PAUSE toets)
Als het Cue punt geprogrammeerd is, druk dan op de CUE toets (22) om dit Cue punt terug op te roepen.
OPSLAAN VAN EEN GEWOON CUE PUNT IN DE “HOT CUE” TOETSEN:
Druk eerst op de RECORD CUE toets (25) om de hot cue memory modus in te schakelen (RECORD CUE
toets is aan):
Druk op één van de vier HOT CUE toetsen (24) op het juiste moment tijdens de normale weergave
van het nummer: de HOT CUE toets die u net gebruikte zal groen oplichten om aan te wijzen dat het
Cue punt is opgeslagen. (“Cue on the fly”).
Zet de CD speler in pauze stand om het jog/shuttle wiel te gebruiken voor het exact opzoeken van het
Cue punt. Eenmaal u dit gevonden hebt, druk dan op één van de vier HOT CUE toetsen om het
nieuwe Cue punt op te slagen: de HOT CUE toets die u net gebruikte zal groen oplichten om aan te
wijzen dat het Cue punt is opgeslagen.
Als het Cue punt geprogrammeerd is, druk dan op de HOT CUE toets om de weergave opnieuw te starten
vanuit het opgeslagen Cue punt.
OPSLAGEN VAN EEN LOOP IN DE “HOT CUE” TOETSEN:
Dit is sterk vergelijkbaar met het opslaan van een gewoon Cue punt. Het enige verschil is dat u de
DMC2000 eerst in Loop modus moet zetten. Wanneer de Loop wordt afgespeeld, druk dan op de
RECORD CUE toets (25) om de speler in hot cue memory mode te zetten (RECORD CUE toets is aan).
SYNQ
®
69/120 DMC2000
SYNQ
®
70/120 DMC2000
Page 38

NEDERLANDS HANDLEIDING
NEDERLANDS HANDLEIDING
Druk daarna op één van de vier HOT CUE toetsen (24): de HOT CUE toets die u net gebruikte verandert
in rode kleur om aan te tonen dat de Loop die op dit moment speelt is opgeslagen. U kunt tot 4 Loops per
nummer opslaan!
DE “HOT CUE” TOETSEN WISSEN:
U kunt gemakkelijk de inhoud van een HOT CUE toets wissen door eerst op de DELETE CUE toets (26),
te drukken en daarna op de HOT CUE toets die u wilt wissen. Of sla eenvoudigweg een nieuw Cue punt of
loop op in deze this HOT CUE toets. U kunt eveneens de inhoud van de vier HOT CUE toetsen
tegelijkertijd wissen door gedurende meer dan 2 seconden op de DELETE CUE toets (26) te drukken. U
zult merken dat de lichten uitgaan om u erop te wijzen dat de HOT CUE toetsen leeg zijn.
GEBRUIK VAN HET PERMANENTE GEHEUGEN:
Om veiligheidsredenen worden de Cue punten en de Loops die opgeslagen zijn in de HOT CUE toetsen
niet automatisch opgeslagen in het permanente geheugen. Dit betekent dat wanneer u een set Cue
punten en Loops oproept van het permanente geheugen naar de HOT CUE toetsen (welke betrekking
hebben tot de track memory), u deze kunt bewerken, wijzigen en wissen, zoveel u maar wilt. Het
permanente geheugen zal niet gewijzigd worden zolang u geen back-up maakt van de HOT CUE toetsen
naar het permanente geheugen.
OPSLAGEN IN HET PERMANENTE GEHEUGEN:
Druk op de RECORD CUE toets (25) tot “Now saving” op het scherm verschijnt om aan te duiden dat de
Cue punten en de Loops van de HOT CUE toetsen van dit nummer opgeslagen zijn in het permanente
geheugen.
EEN NUMMER WISSEN IN HET PERMANENTE GEHEUGEN:
Kies het nummer dat u wilt wissen. Druk tegelijkertijd op de “DELETE CUE” (26) en de “SYNC/Y” (40)
toetsen. Het scherm toont “Del Track?”. Als U de YES toets (PITCH BEND+ toets) indrukt dan wordt alle
cue informatie voor dit nummer in het permanente geheugen gewist.
“HOT CUE POINTS/LOOPS” OPROEPEN UIT HET PERMANENTE GEHEUGEN:
Omdat het oproepen van de permanente cue punten enkele seconden duurt wordt dit niet automatisch
uitgevoerd. Soms hebt U de cue punten gewoon even niet nodig en dan zou het zonde zijn om nutteloos
te moeten wachten. Hieronder vindt U hoe het oproepen werkt:
Geen opgeslagen Cue punten: Als U een track kiest waarvoor er geen cue punten in permanent
geheugen bestaan dan gebeurt er niets: u kan direct de play/pauze toets indrukken om de weergave te
starten.
Er bestaan cue punten in permanent geheugen: Als U een track kiest waarvoor er cue punten in
permanent geheugen bestaan dan zal er “Load Cues?” op het scherm verschijnen. De DMC2000
vraagt wat U wil doen. Dit zijn de mogelijkheden:
U drukt op de YES toets: Druk YES (“pitch bend+” toets) om de cue punten uit het
permanente geheugen naar de hot cue toetsen te laden. Tijdens dit proces toont het scherm
RECALL. Zodra de Hot Cues geladen zijn kunt U de weergave starten.
U drukt op de NO toets: De cue punten worden niet geladen en het scherm toont de normale
track en tijd informatie van het nummer. U kan de weergave onmiddellijk starten.
U doet niets: na enkele seconden zal het scherm automatisch terug overgaan naar zijn
gewone aanduidingen waarbij de cue punten niet werden geladen.
Opmerking: in het setup menu (punt4) kunt u kiezen om de CUE punten automatisch te laten opladen
(autoload). In dit geval zal de speler niets meer vragen en zal hij de CUE punten gewoon opladen.
EIGENSCHAPPEN
Voeding: AC 100 - 240V, 50/60Hz
Verbruik: 21W
Referentie ingangniveau / impedantie:
Line: 47kΩ /-14dBV (200mV) +/-0.1dB
Phono: 47kΩ /-51dBV (2.8mV) +/-0.1dB
Mic: 10kΩ /-56dBV (1.5mV) +/-0.1dB
Maxi input: (1kHz, THD=1%, EQ neutraal, max. gain, belasting=100kΩ)
Line: > +0dBV
Phono: > -38dBV
Mic: > -42dBV
Talkover: -20dB +/-2dB
Frequentierespons: (EQ neutraal, max. gain, belasting = 100kΩ)
Line: 20Hz - 20kHz +/-2dB
Phono: 20Hz - 20kHz +2/-3dB (RIAA)
Mic: 20Hz - 20kHz +2/-3dB
THD+N: (EQ neutraal, max. gain, w/20kHz LPF, A-weighted, belasting = 100kΩ)
Line: < 0.06% @ 1 KHz
Phono: < 0.08% @ 1 KHz
Mic: < 0.15% @ 1 KHz
Uitgangsniveau / impedantie:
Master asymmetrisch: 1kΩ /3.8dBV (1.55V) +/-2dB
Master symmetrisch (load=600Ω): 600Ω /+6dBm (1.55V) +/-3dB (tussen WARM en KOUD)
Booth master: 1kΩ /3.8dBV (1.55V) +/-2dB
Koptelefoon (belasting=32Ω): 33Ω /0dBV (1V) +/-2dB
Max. output: (1kHz, THD=1%, EQ neutraal, max. gain, belasting = 100kΩ)
Master: > +18dBV (8V) load=100kΩ
Koptelefoon: > +4dBV (1,6V) load=32Ω
USB FORMAT:
File Systeem: FAT12/16/32
Max. Hard disk capaciteit: 500GB
Max. Folders: 999
Max. Tracks / Folder: 999
Max. Q-DBASE track capaciteit: 9999
WAV FORMAT: PCM, 1411kbps.
MP3 FORMATS:
MPEG1 Layer3 (ISO/IEC11172-3): mono / stereo sampled at: 32 - 44,1 - 48kHz
Bitrates: 32 – 320 Kbps
Bitrate modes: CBR (Constante Bitrate) of VBR (Variabele Bitrate)
MPEG2 Layer3 (ISO/IEC13818-3): mono / stereo sampled at: 16 – 22,05 - 24kHz
Bitrates: 32 – 160 Kbps
Bitrate modes: CBR (Constante Bitrate) of VBR (Variabele Bitrate)
MPEG2,5 Layer3: mono / stereo sampled at: 8 – 11,025 - 12kHz
Bitrates: 32 – 160 Kbps
Bitrate modes: CBR (Constante Bitrate) of VBR (Variabele Bitrate)
Q-DBASE Software :
File extensies : .DBH + .dat + .DBX
Systeemvereisten : RAM 512MB
100MB vrije schijfruimte
Microsoft®Win XP SP3 ~ Win Vista SP2 ~ Win 7
Afmetingen: 299(D) x 420(B) x 89(H) mm
Gewicht: 4,42kg
SYNQ
U kan de laatste versie van deze handleiding downloaden via onze website: www.beglec.com
®
71/120 DMC2000
SYNQ
®
Elke inlichting kan veranderen zonder waarschuwing vooraf
72/120 DMC2000
Page 39

DEUTSCH BEDIENUNGSANLEITUNG
ACHTUNG:
BEDIENUNGSANLEITUNG
Vielen Dank, dass Sie sich für ein SYNQ®- Produkt entschieden haben. Bitte lesen Sie sich diese
Bedienungsanleitung aufmerksam durch, um dieses Produkt richtig bedienen und handhaben zu können.
Wenn Sie sich die Anleitung durchgelesen haben, bewahren Sie diese an einem sicheren Ort auf, um
jederzeit nachschlagen zu können.
VERGESSEN SIE NICHT IHR SYNQ PRODUKT REGISTRIEREN ZU LASSEN. SIE
ERHALTEN DANN AUTOMATISCH EINE BENACHRICHTIGUNG, WENN EINE NEUE
SOFTWARE VERFÜGBAR IST.
SURF TO: WWW.SYNQ-AUDIO.COM/REGISTER/
EIGENSCHAFTEN
Das Gerät ist funkentstört und erfüllt die Anforderungen der europäischen und nationalen Bestimmungen.
Entsprechende Dokumentation liegt beim Hersteller vor.
Dieser professionelle digitale Mediacontroller bietet eine extrem kompakte Komplettlösung und wird sogar
die anspruchsvollsten DJs zufrieden stellen! Sie brauchen nur noch ein paar aktive Lautsprecher und die
Party kann losgehen!
Darüber hinaus umfasst das Gerät unzählige Funktionen wie:
Musik aus verschiedenen Quellen kann abgespielt und nahtlos gemixt werden:
Zwei eingebaute USB-Player benutzen gemeinsam dieselbe USB-Festplatte/denselben USB-Stick,
um jegliche WAV- oder MP3-Datei abzuspielen.
Verschiedene analoge Eingänge wie Plattenteller, zusätzliche CD-Players, usw.
Steuert jede erdenkliche gängige MIDI DJ-Software, kostenlose Deckadance-LE Software inbegriffen!
Zwei Mikrofone mit Talkover können gleichzeitig benutzt werden.
Q-DBase system: Umfassendes Datenbank-Durchsuchungssystem, damit Sie Ihre Tracks auch auf
großen Festplatten leicht finden, bis 500GB!
Kostenlose W indows Q-DBase-Builder-Software im Lieferumfang enthalten.
Die digitalen Effekte (Echo, Flanger, Filter, Brake) können manuell oder vollständig musikgetaktet mit
zahlreichen Voreinstellungen eingesetzt werden.
Nahtlose Loops mit Echtzeit-Loop-Editierfunktion
PCMS (Permanent Cue Memory System): Für jeden Track können bis zu 4 Cue-Punkte und nahtlose
Loops gespeichert/jederzeit abgerufen werden
Präzise Scratchfunktion und Pitch Bend dank berührungssensiblem Datenrad
Mehrere Datenradmodi: Vinyl, CDJ und A.CUE Scratch!
DJ-Software kann codierte Vinyl-Platten benutzen, um die Wiedergabe zu steuern und Ihre MP3/WAV-
Dateien zu scratchen.
Alphanumerisches 2x 10 Zeichen VFD-Display zeigt alle Informationen, einschließlich ID3-Tags an.
SMART RANDOM: Random-Abspielen kann auf ein Genre oder einen Künstler begrenzt werden (z.B. nur
Slows abspielen!)
Originale, upgrade-bare Synq Firmware: garantiert unvergleichliche bedienerfreundliche Funktionen für
hohe Ansprüche.
Vollständig benutzerdefiniertes Setup-Menu für MIDI und andere Funktionen.
Pitch control (Tonhöhenregler)
Pitch Lock (unveränderte Tonhöhe bei veränderbarer Geschwindigkeit) (Master-Tempo)
Vollausgestattetes digitales 2-Kanal-Mischpult mit individuell gestaltbarem Crossfader, symmetrischem
Ausgang und Booth Master.
Köpfhörer-Monitor mit PFL-Anzeige mit CH1/CH2 Mischung und regelbarer Lautstärke.
Vieles mehr …
DEUTSCH BEDIENUNGSANLEITUNG
VOR DER ERSTBENUTZUNG
Wichtige Hinweise:
Vor der Erstbenutzung bitte das Gerät zuerst auf Transportschäden überprüfen. Sollte das Gerät einen
Schaden aufweisen, Gerät bitte nicht benutzen, sondern setzen Sie sich unverzüglich mit Ihrem Händler in
Verbindung.
Wichtiger Hinweis: Das Gerät hat das Werk unbeschädigt und gut verpackt verlassen. Es ist wichtig,
dass der Benutzer sich streng an die Sicherheitshinweise und Warnungen in der Bedienungsanleitung
hält. Schäden durch unsachgemäße Handhabung sind von der Garantie ausgeschlossen. Der Händler
übernimmt keine Verantwortung für Schäden, die durch Nichtbeachtung der Bedienungsanleitung
hervorgerufen wurden.
Die Bedienungsanleitung zum zukünftigen Nachschlagen bitte aufbewahren. Bei Verkauf oder sonstiger
Weitergabe des Geräts bitte Bedienungsanleitung beifügen.
Aus Umweltschutzgründen Verpackung bitte wiederverwenden oder richtig trennen.
Überprüfen Sie den Inhalt:
Folgende Teile müssen sich in der Geräteverpackung befinden:
DMC2000 Einheit.
Bedienungsanleitung.
1 USB Kabel.
1 Netzkabel
SICHERHEITSHINWEISE
CAUTION
Das Blitzsymbol im Dreieck weist den Benutzer darauf hin, dass eine Berührungsgefahr mit
nicht isolierten Teilen im Geräteinneren, die eine gefährliche Spannung führen, besteht. Die
Spannung ist so hoch, das hier die Gefahr eines elektrischen Schlages besteht.
Das Ausrufezeichen im Dreieck weist den Benutzer auf wichtige Bedienungs- und
Wartungshinweise in den Dokumenten hin, die dem Gerät beiliegen.
Dieses Symbol bedeutet: Nur innerhalb von Räumen verwenden.
Dieses Symbol bedeutet: Achtung! Bedienungsanleitung lesen!
Dieses Symbol bedeutet: Klasse II Klassifizierung
Zur Vermeidung von Stromschlag oder Feuer, Gerät bitte nicht Regen oder Feuchtigkeit aussetzen.
Zur Vermeidung von Kondensation im Inneren des Geräts bitte nach dem Transport in eine warme
Umgebung zum Temperaturausgleich einige Zeit ausgeschaltet stehen lassen. Kondensation kann zu
Leistungsverlust des Geräts oder gar Beschädigung führen.
Gerät nicht im Freien und in feuchten Räumen und Umgebungen verwenden.
Keine Metallgegenstände oder Flüssigkeiten ins Innere des Geräts gelangen lassen. Keine mit Flüssigkeit
gefüllten Gegenstände, z.B. Vasen, auf das Gerät stellen. Kurzschluss oder Fehlfunktion können die Folge
sein. Falls es doch einmal vorkommen sollte, bitte sofort Netzstecker ziehen und vom Stromkreis
trennen.
Offene Brandquellen, wie z.B. brennende Kerzen, sollten nicht auf das Gerät gestellt werden.
Ventilationsöffnungen nicht abdecken, da Überhitzungsgefahr!
Nicht in staubiger Umgebung verwenden und regelmäßig reinigen.
Für Kinder unerreichbar aufbewahren.
Unerfahrene Personen sollen das Gerät nicht bedienen.
Umgebungstemperatur darf 40ºC nicht überschreiten.
Minimalabstand um das Gerät für ausreichende Kühlung = 5cm.
Stets Netzstecker ziehen, wenn Gerät für längeren Zeitraum nicht genutzt oder es gewartet wird.
Elektrische Anschlüsse nur durch qualifiziertes Fachpersonal überprüfen lassen.
Schlags auszusetzen, entfernen Sie keines der
Gehäuseteile. Im Geräteinneren befinden sich keine vom
Benutzer reparierbaren Teile. Überlassen Sie
Reparaturen dem qualifizierten Kundendienst.
Um sich nicht der Gefahr eines elektrischen
SYNQ
®
73/120 DMC2000
SYNQ
®
74/120 DMC2000
Page 40

DEUTSCH BEDIENUNGSANLEITUNG
DEUTSCH BEDIENUNGSANLEITUNG
Sicherstellen, dass Netzspannung mit Geräteaufkleber übereinstimmt.
Die Netzsteckdose sollte immer gut erreichbar sein, um das Gerät vom Netz zu trennen.
Gerät nicht mit beschädigtem Netzkabel betreiben. Ist die Zugangsleitung beschädigt, muss diese durch
den Hersteller, seinen Vertrieb oder durch eine qualifizierte Person ersetzt werden.
Netzkabel nicht mit anderen Kabeln in Berührung kommen lassen!
Das Gerät ist nicht vollständig vom Netz getrennt, wenn der Netzschalter sich in der AUS-Stellung
befindet.
Gerät nicht öffnen. Abgesehen vom Tausch der Sicherung sind keine zu wartenden Bauteile im Gerät
enthalten.
Sicherung niemals reparieren oder überbrücken, sondern immer durch gleichartige Sicherung ersetzen!
Bei Fehlfunktion Gerät nicht benutzen und sich mit dem Händler in Verbindung setzen.
Bei Transport bitte Originalverpackung verwenden, um Schäden am Gerät zu vermeiden.
Aus Sicherheitsgründen dürfen an dem Gerät keine unbefugten Veränderungen vorgenommen werden.
INSTALLATIONSANLEITUNG:
Plazieren und benutzen Sie das Gerät für eine längere Zeit neben sehr warmen Geräten wie Verstärker,
Lampen, etc., könnte die Funktion des Gerätes beeinträchtigt oder sogar zerstört werden.
Sollte das Gerät in einem Flightcase betrieben werden, achten Sie auf eine gute Luftzirkulation.
Wenn das Gerät aus einer kalten Umgebung an einem warmen Ort aufgestellt wird, kann sich
Kondenswasser bilden. Um Fehlfunktionen oder Zerstörung zu vermeiden, sollten Sie das Gerät für ca. 1
Stunde vom Stromnetz trennen.
Wählen Sie einen staubfreien, trockenen Ort zur Installation des CD-Players. Vermeiden Sie starke
Hitzequellen und Vibrationen.
Um Feuer oder elektrische Schläge vorzubeugen, setzen Sie dieses Gerät niemals Nässe und
Feuchtigkeit aus!
Um sich nicht der Gefahr eines elektrischen Schlags auszusetzen, entfernen Sie keines der Gehäuseteile.
Wenn ein Problem auftritt, wenden Sie sich an Ihren Händler.
Legen Sie keine Metallgegenstände oder Flüssigkeiten in den Player! Die Folge wären Fehlfunktionen und
Beschädigungen des Gerätes
Der Player kann nur von qualifiziertem Fachpersonal eingestellt oder repariert werden.
Dieses Gerät kann Interferenzen im Radio- und Fernsehempfang verursachen.
REINIGUNG DES PLAYERS:
Entfernen Sie Staub und Schmutz mit einem weichen, trockenen Tuch. Achten Sie darauf, dass keine
Flüssigkeit in das Geräteinnere gelangen kann. Benutzen Sie keinen Verdünner, Benzin oder andere
chemische Mittel. Die Oberfläche des Gerätes könnte zerstört werden.
4. MIDI / LINK USB Anschluss: Dieser (Typ-B) USB-Anschluss dient zum Anschließen des Abspielgeräts
an einen Computer mit MIDI DJ-Software [gemeinsame Nutzung einer Festplatte ]
Im Kapitel „Anschlüsse” finden Sie weitere Informationen dazu.
5. SYMMETRISCHER MASTER 1 AUSGANG: Verbinden Sie die beiden symmetrischen XLR Buchsen
des Master 1 Ausgangs mit den Eingangsbuchsen Ihres Verstärkers oder ihrer aktiven Lautsprecher.
Hierzu sollten Sie ein abgeschirmtes Mikrofonkabel benutzen.
6. UNSYMMETRISCHE MASTER AUSGÄNG: Der Master Cinchausgang erhält das gleiche Master Signal
wie die beiden XLR Buchsen (5) jedoch in unsymmetrischer Form.
7. BOOTH MASTER-AUSGANG: Der „Booth Master”-Ausgang überträgt dasselbe Signal wie der Master,
kann aber einzeln vom Booth Master (49) gesteuert werden. Benutzen Sie die Ausgänge, um
asymmetrische Verstärker oder ein Tonaufnahmegerät anzuschließen.
8. PHONO/LINE UMSCHALTER: zum Umschalten des Line Eingangs auf Phono.
9. ANALOGER EINGANG: an beide Mischerkanäle können Sie Plattenteller oder zusätzliche CD-Player
anschließen, die gleichzeitig mit Tracks der DMC2000 Player und DJ-Software von Ihrem PC/MAC
gemischt werden können.
10. MASSEANSCHLUSSKLEMME (GROUND): Die meisten Plattenspieler verfügen über ein
Masseanschlusskabel. Verbinden Sie dieses mit dem Masseanschluss. Sollte der Plattenspieler über
kein Massekabel verfügen so hat er wahrscheinlich einen Lineausgang. Diesen dürfen Sie dann nicht mit
den Phonoeingängen verbinden.
11. DJ MIKROFON EINGANG: Kombinierte XLR-/Klinkenbuchse zum Anschluss des DJ-Mikrofons in
symmetrischer Ausführung. Dieser Pegel bleibt von der Talkoverfunktion unbeeinflusst.
12. KENSINGTON SICHERHEITSSCHLOSS: kann benutzt werden, um den DMC2000 vor Diebstahl zu
schützen. Beachten Sie, dass dies kein 100%iger Diebstahlschutz ist! Sie erhalten ein kompatibles
„Kensington” Sicherheitskabel in fast jedem Computer-Geschäft.
TASTEN UND FUNKTIONEN
1. MAINS input: Verbindet das Gerät mit dem Stromnetz (100-240V AC) mittels dem mitgelieferten
Stromkabel.
2. ON/OFF Schalter: Zum Ein- oder Ausschalten des Geräts.
3. USB 2 Anschluss: dies ist der zweite (Typ-A) USB-Anschluss zum Anschließen gleich welchen USB-
Massenspeichergeräts, das in FAT oder FAT32 formatiert ist. Standardmäßig wird dieser Eingang zum
Anschließen einer Festplatte benutzt. (Siehe Kapitel „Anschlüsse”)
®
SYNQ
75/120 DMC2000
13. USB 1 Anschluss: dies ist der erste (Typ-A) USB-Anschluss zum Anschließen gleich welchen USB-
Massenspeichergeräts, das in FAT oder FAT32 formatiert ist. Standardmäßig wird dieser Eingang
benutzt, um ein gelegentlich genutztes USB-Laufwerk wie USB-Sticks usw. anzuschließen.
14. SOURCE [Quellen]-Wahlschalter: benutzen Sie diesen Schalter, um die gewünschte Tonquellle
auszuwählen: USB1 oder USB2.
®
SYNQ
76/120 DMC2000
Page 41

DEUTSCH BEDIENUNGSANLEITUNG
DEUTSCH BEDIENUNGSANLEITUNG
15. DATABASE [Datebank] / NEXT TRACK (folgender Titel] Knopf: ein sehr wichtiger Knopf, wenn Sie
Ihren nächsten Titel einfach und schnell und sogar noch während des Abspielens des vorangehende
Titels finden möchten! Dieser Knopf hat zwei verschiedene Funktionsweisen:
NEXT TRACK-Funktion: wird bei der Suche auf Massenspeichergeräten benutzt, auf denen die „Q-
DBaseSystem”-Dateien nicht installiert sind. Sie können nur nach Titel- und Ordnernummern
suchen.
DATABASE-Funktion:wird bei der Suche auf Massenspeichergeräten benutzt, auf denen die „Q-
DBaseSystem”-Dateien installiert sind. Die können eine alphabetische Suche nach Künstlern,
Titelnamen, Genre oder Alben durchführen. Sehr schnell und ohne dass Sie wissen müssen, wo sich
Ihre Dateien befinden!
Sobald Sie den gewünschten Song gefunden haben, drücken Sie einfach die LOAD TRACK-Taste (19),
um den Titel zu laden.
Zu beiden Funktionen finden Sie weitere Informationen in dem Kapitel „WIE NUTZE ICH ...”.
16. FOLDER [Ordner]-Knopf: Dieser Knopf hat verschiedene Funktionen:
Kein Q-Dbase: Drehen Sie diesen Knopf, um die Ordner eines Speichergeräts durchzusehen,
während das Q-Dbase-System nicht eingesetzt wird.
Während der Q-Dbase-Suche: halten Sie den Knopf beim Drehen gedrückt, um den ersten
Buchstaben des gewünschten Suchschlüssels auszuwählen. Drehen Sie den Knopf, um zum
nächsten Suchschlüssel mit demselben Anfangsbuchstaben zu gelangen. Drücken Sie den Knopf,
um den Suchschlüssel auf der 2. Textzeile des Displays anzuzeigen.
Setup Menü: Drehen Sie den Knopf, um die verschiedenen Menüoptionen durchzusehen.
Weitere Informationen dazu finden Sie in den Kapiteln „WIE NUTZE ICH ...” & „SETUP MENU”.
17. TRACK-Knopf: Dieser Knopf hat verschiedene Funktionen:
Kein Q-Dbase: Drehen Sie diesen Knopf, um die Tracks (Titel) eines Speichergeräts durchzusehen,
während das Q-Dbase-System nicht eingesetzt wird.
Q-Dbase-Suche: zwei Optionen:
Drehen Sie den Knopf, um alle Dateien mit demselben Anfangsbuchstaben, der vorher mit
dem FOLDER-Knopf ausgewählt wurde, durchzusehen.
Halten Sie den Knopf beim Drehen gedrückt, um den Suchschlüssel in der Datenbank zu
ändern. Sie können die folgenden Schlüssel suchen:
Art: Suche nach „Künstlernamen” in alphabetischer Reichenfolge
(Standardsuchschlüssel)
Alb: Suche nach „Albumnamen” in alphabetischer Reihenfolge
Gen: Suche nach „Genres” in alphabetischer Reihenfolge
Std: Keine Benutzung des Q-Dbase-Systems, nur manuelle Suche nach Ordnern und
Titeln.
Während des Abspielens: Drücken Sie den Knopf, damit die verschiedenen ID3-Tags auf dem
Display angezeigt werden:
Drücken Sie 1x: Albumname des aktuellen Tracks wird angezeigt
Drücken Sie 2x: Genre des aktuellen Tracks wird angezeigt
Drücken Sie 3x: Bitrate des aktuellen Tracks wird angezeigt
Setup-Menü: Drehen Sie den Knopf, um die Einstellungen der gewählten Menüoption zu
ändern.
Siehe Kapitel „WIE NUTZE ICH ...“ für weitere Informationen.
18. SEARCH Tasten: Schnellsuche innerhalb eines Track.
19. LOAD TRACK Taste: Diese Taste hat verschiedene Funktionen:
Laden eines Titels: der anhand der Database-Next-Track-Funktion gefunden wurde.
Öffnen des Setup-Menüs: halten Sie die LOAD TRACK-Taste ungefähr 3 Sekunden gedrückt.
Schließen des Setup-Menüs: drücken Sie die LOAD TRACK-Taste kurz, um das Setup zu
verlassen.
Weitere Informationen dazu finden Sie in den Kapiteln „WIE NUTZE ICH ...” & „SETUP MENU”.
20. PLAY/PAUSE Taste: Jedes Mal, wenn Sie die PLAY/PAUSE Taste drücken, wechselt der Player
zwischen Wiedergabe und Pause oder Pause und Wiedergabe.
21. CUE Taste: Drücken Sie die CUE-Taste während der Wiedergabe, beginnt die Wiedergabe sofort ab
dem programmierten CUE Punkt, solange die CUE Taste gedrückt ist. Sobald die CUE-Taste
losgelassen wird, springt der Tonabnehmer an den markierten CUE Punkt. Auch das Jog/Wheel kann im
Pausenmodus (PLAY-/PAUSE Taste blinkt) dazu verwendet werden, um einen anderen CUE Punkt zu
suchen. Durch Drücken der PLAY/PAUSE oder LOOP IN Taste und anschließend CUE können Sie den
neuen CUE Punkt übernehmen.
22. BERÜHRUNGSEMPFINDLICHES JOG-WHEEL (Datenrad): Das Datenrad an vorliegendem Player
umfasst 2 Teile:
Berührungsempfindliches Mittelstück: um ein möglichst authentisches Plattenfeeling (vinylecht)
herzustellen und die Scratch-Leistung erheblich zu steigern, wurde das Mittelstück des Datenrads
mit einer patentierten berührungsempfindlichen Technologie ausgestattet. Mit dem WHEEL MODEKnopfes (23) können Sie das Verhalten des Mittelstücks verändern. Konsultieren Sie die
Beschreibung des WHEEL MODE-Knopfes (23) für weitere Erläuterungen.
Außenring: silberfarbenes Teil des Datenrads, das nicht berührungsempfindlich ist. Unabhängig
vom gewählten Datenradmodus kann der Außenring stets fürs Pitchbending benutzt werden, außer
während des Einsatzes von Digitaleffekten.
23. WHEEL MODE [Datenradmodus]-Taste: wechselt zwischen 3 verschiedenen Modi für das
berührungsempfindliche Datenrad. Das berührungsempfindliche Mittelstück und der Außenring
funktionieren getrennt:
VINYL-Modus: zum extrem realistischen Scratchen von jeglichen MP3-Dateien, die von den
eingebauten Playern oder der DJ-Software Ihres Computers abgespielt werden.
berührungsempfindliche Mittelstück: Während der Wiedergabe stoppt die Musik sofort,
sobald Sie das Datenrad berühren: Die Wiedergabegeschwindigkeit und -richtung werden jetzt
vollständig von Ihrer Hand gesteuert. Im Pause-Modus können Sie leicht einen neuen CuePunkt setzen.
Außenring: Während der Wiedergabe können Sie den Außenring für Pitschbending
benutzen, um den Takt von 2 Tracks zu synchronisieren. Im Pause-Modus werden Sie die
typischen sehr kleinen Loops hören, die Ihnen die Möglichkeit geben, einen Cue-Punkt
framegenau (1/75 Sekunde) zu setzen.
CDJ-Modus: dies ist der Standardmodus, der von den meisten DJ Playern benutzt wird. Das
berührungsempfindliche Mittelstück und der Außenring funktionieren einheitlich. Während der Track
abgespielt wird, kann mit dem Datenrad ein Pitchbending der Musik von bis zu +/-100%
durchgeführt werden, dabei wird das Datenrad zur Beschleunigung im Uhrzeigersinn und zur
Verlangsamung entgegen dem Uhrzeigersinn gedreht. Der Wert der Pitchänderung wird durch die
Umdrehungsgeschwindigkeit bestimmt. Im Pause-Modus werden Sie die typischen sehr kleinen
Loops hören, die Ihnen die Möglichkeit geben, einen Cue-Punkt framegenau (1/75 Sekunde) zu
setzen.
A.CUE SCRATCH-Modus: ähnelt dem VINYL-Modus sehr, aber das Scratchen startet immer vom
jeweiligen Cue-Punkt, das Verhalten des Außenrings ist wie im Vinyl-Modus:
Berührungsempfindliches Mittelstück: Während der Wiedergabe stoppt die Musik sofort
und kehrt zurück zum jeweiligen Cue-Punkt, jedesmal wenn Sie das Datenrad berühren: Die
Wiedergabegeschwindigkeit und -richtung werden jetzt vollständig durch Ihre
Handbewegungen gesteuert. Im Pause-Modus können Sie leicht einen neuen Cue-Punkt
setzen aber der Player kehrt zuerst zurück zum jeweiligen Cue-Punkt.
Außenring: Während der Wiedergabe können Sie den Außenring für Pitschbending
benutzen, um den Takt von 2 Tracks zu synchronisieren. Im Pause-Modus werden Sie die
typischen sehr kleinen Loops hören, die Ihnen die Möglichkeit geben, einen Cue-Punkt
framegenau (1/75 Sekunde) zu setzen.
24. HOT CUE Tasten: Mit diesen 4 programmierbaren Tasten können Sie zusammen mit der MEMO Taste
CUE-Punkte und/oder Loop’s speichern. Wenn ein normaler CUE gespeichert wird, ist die
entsprechende CUE Taste grün, wenn eine Loop gespeichert wird ist die entsprechende CUE Taste rot.
Alle abgespeicherten Cue-Punkte und Loops können für den späteren Gebrauch im Festspeicher
gesichert werden. Diese Eigenschaft wird “PCMS Permanent Cue Memory System” genannt. Lesen Sie
das Kapitel „WIE NUTZE ICH ...“ für weitere Informationen über das Programmieren von Cue-Punkten
usw.
25. RECORD [Aufzeichnen] CUE-Taste: Drücken Sie diese Taste, bevor Sie eine der 4 HOT-CUE-Tasten
(24) drücken, um einen neuen Cue-Punkt oder Loop zu speichern. Siehe Kapitel „WIE NUTZE ICH ...“
für weitere Erläuterungen zum Abspeichern von Cue-Punkten und Loops.
Cues (Markierungen) im Festspeicher speichern: Das Hot-Cue-System benutzt zwei Arten
Speicher: Kurzzeit (temporary) “Track-Memory” und Festspeicher (permanent). Neue Hot-Cues
werden nur im Kurzzeit-“Track-Speicher” gespeichert. Wenn Sie die Hot-Cues für einen späteren
Gebrauch behalten möchten, müssen Sie die Information mit Hilfe des SAVE TRACK-Knopfs (39) im
Festspeicher abspeichern. Zum Abspeichern der Cues im Festspeicher einfach den RECORD CUEKnopf drücken bis auf dem Display „Saving” (Speichern) angezeigt wird.
SYNQ
®
77/120 DMC2000
SYNQ
®
78/120 DMC2000
Page 42

DEUTSCH BEDIENUNGSANLEITUNG
DEUTSCH BEDIENUNGSANLEITUNG
Persönliche Einstellungen speichern: Drücken Sie gleichzeitig den RECORD CUE-Knopf und den
X/SYNC-Knopf (39), um verschiedene persönliche Parameter, die aktuell gebraucht werden (Pitch
Range, Einzelwiedergabe/Kontinuierlich., Normalzeitangabe, Jog-Wheel-Einstellung, Auto-Cue,
Auto-BPM-Modus, Pitch an/aus, Datenbank-Suchschlüssel und Startzeit/Unterbrechungszeit)
26. DELETE [Löschen] CUE: Diese Taste hat verschiedene Funktionen:
LÖSCHEN 1 HOT CUES: Drücken Sie die DELETE CUE Taste gefolgt von der HOT-CUE-Taste, die
Sie aus dem Track-Memory entfernen möchten. Die Entferntaste wird schwarz.
LÖSCHEN VON 4 HOT CUES: Halten Sie die DELETE CUE Taste ungefähr 2 Sekunden lang
gedrückt, um alle 4 Hot-Cues aus dem Track Memory zu entfernen.
LÖSCHEN DES TRACKs: Drücken Sie gleichzeitig die DELETE CUE Taste und die Y/RATIO-Taste
(40), um die Hot-Cues für den gesamten Track aus dem Festspeicher zu entfernen. Da dieser Schritt
nicht rückgängig gemacht werden kann, fragt das Display Sie zunächst, ob Sie sicher sind: mit Hilfe
der PITCH BEND Tasten (29) können Sie YES (Ja) oder NO (Nein) wählen.
Siehe Kapitel „WIE NUTZE ICH ...“ für weitere Informationen.
27. TEMPO RANGE [Geschwindigkeitsbereich]-Knopf: Drücken Sie diesen Knopf, um die verschiedenen
verfügbaren Geschwindigkeitsbereiche auszuwählen: +/-6%, +/-10%, +/-16%, +16/-100%. Die
niedrigeren Werte machen den SPEED-Fader (28) präziser, die höheren Werte sind für Spezialeffekte
geeignet. Um die Geschwindigkeitsfunktion auszuschalten, einfach den Knopf eine Sekunde lang
gedrückt halten, bis sich die Geschwindigkeitsanzeige ausschaltet. Drücken Sie den Knopf erneut, um
die Geschwindigkeitsregelung wieder zu aktivierten.
28. SPEED[Geschwindigkeits]-Fader: zum Anpassen der Wiedergabegeschwindigkeit des
wiedergegebenen Tracks. Sie können mit dem TEMPO RANGE-Knopf (27) die
Geschwindigkeitsfunktion an-/ausschalten oder den Wertebereich ändern.
29. PITCH BEND Tasten: Die Geschwindigkeit nimmt zu, während die "+ Taste" gedrückt wird und kehrt
zurück wenn der Knopf losgelassen wird. Die Geschwindigkeit fällt wenn die "- Taste" gedrückt wird und
kehrt zurück, wenn der Knopf losgelassen wird. Diese Tasten können zum Synchronisieren von 2 Tracks
genutzt werden.
30. KEY LOCK Taste: (MASTER TEMPO) Aktiviert die Pitch Lock Funktion. Diese Funktion erlaubt Ihnen,
die Geschwindigkeit mit Hilfe des SPEED-Faders zu ändern ohne die Tonhöhe zu verändern.
31. LOOP IN Taste: Erlaubt Ihnen, ohne die Wiedergabe zu beenden, den CUE Punkt zu setzen (CUE ON
THE FLY). Diese Taste setzt auch den Anfang eines nahtlosen Loop: kennzeichnet den Anfang des
Loops. Sie müssen die LOOP OUT-Taste drücken, um das Ende des Loops zu kennzeichnen und die
Wiedergabe im Loop-Modus zu starten.
Siehe Kapitel „WIE NUTZE ICH ...“ für weitere Informationen.
32. OUT/EXIT Taste: Zum Einstellen des Endpunkts im Loop-Modus. Der Player gibt nun diesen Loop
solange wieder, bis Sie die Taste noch einmal drücken. Ist ein Loop programmiert, aber nicht aktiv
können Sie ihn neu starten. Der Punkt, wo Sie die Taste drücken, wird als der Endpunkt gespeichert.
Drücken Sie im Loop Edit Modus die OUT/EXIT Taste, wird die Loop Bearbeitung gestoppt und sichert
den neuen Loop Endpunkt.
33. RELOOP/STUTTER Taste: Diese Taste hat 3 Funktionen:
RELOOP: Wenn ein Loop programmiert worden ist und Sie die OUT/EXIT Taste gedrückt haben,
drücken Sie diese Taste um den Loop wieder zu beginnen. Um den Loop zu verlassen drücken Sie
die OUT/EXIT Taste (Start- und Endpunkt werden nicht verändert)
STUTTER: W ährend der Loop Wiedergabe, drücken Sie diese Taste um direkt zum Startpunkt des
Loop’s zu gelangen. Dieser „Stotter“ Effekt gibt Ihnen die Möglichkeit ihre Darbietung kreativ zu
erweitern.
ENTER EDIT LOOP MODE: Wenn eine Loop Schleife programmiert wird (LOOP IN und OUT/EXIT
Taster sind an) können Sie durch Drücken des RELOOP/STUTTER Knopfes, bis das Display “ OUT
EDIT ” zeigt, in den Loop-Ausgabe-Modus gelangen. Im Loop Edit Modus wechseln Sie dagegen hin
und her zwischen „OUT EDIT ” und „IN EDIT ”.
34. ECHO EFFECT-Taste: Drücken Sie diese Taste, um den Echo-Effekt zu aktivieren. Abhängig vom
Sync-Modus (manuell oder taktsynchronisiert) sind verschiedene Einstellungen möglich:
Manueller Modus: die FX-SYNC Taste (38) ist nicht erleuchtet. Sie können alle Parameter manuell
einstellen, benutzen Sie dabei die folgenden Steuerknöpfe:
Jog-Wheel (22): um die Echozeit von 1ms bis 2000ms einzustellen.
Y/RATIO-Knopf (40): Solange die Y/RATIO-Taste blinkt, können Sie das Datenrad (22)
benutzen, um die Wirkung (trocken/nass) des Effekts zu ändern.
Taktsynchronisierter Modus: Die FX-SYNC Taste (38) ist erleuchtet. Sie können die folgenden
Steuerknöpfe benutzen:
EFFECT SYNC-Taste (39+40): Wählen Sie eine der taktsynchronisierten Echo-
Voreinstellungen.
Y/RATIO-Knopf (40): Solange die Y/RATIO-Taste blinkt, können Sie das Datenrad (22)
35. FLANGER EFFECT-Taste: Drücken Sie diese Taste, um den Flanger-Effekt zu aktivieren. Abhängig
vom Sync-Modus (manuell oder taktsynchronisiert) sind verschiedene Einstellungen möglich:
36. FILTER EFFECT-Taste: Drücken Sie diese Taste, um den Filter-Effekt zu aktivieren. Abhängig vom
Sync-Modus (manuell oder taktsynchronisiert) sind verschiedene Einstellungen möglich:
37. BRAKE Taste: Drücken Sie diese Taste, um den Brake-Effekt zu aktivieren. Jetzt können Sie die
Beschleunigung/Abbremsung der Musik festlegen, indem Sie die PLAY/PAUSE-Taste benutzen (20).
Sie können die Parameter mit den Tasten (39+40), einstellen, siehe nachstehend.
38. FX SYNC-Taste: Drücken Sie diese Taste, um zwischen manuellem und taktsynchronisiertem
Effektmodus hin- und herzuwechseln! Weitere Erläuterungen finden Sie unter den Punkten (34+35+36).
39. EFFECT SYNC/START- Taste: Diese Taste hat verschiedene Funktionen je nach Effekt-Modus:
40. EFFECT SYNC/STOP/Y/RATIO-Taste: diese Taste hat verschiedene Funktionen je nach Effekt-Modus:
41. TIME Taste: Mit der TIME Taste schalten Sie zwischen „noch zu spielende Zeit“ und “abgelaufener Zeit“
des gewählten Tracks.
42. SGL/CTN: Sie können zwischen "Einzelwiedergabe" und "kontinuierlicher Wiedergabe" wählen.
benutzen, um die Wirkung (trocken/nass) des Effektsignals zu ändern.
Manueller Modus: die FX-SYNC Taste (38) ist nicht erleuchtet. Sie können alle Parameter manuell
einstellen, benutzen Sie dabei die folgenden Steuerknöpfe:
Jog-Wheel (22): zum manuellen Ändern des Effekts.
Y/RATIO-Taste (40): Solange die Y/RATIO-Taste blinkt, können Sie das Datenrad (22)
benutzen, um die Wirkung (trocken/nass) des Effekts zu ändern.
Taktsynchronisierter Modus: Die FX-SYNC Taste (38) ist erleuchtet. Sie können die folgenden
Steuerknöpfe benutzen:
EFFECT SYNC-Taste (39+40): Wählen Sie eine der taktsynchronisierten Sweep-
Voreinstellungen.
Y/RATIO-Taste (40): Solange die RATIO-Taste blinkt, können Sie das Datenrad (22)
benutzen, um die Wirkung (trocken/nass) des Effektsignals zu ändern.
Manueller Modus: die FX-SYNC Taste (38) ist nicht erleuchtet. Sie können alle Parameter manuell
einstellen, benutzen Sie dabei die folgenden Steuerknöpfe:
Jog-Wheel (22): zum manuellen Ändern der Grenzfrequenz des Filters.
Y/RATIO-Taste (40): Solange die RATIO-Taste erleuchtet ist, können Sie das Datenrad (22)
benutzen, um die Wirkung (Q-Faktor) des Filters zu ändern.
Taktsynchronisierter Modus: Die FX-SYNC Taste (38) ist erleuchtet. Sie können die folgenden
Steuerknöpfe benutzen:
EFFECT SYNC-Taste (39+40): W ählen Sie eine der taktsynchronisierten Sweep-
Voreinstellungen.
Y/RATIO-Taste (40): Solange die Y/RATIO-Taste erleuchtet ist, können Sie das Datenrad
(22) benutzen, um die Wirkung (Q-Faktor) des Filters zu ändern.
BPM-Sync. Effekte: Wenn ein Effekt im taktsynchronisierten Modus eingesetzt wird, leuchtet
diese Taste. Sie können jetzt wählen, wie der Effekt mit dem Takt synchronisiert werden soll.
Benutzen Sie diese Taste, um den aktuellen BPM-Parameter zu halbieren.
BRAKE-Effekt: Drücken Sie diese Taste, um die Beschleunigungszeit zu ändern (Zeiteinstellung
von Null bis volle Geschwindigkeit). Wenn die Taste leuchtet, können Sie mit dem Jog-Wheel
(22) die Zeit zwischen 0,0s (Sofortstart) bis fast 10s anpassen. (sehr langsamer Start)
BPM-Sync. Effekte: Wenn ein Effekt im taktsynchronisierten Modus eingesetzt wird, leuchtet diese
Taste. Sie können jetzt wählen, wie der Effekt mit dem Takt synchronisiert werden soll. Benutzen Sie
diese Taste, um den aktuellen BPM-Parameter zu verdoppeln.
BRAKE-Effekt: Drücken Sie diese Taste, um die Abbremszeit zu ändern (Zeiteinstellung von voller
Geschwindigkeit bis Null). Wenn die Taste leuchtet, können Sie mit dem Jog-Wheel (22) die Zeit
zwischen 0,0s (Sofortstopp) bis fast 10s anpassen. (sehr langsamer Stopp)
IMPACT-Parameter: Wenn einer der 3 DSP-Effekte aktiviert ist, drücken Sie diese Taste, bis sie zu
blinken beginnt. Jetzt können Sie die Wirkung (Impact) des gewählten Effekts anpassen. Beachten
Sie auch die EFFECT-Tasten (34+35+36).
Kontinuierliche Wiedergabe: alle Tracks werden ohne Unterbrechung abgespielt (Funktion wird
meistens von Gaststätten benutzt)
Einzelwiedergabe: Die Wiedergabe endet nach jedem Track und wartet am Anfang des nächsten
Tracks (Funktion wird meistens von DJ’s benutzt)
SYNQ
®
79/120 DMC2000
SYNQ
®
80/120 DMC2000
Page 43

DEUTSCH BEDIENUNGSANLEITUNG
DEUTSCH BEDIENUNGSANLEITUNG
Drücken Sie die SGL/CNT Taste, für mehr als 1 Sekunde um zwischen „Normal“ und „Auto CUE“ Modus
umzuschalten. In "Auto CUE" Modus wartet der Spieler an der Stelle wo die Musik beginnt. Dies
bedeutet, dass schlecht indexierte Tracks die Sofortstart-Eigenschaften des Players nicht
beeinträchtigen werden. Dies ist ein sehr nützliches Merkmal für DJ’s!
43. TAP/SHIFT-Knopf: Dieser Knopf hat zwei Funktionen:
TAP-Funktion: Der vorliegende Player hat einen vollautomatischen BPM-Zähler. In einigen seltenen
Fällen zählt der automatische Taktzähler nicht ordnungsgemäß (Takte liegen außerhalb der
normalen Bereiche oder es kann einfach kein Takt gefunden werden). In diesen Fällen können Sie
dem Taktzähler helfen, indem Sie den Taktrhythmus manuell auf diesen Knopf tippen. Sie können
zurück zum automatischen Taktzähler wechseln, indem Sie den TAB-Knopf solange gedrückt halten,
bis das „AUTOBPM” in der rechten oberen Ecke auf dem Display erscheint.
SHIFT-Funktion: ist nur in Gebrauch, wenn der Player als ein MIDI-Controller benutzt wird. Die
Shift-Funktion verdoppelt die Funktionen jedes Steuerknopfes: Drücken Sie die Shift-Taste, während
Sie einen anderen Steuerknopf betätigen, um zusätzliche, untergeordnete Funktionen zu erhalten.
Siehe Kapitel “MIDI TABELLE für weitere Informationen.
44. VFD DISPLAY: Zeigt alle wichtigen Informationen an, die während des Playbacks gebraucht werden.
45. RANDOM Taste: Sie können zwischen 2 verschiedene Random-Play-Funktionen wählen.
TOTAL (Gesamt-)Random: drücken Sie kurz den RANDOM -Knopf, bis die LED leuchtet. Player 1
spielt jetzt Tracks, die nach dem Zufallsprinzip aus dem gesamten USB-Massenspeicher ausgewählt
wurden. Während Player 1 im Randommodus abspielt, kann Player 2 weiterhin zum Abspielen jedes
gewünschten Tracks eingesetzt werden.
SMART Random: Sie können wählen, nur Spuren von einem bestimmten Verzeichnis zu spielen,
nur Spuren von einem bestimmten Genre oder auch nur Spuren von einem bestimmten Album oder
Künstler:
Spielen Sie Tracks von nur 1 Verzeichnis: wählen Sie zuerst “search-key = Std”
(folders/tracks). Wählen Sie einem Verzeichnis, anschließend halten Sie die RANDOM -Taste
+/- 2 Sekunden lang gedrückt bis die LED zu blinken beginnt. Player 1 spielt jetzt nur Tracks
aus dem gewählten Verzeichnis.
Wiedergabe von Tracks nur ein bestimmtes Genre / Interpret / Album: Wahl der richtigen
Such-Taste und wählen Sie einen Track, um den gewünschten Genre, Interpret oder Album
entspricht. Nach dem drücken der RANDOM -Taste für +/- 2 Sekunden, spielt der Player nur
Titel mit dem gleichen Genre, Interpret oder Album wie der laufende Titel. (Vermeidet das
Vermischen von 2 komplett verschiedenen Musikstilen: optimal für Bars, Clubs, Restaurants,
…) Siehe Kapitel „WIE NUTZE ICH...” für Beispiele.
46. INPUT SOURCE SELECTOR: EINGANGSQUELLEN-AUSWÄHLER: Zum Wählen des richtigen Inputs
auf beiden Kanälen: eingebauter Player, MIDI-Steuerung für DJ-Software auf Computer oder externe
analoge Phono/Line-Eingänge (auf der Rückseite befinden sich auch zusätzliche Eingangswahlschalter
(8)).
47. GAIN REGLER: Mittels dieses Drehreglers und dem LED VU-Meter des Kanals gleichen Sie den
Eingangspegel des angeschlossenen Audiogerätes auf max. 0 dB an.
48. DREIFACH KLANGREGELUNG: Über drei Frequenzbänder kann der Klang in einem Bereich von -
35dB bis +10dB verändert oder angeglichen werden. Sie können die hohen, mittleren und/oder niederen
Frequenzen vollständig entfernen, indem Sie den/die entsprechenden Knopf/Knöpfe drücken. In der
Mittelstellung ist der Klang unverändert also inaktiv
49. BOOTH MASTER LEVEL (Pegel): Zur Regelung des Pegels des asymmetrischen Booth-Master-
Ausgangs.
50. MASTER REGLER: Steuert die Gesamtlautstärke des symmetrischen Master Ausgangs.
51. VU METER: Jeder Kanal hat seine eigene LED VU-Anzeige. Diese hilft Ihnen sehr schnell den
Gainpegel abzugleichen. Der Pegel sollte die 0 dB Marke nicht überschreiten, da ansonsten
Verzerrungen auftreten können wenn die Pegelanzeige den roten Bereich erreicht. Während der
MASTER METER-Knopf (52) leuchtet, zeigen die Volumenmesser den Ausgangspegel auf dem Master
an.
52. MASTER METER (Messer) Knopf: Wenn dieser Knopf dunkel ist, zeigen die Volumenmesser die Pegel
der einzelnen Kanäle an. Drücken Sie den Knopf, damit er leuchtet: Die Volumenmesser zeigen jetzt
den Ausgangspegel des Masters an.
53. KANALFADER: Mit diesem Schieberegler kann man für jeden Kanal die Lautstärke separat anpassen.
54. FADER START Schalter: Wenn er eingeschaltet (ON) wird, kann der eingebaute Player durch
Bewegen des Crossfaders gestartet/gestoppt werden.
55. CROSS FADER CURVE: Stellt die Kurve des Crossfaders von hart (linke Position) bis weich (rechte
Position) ein.
56. CROSSFADER: Mit dem Crossfader können Sie die beiden Kanäle überblenden. Der Crossfader
funktioniert nur, wenn die Schiebefader (53) der Kanäle hochgezogen sind (53)!
57. DJ MIKROFON EINGANG: Anschluss eines asymmetrischen Mikrofons mit 1/4” Monoklinke möglich.
Dieser Eingang wird hauptsächlich für das DJ-Mikrofon benutzt. Dieser Pegel bleibt von der
Talkoverfunktion unbeeinflusst.
58. MIC1 VOL: Regelt die Lautstärke von MIKROFON 1.
59. MIC2 VOL: Regelt die Lautstärke von MIKROFON 2.
60. MIC TONE: zur Regelung des Klangs der beiden Mikrofoneingänge.
61. MIC ON/OFF/TALK OVER SCHALTER:
OFF: Mikrofon1 und Mikrofon2 ausgeschaltet.
ON: Mikrofon1 und Mikrofon2 eingeschaltet.
TALK OVER: MIKROFON1 und MIKROFON2 sind eingeschaltet.
Die Lautstärke aller anderen Kanäle wird um ca. -20dB abgesenkt.
62. CUE MIX: Mit diesem Regler können Sie die Eingangskanäle über den Kopfhörerausgang Mixen (64):
Setzen Sie den Regler in der äußersten linken Position um Kanal 1 abzuhören.
Setzen Sie den Regler in der äußersten rechten Position um Kanal 2 abzuhören.
Setzen Sie den Regler in eine Position zwischen dem linken und dem rechten Anschlag um eine
Mischung der beiden Signale abzuhören.
So können Sie Ihren Audiomix überprüfen, bevor Sie diesen über die Beschallungsanlage wiedergeben.
63. KOPFHÖRER VOLUME [LAUTSTÄRKE]: regelt den Schallpegel des Kopfhörerausgangs.
64. KOPFHÖRER-Ausgang: wenn Sie möchten, können Sie Ihren Kopfhörer hier anschließen.
VFD-ANZEIGE
A. PLAY: Leuchtet während der Wiedergabe eines Tracks.
B. PAUSE: Leuchtet während sich der Player im Pausen oder CUE Modus befindet.
C. CUE: erscheint, wenn der Player am CUE-Punkt wartet.
D. BERÜHRUNGSANZEIGE: erscheint, wenn der berührungsempfindliche Teil des Datenrads
aktiv ist.
E. ALPHANUMERISCHES DISPLAY: zeigt alle Arten von wichtigen Informationen wie
Effektparameter, Loop-Informationen, ID3-Tags, … an
SYNQ
®
81/120 DMC2000
SYNQ
®
82/120 DMC2000
Page 44

DEUTSCH BEDIENUNGSANLEITUNG
DEUTSCH BEDIENUNGSANLEITUNG
F. BPM DISPLAY: Der automatische Beatcounter zeigt die Anzahl der Beats pro Minute auf dem
Display an. Im manuellen Modus zeigt das Display “BPM”. Im automatischen Modus zeigt das
Display “AUTOBPM”. (drücken Sie den TAP Knopf für 2 Sekunden, um in den automatischen
Modus zu gelangen)
G. SPEICHERKORB: zeigt den Status des Pufferspeichers an, der für Anti-shock und einige
Sonderfunktionen gebraucht wird. Jeder Balken des Korbs steht für 2 Sekunden Pufferspeicher.
H. AUTO CUE: Leuchtet, wenn die "AUTO CUE" Funktion aktiv ist. Siehe SGL/CTN-Knopf (42).
I. RELOOP: Leuchtet, während der Wiedergabe eines Loop’s (das Wiederholen eines besonderen
Bereichs)
RELOOP blinkt: Loop ist programmiert und wird wiedergegeben.
RELOOP leuchtet: Loop ist programmiert, wird aber nicht wiedergegeben.
J. SINGLE: Leuchtet wenn der Player nur einen Track abspielt. Leuchtet diese Anzeige nicht,
werden alle Tracks ohne Unterbrechung abgespielt. Diese Funktion wird über die SGL/CTN
Taste eingestellt (42).
K. MP3-Anzeige: erscheint, wenn eine MP3-Datei abgespielt wird.
L. TRACK-Anzeige: zeigt die Anzahl verfügbarer Tracks in Ihrer aktuellen Auswahl.
Standard-Suchfeld: (kein Q-Dbase) Die Tracknummern im aktuellen Ordner (M) werden
angezeigt.
Q-Dbase-Suchfeld: die Tracknummern, die Ihrer Q-Dbase-Vorauswahl entsprechen.
M. FOLDER[Ordner]/SEARCH KEY[Suchschlüssel] Anzeige: die Information hängt vom
Suchfeld-Modus ab, den Sie ausgewählt haben.
Standard-Suchfeld: (keine Q-Dbase) die aktuelle Ordnernummer wird angezeigt.
Q-Dbase-Suchfeld: der aktuelle Suchschlüssel (Art [Künstler], Alb [Album] oder Gen
[Genre]) wird angezeigt.
N. ELAPSED, TOTAL REMAIN: Angezeigte Zeit ist die laufende, abgelaufene oder Gesamtzeit.
O. MINUTE: zeigt "Minuten" Information vom gegenwärtigen Track.
P. SECOND: zeigt "Sekunden" Information vom gegenwärtigen Track.
Q. FRAME: Zeigt den aktuellen Frame vom gegenwärtigen Track. (1 Frame = 1/75thSec.)
R. TIME BAR: mit zwei Funktionen:
Während des normalen Playback: Zeigt die vergangene oder aktuelle Zeit je nach
Einstellung der TIME Taste an. Wenn der Balken warnend blinkt, ist der Track fast am
Ende angelangt.
Während des Loop-Playbacks: Zeigt die verbleibende Zeit bis zum Ende des Loops an.
Diese visuelle Unterstützung erleichtert es festzustellen, wo und wann der Loop nahtlos
wieder beginnt.
S. PITCH DISPLAY: Zeigt die aktuelle Prozentzahl der Geschwindigkeitsveränderung an,
ausgelöst durch den SPEED-Slider (30). Das kleine rote Schloss erscheit, wenn die Pitch
Verriegelungsfunktion (Master Tempo) aktiviert ist.
ANSCHLÜSSE
Einige wichtige Hinweise für die USB-Speichergeräte, die Sie anschließen werden:
Hinweis 1: Die Festplatte muss in FAT32 formatiert sein! Eine in NTFS formatierte Festplatte (meistens
Laufwerke mit großer Kapazität) wird nicht erkannt werden: solch eine Festplatte sollte in FAT32 neu
formatiert werden! (Dies kann unter Windows geschehen, Hilfe finden Sie auf der DMC2000 Produktseite)
Hinweis 2: die USB-Schlitze an vorliegendem Player können jeweils 1A Stromstärke an die angeschlossene
Festplatte liefern. Für eine höhere Zuverlässigkeit empfehlen wir allerdings eine Festplatte mit separater
Stromzufuhr zu benutzen.
Hinweis 3: Ausschließlich WAV und MP3 -Dateien werden erkannt und können abgespielt werden.
Hinweis 4: Damit Sie es einfacher haben, empfehlen wir Ihnen sehr die Q-DBASE Indexier-Software zu
benutzen. Es erleichtert die Sache sehr!
EINFACHER AUFBAU_- 1 DECK
Verbinden Sie den symmetrischen (5) oder den asymmetrischen (6) Master mit einem Leistungsverstärker
oder mit aktiven Lautsprecherboxen.
Schließen Sie einen USB-Stick am USB1-Eingang (13) oder eine USB-Festplatte am USB2-Eingang (3)
an.
Schließen Sie im Bedarfsfall ein Mikrofon am Mic1- (57) oder Mic2- (11) Eingang an.
Verbinden Sie mithilfe der mitgelieferten Anschlussschnur den Netzeingang (1) am Player mit der
Netzdose.
Sie sind startklar zum Abspielen oder Mischen der MP3/WAV-Dateien auf Ihrem USB-Speicher. Viel
Spaß!
AUFBAU - MIT DMC1000 für gemeinsame Festplattennutzung
Schließen Sie eine USB-Festplatte an den USB2-Anschluss des DMC1000.
Stellen Sie sicher, dass die USB-Verbindung auf dem DMC1000 auf „LINK” steht.
Benutzen Sie das mit dem DMC1000 mitgelieferte USB-Kabel, um den USB-Anschluss des Players 1 mit
dem USB2-Anschluss des DMC2000 zu verbinden.
Benutzen Sie den SOURCE SELECT-Knopf (14), um USB2 auf den DMC2000 auszuwählen: Sowohl der
DMC1000 als auch der DMC2000 werden sich mit der Festplatte verbinden.
Sie können jetzt MP3 und WAV-Dateien von der angeschlossenen Festplatte abspielen.
WICHTIG: um eine gute, stabile Leistung zu erhalten, sollten Sie nur ein hochwertiges USB-Kabel mit
einer Höchstlänge von 1 Meter benutzen!
AUFBAU – KOMPLETTE INSTALLATION, EINSCHLIEßLICH MIDI-CONTROLLER
SYNQ
®
83/120 DMC2000
SYNQ
®
84/120 DMC2000
Page 45

DEUTSCH BEDIENUNGSANLEITUNG
DEUTSCH BEDIENUNGSANLEITUNG
Die Abbildung zeigt eine komplette Installation, einschließlich der MIDI-Controller Funktion.
Sie können bis zu 2 externe Audioquellen (Plattenteller oder Line) anschließen und Ihren DMC2000 in ein
Multifunktions-DJ-Gerät verwandeln. Sie müssen einfach nur die Eingänge oben auf den 2 Mischerkanälen
einschalten!
Wenn Sie nur die MIDI-Controller-Funktion benutzen möchten, brauchen Sie nur den Computer mit DJ-
Software über das mitgelieferte USB-Kabel am USB-MIDI-Ausgang (4) am DMC2000 anzuschließen: der
Controller wird erkannt und die Treiber werden automatisch installiert.
Setzen Sie beide Mischerkanal-Eingänge (46) in den MIDI-Modus: die meisten Regler am DMC2000
senden MIDI.
Weitere Informationen zu spezifischen MIDI-Einstellungen finden Sie im Kapitel „SETUP- MENÜ”.
Sie müssen die entsprechenden MIDI-Mappings für die von Ihnen benutzte DJ-Sofware herunterladen. Bei
mancher DJ-Software wird das DMC2000 Mapping automatisch geladen, bei anderer Software müssen
Sie das MIDI-Mapping von unserer Website oder vom Download-Bereich Ihrer DJ-Software herunterladen.
Wenn der DMC2000 von der DJ-Software nicht unterstützt wird, können Sie ihr eigenes MIDI-Mapping
machen, aber dies hängt ganz von der von Ihnen eingesetzten Software ab. Bitte beachten Sie, dass die
Installation und die Benutzung von verschiedener DJ-Software sehr komplex ist und deshalb nicht von
Synq unterstützt wird!
Der DMC2000 als eingebaute Soundkarten: Die Musik Ihrer Mischung kommt aus den Master-Ausgängen
(5+6).
MIDI-Funktion-Mischer: Die Einrichtung des DMC2000 ist so, dass Sie einfach Musik von allen
Eingängen miteinander mischen können. Sie können sogar Musik von der DJ-Software mit Musik aus den
eingebauten Playern oder von einem angeschlossenen Plattenteller mischen. Um dies tun zu können,
müssen Sie die MIDI-Funktion des eingebauten Mischers ausschalten. (siehe Setup-Menü)
VINYL Scratching Option auf DJ-Software: Mit dem DMC2000 können Sie sogar die sehr
leistungsfähige „Vinyl-Scratch-Funktion”, die in mancher besseren DJ-Software verfügbar ist, benutzen.
Dies bedeutet, dass Sie die Audiotracks, die in Ihrer DJ-Software gespielt werden, scratchen und
manipulieren können, indem Sie eine speziell codierte Vinyl-Platte benutzen! Schließen Sie einfach einen
Plattenteller an einen der Audioeingänge: Die Signale von der speziell codierten Vinyl-Platte werden an die
DJ-Software gesendet.
Hinweis 1: Überprüfen Sie zuerst, ob Ihre DJ-Software diese Funktion benutzen kann. Wenn ja,
folgen Sie den Anweisungen der Software, um diese Funktion einzurichten.
Hinweis2: Eine spezielle Vinyl -Scratch-Platte ist bei Synq als Option erhältlich, sie benutzt ein
„zeitverschobenes 1kHz Stereosignal”, das mit verschiedener DJ-Software benutzt werden kann.
DECKADANCE-LE Software
Der DMC2000 wird mit einer kostenlosen Lizenz für Deckadance-LE geliefert, der Benutzercode für diese
kostenlose Lizenz befindet sich an der Rückseite des DMC2000 (siehe Zeichnung).
Um sicherzustellen, dass Sie stets über die neueste Version verfügen, ist das Programm nur über
Download verfügbar. Laden Sie bitte die Demo-Version für Ihr Betriebssystem herunter:
WINDOWS: http://windemo.deckadance.com
MAC OS: http://macdemo.deckadance.com
Installieren Sie die Demo-Software und benutzen Sie den Benutzercode, um sie für die LE-Version von
Deckadance zu öffnen. Sie können diese kostenlose Software benutzen und sie auf neuere Versionen
upgraden, wenn diese verfügbar sind!
Installations- und Benutzerhandbücher können heruntergeladen werden von: http://deckadance.image-
line.com/downloads.html
WICHTIG: Wir empfehlen Ihnen sehr, Ihre Software auf der Deckadance Website zu registrieren:
Sie erhalten dadurch Zugang zum Benutzer-Forum, erhalten eine Newsletter und erhalten volle
Unterstützung von ihrem Support Team. Sie erhalten auch 30% Rabatt beim Upgraden zur HOUSE- und
CLUB-Ausgabe von Deckadance. Auf der Deckadance-Seite finden Sie eine Liste mit den verschiedenen
Eigenschaften der 3 Versionen.
Bitte beachten Sie, dass Sie Support für die Deckadance DJ-Software ausschließlich über die DeckadanceWebsite (www.deckadance.com) erhalten. Sie haben eine sehr weit entwickelte Support-Abteilung mit einem
Benutzerforum, Videoanleitungen usw.
SETUP-MENÜ
Für maximale Flexibilität ist dieses Gerät äußerst anpassbar. Aus diesem Grund können viele Parameter
über das Setup-Menü eingestellt werden. Um in das Setup-Menü gelangen zu können, darf der Player nicht
im MIDI-Modus sein.
Um in das Setup-Menü zu gelangen, halten Sie die LOAD TRACK-Taste (19) ungefähr 3 Sekunden
gedrückt.
Benutzen Sie den FOLDER [Ordner]-Knopf (16), um die verschiedenen Menüoptionen durchzusehen.
Benutzen Sie den TRACK-Knopf (17), um die Untermenüs (falls vorhanden) durchzusehen
Benutzen Sie das JOG WHEEL [Datenrad] (22), um die Einstellungen (Parameter) der gewählten
Menüoption zu ändern.
Um Ihre Einstellungen zu speichern: Wählen Sie die Menüoption E (EXIT & SAVE [verlassen und
sichern]) und drücken Sie den TRACK-Knopf (17) oder drücken Sie den RECORD CUE Knopf (25).
1. MIDI KANAL: zum Einstellen der MIDI-Kanäle der 3 verschiedenen Teile des DMC2000. Das Display
zeigt 3 zweistellige Gruppen: 01-02-03:
Die ersten 2 Zahlen: MIDI-Kanal für die Regler von Player1 + Kanal1 des Mischers.
Die zweiten 2 Zahlen: MIDI-Kanal für die Regler des Mischers mit Ausnahme der Regler der 2
Eingangskanäle (Verstärkung+hoch/mittel/niedrig+Fader)
Die dritten 2 Zahlen: MIDI-Kanal für die Regler von Player 2 + Kanal 2 des Mischers.
Drehen Sie den TRACK-Knopf (17) um die drei zweistelligen Gruppen zu durchlaufen.
Drehen Sie das JOG W HEEL (22), um den MIDI-Kanal zu wechseln.
2. MIDI SETUP [Einstellung]: Im Sinne maximaler Flexibilität können eine Menge anderer MIDI-Parameter
3. MISCHER (MIXER)-Modus: Um den Mischer vom MIDI-Modus in den Nicht-MIDI-Modus und umgekehrt
Hinweis: die 3 Teile müssen unterschiedliche MIDI-Kanäle haben.
ebenfalls eingestellt werden:
Es gibt 2 Untermenüs: Drehen Sie den TRACK-Knopf (17), um ein Untermenü auszuwählen.
o
Submenu 1 – SHIFT-Knopf (43)-Funktionsweise: Sie können wählen, wie der SHIFTKnopf im MIDI-Modus arbeitet.
Drehen Sie das JOG WHEEL (22), um die gewünschte Einstellung auszuwählen:
TAP = HOLD: ähnlich der SHIFT-Taste auf Ihrer PC-Tastatur Der MIDI-
Code einer Taste/eines Knopfes ändert nur, wenn Sie sie/ihn benutzen,
während die SHIFT-Taste (43) gedrückt wird.
TOP = TOGGLE : ähnlich der CAPS LOCK-Taste auf Ihrer PC-Tastatur
Drücken Sie die SHIFT-Taste (43), um die Shift-Funktion anzustellen:
Solange das Display „SHIFT” anzeigt, ändern die MIDI-Codes der meisten
Tasten/Knöpfe, so dass diese eine zweite (doppelte) Funktion erhalten.
I/O = Hide [verstecken]: MIDI-Nachrichten, die gesendet/empfangen
werden, werden nicht angezeigt
I/O = DIS. : MIDI-Nachrichten, die gesendet/empfangen werden, werden
angezeigt.
zu schalten.
o
Submenu 2 – MIDI-Nachrichten Display: Sie können wählen, ob die MIDI I/O
Nachrichten auf dem Display erscheinen sollen oder nicht. Dies kann bei der Erstellung
von MIDI-Konfigurationsdateien hilfreich sein.
Drehen Sie das JOG WHEEL (22), um die gewünschte Einstellung auszuwählen:
Drehen Sie das JOG WHEEL (22) um die gewünschte Einstellung auszuwählen:
SYNQ
®
85/120 DMC2000
SYNQ
®
86/120 DMC2000
Page 46

DEUTSCH BEDIENUNGSANLEITUNG
FUNCTION
DEUTSCH BEDIENUNGSANLEITUNG
MIDI : Benutzen Sie diese Einstellung, wenn der DMC2000 ausschließlich
zum Steuern der DJ-Software benutzt wird. Der Mischer der DJ-Software
wird gesteuert.
NO MIDI : Benutzen Sie diese Einstellung, wenn Sie verschiedene
Audioquellen (DJ-Software, externe Inputs, interne Player) mit einander
mischen wollen, die Pegel aller Audioquellen kann mit Hilfe der
Verstärkungsregelungsknöpfen (gain) leicht angepasst werden (47).
Hinweis: Mit dieser Einstellung sendet der Mischer keine MIDI, sondern
funktioniert als ein normaler Audiomischer.
4. LOAD HOTCUES: Sie können wählen, ob die abgespeicherten Hot-Cues eines Tracks automatisch
wieder abgerufen werden sollen.
Drehen Sie das JOG WHEEL (22), um eine der 2 Möglichkeiten auszuwählen:
o
First Ask: Wenn ein Track Hot-Cues enthält, wird das Display Sie fragen, ob Sie die HotCues laden möchten oder nicht. Sie können mit den YES/NO-Knöpfen antworten (29).
o
Autoload: Wenn ein Track Hot-Cues enthält, werden diese automatisch geladen.
5. CROSS FADER: schaltet den Cross Fader des Audiomischers an/aus. Dies hat keine Wirkung auf die
MIDI-Funktion des Cross Faders.
Drehen Sie das JOG WHEEL (22), um eine der 2 Möglichkeiten auszuwählen:
o
On: der Cross Fader (56) ist aktiviert, bereit zum Gebrauch.
o
Off: wenn Sie keine Lust haben, den Cross Fader zu gebrauchen, wählen Sie diese
Möglichkeit.
6. REVERSE CROSS FADER: schaltet den Cross Fader des Audiomischers in den Umkehrmodus. Dies
hat keine Wirkung auf die MIDI-Funktion des Cross Faders.
Drehen Sie das JOG WHEEL (22), um eine der 2 Möglichkeiten auszuwählen:
o
On: Crossfader (56) arbeitet im Umkehrmodus, Kanal 1 ist hörbar, wenn der Crossfader
rechts steht.
o
Off: Crossfader (56) arbeitet im Normalmodus, Kanal 2 ist hörbar, wenn der Crossfader
rechts steht.
7. DISPLAY TIME: Sie können wählen, wie lange eine Nachricht angezeigt wird, ehe das Display wieder in
den Normalbetrieb umschaltet.
Drehen Sie das JOG WHEEL (22), um den gewünschten Wert auszuwählen: 0,5 Sek 12,0
Sek.
8. SCROLL SPEED: Sie können wählen, wie schnell der Text auf dem Display scrollen (vorrollen) soll.
Drehen Sie das JOG WHEEL (22), um den gewünschten Wert auszusuchen: 50 2000 ms (50
ms = schnell/2000ms=langsam).
9. Sensitivity [Empfindlichkeit]: Sie können die Berührungsempfindlichkeit des taktilen Datenrads ändern,
um die Datenradleistung zu optimieren.
Drehen Sie das JOG WHEEL (22), um eine der 41 Möglichkeiten auszuwählen:
o
ADJ. = 0: neutrale Einstellung (Voreinstellung, OK in den meisten Fällen)
o
ADJ. = -20: niedrigste Empfindlichkeit
o
ADJ. = +20: höchste Empfindlichkeit
A. INTENSITY: zum Anpassen der Leuchtkraft des VFD-Displays.
Drehen Sie das JOG WHEEL (22), um eine der 4 Möglichkeiten auszuwählen.
o
ADJ. = 1 4: 1 = geringe Leuchtkraft, 4 = starke Leuchtkraft (Voreinstellung)
B. A.CUE Level: Die Auto-Cue-Funktion spürt auf, wo die Musik wirklich startet, dies vermeidet musikfreie
Stellen, wenn ein Track nicht gut indexiert ist. Sie können eine der Detektionspegel-Voreinstellungen
wählen:
Drehen Sie das JOG WHEEL (22), um eine der 8 Möglichkeiten auszuwählen.
o
ADJ. = -78dB -36dB: die Voreinstellung = -48dB
C. Firmware version / upgrading: Benutzen Sie diese Option, um die Firmware-Versionen zu überprüfen
oder upzugraden.
Drehen Sie den TRACK-Knopf (17), um die 4 Firmware-Teile auszuwählen:
o
CON: xx: zeigt die Version der Steuer-Firmware
o
DSP: xx: zeigt die Version der DSP-Firmware
o
Upgrade: blinkt, wenn das Gerät bereit ist zu überprüfen, ob neue Firmware-Versionen
verfügbar sind. Siehe “FIRMWARE UPGRADING” für weitere Informationen.
D. Load defaults[Voreinstellungen laden]: Wie Sie bereits feststellen konnten, ist vorliegendes Gerät
extrem konfigurierbar, aber das bedeutet auch, dass Sie viele Einstellungen durcheinander bringen
können. Wenn Sie wirklich Dinge durcheinander gebracht haben, bleibt Ihnen immer noch die
Möglichkeit, zu den Voreinstellungen zurückzukehren!
Während „Enter Load” auf dem Display blinkt: drücken Sie den TRACK-Knopf (17), um die
Voreinstellungen zu laden.
E. Exit & Save verlassen und sichern]: wenn Sie Ihre Änderungen am Setup-Menü dauerhaft speichern
möchten (auch nach dem Ausschalten des Geräts, MÜSSEN Sie diese Option benutzen!
Drücken Sie den TRACK-Knopf (17): das Display zeigt „Saving” [Speichern] an und verlässt das
Setup-Menü.
Hinweis: als Alternative können Sie auch den RECORD CUE-Knopf (25) drücken, um die Einstellungen
dauerhaft zu speichern.
FIRMWARE UPGRADING
Wir empfehlen Ihnen sehr, Ihren Player auf unserer Website zu registrieren (www.synq-audio.com/register/),
so dass wir Sie informieren können, wenn neue Firmware-Updates verfügbar sind. Beim Upgraden von
Firmware sollte stets sehr vorsichtig vorgegangen werden!
Laden Sie die Datei herunter, die die Upgrade-Datei(en) enthält
Lesen Sie die Anweisungen und befolgen Sie sie strikt, ansonsten können Sie Ihre Ausrüstung
beschädigen…
Setzen Sie die Dateien auf einen LEEREN (wichtig!) USB-Stick.
Halten Sie die LOAD TRACK Taste (19) ungefähr 3 Sekunden lang gedrückt, um ins Setup-Menü zu
gelangen.
Benutzen Sie den FOLDER-Knopf (16), um zur Menüoption „C. Version”zu gelangen.
Drehen Sie den TRACK-Knopf (17), bis auf dem Display „Upgrade” erscheint.
Benutzen Sie den SOURCE SELECT-Knopf (14), um den USB1-Eingang zu wählen (13).
Stecken Sie den USB-Stick mit den Firmware-Dateien in den USB1-Eingang (13)
Das Upgrading startet automatisch: WARTEN SIE(!), bis der Upgrade-Vorgang beendet ist. Schalten Sie
NIEMALS den Player während des Upgradens der Software aus!!!
Wenn das Display Sie bittet, das Gerät auszuschalten, schalten Sie es aus, warten 3 Sekunden und
schalten es wieder ein.
Überprüfen Sie, ob die Software-Version der Version entspricht, die in der mit dem Update gekommenen
Readme-Datei gekennzeichneten ist.
MIDI MAP (Voreinstellungen)
FUNCTION Type
SW/ENC 05/17 44/56 05/27 44/66
SW/ENC 01/16 40/55 01/26 40/65
IN SW/LED 02/02 D-1 41 02/02 D-1 41
OUT SW/LED 03/03 D#-1 42 03/03 D#-1 42
SW/LED 04/04 E-1 43 04/04 E-1 43
SOURCE
SELECT
RECORD CUE SW/LED 07/07 G-1 46 07/07 G-1 46
1
1
2
SW 06 45 06 45
SW/LED
(RED)
SW/LED
(GREEN)
SW/LED
(RED)
FUNCTION
CODE
(DECK A)
08/08 G#-1 47 08/08 G#-1 47
08/05 F-1 47 08/05 F -1 47
09/09 A-1 48 09 /09 A-1 48
NOTE
SHIFT
(Hold
TAP)
FUNCTION
CODE
(DECK B)
NOTE
SHIFT
(Hold
TAP)
CODE
(CENTER
DECK)
NOTE
SHIFT
(Hold TAP)
ACTION
7FH:ON
00H:OFF
7FH:ON
00H:OFF
7FH:ON
00H:OFF
7FH:ON
00H:OFF
7FH:ON
00H:OFF
7FH:ON
00H:OFF
7FH:ON
00H:OFF
7FH:ON
00H:OFF
7FH:ON
00H:OFF
7FH:ON
00H:OFF
SYNQ
®
87/120 DMC2000
SYNQ
®
88/120 DMC2000
Page 47

DEUTSCH BEDIENUNGSANLEITUNG
LEVEL
VR/SW/
30/08/
CUE PAN
CUE PAN
DEUTSCH BEDIENUNGSANLEITUNG
2
3
3
4
4
DELETE CUE SW/LED 0C/0C C0 4B 0C/0C C0 4B
LOAD TRACK SW/LED 0D/0D C#0 4C 0D/0D C#0 4C
TIME X SW/LE D 0E/0E D0 4D 0E/0E D0 4D
ECHO SW/LED 0F/0F D#0 4E 0F/0F D#0 4E
FLANGER SW/LED 10 /10 E0 4F 10/10 E0 4F
HOLD SW/LED 11/11 F0 50 11/11 F0 50
FILTER SW/LED 12/12 F#0 51 12/12 F#0 51
BRAKE SW/LED 13/13 G0 52 13/13 G0 52
RATIO Y SW/LED 14/14 G#0 53 14/14 G#0 53
% SW 15 54 15 54
A.Cue
scratch
VINYL SW/LED 19/19 C#1 58 19/19 C#1 58
CDJ SW/LED 1A/1A D1 59 1A/1A D1 59
Time SW 1B 5A 1B 5A
SGL/CTN SW 1C 5B 1C 5B
JOG SW/ENC 27 /18 66/57 27/28 66/67
TAP/SHIFT SW 1E 5D 1E 5D
CUE SW/LED 1F/1F G1 5E 1F/1F G1 5E
DATABASE SW/LED 21/21 A1 60 21/21 A1 60
Pitch Silder VR/CE NTER
GAIN VR 11 50 21 60 VR:00~7F
HIGH VR/SW/CEN TER/LED 12/24/29/24 C2 51/63/68 2 2/24/29/24 C2 61/63/68 VR:00~7F
SW/LED
(GREEN)
SW/LED
(RED)
SW/LED
(GREEN)
SW/LED
(RED)
SW/LED
(GREEN)
SW 16 55 16 55
SW 17 56 17 56
SW/LED 18/18 C1 57 18/18 C1 57
SW/LED 1D/1D F1 5C 1D/1D F1 5C
SW/LED 20/20 G#1 5F 20/20 G#1 5F
SW 22 61 22 61
SW 23 62 23 62
09/06 F#-1 48 09/06 F#-1 48
0A/0A A# -1 49 0A/0A A#-1 49
0A/15 A0 49 0A/15 A0 49
0B/0B B-1 4A 0B/0B B-1 4A
0B/16 A #0 4A 0B/16 A#0 4A
PITCH
BEND/28
PITCH
67
BEND/28
67
7FH:ON
00H:OFF
7FH:ON
00H:OFF
7FH:ON
00H:OFF
7FH:ON
00H:OFF
7FH:ON
00H:OFF
7FH:ON
00H:OFF
7FH:ON
00H:OFF
7FH:ON
00H:OFF
7FH:ON
00H:OFF
7FH:ON
00H:OFF
7FH:ON
00H:OFF
7FH:ON
00H:OFF
7FH:ON
00H:OFF
7FH:ON
00H:OFF
7FH:ON
00H:OFF
7FH:ON
00H:OFF
7FH:ON
00H:OFF
7FH:ON
00H:OFF
7FH:ON
00H:OFF
7FH:ON
00H:OFF
7FH:ON
00H:OFF
7FH:ON
00H:OFF
7FH:ON
00H:OFF
7FH:ON
00H:OFF
7FH:ON
00H:OFF
7FH:ON
00H:OFF
7FH:ON
00H:OFF
7FH:ON
00H:OFF
7FH:ON
00H:OFF
7FH:ON
00H:OFF
7FH:ON
00H:OFF
MID VR/SW/CEN TER/LED 13/25/2A /25 C# 2 52/64/69 23/25/2A/25 C#2 62/64/69 VR: 00~7F
LOW VR/SW/CENTER/LED 14/26/2B/26 D2 53/65/6A 24/26/2B/26 D2 63/65/6A VR:00~7F
Channel Fader VR 10 4F 20 5F VR:00~7F
U1 LED 17 B0 17 B0
U2 LED 1B D#1 1B D#1
16 LED 1C E1 1C E1
10 LED 1E F#1 1E F#1
6 LED 22 A#1 22 A#1
METER LED
RANDOM SW/LED 2C/2C G#2 6B
MASTER
METER
MASTER VR 31 70 VR:00~7F
BOOTH VR 32 71 VR:00~7F
Cross Fader
MIC1 LEVEL VR 35 74 VR:00~7F
MIC2 LEVEL VR 36 75 VR:00~7F
SLIDER
LEVEL
Fader Start
ON(L)
Fader Start
OFF(L)
Fader Start
ON(R)
Fader Start
OFF(R)
C.F CURVE
(L)
C.F CURVE
(CENTER)
C.F CURVE
(R)
LEVEL LED 1 1 00H~7FH *
SW/LED 2D/2D A2 6C
SW/CENTER
VR 34 73 VR:00~7F
VR 33 72 VR:00~7F
SW 1 40
SW 2 41
SW 3 42
SW 4 43
SW 7 46
SW 6 45
SW 5 44
09/0A
6F/47/48/49 VR: 00~7F
7FH:ON
00H:OFF
7FH:ON
00H:OFF
7FH:ON
00H:OFF
7FH:ON
00H:OFF
7FH:ON
00H:OFF
7FH:ON
00H:OFF
7FH:ON
00H:OFF
7FH:ON
00H:OFF
7FH:ON
00H:OFF
7FH:ON
00H:OFF
7FH:ON
00H:OFF
7FH:ON
00H:OFF
7FH:ON
00H:OFF
7FH:ON
00H:OFF
CC-ABSOLUTE (VR, LEVEL METER LED) TYPE
Control Change Messages (Nachrichten über Steuerknopfänderungen) werden mit Status 0xBn gesendet,
wobei n der Kanal für den spezifischen CC Controller ist. Somit wird die Controller MIDI ID mit dem Kanal
und der CC-Nummer angezeigt. Der Wert von 0x00 bis 0x7F bezieht sich unmittelbar auf den Standort
des Controllers.
* LEVEL METER (Pegelmesser) LEDS
00~0B => ALLE LEDS AUS
0C~17 => LED (-30) AN
18~23 => LED (-30, -20) AN
24~2F => LED (-30, -20, -10) AN
30~3B => LED (-30, -20, -10, -7) AN
3C~47 => LED (-30, -20, -10, -7, -4) AN
48~53 => LED (-30, -20, -10, -7, -4, -2) AN
54~5F => LED (-30, -20, -10, -7, -4, -2, 0) AN
60~6B => LED (-30, -20, -10, -7, -4, -2, 0, +2) AN
6C~77 => LED (-30, -20, -10, -7, -4, -2, 0, +2, +4) AN
78~7F=> ALLE LEDS AN (-30, -20, -10, -7, -4, -2, 0, +2, +4, +7)
SYNQ
®
89/120 DMC2000
SYNQ
®
90/120 DMC2000
Page 48

DEUTSCH BEDIENUNGSANLEITUNG
DEUTSCH BEDIENUNGSANLEITUNG
CC-RELATIVE (ENC)
Control Change Messages (Nachrichten über Steuerknopfänderungen) haben den Status 0xBn, wobei n
der Kanal für den spezifischen CC Controller ist. Somit wird die Controller MIDI ID mit dem Kanal und der
CC-Nummer angezeigt. Der Wert von 0x40 dient zur Anzeige der Änderung im Controller. Dies ist eine
Abweichung zwischen 0x40 und „der eigenen zusätzlichen” Angabe.
Eine Nachricht mit den Daten 0x43 zeigt eine positive Änderung von 3 an.
Eine Nachricht mit den Daten 0x31 zeigt eine negative Änderung von 15 an.
SWITCH ON/OFF [Schalter an/aus] (SW,CENTER)
Diese Nachrichten werden für Schalter benutzt.
Control Change messages werden mit Status 0x9n gesendet, SWITCH On und Off-Wert sind 0x7F und
0x00, wobei n der Kanal ist.
LED ON/OFF LED
Diese Nachrichten werden für LEDs benutzt.
Control Change messages werden mit Status 0x9n gesendet, LED On und Off-Wert sind 0x7F und 0x00,
wobei n der Kanal ist.
INSTALLATION DER Q-DBASE-SOFTWARE:
Der DMC2000 arbeitet perfekt ohne die Q-DBASE-Datenbankdateien, aber wenn Sie Ihre Tracks einfach
und Ihre Beleuchtung schnell finden wollen, sollten Sie die Q-DBASE-Software auf Ihrem Computer
installieren! Beachten Sie bitte, dass das Programm zurzeit nur unter Windows (XP, Vista, Win7) läuft. Um
sicherzugehen, dass Sie stets die neueste Version haben, können Sie die Software von unserer Website
herunterladen (Sehen Sie im Download-Bereich auf der DMC2000 Produktseite nach). Die Installation des
Programms ist sehr einfach: Einfach auf die Datei doppelklicken und die Anweisungen auf Ihrem Bildschirm
befolgen.
BENUTZEN DER Q-DBASE-SOFTWARE
Jedes Mal, wenn Sie Tracks auf Ihrer USB-Festplatte hinzufügen oder entfernen,
müssen Sie die Q-DBASE-Software wieder darüberlaufen lassen, um die Datenbankdateien
upzudaten!
Nach der Installation werden Sie ein neues Programmverzeichnis mit
dem Namen „SYNQ” sehen. In diesem Verzeichnis werden Sie 2
Dateien finden:
- Uninstall (zur Deinstallation der Software)
- Q-DBASE (zum Starten der Software)
Schließen Sie Ihre USB-Festplatte an Ihren PC an und überprüfen
Sie, welcher Laufwerksbuchstabe ihr zugewiesen wird.
Klicken Sie auf das Q-DBASE-Icon, um die Software zu starten: der
Hauptschirm wird angezeigt.
In der oberen linken Ecke wählen Sie Ihr USB-Laufwerk.
Drücken sie den BUILD-Knopf auf der rechten Seite.
Die Software beginnt mit dem Scannen des USB-Laufwerks nach kompatiblen Tondateien und zieht
die ID3-Tags heraus, um die Q-DBASE-Dateien zu bauen, die
benötigt werden, um die Suchfunktion auf dem Player zu
beschleunigen. Sobald der Verlaufsanzeigebalken unten auf
dem Bildschirm vollständig ist, ist der DatenbankAufbauprozess abgeschlossen und eine kurze
Zusammenfassung wird angezeigt.
Das Programm hat die Q-DBASE-Dateien (Dateienverlängerungen:
.DBH + .dat + .DBX) in das USB-Laufwerk geschrieben, so dass sie
es jetzt von Ihrem PC entfernen können und es an den DMC-2000
anschließen können.
Um bestmögliche Ergebnisse zu erzielen, sollten Sie stets die neueste Version der Datenbank-Software
benutzen. Sie können die Software-Version unten links auf dem „About”-Schirm finden.
! WICHTIGER HINWEIS FÜR VISTA-BENUTZER!
Viele Vista-Benutzer werden nicht in der Lage sein, die Q-DBASESoftware zu benutzen. Dieses Problem wird durch die UAC (User
Account Control) [Benutzerkontenverwaltung], eine Sicherheitsoption,
die die Benutzerprivilegien in Vista einschränkt, verursacht. Um dieses
Problem zu lösen, klicken Sie mit der rechten Maustaste das Q-
DBASE-Programm-Icon und wählen Sie „Run as administrator” im
Popup-Menü. Windows wird mit dem Schirm rechts antworten: klicken
Sie einfach „Allow” [Zulassen].
WIE NUTZE ICH…
Die meisten gemeinsamen Funktionen sind im vorherigen Kapitel "Tasten und Funktionen" beschrieben. In
diesem Kapitel werden speziellere Funktionen erklärt.
EINIGE ALLGEMEINE FUNKTIONEN:
EINEN TRACK MIT DEM Q-DBASE-SYSTEM SUCHEN:
Wichtig: Bevor Sie das Q-DBASE-System benutzen können, müssen Sie Ihr USB-Laufwerk scannen, ob
es die erforderlichen Dateien enthält.
Sie können den Suchschlüssel jederzeit wählen, indem Sie den TRACK-Knopf (17) drücken, währen Sie
ihn drehen. Sie können nach Art(Künsterl), Alb(Album) oder Gen(Genre) suchen.
Drücken Sie den DATABASE-Knopf (15), um die Suchfunktion zu starten Der Anfangsbuchstabe der
Liste, die Sie suchen möchten, blinkt auf dem Display.
Drehen Sie den FOLDER-Knopf (16), um den Anfangsbuchstaben zu ändern.
Drehen Sie das JOG WHEEL (22), um die Liste, die Ihrer Anfrage entspricht, schnell durchzugehen.
Wenn Sie genauer, Track für Track, suchen möchten, können Sie auch den TRACK-Knopf (17)
drehen.
Sobald Sie den gewünschten Track gefunden haben, drücken Sie die LOAD TRACK-Taste (19).
EINEN TRACK OHNE Q-DBASE-SYSTEM SUCHEN:
Drücken und drehen Sie den TRACK-Knopf (17), um Std(Standard-Suchsystem) auszuwählen. Wenn das
USB-Laufwerk keine Q-DBASE-Dateien hat, wählt der Player automatisch das Standard-Suchsystem. Sie
haben zwei Optionen:
Option 1:
Benutzen Sie einfach die FOLDER und TRACK Knöpfe, um die verschiedenen Verzeichnisse
durchzusehen.
Option 2:
Drücken Sie den DATABASE-Knopf (15), um die Suchfunktion zu starten Sowohl das FOLDER- als
auch das TRACK-Display beginnt zu blinken.
Drehen Sie den FOLDER-Knopf (16), um die Ordner durchzusehen.
Drehen Sie das JOG WHEEL (22), um die gewählten Ordner schnell durchzusehen. Wenn Sie
genauer, Track für Track, suchen möchten, können Sie auch den TRACK-Knopf (17) drehen.
Sobald Sie den gewünschten Track gefunden haben, drücken Sie die LOAD TRACK-Taste (19).
TOTAL RANDOM AUF EINEM USB-Laufwerk:
Dies ist die einfache Random-Funktion, bei der gleich welcher Track auf Ihrem USB-Laufwerk nach dem
Zufallsprinzip auf dem Player 1 abgespielt werden kann:
Öffnen Sie den Fader (53) für Player1 auf der Tonmischpult.
Drücken Sie den SOURCE SELECT-Schalter (14) von Player 1, um eins der USB-Laufwerke
auszuwählen.
Drücken Sie kurz die RANDOM-Taste (45), bis sie leuchtet.
Drücken Sie die PLAY-Taste (20) von Player 1, um das Random-Abspielen zu starten.
SYNQ
®
91/120 DMC2000
SYNQ
®
92/120 DMC2000
Page 49

DEUTSCH BEDIENUNGSANLEITUNG
DEUTSCH BEDIENUNGSANLEITUNG
“SMART” RANDOM AUF EINEM USB-Laufwerk:
Das ist die „intelligente” Random-Funktion, bei der Sie frei entscheiden, welchen Ordner, Genre, Album
oder Künstler Sie in Ihrer Random-Auswahl abspielen möchten. Optimal für Hintergrundmusik in
Restaurants, Geschäften, Clubs & Bars ohne DJ. Dies ist, wie es funktioniert:
Öffnen Sie den Fader (53) für Player1 auf der Tonmischpult.
Drücken Sie den SOURCE SELECT-Schalter (14) von Player 1, um eins der USB-Laufwerke
auszuwählen.
Nur Tracks aus einem Ordner abspielen
Drücken & drehen Sie den TRACK-Knopf (17), um den „Std” Suchschlüssel auszuwählen.
Drücken Sie die FOLDER Taste (16), auf dem Display erscheint die aktuell ausgewählte
Verzeichnis-Namen.
Drehen Sie den FOLDER-Knopf (16) bis zu dem Verzeichnis, aus dem die Daten abgespielt werden
sollen.
Halten Sie den RANDOM- Knopf (45) ungefähr 2 Sekunden lang gedrückt, bis die LED zu blinken
beginnt.
Drücken Sie die PLAY-Taste (20) um das Random-Abspielen nur aus dem ausgewählten Ordner zu
starten.
Nur Tracks vom selben Genre abspielen
Drücken & drehen Sie den TRACK-Knopf (17), um den “Genre” Suchschlüssel auszuwählen.
Drücken Sie die FOLDER-Taste (16), auf dem Display erscheint die aktuell ausgewählte Genre.
Drücken & drehen Sie den FOLDER-Knopf (16) um den ersten Buchstaben des gewünschten
Genres auszuwählen.
Falls erforderlich, drehen Sie das JOG WHEEL (22), während Sie den FOLDER-Knopf (16) gedrückt
halten, um die verschiedenen Genres mit demselben Anfangsbuchstaben durchzusehen.
Halten Sie den RANDOM-Taste (45) ungefähr 2 Sekunden lang gedrückt, bis die LED zu blinken
beginnt.
Drücken Sie die PLAY-Taste (20), um das Random-Abspielen nur aus dem ausgewählten Genre zu
starten.
Anmerkung 1: um nur Titel von einem bestimmten Künstler oder Album zu spielen, wiederholen Sie
einfach die Schritte aber wählen Sie die Künstler oder Album Such-Funktion.
Anmerkung 2: Bitte beachten Sie, dass die "SMART" Random-Funktion nur dann richtig funktionieren
wird, wenn die ID3-Tags gut gepflegt sind. Ein perfekter "Freeware" ID3-Tag-Editor für diese Aufgabe
ist "MP3Tag" und kann auf www.mp3tag.de heruntergeladen werden!
ÜBER LOOPS:
LOOP-ERSTELLUNG:
Während der Wiedergabe drücken Sie die LOOP IN Taste (31). Dies ist der Startpunkt des Loops. Nun
drücken Sie die OUT Taste (32) um den Endpunkt zu markieren. Der nahtlose Loop startet direkt und wird
wiederholt (Mit ein wenig Übung erhalten Sie perfekte Loops). Während der Wiedergabe des Loop’s
können Sie die OUT Taste drücken (32), um den Loop zu verlassen und den Rest des Tracks
wiederzugeben. Es ist möglich während der Wiedergabe des Loop’s einen neuen Loop zu erstellen. Dazu
drücken Sie einfach die Taste LOOP IN (31) um den neuen Startpunkt zu markieren. Nun markieren Sie
den Endpunkt mit der OUT Taste (32). Ihr neuer Loop ist programmiert und wird wiedergegeben.
RESTART DES LOOPS :
Dies kann auf 3 Arten geschehen:
Wenn ein Loop programmiert ist und Sie ihn durch Drücken der OUT Taste (32) verlassen haben,
drücken Sie die Taste RELOOP (33) um den Loop neu zu starten.
Wenn ein Loop programmiert ist und Sie ihn durch Drücken der OUT Taste (32) verlassen haben,
drücken Sie die Taste OUT noch einmal um den Loop neu zu starten. Der nun markierte Punkt ist der
neue Endpunkt des laufenden Loop’s.
Während der Wiedergabe des Loop’s drücken Sie die Taste RELOOP (33) um den Loop direkt wieder
neu zu starten. Ideal um einen „Stotter“ Effekt zu kreieren.
EDITIEREN EINES LOOPS:
Wenn ein Loop programmiert wurde, drücken Sie den RELOOP Knopf (33) über 2sec, um in den „Loop
edit“ Mode zu gelangen. Während der Loop nahtlos abgespielt wird zeigt das Display den Loop Endpunkt
an. Nutzen Sie das große Drehrad um einen neuen Loop Endpunkt zu setzen. Um das Setzen zu
vereinfachen kann man den neu gewählten Endpunkt dauerhaft hören. Wenn Sie den Loop-Intropunkt
auch editieren möchten, drücken Sie den RELOOP-Knopf (33), um zwischen dem Loop-Start- und
Endpunkt hin- und herzuspringen. Wenn der Endpunkt gesetzt ist drücken Sie den LOOP OUT Knopf (32)
um die Stellung zu speichern.
ÜBER DIE EFFEKTE:
In der Beschreibung der Effekte finden Sie bereits eine Menge Informationen, vergessen Sie nicht dort
nachzusehen!
BENUTZUNG DER EFFEKTE IM TAKTSYNCHRONISIERTEM MODUS:
Drücken Sie den FX-SYNC-Knopf (38), so dass er aufleuchtet.
Während des Abspielens der Musik können Sie jeden der 3 Effekte drücken: der Effekt arbeitet im
taktsynchronisiertem Modus. Benutzen Sie die EFFECT SYNC X/Y Knöpfe (39+40), um verschiedene
Takt-Voreinstellungen auszuwählen. Halten Sie den RATIO-Knopf (40) gedrückt, bis die LED zu blinken
beginnt, um die Wirkung des Effekts anzupassen.
BENUTZUNG DER EFFEKTE IM MANUELLEN MODUS:
Drücken Sie den FX-SYNC IN-Knopf (48), so dass er erlischt.
Während des Abspielens der Musik können Sie jeden der 3 Effekte drücken: Benutzen Sie das JOG
WHEEL (24), um den Effekt in Echtzeit zu verändern. Benutzen Sie den HOLD-Knopf (44), um
festzulegen, ob die Effekt-Parameter gespeichert werden müssen oder nicht. Weitere Erläuterungen
finden Sie auch in der Beschreibung der HOLD-Taste (44). Benutzen Sie die RATIO-Taste (46), um die
Wirkung des Effekts anzupassen.
ÜBER DEN SPEICHER:
VERSCHIEDENE SPEICHER:
Bevor wir darüber reden, wie der Speicher verwendet wird, müssen wir den Unterschied zwischen
"TRACK MEMORY" und "PERMANENT MEMORY" kennen:
TRACK MEMORY: Dies ist der interne Speicher, wo der DMC2000 bis zu vier CUE-Punkte und/oder
Loop’s für einen Track speichern kann. Sie können ein "Track Memory" für jeden einzelnen Track auf
einem USB-Laufwerk erstellen.
Beispiel: Ihre USB-Festplatte enthält 5000 Tracks (für jeden Track können Sie bis zu 4 CUE-Punkte
und/oder Loop’s speichern. Das macht eine Gesamtsumme von 5000 x 4 = 20000 CUE-Punkte
und/oder Loop’s auf einer USB-Festplatte!
PERMANENT MEMORY: Dies ist der große Speicher, wo alle CUE-Punkte und Loop’s dauerhaft
gespeichert werden. In der Tat ist es eine indizierte Sammlung von "TRACK MEMORYs". Wenn Sie
sich an zuvor gespeicherte CUE-Punkte eines gewissen Tracks erinnern, übertragen Sie diese vom
"PERMANENT MEMORY" in das "TRACK MEMORY".
Hinweis: alle Cue-Punkte sind in Datenbankdateien auf Ihrem USB-Laufwerk gespeichert. Wenn Sie das
Laufwerk an einen anderen DMC2000 oder DMC1000 anschließen, können alle Cue-Punkte auch sofort
auf diesem Player genutzt werden.
VERWENDUNG DES TRACK MEMORY:
Einen MASTER CUE-Punkt speichern:
Es gibt 2 Arten, einen CUE-Punkt zu setzen:
Drücken Sie den LOOP IN (31)-Knopf während des normalen Abspielens, um den Cue-Punkt zu
setzen („CUE on the fly”).
Setzen Sie den Player auf Pause und benutzen Sie das Jog/Shuttle W heel, um den genauen Standort
für den Cue-Punkt zu suchen. Sobald der Standort gefunden ist, drücken Sie den LOOP IN Knopf (31),
um den neuen Cue-Punkt zu setzen. (oder drücken Sie die PLAY/PAUSE-Taste)
Sobald der Cue-Punkt programmiert ist, drücken Sie einfach den CUE-Knopf (21), um ihn wieder
abzurufen.
Einen einfachen CUE-Punkt auf die "HOT CUE" Tasten speichern:
Drücken Sie zunächst den RECORD CUE-Knopf (25), um das Gerät in den Hot-Cue-Memory-Modus
(RECORD CUE-Knopf ist an) zu setzen:
Drücken Sie einen der vier HOT CUE-Knöpfe (24) im richtigen Moment während des normalen
Abspielens: der HOT CUE-Knopf, den Sie gerade gedrückt haben, wird grün, um anzuzeigen, dass
der gewünschte Cue-Punkt gespeichert wurde. („Cue on the fly”).
Setzen Sie den Player auf Pause und benutzen Sie das Jog/Shuttle W heel, um den genauen Standort
für den Cue-Punkt zu suchen. Sobald der Standort gefunden ist, drücken Sie einen der vier HOT CUE-
SYNQ
®
93/120 DMC2000
SYNQ
®
94/120 DMC2000
Page 50

DEUTSCH BEDIENUNGSANLEITUNG
DEUTSCH BEDIENUNGSANLEITUNG
Knöpfe, um den neuen Cue-Punkt zu setzen: der HOT CUE-Knopf, den Sie gerade gedrückt haben,
wird grün, um anzuzeigen, dass der gewünschte Cue-Punkt gespeichert ist.
Sobald der Cue-Punkt programmiert ist, drücken Sie einfach den Hot-CUE-Knopf, um das Abspielen von
dem gespeicherten Cue-Punkt aus zu starten.
SPEICHERN EINES LOOPS AUF DEN “HOT CUE”-KNÖPFEN:
Dies entspricht im Großen und Ganzen dem Speichern eines einfachen Cue-Punkts. Der einzige
Unterschied ist, dass Sie den DMC2000 zunächst in den Loop-Modus setzen müssen. Wenn der Loop
abgespielt wird, drücken Sie den RECORD CUE-Knopf (25), um den Player in den Hot-Cue-MemoryModus (RECORD CUE-Knopf ist an) zu setzen. Anschließend drücken Sie einen der vier HOT CUEKnöpfe (24): der HOT CUE-Knopf, den Sie gerade gedrückt haben, wird rot, um anzuzeigen, dass der
derzeit spielende Loop gespeichert ist. Sie können bis zu 4 Loops pro Track speichern!
LÖSCHEN DER „HOT CUE”-KNÖPFE:
Sie können die Inhalte eines HOT CUE-Knopfes leicht löschen, indem Sie den DELETE CUE-Knopf (26)
und anschließend den HOT CUE-Knopf, den Sie löschen möchten, drücken. Oder speichern Sie einfach
einen neuen Cue-Punkt oder Loop auf diesem HOT CUE-Knopf. Sie können auch alle vier HOT CUEKnöpfe auf einmal löschen, indem Sie den DELETE CUE-Knopf (26) länger als 2 Sekunden gedrückt
halten. Sie werden bemerken, dass das Licht aller 4 HOT CUE-Knöpfe ausgeht, um anzuzeigen, dass die
HOT CUE-Knöpfe leer sind.
VERWENDUNG DES PERMANENT MEMORY:
Aus Sicherheitsgründen, werden die CUE-Punkte und Loop’s, die auf den HOT CUE Tasten gespeichert
sind, nicht automatisch im PERMANENT MEMORY abgelegt. Dies bedeutet das Sie jederzeit CUE’s und
Loop’s aus dem PERMANENT MEMORY auf die HOT CUE Tasten legen können. Diese CUE Punkte und
Loop’s können Sie ändern, editieren und löschen. Der PERMANENT MEMORY wird davon nicht
beeinflusst werden, bis Sie ein BACKUP der HOT CUE Tasten für PERMANENT MEMORY machen.
SPEICHERN ZUM PERMANENT MEMORY:
Drücken Sie die RECORD CUE Taste (25) bis Das Display zeigt „Now saving“, die CUE Punkte und
Loop’s auf den HOT CUE Tasten in den PERMANENT MEMORY wurden gespeichert.
LÖSCHEN EINES TRACKS IM PERMANENT MEMORY:
Wählen Sie den zu löschenden Track. Drücken Sie gleichzeitig die “DELETE CUE” (26) und “SYNC/Y”
(40) -Knöpfe. Das Display fragt “Del Track?”, wenn Sie den YES Knopf drücken (PITCH BEND+ Taste);
die Track Information wird vom permanenten Speicher gelöscht.
AUFRUFEN VON „HOT CUE-PUNKTEN/LOOPS” AUS DEM FESTSPEICHER:
Da es einige Sekunden dauert, um die permanenten Cue-Punkte zu laden, werden Sie nicht automatisch
aufgerufen. Manchmal brauchen Sie diese einfach nicht, warum also auf sie warten? Im Nachfolgenden
erläutern wir, wie alles funktioniert:
Keine Cue-Punkte gespeichert: Wenn Sie einen Track auswählen, für den keine Cue-Punkte oder
Loops im Festspeicher gespeichert sind, geschieht nichts: Sie können das Abspielen sofort beginnen.
Cue-Punkte gespeichert: Wenn Sie einen Track auswählen, für den Cue-Punkte oder Loops im
Festspeicher gespeichert sind, zeigt der DMC2000 „Load Cues?” [Cues laden?] an, um zu fragen, ob
Sie die Cue-Punkte laden möchten. Dies sind Ihre Auswahlmöglichkeiten:
Sie drücken den YES-Knopf: Drücken Sie Yes (Ja) (Pitch Bend + Knopf), um die
vorgespeicherten Cue-Punkte und Loops zu laden. Das Display zeigt RECALL an, während
die Hot-Cue-Knöpfe gefüllt werden.
Sie drücken den NO-Knopf: Die Cue-Punkte werden nicht geladen und das Display kehrt zur
normalen Anzeige zurück. Die können das Abspielen sofort starten.
Sie tun gar nichts: Nach einigen Sekunden kehrt das Display automatisch zur normalen
Anzeige zurück und die Cue-Punkte wurden natürlich nicht geladen.
Hinweis: Im Setup-Menü (Punkt4) können Sie das automatische Laden (Autoload) der Cue-Punkte
wählen. In diesem Fall fragt der Player nichts, sondern lädt einfach die Cue-Punkte.
TECHNISCHE DATEN
Stromzufuhr: AC 100 - 240V, 50/60Hz
Leistungsaufnahme: 21W
Referenz-Eingangspegel / Impedanz:
Line: 47kΩ /-14dBV (200mV) +/-0,1dB
Phono: 47kΩ /-51dBV (2,8mV) +/-0,1dB
Mikro: 10kΩ /-56dBV (1,5mV) +/-0,1dB
Maxi Input: (1kHz, Klirrfaktor (THD)=1%, EQ flach, max. Verstärkung, Last=100kΩ)
Line: > +0dBV
Phono: > -38dBV
Mikro: > -42dBV
Talkover: -20dB +/-2dB
Frequenzgang: (EQ flach, max. Verstärkung, Last = 100kΩ)
Line: 20Hz - 20kHz +/-2dB
Phono: 20Hz - 20kHz +2/-3dB (RIAA)
Mikro: 20Hz - 20kHz +2/-3dB
Klirrfaktor THD+N: (EQ flach, max. Verstärkung, w/20kHz Tiefpassfilter (LPF), A-gewichtet, Last =
100kΩ)
Line: < 0,06% @ 1 KHz
Phono: < 0,08% @ 1 KHz
Mikro: < 0,15% @ 1 KHz
Ausgangspegel / Impedanz:
Master asymmetrisch: 1kΩ /3,8dBV (1,55V) +/-2dB
Master symmetrisch (Last=600Ω): 600Ω /+6dBm (1,55V) +/-3dB (zwischen HOT (heiß) und
COLD (kalt))
Booth Master: 1kΩ /3,8dBV (1,55V) +/-2dB
Kopfhörer (Last=32Ω): 33Ω /0dBV (1V) +/-2dB
Max. Output: (1kHz, Klirrfaktor (THD)=1%, EQ flach, max. Verstärkung, Last = 100kΩ)
Master: > +18dBV (8V) Last=100kΩ
Kopfhörer: > +4dBV (1,6V) Last=32Ω
USB-FORMAT:
Dateisystem: FAT12/16/32
Max. Festplattenkapazität: 500GB
Max. Ordner: 999
MaxTracks / Ordner: 999
Max. Q-DBASE Spurkapazität: 9999
WAV FORMAT: PCM, 1411kbps.
MP3 FORMATE:
MPEG1 Layer3 (ISO/IEC11172-3): Mono- / Stereo- Samplefrequenzen: 32 - 44,1 - 48kHz
Bitraten: 32 – 320 Kbps
Bitrate Verfahren: CBR (konstante Bitrate) oder VBR (Variable Bitrate)
MPEG2 Layer3 (ISO/IEC13818-3): Mono- / Stereo- Samplefrequenzen: 16 - 22,05 - 24kHz
Bitraten: 32 – 160 Kbps
Bitrate Verfahren: CBR (konstante Bitrate) oder VBR (Variable Bitrate)
MPEG2,5 Layer3: Mono- / Stereo- Samplefrequenzen: 8 – 11.025 - 12kHz
Bitrates: 32 – 160 Kbps
Bitrate Verfahren: CBR (konstante Bitrate) oder VBR (Variable Bitrate)
Q-DBASE Software:
Dateierweiterung: .DBH + .dat + .DBX
Systemanforderungen: RAM 512MB
100MB verfügbarer Speicherplatz
Microsoft®Win XP SP3 ~ Win Vista SP2 ~ Win 7
Abmessungen: 299(T) x 420(B) x 89(H) mm
Gewicht: 4,42kg
Technische Änderungen können auch ohne Vorankündigung vorgenommen werden!
Sie können sich die neueste Version dieses Benutzerhandbuches von unserer Website
herunterladen: www.beglec.com
SYNQ
®
95/120 DMC2000
SYNQ
®
96/120 DMC2000
Page 51

ESPAÑOL MANUAL DE INSTRUCCIONES
MANUAL DE FUNCIONAMIENTO
Lo felicitamos y le agradecemos por haber adquirido este producto SYNQ®. Lea atentamente estas
instrucciones de funcionamiento de tal modo que sepa cómo manejar este producto correctamente.
Después de que haya finalizado la lectura de las instrucciones, guárdelas en un lugar seguro para futuras
consultas.
NO OLVIDE REGISTRAR SU NUEVO PRODUCTO SYNQ®. ¡CUANDO ESTÉN DISPONIBLES NUEVAS
ACTUALIZACIONES DE SOFTWARE, RECIBIRÁ AUTOMÁTICAMENTE UNA NOTIFICACIÓN!
VISITE: WWW.SYNQ-AUDIO.COM/REGISTER/
CARACTERÍSTICAS
Esta unidad es a prueba de interferencias de radio. Este producto cumple con los requisitos actuales de las
directrices nacionales y europeas. Se ha establecido la conformidad y las instrucciones y los documentos
correspondientes han sido depositados por el fabricante.
¡Este controlador profesional digital de medios le ofrece una solución única extremadamente compacta que
satisfará incluso a los DJ más exigentes! ¡Todo lo que necesitará para comenzar la fiesta es un par de
altavoces!
La unidad cuenta con un gran número de características, como por ejemplo:
Podrá reproducir y mezclar sin problemas música proveniente de diversas fuentes:
Dos reproductores USB internos que comparten el mismo disco duro USB/memoria USB para
reproducir archivos WAV o MP3.
Distintas entradas analógicas, como por ejemplo tocadiscos, reproductores de CD adicionales, etc.
Controla todos los populares software de DJ MIDI que usted se pueda imaginar, ¡software
Deckadance-LE gratuito incluido!
Se pueden utilizar simultáneamente dos micrófonos con la función “talk-over”.
Sistema Q-DBase: sistema completo e inteligente de búsqueda de datos para localizar fácilmente sus
pistas, ¡incluso en discos duros de gran capacidad de hasta un máximo de 500 GB!
Software integrador Q-DBase gratuito para Windows incluido.
Los efectos digitales (echo, flange, filter, brake) pueden utilizarse manualmente o totalmente
sincronizados con el beat con los preajustes.
Loops sin fracturas con la función de edición de loop a tiempo real
PCMS (Permanent Cue Memory System)(Sistema de memoria de entrada permanente): para cada pista
se pueden almacenar/recuperar en cualquier momento hasta 4 puntos cue y loops sin fracturas
Función scratch y velocidad de pitch de alta precisión, gracias a las jog wheel táctiles
Diversos modos de jog wheel: ¡scratch para vinilo, CDJ y A. CUE!
El software de DJ puede utilizar discos de vinilo codificados para controlar la reproducción y el scratch de
sus archivos MP3/WAV.
Las pantallas VFD de 2 x 10 caracteres alfanuméricos muestran toda la información, incluyendo etiquetas
ID3.
ALEATORIO INTELIGENTE: la reproducción aleatoria puede limitarse a 1 género o artista (por ejemplo,
¡reproducir únicamente estilos lentos!)
Firmware Synq original y actualizable: garantiza una funcionalidad sencilla y sofisticada imposible de
igualar.
Menú de configuración totalmente personalizable para MIDI y otras funciones.
Control de pitch (+/-6%, 10%, 16%, +16%/-100%)
Bloqueo de pitch (Master Tempo)
Mesa de mezclas digital completa de doble canal con crossfader, salida balanceada y cabina principal
personalizables.
Auriculares de monitoreo PFL con mezcla CH1/CH2 y volumen ajustable.
Mucho más …
ESPAÑOL MANUAL DE INSTRUCCIONES
ANTES DEL USO
Antes de comenzar a utilizar esta unidad, compruebe que no se hayan producido daños durante el
transporte. Si observa algún daño, no utilice el dispositivo y consulte primero a su distribuidor.
Importante: Este dispositivo ha salido de nuestras instalaciones en perfecto estado y bien embalado. Es
absolutamente necesario que el usuario siga estrictamente las instrucciones de seguridad y advertencias
que aparecen en este manual del usuario. Cualquier daño producido por un manejo inadecuado queda
excluido de la garantía. El distribuidor no asumirá ninguna responsabilidad por cualquier defecto o
problema que surja por no haber seguido las instrucciones de este manual del usuario.
Guarde este manual en un lugar seguro para consultarlo en el futuro. Si vende la unidad posteriormente,
asegúrese de incluir este manual del usuario.
Para proteger el medio ambiente, por favor intente reciclar el material de embalaje en la medida de lo
posible.
Compruebe el contenido:
Compruebe que la caja contenga los siguientes artículos:
Unidad DMC2000
Instrucciones de funcionamiento
1 cable USB
1 cable de alimentación CA
INSTRUCCIONES DE SEGURIDAD:
PRECAUCIÓN: Para reducir el riesgo de sufrir descargas
CAUTIO N
El símbolo en forma de rayo con cabeza de flecha dentro de un triángulo equilátero se emplea
para alertar sobre el uso o presencia de “voltaje peligroso” no aislado dentro del bastidor del
producto con la magnitud suficiente para constituir un riesgo de descarga eléctrica.
El signo de exclamación dentro de un triángulo equilátero se emplea para alertar al usuario de la
presencia de instrucciones de funcionamiento y mantenimiento (servicio) importantes en el texto
que acompaña a este aparato.
Este símbolo indica: Usar sólo en el interior
Este símbolo indica: Leer las instrucciones
Este símbolo indica: Aparato de seguridad de clase II
Para evitar incendios o riesgos de descarga, no exponga la unidad a la lluvia o a la humedad.
Para evitar que se forme condensación en el interior, deje que la unidad se adapte a la temperatura
ambiente cuando la lleve a una habitación cálida después del transporte. A veces la condensación impide
que la unidad funcione a pleno rendimiento y puede incluso provocar daños.
Esta unidad sólo se puede usar en interiores.
No coloque objetos metálicos ni derrame líquidos dentro de la unidad. No deberá colocar sobre la unidad
objetos con líquidos, como por ejemplo jarrones. Se pueden producir descargas eléctricas o fallos de
funcionamiento. Si algún objeto extraño entra en la unidad, desconecte inmediatamente el suministro
eléctrico.
No coloque sobre el aparato fuentes de llamas, como por ejemplo velas encendidas.
No cubra ninguna abertura de ventilación puesto que podría producirse un sobrecalentamiento de la
unidad.
Evite el uso en entornos con polvo y limpie la unidad regularmente.
Mantenga la unidad lejos de los niños.
Las personas sin experiencia no deben utilizar este aparato.
La máxima temperatura ambiental para operar con seguridad es de 40° C. No utilice esta unidad a
temperaturas ambientales superiores.
La distancia mínima alrededor del aparato para obtener la ventilación suficiente es de 5 cm.
eléctricas, no quite la cubierta superior. No existen piezas
en el interior que pueda mantener o reparar el usuario.
Asigne el mantenimiento y las reparaciones a personal
cualificado.
SYNQ
®
97/120 DMC1000
SYNQ
®
98/120 DMC1000
Page 52

ESPAÑOL MANUAL DE INSTRUCCIONES
ESPAÑOL MANUAL DE INSTRUCCIONES
Desenchufe siempre la unidad cuando no vaya a ser utilizada durante un largo periodo de tiempo o antes
de comenzar el mantenimiento.
La instalación eléctrica sólo debe ser llevada a cabo por personal cualificado, de acuerdo a las
regulaciones de seguridad eléctrica y mecánica de su país.
Compruebe que el voltaje disponible no supere al que se indica en el panel trasero de la unidad.
La entrada del enchufe deberá permanecer en estado de operación para poderse desconectar de la red
eléctrica.
El cable de alimentación siempre debe estar en perfecto estado. Apague la unidad inmediatamente
cuando observe daños o desperfectos en el cable de alimentación. Debe ser reemplazado por el
fabricante, su agente de servicio o personas cualificadas para evitar cualquier peligro.
¡Nunca deje que el cable de alimentación entre en contacto con otros cables!
¡Aunque el interruptor de alimentación esté en posición desconectada OFF, la unidad no estará
completamente desconectada de la red eléctrica!
Para evitar descargas eléctricas, no abra la cubierta. Aparte del fusible de la red no hay piezas en el
interior de este aparato que pueda mantener el usuario.
Nunca repare un fusible ni derive el soporte del fusible. ¡Reemplace siempre el fusible dañado por uno
del mismo tipo y con las mismas especificaciones eléctricas!
En caso de que ocurran problemas de funcionamiento serios, deje de utilizar el aparato y póngase en
contacto con su distribuidor inmediatamente.
Utilice el embalaje original cuando tenga que transportar el dispositivo.
Por razones de seguridad se prohíbe realizar modificaciones no autorizadas en la unidad.
GUÍA DE INSTALACIÓN:
Colocar y utilizar la unidad durante largos periodos de tiempo cerca de fuentes que generen calor tales
como amplificadores, reflectores, etc. afectará su rendimiento y podría incluso dañarla.
Intente minimizar impactos y vibraciones durante el transporte.
Al instalar la unidad en una cabina o estuche de transporte, asegúrese de tener buena ventilación para
mejorar la disipación del calor de la unidad.
Para evitar que se forme condensación en el interior, deje que la unidad se adapte a la temperatura
ambiente cuando la lleve a una habitación cálida después del transporte. La condensación impide algunas
veces que la unidad funcione a pleno rendimiento.
Seleccione el lugar de instalación con mucho cuidado. Evite la presencia de fuentes de calor. Evite
lugares con vibraciones o lugares que tengan mucho polvo o humedad.
Para evitar incendios o riesgos de descarga, no exponga la unidad a la lluvia o a la humedad.
Para evitar descargas eléctricas, no abra la cubierta superior. Si se presenta un problema, póngase en
contacto con su distribuidor.
No coloque objetos metálicos ni derrame líquidos dentro del reproductor. Se pueden producir descargas
eléctricas o fallos de funcionamiento.
El reproductor no debe ser ajustado o reparado por ninguna persona que no cuente con la capacitación
adecuada.
Esta unidad puede ocasionar interferencias en la recepción de radio y televisión.
LIMPIEZA DEL REPRODUCTOR:
Limpie con un paño pulido ligeramente empapado con agua. No deje entrar agua en la unidad. No utilice
líquidos volátiles como benceno o diluyente, puesto que dañarán la unidad.
CONTROLES Y FUNCIONES
1. Entrada de CORRIENTE: conecte la unidad a un suministro de alimentación de CA de 100-240 V,
usando el cable de alimentación suministrado.
2. Interruptor POWER ON/OFF: enciende y apaga la unidad.
3. Conexión USB2: esta es la segunda conexión USB (tipo A), usada para conectar cualquier dispositivo
de almacenamiento masivo USB con el formato FAT o FAT32. Esta entrada se usa de forma
predeterminada para conectar un disco duro. (Consulte el capítulo “conexiones”)
4. Conexión MIDI / LINK USB: esta conexión USB (tipo B) se usa para conectar el reproductor a un
ordenador con software de DJ MIDI. Consulte el capítulo “conexiones” para más información.
5. SALIDA BALANCEADA MAESTRA: Los conectores XLR pueden utilizarse para conectar esta mesa
de mezclas a cualquier entrada de altavoces o amplificador balanceado, usando cables de señal
balanceados especiales.
6. SALIDA NO BALANCEADA MAESTRA: La salida “maestra” posee la misma señal de salida que la
salida maestra balanceada (5) aunque no está balanceada.
7. SALIDA MAESTRA DE CABINA: La salida “maestra de cabina” transporta la misma señal que la
maestra aunque puede controlarse independientemente por la cabina principal (49). Utilice las salidas
para conectar amplificadores no balanceados o para conectar una grabadora de sonido.
8. INTERRUPTOR PH/LINE: Este interruptor hace posible la alternación entre el nivel de entrada Phono y
Línea para este canal.
9. ENTRADA ANALÓGICA: podrá conectar tocadiscos o reproductores de CD adicionales para ambos
canales de la mesa de mezclas, y podrán mezclarse simultáneamente con pistas desde los
reproductores DMC2000 y software de DJ desde su PC/MAC.
10. CONEXIÓN A TIERRA (GND): Muchos de los tocadiscos disponen de conexión GND. Es preferible
conectar esta señal de tierra al conector GND. Si su tocadiscos no tiene un cable de toma a tierra, no
hará falta que utilice este conector.
11. CLAVIJA DE ENTRADA DEL MIC DJ: Clavija combo. Acepta tanto un micrófono balanceado con un
conector XLR como un micrófono no balanceado con clavija 1/4” mono. Esta entrada se utiliza
principalmente como micrófono DJ. El modo “talk-over” no afectará al nivel de la señal de esta entrada.
12. RANURA DE SEGURIDAD KENSINGTON: puede utilizarse para proteger el DMC2000 de robos
oportunistas. ¡Tenga presente que esta medida no proporciona una protección antirrobo completa!
Podrá comprar un cable de seguridad compatible “Kensington” en prácticamente cualquier tienda de
ordenadores.
SYNQ
®
99/120 DMC1000
SYNQ
®
100/120 DMC1000
Page 53

ESPAÑOL MANUAL DE INSTRUCCIONES
13. Conexión USB1: esta es la primera conexión USB (tipo A), utilizada para conectar cualquier dispositivo
de almacenamiento masivo USB con el formato FAT o FAT32. De forma predeterminada esta entrada
se usa para conectar una unidad USB ocasional como por ejemplo las memorias USB, etc.
14. Interruptor SOURCE SELECT: use este botón para seleccionar la fuente de audio deseada: USB1 o
USB2.
15. Botón DATABASE / NEXT TRACK: un botón muy importante si desea encontrar la siguiente pista fácil
y rápidamente, ¡incluso aún cuando se esté reproduciendo la pista anterior! Este botón funciona de dos
formas diferentes:
Función NEXT TRACK: se usará durante la búsqueda en dispositivos de almacenamiento masivo
que no tengan instalados archivos “Q-DBase system” . Únicamente podrá buscar en los números de
pista y carpeta.
Función DATABASE: se usará durante la búsqueda en dispositivos de almacenamiento masivo
que tengan instalados archivos “Q-DBase system” . Puede buscar alfabéticamente por artista, título
de pista, género o álbum. ¡Es muy rápido y así no tendrá que recordar dónde están sus archivos!
Cuando haya encontrado la canción deseada, simplemente pulse el botón LOAD TRACK (19) para
cargar la pista.
Para ambas funciones, consulte el capítulo “FUNCIONAMIENTO” para obtener más información.
16. Perilla FOLDER: esta perilla tiene varias funciones:
Sin Q-Dbase: gire esta perilla para explorar las carpetas de una unidad USB cuando no use el
sistema Q-Dbase.
Durante la búsqueda Q-Dbase: pulse mientras gira la perilla para seleccionar el primer carácter de
la clave de búsqueda que esté buscando. Gire la perilla para ir a la siguiente clave de búsqueda que
comience con el mismo carácter. Pulse la perilla para mostrar la clave de búsqueda en la 2ªlínea
de texto de la pantalla.
Menú de configuración: gire la perilla para explorar las diferentes opciones de menú.
Consulte los capítulos “FUNCIONAMIENTO” & “MENÚ DE CONFIGURACIÓN” para más información.
ESPAÑOL MANUAL DE INSTRUCCIONES
17. Perilla TRACK: esta perilla tiene varias funciones:
Sin Q-Dbase: gire esta perilla para explorar las pistas en una carpeta de un dispositivo de
almacenamiento cuando no use el sistema Q-Dbase.
Búsqueda Q-Dbase: dos opciones:
Gire la perilla para explorar todos los archivos con el mismo carácter inicial que seleccionó la
primera vez con el botón FOLDER.
Presione la perilla mientras la gira para cambiar la clave de búsqueda en la base de datos;
puede buscar las siguientes claves:
Art: busca por “nombres de artista” en orden alfabético (clave de búsqueda
predeterminada)
Alb: busca por “nombres de álbum” en orden alfabético
Gen: busca por “Géneros” en orden alfabético
Std: no usa el sistema Q-Dbase; sólo las carpetas y pistas manualmente.
Durante la reproducción: Presione la perilla para ver en la pantalla las diferentes etiquetas ID3:
Pulse x 1: Muestra el nombre del álbum de la pista actual
Pulse x 2: Muestra el género de la pista actual
Pulse x 3: Muestra información sobre la velocidad de bits de la pista actual
Menú de configuración: gire el botón para cambiar los ajustes de la opción de menú seleccionada.
Consulte el capítulo “FUNCIONAMIENTO” para obtener más información.
18. Botones SEARCH: utilizados para buscar rápidamente dentro de una pista.
19. Botón LOAD TRACK: este botón tiene diferentes funciones:
Cargar una pista: que se localizó usando la función de base de datos/siguiente pista.
Abrir el menú de configuración: pulse el botón LOAD TRACK durante aproximadamente 3
segundos.
Cerrar el menú de configuración: pulse brevemente el botón LOAD TRACK para salir de la
configuración.
Consulte los capítulos “FUNCIONAMIENTO” & “MENÚ DE CONFIGURACIÓN” para más información.
20. Botón PLAY/PAUSE: cada vez que pulse el botón PLAY/PAUSE, el reproductor cambia de
reproducción a pausa o de pausa a reproducción. El botón parpadea mientras el reproductor esté en
pausa.
21. Botón CUE: Al pulsar el botón CUE durante la reproducción, regresa inmediatamente a la posición en
la cual se inició la reproducción. La reproducción comienza inmediatamente desde el punto cue
programado mientras se mantenga pulsado el botón CUE. El reproductor regresa al punto cue en
cuanto suelte el botón CUE. Igualmente, con la unidad en el modo de pausa (el botón Play/Pause
parpadea) la jog wheel se usa para establecer un punto de inicio diferente. Al pulsar el botón
“PLAY/PAUSE” o “LOOP IN” seguido de “CUE”, podrá confirmar este nuevo punto cue.
22. JOG-WHEEL TÁCTIL: La jog-wheel en este reproductor tiene 2 partes:
Parte central táctil: para igualar la sensación de vinilo al máximo y mejorar en gran medida el
scratch, la parte central de la jog-wheel utiliza una tecnología patentada sensible al tacto. Con los
botones WHEEL MODE (23) puede cambiar el comportamiento de esta parte central. Para más
información, consulte la descripción de los botones WHEEL MODE (23).
Anillo externo: parte en color plata de la jog wheel que no es sensible al tacto. A pesar del modo
de rueda seleccionado, el anillo externo siempre puede usarse para la velocidad de pitch, excepto al
usar uno de los efectos digitales.
23. Botón WHEEL MODE: alterna entre 3 diferentes modos para la jog-wheel táctil. La parte central táctil y
el anillo externo se comportan de forma diferente:
Modo VINILO: utilizado para obtener un scratching de archivos MP3 extremadamente realista
reproducidos en los reproductores internos o en el software de DJ de su ordenador.
Parte central táctil: Durante la reproducción, la música se detiene inmediatamente al tocar la
jog-wheel: la velocidad y dirección de reproducción se controlan totalmente con los
movimientos de su mano. Podrá establecer fácilmente en el modo de pausa un nuevo punto
cue.
Anillo externo: Durante la reproducción podrá utilizar el anillo externo de modificación del
pitch para sincronizar los beats de 2 pistas. En el modo de pausa escuchará los típicos loops
muy pequeños que le dan la posibilidad de establecer un punto cue con una precisión de 1
frame (1/75 segundos).
Modo CDJ: este es el modo estándar, usado por la mayoría de los reproductores de DJ. Tanto la
parte central táctil como el anillo externo se comportan idénticamente. Mientras la pista se
encuentra bajo reproducción, la jog-wheel temporalmente modifica el pitch de la música hasta en +/-
SYNQ
®
101/120 DMC1000
SYNQ
®
102/120 DMC1000
Page 54

ESPAÑOL MANUAL DE INSTRUCCIONES
ESPAÑOL MANUAL DE INSTRUCCIONES
100% al girar la rueda en el sentido de las manecillas del reloj para acelerarla o en el sentido
contrario para alentarla. La cantidad de velocidad del pitch está determinada por la velocidad de
rotación. En el modo de pausa escuchará los típicos loops muy pequeños que le dan la posibilidad
de establecer un punto cue con una precisión de 1 frame (1/75 segundos).
Modo SCRATCH CUE A.: muy similar al modo VINILO pero el scratching siempre comienza a partir
del punto cue actual; el comportamiento del anillo externo es idéntico al del modo de vinilo:
Parte central táctil: Durante la reproducción, la música se detiene inmediatamente y regresa
al punto cue actual cada vez que toque la jog-wheel: la velocidad y dirección de reproducción
se controlan totalmente con los movimientos de su mano. En el modo de pausa, podrá
establecer fácilmente un nuevo punto cue pero el reproductor regresa primero al punto cue
actual.
Anillo externo: Durante la reproducción podrá utilizar el anillo externo de velocidad de pitch
para sincronizar los beats de 2 pistas. En el modo de pausa, escuchará los típicos loops muy
pequeños que le dan la posibilidad de establecer un punto cue con una precisión de 1 frame
(1/75 segundos).
24. Botones HOT CUE: 4 botones programables, en los cuales puede guardar puntos cue y/o loops
habituales. Al guardar un punto cue normal, el botón correspondiente es verde, cuando un loop está
guardado el botón correspondiente cambia a color rojo. Todos los puntos cue y loops guardados se
pueden respaldar en la memoria permanente para uso futuro. A esta característica se la denomina
“PCMS Permanent Cue Memory System”. Consulte el capítulo “FUNCIONAMIENTO” para obtener más
información sobre cómo programar los puntos cue, etc.
25. Botón RECORD CUE: pulse este botón antes de pulsar uno de los 4 botones HOT CUE (24) para
guardar así un nuevo punto cue o loop. Consulte el capítulo “FUNCIONAMIENTO” para aprender cómo
guardar los puntos cue y los loops.
Guardar entradas en la memoria permanente: El sistema hot cue usa 2 tipos de memoria:
“memoria de pista” temporal y memoria “permanente” . Los nuevos hot cues solamente se guardan
en la “memoria de pista”temporal. Si desea conservar los hot cues para un uso futuro, debe guardar
la información en la memoria permanente. Para guardar los cue en la memoria permanente,
simplemente pulse el botón RECORD CUE hasta que aparezca en la pantalla “Saving”.
Guardar ajustes personales: Pulse el botón RECORD CUE y el botón X/SYNC (39) al mismo
tiempo para guardar distintos parámetros personales actualmente en uso (rango del pitch,
sencillo/cont., visualización de tiempo estándar, ajustes de jog wheel, cue automático, modo BPM
automático, pitch activado/desactivado, clave de búsqueda de base de datos y tiempo de
inicio/tiempo de pausa)
26. DELETE CUE: este botón tiene diferentes funciones:
ELIMINAR 1 HOT CUE: Pulse el botón DELETE CUE, seguido del botón HOT CUE que desea
eliminar de la memoria de pista. El botón eliminado cambiará a color negro.
ELIMINAR 4 HOT CUE: Pulse el botón DELETE CUE durante 2 segundos para borrar todos los 4
hot cue de la memoria de pista.
ELIMINAR PISTA: Pulse simultáneamente el botón DELETE CUE y el botón Y/RATIO (40) para
eliminar los hot cue de toda la pista de la memoria permanente. Debido a que no podrá revertir esta
operación, la pantalla primero le preguntará si está seguro: al usar los botones PITCH BEND (29)
puede seleccionar SÍ o NO.
Consulte el capítulo “FUNCIONAMIENTO” para obtener más información.
27. Botón TEMPO RANGE: pulse este botón para seleccionar los diferentes rangos de velocidad
disponibles: +/-6%, +/-10%, +/-16%, +16/-100%. Los rangos inferiores hacen que el SPEED-fader (28)
sea más preciso, los rangos más altos son adecuados para efectos especiales. Para desactivar la
función de velocidad simplemente pulse el botón durante 1 segundo, hasta que se apaguen los
indicadores de velocidad. Pulse nuevamente este botón para reactivar el control de velocidad.
28. SPEED-fader: se usa para ajustar la velocidad de reproducción de la pista que se está reproduciendo.
Puede activar/desactivar la función de velocidad o cambiar el rango con el botón TEMPO RANGE (27)
29. Botones PITCH BEND: La velocidad aumenta mientras se mantenga pulsado el “botón +” y regresa al
pitch original al soltar el botón. La velocidad disminuye mientras se mantenga pulsado el “botón –” y
regresa al pitch original al soltar el botón. Estos botones se pueden usar para sincronizar los beats de 2
pistas. También se usan para confirmar (o no) las preguntas que algunas veces se muestran en la
pantalla.
30. Botón KEY LOCK: (Master tempo) activa la función de bloqueo de pitch. Esta función le permite
realizar ajustes en la velocidad de las pistas usando el SPEED-fader sin alterar el tono del pitch.
31. Botón LOOP IN: Le permite establecer un nuevo punto cue sin detener la reproducción (CUE AL
VUELO). Este botón también establece el inicio de un loop sin fracturas: marca el inicio del loop; tiene
que pulsar el botón LOOP OUT para marcar el final del loop e iniciar la reproducción en el modo loop.
Consulte el capítulo “FUNCIONAMIENTO” para obtener más información.
32. Botón OUT/EXIT: Se usa para establecer el punto final al aplicar el loop a la música. El reproductor
empieza la reproducción del loop continuo hasta que pulse nuevamente este botón para salir. Cuando
programe un loop, pero sin activarlo, puede también reiniciar el loop. El punto en el cual pulse el botón
será memorizado como el nuevo punto final de loop. En el modo de edición de loop, al pulsar el botón
OUT/EXIT se detiene la edición de loop y se guarda el nuevo punto final de loop.
33. Botón RELOOP/STUTTER: Este botón tiene 3 funciones:
RELOOP: Cuando se ha programado un loop y ha pulsado el botón OUT/EXIT, pulse el botón
reloop para ingresar nuevamente el loop. Para salir del loop, pulse el botón OUT/EXIT. (los puntos
de introducción y finales del loop permanecen sin cambiar)
STUTTER: Cuando se esté reproduciendo un loop, puede pulsar este botón para reiniciar el loop
inmediatamente. También puede pulsar este botón cuando no se esté reproduciendo una pista en
loop. Cada vez que pulse el botón RELOOP/STUTTER, reiniciará la música a partir del punto cue
real. El efecto stutter agrega creatividad extra a su presentación.
INGRESAR AL MODO DE EDICIÓN DE LOOP: Tras programar un loop (los botones LOOP IN y
OUT/EXIT están activados), podrá ingresar al modo de edición de loop pulsando el botón
RELOOP/STUTTER hasta que la pantalla muestre “OUT EDIT”. Cuando esté en el modo de edición
de loop puede alternar entre “OUT EDIT” e “IN EDIT”.
34. Botón ECHO EFFECT: Pulse este botón para activar el efecto eco. Dependiendo del modo de
sincronización (manual o sincronización de beats), es posible realizar diferentes ajustes:
Modalidad manual: El botón FX-SYNC (38) está apagado. Puede ajustar todos los parámetros
manualmente, use los siguientes controles:
Jog-wheel (22): se usa para establecer el tiempo de eco entre 1 ms a 2000 ms.
Botón Y/RATIO (40): cuando el botón Y/RATIO esté parpadeando, podrá usar la jog-wheel
(22) para cambiar el impacto (seco/húmedo) del efecto.
Modo sincronizado de beat: el botón FX-SYNC (38) está iluminado. Puede usar los siguientes
controles:
Botones EFFECT SYNC (39+40): seleccione uno de los preajustes eco sincronizados de
beat.
Botón Y/RATIO (40): mientras el botón Y/RATIO esté parpadeando, podrá usar la jog-wheel
(22) para cambiar el impacto (seco/húmedo) del efecto.
35. Botón FLANGER EFFECT: Pulse este botón para activar el efecto flanger. Dependiendo del modo de
sincronización (manual o sincronización de beats), es posible realizar diferentes ajustes:
Modalidad manual: el botón FX-SYNC (38) está apagado. Puede ajustar todos los parámetros
manualmente, use los siguientes controles:
Jog-wheel (22): Usado para cambiar manualmente el efecto.
Botón Y/RATIO (40): cuando el botón Y/RATIO esté parpadeando, podrá usar la jog-wheel
(22) para cambiar el impacto (seco/húmedo) del efecto.
Modo sincronizado de beat: el botón FX-SYNC (38) está iluminado. Puede usar los siguientes
controles:
Botones EFFECT SYNC (39+40): seleccione uno de los preajustes de barrido sincronizado
de beat.
Botón Y/RATIO (40): cuando el botón Y/RATIO esté parpadeando, podrá usar la jog-wheel
(22) para cambiar el impacto (seco/húmedo) del efecto.
36. Botón FILTER EFFECT: pulse este botón para activar el efecto filtro. Dependiendo del modo de
sincronización (manual o sincronización de beats), es posible realizar diferentes ajustes:
Modalidad manual: el botón FX-SYNC (38) está apagado. Puede ajustar todos los parámetros
manualmente, use los siguientes controles:
Jog-wheel (22): se usa para cambiar manualmente la frecuencia de corte del filtro.
Botón Y/RATIO (40) : cuando el botón Y/RATIO esté parpadeando, podrá usar la jog-wheel
(22) para cambiar el impacto (factor-Q) del filtro.
Modo sincronizado de beat: el botón FX-SYNC (38) está iluminado. Puede usar los siguientes
controles:
Botones EFFECT SYNC (39+40): seleccione uno de los preajustes de barrido sincronizado
de beat.
SYNQ
®
103/120 DMC1000
SYNQ
®
104/120 DMC1000
Page 55

ESPAÑOL MANUAL DE INSTRUCCIONES
ESPAÑOL MANUAL DE INSTRUCCIONES
Botón Y/RATIO (40): cuando el botón Y/RATIO esté encendido, podrá usar la jog-wheel (22)
para cambiar el impacto (factor-Q) del filtro.
37. Botón BRAKE: pulse este botón para activar el efecto pausa. Ahora podrá determinar la velocidad de
aceleración/desaceleración de la música mientras usa el botón PLAY/PAUSE (20). Puede ajustar los
parámetros con los botones (39+40), consulte a continuación.
38. Botón FX SYNC:¡pulse este botón para alternar entre el modo de efecto manual y sincronización de
beats! Consulte los puntos (34+35+36) para obtener más información.
39. Botón EFFECT SYNC/START: este botón tiene diferentes funciones, dependiendo del modo de efecto:
Efectos BPM-Synced: al utilizar un efecto en el modo sincronizado de beat, este botón se ilumina.
Ahora podrá seleccionar cómo desea que se produzca el efecto de sincronización en el beat. Utilice
este botón para dividir el parámetro actual BMP en dos.
Efecto BRAKE: pulse este botón para cambiar el tiempo de aceleración (de cero a velocidad
máxima). Mientras este botón permanezca iluminado, podrá utilizar la jog-wheel (22) para modificar
el tiempo de 0,0 seg. (inicio instantáneo) a casi 10 seg. (inicio muy lento)
40. Botón EFFECT SYNC/STOP/Y/RATIO: este botón tiene diferentes funciones, dependiendo del modo
de efecto:
Efectos BPM-Synced: al utilizar un efecto en el modo sincronizado de beat, este botón se ilumina.
Ahora podrá seleccionar cómo desea que se produzca el efecto de sincronización en el beat. Utilice
este botón para doblar el parámetro actual BMP.
Efecto BRAKE: pulse este botón para cambiar el tiempo de desaceleración (de velocidad máxima a
cero). Mientras este botón permanezca iluminado, podrá utilizar la jog-wheel (22) para modificar el
tiempo de 0,0 seg. (parada instantánea) a casi 10 seg. (parada muy lenta)
Parámetro IMPACT: Mientras unos de los 3 efectos DSP está activado, pulse el botón hasta que
comience a parpadear. Ahora podrá adaptar el impacto del efecto seleccionado, también consulte
los botones EFFECT (34+35+36).
41. Botón TIME: El botón TIME alterna entre el tiempo de reproducción transcurrido, y el tiempo restante
de la pista seleccionada.
42. SGL/CTN: Puede seleccionar entre “modo de una sola pista” y “reproducción continua”.
Reproducción continua: todas las pistas serán reproducidas sin interrupción. (se usa comúnmente
en bares)
Una sola pista: el reproductor se detiene al final de cada pista y espera en el inicio de la siguiente
pista. (comúnmente usado por los DJ)
Presione el botón SGL/CNT durante más de 1 segundo para alternar entre el modo normal y “cue
automático” . En el modo “cue automático” el reproductor espera en la primera nota musical de cada
pista. Esto significa que las pistas que hayan sido indexadas incorrectamente no interferirán con la
capacidad de inicio instantáneo del reproductor. ¡Esta es una función muy útil para los DJ!
43. Botón TAP/SHIFT: este botón tiene dos funciones:
Función TAP: Este reproductor cuenta con un contador de BPM totalmente automático. En raros
casos, el contador automático de beats no realiza la cuenta correctamente (los beats están fuera del
rango normal o simplemente no existen beats que se puedan detectar). En estos casos, puede
ayudar al contador de beats tocando manualmente este botón al ritmo del beat. Puede volver al
contador automático de beats pulsando el botón TAP hasta que se encienda el mensaje
“AUTOBPM” en la esquina superior derecha de la pantalla.
Función SHIFT: Sólo se usa cuando el reproductor se utiliza como un controlador MIDI. La función
shift duplica las funciones de cada control: pulse el botón shift mientras esté usando otro control
para obtener una función adicional secundaria. Consulte el capítulo “ASIGNACIÓN MIDI” para más
información.
44. PANTALLA VFD: Muestra toda la información importante necesaria durante la reproducción.
45. Botón RANDOM: podrá seleccionar 2 funciones de reproducción aleatoria distintas.
Aleatorio TOTAL: Presione el botón RANDOM brevemente hasta que el LED se ilumine. El
reproductor 1 ya puede reproducir pistas seleccionadas aleatoriamente desde el dispositivo de
almacenamiento masivo USB. Mientras el reproductor 1 esté reproduciendo en el modo aleatorio, el
reproductor 2 podrá seguir siendo utilizado para reproducir cualquier pista que desee.
Aleatorio SMART: Podrá elegir entre reproducir únicamente las pistas que se encuentren en un
directorio específico, únicamente las pistas de cierto género o incluso solo las pistas provenientes
de un álbum o artista específico:
Reproduce pistas exclusivamente desde 1 directorio: primera opción “clave de búsqueda =
Std” (carpetas/pistas). Ahora debe seleccionar un directorio, a continuación pulse el botón
RANDOM durante +/-2 segundos hasta que el LED comience a parpadear. El reproductor 1
ahora únicamente puede reproducir pistas desde el directorio seleccionado.
Reproduce pistas únicamente de un genero/artista/álbum específico: seleccione la clave
de búsqueda correcta y elija una pista que se corresponda con el género, artista o álbum
deseado. Tras pulsar el botón RANDOM durante +/-2 segundos, el reproductor únicamente
reproducirá las pistas del mismo género, artista o álbum que el de la pista que esté siendo
reproducida actualmente. (Evita la mezcla de 2 estilos musicales totalmente diferentes: perfecto
para bares, clubs, restaurantes …) Consulte el capítulo “FUNCIONAMIENTO” para ver
ejemplos.
46. SELECTOR DE FUENTE DE ENTRADA: Utilizado para seleccionar la entrada correcta en ambos
canales: reproductor interno, control MIDI para software de DJ en ordenador o phono analógico
externo/entradas de línea (existen también selectores de entrada adicionales (8) en la parte trasera).
47. NIVEL DE GANANCIA: Ajusta el nivel de entrada en ambos canales. Utilice este control para ajustar en
nivel en el vúmetro en aproximadamente 0 dB.
48. CONTROLES DE TONO 3-BANDAS: La frecuencia de cada canal puede controlarse
independientemente en una gama que va desde - 35 dB a +10 dB. Puede prescindir (eliminar
completamente) las frecuencias alta, media y/o baja pulsando la perilla(s) correspondiente(s). En la
posición central el control de tono es plano. (desconectado)
49. NIVEL MAESTRO DE CABINA: Se utiliza para ajustar el nivel de la salida cabina maestra no
balanceada.
50. NIVEL MAESTRO: Se utiliza para ajustar el nivel de la salida maestra balanceada.
51. VÚMETRO: Cada canal posee su propio LED de vúmetro, de manera que podrá ajustar el nivel de
ganancia (47) rápidamente. Asegúrese de que los niveles no excedan los 0 dB (o 100%). El audio se
arriesga a sufrir distorsión cuando el nivel de la señal se encuentra en la zona roja del vúmetro. Mientras
el botón MASTER METER (52) esté iluminado los vúmetros indicarán el nivel de salida en el maestro.
52. Botón MASTER METER: Si este botón está apagado, los vúmetros indican los niveles de los canales
individuales. Pulse el botón para encenderlo: Los vúmetros indicarán ahora el nivel de salida del
maestro.
53. FADER DE CANAL: Utilizado para ajustar el nivel de cada canal de forma independiente.
54. Interruptor FADER START: al estar en la posición ON (ACTIVADO) los reproductores internos podrán
ser iniciados/detenidos moviendo el crossfader.
55. CURVA DE CROSS FADER: Ajusta la curva del cross fader desde intenso (posición izquierda) a suave
(posición derecha).
56. CROSSFADER: Con este fader podrá realizar mezclas entre ambos canales. ¡El crossfader funciona
únicamente cuando desplaza los faders (53) del canal seleccionado al nivel deseado!
57. CLAVIJA DE ENTRADA DEL MIC DJ: Acepta micrófonos no balanceados con clavija 1/4” mono. Esta
entrada se utiliza principalmente como micrófono DJ. El modo “talk-over” no afectará el nivel de la señal
de esta entrada.
58. VOL MIC1: Se utiliza para ajustar el nivel de entrada del micro 1.
59. VOL MIC2: Se utiliza para ajustar el nivel de entrada del micro 2.
60. TONO MIC: utilizado para adaptar el sonido de ambas entradas de micrófono.
61. INTERRUPTOR MIC ON/OFF/TALK OVER: Utilizado para alternar entre los micrófonos:
OFF: Ambos mic1 & mic2 están desconectados.
ON: Ambos mic1 & mic2 están conectados.
TALK OVER: mic1 & 2 están conectados; el nivel del sonido del resto de canales se reducirá en
aproximadamente -20 dB.
62. CUE MIX: Con esta perilla podrá mezclar los canales de entrada a través de la salida de los auriculares
(64):
SYNQ
®
105/120 DMC1000
SYNQ
®
106/120 DMC1000
Page 56

ESPAÑOL MANUAL DE INSTRUCCIONES
ESPAÑOL MANUAL DE INSTRUCCIONES
Sitúe la perilla en la posición izquierda más lejana para escuchar el canal 1.
Sitúe la perilla en la posición derecha más lejana para escuchar el canal 2.
Sitúe la perilla en cualquier otra posición para escuchar una mezcla de las dos señales.
Esta opción le permite comprobar su mezcla antes de ponerla en la salida del maestro.
63. VOLUMEN DE AURICULARES: controla el nivel de sonido de la salida de los auriculares.
64. Salida HEADPHONE: si lo desea, puede conectar sus auriculares aquí.
PANTALLA VFD
A. PLAY: aparece mientras la unidad está reproduciendo una pista.
B. PAUSE: aparece mientras el reproductor está en el modo pausa o cue.
C. CUE: aparece cuando el reproductor está esperando en el punto CUE.
D. INDICADOR TÁCTIL: aparece cuando la parte táctil de la jog-wheel está activa.
E. PANTALLA ALFANUMÉRICA: Muestra todo tipo de información importante, como por ejemplo, los
parámetros del efecto, información de loop, etiquetas ID3, …
F. PANTALLA BPM: el contador automático de beats muestra el número de beats por minuto en la
pantalla. En el modo manual la pantalla muestra “BPM”. En el modo automático la pantalla muestra
“AUTOBPM”. (pulse el botón TAP durante 2 segundos para cambiar al modo automático)
G. SECTOR DE MEMORIA: muestra el estado de la memoria de almacenamiento necesaria para las
funciones de anti-shock así como también para algunas funciones especiales. Cada barra del sector
representa 2 segundos de memoria de almacenamiento.
H. AUTO CUE: aparece cuando está activa la función de “cue automático” . Vea la información relacionada
con el botón SGL/CTN (42).
I. RELOOP: indica cuándo está programado un loop. (repetición de un área en particular)
RELOOP parpadeando: El loop está programado y actualmente en reproducción.
RELOOP encendido: El loop está programado pero no en reproducción.
J. SINGLE: aparece cuando la unidad ha sido establecida para reproducir sólo una pista a la vez. Cuando
no aparece, todas las pistas son reproducidas sin interrupción. La función se controla con el botón
SGL/CTN (42).
K. Indicador MP3: aparece cuando se está reproduciendo un archivo MP3.
L. Indicador TRACK: muestra el número de pistas disponible en su selección actual.
Búsqueda estándar: (sin Q-Dbase) se muestran los números de pista en la carpeta actual (M).
Búsqueda Q-Dbase: los números de pista que corresponden a su pre-selección Q-Dbase.
M. Indicador FOLDER/SEARCH KEY: la información depende del modo de búsqueda que haya
seleccionado.
Búsqueda estándar: (sin Q-Dbase) se muestra el número de carpeta actual.
Búsqueda Q-Dbase: se muestra la clave de búsqueda actual (Art, Alb o Gen).
N. ELAPSED, TOTAL REMAIN: indica que el tiempo mostrado en la pantalla es el tiempo transcurrido,
restante o restante total de la pista.
O. MINUTE: Muestra la información del tiempo en “minutos” de la pista actual.
P. SECOND: Muestra la información del tiempo en “segundos” de la pista actual.
Q. FRAME: Muestra la información del tiempo en “frame” de la pista actual. (1 frame = 1/75oseg.)
R. BARRA INDICADORA DEL TIEMPO: tiene 2 funciones:
Durante la reproducción normal: muestra el tiempo restante o el transcurrido, dependiendo del
ajuste del botón TIME. Empieza a parpadear al final de cada pista para alertar al usuario sobre la
siguiente acción.
Durante la reproducción en loop: muestra el tiempo restante hasta el final del loop. Esta ayuda
visual le permite ver dónde y cuándo empieza nuevamente el loop continuo.
S. PANTALLA DE PITCH: Muestra el porcentaje real del cambio de velocidad seleccionado con el
deslizador SPEED (28). Se muestra el pequeño candado en color rojo cuando está activa la función de
bloqueo de pitch (Master Tempo).
CONEXIONES
Algunas notas importantes sobre los dispositivos de almacenamiento USB que deberá conectar:
Nota 1: ¡el disco duro debe estar formateado en FAT32! NO será reconocido un disco duro en formato
NTFS (la mayoría de los discos con gran capacidad): ¡ese tipo de discos duros deben volverse a formatear
en FAT32! (se podrá realizar en Windows, encontrará ayuda en la página del producto DMC2000)
Nota 2: las ranuras USB en este reproductor pueden proporcionar alimentación de 1 A al disco duro
conectado. Sin embargo sugerimos usar un disco duro con suministro de alimentación por separado para
mayor fiabilidad.
Nota 3: únicamente se reconocerán y reproducirán los archivos WAV y MP3.
Nota 4: para su comodidad, se recomienda encarecidamente el uso del software Q-DBASE indexer, ¡le hará
la vida mucho más fácil!
CONFIGURACIÓN SIMPLE – 1 DECK
Conecte el maestro balanceado (5) o no balanceado (6) al amplificador de potencia o a los bastidores del
altavoz.
Conecte un dispositivo de memoria USB a la entrada USB1 (13) o un disco duro USB a la entrada USB2
(3).
Si fuese necesario, conecte un micrófono a la entrada mic1 (57) o mic2 (11).
Conecte el cable de alimentación suministrado entre la entrada de corriente (1) en el reproductor y el
enchufe de corriente.
Ya puede reproducir y mezclar archivos MP3/WAV en su dispositivo de almacenamiento USB. ¡Disfrute!
CONFIGURACIÓN – CON DMC1000 para compartir un disco duro
Conecte un disco duro USB en la conexión USB2 del DMC1000.
Asegúrese de que el enlace USB en DMC1000 esté establecido en “LINK”.
Utilice el cable USB suministrado con DMC1000 para conectar la conexión de enlace USB del reproductor
en la conexión USB 2 (3) del DMC2000.
Utilice el botón SOURCE SELECT (14) para seleccionar USB2 en el DMC2000: ambos reproductores,
DMC1000 y DMC2000, se conectarán al disco duro.
Ahora puede reproducir archivos MP3 y WAV del disco duro conectado.
IMPORTANTE: ¡para contar con un buen desempeño y estabilidad, sólo use cables USB de buena
calidad con una longitud máxima de 1 metro!
SYNQ
®
107/120 DMC1000
SYNQ
®
108/120 DMC1000
Page 57

ESPAÑOL MANUAL DE INSTRUCCIONES
ESPAÑOL MANUAL DE INSTRUCCIONES
CONFIGURACIÓN – CONFIGURACIÓN COMPLETA, INCLUYENDO CONTROLADOR MIDI
El esquema muestra una configuración completa, incluyendo la función controlador MIDI.
Podrá conectar hasta dos fuentes de audio externas (tocadiscos o línea) para convertir su DMC2000 en una
unidad DJ multifuncional. ¡Lo único que tiene que hacer es conectar las entradas en la parte superior de los
2 canales de la mesa de mezclas!
Si únicamente desea utilizar la función controlador MIDI, simplemente tendrá que conectar el ordenador
con software de DJ mediante el cable USB suministrado a la salida USB-MIDI (4) en el DMC2000: el
controlador será reconocido y las unidades se instalarán automáticamente.
Coloque ambas entradas del canal de la mesa de mezclas (46) en el modo MIDI: la mayoría de los
controles del DMC2000 serán enviados a MIDI.
Si desea información adicional sobre ajustes MIDI más específicos, consulte el capítulo “MENÚ DE
CONFIGURACIÓN”.
Dependiendo del software de DJ que esté utilizando, tendrá que cargar las asignaciones MIDI deseadas.
En algunos software de DJ la asignación DMC2000 se cargará automáticamente, en otros tendrá que
descargar la asignación MIDI desde nuestro sitio web o desde la sección de descarga del software de DJ.
Si el DMC2000 no es compatible con el software de DJ, podrá crear su propia asignación MIDI, aunque
ello dependerá exclusivamente del software que esté utilizando. ¡Tenga en cuenta que la instalación y el
uso de distintos software de DJ son muy específicos y por lo tanto no serán compatibles con Synq!
El DMC2000 como tarjetas de sonido internas: la música de su mezcla saldrá a través de las salidas
maestras (5+6).
Función mesa de mezclas MIDI: La configuración del DMC2000 es tal que podrá mezclar fácilmente
música desde todas las entradas, las unas con las otras. Incluso podrá mezclar música desde software de
DJ con música procedente de los reproductores internos o desde un tocadiscos conectado. Para poder
realizarlo, deberá desactivar la función MIDI de la mesa de mezclas interna. (consulte el menú de
configuración)
Opción scratching VINILO en software de DJ: con DMC2000 incluso podrá utilizar la potente “función
scratch de vinilo” disponible en algunos de los software de DJ de gama alta. ¡Lo cual quiere decir que
podrá realizar scratch y manipular las pistas de audio reproducidas en su software de DJ utilizando un
disco de vinilo codificado especial! Simplemente conecte un tocadiscos a una de las entradas de audio:
las señales desde el disco de vinilo codificado especial serán enviadas al software de DJ.
Nota 1: compruebe primero si su software de DJ puede utilizar esta función. En caso afirmativo,
siga las instrucciones del software para configurar esta función.
Nota 2: se encuentra disponible de forma opcional un disco scratch de vinilo especial en Synq;
utiliza una señal “estéreo de tiempo desfasado de 1 kHz” que puede utilizarse en varios software de
DJ.
Software DECKADANCE-LE
DMC2000 viene suministrado con una licencia gratuita para Deckadance-LE, el código de desbloqueo
para esta licencia gratuita se encuentra en la parte trasera del DMC2000 (consulte la imagen).
Para garantizar que posea en todo momento la versión más actualizada, el programa únicamente está
disponible mediante descarga; descárguese la versión de demonstración para su sistema operativo:
WINDOWS: http://windemo.deckadance.com
MAC OS: http://macdemo.deckadance.com
Instale el software de demonstración y utilice el código
de desbloqueo para desbloquearlo a la versión LE de
Deckadance. ¡Podrá utilizar este software y actualizarlo
a versiones más recientes cuando estén disponibles!
Los manuales de instalación y uso pueden descargarse
desde: http://deckadance.imageline.com/downloads.html
IMPORTANTE: se recomienda encarecidamente el registro de su software en el sitio web de
Obtendrá acceso al foro de usuarios, recibirá un boletín de noticias y adquirirá el apoyo total de su equipo
de soporte. Igualmente, recibirá un 30% de descuento si actualiza a las ediciones HOUSE y CLUB de
Deckadance. En el sitio web de Deckadance podrá encontrar una lista de funciones con las diferencias
existentes entre las 3 versiones. Tenga en cuenta que la ayuda para software de DJ de Deckadance se
obtiene exclusivamente desde el sitio web de Deckadance (www.deckadance.com). Poseen una sección de
apoyo muy desarrollada con un foro de usuarios, tutoriales en formato vídeo, …
Deckadance:
MENÚ DE CONFIGURACIÓN
Para tener la máxima flexibilidad esta unidad puede personalizarse totalmente. Por lo tanto muchos
parámetros se pueden ajustar por medio del menú de configuración. Para poder ingresar al menú de
configuración, el reproductor NO debe estar en el modo MIDI.
Para ingresar al menú SETUP, pulse el botón LOAD TRACK (19) durante 3 segundos.
Use la perilla FOLDER (16) para explorar las diferentes opciones de menú.
Use la perilla TRACK (17) para explorar los menús secundarios (si los hay)
Use la JOG-WHEEL (22) para cambiar los ajustes (parámetros) de la opción de menú seleccionada.
Para guardar sus ajustes: seleccione la opción del menú E (EXIT & SAVE) y presione la perilla
TRACK (17) o presione el botón RECORD CUE (25).
1. CANAL MIDI: se utiliza para ajustar los canales MIDI de las 3 distintas partes del DMC2000. La pantalla
muestra 3 grupos de 2 dígitos: 01-02-03:
Primeros 2 dígitos: Canal MIDI para los controles del reproductor 1 + canal 1 de la mesa de
mezclas.
Segundos 2 dígitos:Canal MIDI para los controles de la mesa de mezclas, exceptuando los
controles de los 2 canales de entrada (ganancia+alta/med/baja+fader)
Terceros 2 dígitos: Canal MIDI para los controles del reproductor 2 + canal 2 de la mesa de
mezclas.
Gire la perilla TRACK (17) para navegar por los tres grupos de 2 dígitos
Gire la JOG-WHEEL (22) para cambiar el canal MIDI.
2. CONFIGURACIÓN MIDI:
Nota:las 3 partes deben tener canales MIDI distintos.
Existen 2 menús secundarios: Gire la perilla TRACK (17) para seleccionar un menú secundario.
o
Menú secundario 1 – funcionalidad del botón SHIFT (43) : Puede seleccionar cómo
funcionará el botón SHIFT en el modo MIDI.
Gire la JOG-WHEEL (22) para seleccionar el ajuste deseado:
TAP = HOLD: similar a la tecla SHIFT en su teclado de PC el código
MIDI de un botón/perilla cambia solamente cuando lo usa mientras está
pulsado el botón SHIFT (43).
TAP = TOGGLE : similar a la tecla CAPS LOCK en su teclado de PC
presione el botón SHIFT (43) para activar la función shift: mientras la
pantalla muestre “SHIFT” el código MIDI de la mayoría de los
botones/perillas cambia otorgándoles una segunda (doble) función.
SYNQ
®
109/120 DMC1000
SYNQ
®
110/120 DMC1000
Page 58

ESPAÑOL MANUAL DE INSTRUCCIONES
FUNCIÓN
o
Menú secundario 2 – visualización del mensaje MIDI: puede seleccionar si los
mensajes E/S MIDI aparecerán en la pantalla o no. Esto es de gran ayuda al realizar los
archivos de configuración MIDI.
Gire la JOG-WHEEL (22) para seleccionar el ajuste deseado:
I/O = Hide : no se muestran los mensajes MIDI que se envían/reciben
3. Modo MESA DE MEZCLAS:utilizado para alternar la mesa de mezclas entre los modos MIDI y no MIDI.
4. CARGAR HOTCUES: puede seleccionar si los hot cues guardados de una pista deben recuperarse
automáticamente o no.
Gire la JOG-WHEEL (22) para seleccionar una de las 2 posibilidades:
o
Preguntar primero: cuando una pista contiene hot cues, la pantalla le pregunta si desea
cargar los hot cues o no. Puede responder con los botones YES/NO (29).
o
Carga automática: cuando una pista contiene hot cues, estos serán cargados
automáticamente.
5. CROSS FADER:activa/desactiva el cross fader de la mesa de mezclas de audio; no tiene efecto alguno
en la función MIDI del crossfader.
Gire la JOG-WHEEL (22) para seleccionar una de las 2 posibilidades:
o
Encendido: crossfader (56) está activado, y listo para su uso.
o
Desactivado: si no desea utilizar el crossfader, utilice esta opción.
6. CROSS FADER INVERSO: activa el cross fader de la mesa de mezclas de audio en el modo inverso, no
tiene efecto alguno en la función MIDI del crossfader.
Gire la JOG-WHEEL (22) para seleccionar una de las 2 posibilidades:
o
Encendido: crossfader (56) está funcionado en el modo inverso; el canal 1 es audible
mientras el crossfader se encuentre en la posición derecha.
o
Desactivado: crossfader (56) está funcionado en el modo normal; el canal 2 es audible
mientras el crossfader se encuentre en la posición derecha.
7. TIEMPO DE VISUALIZACIÓN:Podrá seleccionar durante cuánto tiempo se mostrará el mensaje antes
de que la pantalla vuelva a su funcionamiento normal.
Gire la JOG-WHEEL (22) para seleccionar el valor deseado: 0,5 seg. 12,0 seg.
8. VELOCIDAD DE DESPLAZAMIENTO:podrá seleccionar la velocidad de desplazamiento del texto en la
pantalla.
Gire la JOG-WHEEL (22) para seleccionar el valor deseado: 50 2000 ms (50 ms= rápido/2000
ms= lento).
9. Sensibilidad: puede cambiar la sensibilidad de la jog-wheel táctil para optimizar el desempeño de la jog-
wheel.
Gire la JOG-WHEEL (22) para seleccionar una de las 41 posibilidades:
o
AJ. = 0: ajuste neutral (ajuste predeterminado, OK en la mayoría de los casos)
o
AJ. = -20: sensibilidad más baja
o
AJ. = +20: sensibilidad más alta
A. INTENSIDAD: se usa para adaptar el brillo de la pantalla VFD.
Gire la JOG-WHEEL (22) para seleccionar una de las 4 posibilidades.
o
AJ. = 1 4:1 = brillo bajo, 4 = brillo alto (predeterminado)
B. Nivel de A.CUE: la función cue automático detecta dónde realmente comienza la música; esto evita
tener espacios en blanco cuando una pista no está bien mezclada. Puede seleccionar uno de los ocho
preajustes de nivel de detección:
Gire la JOG-WHEEL (22) para seleccionar una de las 8 posibilidades.
o
AJ. = -78 dB -36 dB: el ajuste predeterminado = -48 dB
I/O = DIS. : se muestran los mensajes MIDI que se envían/reciben
Gire la JOG-WHEEL (22) para seleccionar el ajuste deseado:
MIDI: utilice este ajuste cuando el DMC2000 se utilice exclusivamente para
controlar software de DJ. La mesa de mezclas del software de DJ será
controlada.
NO MIDI: utilice este ajuste si desea mezclar distintas fuentes de audio
(software de DJ, entradas externas, reproductores internos) entre sí; los
niveles de todas las fuentes de audio pueden ajustarse fácilmente usando
las perillas de ganancia (47).
Nota: con este ajuste la mesa de mezclas no envía ningún MIDI, en su lugar
funciona como mesa de mezclas de audio normal.
ESPAÑOL MANUAL DE INSTRUCCIONES
C. Versión / actualización de firmware: use esta opción para verificar y/o actualizar las versiones de
firmware.
Gire la perilla PISTA (17) para seleccionar las 4 partes del firmware:
o
CON: xx: muestra la versión del firmware de control
o
DSP: xx: muestra la versión del firmware de DSP
o
Actualizar: parpadea cuando la unidad está lista para verificar si existen nuevas versiones
de firmware disponibles. Consulte “ACTUALIZACIÓN DE FIRMWARE” para obtener más
información.
D. Cargar predeterminados: como ya notó, esta unidad se puede configurar completamente pero eso
quiere decir también que puede arruinar muchos ajustes. ¡Si realmente arruina las cosas, puede aún
volver a cargar el ajuste predeterminado!
Mientras “Enter Load” parpadee en la pantalla: pulse la perilla TRACK (17) para cargar los
predeterminados.
E. Exit & Save: si desea guardar permanentemente sus cambios en el menú de configuración (incluso
después de apagar la unidad) ¡DEBE usar esta opción!
Pulse la perilla TRACK (17) : la pantalla muestra “Saving” y sale del menú de configuración.
Nota:alternativamente podrá también pulsar el botón RECORD-CUE (25) para guardar los ajustes de
forma permanente.
ACTUALIZACIÓN DE FIRMWARE
Le sugerimos encarecidamente registrar su reproductor en nuestro sitio Web (www.synq-audiocomo/register/) de tal modo que podamos informarle si existen nuevas actualizaciones de firmware
disponibles. ¡La actualización del firmware siempre debe realizarse con mucho cuidado!
Descargue el archivo que contiene el(los) archivo(s) de actualización
Lea las instrucciones y sígalas al pie de la letra, de lo contrario podría averiar su equipo…
Coloque los archivos en una memoria USB VACÍA (¡importante!).
Para ingresar al menú de configuración, pulse el botón LOAD TRACK (19) durante aproximadamente 3
segundos.
Use la perilla FOLDER (16) para explorar la opción de menú “Versión C.”.
Gire la perilla TRACK (17) hasta que se muestre en la pantalla “Upgrade”.
Use el botón SOURCE SELECT (14) para seleccionar la entrada USB1 (13).
Inserte la memoria USB con los archivos de firmware en la entrada USB1 (13)
La actualización iniciará automáticamente: ESPERE (!) hasta que haya finalizado el proceso de
actualización. ¡¡¡NUNCA apague el reproductor cuando se encuentre en proceso la actualización del
software!!!
Si la pantalla le pide apagar la unidad: apague la unidad, espere 3 segundos y vuelva a encenderla.
Verifique si la versión de software corresponde a la versión marcada en el archivo léame que viene
incluido con la actualización.
MAPA MIDI (ajustes predeterminados)
FUNCIÓN Tipo
SW/ENC 05/17 44/56 05/27 44/66
SW/ENC 01/16 40/55 01/26 40/65
ENTRADA SW/LED 02/02 D-1 41 02/02 D-1 41
SALIDA SW/LED 03/03 D# -1 42 03/03 D#-1 4 2
SW/LED 04/04 E-1 43 04/04 E-1 43
FUENTE
SELECCIÓN
GRABAR
CUE
SW 06 45 06 45
SW/LED 07/07 G-1 46 07/07 G-1 46
CÓDIGO DE
FUNCIÓN
(DECK A)
NOTA
SHIFT
(Mantenga
TAP)
CÓDIGO DE
FUNCIÓN
(DECK B)
NOTA
SHIFT
(Mantenga
TAP)
CÓDIGO
(DECK
CENTRAL)
NOTA
SHIFT
(Mantega
TAP)
ACCIÓN
7FH:ACT.
00H:DESACT.
7FH:ACT.
00H:DESACT.
7FH:ACT.
00H:DESACT.
7FH:ACT.
00H:DESACT.
7FH:ACT.
00H:DESACT.
7FH:ACT.
00H:DESACT.
7FH:ACT.
00H:DESACT.
SYNQ
®
111/120 DMC1000
SYNQ
®
112/120 DMC1000
Page 59

ESPAÑOL MANUAL DE INSTRUCCIONES
VELOCIDAD
VELOCIDAD
Fader de
NIVEL
VR/SW/
30/08/
DESLIZADOR
NIVEL CUE
Inicio fader
ESPAÑOL MANUAL DE INSTRUCCIONES
1
1
2
2
3
3
4
4
ELIMINAR
CUE
LOAD
TRACK
TIEMPO X SW/L ED 0E/0E D0 4D 0E/0E D0 4D
ECO SW/LED 0F/0F D#0 4E 0F/0F D#0 4E
FLANGER SW/L ED 10/10 E0 4F 10/10 E 0 4F
EN ESPERA SW/LED 11/11 F0 50 11/11 F0 50
FILTRO SW/LED 12/12 F#0 51 12/12 F#0 51
DETENER SW/L ED 13/13 G0 52 13/13 G0 52
RELACIÓN Y SW/LED 14/14 G#0 53 14/14 G# 0 53
% SW 15 54 15 54
A.Cue
scratch
VINILO SW/LED 19 /19 C#1 58 1 9/19 C#1 58
CDJ SW/L ED 1A/1A D1 59 1A/1A D1 59
Tiempo SW 1B 5A 1B 5A
SGL/CTN SW 1C 5B 1C 5B
JOG SW/ENC 27/18 66/57 27/28 66/67
TAP/SHIFT SW 1E 5D 1E 5D
CUE SW/LED 1F/1F G1 5E 1F/1F G1 5E
BASE DE
DATOS
SW/LED
(ROJO)
SW/LED
(VERDE)
SW/LED
(ROJO)
SW/LED
(VERDE)
SW/LED
(ROJO)
SW/LED
(VERDE)
SW/LED
(ROJO)
SW/LED
(VERDE)
SW/LED 0C/0C C0 4B 0C/0C C0 4B
SW/LED 0D/0D C#0 4C 0D/0D C#0 4C
SW 16 55 16 55
SW 17 56 17 56
SW/LED 18/18 C1 57 18/18 C1 57
SW/LED 1D/1D F1 5C 1D/1D F1 5C
SW/LED 20/20 G#1 5F 20 /20 G#1 5F
SW/LED 21/21 A1 60 2 1/21 A1 60
SW 22 61 22 61
08/08 G# -1 4 7 08/08 G# -1 47
08/05 F-1 47 08/05 F-1 47
09/09 A-1 48 09/09 A-1 48
09/06 F#-1 48 09/06 F#-1 48
0A/0A A#-1 49 0A/0A A# -1 49
0A/15 A0 49 0A/15 A0 49
0B/0B B-1 4A 0B/0B B-1 4A
0B/16 A #0 4A 0B /16 A #0 4A
7FH:ACT.
00H:DESACT.
7FH:ACT.
00H:DESACT.
7FH:ACT.
00H:DESACT.
7FH:ACT.
00H:DESACT.
7FH:ACT.
00H:DESACT.
7FH:ACT.
00H:DESACT.
7FH:ACT.
00H:DESACT.
7FH:ACT.
00H:DESACT.
7FH:ACT.
00H:DESACT.
7FH:ACT.
00H:DESACT.
7FH:ACT.
00H:DESACT.
7FH:ACT.
00H:DESACT.
7FH:ACT.
00H:DESACT.
7FH:ACT.
00H:DESACT.
7FH:ACT.
00H:DESACT.
7FH:ACT.
00H:DESACT.
7FH:ACT.
00H:DESACT.
7FH:ACT.
00H:DESACT.
7FH:ACT.
00H:DESACT.
7FH:ACT.
00H:DESACT.
7FH:ACT.
00H:DESACT.
7FH:ACT.
00H:DESACT.
7FH:ACT.
00H:DESACT.
7FH:ACT.
00H:DESACT.
7FH:ACT.
00H:DESACT.
7FH:ACT.
00H:DESACT.
7FH:ACT.
00H:DESACT.
7FH:ACT.
00H:DESACT.
7FH:ACT.
00H:DESACT.
7FH:ACT.
00H:DESACT.
7FH:ACT.
00H:DESACT.
7FH:ACT.
00H:DESACT.
SW 23 62 23 62
Deslizador
de pitch
GANANCIA VR 11 50 21 60 VR:00~7F
ALTO VR/SW/CENTER/LED 12/24/29/24 C2 51/63/68 22/24/29/24 C2 61/63/68 VR:00~7F
MID VR/SW/CENTER/LED 13/25/2A/25 C# 2 52/64/69 23/25/2A/25 C#2 62/64/69 VR:00~7F
BAJO VR/SW/CENTER/LED 14/26/2B/26 D2 53/65/6A 24/26/2B/26 D2 63/65/6A VR:00~7F
canal
U1 LED 17 B0 17 B0
U2 LED 1B D#1 1B D#1
16 LED 1C E1 1C E1
10 LED 1E F#1 1E F#1
LED
CONTADOR
ALEATORIO SW/LED 2C/2C G#2 6B
CONTADOR
MAESTRO
MAESTRO VR 31 70 VR:00~7F
CABINA VR 32 71 VR:00~7F
Cross Fader
NIVEL MIC1 VR 3 5 74 VR:00~7F
NIVEL MIC2 VR 3 6 75 VR:00~7F
CUE PAN
PAN
Inicio fader
Encendido (I)
Inicio fader
APAGADO (I)
Encendido
(D)
Inicio fader
Apagado (D)
CURVA C.F
(L)
CURVA C.F
(CENTRO)
CURVA C.F
(D)
VR/CENTRO
VR 10 4F 20 5F VR:00~7F
6 LED 22 A#1 22 A#1
LED DE NIVEL 1 1 00H~7FH *
SW/LED 2D/2D A2 6C
SW/CENTER
VR 34 73 VR:00~7F
VR 33 72 VR:00~7F
SW 1 40
SW 2 41
SW 3 42
SW 4 43
SW 7 46
SW 6 45
SW 5 44
DE
PITCH/28
67
DE
PITCH/28
67
09/0A
6F/47/48/49 VR: 00~7F
7FH:ACT.
00H:DESACT.
7FH:ACT.
00H:DESACT.
7FH:ACT.
00H:DESACT.
7FH:ACT.
00H:DESACT.
7FH:ACT.
00H:DESACT.
7FH:ACT.
00H:DESACT.
7FH:ACT.
00H:DESACT.
7FH:ACT.
00H:DESACT.
7FH:ACT.
00H:DESACT.
7FH:ACT.
00H:DESACT.
7FH:ACT.
00H:DESACT.
7FH:ACT.
00H:DESACT.
7FH:ACT.
00H:DESACT.
7FH:ACT.
00H:DESACT.
7FH:ACT.
00H:DESACT.
7FH:ACT.
00H:DESACT.
SYNQ
®
113/120 DMC1000
SYNQ
®
114/120 DMC1000
Page 60

ESPAÑOL MANUAL DE INSTRUCCIONES
ESPAÑOL MANUAL DE INSTRUCCIONES
TIPO CC-ABSOLUTO (VR, LED CONTADOR NIVEL)
Los mensajes sobre el cambio de control se envían con el estado 0xBn, donde n es el canal para el
controlador CC especificado. Por esa razón el ID MIDI del controlador se indica con el canal junto con el
número CC. El valor de 0x00 a 0x7F, está directamente relacionado con la ubicación del controlador.
* LEDS MEDIDOR NIVEL
00~0B => TODOS LOS LEDS APAGADOS
0C~17=>LED(-30) ENCENDIDO
18~23=>LED(-30, -20) ENCENDIDO
24~2F=>LED(-30, -20, -10) ENCENDIDO
30~3B=>LED(-30, -20, -10, -7) ENCENDIDO
3C~47=>LED(-30, -20, -10, -7, -4) ENCENDIDO
48~53=>LED(-30, -20, -10, -7, -4, -2) ENCENDIDO
54~5F=>LED(-30, -20, -10, -7, -4, -2, 0) ENCENDIDO
60~6B=>LED(-30, -20, -10, -7, -4, -2, 0, +2) ENCENDIDO
6C~77=>LED(-30, -20, -10, -7, -4, -2, 0, +2, +4) ENCENDIDO
78~7F=> TODOS LOS LED ENCENDIDOS (-30, -20, -10, -7, -4, -2, 0, +2, +4, +7)
TIPO CC-RELATIVO (ENC)
Los mensajes sobre el cambio de control tienen el estado 0xBn, donde n es el canal para el controlador
CC especificado. Por esa razón el ID MIDI del controlador se indica con el canal junto con el número CC.
El valor 0x40 es el valor de referencia del controlador. Esto es una compensación a la anotación
“complemento de uno” 0x40.
Un mensaje con datos 0x43 indica un cambio positivo de 3.
Un mensaje con datos 0x31 indica un cambio negativo de 15.
ENCENDIDO/APAGADO (SW, CENTRO)
Estos mensajes se usan para los interruptores.
Los mensajes de cambio de control se envían con el estado 0x9n, los valores de encendido y apagado
son 0x7F y 0x00, donde n es el canal.
ENCENDIDO/APAGADO DE LED (LED)
Estos mensajes se usan para el LED.
Los mensajes de cambio de control se envían con el estado 0x9n, los valores de encendido y apagado de
LED son 0x7F y 0x00, donde n es el canal.
INSTALACIÓN DEL SOFTWARE Q-DBASE
¡El DMC2000 funciona perfectamente sin los archivos de la base de datos Q-DBASE, pero si desea buscar
sus pistas fácilmente y con rapidez entonces debe instalar el software Q-DBASE en su ordenador! Tenga en
cuenta que el programa actualmente funciona solo en Windows (XP, Vista, Win7). Para estar seguro de que
siempre tenga la última versión, puede descargar el software desde nuestro sitio Web (compruebe la
sección de descargas en la página del producto DMC2000). Instalar el programa es muy fácil: solo haga
doble clic en el archivo y siga las instrucciones en su pantalla.
UTILIZACIÓN DEL SOFTWARE Q-DBASE
¡Cada vez que agregue o elimine pistas de su disco duro USB,
¡debe ejecutar nuevamente el software Q-DBASE para actualizar los archivos de la base de datos!
Después de la instalación verá un nuevo directorio de programa
llamado “SYNQ”. En este directorio encontrará 2 archivos:
- Desinstalar (para desinstalar el software)
- Q-DBASE (para iniciar el software)
Conecte su disco duro USB en su PC y verifique cuál es la letra
que se le ha asignado.
Haga clic en el icono Q-DBASE para iniciar el software: se muestra
la pantalla principal.
En la esquina superior izquierda seleccione su disco USB.
Pulse el botón BUILD en el lado derecho.
El software empieza a escanear la unidad USB para los
archivos de audio compatibles y extrae las etiquetas ID3 para
integrar los archivos Q-DBASE, necesarios para acelerar la
función de búsqueda en el reproductor. Cuando la barra de
progreso en la parte inferior esté llena, el proceso de
integración de base de datos finaliza y se muestra un resumen
corto.
El programa escribió los archivos Q-DBASE (extensiones de
archivo: .DBH + .dat + .DBX) en la unidad USB de tal modo que
pueda extraerlos de su PC y conectarlos en el DMC2000.
Para lograr los mejores resultados, siempre use la última versión del software de la base de datos. Puede
encontrar la versión de software en la parte inferior izquierda de la pantalla “About” .
! ¡MENSAJE IMPORTANTE PARA LOS USUARIOS DE VISTA!
Muchos usuarios de Vista no podrán ejecutar el software Q-DBASE.
Este problema es ocasionado por los ajustes en UAC (User Account
Control; Control de Cuentas de Usuario), una opción de seguridad que
limita los privilegios del usuario en Vista. Para resolver este problema,
haga clic derecho en el icono de programa Q-DBASE y seleccione
“Ejecutar como administrador” en el menú emergente. Windows
responderá con la ventana mostrada a la derecha: simplemente haga
clic en “Allow”.
UTILIZACIÓN …
La mayoría de las funciones comunes se explicaron en el capítulo anterior “controles y funciones” . En este
capítulo se explican las funciones que necesitan un poco más de explicación.
ALGUNAS FUNCIONES GENERALES:
BUSCAR UNA PISTA CON EL SISTEMA Q-DBASE:
Importante:antes de usar el sistema Q-DBASE, debe escanear su unidad USB para comprobar que
contenga los archivos necesarios.
Puede seleccionar la clave de búsqueda en cualquier momento pulsando la perilla TRACK (17) mientras
la gira. Puede buscar por Art(artista), Alb(álbum) o Gen(género).
Pulse el botón DATABASE (15) para iniciar la función de búsqueda el primer carácter de la lista que
desea buscar parpadeará en la pantalla.
Gire la perilla FOLDER (16) para cambiar el primer carácter.
Gire la JOG-WHEEL (22) para explorar la lista que corresponde a su solicitud a alta velocidad. Si
desea buscar con mayor precisión pista por pista, también puede girar la perilla TRACK (17).
Cuando haya encontrado la pista deseada: pulse el botón LOAD TRACK (19).
BUSCAR UNA PISTA SIN EL SISTEMA Q-DBASE:
Pulse y gire la perilla TRACK (17) para seleccionar Std (sistema de búsqueda estándar). Si la unidad
USB no cuenta con archivos Q-DBASE, el reproductor selecciona automáticamente el sistema de
búsqueda estándar. Tiene dos opciones:
Opción 1:
Simplemente use las perillas FOLDER y TRACK para explorar los diferentes directorios.
Opción 2:
Pulse el botón DATABASE (15) para iniciar la función de búsqueda tanto las pantallas FOLDER
como TRACK empiezan a parpadear.
Gire la perilla FOLDER (16) para buscar las carpetas.
Gire la JOG-WHEEL (22) para explorar la carpeta seleccionada a alta velocidad. Si desea buscar con
mayor precisión pista por pista, también puede girar la perilla TRACK (17).
Cuando haya encontrado la pista deseada: pulse el botón LOAD TRACK (19).
ALEATORIO TOTAL EN UNA unidad USB:
Esta es la función aleatoria simple en donde cualquier pista en su unidad USB puede ser reproducida
aleatoriamente en reproductor 1:
Abra el fader (53) para reproductor 1 en la mesa de mezclas de audio.
SYNQ
®
115/120 DMC1000
SYNQ
®
116/120 DMC1000
Page 61

ESPAÑOL MANUAL DE INSTRUCCIONES
ESPAÑOL MANUAL DE INSTRUCCIONES
Pulse el botón SOURCE SELECT (14) del reproductor 1 para seleccionar una de las unidades USB.
Pulse el botón RANDOM (45) brevemente hasta que se ilumine.
Pulse el botón PLAY (20) del reproductor 1 para iniciar la reproducción aleatoria.
“ALEATORIO” INTELIGENTE EN UNA unidad USB:
Esta es la función aleatorio “inteligente” en donde tendrá control total sobre qué carpeta, género, álbum o
artista desea reproducir en su selección aleatoria; perfecto como música de fondo en restaurantes,
tiendas, clubs & bares sin un dj. Funciona de la siguiente manera:
Abra el fader (53) para reproductor 1 en la mesa de mezclas de audio.
Pulse el botón SOURCE SELECT (14) del reproductor 1 para seleccionar una de las unidades USB.
REPRODUCE PISTAS EXCLUSIVAMENTE DESDE 1 CARPETA
Pulse & gire la perilla TRACK (17) para seleccionar la clave de búsqueda “Std” .
Pulse la perilla FOLDER (16), la pantalla mostrará el nombre del directorio seleccionado
actualmente.
Gire la perilla FOLDER (16) para seleccionar el directorio desde el que desea reproducir los
archivos.
Pulse el botón RANDOM (45) durante aproximadamente 2 segundos hasta que el LED comience a
parpadear.
Pulse el botón PLAY (20) para iniciar la reproducción aleatoria únicamente desde la carpeta
seleccionada.
REPRODUCE PISTAS EXCLUSIVAMENTE DESDE 1 GÉNERO
Pulse & gire la perilla TRACK (17) para seleccionar la clave de búsqueda “Género” .
Pulse la perilla FOLDER (16); la pantalla mostrará el género seleccionado actualmente.
Pulse y gire la perilla FOLDER (16) para seleccionar la primera letra del género que desea
seleccionar.
Si fuese necesario, gire la JOG WHEEL (22) mientras mantiene presionada la perilla FOLDER (16)
para buscar entre los distintos géneros que comiencen por la misma letra.
Pulse el botón RANDOM (45) durante aproximadamente 2 segundos hasta que el LED comience a
parpadear.
Pulse el botón PLAY (20) para iniciar la reproducción aleatoria únicamente desde las pistas del
género seleccionado.
Comentario 1:para reproducir únicamente pistas de un cierto artista o álbum, simplemente repita las
mismas acciones pero seleccione la clave de búsqueda del artista o el álbum.
Comentario 2: tenga en cuenta que la función aleatorio “INTELIGENTE” únicamente funcionará
adecuadamente si las etiquetas ID3 se mantienen adecuadamente. Un “software gratuito” editor de
etiquetas ID3 perfecto para esta tarea es el “MP3TAG” ¡que puede descargarse desde
www.mp3tag.de !
ACERCA DE LOOPS:
CREAR UN LOOP:
Mientras se está reproduciendo una pista, pulse el botón LOOP IN (31) para programar el punto inicial del
loop. Pulse el botón OUT (32) para programar el punto final del loop. El loop continuo sin cortes se
empieza a reproducir de inmediato. (¡Tras cierta práctica será capaz de crear loops perfectos!) Mientras
se está reproduciendo el loop, puede pulsar nuevamente el botón OUT (32) para salir del loop y continuar
con el resto de la pista.
Es posible programar un nuevo loop, aún cuando se esté reproduciendo el loop actual. Mientras se está
reproduciendo un loop, simplemente pulse el botón LOOP IN (31) para establecer el punto inicial del
nuevo loop. Ahora ingrese el punto final pulsando el botón OUT (32). El nuevo loop está programado y en
reproducción.
REINICIAR UN LOOP:
Esto se puede realizar de 3 modos:
Cuando está programado un loop y lo deja pulsando el botón OUT (32), sólo pulse RELOOP (33) para
reiniciar el loop.
Cuando está programado un loop y lo deja pulsando el botón OUT (32), sólo pulse OUT nuevamente
para reiniciar el loop. El punto donde pulsó OUT se programa ahora como el nuevo punto final del
loop.
Cuando el loop está en reproducción, pulse el botón RELOOP (33) para reiniciar inmediatamente el
loop. Puede repetir esta operación varias veces para crear un efecto “Stutter”.
EDITAR UN LOOP:
Cuando esté programado un loop, pulse el botón RELOOP (33) durante aproximadamente 2 segundos
para ingresar al modo “editar loop” . Cuando el loop se esté reproduciendo continuamente sin cortes, la
pantalla alfanumérica muestra la información del tiempo del punto final del loop. Use la jog-wheel para
establecer el nuevo punto final del loop. Para facilitar las cosas puede escuchar las modificaciones
realizadas al punto final del loop continuamente. Si también desea editar el punto de introducción del loop,
pulse el botón RELOOP (33) para alternar entre el punto inicial y el punto final del loop. Cuando el loop es
perfecto, pulse el botón LOOP OUT (32) para guardar el nuevo punto final del loop.
ACERCA DE LOS EFECTOS:
¡En la descripción de los efectos puede encontrar mucha información, no olvide también verificar esa
sección!
CÓMO USAR LOS EFECTOS EN EL MODO DE SINCRONIZACIÓN DE BEATS:
Pulse el botón FX-SYNC (38) para que se ilumine.
Cuando se esté reproduciendo la música podrá pulsar cualquiera de los 3 efectos: el efecto funciona en el
modo sincronizado de beats. Utilice los botones EFFECT SYNC X/Y (39+40) para seleccionar preajustes
de beat distintos. Pulse el botón RATIO (40) hasta que comience a parpadear para adaptar el impacto del
efecto.
CÓMO USAR LOS EFECTOS EN EL MODO MANUAL:
Pulse el botón FX-SYNC (38) para que se apague.
Mientras se reproduce música puede pulsar cualquiera de los 3 efectos: utilice la JOG WHEEL (22) para
cambiar los efectos a tiempo real. Pulse el botón RATIO (40) hasta que comience a parpadear para
adaptar el impacto del efecto.
ACERCA DE LA MEMORIA:
DIFERENTES MEMORIAS:
Antes de entrar a detalle sobre el uso de la memoria, debe conocer la diferencia entre “memoria de pista”
y “memoria permanente”:
Memoria de la pista: Esta es la memoria donde DMC2000 guarda un conjunto de hasta cuatro
puntos cue y/o loops para una pista. Puede configurar una “memoria de pista” para cada pista en una
unidad USB.
Ejemplo: su unidad USB contiene 5000 pistaspara cada pista puede guardar hasta 4 puntos cue
y/o loops. ¡Esto produce un total de 5000 x 4 = 20.000 puntos cue y/o loops en una unidad USB!
Memoria permanente: Esta es la amplia memoria donde se guardan permanentemente todos los
puntos cue y loops. De hecho, es una recopilación indexada de “memorias de pista”. Cuando recupere
los puntos cue previamente guardados de una cierta pista, puede realizar la transferencia de la
“memoria permanente” a la “memoria de pista”.
Nota:todos los puntos cue están almacenados en archivos de bases de datos en su unidad USB. Si
conecta la unidad a otro DMC2000 o DMC1000, todos los puntos cue podrán ser utilizados
inmediatamente en este reproductor.
USO DE LA “MEMORIA DE PISTA”:
GUARDAR UN PUNTO CUE M AESTRO:
Existen dos modos para establecer un punto cue maestro:
Pulse el botón LOOP IN (31) durante la reproducción normal para establecer el nuevo punto cue
(“CUE al vuelo”).
Coloque el reproductor en pausa y use la rueda para jog/shuttle para buscar la ubicación exacta para
el punto cue. Cuando se haya encontrado la ubicación, pulse el botón LOOP IN (31) para establecer el
nuevo punto cue. (o pulse el botón PLAY/PAUSE)
Cuando haya programado el punto cue, sólo pulse el botón CUE (21) para recuperarlo.
GUARDAR UN PUNTO CUE SIMPLE EN LOS BOTONES “HOT CUE” :
Primero pulse el botón RECORD CUE (25) para hacer que la unidad ingrese al modo de memoria de hot
cue (botón RECORD CUE encendido):
Pulse uno de los cuatro botones HOT CUE (24) en el momento preciso durante la reproducción
normal: el botón HOT CUE que se pulsó recientemente cambia a color verde para indicar que el punto
SYNQ
®
117/120 DMC1000
SYNQ
®
118/120 DMC1000
Page 62

ESPAÑOL MANUAL DE INSTRUCCIONES
ESPAÑOL MANUAL DE INSTRUCCIONES
cue deseado ha sido almacenado. (“Cue al vuelo”).
Coloque el reproductor en pausa y use la rueda para jog/shuttle para buscar la ubicación exacta para
el punto cue. Cuando se haya encontrado esta ubicación, pulse uno de los cuatro botones HOT CUE
para establecer el nuevo punto cue: el botón HOT CUE que se pulsó recientemente cambia a color
verde para indicar que el punto cue deseado ha sido almacenado.
Cuando haya programado el punto cue, sólo pulse el botón HOT CUE para iniciar la reproducción a partir
del punto cue guardado.
GUARDAR UN LOOP EN LOS BOTONES “HOT CUE” :
Esto es muy similar al procedimiento para guardar un punto cue simple. La única diferencia es que tiene
que colocar el DMC2000 en el modo loop primero. Cuando se esté reproduciendo el loop, pulse el botón
RECORD CUE (25) para hacer que el reproductor ingrese al modo de memoria de hot cue (botón
RECORD CUE encendido). A continuación, pulse uno de los cuatro botones HOT CUE (24): el botón HOT
CUE que se pulsó recientemente, cambia a color rojo para indicar que el loop, en reproducción en ese
momento, ha sido almacenado. ¡Puede guardar hasta 4 loops por pista!
ELIMINAR LOS BOTONES “HOT CUE” :
Puede eliminar fácilmente el contenido del botón HOT CUE pulsando el botón DELETE CUE (26),
seguido del botón HOT CUE que desea eliminar. O simplemente guarde un nuevo punto cue o loop en
este botón HOT CUE. También puede borrar los cuatro botones HOT CUE conjuntamente presionando el
botón DELETE CUE (26) durante más de 2 segundos. Notará que los 4 botones HOT CUE en su totalidad
cambiarán a color oscuro para indicar que los botones HOT CUE están vacíos.
USO DE LA “MEMORIA PERMANENTE”:
Por razones de seguridad los puntos cue y los loops almacenados en los botones HOT CUE no se
guardan automáticamente en la memoria permanente. Esto significa que si recupera un conjunto de
puntos cue y loops de la memoria permanente en la memoria HOT CUE (la cual es la memoria de pista),
puede cambiar, editar y eliminar estos puntos cuantas veces lo desee. La memoria permanente no se
verá afectada hasta que respalde los botones HOT CUE en la memoria permanente.
GUARDAR EN LA “MEMORIA PERMANENTE”:
Pulse el botón RECORD CUE (25) hasta que la pantalla muestre “Now saving” para indicar que los
puntos cue y los loops en los botones HOT CUE para esa pista se guardan en la memoria permanente.
ELIMINAR UNA PISTA EN LA “MEMORIA PERMANENTE”:
Seleccione la pista que desea eliminar. Pulse al mismo tiempo los botones “DELETE CUE” (26) y
“SYNC/Y” (40). La pantalla pregunta “DEL TRACK?” si pulsa el botón YES (botón PITCH BEND+), se
eliminará la información de la pista en la memoria permanente.
RECUPERACIÓN DE LOS “PUNTOS HOT CUE/LOOPS” DE LA MEMORIA PERMANENTE:
Debido a que tarda unos segundos en cargar los puntos cue permanentes, no se restauran
automáticamente. Algunas veces simplemente no los necesita, así que ¿para qué conservarlos? A
continuación se explica cómo funciona:
No hay puntos cue almacenados: Cuando seleccione una pista que no tenga puntos cue o loops
guardados en la memoria permanente, no sucede nada: puede iniciar la reproducción de inmediato.
Hay puntos cue almacenados: Cuando seleccione una pista donde haya guardados puntos cue o
loops en la memoria permanente, el DMC2000 muestra “Load Cues?” y debe confirmar si desea
cargar los puntos cue. Esto es lo que puede hacer:
Pulse el botón YES: Pulse sí (botón pitch bend+) para cargar los puntos cue y loops
guardados previamente. La pantalla muestra RECALL mientras se llenan los botones Hot
Cue.
Pulse el botón NO: los puntos cue no se cargan y la pantalla cambia a su estado normal.
Puede iniciar la reproducción de inmediato.
No haga nada: después de unos segundos la pantalla cambia automáticamente a su estado
normal y por supuesto no se cargan los puntos cue.
Nota: en el menú de configuración (punto 4) podrá seleccionar la carga de los puntos cue
automáticamente (carga automática). En dicho caso el reproductor no le preguntará nada, sino que
simplemente cargará los puntos cue.
ESPECIFICACIONES
Suministro de alimentación: CA 100 – 240 V, 50/60 Hz
Consumo de energía: 21 W
Nivel de entrada/impedancia de referencia:
Línea: 47kΩ /-14 dB V (200 mV) +/-0,1 dB
Phono: 47kΩ /-51 dB V (2,8 mV) +/-0,1 dB
Mic: 10kΩ /-56 dB V (1,5 mV) +/-0,1 dB
Entrada Maxi: (1 kHz, THD=1%, EC plano, máx. ganancia, carga=100kΩ)
Línea: > +0 dB V
Phono: > -38 dB V
Mic: > -42 dB V
Talkover: -20 dB +/-2 dB
Respuesta de frecuencia: (EC plano, máx. ganancia, carga = 100kΩ)
Línea: 20 Hz – 20 kHz +/-2 dB
Phono: 20 Hz – 20 kHz +2/-3 dB (RIAA)
Mic: 20 Hz – 20 kHz +2/-3 dB
THD+N: (EC plano, máx. ganancia, w/20 kHz LPF, A-ponderada, carga = 100kΩ)
Línea: < 0,06% @ 1 KHz
Phono: < 0,08% @ 1 KHz
Mic: < 0,15% @ 1 KHz
Nivel/Impedancia de salida:
Maestro no balanceado: 1kΩ /3,8 dBV (1,55 V) +/-2 dB
Maestro balanceado (carga=600Ω): 600Ω /+6 dBm (1,55 V) +/-3 dB
Cabina maestra: 1kΩ /3,8 dBV (1,55 V) +/-2 dB
Auriculares (carga=32Ω): 33Ω /0 dBV (1V) +/-2 dB
Máx. salida: (1 kHz, THD=1%, EC plano, máx. ganancia, carga = 100kΩ)
Maestro: > +18 dBV (8 V) carga=100kΩ
Auriculares: > +4 dBV (1,6 V) carga=32Ω
FORMATO USB:
Sistema de archivos: FAT12/16/32
Máx. Capacidad de disco duro: 500 GB
Máx. Carpetas: 999
Máx. Pistas / Carpetas: 999
Máx. Capacidad de pistas en Q-DBASE:9999
FORMATO WAV: PCM, 1411 Kbps.
FORMATOS MP3:
MPEG1 Layer3 (ISO/IEC11172-3): mono/estéreo muestreado a: 32 - 44,1 – 48 kHz
Velocidad de bits: 32 – 320 Kbps
Modos de velocidad de bits: CBR (velocidad de bits constante) o VBR (velocidad de bits
variable)
MPEG2 Layer3 (ISO/IEC13818-3): mono/estéreo muestreado a: 16 – 22,05 – 24 kHz
Velocidad de bits: 32 – 160 Kbps
Modos de velocidad de bits: CBR (velocidad de bits constante) o VBR (velocidad de bits
variable)
MPEG2,5 Layer3: mono/estéreo muestreado a: 8 – 11.025 – 12 kHz
Velocidad de bits: 32 – 160 Kbps
Modos de velocidad de bits: CBR (velocidad de bits constante) o VBR (velocidad de bits
variable)
Software Q-DBASE:
Extensiones de archivo: .DBH + .dat + .DBX
Requisitos de sistema: RAM 512 MB
Espacio libre en disco de 100 MB
Microsoft®Win XP SP3 ~ Win Vista SP2 ~ Win 7
Dimensiones: 299(Pr.) x 420(An.) x 89(Al.) mm
Peso: 4,42kg
Toda la información está sujeta a cambios sin previo aviso
Puede descargar la última versión de este manual de usuario en nuestro sitio web: www.beglec.com
SYNQ
®
119/120 DMC1000
SYNQ
®
120/120 DMC1000
 Loading...