

Page 1

VS60 User’s Guide
Firmware version 1.2-0132
VS6006212011
Page 2

Table of Contents
TOC
2
3
Chapter 1: Getting Started with VS60
4
Package Contents
4
Hardware Specications
5
Software Specications
5
Operating Requirements
6
Appearance
7
LED Behavior
7
Safety Instructions
8
Chapter 2: Using VS60
8
Hardware Setup
10
Enabling VS60 on your Synology DiskStation
11
Live-view
11
More Functions
12
Snapshot
12
Start PTZ
13
Event Playback
15
Switch Resolution
15
Firmware Upgrade
16
Information
17
Chapter 3: Troubleshooting
Page 3
CHAPTER
1
3
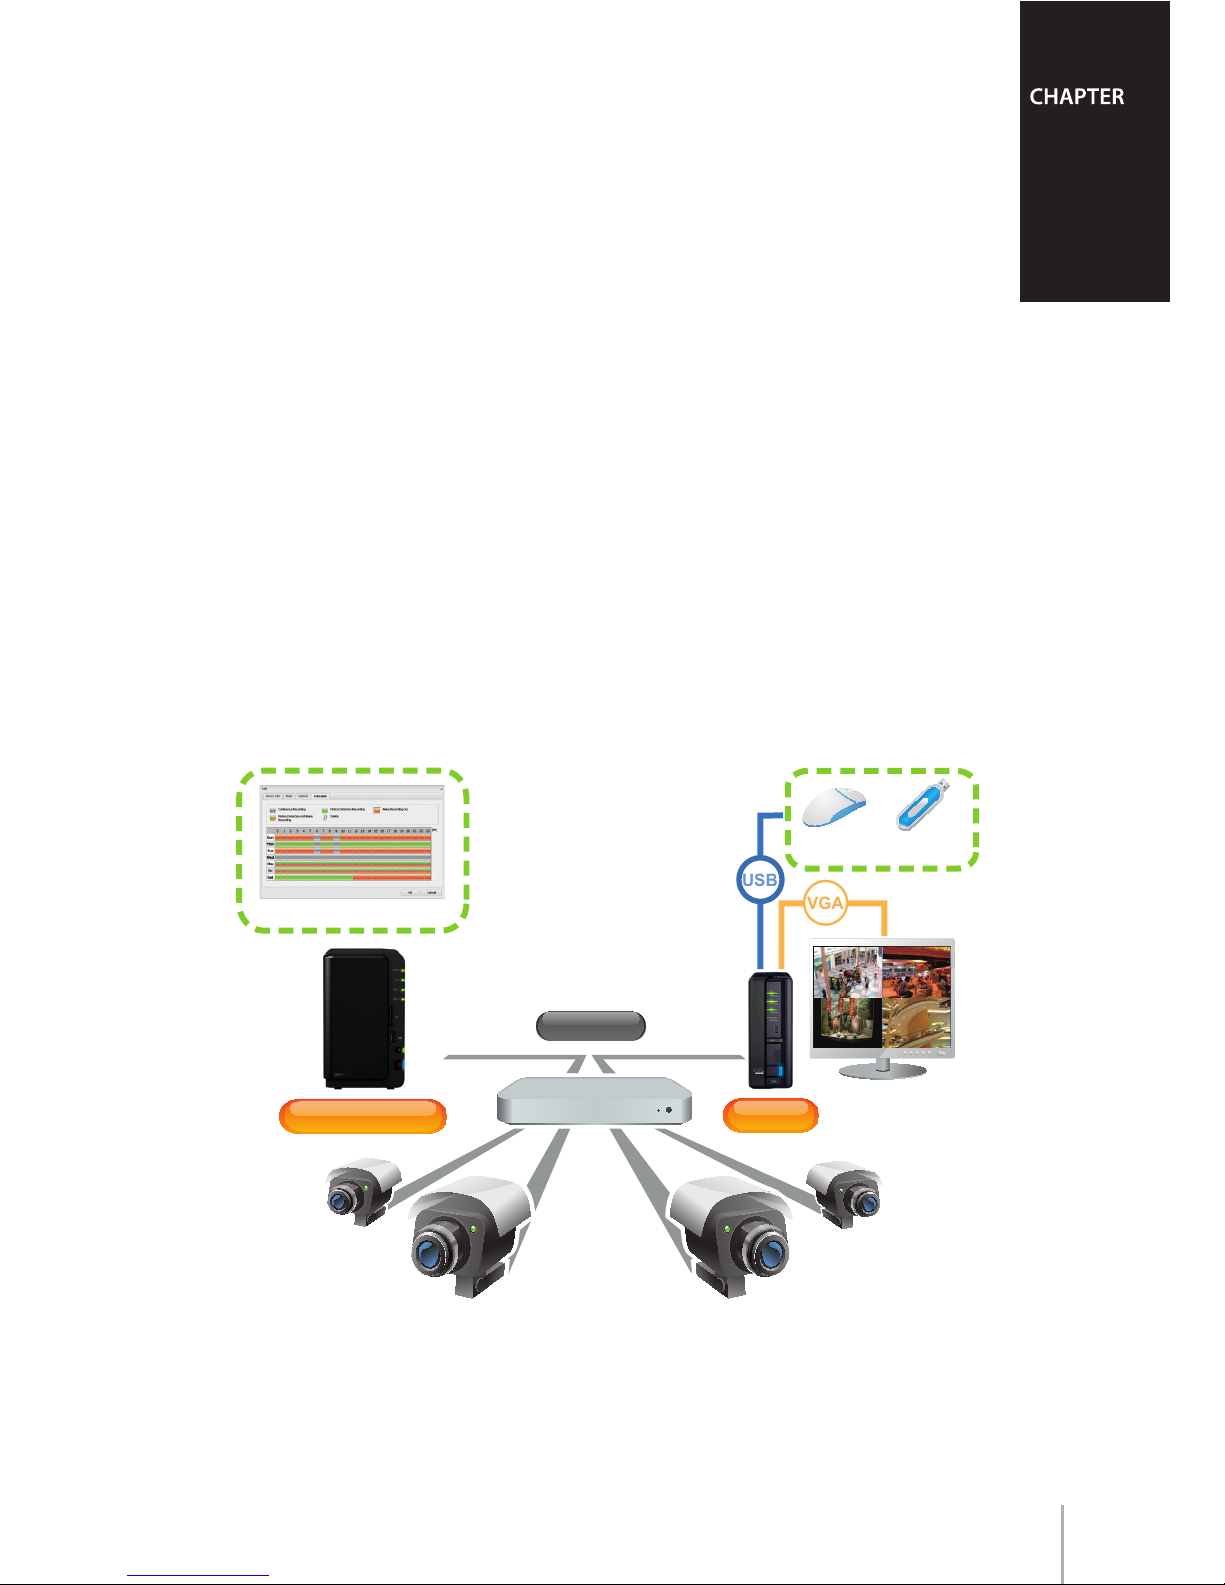
Congratulations on your purchase of Synology VS60. It is designed to expand the
exibility of your Surveillance Station.
By connecting an LCD monitor or TV with VS60, users can directly live-view the
IP cameras set up on their Synology DiskStation without a PC. Installing multiple
VS60s brings you the convenience of live-viewing the cameras as a screen wall.
This user’s guide will assist you with the installation and usage of your VS60.
Before reading further, ensure that you have at least one IP camera managed by
your Synology DiskStation. For information on how to set up an IP camera on your
Synology DiskStation, please check the user's guide of your Synology DiskStation.
Getting Started with VS60
USB Flash
Mouse
Serveillance Station
VS60
VGA
DiskStation
USB
Network
Page 4

4
Chapter 1: Getting Started with VS60
Package Contents
Before installation, please check the package contents to verify that you have
received the items below.
Main Unit AC power adapter
2M RJ-45 LAN cable
User's Guide
Hardware Specications
USB
1 port in front, 1 port in rear
(For USB disk and mouse)
Video Output
VGA x 1
Audio Output
3.5mm Stereo Audio Jack x 1
Size (HxWxD) (mm)
160x63x218 mm
Weight
0.78Kg
LAN
10/100BaseT
AC Input Power Voltage
100V to 240V AC
Power Frequency
50 / 60Hz, Single Phase
Operating Temperature
5°C ~ 35°C (40°F ~ 95°F)
Storage Temperature
-10°C ~ 70°C (15°F ~ 155°F)
Relative Humidity
5% to 95% RH
Maximum Operating Altitude
10,000 feet
Certication
FCC Class B, CE Class B
Page 5

Chapter 1: Getting Started with VS60
5
Software Specications
Channel #
4, 6 or 9
Display Mode
2x2, 3x2 or 3x3 panels
Compression Formats
MJPEG, MPEG-4, H.264
Decoding Throughput [MJPEG]
MJPEG:
4,6 channel: 60FPS, D1
9 channel: 60 FPS, CIF
Decoding Throughput [MPEG4]
MPEG4:
4,6 channel: 60FPS, D1
9 channel: 60 FPS, CIF
Decoding Throughput [H.264]
H.264:
4,6 channel: 45FPS, D1
9 channel: 60 FPS, CIF
Maximum Camera Resolution
4,6 channel D1: (640x480 in VGA, 720x480 in
NTSC, 720x576 in PAL)
9 channel CIF: (320x240 in VGA, 352x240 in
NTSC, 352x288 in PAL)
Snapshot
Yes (save to USB disk)
PTZ
Yes (for PTZ cameras only)
Playback
Event Timeline
Firmware Upgrade
Yes (via USB disk)
Monitor Resolution
1280x768, 1024x768, 800x600
Operating Requirements
Synology DiskStation
Recommend DSM 3.0-1337 and onwards to
support full features of VS60.
Supported IP cameras
For the complete list of supported IP cameras,
please visit http://www.synology.com
Page 6

6
Chapter 1: Getting Started with VS60
Front View Rear View
LED indicators
USB 2.0 port
LOCK button
POWER button
VGA port
AUDIO jack
USB 2.0 port
LAN port
RESET button
DC IN 5V port
Article Name Location Description
POWER button
Front The POWER button is used to turn the Synology VS60 on or off.
LOCK button
Front
The LOCK button is used to prevent VS60 from paring with
other Synology DiskStations.
LED Indicator
Front
The LED Indicators are used to display the status of the
system, network connection, and Lock function. For complete
details, please refer to the
LED Behavior
table below.
USB port
Front &
Rear
The Synology VS60 offers 2 USB ports for both mouse plug-in
and USB ash drive connection*. One of the ports is located
on the front and the other on the rear.
VGA port
Rear To connect the monitor’s VGA adapter to VS60.
AUDIO jack
Rear
The AUDIO jack is used to connect external speakers or
earphone to VS60 (for audio supported cameras).
LAN port
Rear The LAN port is used to connect the LAN cable to VS60.
RESET button
Rear
The RESET button is used to restore the settings to the factory
default.
DC IN 5V port
Rear
The DC IN 5V port is used to connect the AC Power Adapter to
provide power to your Synology VS60.
Appearance
Page 7

Chapter 1: Getting Started with VS60
7
LED Behavior
LED Behavior Description
POWER
Solid Blue
System is ready
Flashing Blue
System is starting up
Off
The power is off
STATUS
Solid Green
Server is connected
Off
Server is not connected
LAN
Solid Green
LAN is connected
Flashing Green
LAN is active
LOCK
Solid Green
Locked (Pairing is not allowed with Synology DiskStation)
Flashing Green
Unlocked (Pairing is allowed with Synology DiskStation)
RESERVE
Off
No functionality (Reserved for future use)
Safety Instructions
To use your Synology product safely, please follow these instructions and warnings
at all time.
Keep away from direct sunlight and away from chemicals. Make sure
the environment does not experience abrupt changes in temperature
or humidity.
Keep Synology product upright. Do not lay it down horizontally.
Do not place the Synology product close to any liquid.
Before cleaning, unplug the power cord rst. Wipe Synology product
with damp paper towels. Do not use chemical or aerosol cleaners to
clean it.
Do not place the Synology product on a cart, table, or desk, which is
not stable to avoid the product from falling over.
The power cord must plug in to the right supply voltage. Make sure
that the supplied AC voltage is correct and stable.
Page 8

2
8
Using VS60
Hardware Setup
1
Connect the AC power adapter to VS60, and the other end to the power outlet.
2
Use the LAN cable to connect VS60 to your switch/router/hub.
Page 9

Chapter 2: Using VS60
9
3
Connect your monitor's VGA cable to the VGA port on the back of VS60.
4
Connect the mouse to the USB port on the back of VS60.
5
Push the Power button on the front of your VS60. Your VS60 is now online and
ready to work with your DiskStation.
Page 10

10
Chapter 2: Using VS60
Enabling VS60 on your Synology DiskStation
Before you start, make sure the DSM version of your DiskStation is
3.0-1337 or
later
to support the full features of VS60. You can view your current DSM version
by going to
Control Panel > DSM Update
.
To update DSM, please visit: http://www.synology.com/support
To Enable VS60 on your Surveillance Station:
1
Enter Surveillance Station.
2
Click on the “
Management
” tab at the top.
3
Select "
Advanced
" option under
System
category.
4
Enable VS60 by checking “
Enable VisualStation
” checkbox.
5
Click on “Save” to save the changes. After conguration, "
VisualStation
" will
appear under the “
Management
” tab.
Page 11

Chapter 2: Using VS60
11
6
Click on the “
VisualStation
” tab to enter the setup page. Follow the steps in “
Help
”
(the icon with question mark) to nish setup.
Live-view
To turn on your VS60 to start live-view:
1
Turn on your VS60 by pressing the Power button. The loading image should
appear on screen.
2
When the loading is completed, the live-view will appear on the screen according
to the settings on Surveillance Station.
3
To see any one of the channels in full screen, double-click on it in the live-view.
Double-click anywhere on the screen to return to the multiple-channel view.
More Functions
Right-clicking anywhere on the screen will bring up the functions menu, which
offers the following functions:
Snapshot, Start PTZ, Event Playback, Switch
Resolution, Firmware Upgrade
and
Information
.
Page 12

12
Chapter 2: Using VS60
Snapshot
By right-clicking on the live-view and selecting “
Snapshot
”, you can save the
current image as a snapshot. The image will be stored onto the connected USB
storage device. VS60 will create an individual folder for each live-view channel.
Alternatively, you can also take snapshots by clicking on the Snapshot button on
the PTZ control Panel.
Note:
You can connect a USB ash drive to Synology VS60 via the USB port. Synology VS60
also supports external USB HDD, provided that it comes with its own power supply.
Important:
VS60 only recognizes USB storage devices in FAT32 format.
Start PTZ
If your camera supports PTZ (pan/tilt/zoom) function, you can select a camera
and use the PTZ control panel to adjust the camera's direction and to zoom in and
out on specic areas. The supported functions on the control panel will appear in
blue, while the unsupported functions will be grayed out.
The button functions are shown as follows:
Adjust the camera’s direction
Restore the camera back to its home position
Take a Snapshot
Zoom in/out function
Page 13

Chapter 2: Using VS60
13
Event Playback
By right-clicking on one channel live view and selecting "
Event Playback
", you
can switch to the event player for playback of video recordings stored on your
DiskStation with specied date and time.
The Timeline displayed on top of the event player indicates the time frame there
are events recorded.
Continuous Recording
mode will be marked in gray in the
Timeline.
Motion Detection Recording
mode will be marked in green.
Alarm
Recording
mode will be marked in orange.
The button functions are shown as follows:
Play / Pause Play / Pause the event
Previous frame and
Next frame
Go to the previous frame or the next
frame
Previous and Next Go to the previous or the next event
Stop Stop playing events
Slow Motion / Fast
Forward
Adjust the video playback tempo
Snapshot Take a Snapshot
Duration / Timestamp
Switch between displaying the video
length or its recorded time
Audio volume Adjust the volume
Page 14

14
Chapter 2: Using VS60
To playback events of a different date:
When you enter the event player, by default the player will automatically search
and start playing the earliest recorded event for your current day. To select a
different date, click on "
Stop
" button on the controller panel, then use the drop
down tool box under "
Time
" module to narrow down the date of interest. When it
is done, click on "Play" to start playback.
To playback events of a certain time:
Move the
Cursor
icon on the timeline to where you want to start watching the
events. You can click
Day
or
Hour
to display the timeline within 24 hours or within
1 hour.
To play an event:
1
Click the
Play
button on the
Controller
panel to start or pause playing the events.
2
Click the
Previous
button or
Next
button on the
Controller
panel to go to the
previous or the next event.
3
Click the
Fast Forward
or
Slow Motion
button to adjust the video playback
tempo.
4
Click the
Duration
/
Timestamp
button to switch between displaying the length of
the video or the time when the video is recorded.
5
Adjust the volume by dragging the slider bar on the
Controller
panel if the
selected event has audio support.
6
Click the
Stop
button to stop playing the event.
To take a snapshot:
To take a snapshot, you can
Pause
the current event, click the
Previous frame
or
Next frame
button on the
Controller
panel, then click the
Snapshot
button to save
the image.
Switch Resolution
If your monitor supports more than one resolution, you can specify the viewing
preference. VS60 supports the following three resolutions:
800 x 600, 1024 x 768, 1280 x 768
Note:
If you select a resolution your monitor does not support, the monitor will black-out for
seconds and then return to its selected resolution.
Page 15

Chapter 2: Using VS60
15
Firmware Upgrade
To upgrade VS60 rmware, follow the steps below:
1
Download the latest rmware from: http://www.synology.com
2
Unzip the rmware and save the le onto your USB storage device.
3
Connect your USB storage device to VS60 .
4
Click on
Firmware Upgrade
to start upgrading.
Information
By right-clicking anywhere on the screen and selecting “Information”, you can see
the facts about your VS60:
•
Model Name:
The model of your VisualStation
•
Fimware Version:
The rmware version of your VisualStation
•
Pairing with:
The current DiskStation paired with your VS60
Page 16

3
16
Troubleshooting
Q1: Why can't I pair my DiskStation with VS60?
You can only pair the VS60 with Synology DiskStation when VS60 is unlocked.
To see if your VS60 is locked, check the LED indicator light on the front panel.
The LED indicator will glow solid green when VS60 is locked and ash green
when unlocked. To lock or unlock your VS60, press and hold the LOCK button
on the VS60 for 3 seconds. The status of the LED indicator should change
accordingly.
Q2: Why can't Surveillance Station detect any VS60 within the
network?
Check if your VS60 is connected to the local network. Also, make sure it is
turned on.
Q3: Why do I see the warning “File cannot be saved!” when I use
Snapshot function?
The snapshot must be saved on a USB storage device which is formatted in
FAT32. You can connect a USB storage device to Synology VS60 via the USB
port. Synology VS60 also supports external HDD, provided that it comes with its
own power supply.
Note that after plugging in your USB storage device, please wait for 15 seconds
before attempting to access.
Q4: Why do I see these icons after VS60 starts up?
•
Disabled:
VS60 is congured but disabled in your Synology DiskStation.
•
Not congured:
VS60 is not paired with any Synology DiskStation.
•
Disconnected:
VS60 is congured but cannot connect to your Synology
DiskStation. Please check the network setting and the DiskStation is started up.
Page 17

Chapter 3: Troubleshooting
17
Q5: What may be the cause for lower FPS (frame per second)
performance on my VS60?
VS60 can achieve its proper 60 fps speed with Mpeg4 codec. You may
experience performance in the 45 fps range if the camera is using H.264
codec because H.264 uses more decoding resources. Therefore, your actual
performance may vary if you use a combination of MPEG4 and H.264 cameras.
Q6: Why does VS60 display “Unsupported Prole” on the
camera screen?
When H.264 camera uses prole other than Baseline prole, or when MPEG4
camera uses prole other than Simple prole, VS60 won’t be able to process the
different prole levels for each video codec and causes this warning message.
The solution is to enter the IP camera’s portal page and adjust the codec prole
with the recommended prole settings above.
Q7: When facing long video delays, how do I reduce the latency?
If video latency is too long, try decreasing the image quality or frame rate from
Surveillance Station or Camera portal to reduce the system workload.
Q8: Why do Live View and Event Playback aspect ratio look
different?
This is caused by the LCD monitor or TV which you are using. To resolve this
issue, go to the Main menu for your LCD/TV, use the “Auto Adjust” function and
your screen aspect ratio will return to normal.
Page 18

18
COPYRIGHT NOTICE
All title, copyright and other intellectual property rights in and to any Synology Products, the “Products”
or “Product” (including but not limited to product design and appearance, rmware, and any relevant
media, images, photographs, animations, video, audio, music, text, and applets incorporated into the
Products), the accompanying manuals and other documents, and on-line or electronic documents, if
any, are owned by Synology Inc. Unless otherwise expressly licensed by Synology Inc. in writing, any
provision of the Products does not represent any license of any of the above rights.
Copyright © 2010 Synology Inc.; All rights reserved.
TRADEMARK NOTICE
Synology and other names of Synology Products are proprietary marks or registered trademarks
of Synology Inc. Microsoft, Windows series, and Internet Explorer are trademarks of Microsoft
Corporation. Apple, Mac, Mac OS series are trademarks of Apple Computer, Inc., registered in the U.S.
and other countries. Other products and company names mentioned herein are trademarks of their
respective holders.
LIMITED WARRANTY AND LIABILITY
Synology provides a limited warranty for its Products only to the initial person or entity that originally
purchased the Product from Synology or its authorized distributor or retailer. Synology warrants that
every hardware portion of the Products will be free from physical defects in material and workmanship
within warranty period, or the Product will be repaired or replaced as determined solely by Synology.
The DS509+, DS508, RS409RP+, RS409+, RS409, RS408-RP, RS408, RS407, DX5 and RX4 have
three years warranty from the purchase date. All other models purchased before 2008/2/29 have one
year warranty, and those purchased after 2008/3/1 have two years warranty from the purchase date.
If the Product proves defective during this warranty period, you can contact the local dealer in order
to obtain assistance. You must provide proof of purchase and a bar code number from the Product's
packaging when asking for assistance. Synology Products are barebones devices so Synology makes
no warranty of the hard disk installed, nor warranty on compatibility of all hard disks.
SYNOLOGY SHALL HAVE NO LIABILITY TO YOU UNDER THIS LIMITED WARRANTY IF THE
PRODUCT IS INSTALLED AND USED IN A MANNER NOT SPECIFIED OR DESCRIBED IN THE
PRODUCT SPECIFICATIONS OR DESCRIPTION, THE PRODUCT HAS BEEN MODIFIED OR
ALTERED IN ANY WAY BY ANY PARTY OTHER THAN SYNOLOGY, OR THE FAILURE OF THE
PRODUCT TO CONFORM TO ITS SPECIFICATIONS CAN BE ATTRIBUTED TO CAUSES THAT
NOT THE RESPONSIBILITY OF SYNOLOGY.
SYNOLOGY MAKES NO WARRANTY OR REPRESENTATION, EXPRESSED, IMPLIED, OR
STATUTORY, WITH RESPECT TO ITS PRODUCTS OR THE CONTENTS OR USE OF THIS
DOCUMENTATION AND ALL ACCOMPANYING SOFTWARE, AND PARTICULARLY DISCLAIMS ITS
QUALITY OR PERFORMANCE FOR ANY PARTICULAR PURPOSE.
SYNOLOGY MAKES NO GUARANTEE THAT ALL DATA STORED ON SYNOLOGY PRODUCTS IS
ALWAYS SECURE WITHOUT ANY RISKS OF DATA LOSS. SYNOLOGY REMINDS YOU TO BACK
UP THE DATA PERIODICALLY. UNDER NO CIRCUMSTANCES SHALL SYNOLOGY BE LIABLE IN
ANY WAY TO THE USER FOR DAMAGES, INCLUDING ANY SAVINGS, LOST PROFITS OR OTHER
INCIDENTAL OR CONSEQUENTIAL DAMAGES ARISING OUT OF THE USE OF, OR INABILITY TO
USE SYNOLOGY PRODUCTS OR RESULTING LOSS OF DATA FROM SUCH USE.
THIS WARRANTY GIVES YOU SPECIFIC LEGAL RIGHTS, AND YOU MAY ALSO HAVE OTHER
RIGHTS WHICH VARY FROM STATE TO STATE (OR JURISDICTION TO JURISDICTION).
SYNOLOGY'S RESPONSIBILITY FOR MALFUNCTIONS AND DEFECTS IN HARDWARE IS
LIMITED TO REPAIR OR REPLACEMENT AS SET FOR IN THIS WARRANTY STATEMENT. FOR
CUSTOMERS, EXCEPT FOR THE EXPRESS WARRANTIES CONTAINED IN THIS WARRANTY
STATEMENT, SYNOLOGY DISCLAIMS ALL OTHER WARRANTIES AND CONDITIONS, EXPRESS
OR IMPLIED, STATUTORY OR OTHERWISE, FOR THE PRODUCT, INCLUDING BUT NOT LIMITED
TO ANY IMPLIED WARRANTIES AND CONDITIONS OF MERCHANTABILITY AND FITNESS FOR
Page 19

19
A PARTICULAR PURPOSE. NO OTHER WARRANTIES, WHETHER EXPRESS OR IMPLIED,
WILL APPLY AFTER THE LIMITED WARRANTY PERIOD HAS EXPIRED. SOME STATES OR
JURISDICTIONS DO NOT ALLOW THE EXCLUSION OF CERTAIN IMPLIED WARRANTIES OR
CONDITIONS, OR LIMITATIONS ON HOW LONG AN IMPLIED WARRANTY OR CONDITION
LASTS, SO THIS LIMITATION MAY NOT APPLY TO YOU. THIS LIMITED WARRANTY COVERAGE
TERMINATES IF YOU SELL OR OTHERWISE TRANSFER THIS PRODUCT TO ANOTHER PARTY.
SYNOLOGY DOES NOT ACCEPT LIABILITY BEYOND THE REMEDIES PROVIDED FOR IN
THIS LIMITED WARRANTY OR FOR SPECIAL, INDIRECT, CONSEQUENTIAL OR INCIDENTAL
DAMAGES, INCLUDING, WITHOUT LIMITATION, ANY LIABILITY FOR THIRD-PARTY CLAIMS
AGAINST YOU FOR DAMAGES, FOR PRODUCTS NOT BEING AVAILABLE FOR USE, OR FOR
LOST DATA OR LOST SOFTWARE. SYNOLOGY'S LIABILITY SHALL NOT EXCEED THE AMOUNT
YOU PAID FOR THE PRODUCT THAT IS THE SUBJECT OF A CLAIM. THIS IS THE MAXIMUM
AMOUNT FOR WHICH SYNOLOGY IS RESPONSIBLE.
SYNOLOGY INC. PRODUCTS ARE NOT INTENDED FOR USE IN MEDICAL, LIFE SAVING, OR
LIFE SUSTAINING APPLICATIONS.
DISPUTE RESOLUTION
For the purposes of this provision, the term “Dispute” means any dispute, controversy, or claim arising
out of or relating to (i) this Agreement, its interpretation, or the breach, termination, applicability or
validity thereof, (ii) the related order for, purchase, delivery, receipt or use of any product or service
from Synology, or iii) any other dispute arising out of or relating to the relationship between You and
Synology; the term “Synology” means Synology, Inc, its parents, subsidiaries, afliates, directors,
ofcers, employees, beneciaries, agents, assigns, component suppliers (both hardware and
software), and/or any third party who provides products or services purchased from or distributed
by Synology; and the term “You” means the owner or purchaser of the Synology product, or those in
privity with you, such as family members or beneciaries. For US customers, you and Synology agree
that any Dispute between You and Synology will be resolved exclusively and nally by arbitration
under the current commercial rules of the American Arbitration Association, except as otherwise
provided below. The arbitration will be conducted before a single arbitrator, and will be limited solely
to the dispute between You and Synology. The arbitration, or any portion of it, will not be consolidated
with any other arbitration and will not be conducted on a class-wide or class action basis. The
arbitration shall be held in King County, Washington State, United States of America by submission
of documents, by telephone, online or in person as determined by the arbitrator at the request of the
parties. The prevailing party in any U.S. or non-U.S. arbitration or other legal action shall receive all
costs and reasonable attorneys’ fees, including any arbitration fee paid by the prevailing party. Any
decision rendered in such arbitration proceedings will be nal and binding on the parties, and judgment
may be entered thereon in any court of competent jurisdiction. You understand that, in the absence
of this provision, You would have had a right to litigate Disputes through a court, including the right
to litigate claims on a class-wide or class-action basis, and that You have expressly and knowingly
waived those rights and agreed to resolve any disputes through binding arbitration in accordance
with the provisions of this paragraph. For non-US customers, any Dispute shall be nally resolved
by arbitration conducted by three neutral arbitrators in accordance with the procedures of the R.O.C.
Arbitration Law and related enforcement rules. The arbitration shall take place in Taipei, Taiwan, R.O.C.,
and the arbitration proceedings shall be conducted in English or, if both parties so agree, in Mandarin
Chinese. The arbitration award shall be nal and binding on the parties and may be enforced in any
court having jurisdiction.
REVISIONS
Synology reserves all rights to revise or update its Products, other products, software, or related
documentation without further notice.
Synology Inc. reserves the right to revise this publication and to make changes in the content hereof
without the obligation to notify any person of such revision or changes.
Page 20

P/N: 15-050370020
Printed in Taiwan
 Loading...