

Page 1
Synology Wi-Fi Router MR2200ac
Hardware Installation Guide
Page 2

Table of Contents
Chapter 1: Before You Start
Package Contents 3
Synology Wi-Fi Router at a Glance 4
Safety Instructions 5
Chapter 2: Set up Your Synology Wi-Fi Router
Position Your Synology Wi-Fi Router 6
Set up MR2200ac as Primary Wi-Fi Point 6
Set up MR2200ac as Additional Wi-Fi Point 7
Set up SRM 8
Appendix A: Specications
Appendix B: LED Indicator Table
Synology_HIG_MR2200ac_20180312
2
Page 3

Before You Start
Thank you for purchasing this Synology product! Before setting up your new Synology Wi-Fi Router, please check
the package contents to verify that you have received all of the items below. Also, make sure to read the safety
instructions carefully to avoid harming yourself or damaging your Synology Wi-Fi Router.
Note:
All images below are for illustrative purposes only, and may dier from the actual product.
Package Contents
Main unit x 1 AC power adapter x 1
Chapter
1
RJ-45 LAN cable x 1
3 Chapter 1: Before You Start
3
Page 4
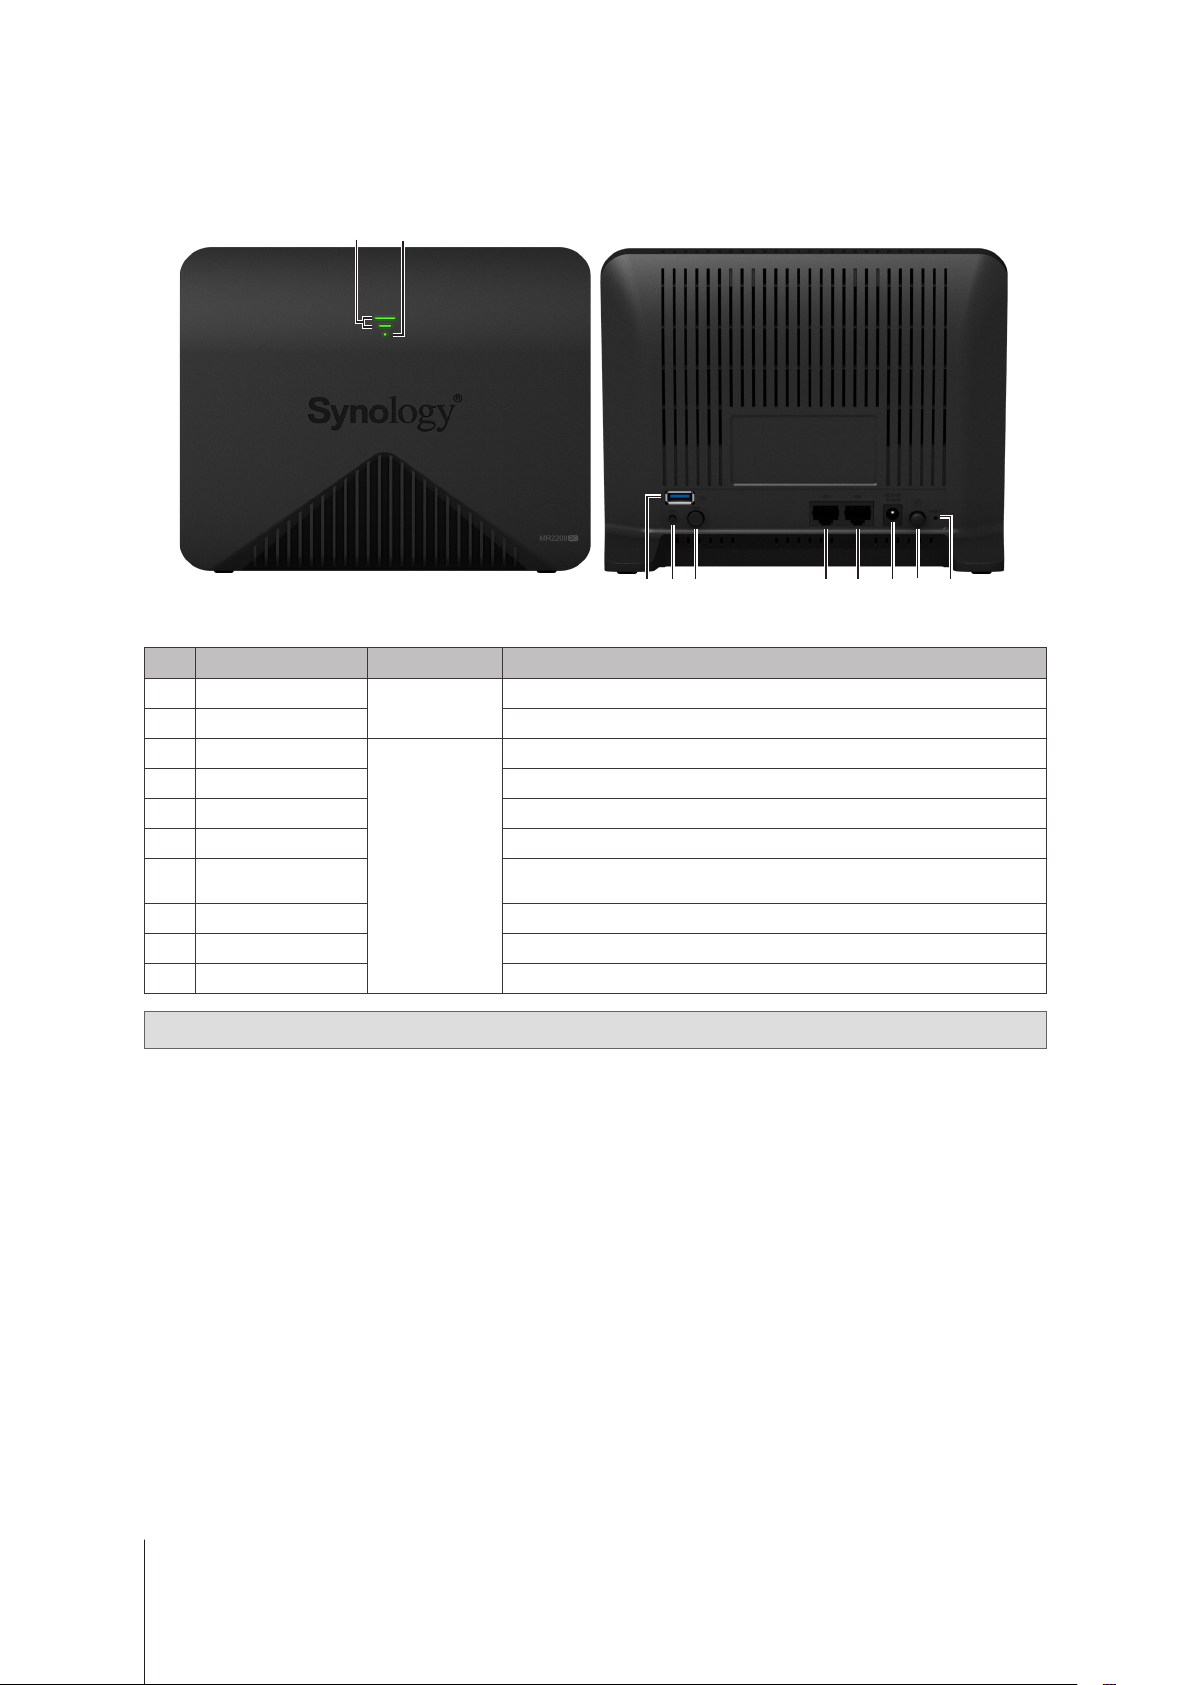
Synology Wi-Fi Router at a Glance
1 2
3 4 5 6
7
8
9 10
No. Article Name Location Description
1
2
3
4
5
6
7
8
9
10
Wi-Fi Indicator
STATUS Indicator Displays the status of the system.
USB 3.0 Port
WPS Button Press to start WPS.
Wi-Fi Button Press the button for 3 seconds to turn on/o the Wi-Fi network.
LAN Port Connect a network cable into this port to establish LAN connection.
WAN Port
Power Port Connect the AC power adapter here.
Power Button Press to power on/o the Synology Wi-Fi Router.
RESET Button Press and hold for 4 seconds (Soft Reset) or for 10 seconds (Hard Reset).
Front Panel
Rear Panel
Displays the status of Wi-Fi signals.
Connect an external drive or an USB printer here.
Connect a network cable from the ISP modem into this port to establish
WAN connection.
Note:
For LED indicator information, please refer to "Appendix B: LED Indicator Table".
4 Chapter 1: Before You Start
Page 5
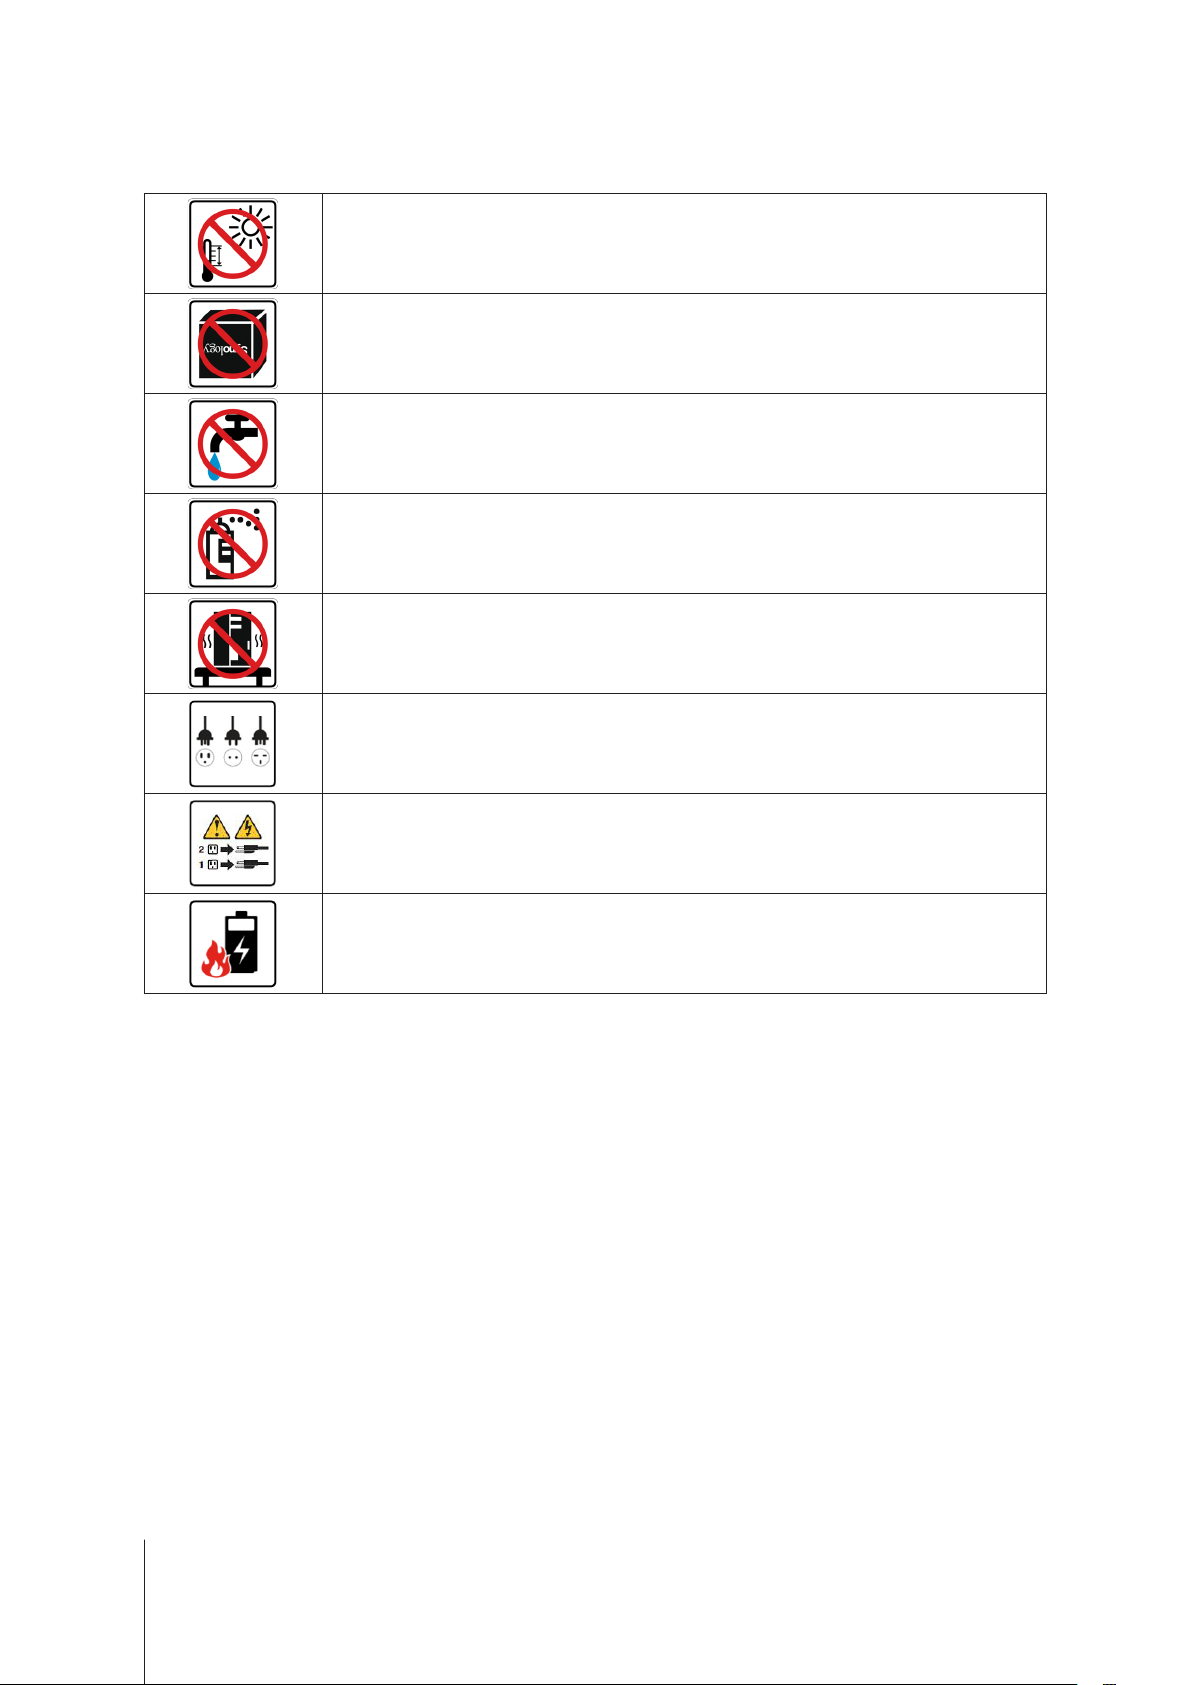
Safety Instructions
Keep away from direct sunlight and away from chemicals. Make sure the environment does not
experience abrupt changes in temperature or humidity.
Place the product right side up at all times.
Do not place near any liquids.
Before cleaning, unplug the power cord. Wipe with damp paper towels. Do not use chemical or
aerosol cleaners.
To prevent the unit from falling over, do not place on carts or any unstable surfaces.
The power cord must plug in to the correct supply voltage. Make sure that the supplied AC voltage is
correct and stable.
To remove all electrical current from the device, ensure that all power cords are disconnected from
the power source.
Risk of explosion if battery is replaced with an incorrect type. Dispose of used batteries appropriately.
5 Chapter 1: Before You Start
Page 6
Set up Your Synology Wi-Fi Router
Position Your Synology Wi-Fi Router
For optimal performance, it is recommended to position your MR2200ac as advised below.
• On a stable surface (e.g. an elevated shelf) away from any possible physical interruptions.
• Close to the center of the area where the wired/wireless client devices are placed, and within a visible distance
from the wireless devices.
• In a position where few walls and ceilings are between your MR2200ac and its client devices.
• Away from any potential electrical signal sources, such as other wireless routers, 3G/LTE bases, and
microwave ovens.
• Away from large expanses of metal or other materials, such as metal doors, glass panels, and concrete.
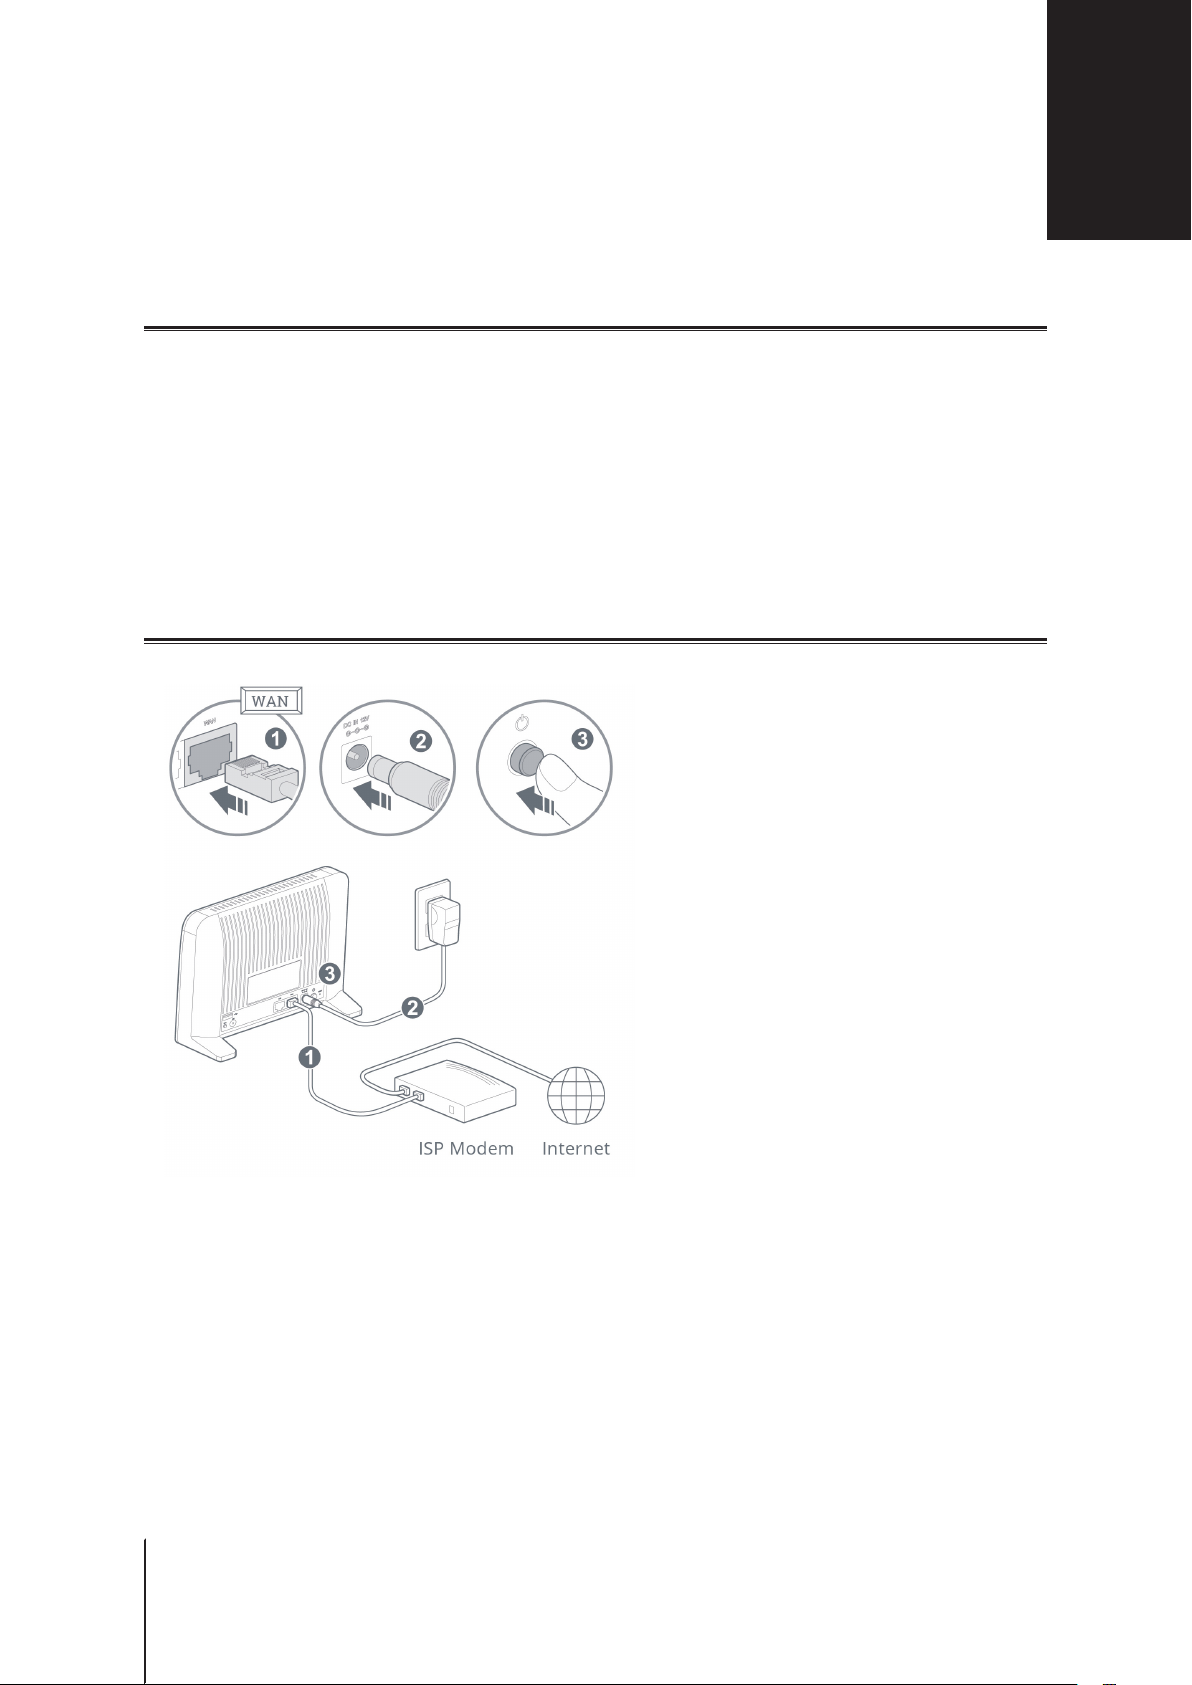
Set up MR2200ac as Primary Wi-Fi Point
Chapter
2
1
Use the included network cable to connect your MR2200ac (at the WAN port) to the ISP modem.
2
Connect one end of the power adapter to the power port on your MR2200ac, and the other end to the power
outlet. Press the power button to power on your MR2200ac. Wait for around two minutes until the STATUS
LED indicator starts blinking blue.
6
6 Chapter 2: Set up Your Synology Wi-Fi Router
Page 7
3
Connect wireless client devices to your MR2200ac:
a
When the Wi-Fi Signal LED indicator turns blinking blue, MR2200ac is ready to connect to other devices.
b
Use your wireless device to scan and join the Wi-Fi network created by your MR2200ac.
Note:
Below are the default credentials for the Wi-Fi network:
1. Wi-Fi SSID:
2. Password:
The default credentials can be changed during the initial SRM setup.
Synology_serial number
synology
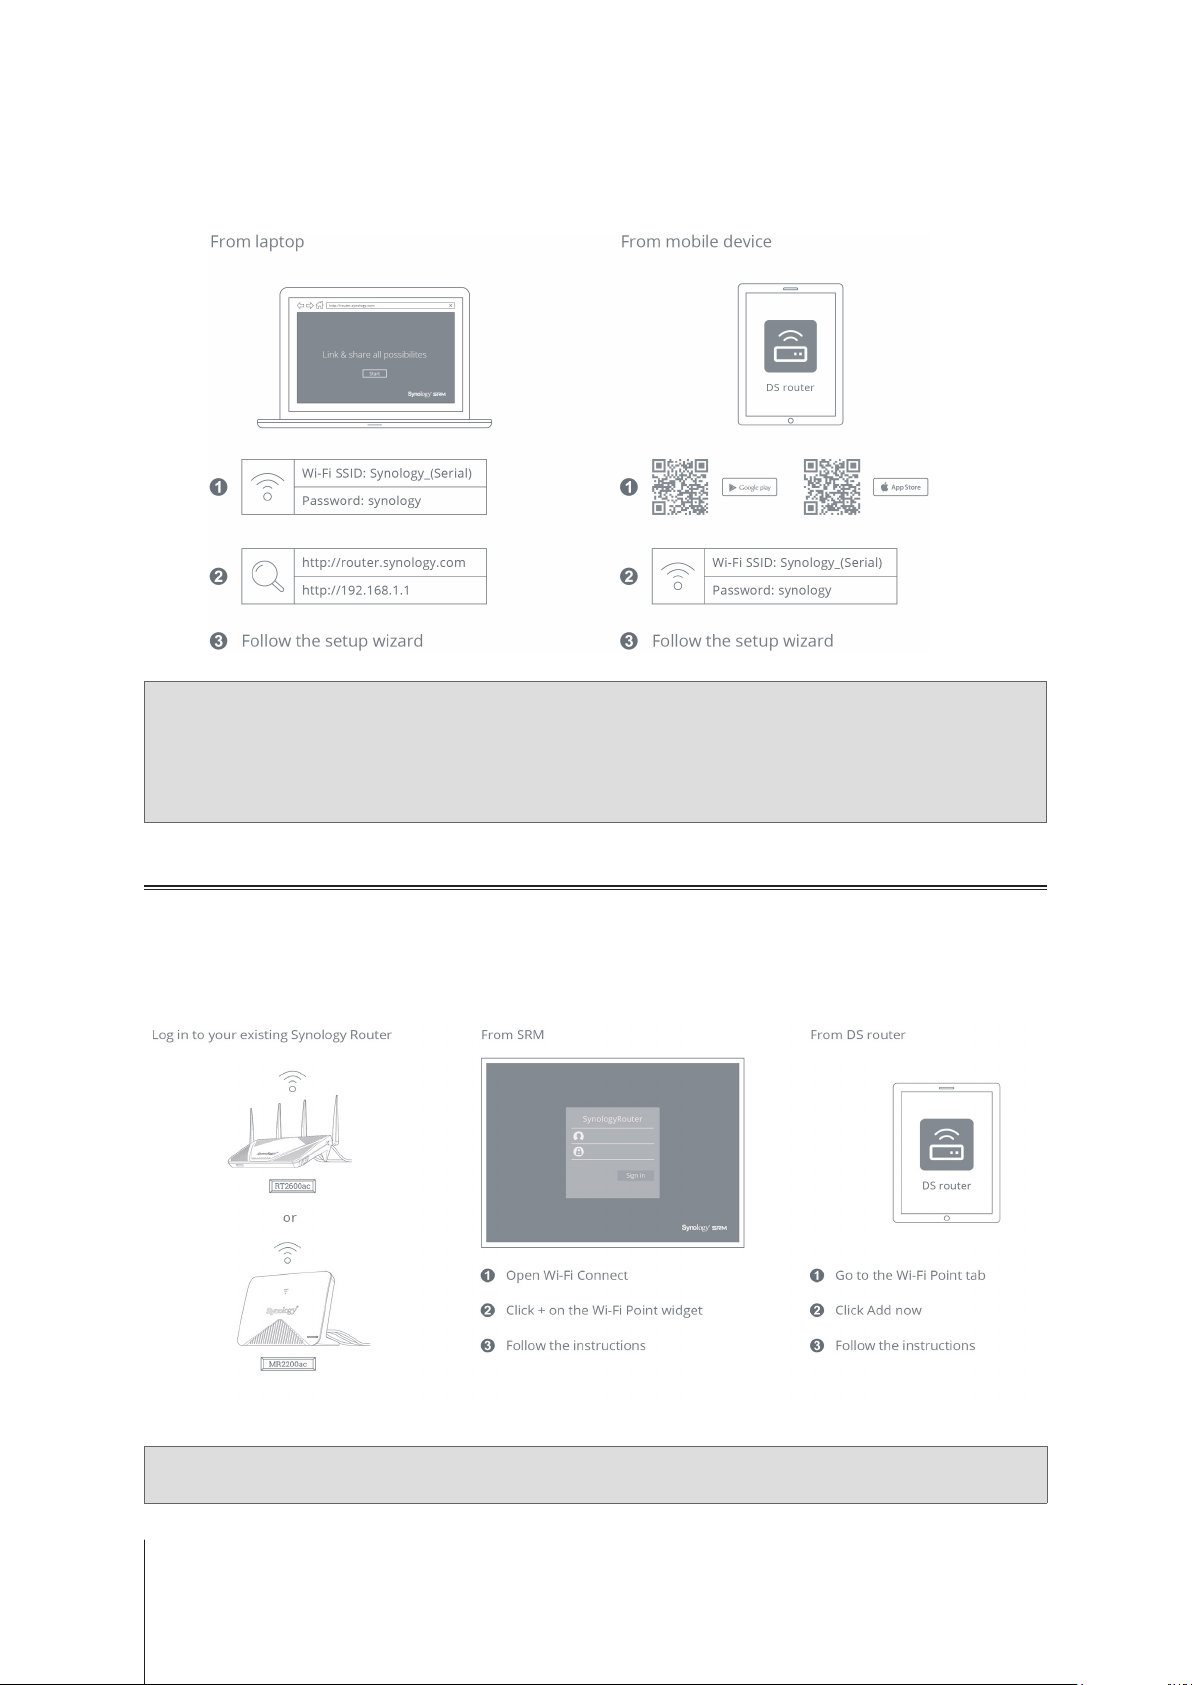
Set up MR2200ac as Additional Wi-Fi Point
1
Connect one end of the power adapter to the power port on your MR2200ac, and the other end to the power
outlet. Press the power button to power on your MR2200ac. Wait for around two minutes until the STATUS
LED indicator starts blinking blue.
2
Log in to
Point
Synology Router Manager
to add your MR2200ac to the Wi-Fi system.
(SRM) on the
primary Wi-Fi point
, and go to
Wi-Fi Connect
>
Wi-Fi
Note:
When setting up MR2200ac as Additional Wi-Fi Point, make sure your primary Wi-Fi point (either RT2600ac or
MR2200ac) is running SRM 1.2 or above.
7 Chapter 2: Set up Your Synology Wi-Fi Router
Page 8
Set up SRM
1
Use a computer or wireless device connected to the MR2200ac's local network. If you use a wireless device,
scan and join the Wi-Fi network (SSID:
2
Open a web browser, and enter either URL into the address bar
a http://router.synology.com
b http://192.168.1.1:8000
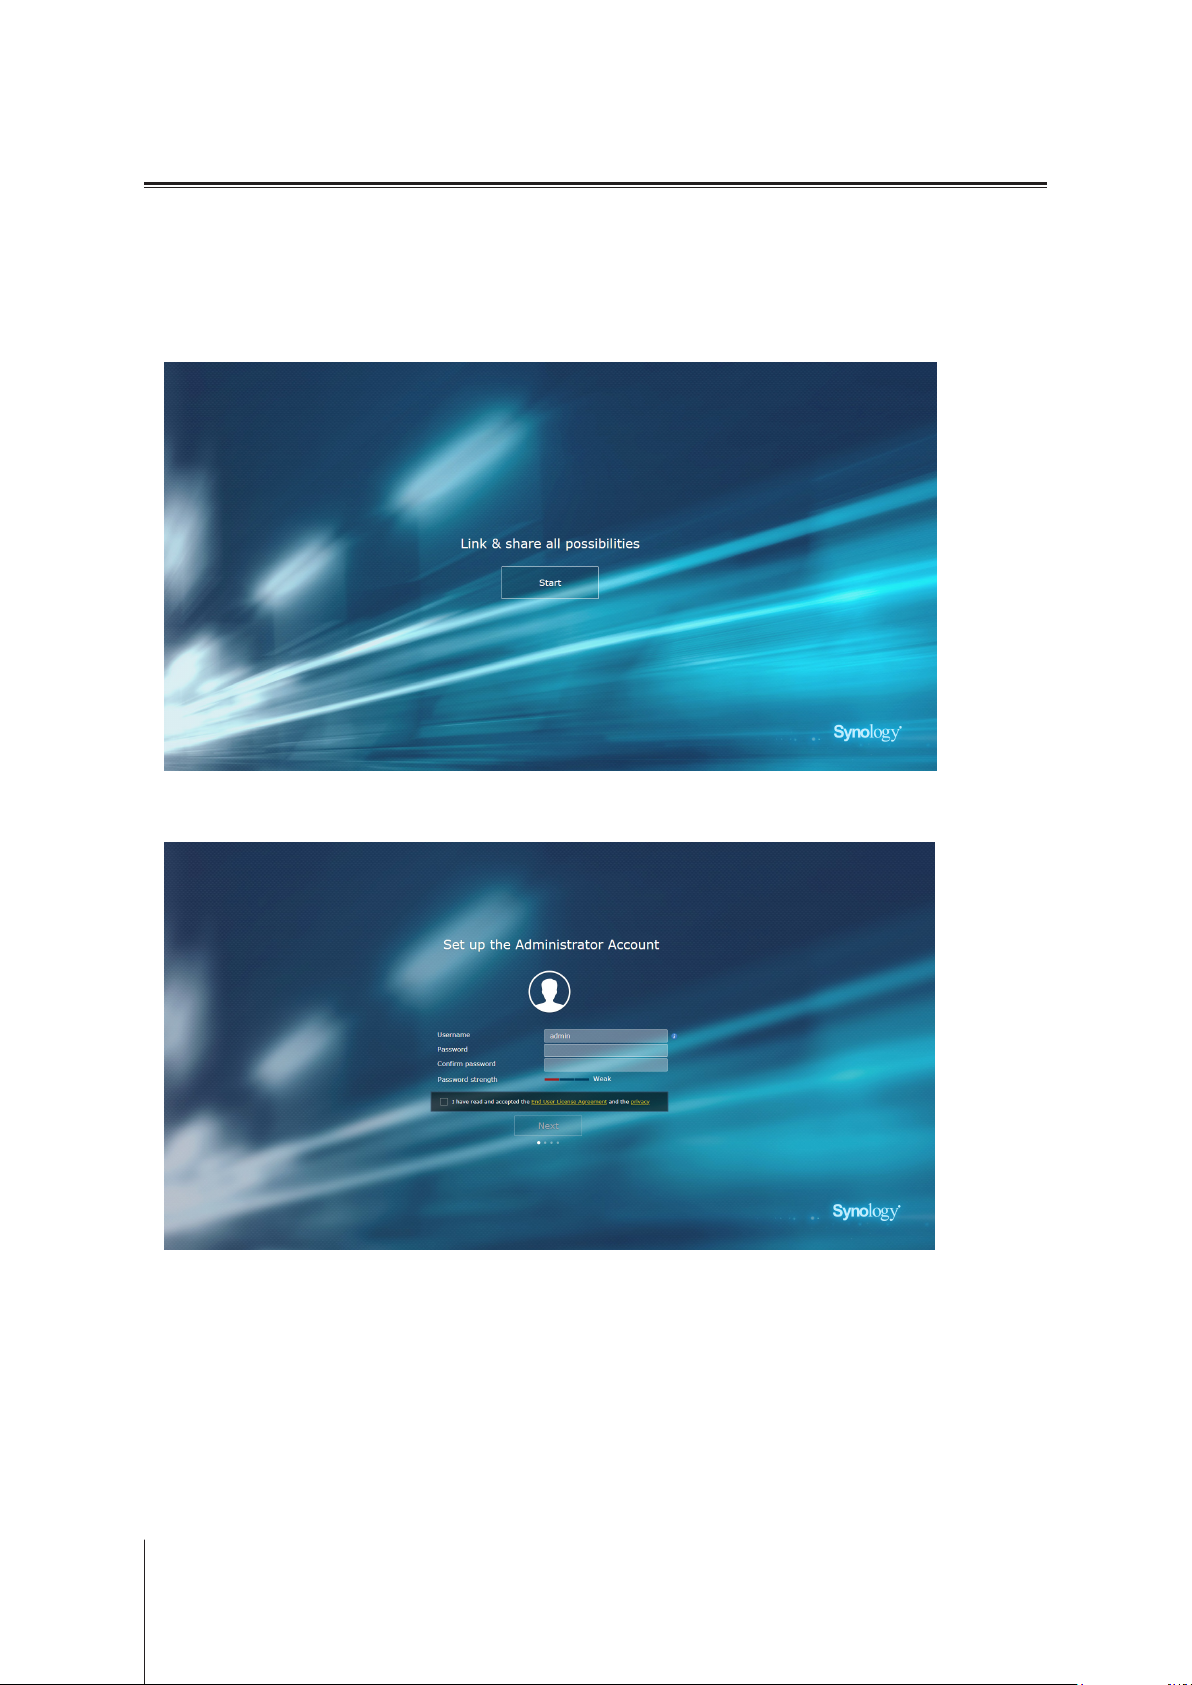
3
Once connected, click
Start
to launch the SRM Setup Wizard.
Synology_serial number
; Password:
synology
).
4
Fill in the information to set up the administrator account. Click
Next
to continue.
8 Chapter 2: Set up Your Synology Wi-Fi Router
Page 9
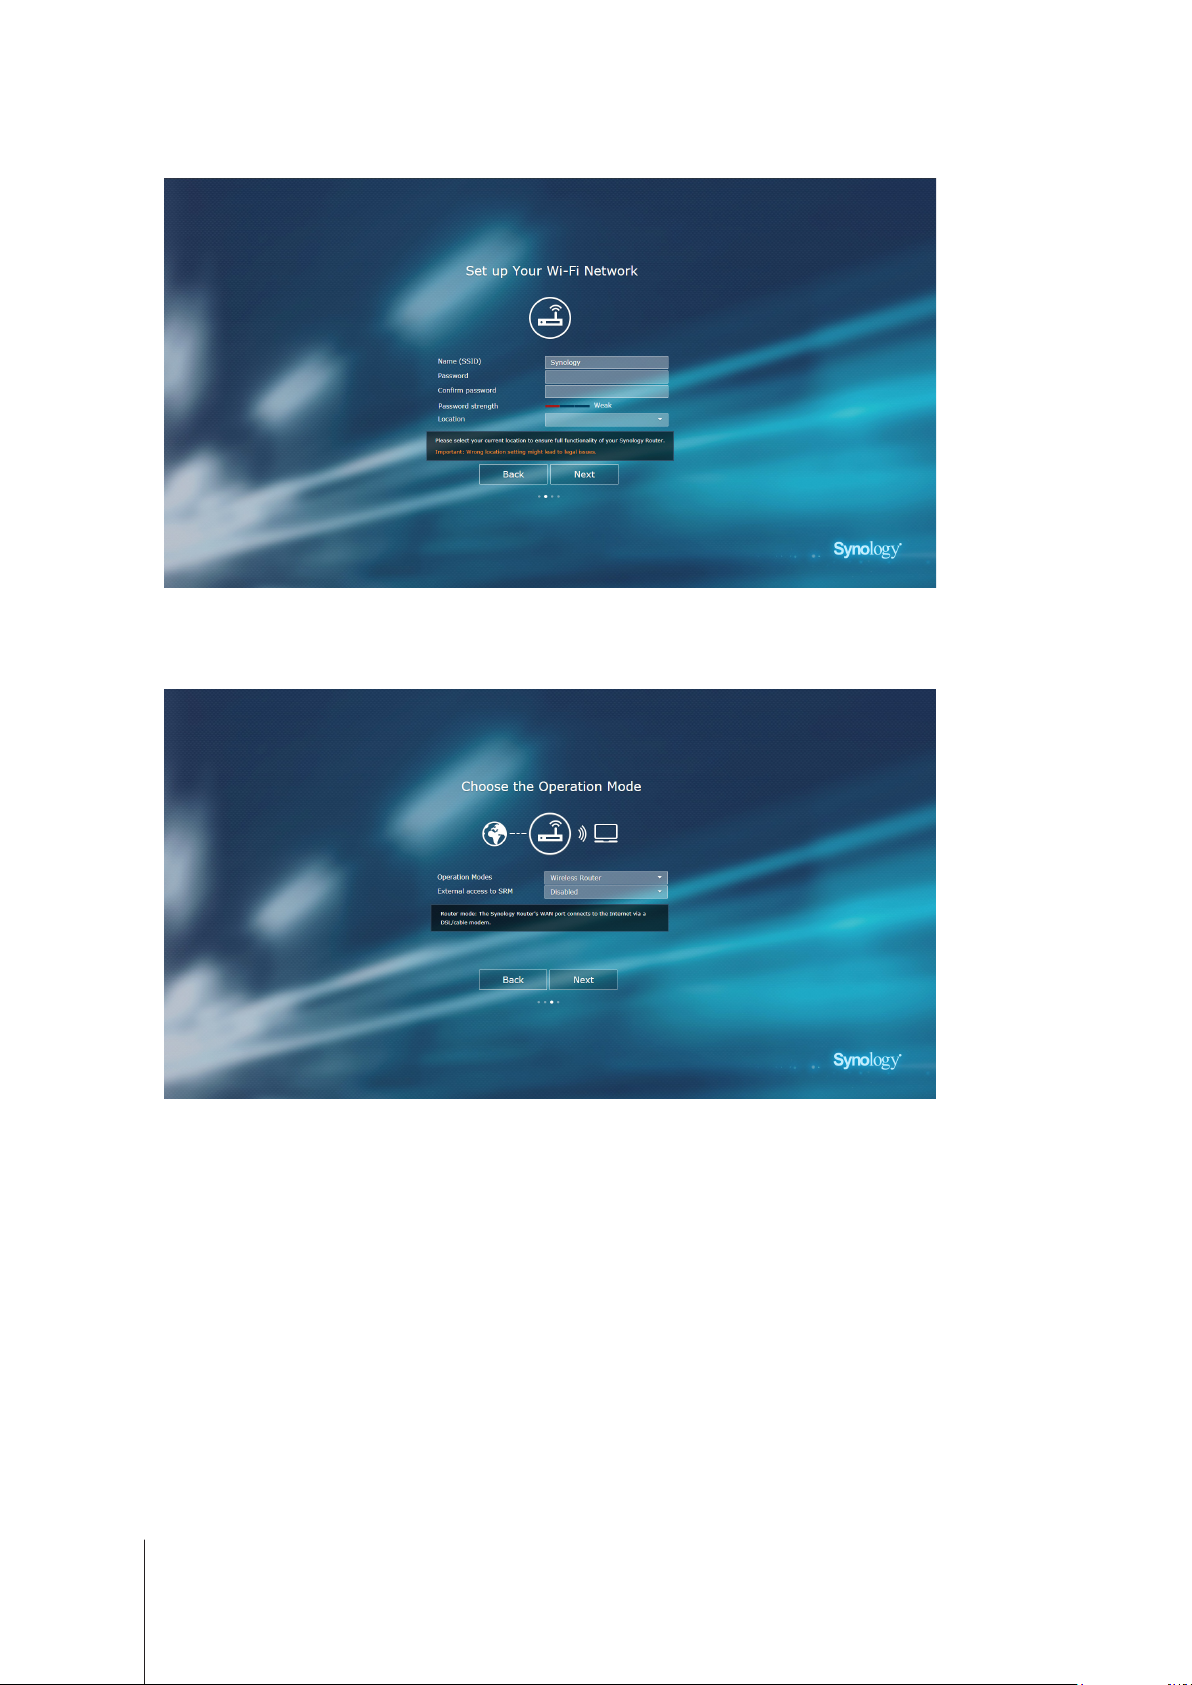
5
Fill in the information to set up the Wi-Fi network. Click
Next
to continue.
6
Set up the operation mode. When choosing the
to SRM
so that only external access via the HTTP(S) port (e.g. 8000/8001) can reach SRM.
Wireless Router
mode, you can also enable
External access
9 Chapter 2: Set up Your Synology Wi-Fi Router
Page 10

7
Choose an Internet connection type:
PPPoE
•
•
•
8
The wizard will continue to set up your Synology Router, and it may take up to three minutes to complete the
setup.
: Choose this option if you have obtained PPPoE credentials from the ISP.
Manual IP
Auto IP
: Choose this option if you have obtained an available IP address for use.
: Choose this option if you rely on an ISP modem for automatic IP assignment.
10 Chapter 2: Set up Your Synology Wi-Fi Router
Page 11

9
After the setup is complete, click
Launch Synology Router
to enjoy SRM and its various features.
Note:
Above is a general demonstration of the SRM setup steps. The steps and available options may somewhat
vary depending on your device type (e.g. PC or wireless device), access type (LAN, WAN, or Wireless LAN), and
chosen operation mode (Wireless Router or Wireless AP).
11 Chapter 2: Set up Your Synology Wi-Fi Router
Page 12

Specications
Item MR2200ac
Model Description Synology Wi-Fi Router MR2200ac
External Port USB 3.0 x 1
WAN Port Gigabit WAN x 1
LAN Port Gigabit LAN x 1
Power Adapter 12V/2A
Size (H x W x D) (mm) 154 x 199 x 65
Weight (kg) 0.45 kg
Appendix
A
Supported Clients
(for SRM management)
File Systems External: ext4, ext3, FAT, NTFS, HFS+
Wireless Standards
Operating Frequency Range
Wireless Operation Modes
Wireless Security
Hidden Antennas • 2T2R 2.4GHz/5GHz Tri Band
Buttons & Switches • WPS • Power • Reset • Wi-Fi On/O
Language Localization
• 802.11ac (5GHz-1/5GHz-2): up to 867 Mbps
• WPA2-Personal • WPA/WPA2-Personal
• WPA2-Enterprise • WPA/WPA2-Enterprise
• Opportunistic Wireless Encryption (OWE)
• Windows 7 and 10
• Mac OS X 10.10 onwards
• 2.4GHz: 802.11 b/g/n
• 5GHz-1/5GHz-2: 802.11 a/n/ac
• 802.11n (2.4GHz): up to 400 Mbps
• Wireless Router
• Wireless AP (Access Point)
• 64/128-bit WEP • WPS support
• WPA3-Personal • WPA3-Enterprise
• WPA2/WPA3-Personal
• Line voltage: 100V to 240V AC
• Frequency: 50/60Hz
Environment Requirements
Note:
Model specications are subject to change without notice. Please refer to
• Operating Temperature: 40 to 104˚F (5 to 40˚C)
• Storage Temperature: -5 to 140˚F (-20 to 60˚C)
• Relative Humidity: 5% to 95% RH
www.synology.com
for the latest information.
12 Appendix A: Specications
Page 13

LED Indicator Table
Not congured:
LED Indicator Color Status Description
Wi-Fi Indicators O Default
Static Booting up
Blinking Ready to set up
STATUS
Blue
O Powered o
Appendix
B
When set up as
LED Indicator Color Status Description
Wi-Fi Indicators
STATUS
When set up as
LED Indicator Color Status Description
Wi-Fi Indicator (upper)
Wi-Fi Indicator (lower)
STATUS
primary Wi-Fi point
additional Wi-Fi point
:
Green
Green
Blue
Green
Green
Green
Blue Static Booting up / Resetting
Static Wireless network enabled
Blinking Finding device / Syncing*
O Booting up / No wireless network
Static Powered on
Blinking
Static Booting up / Reseting
Blinking Resetting admin password
O Powered o
:
Static
Blinking Finding device / Syncing*
O Booting up or weak wireless signal
Static
Blinking Finding device / Syncing*
O Booting up or weak wireless signal
Static Connected
Blinking
Red Static Disconnected
O Powered o
Strong signal from previous Wi-Fi point /
AP WPS / Mesh WPS /
Finding device / Syncing*
Wired
Fair signal from previous Wi-Fi point /
Wired
AP WPS / Mesh WPS /
Finding device / Syncing*
*Important:
1. Finding device: All three indicators will blink simultaneously.
2. Syncing: The three indicators will blink in turn.
Note:
Model specications are subject to change without notice. Please refer to
13 Appendix B: LED Indicator Table Appendix B: LED Indicator Table
www.synology.com
for the latest information.
Page 14

SYNOLOGY, INC.
END USER LICENSE AGREEMENT
IMPORTANT–READ CAREFULLY: THIS END USER LICENSE AGREEMENT ("EULA") IS A LEGAL AGREEMENT
BETWEEN YOU (EITHER AN INDIVIDUAL OR A LEGAL ENTITY) AND SYNOLOGY, INC. ("SYNOLOGY") FOR THE
SYNOLOGY SOFTWARE INSTALLED ONTO THE SYNOLOGY PRODUCT PUCHASED BY YOU (THE "PRODUCT"),
OR LEGALLY DOWNLOADED FROM WWW.SYNOLOGY.COM, OR ANY OTHER CHANNEL PROVIDED BY
SYNOLOGY ( "SOFTWARE").
YOU AGREE TO BE BOUND BY THE TERMS OF THIS EULA BY USING THE PRODUCTS CONTAINING THE
SOFTWARE, INSTALLING THE SOFTWARE ONTO THE PRODUCTS OR DEVICE CONNECTED TO THE PRODUCTS.
IF YOU DO NOT AGREE TO THE TERMS OF THIS EULA, DO NOT USETHE PRODUCTS CONTAINING THE
SOFTWAREOR DOWNLOAD THE SOFTWARE FROM WWW.SYNOLOGY.COM, OR ANY OTHER CHANNEL
PROVIDED BY SYNOLOGY.INSTEAD, YOU MAY RETURN THE PRODUCT TO THE RESELLER WHERE YOU
PURCHASED IT FOR A REFUND IN ACCORDANCE WITH THE RESELLER'S APPLICABLE RETURN POLICY.
Section 1. Limited Software License. Subject to the terms and conditions of this EULA, Synology grants you a limited, nonexclusive, non-transferable, personal license to install, run and use one copy of the Software loaded on the Product or on
your device connected to the Product solely relating to your authorized use of the Product.
Section 2. Documentation. You may make and use a reasonable number of copies of any documentation provided with the
Software; provided that such copies will only be used for internal business purposes and are not to be republished or
redistributed (either in hard copy or electronic form) to any third party.
Section 3. Backup. You may make a reasonable number of copies of the Software for backup and archival purposes only.
Section 4. Updates. Any software provided to you by Synology or made available on the Synology website at
www.synology.com ("Website") or any other channel provided by Synology that updates or supplements the original
Software is governed by this EULA unless separate license terms are provided with such updates or supplements, in which
case, such separate terms will govern.
Section 5. License Limitations. The license set forth in Sections 1, 2 and 3 applies only to the extent that you have ordered
and paid for the Product and states the entirety of your rights with respect to the Software. Synology reserves all rights not
expressly granted to you in this EULA. Without limiting the foregoing, you shall not authorize or permit any third party to: (a)
use the Software for any purpose other than that in connection with the Product; (b) license, distribute, lease, rent, lend,
transfer, assign or otherwise dispose of the Software; (c) reverse engineer, decompile, disassemble or attempt to discover
the source code of or any trade secrets related to the Software, except and only to the extent that such conduct is
expressly permitted by applicable law notwithstanding this limitation; (d) adapt, modify, alter, translate or create any
derivative works of the Software; (e) remove, alter or obscure any copyright notice or other proprietary rights notice on the
Software or Product; or (f) circumvent or attempt to circumvent any methods employed by Synology to control access to the
components, features or functions of the Product or Software. Subject to the limitations specified in this Section 5, you are
not prohibited from providing any services hosted by Synology NAS server to any third party for commercial purpose.
Section 6. Open Source. The Software may contain components licensed to Synology under the GNU General Public
License ("GPL Components"), currently available at http://www.gnu.org/licenses/gpl.html. The terms of the GPL will control
solely with respect to the GPL Components to the extent that this EULA conflicts with the requirements of the GPL with
respect to your use of the GPL Components, and, in such event, you agree to be bound by the GPL with respect to your
use of such components.
Section 7. Audit. Synology will have the right to audit your compliance with the terms of this EULA. You agree to grant
Synology a right to access to your facilities, equipment, books, records and documents and to otherwise reasonably
cooperate with Synology in order to facilitate any such audit by Synology or its agent authorized by Synology.
Section 8. Ownership. The Software is a valuable property of Synology and its licensors, protected by copyright and other
intellectual property laws and treaties. Synology or its licensors own all rights, titles and interests in and to the Software,
including but not limited to copyright and any other intellectual property rights.
Section 9. Limited Warranty. Synology provides a limited warrant that the Software will substantially conform to Synology's
published specifications for the Software, if any, or otherwise set forth on the Website, for a period required by your local
law. Synology will use commercially reasonable efforts to, in Synology's sole discretion, either correct any such
nonconformity in the Software or replace any Software that fails to comply with the foregoing warranty, provided that you
give Synology written notice of such noncompliance within the warranty period. The foregoing warranty does not apply to
any noncompliance resulting from any: (w) use, reproduction, distribution or disclosure not in accordance with this EULA;
(x) any customization, modification or other alteration of the Software by anyone other than Synology; (y) combination of
the Software with any product, services or other items provided by anyone other than Synology; or (z) your failure to
comply with this EULA.
Section 10. Support. During the period specified in the Section 9, Synology will make available to you the support services.
Following the expiration of the applicable period, support for Software may be available from Synology upon written
Page 15

request.
Section 11. Disclaimer of Warranties. EXCEPT AS EXPRESSLY SET FORTH ABOVE, THE SOFTWARE IS PROVIDED
"AS IS" AND WITH ALL FAULTS. SYNOLOGY AND ITS SUPPLIERS HEREBY DISCLAIM ALL OTHER WARRANTIES,
EXPRESS, IMPLIED OR STATUTORY, ARISING BY LAW OR OTHERWISE, INCLUDING BUT NOT LIMITED TO ANY
IMPLIED WARRANTIES OF MERCHANTABILITY, FITNESS FOR A PARTICULAR PURPOSE OR USE, TITLE AND
NONINFRINGEMENT, WITH REGARD TO THE SOFTWARE. WITHOUT LIMITING THE FOREGOING, SYNOLOGY
DOES NOT WARRANT THAT THE SOFTWARE WILL BE FREE OF BUGS, ERRORS, VIRUSES OR OTHER DEFECTS.
Section 12. Disclaimer of Certain Damages. IN NO EVENT WILL SYNOLOGY OR ITS LICENSORS BE LIABLE FOR ANY
INCIDENTAL, INDIRECT, SPECIAL, PUNITIVE, CONSEQUENTIAL OR SIMILAR DAMAGES OR LIABILITIES
WHATSOEVER (INCLUDING, BUT NOT LIMITED TO LOSS OF DATA, INFORMATION, REVENUE, PROFIT OR
BUSINESS) ARISING OUT OF OR RELATING TO THE USE OF OR INABILITY TO USE THE SOFTWARE OR
OTHERWISE UNDER OR IN CONNECTION WITH THIS EULA OR THE SOFTWARE, WHETHER BASED ON
CONTRACT, TORT (INCLUDING NEGLIGENCE), STRICT LIABILITY OR OTHER THEORY EVEN IF SYNOLOGY HAS
BEEN ADVISED OF THE POSSIBILITY OF SUCH DAMAGES.
Section 13. Limitation of Liability. SYNOLOGY'S AND ITS SUPPLIERS' LIABILITY ARISING OUT OF OR RELATING TO
THE USE OF OR INABILITY TO USE THE SOFTWARE OR OTHERWISE UNDER OR IN CONNECTION WITH THIS
EULA OR THE SOFTWARE IS LIMITED TO THE AMOUNT ACTUALLY PAID BY YOU FOR THE PRODUCT
REGARDLESS OF THE AMOUNT OF DAMAGES YOU MAY INCUR AND WHETHER BASED ON CONTRACT, TORT
(INCLUDING NEGLIGENCE), STRICT LIABILITY OR OTHER THEORY. The foregoing disclaimer of warranties,
disclaimer of certain damages and limitation of liability will apply to the maximum extent permitted by applicable law. The
laws of some states/jurisdictions do not allow the exclusion of implied warranties or the exclusion or limitation of certain
damages. To the extent that those laws apply to this EULA, the exclusions and limitations set forth above may not apply to
you.
Section 14. Export Restrictions. You acknowledge that the Software is subject to U.S. export restrictions. You agree to
comply with all applicable laws and regulations that apply to the Software, including without limitation the U.S. Export
Administration Regulations.
Section 15. Termination. Without prejudice to any other rights, Synology may terminate this EULA if you do not abide by
the terms and conditions contained herein. In such event, you must cease use of the Software and destroy all copies of the
Software and all of its component parts.
Section 16. Assignment. You may not transfer or assign your rights under this EULA to any third party, except for that preinstalled in the Products. Any such transfer or assignment in violation of the foregoing restriction will be void.
Section 17. Applicable Law. Unless expressly prohibited by local law, this EULA is governed by and construed in
accordance with the laws of the country, in accordance with which Synology Inc. was organized without regard to any
conflict of law principles to the contrary.
Section 18. Dispute Resolution. Any dispute, controversy or claim arising out of or relating to this EULA will be resolved
exclusively and finally by arbitration conducted by three neutral arbitrators in accordance with the procedures of the
Arbitration Law and related enforcement rules of the country in which Synology Inc. was organized. In such cases, the
arbitration will be limited solely to the dispute between you and Synology. The arbitration, or any portion of it, will not be
consolidated with any other arbitration and will not be conducted on a class-wide or class action basis. The arbitration shall
take place in Taipei and the arbitration proceedings shall be conducted in English or, if both parties so agree, in Mandarin
Chinese. The arbitration award shall be final and binding on the parties and may be enforced in any court having
jurisdiction. You understand that, in the absence of this provision, you would have had a right to litigate any such dispute,
controversy or claim in a court, including the right to litigate claims on a class-wide or class-action basis, and you expressly
and knowingly waives those rights and agrees to resolve any disputes through binding arbitration in accordance with the
provisions of this Section 18. Nothing in this Section shall be deemed to prohibit or restrict Synology from seeking injunctive
relief or seeking such other rights and remedies as it may have at law or equity for any actual or threatened breach of any
provision of this EULA relating to Synology's intellectual property rights.
Section 19. Attorneys' Fees. In any arbitration, mediation, or other legal action or proceeding to enforce rights or remedies
under this EULA, the prevailing party will be entitled to recover, in addition to any other relief to which it may be entitled,
costs and reasonable attorneys' fees.
Powered by TCPDF (www.tcpdf.org)
Section 20. Severability. If any provision of this EULA is held by a court of competent jurisdiction to be invalid, illegal, or
unenforceable, the remainder of this EULA will remain in full force and effect.
Section 21. Entire Agreement. This EULA sets forth the entire agreement of Synology and you with respect to the Software
and the subject matter hereof and supersedes all prior and contemporaneous understandings and agreements whether
written or oral. No amendment, modification or waiver of any of the provisions of this EULA will be valid unless set forth in a
written instrument signed by the party to be bound thereby.
Page 16

SYNOLOGY, INC.
LIMITED PRODUCT WARRANTY
THIS LIMITED WARRANTY ("WARRANTY") APPLIES TO THE PRODUCTS (AS DEFINED BELOW) OF SYNOLOGY,
INC. AND ITS AFFILIATES, INCLUDING SYNOLOGY AMERICA CORP, (COLLECTIVELY, "SYNOLOGY"). YOU
ACCEPT AND AGREE TO BE BOUND BY THE TERMS OF THIS WARRANTY BY OPENING THE PACKAGE
CONTAINING AND/OR USING THE PRODUCT. IF YOU DO NOT AGREE TO THE TERMS OF THIS WARRANTY, DO
NOT USE THE PRODUCT. INSTEAD, YOU MAY RETURN THE PRODUCT TO THE RESELLER WHERE YOU
PURCHASED IT FOR A REFUND IN ACCORDANCE WITH THE RESELLER'S APPLICABLE RETURN POLICY.
Section 1. Products
(a) "Products" refer to New Products or Refurbished Products.
(b) "New Product", includes: (1) "Category I Product" means Synology product models RS810+, RS810RP+, RX410, all FSseries models, all DS/RS NAS models with the XS+/XS suffix (except RS3413xs+) in or after 13-series, all DX/RX/RXD
expansion units with 12 or more drive bays in or after 13-series, 10GbE NIC, ECC DDR4 and ECC DDR3 memory
modules. (2) "Category II Product" means Synology product models RS3413xs+, RS3412xs, RS3412RPxs, RS3411xs,
RS3411RPxs, RS2211+, RS2211RP+, RS411, RS409RP+, RS409+, RS409, RS408-RP, RS408, RS407, DS3612xs,
DS3611xs, DS2411+, DS1511+, DS1010+, DS509+, DS508, EDS14, RX1211, RX1211RP, RX4, DX1211, DX510, DX5,
NVR1218, NVR216, VS960HD, VS360HD, VS240HD, M2D17, and all other non-ECC memory modules not included in
Category I. (3) "Category III Product" means Synology product models that match the following requirements: all DS NAS
models without the XS+/XS suffix and with 5 and more drive bays in or after 12-series, all RS NAS models without the
XS+/XS suffix in or after 12-series, and all DX/RX expansion units with 4 or 5 drive bays in or after 12-series. (4) "Category
IV Product" means all other Synology product models purchased by Customer after March 1, 2008. (5) "Category V
Product" means all other Synology product models purchased by Customer before February 29, 2008 and any "spare
parts" purchased directly from Synology.
(c) "Refurbished Product" means all Synology products which have been refurbished and sold directly by Synology through
Online Store, not including those sold by an authorized Synology distributor or reseller.
(d) Other definition: "Customer" means the original person or entity purchasing the Product from Synology or an authorized
Synology distributor or reseller; "Online Store" means an online shop operated by Synology or Synology’s affiliate;
"Software" means the Synology proprietary software that accompanies the Product when purchased by Customer, is
downloaded by Customer from the Web Site, or is pre-installed on the Product by Synology, and includes any firmware,
associated media, images, animations, video, audio, text and applets incorporated into the software or Product and any
updates or upgrades to such software.
Section 2. Warranty Period
(a) "Warranty Period" : The warranty period commences on the date the Product is purchased by customer and ending (1)
five years after such date for Category I Products; (2) three years after such date for Category II & lll Products; (3) two
years after such date for Category IV Products; (4) one year after such date for Category V Products; or (5) 90 days after
such date for Refurbished Products, except for those sold as "as is" or with "no warranty" on Online Store.
(b) “Extended Warranty Period” : For Customer purchasing EW201 optional service for applicable Products specified in
Section 1 (b), the Warranty Period specified in Section 2 (a) of the applicable Product registered with EW201 optional
service will be extended by two years.
Section 3. Limited Warranty and Remedies
3.1 Limited Warranty. Subject to Section 3.6, Synology warrants to the Customer that each Product (a) will be free of
material defects in workmanship and (b) under normal use will perform substantially in accordance with Synology's
published specifications for the Product during the Warranty Period. Such limited warranty does not apply to the Software
which shall be subject to the accompanying end user license agreement provided with the Product, if any. Synology
provides no warranty to Refurbished Product sold as "as is" or with "no warranty" on Online Store.
3.2 Exclusive Remedy. If Customer gives notice of noncompliance with any of the warranties set forth in Section 3.1 within
the applicable Warranty Period in the manner set forth below, then, upon verification of the noncompliance by Synology,
Synology will, at Synology's option: (a) use commercially reasonable efforts to repair the Product, or (b) replace the
noncomplying Product or part thereof upon return of the complete Product in accordance with Section 3.3 The foregoing
sets forth Synology's entire liability and Customer's sole and exclusive remedy for any breach of warranty under Section
3.1 or any other defect or deficiency in the Product. Customer will reasonably assist Synology to diagnose and validate any
nonconformity with the Product. The warranty set forth in Section 3.1 does not include: (1) any warranty relating to the
Software; (2) physical installation or removal of the Product from Customer's site; (3) visits to Customer's site; (4) labor
necessary to effect repairs or replace defective parts other than during Synology's or its contracted service providers'
normal local business hours, exclusive of weekends and service providers’ holidays; (5) any work with any third party
equipment or software; (6) any warranty of the hard disk if installed by Customer or any other third party; or (7) any
warranty of compatibility with the hard disk.
3.3 Return. Any Product returned by Customer under Section 3.2 must be assigned a Return Merchandise Authorization
Page 17

("RMA") number by Synology before shipment and must be returned in accordance with Synology's then current RMA
procedures. Customer may contact any authorized Synology distributor or reseller or Synology Support to obtain
assistance in obtaining an RMA, and must provide proof of purchase and product serial number when asking for such
assistance. For warranty claims, Customer must return the complete Product to Synology in accordance with this Section
3.3 to be eligible for coverage under this Warranty. Any Product returned without an RMA number, or any Product that has
been disassembled (except under the direction of Synology) will be refused and returned to Customer at Customer's
expense. Any Product that has been assigned a RMA number must be returned in the same condition as it was received
from Synology to the address designated by Synology, freight pre-paid, in packaging sufficient to protect the contents
thereof and with the RMA number prominently displayed on the outside of the box. Customer is responsible for insurance
and risk of loss with respect to returned items until they are properly received by Synology. A Product with a RMA number
must be returned within fifteen (15) days after issuance of the applicable RMA number.
3.4 Replacement by Synology. If Synology elects to replace any Product under this Warranty set forth in Section 3.1, then
Synology will ship a replacement Product at Synology's expense via the shipping method selected by Synology after
receipt of the nonconforming Product returned in accordance with Section 3.3 and validation by Synology that the Product
does not conform to the warranty. In some countries, Synology may at its own discretion apply the Synology Replacement
Service to certain Products, through which Synology will ship a replacement Product to Customer before its receipt of the
nonconforming Product returned by Customer ("Synology Replacement Service").
3.5 Support. During the Warranty Period, Synology will make available to Customer the support services. Following the
expiration of the applicable Warranty Period, support for Products may be available from Synology upon written request.
3.6 Exclusions. The foregoing warranties and warranty obligations do not apply to any Product that (a) has been installed
or used in a manner not specified or described in the Product specifications; (b) has been repaired, modified or altered by
anyone other than Synology or its agent or designee; (c) has been in any way misused, abused, or damaged; (d) has been
used with items not provided by Synology other than the hardware or software for which the Product is designed; or (e)
otherwise fails to conform to the Product specifications and such failure is attributable to causes not within or under
Synology's control. Further, the foregoing warranties will be void if (1) Customer disassembles the Product except as
authorized by Synology; (2) Customer fails to implement any correction, modification, enhancement, improvement or other
update made available to Customer by Synology; or (3) Customer implements, installs or uses any correction, modification,
enhancement, improvement or other update made available by any third party. The warranty set forth in Section 3 will
terminate upon Customer's sale or transfer of the Product to a third party.
3.7 Disclaimer of Warranties. THE WARRANTIES, OBLIGATIONS, AND LIABILITIES OF SYNOLOGY AND THE
REMEDIES OF CUSTOMER SET FORTH IN THIS WARRANTY ARE EXCLUSIVE AND IN SUBSTITUTION FOR, AND
CUSTOMER HEREBY WAIVES, RELEASES AND DISCLAIMS, ALL OTHER WARRANTIES, OBLIGATIONS AND
LIABILITIES OF SYNOLOGY AND ALL OTHER RIGHTS, CLAIMS AND REMEDIES OF CUSTOMER AGAINST
SYNOLOGY, EXPRESS OR IMPLIED, ARISING BY LAW OR OTHERWISE, WITH RESPECT TO THE PRODUCT,
ACCOMPANYING DOCUMENTATION OR SOFTWARE AND ANY OTHER GOODS OR SERVICES DELIVERED UNDER
THIS WARRANTY, INCLUDING, BUT NOT LIMITED TO ANY: (A) IMPLIED WARRANTY OF MERCHANTABILITY OR
FITNESS FOR A PARTICULAR PURPOSE OR USE; (B) IMPLIED WARRANTY ARISING FROM COURSE OF
PERFORMANCE, COURSE OF DEALING, OR USAGE OF TRADE; (C) CLAIM OF INFRINGEMENT OR
MISAPPROPRIATION; OR (D) CLAIM IN TORT (WHETHER BASED ON NEGLIGENCE, STRICT LIABILITY, PRODUCT
LIABILITY OR OTHER THEORY). SYNOLOGY MAKES NO GUARANTEE AND SPECIFICALLY DISCLAIMS ANY
WARRANTY THAT THE DATA OR INFORMATION STORED ON ANY SYNOLOGY PRODUCT WILL BE SECURE AND
WITHOUT RISK OF DATA LOSS. SYNOLOGY RECOMMENDS THAT CUSTOMER TAKES APPROPRIATE MEASURES
TO BACK UP THE DATA STORED ON THE PRODUCT. SOME STATES/JURISDICTIONS DO NOT ALLOW
LIMITATIONS ON IMPLIED WARRANTIES, SO THE ABOVE LIMITATION MAY NOT APPLY TO CUSTOMER.
Section 4. Limitations of Liability
4.1 Force Majeure. Synology will not be liable for, or be considered to be in breach of or default under this Warranty on
account of, any delay or failure to perform as required by this Warranty as a result of any cause or condition beyond its
reasonable control (including, without limitation, any act or failure to act by Customer).
4.2 Disclaimer of Certain Damages. IN NO EVENT WILL SYNOLOGY OR ITS SUPPLIERS BE LIABLE FOR THE COST
OF COVER OR FOR ANY INCIDENTAL, INDIRECT, SPECIAL, PUNITIVE, CONSEQUENTIAL OR SIMILAR DAMAGES
OR LIABILITIES WHATSOEVER (INCLUDING, BUT NOT LIMITED TO LOSS OF DATA, INFORMATION, REVENUE,
PROFIT OR BUSINESS) ARISING OUT OF OR RELATING TO THE USE OR INABILITY TO USE THE PRODUCT, ANY
ACCOMPANYING DOCUMENTATION OR SOFTWARE AND ANY OTHER GOODS OR SERVICES PROVIDED UNDER
THIS WARRANTY, WHETHER BASED ON CONTRACT, TORT (INCLUDING NEGLIGENCE), STRICT LIABILITY OR
OTHER THEORY EVEN IF SYNOLOGY HAS BEEN ADVISED OF THE POSSIBILITY OF SUCH DAMAGES.
4.3 Limitation of Liability. SYNOLOGY'S AND ITS SUPPLIERS' LIABILITY ARISING OUT OF OR RELATING TO THE
Page 18

USE OR INABILITY TO USE THE PRODUCT, ANY ACCOMPANYING DOCUMENTATION OR SOFTWARE AND ANY
OTHER GOODS OR SERVICES PROVIDED UNDER THIS WARRANTY IS LIMITED TO THE AMOUNT ACTUALLY PAID
BY CUSTOMER FOR THE PRODUCT REGARDLESS OF THE AMOUNT OF DAMAGES CUSTOMER MAY INCUR AND
WHETHER BASED ON CONTRACT, TORT (INCLUDING NEGLIGENCE), STRICT LIABILITY OR OTHER THEORY. The
foregoing disclaimer of certain damages and limitation of liability will apply to the maximum extent permitted by applicable
law. The laws of some states/jurisdictions do not allow exclusion or limitation of certain damages. To the extent that those
laws apply to the Product, the exclusions and limitations set forth above may not apply to Customer.
Section 5. Miscellaneous
5.1 Proprietary Rights. The Product and any accompanying Software and documentation provided with the Product include
proprietary and intellectual property rights of Synology and its third party suppliers and licensors. Synology retains and
reserves all right, title, and interest in the intellectual property rights of the Product, and no title to or ownership of any
intellectual property rights in or to the Product, any accompanying Software or documentation and any other goods
provided under this Warranty is transferred to Customer under this Warranty. Customer will (a) comply with the terms and
conditions of the Synology end user license agreement accompanying any Software furnished by Synology or an
authorized Synology distributor or reseller; and (b) not attempt to reverse engineer any Product or component thereof or
accompanying Software or otherwise misappropriate, circumvent or violate any of Synology's intellectual property rights.
5.2 Assignment. Customer will not assign any of its rights under this Warranty directly, by operation of law or otherwise,
without the prior written consent of Synology.
5.3 No Additional Terms. Except as expressly permitted by this Warranty, neither party will be bound by, and each party
specifically objects to, any term, condition or other provision that conflicts with the provisions of this Warranty that is made
by the other party in any purchase order, receipt, acceptance, confirmation, correspondence or otherwise, unless each
party specifically agrees to such provision in writing. Further, if this Warranty conflicts with any terms or conditions of any
other agreement entered into by the parties with respect to the Product, this Warranty will prevail unless the other
agreement specifically references the sections of this Warranty that it supersedes.
5.4 Applicable Law. Unless explicitly prohibited by local law, this Warranty is governed by the laws of the State of
Washington, U.S.A. for the Customers residing within the United States; and by the laws of the Republic of China (Taiwan)
for Customers not residing within the United States, without regard to any conflict of law principles to the contrary. The
1980 U.N. Convention on Contracts for the International Sale of Goods or any successor thereto does not apply.
5.5 Dispute Resolution. Any dispute, controversy or claim arising out of or relating to this Warranty, the Product or services
provided by Synology with respect to the Product or the relationship between Customers residing within the United States
and Synology will be resolved exclusively and finally by arbitration under the current commercial rules of the American
Arbitration Association, except as otherwise provided below. The arbitration will be conducted before a single arbitrator,
and will be limited solely to the dispute between Customer and Synology. The arbitration, or any portion of it, will not be
consolidated with any other arbitration and will not be conducted on a class-wide or class action basis. The arbitration shall
be held in King County, Washington, U.S.A. by submission of documents, by telephone, online or in person as determined
by the arbitrator at the request of the parties. The prevailing party in any arbitration or legal action occurring within the
United States or otherwise shall receive all costs and reasonable attorneys’ fees, including any arbitration fee paid by the
prevailing party. Any decision rendered in such arbitration proceedings will be final and binding on the parties, and
judgment may be entered thereon in any court of competent jurisdiction. Customer understands that, in the absence of this
provision, Customer would have had a right to litigate any such dispute, controversy or claim in a court, including the right
to litigate claims on a class-wide or class-action basis, and Customer expressly and knowingly waives those rights and
agrees to resolve any disputes through binding arbitration in accordance with the provisions of this Section 5.5. For
Customers not residing within the United States, any dispute, controversy or claim described in this section shall be finally
resolved by arbitration conducted by three neutral arbitrators in accordance with the procedures of the R.O.C. Arbitration
Law and related enforcement rules. The arbitration shall take place in Taipei, Taiwan, R.O.C., and the arbitration
proceedings shall be conducted in English or, if both parties so agree, in Mandarin Chinese. The arbitration award shall be
final and binding on the parties and may be enforced in any court having jurisdiction. Nothing in this Section shall be
deemed to prohibit or restrict Synology from seeking injunctive relief or seeking such other rights and remedies as it may
have at law or equity for any actual or threatened breach of any provision of this Warranty relating to Synology's intellectual
property rights.
5.6 Attorneys' Fees. In any arbitration, mediation, or other legal action or proceeding to enforce rights or remedies under
this Warranty, the prevailing party will be entitled to recover, in addition to any other relief to which it may be entitled, costs
and reasonable attorneys' fees.
5.7 Export Restrictions. You acknowledge that the Product may be subject to U.S. export restrictions. You will comply with
all applicable laws and regulations that apply to the Product, including without limitation the U.S. Export Administration
Regulations.
Page 19

5.8 Severability. If any provision of this Warranty is held by a court of competent jurisdiction to be invalid, illegal, or
unenforceable, the remainder of this Warranty will remain in full force and effect.
5.9 Entire Agreement. This Warranty constitutes the entire agreement, and supersedes any and all prior agreements,
between Synology and Customer related to the subject matter hereof. No amendment, modification or waiver of any of the
provisions of this Warranty will be valid unless set forth in a written instrument signed by the party to be bound thereby.
Powered by TCPDF (www.tcpdf.org)
Page 20

EU Declaration of Conformity
Languages Statement
Declaration of Conformity f o r th e Radio Equipment Directive 2014/53/EU
Hereby, Synology Inc. declares that this Wireless Router is in compliance with the
essential requirements and other relevant provisions of Directive 2014/53 /EU.
English
The full text of the EU d
internet address: https://www.synology.com/support/download/MR2200ac
All operational modes:
2.4GHz: 802.11b, 802.11g, 802.11n (HT20), 802.11n (HT40)
5GHz: 802.11a, 802.11ac (VHT20), 802.11ac (VHT40), 802.11ac (VHT 80)
The frequency, mode and the maximum transmitted power in EU are listed below:
2400 MHz – 2483.5 MHz: 19.97 dBm (EIRP)
5150 MHz – 5250 MHz: 22.96 dBm (EIRP)
5250 MHz – 5350 MHz: 22.85 dBm (EIRP)
5470 MHz – 5725 MHz: 29.99 dBm (EIRP)
5150 to 5350 MHz is restricted to indoo r.
This equipment complies with EU radiation exposure limits set forth for an
uncontrolled environment. This equipment should be installed and operated with
minimum distance 20cm between the r adiator & your body.
Erklæring om overholdelse af radioudstyrsdirektivet 2014/53/EF
Herved erklærer Synology Inc., at firmaets trådløse router overholder de vigtigste
krav og andre relevante bestemmelser i direktivet 2014/53/EF.
eclaration of conformity is available at the following
Danish
Den fulde tekst i EU-overholdelseserklæringen findes på følgende internetadresse:
https://www.synology.com/support/download
Alle driftstilstande:
2,4 GHz: 802.11b, 802.11g, 802.11n (HT20), 802.11n (HT40)
5 GHz: 802.11a, 802.11ac (VHT20), 802.11ac (VHT40), 802.11ac (VHT80)
Frekvensen, tilstanden og den maksimale overfør te eff ekt i EU vises nedenfor:
2400 MHz – 2483,5 MHz: 19,97 dBm (EIRP)
5150 MHz – 5250 MHz: 22,96 dBm (EIRP)
5250 MHz – 5350 MHz: 22,85 dBm (EIRP)
5470 MHz – 5725 MHz: 29,99 dBm (EIRP)
5150 til 5350 MHz er begrænset til indendøre.
Dette udstyr overholder EU's grænser for strålingseksponering angivet for et
ukontrolleret miljø. Dette udstyr skal installeres og drives med min. afstand på 20
cm mellem stråleenheden og din krop.
/MR2200ac
Page 21

German
Konformitätserklärung für die Funkausanlagen-Richtlinie 2014/53/EU
Hiermit erklärt Synology Inc., dass dieser WLAN-Router den grundlegenden
Anforderungen und anderen Vorschriften der Richtlinie 2014/53/EU entspricht.
Der vollständige Wortlaut der EU-Konformitätserklärung s teht unter der
folgenden Internetadresse zur Verfügung:
https://www.synology.com/support/download/MR2200ac
Alle Betriebsmodi:
2,4GHz: 802.11b, 802.11g, 802.11n (HT20), 802.11n (HT40)
5 GHz: 802.11a, 802.11ac (VHT20), 802.11ac (VHT40), 802.11ac (VHT80)
Die Frequenz, der Modus und der max. übertragene Strom in der EU sind im
Folgenden aufgeführt:
2.400 MHz – 2483,5 MHz: 19,97 dBm (EIRP)
5.150 MHz – 5.250 MHz: 22,96 dBm (EIRP)
5.250 MHz – 5.350 MHz: 22,85 dBm (EIRP)
5.470 MHz – 5.725 MHz: 29,99 dBm (EIRP)
5.150 bis 5.350 MHz sind auf Innenräume beschränkt.
Greek
Diese Ausrüstung entspr icht d en EU-Strahlenkontaktgrenzwerten, die für eine
unkontrollierte Umgebung definiert wurden. Diese Ausrüstung muss mit einem
Mindestabstand von 20 cm zwischen dem Strahlengerät und Ihrem Körper
installiert und betrieben werden.
Δήλωση Συμμόρφωσης με την Οδηγία για τον Ραδιοεξοπλισμό 2014/53/ΕΕ
Με το παρόν η Synology Inc. δηλώνει ότι ο παρών Ασύρματος Δρομολογητής
συμμορφώνεται με τις ουσιώδεις απαιτήσεις και τις λοιπές σχετικές διατάξεις
της Οδηγίας 2014/53/ΕΕ.
Το πλήρες κείμενο της δήλωσης συμμόρφωσης για την ΕΕ είναι διαθέσιμο στην
ακόλουθη διεύθυνση Internet:
https://www.synology.com/support/download/MR2200ac
Όλες οι καταστάσεις λειτουργίας:
2,4GHz: 802.11b, 802.11g, 802.11n (HT20), 802.11n (HT40)
5GHz: 802.11a, 802.11ac (VHT20), 802.11ac (VHT40), 802.11ac (VHT80)
Η συχνότητα, η κατάσταση λειτουργίας και η μέγιστη ισχύς μετάδοσης στην ΕΕ
αναφέρονται παρακάτω:
2400 MHz – 2483,5 MHz: 19,97 dBm (EIRP)
5150 MHz – 5250 MHz: 22,96 dBm (EIRP)
5250 MHz – 5350 MHz: 22,85 dBm (EIRP)
5470 MHz – 5725 MHz: 29,99 dBm (EIRP)
Η ζώνη 5150 έως 5350 MHz επιτρέπεται μόνο σε εσωτερικούς χώρους.
Ο παρών εξοπλισμός συμμορφώνεται με τα καθορισμένα όρια έκθεσης σε
ακτινοβολία της ΕΕ για μη ελεγχόμενο περιβάλλον. Ο παρών εξοπλισμός πρέπει
να εγκαθίσταται και να λειτουργεί σε ελάχιστη απόσταση 20 εκ. μεταξύ της
πηγής ακτινοβολίας και του σώματός σας.
Page 22

Finnish
Yhdenmukaisuusjulistus Radiolaitedirektiivin 2014/53/EC mukaan
Täten Synology Inc. vakuuttaa, että tämä tuote on yhdenmukainen EUdirektiiviin 2014/53/EC keskeisten vaatimusten sekä sen muiden
merkityksellisten määräysten kanssa.
Tämän EU-yhdenmukaisuusjulistuksen koko teksti löytyy seuraavasta Internetosoitteesta: https://www.synology.com/support/download/MR2200ac
Kaikki käyttötilat:
2,4 GHz: 802.11b, 802.11g, 802.11n (HT20), 802.11n (HT40)
5 GHz: 802.11a, 802.11ac (VHT20), 802.11ac (VHT40), 802.11ac (VHT80)
Taajuus, tila ja maksimi lähetetty teho EU:ssa on lueteltu alla:
2400 MHz - 2483,5 MHz: 19,97 dBm (EIRP)
5150 MHz - 5250 MHz: 22,96 dBm (EIRP)
5250 MHz - 5350 MHz: 22,85 dBm (EIRP)
5470 MHz - 5725 MHz: 29,99 dBm (EIRP)
5150 - 5350 MHz on rajoitettu sisäkäyttöön
Tämä laite noudattaa EU-säteilyraja-arvoa, joka on asetettu valvomattomalle
ympäristölle. Tämä laite tulisi asentaa ja sitä tulisi käyttää 20 cm
minimietäisyydellä kehosi ja radiaattorin välillä.
French
Déclaration de conformité pour la directive sur les équipements
radioélectriques 2014/53/UE
Par la présente, Synology Inc. déclare que ce routeur sans fil est conforme
aux exigences essentielles et autres dispositions connexes de la directive
2014/53/UE.
L'intégralité du texte de la déclaration de conformité UE est disponible à
l'adresse Internet suivante :
https://www.synology.com/support/download/MR2200ac
Tous les modes de fonctionnement :
2,4GHz : 802.11b, 802.11g, 802.11n (HT20), 802.11n (HT40)
5GHz : 802.11a, 802.11ac (VHT20), 802.11ac (VHT40), 802.11ac (VHT80)
La fréquence, le mode et la puissance émise maximale en UE sont répertoriés
ci-dessous :
0 MHz – 2483,5 MHz : 19,97 dBm (EIRP)
240
5150 MHz – 5250 MHz : 22,96 dBm (EIRP)
5250 MHz – 5350 MHz : 22,85 dBm (EIRP)
5470 MHz – 5725 MHz : 29,99 dBm (EIRP)
5150 à 5350 MHz est restreint à une utilisation en intérieur.
Cet
équipement est conforme aux limites d'exposition aux rayonnements de
l'UE indiquées pour un environnement non contrôlé. Cet équipement doit être
installé et utilisé avec une distance minimale de 20 cm entre le radiateu r et
votre corps.
Page 23

Italian
Dichiarazione di conformità alla Direttiva RED (Radio Equipment Directive)
2014/53/UE
Synology Inc. dichiara che il router wireless soddisfa i requisiti essenziali e le
altre disposizioni rilevanti della Direttiva 2014/53/UE.
Il testo completo della dichiarazione UE di conformità è disponibile al seguente
indirizzo Internet: https://www.synology.com/support/download/MR2200ac
Tutte le modalità operative:
2.4GHz: 802.11b, 802.11g, 802.11n (HT20), 802.11n (HT40)
5GHz: 802.11a, 802.11ac (VHT20), 802.11ac (VHT40), 802.11ac (VHT80)
La frequenza, la modalità e la potenza massima tasmessa in UE sono elencate di
seguito:
2400 MHz – 2483.5 MHz: 19.97 dBm (EIRP)
5150 MHz – 5250 MHz: 22.96 dBm (EIRP)
5250 MHz – 5350 MHz: 22.85 dBm (EIRP)
5470 MHz – 5725 MHz: 29.99 dBm (EIRP)
Da 5150 a 5350 MHz limitato ad ambienti interni.
Dutch
Quest'apparecchiatura è conforme ai limiti di esposizione alle radiazioni definiti
dall'UE per ambienti non controllati. Quest'apparecchiatura deve essere
installata e messa in funzione con una distanza minima di 20 cm tra il radiatore
e l'utente.
Conformiteitsverklaring voor richtlijn radioapparatuur 2014/53/EU
Synology Inc. verklaart hierbij dat deze draadloze router aan de essentiële
vereisten en andere relevante bepalingen van richtlijn 2014/53/EU voldoet.
De volledige tekst van de EU-conformiteitsverklaring is beschikbare op het
volgende internetadres:
https://www.synology.com/support/download/MR2200ac
Alle operationele modi:
2.4GHz: 802.11b, 802.11g, 802.11n (HT20), 802.11n (HT40)
5GHz: 802.11a, 802.11ac (VHT20), 802.11ac (VHT40), 802.11ac (VHT80)
De frequentie, modus en maximaal verzendingsvermongen in EU is als volgt:
2400 MHz – 2483.5 MHz: 19,97 dBm (EIRP)
5150 MHz – 5250 MHz: 22,96 dBm (EIRP)
5250 MHz – 5350 MHz: 22,85 dBm (EIRP)
5470 MHz – 5725 MHz: 29,99 dBm (EIRP)
5150 tot 5350 MHz is beperkt voor binnengebruik.
Dit apparaat voldoet aan de EU-limieten voor stralingsblootstelling bepaald
voor ongecontroleerde omgeving. Dit apparaat moet worden geïnstalleerd en
gebruikt op een minimale afstand van 20 cm tussen de zender en uw lichaam.
Page 24

Portuguese
Declaração de conformidade para a Diretiva 2014/53/UE relativa aos
equipamentos de rádio
Por este meio, a Synology Inc. declara que o Router Sem Fios está em
conformidade com os requisitos essenciais e outras disposições relevantes da
Diretiva 2014/53/UE.
O texto integral da declaração de conformidade da UE está disponível no
seguinte endereço de Internet:
https://www.synology.com/support/download/MR2200ac
Todos os modos de funcionamento:
2,4 GHz: 802.11b, 802.11g, 802.11n (HT20), 802.11n (HT40)
5 GHz: 802.11a, 802.11ac (VHT20), 802.11ac (VHT40), 802.11ac (VHT80)
A frequência, o modo e a potência máxima transmitida na União Europeia
estão listados abaixo:
2400 MHz – 2483,5 MHz: 19,97 dBm (EIRP)
5150 MHz – 5250 MHz: 22,96 dBm (EIRP)
5250 MHz – 5350 MHz: 22,85 dBm (EIRP)
5470 MHz – 5725 MHz: 29,99 dBm (EIRP)
5150 a 5350 MHz está restrito a ambientes fechados.
Spanish
Este equip am en t o est á em conformidade com os limites de exposição à
radiação da UE definidos para um ambiente não controlado. Este
equipamento deve ser instalado e utilizado com uma distância mínima de 20
cm entre o radia d or e o seu co rp o.
Declaración de conformidad de la Directiva de equipos de radio 2014/53/UE
Por la presente, Synology Inc. declara que este enrutador inalámbrico cumple
los requisitos es enciales y el resto de disposiciones aplica bles de la Directiva
2014/53/UE.
El texto completo de la declaración de conformidad de la UE está disponible
en la siguiente dirección de Internet:
https://www.synology.com/support/download/MR2200ac
Todos los modos de funcionamiento:
2,4 GHz: 802.11b, 802.11g, 802.11n (HT20), 802.11n (HT40)
5 GHz: 802.11a, 802.11ac (VHT20), 802.11ac (VHT40), 802.11ac (VHT80)
A continuación se enumeran la frecuencia, el modo y la energía transmitida
máxima en la UE:
2400 MHz – 2483,5 MHz: 19,97 dBm (EIRP)
5150 MHz – 5250 MHz: 22,96 dBm (EIRP)
5250 MHz – 5350 MHz: 22,85 dBm (EIRP)
5470 MHz – 5725 MHz: 29,99 dBm (EIRP)
El intervalo de 5150 a 5350 MHz está limitado a espacios interiores.
Este equipo cumple las limitaciones de exposición a radiación de la UE
establecidas para un entorno no co ntrolado. Este equipo se debe instalar y
utilizar con una distancia mínima de 20 cm entre el radiador y el cuerpo.
Page 25

Swedish
Försäkran om överensstämmelse med direktivet för radioutrustning
2014/53/EG
Synology Inc. Försäkrar härmed att den här trådlösa routern överensstämmer
med de grundläggande kraven och andra gällande bestämmelser för direktivet
2014/53/EG.
Den fullständiga texten för EG-försäkran om överensstämmelse finns
tillgänglig på följande internetadress:
https://www.synology.com/support/download/MR2200ac
Alla driftslägen:
2,4GHz: 802.11b, 802.11g, 802.11n (HT20), 802.11n (HT40)
5GHz: 802.11a, 802.11ac (VHT20), 802.11ac (VHT40), 802.11ac (VHT80)
Frekvensen, läget och den maximalt utsända effekten i EG finns uppräknat
här nedanför:
2400 MHz – 2483,5 MHz: 19,97 dBm (EIRP)
5150 MHz – 5250 MHz: 22,96 dBm (EIRP)
5250 MHz – 5350 MHz: 22,85 dBm (EIRP)
5470 MHz – 5725 MHz: 29,99 dBm (EIRP)
5150 till 5350 MHz är begränsat till inomhus.
Den här utrustningen ö verensstämmer med EG-gränser för
strålningsexponering i en okontrollerad miljö. Den här utrustningen ska
installeras och användas med som minst ett avstånd på 20cm mellan kylaren
och din kropp.
Page 26

Federal Communication Commission Interference Statement
This device complies with Part 15 of the FCC Rules. Operation is subject to
the following two conditions: (1) This device may not cause harmful
interference, and (2) this device must accept any interference received,
including interference that may cause undesired operation.
This equipment has been tested and found to comply with the limits for a
Class B digital device, pursuant to Part 15 of the FCC Rules. These limits
are designed to provide reasonable protection against harmful interference in a
residential installation. This equipment generates, uses and can radiate radio
frequency energy and, if not installed and used in accordance with the
instructions, may cause harmful interference to radio communications.
However, there is no guarantee that interference will not occur in a particular
installation. If this equipment does cause harmful interference to radio or
television reception, which can be determined by turning the equipment off
and on, the user is encouraged to try to correct the interference by one of the
following measures:
- Reorient or relocate the receiving antenna.
- Increase the separation between the equipment and receiver.
- Connect the equipment into an outlet on a circuit different from that
to which the receiver is connected.
- Consult the dealer or an experienced radio/TV technician for help.
FCC Caution: Any changes or modifications not expressly approved by the
party responsible for compliance could void the user's authority to operate this
equipment.
This transmitter must not be co-located or operating in conjunction with any
other antenna or transmitter.
Operations in the 5.15-5.25GHz band are restricted to indoor usage only.
This device meets all the other requirements specified in Part 15E, Section
15.407 of the FCC Rules.
Page 27

FOR MOBILE DEVICE USAGE (>20cm/low power)
Radiation Exposure Statement:
This equipment complies with FCC radiation exposure limits set forth for
an uncontrolled environment. This equipment should be installed and
operated with minimum distance 20cm between the radiator & your body.
FOR COUNTRY CODE SELECTION USAGE (WLAN DEVICES)
Note: The country code selection is for non-US model only and is not
available to all US model. Per FCC regulation, all WiFi product marketed
in US must fixed to US operation channels only.
Page 28

Industry Canada statement:
This device complies with ISED’s licence-exempt RSSs. Operation is subject to the
following two conditions: (1) This device may not cause harmful interference, and (2)
this device must accept any interference received, including interference that may
cause undesired operation.
Le présent appareil est conforme aux CNR d’ ISED applicables aux appareils radio
exempts de licence. L’exploitation est autorisée aux deux conditions suivantes : (1) le
dispositif ne doit pas produire de brouillage préjudiciable, et (2) ce dispositif doit
accepter tout brouillage reçu, y compris un brouillage susceptible de provoquer un
fonctionnement indésirable.
Caution :
(i) the device for operation in the band 5150-5250 MHz is only for indoor use to
reduce the potential for harmful interference to co-channel mobile satellite systems;
(ii) the maximum antenna gain permitted for devices in the bands 5250-5350 MHz
and 5470-5725 MHz shall be such that the equipment still complies with the e.i.r.p.
limit;
(iii) the maximum antenna gain permitted for devices in the band 5725-5850 MHz
shall be such that the equipment still complies with the e.i.r.p. limits specified for
point-to-point and non-point-to-point operation as appropriate; and
(iv) the worst-case tilt angle(s) necessary to remain compliant with the e.i.r.p. elevation
mask requirement set forth in Section 6.2.2(3) shall be clearly indicated.
(v) Users should also be advised that high-power radars are allocated as primary users
(i.e. priority users) of the bands 5250-5350 MHz and 5650-5850 MHz and that these
radars could cause interference and/or damage to LE-LAN devices.
Avertissement:
Le guide d’utilisation des dispositifs pour réseaux locaux doit inclure des instructions
précises sur les restrictions susmentionnées, notamment :
(i) les dispositifs fonctionnant dans la bande 5150-5250 MHz sont réservés
uniquement pour une utilisation à l’intérieur afin de réduire les risques de brouillage
préjudiciable aux systèmes de satellites mobiles utilisant les mêmes canaux;
(ii) le gain maximal d'antenne permis pour les dispositifs utilisant les bandes de 5250 à 5
Page 29

350 MHz et de 5470 à 5725 MHz doit être conforme à la limite de la p.i.r.e;
(iii) le gain maximal d'antenne permis (pour les dispositifs utilisant la bande de 5 725 à 5
850 MHz) doit être conforme à la limite de la p.i.r.e. spé cifiée pour l'exploitation point à
point et l’exploitation non point à point, selon le cas;
(iv) les pires angles d’inclinaison nécessaires pour rester conforme à l’exigence de la
p.i.r.e. applicable au masque d’élévation, et énoncée à la section 6.2.2 3), doivent être
clairement indiqués.
(v) De plus, les utilisateurs devraient aussi être avisé s que les utilisateurs de radars de
haute puissance sont désigné s utilisateurs principaux (c.-à-d., qu’ils ont la priorité )
pour les bandes 5250-5350 MHz et 5650-5850 MHz et que ces radars pourraient
causer du brouillage et/ou des dommages aux dispositifs LAN-EL.
FOR MOBILE DEVICE USAGE (>20cm/low power)
Radiation Exposure Statement:
This equipment complies with ISED radiation exposure limits set forth for an
uncontrolled environment. This equipment should be installed and operated with
minimum distance 20cm between the radiator & your body.
Déclaration d'exposition aux radiations:
Cet é quipement est conforme aux limites d'exposition aux rayonnements ISED
é tablies pour un environnement non contrôlé. Cet équipement doit être installé et
utilisé avec un minimum de 20 cm de distance entre la source de rayonnement et votre
corps.
Page 30

低功率電波輻射性電機管理辦法
第十二條 經型式認證合格之低功率射頻電機,非經許可,公司、商
號或使用者均不得擅自變更頻率、加大功率或變更原設計之
特性及功能。
第十四條 低功率射頻電機之使用不得影響飛航安全及干擾合法通
信;經發現有干擾現象時,應立即停用,並改善至無干擾時
方得繼續使用。
前項合法通信,指依電信法規定作業之無線電通信。
低功率射頻電機須忍受合法通信或工業、科學及醫療用電波
輻射性電機設備之干擾。
1. 使用此產品時應避免影響附近雷達系統之操作。
2. 高增益指向性天線只得應用於固定式點對點系統。
3. 「電磁波曝露量MPE標準值1mW/cm2,送測產品實測值為 0.814
mW/cm
2
」
Page 31

クラス B VCCI 基準について
この装置は、クラス B 情報技術装置です。この装置は、家庭環境で使用する
ことを 目的としていますが、この装置がラジオやテレビジョン受信機に近接
して使用されると、受信障害を引き起こすことがあります。
取扱説明書に従って正しい取り扱いをして下さい。
 Loading...