

Page 1

Surveillance Station User's Guide
Based on version 8.2
Page 2

Table of Contents
Chapter 1: Get Started with Surveillance Station
Surveillance Station Desktop 4
Chapter 2: Deploy IP Cameras
Install IP Cameras 6
Utilize Camera Features 11
Set up Event Detection and Receive Notications 17
Large-Scale Deployment 19
Chapter 3: Monitor Camera Feeds
Live View 24
Congure Live View Layout 25
Take Snapshots of Important Events 25
Get Alerted with Live View Analytics 26
Setup Scheduled Patrol with PTZ Control and Action Rule 27
Stream Live Video to YouTube 30
Chapter 4: Play Back Video Recordings
Timeline 31
View Multi-Channel Recordings 32
Smart Search 32
Timeline Filter 33
Chapter 5: Manage Video Recordings
Manage Video Recordings 34
Manage Video Archives 35
Smart Time Lapse 38
Chapter 6: Work with I/O Module
Install I/O Modules 39
View I/O Module History 40
Chapter 7: Notication
Receive Notications Using Different Channels 41
Congure Notication Settings 43
Chapter 8: Action Rule
Set Up Action Rule List 45
Track Action Rule History 47
Modify Action Rule Storage 48
2
Page 3

Chapter 9: Archive Vault
Congure Archiving Tasks 49
Congure Bandwidth Control for Archiving Tasks 53
Chapter 10: License
Install License on Surveillance Station 54
Purchase Licenses 55
Chapter 11: CMS
Operate CMS Servers 56
CMS Failover 60
Chapter 12: More Features
Home Mode 62
E-Map 64
Snapshot 65
Log 66
Syno_UsersGuide_SurveillanceStation8.2_20181114
Page 4
Chapter
Get Started with Surveillance Station
Surveillance Station is a professional Network Video Recording (NVR) package. You can use Surveillance Station along with
existing surveillance equipment to gain situational awareness, allowing you to make informed decisions to efciently safeguard
your home and ofce environment.
Assuming that you have completed the hardware setup and installation of your Synology DiskStation Manager (DSM) or
Network Video Recorder (NVR), this chapter will navigate you through the Surveillance Station desktop.
Surveillance Station Desktop
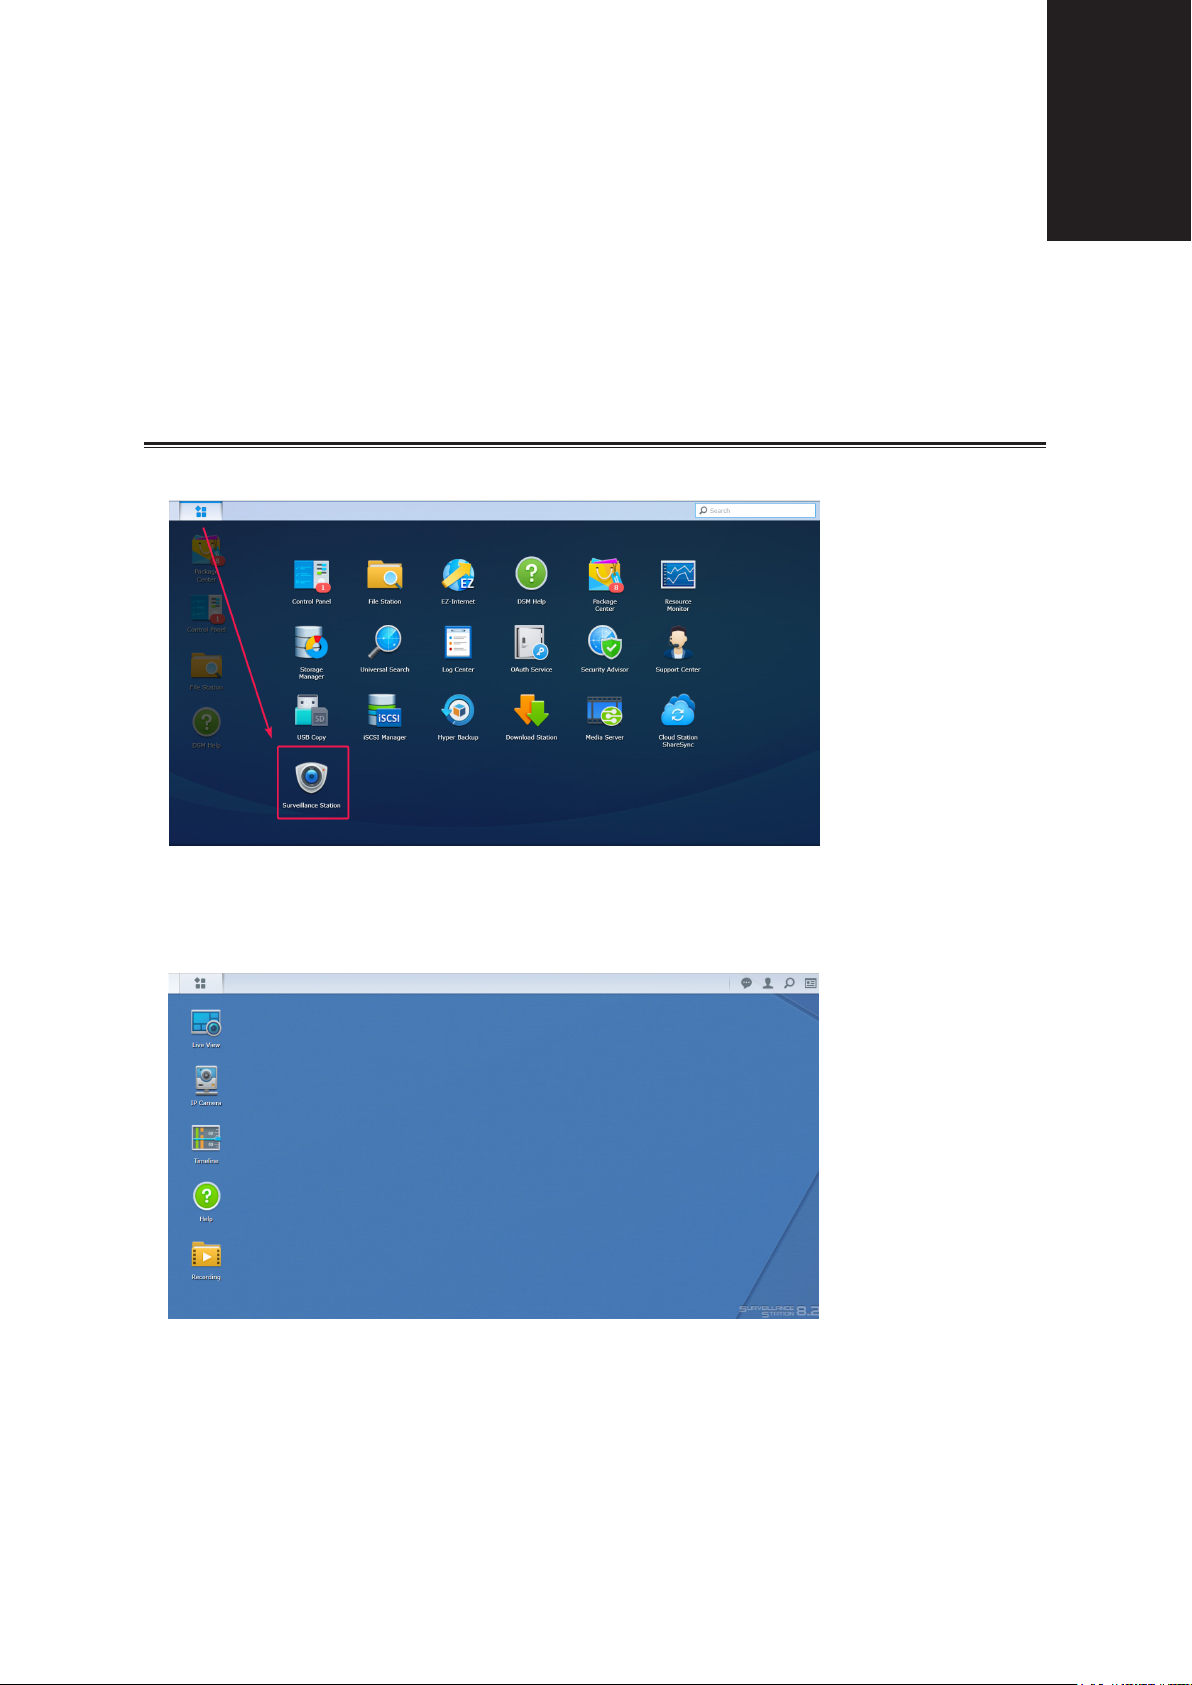
After making sure Surveillance Station 8.2 (or above) has been successifully installed on your Synology NAS/NVR, go to
Menu
Surveillance Station
>
to launch Surveillance Station.
Main
1
Desktop
Once Surveillance Station is launched, you will see the desktop. This is where your applications and package windows are
displayed. You can also create shortcuts to frequently used applications.
Page 5
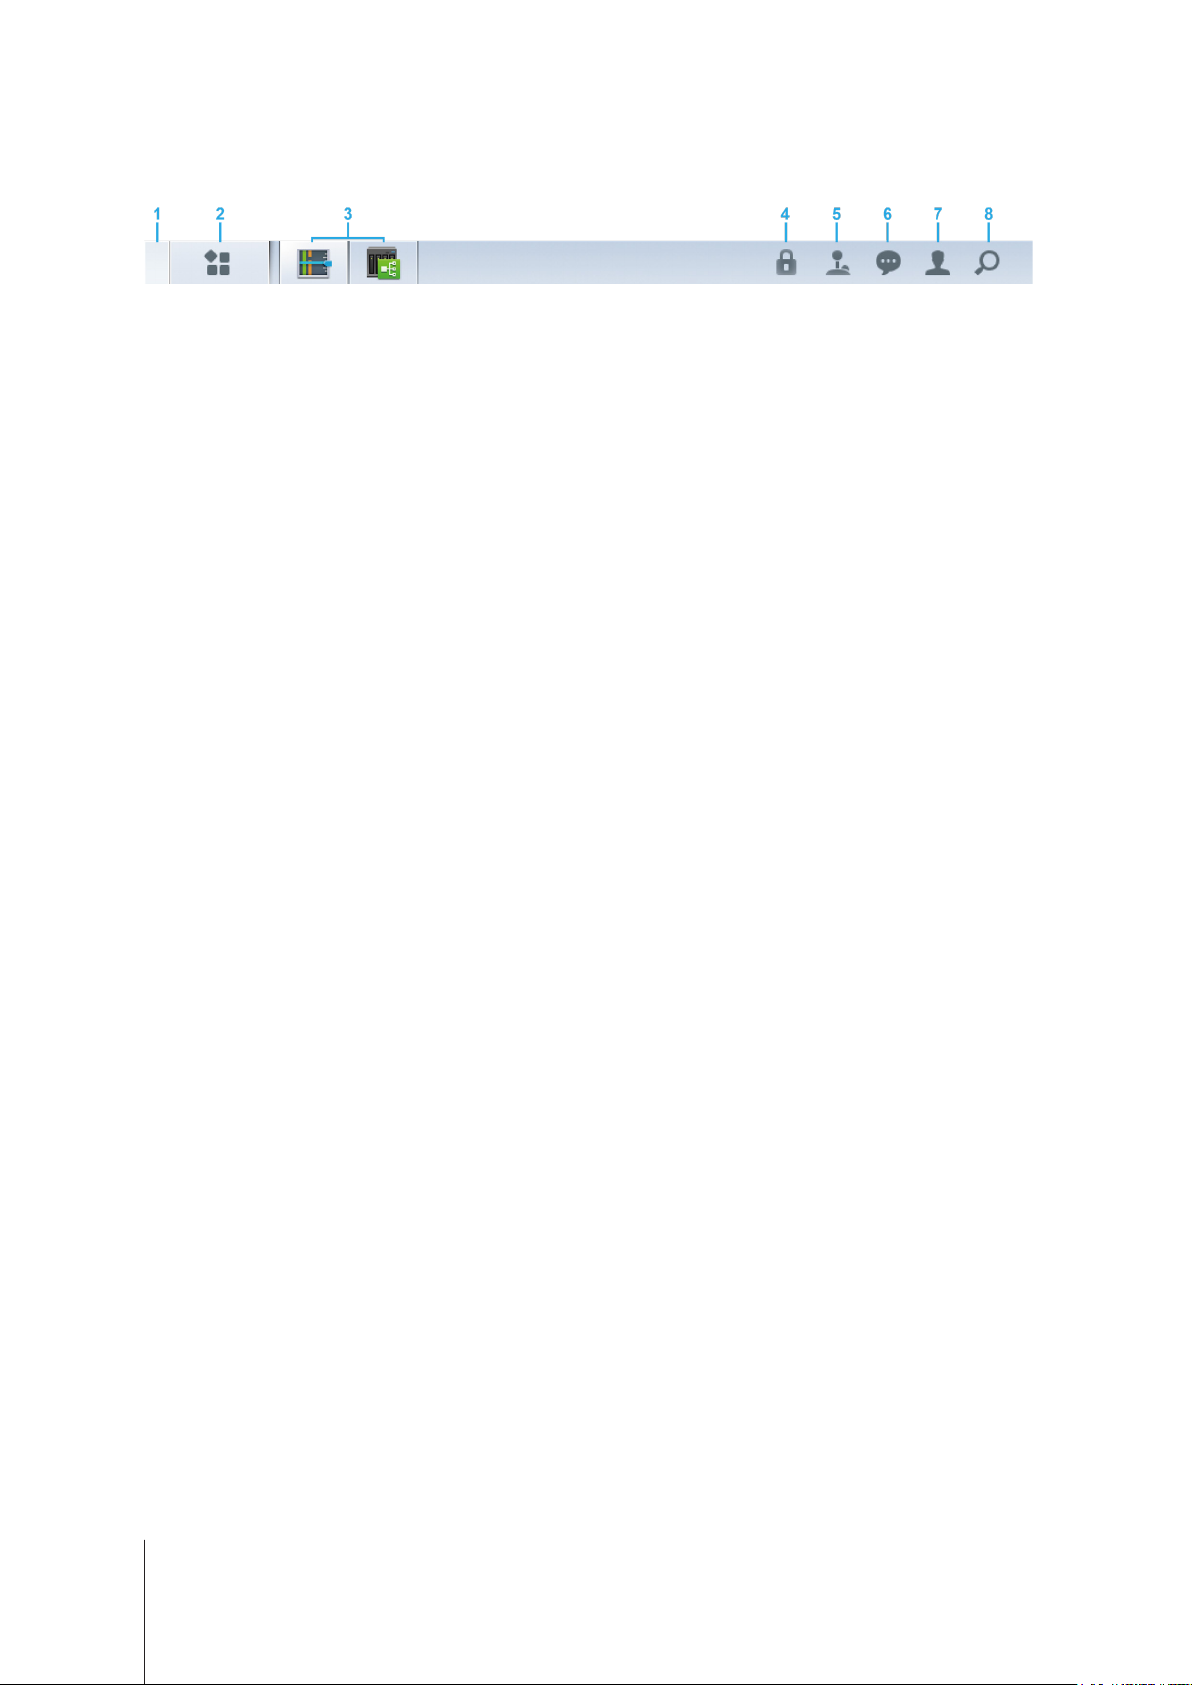
Taskbar
The taskbar is located at the top of the screen and includes the following items:
1 Show desktop
2 Main Menu
shortcuts.
3 Open applications
convenient access in the future.
4 Security Lock
Server.
5 Joystick
Add-ons > Joystick.
6 Notications
7 Options
8 Search
: Minimize all open application windows.
: View and open applications in Surveillance Station. You can also drag and drop icons to create desktop
: Open applications are displayed here. You can right-click and pin applications to the taskbar for
: Lock/unlock the CMS pairing status. This will appear only when Surveillance Station is set up as a Recording
: Congure the hotkey pairing of a connected joystick. This will appear only when joystick support is enabled in
: Notications, e.g., camera disconnected and other status updates can be viewed here.
: Log out (when logged in using Application Portal) or customize personal account options.
: Quickly nd specic applications and Surveillance Station Help articles here.
5 Chapter 1: Get Started with Surveillance Station
Page 6
Chapter
Deploy IP Cameras
In Surveillance Station, you can easily congure and organize your IP cameras to enhance management. This chapter explains
how to add/delete IP cameras, navigates you through IP camera features including device settings, recording schedules, event
detection, and introduces major camera-grouping functions.
Install IP Cameras
Add a Synology Supported IP Camera to Surveillance Station
Surveillance Station provides strong device compatibility and supports over 6000 IP cameras. Before installing a camera,
please refer to the
Is Not on the Support List
1
Power on an IP camera which has been connected to the same local area network as your Synology device.
2
Go to Surveillance Station
IP camera Support List
Add a User-Dened IP Camera
or
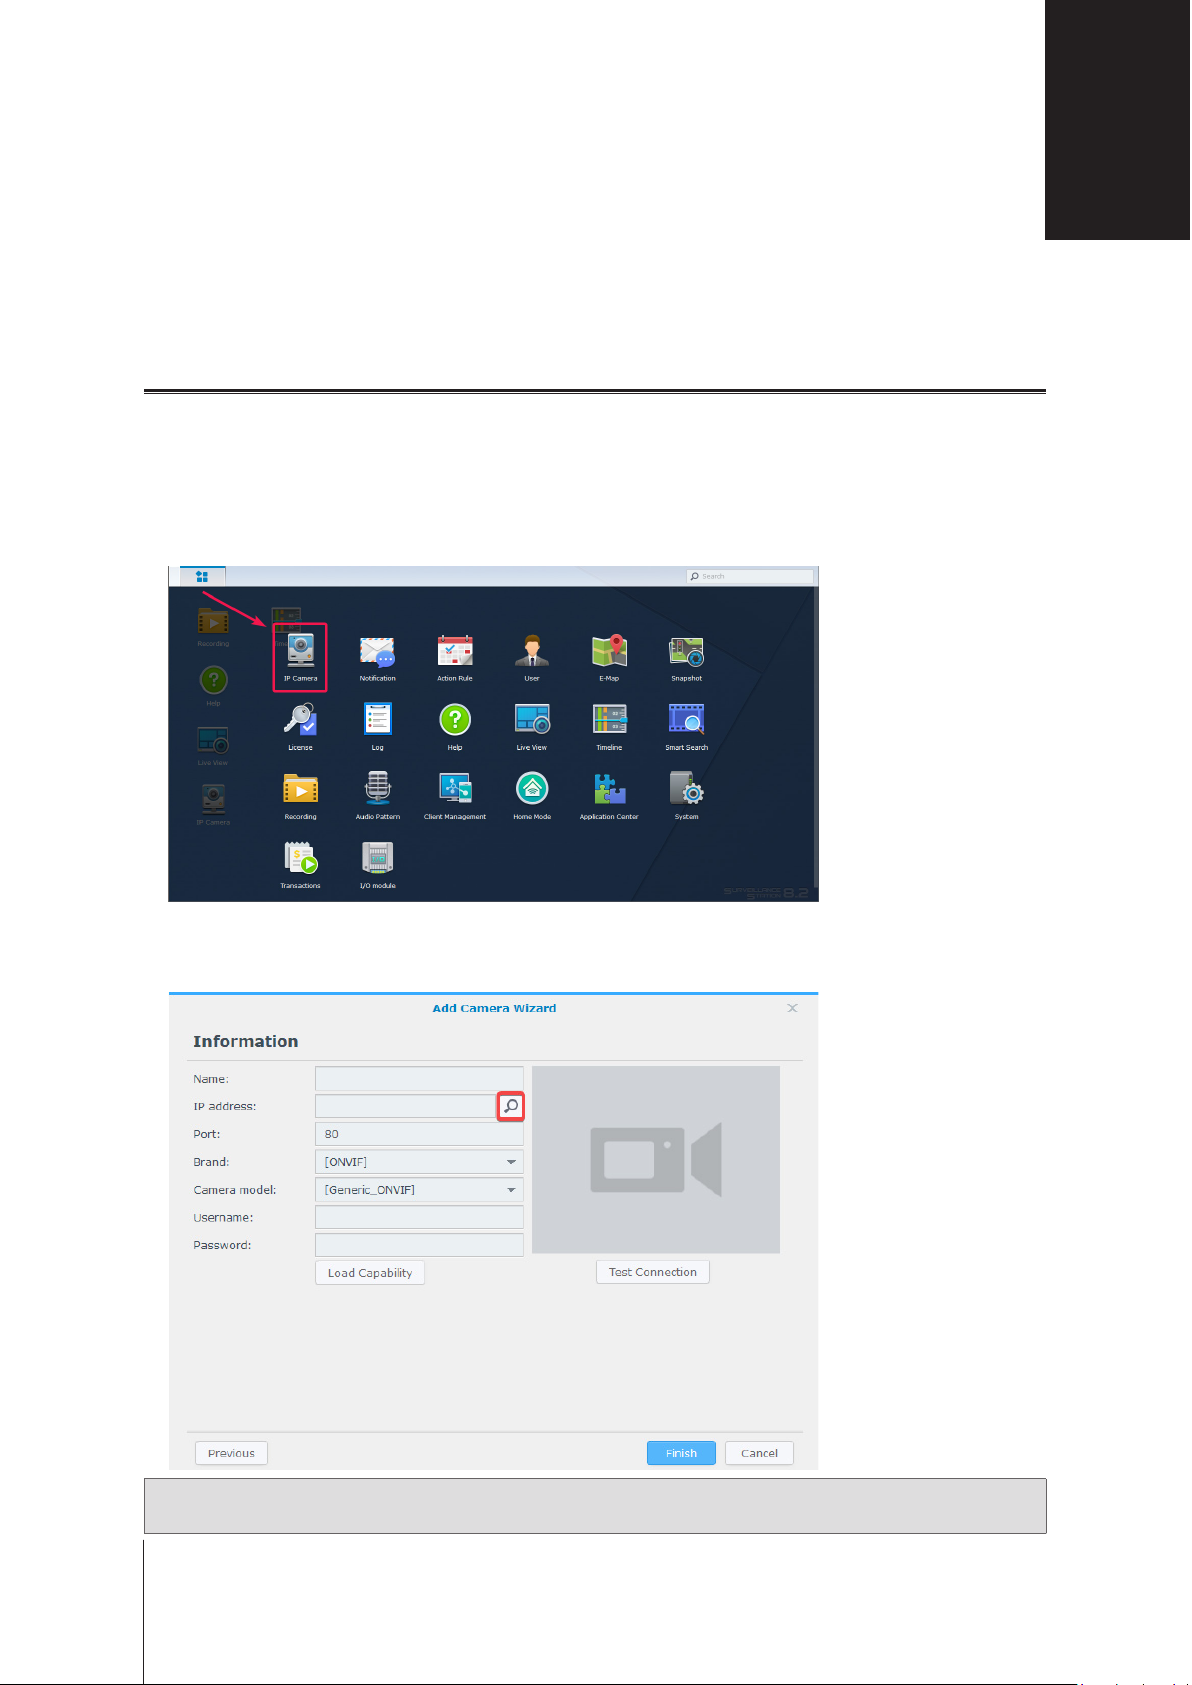
Main Menu
to check if your device is supported. If not, you can try to
IP Camera
>
.
.
Add an IP Camera Which
2
3
4
5
Add
Click
For quicker and simpler conguration, select
Click the
Note:
Username
Add Camera
>
Search
icon to search for all the IP cameras correctly connected to your local area network.
You can also manually enter the camera's information, including
, and
Password
to launch
.
Add Camera Wizard
Quick Setup
.
and click
Next
.
Name, IP address, Port, Brand, Camera model
,
6
Page 7
6
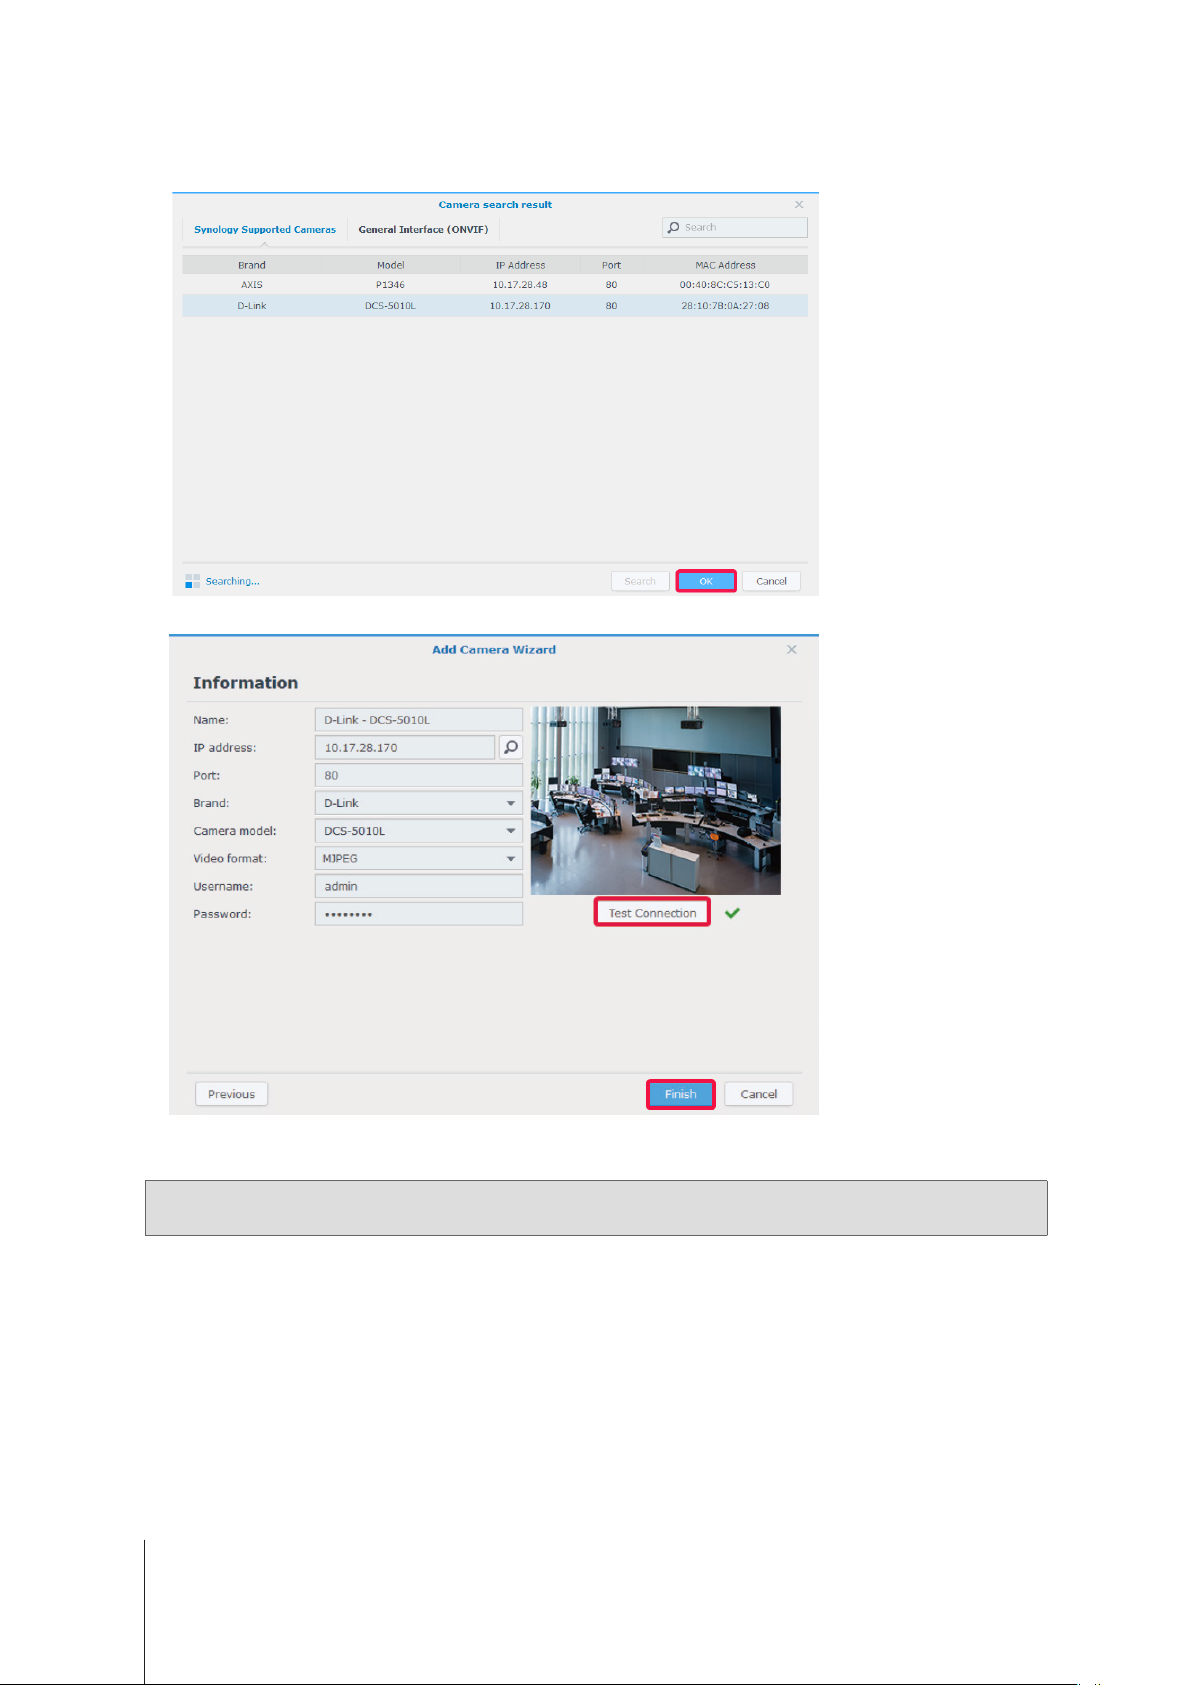
Camera Search Result
From
Station, and click OK.
Synology Supported Cameras
>
, select the IP camera you wish to add to Surveillance
7
You can now operate various network video recording features of Surveillance Station with your IP camera. To congure further
settings for your IP cameras, please refer to corresponding articles under
Test Connection
Click
to check if your IP camera has been correctly congured. Click
Surveillance Station Help
Finish
to complete the installation.
.
Note:
By default, a Synology NAS comes with two free licenses, and depending on the actual mode, an NVR comes with
multiple pre-installed licenses.
7 Chapter 2: Deploy IP Cameras
Page 8
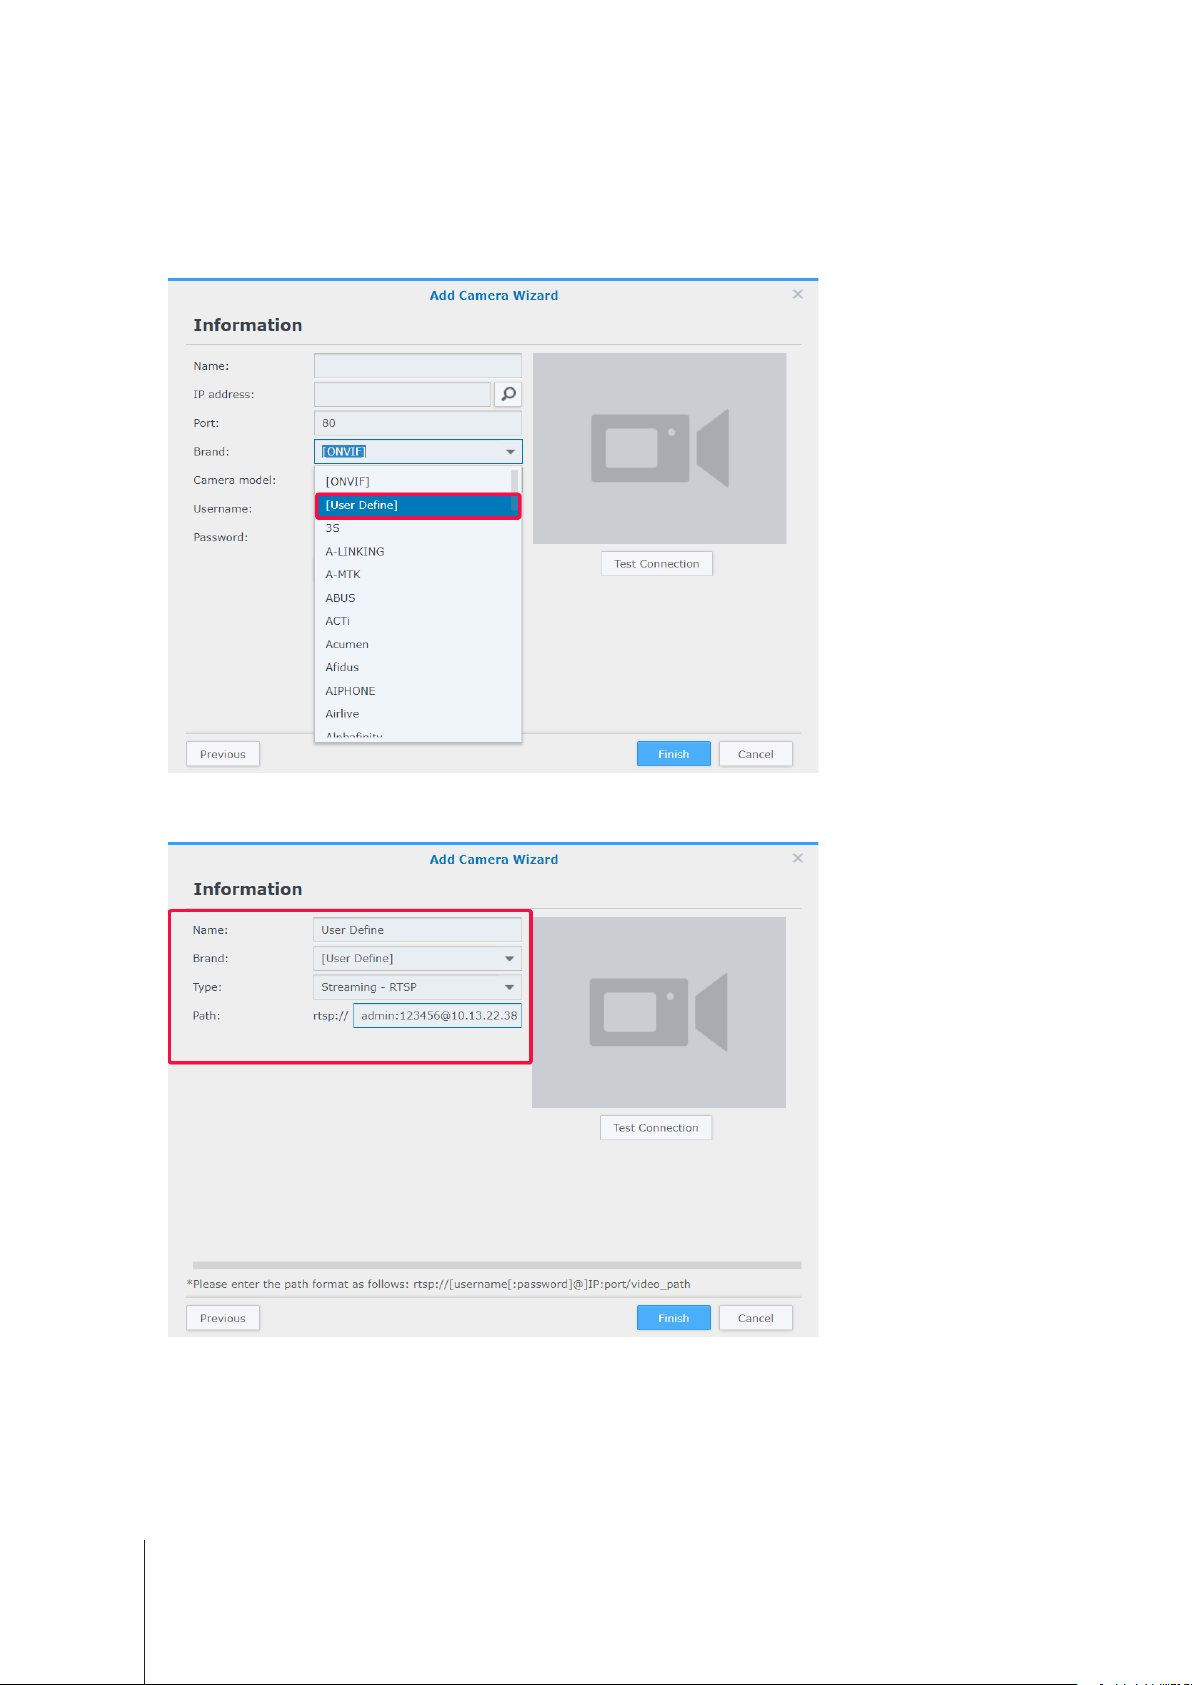
Add a User-Dened IP Camera
User Dene
The
streaming devices to Surveillance Station.
1
Follow steps 1 to 5 of
2
Select
function provides the best device compatibility. You can try connecting different types of network video
Add a Synology Supported IP Camera to Surveillance Station
[User Dene]
from the
Brand
drop-down menu.
.
3
4
Name
Enter a
you have any concerns, please contact your camera manufacturer.
Test Connection
Click
, select a le transfer
to check if your IP camera has been correctly congured. Click
Type
, and set the
Path
in the format of
[Username[:Password]@]IP:port/video_path
Finish
to complete the installation.
. If
8 Chapter 2: Deploy IP Cameras
Page 9
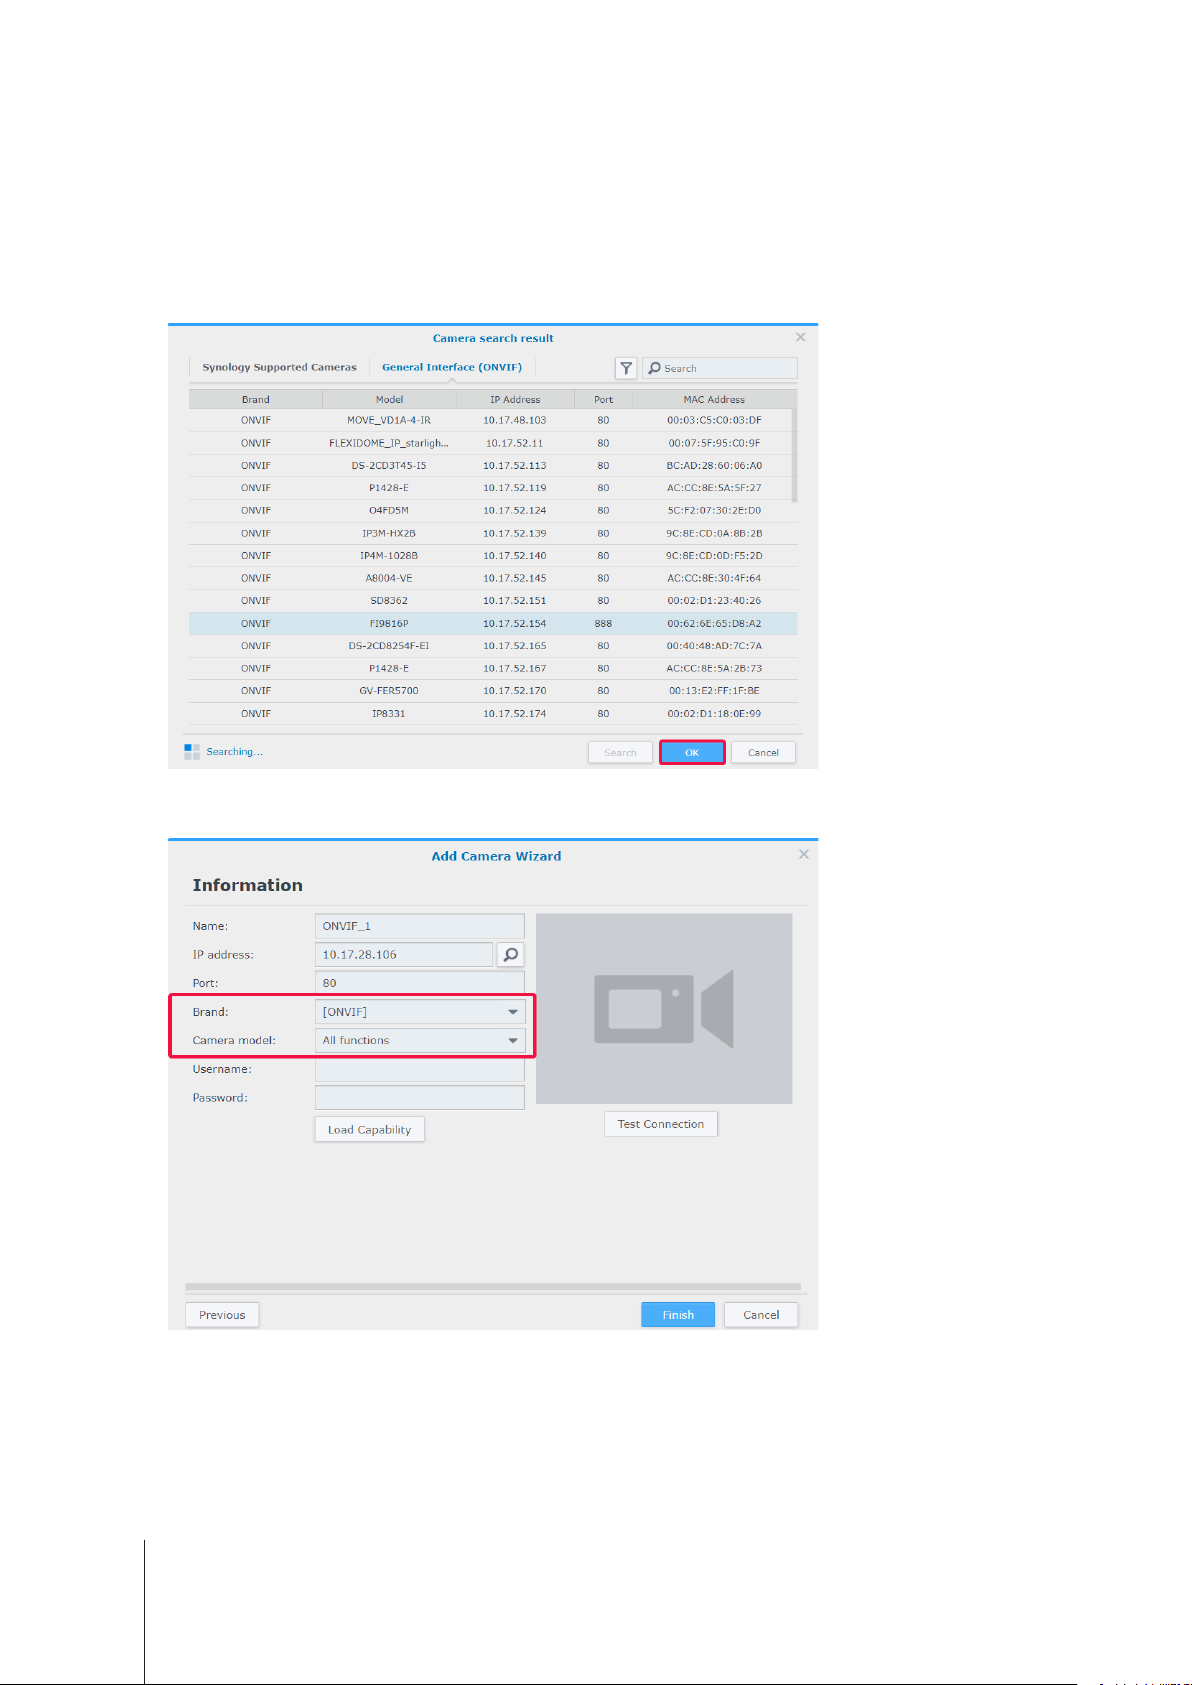
Add an IP Camera Which Is Not on the Support List
Besides the supported models, Synology has also secured a membership with ONVIF and supports all ONVIF protocol
cameras. This allows camera functions and settings to be automatically loaded even if the camera is not listed on the Support
list.
1
Follow steps 1 to 5 of
2
Do either of the following:
a
Camera Search Result
In
Add a Synology Supported IP Camera to Surveillance Station
General Interface (ONVIF)
>
, select the IP camera you wish to add and click OK.
.
b
Select
only
[ONVIF]
from the
or your camera's brand name from the
Camera mode
drop-down menu.
Brand
drop-down menu, then select
All functions
Streaming
or
9 Chapter 2: Deploy IP Cameras
Page 10
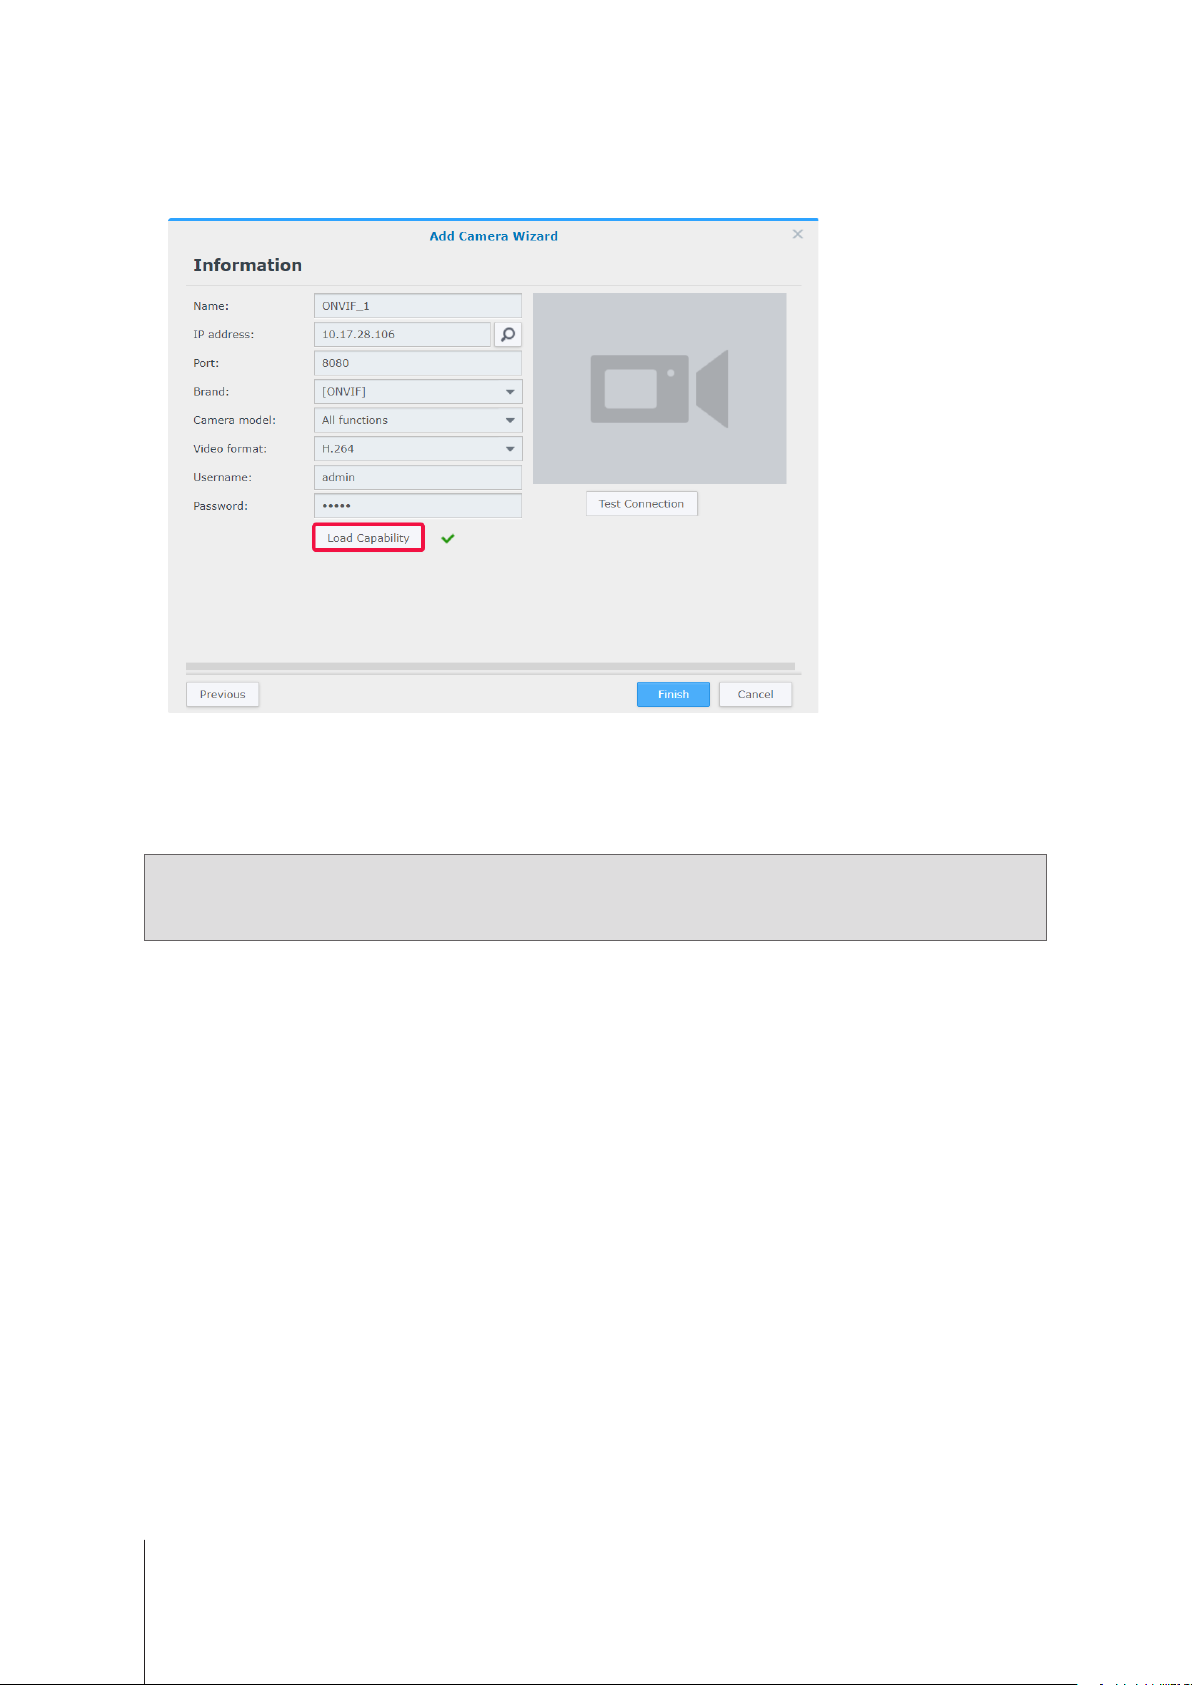
3
4
Username
Enter a
Load Capability
Click
model, more settings may be needed.
Password
and
. A green check will appear if your device is successfully connected. Depending on your camera
.
5
Test Connection
Click
to check if your IP camera has been correctly congured. Click
Delete IP Cameras
To remove an IP camera from Surveillance Station, simply nd your target cameras in the
Delete
. You will be asked to decide whether to keep or remove previous recordings.
Note:
1. The settings of deleted cameras will also be erased.
Shift
2. Press and hold the
Ctrl
or
key for multiple selection.
Disable IP Cameras
If you wish to temporarily end the connection with certain cameras, select the cameras in
Disable
. Click
Enable
Enable
>
to resume the services.
Finish
to complete the installation.
IP Camera
IP Camera
application and click
, then click
Enable
>
10 Chapter 2: Deploy IP Cameras
Page 11
Utilize Camera Features
After setting up your IP camera, you can continue to ne-tune settings to best suit the recording environment. Please go to
Camera
, select your target camera, and click
Edit > Edit
for detailed conguration.
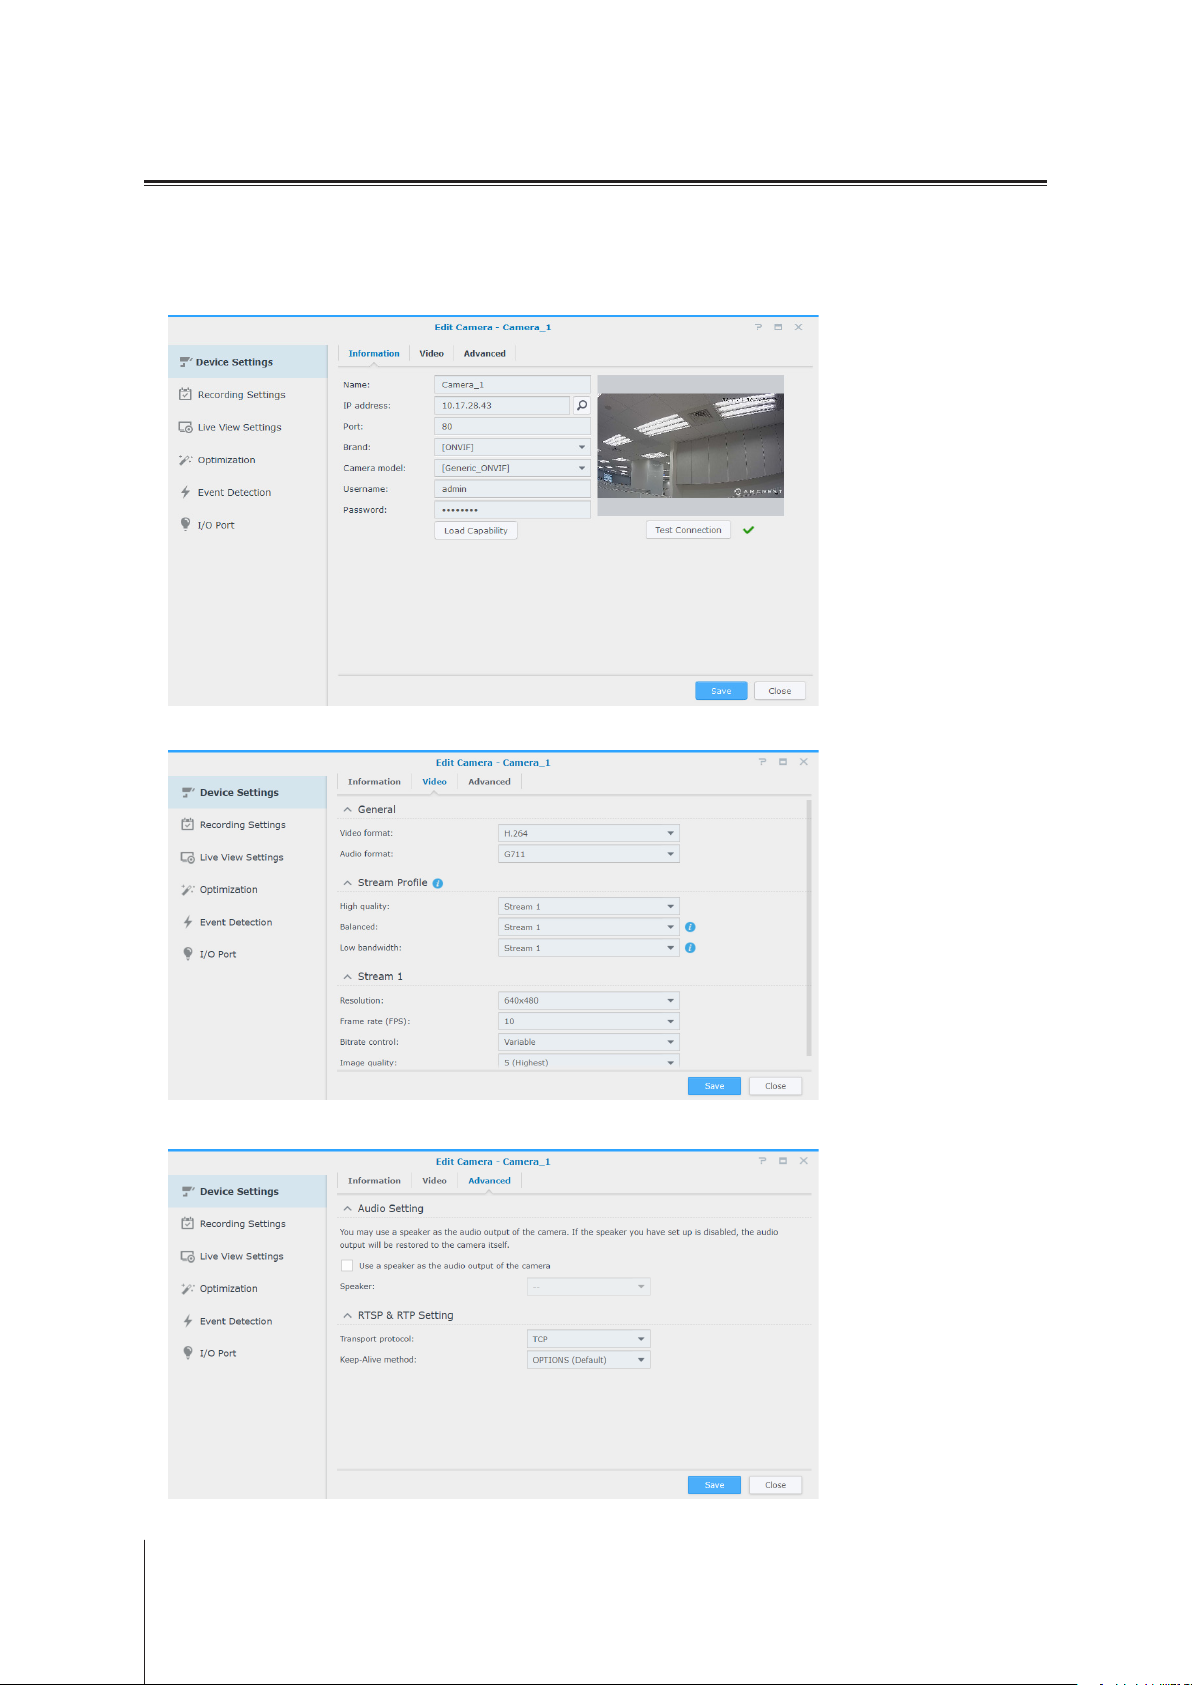
Device Settings
Device Settings
Under
Video
The
tab allows for recording format adjustment and
, the
Information
tab provides options to check and modify general camera information.
Stream Prole
setup.
IP
Advanced
In the
tab, you can modify audio and video transport protocol settings.
11 Chapter 2: Deploy IP Cameras
Page 12
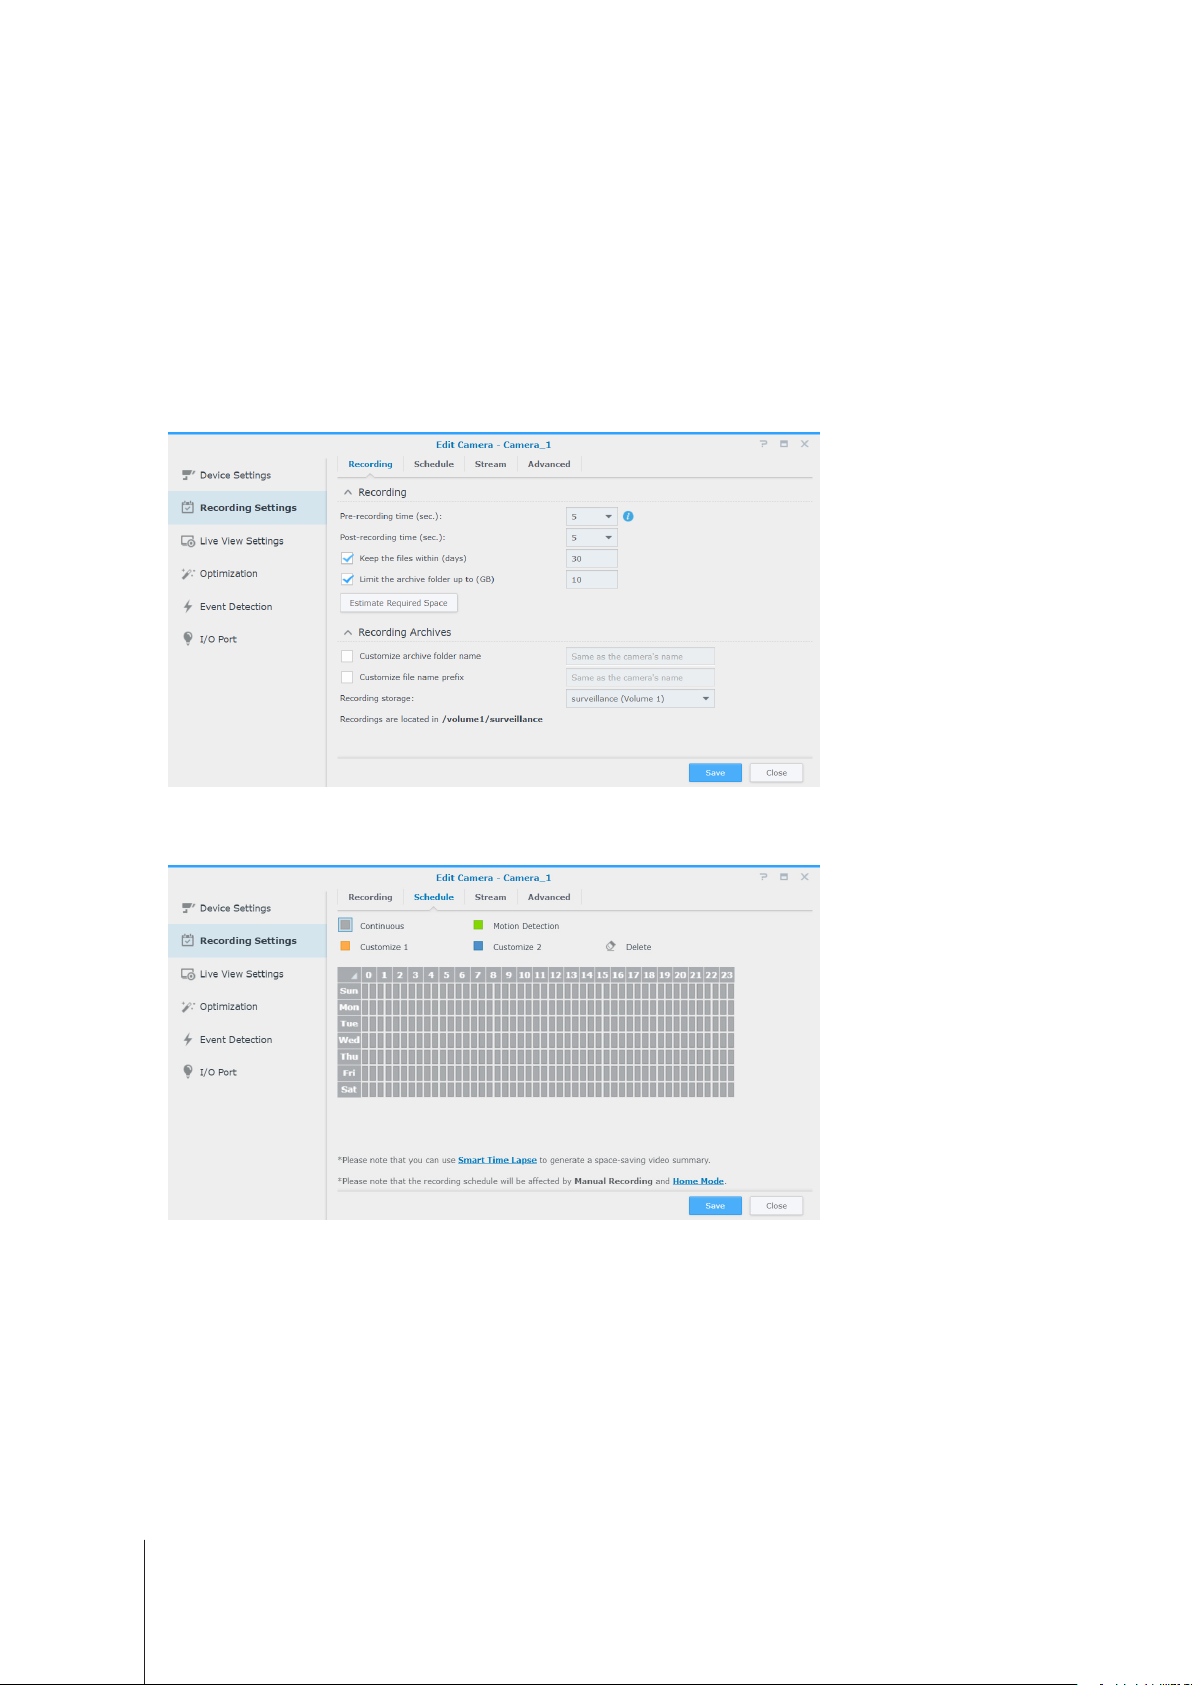
Recording Settings
Recording Settings
Under
names.
From the
Recording
Pre-recording time/Post-recording time (sec.)
•
more footage.
Keep the les within (days)
•
earlier than the specied time range will be deleted automatically.
Limit the archive folder up to (GB)
•
oldest recordings will be overwritten by new ones when the specied maximum size limit is reached.
• Click
Estimate Required Space
with its current settings.
, you can edit recording times, modify recording le lengths, as well as change the le and folder
tab, recording and archive settings can be modied.
: Set how much time the recording will extend backwards/forwards for
: Specify a period of time you wish to retain the recordings. Any recordings that were saved
: Specify the maximum size limit of the storage space to archive recordings. The
to get the estimated storage space that the camera may need for continuous recording
Schedule
The
then either drag your mouse across the timetable or click individual grid cells to apply changes. Every grid cell represents half
an hour.
tab allows you to apply different recording modes to different hours. To set a schedule, rst select a function,
12 Chapter 2: Deploy IP Cameras
Page 13
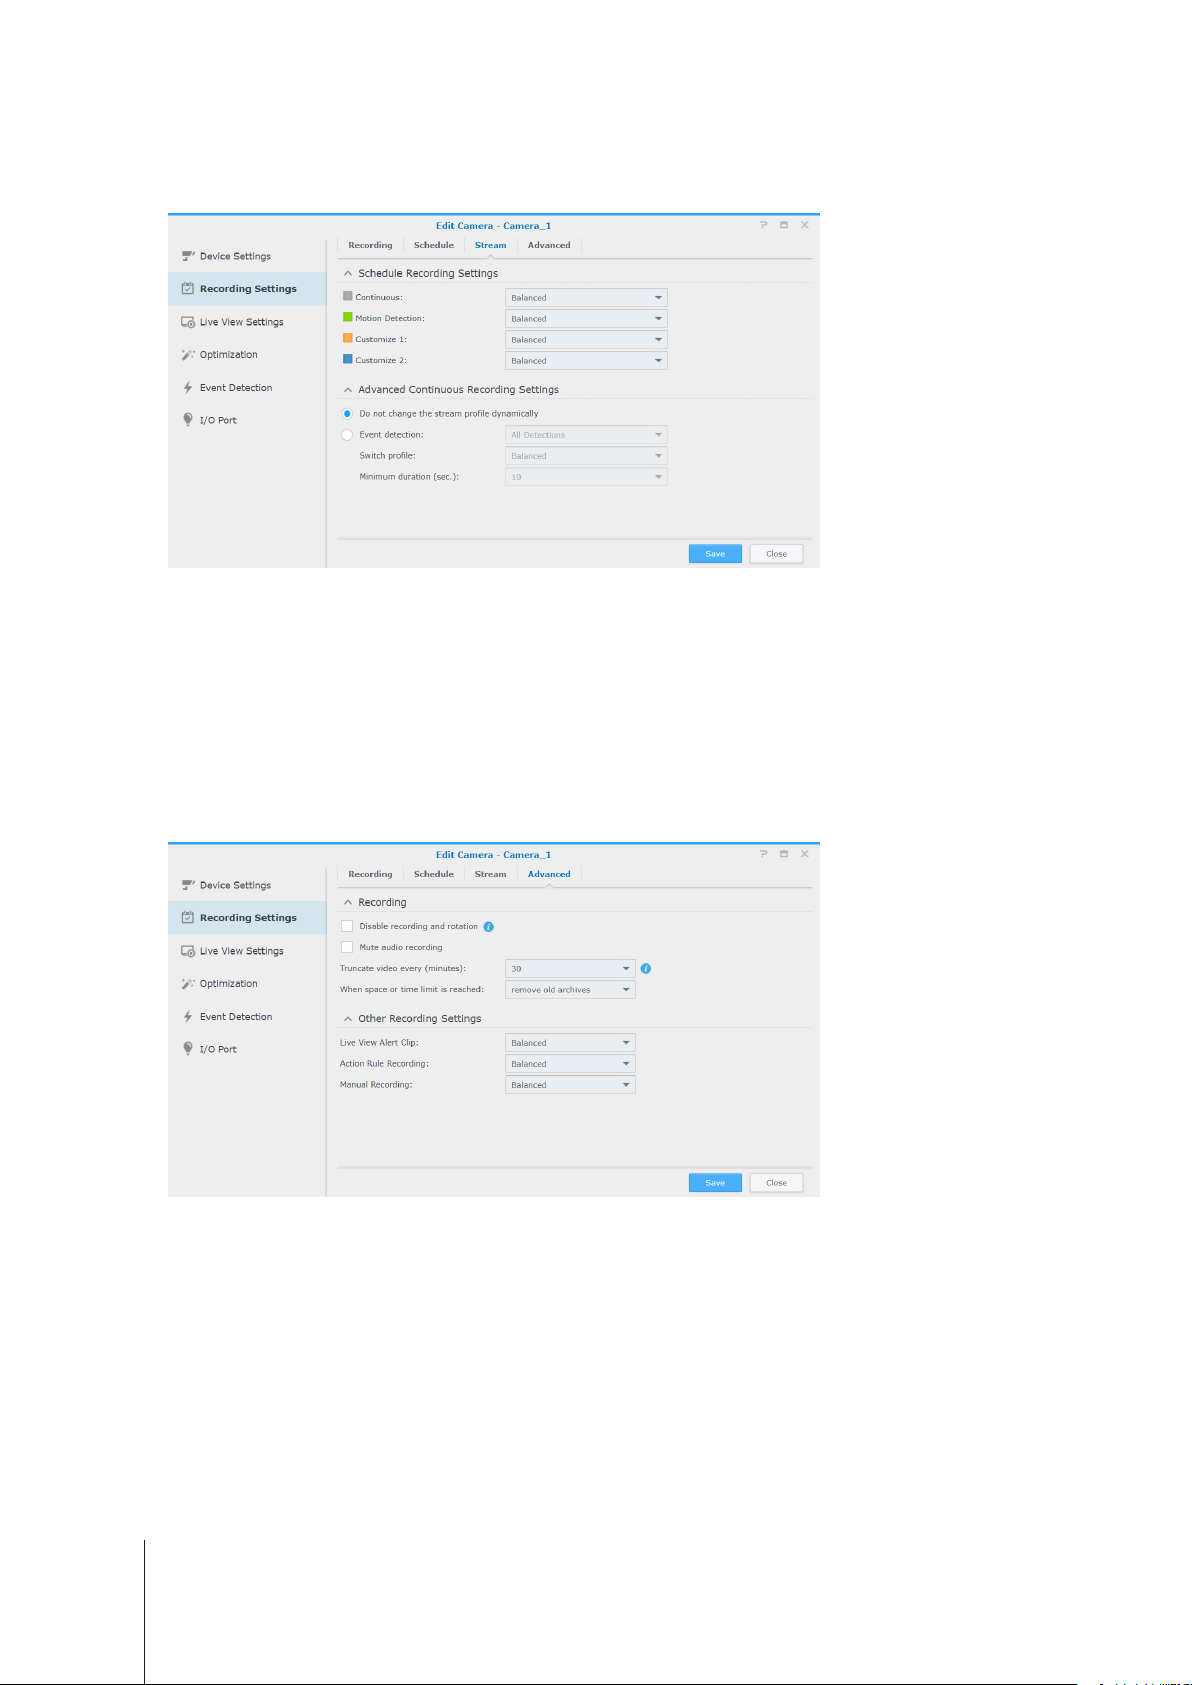
Stream
In the
Continuous Recording
resolution when events occur. You can thus enjoy a more efcient use of storage space while signicantly saving storage costs.
tab, individual stream settings can be applied to each recording type according to your needs. The
feature allows you to set a lower resolution when saving regular recordings, and switch to a higher
Advanced
From the
take when storage space runs out, as well as apply a stream setting to a recording type.
• When
• To congure archive rotation settings, select either of the following:
Advanced
Disable recording and rotation
• Recording schedule, manual recording, edge recording, and related recoding events in
Live View
•
triggered as well.
Action Rule
•
remove old archives
•
time limit is reached.
stop recording
•
tab, you can disable recording and rotation, mute or truncate videos at set times, determine what action to
is ticked, the following settings will be applied:
: Alert settings can still be congured, with live view analytics operating normally. Alert recording can still be
: When a rule with the action "Start recording" is triggered, the recording will not start.
: The oldest recordings will be deleted to make space for newly saved recordings once the space or
: Surveillance Station will automatically stop recording once the space or time limit is reached.
Action Rule
will be disabled.
13 Chapter 2: Deploy IP Cameras
Page 14
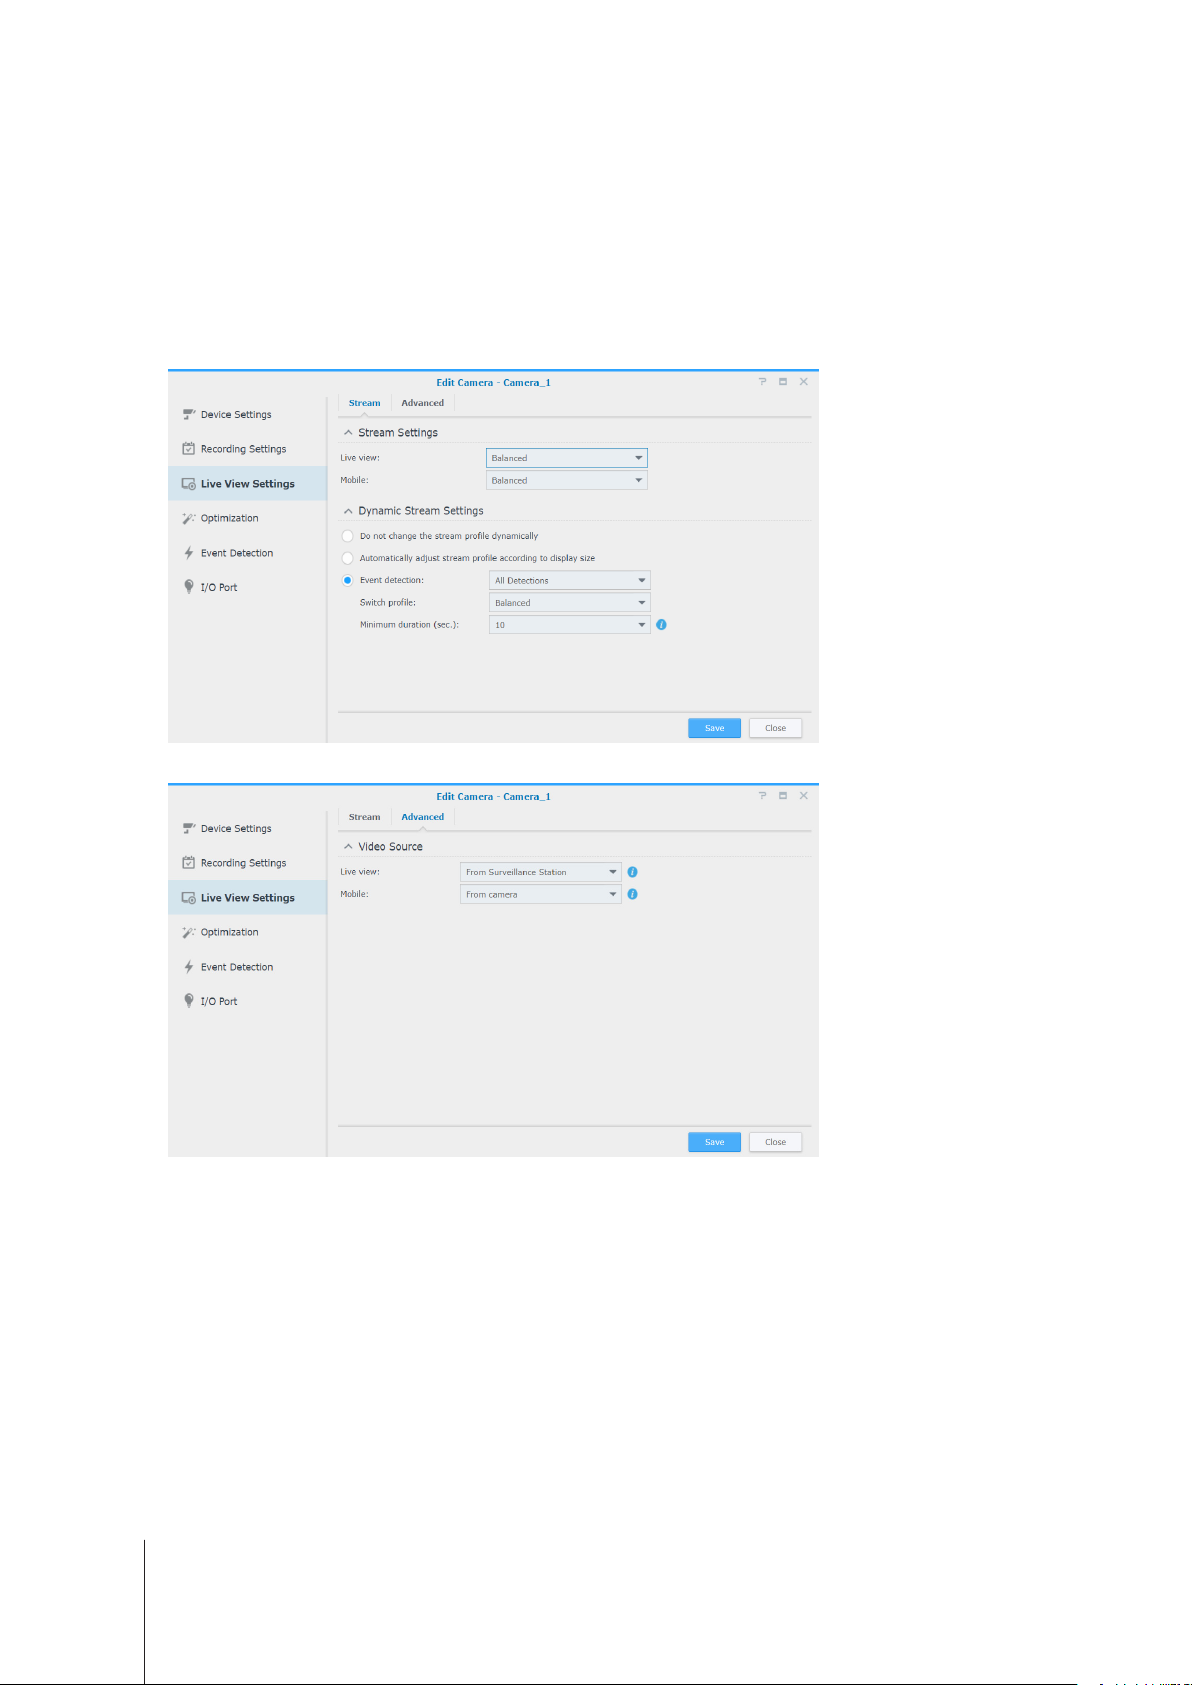
Live View Settings
Live View Settings
Dynamic Stream Settings
Under
Do not change the stream prole dynamically
• Tick
Automatically adjust stream prole according to display size
• Tick
among high quality, balanced, and low bandwidth stream setting according to the display size of the live view feed and the
stream resolution settings.
• For best customization, select one or more conditions from the
Prole
allows you to congure stream settings for
, you can set up dynamic stream prole adjustment according to your needs.
Minimum duration (sec.)
and
.
Live View
if you do not require the stream prole to automatically adjust.
Event Detection
Mobile
and
for Surveillance Station to automatically switch
.
drop-down list and set your ideal
Switch
In the
Advanced
tab, the
Video Source
of Live View can be adjusted.
14 Chapter 2: Deploy IP Cameras
Page 15
Optimization
Optimization
From
can be adjusted to accommodate your environment.
General
>
, various settings including
Time Synchronization, Exposure Mode
On-Screen Display
, and
Advanced
The
your camera requires a regular reboot to maintain best performance, tick
tab provides
Video Orientation
settings where recording images can be set according to your preferences. If
Set force restart schedule
to make arrangements.
Event Detection
Event Detection
The
(AXIS Camera Application Platform Video Motion Detection),
will appear for you to congure settings. For detailed instructions on how to set up event detection, please refer to the
Event Detection and Receive Notications
page offers several detection modes. If your camera supports such functions, the
section below.
Audio, Tampering, PIR
(passive infrared), and
Motion, ACAP VMD
ACAP Apps
tabs
Set up
15 Chapter 2: Deploy IP Cameras
Page 16
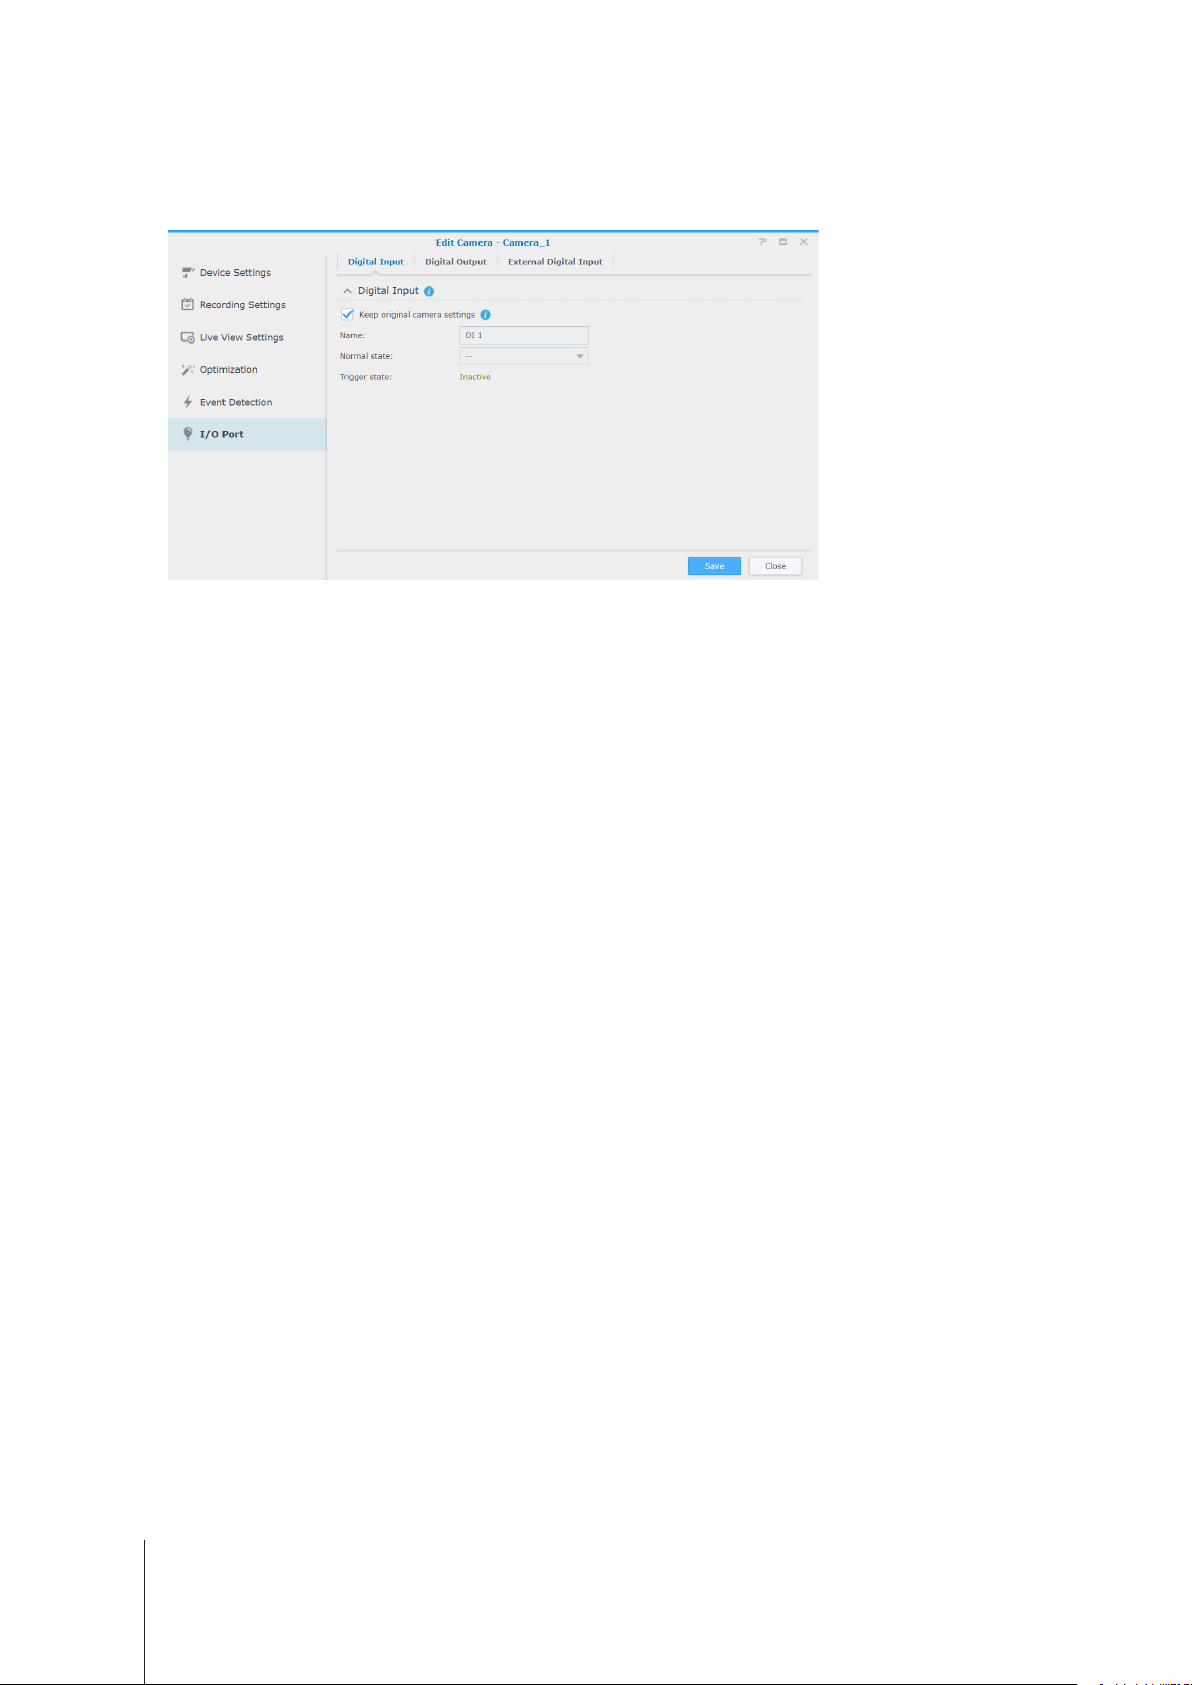
I/O Port
I/O Port
The
your camera supports the functions.
For more detailed information and steps on setting up IP Camera, please refer to the corresponding sections under Surveillance
Station
page provides options for you to modify digital input and output settings. The corresponding tabs will appear if
Help > IP Camera > Congure Camera Settings
.
16 Chapter 2: Deploy IP Cameras
Page 17

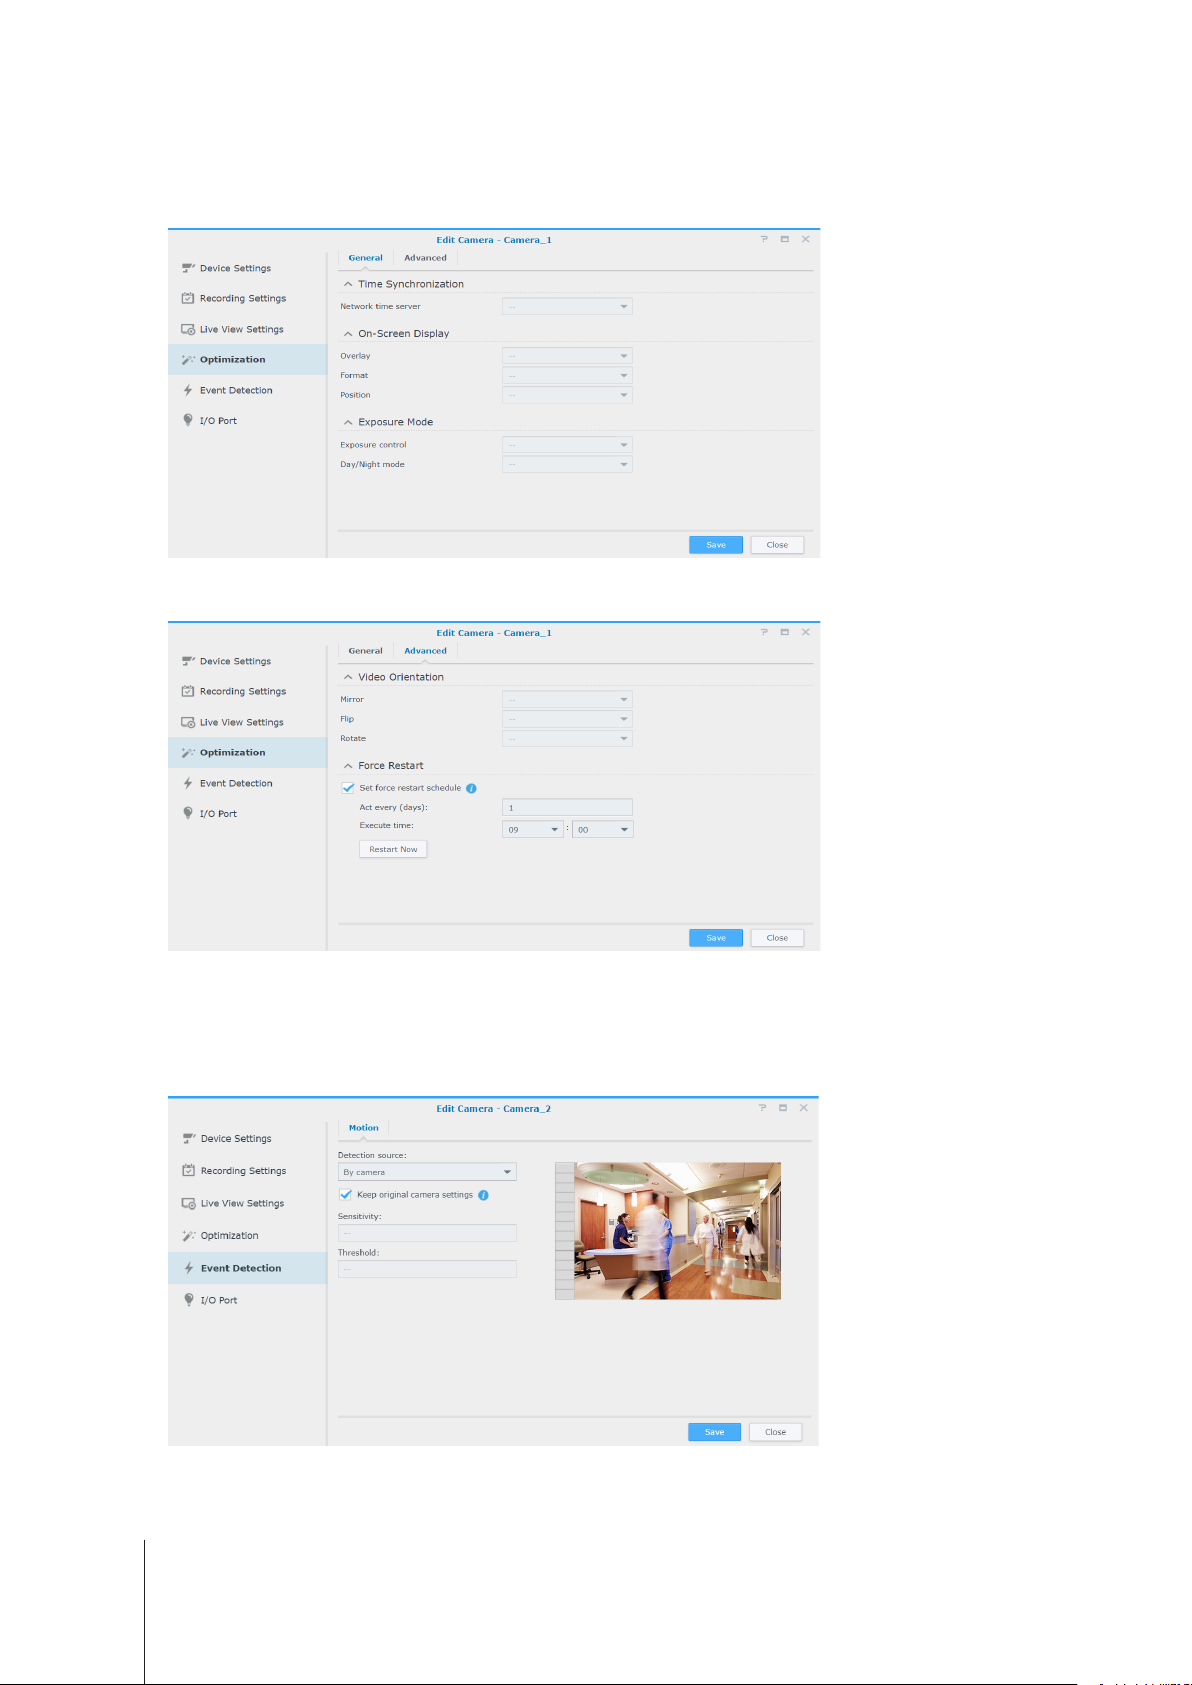
Set up Event Detection and Receive Notications
If your camera supports the corresponding functions,
certain events occur. The following section will take
1
IP Camera
In
2
Go to
3
Go to
• Select
settings
Area, Sensitivity, History, Threshold, Object size, and Trigger percentage (available parameters are subject to camera
capability).
, make sure your device is set up correctly.
Edit
Recording Settings
>
Event Detection
By camera
to apply the current camera settings, or leave the checkbox unticked to ne-tune the values of Detection
Motion
>
if you wish to use the built-in motion detection features of your device. Tick
Schedule
>
to select a
Event Detection
Motion Detection
to set up an ideal timetable, then click
Detection source
allows IP Cameras to be triggered to record when
as an example to walk you through the complete setup.
.
Save
.
Keep original camera
By Surveillance Station
•
detection accuracy will increase accordingly. This can help maintain the hardware performance and video quality of your
device as well.
provides more detailed and precise settings. Also, when Surveillance Station is updated, the
17 Chapter 2: Deploy IP Cameras
Page 18
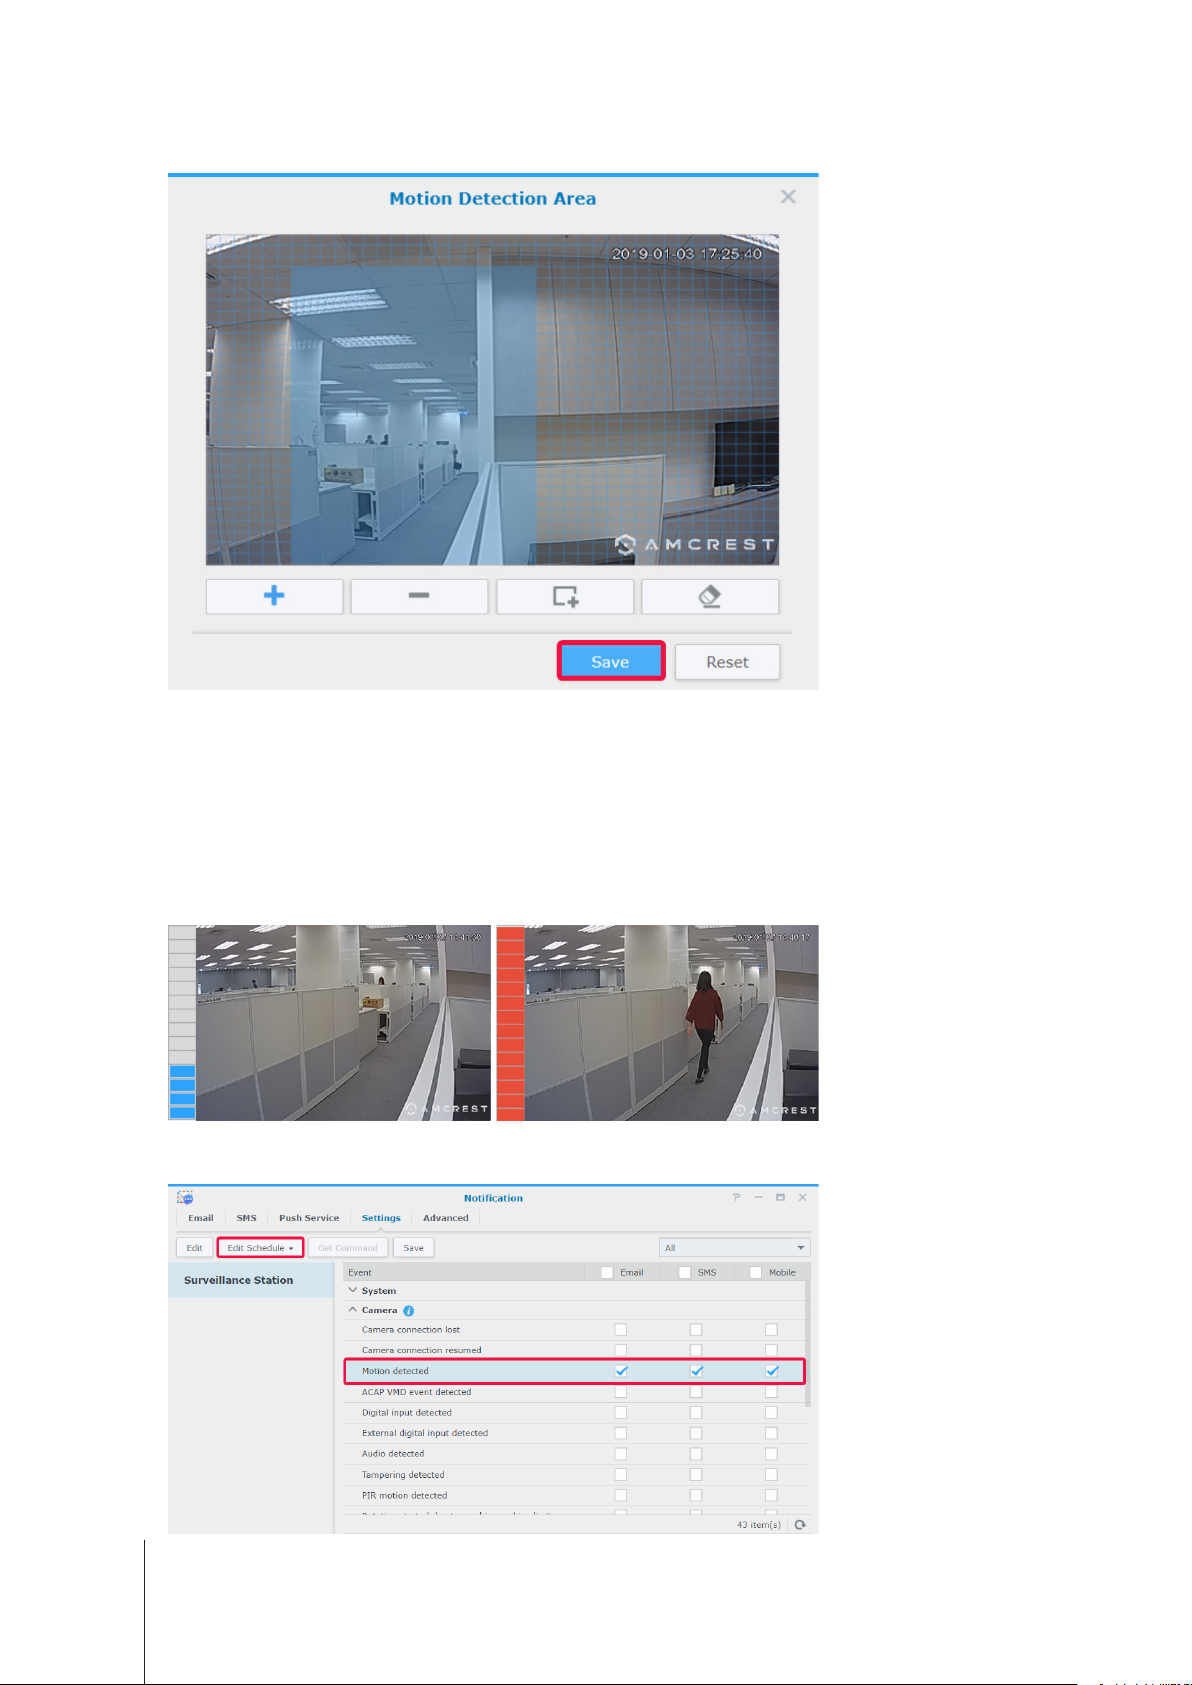
4
5
6
Edit Motion Detection Area
Click
Modify the following parameters:
Sensitivity
•
values will trigger motion detection more easily. The value range is 1 to 99 (%).
Threshold
•
range is 1 to 99 (%).
Ignore short-lived motion
•
to be triggered.
Click
bar on the left indicates the level of motion detected. Blue means the detected movement is below the threshold while red
means the detected motion has triggered recording.
: Determine how large the difference is required between a series of frames to trigger motion detection. Larger
: The threshold of motion detection. Larger values will trigger motion detection for larger movements. The value
Save
to apply settings. You can try triggering motion detection to make sure the settings meet your expectations. The
, use the + and - to add and delete target areas, and click
: Ignore minute motions. Larger values mean motion detection will require longer motion times
Save
.
7
8
Go to
In the
Main Menu
Settings
and launch
tab, select how you wish to be notied (
Notication
18 Chapter 2: Deploy IP Cameras
.
Email, SMS, Mobile
), and click
Edit Schedule
>
Edit
.
Page 19
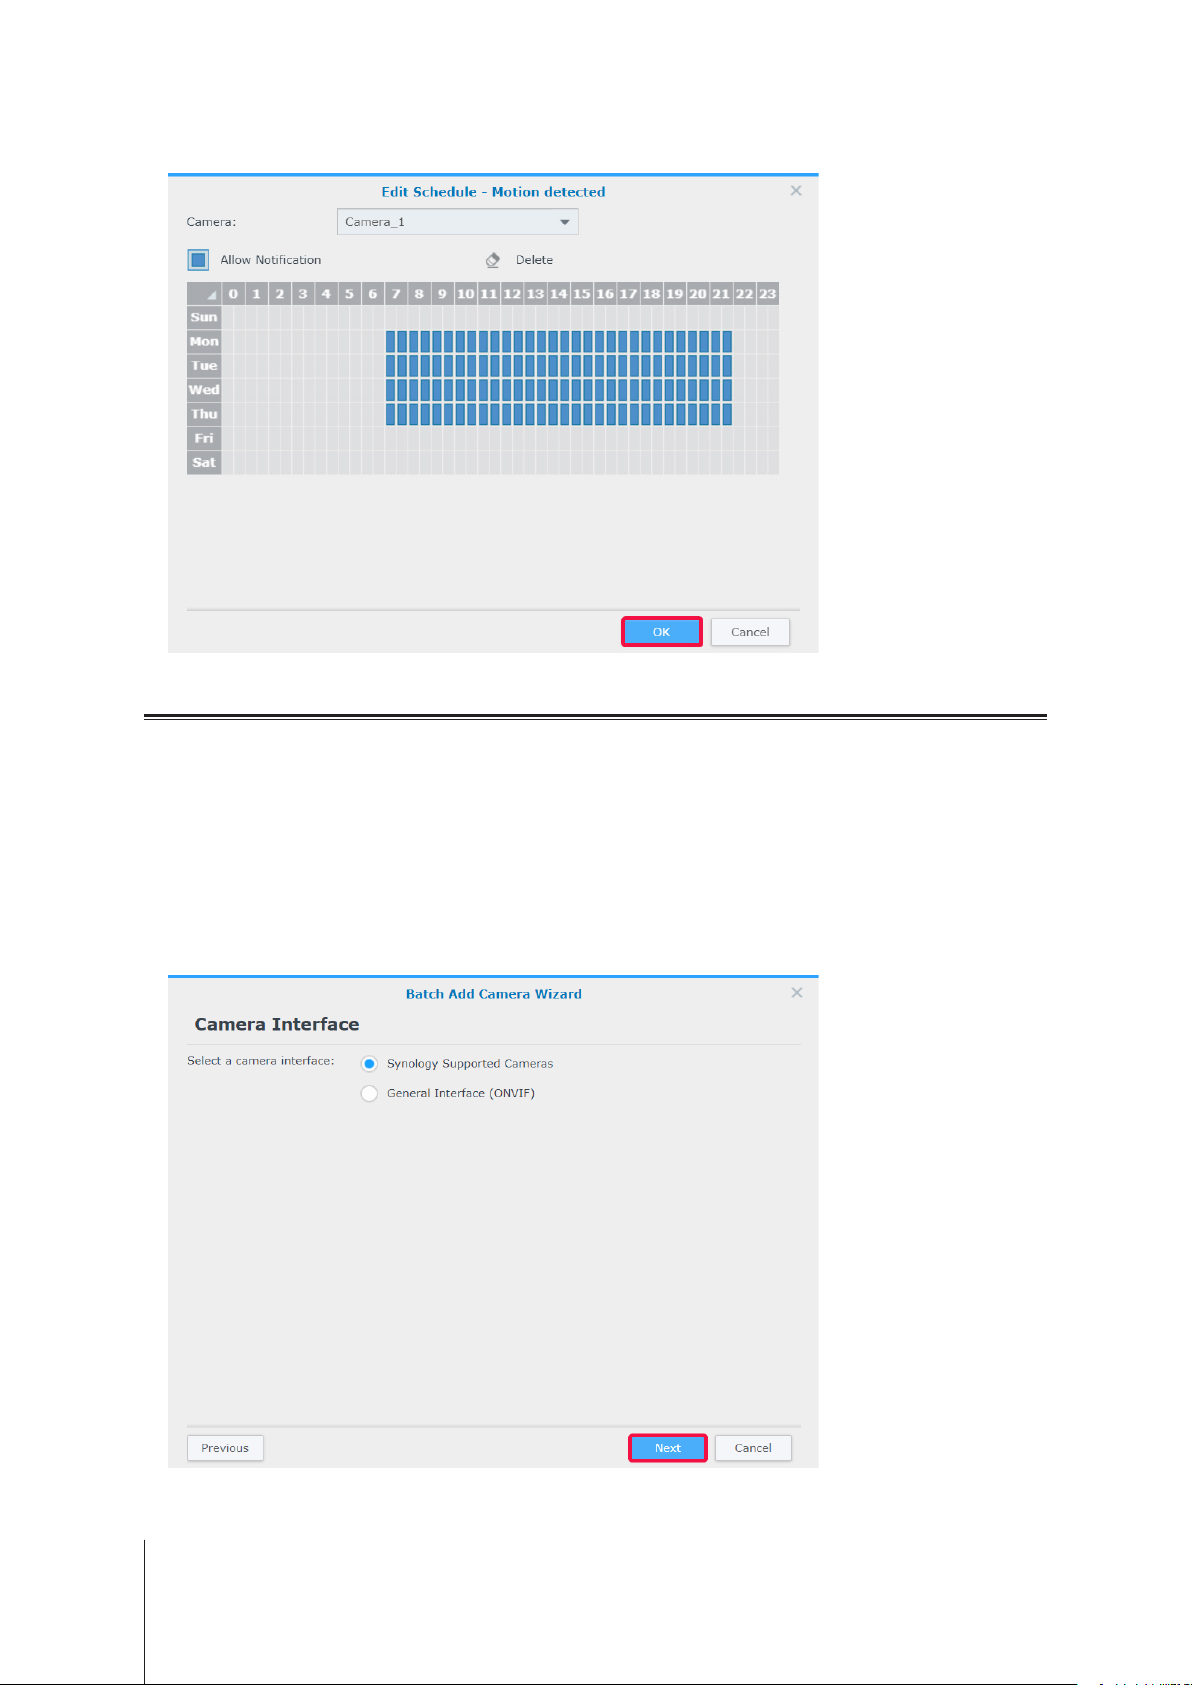
9
Modify the schedule, and click OK to apply settings.
Large-Scale Deployment
To accommodate multi-camera environments,
management efciency and import/extport conguration features that allow you to manage copies of your setup preferences.
IP Camera
also provides camera grouping functions to help enhance
Batch Add Cameras
The Batch Add Camera Wizard can assist you in adding multiple new cameras at a time.
1
Power on IP cameras connected to the same local area network as your Synology device.
2
Go to Surveillance Station
3
4
5
Add
Click
Select
Select a camera interface and click
Add Batch
>
Quick Setup
Main Menu
to launch the
Complete Setup
or
IP Camera
>
Batch Add Camera Wizard
and click
Next
.
.
Next
.
.
19 Chapter 2: Deploy IP Cameras
Page 20
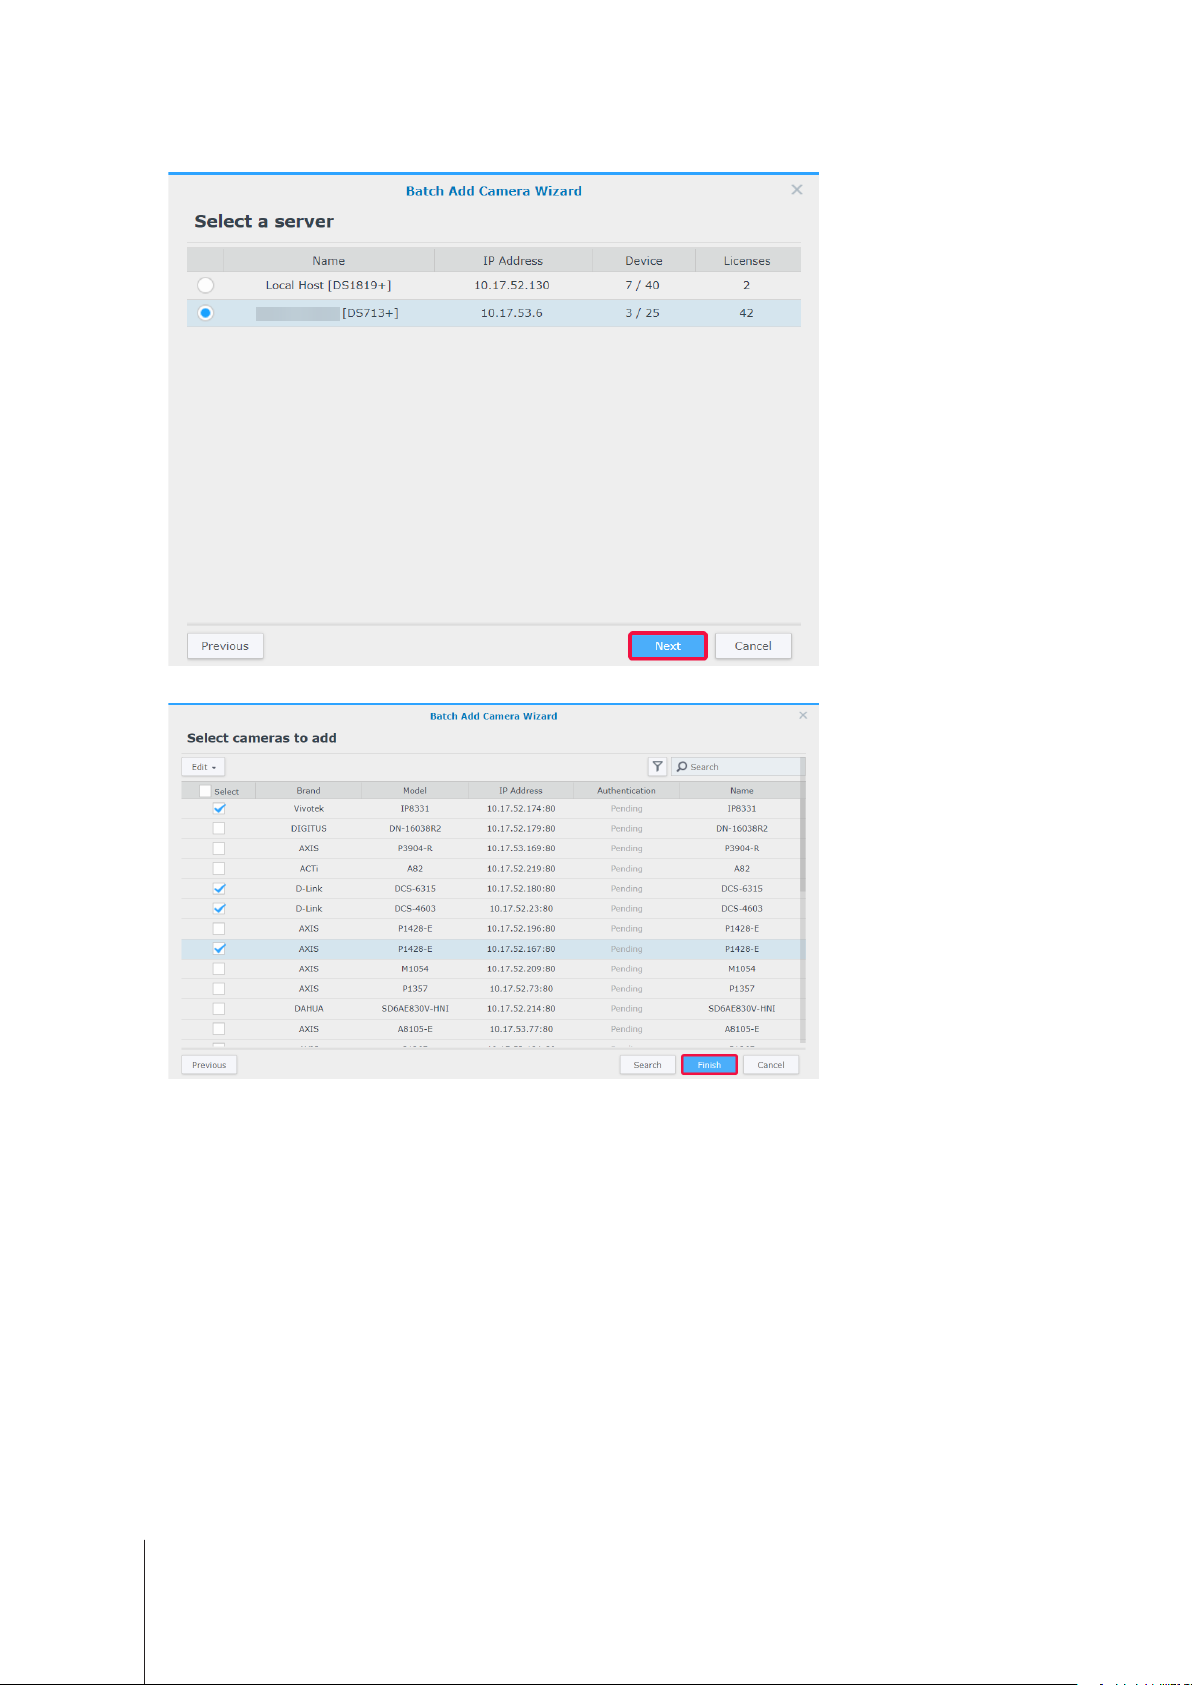
6
Select a server on which you want to install the cameras, and click
Next
.
7
Select the cameras you wish to add, and click
Finish
.
20 Chapter 2: Deploy IP Cameras
Page 21

8
Edit
Click
Model-No.
•
Prex-No.
•
[Camera Number]".
and in the window that appears, enter the
: The names of the cameras will be "[Model Name]-[Camera Number]".
: Specify the prex of camera names in the
Username
Custom Prex
Password
and
eld. The names of the cameras will be "[Prex]-
of the cameras and edit the
Naming rule
:
9
Click
Finish
to complete the setup.
Batch Edit Cameras
1
IP Camera
In
2
Click
3
In the
for the attributes you wish to apply to your other cameras and click
, select a camera in your target batch.
Edit
Edit Batch
>
Source of Attributes
.
step, the camera's attributes are grouped into different categories. Tick the
Next
Apply
.
checkboxes
Note:
1. The attributes marked with asterisk (*) can only be applied to the cameras of the same model as the batch edit's source
camera.
2. Only the attributes supported by the source camera can be applied to the other cameras.
21 Chapter 2: Deploy IP Cameras
Page 22

4
Select the Cameras to Apply
In the
camera groups and click
Note:
1. Due to compatibility issues, some attributes cannot be applied to certain devices. "-" will show when you tick such a
camera.
2. The similarity of two ONVIF cameras is determined by their actual abilities rather than their brands and models.
Recording storage
3.
source camera.
Finish
can only be applied when your target cameras are installed on the same Synology product as the
step, tick the
to complete.
Apply
checkboxes to apply the selected attributes to your cameras or
Group IP Cameras
IP Camera
In
uses. Created groups will automatically appear under
privileges to groups in
To put connected IP cameras into groups, please do the following:
1
Launch
2
Click the
3
Add cameras to the
4
Click
>
IP Camera
Plus
Save
to complete.
Group
, you can group devices however you wish to, for instance by camera location, recording mode, or
Privilege Prole
and click
button, and enter a
Included Cameras
Group
.
.
Name
and
list using the
Layout
Description
Right
in
(optional).
arrow.
Live View
and
Timeline
. You will also be able to apply user
22 Chapter 2: Deploy IP Cameras
Page 23

Import/Export Camera Congurations
To save copies of current camera settings or replace current congurations with older ones, go to
Import/Export
>
Station
. For more information, please refer to Surveillance Station
and follow the instructions of the wizard. The
.conf
les will be saved in the designated folder in
Help > IP Camera
.
IP Camera
Conguration
>
DSM
>
File
23 Chapter 2: Deploy IP Cameras
Page 24

Chapter
Monitor Camera Feeds
Once your camera deployment is complete, you can start monitoring target areas with
basics of arranging
patrol routes.
Live View
layouts, receiving alerts from camera events, as well as setting up preset positions to schedule
Live View
Live View
In
track targets, and adjust camera feeds with PTZ (pan, tilt, zoom) controls. Camera feeds can be arranged in layouts and
customized depending on your individual surveillance needs.
, you can view real-time video feeds of all the IP cameras paired with Surveillance Station, capture snapshots,
Live View
. This chapter introduces the
3
No. Name Function
Displays video feeds from IP cameras. You can click a camera feed
1
2
3
Left
Panels
Live View Layout
PTZ Controls
Layouts Panel
Alerts Panel
Stream Prole Switch stream prole here.
Patrol Panel
Digital Output/Audio Output Activate/deactivate digital output and/or audio output here.
On-screen Buttons
to select it, and use the
The currently selected camera feed is highlighted with a yellow frame.
Double-clicking any camera feed enlarges the image of that feed.
Double-clicking again returns to the normal layout.
Adjust angle and zoom of cameras that support PTZ (pan, tilt, zoom)
controls. These controls are grayed out when the selected camera does
not support PTZ controls:
Arrow
1.
2. The home button returns the selected camera to its default position.
3.
Edit live view layouts or enable/disable layout related features here.
For quick conguration of your camera feed layout, please refer to the
Congure Live View Layout
Manage alerts settings or display alerted video clips here. For quick
conguration of live view analytics, please refer to the
Live View Analytics
Switch patrol settings here. For quick setup of patrol paths and
schedules, please refer to the
Control and Action Rule
Hover the pointer over a selected camera feed to display the on-screen
buttons. Buttons will show according to the features supported by the
cameras.
buttons adjust the angle of the currently selected camera.
Plus
camera.
and
minus
PTZ Controls
buttons adjust the optical zoom of the selected
section below.
section below.
to change viewing options.
section below.
Setup Scheduled Patrol with PTZ
Get Alerted with
For more information, please refer to Surveillance Station
24 Chapter 3: Monitor Camera Feeds
Help > Live View
.
Page 25

Congure Live View Layout
To congure your live view layout and start monitoring your camera feeds, please do the following:
1
2
3
Live View
Launch
Select your preferred layout.
Drag an IP camera and drop it onto a certain channel of the layout. Repeat this step to display more video feeds on your live
view layout.
, and go to
Layouts > Management
.
Note:
See Surveillance Station
4
According to your surveillance requirements, you can add more layouts by clicking the plus button. Enter a
steps 2 and 3. After nishing the conguration, you can quickly switch among the saved layouts on the
5
Click
Save
to complete.
Help > Live View > Monitor Live Views
for more details on layout customization.
Take Snapshots of Important Events
Once your
important events. The button can be used in all Surveillance Station players (e.g.,
Live View
layout is congured, you can always use the on-screen snapshot button to take snapshots and record
Recording
and
Name
Layouts Panel
IP Camera
and repeat
.
).
25 Chapter 3: Monitor Camera Feeds
Page 26

Get Alerted with Live View Analytics
Live View Analytics
choose from several analytics types and track suspicious events to trigger smart recording on-the-y. Each recorded session
is archived in an organized manner for analysis. The simulation mode ensures accurate tuning so you can adjust sensitivity,
detection zone, and object size to deliver the best result for individual cameras.
To track events with live view analytics, please do the following:
1
2
3
4
IP Camera
Launch
Select an
Simulation
Click
To stop simulation mode, please click the button again.
Save
Click
allows for intelligent target-tracking during live video viewing and recording, giving you the ability to
, select a camera, and click
Analytics Type
to ne-tune the sensitivity, detection zone, and object size for individual cameras to obtain the best results.
to complete.
from the drop-down menu.
Live View Analytics
.
5
6
7
Launch
Tick the
Save
Click
Live View
Alert
, and go to
checkbox for the
to nish the conguration.
Alerts > Management
Live View Analytics
.
item which was just now congured in
IP Camera
.
26 Chapter 3: Monitor Camera Feeds
Page 27

8
Go the
Alert Panel
to track alerted video clips. The events will be listed in the middle section.
Note:
See the corresponding articles from Surveillance Station
Help > Live View > Alerts
for more information.
Setup Scheduled Patrol with PTZ Control and Action Rule
If your IP cameras support PTZ features, you can customize multiple preset positions to monitor locations which require extra
attention, and setup patrol paths composed of a serial concatenation of existing preset positions.
To setup patrol paths, please do the following:
1
2
3
4
5
IP Camera
Go to
Click the
Name
Enter a
Adjust your desired viewing angle with the on-screen PTZ controls. Repeat steps 2 to 4 to add more preset positions.
Save
Click
, select a PTZ-supported camera, and click
Plus
button to add a preset position.
and specify the moving
to complete.
Speed
(if supported by your camera).
PTZ Control
.
27 Chapter 3: Monitor Camera Feeds
Page 28

6
Go to the
7
Click the
8
Enter a
seconds, and specify
9
Add preset positions from
sequence by clicking the Up or
10
Click
Patrol
tab.
Plus
button to add a patrol path.
Name
of the newly added patrol path, select the
Speed
Save
to nish the patrol settings. Now you can switch patrol paths from the
to adjust the moving speed level when patrol is executing (if camera supported).
All Presets
Down
Included Presets
list to
arrows.
Interval (sec.)
list using the
to have the patrol repeat after a specied time in
Right
arrow. Adjust the preset positions'
Patrol Panel
.
To automatically repeat the patrol path, please do the following:
11
Go to Surveillance Station
12
13
14
Click
Enter a
Click
Add
to create an action rule.
Name
of the action rule, and set the
Next
to continue.
Main Menu
Action Rule
>
Rule Type
.
as
Scheduled
.
28 Chapter 3: Monitor Camera Feeds
Page 29

15
16
17
18
Action device
Set the
Action
Click
Determine when the action rule you wish to be active by selecting cells on the grid. You can select an entire day by clicking
on a day and a specic time by clicking on the hour.
Click
Patrol
as
Next
Finish
. Specify the
to continue.
to complete the conguration.
as
Camera
Patrol
Device
, the
path you have congured and specify your preferred
as the PTZ camera with preset positions and patrol paths congured, and the
Loops per cycle
and
Interval
.
29 Chapter 3: Monitor Camera Feeds
Page 30

Stream Live Video to YouTube
Besides monitoring with
share your stream with others, simply launch
personal YouTube page.
For more details, please refer to Surveillance Station
Live View
, you can also share video streams to YouTube using the
Live Broadcast
, select a stream camera, and ll in the path information of your
Help > Live Broadcast
.
Live Broadcast
application. To
30 Chapter 3: Monitor Camera Feeds
Page 31

Chapter
Play Back Video Recordings
Besides viewing live feeds, Surveillance Station also supports various video playback features. This chapter introduces the
basics of operating
Timeline
Timeline
In
according to camera modes, recordings, or dates.
Timeline
, you can play back recordings that were captured with IP cameras and stored on your device. Videos can be ltered
.
4
No. Name Function
Displays video feeds from IP cameras. Click a camera feed to select it, and use
Controller Panel
1
2
3
4
Recordings Viewer
Left Panel
On-screen Buttons
Timeline
Controller Panel
Layout Panel
Filter Panel
Seek Panel
the
feed is highlighted with a yellow frame. Double-clicking any camera feed enlarges
the image of that feed. Double-clicking again returns to the normal layout.
Search for recordings based on the capture time. There are two columns: the left
represents all camera feeds; the right represents the currently selected camera
feed.
Controls for recordings playback:
1. Choose to play back recordings captured on specic dates on the calendar.
Dates with recordings are shown in blue.
2. Control recording playback with the buttons below the calendar, including play/
pause, fast forward/slow motion, next/previous, and next frame/previous frame.
Edit timeline layouts, or enable/disable layout related features. For basic
information on conguring layout, please refer to the
section above.
Filter the recordings you wish to view using the following options:
1. Select a specic recording mode on the timeline to lter out sections of time with
a specic recording mode.
2. Select the show events only option to lter out sections of time with events such
as motion detection, audio detection, and other events.
Specify the
specic time in a camera feed. You can also launch
accurate search results.
Hover the pointer over a selected camera feed to display the on-screen buttons.
Buttons will show according to the features supported by the cameras.
hour, minute
to change viewing options; the currently selected camera
second
, and
, and click
Congure Live View Layout
Go To
to quickly search the
Smart Search
to obtain more
For more information, please refer to Surveillance Station
31 Chapter 4: Play Back Video Recordings
Help > Timeline Playback > Work with Timeline
.
Page 32

View Multi-Channel Recordings
Timeline
can simultaneously view clips recorded by different cameras at different times to recreate the action ow of an event, or pinpoint
the exact time of a certain incident in your surroundings.
1
2
3
4
allows for specic-times selection, saving the you the effort of going through all clips to locate your target events. You
Set up a layout. You can either select a layout previously created in
Timeline
Launch
clips to be displayed on the timeline bar.
Note:
1. Time segments on the timeline will be marked in blue if events have occurred and grey if no events have occurred.
2. Under non-continuous recording modes, it is possible that no recordings will be generated when no events have
occurred within the day. In this case, the timeline bar will not be marked, and the system will automatically play
recordings from the most recent date.
Switch to
individual camera will have its own timeline.
Select a camera, and drag the right timeline cursor to adjust the playback time. Repeat until all cameras are at your ideal
timing.
and specify a date from the
non-sync mode
(the
Sync Mode
Controller Panel
button will turn grey) to display video feeds from different points in time. Each
Live View
. Surveillance Station will combine a series of recordings
or create a new one in
Timeline
.
5
You can also locate recordings via
Smart Search
Timeline Filter
or
.
Smart Search
If you are not sure of the exact time of an event, try using
clips of specic actions such as movement, missing or foreign objects, camera occlusion, focus lost, and no-idle zone.
1
2
3
4
5
Smart Search
Launch
Source
Under
Move the timeline cursor or use the
Under
If you select the
, select a recording to search through by selecting a server, camera, and date.
Congure
, specify the search type, sensitivity level, and object type.
Motion detection, Missing object
from
Timeline
or Surveillance Station
Seek
function to quickly move the cursor to a specic time.
Smart Search
Main Menu
Foreign object
or
to locate events.
.
, specify the
Smart Search
Detection Zone
can also help you nd
.
32 Chapter 4: Play Back Video Recordings
Page 33

6
Click to open the advanced search settings window if needed.
7
Click to start searching.
8
Click to expand the Result List.
For more detailed instructions, please refer to Surveillance Station
Timeline Filter
Help > Smart Search
.
If you have set up different recording modes for your cameras, try setting up the
1
Under the
location of the video feeds.
2
If you are only interested in viewing recording segments that contain events, you can select
second drop-down menu.
Filter
panel, select the recording modes you wish to view from the rst drop-down menu, then click on any
Filter
to locate the recordings.
Show Events Only
from the
33 Chapter 4: Play Back Video Recordings
Page 34

Chapter
Manage Video Recordings
Recording
In
locked to ensure important events are not accidentally deleted. You can also create archives to manage video les.
Manage Video Recordings
View Recorded Video Files
To play back a saved recording le in
Recordings are tagged with the
, you can view a list of footage recorded with IP cameras. Recording les can be played back, downloaded, or
Status
Recording
icons:
, go to the
List
tab, right-click on the video you wish to view, and click
Play
5
.
You can also dene what recordings are displayed from the top right
criteria according to source server, camera, recording mode, lock status, or start/end time.
Search
box. To quickly target certain les, set the lter
Truncate a Video File in Process of Being Recorded
If you wish to truncate the video clip which is being recorded, right-click on the clip marked "
the recording
Note:
Station
to immediately stop recording and archive the recorded portion.
Surveillance Station will start another clip for continuous recording. For more information, please refer to Surveillance
Help > Recording > List
.
- Recording
", and select
Truncate
34 Chapter 5: Manage Video Recordings
Page 35

Lock a Recording
Important recordings can be locked in order to ensure they are not accidentally deleted when the system wipes old les.
To lock recordings:
1
Right-click Select the cameras you wish to lock. The cameras cannot be marked "
2
3
Lock
Click
The locked clips will be marked "
Lock
>
to lock the selected cameras or category.
- Locked
".
- Recording
".
4
To unlock recordings, select a camera marked "
- Lock
", and click
Lock
Unlock
>
.
Manage Video Archives
Export Videos as an Archive
Export
In the
or eSATA interface. By specifying the camera and time range, recordings within the range will be exported as an archive.
1
Click
2
Name the archive and select a destination, then click
tab, recordings from Surveillance Station can be exported to any shared folder or external storage device via USB
Add
.
Next
.
35 Chapter 5: Manage Video Recordings
Page 36

3
Select cameras to export recordings, and click
Next
.
4
Select the date and time range, and click
Finish
to export.
Mount archives to Surveillance Station
Mount
In the
played in
To mount archives, click
tab, you can mount exported archives onto Surveillance Station. The recordings in mounted archives can be
Recording
and
Timeline
Add
, select your
.
Shared folder
and target archives, then click OK to mount.
36 Chapter 5: Manage Video Recordings
Page 37

Add a Recording Storage
In Surveillance Station, you can use existing shared folders or add new encrypted folders as recording storages. The following
section will take creating an encrypted folder as an example:
1
2
3
Add
Click
Select
Enter a
>
Add shared folder
Name
Add Storage
Description
and
.
and click
, and select a
Next
.
Location
from the drop-down menu.
4
If you wish to congure the maximum storage size of the recording space, tick the checkbox and specify the maximum size
limit.
5
If you wish to keep the shared folder used as the recording storage from appearing under "Network" in Windows File
Explorer, tick
6
Click
7
Encrypt this shared folder
Tick
8
Click
Hide this shared folder in "My Network Places"
Next
to go to the
Finish
to complete.
Advanced
page.
and set the encryption key.
.
37 Chapter 5: Manage Video Recordings
Page 38

Smart Time Lapse
Smart Time Lapse
you wish to see a quick overview of the all changes of a large-scale project, try launching the
from Surveillance Station >
Completed time lapse videos will be listed in the
condenses a video taken over a long period of time into a video that lasts for a few minutes or seconds. If
Main menu
and
Add
a task.
Recording
tab.
Smart Time Lapse
application
For more details, please refer to the corresponding articles under Surveillance Station
38 Chapter 5: Manage Video Recordings
Help > Smart Time Lapse
.
Page 39

Chapter
Work with I/O Module
Support for I/O module allows Surveillance Station to integrate with a wide range of devices with specialized features. You can
easily connect smoke detectors, LED lights, electromagnetic locks, and other products to operate Surveillance Station as a
centralized security system. This chapter describes how to add and manage I/O modules.
Install I/O Modules
1
Properly connect your I/O module.
2
3
4
5
6
7
Main Menu
Go to
Add
Click
Cameras
Click
circuit types in the normal state. Click
Click
a
b
c
Click
module, the I/O module must be in the same local area network with Surveillance Station.
Click
, and follow the steps of the
section in Chapter 2.)
Next
to edit
Next
to edit
To play camera recordings in the I/O Module Log tab.
Email notications with snapshots attached will be sent once digital input has been detected.
Preview video feeds from paired cameras on
Next
to edit time synchronization in
Finish
I/O Module
>
I/O port settings
Camera Pairing
to complete the setup. You will nd the information in the display window.
.
Add I/O Module Wizard
. You can determine whether to keep the original module settings, the I/O types, and the
Activate Output
. Paired cameras can be used for the following functions:
E-map
Advanced Settings
. (For more detailed instructions, please refer to the
to test if the
.
Trigger State
. If Surveillance Station is running as the time server for the I/O
is switched when the device is triggered.
Install IP
6
8
If you wish to modify the settings later, select your target I/O modules, and click
property from the corresponding tabs.
For more detailed instructions, please refer to the Surveillance Station
You can link devices that are connected to the I/O module with
other. Please refer to
Chapter 8: Action Rule
for more information on the setup.
Help > I/O Module > Congure I/O Module Settings
Action Rules
Edit
. You can change the settings of each
, allowing different devices to interact with each
Delete I/O modules
To remove an I/O module from Surveillance Station, simply select the desired I/O modules and click
Disable I/O modules
If you wish to temporarily end the connection with certain I/O module, select the desired I/O modules, then click
Disable
39
. Click
Enable
Enable
>
to resume the services.
Delete
.
Enable
.
>
Page 40

View I/O Module History
History
In the
• To play a recording, simply browse through the records and click the thumbnails to play. The recording of the camera will
play starting from 10 seconds before the occurrence of the event to 20 seconds after the event has ended.
• To remove certain logs, select your target I/O modules and click
• To save certain logs for record, select your target I/O modules and click
tab, you can view I/O module logs to have a better understanding of historical records.
Clear
.
Download
.
40 Chapter 6: Work with I/O Module
Page 41

Chapter
Notication
Notication
In
changes or when errors occur. This chapter introduces the basics of setting up notications and lists some major features.
Receive Notications Using Dierent Channels
Receive Notications via Email
1
Go to
2
Tick the
• If you select Gmail as your service provider, remember to
• If you wish to use a custom SMTP server, select
3
Tick
4
Tick
to receive messages in the
5
Click
6
Click
, you can set up notications to receive messages via email, SMS, or mobile devices when the system status
Notication
Enable e-mail notications
information. The SMTP server can be an IP address or a domain name. If it is a domain name, please make sure a valid
DNS server IP has been entered at
Attach an event snapshot
Enable email interval limit
Send a test email message
Save
to complete.
>
Email
.
checkbox, and enter the required information.
Log in to Gmail
Custom SMTP
DSM
Control Panel
>
if you wish to receive snapshots with notications.
If you do not want to receive too many messages. You can specify how frequently you want
Minimum interval between each message (minutes)
to see if your settings are correct.
Network
>
.
server from
Service provider
, and the server is connected to the Internet
eld.
and enter the required
7
41 Chapter 7: Notication
Page 42

Receive Notications via SMS
1
2
3
4
5
6
Notication
Go to
Tick the
Select an existing SMS provider from the drop-down menu or click
and enter your SMS account information.
Specify a
Tick
Click
Enable SMS notications
Primary phone number
Enable SMS interval limit
Save
to complete.
>
SMS
.
checkbox.
Secondary phone number
and a
if you do not want to receive too many messages.
Add SMS service provider
if needed.
to add a new SMS provider,
Receive Notications via Push Service
Note:
Before enabling push service, please make sure your Synology NAS/NVR can access the Internet using port 8089.
To use an email server hosted by Synology:
1
2
3
4
5
Notication
Go to
Send notications regarding system status via Synology's email server
Tick
Tick the
Click
verication email will be sent to the addresses you have specied. Please follow the steps in the verication email.
After verication, click
Enable email interval limit
Save
to continue. You will need to verify your email addresses before being able to receive push notications. A
Push Service
>
Send a test message
.
, and enter one or more email addresses.
checkbox if you do not want to receive too many messages.
to see if your settings are correct.
42 Chapter 7: Notication
Page 43

To enable mobile device notications:
6
Tick the
7
On your mobile device, install
8
Back in Surveillance Station, click
devices.
9
Click
10
Click
Note:
Synology product to the
Enable mobile device notications
DS cam
Manage paired DS cam
Send a test message
Save
to complete.
If you wish to receive notications from DSM, you need to install DS nder on your mobile device, and add this
to test connection.
My Favorite
list.
checkbox, and click
DS nder
or
and log into Surveillance Station.
Save
.
Manage paired DS nder
or
to see the list of all paired mobile
Congure Notication Settings
Set Up Notication Service Types
1
2
3
Notication
Go to
Surveillance Station
Select
how you wish to receive notications.
Save
Click
to apply settings.
Settings
>
or
.
DSM
, and tick the corresponding
Email, SMS
, or
Mobile
checkboxes of events to determine
43 Chapter 7: Notication
Page 44

Edit Notication Events
• To customize the contents of the notications, select an event from the
Settings
tab and click
Edit
.
• To specify when messages are allowed to be sent, select an event from the
Settings
tab and click
Edit Schedule
Manage Advances Settings
Advanced
In the
messages, mute notications, combine notications of the same event types, as well as edit notication variables.
tab, you can integrate notications for DSM and Surveillance Station, congure snapshots attached to email
.
For more detailed steps, please refer to the corresponding articles under Surveillance Station
44 Chapter 7: Notication
Help > Live View > Notication
.
Page 45

Chapter
Action Rule
Action Rule
workload. Action rules can be combined with features such as camera patrol and I/O module, and also notify you with the status
of various surveillance system events including lost camera connection or tampering.
Set Up Action Rule List
In the
provides a variety of rules that automate different surveillance functions which can help reduce the manual
List
tab, you can manage all your action rules.
8
As the setup of a
and Action Rule
Scheduled Action Rule
section above, the follow paragraph will take adding a
Triggered Action Rule
To add a triggered action rule:
1
2
3
Action Rule > List
Go to
In the Information step, enter a
Action type
from
Interruptible
•
Uninterruptible
•
action is complete.
Triggered
Select
: The newly triggered action rule will be executed instead of the originally triggered action rule.
, and click
.
: The rule will ignore other actions rules, continuing to execute the originally triggered action rule until the
Rule type
from
has already been demonstrated in the
Add
.
Name
, set the
, and click
Rule Type
Next
to continue.
Triggered
as
Triggered
Setup Scheduled Patrol with PTZ Control
rule as an example.
, and select either
Interruptible
Uninterruptible
or
45 Chapter 8: Action Rule
Page 46

4
5
Event
In the
the events to cancel.
Next
Click
to continue.
step, congure the
Settings
and
Events
. If you wish to set up more events, click
Add
. Click
Delete
to select
6
7
In the
and
Click
Action
Delete
Next
step, congure the
to cancel.
to continue.
Action device, Server, Device
and
Action
parameters. Click
Add
to add more actions
46 Chapter 8: Action Rule
Page 47

8
Set up a
Schedule
, and click
Finish
to complete.
For more details and limitations, please refer to Surveillance Station
Help > Action Rule > List
.
Track Action Rule History
History
In the
Station will generate a log each time an action rule is triggered. For scheduled action rules, Surveillance Station will generate
logs both at the start and end of a schedule.
Log types, recorded times, action rule names, action rule types, and action results are displayed. For
four states:
Finished
•
• Failed
Interrupted
•
View
Ignored
•
or another uninterruptible action rule executing the same action.
tab, you can view, clear, and download the automatically generated logs. For triggered action rules, Surveillance
Action Result
: The action rule was successfully executed according to specied settings.
: The action rule failed to execute according to specied settings.
: The originally triggered action rule was interrupted either by another user executing the same action in
or by another newly triggered action rule executing the same action.
: The originally triggered action rule was ignored due to either another user executing the same action in
, there are
Live
Live View
47 Chapter 8: Action Rule
Page 48

Modify Action Rule Storage
Advanced
In the
numbers.
tab, rotation rules can be adjusted to best suit your needs. You can set the rules by days, les sizes, and le
48 Chapter 8: Action Rule
Page 49

Chapter
Archive Vault
Archive Vault
In
chapter demonstrates the complete process of adding and editing tasks.
Congure Archiving Tasks
Add Archiving Tasks
1
Launch
2
Enter a
3
Select either
Schedule Execution:
•
One Time Execution
•
either
and specify when to execute the archiving task.
, you can manage archiving tasks and transfer recordings from other servers to your Synology device. This
Archive Vault
Name
Schedule Execution
Execute immediately
, and click
.
Add
.
One Time Execution
or
Execute the archiving task periodically.
: The archiving task will only be executed once. From the
to allow archiving tasks to be executed once it is added or
from the
Task type
drop-down menu, and click
Execute Time
drop-down menu, select
Execute at the specied time
Next
9
.
49 Chapter 9: Archive Vault
Page 50

4
Adjust
• You can click
• Tick the
Storage Settings
Management
Customize archive folder name
Rotation Rules
and
to open the
Storage
in the
Storage
tab and edit the storage space.
checkbox to specify a name for the archived recording directory.
step, and click
Next
.
5
Specify the source server, and enter IP address, port, username, and password.
6
Click
Next
to continue.
50 Chapter 9: Archive Vault
Page 51

7
Tick the checkboxes of the desired cameras, and click
Next
.
8
Specify archiving start time and recording time and click
9
Congure archive recording type in the
Specify Recording Type
• In
Video Reduction
• In
Summary
• In
option, only the recordings from the source server that are about to be rotated will be archived. The archiving process will
start one day earlier to avoid network bandwidth problems, therefore overlapping with the last day of the source server's
archiving range.
to obtain the complete recording le.
Specify Archive Range
, select recording modes to archive recordings.
, choose to enable
, choose to enable
Advanced
Event Summary
Next
.
step.
to archive event clips of the recordings, and disable
Archive range does not overlap with the source server
. By enabling this
Event
51 Chapter 9: Archive Vault
Page 52

10
Click
Finish
to complete.
Batch Edit Tasks
To edit tasks, simply select your target task and click
1
2
3
Archive Vault
Launch
Edit > Edit Batch
Click
Source of Attributes
In the
and click
Next
, and select the archiving task you wish to apply attributes to other archiving tasks.
.
.
step, tick the
Apply
Edit
. You can also use the
checkboxes for the attributes you wish to apply to other archiving tasks,
Batch Edit
feature to edit multiple tasks:
52 Chapter 9: Archive Vault
Page 53

4
Select the Archiving Tasks to Apply
In the
archiving tasks. Click
Finish
to complete.
step, tick the
Apply
checkboxes to apply the selected attributes to your
Congure Bandwidth Control for Archiving Tasks
Bandwidth Control
In
to the default unlimited bandwidth, two sets of speed limits are provided in
bandwidth limit and modify the schedule.
1
2 Congure bandwidth limit
3 Congure schedule
4
Bandwidth Control
Launch
grid. You can select an entire day by clicking on a day and a specic time by clicking on the hour.
Save
Click
, you can view and congure the bandwidth control schedule of the current archiving task. In addition
.
: Specify a bandwidth limit (in KB/s) from
: Select a set of speed limit, determine when this speed limit will be activated by selecting cells on the
to complete.
Bandwidth Control
Speed limit 1
and
. You can dene your desired
Speed limit 2
.
53 Chapter 9: Archive Vault
Page 54

Chapter
License
License
In
This chapter introduces the process of adding new licenses to Surveillance Station.
Install License on Surveillance Station
By default, a Synology NAS product comes with two free licenses, and depending on the actual mode, an NVR product comes
with multiple pre-installed licenses.
1
2
, you can view the installed surveillance device licenses and the number of licenses which you have already used.
Go to Surveillance Station
Add
Click
. After reading the agreement, tick the agree checkbox and click
Main Menu
License
>
.
Next
.
10
3
Select a server to which you wish to add surveillance device licenses, and click
Next
.
54 Chapter 10: License
Page 55

4
Enter or paste the license keys. Use + or - to add or delete keys.
5
Click
Finish
to complete the license installation.
6
After adding licenses, you can return to the
• If you need to manage licenses ofine, please install and log in to
surveillance device licenses oine?
• If you wish to migrate licenses to another Synology device, please remove the licenses from the current device and install
them on the desired NAS/NVR.
License
page to check details and statuses of each license.
for the complete steps.
DS cam
to operate. See
Can I install or delete
Purchase Licenses
For additional surveillance devices such as IP cameras, I/O modules, AXIS Door Controllers, and transaction devices, extra
licenses can be purchased.
For more information, please refer to
Surveillance Device License Pack
.
Note:
Neither the pre-installed licenses nor the surveillance device license pack will ever expire.
55 Chapter 10: License
Page 56

Chapter
CMS
CMS
(Central Management System) allows you to set your Synology NAS/NVR as a host server while adding multiple Synology
devices as recording servers to form a larger surveillance network. The host server will act as the central interface to monitor
cameras managed by other recording servers. You can also add multiple Synology devices as failover servers to maximize the
uptime of surveillance services.
Assuming that you are operating the current Synology NAS/NVR as the host server, this chapter explains how to manage
servers and migrate cameras.
Operate CMS Servers
Add recording servers
1
2
3
4
5
Add
Click
Enter a
According to your connection type, enter the
click the magnifying glass button to search for the Synology products within the same local area network.
Enter the admin's password.
Click
Add Server.
>
Name
, and select the
Test Connection
Connection type
to see if the server has been set up properly, and click
of the recording server.
IP address, Port
, or
QuickConnect ID
of the recording server. You can also
Next
.
11
6
Edit the advanced settings:
Failover setting
•
encounters abnormalities, CMS will automatically choose a failover server to take over the services of this recording
server with its original conguration.
Prevent other CMS hosts from pairing with this recording server
•
paired CMS host so that it cannot be added by other CMS hosts.
Prevent users on this recording server from making changes to it
•
servers by preventing users from performing any operations after login.
group on the recording server will only have access to the
Users without administrative privileges will not be able to view or modify any settings after login.
56 Chapter 11: CMS
: You can select corresponding failover servers. When you start a manual failover or the recording server
: This option locks the recording server from the
: This restricts access to the settings of recording
Advanced
admin
page, where they can modify this option afterwards.
or users belonging to the
administrators
Page 57

7
Click
Finish
to complete.
Manage Server Deployment
Once you have successfully added recording servers, they will be listed in the
actions such as editing, locking, disabling, and deleting to accommodate to your surveillance environment.
Recording Server
tab where you can perform
57 Chapter 11: CMS
Page 58

The operation mode of the host server can be modied in the
Host server mode
•
management system from a different domain.
Recording server mode
•
administrative privileges will not be able to view or modify any settings after login.
Failover server mode
•
switched to this mode.
Video relay over the Internet automatically
: Set
Prevent users on this recording server from making changes to it
: Tick
: All the congurations, recordings, and licenses on this server will be cleared when the server is
Advanced
tab:
as
Enable
if you may need to access a central
so users without
Note:
Before switching to the
Failover server mode
, please back up your data and keep the licence keys secure.
Camera Migration
Once you have set up a central management system, connected IP cameras from different servers can be migrated to other
servers.
To perform camera migration:
1
2
Add
Click
Drag or use the arrow buttons to move the cameras you wish to migrate from the left panel to the right panel, and click
(You can click the
.
Filter
icon and select a Synology server to help you nd your cameras faster.)
Next
.
58 Chapter 11: CMS
Page 59

3
Select the destination server.
4
5
For more information, please refer to the corresponding articles under Surveillance Station
Migration
In the
recordings together with the cameras.
Finish
Click
step, select a storage for future recordings, and determine whether to keep, delete, or move current
. Migration will start immediately and you will be able to see the progress in the
Status
Help > CMS
column.
.
59 Chapter 11: CMS
Page 60

CMS Failover
To optimize the uptime of surveillance services, you can add failover servers to take over services when a recording server
goes out. You can also determine how to fail back the services during the failover status once the recording server resumes
working.
Add Failover Servers
1
Go to
Main Menu
Application Center
>
to make sure
CMS Failover
Running
is
.
2
3
4
5
6
7
CMS
Go to
Enter a
According to your connection type, enter the
click the magnifying glass button to search for the Synology products within the same local area network.
Enter the admin's password.
Click
Click
Failover Server
>
Name
, and select the
Test Connection
Finish
to complete.
, and click
Connection type
to see if the server has been set up properly.
Add
Add Server
>
of the recording server.
IP address, Port
.
QuickConnect ID
, or
of the recording server. You can also
60 Chapter 11: CMS
Page 61

Manage Failover Settings
Added failover servers can be managed in the
Failover Server
tab.
Failover Setting
In the
Failover Range
the
For more information, please refer to the corresponding articles under Surveillance Station
white paper
.
tab, you can tick the checkbox to
, and determine whether to restore the recordings and snapshots taken during the failover status.
Enable automatic failover
when conditions listed below are met, set
Help > CMS Failover
or see the
61 Chapter 11: CMS
Page 62

Chapter
More Features
Surveillance Station also provides various applications to manage and integrate surveillance features such as recording,
notication, stream prole and action rules efciently. This chapter introduces some major features which can be applied
universally to help manage your monitoring system.
Home Mode
Settings in Surveillance Station should vary depending on whether or not you are on site. For instance, cameras should record
continuously and stop sending notications when you are present, but once you are away, cameras should record videos by
motion detection and resume sending notications. In
and action rule settings to meet the needs of various environments.
Activate Home Mode
Home Mode
or not you are on site, and automatically switches to
can be activated manually form the
Home Mode
Overview
Home Mode
, you can customize recording, notication, stream prole,
tab or by geofence location via
accordingly.
DS cam. Geofence
detects whether
12
Schedule
From
Schedule
One Time
>
Recurrence
>
.
, you can set up a xed schedule to enter
Home Mode
, or perform a one-time switch-on from
62 Chapter 12: More Features
Page 63

Settings
In
select which set of settings to enable and what devices to apply them to.
, you can modify
Recording, Notication, Stream Prole
, and
Action Rule
from the corresponding tabs, and
For more information, please refer to Surveillance Station
63 Chapter 12: More Features
Help > Home Mode
.
Page 64

E-Map
E-Map
allows you to upload maps of your surroundings to view the location of your surveillance equipment.
To add a map:
1
2
3
4
5
6
E-Map
Go to
Enter a
Upload
Click
From the left panel, drag the device links you wish to place on the uploaded e-map.
Hide device name
Tick
Click OK to apply settings.
List
>
and click
Name.
to upload an image le. The image will be displayed when the upload is complete.
Add
.
if you wish to hide the name of the items, and
Display small icon
checkbox to use smaller icons.
Once maps are created, you can click on the thumbnail to open the
E-Map Viewer
, or click on the device icons to see previews.
64 Chapter 12: More Features
Page 65

You can manage the e-maps from the
List
tab, or go to
Advanced
to set your display preferences.
For more information, please refer to the corresponding articles under Surveillance Station
Snapshot
Snapshot
To edit a snapshot:
1
2
allows you to track and edit all the snapshots taken from players (e.g.,
Snapshot
Go to
thumbnail shown after the snapshot is taken.)
Use the icons to edit the snapshot.
List
>
to select a snapshot, and click
Edit
Snapshot Editor
. (
Live View, Recording
can also be launched by clicking the
Help > E-Map
.
IP Camera
, or
).
3
Click the
Save
icon to save.
65 Chapter 12: More Features
Page 66

The
Advanced
tab provides options for you to congure the sorting, naming, display and archive rules of snapshots.
For more information, please refer to the corresponding articles under Surveillance Station
Log
Log
The
From
select logs and use the
To determine what events you wish to be written into the logs, go to
application allows you to view, clear, and download log messages.
Log
Log
>
, you can select a date and time from the left panel to see the detailed list in the right panel. You can also
Clear
and
Download
buttons to manage them.
Log
Advanced
>
and tick the corresponding checkboxes.
Help > Snapshot
.
66 Chapter 12: More Features
Page 67

The rotation and archive rules of the logs can be modied in the
Archive Settings
tab.
If you wish to save your logs to a syslog server, go to the
required information.
For more information, please refer to the corresponding articles under Surveillance Station
Log Sending
tab, tick
Send logs to a syslog server
Help > Log
, and enter the
.
67 Chapter 12: More Features
 Loading...