

Page 1
You are one of the very first recipients of this new machine! As we are still completing the updates to the
Owner’s and Tech Manuals, we wanted to provide some basic operating instructions to help you understand
the differences between this machine, and the Hydra you are familiar with. We have included the written
instructions below, as well as a more graphic Quick Start Guide for ongoing reference.
The Factory Settings for your machine are as follows:
Brew Group Temp: 203˚F
Steam Tank Temp: 250˚ F
Brew Mode: M (Fully Manual)
Save Mode: Locked
Temp: Fahrenheit
Enabled Programs: 1 & 2 (of 6)
PROGRAM 1:
Preinfusion 4 seconds
Ramp Up: 2 seconds
Ramp Down: 92%
Total Water Count: 280
PROGRAM 2:
Preinfusion 4 seconds
Ramp Up: 2 seconds
Ramp Down: 92%
Total Water Count: 380
Now, we suggest that you approach the machine and try the following steps, to begin to get
a feel for it. You can refer to the written instructions below, or skip to the Quick Start Guides
on pages 7-8 if you prefer a more visual process.
BREW HANDLE MOVEMENTS
1) We use the word SHIFT to indicate a quick press to the brew handle, and HOLD when you need 2.5 seconds or
longer to advance or change modes. NOTE: the brew handle now bounces back, rather than staying in a fixed
position
SHIFT Left- Start Brew
SHIFT Right- Stop Brew * YOU CAN SHIFT RIGHT TO STOP BREWING AT ANY TIME
HOLD Left - Cycle through Brew Modes (M - MP – VP on lower left corner of the timer)
HOLD Right - Save Icon Flashes in the lower right corner, as well as the Red Yield triangle in the center.
This indicates that SAVE mode is currently locked
Page 2

Now that you feel how the Brew Handle works, let’s engage with the different Brew Modes.
ABOUT THE BREW MODES
M = Manual Mode: The barista manually advances every brew stage
MP= Manual Program: The settings for Pre Infusion, Ramp Up, are set. The barista manually Ramps Down, and
stops the brew cycle (Just like the past Manual Hydra models)
VP= Volumetric Program: The barista only needs to start brew function. The rest is determined by the selected
program (As with the past Sabre models)
The machine arrives in M mode, so you can see and feel the advance of each brew stage.
Give it a try without any coffee first. Watch as each shift left advances the brew graph to
the next column.
BREWING IN M MODE: (Reference Row 1A on the Quick Start guide)
1) Shift the brew handle to the left to begin brewing at line pressure NOTE: the brew handle now
bounces back, rather than staying in a fixed position
2) Advance to Ramp Up by pressing left again
3) Shift left to get to 9 Bar extraction
4) Shift left one more time when you want to ramp back down to line pressure
5) Shift right to stop
Now, change the Brew Mode to MP, and run program 1.
CHANGING BREW MODES: (Reference row 1C on the Quick Start Guide)
1) Hold brew handle left for 2.5 seconds and you will see the mode change MP
2) Holding for another 2.5 seconds will advance to VP
3) and another 2.5 seconds will get you back to M
4) Simply let go when you land on the mode you want
Page 3

Brewing in MP Mode: (Reference Row 2B of the Quick Start Guide)
1) Shift the brew handle to the left to begin Pre Infusion
2) When set Pre Infusion time ends, Ramp Up time automatically begins
3) When Ramp Up time ends, full brew pressure automatically engages
4) Shift left to Ramp Down, when desired
5) Shift right to stop brewing
You will see that the machine keeps running until you advance through Ramp Down stage
and once more to stop the brew cycle.
Now, change the Brew Mode to VP by holding left again. Choose Program 1 or 2 by shifting
right. You will see, as these are the only programs enabled, they just toggle back and forth as
you repeatedly shift right. Run one, and then the other, in any order. Once you have run
one program, shift right to switch to the other. The Total Water Count on program 2 is 100
counts higher, so you will see that shot run longer.
Brewing in VP Mode (Reference Row 2C of the Quick Start Guide)
1) Shift the brew handle to the left to start the shot
2) The program will then take you through all brew stages, and stop automatically
VP Mode does it all for you.
Next, change the Brew Mode back to M by holding left again. Now we can set you up to
work on your own recipe!
Pick up the wired controller, scroll through & read the screens to learn your way around a
bit. You will need to get to Level 2 Menus to enable Save Mode, and any more of the 6
programs you might wish to add.
Page 4
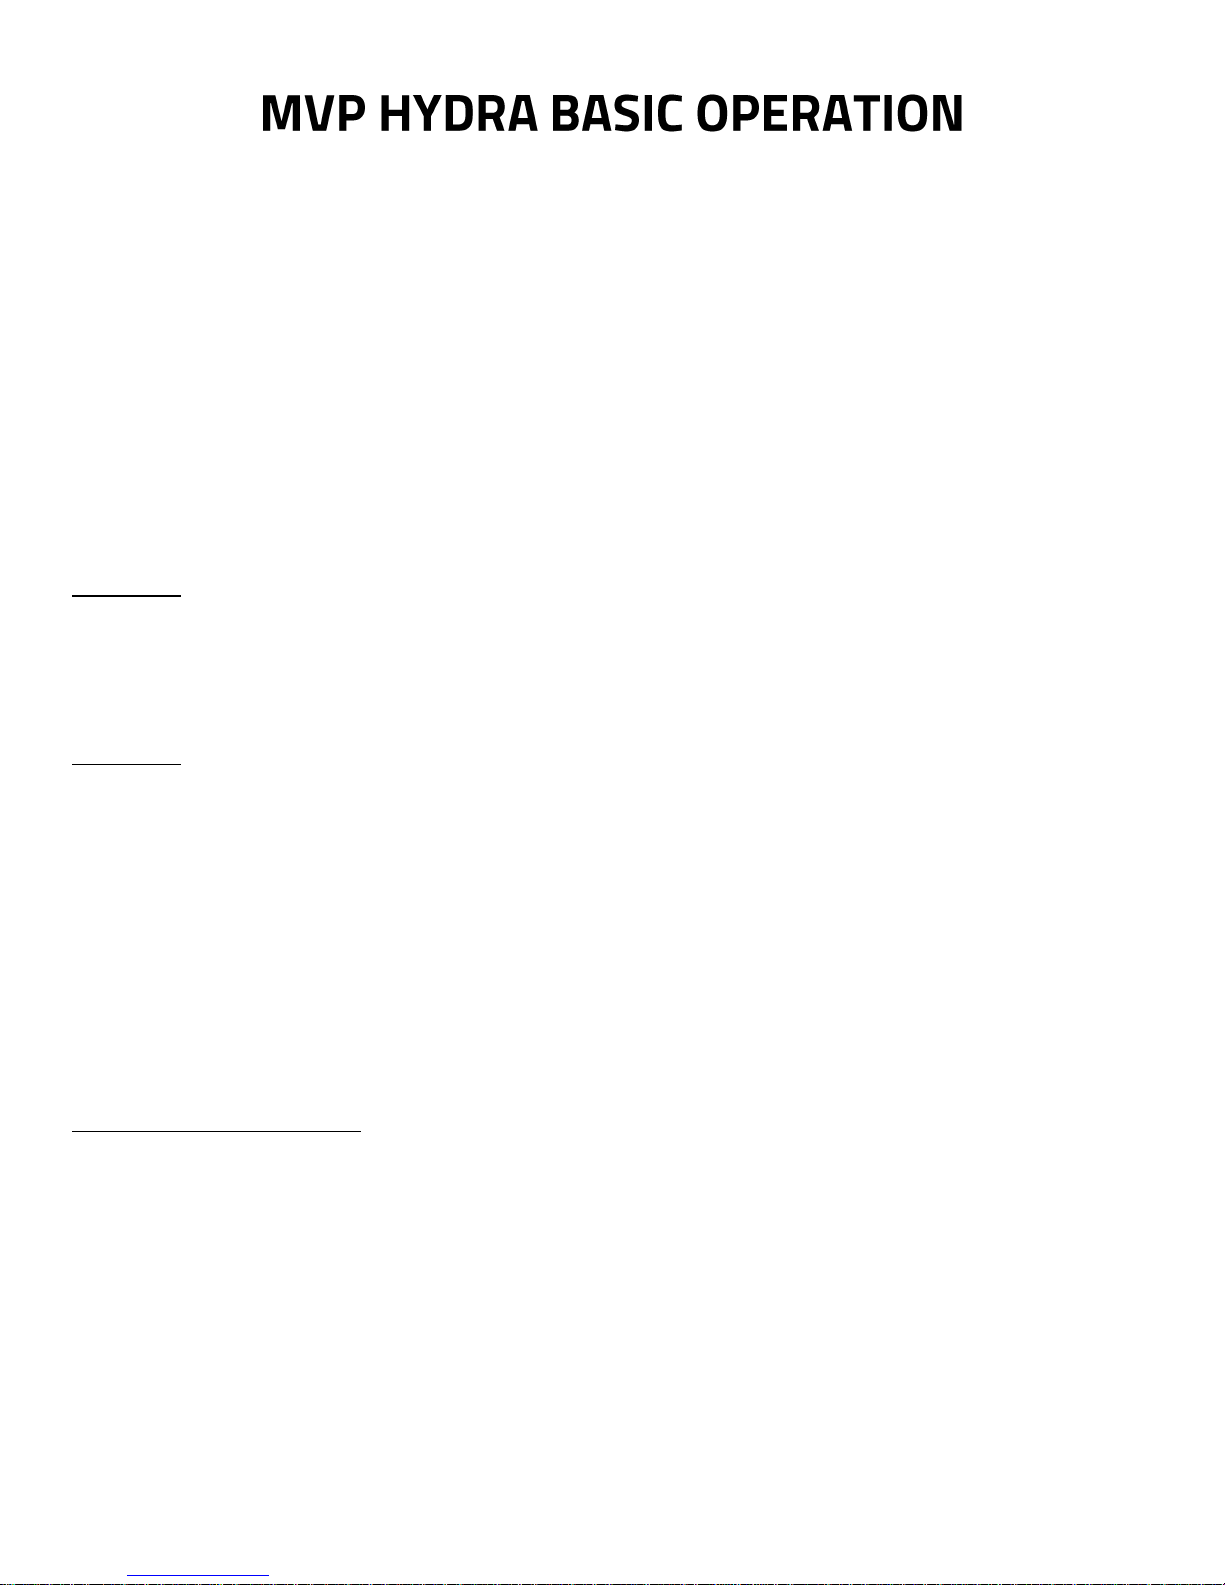
To enter Level 2 menus:
1. Press and release the home button in the upper right to return to the “temperature overview”
screen
2. Press and hold the home button, while you also press and release the 3
button (lower left side)
3. Release the home button
You should end up here:
rd
line
1. Push the button to the left of the word LOCKED to select that line
2. Scroll to change to UNLOCKED
3. Push the middle left button again to deselect
Scroll down to reach the next page.
Page 5

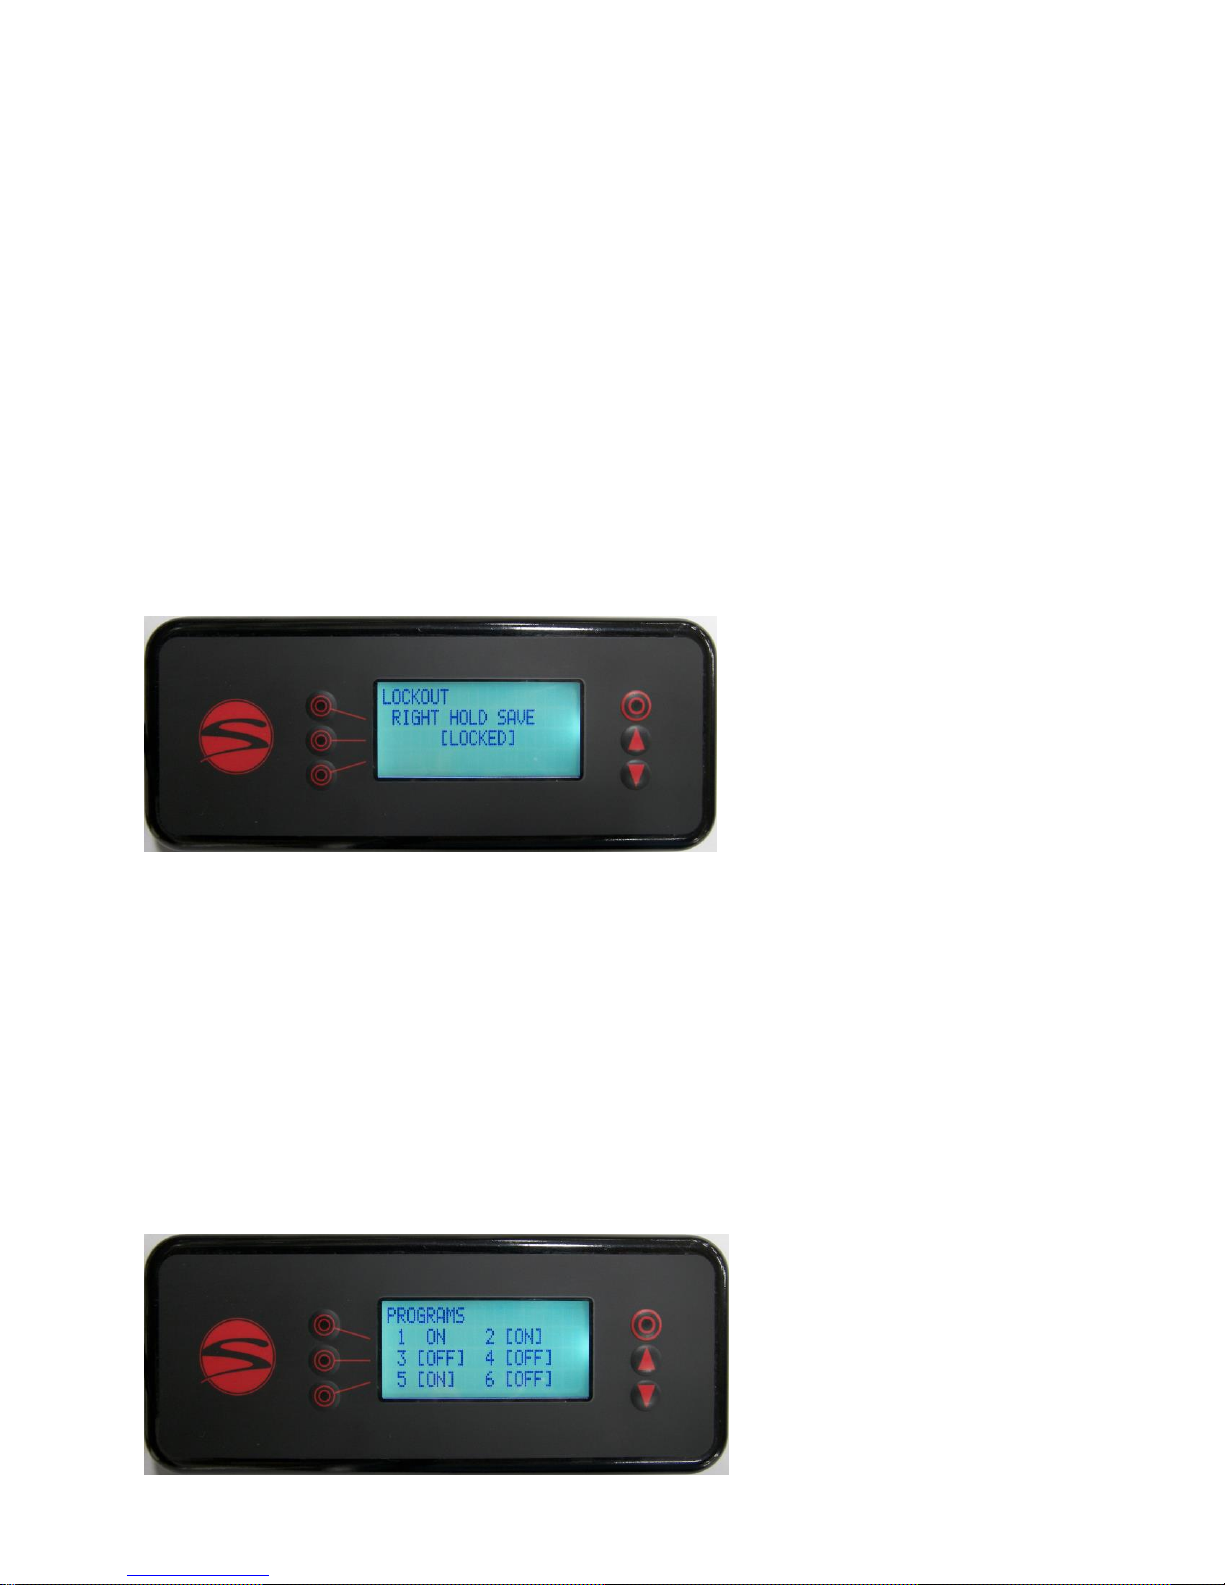
This is where you choose how many programs you would like activated on each group.
What you set on this screen will apply to all groups. As you see, 1 & 2 are already
enabled. If you would like to add or remove any options, you can do so here. Program
1 cannot be deactivated.
Scroll down until you get to the option to Return to Operation. Push the button to the left of
that text and you will go back to the Temperature Overview Screen (Home).
Prepare your coffee.
You should still be set to M mode. Brew in M Mode until you get to a shot that looks and
tastes right for your roast. When you achieve a recipe you would like to save, here is what
you do.
SAVING A RECIPE: (Reference row 1B on the Quick Start Guide)
Hold the brew handle to the right for 2.5 seconds to enter SAVE mode. You will see the green disk
appear on all groups
Shift right to advance through the enabled programs – each shift will move to the next enabled
program. Stop when you get to the one you want
Shift left to save the program to that position. You can repeat this at any position on any group
Hold right for 2.5 seconds to exit SAVE mode
**You are also able to reference and fine tune the parameters -Pre infusion, Ramp Up time,
Ramp down %, and Total Water Count - on the hand held controller. The addition of Total
Water Count is exciting because it illustrates the number of approximate pulses of the flow
meter per ml/g. So, if for example, you want to simply add a gram more water to your recipe,
you just add 5 counts to the TWC. Adjustments made with the hand held controller remain
until a new program is saved to that position.
Now, if you would like your team to be able to simply run this program as you have set it,
you can change modes to VP for maximum ease of repeatability.
Page 6

Hopefully this step by step tour gives you the foundation you need to use the MVP Hydra to
1
2
3
4
5
6
your desired end.
On the following pages you will find:
A description of the new timer
Our graphic Quick Start Guide for ongoing reference and training
A list of updates to the Hand Held Controller (in comparison to the most recent
Hydra)
THE TIMER:
1) There is a numeric counter that starts and stops with brew function, in a new one piece housing!
2) The bottom left corner shows which brew mode is currently selected. M (fully Manual), MP (Manual
Program) or VP (Volumetric Program)
3) The four column Brew Graph at the bottom center shows the 4 stages of brew function- Pre Infusion,
Ramp Up, Pump Pressure, and Ramp Down.
4) The dots that frame the counter show enabled programs ( 6 available) *note that program lights are
disabled in M mode, unless you are saving the last shot brewed
5) There is a disk icon that comes up in the bottom right corner when you hold right to enter save mode.
An arrow pointing left shows that you shift the brew handle left to save to the displayed position
6) A red triangle flashes in the center when flow of water is blocked, or if Save Mode is locked, or if the
Low Level probe in the steam tank is dry
Page 7

1A
1B
1C
Page 8

2C
2B
2A
Page 9

1.2 (Menu Level 1, page 2)
Current program # is now listed
“Stage 1” has been renamed to “Pre-infusion”
“Stage 2” has been renamed to “Ramp Up”
1.3
Current program # is now listed
“Bypass” has been renamed to “Ramp Down”
Brew volume can be changed manually
To add one ml, add about 4.5 counts
Page 10

1.6
All auto-backflush selectors are all now on a single page
To enter Level 2 menus:
1. Press and release the home button to return to the “temperature overview” screen
2. Press and hold the home button, while you also press and release the 3
button (lower left side)
rd
line
3. Release the home button
2.1
We added an option to lock the ability to save a program from the group head
Page 11

2.2
Up to 6 programs can be made available on each group
Program #1 cannot be deactivated
Deactivated programs retain any settings stored, but are not available for further saving or brewing
replay until reactivated. The program location is also skipped (on the timer) when cycling through
programs with the right press
2.4
This screen only appears on machines with a line boost system installed
[AUTO] runs the boost motor when any water valves are open
[ON] runs the boost motor until a 5 minute time-out
[OFF] stops the boost motor from running at all
Page 12

2.5
The “puck temp” line has been removed
2.6
Steam tank fill delay setting has been relocated to this screen
2.8
Power save mode “start” and “end” time have been changed to “cool down” and “heat up” time to reduce
confusion
Changed the screen that appears while power save mode is active to show the heat up time
Page 13

2.9
As the arrow keys are now used to move between screens, you must first select [SCROLL] before you can use the arrows
to view other errors
 Loading...