

Page 1

SYNERGY MFG. 870 INDUSTRIAL WAY, SAN LUIS OBISPO, CA (805) 242-0397
INSTALLATION INSTRUCTIONS
PPM-8200 XJ LONG-ARM SUSPENSION
GENERAL NOTES:
These instructions are also available on our website; www.synergymfg.com. Check the website before
you begin for any updated instructions and additional photos for your reference.
Cutting and grinding of stock control arm brackets is required for installation.
Brackets can be bolted or welded on.
Loosely bolt all hardware in until all bolts have been started, then torque to spec.
This kit is designed to be run at a minimum of 4” of lift and requires the use of a 4” bump stop spacer to
prevent track bar interference at full compression travel.
A Slip Yoke Eliminator kit will likely be needed in the rear for lift heights above 4”
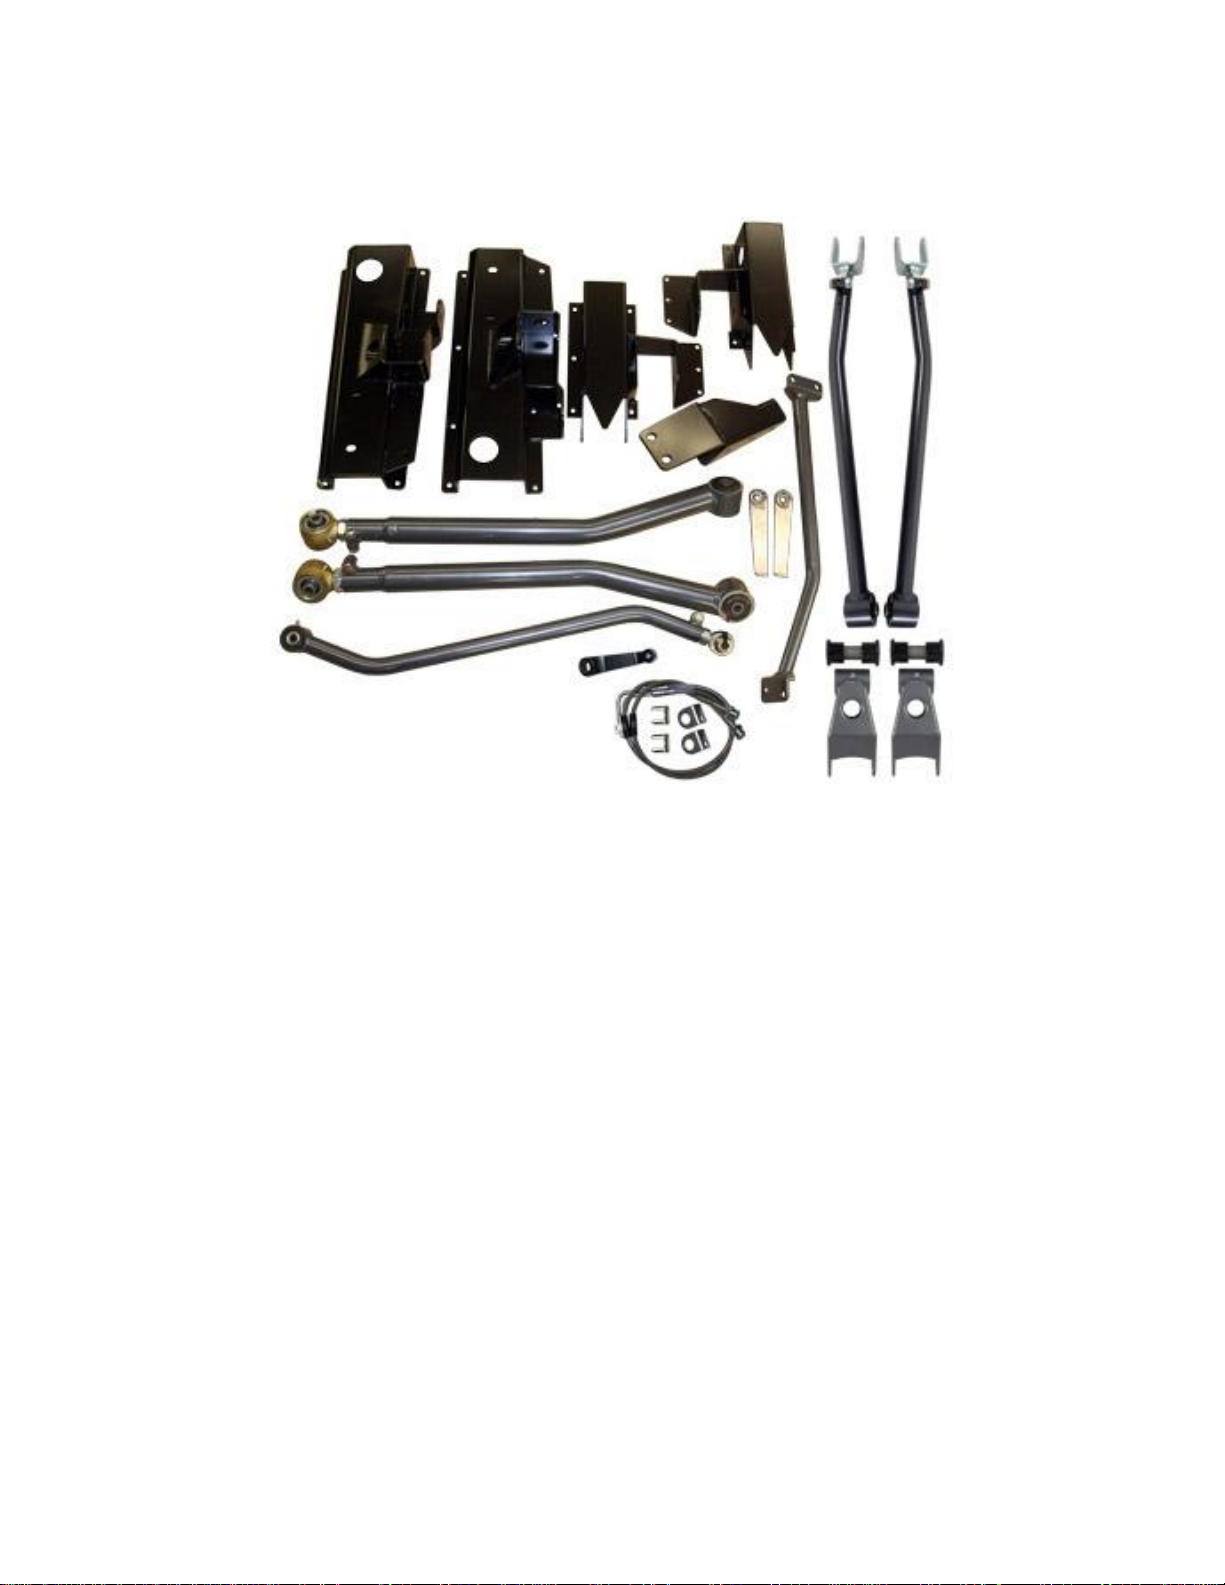
PARTS LIST:
8230– XJ LONG ARM FRAME BRACKET
(1) 823001-L
(1) 823001-R
(2) 823002 XJ Long Arm UCA nut tab
(12) 3/8-16 UNC x 1” long hex head bolt
(12) 3/8-16 UNC Nylock nut
(24) 3/8” flat washer
(4) 3/8-16 UNC x ¾” long thread cutting screw
(4) 9/16-12 UNC x 4” long hex head bolt
(2) 9/16-12 UNC Stover Nut
(6) 9/16” flat washer
(2) 9/16” lock washer
8231– XJ LONG ARM LOWER CONTROL ARM (PAIR)
(1) 8231-01-L Left Lower Control Arm, XJ Long arm (Assembled)
(1) 8231-01-R Right Lower Control Arm, XJ Long Arm (Assembled)
8232– XJ LONG ARM UPPER CONTROL ARM (PAIR)
(1) 8232-01-L Left Lower Control Arm, XJ Long arm (Assembled)
(1) 8232-01-R Right Lower Control Arm, XJ Long Arm (Assembled)
8233– XJ FRONT TRACK BAR BRACKET AND BRACE KIT
Page 2

(1) 823301 XJ Front Track Bar Bracket
(1) 823302 XJ Front Track Bar Brace
(4) ½-13 UNC x 1.5” long hex head bolt
(4) ½-13 UNC Stover nut
(8) ½” flat washer
8233-03 – XJ FRONT TRACK BAR
(1) 8233-03 XJ Front Track Bar (Assembled)
(1) 823304-01 XJ Track Bar Hole Gusset
(1) 823304-02 XJ Track Bar Nut Tab
8057-40 – JEEP JK/LJ/TJ/XJ/ZJ FRONT BUMP STOP SPACER KIT - 4.0" LONG
(1) 8057-40 4” Front Bump Stop Spacer (Pair)
(2) 3/8-16 UNC x 4.5” long socket head cap screw
(2) 3/8-16 UNC Flange Nut
8240– XJ REAR SPRING HANGER BRACKET (PAIR)
(1) 8240-01-L Left XJ Rear Spring Hanger Bracket
(1) 8240-01-R Right XJ Rear Spring Hanger Bracket
(20) 3/8-16 UNC x 1” long hex head bolt
(20) 3/8-16 UNC Nylock nut
(40) 3/8” flat washer
(2) 9/16-12 UNC x 4.5” long hex head bolt
(2) 9/16-12 UNC Stover nut
(2) 9/16” flat washer
3425 XJ/TJ/LJ/YJ DROP PITMAN ARM (3.75” DROP)
8254– XJ LONG TRAVEL 1” LIFT SHACKLE
(2) 825401 XJ Long Travel Lift Shackle (1 pair, assembled)
8260-01– JEEP XJ 1984-1989 BRAKE LINE KIT (5-7" LIFT)
OR
8260-02– JEEP XJ 1990-2001 BRAKE LINE KIT (5-7" LIFT)
Parts / Tools Needed to complete installation:
Basic simple hand tools.
Drill with 1/4”-3/8” metal cutting drill bit.
Spot weld Cutter. Part Number: 4096A11 on www.mcmaster.com for example.
Quality Jack and Jack Stands
4-1/2” angle grinder with cut off wheel, grinding disc and sanding disc
Plasma cutter / Oxy Acetylene Torch (Optional)
APPROXIMATE INSTALL TIME: 12-16 HOURS
TORQUE SPECS:
Page 3
1/2-13 UNC : 80 ft/lbs
9/16-12 UNC : 110 ft/lbs
3/8-24 UNF : 40 ft/lbs
1. Jack up the front of the vehicle by placing the floor jack under the center of the axle, support the vehicle
using jack stands and allow the front axle to hang free (keep the floor jack under the axle for the
duration of the installation). Remove the wheels, upper and lower control arms, trackbar, and coils.
Unbolt the shocks from their lower mounts.
2. Next, cut off the stock lower control arm brackets.
Page 4
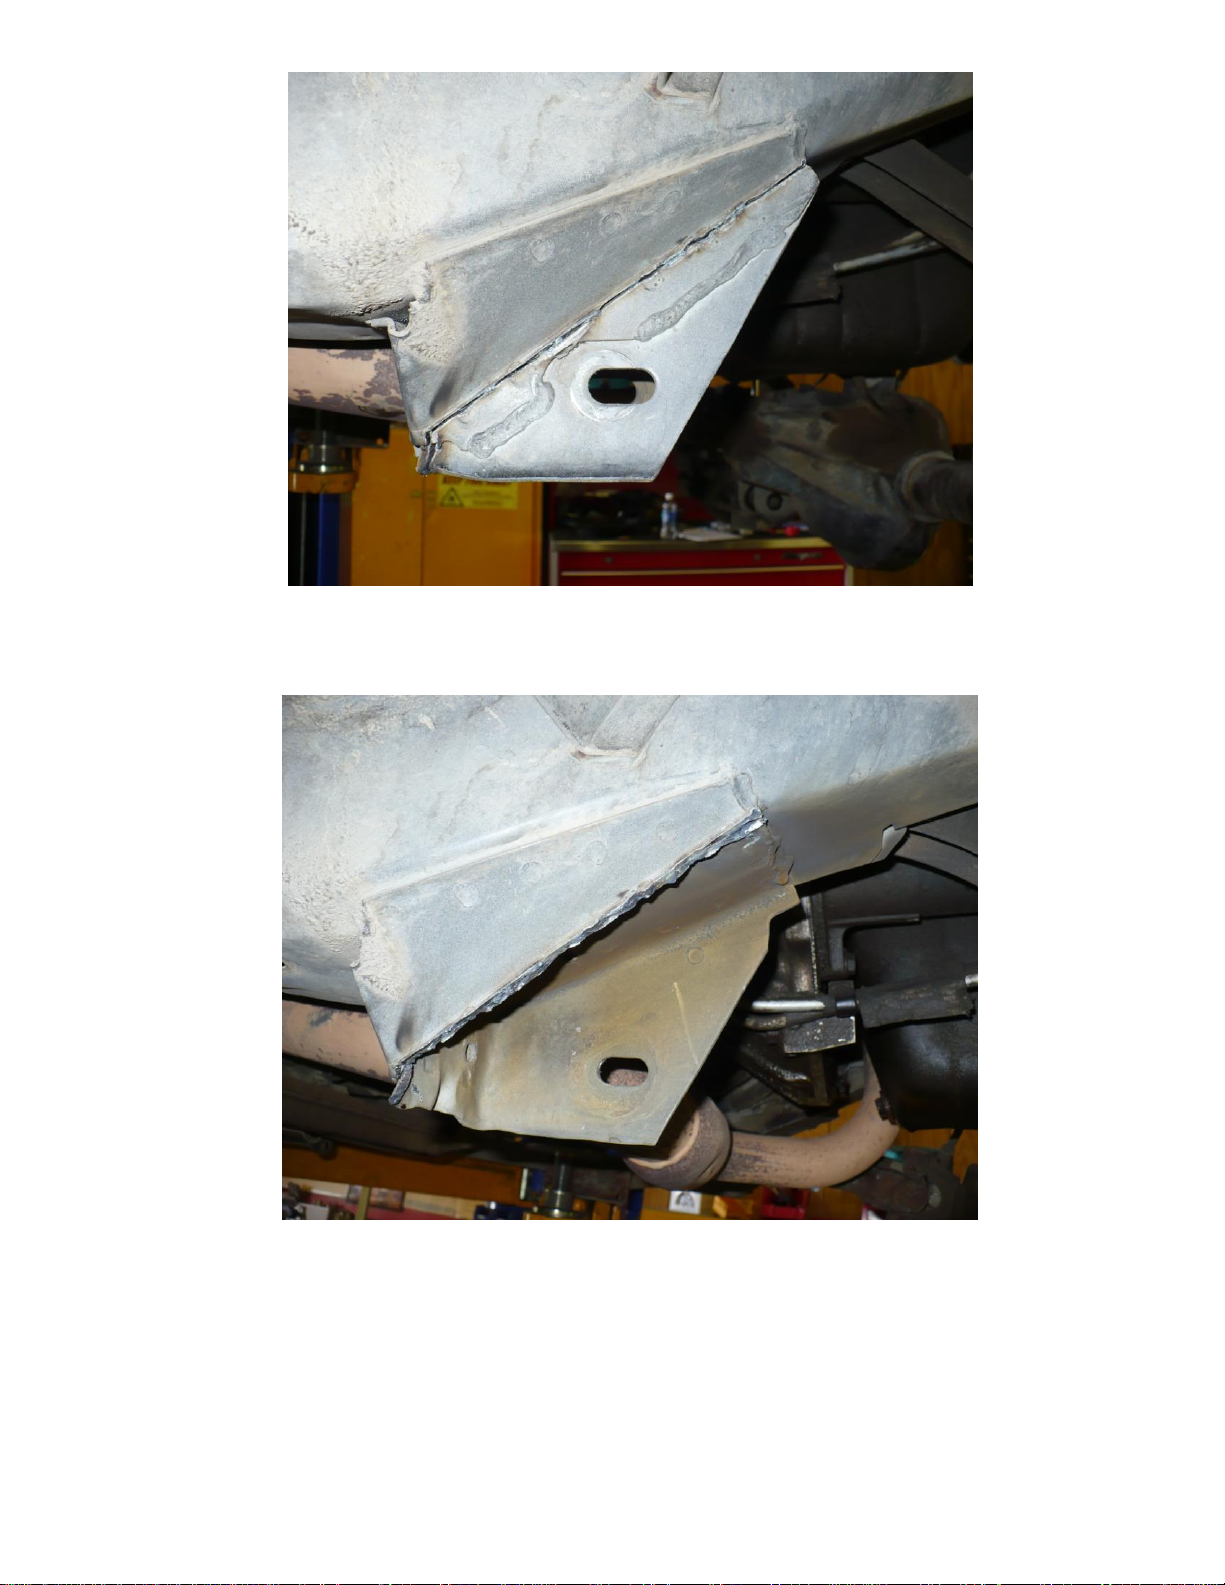
The control arm brackets consist of several layers of sheet metal and can be removed in approximately 4
cuts.
Cut 1 (Outer Edge):
Cut 2 (Back Edge):
Page 5
Cut 3 (Inside Edge):
Page 6
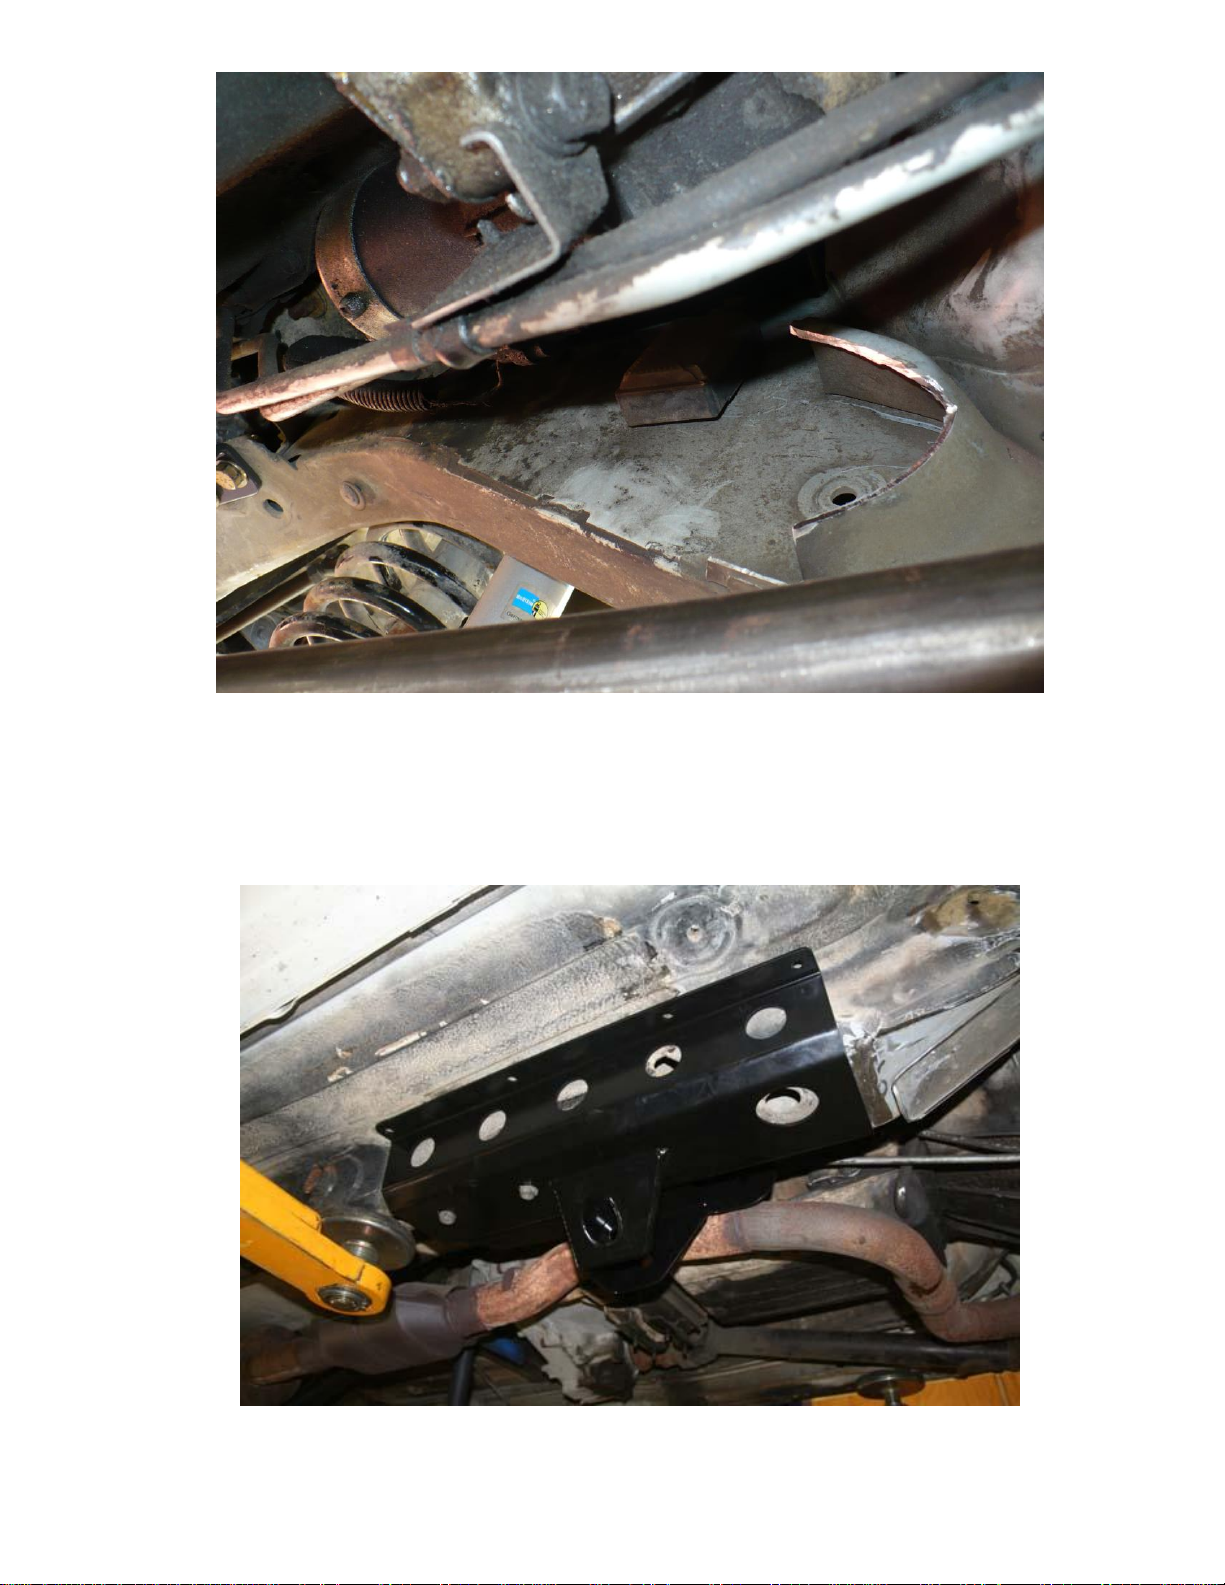
Cut4: Cut off any remaining pieces of the bracket so that the bottom of the unibody looks like this. This is also
a good time to grind smooth all edges.
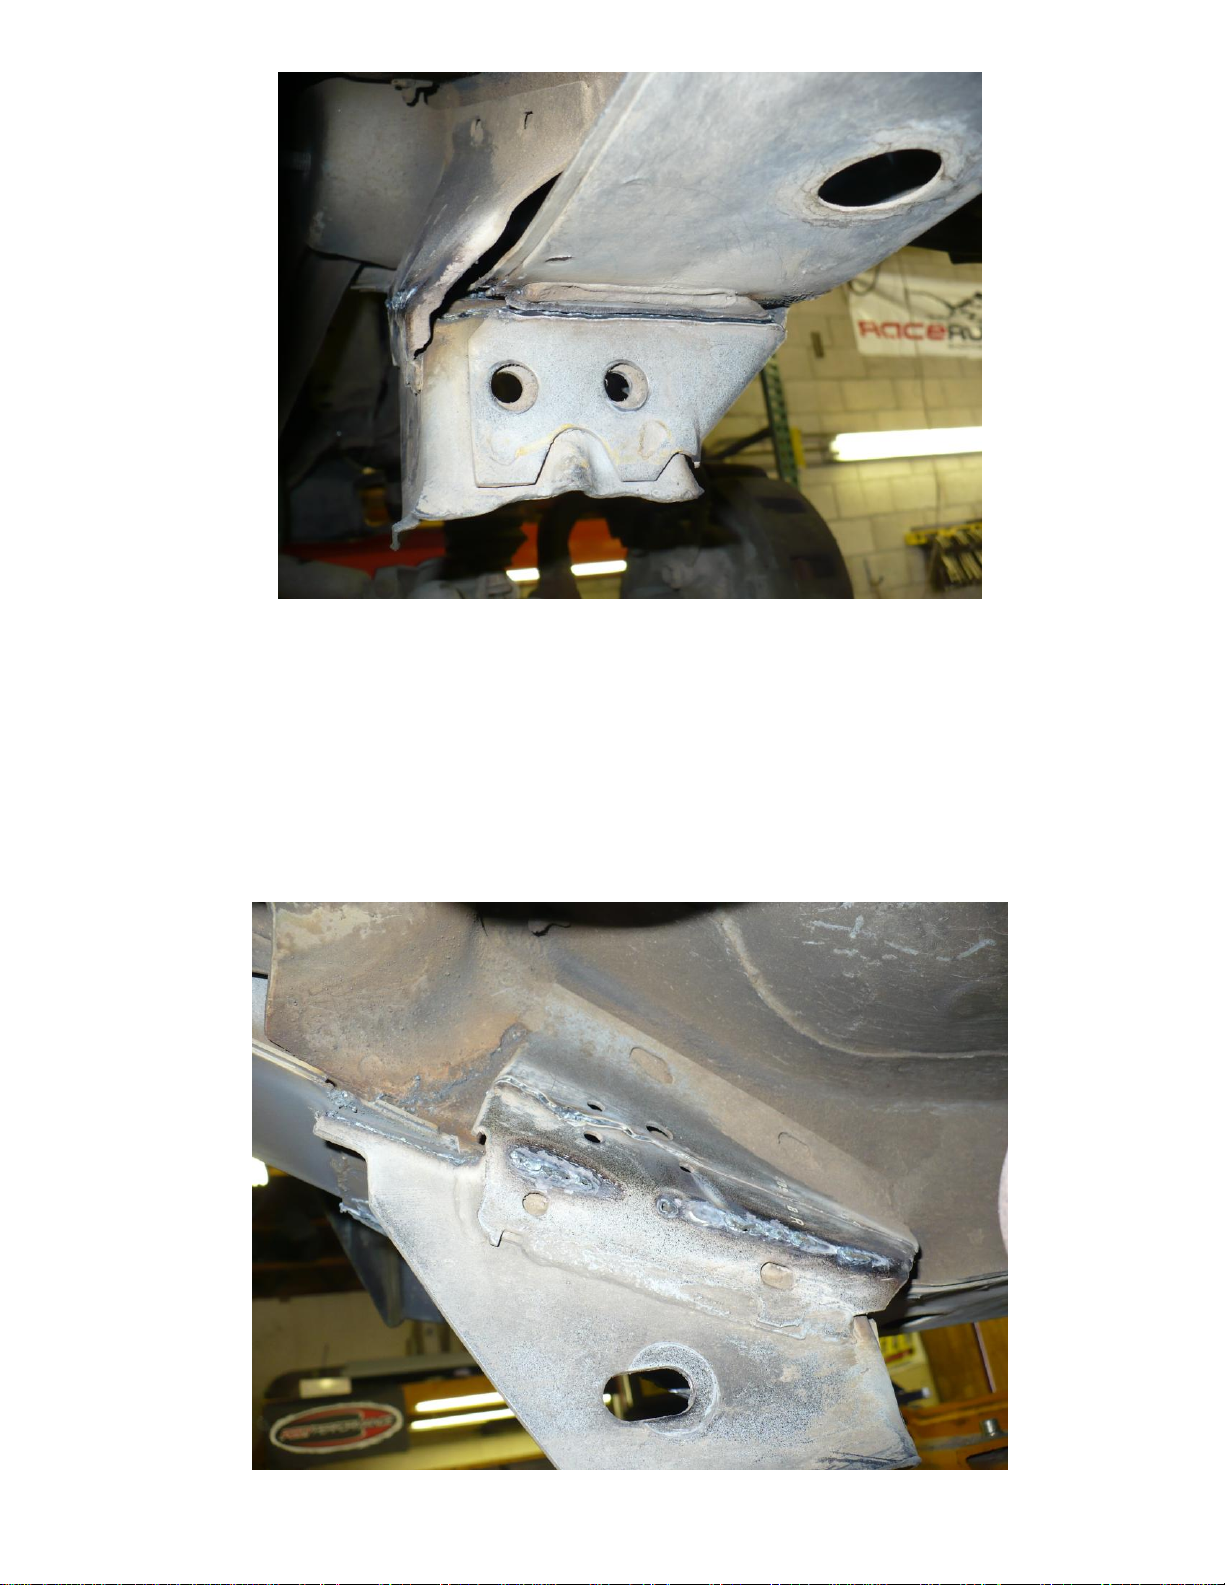
3) Trim upper control arm mounts as shown in picture.
Page 7
4) Once the stock control arm mounts have been cut / trimmed, installation of the new PPM-8230 control
arm bracket can begin.
5) First, support the transmission and remove the transmission cross-member. Fit up the PPM-8230
control arm bracket by bolting it to the body using the 2 transmission cross-member bolts as shown in
the picture. (Note, some trimming of the uni-body may be required depending on the year of the
vehicle. See 2nd picture below for reference on where to cut.)
Possible trimming of the unibody is required depending on vehicle yr. (Note, cut is made inside of ruler.)
Page 8

Close up of cut line.
6) NOTE: PULL UP CARPETING IN BOTH DRIVER AND PASSENGER FOOTWELLS PRIOR
TO DRILLING HOLES! This is much easier to do, by first removing the seats and plastic trim along the
door seam.
Page 9

7) Drilling mounting holes. Begin by drilling the 3 forward outer and inner holes to 3/8” This is easiest to
do with the bracket being held in place via the tranny cross-member bolts as described in step 5.
However, the 2 inner mid holes are easier to drill with the bracket removed, so mark and center punch
them after drilling all other holes, remove the bracket and drill these 2 holes last. The rear holes are to
be drilled to 5/16” since they utilize self tapping hardware. See picture for reference.
8) Fully bolt in the bracket once all 8 holes have been drilled. Drop the 3/8” bolts in from the top. Use a
washer under both the bolt head and under the top lock nut as shown above. The rear most holes on the
inside and outside of the bracket use the 3/8” self tapping bolts screwed in from the under side of the car
as shown. A fully installed bracket with transmission cross-member reinstalled should appear as
follows. See torque specs listed on pg 1 for settings.
Page 10

At this point, carpet and seats can be reinstalled into the vehicle as all drilling into the passenger compartment is
finished at this point.
9) Once the control arm brackets are installed, install the lower control arms (PPM-8231) into the vehicle.
Note, the Johnny joint bolts to the chassis, and the bushing side attaches to the axle. See picture for
bend reference orientation.
Arms bend out towards wheels and are bent up for additional ground clearance.
Page 11

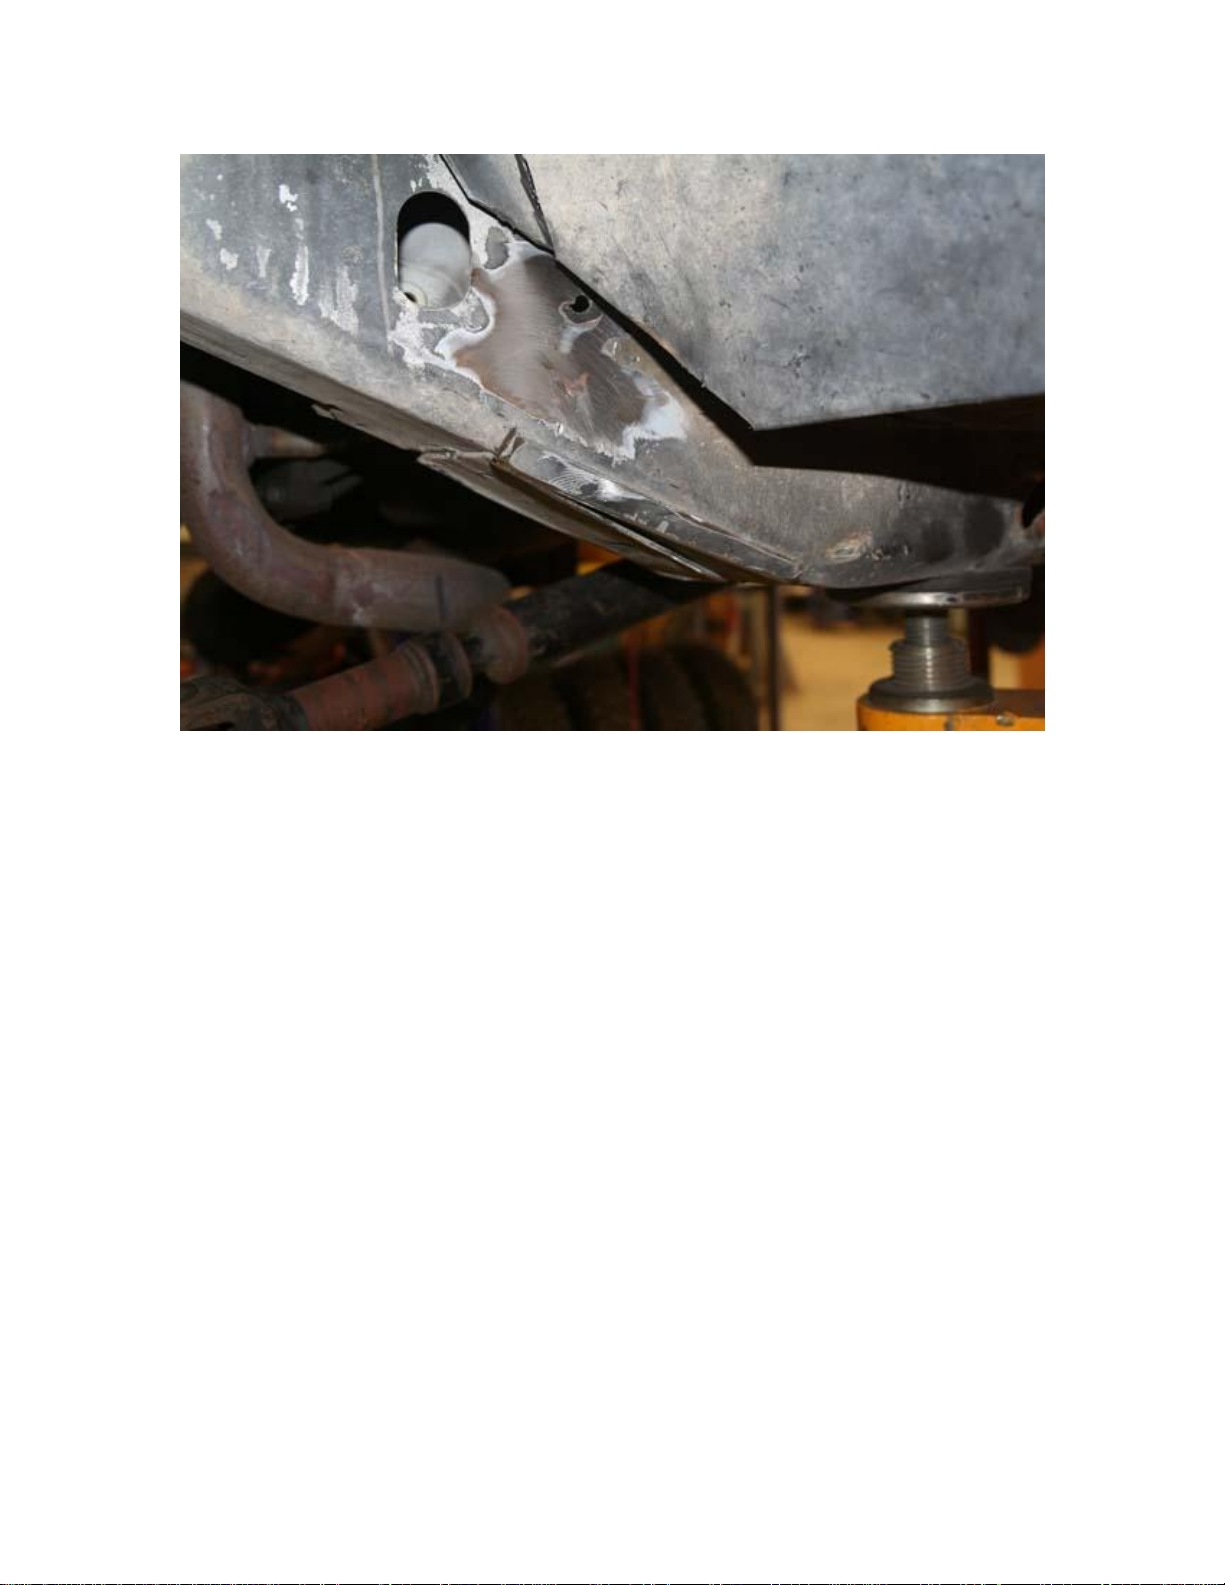
10) Next, install the upper control arms (PPM-8232). Again, see above picture for reference on arm
orientation. Slide the nut tab, 823002-01, between the control arm bracket and the unibody to bolt the
UCA to the chassis. See picture below for reference.
Slide nut tab between bracket and unibody to install UCA. Driver side may require some tweaking and
repositioning of the fuel and brake lines to install the nut tab.
Page 12

PPM-8233
TRACKBAR INSTALLATION
14) Remove the stock trackbar and track bar bracket on the chassis. The track bar bracket attaches to the
chassis via 2 outer 18mm bolts near the coil, and 2 18mm bolts on the underside of the chassis near the
motor mount. See attached picture. Remove the stock bracket and install the PPM-8233-01 bracket
using the same hardware as shown below.
Page 13

16) Before installing the PPM-8233-03 trackbar itself, the trackbar mount on the axle needs to be modified.
Begin by drilling out the trackbar bolt hole to 9/16”
After the hole has been drilled out to 9/16”, clean off the face of the track bar mount so the PPM-8233-04
track bar gusset can be welded in place. Align the gusset with the 9/16” bolt provided in the kit and tack
into place. Remove bolt and full weld gusset on, then repaint mount as desired.
Track bar gusset fully welded.
Page 14

17) The PPM-8233-03 track bar can now be fully installed.
18) Last of the kit to install is the PPM-8233-02 track bar brace. Install using the 4 ½” x 1.5” long bolts and
top lock nuts provided in the kit. Install all hardware loosely until all bolts have been started. The brace
attaches to the track bar bracket as pictured below. Use a washer under both the bolt heads and under
the top lock nuts.
The other end of the trackbar brace attaches to the opposite side of the chassis using the two existing holes in
the chassis and attaches uses the same hardware as shown below.
Page 15

19) At this time, install 8057-40 bump stop spacers. Follow instructions included with the 8057 kit for
details. This is also a good time to cycle shocks to make sure they are not acting as the bump stop.
20) Reinstall coils, shocks, and tires. Set caster to approximately 7 degrees at ride height. Torque all bolts
to specified settings on pg 1. Align front end.
21) Front suspension installation is complete.
PPM-8240
JEEP XJ REAR SPRING HANGER BRACKET
1) Begin by jacking the rear of the vehicle up by placing a floor jack under the center of the diff and securely
support the vehicle using jackstands to take the weight of the vehicle off the rear suspension. Leave the jack
under the rear axle for the duration of the installation process.
a. Remove the wheels, U-bolts, rear spring to shackle bolt, and forward spring to spring hanger bolt
and remove the leaf springs.
b. To prevent damage to the interior of the vehicle, lift up the carpet in the rear passenger footwell
as drilling into the vehicle will take place here. The bottom of the rear seat, and carpet
underneath it will also need to be removed to access some of the holes drilled and prevent
damage to the carpet.
2) With the rear springs removed, removal of the forward spring hanger can begin. Note that the forward
spring hanger is spot welded to the vehicle in many places. It is not necessary to remove every part of the
bracket and is not recommended since it is difficult to do without damaging the unibody around the hanger.
a. Start by cutting off the outer and forward portions of the spring hanger as shown in the following
2 pictures.
Page 16

Page 17

This is how the spring hanger should look after the first cuts.
3) Next, remove the inner part of the rear spring hanger by first locating the approximately 12 spot welds
holding the inner bracket on (6 on the face of the frame, 4 on the under side of the frame and 2 on the body
to frame rail seam).
a. Drill out the spot welds using at least a 3/8” diameter spot weld cutter being careful not to drill
through the unibody.
b. There is also a seam weld on the rear of the hanger that needs to be cut. A 4.5” angle grinder
with cut-off wheel works well, again try not to cut into the unibody.
Red Arrows indicate spot welds; black arrow indicates the seam weld. All of which need to be cut to remove
the inner part of the spring hanger cleanly.
4) Once welds have been cut, remove the inner spring hanger using either a hammer and chisel, or an air
hammer with a chisel end. Be careful not to damage the unibody if using an air-hammer.
Page 18

a. Note the red square near letter A which encompasses the remainder of the forward section of the spring
hanger. This piece of the bracket will need to be cut off for the new spring hanger to be installed. Cut
along the body to frame seam towards the outside of the body to remove this piece. A grinder with cut
off wheel works well.
b. Note the 2 orange cut lines near letter B. This weld nut will need to be cut off. Remove the torx head
bolt from the under side of the seat and cut off the weld nut.
5) Grind smooth the unibody and remainder of the bracketry so the new spring hanger can mount flush to the
frame and body.
Page 19

a. Test fit the new spring hanger and grind smooth any other interfering bracketry. (If welding the
bracket on as well, mark and clean the desired areas of the unibody where planning to weld. The
new hanger should fit snug to both the unibody and the bottom of the body itself.)
b. Note that the fuel and brake lines on the passenger side will need to be slightly moved so the
hanger can fit flush to the unibody.
c. Positioning of the hanger can be done 3 ways.
i. Utilize the hole in the unibody where the old spring bolt went through and line it up with
the hole on the new spring hanger for the spring bolt.
ii. Measure 3.75” from the front of the spring hanger to the nearest body seam in front of the
spring hanger.
iii. The spring hanger should only be able to go so far forward as the unibody gets wider in
front of where the new hanger goes. Position the hanger as far forward as it can go, it
will butt up to the widened portion of the unibody.
Page 20

6) With the hanger positioned, begin drilling the ten 3/8” holes, using the hanger as a guide to bolt the hanger
to the body
7) Once all 10 holes have been drilled, loosely start all ten 3/8” bolts. Drop the bolts in from the top, using
washers under both the bolt head and top lock nut. Once all bolts and nuts have been started, snug them
down and torque them to 40 ft/lbs.
Page 21

Top view of spring hanger bolts, looking down under the rear seat.
8) If welding of the bracket on is desired as well, clean the areas desired to weld (Up to the installer, the
following pictures is what is recommended for a simpler install. If building a Jeepspeed or serious
rockcrawler, more welding may be desired.)
Page 22

9) Paint any areas of bare metal exposed, secure fuel and brake lines and reinstall rear suspension.
a. Install the 4.5” long 9/16” bolt provided in the kit as the forward spring to spring hanger bolt.
Utilize the washer under the bolt head, and install the top lock nut on the back side.
b. Snug all suspension components enough to set vehicle under its own weight, Torque U-bolts,
forward and rear spring bolts once vehicle is sitting under its own weight.
i. Torque U-bolts to 95 ft-lbs
ii. Torque the forward and rear spring bolt to 110 ft-lbs.
10) Check all hardware after 500 miles of driving. We also recommend checking all hardware before and after
all offroad trips to avoid failure from loose fasteners.
11) Installation is Complete.
 Loading...