

Page 1
Sportline® and SYNC™ are trademarks of SPORTLINE,
a division of EB Sport Group, Hazleton, PA 18202
The Bluetooth® mark and logos are owned by Bluetooth SIG, Inc.
MapMyRun™ is a registered trademark of MapMyFitness, Inc.
All Rights Reserved. ©2013
Distributed in the UK by
EB Brands (UK), Worcester, WR4 9FA
SP3010IS01SYN
USER GUIDE
/INSTRUCTION MANUAL
WWW.SYNCACTIVE.COM
SYNC™ GPS harnesses the power of your smartphone and transmits the
data to the watch. Sophisticated GPS tracking, satellite-based speed and
distance, and a running tab on your calorie burn are now all at a quick
glance when you are in motion.
(Please visit www.syncactive.com/compatibility for a complete list of compatible devices.)
Downloading the MapMyRun™ Application:
If not already a MapMyRun™ user, you will need to download the FREE
application and register as a new user.
If you are an existing MapMyRun™ user, please ensure you have
downloaded the most recent version of the MapMyRun™ software by
checking your application updates.
For a complete tutorial regarding downloading, installing, and using the
MapMyRun™ application, please visit: www.syncactive.com/tutorial
ACTIVATING WATCH:
To save power during shipping, your watch has been deactivated.
PRESS & HOLD any button for 3 seconds to activate.
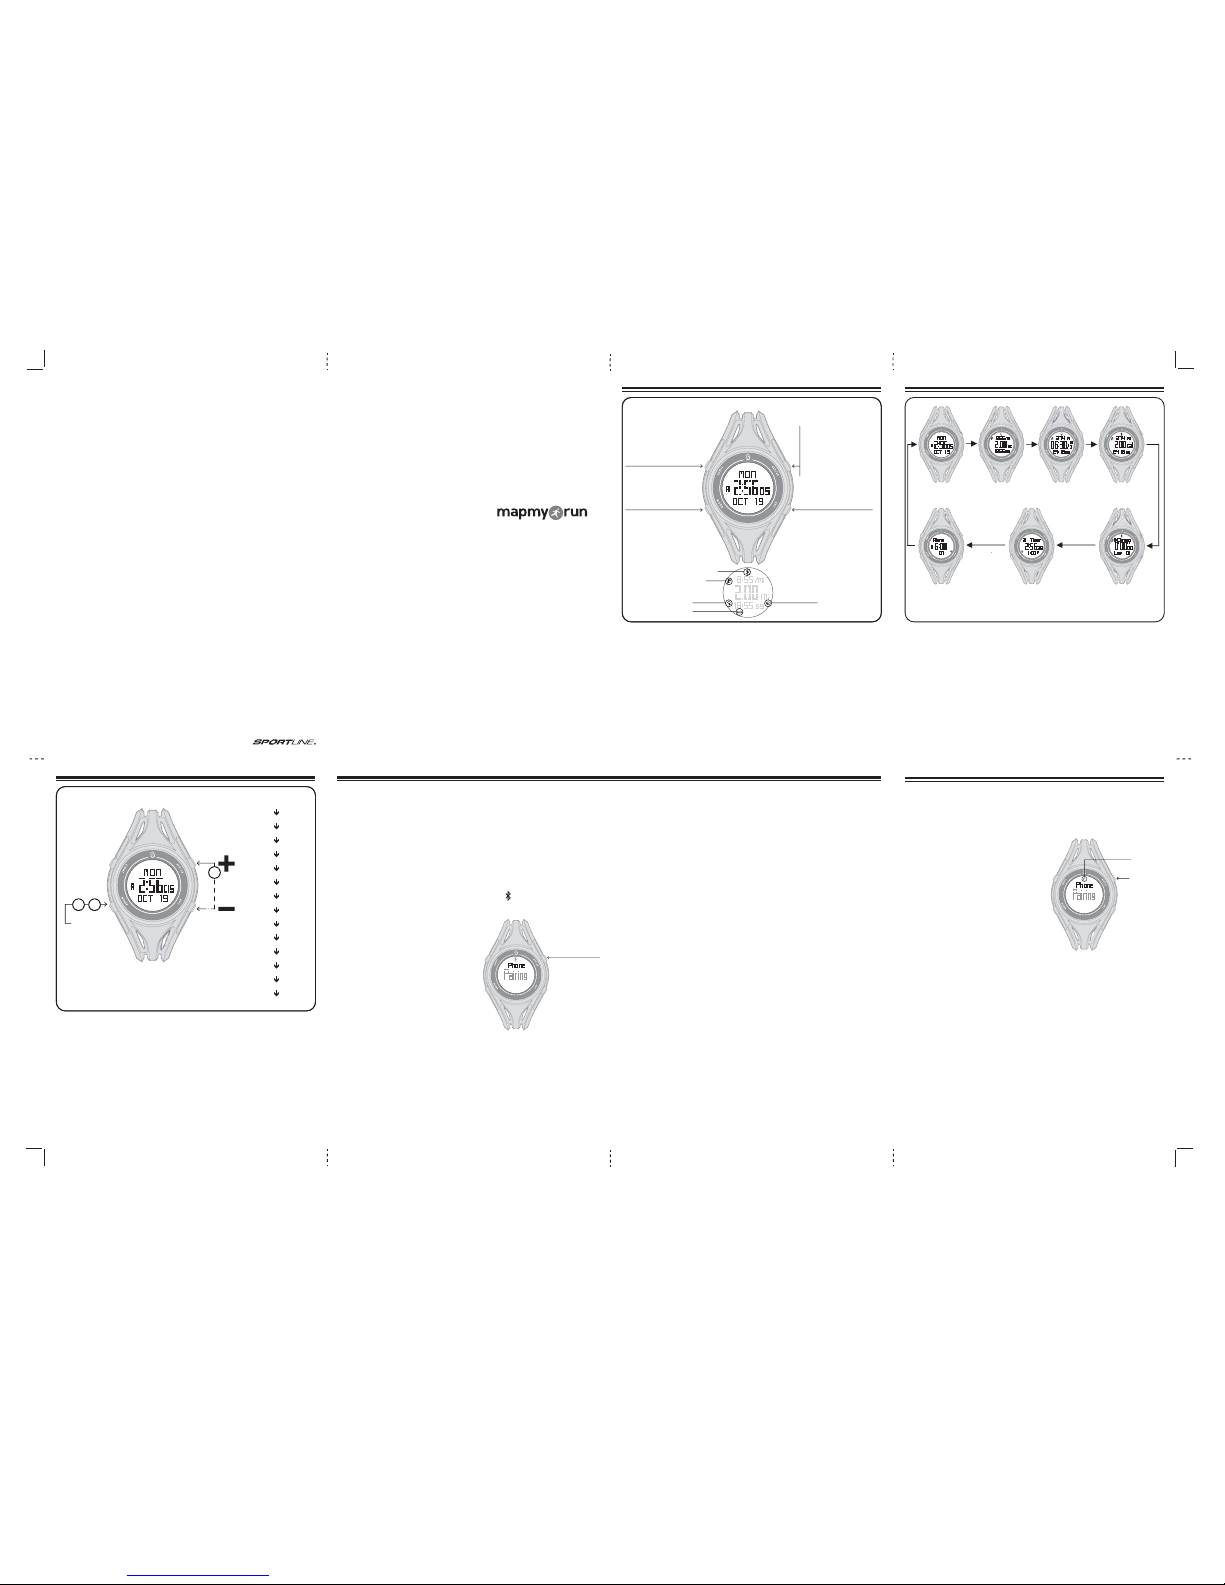
OVERVIEW 1 MODES OF OPERATION 2
54PAIRING YOUR WATCH
The SYNC™ GPS main modes of operation can be accessed by PRESSING the MODE
button.
TIME – Displays the day, time, date
DISTANCE– Shows distance covered during workout in main viewing area
PACE – Shows pace in main viewing area
CALORIES– Shows calories burned during workout in main viewing area
CHRONO– Stopwatch function
INTERVAL (Timer) – Series of programmable timers that allow you to enhance your
running routine
ALARM – Daily alarm
The SYNC™ GPS is designed to link with your smartphone and receive all of
the same fitness metrics that are being recorded and displayed by
MapMyRun™, including GPS accurate speed and distance.
TIME DISTANCE PACE CALORIE
TIMERALARM CHRONO
3SETUP | SYSTEM SETTINGS
PROGRAMMING THE WATCH:
1. PRESS & HOLD the MODE button for 3 seconds to enter the settings mode.
2. PRESS the START/STOP or LAP buttons (increase/decrease) to adjust the value of
the flashing setting.
3. Press MODE to confirm the value and move to the next setting.
4. You will automatically exit settings when all values are confirmed or PRESS &
HOLD the MODE button to exit early.
6USING MAPMYRUN™ AFTER PAIRING
LAP
•RECORDS A LAP
•CHANGES BOTTOM LINE
OF DATA IN WORKOUT SCREENS
•CHANGES TOP LINE OF DATA
IN WORKOUT SCREENS
[PRESS & HOLD]
LIGHT
START/STOP/RESET
•PAIRS WATCH TO PHONE
•STARTS & STOPS
TIMER, STOPWATCH
& WORKOUTS
•RESETS WORKOUT
(PRESS & HOLD)
SYNC GPS
TM
MANUAL WORKOUT
TIMER ACTIVATED
CONNECTED TO PHONE
ALARM ON
REPEAT TIMER
LOW BATTERY
PRESS MODE BUTTON (LOWER LEFT BUTTON)
HOLD FOR
3 SECONDS TO
ENTER SETUP
ACCEPT ENTRY
& GO TO THE
NEXT SETTING
HOLD FOR 3 SECONDS
TO EXIT SETUP
ADJUST
SETTING
VALUE
seconds
SYSTEM SETTINGS
hours
minutes
year
month
day
12/24hr
key tone
weight
contrast
stride length
height
unit of measure
birthday year
gender
2
1 3
! IMPORTANT: Due to continuous application enhancements, the included
instructions may be outdated. For the latest instructions, please visit:
www.syncactive.com/tutorial
After successfully pairing the watch, it should
automatically be detected by the application in
the future once the pairing button is pressed
on the watch.
1. Always ensure that Bluetooth is on in
the main phone settings and then open
the MapMyRun™ application.
2. On the watch, PRESS the top right
button (ST/STP) and the watch will enter
PAIRING mode (Fig.1) and then connect to the
phone.
3. From the main homepage of MapMyRun™
tap RECORD > START. The application will
begin recording your workout and the same
fitness data will be transmitted to your watch which you can view in the Workout
MODE screens. The Bluetooth icon on the watch should remain lit at all times to
indicate the watch is connected.
Note: If the watch does not seem to be paired and receiving data, go to the
MapMyRun™ Settings and select Heart Rate & Other Sensors > SYNC GPS
Watch and ensure that Sync™ GPS indicates "PAIRED" status. If it does not, you
will need to pair it again.
5. When you have completed your workout, press the stop button on the
application and all your data will be saved to MapMyRun™ . The data will not be
saved to the watch.
6. To unpair the watch from the phone go to the Time screen, PRESS the
ST/STP button to enter Pairing mode, then PRESS & HOLD the ST/STP button
again.
MODE
•CHANGE MODES
•HOLD TO ENTER
SETTINGS
Downloading the MapMyRun™ Application:
If not already a MapMyRun™ user, you will need to download the FREE
application and register as a new user.
If you are an existing MapMyRun™ user, please ensure you have
downloaded the most recent version of the MapMyRun™ software by
checking your application updates.
! IMPORTANT: Due to continuous application enhancements, the included
instructions may be outdated. For the latest instructions, please visit:
www.syncactive.com/tutorial
1. Within the main settings of your
smartphone, ensure that Bluetooth is
turned ON and that the Bluetooth
symbol is displayed at the top of
your smartphone screen (Fig.1).
Note: You will not see the SYNC™
GPS watch as a connection option in
the main Bluetooth settings, those
connections will be made inside the
MapMyRun™ application.
2. Open the MapMyRun™ application and
from the settings menu, select Heart Rate
& Other Sensors > SYNC GPS Watch.
3. From the Time screen of the watch, PRESS
the top right button (ST/STP) and the watch will
enter PAIRING mode (Fig.2).
4. On the application, tap the PAIR button and the application will begin
pairing with the device. It can take up to 15 seconds to pair. Sometimes it
may take 1 or 2 tries before pairing is successful.
5. The watch will display a "PAIRED" message once successfully paired,
and the Bluetooth icon on the watch screen and smartphone will remain
lit.
6. Once paired successfully, you may exit the settings screens back to the
homepage and begin using the MapMyRun™ application to actively record
your workouts.
For troubleshooting, please visit:
www.syncactive.com/tutorial
Notes:
To unpair your watch from your phone. From the Time screen on the
watch, enter Pairing mode by PRESSING the ST/STP button. Then PRESS
& HOLD the ST/STP button.
IN THE TIME SCREEN:
PRESS TO PAIR
PRESS, THEN PRESS
& HOLD TO UNPAIR
(FIG.1)
(FIG.2)
(FIG.1) PAIRING WATCH TO PHONE
IN THE TIME
SCREEN:
PRESS TO PAIR
PRESS, THEN
PRESS & HOLD TO
UNPAIR
CONNECTED
TO PHONE
= BLUETOOTH ON
SP3010IS01SYN
16” X 11”
8/13/13 Niko
Page 2
SP3010IS01SYN
16” X 11”
8/13/13 Niko
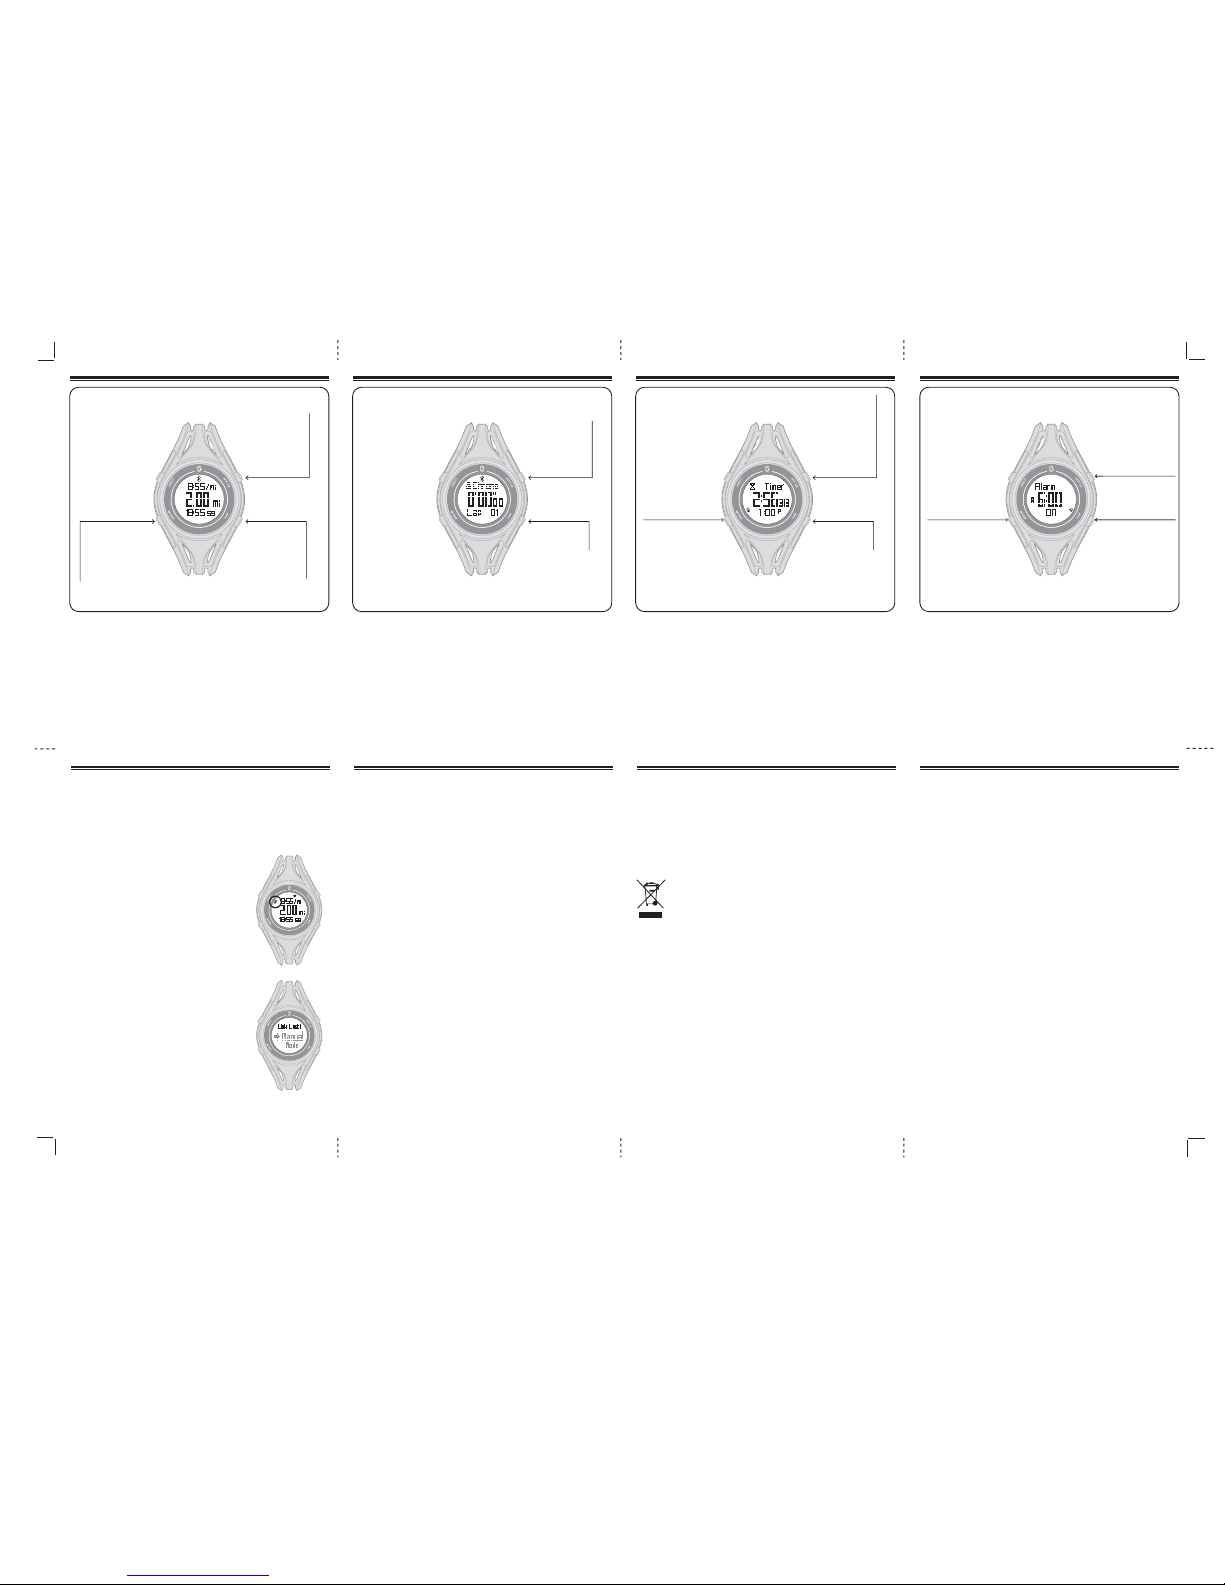
MODES | ALARM 109MODE | TIMER7MODE | WORKOUT (DISTANCE, PACE, CALORIES) 8MODE | CHRONO (STOPWATCH)
STOPWATCH:
1. From the Chrono screen, PRESS the ST/STP button to start or stop the stopwatch.
2. PRESS the LAP button to time a lap/split.
3. PRESS & HOLD the ST/STP button to reset to 0 (stopwatch must be stopped).
Note: To view LAP details before resetting. Stop the stopwatch, and then PRESS LAP
to cycle through the saved laps.
SET THE TIMER:
1. From the Timer screen, PRESS & HOLD the MODE button and you will enter
SETTINGS.
2. PRESS the ST/STP or LAP button increase/decrease the flashing value shown on the
screen and then PRESS the MODE button to confirm the value.
3. PRESS & HOLD the MODE button to exit the settings.
RUN THE TIMER:
1. From the Timer screen, PRESS ST/STP button to start or stop the timer.
2. PRESS & HOLD the ST/STP button to reset to the original value (the timer must be
stopped first).
After successfully pairing the chest strap and watch to your smartphone there are 3
different main workout modes you can choose from to display incoming data from the
application. In addition, the top and bottom row in each main workout mode can be
changed to a different metric.
1. From the chosen Workout screen, PRESS the LAP button to change the data shown
on the bottom row of the screen.
2. PRESS & HOLD the LAP button to change the data shown on the top row of the
screen.
PRESS TO SELECT
WORKOUT MODE
DISTANCE>
PACE>
CALORIES>
PRESS TO
CHANGE BOTTOM
ROW DISPLAY
PRESS & HOLD TO
CHANGE TOP ROW
DISPLAY
PRESS TO
ACTIVATE
MANUAL
WORKOUT TIMER
WHEN NOT
PAIRED TO
PHONE
PRESS TO
RECORD A
LAP OR SPLIT
PRESS TO
START & STOP
THE STOPWATCH
PRESS & HOLD
TO RESET
PRESS TO
DECREASE
FLASHING VALUE
PRESS TO
INCREASE
FLASHING VALUE
PRESS TO
START/STOP TIMER
PRESS & HOLD TO
RESET
PRESS TO
DECREASE
FLASHING VALUE
PRESS & HOLD TO
ENTER SETTINGS
PRESS & HOLD TO
EXIT SETTINGS
PRESS TO
DECREASE
FLASHING VALUE
PRESS TO TURN ON OR OFF
PRESS TO
INCREASE
FLASHING VALUE
PRESS & HOLD TO
ENTER SETTINGS
PRESS & HOLD TO
EXIT SETTINGS
SET THE ALARM:
1. From the Alarm screen, PRESS & HOLD the MODE button and you will enter
SETTINGS.
2. PRESS the ST/STP or LAP button increase/decrease the flashing value shown on
the screen and then PRESS the MODE button to confirm the value.
3. PRESS & HOLD the MODE button to exit the settings.
TURN ALARM ON/OFF:
From the Alarm screen, PRESS the LAP button to turn the alarm on or off.
MANUAL MODE
When your watch is not paired to your smartphone, or the Bluetooth link has been
lost, the built in accelerometer can be activated. This allows you to capture speed,
distance, and all the other fitness metrics without a smartphone.
NOTE: Manual mode does not allow your data to be saved and sent to MapMyRun™.
Activating Manual MODE (Fig.1):
1. Ensure the phone is not paired (no Bluetooth icon on
watch).
2. Select a Workout Mode (Distance, Pace, Calorie)
3. PRESS the ST/STP button and the running man icon will
appear signaling that the watch is now recording your
workout (Fig. 2).
4. Press the ST/STP button when your workout is finished.
5. PRESS & HOLD ST/STP to reset your workout to 0.
6. The top and bottom row display can still be changed by
pressing the LAP button for the bottom row, PRESSING &
HOLDING for the top row.
NOTE: If a warning is displayed that notes “FULL”, this
means that your workout timer is at the maximum and
must be reset to 0 (PRESS & HOLD ST/STP).
Bluetooth Link Lost (Fig.2):
If your watch loses the Bluetooth link to your smartphone,
and it cannot reconnect within 30 seconds, a warning will
flash notifying you that the link has been lost. Press any
button to clear the message. Then you can try to pair your
watch again, or follow the steps above to activate the
built-in sensors.
The device complies with Part 15 of the FCC Rules. Operation is subject to the following two
conditions: (1) this device may not cause harmful interference, and (2) this device must accept any
interference received, including interference that may cause undesired operation.
1. Changes or modifications not expressly approved by the party responsible for compliance could
void the user’s authority to operate the product.
2. NOTE: This product has been tested and found to comply with the limits for a Class B digital device,
pursuant to Part 15 of the FCC Rules. These limits are designed to provide reasonable protection
against harmful interference in a residential installation. This product generates, uses and can
radiate radio frequency energy and, if not installed and used in accordance with the instructions, may
cause harmful interference to radio communications. However, there is no guarantee that
interference will not occur in a particular installation. If the product does cause harmful interference
to radio or television reception, which can be determined by turning the equipment off and on, the
user is encouraged to try to correct the interference by one or more of the following measures:
• Reorient or relocate the receiving antenna.
• Increase the separation between the product and receiver.
• Connect the product into an outlet on a circuit different from that to which the receiver is connected.
• Consult the dealer or an experienced radio/TV technician for help.
GUARANTEE CERTIFICATE – For purchases made in the U.S.
If at any time within one (1) year from the purchase date of this product, it fails to perform properly
because of defects in material or manufacturing, return it prepaid to:
EB SPORT GROUP, 585 Oak Ridge Road, Hazleton, PA 18202
Complete this Guarantee Certificate and enclose it (or a copy of it) with the product.
(PLEASE PRINT CLEARLY)
NAME Phone
ADDRESS
STORE PURCHASED FROM
DATE OF PURCHASE PURCHASE PRICE
STATE ZIP
PROBLEM WITH PRODUCT
REPLACEMENT
This product has been carefully designed, manufactured and packaged. If any parts are missing or
damaged, please contact us at the address above and we will replace the unit at no charge.
(Guarantee does not cover crystal or battery.)
©2013 Distributed by Sportline®, Hazleton, PA 18202
For purchases made in the UK:
Should you experience problems with this item, please return it to the point of purchase. This will not
affect your statutory rights. Alternatively return it to the address shown below for a
repair/replacement.
EB Brands UK, Berkeley Business Park, Wainwright Road,
Worcester WR4 9FA
www.sportline.com
Distributed in the UK by EB Brands UK, Worcester WR4 9FA
CUSTOMER SUPPORT
If you have questions, comments, or need assistance, please feel free to
contact Customer Support by calling: 1-866-694-4575.
11MANUAL MODE
• This product relies on your smartphone to supply GPS accurate speed & distance
data through the Bluetooth link to the watch. The watch itself does not contain a GPS
receiver.
• The performance of this product, like most Global Positioning System equipment,
depends on the satellites operated by the government of the United States. The
satellite system may be subject to change which could affect the accuracy and
performance of this product and all GPS equipment.
• This product is an assistant device for navigation. It is NOT a substitute for getting the
navigating information from charts, maps, observations and experienced navigators.
DO NOT use this product for navigation that requires precise navigation or is used for
vital matters.
• This watch is water resistant to 50M, but submersion should be avoided.
• Avoid exposing the watch to extreme conditions for an unreasonable time and avoid
rough use or severe impact on the watch.
• Clean the watch occasionally with a soft and moist cloth.
• Do not expose the watch to strong chemicals as they will damage the watch.
• Store the watch in a dry place when it is not in use.
CHANGING THE BATTERY:
This watch requires one CR2032 battery.
To change the battery on the watch, remove the 4 screws securing the back plate to the
watch. Remove the spent battery and replace with a fresh CR2032 battery. Ensure the
O-ring remains in place and replace the back plate and the 4 screws.
Note: To preserve the water resistant properties of this watch, it is recommended that
the battery be changed by a local jeweler when available.
CAUTION, CARE & MAINTANCE 12
FCC COMPLIANCE
13BATTERY SAFETY 14LEGAL | WARRANTY
CAUTION – Battery Safety Information
• Do not mix alkaline, standard (carbon-zinc), or rechargeable (nickel-cadmium)
batteries
• Exhausted batteries are to be removed and disposed under proper regulation
• Do not mix old and new batteries
• Do not dispose of product in fire; batteries may explode or leak
• The supply terminals are not to be short-circuited
• Batteries are to be inserted with correct polarity
• Clean the battery contacts and also those of the product prior to battery installation
• As always, dispose of batteries in an eco-friendly manner
The purpose of the crossed-out wheelie bin symbol is to remind us that most electrical
products, and batteries, contain trace elements (including Mercury – Hg, Cadmium – Cd
and Lead – Pb) which could be harmful to our environment and therefore our health. We
must all be careful to dispose of them responsibly in a specifically designated way –
either using a collection scheme or into the correctly labeled civic amenity (NOT into
general waste) – this will help your local authority to arrange to recycle or dispose of
them in the appropriate manner.
(FIG.1)
(FIG.2)
HEADER> PACE>
SPEED> TIME> CALORIES> DURATION
 Loading...