

Page 1
116-081509-003-C-0
SPECIFICATIONS
• Dim Control Max Load: 10 mA Source/Sink
• Radio Frequency: 2.4 GHz (IEEE 802.15.4)
• RF Transmission Output Power: +15dBM
• Operating Temperature: -40 to +85 C
• Operating Humidity: 10 to 90%, non-condensing
• Dimensions: 2”L x 1.6”W X .3”H
(51 X 40.7 X 6.4 mm)
• Configuration/Programming: Stored in non-volatile
memory
CAUTION
• DIM10-087-00 Series controllers must be installed
in accordance with national, state, and local
electrical codes and requirements
NEEDED MATERIALS
• u.FL Insertion Tool: Part Number U.FL-LP-IN
from Hirose Electric (for DIM10-087-00 only)
• u.FL Extraction Tool: Part Number U.FL-LP-N-2
from Hirose Electric (for DIM10-087-00 only)
• u.FL Connector and 14mm bulkhead: A cable
with a u.FL connector on one end and a female
14mm bulkhead connector on the other end is
required to route the signal from the DIM10-08700 through the fixture housing to an external
antenna. Synapse has kits available for these
cables as part numbers:
KIT-ANTUFL18-01
KIT-ANTUFL18-02
KIT-ANTUFL18-03
KIT-ANTUFL18-04
Contact Synapse for further information.
• 50 OHM Terminator plug RP-SMA: Part Number
132360RP from Amphenol.
• Wiring Connectors: All existing wiring connectors
must be replaced with new UL listed wiring
connectors. All wiring connectors must be correctly
sized for the application and the number and the
size of the electrical conductors.
• Mounting: Secure with 1 #4 screw (max
diameter of .312 inches) and standoff.
• Mounting Options: Mount in an LED Fixture or a
Troffer. For the DIM10-087-00, an external
antenna utilizing a u.FL connector must be used to
provide RF connectivity to the SNAP mesh
network.
INSTALLATION INSTRUCTIONS
WARNING: TO AVOID FIRE, SHOCK, OR
DEATH: TURN OFF POWER AT CIRCUIT
BREAKER OR FUSE AND VERIFY THAT POWER IS
OFF BEFORE WIRING!
1. Place the DIM10-087-00 in desired location and
secure it using #4 sized screw and stand-off using
the mounting hole located in the center of the
board. Prior to permanently mounting the DIM10087-00, make sure the antenna is free of any
objects within 3 in. of the internal or external
antenna.
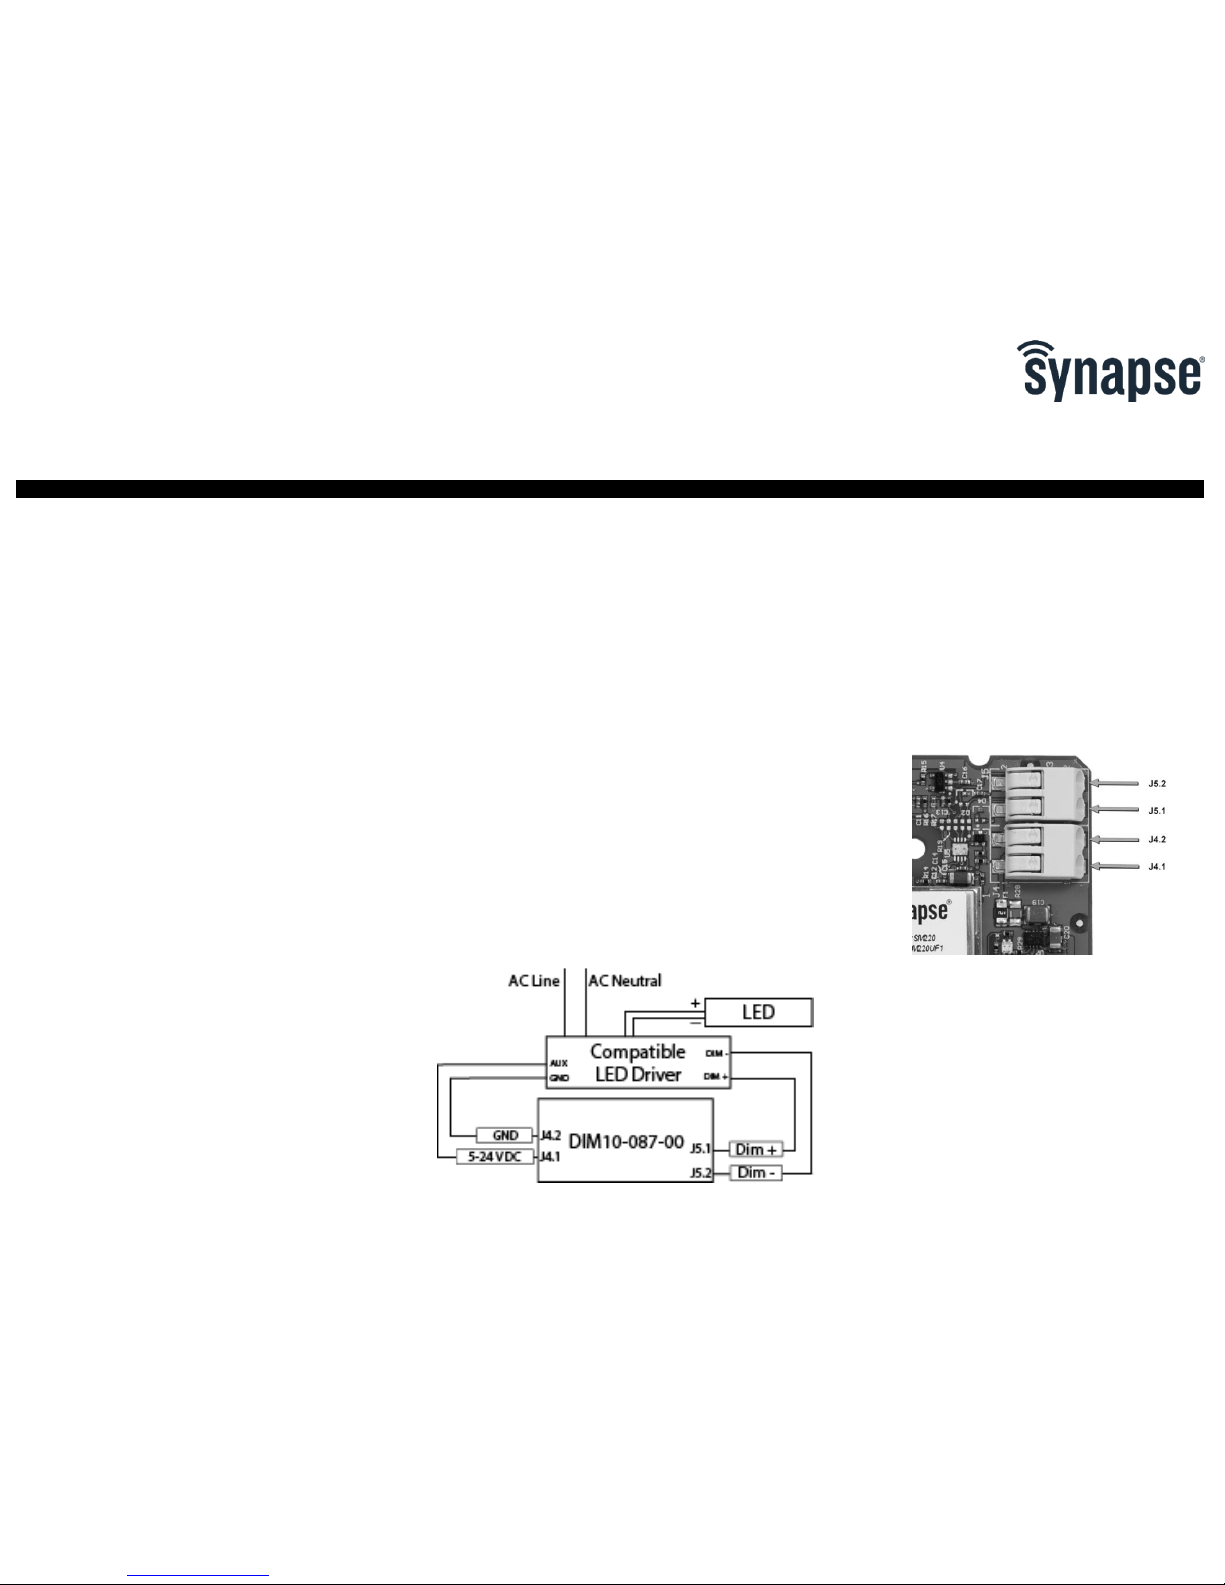
Figure 1 - Wiring Diagram
Note: When installing the DIM10-087-00 into an
enclosure, consideration of the internal or external
antenna position and interference is required in order
to provide the most optimum wireless signal strength.
2. Connect the 5-24VDC Aux output from LED
driver to terminal block pin J4.1 on the
DIM10-087-00. (See Figure 2 to better
identify terminal block pins.)
3. Connect the Aux ground from the LED driver
to terminal block pin J4.2 on the DIM10-087-
00.
Figure 2- Terminal Block PINS
Note: Steps 4-7 are for Class 1/2 Dimming
Control
4. Connect the DIM- wire on the LED driver to
the DIM- input on terminal block pin J5.2 on
the DIM10-087-00.
5. Connect the DIM+ wire on the LED driver to
the DIM+ input on terminal block pin J5.1 on
the DIM10-087-00.
WARNING AND CAUTIONS:
• TO AVOID FIRE, SHOCK, OR DEATH; TURN OFF POWER AT CIRCUIT BREAKER
OR FUSE AND TEST THAT POWER IS OFF BEFORE INSTALLING!
DIM10-087-00 Lighting Controller
Load Ratings: 1.2W @ 5 to 24V DC
Operating Temperature: -40 to +85 C / Operating Humidity: 10 to 90%, non-condensing
WARNING AND CAUTIONS:
• If you are unsure about any part of these instructions, consult an electrician; all
work should be performed by qualified personnel
• Disconnect power at circuit breaker or fuse when servicing, installing or removing
fixture or changing lamps.
INSTALLATION GUIDE
Page 2
116-081509-003-C-0
6. Switch power on to the fixture. The light
should turn on. Note: When switched on,
lamps should turn on to full brightness;
approximately 10 VDC signal on the DIM+
wire using the DIM- wire as reference.
7. Refer to the SimplySNAP User’s Manual for
information on provisioning the DIM10-087-
00.
CONNECTING THE u.FL CABLE
An u.FL antenna may be connected to the DIM10-08700 in order to get maximum RF connectivity. The
recommended antenna kits are:
• KIT-ANTUFL18-01
• KIT-ANTUFL18-02
• KIT-ANTUFL18-03
• KIT-ANTUFL18-04
Please see the DIM10-087-00 Series cut sheet or
contact Synapse sales for more information.
To install the antenna:
1. Make sure the power is off.
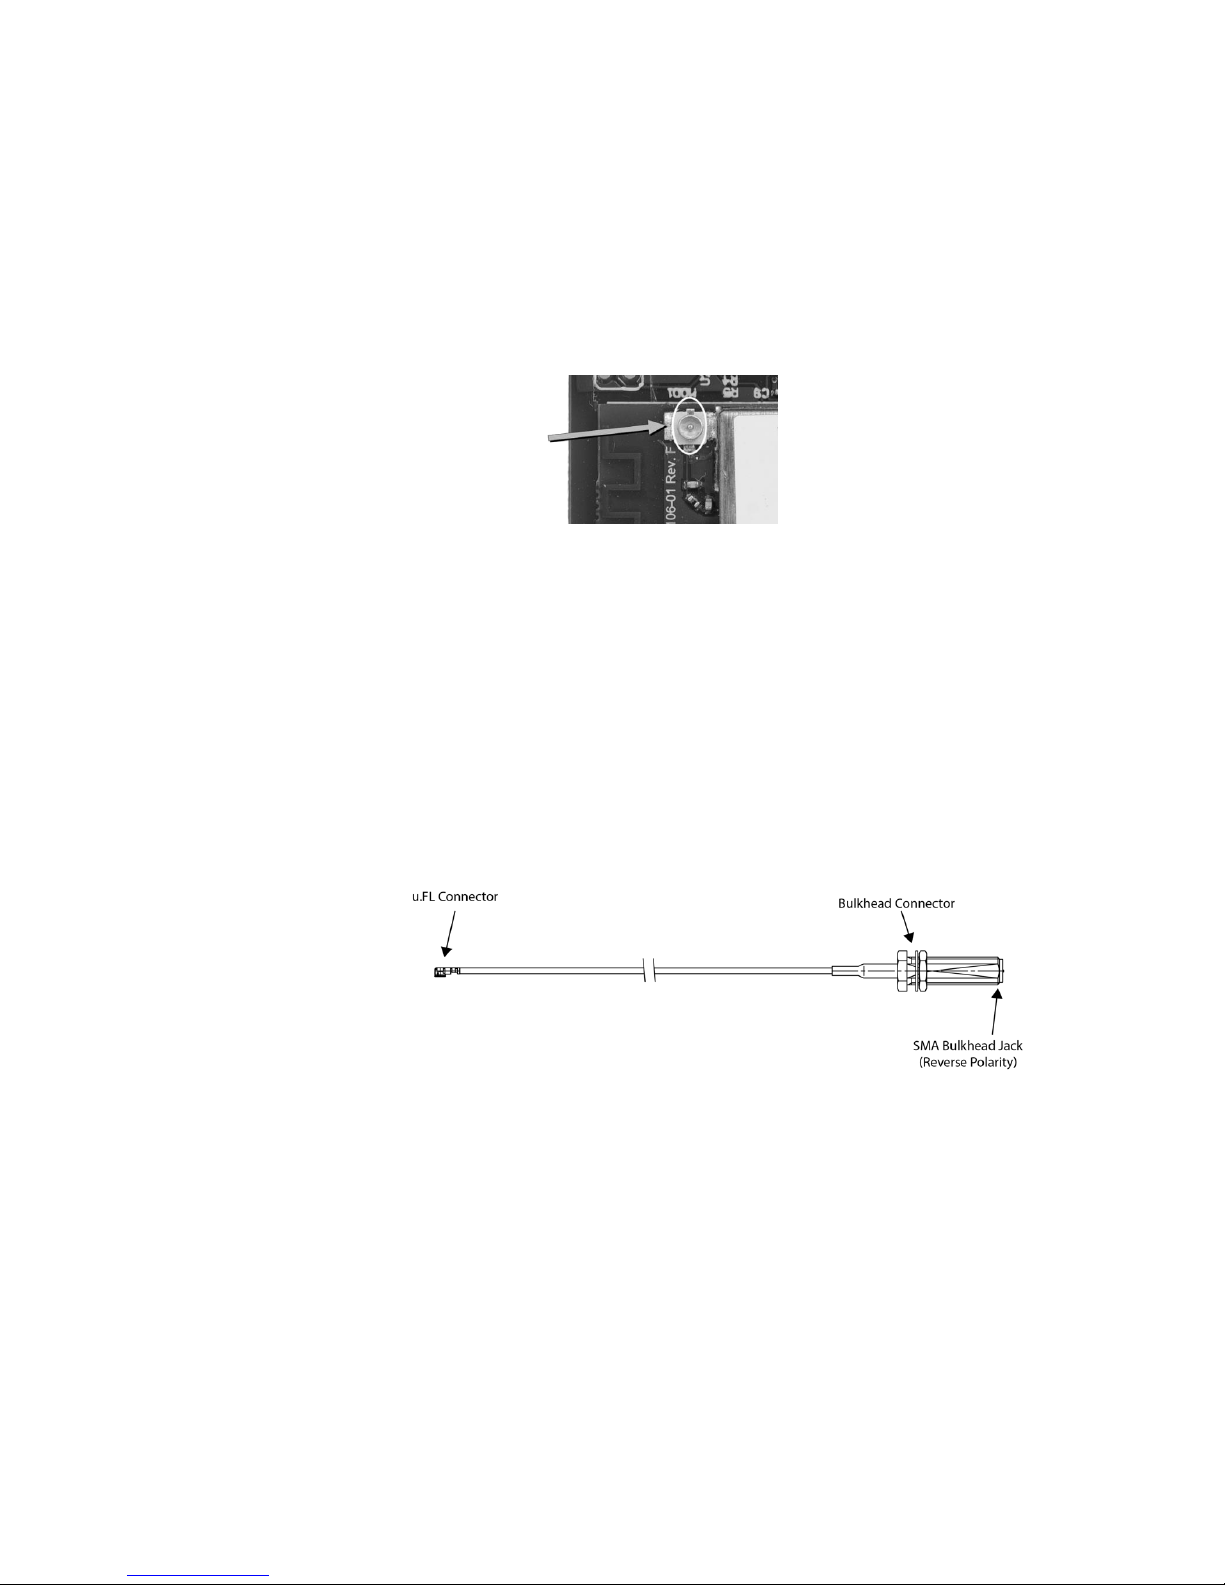
2. Attach the 50 OHM Terminator to the RP-SMA
bulkhead hand tight before attaching the u.FL
cable (Figure 3) to the u.FL Terminal (Figure
2). Keep the 50 OHM Terminator on the cable
until mounting the bulkhead in the fixture or
attaching an antenna for testing.
3. Use the insertion tool, PN U.FL-LP-IN to mate
the connectors. The mating axes of both
connectors must be aligned so that the
connectors can be mated. The “click” will
confirm a fully mated connection. Do not
attempt to insert on an extreme angle.
4. Route the antenna cable such that there is no
upward tension between the cable and the
u.FL connector.
5. To disconnect the connectors, insert the end
portion of the Extraction Tool, U.FL-LP-N-2,
under the connector flanges and pull off
vertically, in the direction of the connector
mating axis.
Figure 3- u.FL Terminal
ATTACHING THE BULKHEAD
Keep the 50 OHM Terminator on the bulkhead at all
times until the antenna replaces the 50 OHM
Terminator. When installing the bulkhead, the
technician must be grounded with a proper ground
strap. After installing the bulkhead in the fixture,
replace the 50 OHM Terminator.
ATTACHING THE ANTENNA
When it is time to attach the antenna, touch a
grounded surface, remove the 50 OHM Terminator and
screw on the antenna hand tight. Tighten a 1/4 turn
with a pair of needle nose pliers. Do not over tighten or
the RF pin in the bulkhead will crack, creating poor RF
link quality.
DIMMING
Below are some recommendations for successful
dimming using the DIM10-087-00. The dimming
control wires are referenced as Dim+ and Dim-. The
dimming signals have a Maximum voltage of 10V DC.
• Use multi-strand 18 Gauge Wire for noise
immunity and current capability
• Do not ground the dimming wire; this is a
return signal and is critical for dimming
• Route dimming wires away from AC lines if
possible
• Use connections with properly sized
connectors
• Eliminate excess wire between fixtures; Line
length will cause voltage drop
• Number of fixtures that can be daisy-chained
is dependent upon the following factors:
dimming current, current requirements for
LED driver, length of wire, quality of
connection, and gauge of wire
• Verify dimming capability via a “test bed” with
the number of actual fixtures, wire length,
connectors, and wire gauge
u.FL
Terminal
Figure 4- u.FL Connector
Page 3

116-081509-003-C-0
REGULATORY INFORMATION AND
CERTIFICATIONS
RF Exposure Statement: This equipment complies
with FCC radiation exposure limits set forth for an
uncontrolled environment. This equipment should be
installed and operated with minimum distance of 20cm
between the radiator and your body. This transmitter
must not be co-located or operating in conjunction with
any other antenna or transmitter.
Industry Canada (IC) certifications: This digital
apparatus does not exceed the Class B limits for radio
noise emissions from digital apparatus set out in the
Radio Interference Regulations of the Canadian
Department of Communications.
Le present appareil numerique n’emet pas de bruits
radioelectriques depassant les limites applicable aux
appareils numeriques de la class B prescrites dans le
Reglement sur le brouillage radioelectrique edicte par
le ministere des Communications du Canada.
FCC certifications and regulatory information
(USA only)
FCC Part 15 Class B: This device complies with part 15
of the FCC rules. Operation is subject to the following
two conditions: (1) These devices may not cause
harmful interference, and (2) These devices must
accept any interference received, including interference
that may cause harmful operation.
RADIO FREQUENCY INTERFERENCE (RFI) (FCC
15.105): This equipment has been tested and found to
comply with the limits for a Class B digital device,
pursuant to Part 15 of the FCC rules. These limits are
designed to provide reasonable protection against
harmful interference in a residential installation. This
equipment generates, uses, and can radiate radio
frequency energy and, if not installed and used in
accordance with the instructions, may cause harmful
interference to radio communications. However, there
is no guarantee that interference will not occur in a
particular installation. If this equipment does cause
harmful interference to radio or television reception,
which can be determined by turning the equipment off
and on, the user is encouraged to try to correct the
interference by one or more of the following measures:
(1) Re-orient or relocate the receiving antenna; (2)
Increase the separation between the equipment and
the receiver; (3) Connect the equipment into an outlet
on a circuit different from that to which the receiver is
connected; (4) Consult the dealer or an experienced
radio/TV technician for help.
Declaration of Conformity (FCC 96-208 & 95-19):
Synapse Wireless, Inc. declares that the product name
“DIM10-087-00” and “DIM10-087-00-F” to which this
declaration relates, meet the requirements specified by
the Federal Communications Commission as detailed in
the following specifications:
• Part 15, Subpart B, for Class B equipment
• FCC 96-208 as it applies to Class B personal
computers and peripherals
• This product has been tested at an External Test
Laboratory certified per FCC rules and has been found
to meet the FCC, Part 15, Emission Limits.
Documentation is on file and available from Synapse
Wireless, Inc.
If the FCC ID for the module inside this product
enclosure is not visible when installed inside another
device, then the outside of the device into which this
product is installed must also display a label referring
to the enclosed module FCC ID. Modifications (FCC
15.21): Changes or modifications to this equipment not
expressly approved by Synapse Wireless, Inc., may
void the user’s authority to operate this equipment.
CERTIFICATIONS
Model : DIM10-087-00
Contains FCC ID : U9O-SM220
Contains IC : 7084A-SM220
UL File No : E346690
Contact Synapse for Support- (877) 982-7888
 Loading...