

Page 1
BRIGHT SOLUTIONS
PROFESSIONAL SERIES Kit
HEADLAMP Resurfacer / Protector
Thank you for purchasing BRIGHT SOLUTIONS
PROFESSIONAL SERIES Kit, this is a 3 or 4 STEP process
that takes approximately 10~15 MINUTES to perform per
headlamp dependent upon severity of damage of lamp lens. By
applying the patented Preserver, your headlamp cleaning will be
preserved for more than two years.
Can Be Used on
Turn Signal Lights Reflective Lens Covers
: Headlamps Taillights
KEEP OUT OF THE REACH OF CHILDREN
DO NOT ALLOW PRODUCT TO FREEZE
WHEN APPLYING PRODUCT IN TEMPERATURES
o
BELOW 60
, TURN LAMPS ON TILL WARM.
DO NOT APPLY SHINE RESTORER/ PROTECTOR IN
DIRECT SUNLIGHT
READ INSTRUCTIONS IN ENTIRETY BEFORE USE.
USE ENCLOSED GLOVES TO PROTECT HANDS.
FIRST determine the extent of damage that has occurred over time to
your headlamp lens.
IF
Headlamp lens is slightly fogged and or yellowed, without
visible hairline scratches or crazing, in most cases, the lamp
can be simply cleaned clear without the use of sandpaper.
Steps 1, 3 and 4
IF
Headlamp lens has extensive yellowing, scratches, crazing,
and/or pits, sanding is necessary to obtain a successful
result. Regardless of damage, using sandpaper during
cleaning will speed the process dramatically.
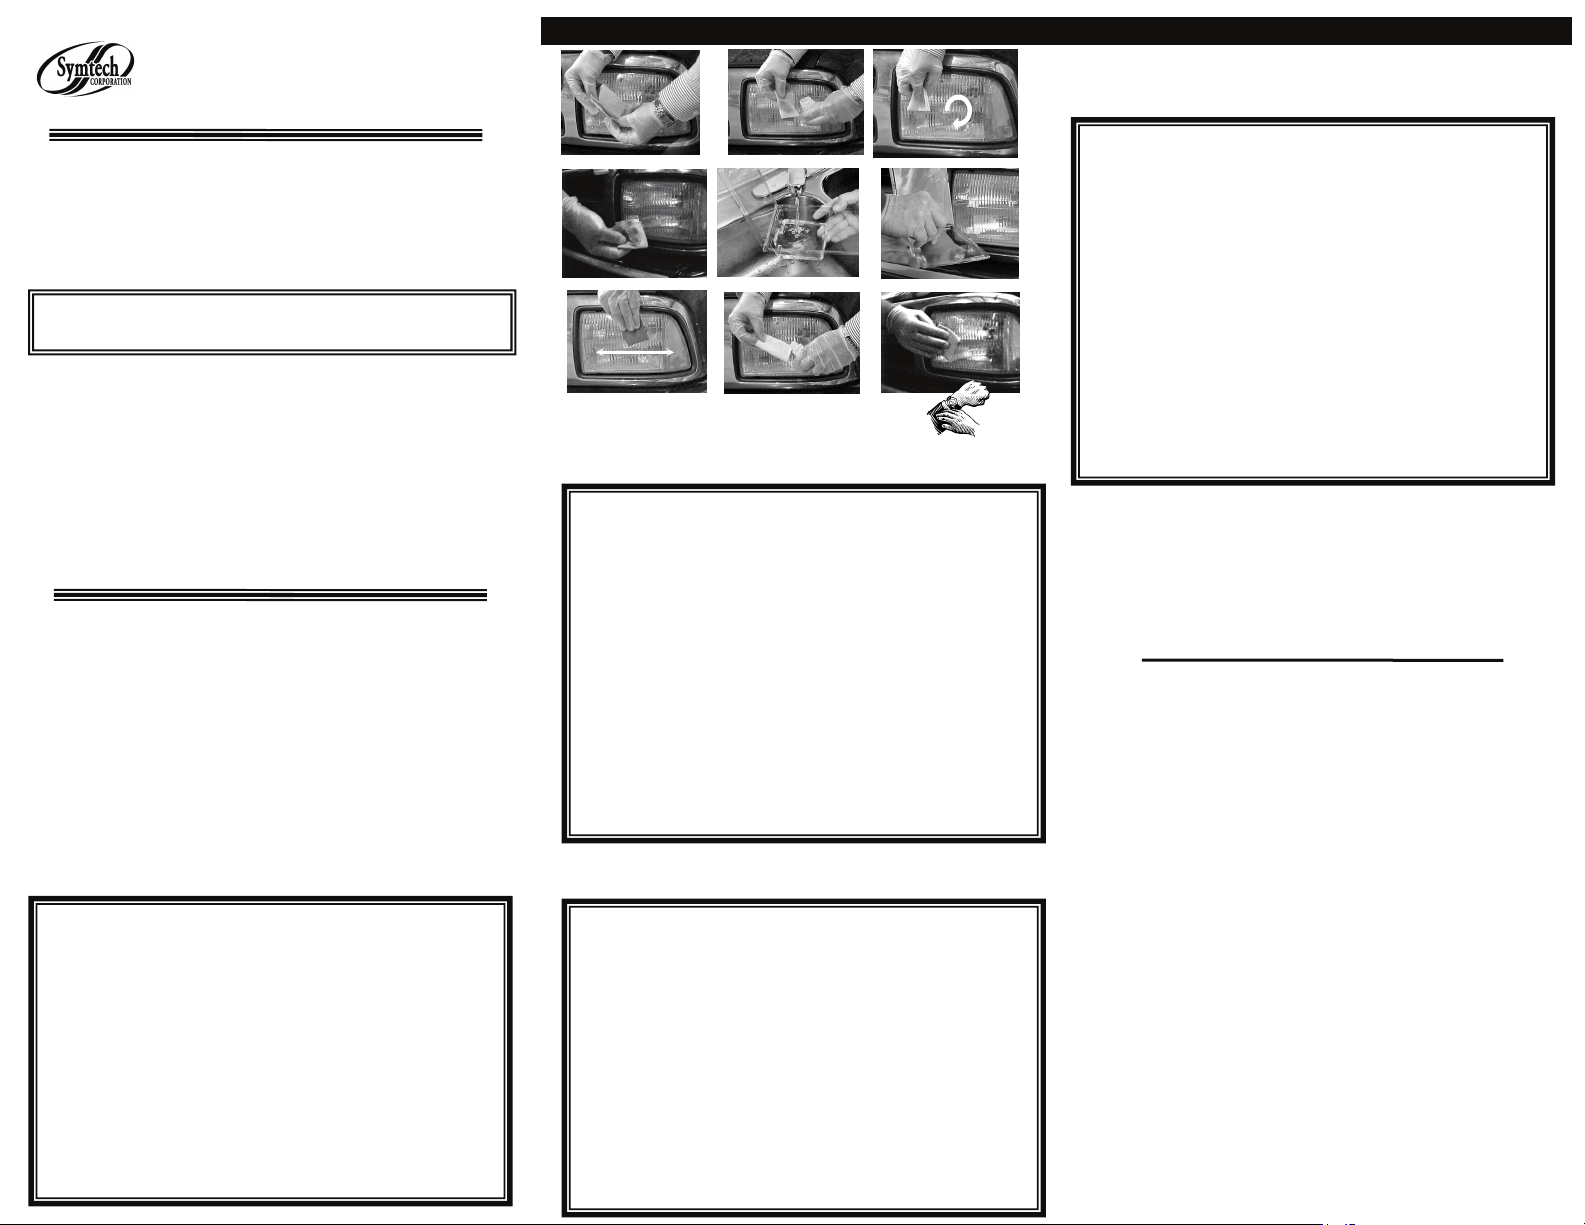
STEP 1
CLEANING
Remove all contents from package.
Select one of the towels and fold in quarters (1).
Thoroughly shake the BRIGHT SOLUTIONS Water Based
Pretreatment before applying to towel.
Open the specially formulated BRIGHT SOLUTIONS Water
Based Pretreatment, saturate the towel (2), and begin cleaning
the entire lens with a circular motion (3).
Continue cleaning, changing the towel surface and adding more Water
Based Pretreatment as towel becomes discolored (4) with dirt
and oxidation film of lamp lens.
When dirt and decolonization ceases to be removed from lens,
Proceed to
STEP 2 or 3
.
Steps 1, 2 ,3
PAGE 1
2
5
8
Five Minutes
Drying Time
STEP 2
1
4
7
SANDING
Fill cavity of package with water (5), start with 1500 grit sandpaper,
dampen with water and begin sanding the entire surface of the
lens, wetting sandpaper (6) as needed to prevent buildup of particles.
Note: ALWAYS sand in a straight motion (7), DONOT use
a circular motion.
Continue sanding till all discolored plastic has been removed from
lamp surface and residue of sanding is white in appearance.
Sanding is complete when lamp lens is uniform in appearance.
Take the 2000 grit sandpaper, dampen with water and sand the entire
surface of the lens, wetting sandpaper (6) as needed. This process will reduce the sanding lines .
Note: ALWAYS sand in the same direction as previous step
and in a straight motion (7), DONOT use a circular
Proceed to
motion.
STEP 3
STEP 3
POLISHING
Select one of the towels and fold in quarters (1).
Thoroughly shake the BRIGHT SOLUTIONS HEADLAMP
CLEANER/POLISH before applying to towel. Shake the
container frequently throughout the cleaning process.
Open the specially formulated BRIGHT SOLUTIONS
HEADLAMP CLEANER/POLISH, saturate a small area of
the towel (2), and begin cleaning the entire lens with a circular
motion (3).
Continue polishing and adding more HEADLAMP CLEANER/
POLISH as necessary to polish the entire lamp lens.
When lens has achieved a highly polished appearance, wipe off all
polish residue with Water Based Pretreatment
Proceed to
STEP 4
.
STEP 4
SHINE RESTORER/PRESERVER
3
6
9
Select one of the towels and fold in quarters (1).
NOTE:
Apply SHINE RESTORER/ PROTECTOR out
of direct sunlight. WHEN APPLYING PRODUCT
IN TEMPERATURES BELOW 60
Safety by Design
ON TILL WARM
o
, TURN LAMPS
Apply a liberal amount of the SHINE RESTORER/
PROTECTOR to a clean lint-free paper towel (8) and apply it
smoothly across the plastic surface (9), avoiding any runs or
bubbling. Do not wipe till dry or tacky, wipe on wet, stand back
and let dry
To remove SHINE RESTORER/PROTECTOR from other
surfaces when wet, rinse with water and wipe off with a dry
towel.
Multiple coats of SHINE RESTORER/PROTECTOR are
recommended to increase the shine and protection properties.
Plastic surface must be dry to the touch prior to each application of
PROCESS FOR
POLICE / EMERGENCY VEHICLE
LIGHT BAR COVERS:
Select one of the towels, fold in quarters (1) and saturate towel with
1.
Water Based PRETREATMENT (2).
Apply Water Based PRETREATMENT to entire surface
of lamp lens with a circular motion (3) Repeat process until
all dirt is removed and towel no longer turns black or yellow
(4). Cover may turn hazy. This is normal and will be removed with the final steps.
Select one of the towels, fold in quarters (1) and saturate towel with
2.
HEADLAMP
CLEANER/POLISH (2).
Apply HEADLAMP CLEANER/POLISH to entire surface
of lamp lens with a circular motion (3) with mild to moderate
pressure.
CLEANER/POLISH as necessary to polish the entire lamp lens.
When lens has achieved a highly polished appearance,
Continue polishing and adding more
residue of HEADLAMP CLEANER/POLISH with WA-
TERBASED PRETREATMENT. It is very important that
all HEADLAMP CLEANER/POLISH is removed in order
to obtain a secure bond of the Deep Fill Restorer & the Shine
Restorer / Protector in Steps 3 & 4.
Remove all
Page 2

PAGE 2
** NOTE: DO NOT sand Police / Emergency light bar covers
unless absolutely necessary, such as excessive breakdown of plastics. This plastic tends to scratch easily,
if you feel it is needed, use the highest grade sandpaper as possible (2000 or 2500 grit). Wet the sand paper
and use a Back and Forth Motion in the same direction.
Before applying Deep Fill Restorer, be sure lens is completely clean and dry. Use only WATERBASED Pretreat-
ment for this. Look at the lens while the Pretreatment is
wet, this will give you an idea of how the lens will look once
the final step is done, and will also let you know if more
cleaning is needed.
Apply a small amount of DEEP FILL RESTORER to a lint
3.
free paper towel and apply it pressing firmly, starting at the
top of the light and wiping from left to right with firm pressure
so you are pushing it into the plastic. Wipe over the area second time with the wet part of the paper towel to remove any
excess. Move down the light in the same manner Do
over a covered area more than twice as this product dries
quickly and will build up leaving the light with a streaked
appearance. Allow to dry completely, if you step back about
3-4 feet from the vehicle, the sand scratches should not be
obvious.
Apply SHINE RESTORER/PROTECTOR with lint free
4.
paper towel and wipe it smoothly over the lens cover as if
painting. Lightly touch up drips and always wait for the coats
to dry before adding the next coat. We recommend at least 3
coats of SHINE RESTORER/PROTECTOR for added
protection.
Not go
NOTES:
As with any repair versus replacement, some items will not
achieve like new results. If directions are followed, significant
improvement in the appearance of the items will be achieved. As
we are unable to supervise the application process, user assumes all
risks. The manufacturer and its distributors are not liable for any
damages incurred by the use of this product. If you are unsure as
to the application process or compatibility of the item you would
like to resurface, please contact the manufacturer or distributor for
advice on how to proceed.
Safety by Design
524 S.E. Transport Drive
Lee’s Summit, Missouri 64081
816-525-9263 FAX: 816-525-9283
www.symtechcorp.net
Manufactured for Symtech Corporation
by Coliance Corporation.
REVISED 10/2008
 Loading...