

Page 1
TABLES DE FORMATION
INSTRUCTIONS DE MONTAGE
TRAINING TABLES
OPERATING INSTRUCTIONS
ÉTAPE 1
2
ÉTAPE 2
PIÈCE QTÉ
1. Surface .....................1
5
1
2. Cadre .......................1
3. Pattes de cadre (3L & 3R) .......2
4. Roulettes ....................4
5. Vis en bois ...................8
6. Boulons avec rondelles .........4
7. Supports de raccordement ......2
8. Vs à oreilles ..................4
9. Clé Allen (non montré) ..........1
Le Tourne-a-vis de Phillips est aussi besoin pour
l’assemblage (non fourni)
FEATURES
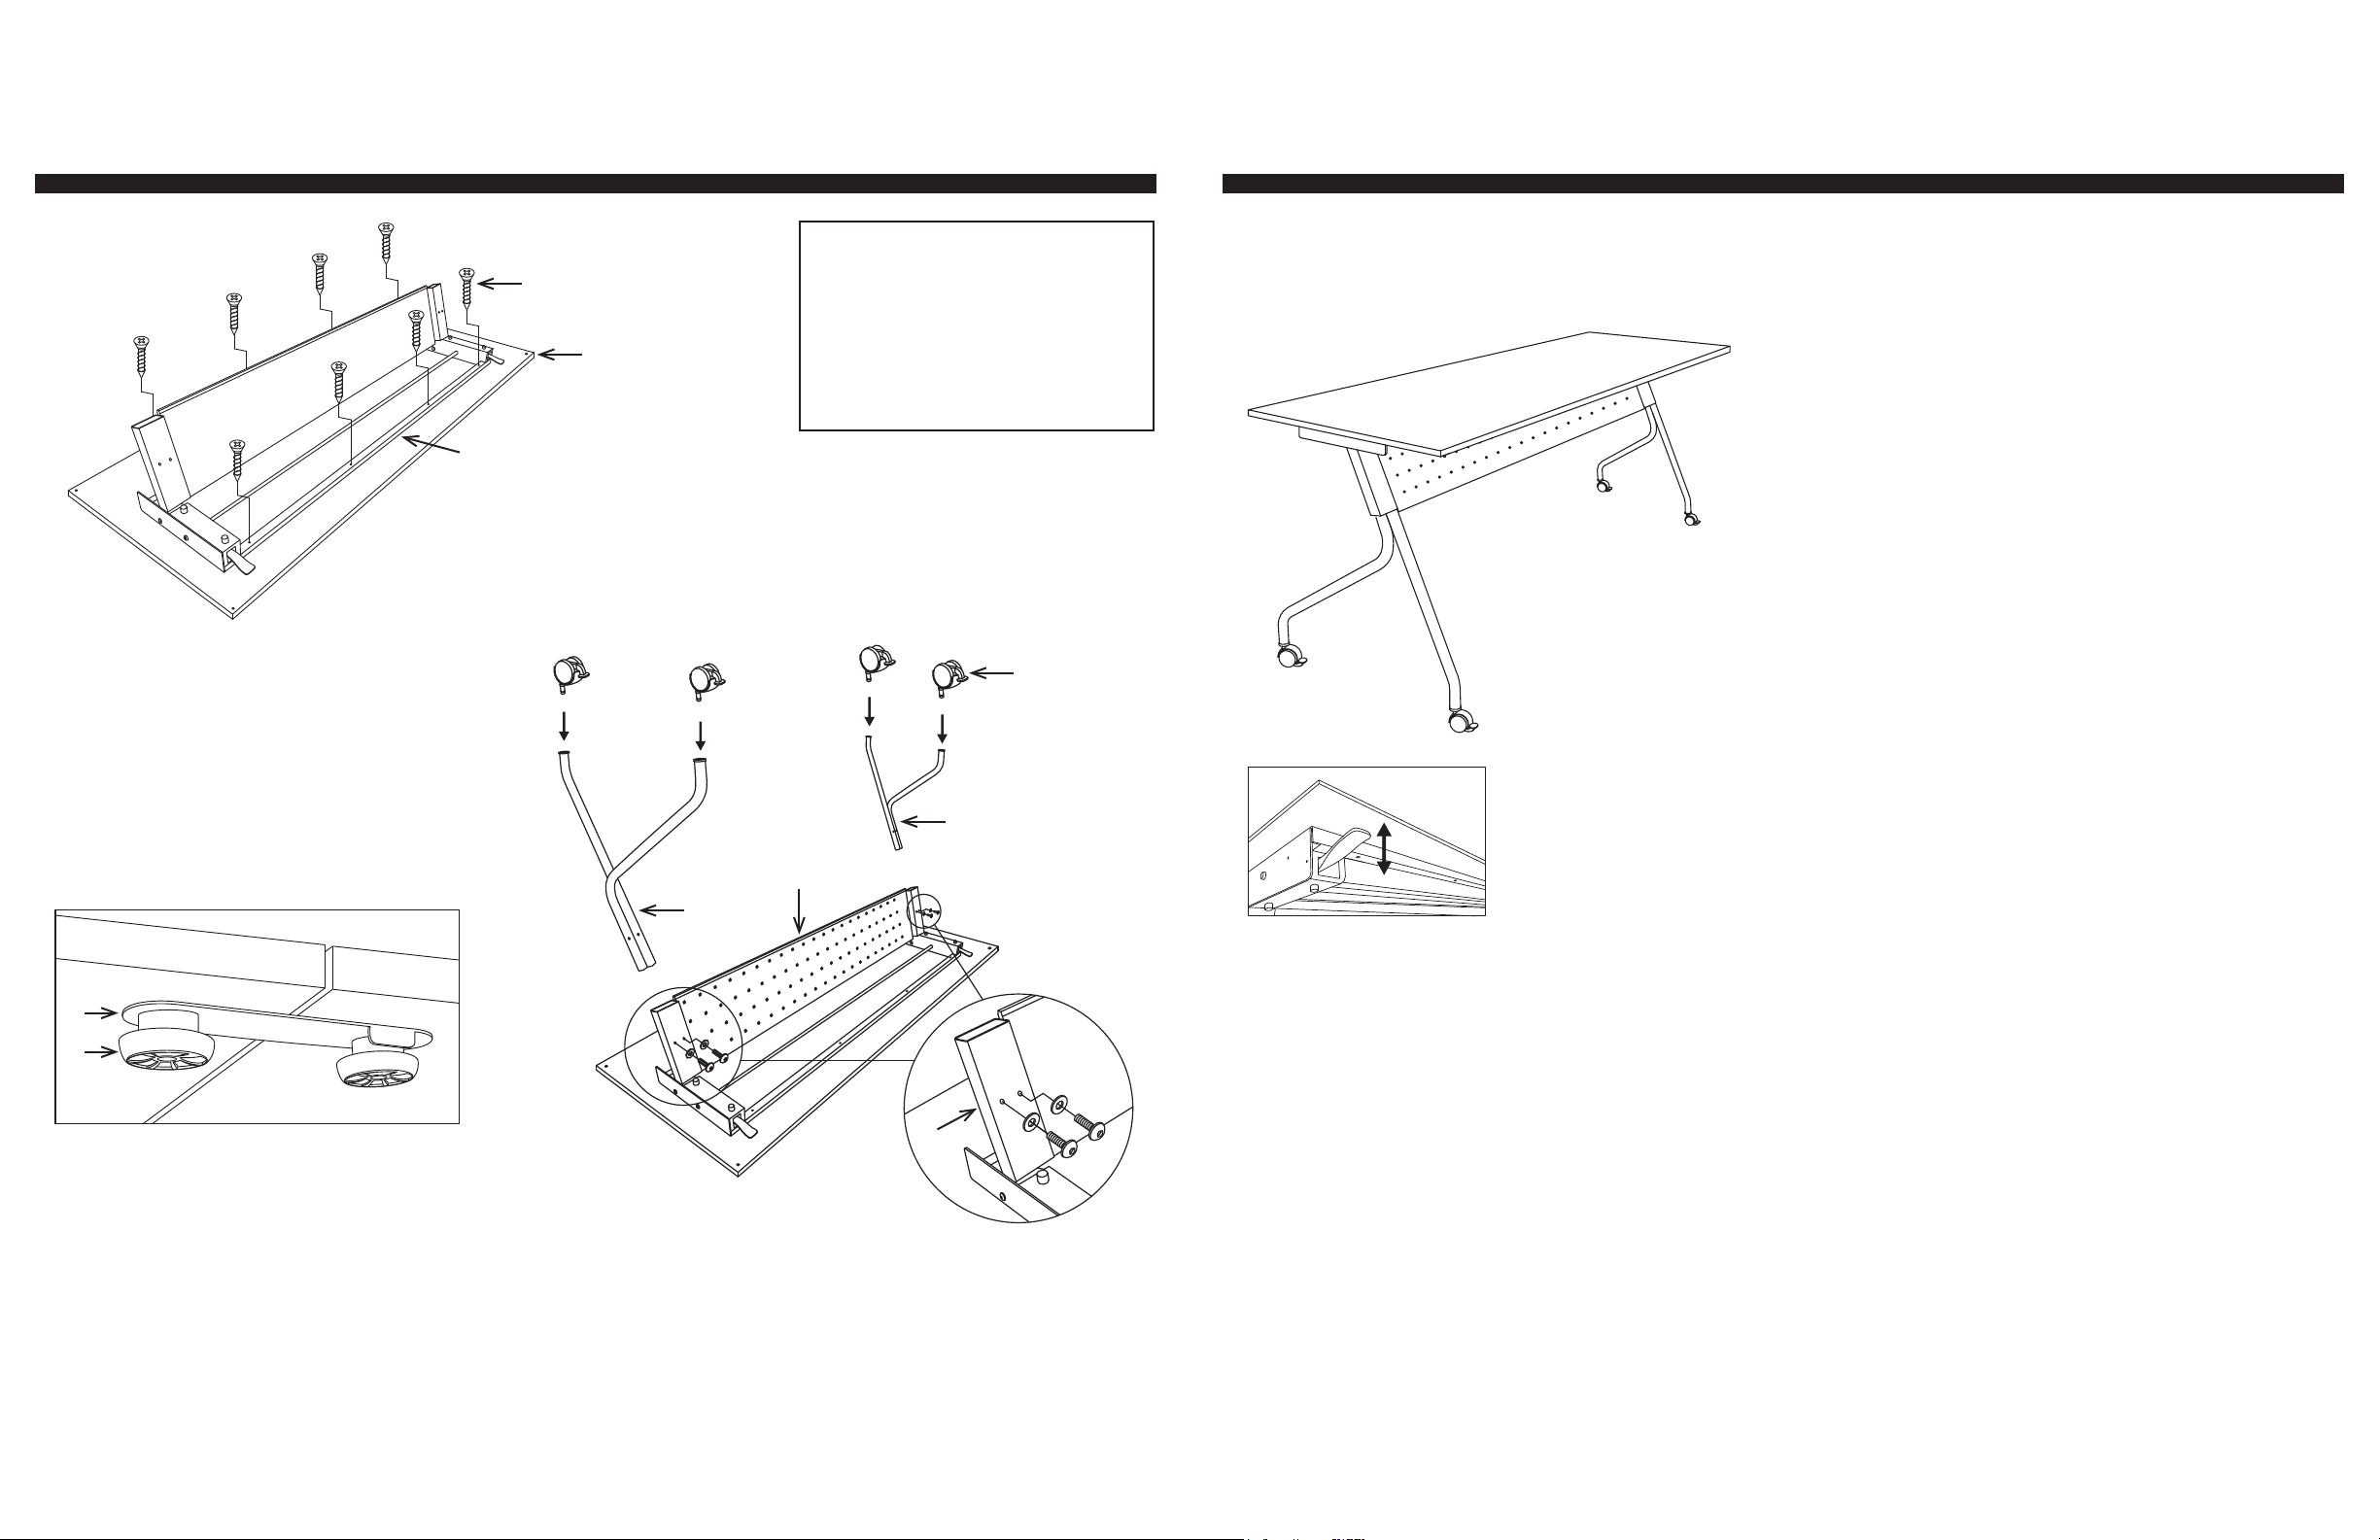
• FLIP TOP ADJUSTMENT
To flip top up or down, lift either lever, flip top up or
down and relase lever to lock into place.
4
3L
2
Trousse de raccordement
3R
7
8
Inclus dans le carton du cadre : Les trousses de
raccordement permettent la connexion et la déconnexion
rapides des tables de formation. Les vis à oreilles fixent
les supports de raccordement au plateau (sur sa face
inférieure) au moyen des inserts préinstallés pour écrous
à pointes à enfoncer en métal.
Enlever toutes les pièces du carton, les organiser selon les numéros de pièce indiqués sur la liste et vous assurer que les quantités
des pièces sont correctes.
ÉTAPE 1 Sécurisez le cadre (2) à la surface (1) avec huit vis en bois (5). SERREZ TOUTES LES VIS POUR LE BOIS (5) COMME IL FAUT AVEC UN TOURNEVIS
PHILLIPS (non fourni).
ÉTAPE 2 Introduisez les pattes de cadre (3L et 3R) dans le cadre (2) et sécurisez-les avec deux boulons avec rondelles (6) pour chaque patte de cadre (3).
SERREZ TOUS LES BOULONS AVEC RONDELLES (6) COMME IL FAUT AVEC LA CLÉ ALLEN (7). Introduisez deux roulettes (4) dans chaque patte (3), poussez
très fort jusqu’à ce que vous sentiez ou écoutiez la roulette (4) rentrer à sa place.
ATTENTION : TOUS LES BOULONS ET TOUTES LES VIS DOIVENT ÊTRE BIEN SERRÉS AVANT D’UTILISER LA TABLE.
2
WARNING
1. Use this product for it’s intended purpose.
2. Do not use this table unless all screws and bolts
are securely tightened.
3. Check that all screws and bolts are tight every three
months or as needed.
4. Dispose of packing material properly. Do not use plastic cover
as head covering. It may cause suffocation.
5. Do not use table as a stepladder.
TRAINING TABLES LIMITED WARRANTY
Our Training Table Series is warranted* from date of purchase against failure due to material and workmanship as follows:
• Laminate finishes are covered for a period of 5 years.
• Lifetime on component parts including control mechanism, frame and casters.
*All warranties are limited to the original purchaser for normal commercial usage defined as a standard forty hour work week. This warranty will not cover labor,
freight or damage from misuse, abuse, negligence, alteration, accident, vandalism, rusting, acts of nature or any other event beyond the control of us. The
warranty does not cover cosmetic damage that may result from normal use. Liability for incidental or consequential damages is excluded. The user assumes
all risk of injury resulting from use of this product. When usage is more than 40 hours per week, a two year warranty on all parts applies. This warranty gives
you specific legal rights, and you may also have other rights which vary from state to state.
Our quality standards are among the highest in the industry. Sometimes, no matter how hard we try, there are times when parts
are damaged or missing. Our Parts Department will do everything possible to promptly remedy the problem. Contact us via e-mail,
by Fax, or toll free parts number.
Page 2
TRAINING TABLES
ASSEMBLY INSTRUCTIONS
TABLES DE FORMATION
MODE D’EMPLOI
STEP 1
2
STEP 2
PART QTY
1. Top ........................1
5
1
2. Frame ......................1
3. Leg Frame (3L & 3R) ...........2
4. Casters .....................4
5. Wood Screw .................8
6. Bolt w/ Washer ...............4
7. Ganging Bracket ..............2
8. Thumb Screw ................4
9. Allen Wrench (not shown) .......1
Phillips screwdriver also needed for
Phillips screwdriver also needed for
assembly (not provided).
assembly (not provided).
CARACTÉRISTIQUES
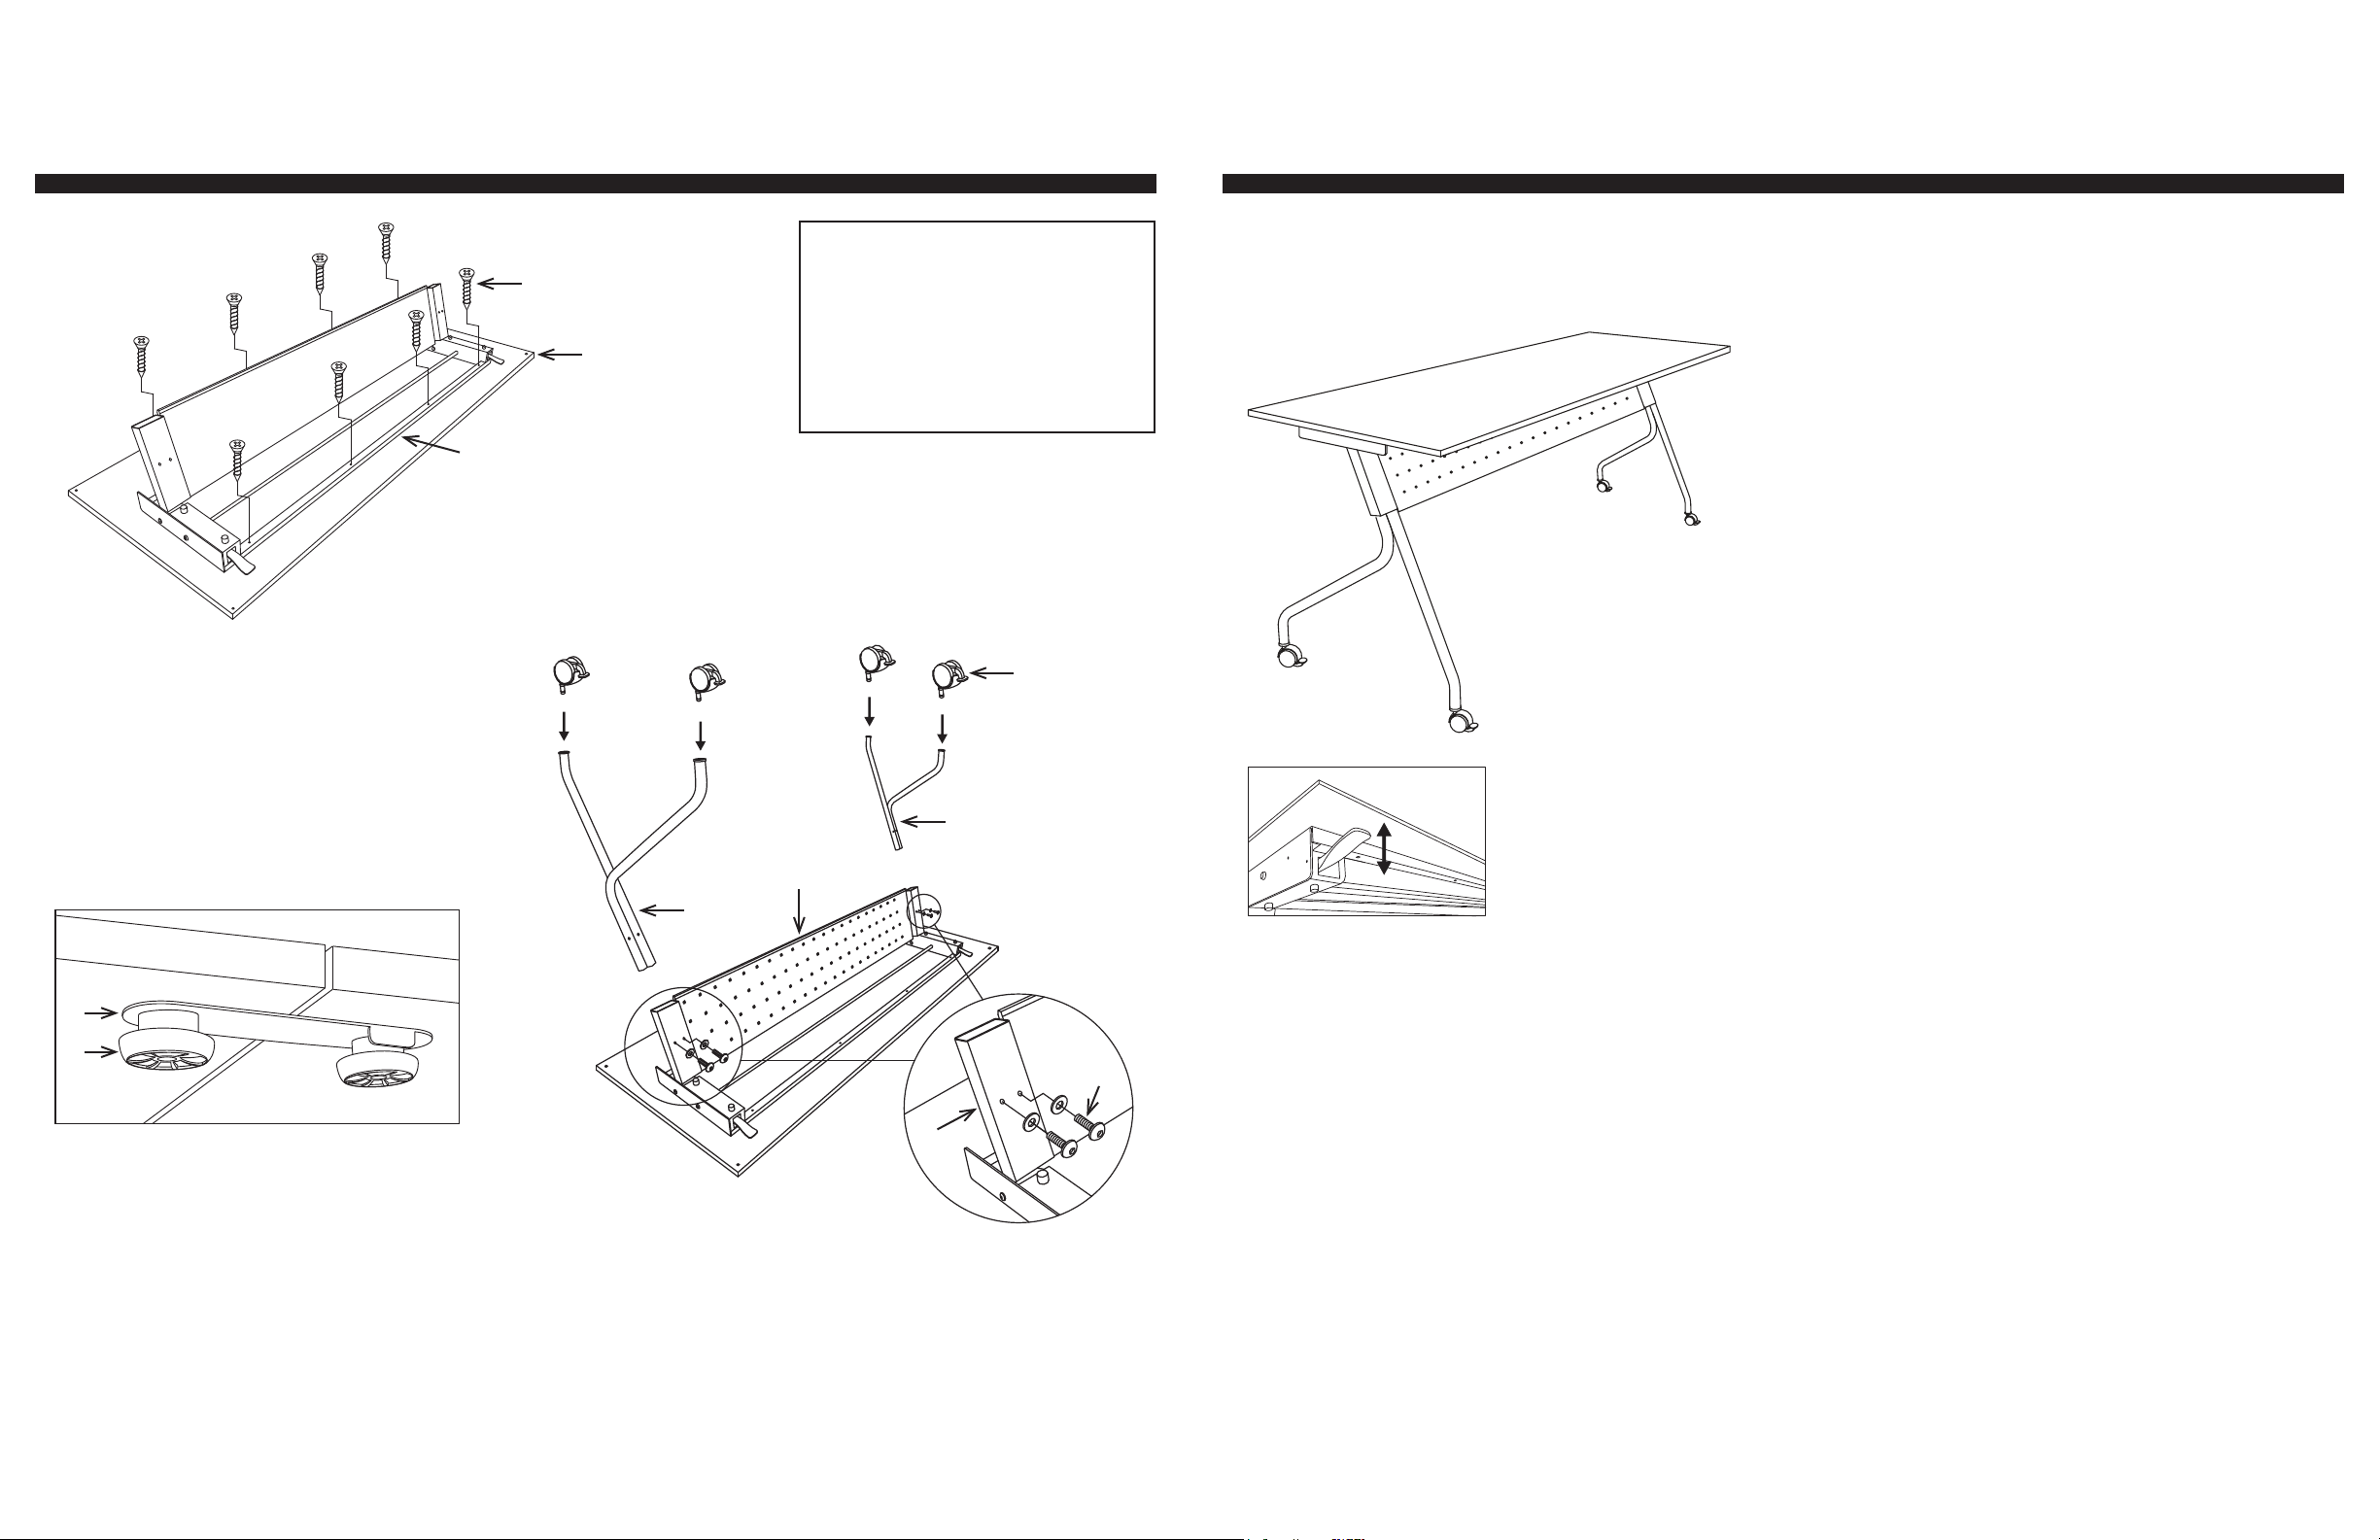
• AJUSTEMENT DE SURFACE RABATTABLE
Pour rabattre la surface vers le haut ou vers le bas, sou
levez un des leviers, rabattez la surface vers le haut ou
vers le bas et libérez le levier pour la fixer à sa place.
4
3L
2
Ganging Kit
3R
7
8
6
Included in the frame carton: Ganging kits allow
quick connect / disconnect of training tables.
Thumb Screws secure Ganging Brackets
to table top (underside) via pre-installed
metal T-nut inserts.
Remove all the parts from carton, separate them into part numbers indicated on the list and make sure part quantities are correct.
STEP 1 Secure Frame (2) to Top (1) using eight Wood Screws (5). FULLY TIGHTEN ALL WOOD SCREWS (5) USING PHILLIPS
SCREWDRIVER (not provided).
STEP 2 Insert Leg Frames (3L & 3R) into Frame (2) and secure using two Bolts w/ Washers (6) for each Leg Frame (3). FULLY TIGHTEN ALL BOLTS W/
WASHERS (6) USING ALLEN WRENCH (7). Insert two Casters (4) into each Leg Frame (3), push hard until you feel or hear the Caster (4) snap into place.
ATTENTION: MAKE SURE ALL SCREWS AND BOLTS ARE FULLY TIGHTENED BEFORE USING TABLE.
2
AVERTISSEMENT
1. Ce produit ne doit servir qu’à l’usage pour lequel il a été conçu.
2. Ne pas utiliser ce table à moins que toutes les vis et tous les
boulons et boutons soient resserrés.
3. Vérifier à tous les trois mois ou au besoin que toutes les vis et
tous les boulons et boutons sont resserrés.
4. Éliminer les matériaux de conditionnement d’une manière
convenable. Ne pasutiliser la couverture en plastique pour
couvrir la tête à cause du risque d’étouffement.
5. Ne pas utiliser le table comme un escabeau.
 Loading...