

Page 1

®
Allura
Lavatory Faucet SLC-4712-1.5
Installation and Service Instructions
Model Numbers
SLC-4712-1.5 (LN-01302)
Lavatory faucet with pop-up drain
Tools & Materials
Alternate Finish Code
append to part numbers when applicable
-STN
--
Satin Nickel
Chrome (standard)
PLUMBERS
PUTTY
Visual Install Guide Allura Lavatory Faucet, SLC-4712-1.5
Part No. LN-01302
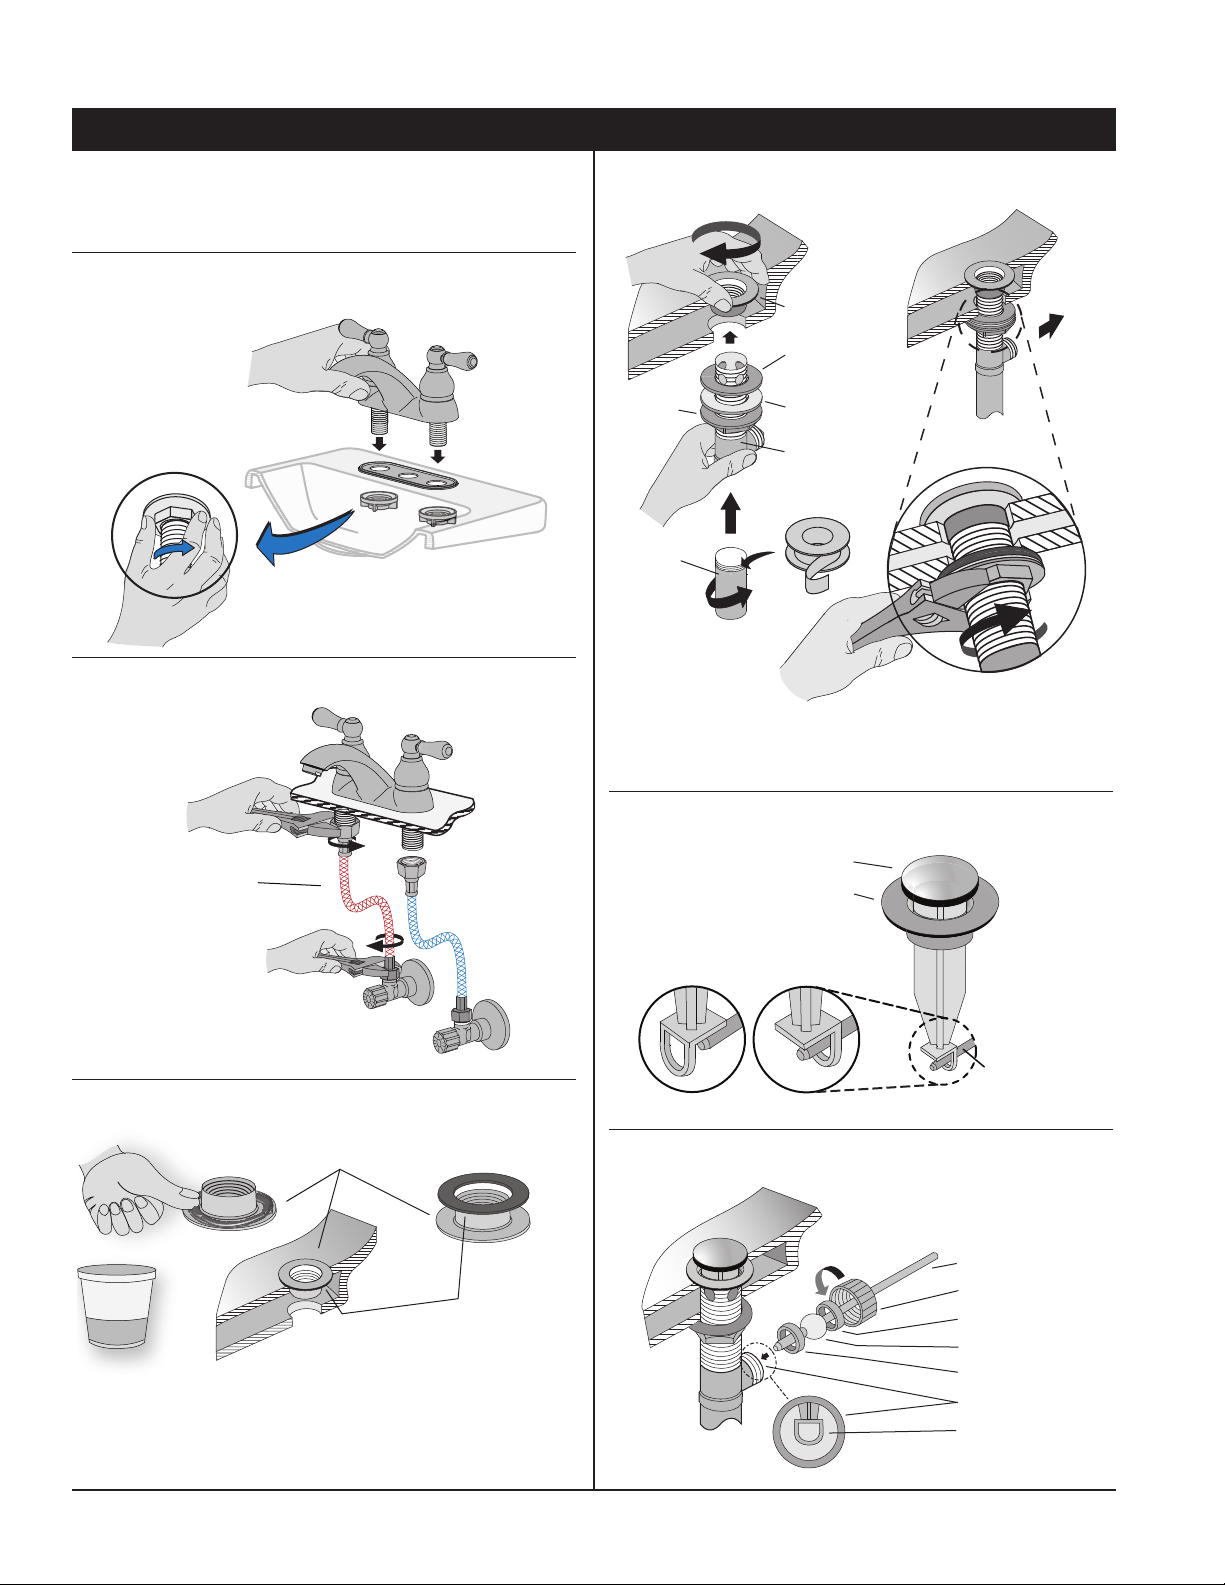
Step 1
Step 1
Attach faucet to sink
Step 2
Connect water supply lines
(supply hoses are not included)
Need Help?
Symmons customer service:
Phone: (800) 796-6667
gethelp@symmons.com
Mon - Fri 7:30 am - 6:00 pm EST
www.symmons.com/service
• Technical help
• Product information
• Warranty policy.
Step 9
Flush water supply lines
NonRemovable Removable
Step 5
Install stopper and
set eye position
Seat ange into sink drain opening
Attach drain body and tail piece to ange
Attach drain body to drain trap
WARNING: is product can expose you to chemicals including lead, which is known to the state of California to cause cancer,
birth defects, or other reproductive harm. For more information, go to www.P65Warnings.ca.gov.
stopper stopper
Step 3
Step 4
Step 8
Step 7
Connect lift rod
and adjust linkage
Step 6
Attach pivot rod to drain body
Page 2
Installation Instructions
Caution: If replacing an older faucet ensure water
supply is turned
control valves
OFF before removing. en turn faucet
ON to relieve water pressure.
Step 1 Attach faucet to sink
Step 2 Connect water supply lines
Step 4 Attach drain body to flange
ange
ange
nut
tail
piece
beveled
washer
friction
washer
drain
body
back
of sink
* Note: Attach tail piece to drain body using teon tape.
tape or plumber’s putty.
Supply hoses
not included
HOT
COLD
Step 3 Seat flange into sink drain opening
ange
PLUMBERS
PUTTY
* use included washer only for when
plumbers putty is not available
washer *
(optional)
* Note: Washer included with faucet should only be
used when plumbers putty is not available.
Step 5 Install stopper and set eye position
stopper
ange
non
removable removable
pivot rod
Step 6 Attach pivot rod to drain body
pivot rod
retaining nut
outer seat
pivot ball
inner seat
pivot cavity
stopper eye
Page 2
Page 3

Step 7 Connect lift rod and adjust linkage
1
lift rod
Valve cartridge replacement
Valve cartridge replacement
M4 .7 x 6 mm
drain body
clevis strap
pivot rod
drain trap
thumb screw
location hole
spring clip
Step 8 Attach drain body to drain trap
Step 9 Flush water supply lines
2
3
RED = Hot
BLUE = Cold
HOT
COLD
4
HOT
COLD
Care of faucet finish
Clean nish area by using mild soap and water or non-abrasive
cleaners and then rinse immediately. A non-abrasive wax may
be used to preserve nish area.
5
HOT
COLD
Page 3
Page 4

Parts Assembly Allura Lavatory Faucet, SLC-4712-1.5
4" (102 mm)
6" (152 mm)
Deck thickness
1/2"-14 NPSM
Hole diameter
1" (25 mm)
3-3/4"
95 mm
9-1/4"
236 mm
2" ( 51 mm)
Part No. LN-01302
7/8" ( 22 mm) max
1-15/16"
49 mm
4-1/4"
108 mm
Dimensions
Allura Lavatory Faucet, SLC-4712-1.5
Part No. LN-01302
hot plug button
cartridge retainer
faucet body
pop-up drain
assembly
includes lift rod
and stopper
RL-154LR
Symmons Industries, Inc. ■ 31 Brooks Drive ■ Braintree, MA 02184 ■ Phone: (800) 796-6667 ■ Fax: (800) 961-9621
Copy rig ht © 2018 Symmons Industries, Inc. ■ symmons.com ■ gethelp@symmons.com ■ ZV-1030 REV E ■ 110718
screw
handle
collar
lift rod
cartridge
standard
aerator
1.5 gpm
gasket
fastener
stopper
P-100N
*
philips (M4 .7 x 6mm)
cold plug button
Ordering replacement parts:
Call Symmons customer service at (800) 796-6667,
(781) 848-2250 M-F 7:30 am - 6:00 pm EST or
check our website at www.symmons.com for a
list of Symmons distributors.
Replacement Parts
Part Number Item
LN-01452 (hot)
OFF = CW
LN-01453 (cold)
OFF = CCW
LN-01454
RL-235
SWA-17FR
FLR-111-1.5
FLR-111-1.0
Cartridge
Cold = BLUE
Handle Kit
hot & cold
plug buttons (2)
Lift Rod
Aerator assembly
ow rates
2.2 gpm (8.3L/min)
1.5 gpm (5.7L/min)
1.0 gpm (3.8L/min)
Hot = RED
screw (1)
handle (1)
 Loading...