

Page 1

P370 / 470 RF Scanner
Quick Reference Guide
Page 2

2 P370 / 470 RF Scanner
© 1997 - 2006 SYMBOL TECHNOLOGIES, INC. All rights reserved.
Symbol reserves the right to make changes to any product to improve reliability,
function, or design.
Symbol does not assume any product liability arising out of, or in connection with,
the application or use of any product, circuit, or application described herein.
No license is granted, either expressly or by implication, estoppel, or otherwise
under any patent right or patent, covering or relating to any combination, system,
apparatus, machine, material, method, or process in which Symbol products
might be used. An implied license exists only for equipment, circuits, and
subsystems contained in Symbol products.
Symbol and the Symbol logo are registered trademarks of Symbol Technologies,
Inc. Other product names mentioned in this manual may be trademarks or
registered trademarks of their respective companies and are hereby
acknowledged.
Symbol Technologies, Inc.
One Symbol Plaza
Holtsville, N.Y. 11742-1300
http://www.symbol.com
Warranty
For the complete Symbol hardware product warranty statement, go to:
http://www.symbol.com/warranty.
Patents
This product is covered by one or more patents. For patent information go to:
http://www.symbol.com/patents.
Page 3
Quick Reference Guide 3
Introduction
The P470/370 cordless RF scanners bring new flexibility and economy to data
capture and data management in both industrial and retail operations. The
scanner communicates with your host computer through radio transmission
instead of through a cable. With the RF scanner, you are free to scan and transmit
without a physical cable, from as far away as 100 feet (30.5 meters) even without
a direct line of sight. This lets you take the scanner to where the work is, whether
on the loading dock, the plant floor, the warehouse, or the POS checkout area.
There are several versions available:
- P470: cordless retail scanner.
- P370: cordless industrial scanner.
- P370 ALR: cordless industrial ALR scanner.
This Quick Reference Guide provides basic instruction on the set up and use of
the Phaser P370/P470 RF scanners.
Refer to PL 370/470 RF Cradle Quick Reference Guide (p/n 72-38494-xx) for
information on setting up the PL 370/470 RF cradle.
To quickly get you started with your new scanner:
1. Charge the scanner in the cradle.
2. Power up the scanner.
3. Follow the Quick Startup Instructions (see page 6).
4. Use the test bar codes to ensure the scanner is working properly (see page 7).
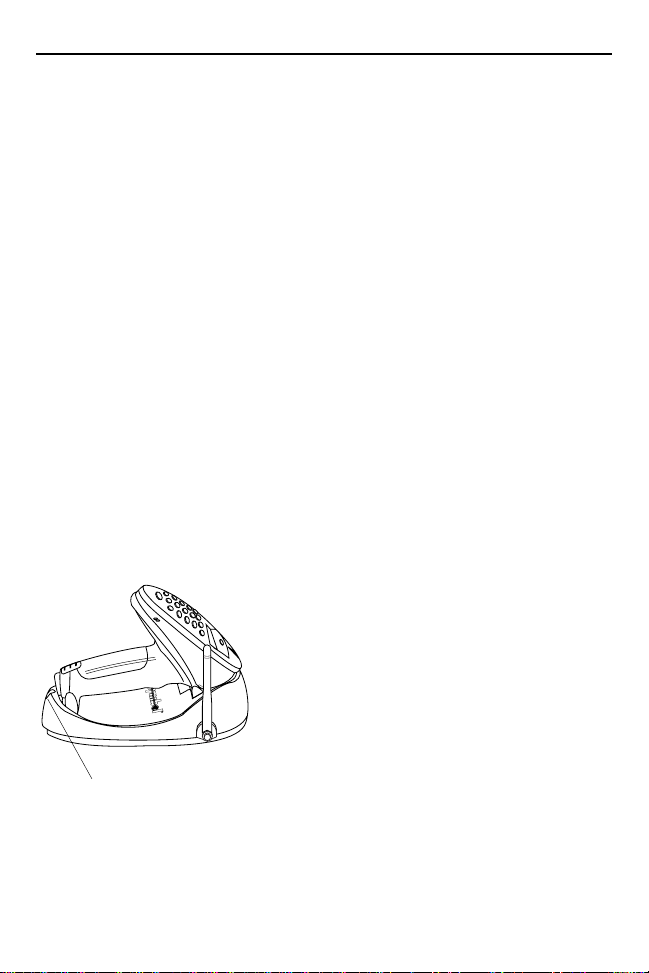
Charging the Scanner in the Cradle
To charge the scanner, insert the scanner into
the cradle so the nose of the scanner and tip of
the handle seat into the receptacles. The
scanner displays “UNIT CRADLED” when
properly inserted in the cradle.
The battery charges automatically. A full charge
of a depleted battery takes approximately 3-1/2
hours. The charge status indicator light on the
back of the cradle blinks then becomes solid
Charge Status
Indicator Light
when the battery is fully charged.
Powering Up the Scanner
To turn the scanner on, press the “Enter” key or pull the trigger. The scanner is
brought out of sleep mode and into scanning mode.
Page 4
4 P370 / 470 RF Scanner
Scanning
Consult the P470/P370 RF Scanners Product Reference Guide (p/n 72-38495-xx)
for programming instructions. If you need assistance, contact your local supplier
or the Symbol Support Center.
To scan:
1. Ensure the battery is charged.
2. Ensure the bar code is in the correct scanning range.
3. Aim and press the trigger. When the scanner has read the symbol:
- a beep sounds.
- the LED above the display turns green.
- the red laser turns off.
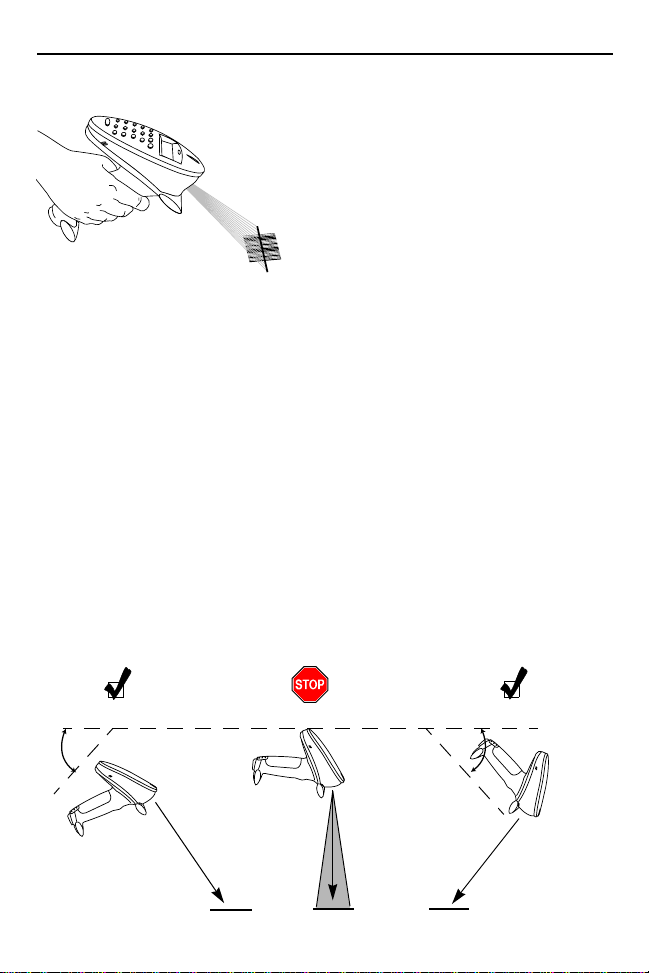
Aiming
Hold at an Angle
Do not hold the scanner directly over the bar code. Laser light reflecting directly
back into the scanner from the bar code is known as specular reflection. Specular
reflection can make decoding difficult.
The scanner can tilt up to 65° forward or back and achieve a successful decode.
Simple practice quickly shows what tolerances to work within.
1.Successful Scanning
65°
Scan
Beam
2.Possible Specular Reflection
Shaded area
represents
dead zone (+-2°)
Bar Code
Bar Code
3.Successful Scanning
65°
Scan
Beam
Bar Code
Page 5
Quick Reference Guide 5
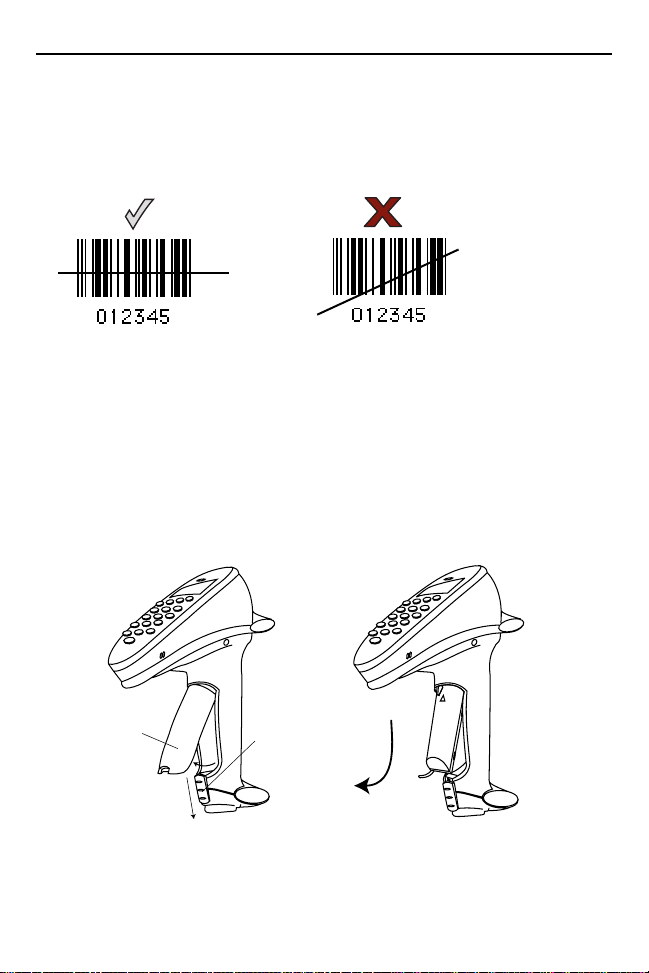
Scan the Entire Symbol
- The scan beam must cross every bar and space on the symbol (as in the
left bar code below).
- Hold the scanner farther away for larger symbols.
- Hold the scanner closer for symbols with bars that are close together.
Changing the Battery
When a battery is fully charged, it generally lasts up to 10 hours without being
returned to the cradle. By returning it to the cradle during the day, this time is
extended.
If a significant decrease in battery life is noticed and does not correspond to
increased usage, consider replacing the battery.
Removing the Battery
1. Slide the battery release latch down using center indent and remove the
battery compartment cover.
2. Slide the battery toward the bottom of the scanner and then pull the bottom of
the battery back and out of the scanner.
Battery
Compartment
Cover
Battery
Release
Latch
Replacing the Battery
1. Place the top portion of the battery (curved side up, contacts toward top) into
the scanner and then slide it up the handle.
2. Replace the battery compartment cover.
3. Slide the release latch up to secure the cover in place.
Page 6

6 P370 / 470 RF Scanner
Quick Startup Instructions
The table that follows includes an index of startup instructions to help get you
started quickly. The index is listed in a step-by-step order beginning with step 1,
Setting up the System. This index references pages in the P470/P370 RF
Scanners Product Reference Guide (p/n 72-38495-xx). The Product Reference
Guide is included on the CD shipped with the scanner. It is also available on the
Symbol Web site at: http://www.symbol.com/manuals.
Mandatory steps are designated by an asterisk (*). If an item has multiple pages
referenced, the most important reference is in bold.
Topic PRG Page
1. Setting Up the System
• Connecting the cradle to a host * 2-1
- RS-232 connection
- Synapse connection (keyboard wedge, USB, etc.)
• Charging the battery * 1-3, 2-8
• Pairing the scanner with the cradle * 2-6
- RF channel
- Coexisting in Spectrum24 environments
2. Using the Default Applications
• Overview of Scan and Transmit application* 3-2
• Keypad operatio n 3-2, 3-3, 3-22
• Eliminating repe titive scann ing 3-4
• Selecting the host communication protocol 3-2, 3-8, 5-8
- - RS-232 baud rate
3. Programming an Advanc ed Data Formatting Rule Using
123Scan
4. Troubleshooting Problem s
• Troubleshooting table 3-24
• Communication errors 3-5, D-2
• Beeper indications and default application error codes 4-7
• Cradle LED indications 4-3
2-2
2-3
3-8, 5-13, C-1
2-7
5-81
3-17
Page 7

Quick Reference Guide 7
Test Symbols
Code 128
EAN-8
13 Mil UPC
Code 39
Page 8

8 P370 / 470 RF Scanner
Regulatory Information
All Symbol devices are designed to be compliant with rules and regulations in locations they
are sold and are labeled as required.
Any changes or modifications to Symbol Technologies equipment, not expressly approved by
Symbol Technologies, could void the user's authority to operate the equipment.
CAUTION Only use Symbol approved and UL Listed accessories, battery packs and
Do NOT attempt to charge damp/wet mobile compute r s or batteries. All components must be
dry before connecting to an external power source.
Country Approvals
Regulatory markings are applied to the device signifying the radio (s) are approved fo r use in
the following countries: United States, Canada, Australia, Japan and Europe.
Please refer to the Symbol Declaration of Conformity (DoC) for details of other country
markings. This is available at http://www2.symbol.com/doc/.
Operation of the device without regulatory approval is illegal.
Health and Safety Recommendations
Ergonomic Recommendations
battery chargers.
CAUTION In order to avoid or minimize the potential risk of ergonomic injury follow
- Reduce or eliminate repetitive motion.
- Maintain a natural position.
- Reduce or eliminate excessive force.
- Keep objects that are used frequently within easy reach.
- Perform tasks at correct heights.
- Reduce or eliminate vibration.
- Reduce or eliminate direct pressure.
- Provide adjustable workstations.
- Provide adequate clearance.
- Provide a suitable working environment.
- Improve work procedures.
the recommendations below. Consult wit h your local Health & Safety
Manager to ensure that you are adhering to your company's safety
programs to prevent employee injury.
Vehicle or Forklift Installation
RF signals may affect improperly installed or inadequately shielded electronic systems in
motor vehicles (including safety systems). Check with the manufacturer or its representative
regarding your vehicle. You should also consult the manufacturer of any equipment that has
been added to your vehicle.
Position your device within easy reach. Be able to access your device without remo ving your
eyes from the road.
Page 9

Quick Reference Guide 9
Warnings for Use of Wireless Devices
Please observe all warning notices with regard to the usage of wireless devices.
Potentially Hazardous Atmospheres
You are reminded of the need to observe restrictions on the use of radio devices
in fuel depots, chemical plants etc. and areas where the air contains chemicals or
particles (such as grain, dust, or metal powders) and any other area where you
would normally be advised to turn off your vehicle engine.
Safety in Hospitals
Wireless devices transmit radio frequency energy and may affect medical
electrical equipment.
Wireless devices should be switched off wherever you are requested to do so in
hospitals, clinics or health care facilities. These requests are designed to prevent
possible interference with sensitive medical equipment.
Pacemakers
Pacemaker manufacturers recommended that a minimum of 15cm (6 inches) be
maintained between a handheld wireless device and a pacemaker to avoid
potential interference with the pacemaker. These recommendations are
consistent with independent research and recommendations by Wireless
Technology Research.
Persons with Pacemakers:
- Should ALWAYS keep the device more than 15cm (6 inches) from their p acemaker
when turned ON.
- Should not carry the device in a breast pocket.
- Should use the ear furthest from the pacemaker to minimize the potential for
interference.
If you have any reason to suspect that interference is taking place, turn OFF your
device
Hearing Aids
The wireless device may interfere with some hearing aids. In the event of
interference you may want to consult your hearing aid supplier to discuss
solutions.
Other Medical Devices
Please consult your physician or the manufacturer of the medical device, to
determine if the operation of your wireless product may interfere with the medical
device.
Page 10

10 P370 / 470 RF Scanner
FCC / EU RF Exposure Guidelines
Safety Information
The device complies with Internationally recognized standards covering Specific
Absorption Rate (SAR) related to human exposure to electromagnetic fields from
radio devices.
Reducing RF Exposure - Use Properly
It is advisable to use the device only in the normal operating position.
Handheld Devices
To comply with FCC RF exposure requirements, this device must be operated in
the hand with a minimum separation distance of 20 cm or more from a person's
body. Other operating configurations should be avoided.
Laser Devices
Complies with 21CFR1040.10 and 1040.1 1 except for deviati ons pursuant to Laser Notice No.
50, dated July 26, 2001.
EN60825-1:1994+ A1:2002 +A2:2001
IEC60825-1:1993+A1:1997+A2:2001
The laser classification is marked on one of the labels on the device.
Class 1 Laser devices are not considered to be hazardous when used for their intended
purpose. The following statement is required to comply with US and international regulations:
CAUTION Use of controls, adjustments or performance of procedures other than
Class 2 laser scanners use a low power, visible light diode. As with any very bright light
source, such as the sun, the user should avoi d st aring directly int o the ligh t beam. Mo menta ry
exposure to a Class 2 laser is not known to be harmful.
those specified herein may result in hazardous laser light exposure.
Scanner Labeling
CAUTION
LASER LIGHT-DO NOT STARE INTO BEAM
630-680 nM LASER 1.0 mW MAX OUTPUT
CLASS II LASER PRODUCT
LASERLICHT - NICHT IN DEN STRAHL BLICKEN, LASER KLASSE 2
LUMIERE LASER-NE PAS REGARDER DANS LE FAISCEAU
APPARIEL A LASER DE CLASSE 2. CAUTION-LASER LIGHT DO NOT
STARE INTO BEAM. IEC CLASS 2 LASER PRODUCT 630-680mW LASER
Page 11

Quick Reference Guide 11
In accordance with Clause 5, IEC 825 and EN60825, the following informat i on is provided to
the user:
ENGLISH HEBREW
CLASS 1 CLASS 1 LASER PRODUCT
CLASS 2 LASER LIGHT
DO NOT STARE INTO BEAM
CLASS 2 LASER PRODUCT
DANISH / DANSK ITALIAN / ITALIANO
KLASSE 1 KLASSE 1 LASERPRODUKT CLASSE 1 PRODOTTO AL LASER DI CLASSE 1
KLASSE 2 LASERLYF CLASSE 2 LUCE LASER
SE IKKE IND I STRÅLEN NON FISSARE IL RAGGIOPRODOTTO
KLASSE 2 LASERPRODUKT AL LASER DI CLASSE 2
DUTCH / NEDERLANDS NORWEGIAN / NORSK
KLASSE 1 KLASSE-1 LASERPRODUKT KLASSE 1 LASERPRODUKT, KLASSE 1
KLASSE 2 LASERLICHT KLASSE 2 LASERLYS IKKE STIRR INN I LYSSTRÅLEN
NIET IN STRAAL STAREN LASERPRODUKT, KLASSE 2
KLASSE-2 LASERPRODUKT
FINNISH / SUOMI PORTUGUESE / PORTUGUÊS
LUOKKA 1 LUOKKA 1 LASERTUOTE CLASSE 1 PRODUTO LASER DA CLASSE 1
LUOKKA 2 LASERVALO CLASSE 2 LUZ DE LASER NÃO FIXAR O RAIO LUMINOSO
ÄLÄ TUIJOTA SÄDETTÄ PRODUTO LASER DA CLASSE 2
LUOKKA 2 LASERTUOTE
FRENCH / FRANÇAIS SPANISH / ESPAÑOL
CLASSE 1 PRODUIT LASER DE CLASSE 1 CLASE 1 PRODUCTO LASER DE LA CLASE 1
CLASSE 2 LUMIERE LASER CLASE 2 LUZ LASER
NE PAS REGARDER LE RAYON FIXEMENT NO MIRE FIJAMENTE EL HAZ
PRODUIT LASER DE CLASSE 2 PRODUCTO LASER DE LA CLASE 2
GERMAN / DEUTCH SWEDISH / SVENSKA
KLASSE 1 LASERPRODUKT DER KLASSE 1 KLASS 1 LASERPRODUKT KLASS 1
KLASSE 2 LASERSTRAHLEN KLASS 2 LASERLJUS STIRRA INTE MOT STRÅLEN
NICHT DIREKT IN DEN LASERSTRAHL SCHAU E N LASERPRODUKT KLASS 2
LASERPRODUKT DER KLASSE 2
CHINESE / ㅔԧЁ᭛
1㉏ 1㉏▔ܝѻક
2㉏ ▔ܝ
ߛ࣓⊼㾚ܝᴳ
2㉏▔ܝѻક
JAPANESE / ᣣᧄ⺆
ࠢࠬޓࠢࠬࠩຠ
ࠢࠬޓࠩశ✢
శ✢ࠍ⋥ⷞߒߥߢߊߛߐ
ࠢࠬࠩຠ
KOREAN /G䚐ạ㛨
X☥ἽG X☥ἽG⤼㢨㤴G㥐䖼
Y☥ἽG ⤼㢨㤴Gṅ㉔
GG 㢨Gṅ㉔㡸G㨰㐐䚌㫴G⫼㐡㐐㝘U
GG Y☥ἽG⤼㢨㤴G㥐䖼
Power Supply
Use only a Symbol approved power supply 50-14000-101 output rated 9 Vdc and minimum 1
A. The power supply is certified to EN60950-1 with SELV outputs. Use of an alternative powe r
supply invalidates any approval given to this device and may be dangerous.
Batteries
Please follow the local regulations when disposing of re-chargeable batteries.
Taiwan - Recycling
EPA (Environmental Protection Administration) requires dry battery producing or importing
firms in accordance with Article 15 of the Waste Disposal Act are required to indicate the
Page 12

12 P370 / 470 RF Scanner
recycling marks on the batteries used in sales, giveaway or promotion. Contact a qualified
Taiwanese recycler for proper battery disposal.
Symbol Rechargeable Batteries
Symbol rechargeable battery packs are designed and constructed to the highest standards
within the industry. However, there are limitations to how long a battery can operat e or be
stored before needing replacement. Many factors af fect th e life of a battery pa ck such as heat,
cold, customer usage profiles, age, and severe drops.
When batteries are stored over a year, battery cell manufacturers advise that some
irreversible deterioration in overall battery quality may occur. To minimize this loss, they
recommend storing batteries half charged in a dry, cool place between 41° and 77°F (5° and
25°C), the cooler the better) and removed from the equipment to prevent the loss of capacity.
Batteries should be charged to half capacity at least once a year. If an electrolyte leakage is
observed, avoid any contact with the affected area and properly dispose of the battery.
Replace the battery when a significant loss of run ti me is detect ed. Bat teries must be charge d
within the 32° to 104°F (0° to 40°C) temperature range.
The standard warranty period for all Symbol batt eries is 30 days, r egardless if t he ba ttery was
purchased separately or included as part of the mobile computer. For more information on
Symbol batteries, please visit http://mysymbolcare.symbol.com/battery/batbasics1.html.
Radio Frequency Interference Requirements-FCC
Tested to comply
with FCC Standards
FOR HOME OR OFFICE USE
and can radiate radio frequency energy and, if not installed and used in accordance with the
instructions, may cause harmful interference to radio communications. However there is no
guarantee that interference will not occur in a particular installation. If this equipment does
cause harmful interference to radio or television reception, which can be determined by
turning the equipment off and on, the user is encouraged to try to correct the interference by
one or more of the following measures:
- Reorient or relocate the receiving antenna.
- Increase the separation between the equipment and receiver.
- Connect the equipment into an outlet on a circuit different from that to which the
receiver is connected.
- Consult the dealer or an experienced radio/TV technician for help.
Radio Transmitters (Part 15)
This device complies with Part 15 of the FCC Rules. Operation is subject to the following two
conditions: (1) this device may not cause harmful interference, and (2) this device must
accept any interference received, including interference that may cause undesired operation.
Note: This equipment has been tested and found to comply with the limits
for a Class B digital device, pursuant to Part 15 of the FCC rules. These
limits are designed to provide reasonable protection against harmful
interference in a residential installation. This equipment generates, uses
Radio Frequency Interference Requirements - Canada
This Class B digital apparatus complies with Canadian ICES-003.
Cet appareil numérique de la classe B est conforme à la norme NMB-003 du Canada.
Page 13

Quick Reference Guide 13
Radio Transmitters
This device complies with RSS 210 of Industry & Science Canada. Operation is sub ject to the
following two conditions: (1) this device may not cause harmful interference and (2) this
device must accept any interference received, including interference that may cause
undesired operation.
Label Marking: The T erm "IC:" bef ore the radio certification only signifies that Industry Canada
technical specifications were met.
Marking and European Economic Area (EEA)
2.4GHz devices for use through the EEA have the following restrictions:
- Maximum radiated transmit power of 10 mW EIRP in the frequency range 2.400
-2.4835 GHz
- France, equipment is restricted to 2.446 -2.454 GHz frequency range
- Italy requires a user license for outside usage.
Statement of Compliance
Symbol Technologies, Inc., hereby, declares that this device is in compliance with the
essential requirements and other relevant provisions of Directive 1999/5/EC. A Declaration of
Conformity may be obtained from http://www2.symbol.com/doc/.
Brazil
Declarações Regulamentares para P370, P470 PL370 y PL470 BRAZIL
NOTA: A marca de certificação se aplica ao Equip. de Radiação Restrita, model P470 y
PL470. Este equipamento opera em caráter secundário, isto é, não tem direito a prot eção
contra interferência prejudicial, mesmo de estações do mesmo tipo, e não pode causar
interferência a sistemas operando em caráter primário."
Para maiores consultas sobre ANATEL consulte o site: www.anatel.gov.br
The following signifies approval in Brazil.
Waste Electrical and Electronic Equipment (WEEE)
English: For EU Customers: All products at the end of their life must be returned to Symbol
for recycling. For information on how to return product, please go to:
http://www.symbol.com/environmental_compliance.
Dansk: Til kunder i EU: Alle produkter skal returneres til Symbol til recirkulering, når de er
udtjent. Læs oplysningerne om returnering af produkter på:
http://www.symbol.com/environmental_compliance.
Page 14

14 P370 / 470 RF Scanner
Deutsch: Für Kunden innerhalb der EU: Alle Produkte müssen am Ende ihrer Lebensdauer
zum Recycling an Symbol zurückgesandt werden. Informationen zur Rücksendung von
Produkten finden Sie unter http://www.symbol.com/environmental_compliance.
Eesti: EL klientidele: kõik tooted tuleb nende eluea lõppedes tagastada taaskasutamise
eesmärgil Symbol'ile. Lisainformatsiooni saamiseks toote t agastamise kohta külastage palun
aadressi: http://www.symbol.com/environmental_compliance.
Español: Para clientes en la Unión Europea: todos los productos deberán entregarse a
Symbol al final de su ciclo de vida para que sean reciclados. Si desea má s info rmación sobre
cómo devolver un producto, visite: http://www.symbol.com/environmental_compliance.
Français : Clients de l'Union Européenne : Tous les produits en fin de cycle de vie doivent
être retournés à Symbol pour recyclage. Pour de plus amples informations sur le retour de
produits, consultez : http://www.symbol.com/environmental_compliance.
Italiano: per i clienti dell'UE: tutti i prodotti che sono giunti al termine del rispettivo ci clo di vit a
devono essere restituiti a Symbol al fine di consentirne il riciclaggio. Per informazion i sull e
modalità di restituzione, visitare il seguente sito Web:
http://www.symbol.com/environmental_compliance.
Magyar: Az EU-ban vásárlóknak: Minden tönkrement terméket a Symbol vállalathoz kell
eljuttatni újrahasznosítás céljából. A termék visszajuttatásának módjával kapcsolatos
tudnivalókért látogasson el a http://www.symbol.com/environmental_compliance weboldalra.
Nederlands: Voor klanten in de EU: alle producten dienen aan het ei nde van hun levensduur
naar Symbol te worden teruggezonden voor recycling. Raadpleeg
http://www.symbol.com/environmental_compliance voor meer informatie over het
terugzenden van producten.
Português: Para clientes da UE: todos os produtos no fim de vida devem ser devolvidos à
Symbol para reciclagem. Para obter informações sobre como devolver o produto, visite:
http://www.symbol.com/environmental_compliance.
Page 15

Quick Reference Guide 15
Slovenski: Za kupce v EU: vsi izdelki se morajo po poteku življenjske dobe vrniti podjetju
Symbol za reciklažo. Za informacije o vraèilu izdelka obišèite:
http://www.symbol.com/environmental_compliance.
Suomi: Asiakkaat Euroopan unionin alueella: Kaikki tuotteet on palau tettava kierrätettäväksi
Symbol-yhtiöön, kun tuotetta ei enää käytetä. Lisätietoja tu otteen palauttamisesta on
osoitteessa http://www.symbol.com/environmental_compliance.
Svenska: För kunder inom EU: Alla produkter som uppnått sin livslängd måste returneras till
Symbol för återvinning. Information om hur du returnerar produkten finns på
http://www.symbol.com/environmental_compliance.
Page 16

Service Information
Before you use the unit, it must be configured to operate in your facility’s network
and run your applications.
If you have a problem running your unit or using your equipment, contact your
facility’s Technical or Systems Support. If there is a problem with the equipment,
they will contact the Symbol Support Center:
United States 1-800-653-5350 Canada 905-629-7226
United Kingdom 0800 328 2424 Asia/Pacific 337-6588
Australia 1-800-672-906 Austria/Österreich 01-5055794-0
Denmark/Danmark 7020-1718 Finland/Suomi 9 5407 580
France 01-40-96-52-21 Germany/
Italy/Italia 2-484441 Mexico/México 5-520-1835
Netherlands/Nederland315-271700 Norway/Norge +47 2232 4375
South Africa 11-809 5311 Spain/España +913244000
Sweden/Sverige 08 445 29 00 Europe/Mid-East
Latin America
Sales Support
For the latest version of this guide go to: http://www.symbol.com/manuals.
Inside USA: 1-800-347-0178;
Outside USA: +1.954.255.2610
Deutschland
Distributor
Operations
6074-49020
Contact local
distributor or call
+44 118 945 7360
72-38493-01
Revision D - May 2006
Symbol Technologies, Inc.
One Symbol Plaza Holtsville, N.Y. 11742-1300
http://www.symbol.com
 Loading...