

Page 1

WSS 1000 System
Page 2

WSS 1000 System
1999-2000 SYMBOL TECHNOLOGIES, INC. All rights reserved.
Symbol reserves the right to make changes to any product to improve
reliability, function, or design.
Symbol does not assume any product liability arising out of, or in
connection with, the application or use of any product, circuit, or
application described herein.
No license is granted, either expressly or by implication, estoppel, or
otherwise under any patent right or patent, covering or relating to any
combination, system, apparatus, machine, material, method, or process in
which Symbol products might be used. An implied license only exists for
equipment, circuits, and subsystems contained in Symbol products.
Symbol and the Symbol logo are registered trademarks of Symbol
Technologies, Inc. Other product names mentioned in this manual may be
trademarks or registered trademarks of their respective companies and are
hereby acknowledged.
Symbol Technologies, Inc.
One Symbol Plaza
Holtsville, N.Y. 11742-1300
http://www.symbol.com
Page 3

Quick Reference
Introduction
The WSS 1000 is a wearable data entry system consisting
of a laser bar code scanner, usually worn on the
operator’s fingers or back of hand, and a wrist computer
(WWC 1000) worn on the operator’s forearm.
The detachable components work equally well for rightand left-handed individuals. Detachable personal mounts
allow multiple operators to share both scanner and wrist
computer without having to use the same mount.
About This Guide
This guide presents information on system components,
assembling the WWC 1000, battery installation and
charging, attaching the system, using the keyboard, and
disassembly for use by others. For wearable scanner
information, refer to the
Guide
scanner.
Quick Reference Guide
, or the
WSS 1000 Product Reference
provided with your
1
Page 4

WSS 1000 System
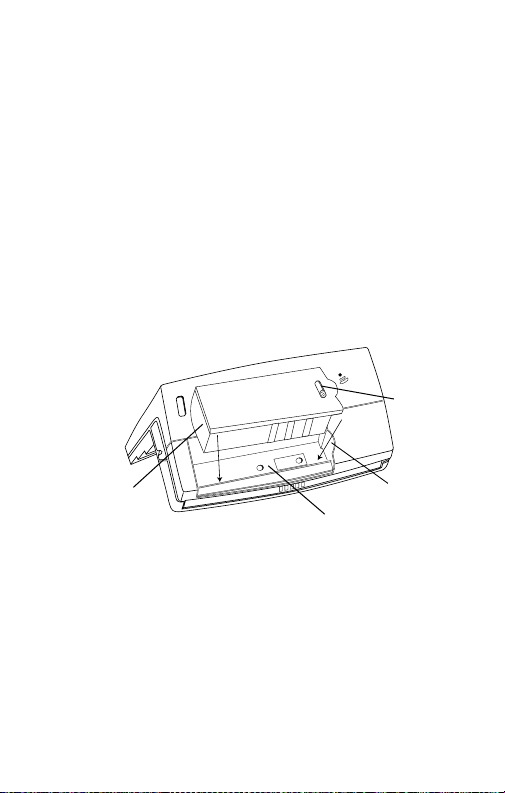
Parts of the WSS 1000 System
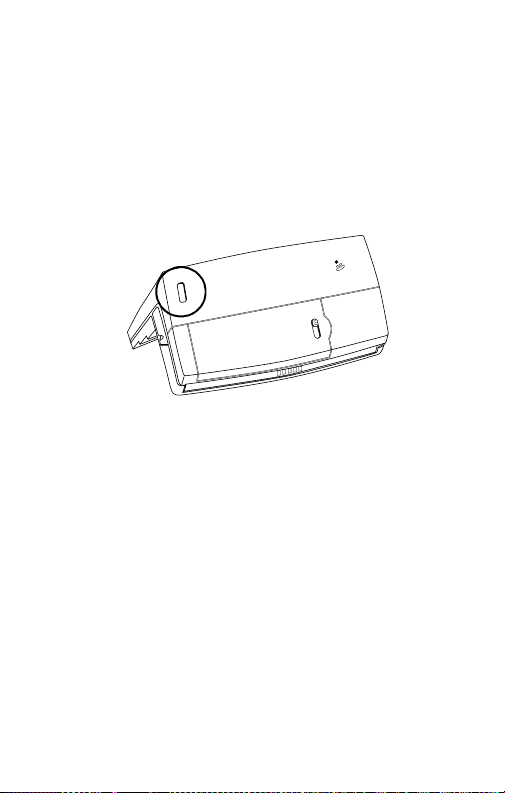
WWC 1000 (Wrist Computer) Front
Display
Key b oar d
WWC 1000 Top
Speaker
Power
Switch
Battery
Latch
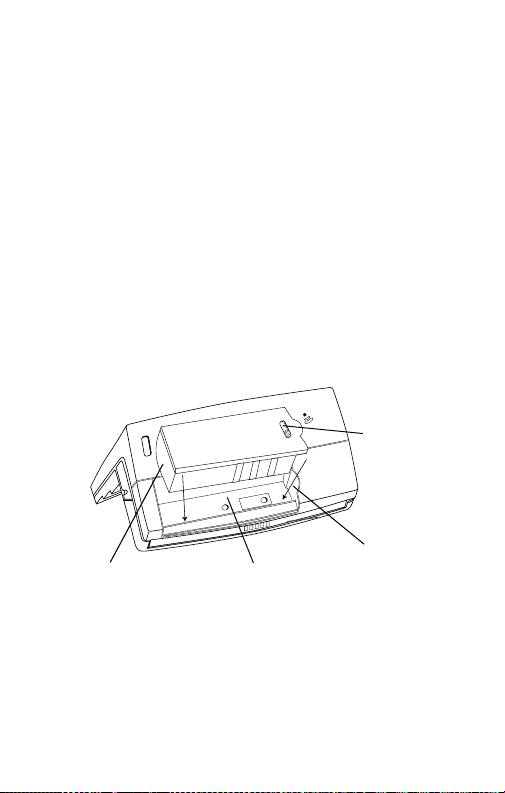
Lithium-Ion
Battery
Adjustable
Straps
Battery Charging
Contacts
WWC 1000 Wrist Mount
Snap-On
Bar
2
Page 5
Quick Reference
Installing and Charging the Battery
The wrist computer and scanner are powered by a
Lithium-Ion battery pack. The pack provides power for
a typical 8-hour shift.
Note:
To install the battery pack in the WWC 1000:
1. Insert the battery pack, base first, in the battery
Before using the wrist computer, install and
fully charge the Lithium-Ion battery pack.
compartment.
Battery
Latch
Battery Pack
Base
2. Line up the pack’s locking mechanism with the
notch in the battery compartment wall by sliding
the battery latch, and press the pack into place.
3. Release the battery latch to lock in place.
Battery
Compartment
3
Notch
Page 6
WSS 1000 System
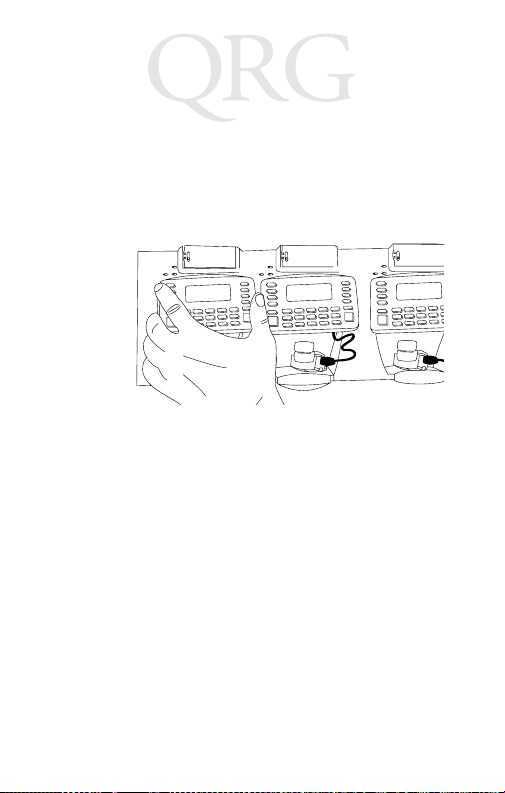
Charging the Battery in WWC 1000
To charge the Lithium-Ion battery in the WWC 1000:
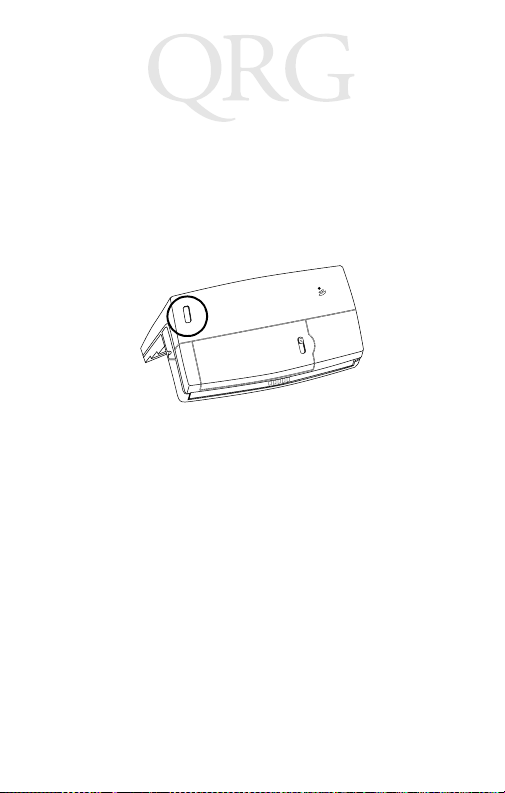
1. Place the WWC 1000 in the cradle as shown below:
2. The cradle’s CHARGING light illuminates (RED)
if the WWC 1000 is properly seated and the battery is charging.
3. The battery requires approximately 2 hours to
charge fully. The CHARGING light changes to
GREEN when the battery is fully charged.
4. To remove the WWC 1000 from the cradle, tilt the
WWC 1000 upward and pull out.
For more information on the CS 1000 Cradle, refer to the
70-16237-xx, or the
p/n 70-17661-xx.
CS 1000 Single-Slot Cradle QRG
CS 1000 4-Slot Cradle QRG
, p/n
,
4
Page 7

Quick Reference
Charging the Spare Battery
Spare battery packs can be charged separate from the
WWC 1000. To charge a spare battery pack in the cradle:
1. Insert the pack in the cradle’s spare charging slot.
2. The CHARGING light illuminates red.
3. The spare pack is charged in approximately two
hours, even if the WWC 1000 is charging at the
same time. The CHARGING light changes to
green when the battery is fully charged.
5
Page 8
WSS 1000 System
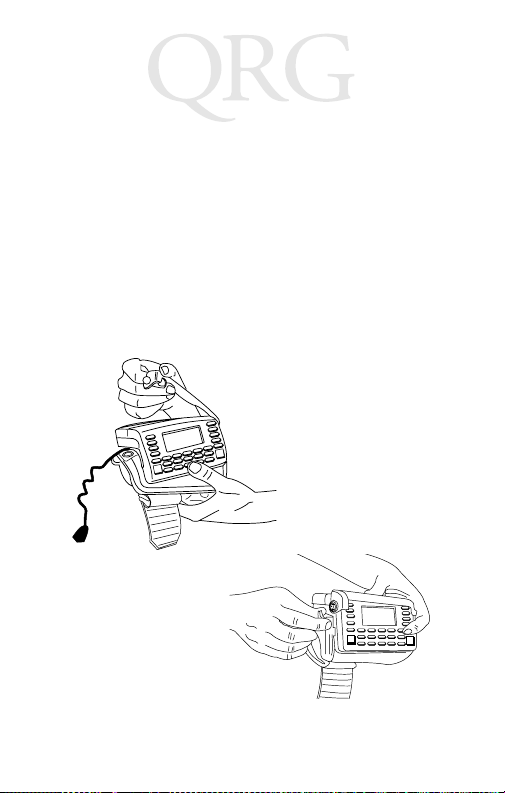
Assembling the WSS 1000 System
To assemble the WWC 1000 (wrist computer):
1. Place the WWC 1000 wrist computer onto the
wrist mount, facing you. Be sure the mount is oriented so that the longer strap will be further up the
forearm.
2. Snap the bar over the WWC 1000 using the snaps
on either side of the mount. The straight part of the
bar should lay across the front of the WWC 1000;
the curved part in back.
6
Page 9
Quick Reference
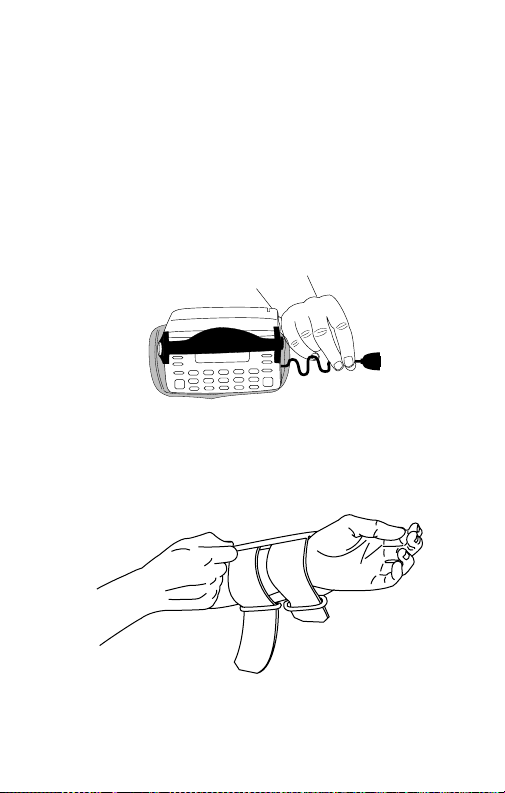
Note:
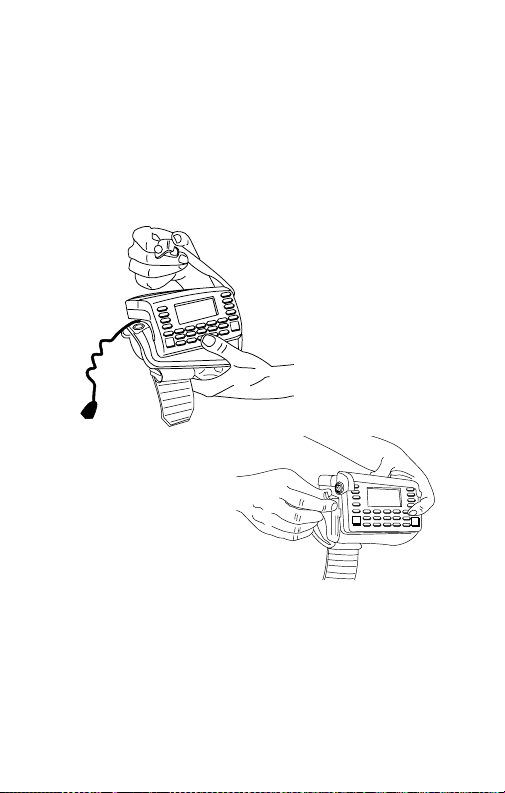
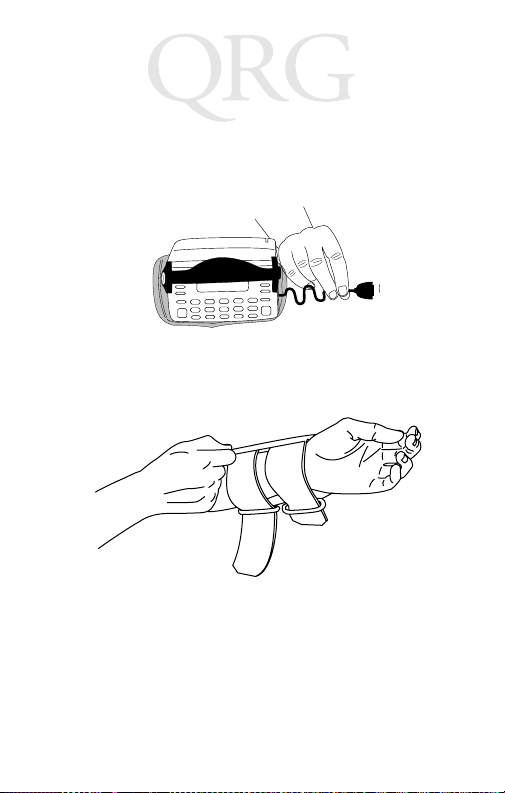
3. Plug the cable connector from the WWC 1000 in
4. Place the WWC 1000 on your arm:
The snaps on the wrist mount act as a tearaway device allowing the wrist computer to
detach from the mount if it catches on an
object.
the interface port on the back of the scanner.
a. Slide the wrist mount on your arm, so that the
WWC 1000 wrist computer faces you.
7
Page 10

WSS 1000 System
b. Pull the straps through the buckles so the wrist
mount is secure but not tight.
c. Use the Velcro to secure the straps.
5. Assemble and mount your scanner. See your scan-
Quick Reference Guide
ner’s
Product Reference Guide
.
, or the
WSS 1000
8
Page 11
Quick Reference
Powe r
Once the battery pack is fully charged, you are ready to
use the wrist computer.
To power the wrist computer on, press the power switch
on top of the WWC 1000.
Display Light and Contrast
To turn the display light and keypad backlight on, press
LAMP (Left Alpha
• press
• press
FUNC
FUNC
and
and
and
Help
). To adjust the contrast:
SPACE
to darken the contrast,
BKSP
to lighten the contrast.
9
Page 12

WSS 1000 System
Communicating with the Host
Using the Cradle
The CS 1000 cradle is used to perform communications
with a host PC. To set up the cradle for operation:
1. Plug one end of a null modem cable (p/n 5984603-00) into the communications port located on
the left end of the cradle.
2. Connect the other end of the cable to the host computer’s serial (COMM) port.
3. Provide power to the cradle by plugging the power
supply’s round connector into the power port on
the cradle and the other end of the power cable in
an electrical outlet.
4. Insert the WWC 1000 in the cradle (the ring scanner can be attached).
5. Start the communications program as detailed in
WSS 1000 Product Reference Guide
the
Radio Communications
Wireless communication with the host is available
through the Spectrum One
network. For information on performing radio
communications, refer to the
Reference Guide
.
or Spectrum24
WSS 1000 Product
.
radio
10
Page 13
Quick Reference
Data Entry
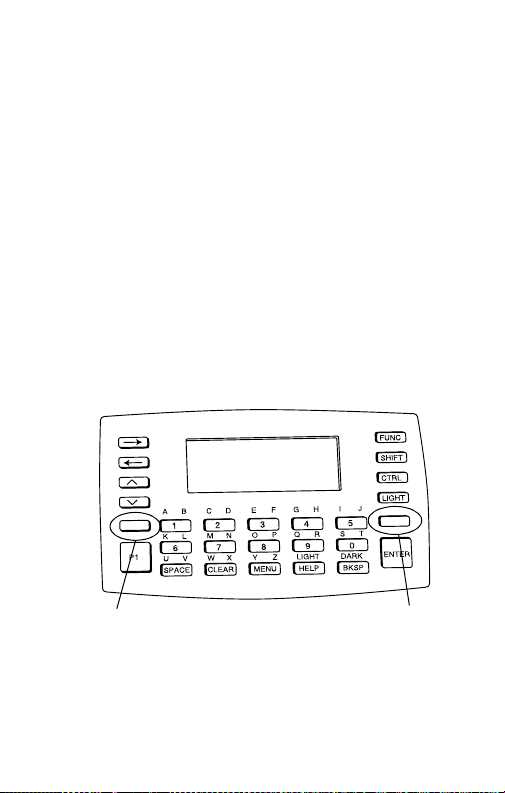
Using the Keyboard
The keyboard consists of two types of keys:
alphanumeric character keys and modifier keys. Most
keys are self-explanatory. Some guidelines for using the
keyboard include:
• Press keys one at a time. Pressing two keys simultaneously produces an error.
• The default keyboard produces numbers; to produce letters, press the left Alpha Shift and the appropriate key to produce the letters in purple,
and the right Alpha Shift to produce the letters
in green, as shown below.
Left Alpha Shift
• Use the modifier keys,
in combination with the character keys to produce
other characters or to issue commands. Refer to
FUNC, SHIFT
Right Alpha Shift
, and
11
CTRL
,
Page 14

WSS 1000 System
documentation for your application for more information.
• Cursor position is controlled by the
Down Arrow, Left Arrow
, and
Up Arrow
Right Arrow
,
keys.
Removing the WWC 1000 from the Mount
The WWC 1000 can be removed from the wrist mount
for use by other operators.
To remove the WWC 1000:
1. Detach the cable connection to the scanner.
2. Unsnap the bar securing the wrist computer.
3. Lift the WWC 1000 out of the mount.
Cleaning
Wrist Computer
To clean the wrist computer, use a clean, soft cloth
dampened with a mild cleaner such as soap and water.
Do not use abrasive paper, cloth, or abrasive/corrosive
cleaners. Clean the keypad and scanner triggers, and
wipe the display window with lens tissue.
Wrist Mount
Remove the bar from the wrist mount. Hand wash the
fabric mount with warm water using a mild detergent
and air dry (see tag on mount for washing instructions).
12
Page 15

Guide utilisateur
Introduction
Le WSS 1000 est un système de saisie de données prêt-àporter qui se compose d'un lecteur laser de codes à
barres, généralement fixé sur le doigt de l'opérateur ou
sur le dos de sa main, et d'un terminal de poignet (WWC
1000) fixé sur son avant-bras.
Les composants amovibles sont conçus pour s’adapter
aux droitiers comme aux gauchers. Les dispositifs de
fixation individuels amovibles permettent à différents
opérateurs de partager le même matériel (lecteur en
forme de bague et terminal) tout en disposant chacun de
son propre support individuel.
Objet de ce guide
Ce guide présente des informations sur les composants
du système, montage du WWC 1000, la mise en place et
la charge de la batterie, la fixation du système,
l’utilisation du clavier et du lecteur et le démontage des
composants amovibles lorsque le système doit être utilisé
par un autre opérateur. Pour obtenir des informations
sur le lecteur prêt-à-porter WSS 1000, reportez-vous au
Guide utilisateur du WSS 1000
fourni avec le lecteur
.
Guide utilisateur
ou au
13
Page 16

WSS 1000 System
r
Composants du système WSS 1000
Vue avant du WWC 1000 (terminal)
Ecran
Clavier
Partie supérieure du WWC 1000
Interrupteur
Marche/Arrêt
Batterie
lithium-ion
Sangles
réglables
Dispositif de fixation de
poignet du WWC 1000
Barre
amovible
Haut-parleu
Loquet de
verrouillage
des batteries
Plots de charge
des batteries
14
Page 17
Guide utilisateur
s
Mise en place et charge de la batterie
Le terminal et le lecteur sont alimentés par un pack de
batteries lithium-ion qui assure une autonomie de 8
heures.
Remarque :
Mise en place du pack de batteries dans le WWC 1000 :
1. Insérez le pack de batteries par la base dans son
compartiment.
Avant d’utiliser l’ordinateur de
poignet, insérez et chargez
complètement le pack de batteries
lithium-ion.
Loquet de
verrouillage
des batterie
Base du pack de
batteries
2. Alignez le mécanisme de verrouillage du pack avec
l’encoche dans la paroi du compartiment en appuyant sur le pack jusqu’à ce qu’il s’enclenche.
3. Pour verrouiller la batterie, relâchez le loquet.
Compartiment
des batteries
Encoche
15
Page 18

WSS 1000 System
Charge de la batterie dans le WWC 1000
Pour charger la batterie lithium-ion dans le WWC 1000,
procédez comme suit :
1. Placez le WWC 1000 dans le puits de chargement
et de communication comme indiqué ci-dessous :
2. Le témoin CHARGE du puits s’allume (ROUGE)
lorsque le WWC 1000 est correctement enclenché
et que la batterie est en cours de charge.
3. La charge complète de la batterie prend environ 2
heures. Le témoin CHARGE vire au VERT une
fois la charge terminée.
4. Pour extraire le WWC 1000 du puits, inclinez le
WWC 1000 vers le haut et extrayez-le.
Pour plus d'informations sur le puits de chargement et de communications CS 1000, reportezvous au Guide utilisateur CS 1000 à une position,
réf. 70-16237-xx ou au Guide utilisateur CS 1000
à quatre positions, réf 70-17661-xx.
16
Page 19

Guide utilisateur
Charge de la batterie de rechange
Vous pouvez charger des packs de batteries hors du
WWC 1000. Pour charger un pack de batteries de
rechange dans le puits, procédez comme suit :
1. Insérez le pack dans le compartiment prévu à cet
effet.
2. Le témoin CHARGE rouge s’allume.
3. Il faut environ deux heures pour charger le pack de
rechange, même si le WWC 1000 est chargé en
mê me t emp s. L e tém oin CHA RGE vir e au ver t un e
fois la charge terminée.
17
Page 20

WSS 1000 System
Montage du système WSS 1000
Pour monter le WWC 1000 (terminal) :
1. Placez le terminal WWC 1000 sur le dispositif de
fixation, face à vous. Lorsque le dispositif est correctement positionné, la sangle la plus longue se
trouve sur la partie supérieure de l’avant-bras.
18
Page 21
Guide utilisateur
2. Fixez la barre au-dessus du WWC 1000 au moyen
des boutons pression situés de part et d’autre du
dispositif de fixation. La partie droite de la barre
doit reposer sur l’avant du WWC 1000, la partie
incurvée sur l’arrière.
Remarque :
Les boutons pression du support de
fixation constituent un dispositif de
dégagement qui désolidarise le
terminal du support lorsqu’il se coince
dans un objet.
19
Page 22
WSS 1000 System
3. Branchez le connecteur du câble du WWC 1000
sur le port d'interface qui se trouve sur l'arrière du
lecteur.
4. Fixez le WWC 1000 sur votre bras:
a. Enfilez le dispositif de fixation sur le bras, le
WWC 1000 tourné vers vous.
20
Page 23

Guide utilisateur
b. Tirez les sangles dans les passants afin que le
dispositif reste bien en place sans toutefois être
trop serré.
c. Utilisez le velcro pour fixer les sangles.
5. Montez et fixez votre lecteur. Consultez le
utilisateur
Guide utilisateur du WSS 1000
ou le
Guide
.
21
Page 24
WSS 1000 System
Alimentation
Une fois le pack de batteries chargé, le terminal est prêt à
être utilisé.
Pour mettre l’ordinateur sous tension, appuyez sur
l’interrupteur Marche/Arrêt situé sur la partie supérieure
du WWC 1000.
Eclairage et contraste de l’écran
Pour mettre l’éclairage de l’écran et le rétroéclairage du
pavé numérique en marche, appuyez sur
Alpha
Help
et
). Pour régler le contraste :
• appuyez sur
contraste ;
• appuyez sur
traste.
FUNC et SPACE
FUNC
et
BKSP
LAMP (Left
pour assombrir le
pour éclaircir le con-
22
Page 25

Guide utilisateur
Communication avec l’ordinateur central
Utilisation du puits de chargement et de communication
Le puits de chargement et de communication CS 1000
sert à établir des communications avec un PC central.
Pour ce faire :
1. Branchez un câble faux modem (réf. 59846-03-00)
sur le port de communication situé sur partie la
gauche du puits.
2. Branchez l’autre extrém ité du câble sur le port série
(COMM) de l’ordinateur central.
3. Alimentez le puits en branchant le connecteur rond
du cordon d’alimentation sur le port d’alimentation du puits et l’autre extrémité à une prise électrique.
4. Insérez le WWC 1000 dans le puits (le lecteur en
forme de bague peut être raccordé).
5. Lancez le programme de communication comme
indiqué dans le
Communications radio
Vous pouvez communiquer par voie radio avec
l’ordinateur central grâce au réseau radio Spectrum
One
ou Spectrum24. Pour plus d’informations sur les
communications radio, reportez-vous au
utilisateur du WSS 1000
Guide utilisateur du WSS 1000.
Guide
.
23
Page 26

WSS 1000 System
Saisie des données
Utilisation du clavier
Le clavier comprend deux types de touches : les touches
de caractères alphanumériques et les touches de
commutation. La plupart des touches sont explicites.
Voici quelques conseils sur l’utilisation du clavier :
• Actionnez les touches l’une après l’autre. En appuyant simultanément sur deux touches, vous produisez une erreur.
• Le clavier par défaut tape des chiffres. Pour
taper des lettres, appuyez sur la touche gauche
de commutation alphanumérique, puis sur la
touche souhaitée pour produire des lettres en violet, et sur la touche droite de commutation al-
24
Page 27

Guide utilisateur
e
phanumérique pour produire des lettres en vert,
comme indiqué ci-dessous.
Touche gauche
de commutation
alphanumérique
• Utilisez les touches de commutation
SHIFT
caractères pour produire d’autres caractères ou
pour exécuter des commandes. Reportez-vous à la
documentation de votre application pour plus
d’informations.
• La position du curseur est contrôlée par les touches
Flèche haut, Flèche bas, Flèche gauche
droite
, et
.
CTRL
, en association avec les touches de
Touche droite d
commutation
alphanumérique
FUNC
,
Flèche
, et
25
Page 28

WSS 1000 System
Retrait du WWC 1000 du dispositif de fixation
Vous pouvez extraire le WWC 1000 de son dispositif de
fixation lorsqu’il doit être utilisé par d’autres opérateurs.
Pour ce faire :
1. Débranchez le câble raccordé au lecteur.
2. Dégrafez la barre maintenant l’ordinateur de poignet en position.
3. Extrayez le WWC 1000 de son support.
Nettoyage
Terminal prêt à porter
Pour nettoyer le terminal, utilisez un chiffon propre
humecté de détergent doux, par exemple de l’eau et du
savon. N’utilisez pas de papier, de chiffon ou de détergent
abrasif/corrosif. Nettoyez le clavier et les gâchettes du
lecteur et essuyez l’écran avec un chiffon pour optiques.
Dispositif de fixation sur le poignet
Retirez le lecteur de son dispositif de fixation. Lavez la
fixation en tissu à l’eau chaude et au détergent doux et
laissez-la sécher à l’air libre (lire au préalable l’étiquette
pour connaître les instructions de lavage).
26
Page 29

Kurzübersicht
Einführung
Das WSS 1000 ist ein tragbares Dateneingabesystem mit
einem am Finger getragenen Strichcode-Laser-Scanner
und einem am Unterarm befestigten
Handgelenkcomputer (WWC 1000).
Die abnehmbaren Komponenten eignen sich
gleichermaßen für Links- wie Rechtshänder.
Abnehmbare individuelle Befestigungsvorrichtungen
machen es möglich, daß verschiedene Bediener denselben
Ring-Scanner und Handgelenkcomputer benutzen, ohne
daß dieselbe Befestigungsvorrichtung eingesetzt werden
muß.
Zu dieser Übersicht
Die vorliegende Übersicht bietet Informationen zu den
Komponenten des Systems, Montage des WWC 1000,
zum Einsetzen und Laden der Akkus, zum Befestigen des
Systems und zur Demontage zwecks Benutzung durch
andere Bediener. Weitere Informationen zum tragbaren
Scanner können Sie dem
oder der mit Ihrem Scanner gelieferten
entnehmen.
WSS 1000 Produktleitfaden
Kurzübersicht
27
Page 30

WSS 1000 System
Teile des WSS 1000-Systems
WWC 1000 (Handgelenkcomputer) Vorderseite
Display
Ta s t a t u r
Ein-
Ausschalter
Lithiumionen-
akkus
Verstellbare
Riemen
WWC 1000 - Oberseite
WWC 1000 Handgelenkmontage
Schnappverschluß
Lautsprecher
Akkufach-lasche
Akkuladekonta kte
28
Page 31

Kurzübersicht
Einsetzen und Laden des Akkus
Handgelenkcomputer und Scanner werden von einem
Lithium-ionenakku mit Energie versorgt, der
ausreichend Spannung für eine normale 8-StundenSchicht bereitstellt.
Hinweis:
Einsetzen des Akkus in den WWC 1000:
1. Setzen Sie den Akku mit seiner Unterseite zuerst in
das Akkufach ein.
Bevor Sie den Handgelenkcomputer
benutzen, müssen Sie den
Lithiumionenakku einsetzen und
vollständig aufladen.
Akkufachlasche
Basis des
Akkusatzes
2. Richten Sie den Verriegelungsmechanismus des
Akkusatzes auf die Einkerbung in der Wand des
Akkufaches aus, indem Sie an der Akkulasche ziehen und den Akkusatz in seine Position drücken.
3. Lassen Sie die Akkulasche los, um eine Arretierung
zu bewirken.
Akkufach
Einkerbung
29
Page 32

WSS 1000 System
Laden des Akkus im WWC 1000
Laden des Lithiumionenakkus im WWC 1000:
1. Setzen Sie den WWC 1000 wie unten dargestellt in
den Cradle ein:
2. Die CHARGING-Anzeige des Cradles leuchtet
(ROT), wenn der WWC 1000 korrekt sitzt und der
Akku aufgeladen wird.
3. Der Akku ist nach ca. 2 Stunden komplett aufgeladen. Sobald der Ladevorgang abgeschlossen ist,
wechselt die Farbe der CHARGING-Anzeige auf
GRÜN.
4. Um den WWC 1000 aus dem Cradle herauszunehmen, drehen Sie den WWC 1000 nach oben und
ziehen ihn heraus.
Weitere Informationen zum CS 1000 Cradle können Sie der Kurzübersicht zum CS 1000 1-fach
Cradle (p/n 70-16237-xx) oder der Kurzübersicht
zum CS 1000 4-fach Cradle (p/n 70-17661-xx)
entnehmen.
30
Page 33

Kurzübersicht
Laden des Ersatzakkus
Ersatzakkus können unabhängig vom WWC 1000
geladen werden. Ersatzakkus werden wie folgt im Cradle
aufgeladen:
1. Setzen Sie den Akkusatz in den zusätzlichen Ladeplatz des Cradles ein.
2. Die CHARGING-Anzeige leuchtet rot auf.
3. Der Ersatzakku ist selbst bei gleichzeitigem Laden
des WWC 1000 nach ca. 2 Stunden aufgeladen.
Sobald der Akku vollständig aufgeladen ist,
leuchtet die CHARGING- Anzeige grün auf.
Montage des WSS 1000 Systems
Montage des WWC 1000 (Handgelenkcomputers):
1. Setzen Sie den WWC 1000 Handgelenkcomputer
in die auf Sie zeigende Handgelenkmontagevorrichtung ein. Achten Sie bei der Montage darauf,
daß der längere Riemen in Richtung Unterarm
zeigt.
31
Page 34

WSS 1000 System
2. Befestigen Sie den WWC 1000 mit Hilfe der beiden
Klammern der Montagevorrichtung. Dabei sollte
die gerade Klammer die Vorderseite des WWC
1000 fixieren, während die gebogene Klammer
den hinteren Bereich fixiert.
Hinweis:
Die Klammern des
Handgelenkmontagesystems basieren auf
dem Prinzip einer Sollbruchstelle, so daß
der Computer sich löst, sobald er
sich
irgendwo verfängt.
32
Page 35

Kurzübersicht
3. Stecken Sie den Kabelverbinder des WWC 1000 in
die Schnittstellenbuchse auf der Rückseite des
Scanners.
4. Bringen Sie das WWC 1000 an Ihrem Arm an:
a. Schieben Sie die Handgelenkmontagevorrich-
tung über Ihren Arm, so daß der WWC 1000
Ihnen zugewandt ist.
33
Page 36

WSS 1000 System
b. Ziehen Sie die Riemen durch die Schlösser, so
daß die Handgelenkmontagevorrichtung sicher aber nicht fest sitzt.
c. Die Riemen lassen sich mit Hilfe des Velcro-
Systems fixieren.
5. Montieren Sie Ihren Scanner. Siehe
Ihres Scanners oder den
faden
.
WSS 1000 Produktleit-
Kurzübersicht
34
Page 37

Kurzübersicht
Strom
Sobald der Akkusatz vollständig aufgeladen ist, können
Sie Ihren Handgelenkcomputer einsetzen.
Um den Handgelenkcomputer einzuschalten, drücken Sie
den Ein/Aus-Schalter auf dem WWC 1000.
Helligkeit und Kontrast des Displays
Um die Displaybeleuchtung und Tastaturhintergrundbeleuchtung einzuschalten, drücken Sie
AlphaLeft Alpha und Help). Zum Einstellen des
Kontrastes:
• Drücken Sie
des Kontrastes.
• Drücken Sie
Kontrastes.
FUNC
FUNC
und
und
SPACE
BKSP
LAMP
(Left
zum Verdunkeln
zum Aufhellen des
35
Page 38

WSS 1000 System
Kommunikation mit dem Host
Benutzen des Cradles
Der CS 1000 Cradle stellt die Verbindung zu einem HostComputer her. Der Cradle wird wie folgt für den Betrieb
vorbereitet:
1. Stecken Sie ein Ende des Null-Modem-Kabels (p/n
59846-03-00) in die Kommunikationsbuchse am
linken Ende des Cradles.
2. Schließen Sie das andere Ende des Kabels am seriellen (COMM) Port des Computers an.
3. Versorgen Sie den Cradle mit Strom, indem Sie den
runden Stecker des Stromkabels in den Stromport
des Cradles und das andere Ende des Stromkabels
in eine Steckdose stecken.
4. Setzen Sie den WWC 1000 in den Cradle ein (der
Ring-Scanner kann befestigt werden).
5. Starten Sie das Kommunikationsprogramm wie im
WSS 1000 Produktleitfaden beschrieben.
Funkkommunikation
Durch das Spectrum One oder Spectrum24Funknetz
steht eine drahtlose Kommunikation mit dem Host zur
Verfügung. Der
Informationen zur Funkkommunikation.
WSS 1000 Produktleitfaden
enthält
36
Page 39

Kurzübersicht
Dateneingabe
Benutzung der Tastatur
Die Tastatur bietet zwei verschiedene Arten von Tasten:
alphanumerische Tasten und Funktionstasten. Die
Funktion der meisten Tasten ist offensichtlich. Es folgen
einige Hinweise zur Benutzung der Tastatur.
• Drücken Sie jeweils nur eine Taste. Das gleichzeitige Drücken von zwei Tasten führt zu einer Fehlermeldung.
• Die Tastatur erzeugt in der Standardeinstellung
Ziffern; um Buchstaben zu erzeugen, drücken Sie
wie unten dargestellt die linke Alpha Shift Taste
und die entsprechende Taste, um die Buchstaben
in rosa, bzw. die rechte Alpha Shift Taste, um die
Buchstaben in grün zu erzeugen.
Alpha Shift links
Alpha Shift rechts
37
Page 40

WSS 1000 System
• Benutzen Sie die Funktionstasten
CTRL
und
um andere Zeichen zu erzeugen oder Befehle einzugeben. Ihre Anwendungsunterlagen enthalten
weitere Informationen.
• Die Position des Cursors wird durch die Tasten
Pfeil oben, Pfeil unten, Pfeil links
gesteuert.
in Verbindung mit den Zeichentasten,
FUNC, SHIFT
Pfeil rechts
und
Herausnehmen des WWC 1000 aus der Montagevorrichtung
Der WWC 1000 kann aus der
Handgelenkmontagevorrichtung herausgenommen
werden, um von anderen Mitarbeitern benutzt zu
werden.
Herausnehmen des WWC 1000:
1. Lösen Sie das Kabel vom Scanner.
2. Lösen Sie die Klammer, die den Handgelenkcomputer sichert.
3. Heben Sie den WWC 1000 aus der Montagevorrichtung.
38
Page 41

Kurzübersicht
Reinigung
Armbandcomputer
Verwenden Sie zum Reinigen des Armbandcomputers ein
sauberes, weiches Tuch, das mit einer milden
Reinigungslösung, also z.B. mit Wasser und Seife,
angefeuchtet wurde. Verwenden Sie kein Papier oder
Tuch mit rauher Oberfläche bzw. kein aggressives oder
ätzendes Reinigungsmittel. Reinigen Sie den Tastenblock
sowie die Auslöser des Scanners, und wischen Sie das
Display mit einem für die Reinigung von Objektiven
geeigneten Tuch sauber.
Armband
Entfernen Sie den Stab aus dem Armband. Waschen Sie
das Armband von Hand mit warmem Wasser. Verwenden
Sie dazu ein mildes Waschmittel, und trocknen Sie das
Band an der Luft. (Eine Waschanleitung finden Sie auf
dem an dem Armband befestigten Schildchen.)
39
Page 42

WSS 1000 System
40
Page 43

Guida rapida
Introduzione
Il WSS 1000 è un sistema portatile per l'immissione dati
costituito da uno scanner laser per la lettura dei codici a
barre, che si indossa di solito sulle dita o sul dorso della
mano dell'operatore, e da un computer da polso (WWC
1000) che si indossa sull'avambraccio dell'operatore.
I componenti smontabili funzionano perfettamente per
l’uso con entrambe le mani. I supporti personali
smontabili consentono a più operatori di utilizzare sia il
lettore ad anello che il computer da polso senza dover
usare lo stesso supporto.
Informazioni su questa guida
In questa guida sono contenute informazioni relative ai
componenti del sistema, assemblaggio del WWC 1000,
all’installazione e al caricamento delle batterie, alla
connessione del sistema, all’uso della tastiera e dello
scanner, al disassemblaggio per l’uso da parte di altri
utenti. Per informazioni sul lettore portatile, consultare il
Manuale di riferimento del WSS 1000 oppure la Guida
rapida di riferimento
forniti con il lettore.
41
Page 44

WSS 1000 System
Componenti del sistema WSS 1000
Parte anteriore del WWC 1000 (Computer da polso)
Display
Ta s t i e r a
Parte superiore del WWC 1000
Interruttore di
alimentazione
Batteria agli ioni
di litio
Supporto da polso del WWC 1000
Fascette
regolabili
42
Altoparlante
Dispositivo
di sgancio
delle
batterie
Contatti per la
ricarica delle
batterie
Barra a
scatto
Page 45

Guida rapida
Installazione e caricamento della batteria
Lo scanner e il computer da polso sono alimentati da un
gruppo batterie agli ioni di litio che fornisce
l’alimentazione necessaria per un intero turno di lavoro.
Nota:
Per installare il gruppo batterie nel WWC 1000:
1. Inserire le batterie, con la base prima, nello scom-
Base del gruppo
2. Allineare il meccanismo di blocco del gruppo bat-
Prima di utilizzare il computer da polso,
installare e caricare completamente il
gruppo batterie agli ioni di litio.
parto batterie.
Dispositivo di
sgancio delle
batterie
Van o
batterie
terie al vano nella parete dello scomparto batterie
facendo scorrere il dispositivo di sgancio della batteria e premendo il gruppo per inserirlo.
Scomparto
batterie
43
Page 46

WSS 1000 System
3. Rilasciare il dispositivo di sgancio della batteria
per bloccarlo in posizione.
Caricamento della batteria nel WWC 1000
Per caricare la batteria agli ioni di litio nel WWC 1000:
1. Posizionare il WWC 1000 nella base come illustrato di seguito:
2. L’indicatore luminoso CHARGING diventa ROSSO se il WWC 1000 è inserito correttamente e la
batteria è in carica.
3. Per una ricarica completa della batteria sono necessarie circa 2 ore. L’indicatore CHARGING diventa VERDE quando la batteria è completamente
carica.
4. Per rimuovere il WWC 1000 dalla base, inclinare
il WWC 1000 verso l’alto ed estrarlo.
Per ulteriori informazioni sulla base CS 1000, consultare la Guida rapida di riferimento per la base
44
Page 47

Guida rapida
ad una posizione CS 1000, N. parte 70-16237-xx
oppure la Guida rapida di riferimento per la base
a quattro posizioni CS 1000, N. parte 70-17661xx.
Caricamento della batteria di riserva
Le batterie di riserva possono essere caricate
separatamente dal WWC 1000. Per caricare un gruppo
batterie di riserva nella base:
1. Inserire le batterie nell’alloggiamento di ricarica
della base.
2. L’indicatore luminoso CHARGING diventa rosso.
3. Il gruppo batterie di riserva si carica in circa due
ore, anche se si sta caricando il WWC 1000. L’indicatore luminoso CHARGING diventa verde
quando la batteria è completamente carica.
45
Page 48

WSS 1000 System
Assemblaggio del sistema WSS 1000
Per assemblare il WWC 1000 (computer da polso):
1. Posizionare il computer da polso WWC 1000 sul
relativo supporto, in posizione frontale rispetto
all’operatore. Assicurarsi che il supporto sia orientato in modo che la fascetta più lunga si trovi oltre
l’avambraccio.
2. Fissare la barra sul WWC 1000 utilizzando i dispositivi di fissaggio situati su entrambi i lati del
supporto. La parte diritta della barra dovrebbe es-
46
Page 49

Guida rapida
sere posizionata nella parte anteriore del WWC
1000; la parte ricurva nella parte posteriore.
Nota:
I dispositivi di fissaggio del supporto da
polso funzionano come un dispositivo a
strappo in modo da consentire al computer
da polso di sganciarsi dal supporto se
impiglia ad un oggetto.
47
Page 50

WSS 1000 System
3. Inserire il connettore del cavo del WWC 1000 nella porta di interfaccia sul retro del lettore.
4. Posizionare il WWC 1000 sul braccio:
a. Far scorrere il supporto da polso sul braccio in
modo che il computer da polso WWC 1000 sia
in posizione frontale rispetto all’operatore.
48
Page 51

Guida rapida
b. Tirare le fascette attraverso i fermagli in modo
che il supporto da polso sia fisso ma non stretto.
c. Utilizzare il velcro per fissre le fascette.
5. Assemblare e montare il lettore. Consultare la
da rapida di riferimento
uale di riferimento del WSS 1000
del lettore oppure il
.
Gui-
Man-
49
Page 52

WSS 1000 System
Alimentazione
Una volta che il gruppo batterie è completamente carico,
è possibile utilizzare il computer da polso.
Per accendere il computer da polso, premere
l’interruttore nella parte superiore del WWC 1000.
Contrasto e indicatore luminoso del display
Per accendere l’indicatore luminoso del display e la
retroilluminazione del tastierino, premere
Alpha
Help
e
). Per regolare il contrasto:
to,
FUNC e SPACE
FUNC
e
BKSP
per aumentare il contras-
per ridurre il contrasto.
• premere
• premere
LAMP (Left
50
Page 53

Guida rapida
Comunicazione con l’host
Uso della base
La base CS 1000 viene utilizzata per eseguire
comunicazioni con un computer host. Per configurare la
base:
1. Inserire un’estremità di un cavo Null modem (N.
parte 59846-03-00) nella porta per le comunicazioni situata all’estremità sinistra della base.
2. Connettere l’altra estremità del cavo alla porta
(COMM) seriale del computer host.
3. Fornire alimentazione alla base inserendo il connettore cilindrico dell’alimentatore nella porta di
alimentazione della base e l’altra estremità del
cavo di alimentazione in una presa elettrica .
4. Inserire il WWC 1000 nella base (il lettore ad anello può essere connesso).
5. Avviare il programma per le comunicazioni come
illustrato nei dettagli nella
prodotto WSS 1000.
Comunicazioni via radio
La comunicazione ”wireless” è disponibile attraverso la
rete radio Spectrum One
informazioni sull’esecuzione di comunicazioni via radio,
consultare la
1000
Guida di riferimento del prodotto WSS
.
Guida di riferimento del
oppure Spectrum24. Per
51
Page 54

WSS 1000 System
Immissione dati
Uso della tastiera
La tastiera è costituita da due tipi di tasti: quelli
alfanumerici e quelli di modifica. La funzione della
maggior parte dei tasti è evidente. Alcune istruzioni base
per l’uso della tastiera:
• Premere i tasti uno alla volta. Se si premono due
tasti contemporaneamente, viene generato un errore.
• Con la tastiera predefinita vengono digitati numeri. Per digitare lettere, premere Alfa Maiusc di
sinistra e il tasto appropriato per digitare le lettere in rosso porpora, Alfa Maiusc di destra per
digitare le lettere in verde, come illustrato di seguito.
Alfa Maiusc di sinistra
Alfa Maiusc di destra
52
Page 55

Guida rapida
• Utilizzare i tasti di modifica,
CTRL
in combinazione con i tasti dei caratteri per
produrre altri caratteri o per eseguire dei comandi.
Per ulteriori informazioni, consultare la documentazione relativa all’applicazione.
• La posizione del cursore è controllata dai tasti
Freccia SU, Freccia GIÙ, Freccia SINISTRA
Freccia DESTRA
.
FUNC, SHIFT
e
e
53
Page 56

WSS 1000 System
Rimozione del WWC 1000 dal supporto
Il WWC 1000 può essere rimosso dal supporto da polso
per essere utilizzato da altri operatori.
Per rimuovere il WWC 1000:
1. Staccare la connessione del cavo al lettore.
2. Sganciare la barra fissando il computer da polso.
3. Estrarre il WWC 1000 dal supporto.
Pulizia
Computer da polso
Per la pulizia del computer da polso usare un panno
morbido e pulito, inumidito con un detergente delicato,
come acqua e sapone. Non utilizzare carta o materiali
abrasivi o detergenti abrasivi o corrosivi. Pulire il
tastierino e i grilletti del lettore e la finestra del display
con un panno per la pulizia delle lenti.
Supporto da polso
Rimuovere la barra dal supporto da polso. Lavare a
mano il supporto di stoffa, usando acqua tiepida ed un
detergente delicato, ed asciugare all'aria (vedere le
istruzioni per il lavaggio sull'apposita etichetta del
supporto).
54
Page 57

Guía rapida
Introducción
El WSS 1000 es un sistema portátil de registro de datos
compuesto de un scanner láser de código de barras, que
por lo general el operador se coloca en los dedos o
reverso de la mano, y un ordenador de pulsera (WWC
1000), que se coloca en el antebrazo.
Los componentes desmontables funcionan igualmente
bien en individuos diestros o zurdos. Los montajes
personales desmontables permiten que varios operadores
compartan el scanner de anillo y el ordenador de pulsera
sin tener que utilizar el mismo montaje.
Acerca de esta guía
En esta guía se ofrece información sobre los componentes
del sistema, ensamblaje del WWC 1000, la instalación y
carga de las baterías, el acoplamiento del sistema, el uso
del teclado y el scanner, y el desensamblaje para ser
utilizado por otros. Para obtener más información sobre
el scanner portátil, consulte la
producto WSS 1000
se suministra con el scanner.
, o la
Guía de referencia del
Guía de referencia rápida
que
55
Page 58

WSS 1000 System
e
Partes del sistema WSS 1000
Parte frontal del (ordenador de pulsera) WWC 1000
Pantalla
Te c l a d o
Cubierta del WWC 1000
Interruptor de
alimentación
Altavoz
Pestillo d
la batería
Batería de litio
Montaje de pulsera del WWC 1000
Correas
ajustables
56
Contactos de
carga de baterías
Barra de
ajuste
Page 59

Guía rapida
Instalación y carga de la batería
El ordenador de pulsera y el scanner se alimentan con
baterías de litio. Las baterías suministran potencia
durante un turno típico de 8 horas.
Nota:
Para instalar las baterías en el WWC 1000:
1. Inserte las baterías, la base primero, en el com-
Antes de utilizar el ordenador de pulsera,
instale y cargue completamente las baterías
de litio.
partimiento de baterías.
Pestillo
de la
batería
Base de las
baterías
2. Alinee el mecanismo de bloqueo de las baterías con
la muesca situada en la pared del compartimiento
de baterías deslizando el pestillo y presionando las
baterías hasta introducirlas completamente.
3. Libere el pestillo de las baterías para que cierre.
Compartimiento de
baterías
Muesca
57
Page 60

WSS 1000 System
Carga de la batería en el WWC 1000
Para cargar una batería de litio en el WWC 1000:
1. Coloque el WWC 1000 en el soporte, como se indica a continuación.
2. La luz de CARGA del soporte se enciende (ROJO)
si el WWC 1000 está bien colocado y la batería se
carga.
3. La batería requiere aproximadamente 2 horas para
cargarse por completo. La luz de CARGA cambia
a VERDE cuando la batería está completamente
cargada.
4. Para extraerlo del soporte, levante el WWC 1000
y sáquelo.
Para obtener más información sobre el soporte CS
1000, consulte la GRR del soporte de ranura única
CS 1000, n/p 70-16237-xx o la GRR del soporte
de cuatro ranuras CS 1000, n/p 70-17661-xx.
58
Page 61

Guía rapida
Carga de la batería de repuesto
Las baterías de repuesto pueden cargarse por separado
desde el WWC 1000. Para cargar una batería de repuesto
en el soporte:
1. Inserte las baterías en la ranura de carga de repuesto del soporte.
2. La luz de CARGA se enciende en rojo.
3. Las baterías de repuesto se cargan aproximadamente en dos horas, incluso aunque el WWC 1000
se esté cargando al mismo tiempo. La luz de CARGA cambia a verde cuando la batería está completamente cargada.
59
Page 62

WSS 1000 System
Ensamblaje del sistema WSS 1000
Para ensamblar el sistema (ordenador de pulsera) WWC
1000:
1. Coloque el ordenador de pulsera WWC 1000 en el
montaje de pulsera, de frente hacia usted. Asegúrese que el montaje quede orientado de manera
que la correa más larga pase por encima del antebrazo.
2. Abroche la barra sobre el WWC 1000 con los botones a presión situados a ambos lados del monta-
60
Page 63

Guía rapida
je. La parte recta de la barra debe pasar por delante
del WWC 1000; la parte curva por detrás.
Nota:
Los botones del montaje de pulsera actúan
como un dispositivo a presión que permite
que el ordenador se separe del montaje si se
engancha con un objeto.
61
Page 64

WSS 1000 System
3. Enchufe el conector del cable del WWC 1000 en el
puerto de interfaz situado en la parte posterior del
scanner.
4. Colóquese el sistema WWC 1000 en el brazo:
a. Deslice el montaje de pulsera por el brazo, de
manera que el ordenador WWC 1000 quede
orientado hacia usted.
62
Page 65

Guía rapida
b. Pase las correas por las hebillas y tire de ellas
hasta que el montaje de pulsera quede seguro
pero no apretado.
c. Utilice el ”velcro” para fijar las correas.
5. Ensamble y monte su scanner. Consulte la
referencia rápida del scanner
cia del Producto WSS 1000
Guía de Referen-
o la
.
Guía de
63
Page 66

WSS 1000 System
Alimentación
Una vez completamente cargadas las baterías, ya puede
utilizar el ordenador de pulsera.
Para encender el ordenador de pulsera, presione el
interruptor de alimentación situado en la cubierta del
WWC 1000.
Luz y contraste de la pantalla
Para encender la iluminación de pantalla y la
retroiluminación del teclado, presione
Help
y
). Para ajustar el contraste:
• presione
• presione
FUNC y SPACE
FUNC y SPACE
LAMP (Left Alpha
para oscurecerlo,
para aclararlo.
64
Page 67

Guía rapida
Comunicación con el ordenador central
Utilización del soporte
El soporte CS 1000 se utiliza para establecer
comunicaciones con un PC central. Para configurar la
operación del soporte:
1. Enchufe un extremo de un cable de módem nulo
(p/n 59846-03-00) en el puerto de comunicaciones
situado en el extremo izquierdo del soporte.
2. Conecte el otro extremo del cable al puerto
(COMM) serie del ordenador central.
3. Suministre alimentación al soporte enchufando el
conector redondo de la fuente de alimentación en
el puerto de alimentación del soporte y el otro extremo del cable en una toma eléctrica.
4. Inserte el WWC 1000 en el soporte (el scanner de
anillo puede ir acoplado).
5. Inicie el programa de comunicaciones, como se indica en la
1000.
Radiocomunicaciones
La comunicación inalámbrica con el ordenador central es
posible a través de la red de radio Spectrum One
Spectrum24
radiocomunicaciones, consulte la
Producto WSS 1000.
Guía de Referencia del Producto WSS
. Para obtener información sobre
Guía de Referencia del
o
65
Page 68

WSS 1000 System
Registro de datos
Utilización del teclado
El teclado se compone de dos clases de teclas: teclas de
caracteres alfanuméricos y teclas modificadoras. La
mayoría de las teclas se explican por sí mismas. Entre las
pautas de utilización del teclado se incluyen:
• Presionar las teclas una a una. Presionar dos teclas
simultáneamente produce error.
• Por defecto, el teclado genera números; para
generar letras, presione la tecla Alpha Shift izquierda y la tecla correspondiente para generar
letras en morado, y la tecla Alpha Shift derecha
para generar letras en verde, como se indica a
continuación.
Alpha Shift izquierda
Alpha Shift derecha
66
Page 69

Guía rapida
• Utilice las teclas modificadoras,
CTRL
, en combinación con las teclas de caracteres
para generar otros caracteres o emitir comandos.
Para obtener más información, consulte la documentación de la aplicación.
• La posición del cursor se controla mediante las
UpArrow, DownArrow, LeftArrow
teclas
tArrow
.
FUNC, SHIFT
Righ-
y
y
67
Page 70

WSS 1000 System
Extracción del WWC 1000 del montaje
El WWC 1000 puede separarse del montaje de pulsera
para ser utilizado por otros operadores.
Para extraer el WWC 1000:
1. Desmonte la conexión del cable con el scanner.
2. Desabroche la barra que fija el ordenador de
pulsera.
3. Levante el WWC 1000 y sáquelo del montaje.
Limpieza
Ordenador de muñeca
Para limpiar el ordenador de muñeca, utilice un paño
suave y limpio humedecido con agua jabonosa. No
utilice papel, paños abrasivos ni limpiadores abrasivos o
corrosivos. Limpie el teclado numérico y los gatillos del
scanner y pase un paño para lentes por la pantalla de
visualización.
Montura de pulsera
Extraiga la barra de la pulsera. Lave a mano la correa de
tela con agua tibia y un detergente suave y déjela secar al
aire (en la etiqueta de la correa encontrará instrucciones
de lavado).
68
Page 71

Quick Reference
Service Information
Before you use the unit, it must be configured to operate in your facility’s
network and run your applications.
If you have a problem running your unit or using your equipment, contact
your facility’s Technical or Systems Support. If there is a problem with the
equipment, they will contact the Symbol Support Center:
United States 1-800-653-5350 Canada 905-629-7226
United Kingdom 0800 328 2424 Asia/Pacific 337-6588
Australia 1-800-672-906 Austria 1-505-5794
Denmark 7020-1718 Finland 9 5407 580
France 01-40-96-52-21 Germany 6074-49020
Italy 2-484441 Mexico 5-520-1835
Netherlands 315-271700 Norway 66810600
South Africa 11-4405668 Spain 9-1-320-39-09
Sweden 84452900
Latin America Sales Support 1-800-347-0178 Inside US
Europe/Mid-East Distributor
Operations
+1-561-483-1275 Outside US
Contact local distributor or call
+44 208 945 7360
Warranty
Symbol Technologies, Inc. (“Symbol”) manufactures its hardware products
in accordance with industry-standard practices. Symbol warrants that for a
period of twelve (12) months from date of shipment, products will be free
from defects in materials and workmanship.
This warranty is provided to the original owner only and is not transferable
to any third party. It shall not apply to any product (i) which has been
repaired or altered unless done or approved by Symbol, (ii) which has not
been maintained in accordance with any operating or handling instructions
supplied by Symbol, (iii) which has been subjected to unusual physical or
electrical stress, misuse, abuse, power shortage, negligence or accident or
(iv) which has been used other than in accordance with the product
operating and handling instructions. Preventive maintenance is the
responsibility of customer and is not covered under this warranty.
69
Page 72

WSS 1000 System
Wear items and accessories having a Symbol serial number, will carry a 90day limited warranty. Non-serialized items will carry a 30-day limited
warranty.
Warranty Coverage and Procedure
During the warranty period, Symbol will repair or replace defective
products returned to Symbol’s manufacturing plant in the US. For warranty
service in North America, call the Symbol Support Center at 1-800-653-
5350. International customers should contact the local Symbol office or
support center. If warranty service is required, Symbol will issue a Return
Material Authorization Number. Products must be shipped in the original or
comparable packaging, shipping and insurance charges prepaid. Symbol will
ship the repaired or replacement product freight and insurance prepaid in
North America. Shipments from the US or other locations will be made
F.O.B. Symbol’s manufacturing plant.
Symbol will use new or refurbished parts at its discretion and will own all
parts removed from repaired products. Customer will pay for the
replacement product in case it does not return the replaced product to
Symbol within 3 days of receipt of the replacement product. The process for
return and customer’s charges will be in accordance with Symbol’s Exchange
Policy in effect at the time of the exchange.
Customer accepts full responsibility for its software and data including the
appropriate backup thereof.
Repair or replacement of a product during warranty will not extend the
original warranty term.
Symbol’s Customer Service organization offers an array of service plans,
such as on-site, depot, or phone support, that can be implemented to meet
customer’s special operational requirements and are available at a
substantial discount during warranty period.
General
Except for the warranties stated above, Symbol disclaims all warranties,
express or implied, on products furnished hereunder, including without
limitation implied warranties of merchantability and fitness for a particular
purpose. The stated express warranties are in lieu of all obligations or
liabilities on part of Symbol for damages, including without limitation,
special, indirect, or consequential damages arising out of or in connection
with the use or performance of the product.
70
Page 73

Quick Reference
Seller’s liability for damages to buyer or others resulting from the use of any
product, shall in no way exceed the purchase price of said product, except
in instances of injury to persons or property.
Some states (or jurisdictions) do not allow the exclusion or limitation of
incidental or consequential damages, so the proceeding exclusion or
limitation may not apply to you.
71
Page 74

WSS 1000 System
Ergonomic Recommendations
In order to avoid or minimize the potential risk of
Caution:
ergonomic injury follow the recommendations below. Consult
with your local Health & Safety Manager to ensure that you are
meeting with your company’s safety programs to prevent
employee injury.
• Reduce or eliminate repetitive motion
• Maintain a natural position
• Reduce or eliminate excessive force
• Keep objects that are used frequently within easy reach
• Perform tasks at correct heights
• Reduce or eliminate vibration
• Reduce or eliminate direct pressure
• Provide adjustable workstations
• Provide adequate clearance
• Provide a suitable working environment
• Improve work procedures.
72
Page 75

Quick Reference
Regulatory Information
Radio Frequency Interference Requirements
This device has been tested and found to comply with the limits for a Class
B digital device pursuant to Part 15 of the Federal Communications
Commissions Rules and Regulation. These limits are designed to provide
reasonable protection against harmful interference when the equipment is
operated in a commercial environment. This equipment generates, uses, and
can radiate radio frequency energy and, if not installed and used in
accordance with the instruction manual, may cause harmful interference to
radio communications. Operation of this equipment in a residential area is
likely to cause harmful interference in which case the user will be required
to correct the interference at his own expense.
However, there is no guarantee that interference will not occur in a
particular installation. If the equipment does cause harmful interference to
radio or television reception, which can be determined by turning the
equipment off and on, the user is encouraged to try to correct the
interference by one or more of the following measures:
• Re-orient or relocate the receiving antenna.
• Increase the separation between the equipment and receiver.
• Connect the equipment into an outlet on a circuit different from that
which the receiver is connected.
• Consult the dealer or an experienced radio/TV technician for help.
This device complies with FCC Part 15. Operation is subject to the following
two conditions: (1) this device may not cause harmful interference and (2)
this device must accept any interferenc e received, including interference that
may cause undesired operation.
Radio Frequency Interference Requirements Canada
This device complies with RSS 210 of Industry & Science Canada.
Operation is subject to the following two conditions: (1) this device may not
cause harmful interference and (2) this device must accept any interference
received, including interference that may cause undesired operation.
This Class B digital apparatus complies with Industry Canada Standard
ICES-003.
Cet appareil numérique de la classe B est conform à la norme NMB-003
d’Industrie Canada.
73
Page 76

WSS 1000 System
CE Marking and European Union Compliance
Products intended for sale within the European Union are
marked with the CE Mark which indicates compliance to
applicable Directives and European Normes (EN), as follows.
Amendments to these Directives or ENs are included:
Applicable Directives
• Electromagnetic Compatibility Directive 89/336/EEC
• Low Voltage Directive 73/23/EEC
Applicable Standards
• EN 55 022 - Limits and Methods of Measurement of Radio Interference Characteristics of Information technology Equipment
• EN 50 082-1:1997 - Electromagnetic Compatibility - Generic Immunity Standard, Part 1: Residential, commercial, Light Industry
• IEC 1000-4-2(1995-01) - Electromagnetic compatibility (EMC) - Part
4:Testing and measurement techniques - Section 2: Electrostatic discharge immunity test.
• IEC 1000-4-3(1995-03) - Electromagnetic compatibility (EMC) - Part
4:Testing and measurement techniques - Section 3: Radiated, radiofrequency, electromagnetic field immunity test.
• IEC 1000-4-4(1995-01) - Electromagnetic compatibility (EMC) - Part
4:Testing and measurement techniques - Section 4: Electrical Fast
transient/burst immunity test.
• EN 60 950 + Amd 1 + Amd 2 - Safety of Information Technology
Equipment Including Electrical Business Equipment
• EN 60 825-1 (EN 60 825) - Safety of Devices Containing
Lasers
RF Devices
Symbol’s RF products are designed to be compliant with the rules and
regulations in the locations into which they are sold and will be labeled as
required. The majority of Symbol’s RF devices are type approved and do not
require the user to obtain license or authorization before using the
equipment. Any changes or modifications to Symbol Technologies
equipment not expressly approved by Symbol Technologies could void the
user’s authority to operate the equipment.
74
Page 77

Quick Reference
Caution:
Use of controls or adjustments or performance of
procedures other than those specified herein may
result in hazardous laser light exposure.
75
Page 78

WSS 1000 System
In accordance with Clause 5, IEC 0825 and EN60825, the following
information is provided to the user:
ENGLISH
CLASS 1 CLASS 1 LASER PRODUCT
CLASS 2 LASER LIGHT
DO NOT STARE INTO BEAM
CLASS 2 LASER PRODUCT
DANISH
KLASSE 1 KLASSE 1 LASERPRODUKT
KLASSE 2 LASERLYF
SE IKKE IND I STRÅLEN
KLASSE 2 LASERPRO DUKT
DUTCH
KLASSE 1 KLASSE-1 LASERPRODUKT
KLASSE 2 LASERLICHT
NIET IN STRAAL STAREN
KLASSE-2 LASERPRODUKT
FINNISH
LUOKKA 1 LUOKKA 1 LASE RTUOTE
LUOKKA 2 LASERVALO
ÄLÄ TUIJOTA SÄD ETTÄ
LUOKKA 2 LASERTUOT E
FRENCH
CLASSE 1 PRODUIT LASER DE CLASSE 1
CLASSE 2 LUMIERE LASER
NE PAS REGARDER LE RAYON FIXEMENT
PRODUIT LASER DE CLASSE 2
GERMAN
KLASSE 1 LASERPRODUKT DER KLASSE 1
KLASSE 2 LASERSTRAHLEN
NICHT DIREKT IN DEN LASERSTRAHL
SCHAUEN
LASERPRODUK T DER KLASSE 2
HEBREW
ITALIAN
CLASSE 1 PRODOTTO AL LASER DI CLASSE 1
CLASSE 2 LUCE LASER
NON FISSARE IL RAGGIO
PRODOTTO AL LASER DI CLASSE 2
NORWEGIAN
KLASSE 1 LASERPRODUKT, KLAS S E 1
KLASSE 2 LASERLYS
IKKE STIRR INN I LYSSTRÅLEN
LASERPRODUKT, KLASSE 2
PORTUGUESE
CLASSE 1 PRODUTO LASER DA CLASSE 1
CLASSE 2 LUZ DE LASER
NÃO FIXAR O RAIO LUMINOSO
PRODUTO LASER DA CLASSE 2
SPANISH
CLASE 1 P RODUCTO LASER DE LA CLASE 1
CLASE 2 LUZ LASER
NO MIRE FIJAMENTE EL HAZ
PRODUCTO LASER DE LA CLASE 2
SWEDISH
KLASS 1 LASERPRODUKT KLAS S 1
KLASS 2 LASERLJUS
STIRRA INTE MOT STRÅLEN
LASERPRODUKT KLASS 2
76
Page 79

Quick Reference
Patent Information
Patents
This product is covered by one or more of the following U.S. and foreign
Patents:
U.S. Patent No. 4,460,120; 4,496,831; 4,593,186; 4,603,262; 4,607,156;
4,652,750; 4,673,805; 4,736,095; 4,758,717; 4,816,660; 4,845,350;
4,896,026; 4,897,532; 4,923,281; 4,933,538; 4,992,717; 5,015,833;
5,017,765; 5,021,641; 5,029,183; 5,047,617; 5,103,461; 5,113,445;
5,130,520; 5,140,144; 5,142,550; 5,149,950; 5,157,687; 5,168,148;
5,168,149; 5,180,904; 5,216,232; 5,229,591; 5,230,088; 5,235,167;
5,243,655; 5,247,162; 5,250,791; 5,250,792; 5,260,553; 5,262,627;
5,262,628; 5,266,787; 5,278,398; 5,280,162; 5,280,163; 5,280,164;
5,280,498; 5,304,786; 5,304,788; 5,306,900; 5,321,246; 5,324,924;
5,337,361; 5,367,151; 5,373,148; 5,378,882; 5,396,053; 5,396,055;
5,399,846; 5,408,081; 5,410,139; 5,410,140; 5,412,198; 5,418,812;
5,420,411; 5,436,440; 5,444,231; 5,449,891; 5,449,893; 5,468,949;
5,471,042; 5,478,998; 5,479,000; 5,479,002; 5,479,441; 5,504,322;
5,519,577; 5,528,621; 5,532,469; 5,543,610; 5,545,889; 5,552,592;
5,557,093; 5,578,810; 5,581,070; 5,589,679; 5,589,680; 5,608,202;
5,612,531; 5,619,028; 5,627,359; 5,637,852; 5,664,229; 5,668,803;
5,675,139; 5,693,929; 5,698,835; 5,705,800; 5,714,746; 5,723,851;
5,734,152; 5,734,153; 5,742,043; 5,745,794; 5,754,587; 5,762,516;
5,763,863; 5,767,500; 5,789,728; 5,789,731; 5,808,287; 5,811,785;
5,811,787; 5,815,811; 5,821,519; 5,821,520; 5,823,812; 5,828,050;
5,850,078; 5,861,615; 5,874,720; 5,875,415; 5,900,617; 5,902,989;
5,907,146; 5,912,450; 5,914,478; 5,917,173; 5,920,059; 5,923,025;
5,929,420; 5,945,658; 5,945,659; 5,946,194; 5,959,285; 6,002,918;
6,021,947; 6,047,892; 6,050,491; 6,053,413; 6,056,200; 6,065,678;
6,067,297; 6,068,190; D305,885; D341,584; D344,501; D359,483;
D362,453; D363,700; D363,918; D370,478; D383,124; D391,250;
D405,077; D406,581; D414,171; D414,172, D419,548; D423,468;
D424,035.
Invention No. 55,358; 62,539; 69,060; 69,187 (Taiwan); No. 1,601,796;
1,907,875; 1,955,269 (Japan).
European Patent 367,299; 414,281; 367,300; 367,298; UK 2,072,832;
France 81/03938; Italy 1,138,713.
rev. 06/00
77
Page 80

70-16191-05
Revision B — August 2000
Symbol Technologies, Inc. One Symbol Plaza Holtsville, NY 11742-1300
 Loading...