

Page 1

SPS 3000 Series
Programmer’s Guide
Page 2

SPS 3000 Series
Programmer’s Guide
72-53911-01
Revision A
February 2002
Page 3

2002 by Symbol Technologies, Inc. All rights reserved.
No part of this publication may be reproduced or used in any form, or by any electrical or
mechanical means, without permission in writing from Symbol. This includes electronic or
mechanical means, such as photocopying, recording, or information storage and retrieval
systems. The material in this manual is subject to change without notice.
The software is provided strictly on an “as is” basis. All software, including firmware,
furnished to the user is on a licensed basis. Symbol grants to the user a non-transferable
and non-exclusive license to use each software or firmware program delivered hereunder
(licensed program). Except as noted below, such license may not be assigned,
sublicensed, or otherwise transferred by the user without prior written consent of Symbol.
No right to copy a licensed program in whole or in part is granted, except as permitted under
copyright law. The user shall not modify, merge, or incorporate any form or portion of a
licensed program with other program material, create a derivative work from a licensed
program, or use a licensed program in a network without written permission from Symbol.
The user agrees to maintain Symbol’s copyright notice on the licensed programs delivered
hereunder, and to include the same on any authorized copies it makes, in whole or in part.
The user agrees not to decompile, disassemble, decode, or reverse engineer any licensed
program delivered to the user or any portion thereof.
Symbol reserves the right to make changes to any software or product to improve reliability ,
function, or design.
Symbol does not assume any product liability arising out of, or in connection with, the
application or use of any product, circuit, or application described herein.
No license is granted, either expressly or by implication, estoppel, or otherwise under any
Symbol Technologies, Inc., intellectual property rights. An implied license only exists for
equipment, circuits, and subsystems contained in Symbol products.
Symbol, Spectrum One, and Spectrum24 are registered trademarks of Symbol
Technologies, Inc. Other product names mentioned in this manual may be trademarks or
registered trademarks of their respective companies and are hereby acknowledged.
Symbol Technologies, Inc.
One Symbol Pl aza
Holtsville, New York 11742-1300
http://www.symbol.com
ii
Page 4

Contents
About This Guide
Introduction . . . . . . . . . . . . . . . . . . . . . . . . . . . . . . . . . . . . . . . . . . . . . . . . . . . . . . . . . . . . . . . . . . . vii
Chapter Descriptions. . . . . . . . . . . . . . . . . . . . . . . . . . . . . . . . . . . . . . . . . . . . . . . . . . . . . . . . . . . . viii
Notational Conventions . . . . . . . . . . . . . . . . . . . . . . . . . . . . . . . . . . . . . . . . . . . . . . . . . . . . . . . . . . viii
Related Documents. . . . . . . . . . . . . . . . . . . . . . . . . . . . . . . . . . . . . . . . . . . . . . . . . . . . . . . . . . . . . .ix
Service Information . . . . . . . . . . . . . . . . . . . . . . . . . . . . . . . . . . . . . . . . . . . . . . . . . . . . . . . . . . . . . .ix
Symbol Support Centers . . . . . . . . . . . . . . . . . . . . . . . . . . . . . . . . . . . . . . . . . . . . . . . . . . . . . . x
Warranty . . . . . . . . . . . . . . . . . . . . . . . . . . . . . . . . . . . . . . . . . . . . . . . . . . . . . . . . . . . . . . . . . . . . . xii
Warranty Coverage and Procedure . . . . . . . . . . . . . . . . . . . . . . . . . . . . . . . . . . . . . . . . . . . . . xiii
General. . . . . . . . . . . . . . . . . . . . . . . . . . . . . . . . . . . . . . . . . . . . . . . . . . . . . . . . . . . . . . . . . . . xiii
Chapter 1. Getting Started
Introduction . . . . . . . . . . . . . . . . . . . . . . . . . . . . . . . . . . . . . . . . . . . . . . . . . . . . . . . . . . . . . . . . . . 1-1
Unpacking the SPS 3000. . . . . . . . . . . . . . . . . . . . . . . . . . . . . . . . . . . . . . . . . . . . . . . . . . . . . . . . 1-1
Parts of the SPS 3000. . . . . . . . . . . . . . . . . . . . . . . . . . . . . . . . . . . . . . . . . . . . . . . . . . . . . . . . . . 1-2
iPAQ Pocket PC Parts Used by the SPS 3000 . . . . . . . . . . . . . . . . . . . . . . . . . . . . . . . . . . . . . . . 1-3
Accessories . . . . . . . . . . . . . . . . . . . . . . . . . . . . . . . . . . . . . . . . . . . . . . . . . . . . . . . . . . . . . . . . . . 1-4
System Requirements . . . . . . . . . . . . . . . . . . . . . . . . . . . . . . . . . . . . . . . . . . . . . . . . . . . . . . . . . . 1-4
Chapter 2. Hardware Setup
Introduction . . . . . . . . . . . . . . . . . . . . . . . . . . . . . . . . . . . . . . . . . . . . . . . . . . . . . . . . . . . . . . . . . . 2-1
Inserting the iPAQ into the SPS 3000 . . . . . . . . . . . . . . . . . . . . . . . . . . . . . . . . . . . . . . . . . . . . . . 2-1
Removing the iPAQ from the SPS 3000 . . . . . . . . . . . . . . . . . . . . . . . . . . . . . . . . . . . . . . . . . . . . 2-2
Inserting the iPAQ and SPS 3000 into the Cradle. . . . . . . . . . . . . . . . . . . . . . . . . . . . . . . . . . . . . 2-2
Charging the Battery (WLAN models only) . . . . . . . . . . . . . . . . . . . . . . . . . . . . . . . . . . . . . . . . . . 2-3
Charging the iPAQ and SPS 3000 Separately. . . . . . . . . . . . . . . . . . . . . . . . . . . . . . . . . . . . 2-4
Charging the SPS 3000 and iPAQ Using the Cradle . . . . . . . . . . . . . . . . . . . . . . . . . . . . . . . 2-5
Charging the SPS 3000 and iPAQ Without the Cradle. . . . . . . . . . . . . . . . . . . . . . . . . . . . . . 2-6
Checking Battery Power . . . . . . . . . . . . . . . . . . . . . . . . . . . . . . . . . . . . . . . . . . . . . . . . . . . . . . . . 2-7
iii
Page 5

SPS 3000 Series Programmer’s Guide
Attaching the Lanyard. . . . . . . . . . . . . . . . . . . . . . . . . . . . . . . . . . . . . . . . . . . . . . . . . . . . . . . . . . .2-9
Chapter 3. Software Installation
Introduction. . . . . . . . . . . . . . . . . . . . . . . . . . . . . . . . . . . . . . . . . . . . . . . . . . . . . . . . . . . . . . . . . . .3-1
Using ActiveSync Software. . . . . . . . . . . . . . . . . . . . . . . . . . . . . . . . . . . . . . . . . . . . . . . . . . . . . . .3-1
Installing ActiveSync Software . . . . . . . . . . . . . . . . . . . . . . . . . . . . . . . . . . . . . . . . . . . . . . . . . . . .3-2
Verifying an ActiveSync Connection . . . . . . . . . . . . . . . . . . . . . . . . . . . . . . . . . . . . . . . . . . . .3-2
Performing a Remote ActiveSync . . . . . . . . . . . . . . . . . . . . . . . . . . . . . . . . . . . . . . . . . . . . . .3-2
Performing Subsequent ActiveSync Operations . . . . . . . . . . . . . . . . . . . . . . . . . . . . . . . . . . .3-2
Symbol Windows CE SDK . . . . . . . . . . . . . . . . . . . . . . . . . . . . . . . . . . . . . . . . . . . . . . . . . . . . . . .3-3
Installing the SDK on the Development PC. . . . . . . . . . . . . . . . . . . . . . . . . . . . . . . . . . . . . . .3-3
Choosing Installation Options . . . . . . . . . . . . . . . . . . . . . . . . . . . . . . . . . . . . . . . . . . . . . . . . .3-4
Installing Drivers and Applications. . . . . . . . . . . . . . . . . . . . . . . . . . . . . . . . . . . . . . . . . . . . . .3-4
SDK Files. . . . . . . . . . . . . . . . . . . . . . . . . . . . . . . . . . . . . . . . . . . . . . . . . . . . . . . . . . . . . . . . .3-7
Chapter 4. Operating the SPS 3000
Introduction. . . . . . . . . . . . . . . . . . . . . . . . . . . . . . . . . . . . . . . . . . . . . . . . . . . . . . . . . . . . . . . . . . .4-1
Operating the Scanner . . . . . . . . . . . . . . . . . . . . . . . . . . . . . . . . . . . . . . . . . . . . . . . . . . . . . . . . . .4-1
Trigger Application. . . . . . . . . . . . . . . . . . . . . . . . . . . . . . . . . . . . . . . . . . . . . . . . . . . . . . . . . .4-2
CTLPanel "Symbol Control Panel" Application . . . . . . . . . . . . . . . . . . . . . . . . . . . . . . . . . . . .4-5
Scanning For the First Time. . . . . . . . . . . . . . . . . . . . . . . . . . . . . . . . . . . . . . . . . . . . . . . . . . .4-6
Wireless Local Area Network (WLAN) Operation . . . . . . . . . . . . . . . . . . . . . . . . . . . . . . . . . . . . . .4-8
Configuring the SPS 3000 For Your WLAN. . . . . . . . . . . . . . . . . . . . . . . . . . . . . . . . . . . . . . . 4-8
Using ActiveSync over Spectrum24. . . . . . . . . . . . . . . . . . . . . . . . . . . . . . . . . . . . . . . . . . . .4-25
Chapter 5. Developing Applications for the SPS 3000
Introduction. . . . . . . . . . . . . . . . . . . . . . . . . . . . . . . . . . . . . . . . . . . . . . . . . . . . . . . . . . . . . . . . . . .5-1
Building Sample Source Code (Demo Applications). . . . . . . . . . . . . . . . . . . . . . . . . . . . . . . . . . . .5-1
Preparing to Build the Demo Applications. . . . . . . . . . . . . . . . . . . . . . . . . . . . . . . . . . . . . . . . 5-1
Compiling and Running the Demo Applications. . . . . . . . . . . . . . . . . . . . . . . . . . . . . . . . . . . .5-2
Downloading the Executable to the iPAQ . . . . . . . . . . . . . . . . . . . . . . . . . . . . . . . . . . . . . . . .5-3
Deploying Applications . . . . . . . . . . . . . . . . . . . . . . . . . . . . . . . . . . . . . . . . . . . . . . . . . . . . . . . . . .5-3
Using Symbol CAB files. . . . . . . . . . . . . . . . . . . . . . . . . . . . . . . . . . . . . . . . . . . . . . . . . . . . . .5-3
Suppressing Prompts During Installation. . . . . . . . . . . . . . . . . . . . . . . . . . . . . . . . . . . . . . . . .5-4
Suppressing the About Dialog . . . . . . . . . . . . . . . . . . . . . . . . . . . . . . . . . . . . . . . . . . . . . . . . .5-6
Installing a CAB file . . . . . . . . . . . . . . . . . . . . . . . . . . . . . . . . . . . . . . . . . . . . . . . . . . . . . . . . . 5-6
Flash Memory. . . . . . . . . . . . . . . . . . . . . . . . . . . . . . . . . . . . . . . . . . . . . . . . . . . . . . . . . . . . . . . . .5-6
Determining if Flash Memory is Present . . . . . . . . . . . . . . . . . . . . . . . . . . . . . . . . . . . . . . . . .5-7
Standard Flash Memory Files . . . . . . . . . . . . . . . . . . . . . . . . . . . . . . . . . . . . . . . . . . . . . . . . .5-7
IHVInstall . . . . . . . . . . . . . . . . . . . . . . . . . . . . . . . . . . . . . . . . . . . . . . . . . . . . . . . . . . . . . . . . .5-7
CAB File Naming Conventions . . . . . . . . . . . . . . . . . . . . . . . . . . . . . . . . . . . . . . . . . . . . . . . . 5-9
iv
Page 6

Contents
Developing Flash Memory Images. . . . . . . . . . . . . . . . . . . . . . . . . . . . . . . . . . . . . . . . . . . . . 5-9
Chapter 6. Maintenance, Troubleshooting, and Technical Specifications
Introduction . . . . . . . . . . . . . . . . . . . . . . . . . . . . . . . . . . . . . . . . . . . . . . . . . . . . . . . . . . . . . . . . . . 6-1
Maintaining the SPS 3000. . . . . . . . . . . . . . . . . . . . . . . . . . . . . . . . . . . . . . . . . . . . . . . . . . . . . . . 6-1
Troubleshooting. . . . . . . . . . . . . . . . . . . . . . . . . . . . . . . . . . . . . . . . . . . . . . . . . . . . . . . . . . . . . . . 6-2
Technical Specifications . . . . . . . . . . . . . . . . . . . . . . . . . . . . . . . . . . . . . . . . . . . . . . . . . . . . . . . . 6-3
Appendix A. Resetting the iPAQ
Resetting Your iPAQ Pocket PC (3100/3600/3700 Series). . . . . . . . . . . . . . . . . . . . . . . . . . . . . . A-1
Performing a Warm Boot . . . . . . . . . . . . . . . . . . . . . . . . . . . . . . . . . . . . . . . . . . . . . . . . . . . . A-1
Performing a Cold Boot . . . . . . . . . . . . . . . . . . . . . . . . . . . . . . . . . . . . . . . . . . . . . . . . . . . . . A-2
Appendix B. Registry Keys
Index
Feedback
v
Page 7

SPS 3000 Series Programmer’s Guide
vi
Page 8

About This Guide
Introduction
The SPS 3000 Series Programmer’s Guide provides information about the SPS 3000 iPAQ
Expansion Pack and its accessories. The SPS 3000 Series is a family of ergonomic
expansion packs for the Compaq iPAQ Pocket PC device that extends the capabilities of
the iPAQ by adding bar code scanning and wireless functionality. The SPS 3000 iPAQ
Expansion Pack Series includes the following variations:
• SPS3000-T0000000 - Scan only integrated 1D Scan Engine for 1-dimensional bar
code scanning without Flash Memory
• SPS3000-T0000200 - Scan only integrated 1D Scan Engine for 1-dimensional bar
code scanning with 2MB of Flash Memory
• SPS3046-T00002WW - Scan/WLAN integrated 1D bar code scan engine,
integrated 802.11b (Spectrum24
ion battery, with 2MB of Flash Memory
• SPS3046-000002WW - WLAN only integrated 802.11b (Spectrum24
radio and antennae, 770mAH Lithium-ion battery, with 2MB of Flash Memory.
®
1 1 Mbps) radio and antennae, 770mAH Lithium-
®
11 Mbps)
vii
Page 9

SPS 3000 Series Programmer’s Guide
Chapter Descriptions
Topics covered in this guide are as follows:
• Chapter 1, Getting Started describes how to unpack your SPS 3000, lists
accessories and system requirements, and describes the parts on your SPS 3000
and the physical buttons and controls on the iPAQ Pocket PC used by the SPS
3000.
• Chapter 2, Hardware Setup describes how to insert the iPAQ into the SPS 3000,
remove the iPAQ from the SPS 3000, insert the units into the cradle, charge
batteries, check battery power, and attach the lanyard.
• Chapter 3, Software Installation describes how to install and use ActiveSync
Software and the Symbol Windows CE Software Developer’s Kit (SDK).
• Chapter 4, Operating the SPS 3000 provides information about scanner operations
and Wireless Local Area Network (WLAN) configuration.
• Chapter 5, Developing Applications for the SPS 3000 provides information about
demo applications, deploying applications, Flash memory, and CAB files registry
entries and how they can be used to customize installation for your individual
needs.
• Chapter 6, Maintenance, Troubleshooting, and Technical Specifications provides
information to help you take proper care of your SPS 3000, and provides
troubleshooting solutions for potential problems during terminal operating.
• Appendix A, Resetting the iPAQ describes how to reset your iPAQ.
• Appendix B, Registry Keys includes Registry Key tables for the SPS 3000.
Notational Conventions
This document uses these conventions:
• “SPS 3000” is used in place of the full name SPS 3000 iPAQ Expansion Pack and
refers to any model of SPS 3000.
• “Development PC” refers to a personal computer where application development
takes place.
• “Host PC” refers to a personal computer used to install drivers and applications
through Microsoft® ActiveSync 3.1.
• “User” refers to anyone using an application on the SPS 3000.
viii
Page 10

About This Guide
• “You” refers to the End User, System Administrator or Technical Support person
using this manual as a reference to install, configure, operate, maintain, and
troubleshoot the SPS 3000.
• Italics are used to highlight specific items in the general text, and to identify
chapters and sections in this and related documents. It also identifies names of
dialog boxes, tabs within dialog boxes, and menu and screen options.
• Bullets (•) indicate:
• lists of alternatives or action items
• lists of required steps that are not necessarily sequential
• lists of files, noted items, titles, and screens.
• Numbered lists indicate a set of sequential steps, i.e., those that describe step-by-
step procedures.
Related Documents
The following documents provide more information about your SPS 3000.
• SPS 3000 Quick Reference Guide, p/n 72-52672-xx.
• Symbol SDK Help file.The SDK help file contains information about the ‘C’ Scan
API. The scanner functions are compatible with the SPS 3000. The Help file is
provided in the SPS 3000 SDK.
Service Information
If you have a problem with the SPS 3000 equipment, contact the Symbol Support Center.
If your problem cannot be resolved over the phone, you may need to return your equipment
for servicing. If that is necessary, you will be given special directions.
Note:Symbol Technologies is not responsible for any damages incurred
during shipment if the approved shipping container is not used.
Shipping the units improperly can possibly void the warranty. If the
original shipping container has not been kept, contact Symbol to
have another sent to you.
ix
Page 11

SPS 3000 Series Programmer’s Guide
Symbol Support Centers
For service information, warranty information or technical assistance contact or call the
Symbol Support Center in:
United States
Symbol Technologies, Inc.
One Symbol Plaza
Holtsville, New York 11742-1300
1-800-653-5350
United Kingdom
Symbol Technologies
Symbol Place
Winnersh Triangle, Berkshire RG41 5TP
United Kingdom
0800 328 2424 (Inside UK)
+44 118 945 7529 (Outside UK)
Australia
Symbol Technologies Pty. Ltd.
432 St. Kilda Road
Melbourne, Victoria 3004
1-800-672-906 (Inside Australia)
+61-3-9866-6044 (Outside Australia)
Denmark/Danmark
Symbol Technologies AS
Dr. Neergaardsvej 3
2970 Hørsholm
7020-1718 (Inside Denmark)
+45-7020-1718 (Outside Denmark)
1
Canada
Symbol Technologies Canada, Inc.
2540 Matheson Boulevard East
Mississauga, Ontario, Canada L4W 4Z2
905-629-7226
Asia/Pacific
Symbol Technologies Asia, Inc.
230 Victoria Street #04-05
Bugis Junction Office Tower
Singapore 188024
337-6588 (Inside Singapore)
+65-337-6588 (Outside Singapore)
Austria/Österreich
Symbol Technologies Austria GmbH
Prinz-Eugen Strasse 70 / 2.Haus
1040 Vienna, Austria
01-5055794-0 (Inside Austria)
+43-1-5055794-0 (Outside Austria)
Europe/Mid-East Distributor Operations
Contact your local distributor or call
+44 118 945 7360
Finland/Suomi
Oy Symbol Technologies
Kaupintie 8 A 6
FIN-00440 Helsinki, Finland
9 5407 580 (Inside Finland)
+358 9 5407 580 (Outside Finland)
x
France
Symbol Technol ogi es France
Centre d'Affaire d'Antony
3 Rue de la Renaissance
92184 Antony Cedex, France
01-40-96-52-21 (Inside France)
+33-1-40-96-52-50 (Outside France)
Page 12

About This Guide
Germany/Deutchland
Symbol Technologies GmbH
Waldstrasse 66
D-63128 Dietzenbach, Germany
6074-49020 (Inside German y)
+49-6074-49020 (Outside Germany)
Latin America Sales Support
7900 Glades Road
Suite 340
Boca Raton, Florida 33434 USA
1-800-347-0178 (Inside United States)
+1-561-483-1275 (Outside United States)
Netherlands/Nederland
Symbol Technologies
Kerkplein 2, 7051 CX
Postbus 24 7050 AA
Varsseveld, Netherlands
315-271700 (Inside Netherl and s)
+31-315-271700 (Outside Netherlands)
Italy/Italia
Symbol Technologies Italia S.R.L.
Via Cristoforo Columbo, 49
20090 Trezzano S/N Navigilo
Milano, Italy
2-484441 (Inside Italy)
+39-02-484441 (Outside Italy)
Mexico/México
Symbol Technologies Mexico Ltd.
Torre Picasso
Boulevard Manuel Avila Camacho No 88
Lomas de Chapultepec CP 11000
Mexico City, DF, Mexico
5-520-1835 (Inside Mexico)
+52-5-520-1835 (Outside Mexico)
Norway/Norge
Symbol’s registered and mailing address:
Symbol Technologi es Norway
Hoybratenveien 35 C
N-1055 OSLO, Norway
Symbol’s repair depot and shipping address:
Symbol Technologi es Norway
Enebakkveien 123
N-0680 OSLO, Norway
South Africa
Symbol Technologies Africa Inc.
Block B2
Rutherford Estate
1 Scott Street
Waverly 2090 Johannesburg
Republic of South Africa
11-809 5311 (Inside South Africa)
+27-11-809 5311 (Outside South Africa)
+47 2232 4375
Spain/España
Symbol Technologi es S.L.
Edificioi la Piovera Azul
C. Peonias, No. 2 - Sexta Planta
28042 Madrid, Spain
+913244000 (Inside Spain)
+34-9-1-320-39-09 (Outside Spain)
xi
Page 13

SPS 3000 Series Programmer’s Guide
Sweden/Sverige
“Letter” address:
Symbol Technologies AB
Box 1354
S-171 26 SOLNA
Sweden
Visit/shipping add res s:
Symbol Technologies AB
Solna Strandväg 78
S-171 54 SOLNA
Sweden
Switchboard: 08 445 29 00 (domestic)
Call Center: +46 8 445 29 29 (international)
Support E-Mail:
Sweden.Support@se.symbol.com
1
Customer support is available 24 hours a day, 7 days a week.
If you purchased your Symbol product from a Symbol Business Partner, contact that
Business Partner for service.
Warranty
Symbol Technologies, Inc (“Symbol”) manufactures its hardware products in accordance with
industry-standard practices. Symbol warrants that for a period of twelve (12) months from date of
shipment, products will be free from defects in materials and workmanship.
This warranty is provided to the original owner only and is not transferable to any third party. It shall
not apply to any p roduct (i) which has been repaired or altered unles s don e or app rov ed by Symbol,
(ii) which has no t been main tained in accordance w ith any op erating or ha ndling inst ructions su pplied
by Symbol, (iii) which has been subjected to unusual physical or electrical stress, misuse, abuse,
power shortage, negligence or accident or (iv) which has been used other than in accordance with
the product operating and handling instructions. Preventive maintenance is the responsibility of
customer and is not covered under this warranty.
Wear items and accessories hav ing a Symbol ser ial number , will carry a 90-day limited warranty . Nonserialized items will carry a 30-day limited warranty.
xii
Page 14

About This Guide
Warranty Coverage and Procedure
During the warranty period, Symbol will repair or replace defective products returned to Symbol’s
manufacturing plan t in the US. For w arranty servic e in North Ameri ca, call the Sym bol Support Center
at 1-800-653-5350 . Intern ationa l custo mers shou ld c ont act th e lo cal Sy mbol of fice or sup port c enter.
If warranty service is required, Symbol will issue a Return Material Authorization Number. Products
must be shipped in the original or comparable packaging, shipping and insurance charges prepaid.
Symbol will ship the rep aired or repla cement product frei ght and insuranc e prepaid in North America.
Shipments from the US or other locations will be made F.O.B. Symbol’s manufacturing plant.
Symbol will use new or refurbished p arts at its discreti on and will o wn all part s removed from repaired
products. Customer will pay for the replacement product in case it does not return the replaced
product to Symbol within 3 days of receipt of the replacement product. The process for return and
customer’s charges will be in accordance with Symbol’s Exchange Policy in effect at the time of the
exchange.
Customer accepts full responsibility for its software and data including the appropriate backup
thereof.
Repair or replacement of a product during warranty will not extend the original warranty term.
Symbol’s Customer Service organization offers an array of service plans, such as on-site, depot, or
phone support, that can be implemented to meet customer’s special operational requirements and
are available at a substantial discount during warranty period.
General
Except for the warranties stated above, Symbol disclaims all warranties, express or implied, on
products furnished hereunder, including without limitation implied warranties of merchantability and
fitness for a partic ular purpose. T he stated e xpress warrant ies are in lie u of all obliga tions or liab ilities
on part of Symbol for damages, including without limitation, special, indirect, or consequential
damages arising out of or in connection with the use or performance of the product.
Seller’s liability for dama ges to buy er or others resulti ng from the use of any pr oduct , shall in no way
exceed the purchase price of said product, except in instances of injury to persons or property.
Some states (or jurisdictions) do not allow the exclusion or limitation of incidental or consequential
damages, so the proceeding exclusion or limitation may not apply to you.
xiii
Page 15

SPS 3000 Series Programmer’s Guide
xiv
Page 16

Chapter 1
Getting Started
Introduction
This chapter describes how to unpack your SPS 3000, lists accessories and system
requirements, and describes the parts on your SPS 3000 and the physical buttons and
controls on the iPAQ Pocket PC used by the SPS 3000.
Unpacking the SPS 3000
Carefully remove all protective material from around the SPS 3000 and save the shipping
container for later storage and shipping.
Verify that you received all equipment listed on the packing slip and inspect the equipment
for damage. If you are missing any equipment or if you find any damaged equipment,
contact the Symbol Technologies Support Center immediately. See page x for contact
information.
1-1
Page 17
SPS 3000 Series Programmer’s Guide
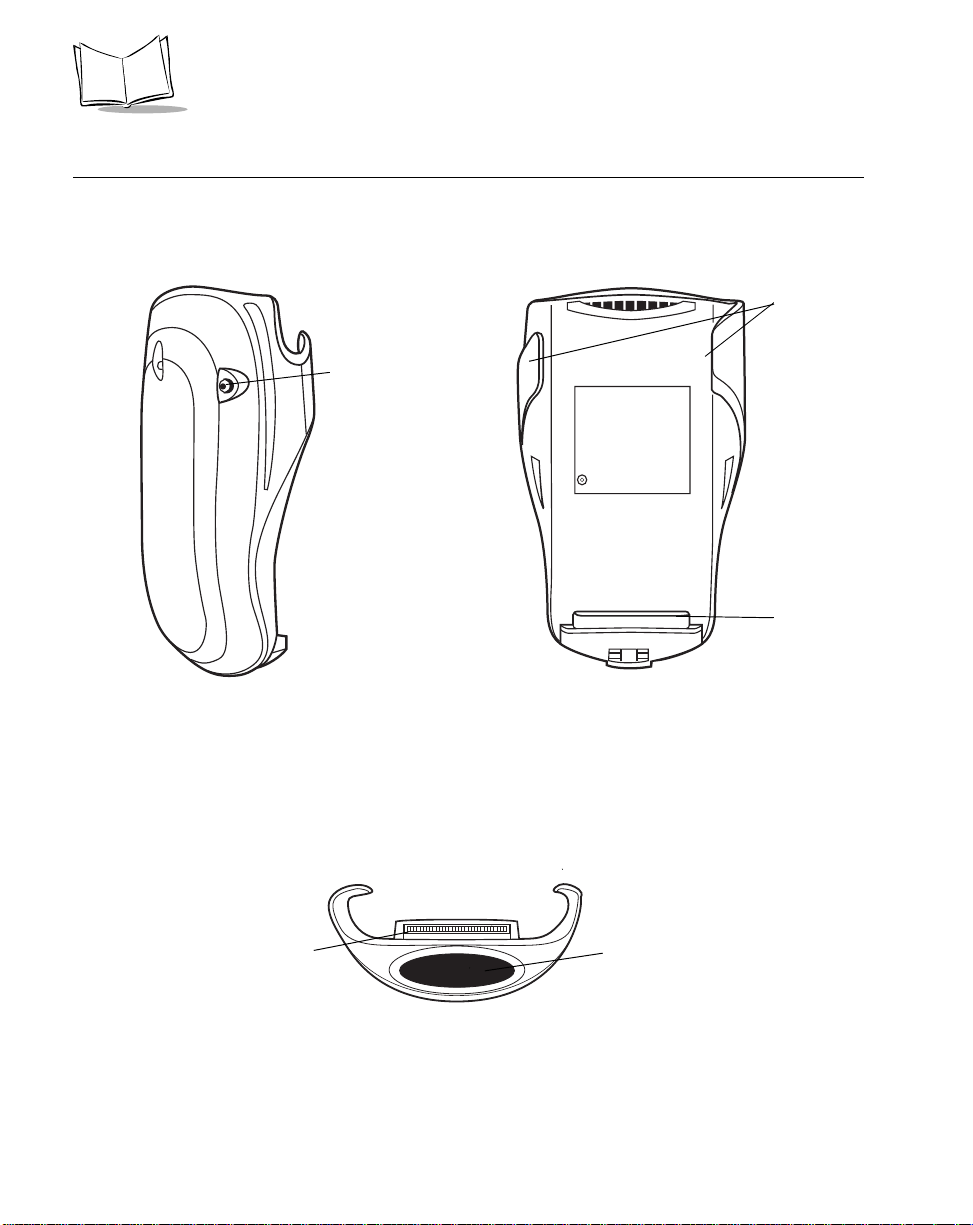
Parts of the SPS 3000
Side View
Inside View
Sleeves
SPS 3000
Power Jack
(not available
on Scan only
model)
Expansion
Connector
1-2
Expansion Connector
Top View
Exit Window
(Scanner models
only)
Figure 1-1. Parts of the SPS 3000
Page 18
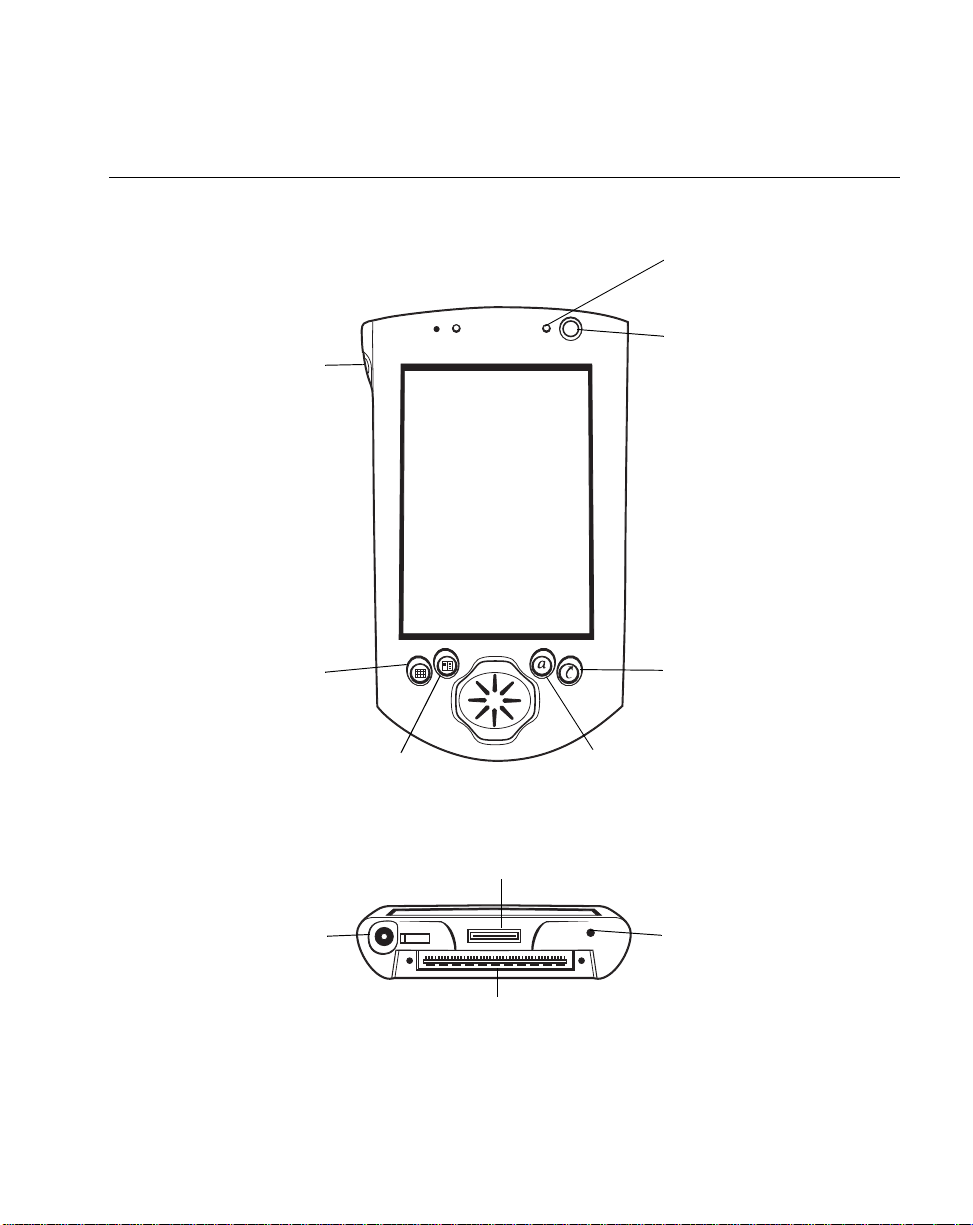
Getting Started
iPAQ Pocket PC Parts Used by the SPS 3000
Record Button
(Button 5)
Calendar
(Button 1)
Contacts
(Button 2)
Front View
Amber Charging
LED
Power Button
Q Star t
(Button 4)
Q Menu
(Button 3)
Bottom View
Communications Port
Power Jack
Expansion Connector
Reset Button
Figure 1-2. iPAQ Pocket PC Parts Used by the SPS 3000
1-3
Page 19

SPS 3000 Series Programmer’s Guide
Accessories
The SPS 3000 is compatible with the following Compaq accessories:
• Chargi ng cradle
• USB and Seri al ActiveSync cables
• Wall mount and cigarette lighter charging adapter/cables.
System Requirements
The following tools must be pre-installed on the Development PC:
•Microsoft
2000 operating system
• Microsoft eMbedded Visual Tools 3.0.
The Development PC must have Microsoft ActiveSync 3.1 or higher installed, and 10MB
available hard disk space for the iPAQ scan driver/application files to be successfully
installed.
®
Windows® NT 4.0 Service Pack 5 or greater, or Microsoft® Windows®
1-4
Page 20
Chapter 2
Hardware Setup
Introduction
This chapter describes how to insert the iPAQ into the SPS 3000, remove the iPAQ from
the SPS 3000, insert the units into the cradle, charge batteries, check battery power, and
attach the lanyard.
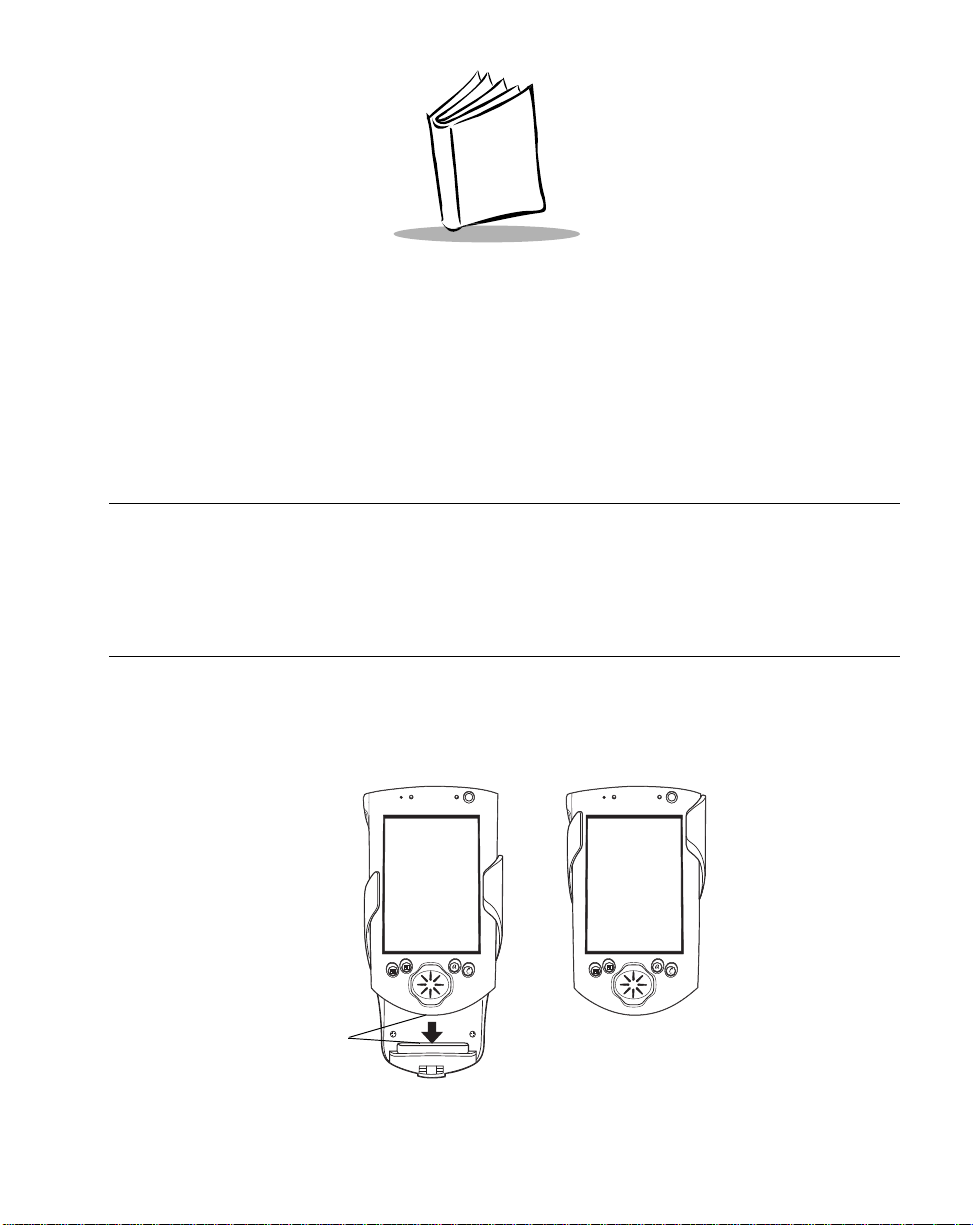
Inserting the iPAQ into the SPS 3000
1. Slide the iPAQ through the SPS 3000 sleeves to connect the iPAQ and SPS 3000
expansion connectors (see Figure 2-1).
2. The iPAQ and SPS 3000 are connected when their expansion connectors are fully
engaged. (When the expansion connectors engage, you will hear a slight click.)
Expansion Connectors
Figure 2-1. Inserting the iPAQ into the SPS 3000
2-1
Page 21

SPS 3000 Series Programmer’s Guide
Removing the iPAQ from the SPS 3000
To remove the iPAQ, push up on the bottom of the iPAQ to disengage the expansion
connectors, then slide the iPAQ off the SPS 3000 sleeves.
Inserting the iPAQ and SPS 3000 into the Cradle
Before inserting the iPAQ and SPS 3000 into the cradle, ensure that the retractable
stabilizing arms located on the inside of the cradle are extended (see Figure 2-2). These
provide a secure fit between the units. If the arms are not extended, press the release
button located on the back of the cradle.
Retractable Stabilizing Arms
Release Button
2-2
Figure 2-2. Releasing the Cradle’s Retractable Arms
Page 22
Hardware Setup
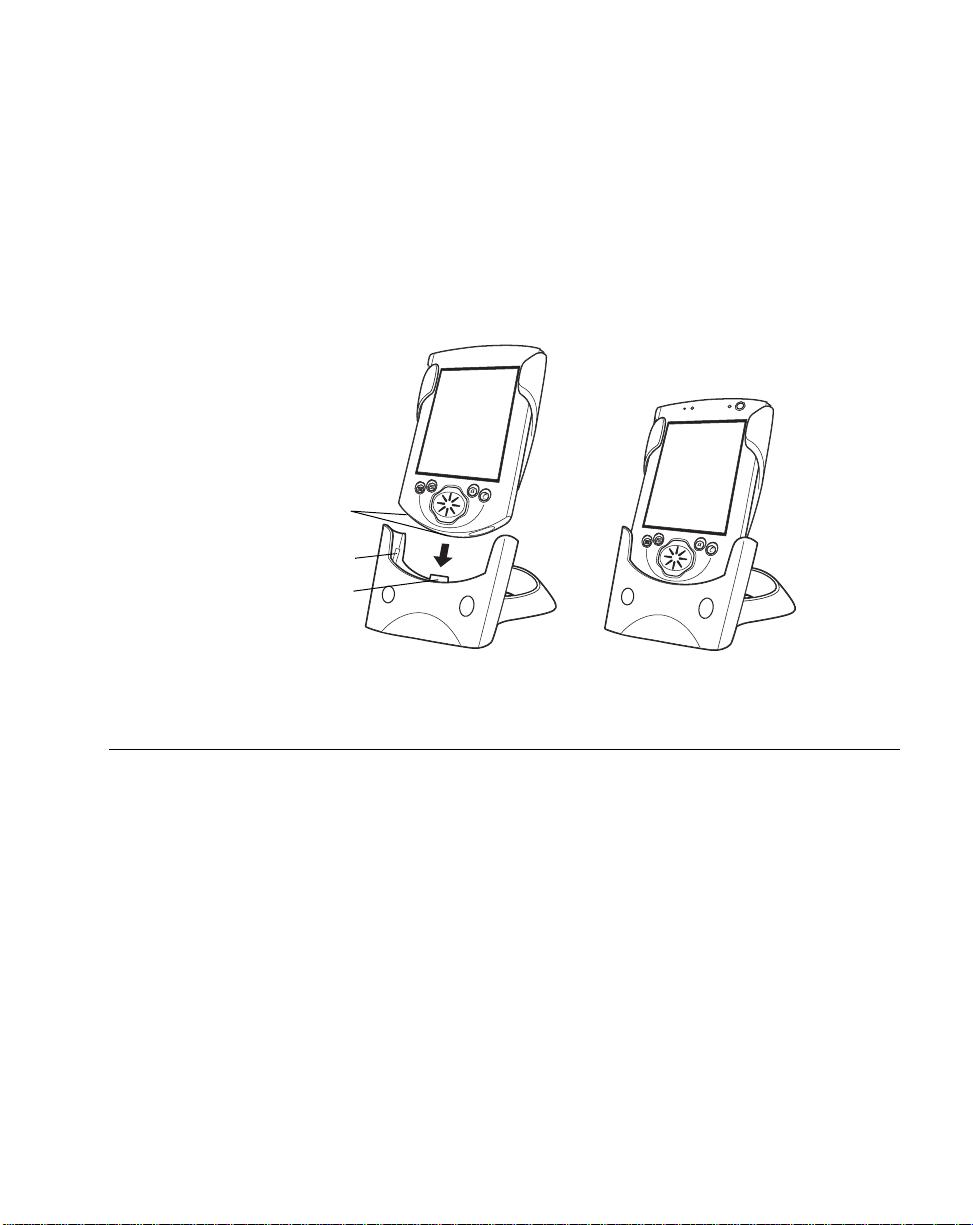
To insert the iPAQ and SPS 3000 into the cradle:
1. Insert the iPAQ into the SPS 3000 (see Figure 2-1).
2. Align the connectors on the bottom of the iPAQ with the cradle’s plastic pin and pin-
out connectors (see Figure 2-3).
3. Slide the iPAQ and SPS 3000 into the cradle as pictured below.
4. The iPAQ and SPS 3000 are connected to the cradle when they are seated firmly
in the cradle and the connectors are fully engaged.
iPAQ Connectors
Plastic Pin Connector
Pin-out Connectors
Figure 2-3. Inserting the iPAQ and SPS 3000 into the Cradle
Charging the Battery (WLAN models only)
Both the iPAQ and SPS 3000 include non user-accessible rechargeable Lithium-ion
batteries.The SPS 3000 battery powers the internal radio. Although the SPS 3000 ships
from the factory with a partially charged battery, it is recommended that you fully charge the
battery before using the SPS 3000.
2-3
Page 23

SPS 3000 Series Programmer’s Guide
Charging the iPAQ and SPS 3000 Separately
To charge the iPAQ:
1. Connect one end of the AC adapter into a power outlet and the other end into the
power jack on the bottom of the iPAQ (see iPAQ Pocket PC Parts Used by the SPS
3000).
2. A flashing amber LED on the iPAQ indicates charging is in progress. When the
amber LED becomes constant, the iPAQ main battery is fully charged.
Note:Total charge time is approximately 2.5 hours for a completely
discharged battery.
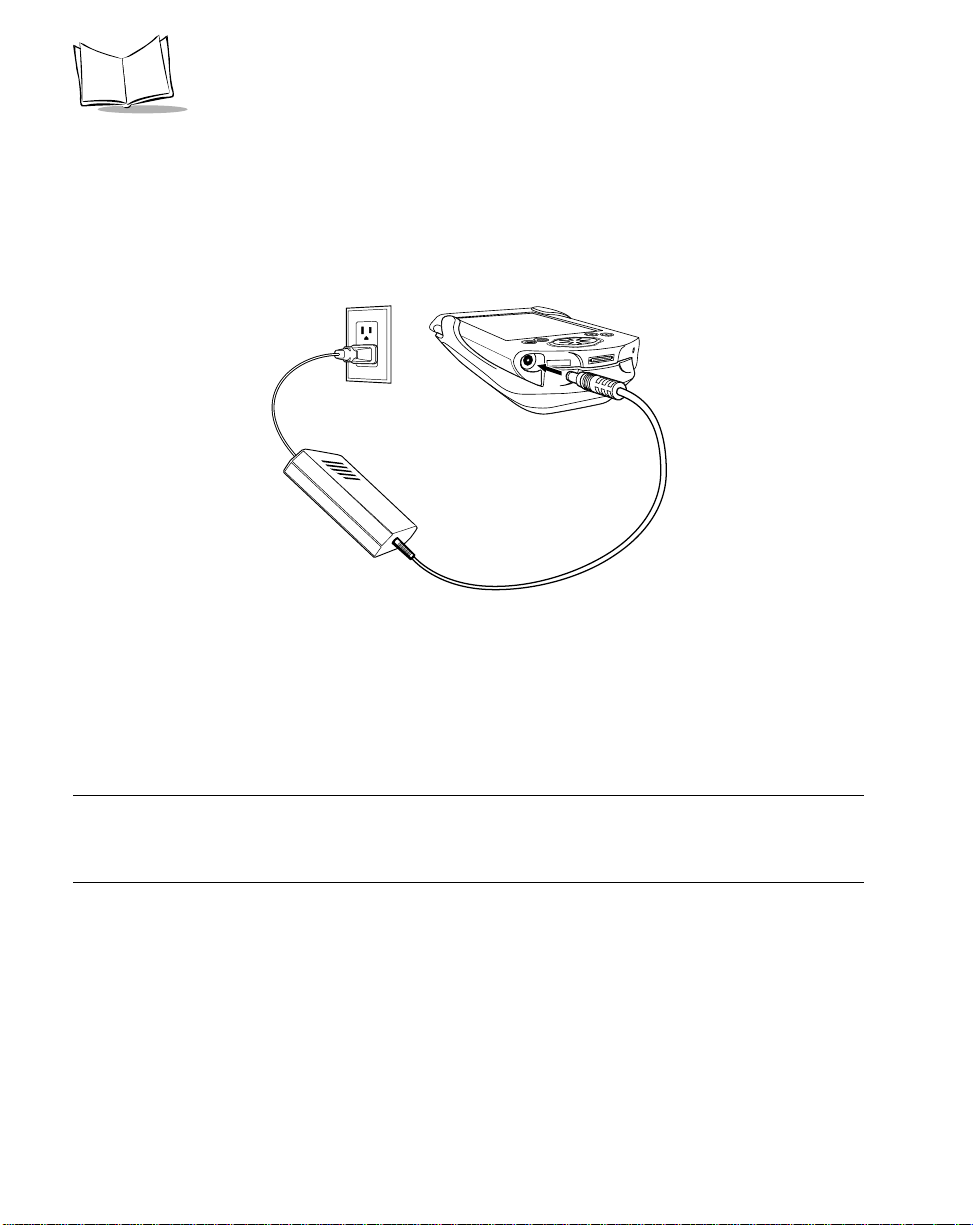
To charge the SPS 3000:
1. Connect one end of the AC adapter into a power outlet and the other end into the
power jack on the SPS 3000.
SPS 3000
Power Jack
Figure 2-4. Connecting SPS 3000 Power
2. When the battery is fully charged, remove the AC adapter.
Note:There is no charging indicator on the SPS 3000. Verify SPS 3000
battery status after charging (see Checking Battery Power on page
2-7). Total charge time is approximately 2.5 hours for a completely
discharged battery.
2-4
Page 24

Hardware Setup
Charging the SPS 3000 and iPAQ Using the Cradle
1. Insert the iPAQ into the SPS 3000 (see Inserting the iPAQ into the SPS 3000 on
page 2-1).
2. Insert the assembled units into the cradle (see Inserting the iPAQ and SPS 3000
into the Cradle on page 2-2).
3. Connect one end of the AC adapter into a power outlet and the other end into the
power port on the cradle (see Figure 2-5).
Cradle Power Port
Figure 2-5. Connecting Cradle Power
4. A flashing amber LED on the iPAQ indicates charging is in progress. When the
amber LED becomes constant, the iPAQ (main) battery is fully charged. The SPS
3000 (external) battery begins charging at this time.
Display the Power settings screen to view charging status (see Checking B attery Power on
page 2-7).
Note:The SPS 3000 battery begins charging only after the iPAQ (main)
battery is fully charged. The total charge time for both batteries can
take up to 5 hours when both batteries are completely discharged.
2-5
Page 25
SPS 3000 Series Programmer’s Guide
Charging the SPS 3000 and iPAQ Without the Cradle
1. Insert the iPAQ into the SPS 3000 (see Inserting the iPAQ into the SPS 3000 on
page 2-1).
2. Connect one end of the AC adapter into a power outlet and the other end into the
power jack on the bottom of the iPAQ.
Figure 2-6. Connecting Power Without Cradle
3. A flashing amber LED on the iPAQ indicates charging is in progress. When the
amber LED becomes constant, the iPAQ (main) battery is fully charged. The SPS
3000 (external) battery begins charging at this time.
Display the Power settings screen to view charging status (see Checking Batter y Power on
page 2-7).
Note:The SPS 3000 battery begins charging only after the iPAQ (main)
battery is fully charged. The total charge time for both batteries can
take up to 5 hours when both batteries are completely discharged.
2-6
Page 26
Hardware Setup
Checking Battery Power
Note:Battery longevity depends upon many factors, such as amount and
type of usage. For example, extended wireless communications will
have an impact on battery life. To conserve battery power, the
integrated 802.11b radio (WLAN) has the capability to reduce power
consumption when wireless communications is not in use.
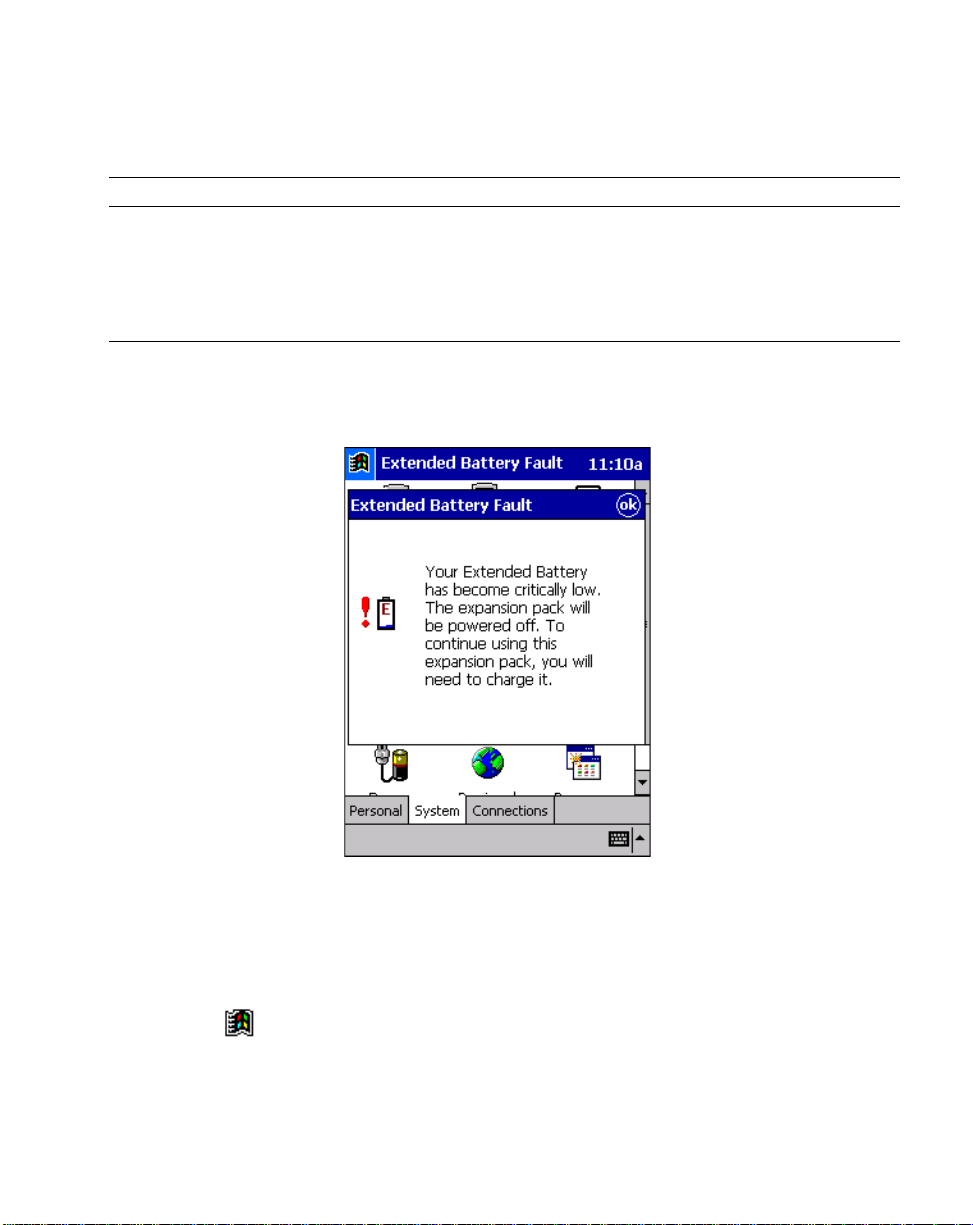
The SPS 3000 battery must have a sufficient charge. When the SPS 3000 battery falls
below critical levels, the iPAQ will automatically shut the SPS 3000 down and the following
screen displays on your iPAQ.
This does not affect the iPAQ main battery and the operation of the iPAQ without the SPS
3000.
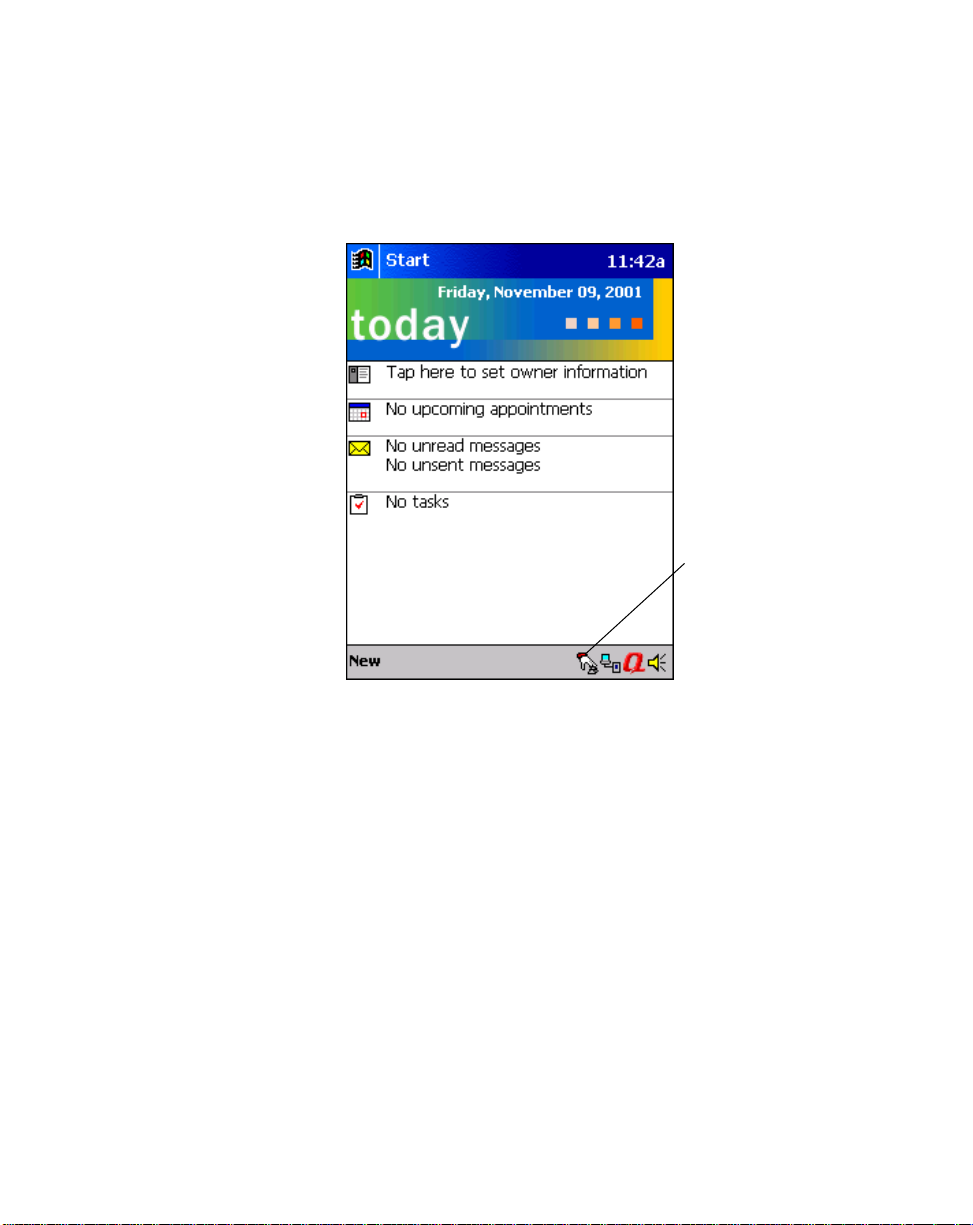
To check the battery power:
1. Power on the iPAQ by depressing and releasing the power button.
2. Tap to display the Start screen.
3. Select Settings.
4. Select the System tab on the bottom of the Settings screen.
2-7
Page 27

SPS 3000 Series Programmer’s Guide
5. Scroll the screen, if necessary , and tap the Power icon to display the Power screen.
iPAQ Main Battery
Status Bar
SPS 3000 External Battery
Status Bar
Figure 2-7. Battery Status Screen
When the iPAQ main battery charges, the main battery “power remaining” status bar
continuously updates until the iPAQ battery is fully charged (100%). If the SPS 3000 is
connected, and its battery is low, the external battery “power remaining” status bar
continuously updates until the SPS 3000 battery is fully charged (100%). The SPS 3000
battery charges after the iP AQ battery is fully charged.
Note:The SPS 3000 scan only model does not include a battery. When
your iPAQ is connected to a scan only SPS 3000, there is no
external battery status bar display on the iPAQ Power screen.
2-8
Page 28

Attaching the Lanyard
Hardware Setup
1. Thread the lanyard loop through
the handstrap connector on the
back of the SPS 3000.
2. Thread the long end of the
lanyard through the loop
and pull.
3. Pull the loop over the
plastic tip on the lanyard.
4. Pull the lanyard to tighten.
Figure 2-8. Attaching the Lanyard
2-9
Page 29

SPS 3000 Series Programmer’s Guide
2-10
Page 30

Chapter 3
Software Installation
Introduction
This chapter describes how to install and use ActiveSync Software and the Symbol
Windows CE Software Developer’s Kit (SDK).
Using ActiveSync Software
Using ActiveSync technology, you can synchronize the information on your iPAQ with the
information on your desktop computer. After you synchronize, changes you make on your
iPAQ or desktop computer appear in both places.
Use ActiveSync software to:
• Install programs and drivers from the host PC to your iPAQ.
• Back up the data stored on your iPAQ. Synchronization is a one-step procedure
that ensures your data is always safe and up-to-date.
• Copy (rather than synchronize) files between your iPAQ and desktop.
• Control when synchronization occurs by selecting a synchronization mode. For
example, you may synchronize continually while the iPAQ is in the cradle, or only
when you select the synchronize command.
• Select the types of information to synchronize, and control how much data is
synchronized.
3-1
Page 31

SPS 3000 Series Programmer’s Guide
Installing ActiveSync Software
To install ActiveSync on your desktop computer, follow the installation instructions on the
ActiveSync CD. During installation you can set up the types of information (e.g., files,
E-mail, databases) to synchronize as well as the Sync Mode (Continuously while the iPAQ
is connected, Only upon connection, or Manually).
Verif ying an ActiveSync Connection
When a proper ActiveSync connection has taken place between the iPAQ and the desktop
computer, the ActiveSync icon on the desktop computer turns green.
Performing a Remote ActiveSync
You can also synchronize your iPAQ remotely using a WLAN connection. Refer to Using
ActiveSync o v er S p ec tr um 2 4 on p age 4-25 for information about setting up an ActiveSync
connection via a WLAN.
Performing Subsequent ActiveSync Operations
After you set up ActiveSync for the first time, subsequent ActiveSync operations only
require a connection between your iPAQ and your desktop computer. To connect, place
your iPAQ in a cradle that is connected to your desktop, connect the synchronization cable
directly from your iPAQ to the desktop, or connect via a Wireless Local Area Network
(WLAN).
A WLAN connect will require additional set up (see Using ActiveSync over Spectrum24 on
page 4-25).
3-2
Page 32

Software Installation
Symbol Windows CE SDK
Note:Refe r to System Requirements on page 1-4 before installing the
Symbol Windows CE SDK.
The Symbol Windows CE SDK is available to develop applications to run on the iPAQ. This
SDK contains SPS 3000-specific software not available in the standard Microsoft Windows
CE Platform SDK. For example, it provides the tools necessary to create and deploy bar
code scanning applications for the Compaq iPAQ Pocket PC and the drivers needed to
operate the SPS 3000.
Installing the SDK on the Development PC
The SDK installation program loads the required Windows CE components for your SPS
3000.
The Symbol SDK includes:
• Applications and Utilities
• Drivers
• Sample code
• Help files
• The SPS 3000 Series Programmer’s Guide (p/n 72-53911-xx).
You can download the latest SDK from the Software Developer Zone at the web address
http://software.symbol.com/devzone. Follow the installation prompts. After the SDK is
properly installed, reboot the development PC.
Use eMbedded Visual C++ or eMbedded Visual Basic to view the active Windows CE
configuration, Microsoft Pocket PC, and display the directory in which the SDK is installed.
3-3
Page 33

SPS 3000 Series Programmer’s Guide
Choosing Installation Options
The software installation package for the SPS 3000 contains separate installation options
for each hardware configuration. During the software installation you are presented with the
following hardware configuration options:
• Scan Only Expansion Pack
• Scan/WLAN Expansion Pack
• WLAN Only Expansion Pack
• Complete/Custom Install.
The first three options automatically choose the correct software to install for the Expansion
Pack you choose. If you choose Complete/C us tom Install, a dialog displays that allows
each software component to install selectively.
Table 3-1 lists the components installed for each configuration.
Table 3-1. Installed Components By Configuration
Configuration Scan Drivers WLAN Drivers SDK Files
Scan Only X n/a X
Scan/WLAN X X X
WLAN Only n/a X X
Complete/Custom User Defined User Defined User Defined
Installing Drivers and Applications
Installation registers the SDK CAB files with the Microsoft ActiveSync Windows CE
Applications Manager (CEAppMgr.exe). When the iPAQ is inserted into the cradle and
connected to the desktop PC via ActiveSync, the installation of the CAB files begins.
The CAB files registered are described in the sections, Scan Drivers and Applications CAB
Files on page 3-5 and WLAN Drivers CAB Files on page 3-6.
Note:You can find information on CAB files in the Microsoft eMbedded
Visual Tools 3.0 help under the section heading, “Installation and
Configuration Guide.”
3-4
Page 34

WARNING
After drivers are inst alled, the iPAQ must be reset (i.e., rebooted).
Scan Drivers and Applications CAB Files
• scnappsw_xxxx.cab
This CAB file contains the scanner application “ScanWedge” and its registry
entries. During installation, the application (ScanWedge.exe) is copied to the
“\Program Files\Scanner Files” directory. A shortcut to this executable is created
and placed in the “\Windows\Start Menu\Scanner” directory. The executable is
registered as a valid scanner application by writing the appropriate registry key.
The .INF file used to create this CAB file can be found in the “\Windows CE
Tools\wce300\SPS3000\Samples\Symbol\CabInfs” directory on the host
computer.
• scnappss2_xxxx.cab
This CAB file contains the scanner application “ScanSamp2” and its registry
entries. During installation, the application (ScanSamp2.exe) is copied to the
“\Program Files\Scanner Files” directory. A shortcut to this executable is created
and placed in the “\Windows\Start Menu\Scanner” directory. The executable is
registered as a valid scanner application by writing the appropriate registry key.
The .INF file used to create this CAB file can be found in the “\Windows CE
Tools\wce300\SPS3000\Samples\Symbol\CabInfs” directory on the host
computer.
• scndrv_xxxx.cab
This CAB file must be installed to use the scanning capabilities of the SPS 3000.
During installation of this CAB file, you must choose the button to use to scan, and
the application to automatically launch when this button is pressed. This button is
linked to the Trigger.exe application which, when launched, loads the associated
scan application (provided no other scanning application is currently running). After
the drivers are installed, a warm boot of the system must take place. A warm boot
is initiated by pressing the Reset button located on the bottom of the iPAQ (see
iPAQ Pocket PC Parts Used by the SPS 3000 on page 1-3).
Software Installation
3-5
Page 35

SPS 3000 Series Programmer’s Guide
The following files are installed by the scndrv_xxxx.cab file:
SpexPDD.DLL Scanner ASIC device driver. This file is copied to the
“\Windows” directory.
ScanMDD.DLL Scanner stream device driver. This file is copied to the
“\Windows” directory.
Scnapi32.DLL Scanner API. This file is copied to the “\Windows” directory.
Trigger.exe A system tray application that allows a hardware application
button to be used to trigger scanning operations. This
application can also be used to launch registered scanning
applications when the button is pressed. This executable is
copied to the “\Program Files\Scanner Files” directory.
Ctlpanel.exe A sample application that provides an interface for modifying
scan parameters. This file is copied to the “\Program
Files\Scanner Files” directory.
WLAN Drivers CAB Files
• landrvarm_xxxx.cab
This CAB file must be installed in order to use the WLAN capabilities of an SPS
3000 that contains WLAN hardware. After the drivers are installed, a warm boot of
the system mu st t a ke p la ce . A warm boot is initiated by pressing the Reset button
located on the bottom of the iPAQ (see iPAQ Pocket PC Parts Used by the SPS
3000 on page 1-3).
• landrvdiv_xxxx.cab
The WLAN hardware on the SPS 3000 contains a single antenna. This CAB file
configures the WLAN driver not to use “Diversity” and sets the hardware default to
not use “Diversity”.
Note:When CAB files are registered, the “xxxx” in each CAB file name
(described in the sections, Scan Drivers and Applications CAB Files
and WLAN Drivers CAB Files) is replaced with a number that
corresponds to the CAB file’s release revision. This provides an
easy way to tell if the most current revision of the CAB file is used.
For example, scndrv_0100.cab corresponds to a CAB file version of
1.00.
3-6
Page 36

Software Installation
SDK Files
If the “SDK files” installation option is checked, all files necessary to develop scanning
applications for the SPS 3000 are installed. Table 3-2 lists the locations to which the SDK
files are installed.
T able 3-2. Installed SDK Files
File Location File Type
\Windows CE Tools\wce30 0\SPS 3000\Bin Sym bol compiled drive rs, applications , and
CAB files.
\Windows CE Tools\wce300\SPS 3000\Include Symbol API Include files.
\Windows CE Tools\wce300\SPS 3000\Lib\arm Symbol API Import library (for SA-1110
StrongARM µP).
\Windows CE Tools\wce300\SPS 3000\Samples Symbol scanner sample source code,
sample CAB .INF files.
\Windows CE Tools\wce300\SPS 3000\Help Symbol API Help files and documentation.
\Windows CE Tools\wce300\SPS 3000\Flash Flash memory tools and images (see
Chapter 5, Developing Appl ic ati ons for the
SPS 3000).
3-7
Page 37

SPS 3000 Series Programmer’s Guide
3-8
Page 38

Chapter 4
Operating the SPS 3000
Introduction
This chapter provides information about scanner operations and Wireless Local Area
Network (WLAN) configuration.
Operating the Scanner
The SPS 3000 scanner provides support for scanning 1-Dimensional bar codes. The
scanner is present on the Scan Only and Scan/WLAN configurations of the SPS 3000.
The Trigger and CTLPanel (Symbol Control Panel) applications are installed during the
scan drivers CAB f ile (scndrv_xxxx. cab) install ation (see Installing Drivers and Applications
on page 3-4). Trigger provides the capability of performing hard triggers (physical button
presses) to initiate scans. CTLPanel provides the capability of setting scanning parameters,
such as scan durations and beep sounds.
4-1
Page 39

SPS 3000 Series Programmer’s Guide
Trigger Application
Note:This application is visible only on the “Today” screen.
The Trigger application provides the capability for hard (physical) scan trigger support for
one of the five applications buttons on the iPAQ (see iPAQ Pocket PC Parts Used by the
SPS 3000 on page 1-3). By default, the button used to Trigger the scanner is set to the
"Record (Button 5)" application button. This can be changed at any time on the Buttons
screen.
To change the scan trigger:
•Tap Start\Settings\Buttons to set a different button to "Trigger."
When the Trigger application is launched, it resides in the tray at the bottom of the
Today screen (see Figure 4-2 on page 4-3) and the Trigger About dialog box displays.
Figure 4-1. Trigger About Dialog Box
T o pr oceed, tap Hide to hide the dialog, or press the Trigger button again. If you do not want
the About box displayed when Trigger loads, uncheck the Show this dialog on start up
option.
In addition to mimicking hard trigger functionality, you can set the Trigger application to
automatically launch registered scanning applications. This feature presents an intuitive
way of running scanning applications. When the user presses the hard trigger button, the
Trigger application loads, if not already loaded, and launches a scanning application, if set
to do so.
4-2
Page 40
Changing Trigger Applications
To change the application that Trigger launches:
1. Tap Start\Today to display the Today screen.
Operating the SPS 3000
Trigger icon
Figure 4-2. Today Screen
4-3
Page 41

SPS 3000 Series Programmer’s Guide
2. Tap the Trigger icon on the bottom of the T oday screen to display the pop-up menu.
Figure 4-3. Pop-up Menu
3. Select the Launch App… option to display a dialog with a list box of all registered
scanning applications.
Figure 4-4. Launch Application Screen
4. Select the application you would like Trigger to automatically launch.
5. Tap OK.
4-4
Page 42

Operating the SPS 3000
For more information about registering scanning applications for use with Trigger, refer to
Chapter 5, Developing Applications for the SPS 3000.
CTLPanel "Symbol Control Panel" Application
The CTLPanel Application provides the user with an interface for setting scan parameters.
You can access a shortcut to the CTLPanel program by tapping Start\Programs\Scanner.
CTLPanel is a menu driven application that allows for quick navigation of the many scan
parameters provided by the scan drivers. For more information about the scan parameters
and what they do, refer to the SPS 3000 Help file.
4-5
Page 43

SPS 3000 Series Programmer’s Guide
Scanning For the First Time
Note:Depending on how your system is configured during installation of
the scan driver CAB file, the physical Compaq® iPAQ application
button that starts the Trigger application and the scanning
application launched may vary.
The information in this section assumes that the Trigger application
is mapped to Button 5, the Record Button (see iPAQ Pocket PC
Parts Used by the SPS 3000 on page 1-3), and that the ScanWedge
application is set to launch automatically.
To scan using the SPS 3000:
1. Insert the iPAQ into the SPS 3000 (see Inserting the iPAQ into the SPS 3000 on
page 2-1).
2. Press the scan trigger (Record Button) to launch the Trigger system tray
application.
3. When the Trigger application’s About box is dismissed (either manually or
automatically), ScanWedge launches.
4. Press the scan trigger a second time. This turns on the laser, which produces a red
scan beam. Verify that the red scan beam covers the entire 1-D bar code. If the bar
code is decoded, an audible beep occurs. ScanWedge places the bar code data in
any valid input field (any field that accepts cursor input).
Scan Trigger (Default)
“Record Button”
4-6
Figure 4-5. Scanning a Bar Code
Page 44

Operating the SPS 3000
Scanning in Foreground and Background Modes
There are two basic types of scanning applications: Foreground and Background. The
designations Foreground and Background refer to the type of read requests (Foreground
or Background) issued by the application. It DOES NOT necessarily refer to whether or not
the application has the "focus."
A Foreground scanning application is one in which Foreground read requests are issued.
Such an application is expected to have read requests pending only when the application
has the "focus." This means that when a Foreground scanning application is visible to the
user (e.g., the application has the "focus"), scanned data goes ONLY to that application.
When a Foreground scanning application loses the "focus" (e.g., the user no longer sees
the application), scanned data WILL NOT go to that application (since it cancels any
pending read requests when it loses the "focus").
A Background scanning application is one in which Background read requests are issued.
Such an application is allowed to have read requests pending at any time, whether or not
the application has the "focus" (e.g., is visible to the user). On receiving scanned data, the
application may or may not take the "focus" (e.g., becomes visible to the user).
Foreground read requests take precedence over Background read requests. Scanned data
goes to a Background scanning application ONLY if the Foreground scanning application
does not have the "focus" with read requests pending.
ScanSamp2 can be a Foreground or Background scanning application, but defaults to
Foreground (this can be changed via the User Interface). ScanWedge is a Background
Scanning application.
Using the ScanWedge Systray Application for Background Scanning
ScanWedge can be used to allow non-scanning aware applications to support bar code
input. When launched, it resides in the system tray. If the foreground window allows
keyboard input (such as the “Notes” application), all scanned data is typed into the field
where the c ursor resides.
4-7
Page 45

SPS 3000 Series Programmer’s Guide
Wireless Local Area Network (WLAN) Operation
The SPS 3000 Scan/WLAN and WLAN only configurations contain Spectrum 24 High Rate
Wireless Networker (WN) directo-sequence (DS) technology. Spectrum 24 DS is a spreadspectrum network operating between 2.4 and 2.5GHz. Spread-spectrum communication
provides a high-capacity network within large or small environments.
Configuring the SPS 3000 For Your WLAN
Symbol Status Utility
Configuration of the SPS 3000 WLAN capabilities can be accomplished through the
Symbol Status Utility. This utility includes ten property pages (beginning on page 11) and
resides in the T oday screen’s system tray. To open the utility , tap Start/Today to display the
Today screen. Tap the icon on the bottom of the Today screen to display the Symbol
Status Utility Mode property page (Figure 4-6).
Note:The icon displays only if the SPS 3000 is attached to the iPAQ.
In addition, the icon changes based on association and signal status
(see Table 4-1 on page 4-10).
Use the following Symbol Status property pages to view and configure the Wireless
Networker settings.
• Mode property page (page 4-11)
• Info property page (page 4-12)
• IP Config property page (page 4-13)
• Power property page (page 4-16)
• Options property page (page 4-17)
• Encryption property page (page 4-19)
• Ping property page (page 4-21)
• Signal property page (page 4-22)
• APs property page (page 4-23)
• Peers property page (page 4-24).
For detailed information about property pages refer to Symbol Status Property Pages on
page 4-11.
4-8
Page 46

Operating the SPS 3000
Installing the Symbol Status Utility
To install Symbol Status complete the driver installation instructions described in Chapter
3, Software Installation.
Using the Symbol Status Utility
Symbol Status provides signal, transmission quality and power management status for the
Wireless Networker. The Symbol Status task tray icon (see Table 4-1) conveys rea l- ti me
signal strength and service quality information. The Symbol Status property pages display
driver and firmware revision data, power management settings and Wireless Networker
transmission and signal quality statistics.
Symbol Status starts automatically and appears on the task tray. Tap the Symbol Status
icon on the task tray to open the utility. The icon changes in real-time to reflect the signal
strength and availability of the Wireless Networker and the network.
Note:The appearance of the Symbol Status Utility can differ depending on
the device being used.
4-9
Page 47

SPS 3000 Series Programmer’s Guide
Symbol Status Task Tray Icons
Symbol Status task tray icons display the signal strength of the Wireless Networker.
T a ble 4-1. Symbol Status Task Tray Icons
ICON Status
Excellent signal strength (Green Bar)
Very goo d sign al stre ng th
Good signal strength
Fair signal strength
4-10
Poor signal strength
Out-of-network range
Page 48

Operating the SPS 3000
Symbol Status Property Pages
The Symbol Status property pages contain wireless network and service quality information
for the Wireless Networker.
Tap the tabs on the bottom of the screen to display a different property page (use the left
and right arrows on the bottom of the screen to display more tabs).Tap Apply to save the
changes made to the Wireless Networker configuration via the property pages. T ap OK to
close the Symbol Status window.
Mode Property Page
The Mode property page provides the option to set the ESSID (wireless LAN identifier) and
the operating mode of the network. If network information is unknown, contact your System
Administrator.
Figure 4-6. Mode Property Page
Use the Operating Mode pull-down menu to select one of the following operational modes:
• Infrastructure - Select Infrastructure to enable the adapter to transmit and receive
data with an access point. Infrastructure is the adapter default mode when Symbol
Status initially displays.
4-11
Page 49

SPS 3000 Series Programmer’s Guide
• Enhanced Ad Hoc - Select Enhanced Ad Hoc when the highest throughput is
required in an Ad Hoc network. Enhanced Ad Hoc does not support adapters
operating in PSP mode (battery power) and does not use authentication. Use the
Channel field to enter the channel for the network. Each adapter is required to be
on the same channel to interoperate. Enhanced Ad Hoc is not recommended as a
normal operational mode or for adapters operating on battery power. When
Enhanced Ad Hoc is selected the Signal, APs, Ping and Peers property pages are
no longer available.
• Ad Hoc - Select Ad Hoc to enable the adapter to form its own local network where
adapters communicate peer-to-peer without access points using a shared ESSID.
The adapter starting the Ad Hoc network (the first station transmitting a beacon)
sets the channel in the Channel field. Each adapter is required to be on the same
channel to transmit and receive data peer-to-peer.
• When Ad Hoc is selected, the Ping, Signal and APs property pages disappear and
the Peers property page displays. Select Peers to view the BSSID or MAC
addresses of the other adapters in the network, their operating mode (PSP or
CAM), their transmit rate, their supported data rate and the length of time an
adapter has been out of the Ad Hoc network. Tap Refresh to update the Peers
property page to the latest Ad Hoc network performance and adapter membership
data.
Enter an ESSID in the 802.11 ESSID field. The ESSID is the 802.11 Extended Service Set
Identifier. The ESSID is a 32-character (maximum) string identifying the wireless local area
network.
Select the Send long preamble headers checkbox if the Wireless Networker is using a long
preamble when transmitting data. A long preamble is approximately 8 bytes of the packet
header attached to the packet prior to transmission. Devices in Ad Hoc mode are required
to use the same preamble length to interoperate. The short preamble length is
approximately half the length. Send long preamble headers is the default setting used by
the adapter.
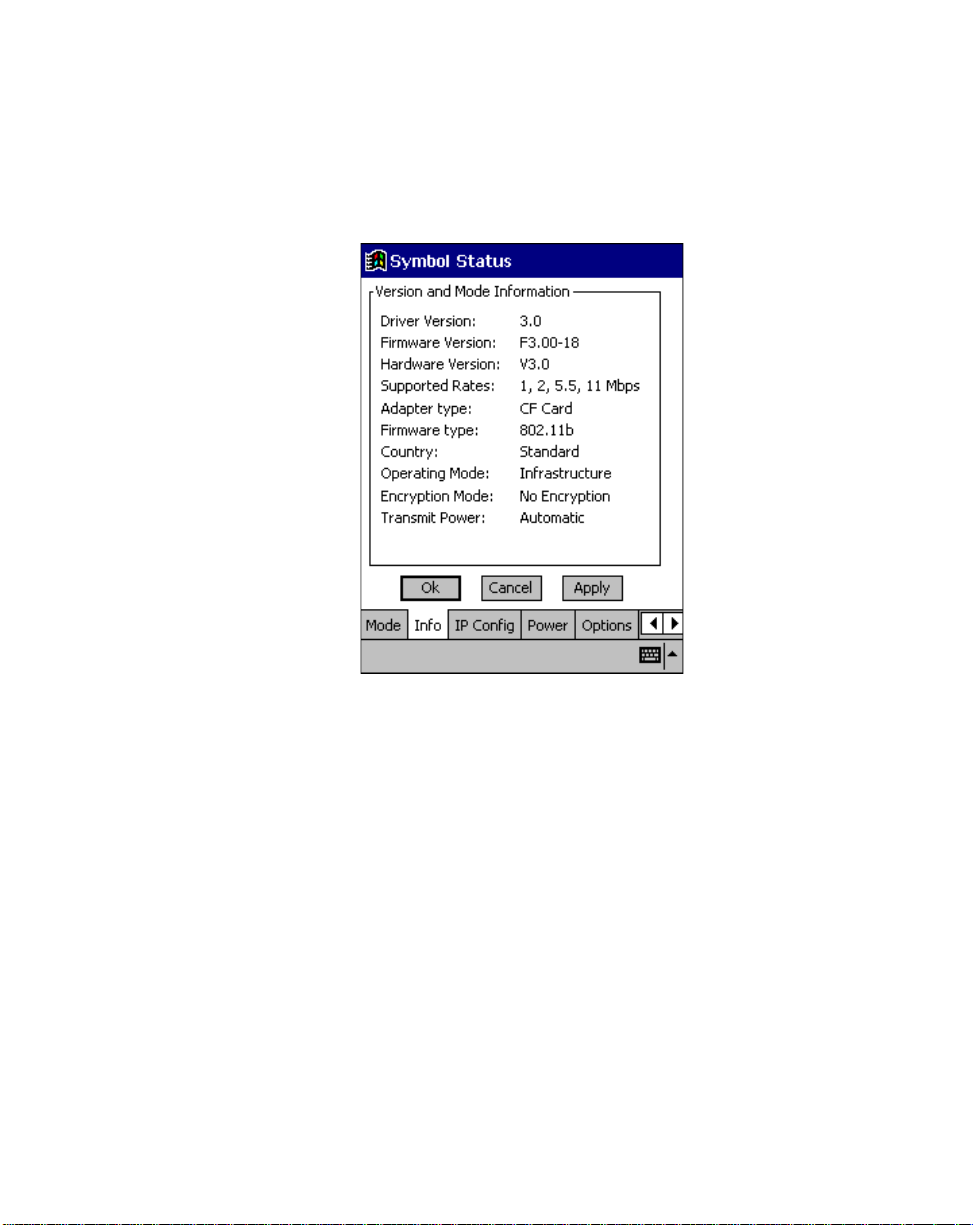
Info Property Page
Use the Info property page to view Wireless Networker version and operating mode
information.
Use the Version and Mode Information field to view the driver version, adapter firmware
version, supported data rate, adapter type, firmware type, operating country, operating
mode (Infrastructure, Ad Hoc or Enhanced Ad Hoc), encryption mode and transmit power.
4-12
Page 50
Operating the SPS 3000
The encryption information is useful when associating to an access point, as the adapter
and access point are required to use the same encryption algorithm to interoperate.
Changes to the operating mode can be made using the Mode property page. Transmit
power can be adjusted in the Radio Transmission Power field of the Power property page.
Figure 4-7. Info Property Page
IP Config Property Page
Use the IP Config property page to view and edit the following: IP address, subnet,
gateway, DNS, WINS, MAC address and host name.
Select DHCP (Dynamic Host Configuration Protocol) to obtain a leased IP address and
network configuration information from a remote server. DHCP is a read-only window and
is the default setting.
4-13
Page 51

SPS 3000 Series Programmer’s Guide
Select Static to manually assign an IP address, subnet mask, default gateway, DNS and
WINS address used by the adapter.
4-14
Figure 4-8. IP Config Property Page
Table 4-2. Config Property Page Fields
Field Description
IP Address The Internet is a collection of networks whose users
communicate with ea ch other . Each communic ation carries the
address of the source and destination networks and the
particular machi ne within th e network as sociated with the us er
or host computer at each end. This address is called the IP
address (Internet Protocol address). Each node on the IP
network must be assi gned a uniqu e IP address, wh ich is mad e
up of a network identifier and a host identifier. This address is
typically represented in dotted-decimal notation, with the
decimal value of each octet separated by a period, for
example, 192.168.7.27.
Page 52

Operating the SPS 3000
Table 4-2. Config Property Page Fields (Continued)
Field Description
Subnet Mask Most TCP/IP networks use subnets in order to effectively
manage routed IP addresses. Having an organization’s
network divided into subnets allows it to be connected to the
Internet with a single shared network address, for example
255.255.255.0.
Gateway The default gateway is a device, which is used to forward IP
packets to and from a remote destination.
DNS The Domain Name System (DNS) is a distributed Internet
directory service. DNS is used mostly to translate domain
names and IP address es. DN S is als o used to cont rol Intern et
email delivery. If DNS is not configured, Web sites cannot be
located or email delivered.
WINS WINS is a Microsoft Net BIOS name server. WINS eliminates
the broadcasts needed to resolve computer names to IP
addresses by providing a cache or database of translations.
MAC Address An IEEE 48-bi t addres s that the adapte r is gi ven at the fac tory
that uniquely identifies the adapter at the physical layer level.
Host User assigned host name.
4-15
Page 53

SPS 3000 Series Programmer’s Guide
Power Property Page
Use the Power property page to set the Wireless Networker power consumption mode and
the radio transmission power. The Wireless Networker has two power consumption modes.
The Automatic Power Saving Mode is the default power mode setting.
Clear the Automatic Power Saving Mode checkbox and use the sliding scale in the Manual
Power Saving Mode field to select a performance index (1 to 5) suited to the intended
operation of the adapter. Each mode is described underneath the sliding scale.
Figure 4-9. Power Property Page
Use the Radio Transmission Power field to set the power level for data transmitted to either
an access point (Infrastructure mode) or other adapters in an Ad Hoc cell (Ad Hoc or
Enhanced Ad Hoc mode). Set the mode for each adapter using the Mode property page.
Adjusting the adapter transmit power level enables users to expand or confine a
transmission area in respect to interference or other wireless devices that could be
operating nearby. Reducing a coverage area in high traffic areas improves transmission
quality by reducing the number of missed beacons and noise in that coverage area.
4-16
Page 54

Operating the SPS 3000
Use the Radio Transmission Power field to set the transmission power level for adapters
operating in Infrastructure mode. There are two options available in Infrastructure mode:
Automatic and Power Plus.
• Select Automatic to use the current access point transmit power level for the
adapter. Automatic is the default mode for adapters operating in Infrastructure
mode.
• Select Power Plus from the pull down menu to set the transmission power one level
higher than the level set for the access point. If the access point is set to the highest
power level, then that is the level used by the adapter.
Use the Radio Transmission Power field to set the transmission power level for adapters
operating in Ad Hoc or Enhanced Ad Hoc mode. Select a transmission power level from the
AdHoc pull-down menu and tap Apply to implement that level for the adapter. There are five
transmission power options available in Ad Hoc and Enhanced Ad Hoc mode.
• Select Maximum power to set the adapter to the highest transmission power level.
Select Maximum power when attempting to communicate with adapters at the
outer edge of a coverage area.
• Choose 50% power to set the adapter to a transmit power level that is half of the
maximum power level. Reduce transmission power as needed to avoid
interference with other devices operating within the same coverage area.
• Specify 25% power to set the adapter to a transmit power level that is half of the
50% power level.
• Select 10% power to set the adapter to a transmit power level that is about half of
the 25% power level.
• Choose Minimum power to set the adapter to the lowest transmit power level. Use
minimum power when communicating with other devices in very close proximity.
Note:If unsure which transmission power level to use in the coverage
area, ask the System Administrator.
Options Property Page
Use the Options properties page to enable or disable international roaming, configure
consumption avoidance capabilities, system sounds and to set temporary settings.
Select the Allow Pocket PC to suspend when wireless network is used option to allow the
Pocket PC to use its automatic power-off feature when the adapter is still active to avoid
battery power drainage. The Pocket PC does not suspend if the suspend option is disabled.
4-17
Page 55

SPS 3000 Series Programmer’s Guide
This allows the adapter to continue beaconing and could result in unnecessary battery
power consumption.
Select Enable Sounds from the Optional Settings field to initiate an audible signal when
performing a ping test and associating with an access point. The tones are important to
notify users if the pinging is received or if the adapter has roamed to another access point.
Check the International roaming checkbox to enable the adapter to roam and associate to
access points with country codes other than the United States.
V alues saved to the Windows registry are used by the adapter when the adapter is inserted.
Select These settings are only temporary to enter temporary values that are used until the
computer is restarted. T emporary values apply to each property page. If the checkbox is not
selected, any value entered is saved and used by the adapter when it is inserted.
4-18
Figure 4-10. Options Property Page
Page 56

Operating the SPS 3000
Encryption Property Page
Use the Encryption property page to set the adapter security level. The absence of a
physical connection makes wireless links vulnerable to information theft. Encryption is an
efficient method of preventing data theft and improving data security . The firmware supports
Open System (no encryption), 40-bit Shared Key (40-bit) or 128-bit Shared Key (128-bit)
encryption algorithms.
Figure 4-11. Encryption Property Page
An access point and an adapter are required to use the same encryption algorithm to
transmit and receive data. If an access point is set to Open System and an adapter is set
to 40-bit or 128-bit, no association takes place. The same is true if the adapter is set for
Open System and the access point is set to 40-bit or 128-bit, no association takes place.
If an access point is set to 40-bit and the adapter is set to 128-bit, the devices can
associate, but no data transmission and reception can take place between the two devices.
T able 4-3. Encryption Access Points and Adapters
Access Point Adapter Association
Open Open OK
40 40 OK
4-19
Page 57

SPS 3000 Series Programmer’s Guide
Table 4-3. Encryption Access Points and Adapters (Continued)
Access Point Adapter Association
128 40 Association, No data transmission
Open 40 No Association
Open 128 No Association
40 128 Association, No data transmission
40 Open No Association
128 Open No Association
128 128 OK
Use the Algorithm pull-down menu to select the Open System, 40-bit or 128-bit encryption
algorithm to be used for the adapter.
Use Open System (no encryption) option as the default setting when no data packet
encryption is needed over the network. Selecting Open System provides no security for the
data being transmitted over the network. Tap Apply to enable Open System encryption.
When 40-bit Shared Key encryption is selected, the user is required to enter a 10 Hex digit
encryption key. The key can be entered by spreading the 10 Hex digits between the two
encryption key fields pr ovided. Tap Apply to save and implement the encryption key data.
Tap Reset Keys to reset the keys to their original default values.
When 128-bit Shared Key encryption is selected, enter a 26 Hex digit encryption key by
spreading the 26 Hex digits across the six encryption key fields provided. The 128-bit
encryption option provides a higher level of security than 40-bit encryption while
maintaining an 11 Mbps data rate. Tap Apply to save the encryption key data. Tap Reset
Keys to reset the keys to their default values.
4-20
Page 58
Operating the SPS 3000
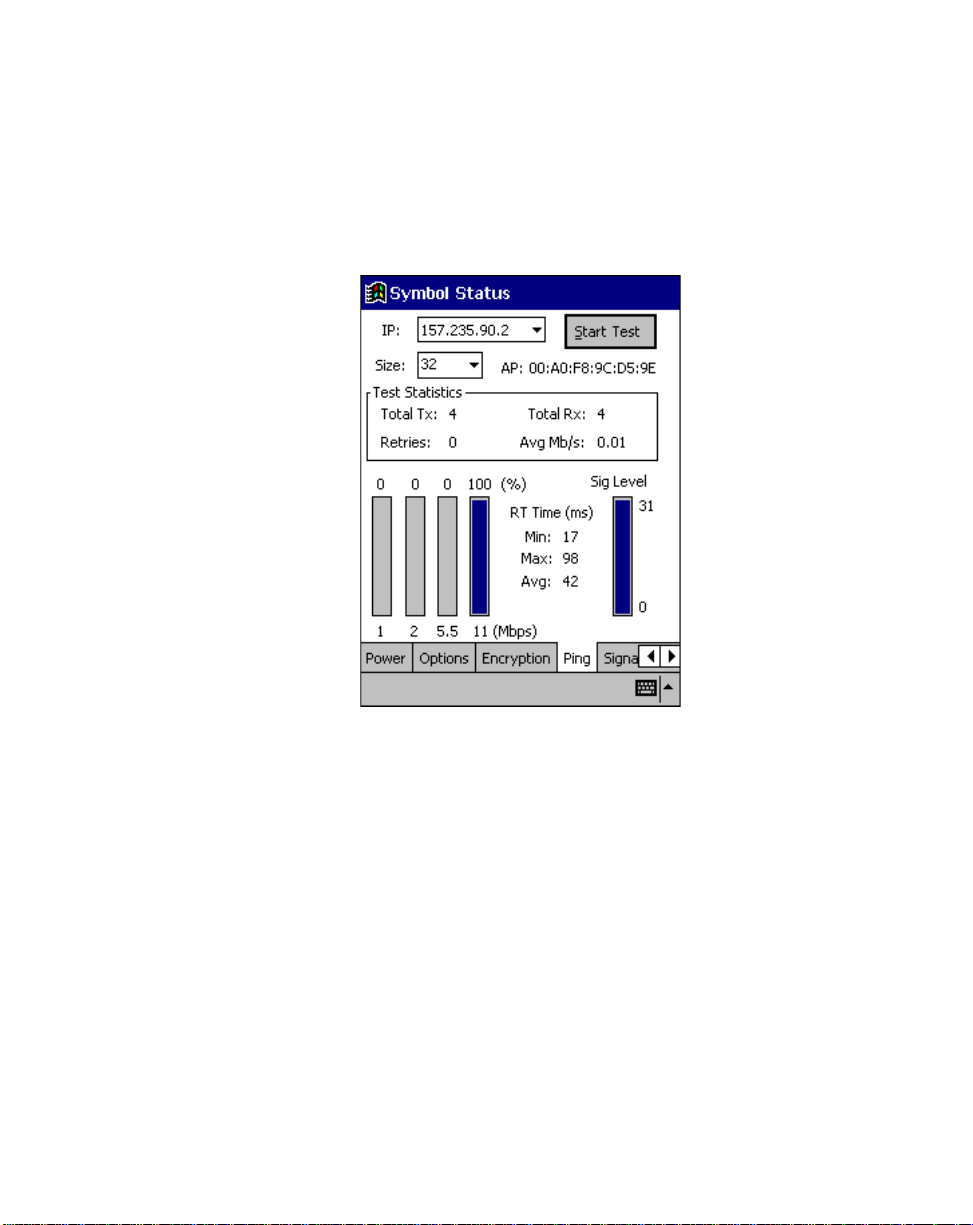
Ping Property Page
Use the Ping property page to view the signal strength, data rate transmission, test
statistics and to perform data transmission tests. Transmission quality tests send an ICMP
ping packet across the network to a selected address to test data transmissions between
computers.
Figure 4-12. Ping Property Page
Use the IP field to enter an IP address as a dotted string (example, 122.78.3.141).
Select the size of packets sent from the Size pull-down menu.
Tap Start Test to begin the test. Each ping displays the round trip time it took the ICMP ping
to complete. The minimum, maximum and average values are displayed as results. A realtime graph indicates the signal strength and each transmission data rate as a percentage
of the overall data traffic.
4-21
Page 59
SPS 3000 Series Programmer’s Guide
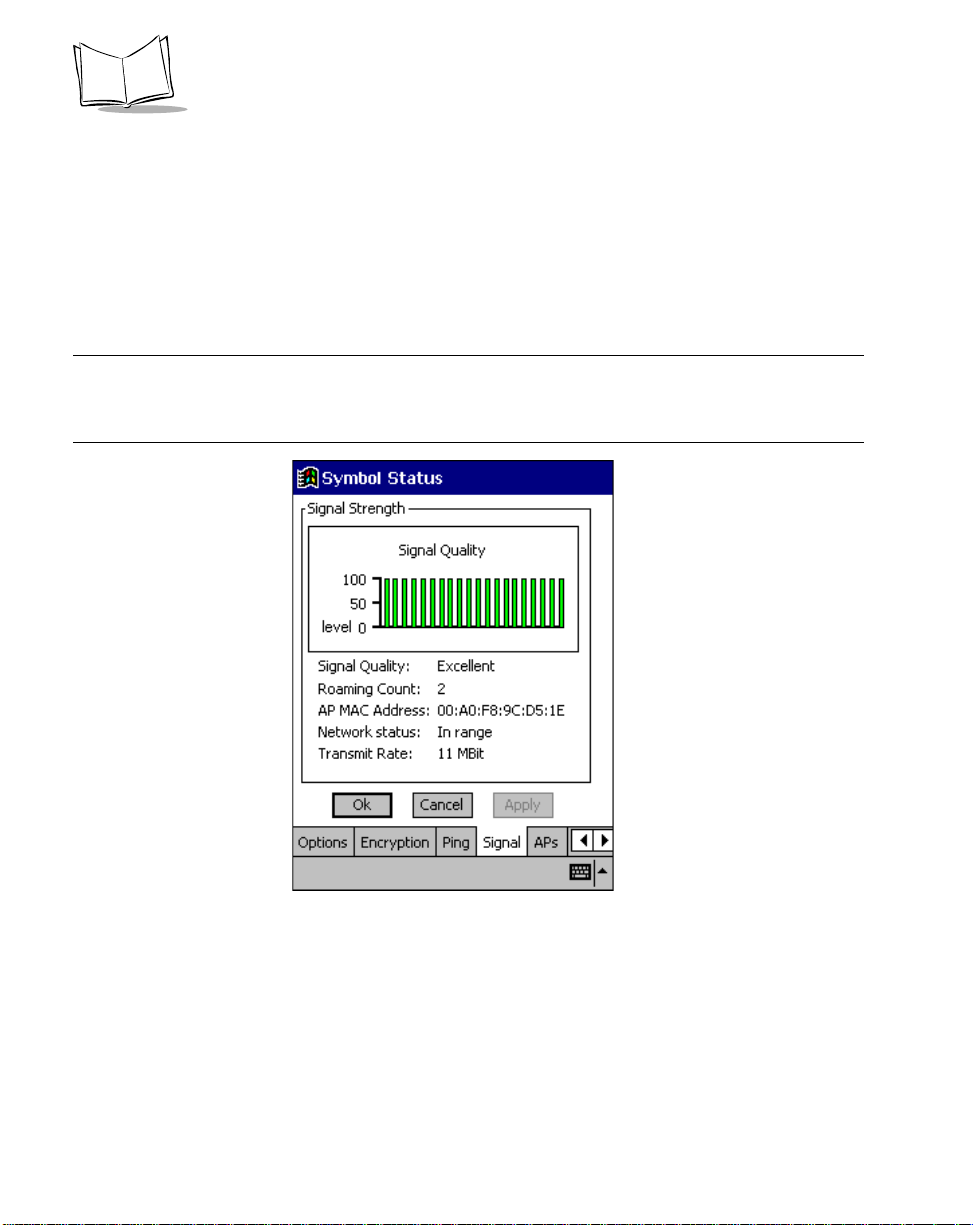
Signal Property Page
Use the Signal property page to view radio signal transmission strength from the adapter
to the associated access point. Signal quality is an indicator of how clearly the adapter can
hear the access point.
Use the Signal property page to display a real-time graph of the signal quality received by
the adapter, the number of times the adapter has roamed between APs, the current data
rate and the network in-range status.
Note:The Signal property page is not accessible if Ad Hoc or Enhanced
Ad Hoc is selected as the operating mode in the Mode property
page.
4-22
Figure 4-13. Signal Property Page
Page 60

Operating the SPS 3000
APs Property Page
Use the APs property page in Infrastructure mode to view access points with the same
ESSID as the adapter within the wireless network. View the AP MAC address, signal and
direct sequence channel of each located access point. If the current adapter signal strength
is poor, one of the access points displayed could provide a stronger signal.
Select and tap on an access point to display a pull-down menu used for setting the adapter
access point roaming capabilities. Selecting Set Mandatory prohibits the adapter from
associating with a different access point. The letter M displays on top of the AP diagram
when the Set Mandatory option is selected. Selecting Set Roaming enables the adapter to
roam to an access point.
Tap Refresh to update the list of the known APs.
Figure 4-14. APs Property Page
When Ad Hoc is selected as the operating mode, the Signal and APs property pages
disappear.
4-23
Page 61

SPS 3000 Series Programmer’s Guide
Peers Property Page
When Ad Hoc is selected as the operating mode, the Signal and APs property pages
disappear and display the Peers property page. Use the Known Peers field to view the
BSSID or MAC addresses of the other adapters (peers) in the wireless network, their power
mode, their transmit rate, supported rate and the length of time an adapter has been out of
the Ad Hoc network. These adapters are all available when forming a peer-to-peer network
in Ad Hoc mode. The number of adapters in the network is displayed at the bottom or of the
screen. The Peers property page is a view-only window with no configurable data fields.
Tap Refresh to update the Peers property page to the latest Ad Hoc network performance
and membership data.
4-24
Figure 4-15. Peers Prope rty Page
Page 62

Operating the SPS 3000
Using ActiveSync over Spectrum24
The SPS 3000 with wireless capabilities allows the user to connect to a host over a wireless
local area network (WLAN).
To connect your iPAQ over a WLAN:
1. Install the ActiveSync software on your desktop computer and restart (reboot).
2. Start ActiveSync on your desktop computer.
3. On the File menu, select Connection Settings.
4. Select Allow network (Ethernet) and Remote Access Service (RAS) server
connection with this desktop computer.
5. Leave your computer on and logged on.
To remotely sync your iPAQ with your desktop computer:
1. Insert the iPAQ into the SPS 3000 (see Inserting the iPAQ into the SPS 3000 on
page 2-1).
2. Power on the iPAQ and tap to display the Start screen.
3. Tap Programs, Connections.
4. Tap your Connection icon.
5. Tap your ActiveSync icon.
6. Choose a method to connect to the selected desktop computer.
7. Tap Connect.
8. Follow the instructions on the screen to set up a partnership that allows
synchronization of information between the two computers. Items to be
synchronized may be customized, and you may select to synchronize continuously
as information changes, upon connection, or manually by clicking the Sync button
on the toolbar of your desktop computer.
4-25
Page 63

SPS 3000 Series Programmer’s Guide
4-26
Page 64

Chapter 5
Developing Applications for the SPS 3000
Introduction
This chapter provides information about demo applications, deploying applications, Flash
memory, and CAB files registry entries and how they can be used to customize installation
for your individual needs.
Building Sample Source Code (Demo Applications)
The SPS 3000 SDK contains four demo applications with source: ScanSamp2,
ScanWedge, CtlPanel, and VBScanTest. These demo applications can be found in the
“\Windows CE tools\wce300\SPS3000\Samples” directory.
Preparing to Build the Demo Applications
Before building the applications:
• Verify that the iP AQ is inserted into the SPS 3000 (see Inserting the iPAQ into the
SPS 3000 on page 2-1).
• Ensure that there is a valid ActiveSync connection between the iPAQ and the
development PC (see Verifying an ActiveSync Connection on page 3-2).
5-1
Page 65

SPS 3000 Series Programmer’s Guide
Compiling and Running the Demo Applications
Note:To compile the demo applications, Microsoft® Embedded Visual
Tools 3.0 must be installed on the development PC.
Compiling and Running “C” Applications
Perform the following steps to compile and run the “C” applications (ScanSamp2,
ScanWedge, and CtlPanel).
1. Open the .vcp file using the Microsoft® Embedded Visual C++
“File\Open Workspace” menu option.
Note:.vcp files reside in “\Windows CE
Tools\wce300\SPS3000\Samples\<application name>.”
2. Select Active WCE Configuration as “SPS3000”.
3. Select Active Configuration as “Win32 (WCE ARM) Release” or “Win32 (WCE
ARM) Debug”. The debug option allows the program to be debugged remotely.
4. Rebuild the project using the “Build\Rebuild All” menu option. This compiles the
application and generates an executable that can be run on the iPAQ.
5. To run the executable on the iPAQ, select the “Build\Execute <application name>”
menu option. This automatically downloads the application and launches it.
Compiling and Running the Visual Basic Application
Perform the following steps to compile and run the Visual Basic application (VBScanTest).
1. Open the .ebp file using the Microsoft® Embedded Visual Basic “Existing” tab in
the “New Project” dialog.
Note:.ebp files reside in “\Windows CE
Tools\wce300\SPS3000\Samples\<application name>.”
2. Select “Pocket PC (Default Device)” from the Devices drop down list box on the
toolbar.
3. Make the VB script by selecting the “File\Make <project name>” menu option.
5-2
Page 66

Developing Applications for the SPS 3000
4. To debug/run the application, select the “Run\Start Debug” menu option. This
automatically downloads the VB script and the ActiveScanSPS3000 Scanner
Active-X control, if they have not already been copied to the iPAQ.
Downloading the Executable to the iPAQ
As an alternative to having Embedded Visual Tools download the executable to the iPAQ,
ActiveSync’s Mobile File Explorer can be used to copy executables to the directory you
choose. You may also want to paste a shortcut to the executable in the “\Windows\Start
Menu” directory so that the application can be launched through the Start Menu.
Deploying Applications
Using Symbol CAB files
Note:CAB files are the preferred method for installing applications and
drivers on a Pocket PC. For more information about creating and
installing CAB files, refer to the Microsoft® Embedded Visual Tools
3.0 help, under the section heading “Installation and Configuration
Guide”.
It is highly recommended that as part of your installation you include the Symbol driver CAB
files (scndrv_xxxx.cab for scan enabled SPS 3000 devices, and landrvarm_xxxx.cab and
landrvdiv_xxxx.cab for WLAN enabled SPS3000 devices). This eases maintenance when
drivers are updated. Simply replace the CAB file(s) with their updated versions inside your
installation.
The CAB files provided by the Symbol SPS 3000 SDK give the utmost flexibility for
automating and customizing installations in the field. All CAB files in the SDK that contain
dialogs can be suppressed or invoked if the correct registry entry is set prior to installing the
CAB file.
5-3
Page 67

SPS 3000 Series Programmer’s Guide
Suppressing Prompts During Installation
The following installation prompts are currently supported by the Scan Driver Installer DLL.
The Installer DLL is located inside the Scan Driver CAB file and is called at certain times
during the installation.
• Trigger button -- By default, the Installer DLL prompts the user to choose a
hardware application button that will initiate a scan. If this prompt is not used, a
valid shortcut to the trigger application should be placed under the desired
hardware button key. The five application button keys are listed below.
Registry Key:
HKEY_LOCAL_MACHINE\Software\Microsoft\Shell\Keys\40C1
HKEY_LOCAL_MACHINE\Software\Microsoft\Shell\Keys\40C2
HKEY_LOCAL_MACHINE\Software\Microsoft\Shell\Keys\40C3
HKEY_LOCAL_MACHINE\Software\Microsoft\Shell\Keys\40C4
HKEY_LOCAL_MACHINE\Software\Microsoft\Shell\Keys\40C5 (Default)
The (Default Value) of one of the above keys should be set to the following
string:
“\Windows\Start Menu\Programs\Scanner\Trigger.lnk”
• Scan application auto-launch -- By default, the Installer DLL prompts the user to
choose the “registered” scanning application to launch automatically when the
scan button is pressed. To register a scanner application for use with the automatic
launch feature, simply add a new registry entry in the following format.
Registry Key:
HKEY_CURRENT_USER\Software\Symbol\ScanApps
String Value:
“<Application Shortname>” = “<Full path name to a shortcut or executable>”
Example:
“ScanSamp2” = “\Windows\Start Menu\Programs\Scanner\ScanSamp2.lnk”
5-4
Page 68

Developing Applications for the SPS 3000
If the Scan application auto-launch prompt is suppressed, the scanning application
launched automatically needs to be set manually. This can be accomplished by
setting the following registry entry.
Registry Key:
HKEY_CURRENT_USER\Software\Symbol\Settings
String Value:
“ScanApp” = “<Registered Application Shortname>”
Example:
“ScanApp” = “ScanWedge”
• System Reset -- By default, the Installer DLL prompts the user at the end of the
installation to reboot (reset) the system so that the drivers can be loaded by the
system at startup.
The installation prompts listed above can be selected on an individual basis not to be
displayed during installation. This is done via the registry. Set the following DWORD
values to 1 to hide the prompts during installation.
Registry Key:
HKEY_CURRENT_USER\Software\Symbol\Settings
DWORD Value(s):
TriggerButton = <0 for prompt, 1 for no prompt>
ScanAppLaunch = <0 for prompt, 1 for no prompt>
Bootdlg = <0 for prompt, 1 for no prompt>
5-5
Page 69

SPS 3000 Series Programmer’s Guide
Suppressing the About Dialog
When the Trigger application (Trigger.exe) runs for the first time, the About box displays
with an option not to show it on subsequent launches (see Scanning For the First Time on
page 4-6).
The following registry entry affects this operation:
Registry Key:
HKEY_CURRENT_USER\Software\Symbol\Settings
DWORD Value:
TriggerDlg = <1 for prompt, 0 for no prompt>
Installing a CAB file
When CAB files run from the iPAQ they automatically install. If you would like to install a
CAB file from inside your installation program, simply use the CAB file name as the
command line parameter to the wceload executable.
“C” Example:
PROCESS_INFORMATION pi;
CreateProcess(L"\\Windows\\wceload.exe”, L”\”\\scndrv_0100.cab\””, NULL, NULL,
FALSE, 0, NULL, NULL, NULL, &pi);
Flash Memory
SPS 3000 Flash memory provides a method for deploying iPAQ applications and drivers in
the field without the use of a desktop PC or other hardware. The developer can create a
CAB file that installs an application. Since not all SPS 3000 devices contain Flash memory,
please refer to Determining if Flash Memory is Present before using the Flash memory
utilities.
Once the developer configures the memory, it should be considered ROM (Read Only
Memory) by the end-user. By default, this memory is locked by the iPAQ so that users
cannot change its content.
5-6
Page 70

Developing Applications for the SPS 3000
Determining if Flash Memory is Present
Not all SPS 3000 devices contain Flash memory. Perform the following steps to determine
if Flash memory is present on your SPS 3000.
1. Insert the iPAQ into the SPS 3000 (see Inserting the iPAQ into the SPS 3000 on
page 2-1).
2. Run the File Explorer program (tap Start\Programs\File Explorer).
3. Tap the My Documents drop down list and select My Device.
If a folder named “Compaq Disk” is included among the list folders, then the SPS 3000
contains Flash memory.
Standard Flash Memory Files
SPS 3000 devices that contain Flash memory ship with the standard driver and application
image.
This image contains the following files:
• IHVInstall.exe – Flash memory install program
• IHVUninstall.exe –Flash memory uninstall program
• scnappss2_xxxx.cab – ScanSamp2 application CAB file
• scnappsw_xxxx.cab – ScanWedge application CAB file
• scndrv_xxxx.cab – Scan drivers CAB file
• landrvarm_xxxx.cab – WLAN drivers CAB file
• landrvdiv_xxxx.cab – WLAN driver diversity configuration CAB file.
These files are found in the
“\Windows CE Tools\wce300\SPS3000\Flash\Image\ScanWLAN” SPS 3000 SDK
directory.
IHVInstall
The IHVInstall.exe program invokes (“runs”) the CAB files located on the SPS 3000, if they
were not already installed. Only CAB files with the appropriate naming convention are
invoked (see CAB File Naming Conventions on page 5-9).
The IHVInstall program determines if a CAB file was installed by checking a version registry
entry for each CAB file. The version registry entries reside under the
“HKEY_LOCAL_MACHINE\Software\Apps” registry key. The entries are of DWORD type
5-7
Page 71

SPS 3000 Series Programmer’s Guide
with the short name of the CAB file set to the version. (A short name consists of the prefix
plus unique name defined in Table 5-1 on page 5-9.)
Version Registry Entry Format:
Registry Key:
HKEY_LOCAL_MACHINE\Software\Apps
DWORD Value:
”<Application Shortname>” = <version number in hex (major rev is first 2 digits,
minor rev is last 2 digits>
Example:
“scndrvex1”=0x0100
Each CAB file should set its own registry version entry. This ensures that older versions of
CAB files are not installed over newer versions, and that CAB files are only installed once.
If an installed CAB file contains “drv” in its prefix, IHVInstall prompts the user with a reboot
dialog at the end of installation.
Note:Warm boots that occur while the SPS 3000 is connected to the iPAQ
do not initiate the Auto-install process (IHVInstall will not run). To
initiate this process, the SPS 3000 must be removed and re-inserted
into the iPAQ.
5-8
Page 72

Developing Applications for the SPS 3000
CAB File Naming Conventions
When creating CAB files for use with IHVInstall, you must adhere to the naming
conventions in Table 5-1.
Table 5-1. CAB File Naming Conventions
CAB File Type Prefix Unique Name Version Full Name
Scan Application CAB
File
Scan Driver CAB File scndrv ex2 _0100 scndrvex2_0100.cab
WLAN Application CAB
File
WLAN Driver CAB File landrv ex4 _0100 landrvex4_0100.cab
Every CAB file must be prefixed, given a unique name, and followed by its version.
Note:This version number in the name should match with the version
registry entry set by the CAB file. Refer to Appendix A for more
information on setting the version registry entry within your CAB file.
scnapp ex1 _0100 scnappex1_0100.cab
lanapp ex3 _0100 landrvex3_0100.cab
Developing Flash Memory Images
Flash memory utilities are provided for developing Flash memory images, and for mass
deployment of these images.
Flash Memory Utilities
The SPS 3000 SDK provides five Flash memory utilities (see Table 5-2). These utilities
reside in the “\Windows CE T ools\wce300\SPS3000\Flash\Tools” SPS 3000 SDK directory.
All the utilities must be copied to the iPAQ via ActiveSync’s Mobile File Explorer prior to their
use. Once copied to the iP AQ, you can execute (“run”) the utilities by clicking on them within
the iPAQ’ s File Explorer program.
5-9
Page 73

SPS 3000 Series Programmer’s Guide
Table 5-2. Flash Memory Utilities
Utility Description
Erase.exe Erases all of Flash memory.
Warning: All files in Flash memory are lost
after this program runs.
Unlock Unlocks Flash memory. After this program
runs, files can be copied to the “\Compaq
Disk” directory on the iPAQ.
Lock Locks Flash memory. After this program runs,
the “\Compaq Disk” directory reverts back to
read only status. Read only is the default state
of the “\Compaq Disk” directory.
CreateImage.exe This program reads the binary image of Flash
memory and saves it to a file you choose.
WriteImage.exe This program reads a binary image created by
the CreateImage program and writes it to
Flash memory. The image file name can be
passed to the WriteImage program via the
command line for automation purposes.
Warning: After WriteImage is used, the SPS
3000 must be removed and re-inserted for the
files to show up in the “\Compaq Disk”
directory.
5-10
Page 74

Developing Applications for the SPS 3000
Creating the Image
Creating a Flash memory image is a straightforward process as long as the utilities are
used in the proper sequence. If the full sequence is not performed during the image
creation process, then there may be instances when copying files to the “\Compaq Disk”
folder fail and hang the system.
To prepare for creating a new image:
1. Copy all the files that you would like to store in Flash memory to an empty directory
on the host computer. These files should include IHVInstall.exe and
IHVUninstall.exe (which reside in the “\Windows CE
Tools\wce300\SPS3000\Bi n\A rm Rel ” direc to ry) .
2. Copy all of the Flash memory utilities (see Table 5-2 on page 5-10) to the iPAQ.
To create a new image:
Note:Deviating from the following sequence may lead to unpredictable
results.
1. Run the Erase.exe program to initialize Flash memory.
2. Run the Unlock.exe program to make the “\Compaq Disk” write accessible.
3. Copy all the files you would like to store in Flash memory to the “\Compaq Disk”
directory via ActiveSync’s Mobile File Explorer, or the iPAQ’s File Explorer.
4. Run the Lock.exe program to flush all memory written to Flash and to set the
“\Compaq Disk” directory back to read only.
Once these steps are complete and a Flash memory is setup, binary image file can be
created using the CreateImage program. The binary image file can be used to easily write
the image to other SPS 3000 devices with the WriteImage program.
5-11
Page 75

SPS 3000 Series Programmer’s Guide
5-12
Page 76

Chapter 6
Maintenance, Troubleshooting, and
Technical Specifications
Introduction
This chapter provides information to help you take proper care of your SPS 3000, and
provides troubleshooting solutions for potential problems during terminal operating.
Maintaining the SPS 3000
For trouble-free service, follow these tips when using your SPS 3000:
• Do not scratch the exit window.
• The exit window of your SPS 3000 contains glass. Do not subject it to any strong
impact.
• Protect your SPS 3000 from temperature extremes, hot or cold:
• Do not leave it on the dashboard of a car on a hot day
• Keep it away from heaters and other heat sources
• Keep it away from freezers and other cold sources .
• Do not store or use your SPS 3000 in any location that is
extremely dusty, damp or wet.
• If the surface of the SPS 3000 exit window becomes soiled, clean it with a soft lens
cloth moistened with a diluted window-cleaning solution.
6-1
Page 77

SPS 3000 Series Programmer’s Guide
Troubleshooting
Problem Cause Solution
The Extended Battery
Fault screen displays.
Table 6-1. Troubleshooting
Lithium-ion battery
not charged.
Charge the battery in the SPS 3000.
SPS 3000 does not
accept scan input.
When install ing drivers, an
out of memory message
appears.
The iPAQ does not
recognize the Wireless
Networker.
Cannot connect to the
network.
Bad bar code. Check that the bar co de s ymbo l is not defaced.
T o o far away f rom bar
code.
Too close to bar code. Be sure you are within proper scanning range.
Scanning at an
incorrect angle.
Wave file is not
enabled.
Note: If, after performing these checks, the scanner is still not reading
bar codes properly, contact your distributor or Symbol Technologies.
Memory full. Your SPS 3000 requires between 300K and
Drivers not installed. The Pocket PC could display an U nrec og niz ed
IP address was not
assigned.
Be sure you are within proper scanning range.
Change the angle you are using to scan the
codes.
If you are expecting a beep on a good decode
and don’t hear one, check that:
• The ‘Sounds & Reminders’ option is set up
properly (Start/Settings/Personal)
• The volume is not muted
• ctlpanel.exe is configured properly.
700K of memory for drivers and applications.
You may have to free more memory before
installation.
Card dialog box when the Wireless Networker
is inserted into the Pocket PC.
This means the Wireless Ne tworker driv er was
not loaded or was loaded incorrectly. If this is
the case, the driver files require reinstallation.
Remove and reinsert the W ireless Networker or
turn the Pocket PC of f and on for chan ges to the
IP address to take effect.
6-2
Page 78

Maintenance, Troubleshooting, and Technical Specifications
Technical Specifications
T able 6-1. Technical Specifications
Operating Temperature -0° C to 50° C (32° F to 122° F)
Storage Temperature -10° C to 50° C (14° F to 122° F)
Humidity 5% to 90% non-condensing
Electrostatic Disch arge
(ESD)
Scanner T y pe Proton (not applicable for Spectrum24 11 Mbps WLAN only
Communications iPAQ BUS
Power Source Scan Only:
T ypic al Battery Life 8 - 10 hours (1 scan/decode/transmit every 40 seconds - no
Integrated RF WLAN Scan Only:
I/O Options Scan Only:
8 kVdc air; 4 kVdc contact
unit)
iPAQ Battery
Scan/WLAN:
WLAN - Integrated Lithium-ion
Scanner - iPAQ Battery
WLAN Only:
Integrated Lithium-ion
backlight)
None
Scan/WLAN:
2.4 GHz 11 Mbps
CF Card
WLAN Only:
2.4 GHz 11 Mbps
CF Card
None
Scan/WLAN:
Power Jack
WLAN Only:
Power Jack
6-3
Page 79

SPS 3000 Series Programmer’s Guide
6-4
Page 80

Appendix A
Resetting the iPAQ
Resetting Your iPAQ Pocket PC (3100/3600/3700 Series)
If your iPAQ stops responding to input from buttons or the screen, you must reset it by
performing a warm or cold boot.
Performing a Warm Boot
A warm boot restarts the terminal and saves all stored records and entries.
Caution
Files that remain open during a warm boot may not be retained.
To perform a warm boot, use your stylus to press the Reset button on the bottom of the
iPAQ.
Reset Button
Figure A-1. Warm Boot Button
A-1
Page 81

SPS 3000 Series Programmer’s Guide
Performing a Cold Boot
A cold boot also restarts your iPAQ, but resets your iP AQ to its default factory settings. All
user stored records, entries, applications, and drivers are erased.
a cold boot unless a warm boot does not solve your problem.
Note:You can restore any data previously synchronized with your
computer during the next ActiveSync operation.
To perform a cold boot:
1. Use your stylus to slide open the Battery On/Off door on the bottom of the iPAQ.
When the door is open, the iPAQ Battery On/Off Switch displays.
Battery
On/Off Door
Figure A-2. Cold Boot Button
Therefore, never perform
2. Using your stylus, slide the Battery On/Off Switch all the way to the right to turn the
iPAQ battery off.
3. Using your stylus again, slide the Battery On/Off Switch all the way to the left to turn
the iPAQ battery on.
4. The iPAQ reboots and all settings must be reset at this time.
5. Before you proceed with resetting you IPAQ settings, use your stylus to close the
Battery On/Off door.
A-2
Page 82

Appendix B
Registry Keys
Table B-1. HKEY_CURRENT_USER\Software\Symbol\Settings
Value Type Description Example(s)
ScanApp String Sets the “registered”
scanning application
automatically launched by
the Trigger application. The
value should be set to a
“<Registered Application
Shortname>”.
TriggerButton DWORD Sets a user prompt during
installation of the scan
driver CAB file. If a prompt
is set a dialog asks for the
application button to be
used as a hard trigger.
ScanAppLaunch DWORD Sets a user prompt during
installation of the scan
driver CAB file. If a prompt
is set, a dialog asks for the
scanning application to
launch automatically when
the hard trigger is pressed
(and no scanning
application has a read
pending).
“ScanApp” = “ScanWedge”
“TriggerButton” = 0 (prompt)
“TriggerButton” = 1 (no prompt)
“ScanAppLaunch” = 0 (prompt)
“ScanAppLaunch” = 1 (no prompt)
B-1
Page 83

SPS 3000 Series Programmer’s Guide
Table B-1. HKEY_CURRENT_USER\Software\Symbol\Settings (Continued)
Value Type Description Example(s)
BootDlg DWORD Sets a user prompt during
installation of the scan
driver CAB file. If a prompt
is set, a dialog asks to
“reset” the system.
TriggerDlg DWORD Sets a user prompt during
startup of the Trigger
system tray application that
displays the About dialog.
“BootDlg” = 0 (prompt)
“BootDlg” = 1 (no prompt)
“TriggerDlg” = 1 (prompt)
“TriggerDlg” = 0 (no prompt)
Table B-2. HKEY_CURRENT_USER\Software\Symbol\ScanApps
Value Type Description Example(s)
<Application
Shortname>
String “Registers” a scanning
application to be launched
automatically by the Trigger
application, if desired.
“ScanWedge” = “\Windows\Start
Menu\Programs\Scanner\ScanSamp2.lnk”
Table B-3. HKEY_LOCAL_MACHINE\Software\Microsoft\Shell\Keys\40C1, 40C2, 40C3,
40C4, 40C5 (Default)
Value Type Description Example(s)
(Default) String These keys set an application to be
launched by the given application button.
Set one of the keys (Default value) listed
below to the Trigger application to support
hard triggering.
Keys:
40C1, 40C2, 40C3, 40C4, 40C5 (Default)
(Default Value) = “\Windows\Start
Menu\Programs\Scanner\Trigger.lnk”
B-2
Page 84

Index
A
accessories . . . . . . . . . . . . . . . . . . . . . . . . . 1-4
ActiveSync
features . . . . . . . . . . . . . . . . . . . . . . . . 3-1
installing . . . . . . . . . . . . . . . . . . . . . . . . 3-2
performing remote . . . . . . . . . . . . . . . . 3-2
performing subsequent operations . . . 3-2
using . . . . . . . . . . . . . . . . . . . . . . . . . . 3-1
verifying connection . . . . . . . . . . . . . . . 3-2
via WLAN . . . . . . . . . . . . . . . . . . . . . . . 3-2
application shortname . . . . . . . . . . . . . . . . .B-2
applications, developing . . . . . . . . . . . . . . . 5-1
APs property page . . . . . . . . . . . . . . . . . . 4-23
B
background scanning . . . . . . . . . . . . . . . . . 4-7
batteries
charging . . . . . . . . . . . . . . . . . . . . . . . . 2-3
checking power . . . . . . . . . . . . . . . . . . 2-7
BootDlg . . . . . . . . . . . . . . . . . . . . . . . . . . . .B-2
booting
cold . . . . . . . . . . . . . . . . . . . . . . . . . . .A-2
warm . . . . . . . . . . . . . . . . . . . . . . . . . .A-1
C
CAB files
scan drivers installation . . . . . . . . . . . . 4-1
using . . . . . . . . . . . . . . . . . . . . . . . . . . 5-3
version registry entry format . . . . . . . . 5-8
changing the scan trigger . . . . . . . . . . . . . . 4-2
chapter descriptions . . . . . . . . . . . . . . . . . . .viii
charging batteries . . . . . . . . . . . . . . . . . . . . 2-3
checking battery power . . . . . . . . . . . . . . . . 2-7
cleaning exit window . . . . . . . . . . . . . . . . . 6-1
configuring for your WLAN . . . . . . . . . . . . . 4-8
contacting Symbol . . . . . . . . . . . . . . . . . . . . .ix
createimage utility . . . . . . . . . . . . . . . . . . 5-10
CTLPanel installation . . . . . . . . . . . . . . . . . 4-1
D
demo applicaions
building sample source code . . . . . . . 5-1
demo applications
compiling and running . . . . . . . . . . . . . 5-2
compiling and running VB apps . . . . . 5-2
compiling and running "C’ apps . . . . . 5-2
desktop software
features . . . . . . . . . . . . . . . . . . . . . . . . 3-1
developing applications . . . . . . . . . . . . . . . 5-1
E
encryption
64-bit . . . . . . . . . . . . . . . . . . . . . . . . . 4-20
encryption property page . . . . . . . . . 4-19
open systems . . . . . . . . . . . . . . . . . . 4-19
erase utility . . . . . . . . . . . . . . . . . . . . . . . . 5-10
F
flash memory utilities . . . . . . . . . . . . . . . . 5-10
foreground scanning . . . . . . . . . . . . . . . . . 4-7
I
info property page . . . . . . . . . . . . . . . . . . 4-12
installing scan drivers and applications . . . 3-5
installing SDK files . . . . . . . . . . . . . . . . . . . 3-7
Index-1
Page 85

SPS 3000 Series Programmer’s Guide
installing the SDK . . . . . . . . . . . . . . . . . . . . 3-3
installing WLAN drivers . . . . . . . . . . . . . . . 3-6
IP config property page . . . . . . . . . . . . . . 4-13
L
lock utility . . . . . . . . . . . . . . . . . . . . . . . . . 5-10
M
maintaining the SPS 3000 . . . . . . . . . . . . . 6-1
mode property page . . . . . . . . . . . . . . . . . 4-11
N
NCPA
encryption property page . . . . . . . . . 4-19
notational conventions . . . . . . . . . . . . . . . . .viii
O
operating the SPS 3000 . . . . . . . . . . . . . . . 4-1
options property page . . . . . . . . . . . . . . . 4-17
P
parts of the SPS 3000 . . . . . . . . . . . . . . . . 1-2
peers property page . . . . . . . . . . . . . . . . . 4-24
ping property page . . . . . . . . . . . . . . . . . . 4-21
power property page . . . . . . . . . . . . . . . . 4-16
property pages . . . . . . . . . . . . . . . . . . . . . 4-11
S
scan applications . . . . . . . . . . . . . . . . . . . . .3-5
scan drivers . . . . . . . . . . . . . . . . . . . . . . . . .3-5
ScanApp . . . . . . . . . . . . . . . . . . . . . . . . . . .B-1
ScanAppLaunch . . . . . . . . . . . . . . . . . . . . .B-1
scanning
background . . . . . . . . . . . . . . . . . . . . .4-7
for the first time . . . . . . . . . . . . . . . . . .4-6
foreground . . . . . . . . . . . . . . . . . . . . . .4-7
scansamp2 . . . . . . . . . . . . . . . . . . . . . .4-7
scanwedge . . . . . . . . . . . . . . . . . . . . . .4-7
scansamp2 . . . . . . . . . . . . . . . . . . . . . . . . .4-7
scanwedge . . . . . . . . . . . . . . . . . . . . . . . . .4-7
SDK . . . . . . . . . . . . . . . . . . . . . . . . . . . . . . .3-3
installation options . . . . . . . . . . . . . . . .3-4
installing . . . . . . . . . . . . . 3-3, 3-5, 3-6, 3-7
installing drivers and applications . . . . 3-4
SDK files . . . . . . . . . . . . . . . . . . . . . . . . . . .3-7
service information . . . . . . . . . . . . . . . . . . . . ix
signal property page . . . . . . . . . . . . . . . . .4-22
software development kit . . . . . . . . . . . . . .3-3
status utility . . . . . . . . . . . . . . . . . . . . . . . . .4-8
Symbol Status
installing . . . . . . . . . . . . . . . . . . . . . . . .4-9
using . . . . . . . . . . . . . . . . . . . . . . . . . .4-9
Symbol Status utility
installing . . . . . . . . . . . . . . . . . . . . . . . .4-9
property pages . . . . . . . . . . . . . . . . . .4-11
task tray icons . . . . . . . . . . . . . . . . . .4-10
R
registry keys
application shortname . . . . . . . . . . . . . B-2
BootDlg . . . . . . . . . . . . . . . . . . . . . . . . B-2
defaults . . . . . . . . . . . . . . . . . . . . . . . . B-2
ScanApp . . . . . . . . . . . . . . . . . . . . . . . B-1
ScanAppLaunch . . . . . . . . . . . . . . . . . B-1
TriggerButton . . . . . . . . . . . . . . . . . . . B-1
TriggerDlg . . . . . . . . . . . . . . . . . . . . . . B-2
resetting . . . . . . . . . . . . . . . . . . . . . . . . . . . A-1
cold boot . . . . . . . . . . . . . . . . . . . . . . . A-2
warm boot . . . . . . . . . . . . . . . . . . . . . . A-1
Index-2
T
task tray icons . . . . . . . . . . . . . . . . . . . . . .4-10
tools and utilities
Symbol Status . . . . . . . . . . . . . . . . . . .4-9
trigger application
changing trigger button . . . . . . . . . . . .4-2
trigger installation . . . . . . . . . . . . . . . . . . . .4-1
TriggerButton . . . . . . . . . . . . . . . . . . . . . . .B-1
TriggerDlg . . . . . . . . . . . . . . . . . . . . . . . . . .B-2
troubleshooting . . . . . . . . . . . . . . . . . . . . . .6-2
U
unlock utility . . . . . . . . . . . . . . . . . . . . . . . .5-10
Page 86

Index
unpacking . . . . . . . . . . . . . . . . . . . . . . . . . . 1-1
W
wireless local area network . . . . . . . . . . . . . 4-8
WLAN . . . . . . . . . . . . . . . . . . . . . . . . . . . . . 4-8
configuring the SPS 3000 for WLAN . 4-8
status utility . . . . . . . . . . . . . . . . . . . . . 4-8
WLAN drivers . . . . . . . . . . . . . . . . . . . . . . . 3-6
writeimage utility . . . . . . . . . . . . . . . . . . . 5-10
Index-3
Page 87

SPS 3000 Series Programmer’s Guide
Index-4
Page 88

Tell Us What You Think...
We’d like to know what you th ink about this Manu al. Please t ake a mo ment
to fill out this questionnaire and fax this form to: (631) 738-3318, or mail to:
Symbol Technologies, Inc.
One Symbol Plaza M/S B-4
Holtsville, NY 11742-1300
Attention: Technical Publications Manager
IMPORTANT: If you need product support, please call the appropriate
customer support number provided. Unfortunately, we cannot provide
customer support at the fax number above.
User’s Manual Title:___________________________________________
(please include revision level)
How familiar were you with this product before using this manual?
Very familiar Slightly familiar Not at all familiar
Did this manual meet your needs? If not, please explain.
___________________________________________________________
___________________________________________________________
What topics need to be added to the index, if applicable?
___________________________________________________________
___________________________________________________________
What topics do you feel need to be better discussed? Please be specific.
___________________________________________________________
___________________________________________________________
What can we do to further improve our manuals?
___________________________________________________________
___________________________________________________________
Page 89

Page 90

SPS 3000 Series Programmer’s Guide
72-53911-01
Revision A — February 2002
Symbol Technologies, Inc. One Symbol Plaza, Holtsville N.Y. 11742-1300
http://www.symbol.com/manuals
 Loading...