

Page 1

SPT 1500
Product Reference Guide
Page 2

SPT 1500 Product Reference Guide
70-33757-01
Revision A — July, 1998
2
Symbol Technologies, Inc. One Symbol Plaza, Holtsville N.Y. 11742
Page 3

SPT 1500
Product Reference Guide
70-33757-01
Revision A
July, 1998
Page 4

1998
by Symbol Technologies, Inc. All rights reserved.
No part of this publication may be reproduced or used in any form, or by any electrical or
mechanical means, without permission in writing from Symbol. This includes electronic or
mechanical means, such as photocopying, recording, or information storage and retrieval
systems. The material in this manual is subject to change without notice.
The software is provided strictly on an “as is” basis. All software, including firmware,
furnished to the user is on a licensed basis. Symbol grants to the user a non-transferable and
non-exclusive license to use each software or firmware program delivered hereunder (licensed
program). Except as noted below , such license may not be assigned, sublicensed, or otherwise
transferred by the user without prior written consent of Symbol. No right to copy a licensed
program in whole or in part is granted, except as permitted under copyright law. The user
shall not modify , merge, or incorporate any form or portion of a licensed program with other
program material, create a derivative work from a licensed program, or use a licensed
program in a network without written permission from Symbol. The user agrees to maintain
Symbol’s copyright notice on the licensed programs delivered hereunder, and to include the
same on any authorized copies it makes, in whole or in part. The user agrees not to
decompile, disassemble, decode, or reverse engineer any licensed program delivered to the
user or any portion thereof.
Symbol reserves the right to make changes to any software or product to improve reliability ,
function, or design.
Symbol does not assume any product liability arising out of, or in connection with, the
application or use of any product, circuit, or application described herein.
No license is granted, either expressly or by implication, estoppel, or otherwise under any
Symbol Technologies, Inc., intellectual property rights. An implied license only exists for
equipment, circuits, and subsystems contained in Symbol products.
Symbol, Spectrum One, and Spectrum24 are registered trademarks of Symbol T echnologies,
Inc. Other product names mentioned in this manual may be trademarks or registered
trademarks of their respective companies and are hereby acknowledged.
Symbol Technologies, Inc.
One Symbol Plaza
Holtsville, New York 11742-1300
http://www.symbol.com
iv
Page 5

Contents
About This Guide
Introduction . . . . . . . . . . . . . . . . . . . . . . . . . . . . . . . . . . . . . . . . . . . . . . . . . . . . . . . . . . . . . . . . . . . xv
Chapter Descriptions . . . . . . . . . . . . . . . . . . . . . . . . . . . . . . . . . . . . . . . . . . . . . . . . . . . . . . . . . . . . xv
Notational Conventions . . . . . . . . . . . . . . . . . . . . . . . . . . . . . . . . . . . . . . . . . . . . . . . . . . . . . . . . . xvii
Service Information . . . . . . . . . . . . . . . . . . . . . . . . . . . . . . . . . . . . . . . . . . . . . . . . . . . . . . . . . . . . xvii
Symbol Support Center . . . . . . . . . . . . . . . . . . . . . . . . . . . . . . . . . . . . . . . . . . . . . . . . . . . . . . xvii
Europe . . . . . . . . . . . . . . . . . . . . . . . . . . . . . . . . . . . . . . . . . . . . . . . . . . . . . . . . . . . . . . .xviii
Asia . . . . . . . . . . . . . . . . . . . . . . . . . . . . . . . . . . . . . . . . . . . . . . . . . . . . . . . . . . . . . . . . .xviii
Chapter 1.
Getting Started with the SPT 1500
Introduction . . . . . . . . . . . . . . . . . . . . . . . . . . . . . . . . . . . . . . . . . . . . . . . . . . . . . . . . . . . . . . . . . . 1-1
Parts of the SPT 1500. . . . . . . . . . . . . . . . . . . . . . . . . . . . . . . . . . . . . . . . . . . . . . . . . . . . . . . . . . . 1-2
Installing the Batteries . . . . . . . . . . . . . . . . . . . . . . . . . . . . . . . . . . . . . . . . . . . . . . . . . . . . . . . . . . 1-4
About the Backlight Feature. . . . . . . . . . . . . . . . . . . . . . . . . . . . . . . . . . . . . . . . . . . . . . . . . . . . . . 1-7
Setting the Time . . . . . . . . . . . . . . . . . . . . . . . . . . . . . . . . . . . . . . . . . . . . . . . . . . . . . . . . . . . . . . . 1-7
Setting the Current Date. . . . . . . . . . . . . . . . . . . . . . . . . . . . . . . . . . . . . . . . . . . . . . . . . . . . . . . . . 1-8
Connecting the Cradle . . . . . . . . . . . . . . . . . . . . . . . . . . . . . . . . . . . . . . . . . . . . . . . . . . . . . . . . . . 1-9
Palm SPT 1500 Desktop Software . . . . . . . . . . . . . . . . . . . . . . . . . . . . . . . . . . . . . . . . . . . . . . . . 1-10
System Requirements . . . . . . . . . . . . . . . . . . . . . . . . . . . . . . . . . . . . . . . . . . . . . . . . . . . 1-11
Desktop Software Installation . . . . . . . . . . . . . . . . . . . . . . . . . . . . . . . . . . . . . . . . . . . . 1-11
Chapter 2.
Working with Your SPT 1500 Terminal
Introduction . . . . . . . . . . . . . . . . . . . . . . . . . . . . . . . . . . . . . . . . . . . . . . . . . . . . . . . . . . . . . . . . . . 2-1
Selecting Applications. . . . . . . . . . . . . . . . . . . . . . . . . . . . . . . . . . . . . . . . . . . . . . . . . . . . . . . . . . . 2-1
Switching Applications. . . . . . . . . . . . . . . . . . . . . . . . . . . . . . . . . . . . . . . . . . . . . . . . . . . . . . . . . . 2-2
Changing the Applications Launcher Display Format. . . . . . . . . . . . . . . . . . . . . . . . . . . . . . . . . . . 2-2
v
Page 6

SPT 1500 Product Reference Guide
Displaying Applications by Category. . . . . . . . . . . . . . . . . . . . . . . . . . . . . . . . . . . . . . . . . . . . . . . .2-3
Using the On-Screen Keyboard . . . . . . . . . . . . . . . . . . . . . . . . . . . . . . . . . . . . . . . . . . . . . . . . . . . . 2-4
Writing With the Stylus . . . . . . . . . . . . . . . . . . . . . . . . . . . . . . . . . . . . . . . . . . . . . . . . . . . . . . . . . .2-5
Opening the Memo Pad Application . . . . . . . . . . . . . . . . . . . . . . . . . . . . . . . . . . . . . . . . . . . . . . . . 2-6
Writing Letters With Graffiti . . . . . . . . . . . . . . . . . . . . . . . . . . . . . . . . . . . . . . . . . . . . . . . . . .2-6
Graffiti Tips . . . . . . . . . . . . . . . . . . . . . . . . . . . . . . . . . . . . . . . . . . . . . . . . . . . . . . . . . . . . . . .2-8
The Graffiti Alphabet. . . . . . . . . . . . . . . . . . . . . . . . . . . . . . . . . . . . . . . . . . . . . . . . . . . . . . . 2-10
Writing Capital Letters With Graffiti . . . . . . . . . . . . . . . . . . . . . . . . . . . . . . . . . . . . . . . . . . .2-11
Writing Numbers With Graffiti . . . . . . . . . . . . . . . . . . . . . . . . . . . . . . . . . . . . . . . . . . . . . . . 2-11
Graffiti Numbers . . . . . . . . . . . . . . . . . . . . . . . . . . . . . . . . . . . . . . . . . . . . . . . . . . . . . . . . . .2-11
Writing Punctuation Marks With Graffiti. . . . . . . . . . . . . . . . . . . . . . . . . . . . . . . . . . . . . . . .2-12
Additional Graffiti Punctuation . . . . . . . . . . . . . . . . . . . . . . . . . . . . . . . . . . . . . . . . . . . . . . .2-13
Writing Symbols and Extended Characters. . . . . . . . . . . . . . . . . . . . . . . . . . . . . . . . . . . . . . . 2-13
Writing Accented Characters . . . . . . . . . . . . . . . . . . . . . . . . . . . . . . . . . . . . . . . . . . . . . . . . .2-14
Accent Strokes . . . . . . . . . . . . . . . . . . . . . . . . . . . . . . . . . . . . . . . . . . . . . . . . . . . . . . . . . . . .2-14
Additional Non-English Characters . . . . . . . . . . . . . . . . . . . . . . . . . . . . . . . . . . . . . . . . . . . .2-14
Navigation Strokes. . . . . . . . . . . . . . . . . . . . . . . . . . . . . . . . . . . . . . . . . . . . . . . . . . . . . . . . .2-15
Graffiti ShortCuts. . . . . . . . . . . . . . . . . . . . . . . . . . . . . . . . . . . . . . . . . . . . . . . . . . . . . . . . . . 2-15
Using Application Controls . . . . . . . . . . . . . . . . . . . . . . . . . . . . . . . . . . . . . . . . . . . . . . . . . . . . . .2-16
Using Menus . . . . . . . . . . . . . . . . . . . . . . . . . . . . . . . . . . . . . . . . . . . . . . . . . . . . . . . . . . . . . . . . . 2-17
Choosing a Menu. . . . . . . . . . . . . . . . . . . . . . . . . . . . . . . . . . . . . . . . . . . . . . . . . . . . . . . . . .2-18
Graffiti Menu Commands . . . . . . . . . . . . . . . . . . . . . . . . . . . . . . . . . . . . . . . . . . . . . . . . . . .2-18
Edit Menu Commands . . . . . . . . . . . . . . . . . . . . . . . . . . . . . . . . . . . . . . . . . . . . . . . . . .2-19
Choosing Fonts . . . . . . . . . . . . . . . . . . . . . . . . . . . . . . . . . . . . . . . . . . . . . . . . . . . . . . . . . . . . . . .2-20
Using Categories . . . . . . . . . . . . . . . . . . . . . . . . . . . . . . . . . . . . . . . . . . . . . . . . . . . . . . . . . . . . . .2-21
Using Categories in Lists. . . . . . . . . . . . . . . . . . . . . . . . . . . . . . . . . . . . . . . . . . . . . . . . . . . . .2-22
Defining a New Category. . . . . . . . . . . . . . . . . . . . . . . . . . . . . . . . . . . . . . . . . . . . . . . . . . . . 2-23
Renaming Categories . . . . . . . . . . . . . . . . . . . . . . . . . . . . . . . . . . . . . . . . . . . . . . . . . . . . . . . 2-25
Attaching Notes. . . . . . . . . . . . . . . . . . . . . . . . . . . . . . . . . . . . . . . . . . . . . . . . . . . . . . . . . . . . . . . 2-26
Marking Private Entries . . . . . . . . . . . . . . . . . . . . . . . . . . . . . . . . . . . . . . . . . . . . . . . . . . . . . 2-26
Beaming Information to Other SPT 1500 Terminals . . . . . . . . . . . . . . . . . . . . . . . . . . . . . . . . . . . 2-27
Chapter 3.
Finding Information With Your SPT 1500 Terminal
Introduction. . . . . . . . . . . . . . . . . . . . . . . . . . . . . . . . . . . . . . . . . . . . . . . . . . . . . . . . . . . . . . . . . . .3-1
Using the Find Command . . . . . . . . . . . . . . . . . . . . . . . . . . . . . . . . . . . . . . . . . . . . . . . . . . . . . . . .3-1
Using Phone Lookup . . . . . . . . . . . . . . . . . . . . . . . . . . . . . . . . . . . . . . . . . . . . . . . . . . . . . . . . . . . .3-2
Phone Lookup Tips. . . . . . . . . . . . . . . . . . . . . . . . . . . . . . . . . . . . . . . . . . . . . . . . . . . . . .3-3
vi
Page 7

Chapter 4.
Applications: Address Book
Introduction . . . . . . . . . . . . . . . . . . . . . . . . . . . . . . . . . . . . . . . . . . . . . . . . . . . . . . . . . . . . . . . . . . 4-1
Getting Started With Address Book Entries . . . . . . . . . . . . . . . . . . . . . . . . . . . . . . . . . . . . . . . . . . 4-2
Creating an Address Book Entry . . . . . . . . . . . . . . . . . . . . . . . . . . . . . . . . . . . . . . . . . . . . . . . 4-2
Editing an Address Book Entry . . . . . . . . . . . . . . . . . . . . . . . . . . . . . . . . . . . . . . . . . . . . . . . . 4-4
Deleting an Address Book Entry . . . . . . . . . . . . . . . . . . . . . . . . . . . . . . . . . . . . . . . . . . . . . . . 4-5
Working With Address Book Entries. . . . . . . . . . . . . . . . . . . . . . . . . . . . . . . . . . . . . . . . . . . . 4-5
Looking Up Address Book Entries . . . . . . . . . . . . . . . . . . . . . . . . . . . . . . . . . . . . . . . . . . 4-5
Choosing Types of Phone Numbers. . . . . . . . . . . . . . . . . . . . . . . . . . . . . . . . . . . . . . . . . . . . . 4-6
Assigning Address Categories . . . . . . . . . . . . . . . . . . . . . . . . . . . . . . . . . . . . . . . . . . . . . . . . . 4-7
Sorting by Name or Company. . . . . . . . . . . . . . . . . . . . . . . . . . . . . . . . . . . . . . . . . . . . . . . . . 4-7
Changing Address Entry Details . . . . . . . . . . . . . . . . . . . . . . . . . . . . . . . . . . . . . . . . . . . . . . . 4-8
Beaming Address Entries to Other SPT 1500 terminals. . . . . . . . . . . . . . . . . . . . . . . . . . . . . . 4-9
Address Book Menu Commands . . . . . . . . . . . . . . . . . . . . . . . . . . . . . . . . . . . . . . . . . . . . . . . . . 4-10
Record Menu . . . . . . . . . . . . . . . . . . . . . . . . . . . . . . . . . . . . . . . . . . . . . . . . . . . . . . . . . . . . 4-10
Options Menu. . . . . . . . . . . . . . . . . . . . . . . . . . . . . . . . . . . . . . . . . . . . . . . . . . . . . . . . . . . . 4-12
Chapter 5.
Applications: Calculator
Introduction . . . . . . . . . . . . . . . . . . . . . . . . . . . . . . . . . . . . . . . . . . . . . . . . . . . . . . . . . . . . . . . . . . 5-1
Using the Calculator Screen . . . . . . . . . . . . . . . . . . . . . . . . . . . . . . . . . . . . . . . . . . . . . . . . . . . . . . 5-1
Special Calculator Buttons. . . . . . . . . . . . . . . . . . . . . . . . . . . . . . . . . . . . . . . . . . . . . . . . . . . . 5-2
Calculator Menu Commands . . . . . . . . . . . . . . . . . . . . . . . . . . . . . . . . . . . . . . . . . . . . . . . . . 5-2
Recent Calculations. . . . . . . . . . . . . . . . . . . . . . . . . . . . . . . . . . . . . . . . . . . . . . . . . . . . . . . . . 5-2
Chapter 6.
Applications: Date Book
Introduction . . . . . . . . . . . . . . . . . . . . . . . . . . . . . . . . . . . . . . . . . . . . . . . . . . . . . . . . . . . . . . . . . . 6-1
Scheduling an Event . . . . . . . . . . . . . . . . . . . . . . . . . . . . . . . . . . . . . . . . . . . . . . . . . . . . . . . . . . . . 6-2
Rescheduling an Event . . . . . . . . . . . . . . . . . . . . . . . . . . . . . . . . . . . . . . . . . . . . . . . . . . . . . . . . . . 6-6
Setting an Alarm for an Event. . . . . . . . . . . . . . . . . . . . . . . . . . . . . . . . . . . . . . . . . . . . . . . . . . . . . 6-6
Scheduling Repeating Events . . . . . . . . . . . . . . . . . . . . . . . . . . . . . . . . . . . . . . . . . . . . . . . . . . . . . 6-7
Considerations for the Repeat Function . . . . . . . . . . . . . . . . . . . . . . . . . . . . . . . . . . . . . . . . . . . . . 6-8
Marking a Private Event. . . . . . . . . . . . . . . . . . . . . . . . . . . . . . . . . . . . . . . . . . . . . . . . . . . . . . . . . 6-9
Deleting an Event . . . . . . . . . . . . . . . . . . . . . . . . . . . . . . . . . . . . . . . . . . . . . . . . . . . . . . . . . . . . . . 6-9
Changing the Date Book View . . . . . . . . . . . . . . . . . . . . . . . . . . . . . . . . . . . . . . . . . . . . . . . . . . . . 6-9
Working in Week View. . . . . . . . . . . . . . . . . . . . . . . . . . . . . . . . . . . . . . . . . . . . . . . . . . . . . 6-10
Spotting Event Conflicts in Week View. . . . . . . . . . . . . . . . . . . . . . . . . . . . . . . . . . . . . . . . . 6-11
Working in Month View. . . . . . . . . . . . . . . . . . . . . . . . . . . . . . . . . . . . . . . . . . . . . . . . . . . . 6-12
Date Book Menu Commands . . . . . . . . . . . . . . . . . . . . . . . . . . . . . . . . . . . . . . . . . . . . . . . . . . . . 6-13
vii
Page 8

SPT 1500 Product Reference Guide
Record Menu . . . . . . . . . . . . . . . . . . . . . . . . . . . . . . . . . . . . . . . . . . . . . . . . . . . . . . . . . . . . .6-13
Options Menu . . . . . . . . . . . . . . . . . . . . . . . . . . . . . . . . . . . . . . . . . . . . . . . . . . . . . . . . . . . .6-14
Chapter 7.
Applications: Expense
Introduction. . . . . . . . . . . . . . . . . . . . . . . . . . . . . . . . . . . . . . . . . . . . . . . . . . . . . . . . . . . . . . . . . . .7-1
Creating an Expense Item . . . . . . . . . . . . . . . . . . . . . . . . . . . . . . . . . . . . . . . . . . . . . . . . . . . . . . . . 7-2
Changing the Expense Item Date. . . . . . . . . . . . . . . . . . . . . . . . . . . . . . . . . . . . . . . . . . . . . . . . . . . 7-3
Entering Receipt Details. . . . . . . . . . . . . . . . . . . . . . . . . . . . . . . . . . . . . . . . . . . . . . . . . . . . . . . . . .7-3
Customizing the Currency Pick List. . . . . . . . . . . . . . . . . . . . . . . . . . . . . . . . . . . . . . . . . . . . . . . . .7-5
Show Options. . . . . . . . . . . . . . . . . . . . . . . . . . . . . . . . . . . . . . . . . . . . . . . . . . . . . . . . . . . . . . 7-6
Transferring Your Data to Microsoft Excel. . . . . . . . . . . . . . . . . . . . . . . . . . . . . . . . . . . . . . . . . . . 7-7
Printing an Expense Report . . . . . . . . . . . . . . . . . . . . . . . . . . . . . . . . . . . . . . . . . . . . . . . . . . . . . . .7-7
Using Expense Report Templates. . . . . . . . . . . . . . . . . . . . . . . . . . . . . . . . . . . . . . . . . . . . . . . . . . 7-11
Expense Menu Commands . . . . . . . . . . . . . . . . . . . . . . . . . . . . . . . . . . . . . . . . . . . . . . . . . . . . . .7-12
Record Menu . . . . . . . . . . . . . . . . . . . . . . . . . . . . . . . . . . . . . . . . . . . . . . . . . . . . . . . . . . . . .7-12
Options Menu . . . . . . . . . . . . . . . . . . . . . . . . . . . . . . . . . . . . . . . . . . . . . . . . . . . . . . . . . . . .7-12
Chapter 8.
Applications: HotSync®
Introduction. . . . . . . . . . . . . . . . . . . . . . . . . . . . . . . . . . . . . . . . . . . . . . . . . . . . . . . . . . . . . . . . . . .8-1
The HotSync Process and the HotSync Manager . . . . . . . . . . . . . . . . . . . . . . . . . . . . . . . . . . . . . . .8-1
Performing a HotSync Operation for the First Time . . . . . . . . . . . . . . . . . . . . . . . . . . . . . . . . . . . . 8-2
Conducting a Local HotSync Operation . . . . . . . . . . . . . . . . . . . . . . . . . . . . . . . . . . . . . . . . . . . . . 8-4
Selecting HotSync Setup Options. . . . . . . . . . . . . . . . . . . . . . . . . . . . . . . . . . . . . . . . . . . . . . . . . . .8-4
Customizing HotSync Application Settings . . . . . . . . . . . . . . . . . . . . . . . . . . . . . . . . . . . . . . . . . . .8-7
Conducting a HotSync Operation via Modem. . . . . . . . . . . . . . . . . . . . . . . . . . . . . . . . . . . . . . . . .8-9
Preparing Your Computer for a Modem HotSync Operation. . . . . . . . . . . . . . . . . . . . . . . . . . 8-9
Preparing Your SPT 1500 Terminal for a Modem HotSync Operation . . . . . . . . . . . . . . . . . . . . . 8-10
Selecting the Conduits for a Modem HotSync Operation . . . . . . . . . . . . . . . . . . . . . . . . . . . .8-11
Performing a HotSync Operation via a Modem: . . . . . . . . . . . . . . . . . . . . . . . . . . . . . . . . . . . . . .8-12
Conducting HotSync Operation via a Network. . . . . . . . . . . . . . . . . . . . . . . . . . . . . . . . . . . . . . . 8-12
Creating a User Profile . . . . . . . . . . . . . . . . . . . . . . . . . . . . . . . . . . . . . . . . . . . . . . . . . . . . . .8-12
Using File Link . . . . . . . . . . . . . . . . . . . . . . . . . . . . . . . . . . . . . . . . . . . . . . . . . . . . . . . . . . . .8-14
Chapter 9.
Applications: Mail
Introduction. . . . . . . . . . . . . . . . . . . . . . . . . . . . . . . . . . . . . . . . . . . . . . . . . . . . . . . . . . . . . . . . . . .9-1
Setting Up Mail on the Desktop. . . . . . . . . . . . . . . . . . . . . . . . . . . . . . . . . . . . . . . . . . . . . . . . . . . . 9-1
Synchronizing Mail with your E-Mail Application . . . . . . . . . . . . . . . . . . . . . . . . . . . . . . . . . .9-3
viii
Page 9

Opening Mail on your SPT 1500 Terminal . . . . . . . . . . . . . . . . . . . . . . . . . . . . . . . . . . . . . . . 9-4
Viewing Messages . . . . . . . . . . . . . . . . . . . . . . . . . . . . . . . . . . . . . . . . . . . . . . . . . . . . . . . . . . 9-4
Message Fonts . . . . . . . . . . . . . . . . . . . . . . . . . . . . . . . . . . . . . . . . . . . . . . . . . . . . . . . . . 9-5
Displaying Full Header Information. . . . . . . . . . . . . . . . . . . . . . . . . . . . . . . . . . . . . . . . . 9-5
Creating Messages. . . . . . . . . . . . . . . . . . . . . . . . . . . . . . . . . . . . . . . . . . . . . . . . . . . . . . . . . . 9-5
Looking Up an Address. . . . . . . . . . . . . . . . . . . . . . . . . . . . . . . . . . . . . . . . . . . . . . . . . . . . . . 9-8
Adding Message Details . . . . . . . . . . . . . . . . . . . . . . . . . . . . . . . . . . . . . . . . . . . . . . . . . . . . . 9-9
Setting a Priority . . . . . . . . . . . . . . . . . . . . . . . . . . . . . . . . . . . . . . . . . . . . . . . . . . . . . . 9-10
Sending a Blind Carbon Copy . . . . . . . . . . . . . . . . . . . . . . . . . . . . . . . . . . . . . . . . . . . . 9-10
Adding a Signature to Your Message . . . . . . . . . . . . . . . . . . . . . . . . . . . . . . . . . . . . . . . 9-11
Requesting Confirmations . . . . . . . . . . . . . . . . . . . . . . . . . . . . . . . . . . . . . . . . . . . . . . . 9-12
Sending Messages . . . . . . . . . . . . . . . . . . . . . . . . . . . . . . . . . . . . . . . . . . . . . . . . . . . . . . . . . 9-12
Editing an Unsent Message . . . . . . . . . . . . . . . . . . . . . . . . . . . . . . . . . . . . . . . . . . . . . . . . . . 9-12
Draft Messages . . . . . . . . . . . . . . . . . . . . . . . . . . . . . . . . . . . . . . . . . . . . . . . . . . . . . . . . . . . 9-13
Filing a Message . . . . . . . . . . . . . . . . . . . . . . . . . . . . . . . . . . . . . . . . . . . . . . . . . . . . . . . . . . 9-14
Deleting Messages. . . . . . . . . . . . . . . . . . . . . . . . . . . . . . . . . . . . . . . . . . . . . . . . . . . . . . . . . 9-15
Removing a Message From the Deleted Folder. . . . . . . . . . . . . . . . . . . . . . . . . . . . . . . . 9-15
Purging Deleted Messages . . . . . . . . . . . . . . . . . . . . . . . . . . . . . . . . . . . . . . . . . . . . . . . 9-16
Message List Options . . . . . . . . . . . . . . . . . . . . . . . . . . . . . . . . . . . . . . . . . . . . . . . . . . . . . . 9-16
Folders. . . . . . . . . . . . . . . . . . . . . . . . . . . . . . . . . . . . . . . . . . . . . . . . . . . . . . . . . . . . . . 9-16
Date Column . . . . . . . . . . . . . . . . . . . . . . . . . . . . . . . . . . . . . . . . . . . . . . . . . . . . . . . . . 9-17
Sorting the Message List. . . . . . . . . . . . . . . . . . . . . . . . . . . . . . . . . . . . . . . . . . . . . . . . . 9-18
HotSync Options. . . . . . . . . . . . . . . . . . . . . . . . . . . . . . . . . . . . . . . . . . . . . . . . . . . . . . . . . . 9-18
Creating Special Filters . . . . . . . . . . . . . . . . . . . . . . . . . . . . . . . . . . . . . . . . . . . . . . . . . . . . . 9-21
Ignoring or Receiving Messages . . . . . . . . . . . . . . . . . . . . . . . . . . . . . . . . . . . . . . . . . . . 9-21
Defining Filter Strings . . . . . . . . . . . . . . . . . . . . . . . . . . . . . . . . . . . . . . . . . . . . . . . . . . . . . . 9-22
High-Priority Messages . . . . . . . . . . . . . . . . . . . . . . . . . . . . . . . . . . . . . . . . . . . . . . . . . . . . . 9-24
Truncating Messages. . . . . . . . . . . . . . . . . . . . . . . . . . . . . . . . . . . . . . . . . . . . . . . . . . . . . . . 9-25
Mail Menu Commands . . . . . . . . . . . . . . . . . . . . . . . . . . . . . . . . . . . . . . . . . . . . . . . . . . . . . 9-25
Message Menu. . . . . . . . . . . . . . . . . . . . . . . . . . . . . . . . . . . . . . . . . . . . . . . . . . . . . . . . 9-26
Options Menu . . . . . . . . . . . . . . . . . . . . . . . . . . . . . . . . . . . . . . . . . . . . . . . . . . . . . . . . 9-27
Chapter 10.
Applications: Memo Pad
Introduction . . . . . . . . . . . . . . . . . . . . . . . . . . . . . . . . . . . . . . . . . . . . . . . . . . . . . . . . . . . . . . . . . 10-1
Working With Memos . . . . . . . . . . . . . . . . . . . . . . . . . . . . . . . . . . . . . . . . . . . . . . . . . . . . . . . . . 10-2
Reviewing Memos. . . . . . . . . . . . . . . . . . . . . . . . . . . . . . . . . . . . . . . . . . . . . . . . . . . . . . . . . 10-3
Arranging Memos . . . . . . . . . . . . . . . . . . . . . . . . . . . . . . . . . . . . . . . . . . . . . . . . . . . . . . . . . 10-3
Manually arranging the Memo List. . . . . . . . . . . . . . . . . . . . . . . . . . . . . . . . . . . . . . . . . . . . 10-4
Choosing a Memo Category . . . . . . . . . . . . . . . . . . . . . . . . . . . . . . . . . . . . . . . . . . . . . . . . . 10-4
Marking a Private Memo . . . . . . . . . . . . . . . . . . . . . . . . . . . . . . . . . . . . . . . . . . . . . . . . . . . 10-4
Deleting a Memo. . . . . . . . . . . . . . . . . . . . . . . . . . . . . . . . . . . . . . . . . . . . . . . . . . . . . . . . . . 10-5
Memo Pad Menu Commands . . . . . . . . . . . . . . . . . . . . . . . . . . . . . . . . . . . . . . . . . . . . . . . . 10-5
ix
Page 10

SPT 1500 Product Reference Guide
Record Menu . . . . . . . . . . . . . . . . . . . . . . . . . . . . . . . . . . . . . . . . . . . . . . . . . . . . . . . . .10-5
Options Menu. . . . . . . . . . . . . . . . . . . . . . . . . . . . . . . . . . . . . . . . . . . . . . . . . . . . . . . . .10-6
Chapter 11.
Applications: Preferences
Introduction. . . . . . . . . . . . . . . . . . . . . . . . . . . . . . . . . . . . . . . . . . . . . . . . . . . . . . . . . . . . . . . . . .11-1
Buttons Preferences . . . . . . . . . . . . . . . . . . . . . . . . . . . . . . . . . . . . . . . . . . . . . . . . . . . . . . . . . . . . 11-2
Pen Preferences. . . . . . . . . . . . . . . . . . . . . . . . . . . . . . . . . . . . . . . . . . . . . . . . . . . . . . . . . . . .11-2
HotSync® Buttons Preferences. . . . . . . . . . . . . . . . . . . . . . . . . . . . . . . . . . . . . . . . . . . . . . . .11-4
Digitizer Preferences . . . . . . . . . . . . . . . . . . . . . . . . . . . . . . . . . . . . . . . . . . . . . . . . . . . . . . . . . . .11-5
Formats Preferences. . . . . . . . . . . . . . . . . . . . . . . . . . . . . . . . . . . . . . . . . . . . . . . . . . . . . . . . . . . .11-5
Country Default . . . . . . . . . . . . . . . . . . . . . . . . . . . . . . . . . . . . . . . . . . . . . . . . . . . . . . . . . . .11-5
Time, Date, Week Start and Numbers Formats . . . . . . . . . . . . . . . . . . . . . . . . . . . . . . . . . . .11-6
General Preferences . . . . . . . . . . . . . . . . . . . . . . . . . . . . . . . . . . . . . . . . . . . . . . . . . . . . . . . . . . . .11-6
Setting the Current Time . . . . . . . . . . . . . . . . . . . . . . . . . . . . . . . . . . . . . . . . . . . . . . . . . . . .11-6
Setting the Current Date. . . . . . . . . . . . . . . . . . . . . . . . . . . . . . . . . . . . . . . . . . . . . . . . . . . . .11-7
Auto-Off Delay. . . . . . . . . . . . . . . . . . . . . . . . . . . . . . . . . . . . . . . . . . . . . . . . . . . . . . . . . . . .11-8
System, Alarm and Game Sounds. . . . . . . . . . . . . . . . . . . . . . . . . . . . . . . . . . . . . . . . . . . . . . 11-8
Modem Preferences . . . . . . . . . . . . . . . . . . . . . . . . . . . . . . . . . . . . . . . . . . . . . . . . . . . . . . . . . . . .11-9
Network Preferences and Palm TCP/IP Software. . . . . . . . . . . . . . . . . . . . . . . . . . . . . . . . . . . . . 11-10
Selecting a Service. . . . . . . . . . . . . . . . . . . . . . . . . . . . . . . . . . . . . . . . . . . . . . . . . . . . . . . . . 11-11
Entering a User Name. . . . . . . . . . . . . . . . . . . . . . . . . . . . . . . . . . . . . . . . . . . . . . . . . . . . . .11-11
Entering a Password. . . . . . . . . . . . . . . . . . . . . . . . . . . . . . . . . . . . . . . . . . . . . . . . . . . . . . .11-12
Adding Telephone Settings . . . . . . . . . . . . . . . . . . . . . . . . . . . . . . . . . . . . . . . . . . . . . . . . . .11-13
Entering a prefix. . . . . . . . . . . . . . . . . . . . . . . . . . . . . . . . . . . . . . . . . . . . . . . . . . . . . . . . . . 11-14
Disabling Call Waiting . . . . . . . . . . . . . . . . . . . . . . . . . . . . . . . . . . . . . . . . . . . . . . . . . . . . .11-14
Using a Calling Card . . . . . . . . . . . . . . . . . . . . . . . . . . . . . . . . . . . . . . . . . . . . . . . . . . . . . .11-15
Connecting to your Service. . . . . . . . . . . . . . . . . . . . . . . . . . . . . . . . . . . . . . . . . . . . . . . . . .11-16
Creating Additional Service Templates. . . . . . . . . . . . . . . . . . . . . . . . . . . . . . . . . . . . . . . . . 11-16
Adding Detailed Information to a Service Template . . . . . . . . . . . . . . . . . . . . . . . . . . . . . . .11-17
Idle Timeout. . . . . . . . . . . . . . . . . . . . . . . . . . . . . . . . . . . . . . . . . . . . . . . . . . . . . . . . . . . . .11-18
Defining Primary and Secondary DNS . . . . . . . . . . . . . . . . . . . . . . . . . . . . . . . . . . . . . . . . . 11-19
IP Address . . . . . . . . . . . . . . . . . . . . . . . . . . . . . . . . . . . . . . . . . . . . . . . . . . . . . . . . . . . . . .11-19
Creating a Login Script. . . . . . . . . . . . . . . . . . . . . . . . . . . . . . . . . . . . . . . . . . . . . . . . . . . . . 11-20
Deleting a Service Template . . . . . . . . . . . . . . . . . . . . . . . . . . . . . . . . . . . . . . . . . . . . . . . . . 11-22
Network Preferences Menu Commands. . . . . . . . . . . . . . . . . . . . . . . . . . . . . . . . . . . . . . . . . . . . 11-22
Service Menu . . . . . . . . . . . . . . . . . . . . . . . . . . . . . . . . . . . . . . . . . . . . . . . . . . . . . . . . . . . .11-23
Options Menu . . . . . . . . . . . . . . . . . . . . . . . . . . . . . . . . . . . . . . . . . . . . . . . . . . . . . . . . . . .11-23
Displaying expanded Service Connection Progress messages. . . . . . . . . . . . . . . . . . . . . . . . .11-24
Viewing the Network Log . . . . . . . . . . . . . . . . . . . . . . . . . . . . . . . . . . . . . . . . . . . . . . . . . .11-24
Adding a DNS Number . . . . . . . . . . . . . . . . . . . . . . . . . . . . . . . . . . . . . . . . . . . . . . . . . . . . 11-24
Owner Preferences. . . . . . . . . . . . . . . . . . . . . . . . . . . . . . . . . . . . . . . . . . . . . . . . . . . . . . . . . . . .11-24
ShortCuts Preferences . . . . . . . . . . . . . . . . . . . . . . . . . . . . . . . . . . . . . . . . . . . . . . . . . . . . . . . . . 11-25
x
Page 11

Creating a ShortCut . . . . . . . . . . . . . . . . . . . . . . . . . . . . . . . . . . . . . . . . . . . . . . . . . . . . . . 11-25
Editing a ShortCut. . . . . . . . . . . . . . . . . . . . . . . . . . . . . . . . . . . . . . . . . . . . . . . . . . . . . . . . 11-26
Deleting a ShortCut. . . . . . . . . . . . . . . . . . . . . . . . . . . . . . . . . . . . . . . . . . . . . . . . . . . . . . . 11-27
Chapter 12.
Applications: Security
Introduction . . . . . . . . . . . . . . . . . . . . . . . . . . . . . . . . . . . . . . . . . . . . . . . . . . . . . . . . . . . . . . . . . 12-1
Assigning a Password . . . . . . . . . . . . . . . . . . . . . . . . . . . . . . . . . . . . . . . . . . . . . . . . . . . . . . . . . . 12-1
Hiding Private Entries. . . . . . . . . . . . . . . . . . . . . . . . . . . . . . . . . . . . . . . . . . . . . . . . . . . . . . . . . . 12-2
Showing Private Entries . . . . . . . . . . . . . . . . . . . . . . . . . . . . . . . . . . . . . . . . . . . . . . . . . . . . . . . . 12-3
Locking Your SPT 1500 Terminal . . . . . . . . . . . . . . . . . . . . . . . . . . . . . . . . . . . . . . . . . . . . . . . . 12-3
Changing or Deleting a Password. . . . . . . . . . . . . . . . . . . . . . . . . . . . . . . . . . . . . . . . . . . . . . . . . 12-4
Recovering from a Forgotten Password . . . . . . . . . . . . . . . . . . . . . . . . . . . . . . . . . . . . . . . . . . . . 12-5
Chapter 13.
Applications: To Do List
Introduction . . . . . . . . . . . . . . . . . . . . . . . . . . . . . . . . . . . . . . . . . . . . . . . . . . . . . . . . . . . . . . . . . 13-1
Opening the To Do List . . . . . . . . . . . . . . . . . . . . . . . . . . . . . . . . . . . . . . . . . . . . . . . . . . . . . . . . 13-1
Working With To Do Items . . . . . . . . . . . . . . . . . . . . . . . . . . . . . . . . . . . . . . . . . . . . . . . . . . . . . 13-2
Setting Priority . . . . . . . . . . . . . . . . . . . . . . . . . . . . . . . . . . . . . . . . . . . . . . . . . . . . . . . . . . . 13-3
Checking Off a To Do Item. . . . . . . . . . . . . . . . . . . . . . . . . . . . . . . . . . . . . . . . . . . . . . . . . . 13-3
To Do Item Details . . . . . . . . . . . . . . . . . . . . . . . . . . . . . . . . . . . . . . . . . . . . . . . . . . . . . . . . 13-4
Choosing a To Do Category . . . . . . . . . . . . . . . . . . . . . . . . . . . . . . . . . . . . . . . . . . . . . . . . . 13-4
Setting a Due Date. . . . . . . . . . . . . . . . . . . . . . . . . . . . . . . . . . . . . . . . . . . . . . . . . . . . . . . . . 13-4
Deleting a To Do Item. . . . . . . . . . . . . . . . . . . . . . . . . . . . . . . . . . . . . . . . . . . . . . . . . . . . . . 13-5
To Do Show Options . . . . . . . . . . . . . . . . . . . . . . . . . . . . . . . . . . . . . . . . . . . . . . . . . . . . . . 13-6
To Do List Menu Commands. . . . . . . . . . . . . . . . . . . . . . . . . . . . . . . . . . . . . . . . . . . . . . . . . . . . 13-7
Record Menu . . . . . . . . . . . . . . . . . . . . . . . . . . . . . . . . . . . . . . . . . . . . . . . . . . . . . . . . . . . . 13-7
Options Menu. . . . . . . . . . . . . . . . . . . . . . . . . . . . . . . . . . . . . . . . . . . . . . . . . . . . . . . . . . . . 13-8
Chapter 14.
Applications: Laser Scanner and Laser Pointer
Introduction . . . . . . . . . . . . . . . . . . . . . . . . . . . . . . . . . . . . . . . . . . . . . . . . . . . . . . . . . . . . . . . . . . 141
Scanning with the SPT 1500. . . . . . . . . . . . . . . . . . . . . . . . . . . . . . . . . . . . . . . . . . . . . . . . . . . . . . 141
SimpleScan Application. . . . . . . . . . . . . . . . . . . . . . . . . . . . . . . . . . . . . . . . . . . . . . . . . . . . . . 141
Demo Scan Application. . . . . . . . . . . . . . . . . . . . . . . . . . . . . . . . . . . . . . . . . . . . . . . . . . . . . . 142
Demo Scan Menu Options. . . . . . . . . . . . . . . . . . . . . . . . . . . . . . . . . . . . . . . . . . . . . . . . 143
Scanning Bar Codes using Demo Scan . . . . . . . . . . . . . . . . . . . . . . . . . . . . . . . . . . . . . . . 144
Receiving Demonstration Program . . . . . . . . . . . . . . . . . . . . . . . . . . . . . . . . . . . . . . . . . . . . . 145
Scanning Problems. . . . . . . . . . . . . . . . . . . . . . . . . . . . . . . . . . . . . . . . . . . . . . . . . . . . . . 145
xi
Page 12

SPT 1500 Product Reference Guide
Battery Implications While Using the Laser Scanner . . . . . . . . . . . . . . . . . . . . . . . . . . . . 146
Pointer Mode Laser Settlement Time . . . . . . . . . . . . . . . . . . . . . . . . . . . . . . . . . . . . . . . . . . . 148
Chapter 15.
Installing and Removing Applications
Introduction. . . . . . . . . . . . . . . . . . . . . . . . . . . . . . . . . . . . . . . . . . . . . . . . . . . . . . . . . . . . . . . . . .15-1
Installing Applications. . . . . . . . . . . . . . . . . . . . . . . . . . . . . . . . . . . . . . . . . . . . . . . . . . . . . . . . . .15-1
Installing Games. . . . . . . . . . . . . . . . . . . . . . . . . . . . . . . . . . . . . . . . . . . . . . . . . . . . . . . . . . .15-4
Removing Applications. . . . . . . . . . . . . . . . . . . . . . . . . . . . . . . . . . . . . . . . . . . . . . . . . . . . . .15-4
Removing Palm Desktop Software . . . . . . . . . . . . . . . . . . . . . . . . . . . . . . . . . . . . . . . . . . . . .15-5
Chapter 16.
Getting Help With Your SPT 1500 Terminal
Introduction. . . . . . . . . . . . . . . . . . . . . . . . . . . . . . . . . . . . . . . . . . . . . . . . . . . . . . . . . . . . . . . . . .16-1
Displaying Online Tips . . . . . . . . . . . . . . . . . . . . . . . . . . . . . . . . . . . . . . . . . . . . . . . . . . . . . . . . .16-1
SPT 1500 Diagnostics Utility. . . . . . . . . . . . . . . . . . . . . . . . . . . . . . . . . . . . . . . . . . . . . . . . . . . . .16-2
System Information Test. . . . . . . . . . . . . . . . . . . . . . . . . . . . . . . . . . . . . . . . . . . . . . . . . . . . . 16-3
Bar Code Scanner Test . . . . . . . . . . . . . . . . . . . . . . . . . . . . . . . . . . . . . . . . . . . . . . . . . . . . . .16-4
Serial Port Test. . . . . . . . . . . . . . . . . . . . . . . . . . . . . . . . . . . . . . . . . . . . . . . . . . . . . . . . . . . .16-5
Digitizer Alignment Test. . . . . . . . . . . . . . . . . . . . . . . . . . . . . . . . . . . . . . . . . . . . . . . . . . . . . 16-6
System Diagnostics Test . . . . . . . . . . . . . . . . . . . . . . . . . . . . . . . . . . . . . . . . . . . . . . . . . . . . .16-6
Troubleshooting . . . . . . . . . . . . . . . . . . . . . . . . . . . . . . . . . . . . . . . . . . . . . . . . . . . . . . . . . . . . . .16-7
Installation Troubleshooting . . . . . . . . . . . . . . . . . . . . . . . . . . . . . . . . . . . . . . . . . . . . . .16-7
HotSync® Troubleshooting. . . . . . . . . . . . . . . . . . . . . . . . . . . . . . . . . . . . . . . . . . . . . . .16-7
General Troubleshooting . . . . . . . . . . . . . . . . . . . . . . . . . . . . . . . . . . . . . . . . . . . . . . . . . . . .16-9
Security Troubleshooting . . . . . . . . . . . . . . . . . . . . . . . . . . . . . . . . . . . . . . . . . . . . . . . . . . . 16-11
Applications Troubleshooting . . . . . . . . . . . . . . . . . . . . . . . . . . . . . . . . . . . . . . . . . . . .16-11
Technical Support, Service and Repair. . . . . . . . . . . . . . . . . . . . . . . . . . . . . . . . . . . . . . . . . . . . . 16-12
Technical Support. . . . . . . . . . . . . . . . . . . . . . . . . . . . . . . . . . . . . . . . . . . . . . . . . . . . . . . . .16-13
Chapter 17.
Maintaining Your SPT 1500 Terminal
Introduction. . . . . . . . . . . . . . . . . . . . . . . . . . . . . . . . . . . . . . . . . . . . . . . . . . . . . . . . . . . . . . . . . .17-1
Caring for Your SPT 1500 Terminal . . . . . . . . . . . . . . . . . . . . . . . . . . . . . . . . . . . . . . . . . . .17-1
Battery Considerations . . . . . . . . . . . . . . . . . . . . . . . . . . . . . . . . . . . . . . . . . . . . . . . . . . 17-2
Resetting Your SPT 1500 Terminal . . . . . . . . . . . . . . . . . . . . . . . . . . . . . . . . . . . . . . . . . . . . 17-3
Appendix A.
Expense Templates
xii
Page 13

Appendix B.
Creating a Custom Expense Report
Introduction . . . . . . . . . . . . . . . . . . . . . . . . . . . . . . . . . . . . . . . . . . . . . . . . . . . . . . . . . . . . . . . . . . B-1
About Mapping Tables. . . . . . . . . . . . . . . . . . . . . . . . . . . . . . . . . . . . . . . . . . . . . . . . . . . . . . . . . . B-1
Customizing Existing Sample Templates . . . . . . . . . . . . . . . . . . . . . . . . . . . . . . . . . . . . . . . . . B-2
Determining the Layout of the Expense Report. . . . . . . . . . . . . . . . . . . . . . . . . . . . . . . . . . . . B-4
Labels. . . . . . . . . . . . . . . . . . . . . . . . . . . . . . . . . . . . . . . . . . . . . . . . . . . . . . . . . . . . . . . . B-4
Sections . . . . . . . . . . . . . . . . . . . . . . . . . . . . . . . . . . . . . . . . . . . . . . . . . . . . . . . . . . . . . . B-4
Analyzing Your Custom Expense Report . . . . . . . . . . . . . . . . . . . . . . . . . . . . . . . . . . . . . . . . B-5
Programming the Mapping Table . . . . . . . . . . . . . . . . . . . . . . . . . . . . . . . . . . . . . . . . . . . . . . B-6
Using Applications Other Than Microsoft Excel. . . . . . . . . . . . . . . . . . . . . . . . . . . . . . . . . . B-10
Expense File Details. . . . . . . . . . . . . . . . . . . . . . . . . . . . . . . . . . . . . . . . . . . . . . . . . . . . . . . . B-11
Appendix C.
Non-ASCII Characters for Login Scripts
Introduction . . . . . . . . . . . . . . . . . . . . . . . . . . . . . . . . . . . . . . . . . . . . . . . . . . . . . . . . . . . . . . . . . . C-1
Use of ^char . . . . . . . . . . . . . . . . . . . . . . . . . . . . . . . . . . . . . . . . . . . . . . . . . . . . . . . . . . . . . . . . . . C-1
Carriage Return and Line Feed . . . . . . . . . . . . . . . . . . . . . . . . . . . . . . . . . . . . . . . . . . . . . . . . C-1
Literal Characters . . . . . . . . . . . . . . . . . . . . . . . . . . . . . . . . . . . . . . . . . . . . . . . . . . . . . . . . . . C-2
xiii
Page 14

SPT 1500 Product Reference Guide
xiv
Page 15

About This Guide
Introduction
The SPT 1500 Product Reference Guide provides information about the SPT 1500 terminal
and its accessories.
Chapter Descriptions
Topics covered in this guide are as follows:
t
Chapter 1, Getting Started with Your SPT 1500
controls on your SPT 1500 terminal, how to install the batteries, start your SPT 1500
terminal for the first time, and set up your Palm™ Desktop software.
t
Chapter 2, Working with Your SPT 1500 Terminal
applications, use the on-screen keyboard, write with the stylus and use common
features on your SPT 1500 terminal.
t
Chapter 3, Finding Information with Your SPT 1500 Terminal
locate information on your SPT 1500 terminal with the Find command and the
Phone Lookup command.
t
Chapter 4, Applications: Address Book
application, which enables you to keep names, addresses, phone numbers and other
information about your personal or business contacts.
t
Chapter 5, Applications: Calculator
which allows you to perform simple calculations on your SPT 1500.
t
Chapter 6, Applications: Date Book
which enables you to quickly and easily schedule appointments or any kind of
activity associated with a time and date.
, explains the use of the Address Book
, explains the use of the Calculator application,
, covers the use of the Date Book application,
, explains the physical buttons and
, explains how to open
, explains how to
xv
Page 16

SPT 1500 Product Reference Guide
t
Chapter 7, Applications: Expense
, explains the use of the Expense application,
enables you to keep track of your expenses and then transfer the information to a
spreadsheet on your computer.
t
Chapter 8, HotSync
, describes the use of the HotSync utility, which allows you to
synchronize data between the SPT 1500 and your computer.
t
Chapter 9, Applications: Mail
, describes the use of the Mail application which
enables you to manage your e-mail while away from your desk.
t
Chapter 10, Applications: Memo Pad
, explains the Memo Pad application, which
provides a place to take notes that are not associated with Date Book, Address Book
or To Do items.
t
Chapter 11, Applications: Preferences
, describes the Preferences screens, which
enable you to customize the configuration options on your SPT 1500 terminal.
t
Chapter 12, Applications: Security
, covers the security options available for
protecting your SPT 1500 from unauthorized users.
t
Chapter 13, Applications: To Do List
, describes using the To Do List application,
which is a convenient place to create reminders and prioritize the things that you
have to do.
t
Chapter 14, Applications: Laser Scanner and Laser Pointer
, covers the use of the
laser scanner and laser pointer applications.
t
Chapter 15, Installing and Removing Applications
, explains how to install and
remove applications on your SPT 1500 terminal and how to remove the Palm™
Desktop software from your computer.
t
Chapter 16, Getting Help with your SPT 1500
, describes methods for
troubleshooting problems with the SPT 1500, and contact phone numbers for
technical support.
t
Chapter 17, Maintaining Your SPT 1500
, provides information to help you take
proper care of your SPT 1500 terminal and prolong battery life. It also discusses how
to reset your SPT 1500 terminal.
t
Appendix A, Expense T emplates
, provides illustrations of the four expense templates
that come with the Palm™ Desktop software.
t
Appendix B, Creating a Custom Expense Report
, explains how to modify existing
Expense application templates, and how to create your own custom expense report
templates for use with the Expense application.
t
Appendix C, Non-ASCII Characters for Login Scripts
, provides information to
enable you to create custom login scripts that require non-ASCII characters. This
information is for advanced users only.
xvi
Page 17

About This Guide
Notational Conventions
This document uses these conventions:
¥ ÒterminalÓ refers to the SPT 1500.
¥ ÒUserÓ refers to anyone using an application on the SPT 1500.
¥ ÒYouÓ refers to the End User, System Administrator or Technical Support person
using this manual as a reference to install, conÞgure, operate, maintain and
troubleshoot the SPT 1500.
¥
Italics
are used to highlight speciÞc items in the general text, and to identify
chapters and sections in this and related documents.
¥ Bullets (¥) indicate:
- lists of alternatives or action items.
- lists of required steps that are not necessarily sequential.
¥ Numbered lists indicate a set of sequential steps, i.e., those that describe step-by-
step procedures.
Service Information
If you have a problem with the SPT 1500 equipment, contact the Symbol Support Center. If
your problem cannot be resolved over the phone, you may need to return your equipment for
servicing. If that is necessary, you will be given special directions.
Note:
Symbol Technologies is not responsible for any damages incurred
during shipment if the approved shipping container is not used.
Shipping the units improperly can possibly void the warranty. If the
original shipping container has not been kept, contact Symbol to have
another sent to you.
Symbol Support Center
In the USA and Canada, for service information, warranty information or technical
assistance, call:
SYMBOL SUPPORT CENTER
1-800-659-2240
xvii
Page 18

SPT 1500 Product Reference Guide
If you purchased your Symbol Product from a Symbol Business Partner , contact that Business
partner for service.
Europe
Wokingham, England
European Headquarters
0734-771-222 (Inside UK)
+441-734-771222 (Outside UK)
Asia
Singapore
Symbol Technologies Asia, Inc.
337-6588 (Inside Singapore)
+65-337-6588 (Outside Singapore)
xviii
Page 19

Chapter 1
Getting Started with the SPT 1500
Introduction
This chapter explains the physical buttons and controls on your SPT 1500 terminal, how to
install the batteries, start your SPT 1500 terminal for the first time, and set up your Palm™
Desktop software.
1-1
Page 20
SPT 1500 Product Reference Guide
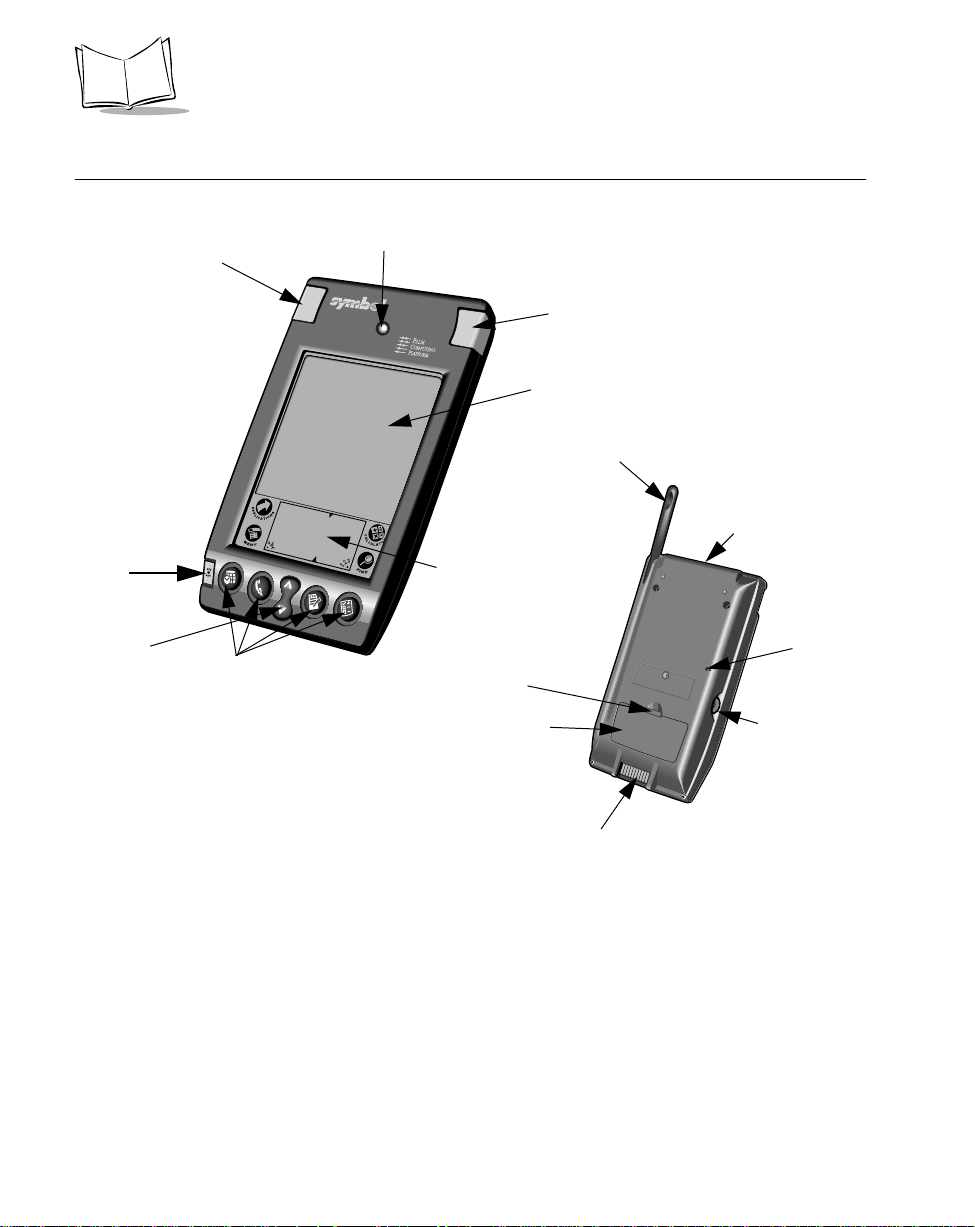
Parts of the SPT 1500
Left Scan Trigger
Power/Backlight
control
Scroll Button
Application Buttons
Decode LED
Right Scan Trigger
Touchscreen Display
Graffiti Writing Area
Battery Door
Release
Battery Door
Stylus
IR Port/ Scan
Window
Reset Button
Contrast Control
1-2
Serial Port
Figure 1-1. Parts of the SPT 1500
Page 21

Getting Started with the SPT 1500
SPT 1500
Touchscreen
Display
¨
Graffiti
writing area
Displays the applications and information stored in your SPT
1500 terminal. It is touch-sensitive and responds to the stylus
or your finger.
The area where you write strokes using the Graffiti alphabet.
See W riting With the Stylus on page 2-5 for details about how
to write Graffiti character strokes.
Application
buttons
Activate the individual SPT 1500 terminal applications that
correspond to the icons on the buttons: Date Book, Address
Book, To Do List and Memo Pad. You can reassign these
buttons to activate any application on your SPT 1500
terminal. See Buttons Preferences on page 11-2.
Note: If your SPT 1500 terminal is off, pressing any
application button activates the SPT 1500 terminal
and opens the corresponding application.
Scroll button Displays text and other information that extends beyond the
area of the SPT 1500 terminal screen. Pressing the lower half
of the scroll button “scrolls down” to view information below
the viewing area, and pressing the upper half of the button
“scrolls up” to view the information above the viewing area.
Power button Turns your SPT 1500 terminal on or off and controls the
backlight feature. If your SPT 1500 terminal is turned off,
pressing the power button turns the unit on and returns you to
the last screen you were viewing.
If your SPT 1500 terminal is turned on, pressing the power
button turns the unit off, helping to conserve battery life.
Holding the power button down for about two seconds turns
the backlight on or off.
Stylus Slides in and out of the slot on the back side of the SPT 1500
terminal. T o use the stylus, remove it from the slot and hold it
as you would a pen or pencil.
Important: Always use the point of the stylus for tapping
or making strokes on the SPT 1500 terminal
screen. Never use an actual pen, pencil or
other sharp object to write on the SPT 1500
terminal screen.
1-3
Page 22

SPT 1500 Product Reference Guide
IR port Uses infrared technology to transmit data to and receive data
from other SPT 1500 terminals and other Palm Computing®
devices. See Beaming Information to Other SPT 1500
Terminals on page 2-27 for more information.
Reset button Under normal use, you should never have to use the reset
button. See Resetting Your SPT 1500 Terminal on page 17-
3for information about how to use the reset button.
Contrast
control
Battery door Covers the batteries that power your SPT 1500 terminal. See
Serial port
door
Adjusts the appearance of the screen for the clearest screen
display. Depending on the lighting conditions or temperature
of the environment where you use your SPT 1500 terminal,
you may need to adjust the setting of the contrast control.
Installing the Batteries for information on removing the
battery door and installing batteries.
Protects the serial port that fits into the connector of the SPT
1500 terminal cradle to ensure that the connection surface of
the serial port remains clean and clear of debris.
Installing the Batteries
To use your SPT 1500 terminal, you must install two AAA alkaline batteries. The batteries
fit behind the battery door on the back of the SPT 1500 terminal.
To install the batteries in your SPT 1500:
1. Press the latch on the battery door and lift the battery door away from the SPT 1500
terminal.
Press tab to
open
2. Install the two AAA alkaline batteries into the battery compartment.
1-4
Page 23

Getting Started with the SPT 1500
Note: a diagram in the interior of the battery compartment shows the orientation of
the + and - ends of the batteries. When correctly installed, the clips in the
battery compartment secure the batteries in place.
3. Insert the battery door back into place so that it is flush with the back of the SPT
1500 terminal and “clicks” into position.
Caution
Do not force the battery door . When the batteries are correctly installed, the
battery door clips smoothly into place. If you feel resistance when replacing
the battery door, make sure the door is aligned with the slots on the back of
your SPT 1500 terminal, and that the batteries are firmly seated in the battery compartment.
1-5
Page 24

SPT 1500 Product Reference Guide
Calibrating the Screen
The first time you start your SPT 1500 terminal the calibration screen automatically appears.
Follow the steps in this section to align the internal circuitry of your SPT 1500 terminal with
its touch-sensitive screen.
To calibrate your SPT 1500:
1. Press the green power button on the front panel of your SPT 1500 terminal to display
the calibration screen.
Power
button
Note: If necessary, adjust the contrast control located on the side of the SPT 1500
terminal, so the alignment screen is clear and readable.
2. Remove the stylus from its storage slot on the back of the SPT 1500 terminal.
3. Tap the exact center of each target that appears on the screen with the tip of the
stylus.
1-6
Page 25

Getting Started with the SPT 1500
After you tap each of the targets, continue with the following sections to set the time and
date.To recalibrate after initial calibration:
1. Select the Prefs Icon
2. Tap in the right-top corner
3. Select Digitizer
About the Backlight Feature
If you have difficulty seeing the information on your SPT 1500 terminal, you can use the
backlight feature to illuminate your screen.
To activate the backlight feature, press the green power button and hold it down for about
two seconds. Release the button when the backlight turns on.
To turn off the backlight feature, press and hold the green power button for about two
seconds. The backlight feature also turns off automatically (after a period of inactivity) with
the Auto-off after feature.
In addition, you can use a full-screen pen stroke to activate the backlight feature. See Buttons
Preferences on page 11-2 for more information.
Setting the Time
The General Preferences screen is the first screen to appear after you align the digitizer on
your SPT 1500 terminal.
Note: If the General Preferences screen is not on your SPT 1500 terminal screen, you
may have pressed one of the application buttons on the front panel. See
1-7
Page 26

SPT 1500 Product Reference Guide
General Preferences on page 11-6 for information on displaying the General
Preferences screen.
To set the current time:
1. Tap the Set Time box in the General Preferences screen to open the Set Time dialog.
Tap here
2. Tap the up or down arrows to change the hour.
3. Tap the minutes box, and then tap the arrows to adjust the settings for the current
time.
4. Tap the AM or PM box to select the time of day.
Note: Your SPT 1500 terminal can also display time based on a 24-hour clock. See
Formats Preferences on page 11-5.
5. Tap the OK button to close the Set T ime dialog and return to the General Preferences
screen.
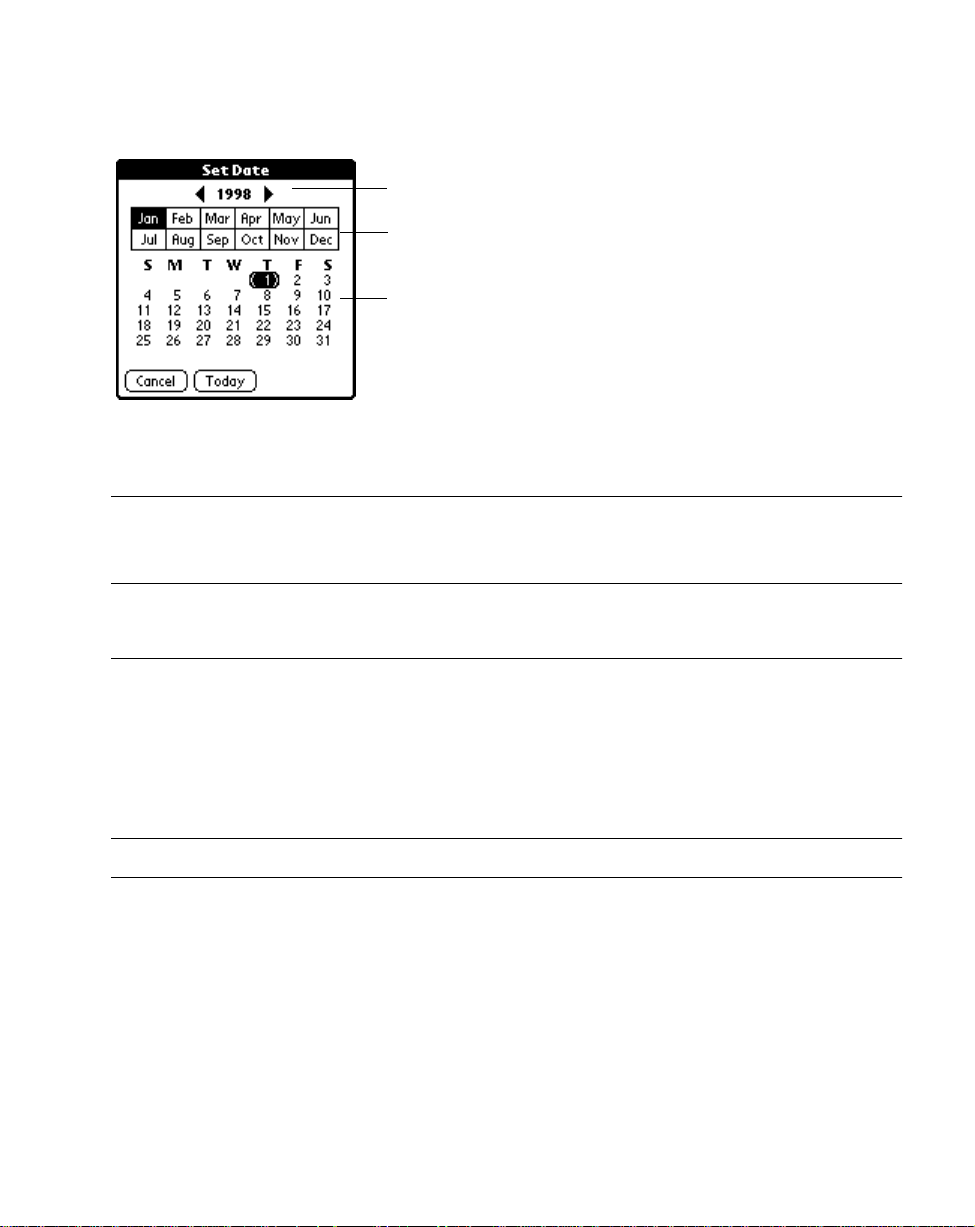
Setting the Current Date
The Set Date box in the General Preferences screen is used to set the current date for your
SPT 1500 terminal.
To set the current date:
1. Tap the Set Date box to open the Set Date dialog.
2. Tap the arrows at the top to select the current year.
1-8
Page 27
Getting Started with the SPT 1500
Tap arrows to select year
Tap to select month
Tap to select date
3. Tap a month box to select the current month.
4. Tap the current date to close the Set Date dialog and return to the General
Preferences screen.
Note: You do not need to adjust the other General Preference settings at this time.
See General Preferences on page 11-6 for information about the remaining
options.
Connecting the Cradle
The cradle that comes with your SPT 1500 terminal enables you to synchronize the
information on your SPT 1500 terminal and the Palm Desktop software using HotSync®
technology.
T o connect the cradle, turn off your computer and plug the cable from the SPT 1500 terminal
cradle into the serial communications port on your computer.
Note: You may require a 9-pin to 25-pin adapter.
1-9
Page 28

SPT 1500 Product Reference Guide
Figure 1-2. Connecting the Cradle
Note: Your SPT 1500 terminal requires a dedicated port. It cannot share a port with
an internal modem or other device. If you are unsure about the exact location
of the serial port on your computer, refer to the user’s manual supplied with
the computer.
Palm SPT 1500 Desktop Software
Palm SPT 1500 Desktop terminal software extends many of the functions of your SPT 1500
terminal to your computer . Although using Palm Desktop software is optional, when you use
it with your SPT 1500 terminal and the built-in HotSync technology, you can fully
synchronize the information on your SPT 1500 terminal with the information on your
computer. Changes you make on your SPT 1500 terminal or Palm Desktop appear in both
places after you synchronize.
With Palm Desktop software you can:
t Work with your SPT 1500 terminal applications on your computer. Palm Desktop
duplicates the Date Book, Address Book, T o Do List and Memo Pad applications on
your SPT 1500 terminal, so you can view , enter and modify any data stored on your
SPT 1500 terminal.
t Back up the data stored on your SPT 1500 terminal with HotSync technology and
synchronize the data with Palm Desktop. Synchronization is a one-step procedure
that ensures your data is always safe and up-to-date. See Chapter 8, Applications:
HotSync® for information about using this feature.
t Import and export data, so you can easily transfer data from other Windows
applications into Address Book or Memo Pad.
1-10
Page 29

Getting Started with the SPT 1500
t Print your Date Book, Address Book, To Do List and Memo Pad information on any
Windows-compatible printer.
System Requirements
To install and operate Palm Desktop, your computer system must meet the following
requirements:
Minimum Requirements
t Windows 95 or Windows NT 4.0
t IBM-compatible 486 computer or higher
t 8 MB RAM (memory) minimum, 16 MB recommended
t 12 MB available hard disk space
t VGA monitor or better
t CD-ROM drive
t Mouse
t One available serial port
Optional Equipment
t Modem (such as Palm Pilot Modem)
t Windows-compatible printer
Desktop Software Installation
The following instructions guide you through installing SPT 1500 Palm Desktop software.
After you install the software, refer to the Help menu for complete information about how
to use Palm Desktop.
To ensure a safe and uninterrupted installation of the Palm Desktop software, please do the
following before installing:
t Connect the cradle to your computer.
t If you have placed your SPT 1500 terminal in the cradle, remove it during software
installation.
t Exit all programs, including those that run automatically at startup, such as fax
software, virus protection software, screen-saver software, and application toolbars
such as Microsoft Office.
t Do not simply copy the Palm Desktop files to your hard drive. You must use the
installer to place the files in their proper locations and to decompress the files.
1-11
Page 30

SPT 1500 Product Reference Guide
To install Palm Desktop software:
1. Insert the SPT 1500 Desktop Software CD into the CD-ROM drive on the
development PC (D: on most computers).
2. If your CD-ROM supports the auto-run feature, an installation menu automatically
appears on your desktop. If your CD-ROM does not support auto-run, navigate to
your CD-ROM drive (D:), to Palmsfw/disk1 and double-click on setup.exe. The
Welcome Screen appears.
3. Follow the directions as the installation program guides you through the install
process.
1-12
Page 31

Chapter 2
Working with Your SPT 1500 Terminal
Introduction
This chapter explains how to open applications, use the on-screen keyboard, write with the
stylus, perform scanning, and use common features on your SPT 1500 terminal.
Selecting Applications
Your SPT 1500 terminal is equipped with a variety of applications. All the applications
installed on your SPT 1500 terminal appear in the Applications Launcher. You can use the
Applications Launcher to open any application installed on your SPT 1500 terminal. Y ou can
also open the four main applications — Date Book, Address Book, To Do List and Memo
Pad — with the buttons on the front panel your SPT 1500 terminal.
Tip: When you press the buttons on the front panel, you have instant access to the
selected application. You don’t need to turn on your SPT 1500 terminal first.
In addition to providing a way for you to open applications, the Applications Launcher
displays the current time, battery level and application category.
To open applications:
1. Tap the icon on the SPT 1500 terminal screen to open the Applications Launcher .
2-1
Page 32

SPT 1500 Product Reference Guide
2. Tap the icon of the application that you want to open. If you have many applications
installed on your SPT 1500 terminal, tap the scroll bar to see all of your applications.
Tip: As a shortcut, you can write the Graffiti® handwriting software character stroke
for the first letter of the application you want to use. The Applications Launcher
scrolls to the first application that begins with that letter.
Switching Applications
When working in any application, you can tap the icon or press the buttons on the front
panel to switch to any other application. Your SPT 1500 terminal saves your work in the
current application and displays it when you return to the current screen.
Changing the Applications Launcher Display Format
By default the Applications Launcher displays each application as an icon. As an alternative,
you can choose to show a list of applications.
To change the Applications Launcher display:
1. Tap the icon on the SPT 1500 terminal screen to open the Applications Launcher .
2. Tap the icon on the SPT 1500 terminal screen to open the Applications Launcher
menus.
3. Tap Preferences from the Options menu to open the Preferences dialog.
4. Tap the View By pick list and select the List option.
5. Tap the OK button to close the Preferences dialog and display the Applications
Launcher in list format.
2-2
Page 33

Working with your SPT 1500
Displaying Applications by Category
The category feature enables you to limit the number of applications that appear on the
screen. You can assign categories to your applications and then choose to display a single
category or all your applications.
To display applications by category:
1. Tap the icon on the SPT 1500 terminal screen to open the Applications Launcher .
2. Tap the icon on the SPT 1500 terminal screen to open the Applications Launcher
menus.
3. Tap Category from the App menu to open the Category dialog.
4. Tap the pick list next to each application to assign it to a category.
Tip: T o create a new category, tap Edit Category from the pick list to open the Edit
Categories dialog. T ap the New button, enter the category name, and then tap
the OK button to add the category . T ap OK to close the Edit Categories dialog.
2-3
Page 34

SPT 1500 Product Reference Guide
5. Tap the Done button to close the Category dialog and return to the Applications
Launcher.
6. Tap the pick list in the upper-right corner of the screen and select the application
category you want to display.
Tip: You can also tap the icon to scroll through the application categories.
Using the On-Screen Keyboard
Y ou can activate the on-screen keyboard any time you need to enter text or numbers on your
SPT 1500 terminal. Note that you cannot enter Graffiti characters while using the on-screen
keyboard.
To use the on-screen keyboard:
1. Open any SPT 1500 terminal application (such as the Memo Pad application, as
described in the previous section).
2. Tap any record name, or tap the New button.
3. Tap the left target to open the Alpha keyboard, or tap the right target to open the
Numeric keyboard.
2-4
Tap here for letters
keyboard
Tap here for numbers
keyboard
Page 35

Alpha
Working with your SPT 1500
Tab
Caps lock
Caps shift
Tap here to display
Alpha keyboard
Numeric
Tap here to display
Numeric keyboard
Backspace
Carriage return
International
Tap here to display
International keyboard
4. Tap the characters of the on-screen keyboard to enter text and numbers.
Note: The on-screen keyboard also includes a dialog for international
characters. You can switch among the three dialogs at any time to
enter the exact text you need.
After you finish, tap the Done button to close the on-screen keyboard and place the text in
your SPT 1500 terminal application.
Writing With the Stylus
Your SPT 1500 terminal includes Graffiti handwriting software as the primary system for
entering text and numbers. Graffiti is a system where simple strokes you write with the stylus
are instantly recognized as letters or numbers.
This section explains the basics of Graffiti, and how to make strokes in the Graffiti writing
area. Y our SPT 1500 terminal also includes Giraffe — a game you can use to practice writing
Graffiti. See “Installing Games” for instructions on how to install Giraffe.
2-5
Page 36

SPT 1500 Product Reference Guide
Opening the Memo Pad Application
The Memo Pad application is ideal for practicing the Graffiti alphabet. This section explains
how to open the Memo Pad and use it to practice Graffiti. A complete explanation of the
Memo Pad application appears in Chapter 10, Applications: Memo Pad.
To open the Memo Pad application:
1. Press the button on the front of your SPT 1500 terminal to open the Memo Pad
application.
2. Tap the New button to open a new Memo Page.
New
memo
cursor
Tap
New
Write in Graffiti area
Note: A cursor appears in the upper-left corner of the Memo Page to indicate where
new text will appear.
Writing Letters With Graffiti
Most people find they can enter text quickly and accurately with only minutes of practice.
Graffiti includes any character you can type on a standard keyboard. The Graffiti strokes
closely resemble those of the regular alphabet which makes it quick and easy to learn. For
example, the following Graffiti strokes are portions of the regular alphabet equivalents.
2-6
Page 37

Working with your SPT 1500
AF
4
There are four basic concepts for success with Graffiti:
t If you draw the character shape exactly as shown in the tables later in this chapter
(like the shapes shown in the following diagram), you achieve 100% accuracy.
t The heavy dot on each shape shows where to begin the stroke. Certain characters
have similar shapes, but different beginning and end points. Always begin the stroke
at the heavy dot.
t Most characters require only a single stroke. When you lift the stylus from the
Graffiti writing area, your SPT 1500 terminal recognizes and displays the text
character immediately.
t The Graffiti writing area is divided into two parts: one for writing the letters of the
alphabet and one for writing numbers. The small marks at the top and bottom of the
Graffiti writing area indicate the two areas.
Write letters here Write numbers here
K
5
T
Division marks
To write letters of the alphabet with Graffiti:
1. Tap the screen where you want your text to go.
2. Use the table on the next page to find the stroke shape for the letter you want to
create. For example, the stroke shown below creates the letter “n.”
2-7
Page 38

SPT 1500 Product Reference Guide
Note: There are two different stroke shapes available for some letters. For these
letters, choose the one that’s easiest for you.
Lift stylus here
Start stroke at
heavy dot
As you’ll see later, you use these shapes to create both upper- and lowercase letters.
1. Position the stylus in the left-hand side of the Graffiti writing area.
2. Start your stroke at the heavy dot, and draw the stroke shape as it appears in the
table.
Note: Don’t try to draw the dot shape itself. The heavy dot is there to show the
starting point of the stroke.
3. Lift the stylus from the screen at the end of the stroke shape.
That’s all there is to it! When you lift the stylus from the screen, your SPT 1500 terminal
recognizes your stroke immediately and prints the letter at the insertion point on the screen.
As soon as you lift the stylus from the screen, you can begin the stroke for the next character
you want to write.
Caution
You must begin the character strokes in the Graffiti writing area. If you do
not make Graffiti strokes in the Graffiti writing area, your SPT 1500 terminal does not recognize them as text characters.
Graffiti Tips
When writing with Graffiti, keep these tips in mind:
t Accuracy improves when you write large characters. You should draw strokes that
nearly fill the Graffiti writing area.
2-8
Page 39

Working with your SPT 1500
t To delete characters, simply set the insertion point to the right of the character you
want to delete and make the backspace stroke (a line from right to left) in the Graffiti
writing area.
t Write at natural speed. Writing too slowly can generate recognition errors.
t Do not write on a slant. Vertical strokes should be parallel to the sides of the Graffiti
writing area.
2-9
Page 40

SPT 1500 Product Reference Guide
The Graffiti Alphabet
Letter Strokes Letter Strokes
AN
B
O
CP
D
Q
ER
F
G
S
T
HU
IV
JW
KX
LY
M
Z
Space Back Space
2-10
Page 41

Working with your SPT 1500
Carriage
Return
Period
tap twice
Writing Capital Letters With Graffiti
Note: You make capital letters with the same stroke shapes as the basic alphabet
characters. T o make capital letters, you must first “shift” to caps — just as you
press the Shift key on a keyboard — and then write the character strokes.
Graffiti includes a Smart Shifting feature which automatically capitalizes the
first letter when you create a new entry (by tapping a New button or a blank
line).
To draw the first letter of a word as a capital letter use the Caps Shift stroke:
Caps
Shift
Tip: When Caps Shift is active, an “up arrow” symbol appears in the lower-right corner
To enter only capital letters (Caps Lock) use the Caps Lock stroke:
Caps
Lock
of the SPT 1500 terminal screen.
Tip: When Caps Lock is active, an underlined “up arrow” symbol appears in the lower-
right corner of the SPT 1500 terminal screen. T o return to lowercase, make the Caps
Shift stroke.
Writing Numbers With Graffiti
Writing numbers with Graffiti is similar to writing letters of the alphabet, except that you
make the character strokes on the right-hand side (numbers side) of the Graffiti writing area.
Graffiti Numbers
Number Strokes Number Strokes
2-11
Page 42

SPT 1500 Product Reference Guide
0
1
5
6
27
38
4
9
Writing Punctuation Marks With Graffiti
Graffiti can create any punctuation symbol that you can enter from a standard keyboard. All
punctuation marks begin with a single tap on the Graffiti writing area. When you make this
tap, you activate Punctuation Shift and a dot appears to show it is active. The next stroke you
make with the stylus creates a punctuation mark.
Punctuation shift
Symbol Stroke Symbol Stroke
Period
.
Dash
—
Comma
,
Apostrophe
'
Question
?
Exclamation
!
2-12
Left Paren
(
Right Paren
)
Slash
/
Dollar
$
Page 43

Working with your SPT 1500
Additional Graffiti Punctuation
@ # % ^ & * < > – + = |
\ { } [ ] ~ ` ; : " tab
Note: When Punctuation Shift is active, you can make a symbol stroke
anywhere in the Graffiti writing area (the letters or numbers side).
Writing Symbols and Extended Characters
All symbols and extended characters begin with the stroke in the Graffiti writing area of your
SPT 1500:
Symbol
Shift
When the Symbol Shift is active, a slanted shift symbol appears in the lower-right corner of
the screen. The next stroke that you make creates the symbol or extended character.
•
+
–
:
X
,
==c
ƒ
,
,
,
,
Y
∅
.
?
!
,
2-13
Page 44

SPT 1500 Product Reference Guide
Writing Accented Characters
T o create accented characters, draw the stroke normally used to letter, followed by an accent
stroke. Graffiti then adds the accent to the letter.
For example, the following diagram shows the strokes required to draw an accented “e.”
= e
Accent Strokes
a a a a a a
Using these accent strokes, you can write the following accented letters:
à á â ã ä å è é ê ‘“’ ” • ò — ô õ ö ù ú û ü – ÿ
Additional Non-English Characters
You can write the following characters in the lowercase alphabet mode without any special
punctuation or shifting:
c
a
e
Note: You must write these non-English characters in the left side of the
Graffiti writing area.
2-14
Page 45

Working with your SPT 1500
Navigation Strokes
In addition to character symbols, Graffiti includes special strokes that you can use to navigate
within text or fields in your SPT 1500 terminal applications.
Command Stroke
Move cursor right
Move cursor left
Previous field
(Address Book only)
Next Field
(Address Book only)
Open Address Record
(Address Book only)
Graffiti ShortCuts
Graffiti’s ShortCuts make entering commonly used words or phrases quick and easy.
ShortCuts are similar to the Glossary or Autotext features of some word processors.
Graffiti comes with several predefined ShortCuts, and you can also create your own. Each
ShortCut can represent up to 45 characters. For example, you might create a ShortCut for
your name, or for the header of a memo. See ShortCuts Preferences on page 11-25 to learn
about creating your own ShortCuts.
T o use a ShortCut, draw the ShortCut stroke followed by the ShortCut characters. When you
draw the ShortCut stroke, the ShortCut symbol appears at the insertion point to show that
you are in ShortCut mode.
ShortCut
Your SPT 1500 terminal includes the following predefined Graffiti ShortCuts:
2-15
Page 46

SPT 1500 Product Reference Guide
Entry ShortCut Entry ShortCut
Date stamp ds Breakfast br
Time stamp ts Lunch lu
Date / time stamp dts Dinner di
Meeting me
For example, if you want to enter the current date and time, you would draw the following
strokes:
Using Application Controls
SPT 1500 applications include several types of controls. Once you become familiar with using
these controls, you can easily select options and navigate through your SPT 1500 terminal
applications. The following table lists the controls and how to use them.
2-16
Check box. When a check mark appears in a check box, the
corresponding option is active. If a check box is empty, tap
it to insert a check mark. If a check box is checked, tapping
it removes the check mark.
Scroll arrows.T ap the up arrow to display the previous page
of information, or tap the down arrow to display the next
page. These arrows perform the same function as pressing
the upper and lower portions of the scroll button on the
front panel of the SPT 1500 terminal.
Pick list.Tap the arrow to display a list of choices, and then
tap an item on the list to select it.
Page 47

Working with your SPT 1500
Button.Tap a button to perform a command. Buttons
appear with different text depending on their function. In
most cases, tapping a button opens or closes a dialog. A
dialog is a screen that appears on your SPT 1500 terminal,
prompting you to enter information or make settings. A
dialog always contains an OK, Cancel or Done button, so
you can close the dialog when you are through with it. The
on-screen keyboard is an example of a dialog.
Scroll bar. Drag the slider to scroll the display one line at a
time. T o scroll to the previous page, tap the arrow at the top
of the scroll bar. T o scroll to the next page, tap the arrow at
the bottom of the scroll bar.
Using Menus
Menus are a special set of commands that are available in most of your SPT 1500 terminal
applications (Memo Pad, Date Book, etc.). The exact commands that appear in the menus
depend on the application that is currently running on your SPT 1500 terminal.
Some menu commands are common to all SPT 1500 terminal applications. The common
menu commands are described in this section; other menu commands are described in the
chapters within this manual about each SPT 1500 terminal application.
To activate the menus:
1. Open a SPT 1500 terminal application (such as the Memo Pad, as described earlier
in this chapter).
2. Tap the icon to open the menus for the application at the top of the screen.
2-17
Page 48

SPT 1500 Product Reference Guide
Tap the Menus icon
In this example, three menus are available: Record, Edit and Options. The Record menu is
selected and contains the “New Memo,” “Delete Memo” and “Beam Memo” commands.
Choosing a Menu
After you activate the menus for an application, tap the menu that contains the command you
want to use.
The menus and menu commands that are available depend on the application that is currently
running on your SPT 1500 terminal. Also, the menus and menu selections vary depending on
which part of the application is currently on the screen. Using the Memo Pad application as
an example, the menus are different for the Memo List screen and the Memo screen.
Graffiti Menu Commands
Most menu commands have Graffiti “Command stroke” equivalents — similar to keyboard
commands on computers. The command letters appear on the right side of the menu
commands.
2-18
Page 49

Working with your SPT 1500
Menu commands
Command letters
To use the Graffiti menu commands, draw the Command stroke followed by the
corresponding command letter . When you draw the Command stroke, the Command symbol
appears just above the Graffiti writing area to indicate that you are in Command mode.
Command
For example, to activate the Select All command in the previous diagram, draw the
Command stroke, followed by the letter “s.”
Note: You do not have to tap the icon or access the menus when you use
the Graffiti menu commands. However, since the Command mode is
active for approximately two seconds, you must write the letter
character immediately to activate the menu command.
Edit Menu Commands
The Edit menu is available with any screen where you enter or edit text. In general, the Edit
Menu commands available in the Edit menu apply to text that you select in an application.
To select text in an application:
1. Tap the beginning of the text that you want to select.
2. Drag the stylus over the text to highlight it (in black).
Note: You can drag across the text to select additional words, or drag down
to select a group of lines.
The following commands may appear in an Edit menu:
2-19
Page 50

SPT 1500 Product Reference Guide
Undo Reverses the action of the last edit command. For
example, if you used the Cut command to remove text,
the Undo command replaces the text you removed.
Cut Removes the selected text and stores it temporarily in
the memory of your SPT 1500 terminal. You can paste
the text you cut into another area of the SPT 1500
terminal application or into a different SPT 1500
terminal application.
Copy Copies the selected text and stores it temporarily in the
memory of your SPT 1500 terminal. You can paste the
text that you copy into another area of the SPT 1500
terminal application or into a different SPT 1500
terminal application.
Paste Inserts the text that you cut or copied at the selected
point in your SPT 1500 terminal application. The Paste
command replaces any selected text. If you did not
previously cut or copy text, the Paste command does
nothing.
Select All Selects all of the text on the current record or screen.
This enables you to cut or copy all of the text and paste
it elsewhere.
Keyboard Opens the on-screen keyboard. When you finish with
the on-screen keyboard, tap the Done button.
Graffiti Help Opens the dialogs that show the Graffiti character
strokes. Use this command any time you forget a stroke
for a particular character.
Choosing Fonts
In most of your SPT 1500 terminal applications, you can change the font style to make the
text on the screen easier to read. You can even choose a different font style for each
application that supports this feature.
Note: The Expense application does not support changing fonts.
To change the font style:
1. Open a SPT 1500 terminal application.
2-20
Page 51

Working with your SPT 1500
2. Tap the icon to open the menus at the top of the screen.
3. Tap Font from the Options menu to open the Select Font dialog.
Tap here for large font
Tap here for bold font
Tap here for small font
4. Tap the font style you want to use.
5. Tap the OK button to close the dialog and return to the application with the new font
style.
Small font
Bold font
Large font
Using Categories
Categories can help you group Address entries, To Do items or Memos for easy review. Y ou
cannot, however, assign categories to Date Book events.
When you first create an entry, it is “Unfiled,” which means it does not belong to any
particular category. You can leave an entry as Unfiled or assign it to a category at any time.
2-21
Page 52

SPT 1500 Product Reference Guide
Either way, the entry is always available until you delete it. The category you choose is used
only for sorting and reviewing records. The category you select does not affect the actual
contents of the record.
Note: The use of categories is optional. You do not need to assign categories
to use SPT 1500 terminal applications.
To assign a category to an entry:
1. Tap a To Do item or Memo, or tap an Address Book entry then tap the Edit button
in the Address View screen.
2. Tap the Details button to open the Details dialog.
3. Tap the Category pick list to display a list of available categories.
4. Tap the category that you want to assign to the entry.
5. Tap the OK button to close the Details dialog and activate your setting.
Using Categories in Lists
After you assign categories to your entries, you can easily display lists of your entries by
category.
To use categories in a List screen:
1. Tap the category pick list in the upper-right corner of the List screen.
2-22
Page 53

Working with your SPT 1500
Tap here
2. Tap the category of entries that you want to view.
Note: The List screen changes to show only the records that you filed in the
selected category.
3. Repeat the previous steps, and tap All in the category pick list to restore the list of
all Address Book entries.
Tip: Pressing the application button on the front panel of the SPT 1500 terminal
toggles through the available categories.
Defining a New Category
Your SPT 1500 terminal comes with two default categories: Business and Personal. In
addition, the Address Book contains the QuickList category , designed as a “quick reference”
of commonly used names, addresses and phone numbers (such as doctor, lawyer, etc.).
You can change the names of these default categories, or add new categories to suit your
needs. You can define up to 15 categories for each application.
To define a new Address Book category:
1. Tap the category pick list in the upper-right corner of the screen.
2-23
Page 54

SPT 1500 Product Reference Guide
Tap here
2. Tap the Edit Categories item to open the Edit Categories dialog.
3. Tap the New button to open another Edit Categories dialog.
4. Enter the name of the new category, and tap the OK button to close the Edit
Categories dialog.
5. Tap the OK button to close the first Edit Categories dialog and view your new
category in the pick list.
Note: You can edit any of your records and file them in the new categories
as appropriate.
2-24
Page 55

Working with your SPT 1500
Renaming Categories
You can also use the Edit Categories dialog to change the names of any existing category.
To change the name of an Address Book category:
1. Tap the category pick list in the upper-right corner of the screen.
2. Tap the Edit Categories item to open the Edit Categories dialog.
3. Tap the category that you want to rename, and then tap the Rename button to open
another Edit Categories dialog.
4. Enter the new name that you want to assign to the category, and tap the OK button
to close the Edit Categories dialog.
5. Tap the OK button to close the first Edit Categories dialog and view the new name
in the pick list.
Note: You can “merge” two or more Categories by assigning them the same
name. For example, if you change the name of the “Personal”
category to the name “Business,” all entries formerly in the Personal
category appear in the Business category.
2-25
Page 56

SPT 1500 Product Reference Guide
Attaching Notes
SPT 1500 terminal applications (except the Memo Pad) enable you to attach a note to an
entry . A note is anything that you want to write, and can be up to several thousand characters
long. For example, if you have an appointment in the Date Book application, you could
attach a note with directions to the location.
To attach a note to an entry:
1. Display the entry where you want to add a note.
2. Tap the Details button to open the Details dialog.
3. Tap the Note button to open the Note dialog.
4. Write Graffiti character strokes (or use the on-screen keyboard) for the text you want
to appear in the note. Use the Carriage Return stroke to move down to new lines in
the note.
5. Tap the Done button to close the note and return to the application screen. A small
note icon appears at the right side of any item that has a note attached. T o review or
edit a note, tap the icon.
Note icon
Marking Private Entries
In SPT 1500 terminal applications you can mark individual entries as Private. Private entries
remain visible and accessible until you change the SPT 1500 terminal Security setting to hide
all Private entries. See Chapter 12, Applications: Security for complete information about
how to activate and use the SPT 1500 terminal Security settings.
To mark an entry as Private:
1. Display the entry that you want to mark as Private.
2. Tap the Details button to open the Details dialog.
3. Select the Private check box to insert a check mark and mark the entry as Private.
2-26
Page 57

Working with your SPT 1500
Beaming Information to Other SPT 1500 Terminals
Your SPT 1500 terminal is equipped with an IR (infrared) port that you can use to “beam”
information from one SPT 1500 terminal to another, and also to other Palm III users. The IR
port is located at the top of the SPT 1500 terminal, next to the laser scanner behind the red
shield. See Figure 1-1 for location of the IR port.
Note: If you are using a device other than an SPT 1500 terminal, please
confirm that your device includes the required infrared hardware
before you use this feature.
You can beam the following information between SPT 1500 terminals:
t The current Address Book, Date Book, To Do List or Memo Pad entry
t All the Address Book, To Do List or Memo Pad entries in the current category
t A special Address Book entry which you designate as your “business card” (see
Beaming Address Entries to Other SPT 1500 terminals on page 4-9 for details)
t An application installed in RAM memory.
To beam information:
1. Locate the entry, category, business card or application you want to beam.
2. Tap the Beam command from the Record menu to open the Beam Status dialog.
3. Point the IR port directly at the IR port of the receiving SPT 1500 terminal.
Tip: For best results, the SPT 1500 terminals should be between approximately 2
inches and 5 inches apart, and the path between the two devices must be clear
of obstacles.
4. Wait for the Beam Status dialog to indicate that the transfer is complete before you
continue working on your SPT 1500 terminal.
2-27
Page 58

SPT 1500 Product Reference Guide
To receive beamed information:
1. Turn on your SPT 1500 terminal.
2. Point the IR port directly at the IR port of the transmitting SPT 1500 terminal to
open the Beam Status dialog.
3. Tap the Yes button to accept the transmission.
4. Wait for the Beam Status dialog to indicate that the transfer is complete, and then
tap the OK button to display the new entry.
Note: Incoming entries are filed under the “Unfiled” category.
2-28
Page 59

Chapter 3
Finding Information With Your SPT 1500 Terminal
Introduction
This chapter explains how to locate information on your SPT 1500 terminal with the Find
command and the Phone Lookup command.
Using the Find Command
The Find command locates any text that you specify and is available in any SPT 1500
terminal application. Y ou can search for whole words or the beginning letters of a word. The
Find command automatically searches all the data on your SPT 1500 terminal and lists which
applications contain the text.
For example, suppose you want to find a particular name, but aren’t sure where you stored
it. The Find command immediately lists all instances of that name and enables you to jump
directly to the name.
To use the Find command:
1. Tap the icon from any SPT 1500 terminal application to open the Find dialog.
Tip: If you select text in a SPT 1500 terminal application before you tap the Find
button, the selected text automatically appears in the Find dialog.
2. Enter the text that you want to find in your SPT 1500 terminal.
3-1
Page 60

SPT 1500 Product Reference Guide
Note: The Find command is not case-sensitive. In other words, searching for
the name “davidson” also finds “Davidson.” The Find command also
searches the contents of notes.
3. Tap the OK button to display a list of all instances of the text that you specified.
Note: As your SPT 1500 terminal searches for the text, you can tap the Stop
button at any time. You may want to do this if the entry you want
appears before your SPT 1500 terminal finishes the search. To
continue the search after you tap Stop, tap the Find More button.
4. Tap the text that you want to review to display the selected entry and its
corresponding SPT 1500 terminal application on the screen.
Using Phone Lookup
In addition to using the Find feature to locate text, you can search for and display phone
numbers with the Phone Lookup menu command. After you find a phone number, you can
paste it directly into a SPT 1500 terminal application.
For example, if you want to include a phone number in a memo, you could use the Phone
Lookup feature to find the phone number and transfer it directly into the memo.
To use the Phone Lookup command:
1. Display the entry where you want to insert a phone number . This can be an event in
the Date Book, a To Do List Item or a memo in the Memo Pad application.
3-2
Page 61

Finding Information with your SPT 1500
Note: The Phone Lookup feature is not available in the Address Book and
Expense applications.
2. Tap the icon to open the menus for your application.
3. Tap Phone Lookup from the Options menu to display the Phone Number Lookup
screen.
4. Tap the phone number you want to use.
Note: To find a phone number more quickly, you can enter the first letter of
the name you want to find in the Look Up line at the bottom of the
screen. The list automatically scrolls to the first name that starts with
that letter. You can continue to add letters to narrow your search.
5. Tap the Add button to close the Phone Number Lookup screen and paste the name
and phone number you selected into the entry you selected in step 1.
Phone Lookup Tips
You can also use the Graffiti® Command stroke “/L” to activate the Phone Lookup feature.
t You can use Phone Lookup while entering text. For example, to insert the full name
and phone number for someone with the last name “Williams,” you would write the
Graffiti characters for “Wi” and then the Phone Lookup Command stroke “/L.”
Assuming you have only one Address Book entry that begins with “Wi,” your SPT
1500 terminal inserts the full name “Williams” (and the corresponding phone
number). If you have more than one name that begins with “Wi,” the Phone Lookup
screen appears.
3-3
Page 62

SPT 1500 Product Reference Guide
t The Phone Lookup feature also works for selected text. Drag to highlight the text,
and then write the Phone Lookup Command stroke Ò/L.Ó Your SPT 1500 terminal
replaces the selected text and adds the phone number to the name that it Þnds.
3-4
Page 63

Chapter 4
Applications: Address Book
Introduction
The Address Book enables you to keep names, addresses, phone numbers and other
information about your personal or business contacts.
With the Address Book, you can:
t Quickly look up or enter names, addresses, phone numbers and other information.
t Enter up to five phone numbers (home, work, fax, car, etc.) or e-mail addresses for
each name.
t Define which phone numbers appear in the Address List screen for each Address
Book entry.
t Attach a note to each Address Book entry where you can enter additional
information about the entry.
t Assign categories to your Address Book entries, so you can quickly sort and view
your entries in logical groups.
T o open the Address Book, press the Address Book button on the front panel of the SPT 1500
terminal to display the Address Book on the screen.
4-1
Page 64

SPT 1500 Product Reference Guide
A
P
S
P
N
L
O
I
I
T
C
A
a
b
c
M
U
N
E
C
A
R
L
O
C
T
A
U
L
3
2
F
I
D
N
1
Address button
Getting Started With Address Book Entries
An Address Book entry is where you store name and address information about people or
businesses. Your SPT 1500 terminal makes it easy to create, edit and delete Address Book
entries.
Creating an Address Book Entry
You can create Address Book entries on your SPT 1500 terminal, or you can use the Palm™
Desktop software to create Address Book entries on your computer and download the entries
to your SPT 1500 terminal with the next HotSync® operation. See Chapter 8, Applications:
HotSync® for details.
Note: The Palm Desktop software also has data import capabilities that
enable you to load database files into the Address Book
on your SPT 1500 terminal. Refer to the online documentation
supplied with the Palm Desktop software for details.
To create a new Address Book entry:
1. Press the button on the front of your SPT 1500 terminal to display the Address
List screen.
2. Tap the New button to display the Address Edit screen.
4-2
Page 65

Applications: Address Book
Cursor
at Last
name
Tap New
3. Enter the last name of the person you want to add to your Address Book.
Note: Your SPT 1500 terminal automatically capitalizes the first letter of
each field (except numeric and e-mail fields). You do not have to use
the Graffiti® capital stroke to capitalize the first letter of the name.
4. Use the Next Field Graffiti stroke to move to the First Name field.
Next Field
Note: You can also move to any field by tapping it directly.
5. Enter the person's first name in the First Name field.
6. Repeat steps 4 and 5 to enter the other information that you want to include in this
Address Book entry.
7. Tap the arrows to move to the next page of information.
8. After you finish entering information, tap the Done button to return to the Address
List screen.
4-3
Page 66

SPT 1500 Product Reference Guide
Tap Done
Tip: You can create an Address Book entry that always appears at the top of the
list by beginning the Last name (or Company name) field with a blank space.
For example, you might create an “If Found Call” entry that contains your
name and phone number in case you lose your SPT 1500 terminal.
Editing an Address Book Entry
After you create an Address Book entry, you can update it or enter additional information
any time.
To edit an Address Book entry:
1. Tap the Address Book entry that you want to change to display the Address View
screen for that entry.
2. Tap the Edit button (or anywhere on the screen) to display the Address Edit screen.
3. Tap any field (Address, City, etc.) and enter or change the information.
4-4
Page 67

Applications: Address Book
4. After you finish, tap the Done button to return to the Address
List screen.
Deleting an Address Book Entry
There are two ways to delete an entry: use the Menu Commands (described in the Record
Menu section of this chapter) or use the Address Entry Details dialog.
To delete an entry with the Address Entry Details dialog:
1. Tap the Address Book entry that you want to delete to display the Address View
screen for that entry.
2. Tap the Edit button to display the Address Edit screen.
3. Tap the Details button to open the Event Details dialog.
4. Tap the Delete button to open the Delete Address alert.
5. Tap the OK button to confirm you want to delete the entry.
Working With Address Book Entries
Y our SPT 1500 terminal enables you to quickly find your Address Book entries, group them
by category , and display the entries by name or company name. You can also choose the type
of information you want your entries to include and exchange Address Book information
with other SPT 1500 terminal users.
Looking Up Address Book Entries
When working with the Address Book, the scroll button on the front panel of the SPT 1500
terminal makes it easy to navigate among your address entries. In the Address List screen, the
scroll button moves up or down an entire screen of address entries. If you hold down the
scroll button, you accelerate the scrolling so that it displays every third screen. In the Address
View screen, the scroll button moves to the previous or next address entry.
You can also use the Address List Look Up feature to quickly scroll to any of your Address
Book entries.
To Look Up an Address Book entry:
1. Display the Address List screen.
2. Enter the first letter of the name you want to find.
4-5
Page 68

SPT 1500 Product Reference Guide
Look Up line
Note: The letter appears on the Look Up line and the list scrolls to the first
entry that begins with that letter. If you write another letter, the list
scrolls to the first entry that starts with those two letters. For example,
writing an “s” might scroll to “Sands,” and writing “sm” might scroll
further to “Smith.” If you sort the list by company name, the Look
Up feature scrolls to the first letter of the company name.
3. Tap any entry to view its contents, or use the carriage return stroke to view the
selected entry.
Choosing Types of Phone Numbers
Your SPT 1500 terminal enables you to choose the types of phone numbers or e-mail
addresses that you associate with an Address Book entry. Any changes you make apply only
to the current Address Book entry.
To choose other types of phone numbers in an Address Book entry:
1. Tap the Address Book entry that you want to change to display the Address View
screen for that entry.
2. Tap the Edit button to display the Address Edit screen for that entry.
3. Tap the pick list next to the label you want to change.
4-6
Page 69

Applications: Address Book
Tap
triangle
4. Tap the new label you want to use.
Assigning Address Categories
Categories can help you file individual Address Book entries into groups for easy review . You
can assign and edit categories in the Address Book or by using the Categories pick list in the
Details dialog (see Using Categories on page 2-21 for a complete description of categories).
To assign a category to an Address Book entry:
1. Tap the Address Book entry you want to assign to a category.
2. Tap the Edit button in the Address View screen to display the Address Edit screen.
3. Tap the pick list in the upper-right corner and tap the category that you want to
assign to the Address Book entry.
Sorting by Name or Company
You can sort the entries in the Address List screen by Company and Last Name, rather than
by Last Name and First Name. These settings do not change your Address Book data in any
way; they merely change the view.
To sort the entries in the Address List screen:
1. Display the Address List screen.
2. Tap the icon to open the Address Book menus.
3. Tap Preferences from the Options menu to open the Address Book Preferences
dialog.
4-7
Page 70

SPT 1500 Product Reference Guide
4. Tap the setting that you want for the Address List screen.
5. Tap the OK button to display the Address List screen with your new setting.
Note: Entries with no company name sort by last name.
Changing Address Entry Details
The Address Entry Details dialog provides a variety of options that you can associate with an
Address entry.
To open the Address Entry Details dialog:
1. Tap an Address Book entry to display the Address View screen for that entry.
2. Tap the Edit button to display the Address Edit screen.
3. Tap the Details button to open the Address Entry Details dialog.
4. Select any of the following settings:
Show in List Choose which type of phone or other information appears
on the Address List screen for the current entry. Your
options are: Work, Home, Fax, Other and E-mail.
Category Assign the entry to a particular category. Your options
are: Business, Personal, QuickList, Unfiled and Edit
Categories.
Private Hide this entry when the security features are turned on.
4-8
Page 71

Applications: Address Book
Beaming Address Entries to Other SPT 1500 terminals
The IR port on your SPT 1500 terminal enables you to beam Address Book entries to other
SPT 1500 terminals. You can beam any of the following:
t Business card. A specially designated entry containing information you want to
exchange with business contacts. Y ou can send your business card quickly with onetouch beaming.
t Current address entry. The entry currently selected on your SPT 1500 terminal. For
example, you may want to beam the name of a business contact to a coworker who
also uses a SPT 1500 terminal.
t Category of address entries. All of the entries that you have assigned to the selected
category . For example, you might want to share your list of restaurants with a friend.
Note: For more on the IR port, see Beaming Information to Other SPT
1500 Terminals on page 2-27.
To select a business card:
1. Create an Address Book entry containing the information you want on your business
card.
2. Tap your business card entry to display the Address View screen for that entry.
3. Tap the icon to open the Address Book menus.
4. Tap Select Business Card from the Record menu, and tap Yes to accept this entry as
your business card.
To beam a business card:
1. Tap your business card entry to display the Address View screen for that entry.
2. Tap the icon to open the Address Book menus.
3. Tap Beam Business Card from the Record menu to beam your card to another SPT
1500 terminal.
Tip:You can press the button for about two seconds to beam your card.
To beam the current entry:
1. Tap an Address Book entry that you want to beam to display the Address View
screen for that entry.
2. Tap the icon to open the Address Book menus.
4-9
Page 72

SPT 1500 Product Reference Guide
3. Tap Beam Address from the Record menu to beam the current entry to another SPT
1500 terminal through the IR port.
Tip: You can set the full-screen pen stroke to beam the current entry. See “Pen
Preferences” for details.
To beam the current category:
1. Display the Address List screen.
2. Tap the pick list in the upper-right corner and tap the category you want to beam to
display the entries in that category.
3. Tap the icon to open the Address Book menus.
4. Tap Beam Category from the Record menu to beam the entries in the current
category to another SPT 1500 terminal through the IR port.
Address Book Menu Commands
The Address Book includes menu commands to make it fast and easy to perform common file
and editing tasks. This section explains the menu commands that are specific to the Address
Book.
Refer to Using Menus on page 2-17 for information about menu commands that are common
to all of your SPT 1500 terminal applications.
Record Menu
When you select the Record menu, its commands appear on the screen. The menu commands
are slightly different depending on the current screen.
Address List
Address View
4-10
Page 73

Applications: Address Book
Delete Address Opens an alert dialog prompting you to confirm deletion
of the current entry . T ap the OK button to delete the entry
from your SPT 1500 terminal, or tap the Cancel button to
close the alert dialog and keep the entry.
Note: By default, your SPT 1500 terminal removes the
entry from the Address Book, but retains a copy of
the entry and transfers it to an archive file on your
computer the next time you perform a HotSync
operation. To remove the entry completely, clear
the Save archive copy on PC check box.
Attach Note Opens the Address Book Note dialog where you can
create a Note for the current entry.
Delete Note Opens an alert dialog prompting you to confirm deletion
of the Note attached to the entry. Tap the OK button to
delete the Note, or tap the Cancel button to close the alert
dialog and keep the note.
Beam Address Beams the current Address Book entry to another SPT
1500 terminal through the IR port.
Beam Category Beams all Address Book entries in the current category to
another SPT 1500 terminal through the IR port.
Select Business
Card
Beam Business
Card
Enables you to select the current Address Book entry as
your business card. To beam your business card to other
SPT 1500 terminals, use the Beam Business Card
command.
Sends the current business card to another SPT 1500
terminal through the IR port. You can also initiate this
command by holding down the Address Book button for
at least two seconds. This is a convenient way to exchange
business cards with other SPT 1500 terminal users.
4-11
Page 74

SPT 1500 Product Reference Guide
Options Menu
When you select the Options menu, its commands appear on screen.
Address List
Font Opens the Select Font dialog where you can choose a
different font (text) style for your Address Book entries.
See Choosing Fonts on page 2-20 for details.
Preferences Opens the Address Book Preferences dialog.
t Remember last category. Determines how the
Address Book appears when you return from
another Palm application (Memo Pad, To Do
List, etc.). If you select this check box, the
Address Book shows the last category you
selected. When you clear it, the Address Book
shows the address entries for all categories.
t List By. Determines whether address entries sort
by last name, first name or by company name,
last name in the Address List screen.
Address View
4-12
Page 75

Applications: Address Book
Rename Custom
Fields
About Address
Book
Enables you to define custom field names. Each Address
Book entry contains four “custom fields” that you can
rename. Any changes you make to the names of the
custom fields appear in all of your Address Book entries.
Shows version (revision) information for the Address
Book application.
4-13
Page 76

SPT 1500 Product Reference Guide
4-14
Page 77

Chapter 5
Applications: Calculator
Introduction
The Calculator enables you to perform basic calculations. You can also store and retrieve
values in the Calculator’s memory.
To open the Calculator tap the icon next to the Graffiti® area.
Using the Calculator Screen
The Calculator is designed to perform addition, subtraction, multiplication and division
operations.
T o use the Calculator screen, use your fingers or the stylus to tap the Calculator buttons that
appear on the screen.
5-1
Page 78

SPT 1500 Product Reference Guide
Special Calculator Buttons
The Calculator includes several buttons to help you perform calculations.
Clears the last number you entered. Use this button if you
make a mistake while entering a number in the middle of a
calculation. This button enables you to re-enter the number
without starting the calculation over.
Clears the entire calculation and enables you to begin a
fresh calculation.
Toggles the current number between a negative and
positive value. If you want to enter a negative number,
enter the number first and then press the +/- button.
Places the current number into Memory. Each
new number you enter with the M+ button is
added to the total already stored in memory. The number
that you add can be either a calculated value, or any
number you enter by pressing the number buttons. Pressing
this button has no effect on the current calculation (or
series of calculations); it merely places the value into
memory until it is recalled.
Recalls the stored value from memory and inserts it in the
current calculation.
Removes any value that is stored in the Calculator memory .
Calculator Menu Commands
The Calculator supports the Copy and Paste commands. You can use these commands to
copy a value from the Calculator and paste it into another application on your SPT 1500
terminal. Similarly , you can copy values from other applications on your SPT 1500 terminal,
such as Expense, and paste the values into the Calculator. For additional information on the
Copy and Paste commands, see Using Menus on page 2-17.
Recent Calculations
The Recent Calculations command enables you to review the last series of calculations, and
is particularly useful for confirming a series of “chain” calculations.
5-2
Page 79

Applications: Calculator
To display the Recent Calculations:
1. Tap the icon to open the Calculator menus.
2. Tap Recent Calculations from the Options menu to display the Recent Calculations
screen.
3. After you finish reviewing the dialog, tap the OK button to close the Recent
Calculations dialog and return to the Calculator.
5-3
Page 80

SPT 1500 Product Reference Guide
5-4
Page 81

Chapter 6
Applications: Date Book
Introduction
The Date Book enables you to quickly and easily schedule appointments or any kind of
activity associated with a time and date.
With the Date Book, you can:
t Enter a description of your appointment and assign it to a specific time and date.
t Display a chart of your appointments for an entire week. The Week View feature
makes it easy to spot any potential scheduling overlaps or conflicts.
t Display a monthly calendar to quickly spot days where you have morning, lunch or
afternoon appointments.
t Set an alarm to sound prior to the scheduled activity.
t Create reminders for events that are based on a particular date, rather than time of
day. Birthdays and anniversaries are easy to track with your SPT 1500 terminal.
t Attach notes to individual events for a description or clarification of the entry in your
Date Book.
To open the Date Book, press the Date Book button on the front panel of the SPT 1500
terminal.
6-1
Page 82

SPT 1500 Product Reference Guide
A
P
S
P
N
L
O
I
I
T
C
A
a
b
c
M
U
N
E
C
A
R
L
O
C
T
A
U
L
3
2
F
I
D
N
1
Date Book button
Scheduling an Event
An event can be any kind of activity that you associate with a day . When the Date Book screen
first appears, it shows the current date and a list of times for a normal business day . You can
enter a new event on any of the available time lines.
When you create an event, its description appears on the time line, and its duration is
automatically set to one hour . Y ou can easily change the start time and duration for any event.
You can also include events in your Date Book that occur on a particular date but have no
specific start or end times, such as birthdays, holidays and anniversaries. These are referred
to as untimed events. Untimed events appear at the top of the Date Book screen with a
diamond in the time list. You can have several untimed events on a particular date.
To schedule an event for the current day:
1. Tap the time line that corresponds to your event in the Date Book screen.
6-2
Tap a time
line
Time bar
shows
duration
Enter event
Page 83

Applications: Date Book
2. Use the stylus to write Graffiti® character strokes (or the on-screen keyboard) to
describe your event. You can enter up to 255 characters.
3. If your appointment is longer or shorter than an hour, tap the time of the event to
open the Set Time dialog. If your appointment is one hour long, skip to step 7.
Note: You can also open the Set Time dialog (to select a start time) by
making sure no event is selected, and then writing a number on the
number side of the Graffiti writing area.
Tap the time
of an event
4. Tap the time columns on the right side of the Set Time dialog to set the Start Time.
Start Time
highlighted
Tap to scroll to
earlier hours
Tap to change hours
Tap to change
minutes
Tap to scroll to later
hours
5. Tap the End Time box, and then tap the time columns to set the End Time.
6. Tap the OK button to confirm your selection and close the Set Time dialog.
6-3
Page 84

SPT 1500 Product Reference Guide
7. Tap a blank area of the screen to de-select the event. A vertical line appears next to
the time, indicating the duration of the event.
To schedule an event for another day:
1. Select the date you want for the event by doing one of the following:
s T ap the day of the week that you want in the Date Bar at the top of the Date Book
screen. If necessary, tap the Previous week or Next week scroll bars to move to
another week.
Previous
week
Next
week
Tap to select the day of the
current week
s Tap the Go To button to open the Go to Date dialog. Select a date by tapping a
year, month and day in the calendar.
Previous year Next year
Tap to scroll to
earlier hours
Tap to scroll to
earlier hours
Tap to select
current date
s Press the scroll button on the front panel of the SPT 1500 terminal to scroll to
another day . Press the upper half of the button to move to the previous day or the
lower half to move to the next day.
2. After you locate the date, follow the steps described in the previous section, To
schedule an event for the current day:.
To schedule an untimed event:
1. Select the date that you want for the event as described in the previous section, To
schedule an event for another day:.
2. Tap New to open the Set Time dialog.
6-4
Page 85

Applications: Date Book
3. Tap OK, so that no start or end times are defined for the new event.
Note: You can also create a new untimed event by making sure no event is
selected, and then writing letters in the Graffiti writing area.
4. Enter a description for the event (which appears at the top of the Date Book screen).
New
untimed
event
No time
selected
5. Tap a blank area on the screen to de-select the untimed event.
Note: If you create an event and decide later that there is no particular start
or end time, you can easily change it to an untimed event. T ap the time
of the event in the Date Book screen, tap the No Time button, and
then tap the OK button to confirm your selection and close the Set
Time dialog.
6-5
Page 86

SPT 1500 Product Reference Guide
Rescheduling an Event
You can easily make changes to your schedule with your SPT 1500 terminal.
To reschedule an event:
1. Tap the event you want to reschedule.
2. Tap the Details button to open the Event Details dialog for that event.
3. To change the time, tap the Time box and select the new time as described earlier in
this chapter.
4. To change the date, tap the Date box and select the new date as described earlier in
this chapter.
5. Tap the OK button to close the Event Details dialog and return to the Date Book
screen.
Setting an Alarm for an Event
The Alarm setting enables you to set an audible alarm for events in your Date Book. Y ou can
set an alarm to sound minutes, hours or days before an event. The default Alarm setting is 5
minutes before the time of the event, but you can change this to any number of minutes, hours
or days.
When you set an alarm, an icon appears to the far right of the event with the alarm. When
the alarm tone sounds, a reminder message also appears on the SPT 1500 terminal screen.
To set an alarm for an event:
1. Tap the event to which you want to assign an alarm.
2. Tap the Details button to open the Event Details dialog for that event.
3. Select the Alarm check box in the Event Details dialog to activate the alarm.
4. Tap the Alarm units pick list to select Minutes, Hours or Days.
5. Select the “5” and enter any number from 0 to 99 (inclusive) as the numeric alarm
setting.
6-6
Page 87

Applications: Date Book
Enter numeric
setting here
Tap here to
select alarm unit
6. Tap the OK button to close the Event Details dialog and return to the Date Book
screen.
Note: You can set a silent alarm for an untimed event. In this case, the alarm
triggers at the specified period of minutes, hours or days before
midnight (beginning) of the day of the untimed event. No audible
alarm sounds for an untimed event; instead, the reminder message
appears on the screen of the SPT 1500 terminal.
For example, you could create a reminder for an untimed event that occurs on February 4th.
If the alarm reminder is set for 5 minutes, the alarm reminder appears at 11:55 PM on the
night of February 3rd. The reminder remains on the screen until you turn on your SPT 1500
terminal and tap the OK button to dismiss it.
Scheduling Repeating Events
The Repeat function enables you to schedule events that recur at regular intervals. A birthday
is a good example of an event that repeats annually. Another example would be a weekly
guitar lesson that falls on the same day of the week and the same time of day . After you enter
a repeating event, a icon appears to the far right of the event.
To schedule a repeating event:
1. Tap anywhere on the text of an event in the Date Book screen.
2. Tap the Details button to open the Event Details dialog.
3. Tap the Repeat box in the Event Details dialog to open the Change Repeat dialog.
6-7
Page 88

SPT 1500 Product Reference Guide
Tap the
Repeat
box
4. Tap Day, Week, Month or Year in the Change Repeat dialog.
5. Enter a number that corresponds to how often you want the event to repeat in the
“Every” area. For example, if you select Month and enter the number “2,” the event
repeats every other month.
6. If you want to specify an ending date for the repeating event, tap the End on pick list
and tap Choose Date. Use the Date Picker to select an end date.
7. Tap the OK button to close the Change Repeat dialog and activate your settings.
Considerations for the Repeat Function
t If you change the start date of a repeating event, your SPT 1500 terminal calculates
the number of days you have moved the event. Your SPT 1500 terminal then
automatically changes the end date to maintain the duration of the repeating event.
t If you change the repeat type (e.g., daily to weekly) of a repeating event, past
occurrences (prior to the day on which you change the setting) are left alone and your
SPT 1500 terminal creates a new repeating event.
t If you change the date of an occurrence of a repeating event (e.g., from January 14th
to January 15th) and apply the change to all occurrences, the new date becomes the
start date of the repeating event. Your SPT 1500 terminal adjusts the end date to
maintain the duration of the event.
t If you change other repeat settings (e.g., time, alarm, private) of a repeating event
and apply the change to all occurrences, your SPT 1500 terminal creates a new event.
The start date of this new event is the day on which the setting is changed. Past
occurrences (prior to the day of the change) are left alone and not changed.
t If you make a change to one occurrence of a repeating event (e.g., time), that
occurrence no longer shows the Repeat icon.
6-8
Page 89

Applications: Date Book
Marking a Private Event
Y ou can designate a specific event as “private.” When you activate the Security features, your
SPT 1500 terminal hides all private entries and you must enter a password to display them
on the screen.
To mark an event as private:
1. Tap the event you want to mark as private.
2. Tap the Details button to open the Event Details dialog for that event.
3. Select the Private check box.
4. Tap the OK button to close the Event Details dialog and return to the Date Book
screen.
Deleting an Event
There are three ways to delete an event from the Date Book application: simply delete the text
of the event, use the Menu Commands (described in the Record Menu section later in this
chapter), or use the Event Details dialog.
Note: If you delete the text of a repeating event, you delete all instances of
that event. If you use the Menu Command or the Event Details dialog,
you can delete one occurrence of the event (as an exception) or all
occurrences.
To delete an event with the Event Details dialog:
1. Tap anywhere in the text area of the event to delete.
2. Tap the Details button to open the Event Details dialog.
3. Tap the Delete button to open the Delete Event alert.
4. Tap the OK button to confirm you want to delete the event.
Changing the Date Book View
In addition to displaying the calendar for a specific day , you can also display your Date Book
by the week or month, and you can display the current time.
6-9
Page 90

SPT 1500 Product Reference Guide
To toggle through the different views, press the Date Book button repeatedly to display the
next view.
T o display the current time tap the date in the Date Book title bar to display the current time.
Tap the date Current time displays
Note: After a few seconds, the title bar reverts to show the date.
W orking in W eek View
The Week View shows a chart of your events for an entire week. This view lets you quickly
review your appointments and available time slots.
In addition, the graphical display helps you spot overlaps and conflicts in your schedule.
To display the Week View:
1. Tap the Week View button in the Date Book screen to display the Week View.
Week view
2. Tap the navigation controls to move forward or backward a week at a time, or to
display details of an event.
Note: The Week View also shows untimed events and events that are before
and after the range of times shown.
6-10
Page 91

Applications: Date Book
Previous
week
Next
week
Tap for that day
Bar indicates event above display
Dot indicates untimed event
Bar indicates event below display
3. Tap any of your events to show a description of the event.
Event details
Tap to show Event details
If you want to reschedule an event, tap and drag the event to a different time or day.
You can tap a blank time on any day to move to that day and have the time selected for a
new event. Or you can tap any of the days and dates that appear at the top of the W eek V iew
to move directly to that day without selecting an event.
The Week View shows the time span defined by the Start Time and End Time in the Date
Book Preferences settings. If you have an event before or after this time span, a bar appears
at the top or bottom of that day's column, and these on-screen scroll arrows appear if your
scheduled events go beyond the displayed time range.
Spotting Event Conflicts in Week View
With the ability to define specific start and end times for any event, it’s possible to schedule
events that overlap (an event that starts before a previous event finishes).
6-11
Page 92

SPT 1500 Product Reference Guide
In this case, any event conflict (time overlap) appears in the W eek View as overlapping bars.
The Day View displays bracketed bars to the left of the conflicting times.
Event
conflicts
Working in Month View
The Month View screen shows which days have events scheduled. Dots and lines in the
Month View indicate events, repeating events and untimed events.
Previous/next month
Dashed line indicates daily repeating event
Dots on right side indicate events
Dot below date indicates untimed events
Month view button
T ap any day that appears in the Month View screen to move directly to that day with the Day
View screen. Tap the arrows at the top to move forward or backward a month. Tap the Go
to button to open the Date Picker and choose a different month.
When the Month View is on the screen, you can use the scroll button on the front panel of
the SPT 1500 terminal to move between months. Press the upper half of the button to display
the previous month, or press the lower half to display the next month.
6-12
Page 93

Applications: Date Book
Note: You can control the dots and lines that appear in the Month View. See
“Options Menu” later in this chapter.
Date Book Menu Commands
The Date Book includes menu commands to perform common file and editing tasks. This
section explains the menu commands that are specific to the Date Book.
See Using Menus on page 2-17 for information about menu commands common to all of
your SPT 1500 terminal applications.
Record Menu
When you select the Record menu, its commands appear on screen.
New Event Creates an event and opens the Set Time dialog where
you can choose start and end times for the new event.
If you do not enter start and end times, it creates a
blank untimed event.
Delete Event Opens an alert dialog, prompting you to confirm that
you want to delete the current event. Y ou must tap an
event before you use the Delete Event command. Tap
the OK button to delete the event from your SPT 1500
terminal, or tap the Cancel button to close the alert
dialog and keep the event.
Note: By default your SPT 1500 terminal removes the
event from the Date Book, but retains a copy of
the event and transfers it to an archive file on
your computer the next time you perform a
HotSync
completely, clear the Save archive copy on PC
check box.
®
operation. To remove the event
6-13
Page 94

SPT 1500 Product Reference Guide
Attach Note Opens the Note dialog, where you can create a Note
for the current event.
Delete Note Opens an alert dialog, prompting you to confirm that
you really want to delete the Note attached to the
event. T ap the OK button to delete the Note from the
memory of your SPT 1500 terminal, or tap the Cancel
button to close the alert dialog and return to the Date
Book.
Purge Opens an alert dialog, prompting you to confirm that
you want to purge events older than a certain time
period — based on the current date on the internal
clock on the SPT 1500 terminal. Y ou can use the Purge
command to conserve memory on your SPT 1500
terminal. The default setting for the Purge alert is to
“Save archive copy on PC.” This setting removes
events from the Date Book, but retains copies and
transfers them to an archive file on your computer
during the next HotSync operation.
Note: The Purge command also deletes repeating
events if they end before the date that you
activate the Purge command.
Beam Event Beams the current event to another terminal through
the IR port. See Beaming Information to Other SPT
1500 Terminals on page 2-27 for more information.
Options Menu
When you select the Options menu, its commands appear on screen.
Font Opens the Select Font dialog where you can choose a
different font (text) style for your Date Book entries. See
Choosing Fonts on page 2-20 for details.
6-14
Page 95

Applications: Date Book
Preferences Enables you to set the range of times that appear in the
Date Book, and to automatically activate alarms for each
event.
t Start/End Time. Enables you to define the start
and end times for the Date Book screens. If the
time slots you select do not fit on one screen,
you can tap the arrows to scroll up and
down.
t Alarm Preset. Automatically sets an alarm for
each new event. The alarm for untimed events is
defined by minutes, days or hours before
midnight of the date associated with the event.
t Alarm sound. Controls the type of tone the
alarm generates when it sounds.
t Remind me. Defines how many times the alarm
sounds. The choices are: Once, T wice, 3 times, 5
times and 10 times.
t Play every. Defines how often the alarm sounds.
The choices are every: Minute,
5 minutes, 10 minutes and 30 minutes.
6-15
Page 96

SPT 1500 Product Reference Guide
Display Options Allows you to change the Date Book’s appearance and
which events display.
t Show Time Bars. Activates the time bars that
appear in the Day View. The time bars show the
duration of an event and illustrate event
conflicts.
t Compress Day View. Controls how times
appear in the Day View. When Compress Day
View is off, all time slots display. When it is on,
start and end times display for each event, but
blank time slots toward the bottom of the screen
disappear to minimize scrolling.
t Month View settings. These check boxes apply
to the Month View of the Date Book. You can
activate any or all of these settings to show that
you have Timed, Untimed or Daily Repeating
events in the Month View only.
Phone Lookup Activates the Phone Lookup feature. See Using Phone
Lookup on page 3-2.
About Date Book Shows version (revision) information for the Date Book
application.
6-16
Page 97

Chapter 7
Applications: Expense
Introduction
The Expense application enables you to keep track of your expenses and then transfer the
information to a spreadsheet on your computer.
With the Expense application you can:
t Record dates, type of expenses, amount spent, payment method and other details
associated with any money that you spend.
t Create categories for your expenses, such as business and personal expenses
associated with a range of dates.
t Keep track of vendors (companies) and people involved with each particular
expense.
t Log miles traveled for a particular date or expense category.
t Sort your expenses by date or expense type.
t Transfer your expense information to a Microsoft
or later) on your computer. (Microsoft Excel is not included with the SPT 1500
organizer package.)
To open Expense:
®
Excel spreadsheet (version 5.0
1. Tap the icon to open the Applications Launcher.
2. Tap the icon to display the Expense List screen.
7-1
Page 98

SPT 1500 Product Reference Guide
Creating an Expense Item
Expense enables you to record the date, expense type and the amount that you spent. You
can sort your expense items into categories or add other information that you want to
associate with the item.
To create an expense item:
1. Tap the New button in the Expense List to create a new item.
Cursor of
new item
Tap New
Note: You can also create a new expense item by writing on the number side
of the Graffiti® pad while in the Expense List screen. The first number
you write begins your new expense item.
2. Enter the amount of the expense.
3. Tap the Expense Type pick list and select a type from the list.
Tap here
7-2
Page 99

Applications: Expense
Note: As soon as you select an expense type, your SPT 1500 organizer saves
your entry. If you do not select an expense type, it does not save the
entry.
Tip: A quick way to create a new expense item is to make sure that no expense
item is selected in the Expense List, write the first letter(s) of the expense
type, and then write the numerical amount of the expense item. This
technique takes advantage of the automatic fill feature. See Options Menu
later in this chapter for details.
Changing the Expense Item Date
Initially , expense items appear with the date you enter them on your SPT 1500 organizer. You
can use the Expense application to change the date associated with any expense item.
To change the date of an expense item:
1. Tap the expense item you want to change to highlight the date.
2. Tap the date of the selected item to open the Date dialog.
Tap date
3. Tap the date you want for the expense item.
For more information about the Date dialog, see Scheduling an Event on page 6-2.
Entering Receipt Details
The Expense application provides a variety of options that you can associate with an item.
These options appear in the Receipt Details dialog.
To open the Receipt Details dialog:
7-3
Page 100

SPT 1500 Product Reference Guide
1. Tap the expense item you want to assign details.
2. Tap the Details button to open the Receipt Details dialog.
3. Select any of the following options:
Category Defines the category for the Expense item. The default
Category is Unfiled when All is selected. Otherwise,
the default is the currently selected Category. An
expense item remains in the default category until you
change it.
Your SPT 1500 organizer provides two sample
categories, New York and Paris, to show how you
might sort your expenses according to different
business trips.
Choose Edit Categories from the pick list to change
existing or to create new expense categories. For
example, you might create a category for a range of
dates, such as a week or month, or you might delete or
rename the New York and Paris categories.
Type Opens a pick list of the expense type options so that
you can change the expense type for any of your
expense items.
Payment Enables you to choose the payment method used to
pay the expense item. If the item is prepaid (such as
airline tickets supplied by your company), you can
choose Prepaid to place your expense in the
appropriate company-paid cell of your printed
expense report spreadsheet. See Transferring Your
Data to Microsoft Excel later in this chapter for more
information.
7-4
 Loading...