

Page 1
USER GUIDE
Page 2

3300 ICP
Page 3

Notice
The information contained in this document is believed to be accurate in all respects but is not warranted by Mitel Networks® Corporation. The
information is subject to change without notice and should not be construed in any way as a commitment by Mitel Networks or any of its affiliates or
subsidiaries. Mitel Networks and its affiliates and subsidiaries assume no responsibility for any errors or omissions in this document. Revisions of this
document or new editions of it may be issued to incorporate any such changes.
Nothing in this document may be reproduced in any manner, either wholly or in part for any use whatsoever, without written permission from Mitel
Networks Corporation.
Copyright© 2002, Mitel Networks Corporation. All rights reserved.
Page 4

Contents
ABOUT YOUR PHONE
Softkeys 2
BATTERY OPERATIONS
Charging the Battery 3
Removing the Battery 3
Replacing the Battery 4
BASIC FUNCTIONS
Power On 5
Login 6
Logout 6
LCD Icons 7
Make a Call 7
Using the Phonebook 8
Using Speak@Ease 8
Redial 9
Speed Call 10
Adjust Call Volume 10
Receive a Call 11
Auto Answer 11
End a Call 11
Keyguard 12
Power Off 12
1
2
5
PHONE SETTINGS
Ring Type 13
Ring Tone 13
Key Volume 14
Backlight 14
Contrast 14
13
-i-
Page 5

CALL OPERATIONS
Transfer Call 16
Conference Call 16
Hold 17
Off Hold 17
Cancel 17
Redial 17
Message 18
Superkey 19
Agent Login 19
Call Forwarding 20
Call Forward - Remote 21
Timed Reminder 22
Advisory Messages 23
Remote Messages 23
Music 23
Do Not Disturb 24
Auto Answer 24
Night Service 25
Set Password 25
Language Selection 26
Account Codes 26
15
PATENTS
FEATURE ACCESS CODES
27
28
-ii-
Page 6
ABOUT YOUR PHONE
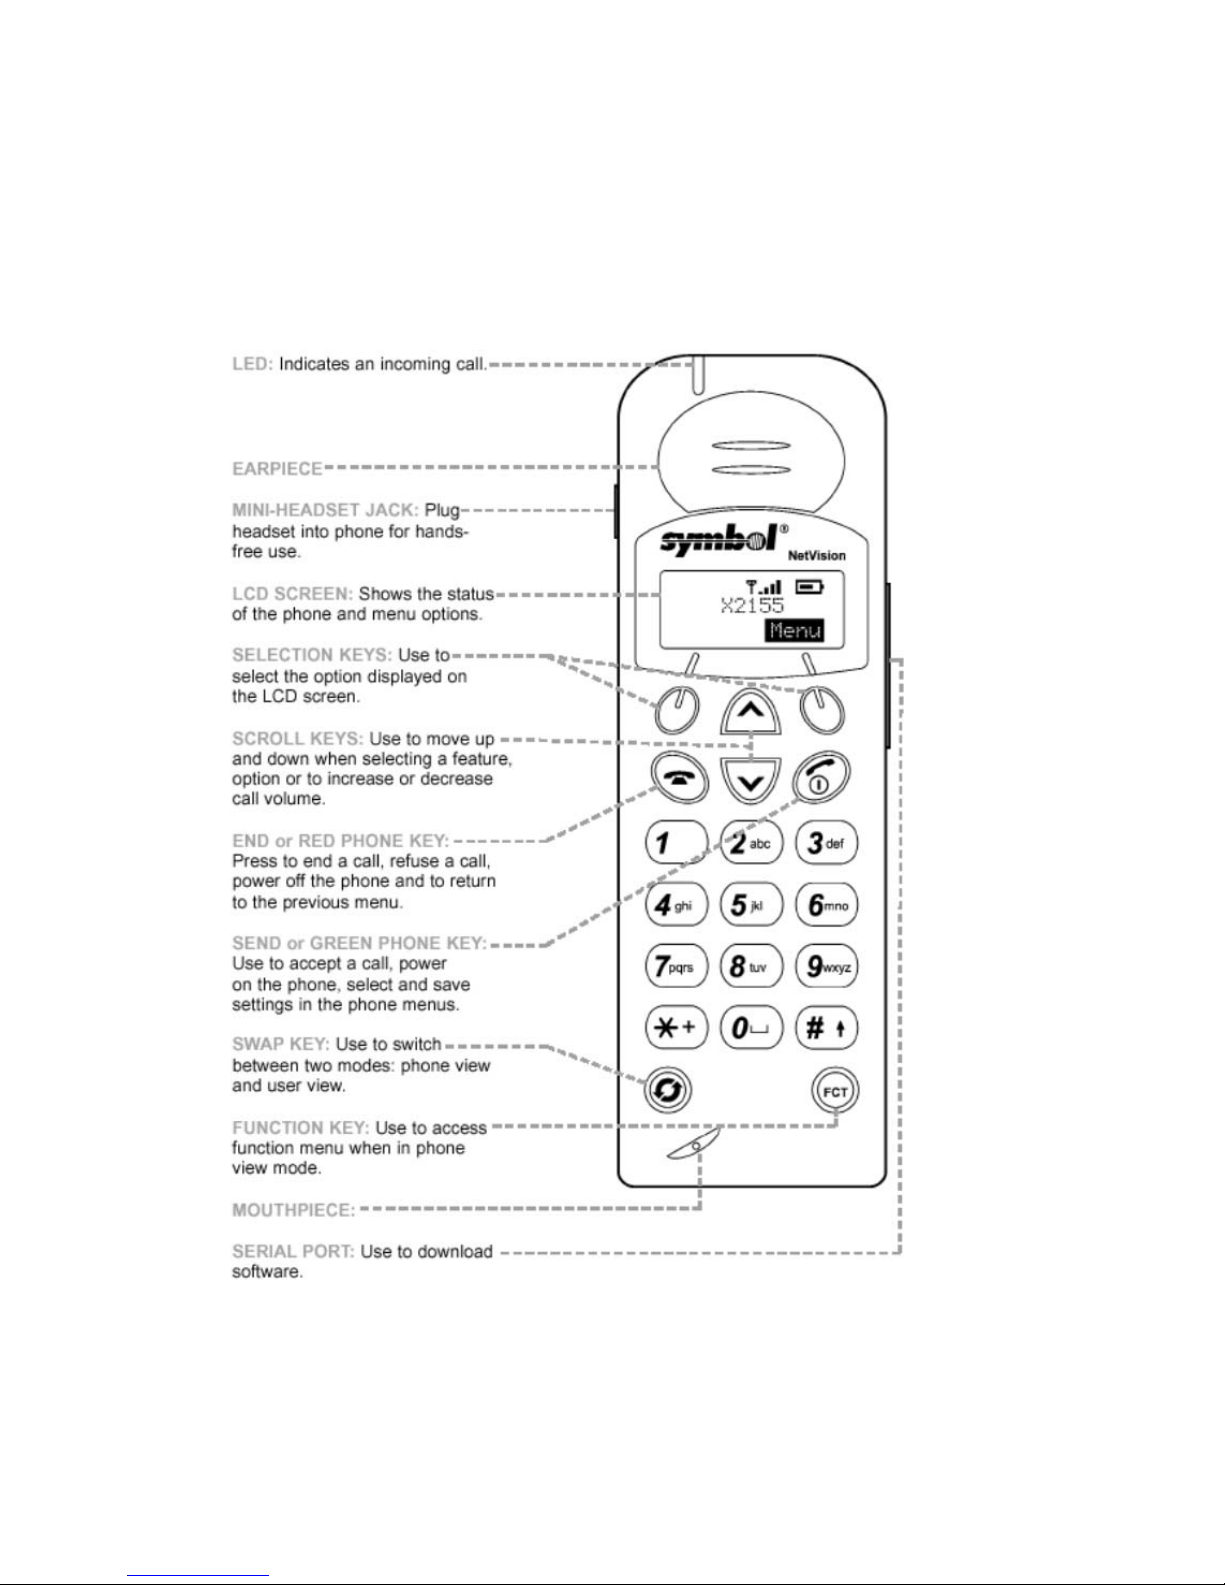
The NetVision Phone (NVP) provides on-site, wireless voice communication
capability. The NVP performs like a cellular phone. Before use, the NVP
requires configuration to the local network by the System Administrator.
-1-
Page 7
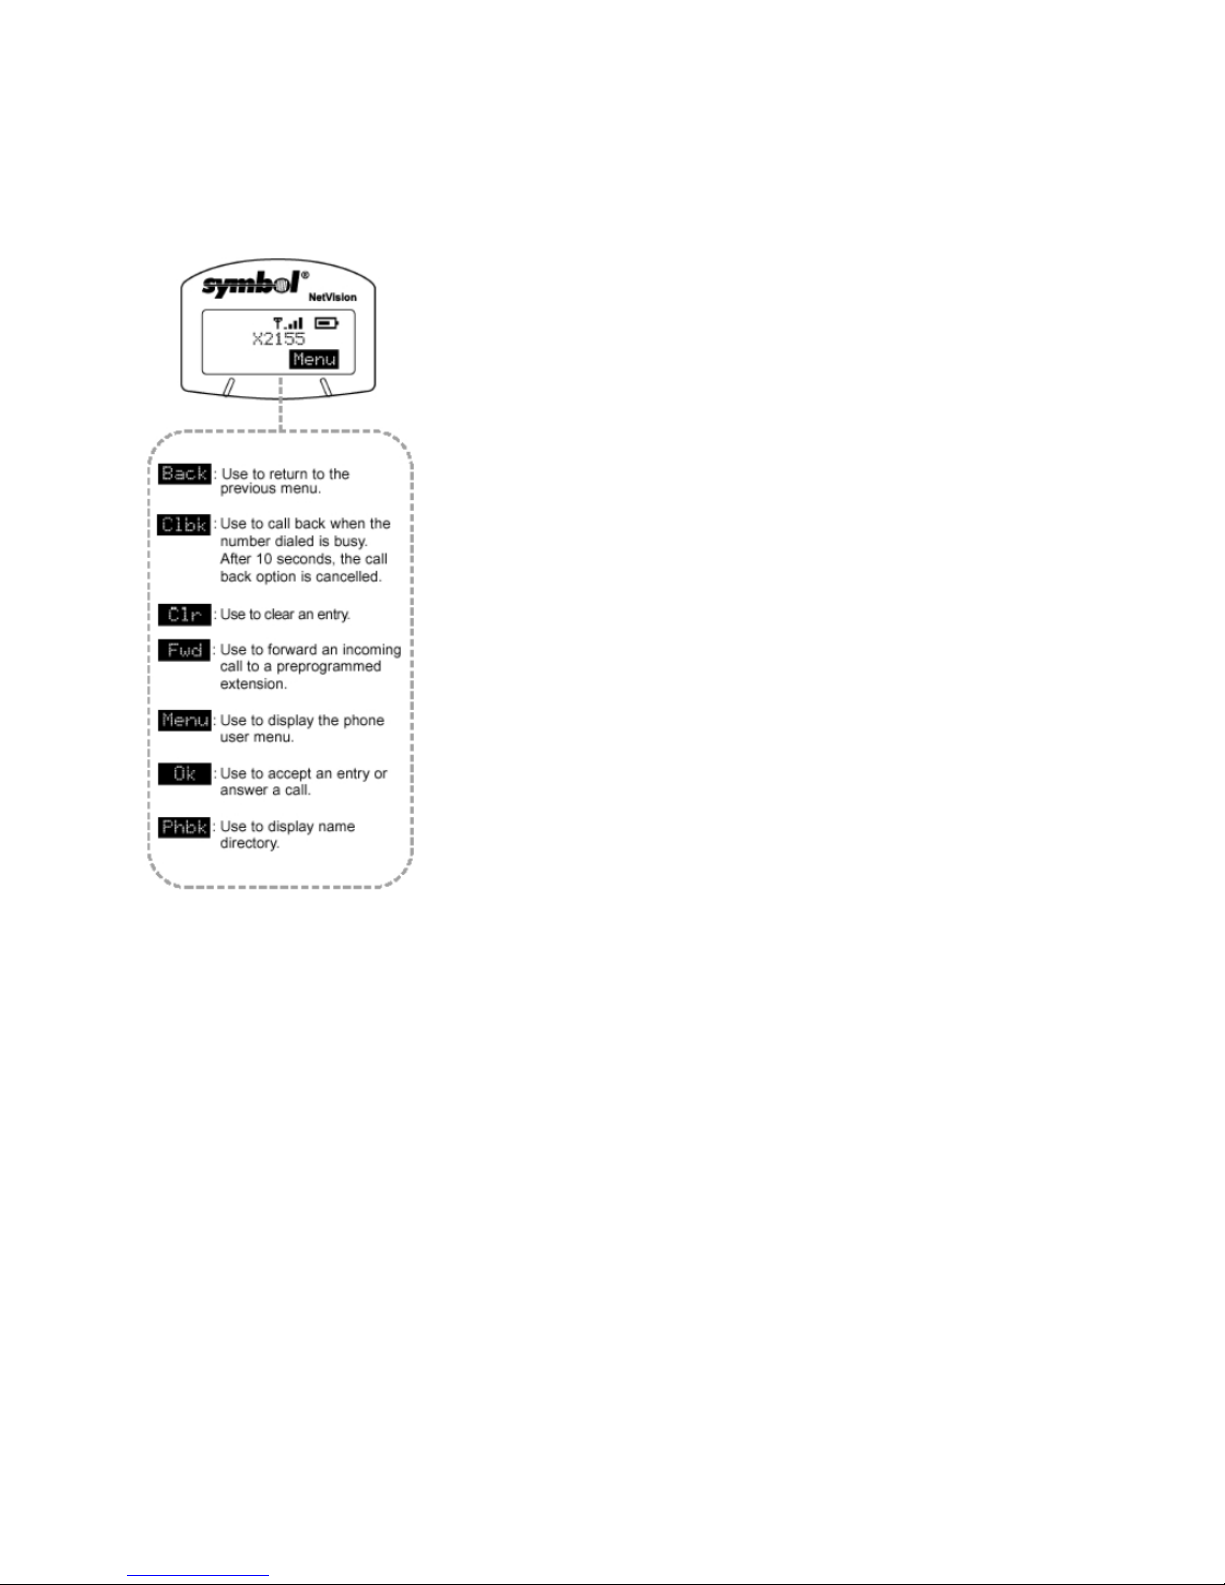
Softkeys
Appear as text on the LCD screen.
BATTERY OPERATIONS
Fully charge the battery before initial use of the NVP. Charge the battery
attached or detached from the phone.
-2-
Page 8

Charging the Battery
When charging the battery attached to the phone, turn off the phone before
inserting it into the charger. Place the battery or battery and phone
combination into the charger. The LED indicators on the charger indicate:
GREEN LED indicates a fully charged battery.
RED LED indicates the battery is charging; wait until the LED changes to
green before using battery.
AMBER LED indicates the charger is waiting to charge the other battery.
The charger charges the phone first. The charging cycle for the other device
starts when the first cycle finishes.
Removing the Battery
Remove the battery by depressing the catch and pulling the top of the
battery away from the phone.
Note: When the battery latch is opened you will find the part number, serial
number and manufacturing and regulatory information located on the inside
compartment.
-3-
Page 9
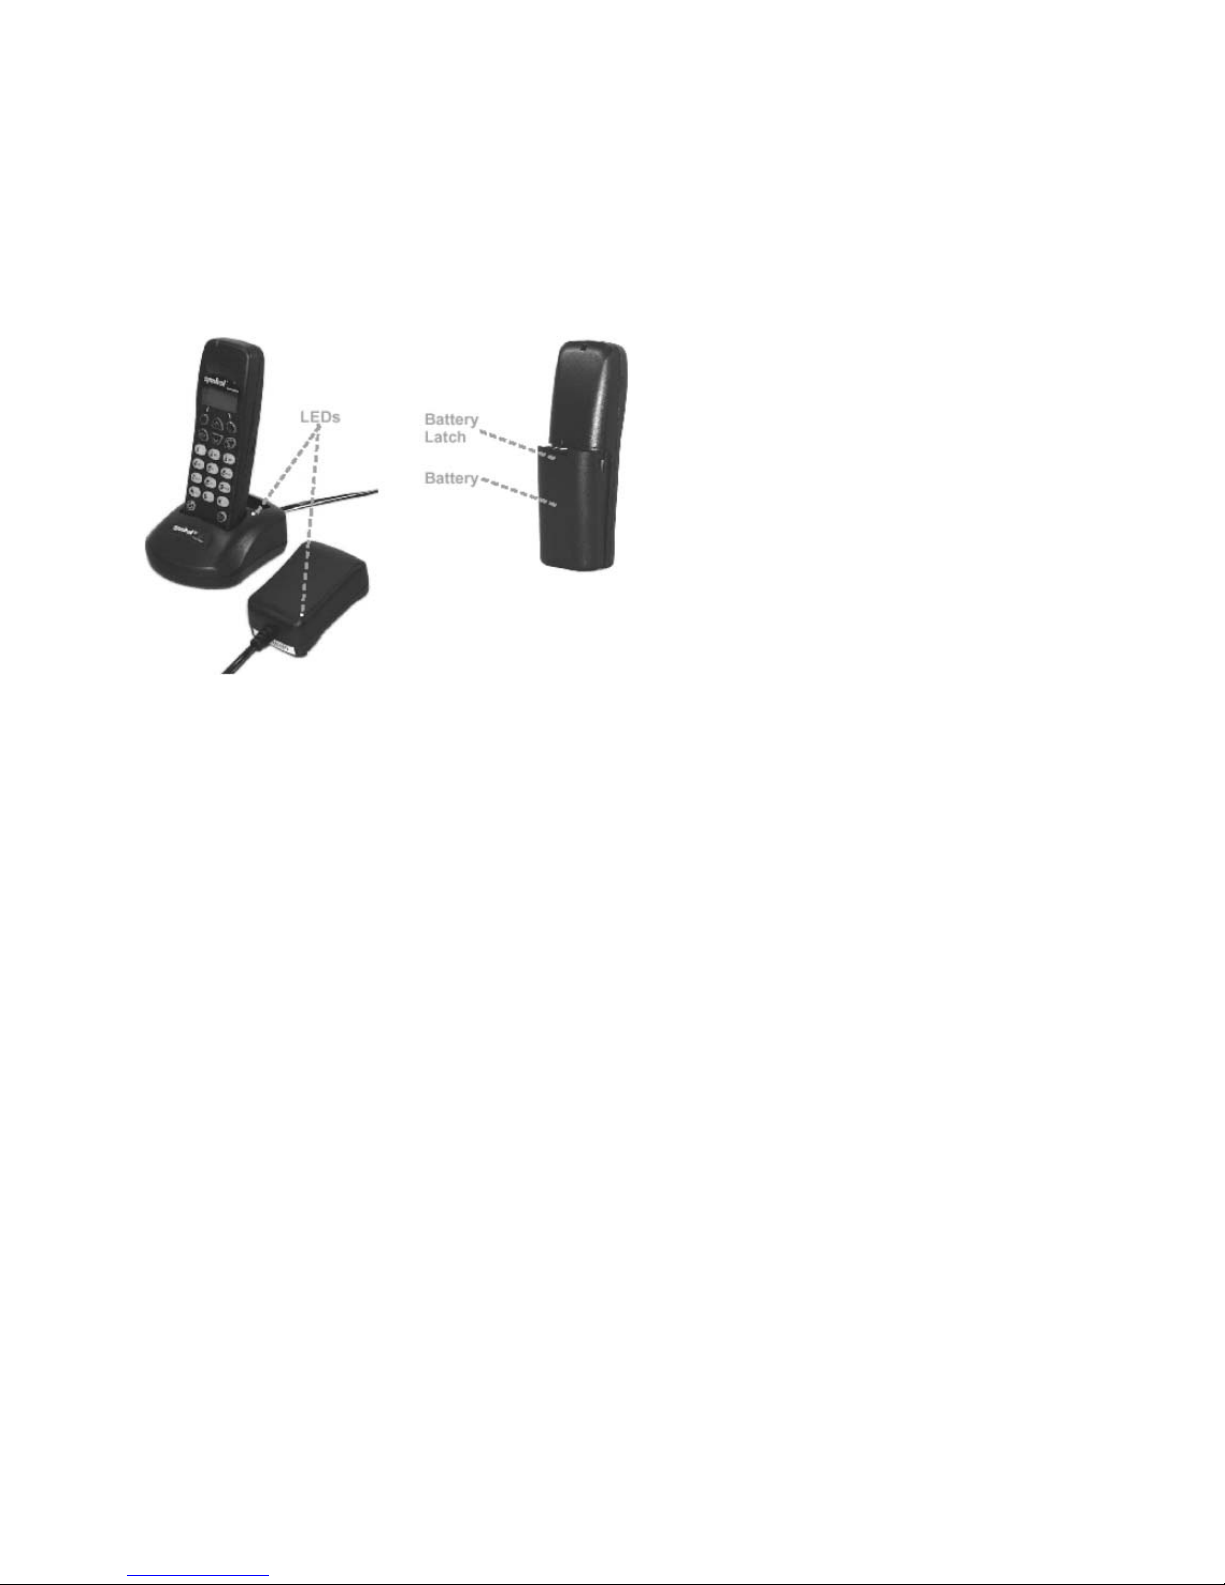
Replacing the Battery
Replace the battery in the phone by aligning the feet on the battery with the
notches on the phone. Push the top of the battery into the phone until the
latch clicks.
-4-
Page 10

BASIC FUNCTIONS
Basic Functions introduces the user to tasks, such as:
z Power On
Login
z
z Logout
z LCD Icons
z Make a Call
Using the Phonebook
z
z Using Speak@Ease
z Redial
z Speed Call
Adjust Call Volume
z
z Receive a Call
z End a Call
z Keyguard
Power Off
z
Power On
Press to power on the NVP. The NVP LCD briefly displays the firmware
version. After powering on (Personal Mode) and logging in (Shared Mode),
two screen modes are available: Phone View and User View.
Phone View:
Press to toggle between the two screens. Phone view allows access to
the phone book (PHBK), making and answering calls.
Note: Phonebook softkey is displayed only when this feature is enabled by
the System Administrator.
User View:
User view sets basic phone and network features.
-5-
Page 11

Login
There are two different status displays, shared mode and personal mode.
Personal Mode:
A phone configured for personal mode automatically logs in and displays the
time and date when powered on, indicating an IDLE state.
Shared Mode:
If your phone is configured in shared mode, a User Login screen displays.
1. Enter your user login (directory number).
2. Press .
3. Enter your user PIN.
4. Press .
Note: Obtain a user Login (usually a one to seven digit DN) and password
(PIN) from the System Administrator.
Logout
To logout of the network:
Note: From Phone View press to return to the User View.
1. From the User View, select Menu.
2. Scroll to "Logout ."
3. Press to logout. "User Login" displays on the LCD screen.
Note: Only users with a Shared mode configured phone can logout of the
network. Users with Personal mode configured phones power it off.
-6-
Page 12

LCD Icons
Signal Strength Indicator: Shows
the RF signal strength from the
access point.
"X": Indicates that the phone is not
associated. Note: When the phone is
not associated, it will beep three
times and turn off after 5 minutes.
Signal Strength Indicator: When
the battery is low, the battery
indicator will begin to flash and the
phone will beep once.
Make a Call
Note: Place the phone in Phone View to make a call or accept an incoming
call.
To place a call to another dialable endpoint (e.g.,wired IP phone,
wireless phone, TDM device):
z Enter the number or press the PHBK softkey (if the Phonebook feature is
enabled).
-7-
Page 13

Using the Phonebook
Note: The NVP must be enabled to use the Phonebook.
1. Press the left hand Phonebook ( PBHK ) softkey in the Phone view.
The phone displays "Enter Name."
2. Use the keypad to enter the name of the person you wish to call
(entering the first few letters is allowed).
3. Press the Lookup softkey.
Note: For each letter in the name, press the appropriate key on the
keypad until the letter displays on the LCD. For example, if the letter C is
required, press the 2 button on the keypad three times. Use the right and
left arrow softkeys to correct errors. If the next letter in a name is on the
same key as the previous letter, press the right-hand softkey to proceed.
Use the right-hand softkey to add a space between the first and last
name.
4. Press the Call softkey once the name appears on the phone LCD.
Note: If no match exists the phone displays "No Such Entry." Edit the
original entry and try to find the name again.
5. If there are similar names listed, press the Next softkey to advance
through the list of names until the correct name appears then:
To make a call press the Call softkey.
To edit the entry press the Retry softkey.
To exit press .
Using Speak@Ease
Note: The NVP must be enabled to use Speak@Ease . If "SPEZ" is not
displayed in the Phone View or when Superkey is selected, Speak@Ease is
not available.
1. Press the left-hand softkey, SPEZ, in the Phone View.
The phone displays a DN followed by "Speak."
2. Follow the voice prompts.
Note: This procedure is the same when the user has activated Superkey
using the key.
-8-
Page 14

Redial
Note: Feature access codes are programmed at the 3300 ICP and are
unique to each customer environment. Contact the System Administrator for
specific feature access codes.
To redial the last number manually dialed:
1. Press the .
2. Press the scroll key to locate "Redial."
3. Press to redial the number.
To save the last number manually dialed:
1. Press .
2. Enter the "Last Number Saved" feature access code, **79. The display
clears momentarily and returns to the Phone View.
To redial a saved number:
1. Press .
2. Enter "Last Number Saved" feature access code, *6*. The name/number
being dialed is displayed.
-9-
Page 15

Speed Call
Note: Personal Speed Call lists must be configured by the System
Administrator.
To store a personal Speed Call number:
1. Press .
2. Enter "Personal Speed Call" feature access code, 67.
3. Enter an index number (this is the location on the Speed Call list)
between 00 and 09.
Note: A pause is needed between the digits dialed.
4. Enter the first digit of the number to be stored.
5. Press .
6. Scroll to the the Hold menu item using the scroll keys, Press
Note: Selecting Hold more than once lengthens the pause.
7. Repeat steps 4, 5 and 6 until the last digit is entered, then proceed.
8. Press to save the Speed call number.
To dial a stored personal Speed Call number:
1. Press .
2. Enter "Personal Speed Call" feature access code, 58.
3. Enter the location of the stored number (a location/index number
between 00 and 09.
Adjust Call Volume
When in an active call, adjust the earpiece volume of the current call using
the scroll keys.
1. Select the Down Scroll key.
2. Adjust Level using Up and Down scroll keys.
Volume can be adjusted from Level 0 (low) to Level 15 (high).
-10-
Page 16

Receive a Call
Note: Place the phone in Phone View to make a call or accept an incoming
call.
For an incoming call, the caller ID feature identifies callers, before the call is
answered.
To accept an incoming call when there is no active call taking place, press
(if the phone is configured for Auto Answer, no user action is required to
accept the call).
Auto Answer
To enable or disable Auto Answer:
1. Press .
2. Scroll down (using the scroll keys) to the Superkey menu item and select
the Superkey by pressing .
3. Scroll through the Superkey menu selecting No until "Auto Answer" is
displayed.
4. Press the left-hand softkey to enable or disable Auto Answer.
End a Call
z To end a call, press .
The LCD screen displays IDLE state (Phone View).
-11-
Page 17

Keyguard
Lock the keypad in order to prevent accidental phone operation and
unnecessary battery power consumption. Any incoming call can be answered
(using the green off-hook button) and ended (using the red on-hook button)
without unlocking the keypad. All other keys are disabled, unless the user
returns to User View and turns off Keyguard. The keypad reverts locked
after the call is completed.
To lock keypad:
1. From User View, select Menu and scroll to "Keyguard."
2. Press . "Keys Locked" displays on the LCD screen.
--OR--
3. Select Menu and press *. "Keys Locked" displays on the LCD screen.
To unlock the keypad:
Press the Unlk softkey, and then *.
z
"Keys Unlocked" displays on the LCD screen.
Power Off
From User View, press and hold . If the key is released before the boxes
on the LCD screen are cleared, the phone will remain ON. The LCD screen
clears and the phone powers off.
Note: To use the key to power off, place the phone in User View.
-12-
Page 18

PHONE SETTINGS
Phone Settings allows user to set features, such as:
z Ring Type
Ring Tone
z
z Key Volume
z Backlight
z Contrast
Notes:
z To set phone settings, from User View, select Menu Settings, and then
press .
z To return to the previous menu, press .
Ring Type
To set the volume of the ring for incoming calls:
1. Select "Ring Type" from the Settings menu and press .
2. Use the scroll keys to display the ring type options:LED, Beep, Vibrate or
All (the phone beeps, LED flashes and vibrates).
When the selection displays, a sample of the option is given.
3. Press .
"Ring Type Configured" displays on the LCD screen.
4. Return to the Main settings display by pressing the top left hand key.
Ring Tone
To set the ring tone for incoming calls:
1. Select "Ring Tone" from the Settings menu and press .
2. Use the scroll keys to display the ring tone options: Tone 1 to Tone 6.
When the selection displays, a sample of the option is given.
3. Press .
"Ring Tone Configured" displays on the LCD screen.
4. Press to return to main menu.
-13-
Page 19

Key Volume
To set the volume level:
1. Select Key Volume from the Settings menu and press .
2. Use the scroll keys to display the key volume options: Off , Low or High .
When the selection displays, a sample of the option is given.
3. Press .
"Key Volume Configured" displays on the screen.
Backlight
To set the LCD screen to illuminate in the dark:
1. Select Backlight from the Settings menu and press .
2. Use the scroll keys to display the backlight options:Off, On, Auto.
3. Press .
"Backlight Configured" displays on the LCD screen.
Contrast
To set the contrast level of the LCD screen to suit various lighting
conditions:
1. Select Contrast from Settings menu and press .
2. Use the scroll keys to adjust the contrast slider from Level 0 (light) to
Level 15 (dark).
3. Press .
"Contrast Configured" displays on the LCD screen.
-14-
Page 20

CALL OPERATIONS
Call Operations introduces the user to features, such as:
z Transfer Call
Conference Call
z
z Hold
z Off Hold
z Cancel
Redial
z
z Message
z Superkey
z Agent Login
Call Forwarding
z
z Call Forward - Remote
z Timed Reminder
z Advisory Messages
Music
z
z Do Not Disturb
z Auto Answer
z Night Service
Set Password
z
z Language Selection
z Account Codes
Notes:
Feature access codes are programmed at the 3300 ICP and are unique to
z
each customer environment. Contact the System Administrator for specific
feature access codes.
z Call operations can only be accessed from Phone View.
-15-
Page 21

Transfer Call
To transfer an active call:
1. Press .
2. On the Function menu, use the scroll keys to display "Trans/Conf."
3. Press to select Trans/Conf.
4. Dial the number of the third party.
5. Do one of the following:
To complete the Transfer, press or use the right hand softkey
(RLS).
To announce the Transfer, wait for an answer, consult and press .
To swap between the incoming call and the called user during the
transfer, press the left-hand softkey (TRD).
To release the incoming call and complete the transfer, press the
right-hand softkey (RLS).
To cancel the Transfer, press and then use the scroll keys to
display Cancel and press .
Conference Call
To form a conference when a two party call is already in place, or to
add another party to an existing conference:
1. Press .
2. On the Function menu, use the scroll keys to display "Trans/Conf."
3. Press to select Trans/Conf .
4. Dial the number of the next party.
5. Wait for an answer.
6. Press and scroll to Trans/Conf.
7. Press .
Callers are now in a three-way call (conference).
8. Press to leave a conference call.
Note: The two original callers can split the conference and speak privately
by pressing the left-hand softkey. This places the last conferenced party on
hold. The Split Conference softkey feature is only available when there is a
three party conference.
-16-
Page 22

Hold
To place a call on hold:
1. Press .
2. On the Function menu, use the scroll keys to display "Hold" on the
Function menu.
3. Press to select Hold.
Off Hold
To take a call off of hold:
1. Press .
2. On the Function menu, use the scroll keys to display "Off Hold."
3. Press to select "Off Hold."
Cancel
To return to the main screen:
1. Press .
2. On the Function menu, use the scroll keys to display "Cancel."
3. Press to select "Cancel."
Redial
To redial the last number that you manually dialed:
1. Press
2. On the Function menu, use the scroll keys to display "Redial."
3. Press to select Redial.
-17-
Page 23

Message
To respond to a message waiting on your telephone:
1. Press .
2. On the Function menu, use the scroll keys to display "Message."
3. Press Message to select.
4. If a password is required, enter the password and select the Enter
softkey or press .
5. Press the Yes softkey.
6. Do one or all of the following (if required):
To display the time the message was sent, select the More softkey.
To display the number of the caller, select the More softkey twice.
7. Perform the following when applicable:
To call the message sender, select the Call softkey.
To delete the message,select Erase softkey.
To view the next message, select the Message softkey and press .
To leave a message waiting indication on a telephone when you hear
busy or ringback tone:
1. Press .
2. On the Function, menu use the scroll keys to display "Message."
3. Press .
-18-
Page 24

Superkey
Note: PBX specific features and feature access codes are programmed at
the 3300 Integrated Communications Platform (ICP). PBX features and
access codes are unique to each customer environment. Contact the System
Administrator for specific features and access codes. To access PBX specific
feature functionality:
To access PBX specific feature functionality:
1. Press .
2. On the Function, menu use the scroll keys to display "Superkey."
3. Press to select.
Use the right-hand softkey to move through the list of Superkey features.
The right-hand softkey is used to say no to the feature displayed and move
on to the next feature. To activate a feature use the left-hand softkey.
Agent Login
To invoke the Agent Login feature:
1. Press the left-hand softkey.
2. Enter a valid agent ID.
3. Press the left-hand softkey; the phone displays the idle state for agent
login.
-19-
Page 25

Call Forwarding
1. Press the left-hand softkey, the phone displays "Call Forwarding."
2. Call Forward redirects incoming calls to an alternate number; There are
several different types of call forwarding:
Always redirect all incoming calls regardless of the state of telephone.
B-Int redirects internal calls when the telephone is busy.
B-Ext redirects external calls when the telephone is busy.
NA-Int redirects internal calls after several rings if the telephone is
not answered.
NA-Ext redirects external calls after several rings if the telephone is
not answered.
To program Call Forward:
1. Press the NXT softkey until the desired type of Call Forward appears.
2. Press the REV softkey.
3. If a number is already programmed, press the CHG softkey.
4. Press the PRG softkey.
5. Dial the destination number.
6. Press the SAV softkey.
To turn Call Forward on and off (once it has been programmed):
1. Press the NXT softkey until the type of Call Forward appears.
2. Press the REV softkey.
3. Press the CHG softkey.
To turn Call Forward on, press the ON softkey.
To turn Call Forward off, press the OFF softkey.
-20-
Page 26

Call Forward - Remote
To forward calls from a remote station to the current location:
1. Press the No softkey until "Call Forwarding?" appears.
2. Press the Yes softkey.
3. Press the NXT softkey until I Am Here appears.
4. Press the Yes softkey.
5. Dial the extension of the remote station.
6. Press the Sav softkey.
To cancel Call Forward - Remote from the station that was forwarded:
1. Press the No softkey until "Call Forwarding?" appears.
2. Press the Yes softkey.
3. Press the Rev softkey.
4. Press the Chg softkey.
5. Press the Off softkey.
6. Press .
To cancel Call Forward - Remote from the station that set the remote
forwarding:
1. Press .
2. Dial "Cancel Call Forward Follow Me Remote" feature access code, **77.
3. Dial the extension of the remote station.
4. Press .
To ensure that calls are not forwarded again by the destination
number:
1. Press .
2. Dial "Call Forwarding End Chaining" feature access code, 64.
3. Press .
To allow calls to be forwarded by the destination number:
1. Press .
2. Dial "Cancel Call Forwarding End Chaining" feature access code **73.
3. Press .
-21-
Page 27

To force an incoming call to be forwarded:
z Press the Fwd softkey.
Note: Call Forwarding MUST be programmed and enabled in order to have
the Fwd softkey selection available.
To override Call Forward and ring a station:
1. Press .
2. Dial "Call Forwarding Override" feature access code, *1*.
3. Dial the extension number.
Timed Reminder
To program a Timed Reminder:
1. Press the No softkey until "Timed Reminder" appears.
2. Press the Yes softkey.
3. Enter the time in 24-hour format.
4. Press the SAV softkey.
To view, change, and/or cancel a pending Reminder:
1. Press the No softkey until Timed Reminder appears.
2. Press the Yes softkey. Perform the following where applicable:
To change the Reminder, press the Chg softkey, enter the new time,
and press the SAV softkey.
To cancel the Reminder, press the Clr softkey.
To exit without canceling the Reminder, press .
To acknowledge a Reminder when your phone rings once press the
Cfm softkey.
-22-
Page 28

Advisory Messages
To turn Messaging - Advisory on:
1. Press the No softkey until "Advisory Msgs?" appears.
2. Press the Yes softkey.
3. Press the NXT softkey until the desired message appears.
4. Press the On softkey.
To turn Messaging - Advisory off:
1. Press the No softkey until "Advisory Msgs?" appears.
2. Press the Yes softkey.
3. Press the Off softkey.
Remote Messages
To check for messages from a remote station:
1. Press the No softkey until "Remote Msging?" appears.
2. Press the Yes softkey.
3. Dial your extension number.
4. Press the Ent softkey.
5. If a password is required, enter your password and press the Ent
softkey.
6. Press the Yes softkey.
Music
To turn Music on (remote music source must be programmed in the
3300 ICP):
1. Press the No softkey until "Music?" appears.
2. Press the On softkey.
To turn Music off:
1. Press the No softkey until "Music?" appears.
2. Press the Off softkey.
-23-
Page 29

Do Not Disturb
To turn DND on:
1. Press the No softkey until "Do Not Disturb?" appears.
2. Press the On softkey.
To turn DND off:
1. Press the On softkey until "Do Not Disturb?" appears.
2. Press the Off softkey.
To activate Do Not Disturb from a remote station:
1. Press .
2. Dial the "DND Remote" feature access code, **5.
3. Dial the number of the station to which Do Not Disturb is to apply.
4. Press .
To deactivate Do Not Disturb from a remote station:
1. Press .
2. Dial "DND Cancel Remote" feature access code, ##5.
3. Dial the number of the station with Do Not Disturb activated.
4. Press .
To use Override when you encounter busy or DND tone :
z Press the Intrude softkey.
Auto Answer
To turn Auto Answer on:
1. Press the No softkey until "Auto Answer?" appears.
2. Press the On softkey.
To turn Auto Answer off:
1. Press the No softkey until "Auto Answer?" appears.
2. Press the Off softkey
-24-
Page 30

Night Service
To turn night service on (night service needs to be programmed in the
3300 ICP):
1. Press the No softkey until "Night Service?" appears.
2. Press the Yes softkey.
3. Press the Chg softkey.
4. Press the Yes softkey to select night service #1.
5. Press the No and then Yes softkeys to select night service #2.
Set Password
To set, change, or clear a password (up to 7 digits, not including 0):
1. Press the No softkey until "Set Password" appears.
2. Press the Yes softkey.
Perform the following where applicable:
z To enter a new password, enter your password.
z To change or clear your password, enter your current password.
z Press the Enter softkey.
If you are changing or clearing your password, perform the following where
applicable:
1. To change your password, enter your new password.
2. Press the Ent softkey.
3. To clear your password, enter 0.
4. Enter your new password again.
5. If you are setting up or changing a password, press the Ent softkey.
6. Press .
-25-
Page 31

Language Selection
Note: English is currently the only language supported.
1. Press the No softkey until "Language" appears.
2. Press the Yes softkey.
3. Press the Chg softkey.
4. Press the No softkey until the desired message appears.
5. Press the Yes softkey.
Account Codes
To enter an Account Code during a call:
1. Press .
2. On the Function, menu use the scroll keys to display "Superkey."
3. Press to select Superkey.
4. Press the Yes softkey.
5. Dial the Account Code digits.
6. Press the Sav softkey.
7. Perform the following where applicable:
For a verified account code, press the Yes softkey.
For a non-verified account code, press the No softkey.
Note: Account Code selection is only available when enabled by the System
Administrator.
-26-
Page 32

PATENTS
This product is covered by one or more of the following U.S. and foreign Patents:
U.S.Patent No.
4,593,186; 4,603,262; 4,607,156; 4,652,750; 4,673,805;
4,736,095; 4,758,717; 4,760,248; 4,806,742; 4,816,660;
4,845,350; 4,896,026; 4,897,532; 4,923,281; 4,933,538;
4,992,717; 5,015,833; 5,017,765; 5,021,641; 5,029,183;
5,047,617; 5,103,461; 5,113,445; 5,130,520; 5,140,144;
5,142,550; 5,149,950; 5,157,687; 5,168,148; 5,168,149;
5,180,904; 5,216,232; 5,229,591; 5,230,088; 5,235,167;
5,243,655; 5,247,162; 5,250,791; 5,250,792; 5,260,553;
5,262,627; 5,262,628; 5,266,787; 5,278,398; 5,280,162;
5,280,163; 5,280,164; 5,280,498; 5,304,786; 5,304,788;
5,306,900; 5,324,924; 5,337,361; 5,367,151; 5,373,148;
5,378,882; 5,396,053; 5,396,055; 5,399,846; 5,408,081;
5,410,139; 5,410,140; 5,412,198; 5,418,812; 5,420,411;
5,436,440; 5,444,231; 5,449,891; 5,449,893; 5,468,949;
5,471,042; 5,478,998; 5,479,000; 5,479,002; 5,479,441;
5,504,322; 5,519,577; 5,528,621; 5,532,469; 5,543,610;
5,545,889; 5,552,592; 5,557,093; 5,578,810; 5,581,070;
5,589,679; 5,589,680; 5,608,202; 5,612,531; 5,619,028;
5,627,359; 5,637,852; 5,664,229; 5,668,803; 5,675,139;
5,693,929; 5,698,835; 5,705,800; 5,714,746; 5,723,851;
5,734,152; 5,734,153; 5,742,043; 5,745,794; 5,754,587;
5,762,516; 5,763,863; 5,767,500; 5,789,728; 5,789,731;
5,808,287; 5,811,785; 5,811,787; 5,815,811; 5,821,519;
5,821,520; 5,823,812; 5,828,050; 5,848,064; 5,850,078;
5,861,615; 5,874,720; 5,875,415; 5,900,617; 5,902,989;
5,907,146; 5,912,450; 5,914,478; 5,917,173; 5,920,059;
5,923,025; 5,929,420; 5,945,658; 5,945,659; 5,946,194;
5,959,285; 6,002,918; 6,021,947; 6,029,894; 6,031,830;
6,036,098; 6,047,892; 6,050,491; 6,053,413; 6,056,200;
6,065,678; 6,067,297; 6,082,621; 6,084,528; 6,088,482;
6,092,725; 6,101,483; 6,102,293; 6,104,620; 6,114,712;
6,115,678; 6,119,944; 6,123,265; 6,131,814; 6,138,180;
6,142,379; 6,172,478; 6,176,428; 6,178,426; 6,186,400;
6,188,681; 6,209,788; 6,209,789; 6,216,951; 6,220,514;
6,243,447; 6,244,513; 6,247,647; 6,308,061; 6,250,551;
6,295,031; 6,308,061; 6,308,892; 6,321,990; 6,328,213;
6,330,244; 6,336,587; 6,340,114; 6,340,115; 6,340,119;
6,348,773; D305,885; D341,584; D344,501; D359,483;
D362,453; D363,700; D363,918; D370,478; D383,124;
D391,250; D405,077; D406,581; D414,171; D414,172;
D418,500; D419,548; D423,468; D424,035; D430,158;
D430,159; D431,562; D436,104.
Invention No.55,358; 62,539; 69,060; 69,187 (Taiwan);
No.1,601,796; 1,907,875; 1,955,269 (Japan); European
Patent 367,299; 414,281; 367,300; 367,298; UK
2,072,832; France 81/03938; Italy 1,138,713
-27-
Page 33

FEATURE ACCESS CODES
Save Last Number **79
Repeat Last Number Saved *6*
Personal Speedcall - Store 67
Personal Speedcall - Invoke 58
Cancel Call Forwarding Follow Me - Remote **77
Call Forwarding - End Chaining 64
Cancel Call Forwarding - End Chaining **73
Call Forwarding - Override *1*
Do Not Disturb - Remote **5
Do Not Disturb - Cancel Remote ##5
-28-
Page 34

TM
, ® Trademark of Mitel Networks Corporation.
© Copyright 2003, Mitel Networks Corp or ation .
All rights reserved.
 Loading...