

Page 1

Symantec pcAnywhere™ User's Guide
12164653
Page 2

Symantec pcAnywhere™ User's Guide
The softwaredescribed inthis bookis furnishedunder alicense agreementand maybe used
only in accordance with the terms of the agreement.
Documentation version 12.5
PN: 12164653
Legal Notice
Copyright © 2008 Symantec Corporation. All rights reserved.
Symantec, the Symantec Logo, Symantec pcAnywhere, Symantec Packager, ColorScale,
SpeedSend, LiveUpdate, Virtually Anywhere andWork Virtually Anywhere are trademarks
or registered trademarks of Symantec Corporation or its affiliates in the U.S. and other
countries. Other names may be trademarks of their respective owners.
Apple and Mac OS are registered trademarks of Apple Computer, Inc. Java is a trademark
of Sun Microsystems, Inc. in the United States and other countries. Microsoft, Windows,
Windows NT, Windows Vista, MS-DOS, and the Windows logo are registered trademarks of
Microsoft Corporation in the United States and other countries. Linux is a registered
trademark of Linus Torvalds. SUSE and its logo are registered trademarks of SUSE AG. The
Red Hat trademark and logo are trademarks of Red Hat, Inc. in the United States and other
countries. SSH and Secure Shell are trademarks of SSH Communications Security, Inc.
Additional companyand productnames maybe trademarksor registeredtrademarks ofthe
individual companies and are respectfully acknowledged.
The product described in this document is distributed under licenses restricting its use,
copying, distribution, and decompilation/reverse engineering. No part of this document
may be reproduced in any form by any means without prior written authorization of
Symantec Corporation and its licensors, if any.
THE DOCUMENTATIONISPROVIDED "ASIS" AND ALLEXPRESS ORIMPLIED CONDITIONS,
REPRESENTATIONS AND WARRANTIES, INCLUDING ANY IMPLIED WARRANTY OF
MERCHANTABILITY, FITNESS FOR A PARTICULAR PURPOSE OR NON-INFRINGEMENT,
ARE DISCLAIMED, EXCEPT TO THE EXTENT THAT SUCH DISCLAIMERS ARE HELD TO
BE LEGALLYINVALID. SYMANTEC CORPORATIONSHALL NOT BELIABLE FOR INCIDENTAL
OR CONSEQUENTIAL DAMAGES IN CONNECTION WITH THE FURNISHING,
PERFORMANCE, OR USE OF THIS DOCUMENTATION. THE INFORMATION CONTAINED
IN THIS DOCUMENTATION IS SUBJECT TO CHANGE WITHOUT NOTICE.
The LicensedSoftware andDocumentation aredeemed tobe commercialcomputer software
as definedin FAR 12.212 and subject to restricted rights asdefined inFAR Section52.227-19
"Commercial Computer Software - Restricted Rights" and DFARS 227.7202, "Rights in
Commercial Computer Software or Commercial Computer Software Documentation", as
applicable, and any successor regulations. Any use, modification, reproduction release,
performance, displayor disclosure of the Licensed Software and Documentation bythe U.S.
Government shall be solely in accordance with the terms of this Agreement.
Page 3

Symantec Corporation
20330 Stevens Creek Blvd.
Cupertino, CA 95014
http://www.symantec.com
Printed in the United States of America.
10 9 8 7 6 5 4 3 2 1
Page 4

Technical Support
Symantec Technical Support maintains support centers globally. Technical
Support’s primary role is to respond to specific queries about product features
and functionality.The Technical Support group also creates contentfor our online
Knowledge Base. The Technical Support group works collaboratively with the
other functional areas within Symantec to answer your questions in a timely
fashion. Forexample, theTechnical Supportgroup works with Product Engineering
and SymantecSecurity Response to provide alerting services andvirus definition
updates.
Symantec’s maintenance offerings include the following:
■ A range of support options that give you the flexibility to select the right
amount of service for any size organization
■ Telephone and Web-based support that provides rapid response and
up-to-the-minute information
■ Upgrade assurance that delivers automatic software upgrade protection
■ Global support that is available 24 hours a day, 7 days a week
■ Advanced features, including Account Management Services
For information about Symantec’s Maintenance Programs, you can visitour Web
site at the following URL:
www.symantec.com/techsupp/
Contacting Technical Support
Customers with a current maintenanceagreement may access Technical Support
information at the following URL:
www.symantec.com/techsupp/
Before contacting Technical Support, make sure you have satisfied the system
requirements that are listed in your product documentation. Also, you should be
at thecomputer on which the problem occurred, incase itis necessaryto replicate
the problem.
When you contact Technical Support, please have the following information
available:
■ Product release level
■ Hardware information
■ Available memory, disk space, and NIC information
■ Operating system
Page 5

■ Version and patch level
■ Network topology
■ Router, gateway, and IP address information
■ Problem description:
■ Error messages and log files
■ Troubleshooting that was performed before contacting Symantec
■ Recent software configuration changes and network changes
Licensing and registration
If yourSymantec product requires registration or a licensekey, accessour technical
support Web page at the following URL:
www.symantec.com/techsupp/
Customer service
Customer service information is available at the following URL:
www.symantec.com/techsupp/
Customer Service is available to assist with the following types of issues:
■ Questions regarding product licensing or serialization
■ Product registration updates, such as address or name changes
■ General product information (features, language availability, local dealers)
■ Latest information about product updates and upgrades
■ Information about upgrade assurance and maintenance contracts
■ Information about the Symantec Buying Programs
■ Advice about Symantec's technical support options
■ Nontechnical presales questions
■ Issues that are related to CD-ROMs or manuals
Page 6

Maintenance agreement resources
If you want to contact Symantec regarding an existing maintenance agreement,
please contact the maintenance agreement administration team for your region
as follows:
Additional enterprise services
Symantec offers a comprehensive setof services that allow you to maximize your
investment in Symantec products and to develop your knowledge, expertise, and
global insight, which enable you to manage your business risks proactively.
Enterprise services that are available include the following:
contractsadmin@symantec.comAsia-Pacific and Japan
semea@symantec.comEurope, Middle-East, and Africa
supportsolutions@symantec.comNorth America and Latin America
Symantec EarlyWarning Solutions
Managed Security Services
Consulting Services
Educational Services
To access more information about Enterprise services, please visit our Web site
at the following URL:
www.symantec.com
Select your country or language from the site index.
These solutions provide early warning of cyber attacks, comprehensive threat
analysis, and countermeasures to prevent attacks before they occur.
These servicesremove theburden ofmanaging andmonitoring securitydevices
and events, ensuring rapid response to real threats.
Symantec Consulting Services provide on-site technical expertise from
Symantec andits trustedpartners. SymantecConsulting Servicesoffer avariety
of prepackaged and customizable options that include assessment, design,
implementation, monitoring,and managementcapabilities. Each is focused on
establishing andmaintaining the integrity and availability of your IT resources.
Educational Services provide a full array of technical training, security
education, security certification, and awareness communication programs.
Page 7

Contents
Technical Support ..... ..... ..... .... . .... . .... . .... ..... ..... .... . .... . .... ..... ..... .... . .... . .... . .... ..... ... 4
Chapter 1 Introducing Symantec pcAnywhere ... . .... . .... ..... ..... .... . .... 17
About Symantec pcAnywhere . ..... ..... .... . .... . .... . .... ..... .... . .... . .... . .... ... 17
What's new in Symantec pcAnywhere ... . .... ..... ..... .... . .... . .... . .... ..... .... 18
Components of Symantec pcAnywhere ... ..... ..... .... . .... . .... . .... ..... ..... ... 18
How Symantec pcAnywhere works . .... ..... ..... .... . .... . .... . .... ..... ..... .... . . 20
Understanding the difference between a host and a remote . .... . .... . 20
About connecting over the Internet . . .... ..... ..... .... . .... . .... . .... ..... ... 20
Issues that affect performance ... . .... . .... ..... ..... .... . .... . .... ..... ..... .. 23
What you can do with Symantec pcAnywhere ... . .... . .... . .... ..... ..... .... . ... 26
Where to find more information . .... ..... ..... .... . .... . .... . .... ..... ..... .... . .... 27
Chapter 2 Navigating in Symantec pcAnywhere .... . .... ..... ..... .... . .... . . 29
Selecting a view mode in Symantec pcAnywhere . . .... ..... ..... .... . .... . .... . . 29
Starting a connection in Basic View . .... . .... . .... . .... ..... ..... .... . .... . .... . .... 30
Viewing or editing connection settings .... . .... ..... ..... .... . .... . .... . .... ..... .. 33
Working in Advanced View . ..... .... . .... . .... . .... ..... ..... .... . .... . .... . .... ..... . 34
Organizing column headings in the Symantec pcAnywhere
window . .... . .... ..... ..... .... . .... . .... ..... ..... .... . .... . .... . .... ..... ..... . 35
Customizing the Symantec pcAnywhere navigation bar ... . .... ..... ... 36
Closing the main product window upon connection ... ..... ..... .... . .... 37
About the Connection Wizard ... ..... .... . .... . .... . .... ..... ..... .... . .... . ... 38
What you need to know before you connect .... .... . .... . .... ..... ..... .... . 38
Ways to connect to another computer remotely . .... ..... ..... .... . .... . .. 39
About the start modes for remote connections .... .... . .... . .... ..... ..... . 40
About the Session Manager . . .... . .... ..... ..... .... . .... . .... ..... ..... .... . .... . .... . 42
Changing how active sessions appear in the Session Manager ..... ... 43
Showing or hiding options on the Session Manager navigation
bar . .... . .... . .... ..... ..... .... . .... . .... ..... ..... .... . .... . .... . .... ..... ..... .. 44
Resizing the Session Manager navigation bar . ..... ..... .... . .... . .... . ... 44
Showing or hiding the Session Manager navigation bar ... ..... .... . .... 45
Using Thumbnail tab ... ..... .... . .... . .... . .... ..... ..... .... . .... . .... ..... ..... .... . .. 45
Managing pcAnywhere preferences ... . .... . .... ..... ..... .... . .... . .... . .... ..... .. 45
About customizing network connections ... ..... ..... .... . .... . .... . .... .... 46
Page 8

Contents8
Customizing modem connections ... ..... .... . .... . .... . .... ..... ..... .... . .... 47
Customizing European ISDN connections . ..... .... . .... . .... . .... ..... ..... 48
Customizing direct connections .... . .... . .... ..... ..... .... . .... . .... . .... ..... 49
Chapter 3 Installing Symantec pcAnywhere . .... ..... ..... .... . .... . .... ..... ... 51
Preparing for installation .... ..... ..... .... . .... . .... . .... ..... ..... .... . .... . .... . .... 51
Symantec pcAnywhere system requirements . . .... . .... ..... ..... .... . .... 51
User rights requirements ... . .... . .... ..... ..... .... . .... . .... . .... ..... ..... .... 56
Installation options . ..... ..... .... . .... . .... . .... ..... ..... .... . .... . .... . .... ..... 56
If you have a previous version installed ... ..... ..... .... . .... . .... . .... ..... . 61
Symantec pcAnywhere installation . ..... .... . .... . .... . .... ..... ..... .... . .... . .... 61
Installing the full product version . . .... . .... ..... ..... .... . .... . .... . .... ..... 61
Installing a custom version . ..... .... . .... . .... . .... ..... ..... .... . .... . .... . .... 63
Running the setup program manually .... . .... ..... ..... .... . .... . .... ..... .. 63
Post-installation tasks . .... . .... . .... ..... ..... .... . .... . .... . .... ..... ..... .... . .... . .. 64
Starting Symantec pcAnywhere ... .... . .... . .... . .... ..... ..... .... . .... . .... . . 64
Modifying installation settings . .... . .... . .... ..... ..... .... . .... . .... . .... ..... 65
Updating Symantec pcAnywhere ..... .... . .... . .... . .... ..... ..... .... . .... . .. 66
Uninstalling Symantec pcAnywhere ..... .... . .... . .... . .... ..... ..... .... . ... 67
Chapter 4 Allowing others to control your computer .... .... . .... . .... . .. 69
Managing host connections ... . .... . .... . .... ..... ..... .... . .... . .... . .... ..... ..... .. 69
Adding a host connection item to Favorites . .... . .... ..... .... . .... . .... . ... 69
Locating a recent host connection item ..... ..... .... . .... . .... . .... ..... .... 70
Ways to set up host computer .... . .... . .... . .... ..... ..... .... . .... . .... ..... ..... .... 70
Using the Connection Wizard to configure a host connection .... ..... 70
Configuring a host using advanced properties . .... . .... ..... ..... .... . .... 73
Knowing which connection device to use for host sessions . . .... ..... .. 74
Configuring a host network connection ..... .... . .... . .... ..... ..... .... . .... 75
Selecting a network card ... . .... ..... ..... .... . .... . .... ..... ..... .... . .... . .... . 76
Changing the default port numbers on the host ... ..... .... . .... . .... . .... 77
Configuring a host modem connection ... . .... . .... ..... .... . .... . .... . .... .. 78
Configuring an ISDN connection on a host .... .... . .... . .... . .... ..... ..... . 79
Configuring a direct connection on a host .... .... . .... . .... . .... ..... ..... .. 80
Setting the host startup options . .... . .... . .... . .... ..... ..... .... . .... . .... . ... 81
If you are logged on as a guest user in Windows ..... ..... .... . .... . .... . .. 82
Setting end of session options ... . .... ..... ..... .... . .... . .... . .... ..... ..... ... 83
Configuring a host computer to enlist in a directory service . ..... ..... 85
Setting the Multi Monitor options .... ..... ..... .... . .... . .... . .... ..... ..... .. 86
Specifying a host name ... ..... .... . .... . .... . .... ..... ..... .... . .... . .... ..... ... 86
Sharing host disk drives . . .... . .... ..... ..... .... . .... . .... . .... ..... ..... .... . ... 87
Ways to start a host session ..... ..... .... . .... . .... . .... ..... ..... .... . .... . .... . .... . 88
Page 9

Waiting for a connection from a remote computer ..... ..... .... . .... . ... 88
Calling a remote computer .... .... . .... . .... ..... ..... .... . .... . .... . .... ..... ... 89
Accepting a host invitation .... . .... ..... ..... .... . .... . .... ..... ..... .... . .... . . 90
What you can do during a host session .... . .... . .... . .... ..... ..... .... . .... . .... .. 90
Working with the host online menu . . .... ..... ..... .... . .... . .... . .... ..... ... 90
Letting multiple remote users hold a conference .... . .... . .... . .... ..... .. 91
Chatting online with the remote user .... ..... .... . .... . .... . .... ..... ..... ... 93
Using draw feature on the host computer .... . .... . .... . .... ..... ..... .... . . 93
Ending a host session ..... ..... .... . .... . .... ..... ..... .... . .... . .... . .... ..... .... 94
Chapter 5 Controlling another computer remotely ..... .... . .... . .... . .... . 95
Managing remote connections . . .... ..... ..... .... . .... . .... . .... ..... ..... .... . .... . . 95
Adding a remote connection item to Favorites . .... . .... ..... ..... .... . .... 95
Locating a recent remote connection item ..... ..... .... . .... . .... . .... ..... 96
Ways to set up a remote computer ..... .... . .... . .... . .... ..... ..... .... . .... . .... . .. 96
Using the Connection Wizard to configure a remote
connection ..... .... . .... . .... ..... ..... .... . .... . .... . .... ..... ..... .... . .... . .. 97
Configuring a remote connection using advanced properties . . .... . ... 98
Knowing which connection device to use for remote sessions ... . ... 100
Configuring a remote network connection ... . .... ..... ..... .... . .... . .... . 101
Customizing the data port range for remote connections .... . .... .... 102
Changing the default port numbers on the remote ..... ..... .... . .... . .. 103
Configuring a remote modem connection . ..... .... . .... . .... ..... ..... .... 104
Configuring a direct connection on a remote ..... .... . .... . .... . .... ..... 108
Configuring a remote computer to use directory services . .... ..... ... 109
Connecting throughpcAnywhere Gatewayor pcAnywhereAccess
Server ..... .... . .... . .... . .... ..... ..... .... . .... . .... . .... ..... ..... .... . .... . . 110
Modifying connection speeds .... . .... ..... ..... .... . .... . .... . .... ..... ..... .. 111
Adjusting video performance settings . .... ..... ..... .... . .... . .... . .... .... 112
Automatically logging on to the host computer . ..... .... . .... . .... . .... . 113
Automatically reconnecting if the host is busy .... ..... .... . .... . .... . ... 114
Ways to start a remote control session . . .... . .... ..... ..... .... . .... . .... . .... ... 115
Starting a remote connection item . ..... ..... .... . .... . .... ..... ..... .... . ... 115
Waiting for a host connection .... . .... ..... ..... .... . .... . .... ..... ..... .... . . 116
Connecting to a host computer using Smart Card
authentication .... ..... .... . .... . .... . .... ..... ..... .... . .... . .... ..... ..... . 116
Connecting to another computer using Quick Connect ... ..... ..... .... 117
Using pcA Quick Connect ... . .... . .... ..... .... . .... . .... . .... ..... ..... .... . ... 124
What you can do during a remote control session . ..... .... . .... . .... . .... .... 125
Taking a snapshot . .... ..... ..... .... . .... . .... . .... ..... .... . .... . .... . .... ..... . 127
Changing display settings during a remote control session . .... . .... . 128
Changing the background colors . ..... ..... .... . .... . .... . .... ..... ..... .... . 131
9Contents
Page 10

Contents10
Configuring remote printing .... .... . .... . .... . .... ..... ..... .... . .... . .... .... 132
Transferring the contents of the Windows clipboard . .... . .... . .... . ... 133
Chatting online with the host user ..... ..... .... . .... . .... . .... ..... .... . .... 134
Connecting to multiple hosts . . .... . .... . .... ..... ..... .... . .... . .... . .... ..... 134
Using draw feature on the remote computer ... ..... .... . .... . .... . .... ... 135
Turning off host computer . . .... ..... ..... .... . .... . .... ..... ..... .... . .... . ... 136
Viewing shared host drives .... . .... ..... ..... .... . .... . .... ..... ..... .... . .... 136
Ending a remote control session . . .... ..... ..... .... . .... . .... . .... ..... ..... . 137
Connecting to a computer that does not have a host running . . .... ..... ... 137
Configuring initial host properties for Quick Deploy and
Connect ... ..... ..... .... . .... . .... . .... ..... ..... .... . .... . .... ..... ..... .... . . 140
About reconnectingto a host using the Quick Deploy and Connect
feature . .... . .... . .... . .... ..... ..... .... . .... . .... . .... ..... ..... .... . .... . .... 149
Editing the Quick Deploy and Connect host properties . .... . .... ..... . 149
How pcAnywhere works in a Windows recovery
environment ... . .... ..... ..... .... . .... . .... . .... ..... ..... .... . .... . .... .... 150
Chapter 6 Supporting computers and servers remotely ..... ..... .... 151
About Symantec pcAnywhere Remote Management tools . .... . .... . .... . .. 151
User rights requirements for remote management ... ..... .... . .... . .... . .... 151
Ways to start a remote management session .... ..... ..... .... . .... . .... . .... .. 152
What you can do during a remote management session ... . .... . .... . .... ... 153
Managing tasks remotely .... . .... . .... ..... ..... .... . .... . .... . .... ..... ..... .. 154
Running DOS commands ..... .... . .... . .... ..... ..... .... . .... . .... . .... ..... .. 155
Viewing services . .... . .... ..... ..... .... . .... . .... . .... ..... ..... .... . .... . .... . .. 157
Viewing and editing system files . ..... ..... .... . .... . .... . .... ..... ..... .... . 159
Viewing and editing the system registry . .... . .... . .... ..... ..... .... . .... . 160
Viewing the event log .... .... . .... . .... ..... ..... .... . .... . .... . .... ..... ..... ... 161
Viewing and uninstalling programs . .... . .... . .... . .... ..... ..... .... . .... . . 162
Restarting or shutting down a host computer during a remote
management session . . .... ..... ..... .... . .... . .... ..... ..... .... . .... . .... . 162
Locking a computer or logging off a user during a remote
management session . . .... ..... ..... .... . .... . .... ..... ..... .... . .... . .... . 163
Sending system state commands to one or more computers . .... .... 164
Ending a remote management session .... .... . .... . .... . .... ..... ..... .... . 167
Chapter 7 Transferring files and folders ..... .... . .... . .... ..... ..... .... . .... . .. 169
About pcAnywhere File Transfer .... . .... ..... ..... .... . .... . .... . .... ..... ..... ... 169
Going to a recently visited file location .... . .... . .... ..... ..... .... . .... . ... 170
Tagging all files in a folder . ..... ..... .... . .... . .... . .... ..... ..... .... . .... . ... 171
Tagging all folders in a directory . .... ..... ..... .... . .... . .... . .... ..... ..... . 171
Tagging files using wildcard characters . .... . .... . .... ..... ..... .... . .... . . 171
Page 11

Tagging files by date modified . . .... . .... . .... ..... ..... .... . .... . .... . .... ... 172
Managing files and folders .... .... . .... . .... . .... ..... ..... .... . .... . .... . .... . 172
Comparing folders .... .... . .... . .... . .... ..... ..... .... . .... . .... . .... ..... ..... .. 173
About file transfer preferences . . .... ..... ..... .... . .... . .... . .... ..... ..... .... . ... 174
Selecting a start-up location . .... . .... ..... ..... .... . .... . .... ..... ..... .... . .. 174
Selecting an overwrite option . .... ..... ..... .... . .... . .... ..... ..... .... . .... . 175
Increasing file transfer performance . . .... ..... ..... .... . .... . .... . .... ..... 175
Ways to start a file transfer session . . .... . .... . .... ..... ..... .... . .... . .... ..... .. 176
Transferring files between computers . ..... ..... .... . .... . .... . .... ..... ... 176
Canceling a file transfer operation ... ..... .... . .... . .... ..... ..... .... . .... . . 177
Pausing a file transfer operation ... ..... .... . .... . .... . .... ..... .... . .... . ... 177
Viewing the Command Queue during a file transfer
operation ... ..... .... . .... . .... . .... ..... ..... .... . .... . .... ..... ..... .... . .... 178
Changing file transfer settings during a session .... . .... ..... ..... .... . . 178
About synchronization and cloning ... ..... .... . .... . .... . .... ..... ..... .... . .... . 179
Synchronizing folders ..... .... . .... . .... . .... ..... ..... .... . .... . .... . .... ..... . 179
Synchronizing folders by file type . ..... ..... .... . .... . .... . .... ..... ..... ... 180
Cloning a folder ... ..... ..... .... . .... . .... . .... ..... ..... .... . .... . .... . .... ..... .. 180
Chapter 8 Automating file transfer and management tasks ... .... 181
11Contents
About the Command Queue . .... . .... . .... ..... ..... .... . .... . .... . .... ..... ..... .... 181
Using command queue files to automate tasks . . .... ..... .... . .... . .... . .... ... 182
Using environment variables .. .... ..... ..... .... . .... . .... . .... ..... ..... .... 183
Working with command queue files ... .... . .... . .... . .... ..... ..... .... . .... 183
Arranging items in the queue file ... ..... ..... .... . .... . .... . .... ..... ..... .. 188
Adding remote connection items to a command queue file . ..... .... . 189
Selecting file handling options for command queues ... ..... .... . .... . . 190
Selecting end of session options for command queues . ..... ..... .... . . 191
Creating a command queue file during a session ... . .... ..... ..... .... . .... . ... 196
Pausing the Command Queue ... . .... . .... ..... ..... .... . .... . .... . .... ..... .. 196
Removing a command from the command list ... ..... ..... .... . .... . .... . 197
Arranging commands in the command list . . .... . .... ..... ..... .... . .... . . 197
Saving a command queue file .... ..... .... . .... . .... . .... ..... ..... .... . .... . .. 197
Generating a command queue report on-demand ... . .... . .... ..... ..... 198
Running a command queue file ... ..... ..... .... . .... . .... . .... ..... ..... .... . .... . . 198
Running a command queue file during a session . .... ..... ..... .... . .... 199
Running a command queue file without starting a session ..... ..... . 199
Scheduling a command queue file to run automatically . . .... ..... .... 200
Chapter 9 Securing your computer and sessions .... . .... ..... ..... .... . .. 203
Protecting a host computer from unauthorized access ... . .... . .... . .... ..... 203
About authentication in pcAnywhere . ..... ..... .... . .... . .... . .... ..... .... 204
Page 12

Contents12
Configuring logon security .... .... . .... . .... . .... ..... .... . .... . .... . .... ..... . 209
Securing the host computer upon connection ... ..... .... . .... . .... . .... . 210
Hiding the host name from network search results . . .... . .... . .... ..... 211
Calling back remote users . .... . .... . .... ..... ..... .... . .... . .... . .... ..... ..... 212
About access rights . ..... ..... .... . .... . .... . .... ..... .... . .... . .... . .... ..... ..... .... . 213
Configuring caller rights . .... . .... . .... ..... ..... .... . .... . .... . .... ..... ..... .. 213
Setting time limits for callers ... . .... ..... ..... .... . .... . .... ..... ..... .... . ... 214
Blocking connections by days or times ... ..... .... . .... . .... . .... ..... ..... . 215
About session security .... . .... ..... ..... .... . .... . .... . .... ..... ..... .... . .... . .... ... 216
Restricting control of the keyboard and mouse .... . .... ..... ..... .... . .. 216
Setting inactivity time limits for sessions ... . .... ..... ..... .... . .... . .... .. 217
Using encryption to protect data . . .... ..... ..... .... . .... . .... . .... ..... ..... .... . . 218
About the Symantec Cryptographic Module .... ..... ..... .... . .... . .... . .. 218
About symmetric encryption ... . .... ..... ..... .... . .... . .... . .... ..... ..... ... 219
About public-key encryption ... . .... . .... ..... ..... .... . .... . .... ..... ..... ... 219
Understanding the performance trade-offs . .... . .... ..... ..... .... . .... . . 220
How pcAnywhere works with encryption ... .... . .... . .... . .... ..... ..... .. 220
Configuring pcAnywhere to use pcAnywhere encoding .... . .... ..... .. 221
Configuring pcAnywhere to use symmetric encryption . .... ..... ..... . 221
Denying connections from computers that use lower
encryption . .... . .... . .... ..... .... . .... . .... . .... ..... ..... .... . .... . .... . .... 222
Configuring pcAnywhere to use public-key encryption . ..... .... . .... . 223
Protecting configuration settings ... ..... ..... .... . .... . .... ..... ..... .... . .... . ... 228
Ways to assess host security . ..... ..... .... . .... . .... . .... ..... ..... .... . .... . .... ... 229
Running the Host Assessment Tool .... . .... ..... ..... .... . .... . .... . .... .... 230
Specifying the location of the host connection items .... .... . .... . .... . 231
Analyzing scan results . . .... ..... ..... .... . .... . .... . .... ..... ..... .... . .... . ... 231
Getting more information about scan results ... . .... . .... . .... ..... ..... . 232
Learning more about security features . ..... .... . .... . .... . .... ..... ..... .. 232
Saving scan results . .... . .... . .... ..... ..... .... . .... . .... . .... ..... ..... .... . .... 233
Chapter 10 Monitoring and recording sessions ... .... . .... . .... ..... ..... .... 235
Monitoring events in Symantec pcAnywhere ..... .... . .... . .... . .... ..... .... . . 235
Sending logging events to an SNMP trap ..... ..... .... . .... . .... . .... ..... . 235
Generating a pcAnywhere log file . .... ..... ..... .... . .... . .... . .... ..... ..... 237
Logging events in the Windows Event Viewer ... . .... . .... . .... ..... ..... 238
About logging information to a central server . ..... .... . .... . .... ..... ... 239
Managing log files .... . .... . .... ..... ..... .... . .... . .... ..... ..... .... . .... . .... . .... ... 240
Creating an activity log report . . .... . .... . .... ..... ..... .... . .... . .... ..... ... 241
Archiving or deleting log file data . .... . .... ..... ..... .... . .... . .... ..... ..... 242
About recording and replaying sessions . .... . .... ..... .... . .... . .... . .... ..... ... 242
Recording a remote session . . .... ..... ..... .... . .... . .... . .... ..... ..... .... . .. 243
Page 13

Automatically recording a remote session ... . .... . .... ..... .... . .... . .... . 243
Automatically recording a host session ... . .... . .... ..... ..... .... . .... . .... 244
Replaying a recorded session ..... .... . .... . .... ..... ..... .... . .... . .... . .... .. 244
Saving information from a recorded session .... ..... ..... .... . .... . .... . . 246
Chapter 11 Connecting across multiple platforms .... ..... ..... .... . .... . .. 247
About Symantec pcAnywhere CrossPlatform .... .... . .... . .... . .... ..... ..... .. 247
Installing Symantec pcAnywhere CrossPlatform . .... . .... . .... . .... ..... ..... 247
Installing pcAnywhere CrossPlatform on Windows . .... . .... ..... ..... . 248
Installing pcAnywhere CrossPlatform on Linux .... . .... . .... ..... ..... . 248
Installing pcAnywhere CrossPlatform on MAC OS X ..... ..... .... . .... 249
Starting pcAnywhere CrossPlatform . .... ..... ..... .... . .... . .... . .... ..... . 250
Connecting to a host computer through pcAnywhere
CrossPlatform ... . .... . .... . .... ..... ..... .... . .... . .... . .... ..... ..... .... . .... . ... 251
Securing connections through pcAnywhere CrossPlatform . ..... ..... .... . 252
Encrypting your sessions through pcAnywhere
CrossPlatform ... . .... . .... . .... ..... ..... .... . .... . .... . .... ..... ..... .... . .. 252
Connecting to a serialized host through pcAnywhere
CrossPlatform ... . .... . .... . .... ..... ..... .... . .... . .... . .... ..... ..... .... . .. 254
Navigating in a pcAnywhere CrossPlatform session . ..... ..... .... . .... . .... . 254
Transferring files during a pcAnywhere CrossPlatform
session ..... ..... .... . .... . .... ..... ..... .... . .... . .... . .... ..... ..... .... . .... . 257
Transferring clipboard content in a pcAnywhere CrossPlatform
session ..... ..... .... . .... . .... ..... ..... .... . .... . .... . .... ..... ..... .... . .... . 257
Increasing video performance during a pcAnywhere
CrossPlatform session .... . .... ..... ..... .... . .... . .... . .... ..... ..... .... . 258
Using ezScroll to navigate during a pcAnywhere CrossPlatform
session ..... ..... .... . .... . .... ..... ..... .... . .... . .... . .... ..... ..... .... . .... . 258
Saving and opening pcAnywhere CrossPlatform connection
files . ..... ..... .... . .... . .... ..... ..... .... . .... . .... . .... ..... ..... .... . .... . ... 259
Ending a pcAnywhere CrossPlatform session . .... . .... ..... ..... .... . .... 260
13Contents
Chapter 12 Connecting from a Web browser ... .... . .... . .... ..... ..... .... . .... 261
About Symantec pcAnywhere Web Remote .... .... . .... . .... . .... ..... ..... .... 261
About Web Remote setup .... . .... . .... . .... ..... ..... .... . .... . .... . .... ..... ..... ... 262
Starting the Web Remote from the installation CD ... ..... ..... .... . .... 263
Starting theWeb Remote from a hard drive, server,or removable
media . ..... .... . .... . .... ..... ..... .... . .... . .... . .... ..... ..... .... . .... . .... . . 263
Ways to secure your Web Remote session . . .... . .... ..... ..... .... . .... . .... . ... 264
How the Web Remote secures the logon process ... ..... ..... .... . .... . .. 265
About Web Remote encryption ... . .... ..... ..... .... . .... . .... . .... ..... ..... . 265
Configuring session encryption . .... . .... ..... ..... .... . .... . .... ..... ..... ... 267
Page 14

Contents14
Using a serial ID to secure a connection on Web Remote .... . .... . .... 268
Editing port settings in Web Remote ... ..... .... . .... . .... . .... ..... ..... ... 268
Ways to connect to a host through Web Remote .... . .... . .... . .... ..... ..... .. 269
Connecting to a host in the host list ... ..... ..... .... . .... . .... . .... ..... ... 269
Connecting to a host by manually entering connection
information .... . .... . .... . .... ..... ..... .... . .... . .... ..... ..... .... . .... . .... 270
What you can do during a Web Remote session ... ..... .... . .... . .... . .... ..... 270
Transferring clipboard contents on Web Remote . ..... .... . .... . .... . ... 272
Increasing video performance during a Web Remote session ..... ... 273
Using ezScroll to navigate during a Web Remote session ... .... . .... . 273
Ending a Web Remote session ... ..... ..... .... . .... . .... . .... ..... ..... .... . .. 274
Chapter 13 Connecting from a mobile device ... .... . .... . .... . .... ..... ..... ... 275
About Symantec pcAnywhere Mobile .. . .... . .... ..... ..... .... . .... . .... . .... ... 275
What you can do in Symantec pcAnywhere Mobile ... . .... . .... ..... ... 276
Getting help on your device .... .... . .... . .... . .... ..... ..... .... . .... . .... ..... 276
Symantec pcAnywhere Mobile installation ... .... . .... . .... . .... ..... ..... .... . . 277
Symantec pcAnywhere Mobile system requirements . . .... . .... ..... ... 277
If you have a previous version of Symantec pcAnywhere Mobile
installed . ..... ..... .... . .... . .... . .... ..... ..... .... . .... . .... . .... ..... .... . .. 278
Installing Symantec pcAnywhere Mobile . ..... .... . .... . .... . .... ..... .... 278
Uninstalling Symantec pcAnywhere Mobile ... ..... .... . .... . .... . .... ... 281
Starting Symantec pcAnywhere Mobile .... . .... . .... . .... ..... ..... .... . .. 283
Ways to connect another computer from a mobile device ... ..... ..... .... . . 284
Configuring a custom connection item on your mobile device ... .... 284
Including logon information in your mobile connections ... ..... .... . 286
Connecting through a pcAnywhere Gateway or Access
Server ..... .... . .... . .... . .... ..... ..... .... . .... . .... . .... ..... ..... .... . .... . . 287
Encrypting your mobile sessions ... . .... . .... ..... ..... .... . .... . .... . .... ... 288
Using a serial ID to secure mobile connections .... .... . .... . .... . .... .... 290
Specifying the host ports for mobile connections . .... ..... ..... .... . ... 290
Adding subnet addresses to a host search on your mobile
device ... ..... ..... .... . .... . .... . .... ..... .... . .... . .... . .... ..... ..... .... . .... 291
Starting a mobile session from a custom connection item .... .... . ... 292
Starting a mobile connection from Quick Connect . . .... . .... . .... ..... . 292
Navigating in the Symantec pcAnywhere Mobile session screen ... ..... .. 294
Modifying navigation preferences during a mobile session . . .... . .... 296
Improving performance during a mobile session .... . .... ..... ..... .... . 297
Performing remote control tasks from a mobile device .... .... . .... . .... .... 298
Starting a remote management session in Symantec pcAnywhere
Mobile . . .... ..... ..... .... . .... . .... ..... ..... .... . .... . .... . .... ..... ..... .... . .... . . 298
What you can do during a remote management session ... . .... . .... . .... ... 299
Page 15

Viewing or changing program status from a mobile device . .... . .... . 299
Stopping and starting processes from a mobile device . ..... .... . .... . . 300
Locking your computer or logging off a user from a mobile
device ... ..... ..... .... . .... . .... . .... ..... .... . .... . .... . .... ..... ..... .... . .... 302
Restarting or shutting down a host computer from a mobile
device ... ..... ..... .... . .... . .... . .... ..... .... . .... . .... . .... ..... ..... .... . .... 303
Running DOS commands from a mobile device . .... ..... ..... .... . .... . . 304
Ending a mobile session . ..... .... . .... . .... . .... ..... ..... .... . .... . .... ..... ... 305
Managing connection items on a mobile device . . .... . .... . .... ..... ..... .... . . 306
Renaming a connection item on a mobile device .... ..... .... . .... . .... . . 306
Copying a connection item on a mobile device ... . .... . .... ..... ..... .... . 306
Organizing connection items on a mobile device .... ..... .... . .... . .... . 307
Removing a connection item from a mobile device . . .... . .... . .... ..... . 307
About closing Symantec pcAnywhere Mobile .. .... . .... . .... . .... ..... ..... ... 307
Chapter 14 Managing Symantec pcAnywhere Gateway . .... . .... . .... . . 309
About Symantec pcAnywhere Gateway . .... . .... ..... ..... .... . .... . .... ..... .... 309
Installing Symantec pcAnywhere Gateway ... . .... . .... ..... .... . .... . .... . .... . 310
About the Gateway Manager ..... ..... .... . .... . .... . .... ..... ..... .... . .... . .... . ... 311
Starting pcAnywhere Gateway ... ..... ..... .... . .... . .... ..... ..... .... . .... . . 312
Changing the launch settings for pcAnywhere Gateway . .... . .... . .... 313
Changing the name that the gateway computer uses ... . .... . .... ..... . 313
Hiding the gateway computer from search results .... ..... ..... .... . ... 314
Securing the gateway computer . ..... .... . .... . .... . .... ..... ..... .... . .... . . 314
Monitoring events in pcAnywhere Gateway .... . .... ..... ..... .... . .... . .. 315
Editing the port settings for pcAnywhere Gateway .... . .... . .... ..... .. 316
Configuring pcAnywhere Gateway to allow incoming modem
connections .... . .... . .... ..... ..... .... . .... . .... . .... ..... ..... .... . .... . .... 317
Choosing how pcAnywhere Gateway discovers hosts .... . .... ..... ..... 318
Adding or removing a subnet for host searches in pcAnywhere
Gateway . . .... . .... . .... ..... ..... .... . .... . .... . .... ..... .... . .... . .... . .... .. 318
Docking a gateway computer to an access server . ..... .... . .... . .... . ... 319
Ending a pcAnywhere Gateway session ..... ..... .... . .... . .... . .... ..... .. 320
Stopping the pcAnywhere Gateway service ... ..... .... . .... . .... . .... .... 320
15Contents
Index . . .... ..... ..... .... . .... . .... ..... ..... .... . .... . .... . .... ..... ..... .... . .... . .... . .... ..... ..... .... . .... . .... . .. 321
Page 16

Contents16
Page 17

Chapter
Introducing Symantec pcAnywhere
This chapter includes the following topics:
■ About Symantec pcAnywhere
■ What's new in Symantec pcAnywhere
■ Components of Symantec pcAnywhere
■ How Symantec pcAnywhere works
1
■ What you can do with Symantec pcAnywhere
■ Where to find more information
About Symantec pcAnywhere
Symantec pcAnywhere provides secure, remote access to computers and servers.
It lets you quickly resolve helpdesk and server support issues or stay productive
while youwork away from your office. You canuse yourdesktop computer, laptop,
or mobile device to work across multiple platforms, including Windows®, Linux®,
and Mac® OS. You can also deploy a limited-functionality, single-use host to
computers that do not have a host running.
Connectivity features such as Symantec pcAnywhere Gateway help facilitate
connections through firewalls, routers, and other types of Network Address
Translation (NAT) devices. Robust security features help protect your computers
and servers from unauthorized access.
You can use Symantec pcAnywhere in the following ways:
Page 18

Introducing Symantec pcAnywhere
18
What's new in Symantec pcAnywhere
Manage computers
remotely
Support and maintain
servers
Transfer files between
computers
Work from a remote
location
Symantec pcAnywhere lets helpdesk providers and
administrators troubleshoot and quickly resolve computer
problems. You can remotely perform diagnostics, check and
modify settings, and deploy and install software.
Symantec pcAnywherelets administratorsconnect toservers
across their organizations to perform routine maintenance,
deploy and install software patches and upgrades, assess
performance, and troubleshoot network problems.
Symantec pcAnywherelets youconnect toyour homeor office
computer to quickly get the files that you need. You can
perform automatic end-of-day file transfers from one
computer to another or exchange multimedia and other files
that are too large to send by email.
Symantec pcAnywhere lets you remotely connect to another
computer and work as though you are sitting in front of that
computer. Youcan view and edit files, run software,print files
to a printer at your location or at the host's location, or give
presentations or demonstrations.
What's new in Symantec pcAnywhere
Symantec pcAnywhere includes the following new features and enhancements:
2008 Server
Multi Monitor
pcA Quick Connect
Lets youremotely connectto andfrom a2008 Serverplatform
to all platforms that are supported by pcAnywhere.
Lets you select the monitor that isdisplayed by default on the
remote computer when the session starts.
pcA QuickConnect letsyou connectto anothercomputer with
minimum setup. You can use this option when you need to
connect to the host computer.
Components of Symantec pcAnywhere
See Table 1-1 on page ?. lists the main components of Symantec pcAnywhere.
These components are included on the product CD as separate installations.
Page 19

Components of Symantec pcAnywhere
19Introducing Symantec pcAnywhere
Table 1-1
Symantec pcAnywhere full
product
Symantec pcAnywhere
CrossPlatform
Symantec pcAnywhere
Gateway
Symantec pcAnywhere Mobile
Main components of Symantec pcAnywhere
DescriptionName
Lets you access computers and servers remotely for
remote control, file transfer, and remote management
tasks. Runs on Windows operating systems only.
You can choose from several installation options that
range from the full version to scaled-down versions that
contain only the functionality that you need.
See “Installation options” on page 56.
Lets you remotely access one or more computers that are
running Windows,Linux, or Mac OS Xoperating systems.
See “About Symantec pcAnywhere CrossPlatform”
on page 247.
Lets you find and connect to one ormore host computers
that arebehind a firewall, router, or other type of Network
Address Translation (NAT) device.
See “About Symantec pcAnywhere Gateway” on page 309.
Lets you access computers and servers remotely from a
mobile device.
See “About Symantec pcAnywhere Mobile ” on page 275.
Symantec pcAnywhere Web
Remote
Host Administrator
Symantec Packager
Lets you connect to another computer through a
Java-enabled Web browser.
See “About Symantec pcAnywhere Web Remote ”
on page ?.
Lets youremotely manage thepcAnywhere hoststhat are
running on your network.
For more information, see the Symantec pcAnywhere
Administrator's Guide .
Lets youcreate custominstallations ofSymantec pcAthat
you can deploy to target systems.
For more information, see the Symantec pcAnywhere
Administrator's Guide.
Page 20

Introducing Symantec pcAnywhere
20
How Symantec pcAnywhere works
How Symantec pcAnywhere works
Symantec pcAnywhere uses remote control technology to let you connect to
another computer or server and work as though you are sitting in front of it.
Symantec pcAnywhere supports network connections over a local area network
(LAN), wide area network (WAN), or the Internet. It also supports
modem-to-modem connections and direct, computer-to-computer connections
through a serial or parallel port and the appropriate type of cable.
In most cases, the remote user initiates the connection. You provide the
information that is needed to connect to the host computer. You can also select
options to increase security or optimize performance. To make a connection, the
host computer must be set up to wait for incoming pcAnywhere connections. The
host usercan select the type ofdevice to use for connections (for example,TCP/IP).
The host user can select security options to control access to the host computer.
Administrators can use Quick Deploy and Connect to configure and deploy a
limited-functionality, single-usehost to computers that do not havea hostrunning.
You musthave administratorrights on the computer to which you want toconnect.
See “ Connecting to a computer that does not have a host running” on page 137.
Understanding the difference between a host and a remote
When two computers are connected using pcAnywhere, they function in a
client/server relationship.The host computer, as theserver, waitsfor connections
from a remote computer and provides the requested services.
When you configure a host computer, you control who can connect to the host
computer and what level of access the remote user should have.For example, you
can restrict a remote user from restarting the host computer.
See “Ways to set up host computer” on page 70.
The remote computer, as the client, connects to the host computer and specifies
the actions that should be carried out. Although the actual work is performed on
the host computer, anything that happens on the host computer screen is also
displayed on the remote computer screen.
See “Ways to set up a remote computer” on page 96.
About connecting over the Internet
Symantec pcAnywhere lets you connect to a host computer over the Internet,
provided that both the host and the remote computers have Internet access. If
the host computer has a public IP address, connecting over the Internet involves
the following process:
Page 21

How Symantec pcAnywhere works
■ The host user connects to the Internet, following the instructions provided by
the Internet service provider (ISP).
■ In pcAnywhere,the host user starts a host sessionthat isconfigured for TCP/IP.
See “Ways to start a host session” on page 88.
■ The remote user connects to theInternet, following the instructions provided
by the ISP.
■ In pcAnywhere, the remote user configures a TCP/IP connection, specifying
the IP address of the host computer and the logon information.
See “Configuring a remote network connection” on page 101.
■ The remote user starts the pcAnywhere remote connection item.
See “Ways to start a remote control session” on page 115.
About cable modem connections
Unlike traditional modems, which convert analogand digital signals to exchange
data over a telephone line, cable modems use Internet protocols to transmit data
over a cable television line. Because cable modems use TCP/IP to transmit data,
cable modem connections must be configured as TCP/IP network connections.
The default Network, Cable, DSL connection item in pcAnywhere is configured
for TCP/IP.
See “Configuring a host network connection” on page 75.
See “Configuring a remote network connection” on page 101.
21Introducing Symantec pcAnywhere
About DSL or ADSL connections
Digital subscriberlines, such as ADSL or DSL, arehigh-speed Internet connections
offered by an Internet service provider (ISP). Your computer operates as though
it is connected to a network and is assigned an IP address. DSL and ADSL
connections must be configured as TCP/IP network connections.
The default Network, Cable, DSL connection item in pcAnywhere is configured
for TCP/IP.
See “Configuring a host network connection” on page 75.
See “Configuring a remote network connection” on page 101.
About Internet broadband connections
Connecting over the Internet to a home-based network that uses a broadband
solution such as a cable modem or DSL can present some challenges. Many
home-based broadband Internet solutions include a cable or DSL router, which
Page 22
Remote
computer
Internet
Router
10.101.101.1
Port-to-IP
mapping table
Host
computer
192.168.1.2
192.168.1.3
192.168.1.4
Introducing Symantec pcAnywhere
22
How Symantec pcAnywhere works
lets multiple computers share a single Internet connection. The router uses
Network Address Translation (NAT) technology to make this address sharing
possible.
In a sharing situation, this IP address is assigned to the router. The router, in turn,
generates new IP addresses, and then assigns them to the individual computers
that share the connection.
When you subscribe to a broadband service, your Internet service provider (ISP)
assigns you a single IP address. These router-assigned IP addresses are private
and cannot be seen from the Internet. The only address that can be seen from the
Internet is the IP address that is assigned to the router.
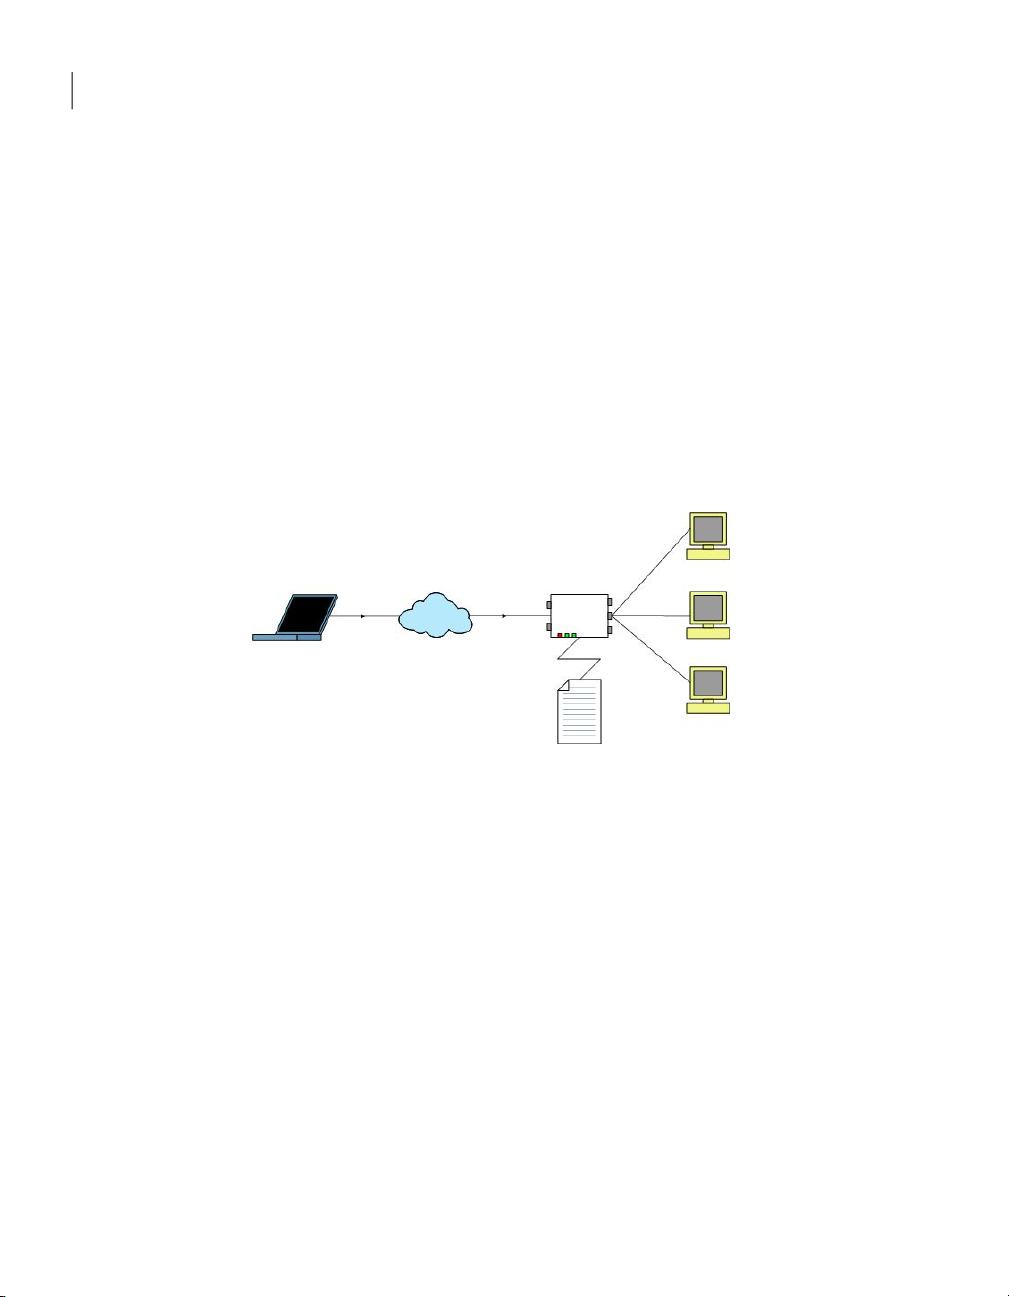
Figure 1-1 shows how Internet broadband connections are made.
Figure 1-1
How broadband connections work
To support inbound connections from a pcAnywhere remote, you must configure
the router to direct incoming data from the pcAnywhere ports to the
router-assigned IP address of the host computer.
For pcAnywhere connections, you must map the following pcAnywhere port
numbers to the private IP address of the host computer, which is assigned by the
router:
■ 5631 (data)
■ 5632 (status)
If you are connecting to a host computer that uses custom port numbers, you
must configure the custom port numbers in the remote connection item. This
port mappingconfiguration is done in theadministrator propertiesfor the router,
which is typically accessible through a Web browser. The location of the port
mapping settings varies by router.
For more information, consult the documentation for your router.
Page 23

How Symantec pcAnywhere works
Symantec pcAnywhere Gateway lets you set up a single connection point to
facilitate theprocess offinding andconnecting tohost computers that are behind
a Network Address Translation (NAT) device.
See “About Symantec pcAnywhere Gateway” on page 309.
About connecting from outside a firewall
For security reasons, an administrator might set up a firewall to restrict access
to specificIP addresses. A firewall preventscomputers thatare outside the firewall
from connecting to any IP address that is inside the firewall. Some corporate
environments mightalso have security policies that restrict users from installing
a modem phone line behind a firewall.
If thehost computer is connected toa network that is behind a firewall,the remote
user must have a way to connect to the network through a Remote Access Service
(RAS) or virtual private network (VPN). This information must be provided by an
administrator.
Once theremote user connects to the corporate networkusing oneof these trusted
services, the remote computer becomes a node on the network and can use
pcAnywhere to connect to the target computer using TCP/IP.
Connecting to a network host computer from outside a firewall involves the
following process:
■ Connect to the host site's network using the procedures provided by the
administrator at the host site.
■ In pcAnywhere, configure a TCP/IP network connection, specifying the IP
address of the host computer to which you want to connect.
See “Configuring a remote network connection” on page 101.
■ Start the remote control session.
See “Ways to start a remote control session” on page 115.
Symantec pcAnywhere Gateway lets you set up a single connection point to
facilitate theprocess offinding andconnecting tohost computers that are behind
a Network Address Translation (NAT) device.
See “About Symantec pcAnywhere Gateway” on page 309.
23Introducing Symantec pcAnywhere
Issues that affect performance
Even with the advances in remote control technology, controlling another
computer over a communication device poses many performance challenges.
During a remote control session, you control the host computer as though you
Page 24

Introducing Symantec pcAnywhere
24
How Symantec pcAnywhere works
are sitting in front of it. Everything from the desktop wallpaper on the host
computer to the movement of your cursor must be transmitted back and forth.
The two biggest factors in performance are the speed of the connection and
graphics overhead. The more data that needs to be transferred between the
computers—especially graphics data—the slower the performance.
Some security settings, such as data encryption, can also affect performance.
When configuring a connection, you must balance the need for high performance
with the need to protect your data.
See “Understanding the performance trade-offs” on page 220.
Ways to improve performance
Although SymantecpcA is designed to optimize performance, there are anumber
of factors that you can control to boost performance.
Table 1-2 includes information about how you can improve performance.
Improve connection speed
Table 1-2
Ways to improve performance
SolutionObjective
Ensure that you are using the fastest type of connection possible. If you are using a
modem, you should use the fastest connection that your modem and phone line can
support.
Symantec pcAnywhere can detect the speed of your connection (bandwidth) and
automatically adjust video settings to optimize performance.
Page 25

How Symantec pcAnywhere works
25Introducing Symantec pcAnywhere
Minimize graphics
overhead
Work more efficiently
Table 1-2
Ways to improve performance (continued)
SolutionObjective
In the Windows operating system, everything that you see on your computer screen,
from astatus barto a menu, is a graphical user interface. This information is transmitted
to theremote computerover theconnection device.The moregraphics thatare displayed
on the host computer, the more informationthat must be sent tothe remote computer,
which slows performance.
You can minimize graphics overhead in the following ways:
■ For low-bandwidth connections (for example, modems), select the low bandwidth
option when you configure the remote properties in Symantec pcA.
■ Turn off status bars in applications and on the Windows system tray, including
modem lights.
■ Minimize dialog boxes that you are not using and use smaller windows.
■ Reduce the desktop resolution and number of colors on the display.
■ Hide the Windows taskbar on the host.
■ Disable wallpaper, backgrounds, and screen savers on the host.
■ Disable the Windows Active Desktop feature on the host.
■ Turn off full-window dragging capability on the host to avoid transmitting each
pixel of movement as you drag a window across the computer screen.
As you perform tasks during a remote control session, use the following guidelines to
help improve performance:
■ If you are running pcAnywhere on Vista, to improve performance, use computers
that have graphics cards with high ratings.
■ Avoid using animation.
■ Use the Page Up and Page Down keys to scroll through documents.
■ Disable the scroll wheel on your mouse.
■ Avoid performing remote control tasks when transferring files.
■ Use toolbars instead of the menu to perform tasks.
Changing performance settings
Symantec pcAnywhere stores data in a cache file to avoid resending the same
data over the connection, thus improving performance. Symantec pcAnywhere
never uses more than 16 MB of disk space for a cache file.
To change performance settings
In the Symantec pcAnywhere window, on the Edit menu, click Preferences.
1
In thepcAnywhere Options window, on theRemote Operation tab, check Use
2
pcAnywhere cache file.
Page 26

Introducing Symantec pcAnywhere
26
What you can do with Symantec pcAnywhere
What you can do with Symantec pcAnywhere
Symantec pcAnywherelets you connect to anothercomputer to troubleshoot and
resolve computerproblems, support and maintain servers, transfer files,and work
from a remote location.
You can use pcAnywhere to do the following:
Let others connect to your
computer remotely
Take control of another
computer
Administer computersand
servers remotely
Setting up your computer as a host lets you do the following:
■ Remotely connect to it when working from a remote
location
■ Let someonein anotherlocation helpyou solvea computer
problem
■ Host presentations and demos over a conference
connection
See “Managing host connections” on page 69.
The remote control features let you do the following:
■ Help another user troubleshoot a computer problem
■ Access software, email, or other resources on another
computer
■ Print filesthat are stored on another computer to a printer
at your location
See “Managing remote connections” on page 95.
The remote management tools let you do the following:
■ Connect to a remote server to troubleshoot problems and
perform routine maintenance
■ Troubleshoot and resolve computer problems quickly
■ Monitor computer performance
■ Remotely install and remove software
■ Deploy software, patches, and upgrades
See “AboutSymantec pcAnywhereRemote Management tools”
on page 151.
Page 27

Where to find more information
27Introducing Symantec pcAnywhere
Transfer files
The file transfer and command queue features let you do the
following:
■ Quickly access the files that you need to stay productive
■ Perform automatic end-of-day file transfers for audit and
archive purposes
■ Automatically distribute files and updates to multiple
computers
■ Exchange multimedia and other files that are too large to
send by email
See “About pcAnywhere File Transfer” on page 169.
See “About the Command Queue” on page 181.
Where to find more information
Check the Symantec Web site at the following URL for technical support
information, Knowledge Base articles, online tutorials, and the latest product
information:
www.symantec.com/techsupp/
In additionto the online Help, the following documentationresources areavailable
on the Symantec pcAnywhere CD:
■ Symantec pcAnywhere User's Guide
■ Symantec pcAnywhere Administrator's Guide
■ Symantec pcAnywhere OLE Automation Guide
■ Symantec Packager Implementation Guide
■ Symantec WebRemote Help
■ Symantec CrossPlatform Help
■ Symantec pcAnywhere Getting Started Guide
Note: Viewing the online manuals requires Acrobat Reader 5.0 or later.
Page 28

Introducing Symantec pcAnywhere
28
Where to find more information
Page 29

Chapter
Navigating in Symantec pcAnywhere
This chapter includes the following topics:
■ Selecting a view mode in Symantec pcAnywhere
■ Starting a connection in Basic View
■ Viewing or editing connection settings
■ Working in Advanced View
2
■ About the Session Manager
■ Using Thumbnail tab
■ Managing pcAnywhere preferences
Selecting a view mode in Symantec pcAnywhere
Symantec pcAnywhere lets you work in one of the following modes:
Basic View
Advanced View
Basic View provides quick access to the most commonly
performed pcAnywhere tasks. It simplifies the process of
configuring and starting connections.
See “Starting a connection in Basic View” on page 30.
Advanced Viewlets youaccess configurationoptions andtools
that are not available in Basic View. It lets you manage
connection settings, customize preferences, and select
advanced security options.
Page 30
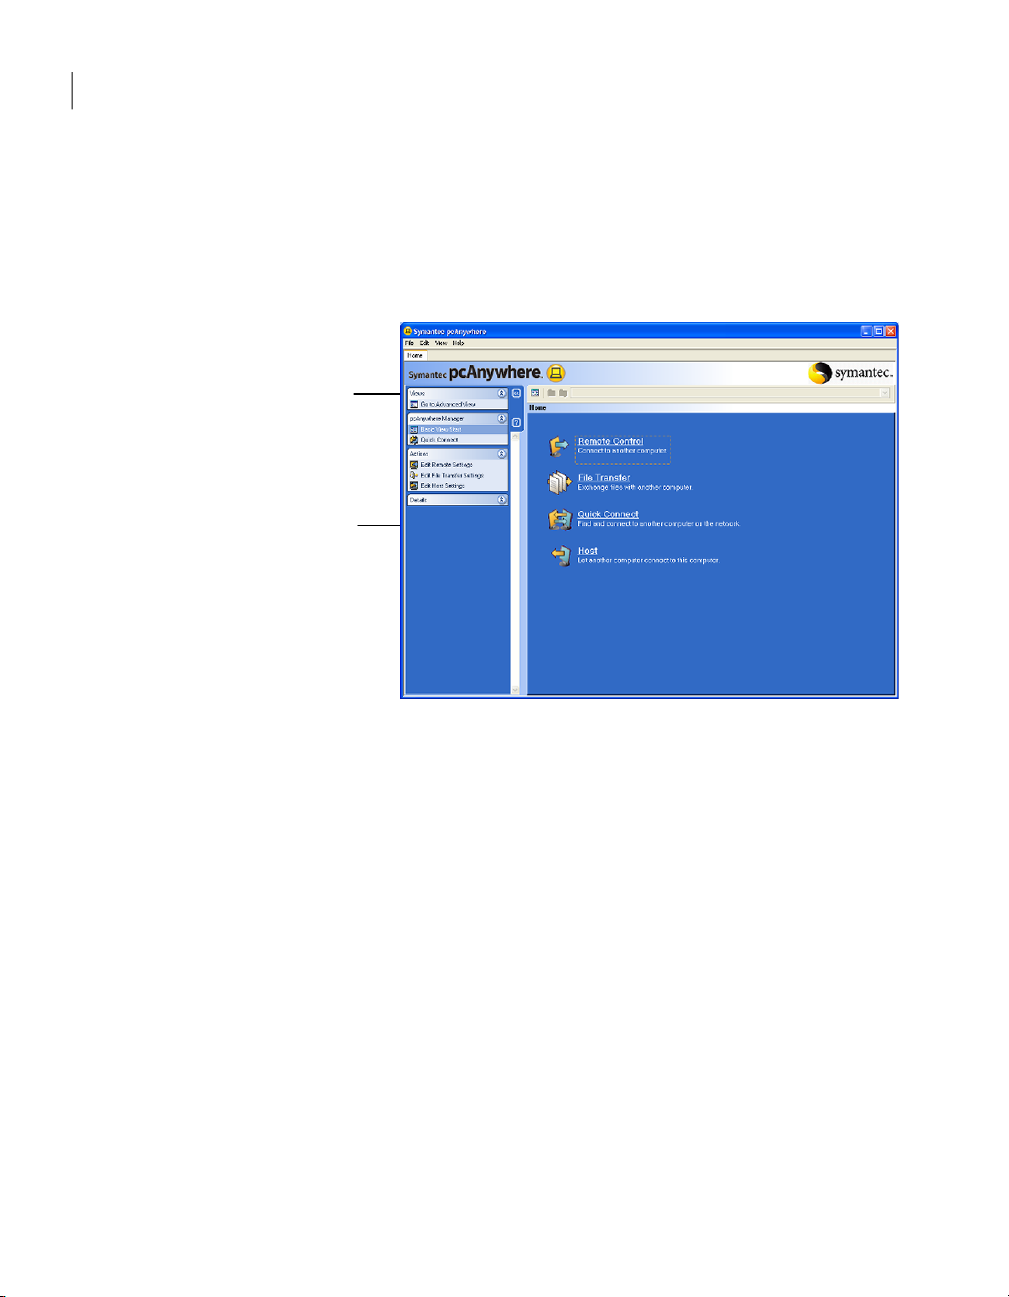
Lets you switch
between view modes
Shows the Basic
View tasks
Navigating in Symantec pcAnywhere
30
Starting a connection in Basic View
When youstart Symantec pcAnywhere for the first timeafter installation, it opens
in BasicView mode.The nexttime thatyou startpcAnywhere, itopens inthe view
that you were using when you closed the program.
Figure 2-1 shows the Symantec pcAnywhere window with Basic View selected.
Figure 2-1
Symantec pcAnywhere window in Basic View
To select a view mode in Symantec pcAnywhere
In the Symantec pcAnywhere window, on the left navigation bar, do one of
◆
the following:
■ To switchfrom Basic View to AdvancedView, click Go to AdvancedView.
■ To switch from Advanced View to Basic View, click Go to Basic View.
Starting a connection in Basic View
You can use Basic View mode to quickly perform the following tasks:
Remote control
File transfer
Quick connect
Lets youcontrol ahost computerremotely andwork asthough
you are sitting in front of it
Starts thesession in file transfer mode so thatyou canquickly
access the files that you need
Lets you quickly connect to another computer with minimal
setup
Page 31

Starting a connection in Basic View
31Navigating in Symantec pcAnywhere
Host
Lets you set up your computer so that others can connect to
it
The first time that you start a remote control, file transfer, or host connection in
Basic View mode, Symantec pcAnywhere starts the Connection Wizard. The
Connection Wizard simplifies the process of configuring and starting a
pcAnywhere connection. After you complete the steps in the Connection Wizard,
you can start the connection.
The options that you select in the Connection Wizard are saved in a connection
item file. Symantec pcAnywhere uses these settings for subsequent connections
that you start from Basic View. You can edit these settings.
See “Viewing or editing connection settings” on page 33.
You can access more advanced tools and configuration options by switching to
Advanced View.
See “Working in Advanced View” on page 34.
Page 32

Navigating in Symantec pcAnywhere
32
Starting a connection in Basic View
To start a connection in Basic View
In theSymantec pcAnywhere window, on left navigation bar,click Goto Basic
1
View.
Under pcAnywhere Manager, click Basic View Start.
In the right pane, select one of the following:
2
Remote
Control
File Transfer
Quick
Connect
Starts the connection in remote control mode using the settings that
you selected in the Connection Wizard. For example, if you specified
an IP address for the host computer, pcAnywhere tries to connect to
that IP address.
After the connection is made and you log on, the host desktop is
displayed on your computer screen in a Session Manager window.
See “About the Session Manager” on page 42.
When you select this option for the first time, pcAnywhere starts the
Connection Wizard.
Starts theconnection infile transfermode usingthe settingsthat you
selected in the Connection Wizard. For example, if you specified an
IP addressfor thehost computer,pcAnywhere triesto connectto that
IP address.
After theconnection is madeand you logon, theFile Manager window
is displayed on your computer screen.
When you select this option for the first time, pcAnywhere starts the
Connection Wizard.
Opens the Quick Connect window from which you can type the IP
address, computer name, or modem phone number of the computer
to which you want to connect.
If you are connecting to another computer over a LAN, pcAnywhere
automatically searches your subnet for available hosts andlists them
by computer name.
Host
Waits for connections from remote computers usingthe settings that
you selectedin theConnection Wizard.The pcAnywherehost waiting
icon appears in the notification area of your taskbar.
When you select this option for the first time, pcAnywhere starts the
Connection Wizard.
Page 33

Viewing or editing connection settings
Viewing or editing connection settings
Symantec pcAnywhere saves your connection settings in a connection item file.
You can view or edit connection item files in the following ways:
33Navigating in Symantec pcAnywhere
Basic View
Advanced View
Starts theConnection Wizardto guideyou throughthe process
of configuring the connection.
If you have already configured a connection by using the
Connection Wizard in Basic View, the Connection Wizard
shows the settings that you previously selected.
Lets you change settings and select advanced configuration
options, such as session encryption, that are not available in
the wizard.
To view or edit connection settings in Basic View
In the Symantec pcAnywhere window, on the left navigation bar, click Goto
1
Basic View.
On the left navigation bar, under Actions, select one of the following:
2
Edit Remote Settings
Edit File Transfer Settings
Lets youview oredit theproperties forthe remotecontrol
connections that you start from Basic View
See “Using theConnection Wizardto configure a remote
connection” on page 97.
Lets you view or edit the properties for the file transfer
connections that you start from Basic View
See “Using theConnection Wizardto configure a remote
connection” on page 97.
Edit Host Settings
In the Connection Wizard, follow the on-screen instructions until you reach
3
Lets you view or edit the properties for the host
connections that you start from Basic View
See “ Using the Connection Wizard to configure a host
connection” on page 70.
the Summary screen.
On the Summary screen, review the settings that you have selected.
4
Do one of the following:
■ To apply your changes and close the Connection Wizard, click Finish.
■ To closethe Connection Wizard without saving your changes, click Cancel.
Page 34

Navigating in Symantec pcAnywhere
34
Working in Advanced View
To view or edit connection settings in Advanced View mode
In the Symantec pcAnywhere window, on the left navigation bar, click Go to
1
Advanced View.
Do one of the following:
2
■ To viewor editthe propertiesfor aremote control,file transfer,or remote
management connection, click Remotes.
■ To view or edit the properties for a host connection, click Hosts.
Do one of the following:
3
■ To viewor editthe propertiesfor aremote control,file transfer,or remote
management connection, in the Remotes window, right-click the item
that you want to edit, and then click Properties.
See “Configuring a remote connection using advanced properties”
on page 98.
■ To view or edit the properties for a host connection, in the Hosts window,
right-click the item that you want to edit, and then click Properties.
See “Configuring a host using advanced properties” on page 73.
Working in Advanced View
Advanced View lets you access configuration options and tools that are not
available in Basic View. It lets you manage connection settings, customize
preferences, and select advanced security options.
Figure 2-2shows theSymantec pcAnywherewindow withAdvanced View selected.
Page 35

Menu bar
Navigation bar
Right pane content
Working in Advanced View
35Navigating in Symantec pcAnywhere
Figure 2-2
Symantec pcAnywhere window in Advanced View
The navigation bar on the left of the window lets you access pcAnywhere session
options, configuration files, and tools. Use the arrow buttons to expand and
collapse the navigation bar.
When you select an option under pcAnywhere Manager, the Actions box in the
middle displays the options that are available for that selection. The right pane
displays content that is specific to the option that you have selected on the
navigation bar.
For example, on the left navigation bar, select Remotes or Hosts to view the list
of connection items. Details about the connection items appear in the right pane
in column format.
Organizing column headings in the Symantec pcAnywhere window
You can sort the columns that appear in the right pane of the Symantec
pcAnywhere window in ascending or descending order. You can also hide the
column headings that you do not want to see.
To sort columns
In the Symantec pcAnywhere window, in the right pane, click any column
◆
heading.
Click the column heading again to sort in the reverse order.
Page 36

Navigating in Symantec pcAnywhere
36
Working in Advanced View
To show or hide column headings
In the Symantec pcAnywhere window, in the right pane, right-click any
1
column heading.
Select the items that you want to show or hide.
2
A check mark appears next to each column heading that will be displayed.
Customizing the Symantec pcAnywhere navigation bar
You can customize the navigation bar in the Symantec pcAnywhere window to
display only the options that you commonly use. This lets you organize your
workspace. The options that are hidden on the navigation bar are still accessible
from the View menu. You can also restore these options to the navigation bar.
For eachpcAnywhere Manager task, the Actions box displaysthe options that are
available forthat task. Some actions are common to several pcAnywhereManager
tasks (for example, Add, Delete, and Properties). If you hide of one these options,
the option is hidden for all pcAnywhere tasks.
To hide individual options from the Symantec pcAnywhere window
In the Symantec pcAnywhere window, in Advanced View, on the left
1
navigation bar, right-click the option that you want to hide.
Click Hide Item.
2
To show or hide options in the pcAnywhere Manager box
In the Symantec pcAnywhere window, in Advanced View, on the View menu,
1
click Customize Navigation Bar > Customize pcAnywhere Manager.
In the Configure Navigation Bar window, do any of the following:
2
■ Check the items that you want to show.
■ Uncheck the items that you want to hide.
Click OK.
3
To show or hide options in the Actions box
In the Symantec pcAnywhere window, in Advanced View, on the View menu,
1
click Customize Navigation Bar > Customize Actions.
In the Configure Navigation Bar window, do any of the following:
2
■ Check the items that you want to display.
■ Uncheck the items that you want to hide.
Click OK.
3
Page 37

You can switch to the Home tab by using the following shortcut: CTRL + 0.
Closing the main product window upon connection
When you establish a connection, Symantec pcAnywherekeeps the main product
window open so that you can perform other tasks (for example, to connect to
another computer). You can configure pcAnywhere to automatically close the
main product window when you establish a remote connection. However, you
need the main product window to connect to another host computer.
By default, pcAnywhere displays your active sessions in a single window in a
tabbed view, and the main product window is represented as the Home tab. If you
change thedisplay preferences to close the main product window uponconnection
and you turn off the option to display active sessions in a tabbed view, the Home
tab and Thumbnail tab will not appear in the Session Manager window.
Note: You may need to close and reopen Symantec pcAnywhere before your
changes take affect.
See “Changing how active sessions appear in the Session Manager” on page 43.
To close the main product window upon connection
Working in Advanced View
37Navigating in Symantec pcAnywhere
In the Symantec pcAnywhere window, on the Edit menu, click Preferences.
1
If you are logged in as a standard user, you are prompted for administrator
credentials.
If you are logged in as an administrator, a consent dialog is displayed.
If you enter administrator login information, you then have access to the
pcAnywhere Options window. If you are not logged in as an administrator,
you can view the options, but the tabs are disabled.
In the pcAnywhere Options window, on the Session Manager tab, uncheck
2
Keep pcAnywhere Manager open after connection.
The pcAnywhere Manager is the main product window.
To find this tab, use the left and right arrows in the pcAnywhere Options
window to scroll through the list of tabs.
Click OK.
3
Page 38

Navigating in Symantec pcAnywhere
38
Working in Advanced View
About the Connection Wizard
The Connection Wizard simplifies the process of configuring your computer for
a pcAnywhereconnection. After you complete the steps in the ConnectionWizard,
you can start the connection.
The Connection Wizard lets you do the following:
■ Configure your computer to connectto anothercomputer (remote connection)
See “Using theConnection Wizardto configurea remoteconnection” on page 97.
■ Configure your computer to allow another computer to connect to it (host
connection)
See “Using the Connection Wizard to configure ahost connection” on page 70.
The options that you select in the Connection Wizard are saved in a connection
item file, which you canmodify. Symantec pcAnywhere adds the connection item
to the Hosts or Remotes window, depending on the type of connection. Symantec
pcAnywhere offers advanced configuration options, such as security settings,
that are not available in the wizard.
See “Configuring a remote connection using advanced properties” on page 98.
What you need to know before you connect
Before youcan connect to another computer using pcAnywhere, you mustprovide
the information that is needed to find the host computer, establish a connection,
and log on.
Some of this information varies by connection type and might include the
following:
Network connections
Modem and ISDN
connections
Direct connections
Symantec pcAnywhere requires a user name and password for all sessions. The
host usermust set up a caller account andprovide youwith these logon credentials.
IP address or computer name of the pcAnywhere host
computer, Gateway, or Access Server to which you want to
connect.
If you are connecting over a local area network (LAN),
pcAnywhere automaticallysearches forthe pcAnywherehosts
that are running on your local subnet.
Dialing information, such as the modem phone number and
any additional dialing properties that might be required.
COM or LPT port numberof the two computers that you want
to connect.
Page 39

If thehost computeris runningWindows XP/2003/2008Server/2000, theoperating
system might also prompt you for computer logon credentials.
You can save this configuration information in a connection item file to use again
later. Youcan accessyour remote connection item files from the Remotes window
in Advanced View.
See “Managing remote connections” on page 95.
Ways to connect to another computer remotely
Table 2-1 includes information about the ways inwhich you can connect to a host
computer.
Working in Advanced View
39Navigating in Symantec pcAnywhere
Table 2-1
Quick Connect
Basic View Start
Preconfigured connections
Ways to connect to another computer
DescriptionOption
Opens the Quick Connect window from which you can type
the IP address, computer name, or modem phone number of
the computer to which you want to connect.
If you are connecting to another computer over a LAN,
pcAnywhere automaticallysearches yoursubnet foravailable
hosts and lists them by computer name.
See “Connecting to another computer using Quick Connect”
on page 117.
Basic View provides quick access to the most commonly
performed pcAnywhere tasks. It simplifies the process of
configuring and starting connections. It is designed for new
users.
See “Starting a connection in Basic View” on page 30.
Symantec pcAnywhere provides default remote connection
items that are preconfigured with optimized security and
performance settings for modem, direct, or network
connections.
See “Starting a remote connection item” on page 115.
Page 40

Navigating in Symantec pcAnywhere
40
Working in Advanced View
Table 2-1
User-defined connections
Favorites
History
Host invitation
Ways to connect to another computer (continued)
DescriptionOption
You can create a custom remote connection item, which lets
you select the connection andsecurity settings that you want
to use.
Symantec pcAnywhere saves these settings in a remote
connection item file (.chf), which is listed in the Remotes
window.
See “Ways to set up a remote computer” on page 96.
You canadd theconnection itemsthat youuse mostfrequently
to the Favorites window for quick access.
See “Adding a host connection item to Favorites” on page 69.
Symantec pcAnywheremaintains ahistory ofyour most recent
connections. You can use this option to reconnect to a host
computer to which you have recently connected.
See “Locating a recent host connection item” on page 70.
You canset up a host invitationthat containsthe information
that the host user needs to connect to your computer. After
the host user accepts the invitation and the connection is
established, you can take control of the host computer.
Quick Deploy and Connect
pcA Quick Connect
You can use this option to connect to a computer on your
network that does not have a pcAnywhere host running.
See “ Connecting to a computer that does not have a host
running” on page 137.
pcA Quick Connect lets you connect to a host computer. You
can connect to the host computer using the computer name
or IP address and the logon information.
About the start modes for remote connections
You can start a connection in one of the following modes:
Page 41

Working in Advanced View
41Navigating in Symantec pcAnywhere
Remote control
Remote management
Lets you control a host computer remotely and work as though
you are sitting in front of it.
During a remote control session, video and data are transferred
between the host computer and the remote computer. The host
computer handles all of the processing of the requests that are
sent by the remote. Only the input and output information (for
example, keyboard,mouse, andvideo information)are transferred
between the computers.
Because onlyminimal dataneeds tobe transferred between each
computer, remote control results in faster performance than
other forms of remote networking and minimizes the risk of
losing data.
See “Ways to start a remote control session” on page 115.
Lets you remotely administer a host computer using common
administrator tools(such asthe TaskManager, Command Prompt,
and Registry Editor).
Remote management mode lets you quickly troubleshoot and
resolve problems on a host computer without the overhead of a
full remote control session. A remote management session uses
less bandwidth than a full remote control session because only
the data needs to be transferred between the host and remote
computers.
See “What you can do during a remote management session”
on page 153.
File transfer
Lets youtransfer filesbetween ahost andremote computerusing
a two-pane window that functions like Windows Explorer.
You can navigate to the files and folders that you need, transfer
files andfolders to and from anothercomputer, andsynchronize
content. Filestransfer inthe backgroundso thatyou cancontinue
to work or queue other files. A file transfer session uses less
bandwidth than a full remote control session because only the
data needs to be transmitted between the host and remote
computers.
See “About pcAnywhere File Transfer” on page 169.
You can optimize performance by starting a connection in remote management
mode or file transfer mode. These modes suspend video transfer to allocate full
resources to the data transfer. If you do not select a start mode, pcAnywhere
defaults to remote control mode. You can switch to a different mode at any time
during a connection.
Page 42

Navigating in Symantec pcAnywhere
42
About the Session Manager
About the Session Manager
After you establish a connection and log on to the host computer, the Session
Manager window appears on your computer screen. You switch between the
Session Manager modes to perform remote control, remote management, chat,
or file transfer tasks. The tasks that are displayed in the middle of the Session
Manager window navigation bar are only available during a session.
Figure 2-3 shows the Session Manager window during a remote control session.
Figure 2-3
Symantec pcAnywherelets you run multiple remote sessions ata time. By default,
the Session Manager window displays your active sessions in a single window in
a tabbed view. Each host computer to which you are connected is represented by
a tab so that you can quickly switch between active sessions. The Home tab lets
you go back to the pcAnywhere Manager window (for example, to connect to
another computer). You can change the default settings to display each session
in a separate Session Manager window. The Thumbnail tab provides a thumbnail
view of the number of hosts that a caller is connected to. The Thumbnail tab lets
a remote caller switch between the hosts by clicking the thumbnail link.
See “Changing how active sessions appear in the Session Manager” on page 43.
You can switch between active sessions in the Session Manager window, but you
can view only one session at a time. To view multiple sessions at a time, you can
use the Session Manager.
Session Manager window
Page 43

About the Session Manager
See “About Symantec pcAnywhere CrossPlatform” on page 247.
Changing how active sessions appear in the Session Manager
By default, the Session Manager window displays your active sessions in a single
window in a tabbed view. You can change the default settings to display each
session in a separate Session Manager window.
The pcAnywhere Manager window is also kept open by default so that you can
perform other tasks (for example, to connect to another computer). If you set the
Session Managerwindow touse thetabbed view,the pcAnywhereManager window
is represented in the Session Manager window as the Home tab.
Note: You might need to close and reopen Symantec pcAnywhere before your
changes take affect.
You can also change the background color settings for your remote control
sessions. Youcan change these settings while your workoffline or during a session.
See “Changing display settings during a remote control session” on page 128.
To change how active sessions appear in the Session Manager
43Navigating in Symantec pcAnywhere
In the Symantec pcAnywhere window, on the Edit menu, click Preferences.
1
If you are logged in as a standard user, you are prompted for administrator
credentials.
If you are logged in as an administrator, a consent dialog is displayed.
If you enter administrator login information, you then have access to the
pcAnywhere Options window. If you are not logged in as an administrator,
you can view the options, but the tabs are disabled.
In the pcAnywhere Options window, on the Session Manager tab, do one of
2
the following:
■ To display your active sessions in a single window in a tabbedview, check
Show active sessions in a tabbed view.
■ To display your active sessions in a separate window for each session,
uncheck Show active sessions in a tabbed view.
To find this tab, click the left and right arrows in the pcAnywhere Options
window to scroll through the list of tabs.
Click OK.
3
Close Symantec pcAnywhere, and then reopen it.
4
You can switch to the Session tab by using the following shortcut: CTRL + N.
Page 44

Navigating in Symantec pcAnywhere
44
About the Session Manager
(Where N is the session number)
Showing or hiding options on the Session Manager navigation bar
You can customize the navigation bars in the Session Manager window to display
only the options that you commonly use. This lets you organize your workspace.
The options that are hidden on the navigation bar are still accessible from the
View menu. You can also restore these options to the navigation bar.
To hide individual options from the Session Manager window
In the Session Manager window, on the left navigation bar, right-click the
1
option that you want to hide.
You must be connected to another computer to see the Session Manager
window.
Click Hide Item.
2
To show or hide multiple options from the Session Manager window
In the Session Manager window, on the left navigation bar, do one of the
1
following:
■ To showor hide multiple options from the Session Manager box,right-click
Session Manager, and then click Customize.
■ To showor hide multiple options fromthe task list, right-click the heading
for the mode that you are running (for example, Remote Control), and
then click Customize.
In the Configure Navigation Bar window, do one of the following:
2
■ Check the options that you want to show.
■ Uncheck the options that you want to hide.
Click OK.
3
Resizing the Session Manager navigation bar
The arrowson the Session Manager navigation bar letyou collapsethe navigation
bar or expand it. When you collapse the navigation bar, only the Session Manager
icons appear. This gives you more workspace in the remote control window.
To resize the Session Manager navigation bar
In the Session Manager window, on the left navigation bar, do one of the
◆
following:
■ To collapse the navigation bar, click the left arrow.
Page 45

■ To expand the navigation bar, click the right arrow.
Showing or hiding the Session Manager navigation bar
During a session, you can completely hide the navigation bar to gain more
workspace.
To show or hide the Session Manager navigation bar
In the Session Manager window, do one of the following:
◆
■ To hide the Session Manager navigation bar, on the navigation bar, click
the Close (X) button.
■ To show the Session Manager navigation bar, on the Actions menu, click
Display Navigation Bar.
Using Thumbnail tab
The Thumbnail tab provides the thumbnail view of the hosts that a remote user
is connected to. The Thumbnail tab lets a remote user switch between the hosts
by clicking the thumbnail link.
To use a Thumbnail tab
Using Thumbnail tab
45Navigating in Symantec pcAnywhere
In the Symantec pcAnywhere window, click the Thumbnail tab.
1
In the Thumbnail window, click the thumbnail link of the host you want to
2
switch to.
Note: The short cut key to switch to Thumbnail tab fromany tabis CTRL+SHIFT+T
Managing pcAnywhere preferences
Symantec pcAnywhere lets you manage the default preferences for host and
remote connections, file transfer, logging, and other functions to improve
performance, enhance security, or manage connections. These options apply
globally to all sessions unless you override them during a session.
Some of the preferences are intended for administrators and other advanced
users. Depending on your computing environment, your administrator might
restrict you from modifying some settings.
Symantec pcAnywhere groups the default program settings by tabs.
Table 2-2 includes information about the preferences that you can customize.
Page 46

Navigating in Symantec pcAnywhere
46
Managing pcAnywhere preferences
Table 2-2
Host Operation
Host Communications
Remote Communications
Session Manager
Event Logging
Encryption
pcAnywhere preferences
DescriptionTab
Controls basic hostoperations, such ashost name andrecord
and replay settings
Controls performanceand displaysettings forremote sessionsRemote Operation
Contains customization options for modem and network
connections on the host
Contains customization options for modem and network
connections on the remote
Controls basic session options, such as the background color
for theunusable partof theremote desktop,and letsyou view
or edit the command prompt exclusion list
Controls file transfer settingsFile Transfer
Enables logging of events that occur during pcAnywhere
sessions
Controls settings for using a directory service to find hostsDirectory Services
Contains settings for configuring remote printingRemote Printing
Specifies certificate information required for public-key
encryption
Administrators and users who frequently need to change global settings to
accommodate unique configuration requirements can create option sets that
contain the settings that they need.
For more information, see the Symantec pcAnywhere Administrator's Guide.
About customizing network connections
Symantec pcAnywhere lets you customize network settings to handle unique
configuration requirements such as multiple network cards or to handle
connections on both sides of a firewall. These options are intended for
administrators and advanced users. In most cases, you do not need to change the
network settings.
See “Configuring a host network connection” on page 75.
See “Configuring a remote network connection” on page 101.
Page 47

Customizing modem connections
If a modem is installed and properly configured on your computer, pcAnywhere
automatically detectsit and adds it tothe list of available devicesin the connection
item properties. Modem properties are configured in the operating system when
you set up your modem.
Generally, you should use the default modem settings; however, pcAnywherelets
you selectcustom settings for pcAnywhere sessions. Custom settingstemporarily
override the modem properties that are configured in the operating system.
Table 2-3 includes information about modem settings.
Managing pcAnywhere preferences
47Navigating in Symantec pcAnywhere
Table 2-3
Custom modem settings
ExplanationTab
General
Connection
Options
Lets you select a different COM port, adjust speaker volume, and
control connection speed.
Lets youcontrol error-checking rates, set timelimits forhandling
busy connections or idle activity, adjust buffer settings for the
COM port, and configure advanced settings, such as flow control
methods and modulation type.
Lets you control whether you want to use a terminal window,
specify how long to wait for a credit card tone when making an
operator-assisted or manually dialed call, and enable status
information.
For more information, see the documentation that came with your modem or the
documentation for your operating system.
See “ Configuring a host modem connection” on page 78.
See “Configuring a remote modem connection” on page 104.
To customize modem connections
In the Symantec pcAnywhere window, in Advanced View, on the left
1
navigation bar, do one of the following:
■ To customize modem settings for host sessions, click Hosts.
■ To customize modem settings for remote sessions, click Remotes.
In the right pane, right-click theconnection item that you want to configure,
2
and then click Properties.
In theproperties window, on the Connection Info tab,select themodem device
3
that you want to use.
Page 48

Navigating in Symantec pcAnywhere
48
Managing pcAnywhere preferences
Click Details.
4
After you modify the settings that you want to change, click OK.
5
Customizing European ISDN connections
In Europe,ISDN devicesuse theCommon ISDNApplication ProgrammingInterface
(CAPI) to transmit and receive data. Even if a separate ISDN device is listed on
the Connection Info tab, you must select ISDN via CAPI 2.0.
To improve connection speed, you can configure pcAnywhere to use channel
bonding. Channel bonding combines two 64-KB channels into a single channel,
which provides for 128-KB bps transmission. Channel bonding only works if both
channels are available.
For security or economy purposes, you can restrict incoming calls to specific
extensions. If you do not specify an extension, you can receive calls on any
extension.
See “ Configuring an ISDN connection on a host” on page 79.
See “Configuring an ISDN connection on a remote” on page 107.
To customize European ISDN connections
In the Symantec pcAnywhere window, in Advanced View, on the left
1
navigation bar, do one of the following:
■ To customize European ISDN connections for host sessions, click Hosts.
■ To customize European ISDN connections for remote sessions, click
Remotes.
In the right pane, right-click theconnection item that you want to configure,
2
and then click Properties.
In the properties window, on the Connection Info tab, check ISDN via CAPI
3
2.0 .
Page 49

Managing pcAnywhere preferences
Click Details.
4
Check Attempt channel bonding.
5
To restrict incoming calls to specific extensions, in the text box, type the
6
extensions from which you want to receive calls.Use a semicolon to separate
entries.
Click OK.
7
49Navigating in Symantec pcAnywhere
Customizing direct connections
If the computer to which you want to connect is nearby, you can connect the two
computers directlyby using an appropriate cable for yourport. Direct connections
require either a parallel (LPT) or a serial (COM) port. To use a parallel connection,
you must configure the parallel port in the BIOS for bi-directionaloperations and
use a bi-directional, null parallel cable. Serial connections on Windows
Vista/XP/2003/2008 Server/2000/NT require an available COM port and a serial
null cable.
For direct connections, the settings on both computers must match.
Table 2-4 includes information about serial and parallel port settings.
Table 2-4
Speed
Custom port settings
newer computers can handle speeds of 38,400
or greater.
Default settingExplanationSetting
38,400Controls the speed of the connection. Most
Page 50

Navigating in Symantec pcAnywhere
50
Managing pcAnywhere preferences
Table 2-4
Custom port settings (continued)
Default settingExplanationSetting
Parity
To increase performance, click None. Most
operating systemsand modems have their own
methods of validating data integrity.
Flow control
computers. Fordirect and modem connections,
use RTS/CTS.
NoneChecks for errors on the communications line.
RTS/CTSControls the flow of information between
Carrier detect (DCD)Controls themethod bywhich asession begins.Started by
Carrier detect (DCD)Controls the method by which a session ends.Ended by
See “ Configuring a direct connection on a host” on page 80.
See “Configuring a direct connection on a remote” on page 108.
To customize direct connections
In the Symantec pcAnywhere window, in Advanced View, on the left
1
navigation bar, do one of the following:
■ To customize settings for the host session, click Hosts.
■ To customize settings for the remote session, click Remotes.
In the right pane, right-click theconnection item that you want to configure,
2
and then click Properties.
In theproperties window, on the Connection Info tab, select theport that you
3
want to use.
Click Details.
4
Select the connection preferences that you want to use.
5
Click OK.
6
Page 51

Chapter
Installing Symantec pcAnywhere
This chapter includes the following topics:
■ Preparing for installation
■ Symantec pcAnywhere installation
■ Post-installation tasks
3
Preparing for installation
Installation procedures might vary, depending on your work environment and
which installation option you choose. You can choose a full product installation
or a custom installation package that includes only the functionality that you
need.
If you are an administrator and need assistance with creating, building, and
deploying custominstallation packages for network installations, see theSymantec
pcAnywhere Administrator's Guide on the installation CD.
Before you install pcAnywhere, ensure that your computer meets the system
requirements. Reviewthe Readme file on the installation CDfor anyknown issues.
Note: Installation of Symantec pcAnywhere is not supported on encrypted file
systems.
Symantec pcAnywhere system requirements
Table 3-1 lists the minimum resourcesthat are required to install the full version
of Symantec pcAnywhere.
Page 52

Installing Symantec pcAnywhere
52
Preparing for installation
Table 3-1
Symantec pcAnywhere system requirements
RequirementsOperating systems
Windows 2000 Professional/Server/
Advanced Server
Windows XPHome/Professional (32-bitand
64-bit)
Windows 2003 Server Standard/Enterprise
(32-bit and 64-bit)
Windows Vista
Ultimate/Business/Enterprise/Home
Premium/Home Basic (32-bit and 64-bit)
Windows 2008 Server
■ Operating system requirements as
defined by Microsoft
■ Internet Explorer 6.0 or later
Table 3-2 lists the minimum resources that are required to install a Symantec
pcAnywhere thin host on a Windows computer.
Table 3-2
Thin host system requirements for Windows
RequirementsOperating Systems
Windows 2000 Professional/Server/
Advanced Server
Windows XPHome/Professional (32-bitand
64-bit)
Windows 2003 Server Standard/Enterprise
(32-bit and 64-bit)
Windows PE
Windows XP Embedded/Point of Service
Windows Vista
Ultimate/Business/Enterprise/Home
Premium/Home Basic (32-bit and 64-bit)
Windows 2008 Server
■ Operating system requirements as
defined by Microsoft
■ Internet Explorer 6.0 or later
Table 3-3 lists the minimum resources that are required to install a Symantec
pcAnywhere thin host on a Linux computer.
Page 53

Preparing for installation
53Installing Symantec pcAnywhere
Table 3-3
Thin host system requirements for Linux
RequirementsOperating Systems
Red Hat Enterprise Linux ES 3.0 or later
Red Hat Enterprise Linux WS 3.0 or later
SUSE Linux Enterprise Server 8.0 or later
SUSE Linux 10.0
SUSE Professional 9.3 or later
Novell Linux Desktop 9.0
■ Intel Pentium (or compatible) processor
at 133 MHz or higher
■ 64 MB of RAM
■ 20 MB of hard disk space
■ CD-ROM or DVD-ROM drive
■ VGA or higher resolution monitor
■ Firefox 1.5 or Mozilla 1.6 or later
Table 3-4 lists the minimum resources that are required to install a Symantec
pcAnywhere thin host on a Mac OS X computer.
Table 3-4
Thin host system requirements for Mac OS X
RequirementsOperating Systems
Mac OS X 10.4.3
Mac OS X 10.3.9
Mac OS X 10.5.x
■ Operating system requirements as defined by Apple
■ Firefox 1.5 or Safari 2.0.1 browsers
■ Operating system requirements as defined by Apple
■ Firefox 1.5 or Safari 1.3.1 browsers
■ Operating system requirements as defined by Apple
■ Firefox 2.0.0.8and aboveor Safari3.1.2 andabove browsers
Symantec pcAnywhere Gateway system requirements
Table 3-5 lists the minimum resources that are required to install Symantec
pcAnywhere Gateway.
Page 54

Installing Symantec pcAnywhere
54
Preparing for installation
Table 3-5
Symantec pcAnywhere Gateway system requirements
RequirementsOperating Systems
Windows 2000 Professional/Server/
Advanced Server
Windows XPHome/Professional (32-bitand
64-bit)
Windows 2003 Server Standard/Enterprise
(32-bit and 64-bit)
Windows Vista
Ultimate/Business/Enterprise/Home
Premium/Home Basic (32-bit and 64-bit)
Windows 2008 Server
■ Operating system requirements as
defined by Microsoft
■ Internet Explorer 6.0 or later
Symantec pcAnywhere Web Remote system requirements
Table 3-6 lists the minimum resources that are required to install Symantec
pcAnywhere Web Remote.
Table 3-6
Windows 2000 Professional/Server/
Advanced Server
Windows XP Home/Professional
Windows 2003 Server Standard/Enterprise
Windows Vista
Ultimate/Business/Enterprise/Home
Premium/Home Basic
Windows 2008 Server
Symantec pcAnywhere Web Remote system requirements
RequirementsOperating Systems
■ Operating system requirements as
defined by Microsoft
■ Internet Explorer 6.0 or later
■ Java Runtime Environment 1.4.2 orlater
Red Hat Enterprise Linux ES 3.0 or later
Red Hat Enterprise Linux WS 3.0 or later
SUSE Linux Enterprise Server 8.0 or later
SUSE Linux 10.0
SUSE Professional 9.3 or later
Novell Linux Desktop 9.0
■ Intel Pentium (or compatible) processor
at 133 MHz or higher
■ 64 MB of RAM
■ 20 MB of hard disk space
■ CD-ROM or DVD-ROM drive
■ VGA or higher resolution monitor
■ Firefox 1.5 or Mozilla 1.6 or later
■ Java Runtime Environment 1.4.2 orlater
Page 55

Preparing for installation
55Installing Symantec pcAnywhere
Table 3-6
Symantec pcAnywhere Web Remote system requirements
(continued)
RequirementsOperating Systems
Mac OS X 10.4.3
Mac OS X 10.3.9
Mac OS X 10.5.x
■ Operating system requirements as
defined by Apple
■ Firefox 1.5 or Safari 2.0.1 browsers
■ Java Runtime Environment 1.4.2 orlater
■ Operating system requirements as
defined by Apple
■ Firefox 1.5 or Safari 1.3.1 browsers
■ Java Runtime Environment 1.4.2 orlater
■ Operating system requirements as
defined by Apple
■ Firefox 2.0.0.8 and above or Safari 3.1.2
and above browsers
■ Java Runtime Environment 1.4.2 orlater
Symantec pcAnywhere CrossPlatform system requirements
Table 3-7 lists the minimum resources that are required to install Symantec
pcAnywhere CrossPlatform.
Table 3-7
Symantec pcAnywhere CrossPlatform system requirements
Windows 2000 Professional/Server/
Advanced Server
Windows XP Home/Professional
Windows 2003/2008 Server
Standard/Enterprise
Windows Vista
Ultimate/Business/Enterprise/Home
Premium/Home Basic
Windows 2008 Server
RequirementsOperating Systems
■ Operating system requirements as
defined by Microsoft
■ Internet Explorer 6.0 or later
■ Java Runtime Environment 1.4.2 orlater
Page 56

Installing Symantec pcAnywhere
56
Preparing for installation
Table 3-7
Symantec pcAnywhere CrossPlatform system requirements
(continued)
Red Hat Enterprise Linux ES 3.0 or later
Red Hat Enterprise Linux WS 3.0 or later
SUSE Linux Enterprise Server 8.0 or later
SUSE Linux 10.0
SUSE Professional 9.3 or later
Novell Linux Desktop 9.0
Mac OS X 10.4.x
Mac OS X 10.5.x
RequirementsOperating Systems
■ Intel Pentium (or compatible) processor
at 133 MHz or higher
■ 64 MB of RAM
■ 20 MB of hard disk space
■ CD-ROM or DVD-ROM drive
■ VGA or higher resolution monitor
■ Firefox 1.5 or Mozilla 1.6 or later
■ Java Runtime Environment 1.4.2 orlater
■ Operating system requirements as
defined by Apple
■ Firefox 1.5 or Safari 2.0.1 browsers
■ Java Runtime Environment 1.4.2 orlater
■ Operating system requirements as
defined by Apple
■ Firefox 2.0.0.8 and above or Safari 3.1.2
and above browsers
■ Java Runtime Environment 1.4.2 orlater
User rights requirements
Users on Windows Vista/XP/2003/2008 Server/2000 must have administrator
rights toinstall pcAnywhere. If you are logged onto a Vista/2008 Server computer
as a non-adminstrator user, during the pcAnywhere installation, you will be
prompted to enter administrator credentials.
Windows XPrestricts users who are assigned to thelimited user or guest accounts
from installingor uninstalling software, changing system-wide settings, oradding,
editing, or deleting user accounts. For optimal performance, log on as a user with
administrator rights when running pcAnywhere on Windows XP.
Installation options
Table 3-8 lists the installation options that are available on the Symantec
pcAnywhere installation CD.
Page 57

Preparing for installation
57Installing Symantec pcAnywhere
Table 3-8
Symantec pcAnywhere installation options
DescriptionInstallation Option
Full version of Symantec
pcAnywhere
pcAnywhere components
Administrator tools
Includes the host and remote components that you need for
remote control, file transfer, and remote management tasks.
Runs on Windows operating systems only.
See “Installing the full product version” on page 61.
Includes the components that you need to support
pcAnywhere connectionsacross multipleplatforms, onmobile
devices, and through Network Address Translation (NAT)
devices.
See “pcAnywhere componentson theproduct CD”on page57.
Includes tools to assist you in using and administering
pcAnywhere.
See “Administrator tools” on page 58.
pcAnywhere components on the product CD
Table 3-9 lists the pcAnywhere components that are available on the product CD
in addition to the full product installation.
Table 3-9
Product components
Symantec pcAnywhere
Gateway
DescriptionComponent
Lets you find and connect to a host computer that is behind
a firewall, router, or other type of Network Address
Translation (NAT) device. You can connect to up to five
computers.
Includes a service component that is needed to support
gateway connections.Includes aGateway Manager component
that is needed to view and manage pcAnywhere connections
that are running through the Gateway.
Runs on Windows Vista/XP/2003/2008 Server (32-bit and
64-bit) and Windows 2000.
See “Installing Symantec pcAnywhere Gateway” on page 310.
Page 58

Installing Symantec pcAnywhere
58
Preparing for installation
Table 3-9
Product components (continued)
DescriptionComponent
Symantec pcAnywhere
Mobile
Symantec pcAnywhere
CrossPlatform
Lets youaccess computersand serversremotely froma mobile
device. Includes the remote component that you need for
remote control and remote management.
Runs on Windows Mobile 5.0/6.0.
See “Symantec pcAnywhere Mobile installation” on page 277.
Lets you remotely access one or more computers that are
running the Windows, Linux, or Mac OSX operating systems.
Lets you view all of your sessions in a single window and
transfer files between host computers.
Runs onWindows, Linux,or MacOS Xoperating systemsthat
support Java applications.
See “ Installing Symantec pcAnywhere CrossPlatform”
on page 247.
Administrator tools
Table 3-10lists the tools that areavailable to assist you in using andadministering
pcAnywhere.
Table 3-10
Administrator tools
Symantec pcAnywhere
Web Remote
OLE Automation APIs
DescriptionComponent
Starts Symantec pcAnywhere Web Remote in your Web
browser so that you can remotely access another computer.
Includes thecomponents thatare neededto hostpcAnywhere
on a Web server.
Runs on Windows, Linux, and Mac OS X operating systems
that support Java applications.
Provides application programming interfaces (APIs) for
writing custom programs to automate certain functions in
pcAnywhere.
Runs on Windows operating systems only.
For more information, see the Symantec pcAnywhere OLE
Automation Guide on the installation CD.
Page 59

Preparing for installation
59Installing Symantec pcAnywhere
Table 3-10
Administrator tools (continued)
DescriptionComponent
Policy Management
snap-ins
Symantec LiveUpdate
Administration Utility
Microsoft Systems
Management Server (SMS)
Provides thepcAnywhere administrativetemplate (.adm)files
needed to support centralized, policy-based administration
in a Windows environment.
For more information, see the Symantec pcAnywhere
Administrator's Guide.
Lets administrators setup an intranetHTTP or FTPserver or
shared directoryto handle all LiveUpdate operations for their
network.
LiveUpdate isthe Symantectechnology thatlets youdownload
program and definitions updates for your licensed versions
of Symantec products.
For more information, see the Symantec LiveUpdate
Administrator's Guide on the Symantec Web site.
Provides the support files that are needed to integrate
pcAnywhere with SMS in a Windows environment.
For more information, see the Symantec pcAnywhere
Administrator's Guide.
The administrator tools are available for download from the following location:
www.solutionsam.com/solutions/public
Table 3-11
Symantec Packager
Administrator tools available for download
DescriptionComponent
Lets you create custom installations of pcAnywhere that you
can deploy to target systems.
Runs on Windows Vista/2000 and Windows XP/2003 Server
(32-bit only)
For more information, see the Symantec pcAnywhere
Administrator's Guide on the installation CD.
Page 60

Installing Symantec pcAnywhere
60
Preparing for installation
Table 3-11
Pre-configured host with
group caller support
Package Deployment Tool
Web Deployment Tool
Administrator tools available for download (continued)
DescriptionComponent
Lets you deploy a preconfigured, host-only package to the
target computers that you select. Includes support for group
caller authentication. Upon installation, automatically
launches the host on the target computer so that it is waiting
for connections.
Runs on Windows operating systems only.
For more information, see the Symantec pcAnywhere
Administrator's Guide on the installation CD.
Lets you deploy custom installation packages to one or more
Windows XP/2003 Server/2000 computers across your
network.
Use Symantec Packager to create custom installations of
pcAnywhere.
For more information, see the Symantec pcAnywhere
Administrator's Guide.
Provides the source files that are needed to implement
Web-based deployment over a corporate intranet.
Use Symantec Packager to create custom installations of
pcAnywhere.
For more information, see the Symantec pcAnywhere
Administrator's Guide.
Custom installation packages on the product CD
Table 3-12 describes the custom installation packages that are included on the
product CD.
Table 3-12
Auto Start Host
Custom installation packages
DescriptionPackage
The host starts automatically. Installs the host features that
are needed to support network and modem connections.
Excludes remote features.
Select this option if you only want to receive connections or
if you want to install pcAnywhere on two computers, where
one computer is a host and the other is a remote.
Page 61

Symantec pcAnywhere installation
61Installing Symantec pcAnywhere
Table 3-12
Remote Only Installation
Custom installation packages (continued)
DescriptionPackage
Installs the remote features that are needed to connect to a
host computer for remote control, remote management, and
file transfer. Excludes host features.
Select this option if you only want to initiate connections or
if you want to install pcAnywhere on two computers, where
one computer is a host and the other is a remote.
If you have a previous version installed
During the installation process, pcAnywhere automatically scans for a previous
version. If you are installing pcAnywhere on a computer that has pcAnywhere
12.0.x or later, pcAnywhere confirms whether you want to preserve existing
configuration data before installing over the previous version. How pcAnywhere
handles the data conversion process depends on your operating system and the
version of pcAnywhere that is installed.
If youare installing pcAnywhere on a computer that has aversion of pcAnywhere
earlier than 10.x, pcAnywhere prompts you to uninstall it. This removes all
pre-existing configuration data. Configuration data from these versions cannot
be converted or preserved.
For more information about planning a migration and upgrade strategy, see the
Symantec pcAnywhere Administrator's Guide.
Symantec pcAnywhere installation
During the installation process, you might be required to restart the computer.
If so, after the computer restarts, you must log on again using the same user
credentials to ensure proper functionality.
If you are installing a packaged version of pcAnywhere, installation procedures
might vary.
See “Installing a custom version” on page 63.
Installing the full product version
The full product version includes host, remote control, remote management, and
file transfer features. In the Corporate and Retail versions, this includes the Host
Administrator tool.
Page 62

Installing Symantec pcAnywhere
62
Symantec pcAnywhere installation
To install the full product version
Insert the Symantec pcAnywhere CD into the CD-ROM drive.
1
If the installation window does not appear automatically after you insert the
pcAnywhere installation CD, manually run the setup program, and then
continue with the installation procedures.
See “Running the setup program manually” on page 63.
In the Symantec pcAnywhere window, click Install Symantec pcAnywhere.
2
In theChoose Setup Language dialog box, depending onthe locale, a language
3
for installation is selected. To change thelanguage, you can select adifferent
language from the drop-down list.
Click OK.
4
Note: If you are installing the pcAnywhere box solution using the msiexec
file, the Choose Setup Language dialog box is not displayed. The locale is
automatically detectedand the language is selected.Tochoose an installation
language, run the following command in the command prompt: msiexec /i
<Symantec pcAnywhere.msi> /qf TRANSFORMS = LCID.mst. Where LCID
represents the language locale ID.
In the Welcome panel, click Next.
5
Accept the terms of the license agreement, and then click Next.
6
In the Customer Information panel, type a user name and organization.
7
Click Next.
8
In the Destination Folder panel, do one of the following:
9
■ To install pcAnywhere in the default data directory, click Next.
■ To change the installation directory, click Change.
In the Change Current Destination Folder panel, browse to the folder
location in which you want to install pcAnywhere, and then click OK.
Then, in the Destination Folder panel, click Next.
In the Custom Setup panel, do one of the following:
10
■ To install pcAnywhere using the program default settings, click Next.
■ To customizethe installation or install administratortools, click the down
arrow nextto the component that you want toinstall, selectthe installation
option that you want to use, and then click Next.
You can modify the installation settings after installation.
Page 63

See “Modifying installation settings” on page 65.
In the Ready to Install the Program panel, select the programs that you want
11
to place on the desktop as shortcuts.
The pcAnywhere program icon is placed on the desktop by default. If you do
not wantto createthis shortcut on your desktop, uncheck theCreate Symantec
pcAnywhere desktop shortcut check box.
Click Install.
12
Follow the on-screen instructions for the type of installation that you have
selected.
Click Finish when the installation is complete.
13
If your computer requires updates to system files, you will be prompted to
restart your computer. This step is necessary to ensureproper functionality.
Installing a custom version
Symantec pcAnywherelets you install a custom installation packagethat contains
only the functionality that you need. Use these installation procedures as a
guideline. Installationprocedures might vary, depending on the typeof installation.
To install a custom version
Symantec pcAnywhere installation
63Installing Symantec pcAnywhere
Insert the Symantec pcAnywhere CD into the CD-ROM drive.
1
If the installation window does not appear automatically after you insert the
pcAnywhere installation CD, manually run the setup program, and then
continue with the installation procedures.
See “Running the setup program manually” on page 63.
In thepcAnywhere installation panel, click View OtherInstallationOptions.
2
Click View Custom Installation Packages.
3
Select the type of installation that you want to perform, and then follow the
4
on-screen instructions.
See “Installation options” on page 56.
Running the setup program manually
Perform this procedure if the installation window does not appear automatically
after you insert the Symantec pcAnywhere installation CD.
Page 64

Installing Symantec pcAnywhere
64
Post-installation tasks
To run the setup program manually
Insert the Symantec pcAnywhere CD into the CD-ROM drive.
1
On the Windows taskbar, click Start > Run.
2
Type <CD-ROM drive letter>:\setup.exe
3
For example:
D:\setup.exe
Click OK.
4
Install pcAnywhere.
5
In Windows Vista/2008 Server, the operating system might prompt you to
approve this action. You do not receive this prompt if you are logged on to
the built-in administrator account.
Note: If you want to install pcAnywhere on a mapped drive on Vista/2008
Server, you should map the drive using an elevated command prompt.
Post-installation tasks
After you install Symantec pcAnywhere, you can perform the following
post-installation tasks:
■ Starting Symantec pcAnywhere
■ Modifying installation settings
■ Updating Symantec pcAnywhere
■ Uninstalling Symantec pcAnywhere
Starting Symantec pcAnywhere
Symantec pcAnywhereis installed in the Windows Program Files folder bydefault.
During installation, pcAnywhere optionally lets you place a program icon on the
Windows desktop from which you can open the program. You can also open
pcAnywhere from the Windows Start menu.
To start Symantec pcAnywhere
Do one of the following:
◆
■ On the Windows XP/2003/2000 desktop, double-click Symantec
pcAnywhere.
Page 65

■ On the Windows XP/2003/2000 taskbar, click Start > Programs >
Symantec pcAnywhere.
■ On the Windows Vista/2008 Server taskbar, click Start > All Programs >
Symantec pcAnywhere.
Modifying installation settings
You can add, modify, or remove certain feature components after installation.
To modify installation settings
Do one of the following:
1
■ On the Windows XP/2003/2000 taskbar, click Start > Settings > Control
Panel.
■ On the Windows Vista/2008 Server taskbar, click Start > Control Panel.
Do one of the following:
2
■ For Windows XP/2003/2000, in the Control Panel window, click Add or
Remove Programs.
■ For Windows Vista/2008 Server, in the Control Panel window, click
Uninstall a Program.
Post-installation tasks
65Installing Symantec pcAnywhere
In theAdd orRemove Programswindow, double-clickSymantecpcAnywhere.
3
Click Change.
4
In the Modify or Remove Symantec pcAnywhere window, click Next.
5
In the Program Maintenance window, click Modify.
6
Page 66

Installing Symantec pcAnywhere
66
Post-installation tasks
Click Next.
7
In the Custom Setup window, click the down arrow next to the component
8
that youwant to modify, and then select theinstallation optionthat you want
to use.
Click Next.
9
If youare installing a component, in the Ready to Modifythe Programwindow,
10
select the program shortcuts that you want to place on the desktop.
Click Install.
11
Follow the on-screen instructions for the type of installation that you have
selected.
Click Finish when the installation is complete.
12
Updating Symantec pcAnywhere
You can receive software updates associated with your version of pcAnywhere by
connecting to the Symantec LiveUpdate server. You can select the updates that
you want to install.
To update Symantec pcAnywhere
Do one of the following:
1
Page 67

On the Windows XP/2003/2000 taskbar, click Start > Programs >
■
Symantec pcAnywhere.
■ On the Windows Vista taskbar, click Start > All Programs > Symantec
pcAnywhere.
In the Symantec pcAnywhere window, on the Help menu, click LiveUpdate.
2
Follow the on-screen instructions.
3
Uninstalling Symantec pcAnywhere
You can uninstall pcAnywhere using the Add or Remove Programs option in
Windows. Once the removal process begins, you cannot cancel the action. This
uninstalls the main product. If you installed other components (for example,
Gateway), you must uninstall them separately.
To uninstall Symantec pcAnywhere
Do one of the following:
1
■ On the Windows XP/2003/2000 taskbar, click Start > Settings > Control
Panel.
■ On the Windows Vista/2008 Server taskbar, click Start > Control Panel
> Uninstall a Program.
Post-installation tasks
67Installing Symantec pcAnywhere
In the Control Panel window, double-click Add or Remove Programs.
2
In the Add or Remove Programs window, click Symantec pcAnywhere.
3
Do one of the following:
4
■ On Windows XP/2003 Server/2000/NT, click Remove.
■ On Windows Vista/2008 Server, click Uninstall.
In the Add or Remove Programs window, click Yes.
5
Restart your computer if prompted to do so. This step is necessary to ensure
that all components are removed properly.
Page 68

Installing Symantec pcAnywhere
68
Post-installation tasks
Page 69

Chapter
Allowing others to control your computer
This chapter includes the following topics:
■ Managing host connections
■ Ways to set up host computer
■ Ways to start a host session
■ What you can do during a host session
4
Managing host connections
As a host, you let authorized remote users connect to your computer and take
control of it. The remote user views your computer screen and can open files or
programs for which you have given the user the permission to access.
You must set up your computer before the remote user connects to your
computer.You must specify the connection type, what method to use to ensure
that remote users have permission to access your computer, and other session
options. This information is stored in a host connection item file (.bhf), which
appears as an icon in the Hosts window. The host connection items are stored in
the Symantec\pcAnywhere\Hosts (in Vista, C:\Program
Data\Symantec\pcAnywhere\Hosts) folder in the Windows ALLUSERSPROFILE
data directory.You can retrieve the ALLUSERSPROFILE data directory by opening
a command prompt and using the set command.
Adding a host connection item to Favorites
You can manage the connection items by adding them to the Favorites window.
This window supports folder management to organize your connections.
Page 70

Allowing others to control your computer
70
Ways to set up host computer
To add a host connection item to Favorites
In Advanced View, on the left navigation bar, under pcAnywhere Manager,
1
click Hosts.
In the right pane, right-click a connection item in the list.
2
Click Add to Favorites.
3
Locating a recent host connection item
Symantec pcAnywhere automatically maintains a history of your most recently
used host connection items.
To locate a recent host connection item
In Advanced View, on the left navigation bar, under pcAnywhere Manager,
◆
click History.
The most recent connection items appear in the right pane.
Ways to set up host computer
You can set up a host computer by modifying an existing connection item or by
creating a new one. You can also configure new connection items in the following
ways:
■ Connection Wizard
See “Using the Connection Wizard to configure ahost connection” on page 70.
■ Advanced properties
See “Configuring a host using advanced properties” on page 73.
The following items are preconfiguredto optimizesecurity andperformance. You
can also modify their configuration settings:
■ Direct
■ Modem
■ Network, Cable, DSL
Using the Connection Wizard to configure a host connection
The Connection Wizard guides you through the process of configuring your
computer (the host computer) to allow another computer (the remote computer)
to connect to it. After the Connection Wizard finishes, you can launch the host
to wait for connections.
Page 71

Ways to set up host computer
Symantec pcAnywhere stores these connection settings in a host connection file.
It places the host connection item in the Hosts window. You can use the host
connection item to begin a host session or to modify the connection settings.
Symantec pcAnywhere offers some advanced configuration options that are not
available in the wizard.
See “Configuring a host using advanced properties” on page 73.
To use the Connection Wizard to configure a host connection
In Advanced View, on the left navigation bar, under pcAnywhere Manager,
1
click pcAnywhere Tools.
In the right pane, double-click Connection Wizard.
2
On the Introduction screen, click Iwant another computer to connect to my
3
computer, and then click Next.
Select one of the following:
4
■ I want to use cable modem/DSL/LAN/dial-up ISP.
■ I wantto usemy telephone modem to connect directly to another telephone
modem.
The wizardautomatically detects the connection devices that areavailable
on your computer. If your computer has multiple connection devices,
choose the device that you want to use for the connection that you
configure. For example, if theremote computer uses a phonemodem, you
should select the phone modem as your connection device.
71Allowing others to control your computer
Click Next.
5
In the Connection Mode panel, select one of the following:
6
■ Wait for someone to call me
■ Call out to another computer
In the Remotes IP Address box, type the IP address or modem phone
number of the computer to which you want to connect.
Click Next.
7
Page 72

Allowing others to control your computer
72
Ways to set up host computer
8
In the Authentication Type panel, select one of the following:
I want to use an
existing Windows
account
I want to set up a user
name and password
Click Next.
9
Do one of the following:
10
■ Select a local account.
Validates auser orgroup byverifying withthe listmaintained
on aworkstation orshared directory.The ConnectionWizard
detects the accounts that are available on your local
computer.
See “Configuring a caller to use Windows-based
authentication” on page 207.
Uses pcAnywhere Authentication to verify remote user's
permission to connect to the host computer. It checks the
list of users and passwords that are maintained on the host
computer. This method of authenticationis the least secure.
This option is available only if you choose to use an existing Windows
account.
■ Type a name and password.
This option is available only if you choose to create a host name and
password.
Click Next.
11
On the Summary screen, verify the settings.
12
To startthe host session upon closing the wizard,check Waitfora connection
13
from a remote computer after the Connection Wizard finishes.
In Windows Vista, the operating system might prompt you to approve this
action. You do not receive this prompt if you are logged on to the built-in
administrator account. If the host is configured to run as an application, the
prompts are not given.
Click Finish.
14
A host connection item is added to the Hosts pane.
If you selected to start the host session, the Symantec pcAnywhere Waiting
icon appears in the Windows system tray.
To name the connection item, in the Symantec pcAnywhere window, in the
15
Hosts pane, type a name for the host connection item. Then, press Enter.
Page 73

Configuring a host using advanced properties
For more control over your connections, use the Advanced option to create or
modify hostconnection items. Advanced properties provide access toall available
host configuration options. It includes theoptions that are not available in the
Connection Wizard, such as host startup options and public-key encryption.
Table 4-1 includes information about the settings that are available.
Ways to set up host computer
73Allowing others to control your computer
Table 4-1
Connection Info
Settings
Callers
Security Options
Encryption
Overview of host settings
DescriptionTab
Lets you select the connection device for the session.
See “Knowing which connection device to use for host sessions”
on page 74.
Lets you select the host startup and end of session options.
See “Setting the host startup options” on page 81.
See “Setting end of session options” on page 83.
Lets you set up logon accounts for individuals or user groups and
specify which level of access the user should have.
See “About authentication in pcAnywhere” on page 204.
You must configure at least one caller account.
See “Configuring caller rights” on page 213.
Lets you set security options for connections and logons.
See “Protecting a host computer from unauthorized access”
on page 203.
See “Monitoring events in Symantec pcAnywhere” on page 235.
Lets you set data encryptionlevels including algorithm, key length,
and public-key encryption settings.
See “Using encryption to protect data” on page 218.
Conference
Lets you set up a conference so that multiple remote users can log
on to the host.
See “Letting multiple remote users hold a conference” on page 91.
Lets you add comments about the host connection item.Comments
Lets you protect the connection item with a password.Protect Item
Page 74

Allowing others to control your computer
74
Ways to set up host computer
To configure a host using advanced properties
In Advanced View, on the left navigation bar, under pcAnywhere Manager,
1
click Hosts.
In the right pane, under Hosts, do one of the following:
2
■ To create a new connection item, on the File menu, click New Item >
Advanced.
■ To modifyan existing connection item, right-clickthe item, and then click
Properties.
In the Host Properties window, configure the host configuration settings.
3
Click theleft and right arrows inthe HostProperties window to scroll through
the tabs.
Click OK to save your changes.
4
On Vista, you might be prompted to approve this action because changing
the host properties might affect other users.
Knowing which connection device to use for host sessions
A connection device is the interface that handles communication between the
host and remote computers. A host computer can wait for a connection from two
devices. For example, you can set up your office computer to wait for a network
connection from other co-workers or a direct connection from your laptop . A
host can accept only one connection at a time. When a remote establishes a
connection on one device, the other device is not available until the session ends.
Table 4-2 provides information to assist you in selecting a connection device.
Table 4-2
Host connection devices
Connection deviceHardware device
Modem that supports the
Microsoft Telephony API
(TAPI)
ISDN (North America)
Modem name.
See “ Configuring a host modem connection” on page 78.
ISDN device name.
See “ Configuring an ISDN connection on a host”
on page 79.
ISDN via CAPI 2.0.ISDN (Europe)
Page 75

Ways to set up host computer
75Allowing others to control your computer
Table 4-2
Host connection devices (continued)
Connection deviceHardware device
Network adaptercard installed
on a networked computer or
server on a LAN or WAN
Cable modem
DSL or ADSL
Null serial cable connected to
the hostand remotecomputers
(for example, a laptop and
desktop computer)
For most network connections, select TCP/IP.
Symantec pcAnywhere also supports NetBIOS and SPX
protocols in Windows XP/2003 Server/2000.
See “Configuring a host network connection” on page 75.
TCP/IP.
See “About cable modem connections” on page 21.
TCP/IP.
See “About DSL or ADSL connections” on page 21.
An available COM port.
Symantec pcAnywhere supports serial connections in
Windows Vista/XP/2003 Server/2000.
Configuring a host network connection
Symantec pcAnywhere supports network connections over a LAN, WAN, or the
Internet using TCP/IP, NetBIOS, and SPX. For most network connections, use
TCP/IP. NetBIOS is another commonly used network protocol that is used mostly
for file and print sharing services. SPX is a Novell NetWare protocol.
Note: Symantec pcAnywhere doesnot support SPX connections in Windows Vista.
Symantec pcAnywhere requires a user name and password for all host sessions.
To connect, the remote user must know the user name and password as well as
the IP address or name of the host computer.
If thehost computer is connected toa network that is behind a firewall,the remote
user must have a way to connect to the network through a Remote Access Service
(RAS) or virtual private network (VPN). An administrator must provide this
information.
To configure a host network connection
In Advanced View, on the left navigation bar, under pcAnywhere Manager,
1
click Hosts.
In the right pane, under Hosts, do one of the following:
2
Page 76

Allowing others to control your computer
76
Ways to set up host computer
3
4
5
To configure an existing connection item, right-click the item, and then
■
click Properties.
■ To create a new connection item, on the File menu, click New Item >
Advanced.
In the Host Properties window, on the Connection Info tab, select one of the
following:
■ TCP/IP
■ NetBIOS
■ SPX
On the Callers tab, configure a user name and password for users who can
connect to the host.
See “About authentication in pcAnywhere” on page 204.
Click OK.
On Vista, you might be prompted to approve this action because changing
the host properties might affect other users.
Selecting a network card
By default, pcAnywhere accepts TCP/IP connections on any network card that is
installed on the host computer. If you have more than one network card installed
on the host, pcAnywhere lets you specify which one to use.
To select a network card
In the Symantec pcAnywhere window, on the Edit menu, click Preferences.
1
In Windows Vista/2008 Server, the operating system might prompt you to
approve this action. You do not receive this prompt if you are logged on to
the built-in administrator account.
In the pcAnywhere Options window, on the Host Communications tab, click
2
Advanced TCP/IP Options.
Page 77

Ways to set up host computer
In the Advanced Host TCP/IP Options window, select one of the following:
3
77Allowing others to control your computer
Use the default network
adapter
Accept connections on all
network adapters
Specify the network
adapter to use for
pcAnywhere connections
In the Advanced Host TCP/IP Options window, click OK.
4
In the pcAnywhere Options window, click OK.
5
Uses the default network card.
This network card is identified in Windows.
Accepts connections on any available network card that
is installed on the host computer.
Lets you assign the network card to use for pcAnywhere
connections.
Select the index number that is assigned to the network
card that you want to use.
Changing the default port numbers on the host
Symantec pcAnywhere uses ports 5631 and 5632 for connections. These ports
are registered, and in most cases, you do not need to change them. Symantec
pcAnywhere uses the data port for data transmissions. It uses the status port to
wait for connections and to exchange status information.
If you change the port numbers on the host computer, all remote users who want
to connect to the host computer must also change their port settings to match.
See “Changing the default port numbers on the remote” on page 103.
Note: Some port numbers lower than 1024 arereserved forWeb-based applications
and services, such as FTP and the Internet. Choosing a reserved port number
might interfere with these applications and possibly result in a loss of service.
This procedure should be performed by an experienced administrator.
To change the default port numbers on the host
In the Symantec pcAnywhere window, on the Edit menu, click Preferences.
1
In Windows Vista/2008 Server, the operating system might prompt you to
approve this action. You do not receive this prompt if you are logged on to
the built-in administrator account.
In the pcAnywhere Options window, on the Host Communications tab, click
2
Advanced TCP/IP Options.
In the Advanced Host TCP/IP Options window, do the following:
3
Page 78

Allowing others to control your computer
78
Ways to set up host computer
To use a custom port number for the data port, in the Data port box, type
■
a new port number.
■ To return the data port to the registered port setting for pcAnywhere,
next to the Data port box, click Reset Default.
■ To use a custom port number for the status port, in the Status port box,
type a new port number.
■ To return the status port to the registered port setting for pcAnywhere,
next to the Status port box, click Reset Default.
Click OK.
4
Configuring a host modem connection
Symantec pcAnywhere supports modem-to-modem connections using a modem
that supports the Microsoft Telephony API (TAPI). If a modem is installed and
properly configured on your computer, pcAnywhere automatically detects it and
adds it to the connection device list.
Symantec pcAnywhere requires a user name and password for all host sessions.
To connect, the remote user must know the user name and password as well as
the phone number of the host modem.
If a modem is installed and configured properly on the operating system, host
users can customize the dial-up properties and specify on what ring to answer an
incoming call. By default, pcAnywhere answers on the third ring to support
modems that use call waiting. Change this setting only if you are experiencing
problems with your modem connection. Lower the number of rings only if your
modem does not have call waiting.
To configure a host modem connection
In Advanced View, on the left navigation bar, under pcAnywhere Manager,
1
click Hosts.
In the right pane, under Hosts, do one of the following:
2
■ To edit an existing connection item, right-click the item, and then click
Properties.
■ To create a new connection item, on the File menu, click New Item >
Advanced.
In the Host Properties window, on the Connection Info tab, select the name
3
of your modem.
Page 79

On the Callers tab, configure a user name and password for users who can
4
connect to the host.
See “About authentication in pcAnywhere” on page 204.
Click OK.
5
On WindowsVista/2008 Server,you might be prompted to approve this action
because changing the host properties might affect other users.
To change the number of rings for incoming modem connections
In the Symantec pcAnywhere window, on the Edit menu, click Preferences.
1
In Windows Vista/2008 Server, the operating system might prompt you to
approve this action. You do not receive this prompt if you are logged on to
the built-in administrator account.
In the pcAnywhere Options window, on theHost Communications tab, under
2
Dial-up properties, select the number of times the connection rings before
the host answers the incoming call.
Click OK.
3
Configuring an ISDN connection on a host
Ways to set up host computer
79Allowing others to control your computer
Integrated Services Digital Networks (ISDNs) are digital telephone services that
can transmitdigital and voice data at much fasterspeeds thantraditional modems.
The configuration for an ISDN device is similar to that of a modem.
Symantec pcAnywhere supports ISDN only in North America and Europe. If an
ISDN device is installed and configured properly on your computer, pcAnywhere
automatically detects it and adds it to the connection device list. Choose this
device only if you are using ISDN in North America. If you are using ISDN in
Europe, you must select ISDN via CAPI 2.0.
Symantec pcAnywhere requires a user name and password for all host sessions.
To connect, the remote user must know the user name and password as well as
the phone number assigned to the host ISDN device.
To configure an ISDN connection on a host
In Advanced View, on the left navigation bar, under pcAnywhere Manager,
1
click Hosts.
In the right pane, under Hosts, do one of the following:
2
■ To edit an existing connection item, right-click the item, and then click
Properties.
■ To create a new connection item, on the File menu, click New Item >
Advanced.
Page 80

Allowing others to control your computer
80
Ways to set up host computer
In the Host Properties window, on the Connection Info tab, do one of the
3
following:
■ For North American ISDN, select the name of your ISDN device.
■ For European ISDN, select ISDN via CAPI 2.0.
See “Customizing European ISDN connections” on page 48.
On the Callers tab, configure a user name and password for users who can
4
connect to the host.
See “About authentication in pcAnywhere” on page 204.
Click OK.
5
On WindowsVista/2008 Server,you might be prompted to approve this action
because changing the host properties might affect other users.
Configuring a direct connection on a host
If the host and remote computersare nearby, you can connect the two computers
directly using a null cable. A direct connection is typically faster than a modem
connection, especiallyif you want to transferlarge files.Direct connections require
a serial (COM) port and a null serial cable.
For more information about finding an available port on your computer, consult
your Windows documentation.
Symantec pcAnywhere requires a user name and password for all host sessions.
To configure a direct connection on a host
In Advanced View, on the left navigation bar, under pcAnywhere Manager,
1
click Hosts.
In the right pane, under Hosts, do one of the following:
2
■ To configure an existing connection item, right-click the item, and then
click Properties.
■ To create a new connection item, on the File menu, click New Item >
Advanced.
In theHost Properties window, on theConnection Info tab, select an available
3
COM port.
Page 81

On the Callers tab, configure a user name and password for users who can
4
connect to the host.
See “About authentication in pcAnywhere” on page 204.
Click OK.
5
On Vista, you might be prompted to approve this action because changing
the host properties might affect other users.
Setting the host startup options
Symantec pcAnywhere lets you configure a host connection item to start
automatically whenyou launch Windows. To protect against unauthorized access,
if you configure a host to start automatically, you should also use the Windows
lock computer feature.
The pcAnywhere host automatically runs as Windows service. This option lets
you take advantage of the inherent security and performance features of the
operating system. You must have administrator rights on the computer to run a
service. Additionally, Symantec pcAnywhere does not currently support setting
a hostto run as an applicationon Vista.After connecting to the hostwhile running
as an application on Windows Vista, if the remote user attempts a task that
requires administrator privileges (for example, right-clicking My Computer >
Manage), arequest to enter administrator credentials appears on the hostmachine,
but not on the remote machine, so the user cannot proceed.
To set the host startup options
Ways to set up host computer
81Allowing others to control your computer
In Advanced View, on the left navigation bar, under pcAnywhere Manager,
1
click Hosts.
In the right pane, under Hosts, do one of the following:
2
■ To configure an existing connection item, right-click the item, and then
click Properties.
■ To create a new connection item, on the File menu, click New Item >
Advanced.
Page 82

Allowing others to control your computer
82
Ways to set up host computer
3
In theHost Properties window, on the Settings tab, under Host startup, select
any of the following:
Launch with Windows
Lock computer
Run minimized
Run as a service
Automatically starts the host session when the host
computer is started.
Note: For Windows XP/Vista and Windows2008 operating
system, you must have administrator rights on the
computer toset LaunchHost withWindows. Youmust also
have administrator rights to rename or modify the host
item that is configured to launch with Windows.
Prevents unauthorized users from accessing the host
computer. Tounlock thecomputer, usersmust providethe
appropriate Windows user name and password.
Hides the status window.
A host icon appears in the system tray when the host is
waiting for a connection.
Recommended for Windows Vista/ XP/2003 Server/2000
and Windows 2008 operating system for optimum
performance.
If you want to run a host session unattended in Windows
Vista, you should keep this option checked.If you uncheck
this option, after connecting to the host while running as
an application on Windows Vista, if the remote user
attempts a task that requires administrator privileges (for
example, right-clickingMy Computer> Manage),a request
to enter administrator credentials appears on the host
machine, butnot onthe remotemachine, sothe usercannot
proceed.
You must have administrator rights on the computer to
run a service.
Click OK.
4
On Vista, you might be prompted to approve this action because changing
the host properties might affect other users.
If you are logged on as a guest user in Windows
Windows Vista/XP restricts users who are assigned to a limited user or guest
account from performing tasks that require administrator rights. For example,
you cannot install software or run services.
Page 83

Symantec pcAnywhere automatically runs all host sessionsas aWindows service.
This option lets you take advantage of the inherent security and performance
features of the operating system.
If you want to start a host session in Windows Vista/XP and you are logged on as
a guest user, you have the following options:
■ In Windows,switch to a user account that has administrator rightson thehost
computer, and then start the host session in pcAnywhere.
In WindowsVista, the operating system automatically prompts you to provide
administrator credentials before you can run the host as a service.
■ In pcAnywhere, turn off the option to run the host session as a service.
You should not turn off this option if you want to run the host session
unattended in Windows Vista.
To ensureproper functionality, you should log on toyour computer as a user with
administrator rights before you start pcAnywhere. For Vista, you can log on to
the computer as a standard user or guest user, however, you will be prompted to
supply the proper credentials when performing certain actions.
Setting end of session options
Ways to set up host computer
83Allowing others to control your computer
It is important to securely end sessions to prevent potential security risks.
Normally, a session ends when either the host or remote user cancels the session.
However, network or equipment problems might cause either the host or remote
computer to lose the connection. A connection might also be dropped because of
a security issue, such as an unauthorized user attempting to connect.
Symantec pcAnywherelets you select different options for handlingsessions that
end normally (an authorized user cancels the session) and abnormally (a
connection is unexpectedly lost).
To set end of session options for sessions that end normally
In Advanced View, on the left navigation bar, under pcAnywhere Manager,
1
click Hosts.
In the right pane, under Hosts, do one of the following:
2
■ To configure an existing connection item, right-click the item, and then
click Properties.
■ To create a new connection item, on the File menu, click New Item >
Advanced.
Page 84

Allowing others to control your computer
84
Ways to set up host computer
3
In the Host Properties window, on the Settings tab, under Aftera normal end
of session, select one of the following:
Wait for anyone
Keeps the host session running so that others can connect
to it
Ends the host session to prevent other connectionsCancel Host
To secure the host computer further, check and secure by, and then select
4
one of the following:
■ Logoff user
■ Restart Host computer
■ Lock computer
Click OK.
5
On Vista, you might be prompted to approve this action because changing
the host properties might affect other users.
Page 85

Ways to set up host computer
To set end of session options for sessions that end abnormally
In Advanced View, on the left navigation bar, under pcAnywhere Manager,
1
click Hosts.
In the right pane, under Hosts, do one of the following:
2
■ To configure an existing connection item, right-click the item, and then
click Properties.
■ To create a new connection item, on the File menu, click New Item >
Advanced.
In the Host Properties window, on the Settings tab, under After an abnormal
3
end of session, select how many minutes to wait before proceeding with the
security option.
Select one of the following:
4
85Allowing others to control your computer
Wait for anyone
To secure the host computer further, check and secure by, and then select
5
Keeps the host session running so that others can connect
to it
Ends the host session to prevent other connectionsCancel Host
one of the following:
■ Logoff user
■ Restart host computer
■ Lock computer
Click OK.
6
On Vista, you might be prompted to approve this action because changing
the host properties might affect other users.
Configuring a host computer to enlist in a directory service
Prior toconfiguring a host computer to use directoryservices, youshould configure
the directory service by going to the pcAnywhere Edit menu and clicking
Preferences.
For more information, see Chapter 5, "Integrating pcAnywhere with directory
services" in the Symantec pcAnywhere Administrator's Guide
If your administrator has configured pcAnywhere to use directory services, you
can configure the host computer to register itself with the directory server upon
startup. This lets remote users who connect to the directory server find your
Page 86

Allowing others to control your computer
86
Ways to set up host computer
computer. As the host status changes, the host computer updates its entry in the
directory server so that remote computers can see the current status.
For more information, see the Symantec pcAnywhere Administrator's Guide.
To configure a host computer to use directory services
1
2
3
4
5
In Advanced View, on the left navigation bar, under pcAnywhere Manager,
click Hosts.
In the right pane, under Hosts, do one of the following:
■ To configure an existing connection item, right-click the item, and then
click Properties.
■ To create a new connection item, on the File menu, click New Item >
Advanced.
In the Host Properties window, on the Settings tab, check Use directory
services.
From the list, select the directory server that you want to use.
Click OK.
Setting the Multi Monitor options
Symantec pcAnywhere lets you configure a Multi Monitor option. The host can
select the monitor that is displayed by default on the remote computer when the
session starts.
To set the Multi Monitor option
In Advanced View, on the left navigation bar, under pcAnywhere Manager,
1
click Hosts.
In the right pane, under Hosts, do one of the following:
2
■ To configure an existing connection item, right-click the item, and then
click Properties.
■ To create a new connection item, on the File menu, click New Item >
Advanced.
Click Apply.
3
Click OK.
4
Specifying a host name
Symantec pcAnywhere uses the Windows computer name or IP address as the
default host name. This is the name that appears in the host list when a remote
Page 87

Ways to set up host computer
user searchesfor ahost computer. Symantec pcAnywhere lets you specify a custom
name, althoughthis is not recommended if your computer is attachedto anetwork.
Your administrator might determine this setting for you.
To specify a host name
In the Symantec pcAnywhere window, on the Edit menu, click Preferences.
1
In Windows Vista/2008 Server, the operating system might prompt you to
approve this action. You do not receive this prompt if you are logged on to
the built-in administrator account.
In the pcAnywhere Options window, on the Host Operation tab, under Your
2
host name selection, select one of the following:
87Allowing others to control your computer
User defined
Windows computer
name
Click OK.
3
Sharing host disk drives
Symantec pcAnywhere allows the host computer toshare its standard disk drives
with the remote computer.
You need to give permission for the remote user to access and share the host
computer disk drives by configuring the super user caller rights.
To share disk drive of host computer
In theAdvanced View,on the left navigation bar, under pcAnywhere Manager,
1
click Hosts.
In the right pane, under Hosts, right-click Network, Cable, DSL and click
2
Properties.
In the Host Properties: Network, Cable, DSL dialog box, click the Callers tab.
3
In the Authentication type, select one of the following:
4
■ Active Directory Services (ADS)
Lets you specify a new name for the pcAnywhere host.
In the text box, type a host name. The maximum name size
is 24 characters.
Uses the Windows computer name or IP address that is
assigned to the host computer.
Symantec pcAnywhere uses this setting by default.
■ NT
■ Windows
Page 88

Allowing others to control your computer
88
Ways to start a host session
In the Caller list section, double-click the user with whom you want to share
5
the disk drives.
In the Caller Properties dialog box, click the Privileges tab.
6
Select Superuser-caller has full access rights to the host machine.
7
Click Apply and then OK.
8
In the Host Properties: Network, Cable, DSL dialog box, click the Security
9
Options tab.
In the Session options section,in Select drive, check the drives that you want
10
to share.
Click Apply and then OK.
11
Note: The drives remain shared even if the session ends.
Ways to start a host session
You can start a host session in one of the following ways:
■ Wait for connections from authorized remote users.
See “Waiting for a connection from a remote computer” on page 88.
■ Initiate a connection with a remote computer, and then let the remote user
take control.
See “Calling a remote computer” on page 89.
■ Accept a host invitation.
See “Accepting a host invitation” on page 90.
Waiting for a connection from a remote computer
When you start a host session, your computer waits for connections from
authorized remote users, using the connection device that is selected in the host
properties on the Connection Info tab. If two devices are selected, the host waits
for a connection on both devices. A hostcan accept only one connection at a time.
After establishing a connection on one device, the other device is not available
until the session ends.
This method is the most common way to start a host session.
Page 89

To wait for a connection from a remote computer
In Advanced View, on the left navigation bar, under pcAnywhere Manager,
1
click Hosts.
In the right pane, under Hosts, double-click the connection item that you
2
want to use.
The Symantec pcAnywhere Waiting icon appears in the Windows system
tray, which means the host is available for connections.
In WindowsVista/2008 Server, you might be prompted to approve thisaction;
however, youare not prompted if youare loggedin as a built-in administrator.
Calling a remote computer
The host computer can initiatea connection with a remotecomputer. The remote
computer resembles host behavior in that it must be waiting for the connection.
However, unlike a typical host session, after the connection is established, the
remote computer controls the activities on the host.
Use this method for added security if you do not want remote users to initiate
connections with your computer.
To call a remote computer
Ways to start a host session
89Allowing others to control your computer
In Advanced View, on the left navigation bar, under pcAnywhere Manager,
1
click Hosts.
In the right pane, under Hosts, right-click the connection item that you want
2
to use, and then click Call Remote.
In WindowsVista/2008 Server, you might be prompted to approve thisaction;
however, youare not prompted if youare loggedin as a built-in administrator.
The host connection item must be configured to use the same type of
connection device that the remote computer uses.
In the pcAnywhere Waiting window, do one of the following:
3
■ For modemconnections, typethe phone number for the remote computer,
and then click OK.
■ For networkconnections, typethe hostname orIP address,and thenclick
OK.
Once the connection is made, the remote user can take control of the host
computer.
Page 90

Allowing others to control your computer
90
What you can do during a host session
Accepting a host invitation
A remote user can send you an invitation through an email message, instant
message, or physical media to start a remote control session. The invitation
contains the information that is needed to connect to the remote computer so
that the remote user can take control of your computer.
To accept a host invitation
Do one of the following:
◆
■ If you received the invitation in an email message or instant message,
open the file attachment (.pcainv).
■ If youreceived the invitation on physical media, browseto the .pcainv file
and open it.
What you can do during a host session
During a host session, pcAnywhere lets you do any of the following:
■ View status information about the session.
See “ Working with the host online menu” on page 90.
■ Hold a conference with multiple remote users.
See “Letting multiple remote users hold a conference” on page 91.
■ Chat with the remote user.
See “Chatting online with the remote user” on page 93.
■ Highlight an item on the host computer.
See “Using draw feature on the host computer” on page ?.
■ End the session.
See “Ending a host session” on page 94.
Working with the host online menu
When youstart a session, a host icon appearson the system tray on your Windows
desktop. You can use an alternative if security measures are not in place to lock
the keyboardand mouse on the host computer. Use the hostonline menuto display
status information and end a session.
You can also see information about who is connected to the host computer. It
includes the following information:
■ Session duration
■ User name
Page 91

What you can do during a host session
■ Type of connection (such as TCP/IP) and the device name
For example, for TCP/IP connections pcAnywhere provides the Windows
specified remote computer name.
Note: When you start a session, an animated host icon appears on the system
tray that shows the status of the session. When the session is active, the icon
displays three blinking white dots. When the session ends, a message appears
that theremote user has disconnected and the animationstops. When the host
is canceled, the icon is displayed in red.
To access the host online menu
On the desktop, on the system tray, right-click the host icon.
◆
To view information about who is connected
On the desktop, on the system tray, move the cursor over the host icon.
◆
Letting multiple remote users hold a conference
Conferencing lets multiple remote users connect to a single host and
simultaneously view what is happening on the host screen. For example, you can
host a conference to conduct a software training demonstration.
A conference is basically a remote control session, except that multiple remote
users connect to the host at the same time. The first caller can connect using any
connection device. However, subsequent callers must use a TCP/IP network
connection. The first remote user to establish a connection controls the host.
Other users can view the activity on the host screen, but cannot take control of
the host.
91Allowing others to control your computer
Note: The Auto Detect Bandwidth setting selected by default. If performance is
an issue, conference users can select Low Bandwidth in the remote connection
item's Properties window on the Remote Control tab.
Configuring a conference host
To let multiple remote usersconnect to your host computer, you must specifythe
information needed to make the connection. You can start with an existing host
connection item or create a new one.
Conferencing usesa type of communication called multicast. Thisrequires avalid
Class D IP address.
Page 92

Allowing others to control your computer
92
What you can do during a host session
To configure a conference host
1
2
3
4
In Advanced View, on the left navigation bar, under pcAnywhere Manager,
click Hosts.
In the right pane, under Hosts, do one of the following:
■ To configure an existing connection item, right-click the item, and then
click Properties.
■ To create a new connection item, on the File menu, click New Item >
Advanced.
In the Host Properties window, on the Conference tab, check Enable
conferencing.
Select one of the following:
Obtain IP address
automatically
Lets your network server automatically assign an available
Class D IP address.
Lets you type the Class D IP address that you want to use.Specify IP address
The address must be within the range of 225.1.1.1 through 239.254.254.254.
To use routers to increase the broadcast area of the conference, in the Allow
5
conference over “x” routers list, select the number of routers that you want
to use.
Click OK.
6
On Vista, you might be prompted to approve this action because changing
the host properties might affect other users.
Starting a conference
The steps for starting a conference are similar to starting a host for a remote
control session. After you start the conference host, the remote user who will
control the conference host can connect to it using any connection method that
is supported by the host computer. After the first connection is established, the
other remote participants must connect using TCP/IP.
Note: The Auto Detect Bandwidth setting selected by default. If performance is
an issue, conference users can select Low Bandwidth in the remote connection
item's Properties window on the Connection Info tab.
Page 93

To start a conference
In Advanced View, on the left navigation bar, under pcAnywhere Manager,
1
click Hosts.
In the right pane, double-click the host connection item that is configured
2
for conferencing.
The Symantec pcAnywhere Waiting icon appears in the Windows system
tray, which means the host is available for connections.
See “Letting multiple remote users hold a conference” on page 91.
Chatting online with the remote user
During a remote control session the host user and remote user can have a typed
conversation in a chat window. Either the host or remote user can initiate a chat
session. This feature is helpful for sending brief messages or instructions. You
can also save the chat log on plain text format.
To chat online with another user
On the system tray, right-click the host icon. Then, click Chat.
1
In the Chat window, in the lower pane, type your message.
2
Click Send.
3
Your messages and the other user's responses appear in the upper portion
of the chat window.
To save the chat, click Save.
4
In the pcA Chatting Log dialog box, select the location to save the chat.
5
Type a file name.
6
Click Save.
7
What you can do during a host session
93Allowing others to control your computer
Using draw feature on the host computer
During a remote control session, you can use the draw feature to highlight or
direct the remote user's attention to an item. You can show or explain an item of
the host computer. You can change the shape, width, and color of the drawn
highlight.
To use the draw feature on the host computer
On the host computer, right-click the animated pcAnywhere host icon, and
1
then click Enable Pen.
In the white board box, click Draw.
2
Page 94

Allowing others to control your computer
94
What you can do during a host session
3
4
5
In the white board box, select one of the following:
Lets you draw a rectangle.Rectangle
Lets you draw a circle.Circle
Lets you draw a customized shape.Free Hand
Highlight the item on the host computer, by clicking and dragging themouse
over the item.
To change the width of the highlight, select one of the following:
Increase width
Decrease width
To modify the color of the highlight, click Color and select the color of your
6
choice.
To select a custom color, in the Color window, click Define Custom Colors.
7
Select a custom color and click Add to Custom Colors.
Click OK.
8
Note: To undo an action click Clear or use Ctrl+Z andto redoan action, use Ctrl+Y.
Ending a host session
Either the host or remote user can end a session. If the remote user ends the
session, the end of session options that are configured for the host connection
item determinewhether the host waits for another connectionor is canceled. The
caller rights that are configured for the host connection item determine whether
the remote user is allowed to cancel the host.
See “Setting end of session options” on page 83.
See “Configuring caller rights” on page 213.
To end a host session
Lets you increase the width of the
highlight.
Lets you decrease the width of the
highlight.
On the Windows status bar, right-click the host icon, and then click Cancel
◆
Host.
Page 95

Chapter
Controlling another computer remotely
This chapter includes the following topics:
■ Managing remote connections
■ Ways to set up a remote computer
■ Ways to start a remote control session
■ What you can do during a remote control session
5
■ Connecting to a computer that does not have a host running
Managing remote connections
For computers to which you connect frequently, Symantec pcAnywhere lets you
select the connection and security settings that you want to use and store this
information in a remote connection item file. Connection item files appear as
icons in the Remotes window. Remote connection item files (.chf) are stored in
the pcAnywhere program data directory
(:\ProgramData\Symantec\pcAnywhere\Remotes).
Adding a remote connection item to Favorites
Symantec pcAnywhere lets you manage the connection items that you use most
frequently by adding them to the Favorites window. This window supports folder
management to organize your connections.
Page 96

Controlling another computer remotely
96
Ways to set up a remote computer
To add a remote connection item to Favorites
In Advanced View, on the left navigation bar, under pcAnywhere Manager,
1
click Remotes.
In the right pane, right-click on a connection item.
2
Click Add to Favorites.
3
Locating a recent remote connection item
Symantec pcAnywhere automatically maintains a history of your most recently
used remote connection items.
To locate a recent remote connection item
In Advanced View, on the left navigation bar, under pcAnywhere Manager,
◆
click History.
The most recent connection items appear in the right pane.
Ways to set up a remote computer
Symantec pcAnywherelets youset up a remote computer by modifying an existing
connection itemor by creating a new one. Youcan configurenew connection items
in the following ways:
■ Connection Wizard
See “Using theConnection Wizardto configurea remoteconnection” on page 97.
■ Advanced properties
See “Configuring a remote connection using advanced properties” on page 98.
To quickly connect to a host computer with minimal configuration, you can use
Quick Connect.
See “Connecting to another computer using Quick Connect” on page 117.
Symantec pcAnywhere provides the following default connection items:
■ Direct
■ File Transfer
■ Modem
■ Network, Cable, DSL
■ Remote Management
These itemsare preconfiguredto optimize security and performance, but you can
modify their configuration settings.
Page 97

Ways to set up a remote computer
See “Knowing which connection device to use for remote sessions” on page 100.
Using the Connection Wizard to configure a remote connection
The Connection Wizard guides you through the process of configuring your
computer (the remote computer) to connect to another computer (the host
computer). After the Connection Wizard finishes, you can start a remote control
session.
Symantec pcAnywherestores this connection information in a remote connection
file. It places the remote connection item in the Remotes window. You can use
this connectionitem to begin a remote session orto modifythe connection settings.
See “Starting a remote connection item” on page 115.
Symantec pcAnywhere offers some advanced configuration options, such as
session encryption, that are not available in the wizard.
See “Configuring a remote connection using advanced properties” on page 98.
To use the Connection Wizard to configure a remote connection
In Advanced View, on the left navigation bar, under pcAnywhere Manager,
1
click pcAnywhere Tools.
In the right pane, double-click Connection Wizard.
2
On the Introduction screen, click I want to connect to another computer,
3
and then click Next.
Select one of the following:
4
■ I want to use cable modem/DSL/LAN/dial-up Internet ISP.
97Controlling another computer remotely
■ I wantto usemy telephone modem to connect directly to another telephone
modem.
The wizard automatically detects the connection devices that are available
on your computer. The connection device that you choose must be the same
type of connection device that the host computer uses. For example, if the
host computer uses a phone modem, you must select the phone modem as
your connection device.
See “Knowingwhich connectiondevice touse for remote sessions” on page 100.
Click Next.
5
Do one of the following:
6
■ Type the IP address of the computer to which you want to connect.
This option is available for cable modem/DSL/LAN/dial-up Internet ISP
connections only. If the host computer is on a private network, use the IP
Page 98

Controlling another computer remotely
98
Ways to set up a remote computer
7
8
9
address of the router. The host's administrator mustconfigure the router
to allow the connection.
■ Type the phone number of the computer to which you want to connect.
This option is available for phone modem connections only.
You can leave this box blank if you run pcAnywhere on a network, and you
want pcAnywhereto searchfor the host computers that are available on your
subnet.
Click Next.
On theConnection WizardSummary screen, click Connecttoahost computer
after the Connection Wizard finishes to start a remote session when the
wizard is done.
Click Finish.
A remote connection item is added to the Remotes window. You can rename
the item.
If you chose to connect to a host computer, pcAnywhere attempts to connect
to the IP address or modem number that you specified on the Destination
screen.
If your computer is on a network and you did not specify the host computer's
IP address, pcAnywhere searches your subnet for available hosts. You can
select a host computer from the list.
Configuring a remote connection using advanced properties
For more configuration options and control over your connections, you can use
the Advanced option to create or modify remote connection items. Advanced
properties provide access to all available remote configuration options. This
includes optionsthat are not available in the ConnectionWizard, such as directory
services and public-key encryption.
Table 5-1 includes information about the settings that are available.
Page 99

Ways to set up a remote computer
99Controlling another computer remotely
Table 5-1
Connection Info
Settings
Remote Control
Encryption
Protect Item
Overview of remote settings
DescriptionTab
Lets you select the connection device and start mode for the
session. You can also select whether you want to connect
through pcAnywhere Gateway or pcAnywhere Access Server.
See “Aboutthe start modesfor remoteconnections” on page40.
See “Knowing which connection device to use for remote
sessions” on page 100.
Lets you specify the information needed to find the host
computer, make the connection, and log on.
This information varies depending on the type of connection.
Lets you select a bandwidth optimization setting and choose
whether to automatically record the session for later playback.
See “Automatically recording a remote session” on page 243.
Lets you set the level of data encryption to use during a remote
control session with a host.
See “Using encryption to protect data” on page 218.
Lets you add comments about the remote connection item.Comments
Lets you protect the connection item with a password.
See “Protecting configuration settings” on page 228.
To configure a remote connection using advanced properties
In Advanced View, on the left navigation bar, under pcAnywhere Manager,
1
click Remotes.
In the right pane, under Remotes, do one of the following:
2
■ To create a new connection item, on the File menu, click New Item >
Advanced.
■ To modifyan existing connection item, right-clickthe item, and then click
Properties.
In theRemote Propertieswindow, configure the remote configuration settings.
3
Click OK to save your changes.
4
Page 100

Controlling another computer remotely
100
Ways to set up a remote computer
Knowing which connection device to use for remote sessions
A connectiondevice is the interface that handles the communication betweenthe
host and remote computers. A connection device might be a modem or ISDN, a
network protocol, or a port.
The connection device that you choose depends on the host and remote
environments. If the host and remote computers are nearby, you can connect
them directly using a cable that is appropriate for the port. For example, you can
set up a direct connection between a laptop computer and an office computer.
Both computers must use the same type of connection device to connect.
Table 5-2 provides information to assist you in selecting a connection device.
Table 5-2
Modem that supports the
Microsoft Telephony API
(TAPI)
ISDN (North America)
Network adaptercard installed
on a networked computer or
server on a LAN or WAN
Cable modem
DSL or ADSL
Null serial cable connected to
the hostand remotecomputers
(for example, a laptop and
desktop computer)
Remote connection devices
Connection deviceHardware device
Modem name.
See “Configuringa remotemodem connection” on page 104.
ISDN device name.
See “Configuring an ISDN connection on a remote”
on page 107.
ISDN via CAPI 2.0ISDN (Europe)
For most network connections, select TCP/IP.
Symantec pcAnywhere also supports NetBIOS and SPX
protocols in Windows XP/2003 Server/2000.
See “Configuringa remotenetwork connection” on page 101.
TCP/IP.
See “About cable modem connections” on page 21.
TCP/IP.
See “About DSL or ADSL connections” on page 21.
An available COM port.
Symantec pcAnywhere supports serial connections on
Windows Vista/XP/2003/2008 Server/2000.
See “Configuring a direct connection on a remote”
on page 108.
 Loading...