

Page 1
AGES {2+
Xas
4CH 2.4O REMOTE CONTROL
SUADCOPTER
FOC(@
ffi
gxx@
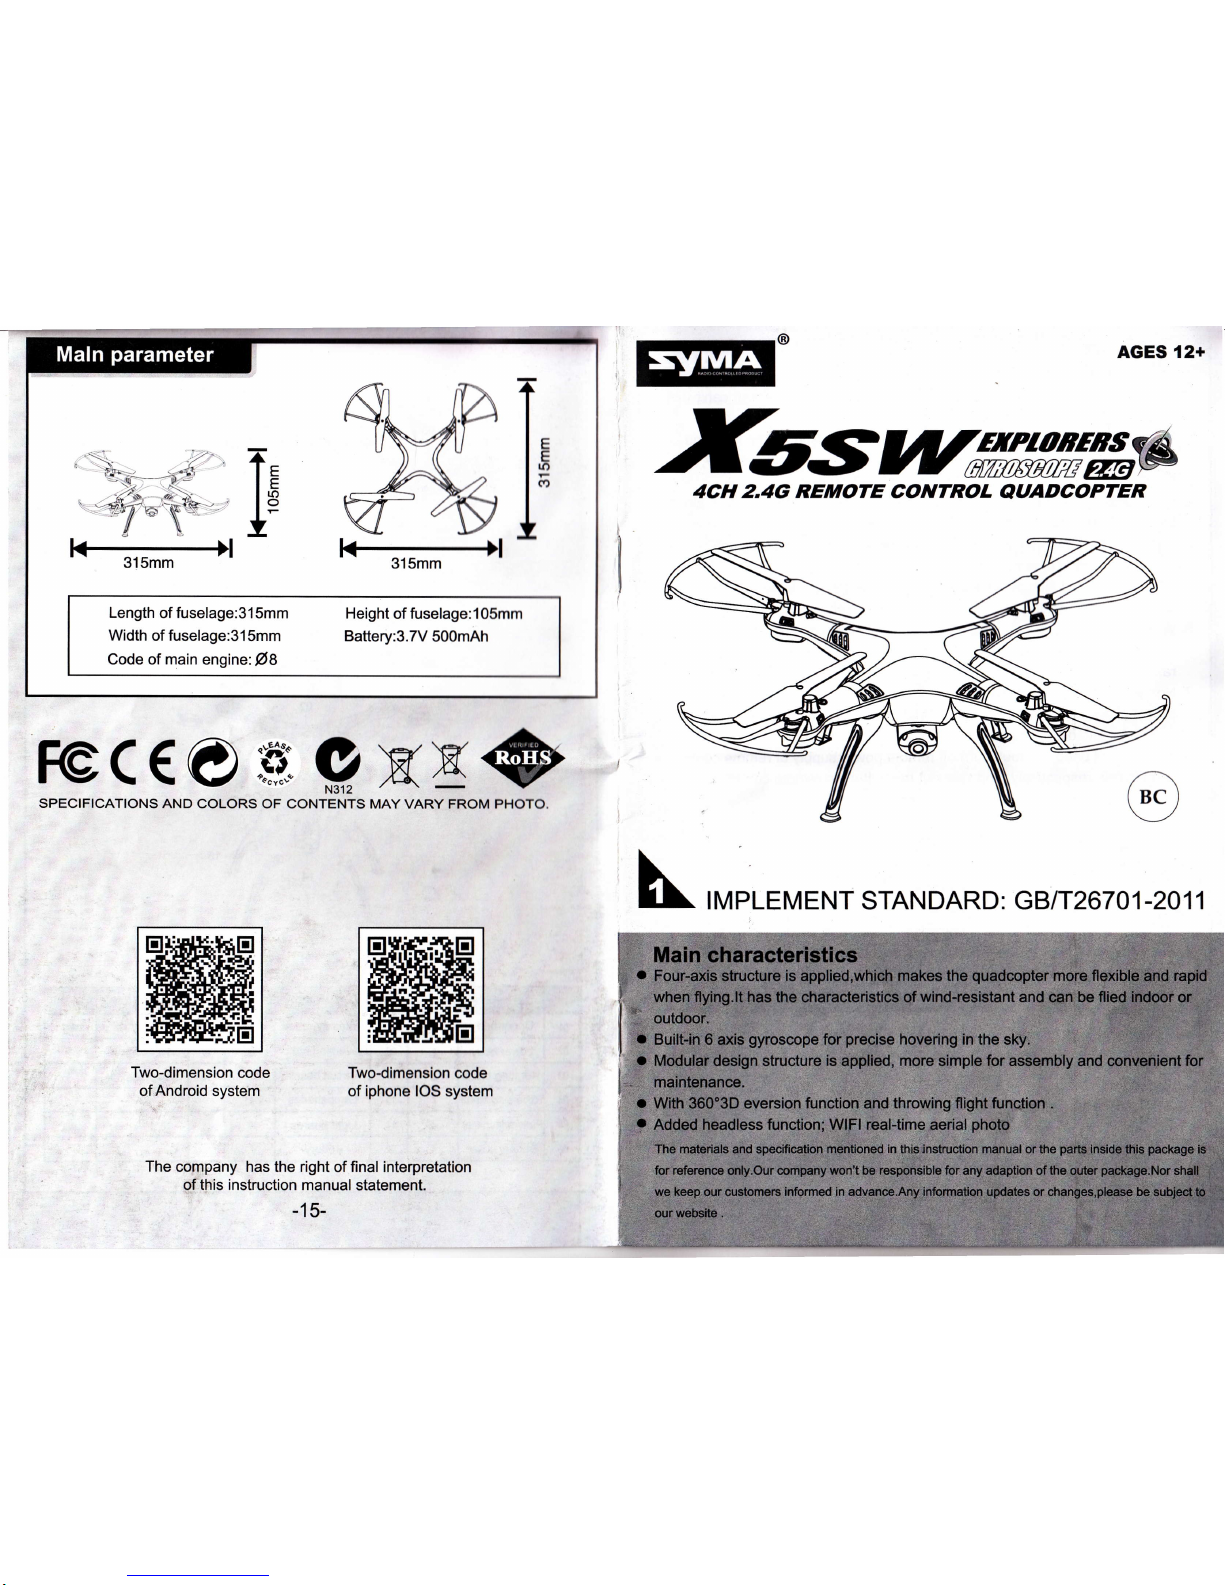
SPECIFICATIONS
AND COLORS
OF CONTENTS MAYVARY
FROM PHOTO.
h.
TM'LEMENT
.TANDARD:
cB,tr267o1-2011
ffi
ffi
Two-dimension
code
ofAndroid system
Two-dimenslon
code
of iphone IOS system
The
coJnpany has the right
of final interpretation
.oJ
tfris i nstruction manual
statement.
-15-
Page 2
1.
Please
put
smaller
parts
of
the
aircraft in the
place
whsre
children can't
reach, avoiding from
accidents.
2. Power
of this aircraft is
adequate. Therefore, when
flying for
the
first
time,
it should
push
remote
control's righUlefi variable-speed
joystick
slowly,
avoiding from
collisions caused
by
rising
aircraft rapidly.
3. After flying, it
should turn
off
remote
control's
power
supply and come close
to the aircraft to turn
off its
power
supply.
4. Please
don't
put
battery in hightemperature
and
heated
places(such
as fire
or
nearby
electric heating
devices).
5. When the aircraft flies, it
should maintain 2-3
meters from the user or others,
avoiding
from
crashing into
others' head, face
or body
when it lands.
6.
When
children operate the
aircraft, they should
be accompanied with the
adult and
guided
by the adult. Ensure
that the aircraft is
controlled
within
the
range of operator's
(or
instructo/s) visibility.
lt is convenient for controlling.
7. Non-rechargeable
battery
can't charge. As installing
or changing battery,
please pay
attention to the
polarity.
Don't use
a
mixture
of old
and new battery
or battery with
different types.
8. When it isn't
used,
it should
turn off remote
power
supply
of remote
control
and aircraft, respectively,
and
take
out the battery in remote control.
9. Power supply terminal
can't be short circuit.
1. Use clean soft cloth to clean this
product
frequently.
2. Avoid from exposure or heating in the
sun.
3.
Don't
put
the toy
in
the
water.
Otherwise, it'll damage electronic
parts.
4. Please check the
plug
and other accessories
at
regular intervals. lf
there
is any damage,
please
stop using it immediately until it is repaired completely.
Product
included
following contents:
-
Quadcopter
-
Screwdriver
- 2.4G Remote controller - Landing
gear
-
USB charging
wire
-
WlFl
Camera
- lnstruction manual
-
Screw
-
Protecting frames
-
Blade
-
Phone attaching clamp
\..
.r2
rgq:lt.e
h^"t/-.
a
'.f.R-
.,*4".
l6flA'
#rrrhit-
\rr.rr
E@-7''\-
re
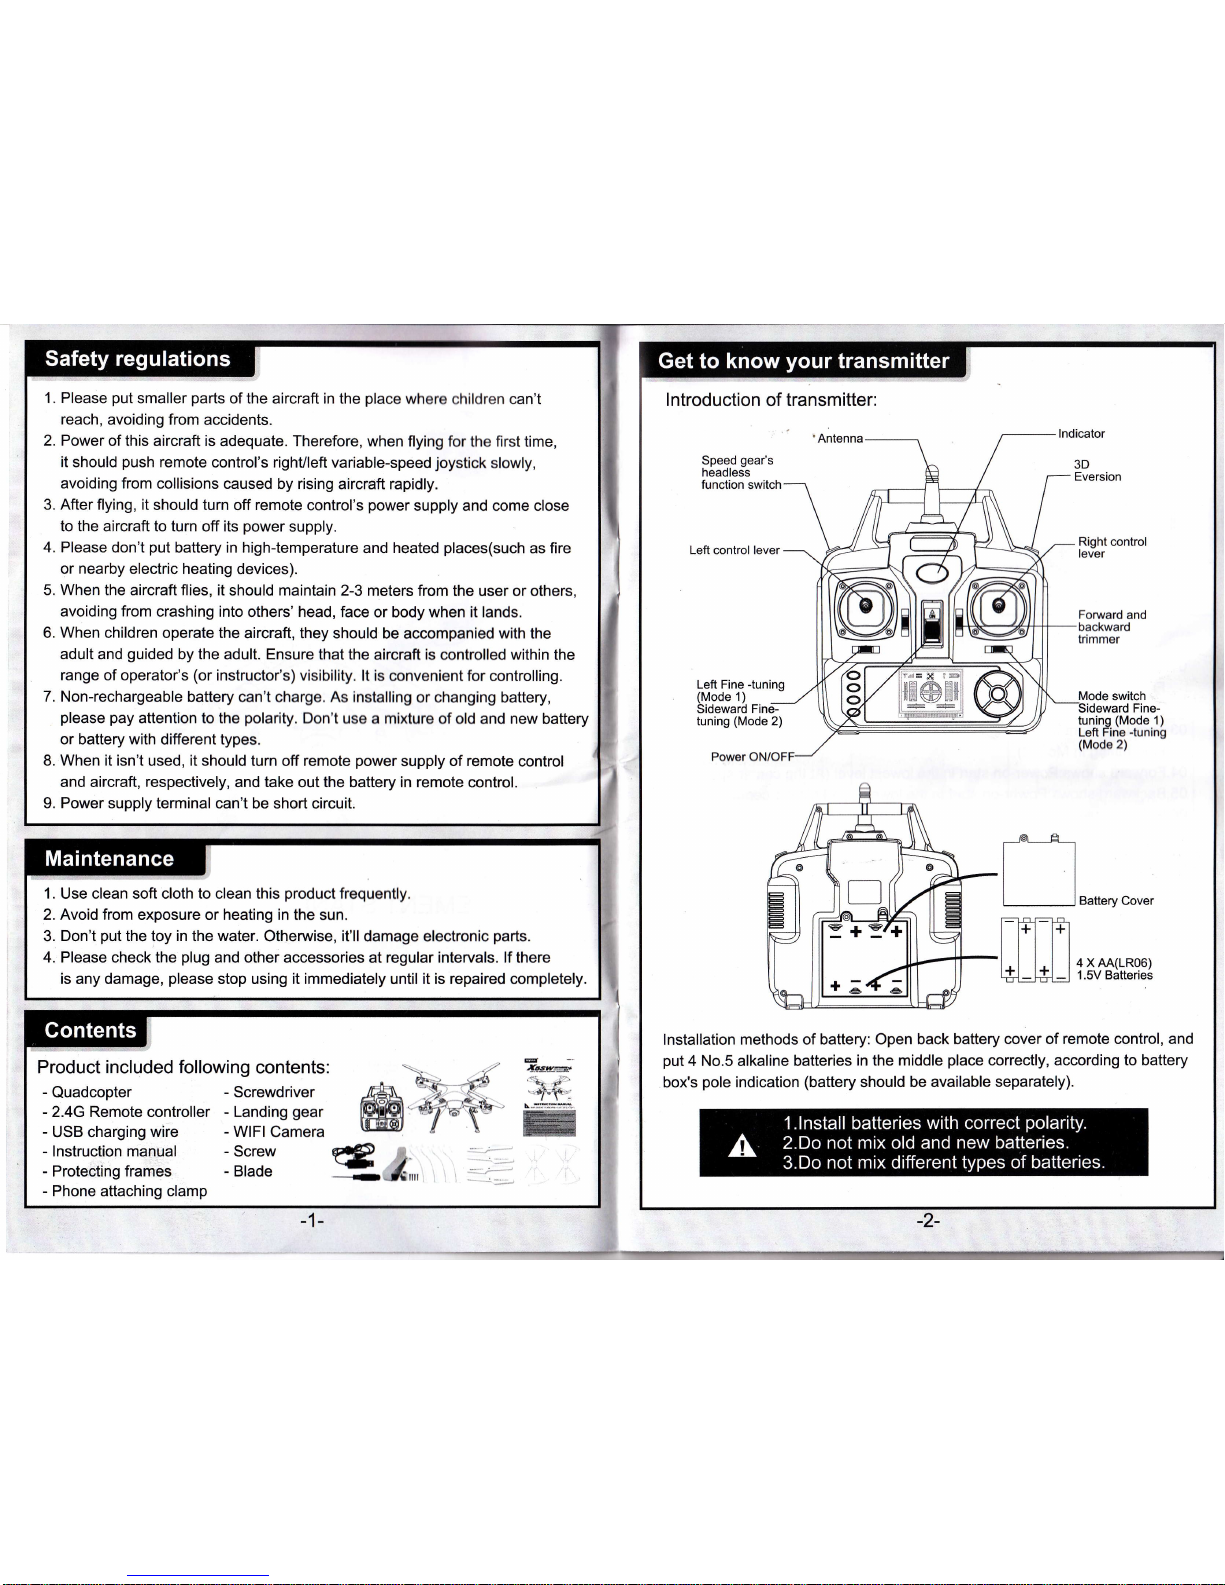
I ntroduction
of
transmitter:
Left control lever
Left Fine
-tuning
(Mode
1)
Sideward
Fine-
tuning
(Mode
2)
Right control
lever
switch
ard Fine-
Mode
tuning
(Mode
1)
Left Fine
-tuning
(Mode
2)
lnstallation methods of battery:
Open back battery
cover of remote control, and
put
4 No.5 alkaline batteries
in the middle
place
correctly,
according to battery
box's
pole
indication
(battery
should be
available separately).
Page 3
:,""-'*#T
l,
!-'
..
!*,
Figure 1
Figure
2 Figure
3
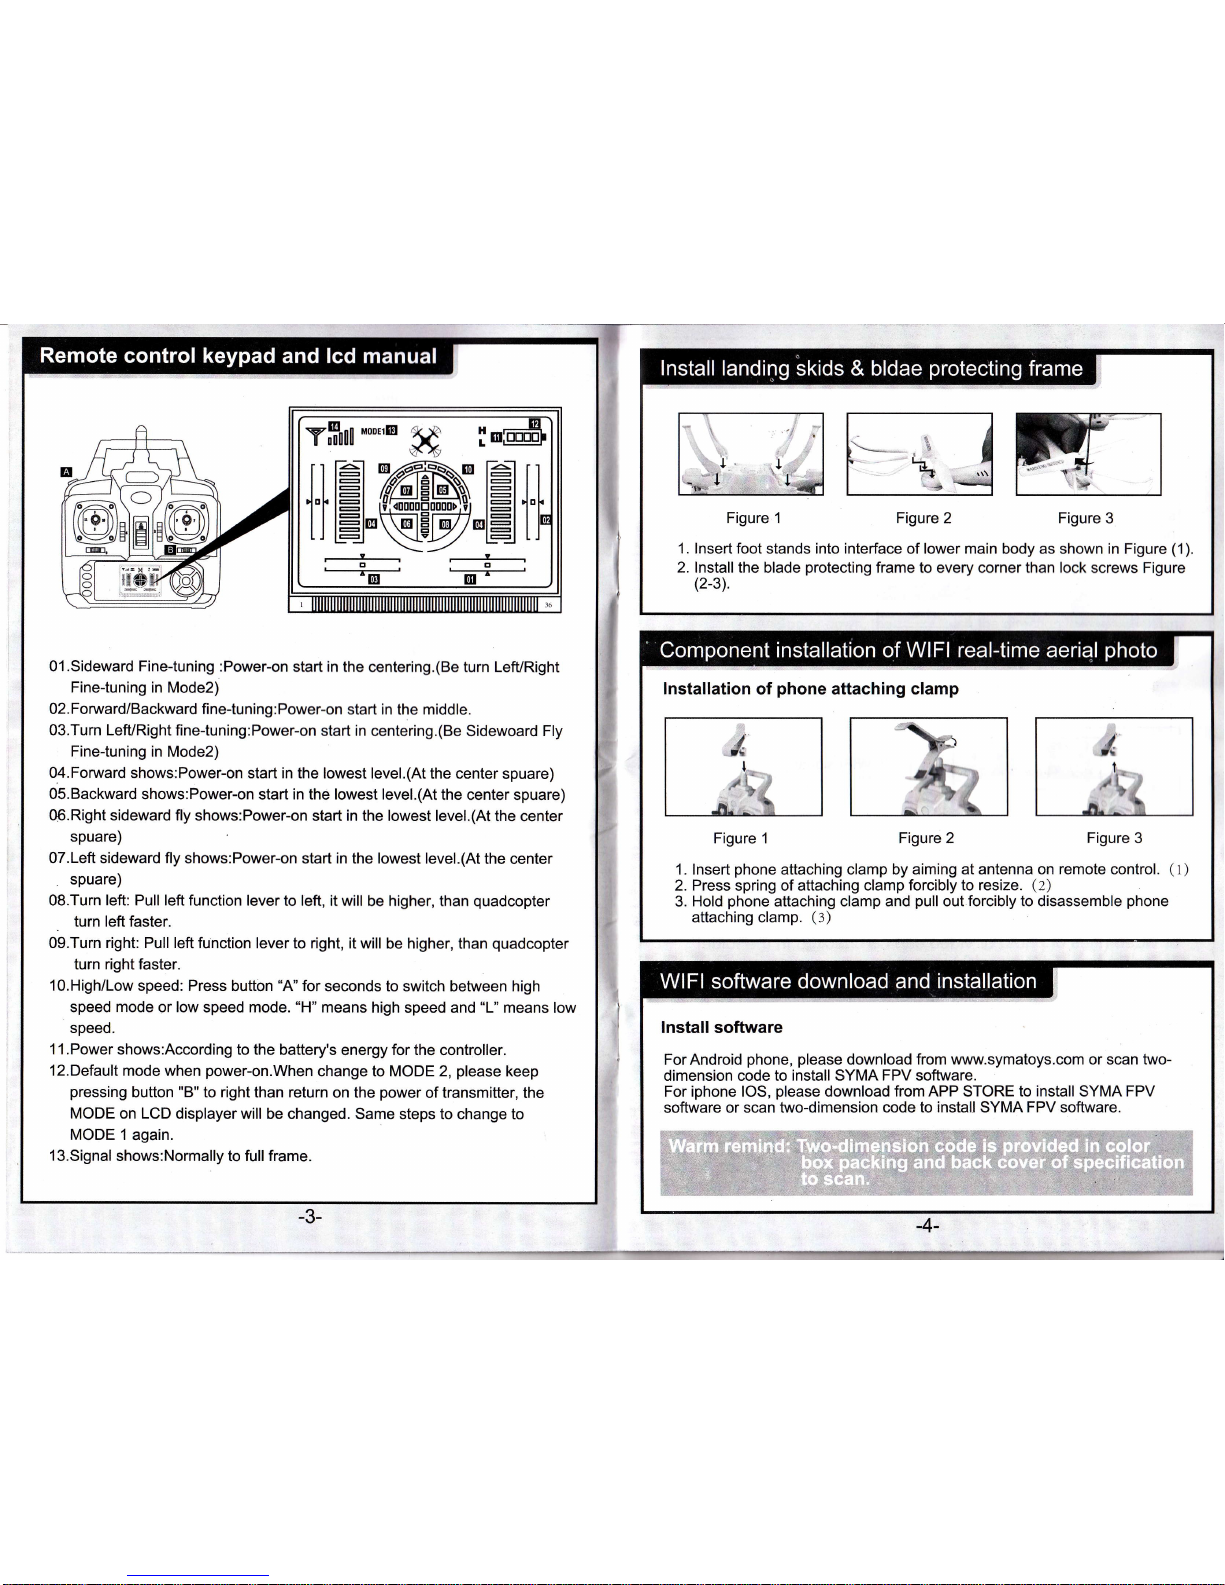
1.
2.
Insert foot stands into interface of lower main body as shown in
Figure
(1).
lnstall the blade
protecting
frame to every corner than lock screws Figure
(2-3\.
t'**
-
ii'
t-*
.-+
lnstallation
of
phone
attaching clamp
Figure 1
Figure 2 Figure 3
1 . Insert
phone
attaching clamp by aiming
at antenra on remote control.
(
t
)
2. Press spring of attaching
clamp forcibly to resize.
(z)
3.
Hold
phone
attaching clamp
and
pull
out
forcibly
to disassemble
phone
attaching clamp.
(:)
I
tr
t
,,
\,
,
,.
\
\*
"\
I
1.
,,,
I
{
0l.Sideward Fine-tuning :Power-on
start in the
centering.(Be
turn LefURight
Finetuning in Mode2)
02. Foruvard/Backward fine-tuning
: Power-on
start
in
the middle.
03.lurn LefVRight fine-tuning:Power-on
start
in
centering.(Be
Sidewoard
Fly
Fine-tuning
in Mode2)
04.Fonvard
shows:Power-on start in the
lowest level.(At the center
spuare)
05.Backward
shows:Power-on
start
in the lowest level.(At
the
center spuare)
06.Right sideward
fly shows:Power-on
start
in
the lowest level.(At the
center
spuare)
07.Left sideward fly shows:Power-on
start
in
the lowest level.(At
the center
spuare)
08.Turn left: Pull left function lever
to left, it will
be
higher,
than
quadcopter
,
lurn left faster.
09.Turn right: Pull left function
lever to right, it will
be higher, than
quadcopter
turn
right faster.
10.High/Low
speed: Press
button
"A"
for
seconds to switch
between
high
speed
mode
or low
speed
mode.
"H"
means high
speed and
"L"
means
low
speed.
'l1.Power
shows:According to the
battery's
energy
for the controller.
l2.Default mode
when
power-on.When
change to MODE 2,
please
keep
pressing
button "8" to right than return
on the
power
of transmitter, the
MODE on LCD displayer
will be changed.
Same steps to change to
MODE 1
again.
1
3.Signal shows:Normally to full frame.
-3-
lnstall software
ForAndroid
phone, please
download from www.symatoys.com or scan two-
dimension code to install SYMA
FPV software.
For iphone lOS,
please
download from APP STORE to
install
SYMA FPV
software or scan two-dimension code to
install
SYMA
FPV software.
4-
Page 4

s
2.
Connection
Description
When connecting with model
power,
indicator light of FPV
is
green
light.
Red lighi flashes
slowly after
20
seconds
for waiting to connect with the
phone.
Click
"setting"
of the
phone,
open WlFl, find
out
'FPV
WlFl
****n
in
WlFl searching list, click connection until it
appears
"connected",
indicating
successful
connection,
and now exit setting
option,,ppen
SYMA
FPV
software, click
"START"
button" and enter into control interface.
lmage is
showing on
phone
screen. WlFl signal is full, showing the strongest signal
right now.
1.Open the software
SYMA FPV.
2.Click the
'START'
button.
3.lmage
is showing
on the screen.
3. lcon description
of
real-time interface
@trTE6E
6Ag3r
1. Return
2. WlFl signal
3.
Phone
and
video
check
4. Video
5. Photograph
6.
Time
display
4. Realtime
aerial
photo
Photo & video: When WlFl
camera stays in normal state, click
photo
or
video icon
on the
real-time interface
to take
pictures
or
video
(files
of
photo
or video can be checked in the folder
of
"photo
and video check".)
i
W
t-.
-:.
_t-
I
ttFffiil zA.\ i
I
-5-
-6-
Operating direction
rr
ri
*
*
:...
t*;
;i,
.i*
;;
s'rl-a
-N'Y
4\
ll
Push the throttle
up or down,
the
quadcopter
flies upward or
downward.
Push
the direction
lever
up or down,
the
quadcopter
flies fonarard
or
backward.
+
^.
,r.(.\.. t./x
F-Y: +
-)
/\
./
,)
(
i,l,.
-iiJl
r:N'Y IfJ
KJ/
t-\>
.* at
v'l'
i.Y
/I
++
il
Pull
the
throttle
lefl
or
right, the
quadcopter
turns to
left or right.
Fine-tuning operation
Pullthe direction lever
left
or
right,
the
quadcopter
flies
to
left
side or
right
side.
l
,:}''
:l:,tii.'ii:-r
:
:
:
fi"l"ri
anxi tttt} xsi'r.r':1;:
J:
'if,i
iii
l.;$
Xffit
i.li:::li:;;,;ri;,,
,1|,
f
.
,.
:i'.i,
r,
i:i
,,:,1r,,1.;.r.,
,.1,,,f:it,,r,,'iliilllr.,',
.';ll
l.,rt,.r.rt
.i.:
&.
+;.
n\ +'-n
\
-tr-
))
(
g'.\r
rt'
"1,"
/t
,.\
When the
quadcopter
keeps flying
forward
/
backward,
youcan
correct
it
by
pressing
finetuning
button
down / up.
When the
quadcopter
keeps flying to
left
/
right
side,
youcan
correct
it
by
pressing
the
Fine{uning
button
right
/
left.
'When
the
quadcopter
keeps rotating to left /
right,
you
can correct
it
by
pressing
the fine-
tuning
button
right / left.
-t
'F
';']-.n
ra
-*+
7
',.-i+,
x
-
In-\
lll",._
*i
rs
l-
.&-"t
r,*o
7'8.r
!
Y
t,,*
,,i
i
Page 5

Operating direction
.&.
.&
&&
/.
'
''Ee,
e{
c's,
.a
x
'
nS"
ta'\
'r
'
/\
ll
Push the throttle up or down, the
quadcopter
flies upward or
downward.
Push
the direction
lever
up or down,
the
quadcopter
flies forward or
backward.
*
.,r
si.
.:*
,t:.ri ! .,.
-..:
-r,:;
,
t-.
t.ia
.
'.'.a
_a
...+!j'*\
l"l*
(*'
s
Pull the direction
lever left
or
right,
the
quadcopter
turns to
left
or
right.
Pull
the throttle
left
or
right,
the
quadcopter
flies
to
left
side or
right
side.
Fine-tuning operation
f"f;€.'>.i. nn
t
X&{*X$Xf*f'.:ifii:.:rii&*i:,. tt''
.i&***f.,
li*&&;r;il****l:.**l*
,XXi.,;:ili.3xXii,lXfi
.fXfmXf&m,f.
*{--j----EDD-
.*ft
L
I
. "i:
t'
,.ts.l.
b'
AJz
l;
tr+r
"
\=,rr-
,1ffi5 ) it .
flRI@| , rl.\,
(€
,,
\<!
D'
When the
quadcopter
keeps flying
foruard
/
backward,
youcan
correct
it by
pressing
fine-tuning
button
down / up.
When the
quadcopter
keeps flying to left / right
side,
youcan
correct
it by
pressing
the Fine-tuning
button
right / left.
When the
quadcopter
keeps rotating to left /
right,
you
can correct it
by
pressing
the fine-
tuning button right /
left.
n
,/5 : lr
\s
l@-lret
I'ffi1
-7-
x
I
l.Press the
ON/OFF
power
switch up.
2. Open battery cover,
and connect battery
connector
with dash
receiver.
3.
Enclose
battery
into
the fuselage,
after
closing
battery cover,
turn on the switch
on
the bottom
of
aircraft.
4.Push the throttle lever to the
highest
position,
and
then
pull
it back to the
lowest
position.
There will be one clear sound
from the transmittel
this shows
that the
quadcopter
has entered
into
the
pre-fly
state.
1 .Lowvoltage
protection:
When four indicator lights on the bottom
of aircraft start to
flicker, it means electric
quantity
of the aircraft
is insufficient. Please
control
the aircraft to
make a return voyage.
2.
Over-cu
rrent
protection
:
ln
the
condition of rotating aircraft's
fan blade,
when being crashed or stuck,
aircraft's circuit
will conduct
over-current
protection.
-8-
Page 6

3. Horizontal correcting function :
Place the
quadcopter
on a
horizontal
postion,
then
push
transmitter both left and right lever
to
lowest right conner for about 2-3 second
,
indicator
on the
quadcopter
changed
from
normal lights
up to
quickly
flashing
;After
2-3
second
,the
indicator
changed
to
normal lights,
it means the
quadcopter
restarted
/reset
successfully.
4.3D eversion:
When
you
are
familiar
with the basic operation,
you
can do some awesome&
exciting
tricks and
stunts! First
of all,fly
the
aircraft to a height of
more
than 3 meters,
press
the
3D
Eversion
switch on
the rear
right side
of
the transmitter,
then
push
the right
rudder(in any direction)
to make 360
degree flip.
5.Throwing fl ight instructions:
Thanks to the 6 axis
gyroscope,you
can
throw the
quadcopter
and
push
the
throttle
right
up,it will automatically
level out and
hover
smoothly in the sky, This
can also be
done when the
quadcopter
is rolling.
6.Headless function:
1. Foruvard
definition
1. Turn on
power
switch of remote
control.
-10-
ffi
t
K
2. Switch to headless
2. After
aircraft
connects with
power
supply,
place
the switch in
"ON"
position,
adjust the direction
pointed
by aircraft's
handpiece and regard it as
the dead ahead
in headless situation;
3.
Push the accelerator's
push
rod
of remote
control
to the highest
point
and
pull
back to the
lowest
point.
When remote control
pops,
it
indicates
that
frequency modulation and forward definition have
already finished.
function and
general
function
1. After frequency
modulation, the aircraft defaults
to
general pattern.
The indicator light on aircraft
is long bright
state. After
pressing
down
headless
function
switch
on the top
left
of
master remote
controller for 2 seconds,
remote
control
will
give
out
"DDD...",
it means
that it enters into headless
state. After
pressing
for 2 seconds and
hearing long
"D",
it means that it
exits headless state.(ln
headless
mode, four indicators on the aircraft
flicker slowly
for once within
four
seconds)
2. ln headless state,
the
operator
has no need
to
recognize
the
position
of
aircraft's
headpiece,
and he
just
needs
to
control
the aircraft
in
accordance
with the direction of
remote control's
operating rod.
3. Correcting
fonivard direction
1.
After aircraft
crashes in
headless state, if there
is
deviation in head direction,
it
just
needs to adjust
the aircraft's direction
again,
pull
remote control's
accelerator and operating
rod to bottom
left
simultaneously.
When indicalor
light on the
aircraft flickers
for
slow
three seconds,it means
that correction is done.
ffi
1) \\
fl*\
ffi
Page 7

'l.Push
the
on/off switch
of
quadcopter
to OFF
position
than
oper the battery
cover.
2.Pull out the battery wire from the
power port.
3.To charge battery,
please
insert the
USB
port
of
provided
USB charging cable to anyone
USB
port
of
computer.
The indicator on USB
cable will light ON
during
charging
battery, than it will light
OFF when
battery fully
charged.
Caution:
When using the
computer for charging,please
remember to
pull
out the
charging
cable before
shutting down the computer.Take
the battery cover,
and close the
battery cover on the
quadcopter.
4.Reconnect
the battery wire to
power port
than
close the
battery cover.
Cautions when charging:
1.When
charging,
please put
this
product
on a
dried or
ventilated
area and
keep it far
away
from
heat source
or explosive
product.
2.When
charging,
please
remove
the
batteries
from
the
quadcopter.
Then
charging
process
should be
supervised by an
adult so as
not
to cause an
accident.
3.When finish
flying,
please
do not
charge the battery if the surface
temperature is
still
not
cool. Othenruise it may
cause a swollen battery
or
even a fire hazard.
4.Please make
sure that
you
use the
original USB charging cable
provided.
When the battery has
beea used for a long
time, or appears to be swollen,
please
replace
them.
5.A battery when not in
use
for
a long time
will lose its charge automatically.
Charging or discharging
too often may reduce
the life of the battery.
,
Disassembly steps of camera:
1. Pull
out
power
supply cable of the
camera
as shown
in Figure
(1).
2. Press safe lock of
lower main body
forcibly and
pull
back the camera
simultaneously.
lnstallation steps
of camera:
1. Push
the camera
in
place
as
shown
in Figure
(1).
2.
Connect connecting
line
of camera
with
power
supply socket
of
fuselage's
camera
as shown
in
Figure
(2).
Figure 2
MM
Figure 1
Figure 2
Figure 1
1. Alrcraft
enters
into low-voltage
protection.
2. Electric
quantity
of remote control
is
insufficient,
power
indicator light will
flicker.
3. Channel selection
of
remote
control
is inconsistent with aircraft's match
codes.
1.
Charge
the
aircraft.
2.
Change
remote control's battery.
3.
Adjust
channels of
remote
control
and aircraft, and
make them
become
consistent.
1. lnsufiicient
remote
control's
electric
quantity.
2. Remote control
with the
same
frequency
is transmitting interference
1. Battery replacement.
2.
Change
the
place
where has no
transmitting interference of the
same frequency.
When hovering,
side flight
is
formed
1. Have no horizontal correction.
Conduct
horizontal
correction, as
shown
in
p.9(3)(correcting
function)
1. Head deflection
is
caused
by
multiple
collisions.
1. Define forward again, as shown in
p.9-1
0(6)(headless function)
Page 8

Here
are alternative
accessories. ln
order to
provide
convenience
for
customer
purchasing,
every
component are marked.
Accessoriescan
be
purchased
from local
dealer. Please
specifu
the color when
purchasing.
{ea
{Qr'-
:r
66
60
.\i,:
.:
XsSW.O1A
Fuselage
(white)
XsSW-O1B
luselage
(black)
x5sw-02A
Rotating
blade
(white/black)
rffr
XsSW-O2B
Reversing
blade
(white/black)
XSSW-O3A
Landing
skids
(white)
x5sw-038
Landing
skids
(white)
X55W.O4
Protecting frames
X5SW-o5
Lampshades
x5sw-06A
MotorA
---
'H
t
x5sw-068
Motor B
X5SW-07
Light
boards
x5sw-08
Receiver board
'
&,:xtx :
tyW";
t
XSSW-o9
Battery
X5SW-10
USB
x5sw-11
Camera
(white)
,,.
t*
i;t
x5sw-12
Camera
(black)
xssw-13
Transmitter
x5sw-14
Phone attaching clamp
-13-
-14-
@
7@
,2
10
'?r
s
@
e
/9
///
effi
{
W€
@
*\,,
14
\N*
\
*lWftr
,qDrtgrlSlpn
01
Upper body
07
Rotating
motor
2
'13
Gear
4
02
Lower body
08
Reversing motor
14 WlFl camera
1
03
Rotating blade
2
09 Circuit board 15
Landing skids
4
04
ieversing
blade
2
'10
Lampshades
4
05
rrotecting
frames
4
11
Light
boards
4
06 Bettery cover
12
Bettery
 Loading...