

Page 1
AGE {4+
HELICOPTER
USING
INSTRUCTION
,//
4
//fl
t
fl/
0t
a /.,
To avoid copterrs
damage and
player's
injury,
please
read
this
instruction
before flying!
Page 2

1. Placed in
small
parts
of the reach of children, to
avoid accidents.
2. The
blades of
this helicopter
is used activities
blades,don't screw up.
3.
The helicopter.was powerful,
should
be
gradually
pushed
up the remote
control shift
lever on the left for first flight, to
avoid the surge caused the helicopter
crash damage.
4.
Should be
turn
off
the
power
of controller first then
turn off the
power
of the helicopter
when finished flight.
5. Do not
place
the
battery
in
high temperature, heating
place(e.g:fire
or electric
heating
devices)
6.
Note
that
when
the helicopter
to keep the user or other
persons
from 2-3 mto avoid the
helicopter flight, landing crashed into another
person's
head, face and body and so on.
7. Children should control the helicopter
by adults
in
the
guidance
and ensure
the helicopter
control
in manipulator
(or guides)
line
of sight range, easy to control.
8. Non-rechargeable battery is not
charging,installation
the lithium
battery,please
note that
the
battery
polarity.
Do not mix
old batteries and
new
batteries or different
type batteries.
9. Should be tum off the
power
of the controller and helicopter when not in use.
10. Power terminal is not allow short circuiting.
1. Please recheck the
ground, keep
away
from
the crowds, animals and other barriers.
2. Tum the remote control on, after a while, the LEDs will be flashing. Push the motive
handle must
be
pushed
to the maximum control route of travel first, then adjust it to the lowest; When
the
remote control LEDs keep lighting, it means the helicopter is
going
to fly.
3. Move Power
Swithch
on the helicopter the the
"ON"position,
after that,
the
power
indicator will
light
up;
Place the helicopter
on
the
ground
for
some seconds,then the helicopter
is
going
to fly.
4. Push the motive handle
slowly,
then the helicopter
will fly up.
Low
volatage
protection:
When the helicopter
power
is
wealq
helicopter
control system will
protect
the
battery and the
power
supply to the helicopter
blades will be stopped.
After low
volatage
protection,
it
can fly again ifthe helicopter charged.
1.
Cleaning
the
helicopter with clean and
soft cloth.
2. Don't put
the helicopter under the
direct sun or strong lighting
3.
Don't
soak the toys in the
water, or the electronic
parts
will be destructed.
4. Regularly
check the
plug
and
other spare
parts,
if find
some
parts
broken,
please
soppi*ne
using till the product
in
good
condition.
Page 3

Assembly transmitter
Battery
cover
6 X l.5VAA
batteries
1. Install
batteries: open the
cover
ofbattery
case, insert
4 batteries
(size
1.5v
AA)
properly
Battery-Helicopter
A.
Controller charging
While charge,
pull
out the
switch of
thc helcopter to
"OFF
!posidon
up.
1.
Move the
power
switch on the helicopter
to
the
"OFF"
position.
2.
Charging way A: Put
dosn the
charging
wire cover
of the back
controller and
put
out the charging
l-ire. then put
into
the interface
ofthe helicopter,
the red LED
on the controller
C[LA. u'ill turn
on.
The charging
time
is about 40-50
minutes.
When
charging completed,
red LED
on the controller
CHA
will
tum
off.
The
fught time
about
5-6 minutes.
Charging
way B: Put the
USB charging
wire into the
computer
USB interface,
the charging
wire
will
be
light.
Put the
other
side
of USB charging
wire into the
helicopter's
interFace.
USB charging
wire tight
will be tum
off. The charging
time is about
40-50
minutes.
Charging
wire light
will turn
on.
Then
the helicopter
is
fu11y
charged. The flight
time
about
5-6 minutes.
-
Helicopter
is equipped
with a Li-Poly
battery, please
also
pay
attention
to the following
cautions
or
safety
use.
-
Do not
use or leave
the battery
near a heat
source
such as fire
or heater.
Otherwise it
will cause
damage
or explode.
- Do
not
use the battery
slam
or beating hard
surface.
- Do
not immerse
the
battery in water,
and
keep the
battery
in a cool
dry
place.
- Charger
included
with the
product
can
only
be used for
the
product
charge.
-
Do not
disassemble
the battery.
-
Never leave
the
battery
unattended
during
charging.
follo*'ed
by
polar
indicator.
(batteries
to be
purchased)
B.
USB charging
Page 4

Push tle rudder stick
toward
left to tum counter
clockwise.
When
you press
the shoot button,
the
camera on
the red light
camera to take
a
picture,
the button
is loosened,
the red
light camera.
(
click on a
photo
shoot
)
When
you push
up
the left stick
(throttle)
the speed ofthe
main
rotor blade will
increase and
the
helicopter will
go
up.
When
you pull
down
the left stick
(throttle)
the
speed
ofthe
main
rotor blade will decrease
and the
helicopter will
go
down.
When
you push
doriln
the right control lever
(steering
rudder), the
nose incline to up, the
helicopter is moving to backward.
I
when
once again
press
the camera
button.
]
red light camera
camera.
enter an offstate.
Push the
rudder stick toward
right to turn
clockwise.
Press
the camera button,
the camera on
the
red light,
helicopter camera
into camera state;
When the
helicopter tail
presents
the
clockwise
rotation,
you
may
the
comterclockwise
rotation
you
in the
hmd the remote
control vemier
adjustment
knob until
balanced.
The tail lin aim
at the operator.
When
the helicopter
tail
presents
the
comterclockwise
rotation,
you
may
the clockwise
rotation
you
in the
hmd the remote
control vemier
adjustment
knob until balmced.
The tail lin
aim at the operator.
When
you push
up
the right control
lever
(steering
rudder), the nose
incline to down, the
helicopter is moving
to lorward.
J
Page 5

Install
cameras method:
Connected
the wire,
put
the hook
hole
of camera
aim clevis
joint,
and
pushed
forward the
end.
(Cameras
can be adjusted at will
angle
Problem
Cause
Check this
No reaction
from the
helicopter
1. Not
enough
power
for the
helicoper.
2. Not enough
power
for the controller.
3. The chmel
q.a
different
ftom helicopter
and
the
controller.
4. The
glro
ofthe helicopter
can't
find
out the right
point.
1.
Should be chuging
for the helicopter.
2. Change new
batteries instead.
3. Make
sue the same
channel flom helicopter
and
the controller.
4.
Move the helicopter
onto the flat gromd,
when
the
gyro
receive
the signal,then
open the
controller.
Not reaction
from
the
helicopter
when was fly
1. By sunlight or intense
light inadiation
effects.
2. Have the
me frequency remote
conhol
trmmitter-
1.
Move the helicopter
onto without
sunlight or
intense light.
2. Not the
same for a lamch interference.
Order bv
number
from local
distributors.
item
IWWW
WMWWW
s107c-11
S107C-12
S107C_13
S107C_14
S107C_1s
Main
fiame
metal
part
A
Main fiame meral part
B
Tail
support pipe
Main
shaft
Main shaft pipe
WMreWre
s107c-07
Tail
blade
s107c-r7
Motor A
s107c-08
Tail
decoration
s107c-18
Motor
B
s107c-10
Balance bar
s107c-20
3.7V
Li-Poly
rcTreWW
s107c-01
Head
cover
s107c-06
Main blades
s107c-16
Chopper tail
unit module
&--*"e
@^
.-
-)
k*
*:d
s107c-02
Main frame
s107c-03
Ascend
and
descend
s107c-04
Camera box
s107c-09
Gear
s107c-19
Circuit
board
s107c-05
Connect buckle
Page 6
H-_
o,
Or------F
H
"o19
Page 7

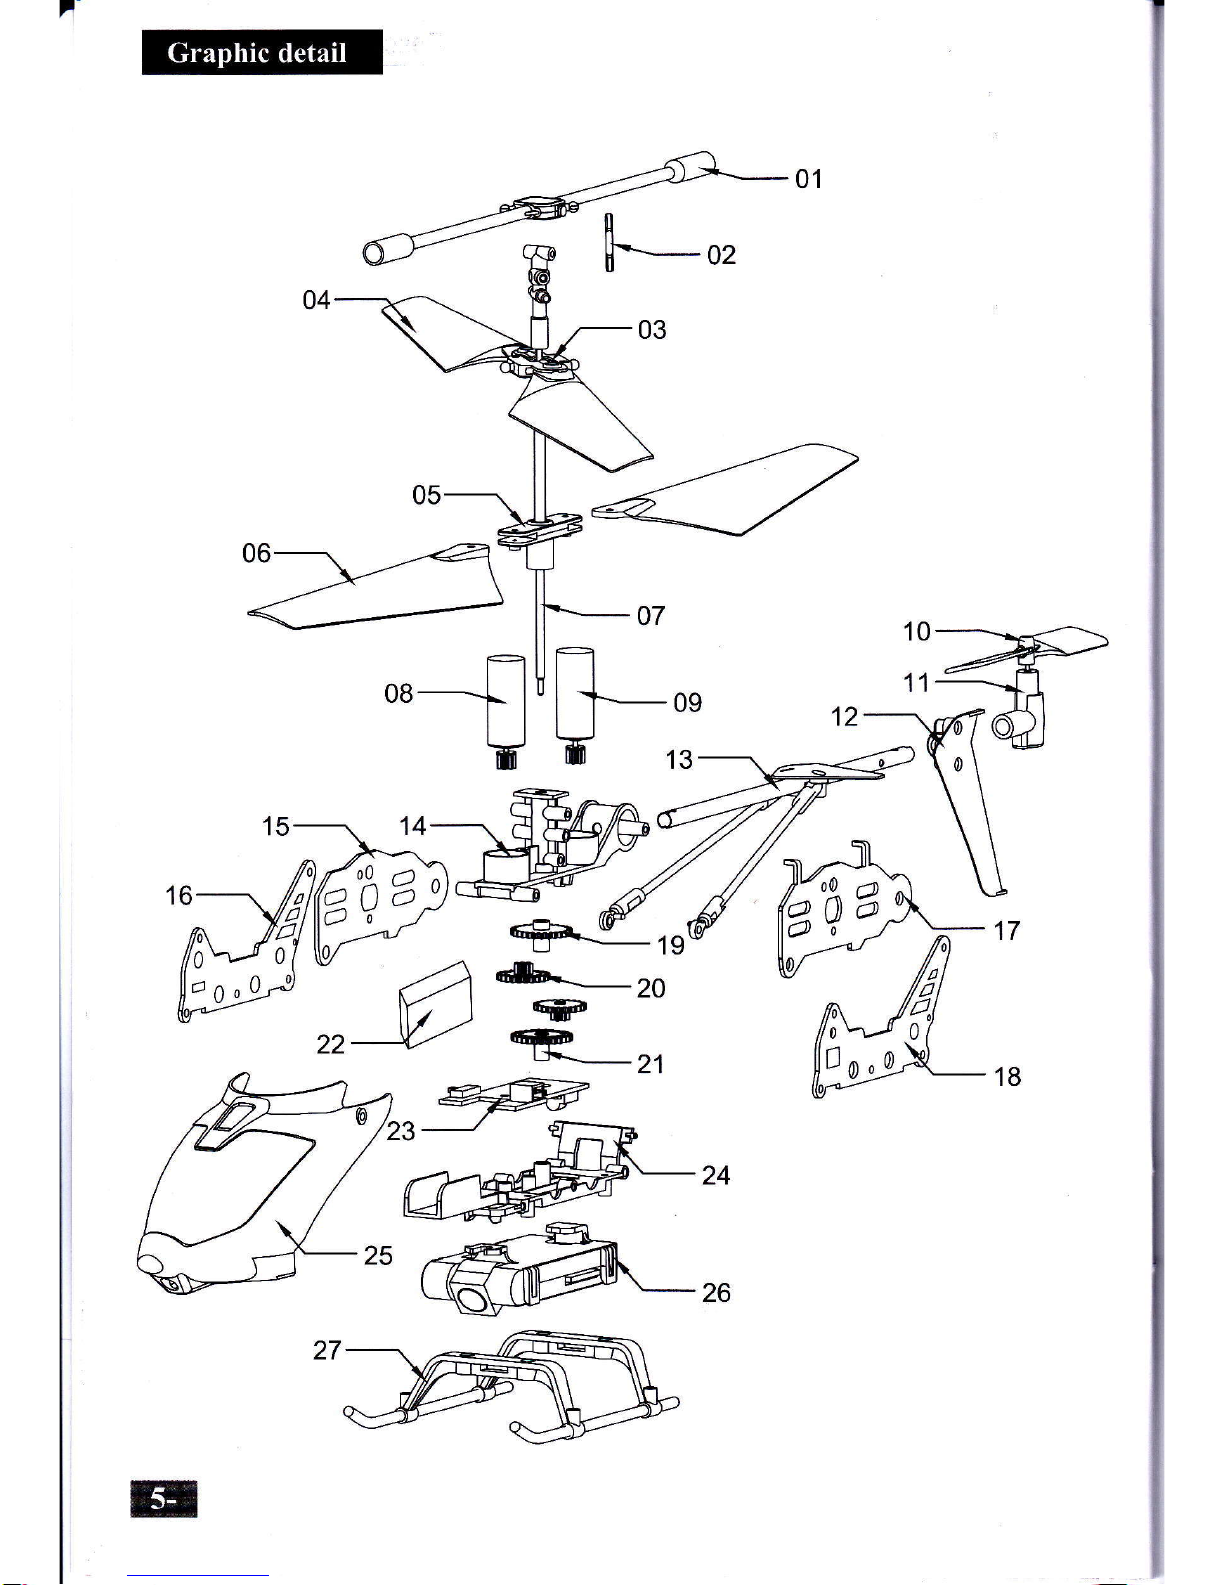
Ltem Number
Description
Qty
Need
01
Balance
bar
1
02
Connect buckle 2
03 Upper
blades
grip
set 1
04 Upper blades
2
05
Lower blades
grip
set 1
06 Lower blades 2
07 lnner shaft base
1
OB Motor B
1
09
MotorA 1
10 Tail
blade 1
11 Tailmotor
1
12
Verticalfin 1
13 Tail
pipe
setof compnenb 1
14 Main frame 1
15 Left
protect
ftarc(upper)
1
16 Left
protec{
ftanc(lovcr) 1
17 Right
pmtect
ftame(upper)
1
18 Ri
g
ht
proted
toame(lorer)
1
19 Upper blades
gear
1
20 Transition
gear
2
21 Lowr blades
gear
1
22
Battery 1
23 PCB
1
24
Chassis
1
25
Head cover
1
26 Camera
1
27 Landing
skids 1
Ltem Number
Description
Qty
Need
 Loading...