

Page 1

PACKING LIST
-1-
S-CV1
PROFESSIONAL GRADE
Metal Body ... Remote Control Helicopter
TM
CAMERA AND VIDEO
Instruction Manual
Distributed and serviced by: Extreme RC by RSI ... Ferndale, MI 48220
Tel: (586) 757-1336 E-mail: Service@extremercbyrsi.com
Website: www.extremercbyrsi.com
Manual Contents
• Safety instructions
• Charging instructions
• Flying instructions
• Calibration trim control
• Battery installation
• Part list
• Camera Installation
• Taking & downloading photos
Packing list
(1) Extreme indoor helicopter
(1) Infrared remote controller
(1) Set of extra blades
(1) USB charging wire
(1) Helicopter photo / computer wire
(1) Camera / housing
(1) Warranty registration card
(1) Instruction manual
Manufactured by
A name you can trust
®
AGES
8
+
Balance Bar
Top main blade
Bottom main blade
Main shaft
Rear tail blade
Rear motor
Camera
Landing gear
Search light
Power switch
Input charging socket
CHG
ON OFF
ON / OFF
switch
VideoPhotos
Calibration trim
control knob
Up / Down
throttle-stick
Left / Right
Forward
Backward
throttle-stick
Power indicator
Charge wire
(located in front storage compartment)
Charging
indicator
Frequency
channels (A / B)
Concealed charging wire
(Located on front of RC)
Charging wire
Extra tail blade
Extra main blades
EXTRA PARTS
Features New
Gyroscope Stabilization Technology
for Smooth
Easy-to-Control Flights!
Parts - Service - Repairs ... www.extremercbyrsi.com or call our MI service center: 586-757-1336 x 1
Front motors
Page 2
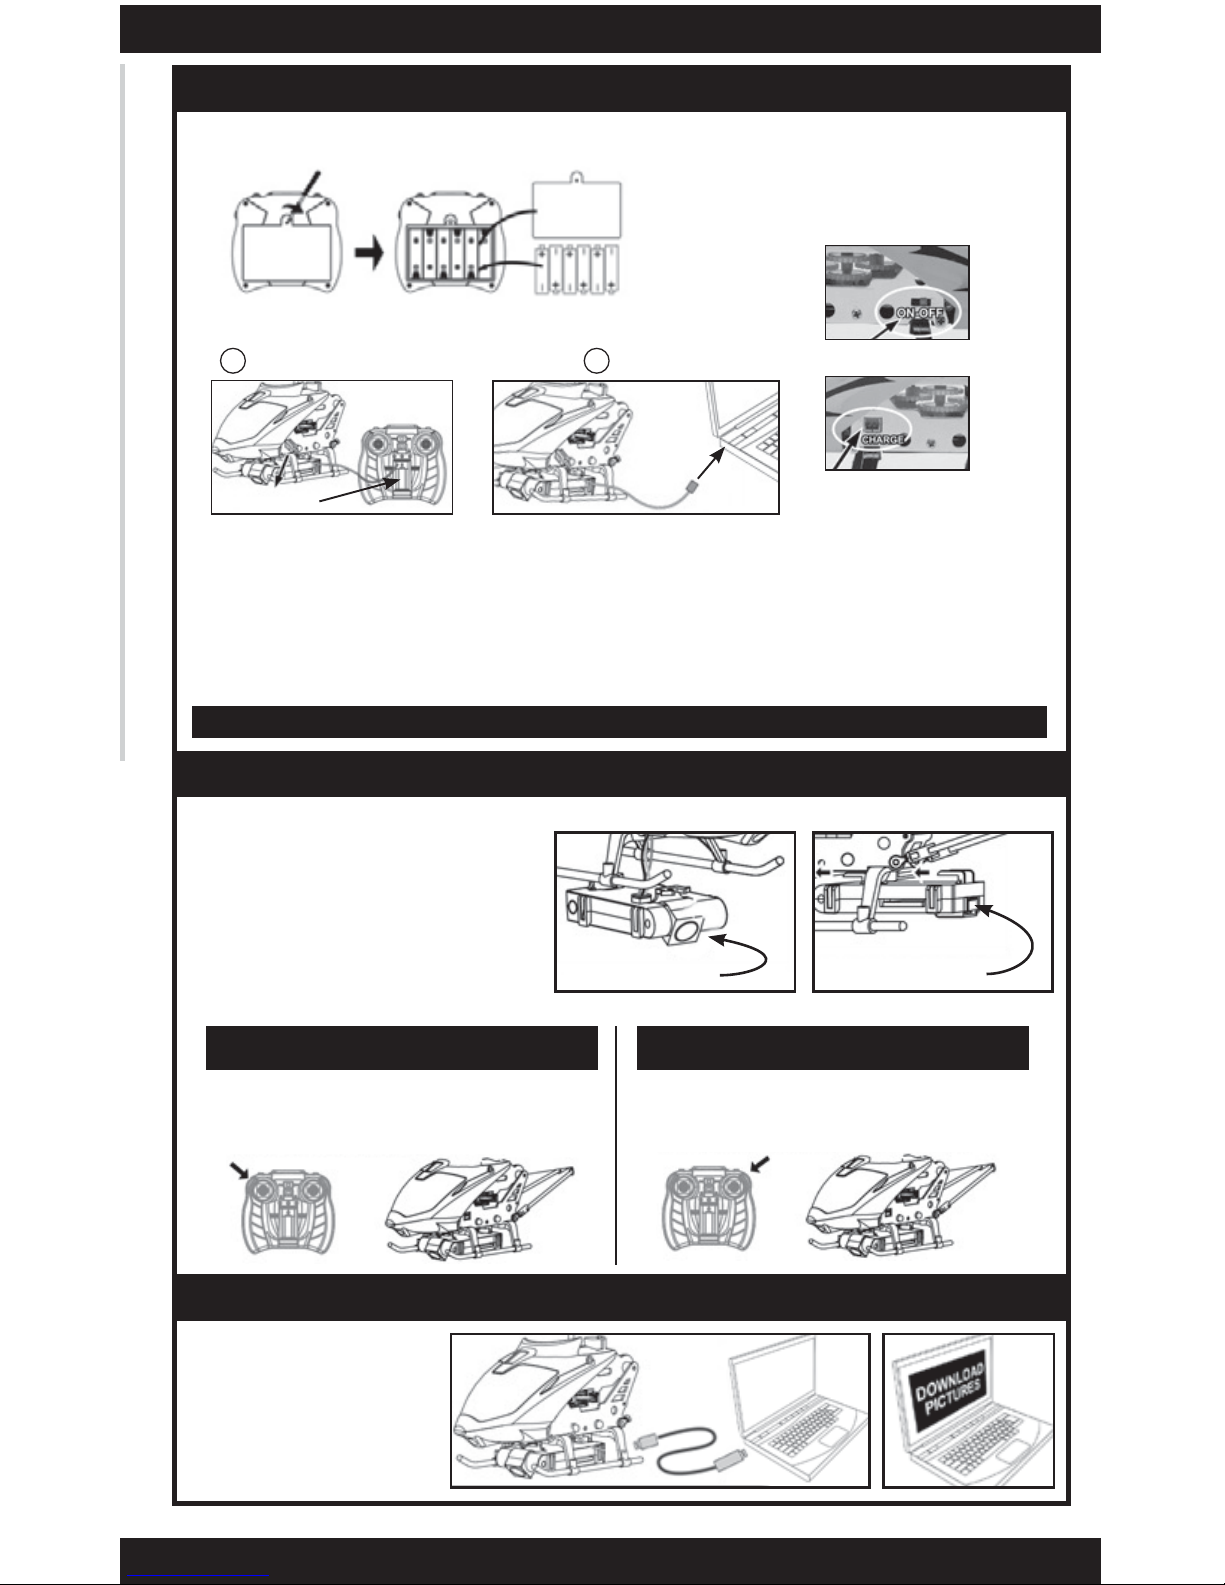
BATTERY INSTALLATION & CHARGING
CAMERA INSTALLATION
To install Photo/Video Camera:
Connect the camera's wire to the helicopter's
charging port. Line up the hook on the top of
the camera with the hole in the helicopter's
undercarriage and push forward. Rear hooks
will go over the helicopter's skids. Gently aim
the camera lens as desired.
Unscrew and remove battery cover from RC
unit. Insert 6 'AA' batteries, noting polarity
indicators. Replace battery cover.
Battery Installation
1) Be sure the helicopter power switch is in the OFF position
2) Remove charge wire from the front of the remote control, or use provided USB charging wire to charge from
your computer.
3) Plug charging wire into helicopter – remote control light will be red, but will turn green when the helicopter is
fully charged. Full charge takes up to 1 hour.
4) Unplug the helicopter and replace charging wire for safe keeping.
5) Turn helicopter and remote control power switches to ON positions.
-2-
Battery cover
ON/OFF Switch
Charge port
Plug wire in helicopter
Charge time: up to 60 minutes. Flight time up to 10 minutes. Fresh alkaline batteries strongly recommended
DOWNLOADING PICTURES
Connect the camera's provided
USB cord into the rear of the
camera. Plug the other end of
cord into your computer's USB
port and follow the instructions
on your screen.
Photos Video
6 X 1.5 V 'AA' batteries
Connected to
a computer
USB port
Slide open
Parts - Service - Repairs ... www.extremercbyrsi.com or call our MI service center: 586-757-1336 x 1
To take photos: click the left "shoulder" button.
Light will turn red, and the camera will take a
digital photo.
To record video: push the right "shoulder" button
down. Light will turn red while the camera records a
digital video. To stop recording, push button again.
Slide in camera
Camera
B USB ChargingA Remote Control Charging
Page 3

-3-
Hover up and down
Turn counter-clockwise & clockwise
can hover, try moving up and down with the throttle
stick (left). Move the throttle stick gradually.
FLYING YOU HELICOPTER
• Set the band selector on remote control to either "A" or "B"
• Turn power switches for helicopter and RC to "ON" – lights will turn on
• Point top of controller towards helicopter and step back 6-8 feet
• For best signal, keep the top of the RC pointed towards the helicopter
While hovering helicopter, push throttle stick left for
counter-clockwise turns or right for clockwise turns.
Forward Reverse
Push the right control throttle up – the nose of the
helicopter will point downward, the tail motor will
Pull right control throttle down – the nose of the helicopter will point upward, the tail motor will activate,
If helicopter rotates counter-clockwise...
turn calibration control knob downward.
If helicopter rotates clockwise...
turn calibration control knob upward.
LEFT-SIDE
THROTTLE
FOR UP / DOWN
HOVERING
RIGHT-SIDE
THROTTLE
FOR LEFT /RIGHT
TURNS
BACKWARD / FORWARD
REMOTE CONTROL THROTTLES / CHARGE WIRE STORAGE
SLIDE DOWN TO OPEN
Page 4

SPARE PARTS LIST
Order by item number from www.extremercbyrsi.com or call our service department: 586-757-1336 x 1
Parts - Service - Repairs ... www.extremercbyrsi.com or call our MI service center: 586-757-1336 x 1
CAUTION:
• Direct sunlight may interfere with remote control signal.
• Do not block the transmitter lens on top of the remote control unit.
• Do not place stickers, weights, or anything else on the helicopter. This may cause the helicopter to crash or
malfunction.
•
• To avoid injury, do not touch the blades or any moving parts.
• When not in use, (especially for 60 days or more) remove 'AA' batteries from remote control unit – batteries
may leak and cause damage.
ENVIRONMENT FOR FLIGHT:
•
• Avoid wind, drafts, forced air, water, fans, heat and air-conditioning vents.
•
Head cover #1 #2 #3
#4
#5Main Blades
Tail decora
tion
Blade connecting buckles
Balance Bar
Rear tail blade #6
#7 #8 #9 #10
Body main-frame
Landing gear
Motor drive gears
Tail support pipes
Outer body
metal support
#11
Inner body
metal support
#12
#13
Main shaft pipe
Tail support pipe
with tail motor
#14
Main shaft with bottom
blade connectors
#15
Rear motor #16 Front motor #17
#18
Circuit PCB board with
built-in
ON/OFF
switch
#19
Remote control
#20
Camera housing
#21
Micro SD card
#22
Camera-to-computer USB
cable & charger
#23
USB charge wire
#24
Main shaft connector
#25
-4-
Top blade connectors
#26
Li-polly battery
 Loading...