

Page 1
Before using your air conditioner, please read
this manual carefully and keep it for future reference.
WINDOW/WALL TYPE
ROOM AIR CONDITIONER
-
Page 2
CONTENTS
Inside you will find many helpful hints on how to use and maintain your air conditioner
properly. Just a little preventive care on your part can save you a great deal of time
and money over the life of your air conditioner. You'll find many answers to common
problems in the chart of troubleshooting tips. If you review our chart of Troubleshooting
Tips first, you may not need to call for service at all.
Contact the authorised service technician for repair or maintenance of this unit.
Contact the installer for installation of this unit.
The air conditioner is not intended for use by young children or infirm persons
without supervision.
Young children should be supervised to ensure that they do not play with the air
conditioner.
If the power cord is to be replaced, replacement work shou
ld be performed by
authorised personnel only.
Installation work must be performed in accordance with the national wiring
standards by authorised personnel only.
!
CAUTION
Read This Manual
1
1. SAFETY PRECAUTIONS..................................................................2
2. IMPORTANT SAFETY INSTRUCTIONS ...............................
...........4
3. NORMAL SOUNDS ...........................................................................5
4. AIR CONDITIONER FEATURES .......................................................5
5. INSTALLATION INSTRUCTIONS......................................................10
6. CARE AND CLEANING ....................................................................14
7. TROUBLESHOOTING TIPS..............................................................15
All the il lust rations in th is manual are for exp lanation p urpose only. Your air
condit ione r may be sligh tly differen t. Th e actual shap e shall preva il.
NOTE:
Page 3

To prevent injury to the user or other people and property damage, the following instructions
must be followed. Incorrect operation due to ignoring of instructions may cause harm or
damage. The seriousness is classified by the following indications.
Safety Precautions
This symbol indicates the possibility of death or serious injury.
Meanings of symbols used in this manual are as shown below.
!
!
WARNING
Always do this.
Never do this.
!
CAUTION
This symbol indicates the possibility of injury or damage to property.
Plug in power cord
properly.
Do not modify power cord
length or share the outlet
with other appliances.
Always ensure effective
grounding.
Unplug the unit if strange
sounds, smell, or smoke
comes from it.
Keep firearms away.
Ventilate room before operating air
conditioner if there is a gas leakage from
another appliance.
Otherwise, it may cause electric
shock or fire due to excess heat
generation.
It may cause electric shock or
fire due to heat generation.
Incorrect grounding may cause
electric shock.
It may cause fire and electric
shock.
It may cause fire.
It may cause explosion, fire and, burns.
It may cause electric shock or fire
due to heat generation.
It may cause electric shock.
It may cause failure of machine
or electric shock.
It may cause fire and electric
shock.
It may cause fire and electric
shock.
It may cause electric shock or fire.
If the power cord is damaged, it
must be replaced by the manufac turer or an authorised service
center or a similarly qualified per son in order to avoid a hazard.
This could damage your health.
Incorrect installation may cause
fire and electric shock.
It may cause electric shock.
It may cause an explosion or fire.
It may cause failure and electric shock.
Do not operate or stop the
unit by inserting or pulling
out the power cord.
Do not operate with wet
hands or in damp
environment.
Do not allow water to run
into electric parts.
Do not use the socket if it is
loose or damaged.
Do not use the power cord
close to heating appliances.
Do not damage or use an
unspecified power cord.
Do not direct airflow at
room occupants only.
Always install circuit
breaker and a dedicated
power circuit.
Do not open the unit
during operation.
Do not use the power cord near
flammable gas or combustibles, such
as gasoline, benzene, thinner, etc.
Do not disassemble or modify unit.
!
!
!
!
!
!
WARNING
!
2
!
!!
Page 4
!
CAUTION
When the air filter is to be
removed, do not touch the
metal parts of the unit.
It may cause an injury.
Do not clean unit when
power is on as it may cause
fire and electric shock, it may
cause an injury.
Operation with windows
opened may cause wetting
of indoor and soaking of
household furniture.
When the unit is to be
cleaned, switch off, and turn
off the circuit breaker.
Stop operation and close
the window in storm or
hurricane.
Use caution when unpacking and
installing. Sharp edges could cause injury.
Do not clean the air
conditioner with water.
Water may enter the unit and
degrade the insulation. It may
cause an electric shock.
This could injure the pet or
plant.
It may cause electric shock
and damage.
Do not put a pet or house
plant where it will be
exposed to direct air flow.
Hold the plug by the head
of the power plug when
taking it out.
Ventilate the room well when
used together with a stove,
etc.
An oxygen shortage may occur.
Do not use this air conditioner to
preserve precision devices, food,
pets, plants, and art objects.
It may cause deterioration of
quality, etc.
It may cause failure of product
or fire.
Do not use for special
purposes.
Turn off the main power
switch when not using the
unit for a long time.
If water enters the unit, turn the unit off at the power
outlet and switch off the circuit breaker. Isolate
supply by taking the power-plug out and contact a
qualified service technician.
3
!
!
!
!
!
!
!
It may cause failure of
appliance or accident.
Appearance may be
deteriorated due to change
of product color or
scratching of its surface.
Do not place obstacles
around air-inlets or inside
of air-outlet.
Do not use strong detergent such as wax or
thinner but use a soft cloth.
If bracket is damaged, there
is concern of damage due to
falling of unit.
There is danger of fire or
electric shock.
Ensure that the installation bracket of
the outdoor appliance is not damaged
due to prolonged exposure.
Do not place heavy object on the
power cord and ensure that the cord
is not compressed.
Operation without filters may
cause failure.
It contains contaminants and
could make you sick.
Always insert the filters
securely. Clean filter once
every two weeks.
Do not drink water drained
from air conditioner.
!
!
Page 5
IMPORTANT SAFETY INSTRUCTIONS
Be sure the electrical service is adequate for the model you have
chosen. This information can be found on the serial plate, which
is located on the side of the cabinet and behind the grille.
Be sure the air conditioner is properly grounded. To minimize
shock and fire hazards, proper grounding is important. The power
cord is equipped with a three-prong grounding plug for protection
against shock hazards.
Your air conditioner must be used in a properly grounded wall
receptacle. If the wall receptacle you intend to use is not adequately
grounded or protected by a time delay fuse or circuit breaker,
have a qualified electrician install the proper receptacle.
Ensure the receptacle is accessible after the unit installation.
Do not run air conditioner without side protective cover in place.
This could result in mechanical damage within the air conditioner.
Do not use an extension cord or an adapter plug.
WARNING
For your safety
Do not store or use gasoline or other flammable vapors and liquids in
the vicinity of this or any other appliance.
Avoid fire hazard or electric shock. Do not use an extension cord or an
adaptor plug. Do not remove any prong from the power cord.
WARNING
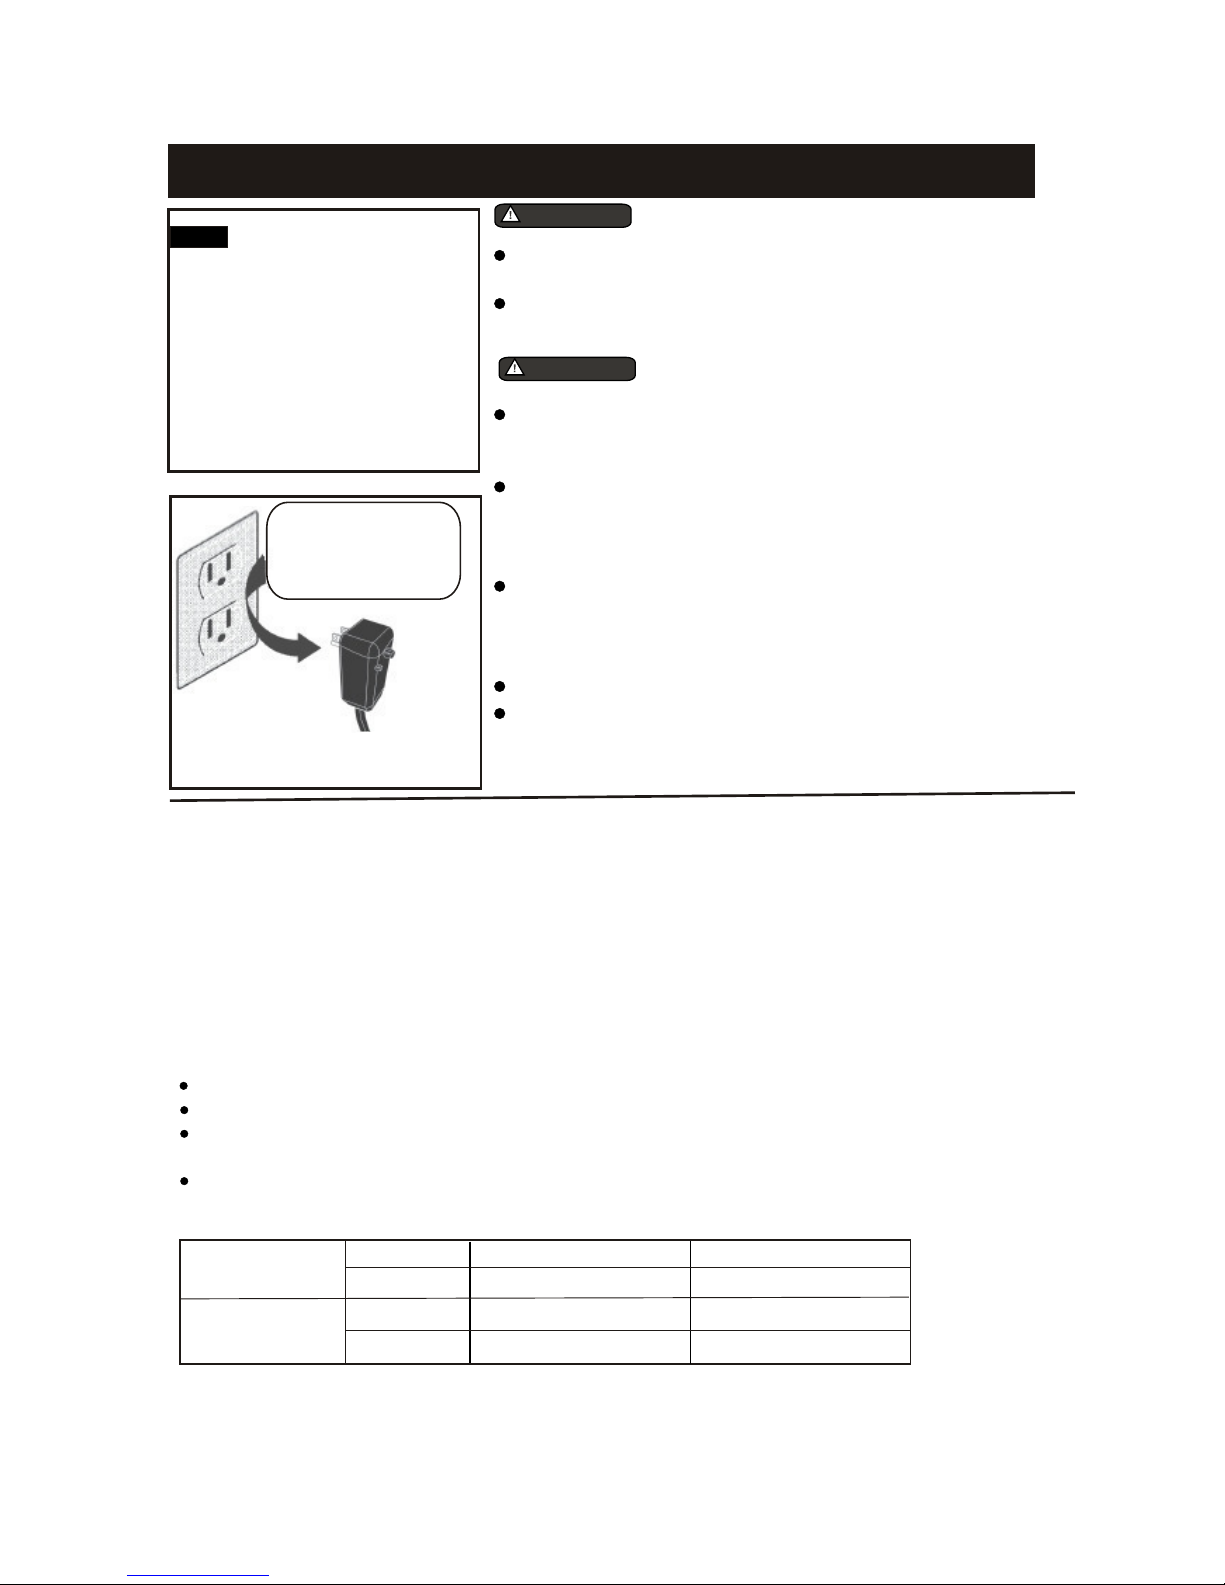
Electri cal Informa tion
NOTE For some models, the power
supply cord with this air conditioner
contains a current detection device
designed to reduce the risk of fire.
Please refer to the section Operation
of Current Device for details.
In the event that the power supply
cord is damaged, it cannot be
repaired-it must be replaced with a
cord from the Product Manufacturer.
,
,
Do not, un der any
circumst anc es, cut,
remove, o r bypa ss
the groun din g prong.
Power sup ply cord
with 3-pr ong groundi ng plug
and curre nt det ection d evi ce
Operati on of Cur rent Device
(Applicabl e to the unit ado pts c urrent detec tion device only )
The power supply cord contains a current device that senses damage to the power cord. To test your power
supply cord do the following:
1. Plug in the Air Conditioner.
2. The power supply cord will have TWO buttons on the plug head. Press the TEST button, you will notice a
click as the RESET button pops out.
3. Press the RESET button, again you will notice a click as the button engages.
4. The power supply cord is now supplying electricity to the unit. (On some products this it also indicated by
a light on the plug head.)
NOTES:
Do not use this device to turn the unit on or off.
Always make sure the RESET button is pushed in for correct operation.
The power supply must be replaced if it fails reset when either the TEST button is pushed, or it cannot be
reset. A new one can be obtained from the product manufacturer.
If power supply cord is damaged, it cannot be repaired. It MUST be replaced by one obtained from the
product manufacturer.
4
Cooling operation
Outdoor temp:
O
1 Environment)
Indoor temp:
O
1 Environment)
O
3 Environment)
O
3 Environment)
Heating operation
Outdoor temp:
O
1 Environment)
Indoor temp:
O
1 Environment)
O
3 Environment)
3 Environment)
Note: P erfo rmance may be re duced outside of t hese operati ng tempera ture s.
NOTE:This air conditioner is designed to be operated under condition as follows:
64-109 F(T
70-126 F(T
63-90 F(T
23-75 F(T
19-75 F(T
63-90 F
(T
32-81 F
(T
(T
O
32-86 F
Page 6
NORMAL SOUNDS
AIR CONDITIONER FEATURES
Soun d of Ru shi ng Air
At th e f ro nt of t he unit, you ma y
hear th e s ou nd of r ushin g a ir
bein g m ov ed by the fan
High Pit ch ed C hatte r
High ef fi ci en cy com pr es so rs
may h av e a hig h p it ched c ha tt er
duri ng th e c oo ling cycl e.
Gurg le/ Hi ss
Gurg li ng or hi ssing noi se ma y
be he ar d d ue to r ef riger an t
pass in g t hr ou gh eva po ra to r
duri ng no rm al opera ti on .
Ping ing or Swi tchin g
Drop le ts of wa ter hitti ng co nd enser
duri ng no rm al opera ti on may ca use
ping in g o r s wi tchin g soun ds .
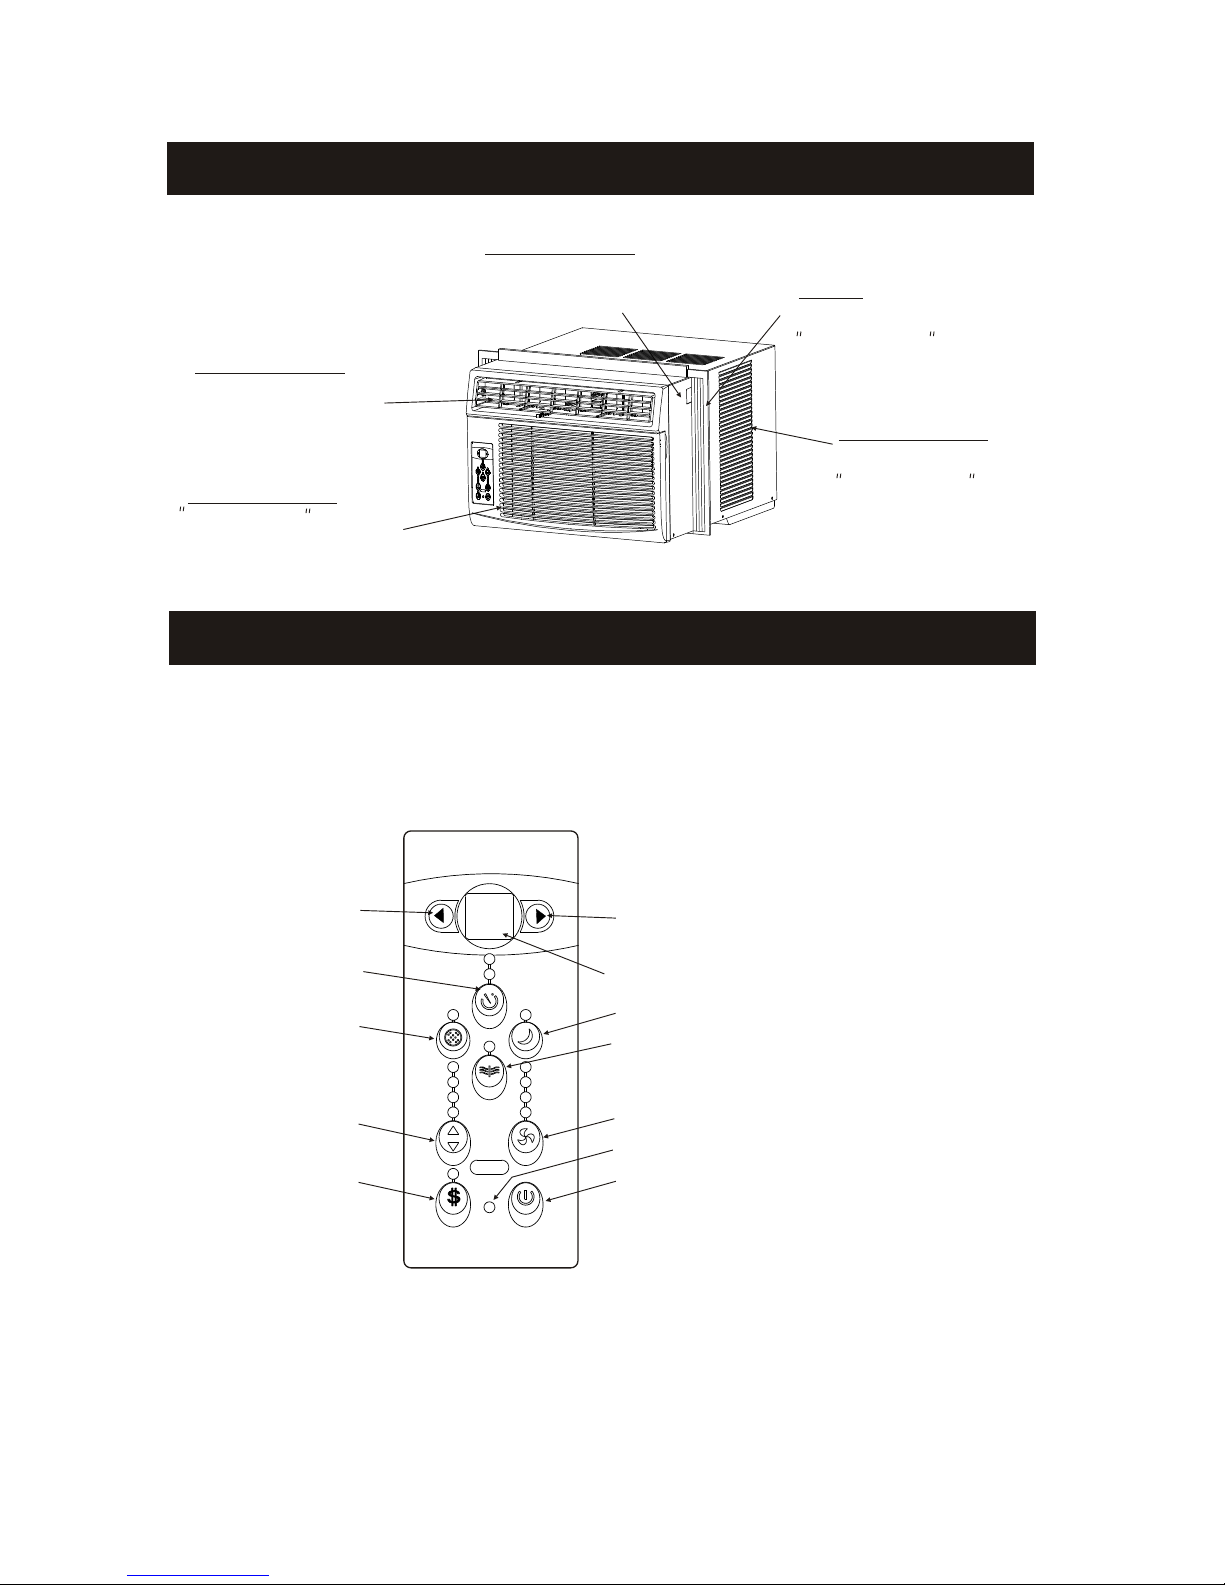
Before you beg in, thorou ghly familia rize yourself wit h the control pane l and remote as s hown below
and all it s fun ctions, then follow the sy mbol fo r the functio ns you desire . The u nit can be contr olle d
by the uni t con trol alone or wi th th e remote.
Vibr ati on
Unit ma y v ib ra te an d m ak e n oi se
beca us e o f p oo r wall or w in do w
cons tr uc ti on or inc or re ct ins ta llati on .
EL E C T RONIC CONTROL OPERATIN G I N STRUCTIONS
ADJ USTS
TEM PERAT URE
OR T IME
ADJ USTS
TEM PERAT URE
OR T IME
DIS PLAYS
TEM PERAT URE
OR T IME OR ERROR CODE S
ACT IVATE S
TIM ER
CHE CK FIL TER
RES ET BUT TON
SET S MODE
ENE RGY
SAV ER MOD E
SLE EP MOD E
CLE AN AIR M ODE
(on some m odels )
SET FAN SP EED
TUR NS UNI T
ON O R OFF
UNIT CO NTROL
Tem p Tem p
Tim er
Tim er
On
Off
Sle ep
Chec k
Filt er
Tim er
Aut o
Coo l
Dry
Fan
Low
Aut o
Med
Hig h
Clea n
Air
Fan
Mod e
Foll ow
Me
Ener gy
Save r
On/ Off
5
FOL LOW ME INDIC ATOR
(on some m odels )
Page 7
AIR CONDITIONER FEATURES(CONTINUED)
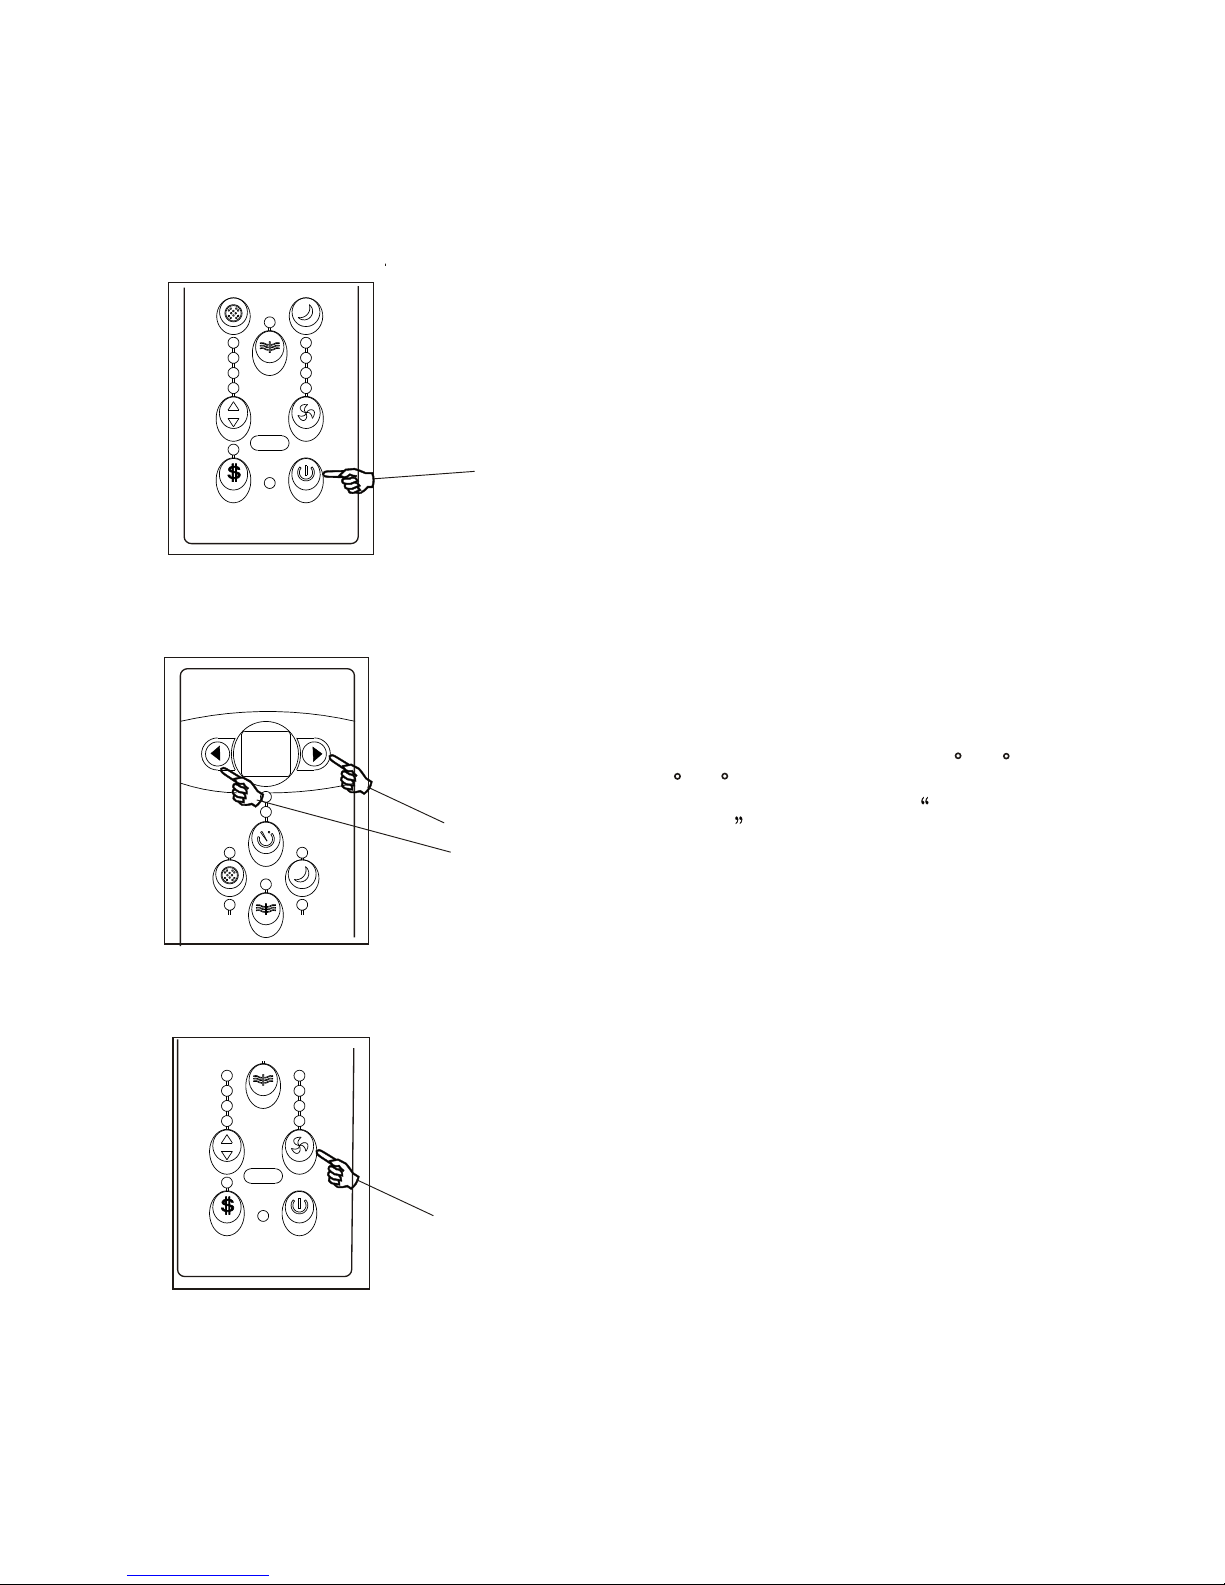
TO TURN UNIT ON :
NOTE: The fol lowing inst ruct ions repre sent the Unit Co ntro ls, the same i nstr uctions can b e used
for the Remote Control.
TO CHANGE TE M P ERATURE
SE T T ING:
Press the On/O ff button.
Aut o
Coo l
Dry
Fan
Low
Aut o
Med
Hig h
Clea n
Air
Fan
Mod e
Foll ow
Me
Ener gy
Save r
On/ Off
DO THIS:
Tem p Tem p
Tim er
Tim er
On
Off
Sle ep
Chec k
Filt er
Tim er
Aut o
Aut o
Press t o raise
DO THIS :
Press t o lower
Press o r hold e ither Left( < ) or Right (>) bu tton
until t he desi red temper ature is seen on the
displa y. Thi s temperat ure will be automat ically
mainta ined anywhere bet ween 62 F(17 C ) and
86 F(30 C). If you want the disp lay to r ead the
actual room te mperature , see To Operate on
Fan Onl y secti on.
NOTE:
TO ADJUST FAN SPEEDS:
Aut o
Coo l
Dry
Fan
Low
Aut o
Med
Hig h
Clea n
Air
Fan
Mod e
Foll ow
Me
Ener gy
Save r
On/ Off
Press t o selec t
approp riat e fan
speed
DO THIS :
Used to se lect the Fan Speed in four st epsAuto, L ow, Med or High. Each ti me the button
is pres sed, th e fan speed mo de is shifted .Fo r
some mo dels , the fan speed c annot be adjusted
under H EAT mo de. On Dry mode,th e fan speed
is cont roll ed at Low automa tically.
NOTE:
6
Page 8
AIR CONDITIONER FEATURES(CONTINUED)
TO SELECT TH E
OP E R A TING MODE:
Press t he Mode
button .
Aut o
Coo l
Dry
Fan
Low
Aut o
Med
Hig h
Clea n
Air
Fan
Mod e
Foll ow
Me
Ener gy
Save r
On/ Off
DO THIS:
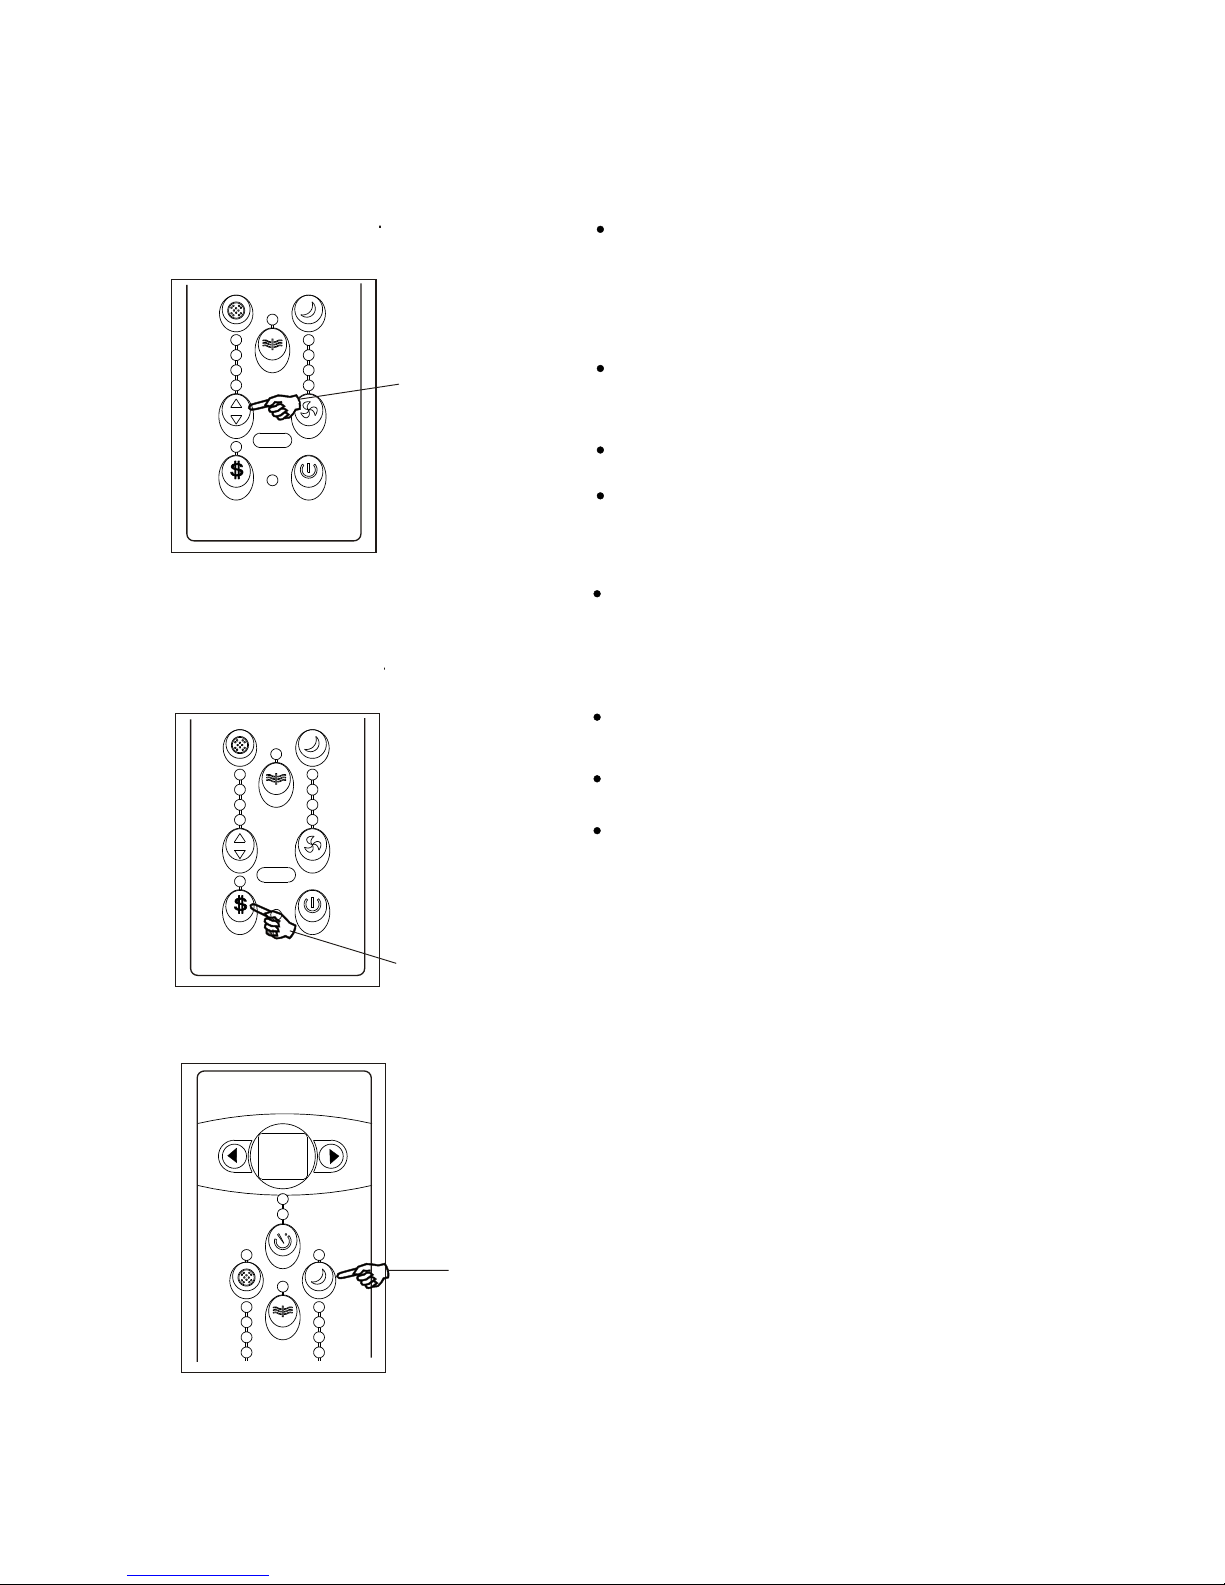
To choose op erat ing mode, pre ss the Mode bu tton .
Each time you p ress the butt on, a mo de is selecte d
in a sequence t hat goes from Au to, Cool, Dry an d
Fan. The indi cator ligh t besid e will be illu minated
and remaine d on once the mod e is selected .
NOTE:
To operate Rn Au to fe ature:
In this mode, t he fan speed can not be adjust ed, i t
starts auto matically at a speed according to the
room temper ature.
To operate on Fa n Onl y:
Use this funct ion only when cooling is no t desir ed,
such as for roo m air circula tion or to exhau st st ale
air(on some mo dels). (Re memb er to ope n the ve nt
during this fu nction, bu t keep it closed duri ng
coolin g for ma ximum cool ing efficien cy.) You can
choose any fan speed you pre fer.
During this fu nction, th e display will show t he actual
room temper ature, not th e set te mperature as in the
coolin g mod e.
TO USE THE ENER G Y
SA V E R FE A T URE:
Press t he butt on
Aut o
Coo l
Dry
Fan
Low
Aut o
Med
Hig h
Clea n
Air
Fan
Mod e
Foll ow
Me
Ener gy
Save r
On/ Off
DO THIS:
This functi on is availab le on COOL mode.Th e fan
will contin ue to run for 3 minu tes after the comp ressor
shuts off.T he fan then cyc les o n for 2 minutes a t 10
minute inte rvals until t he room temperatu re is above
the set temper ature, at whi ch ti me the compre ssor
turns back on a nd Cooling St arts.
NOTE:
Tem p Tem p
Tim er
Tim er
On
Off
Sle ep
Chec k
Filt er
Tim er
Aut o
Coo l
Dry
Fan
Low
Aut o
Med
Hig h
Clea n
Air
SL E E P FEATURE:
Press S leep
button
DO THIS :
In this mo de th e selected te mperature wi ll in crease by
O O
2 F/1(or 2) C 30 minutes af ter the mode is selec ted.
The tempera ture will the n incre ase by an othe r
O O
2 F/1(or 2) C after an addi tion al 30 minutes . This new
temperatur e will be main tain ed for 6 hou rs be fore it
returns to the originall y selec ted temper ature. This
ends the Sleep mode and the uni t wil l continue to
operate as ori ginally pr ogra mmed. Th e Sle ep mode
program can be cancelled at any time during oper ation
by again press ing the Sleep butt on.
NOTE:
7
To operate on Dr y mod e:
In this mode, t he air condit ione r will genera lly
operate in the form of a dehumi difi er. Sinc e the
conditione d space is a clos ed or sealed area, so me
degree of cool ing will cont inue.
When you set the air conditioner in AUTO mode, it will
automatically select cooling, heating(cooling only models
without), or fan only operation depending on what
temperature you have selected and the room temperature.
The air conditioner will control room temperature
automatically around the temperature point set by you.
In Fan only mod e ,the temper atur e is not adjuste d..
Page 9
Tem p Tem p
Tim er
Tim er
On
Off
Sle ep
Chec k
Filt er
Tim er
Aut o
Coo l
Dry
Fan
Low
Aut o
Med
Hig h
Clea n
Air
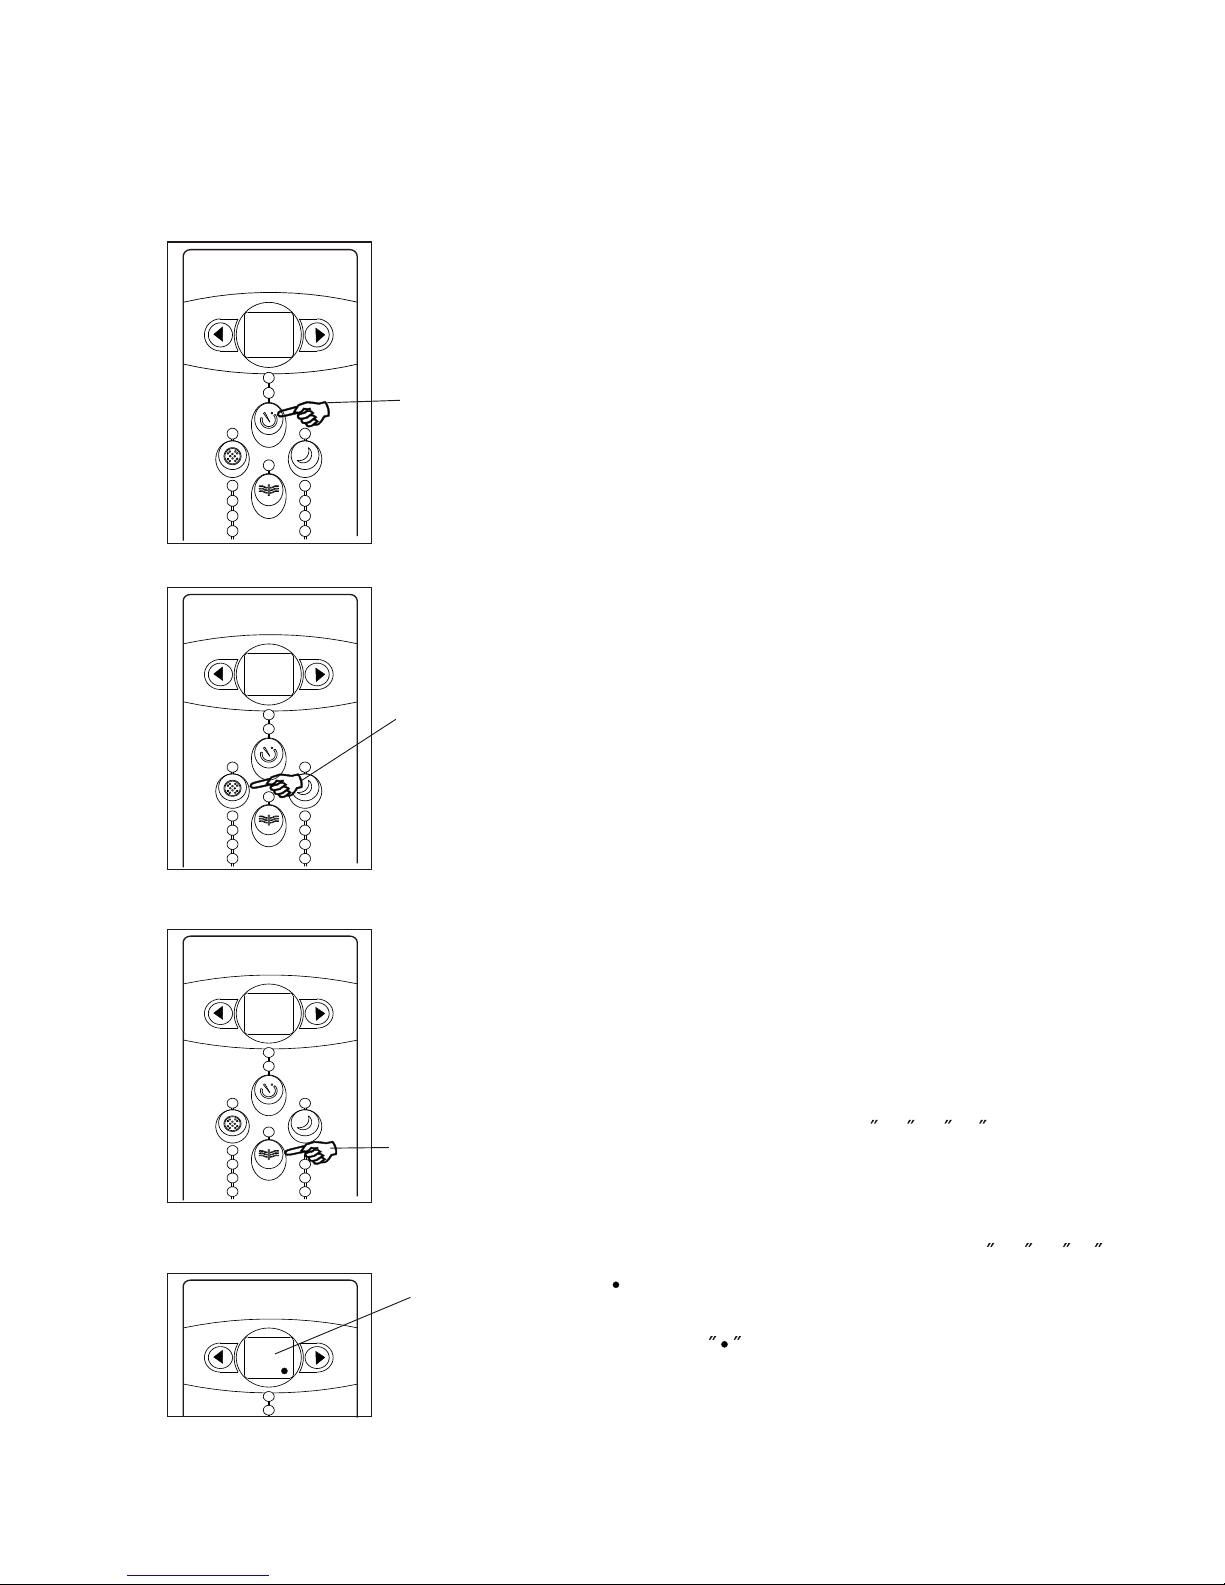
TI M E R : AUTO START/
ST O P FEATUR E :
Press Time r
button
DO THIS :
AIR CONDITIONER FEATURES(CONTINUED)
NOTE:
Tem p Tem p
Tim er
Tim er
On
Off
Slee p
Chec k
Filt er
Time r
Auto
Cool
Dry
Fan
Low
Auto
Med
High
Clea n
Air
CH E C K FILTE R FEATURE:
Press C heck
Filter butt on
DO THIS :
Tem p Tem p
Tim er
Tim er
On
Off
Slee p
Chec k
Filt er
Time r
Auto
Cool
Dry
Fan
Med
High
Clea n
Air
CL E A N AIR FEATURE:
(o n s o me models)
Press C lean
Air but ton
DO THIS :
This fe atur e is a reminder to clea n the Air Filter for
more ef fici ent operati on. T he LED(ligh t) will illum i nate af ter 250 hours of oper ation. To rese t after
cleani ng th e filter, press the Check Fil ter but ton and
the lig ht will go off.
NOTE:
Press t he Clea n Ai r but ton, the ion gen erator is ene r gized a nd will help to remov e pollen and imp urities
from th e air, and trap them in the filter.
NOTE:
8
- When the unit is on or off, firs t pre ss the Timer but ton,
the TIM ER ON i ndicator lig ht il luminates . It indicate s
the Auto Start program is initiated .
- When the time of TIMER ON is dis play ed
- Press or hold th e UP or DOWN but ton t o change the
Auto time by 0.5 h our incremen ts, up to 10 hour s,t hen
at 1 hour incre ments up to 24 ho urs. The cont rol will
count d own the time remaini ng until star t.
- The selecte d time will re gist er in 5 seconds, and the
system will au tomatical ly revert bac k to dis play the
previo us te mpera ture se tting or room temp erature when
the uni t is on. (when the uni t is off ,the re is n o display.)
- Turning the uni t ON or OFF at any ti me or ad justi ng
the tim er sett ing to 0.0 wil l cancel the Aut o Start /Stop
timed p rogr am.
,press the
Timer but ton a gain, the TIM ER OFF indicator li ght
illumi nate s. It indicat es the Auto Stop prog ram is
initia ted.
Tem p Tem p
Tim er
Tim er
On
Off
DI S P L AYS:
Displa ys
O O
Shows t he set t emperatur e in C or F an d the
Auto-t imer settings. While on Fan on ly mo de,it shows
the roo m tempe rature.
DISPLA YS:
-Evaporato r temperat ure sen sor er ror- Unplug the
unit an d plug i t back in. If error repea ts, call for
servic e.
NOTE: is displa yed as s hown in the left picture.
HS -Elec tric heating sens or error-U nplu g the unit and
plug it back in . If error rep eats, call for servi ce.
Error c odes :
AS-Roo m tem perature sen sor error- Unpl ug the unit
and plug it bac k in.If erro r repea ts, call for s ervice.
NOTE: In Fan on ly mode, it wi ll di splay LO or HI .
Page 10
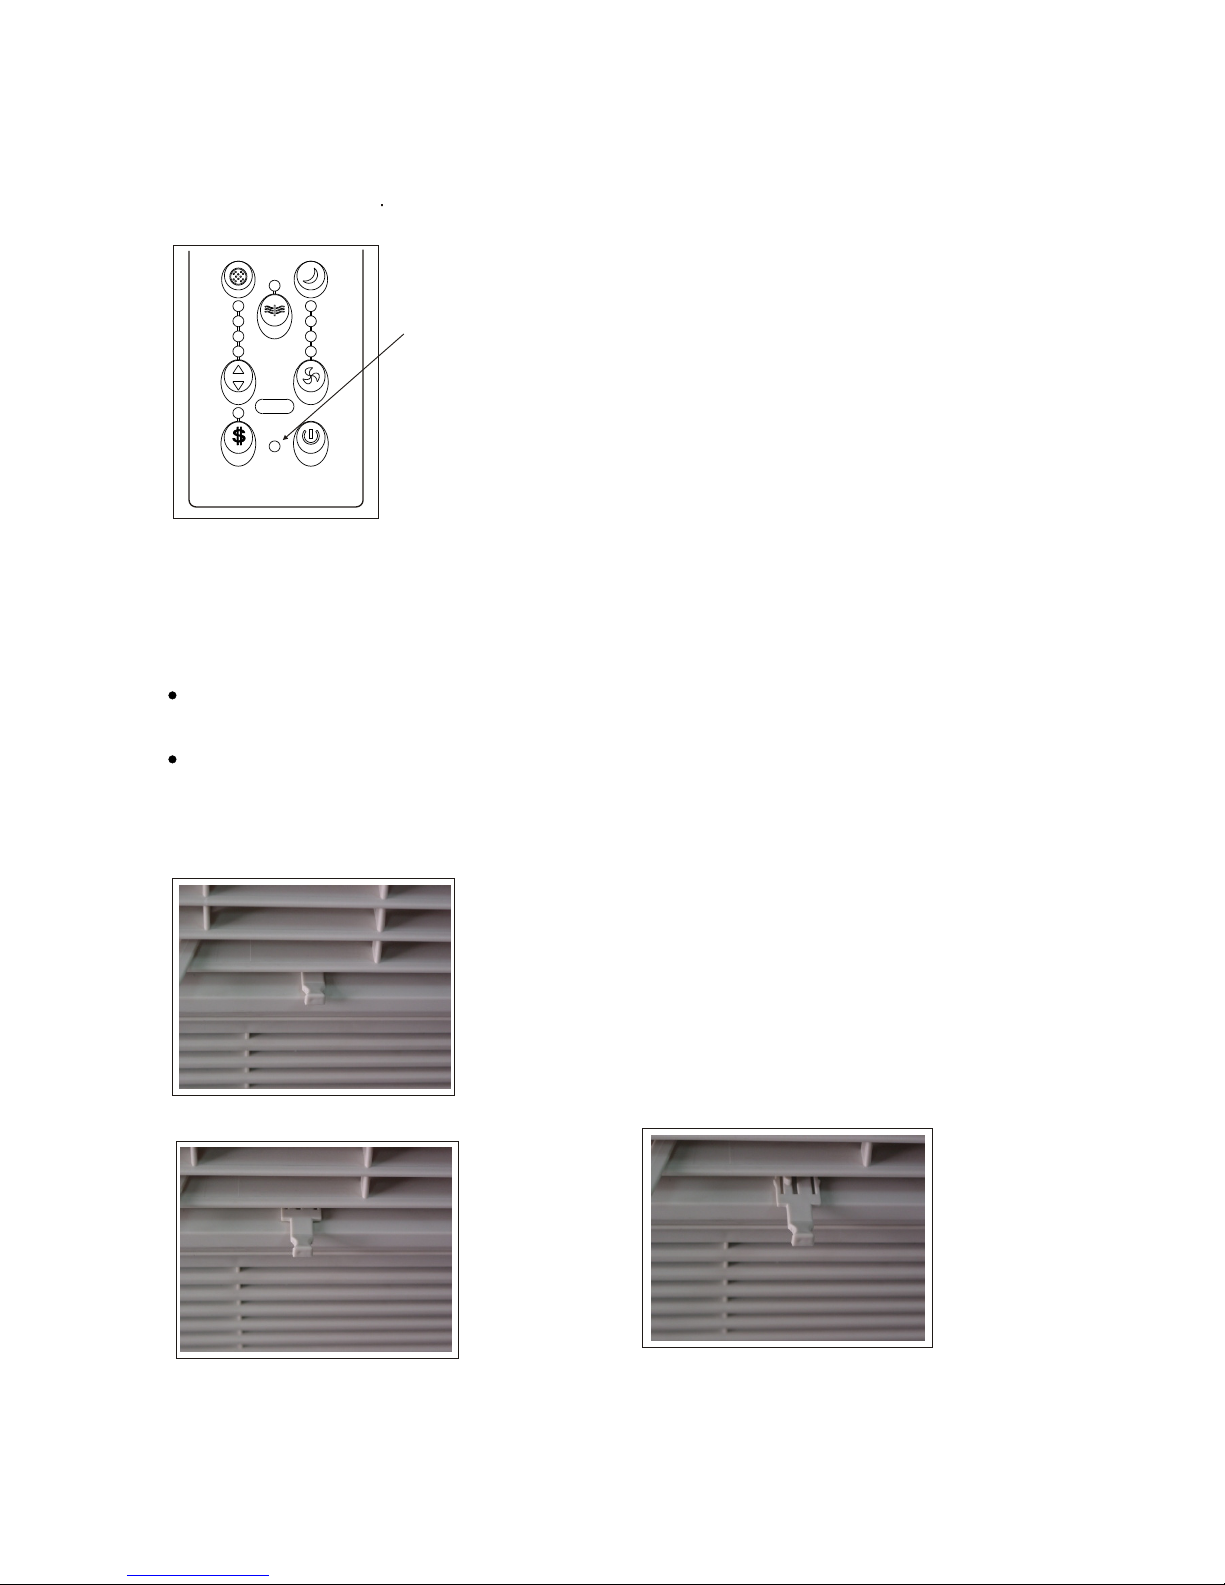
AIR CONDITIONER FEATURES(CONTINUED)
FO L L O W ME FE ATU R E:
(o n some mod e ls)
Light f lash ing
Aut o
Coo l
Dry
Fan
Low
Aut o
Med
Hig h
Clea n
Air
Fan
Mod e
Foll ow
Me
Ener gy
Save r
On/ Off
NOTE:
To activate the F ollow Me feat ure, point the remot e
control tow ards the unit an d pre ss the Follow Me
button. T
If the unit
does not recei ve the Follow Me signal during any 7
minutes int erval, the un it will beep to indic ate the
Follow Me mode has ended.
he remote disp lay is actual temp erature
at its locatio n. The remot e con trol will sen d this
signal to the a ir condition er ev ery 3 minutes until
This featur e can be activat ed fr om the remote
control ONLY. The remote contr ol se rves as a
remote ther mostat allow ing f or the precis e
temperatur e control at i ts loca tion.
ADDITIONAL THINGS YOU SHOULD KNOW
Now that you ha ve mastered t he operating proc edure, here a re more featu res in y our control t hat
you should bec ome famili ar with.
The Cool circ uit has an aut omat ic 3 minute time delayed star t if the unit is turne d off and on
quickly. Thi s pre vents overh eating of the comp ressor and po ssible circu it br eaker trippi ng.
The fan will c onti nue to ru n durin g this time.
The control is capable of d ispl aying temper ature in degr ees F ahrenheit or degrees Cels ius.
To c onve rt from one to th e other, press and hold the Left and Rig ht Temp/ Time r buttons at the
same time, for 3 seconds.
Fr e s h Air Vent Contro l ( o n some models):
Figure 1 (VENT CLOSED)
Figure 2 (VENT OPEN)
The Fre sh Air Ven t allows the air condition er to:
1. Reci rcul ate inside ai r - Vent Closed (Se e Fig .1)
2. Draw fr esh a ir into the room - Vent Open (see Fig. 2)
3. Exch ange ai r from the roo m and draws fres h air in to
the roo m - Vent an d Exhaust Ope n (see Fig.3)
Figure 3 (VENT & EXHAUST OP EN)
9
you p ress th e Follow Me bu tton again.
Page 11
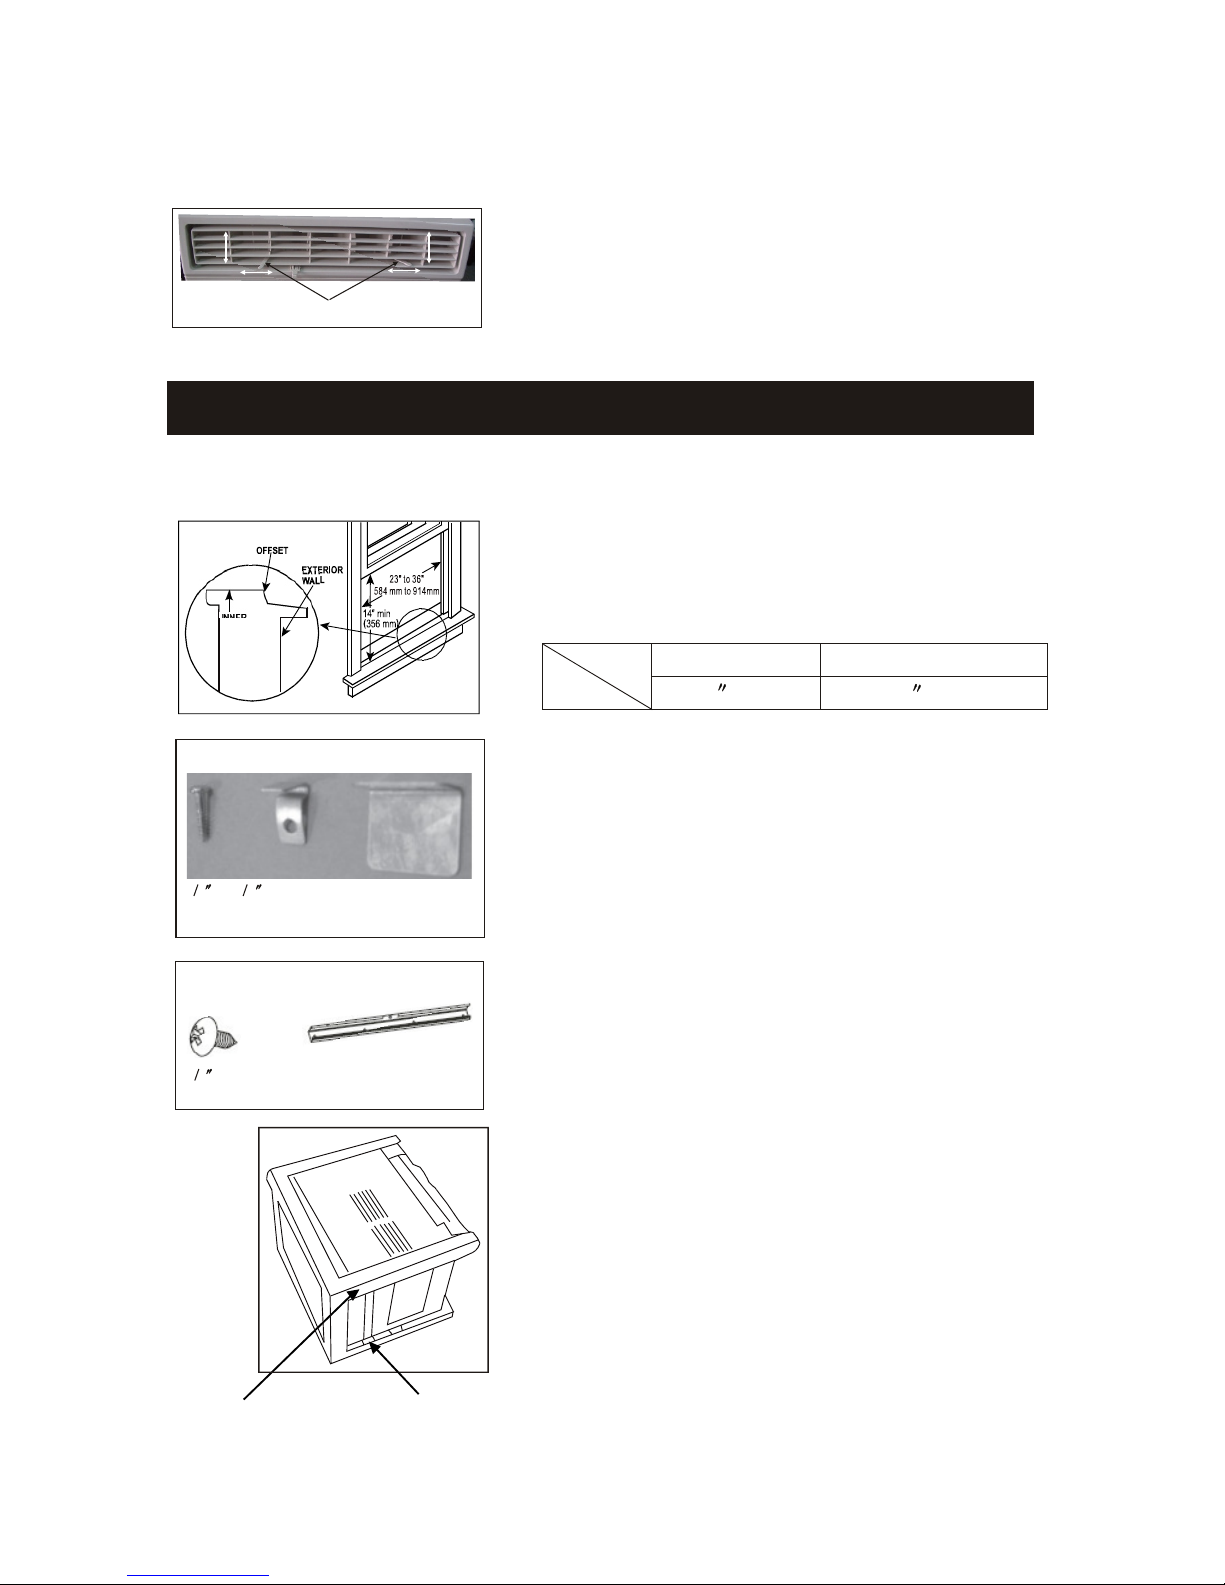
Fig. 1
INT ERIOR
WALL
Wooden Windows
WIN DOW SIL L
Ai r D irectional Louver s
The lou vers wi ll allow you t o direct the air flow Up
or Down (on som e models) and Left or Right
throug hout the room as need ed. Pivot hor izon tal
louver s unt il the desire d Up/Down dir ection is
obtain ed.
Move th e Lever s from side to si de until the d esir ed
Left/R ight direction is obtained.
Levers
Air Dir ecti on
INSTALLATION INSTRUCTIONS
Your air con ditioner is d esig ned to instal l in standard do uble hung windows with opening widths of
23 to 36 in ches (584mm to 914 mm) (See Fig. 1).
Lower s ash mus t open suffic iently to allow a cl ear vertic al
openin g of fol lowing siz e (see Tabl e 1).Side lou vers and the
rear of th e AC must ha ve cl ear air space to allow enough
airflo w thr ough the cond enserfor he at remo val. The rea r of
the uni t must b e outdoors, n ot insi de a buil ding or garage.
NOTE: Sa ve Car ton and thes e Installati on In struction s
for fut ure ref erence. Th e cart on is the best wa y to store uni t
during wint er, or when not in u se.
3 4 (or 1 )
Scre ws
(7)
2
Lock Fra me
(2)
Sash Loc k
(1)
Mounting Ha rdware
TOOLS NEEDE D:
Phillips Sc rew Driver
Drill(If pi lot holes are ne eded )
CAUTION: Whe n handling un it, b e careful to avo id cuts from
sharp metal ed ges and alumi num f ins on fr ont and rear coils.
Top Rail Hard ware
3 8 Sc rew s
(4)
Top Rail
(1)
Before inst alling unit, the top rail must be ass embl ed
on the unit (Fo r <10000Btu/h mod els only).
Tool Needed: P hill ips Screwd river
A: Remove the a ir condition er fr om the carton an d place
on a flat surfa ce.
B:
Remove top rai l from the rea r of the pa ckaging ma teri al
as shown in Fig . A.
10
NOTE: The top ra il hardwar e and th e following F ig.A,
Fig.B and Fig. C are not appl icab le to the un its mo re
than 10000B tu/h.
Packagin g
Fig. A
Top Ra il
Model
Size
5000~8 000B tu/h
10000~ 1200 0Btu/h
14 (356 mm)
15-1/2 (394 mm)
Table 1
Page 12
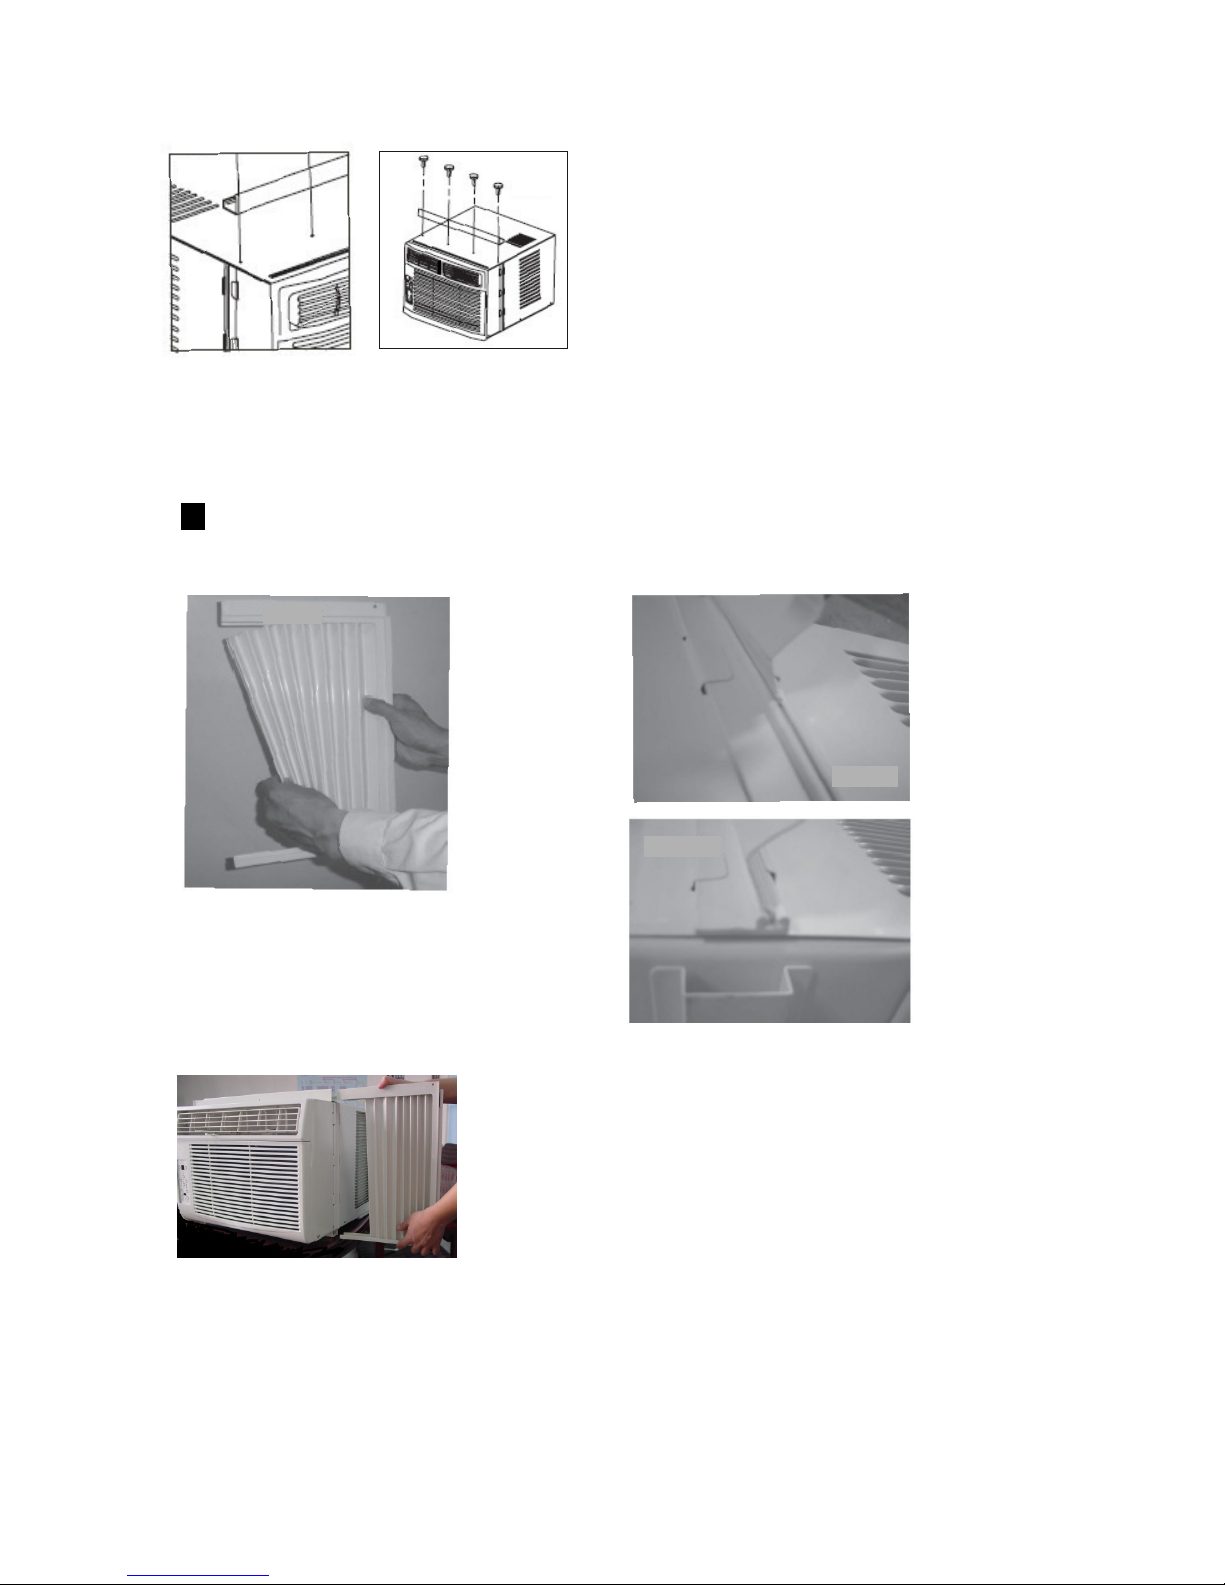
C: Al ign the hole i n the to p rail with thos e in the
top of the unit as shown in Fig. B
Fig.B
Fig. C
D: Secure the t op rail to the un it with the 3/8
Screws as show n in Fig.C.
NOTE: For saf ety reasons, all fou r(4) screw s
MUST be secur ely fastened .
,,
HOW TO INSTA LL
NOTE: Top rail an d Sliding Pan els a t each side are o ffset to provide th e proper pitc h to the rear
(5/16 ). This i s
Place unit on floor, bench or table. Install the accordion filler panels into the left and right wings.
necessary f or proper con dens ed water util ization and d rainage. If y ou are
not using the S ide Panels fo r any re ason, this pi tch to the rear m ust be m aintained .
,,
1
Fig. 1
A. Hold th e Accord ion P anel
in one han d and ge ntly
pull ba ck the c enter to free
the ope n end. S ee Fig.1.
Fig. 2A
Fig. 2B
B. Slid e the fr ee end (I sectio n)
of the panel in to the cabine t
as shown in Fig . 2A, 2B & 3.
Slide the pane l down., Be
sure to leave e nough space
to slip the top an d bottom of
the frame into the rails on
the cabinet .
Fig. 3
11
Attach the accordion panels to the sides of the unit and then secure (slide) the proper righ and left
wings into top and bottom rails.
Page 13
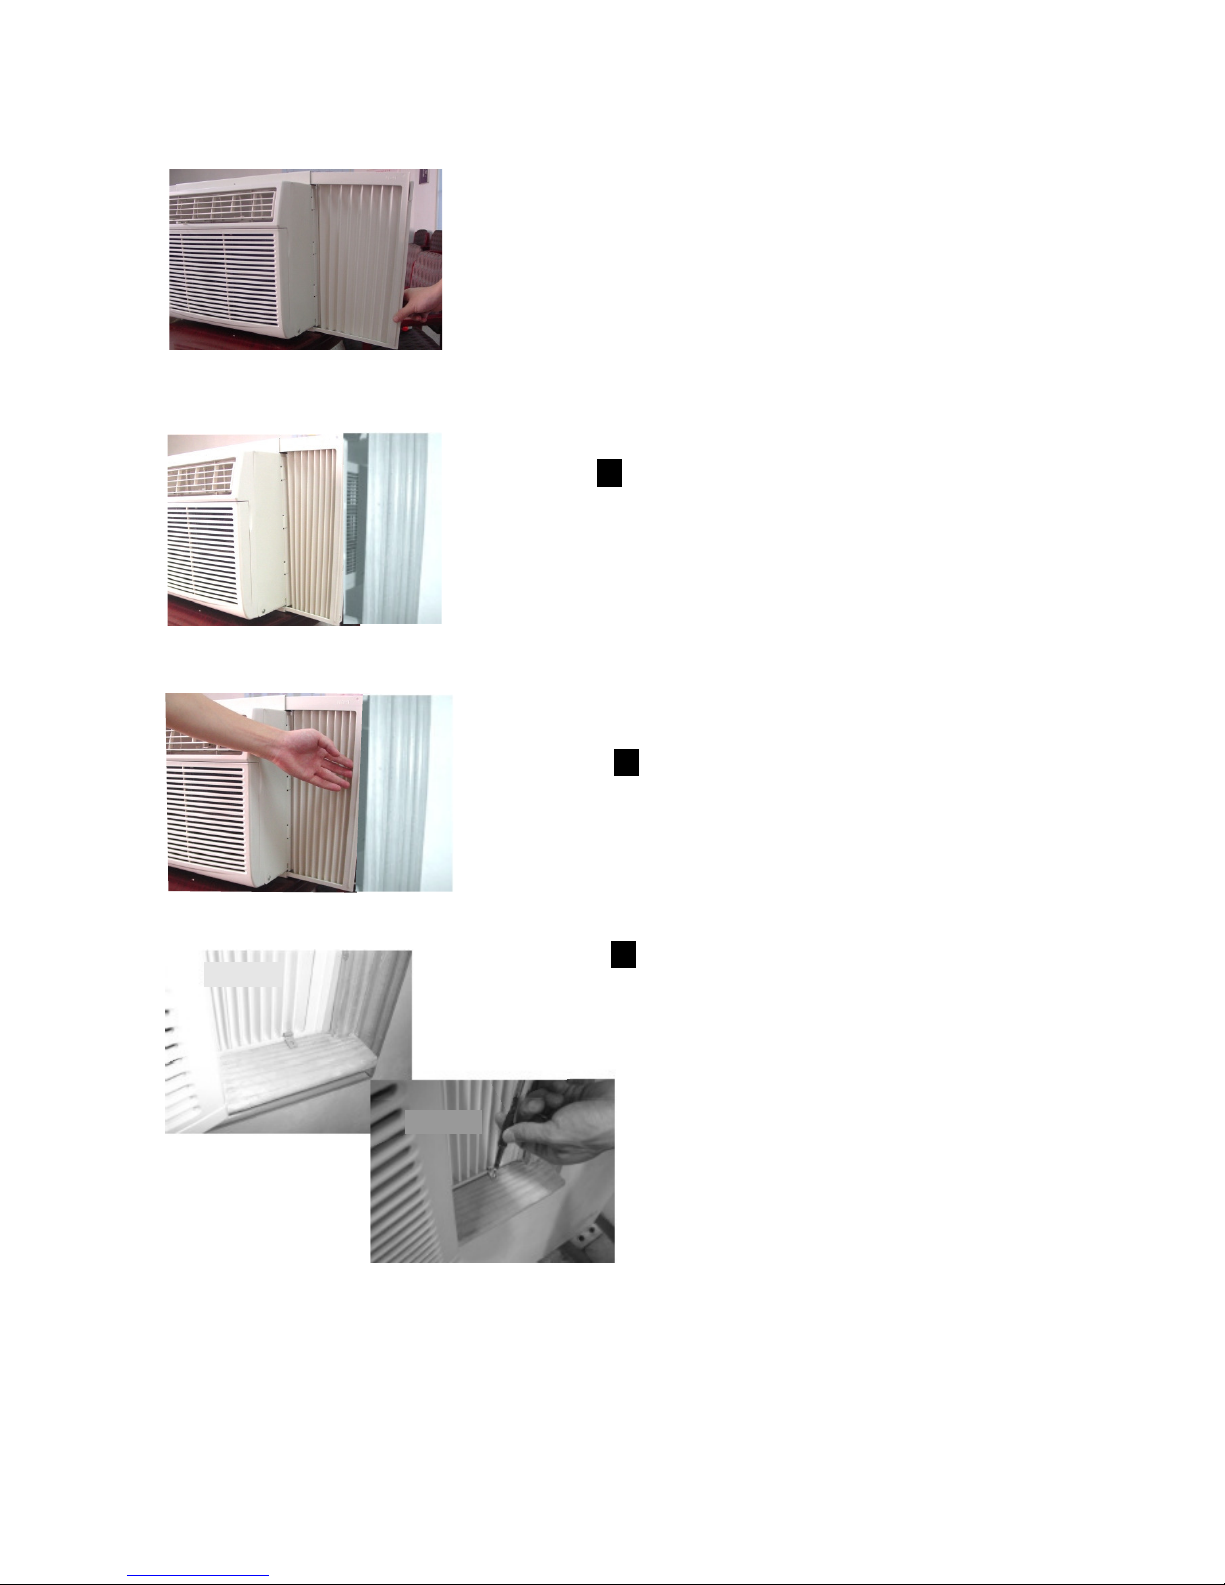
Keep a firm gri p on the air cond itio ner, car eful ly
place t he unit into the wind ow opening so th e bot tom
of the air cond itioner fram e is against t he wind ow
sill (F ig.5 ). Carefully close the win dow beh ind the top
rail of th e uni t.
2
Fig. 5
Fig. 6
Extend the sid e panels out a gainst the window
frame ( Fig. 6).
3
Place t he fram e lock betwee n the frame
extens ions and the windo w sill as shown
(Fig.7 ). Dr ive 3 / 4 (19mm) or 1
lockin g scr ews through t he frame lock an d
into th e sill ( Fig.8).
NOTE: To preve nt window sil l from s plitting,
drill 1 / 8 (3mm) p ilot holes be fore dr iving
screws .
/ 2 (13mm)
4
,,
,,
Fig.7
Fig.8
12
Fig. 4
C. Once th e pan el has been inst alled on the s ide of t he
cabine t, ma ke sure it sits s ecurely insi de th e frame
channel by mak ing slight ad justments . Sli de the top
and bottom end s of the frame in to th e top and bottom
ends of the fra me into the top a nd bott om rails of
the cabinet . Fig.4.
D. Slid e the pa nel all the way i n and repeat on t he othe r
side.
NOTE: If stor m window bloc ks AC, see Fig. 13.
,,
Page 14
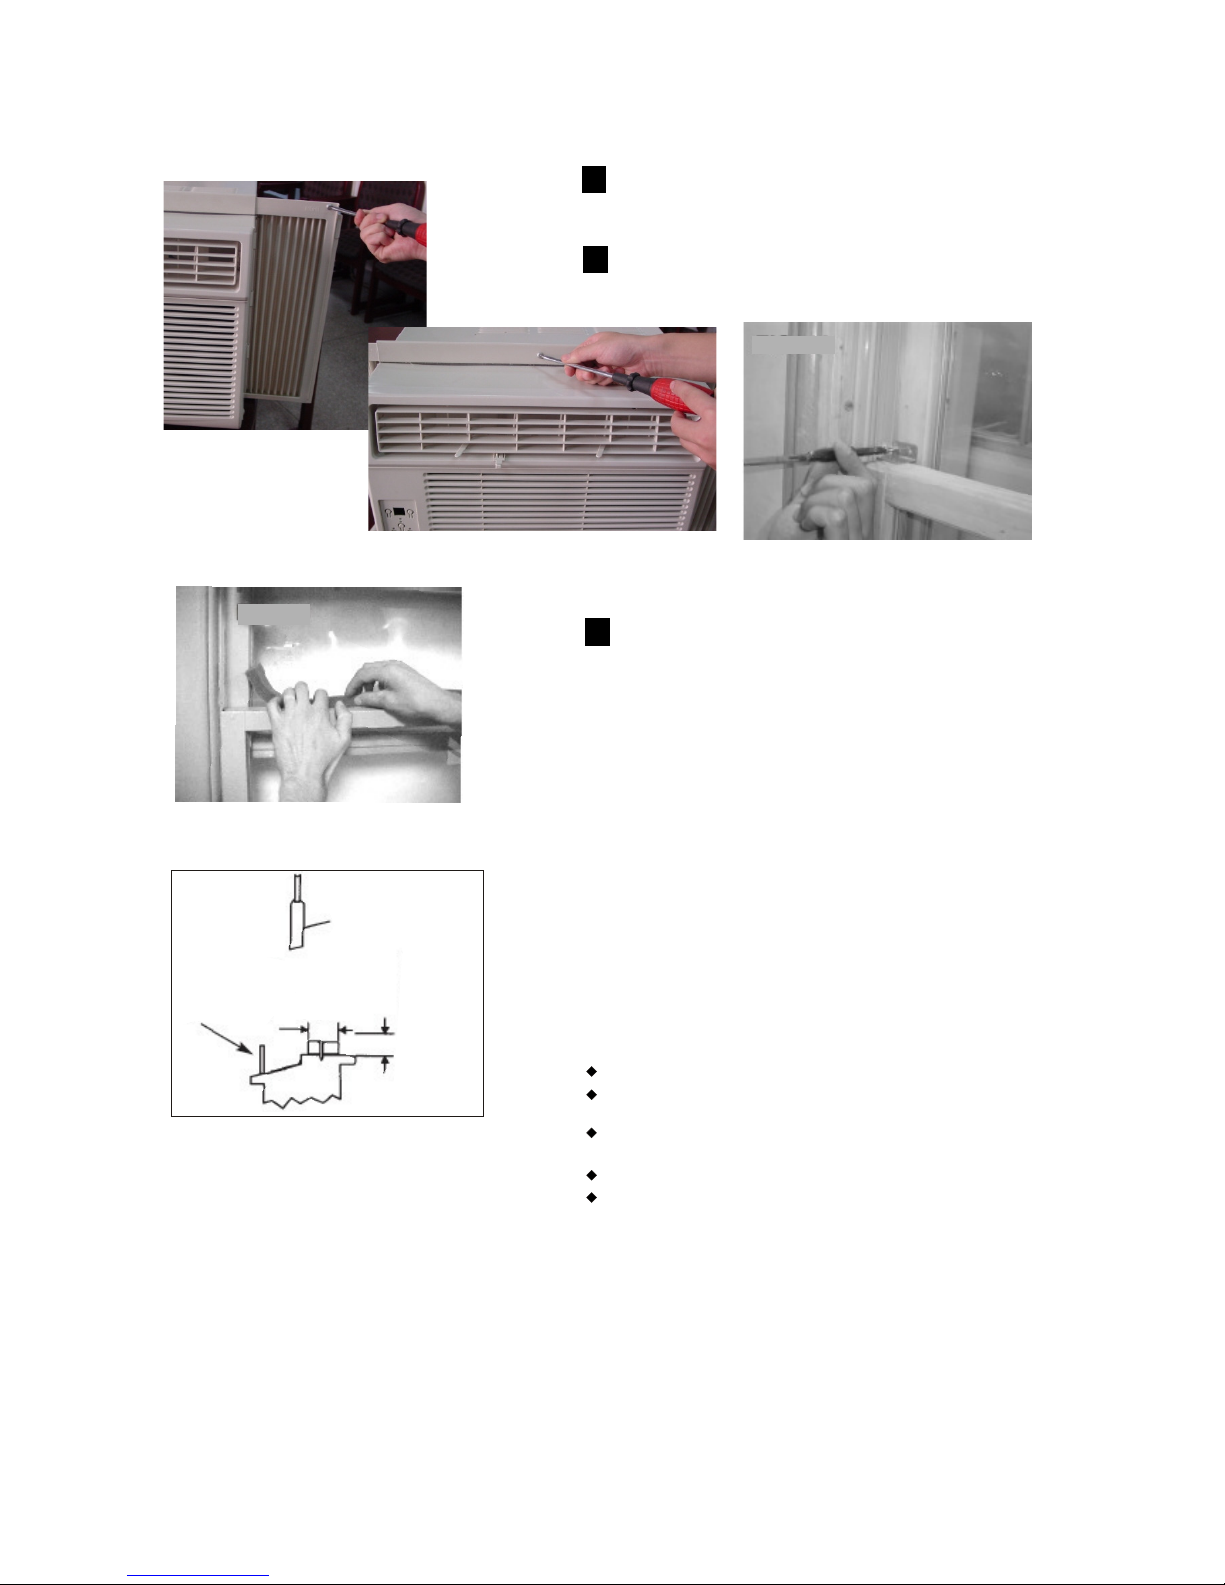
Fig.9
Fig.10
Drive 1 / 2 (13mm) locking scre ws th rough frame
holes i nto win dow sash (Fig .9/10)
5
,,
To secur e lower sash in p lace , attach righ t angle
sash lock with 3 / 4 (19mm) or 1 screw as
shown( Fig. 11).
/ 2 (13mm)
6
,,
Fig.11
Cut foam seal a nd insert in the space betwee n the
upper a nd lowe r sashes (Fig .12).
7
Fig.12
If AC is Blocked by St orm Wi ndow
Add wood as shown in Fig.13, or re move storm
window befo re air condit ione r is inst alle d.
If Storm Windo w Frame must r emai n, be sure the
drain holes or slots are not ca ulke d or pain ted s hut.
Accumulate d Rain Water or Condensa tion must be
allowed to dra in out.
Stor m w in do w
fram e o r o th er
obst ru ct io n
11/2 MI N
(38 m m)
,,
Sash
Boar d
thic kn es s
as re qu ir ed ,
for p ro pe r
pitc h t o r ea r,
alon g e nt ir e
sill . F as te n
with na il s o r
scre ws .
Fig.13
Removing AC From Wind ow
13
Turn AC off, and disconnect p ower co rd.
Remove sash se al from betwe en wi ndows, and
unscrew saf ety lock.
Remove scre ws installed thro ugh frame and fr ame
lock.
Close (slid e) side panel s into f rame.
Keeping a firm grip on air cond itioner, rai se sa sh
and careful ly rock air cond itio ner backwa rd to
drain any cond ensate wat er in ba se of unit. Be
carefully n ot to spill any r emai ning water wh ile
lifting uni t from window. S tore parts WITH air
conditione r.
,
,
,
,
,,
Page 15
CARE AND CLEANING
Clean your air conditioner occasionally to keep it looking new. Be sure to unplug the unit
before cleaning to prevent hock or fire hazards.
CAUTION
Air Filter Cleaning
The air filter should be checked at least once a
month to see if cleaning is necessary. Trapped
particles in the filter can build up and cause an
accumulation of frost on the cooling coils.
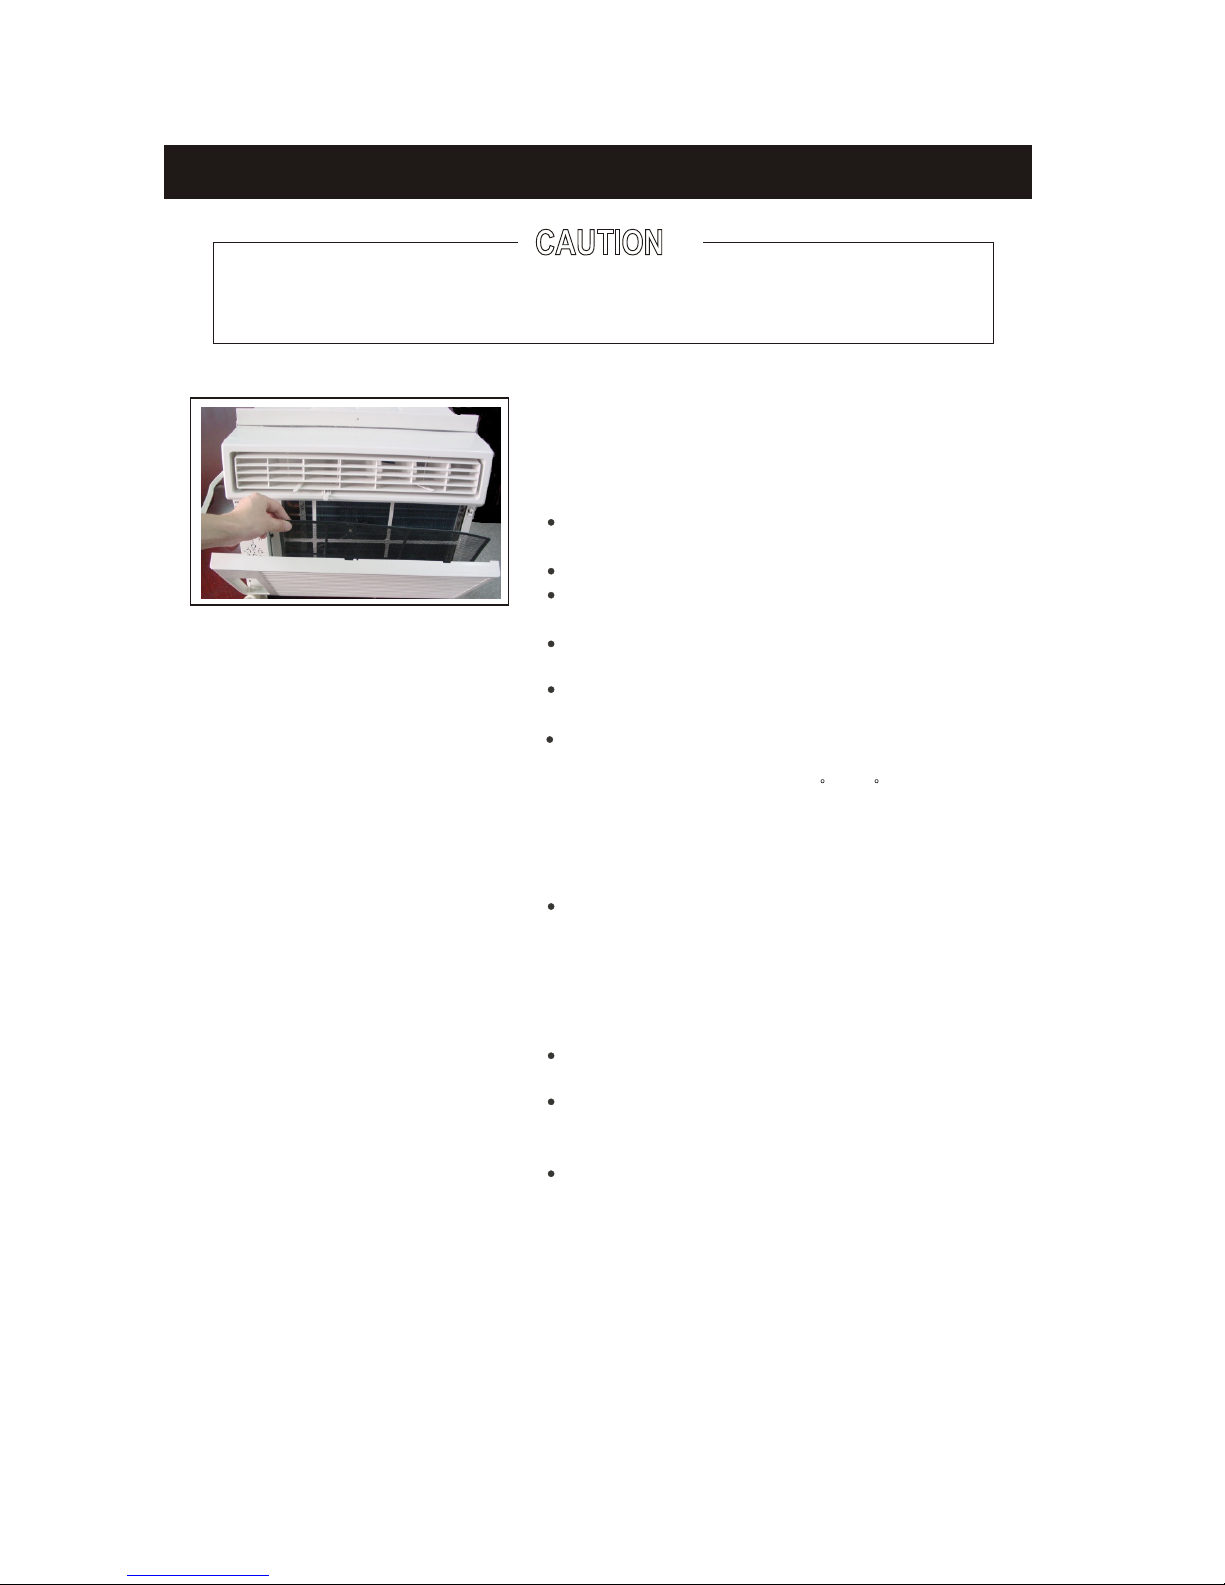
Push the vent handle to the Vent Closed position
(where applicable).
Open the front panel.
Grasp the filter by the center and pull up and
out.
Wash the filter using liquid dishwashing deter gent and warm water. Rinse filter thoroughly.
Gently shake excess water from the filter. Be
sure the filter is thoroughly dry before replacing.
Or, instead of washing you may vacuum the
filter clean.
Note: Never use hot water over 40 C(104 F) to
cl ean th e ai r fil ter. Never attempt to operate the
unit without the air filter.
Cabinet Cleaning
Be sure to unplug the air conditioner to prevent
shock or fire hazard. The cabinet and front may
be dusted with an oil-free cloth or washed with
a cloth dampened in a solution of warm water
and mild liquid dishwashing detergent. Rinse
thoroughly and wipe dry.
Never use harsh cleaners, wax or polish on the
cabinet front.
Be sure to wring excess water from the cloth before
wiping around the controls. Excess water in or around
the controls may cause damage to the air conditioner.
Plug in air conditioner.
If you plan to store the air conditioner during the winter,
remove it carefully from the window according to the
installation instructions. Cover it with plastic or return it
to the original carton.
Winter Storage
14
s
Page 16
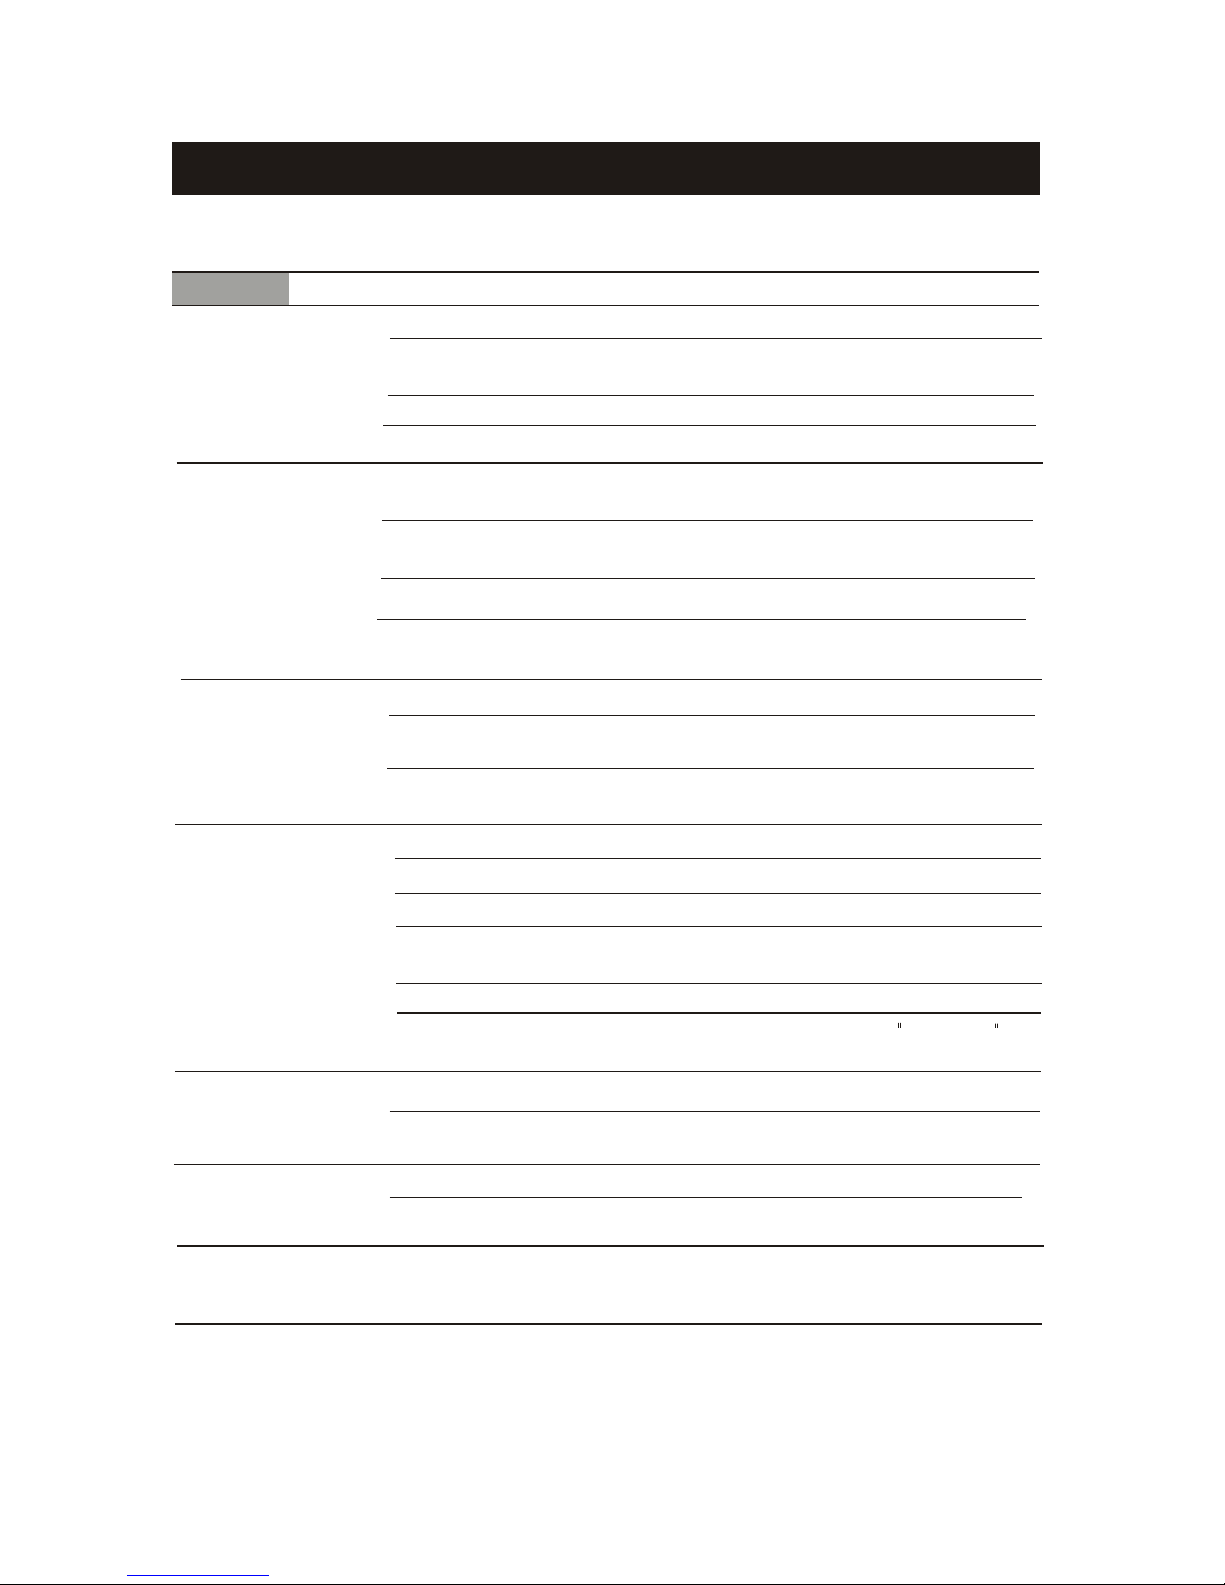
Before calling for service, review this list. It may save you time and expense. This list includes common
occurrences that are not the result of defective workman-ship or materials in this appliance.
Solution
Air conditioner
does not start
Wall plug disconnected. Push plug firmly into wall outlet.
House fuse blown or circuit breaker tripped. Replace fuse with time delay type or
reset circuit breaker.
Plug Current Device Tripped. Press the RESET button.
TROUBLESHOOTING TIPS
Problem
Air from unit does
not feel cold
enough
Reset to a Lower temperature.
Room temperature below 17 C(62 F). Cooling may not occur until room temperature
rises above 17 C(62 F).
Thermostat set too cold for night-time cooling. To defrost the coil, set to FAN ONLY
mode. Then, set temperature to a Higher setting.
Temperature sensing element touching cold coil, located behind air filter. Straighten
tube away from coil.
Air filter may be dirty. Clean filter. Refer to Care and Cleaning section. To defrost,
set to FAN ONLY mode.
Dirty air filter- air restricted. Clean air filter. Refer to Care and Cleaning section.
Unit recently turned on in hot room. Allow additional time to remove Stored heat from
walls, ceiling, floor and furniture.
Control is OFF. Turn Control ON and set to desired setting.
O
O
O
O
Air conditioner
cooling, but room
is too warm- ice
forming on cooling
coil behind
decorative front.
Outdoor temperature below 18 C(64 F). To defrost the coil, set FAN ONLY mode.
O
O
Air conditioner
cooling, but room
is too warm- NO
ice forming on
cooling coil behind
decorative front.
Temperature is set too High, set temperature to a Lower setting.
Air directional louvers positioned improperly. Position louvers for better air distribution.
Front of unit is blocked by drapes, blinds, furniture, etc. - restricts air distribution.
Clear blockage in front of unit.
Doors, windows, registers, etc. Open- cold air escapes. Close doors, windows, registers.
Compressor shut-off by changing modes. Wait approximately 3 minutes and listen for
compressor to restart when set in the COOL mode.
Air conditioner turns on
and off rapidly
Noise when unit is
cooling
Water dripping
INSIDE when
unit is cooling.
Improper installation. Tilt air conditioner slightly to the outside to allow water drainage.
Refer to installation instructions - check with installer.
Dirty air filter- air restricted. Clean air filter.
Air movement sound. This is normal . If too loud, set to a slower FAN setting.
Outside temperature extremely hot. Set FAN speed to a Higher setting to bring air past
cooling coils more frequently.
Window vibration - poor installation. Refer to installation instructions or check with installer.
15
Page 17
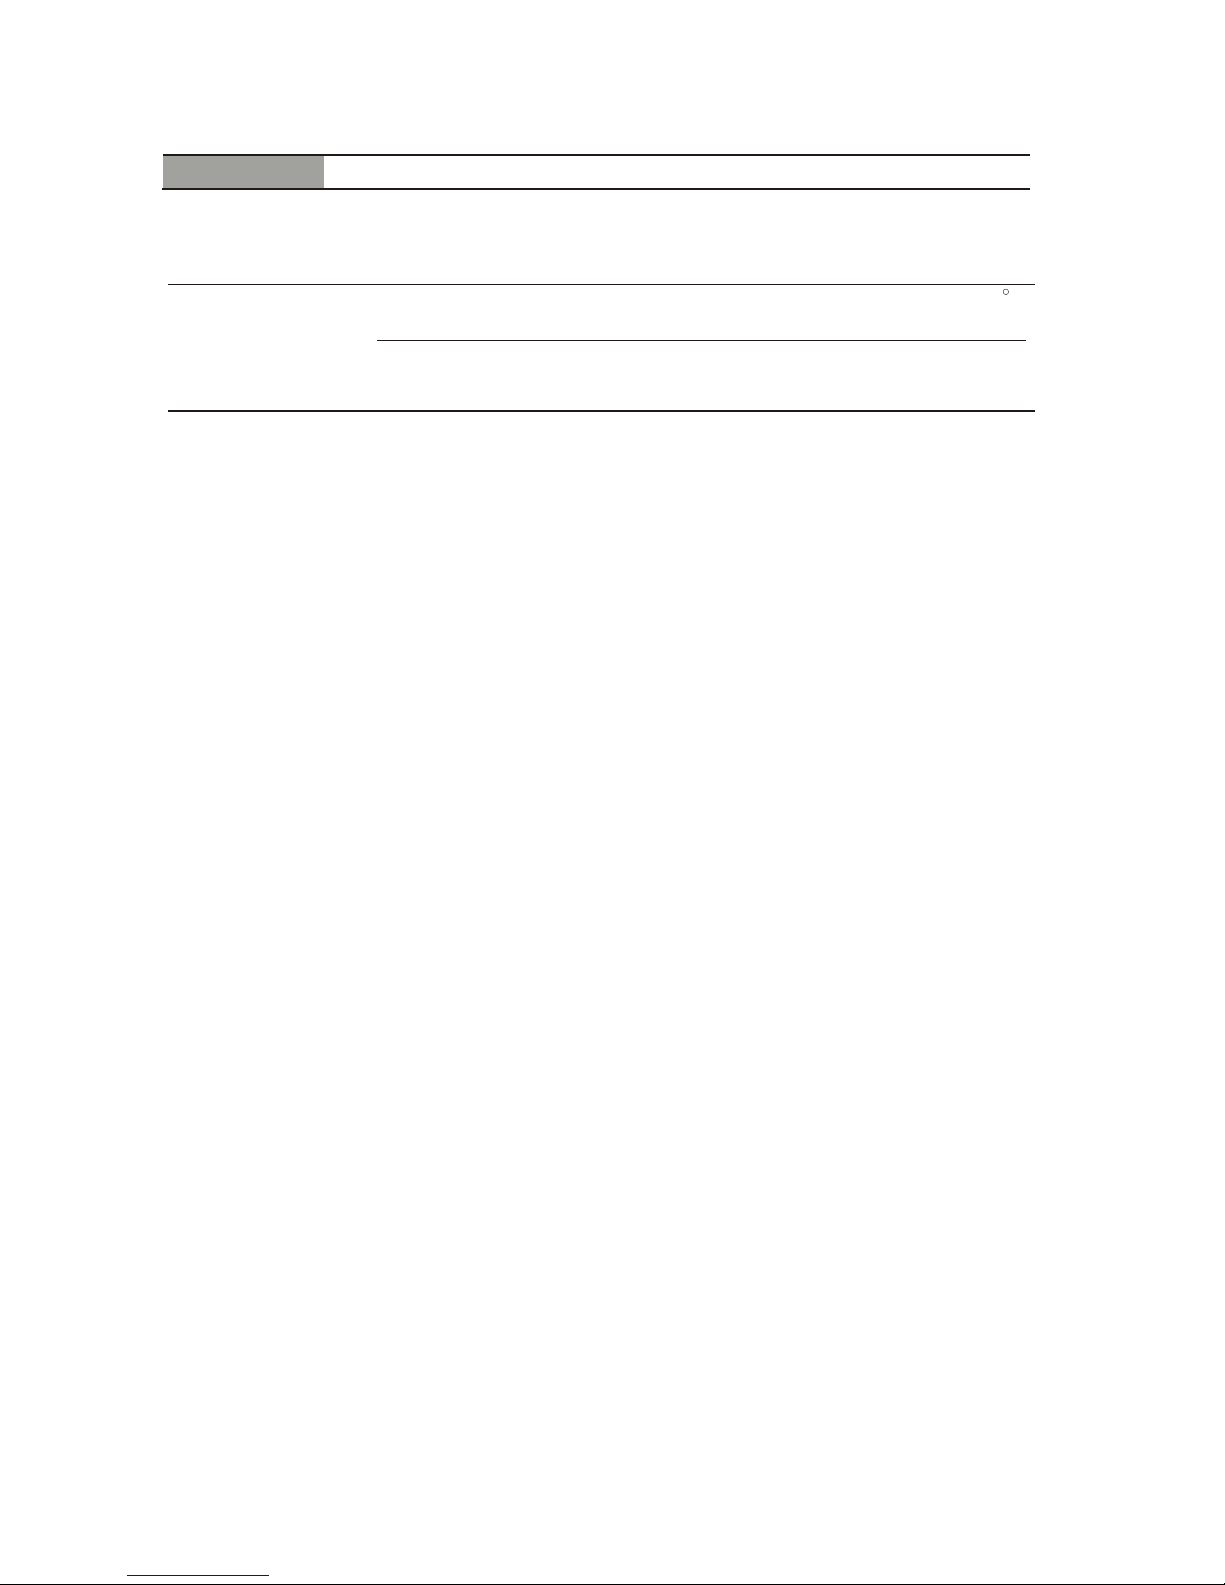
Solution
Problem
Water dripping
OUTSIDE when
unit is cooling.
Unit removing large quantity of moisture from humid room. This is normal during
excessively humid days.
Remote Sensing
Deactivating
Prematurely
(some models)
Remote control not located within range. Place remote control within 20 feet & 180 ,
radius of the front of the unit.
Remote control signal obstructed. Remove obstruction.
Room too cold
Set temperature too low. Increase set temperature.
16
Page 18

2020001A6027
SYLVANIA is a registered trademark of OSRAM SYLVANIA Inc., used under license
 Loading...