

Page 1
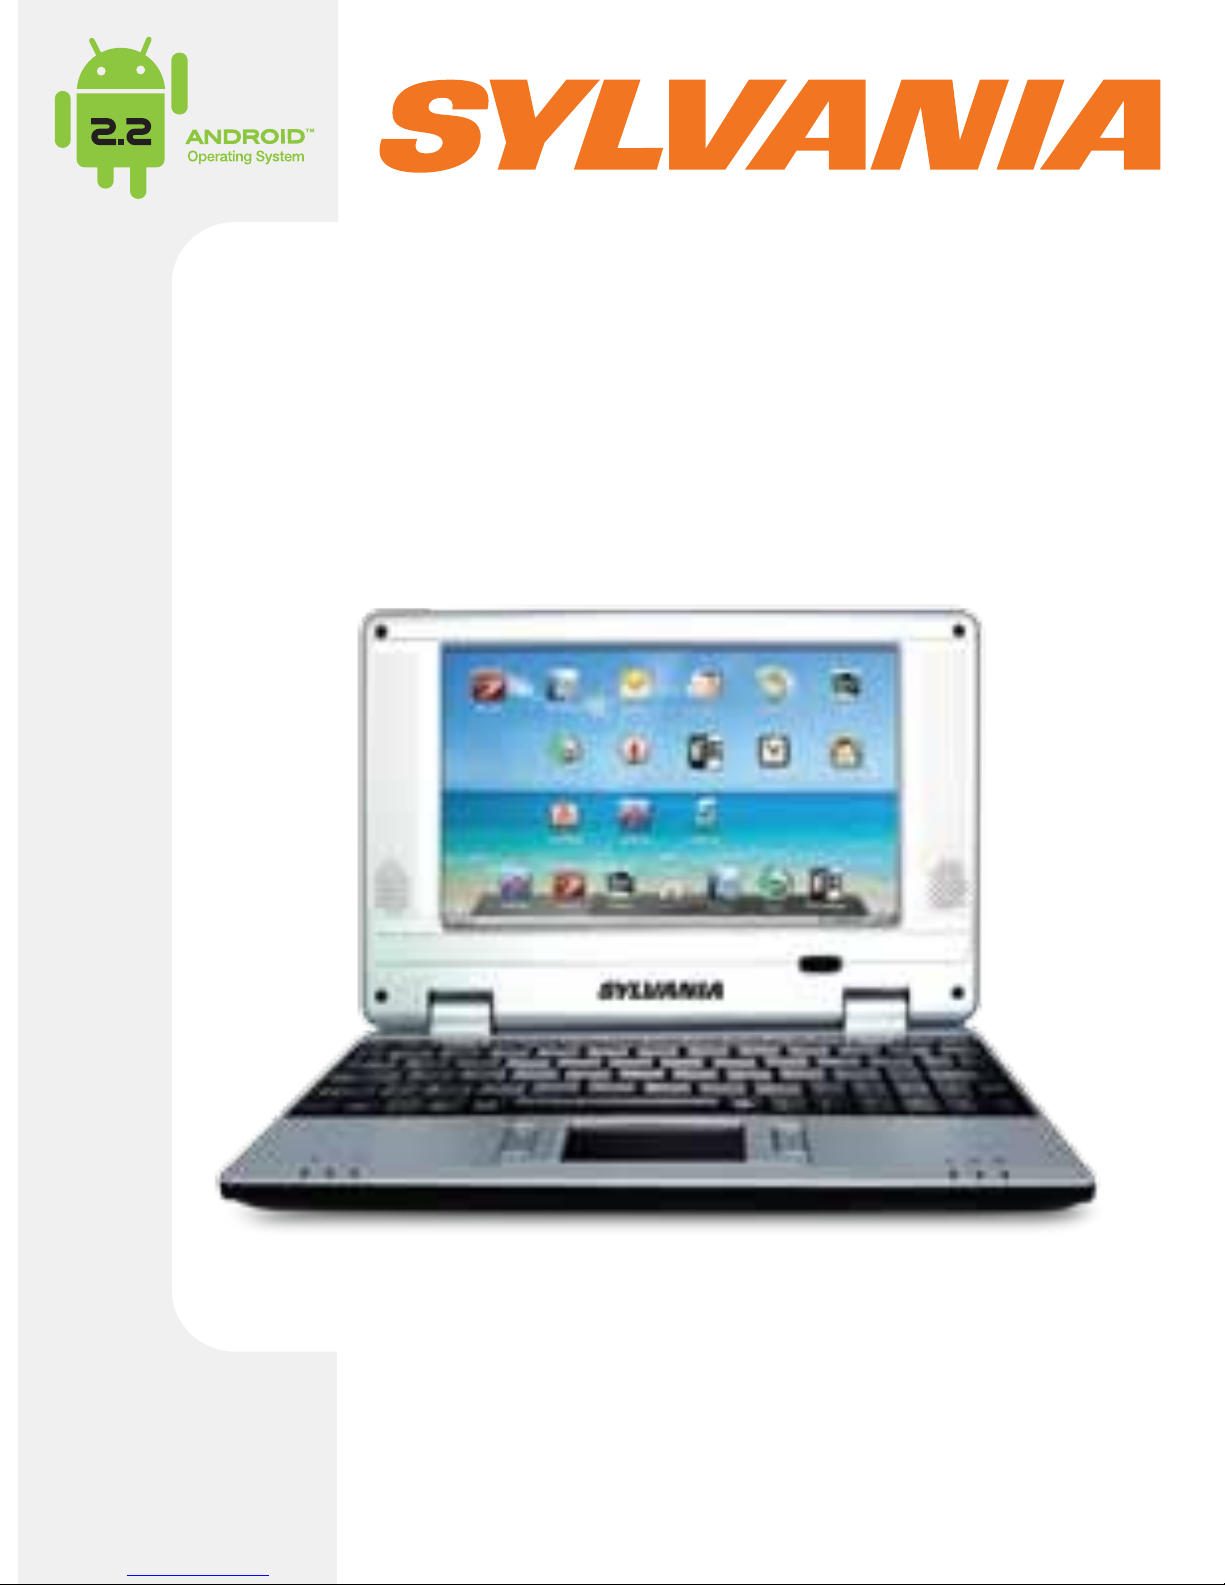
MODEL NUMBER: SYNETA7
Mobile Internet Device
7” ANDROID NETBOOK
User Guide
Page 2
1
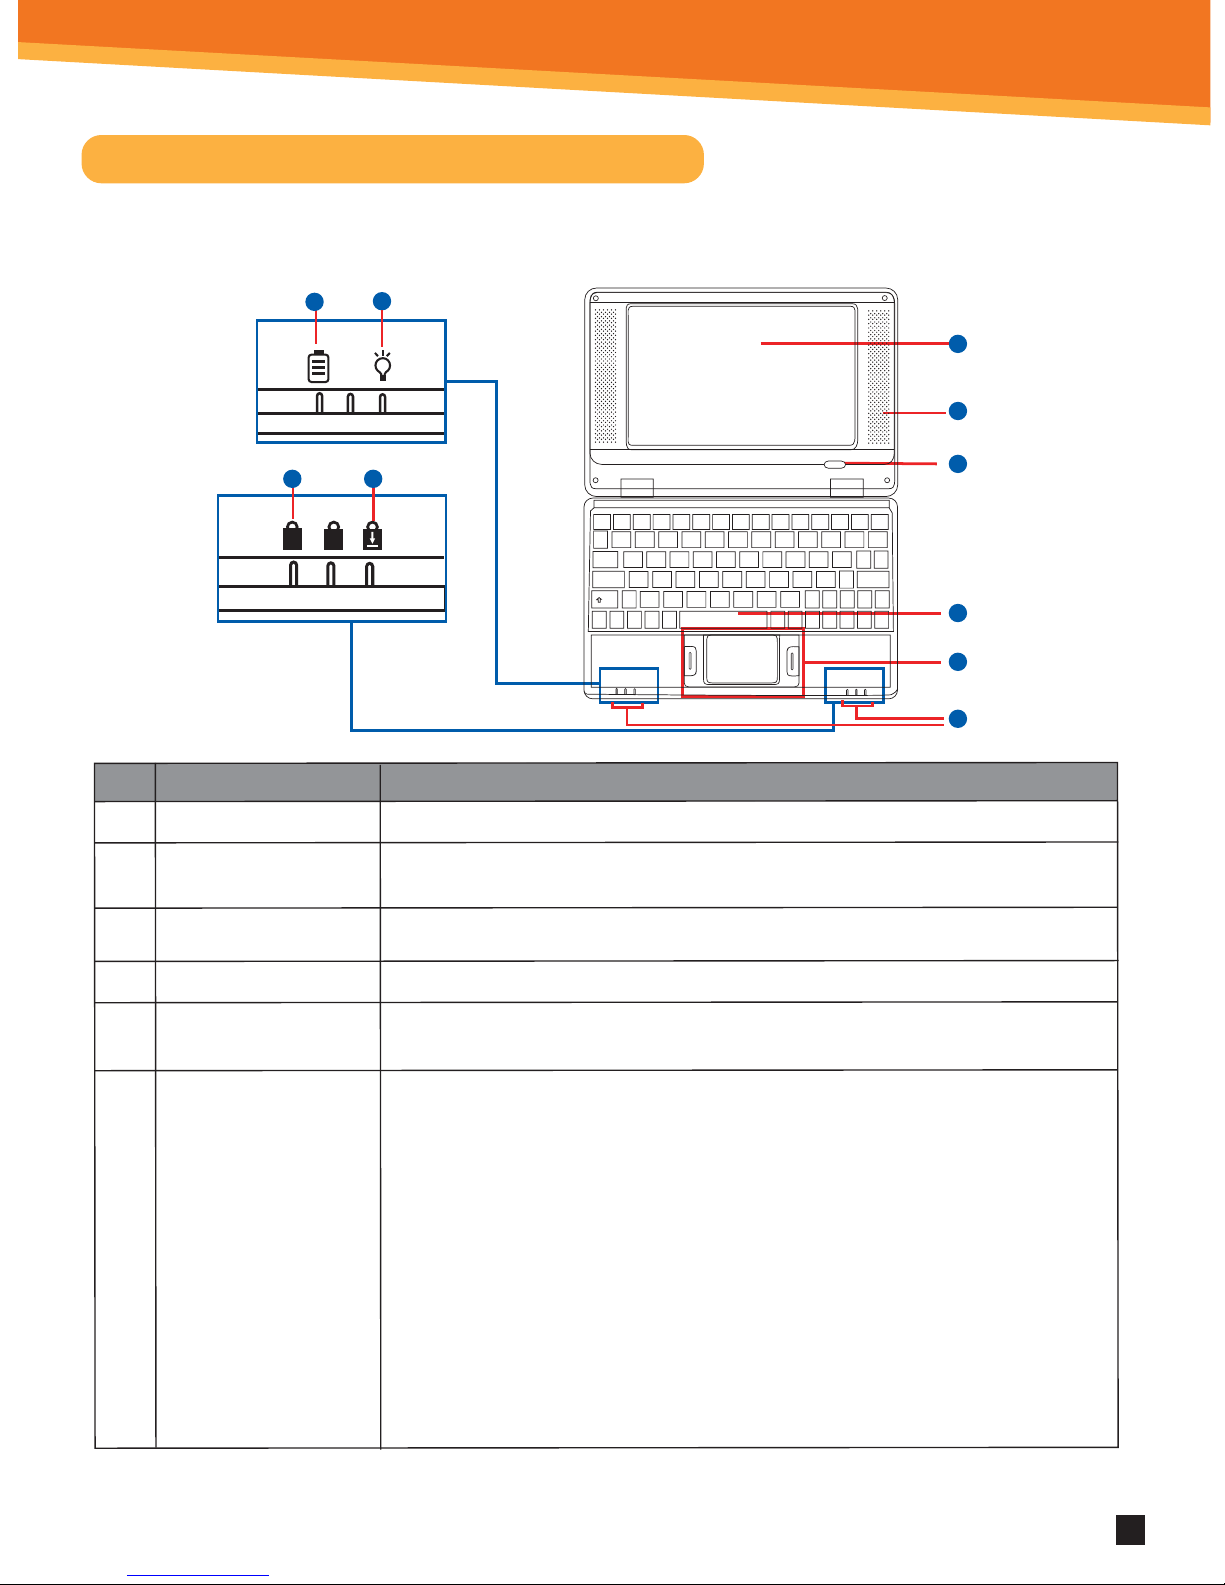
1.1 Getting to know your Android Netbook
Congratulations on the purchase of your new Android Netbook!
No.
1.
2.
3.
4.
5.
6.
Item
LCD screen
Power On/Off button
Speakers
Keyboard
Touch pad and button
Status indicator
(from left to right)
Description
7” LCD screen display.
Press the power button to start up the Netbook. The power
button will also recover the Netbook from standby status.
These produce the sound for the Netbook.
Input Device used for Controlling the Netbook's various functions.
Works the same way as a mouse and is used for controling the cursor.
The buttons work the same way as a left and right mouse buttons
a) Battery charge indication lamp: A red colored light indicates the battery is being
charged. When the battery is fully charged the light will turn off.
b) Power indication lamp: When your Netbook is in use, the power indication lamp
will be lit green.
c) Num Lock indication lamp: When the green lamp is on, it indicates that the
digital keys (blue numebers) of the keyboard are active. When the light is off,
it means that the Num Lock application is not on. Press the Num Lock key to turn
this function on and off.
d) Caps Lock indication lamp: When the green light is on, it indicates the Caps Lock
function on the keyboard is activated and all the letters typed will be capitalized.
Q W E R T Y U I O P
A S D F G H J K L
VZ X C B N M
1 2 3 4 5 6 7 8 9 0
!
@
# $
%
^ &
*
( )
~
`
_
_
+
=
\
|
;
:
< >
.
,
?
/
{ }
[
]
“
‘
\
|
A
lt
Ctrl
Shift
Caps
Lock
Tab
Pause
Break
Esc
Shift
Enter
Delete
Insert
F1
F2
F3 F4
F5 F6
F7
F8
F9
F10
F11
F12
1
A
1
a
b
c
d
2
3
4
5
6
d
c
SYNETA7
Page 3
2
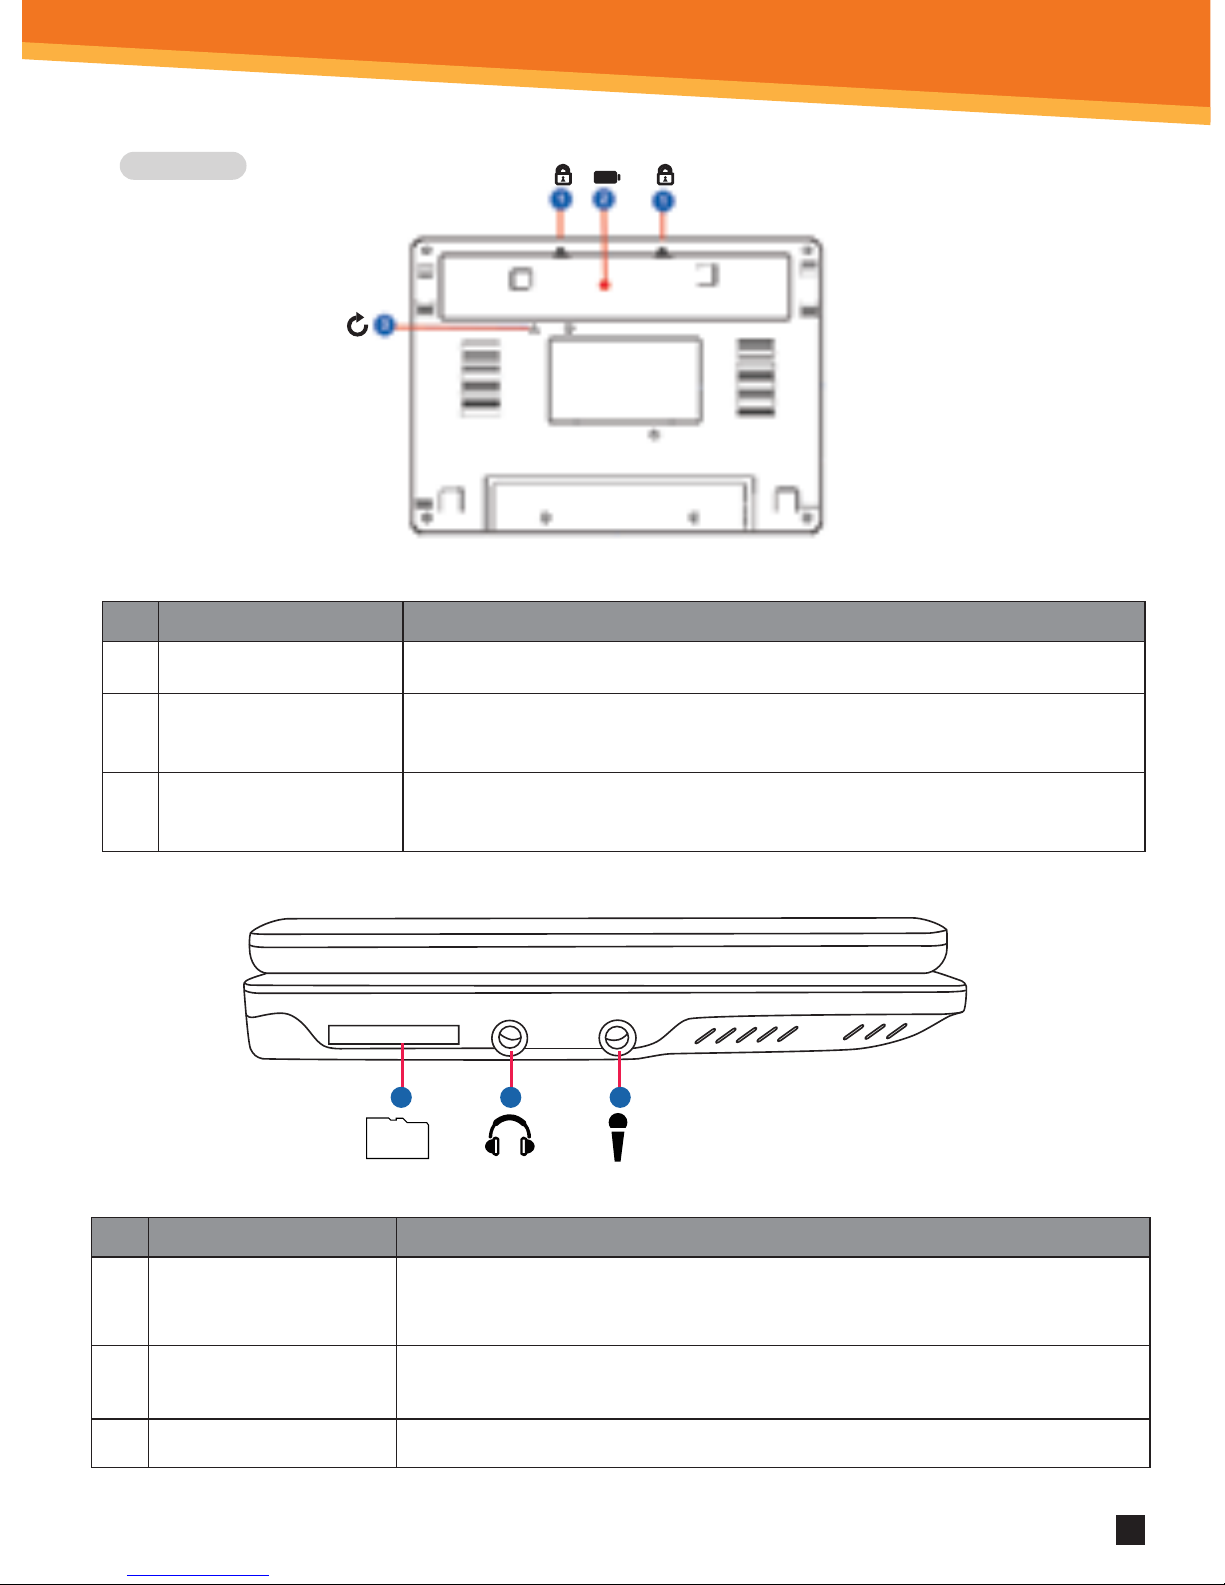
Bottom View
No.
1.
2.
3.
Item
Battery Lock
Batter Pack
Recovery
Description
The manual battery lock is used to protect battery pack.
The battery pack will charge automatically after connecting to a power
supply. The battery pack cannot be detached.
In the event your Netbook cannot normally shut down or restart, press this
button with a pin or straight paper clip to restart the Netbook.
No.
1.
2.
3.
Item
Storage card slot
Headphone output jack
Microphone jack
Description
The card reader in the Netbook can read SD/MMC cards from
devices such as digital cameras, MP3 players, mobile phones and PDAs.
For connecting to external speakers or headphones. The built-in speakers in the
Netbook will stop playing automatically after inserting headphones into the jack.
Connect to the external microphone
1 2 3
Card Slot
SYNETA7
Page 4
3
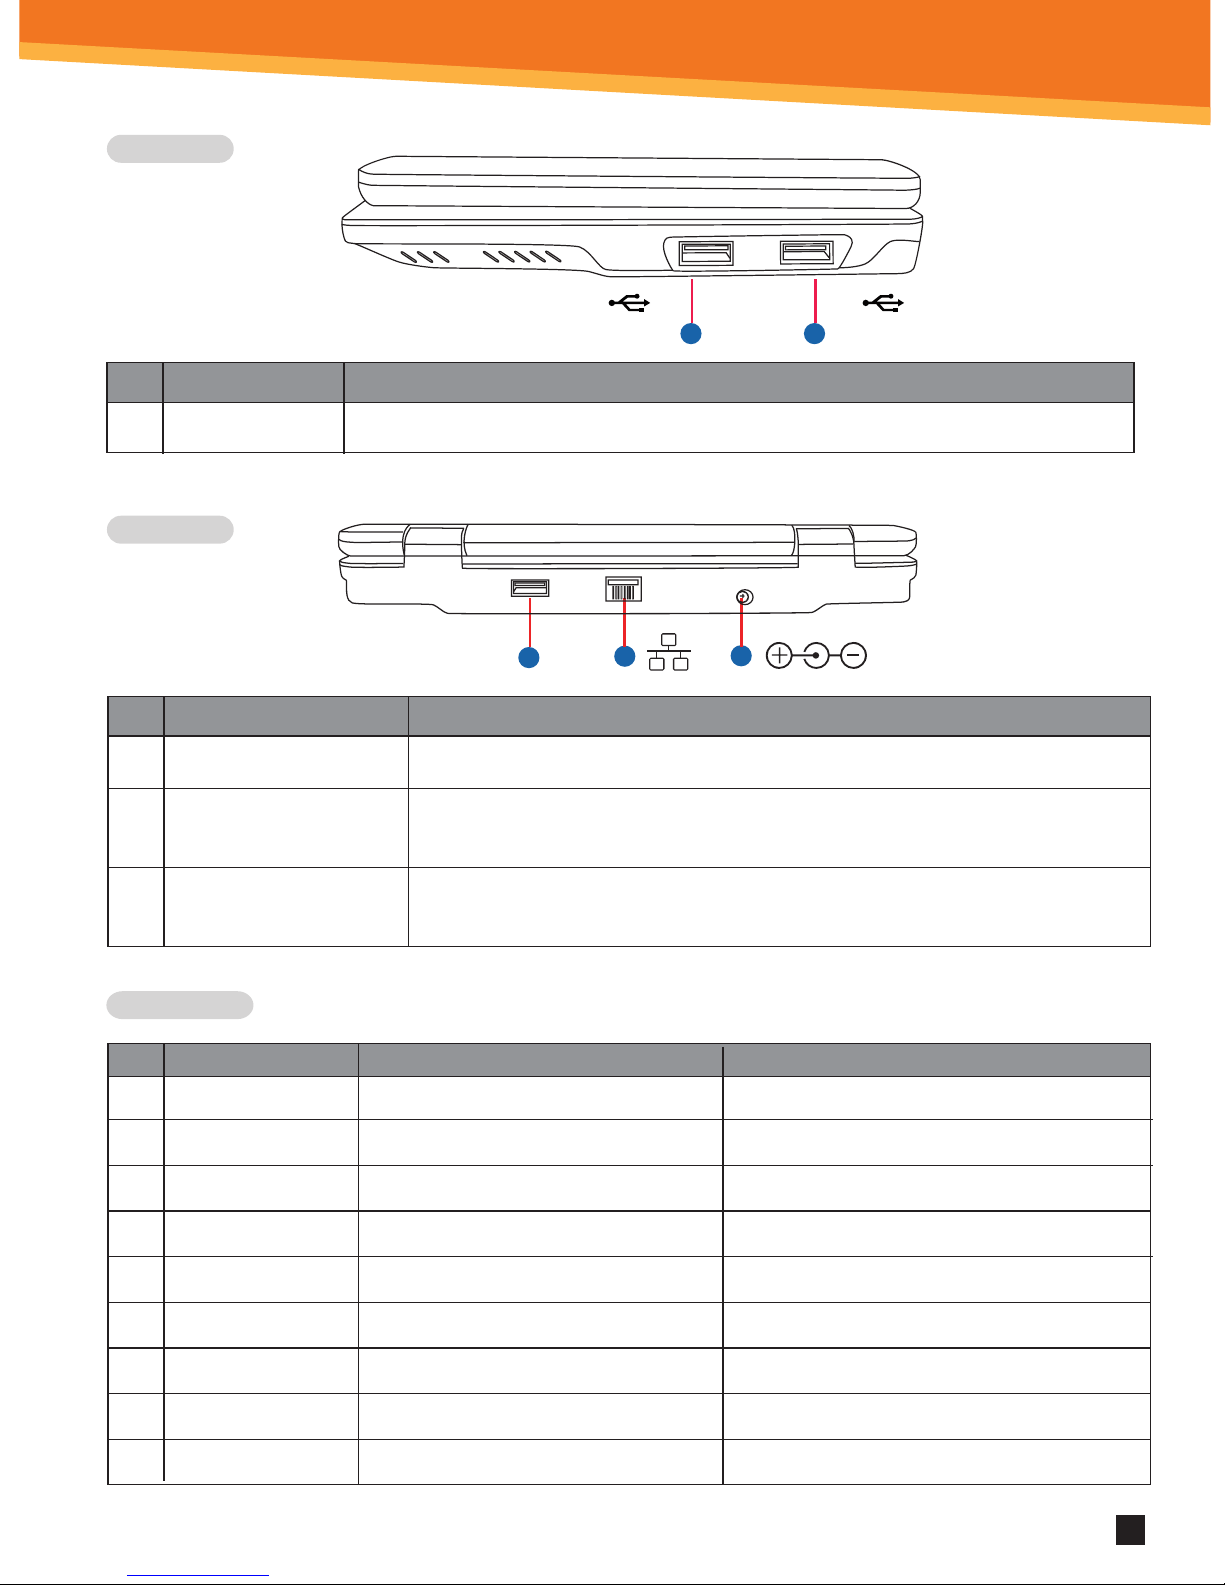
Side View
Back View
Short-Cut Keys
1
3
2
1
1
No.1.Item
USB port (2.0)
Description
2 USB ports can be used to connect USB memor y, mice and other equipment.
Item
1.
2.
3.
Power jack
Network interface
Special factory
USB port
This port connects the AC power adaptor.
The Ethernet (RJ-45) network interface supports standard Ethernet wires
(CAT5, CAT5e, etc.) to connect to local networks.
This USB is strictly for the factory use; do not use it !
USB 2.0 USB 2.0
SYNETA7
X
No.
1.
2.
3.
4.
5.
6.
7.
8.
9.
Short-cut
ESC
F1
F2
F3
F4
F5
Function
Back
Ethernet Settings
Wifi Settings
Browser
Email
Volume down
Remark
Moves back to the previous screen
Ethernet Settings menu
Wi-Fi Settings menu
Web browser application
Email application
Decreases volume
F6 Volume up Increases volume
F7 Home Displays Home screen panel
F8 Menu Menu options
Page 5
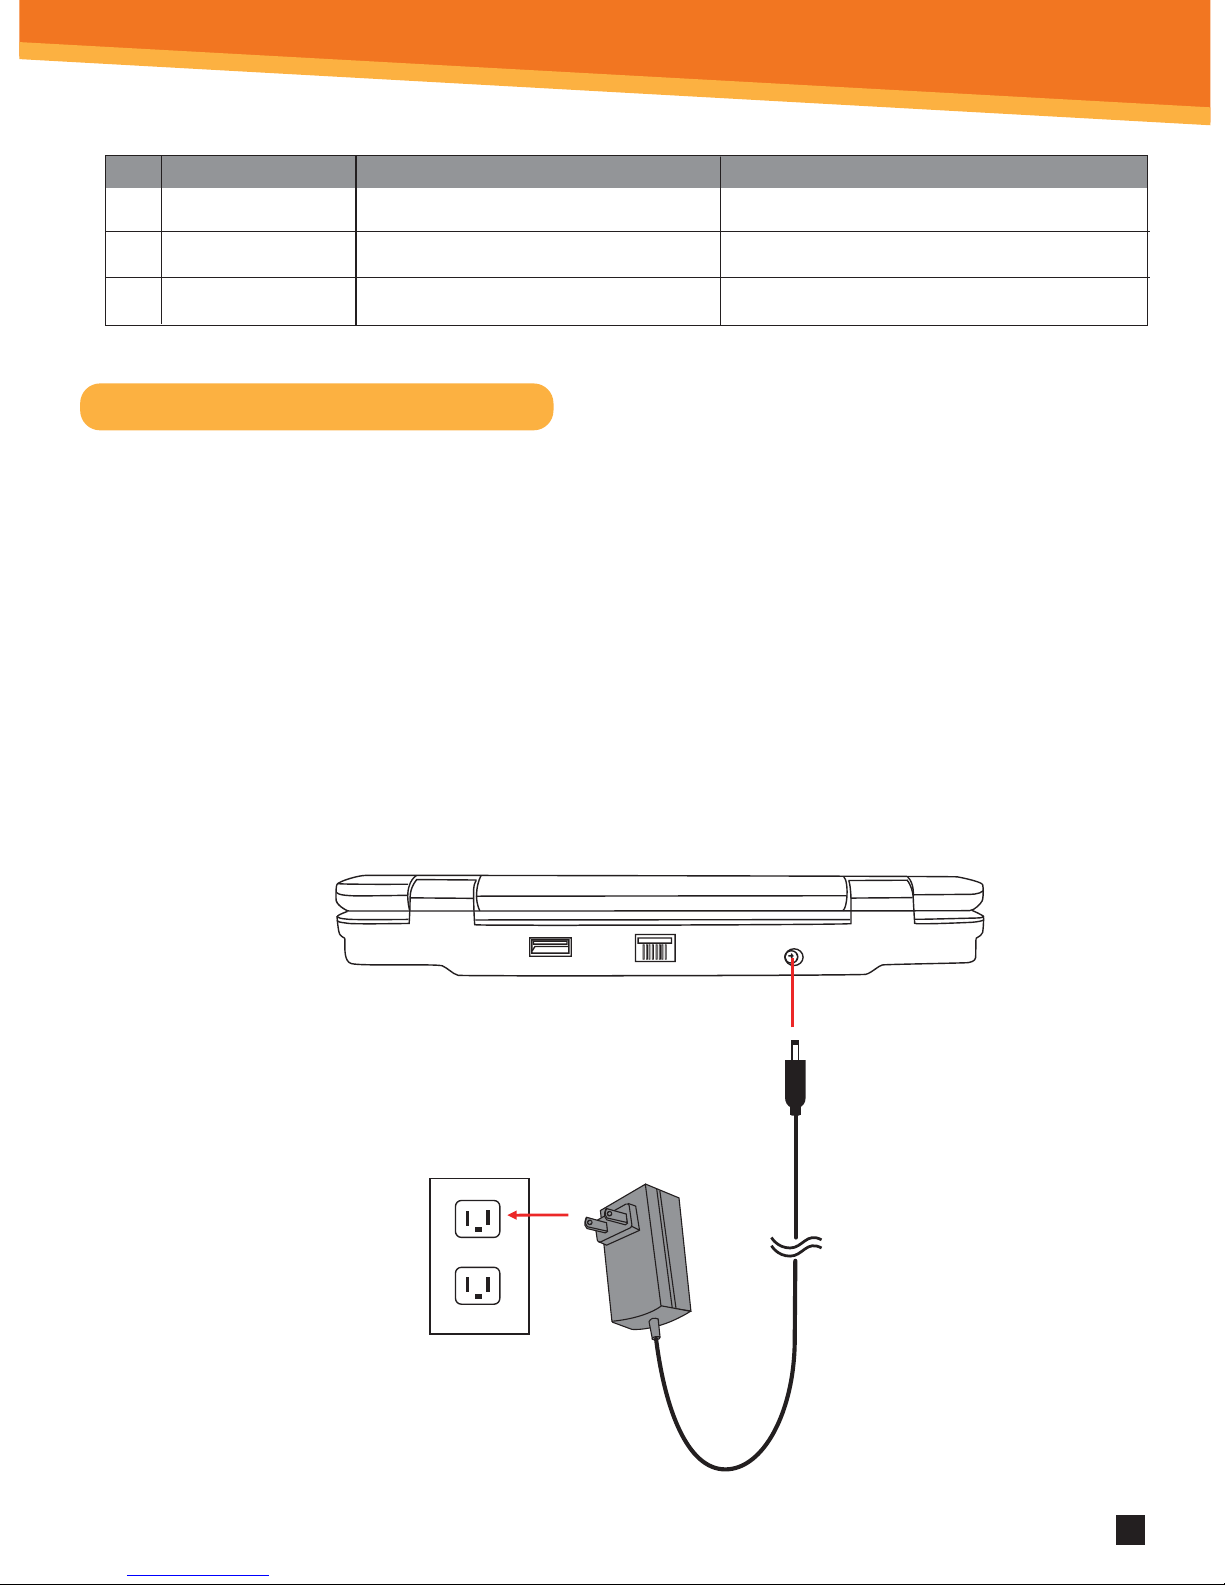
Charging Your Android Netbook
4
Your Android Netbook comes with an AC power adaptor. Before using this
Android Netbook, the battery will need to be fully charged. To maximize the
battery life, the rst charge must be a full charge. It is our recommendation that you
charge the Android Netbook for 6 hours before use in order to achieve a full
charge.
1. Plug the AC plug of your adaptor into an outlet.
2. Plug the power adaptor plug into your Android Netbook’s power
adaptor port on the back of your Android Netbook as shown below.
3. Your Android Netbook will automatically charge.
SYNETA7
No.
10.
11.
12.
Short-cut
Function
Remark
F9 Music player Music Player application
F10 My Pad Storage file manager application
Fn+F11 Gallery Displays photo and video files saved
Page 6
4
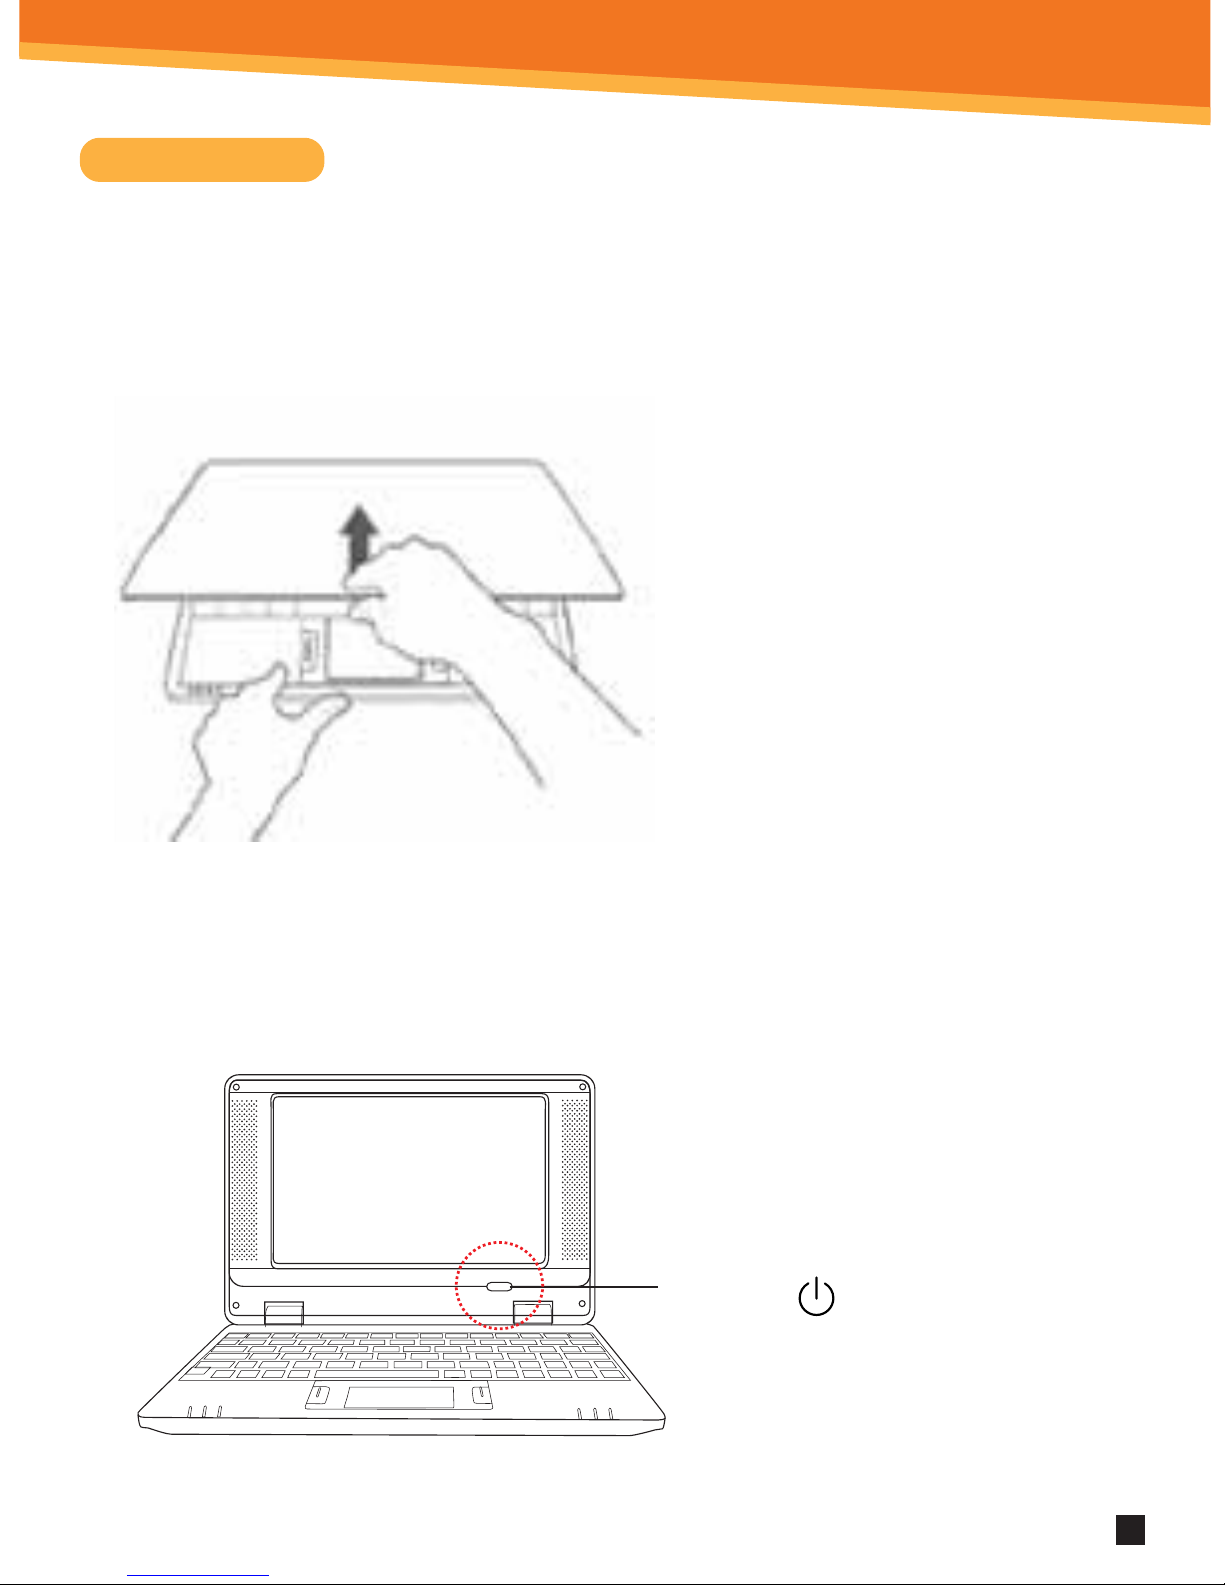
Getting Started
• Press the power button
to start up the Android
Netbook and wait for it
to load the desktop.
• You can use the device while the
battery is charging. To turn the
power o, hold the power button
of your device for about ve
seconds. To Power O .
Startup
Turn on the device by pressing the Power Button.STEP 2:
Open the screen of your Android Netbook.
STEP 1:
SYNETA7
Power Key
ON/OFF Button
Page 7
5
Sleep Mode: Your device will go into sleep mode after a period of inactivity
or if ON/OFF button pressed. (Go to Settings, under display to
modify the sleep time.) To get out of sleep mode, press the
power button to start using it again.
INSERTING AN SD CARD
Using an SD Card allows you to import other les, download applications and
play stored media. Insert a SD Card (supports up to 32GB) into the top SD
Card Slot. You will hear a click when the card is inserted properly.
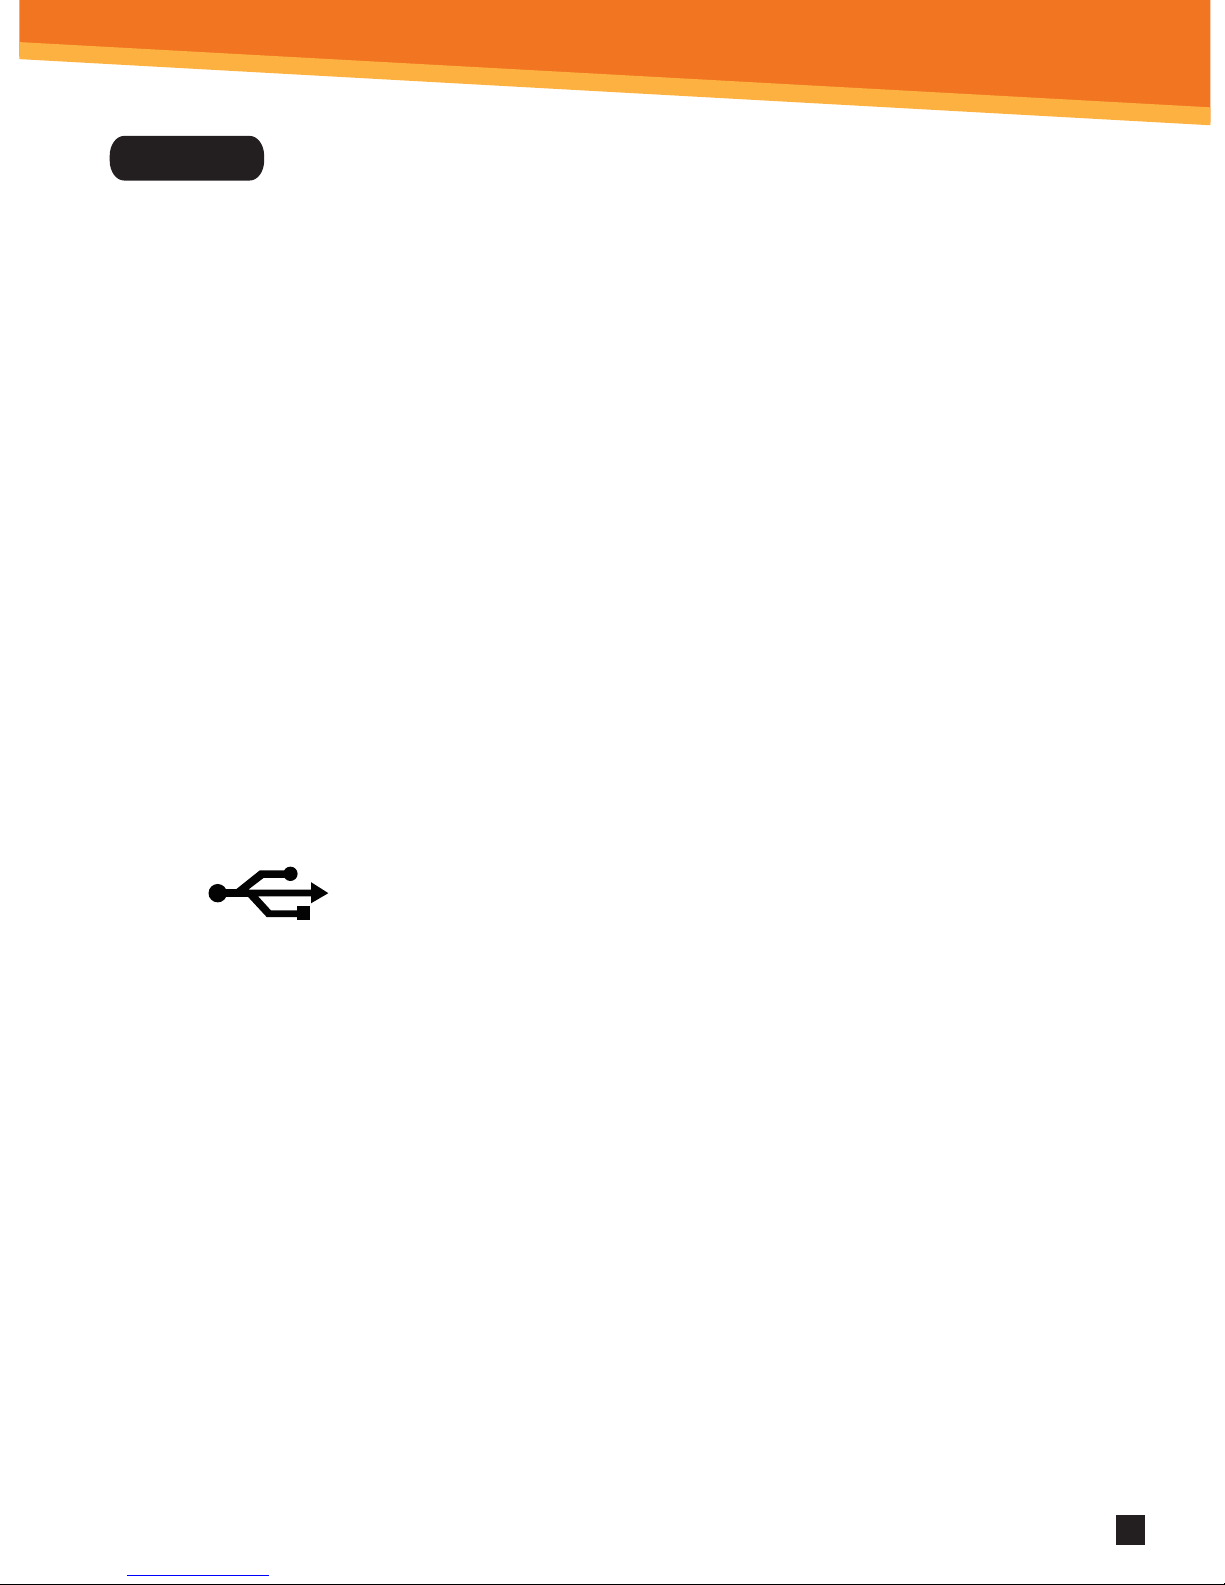
USB PORTS
USB PORT (Host), to read USB Memory sticks, USB keyboards and a
USB mouse.
SYNETA7
Features
Page 8
6
SYNETA7
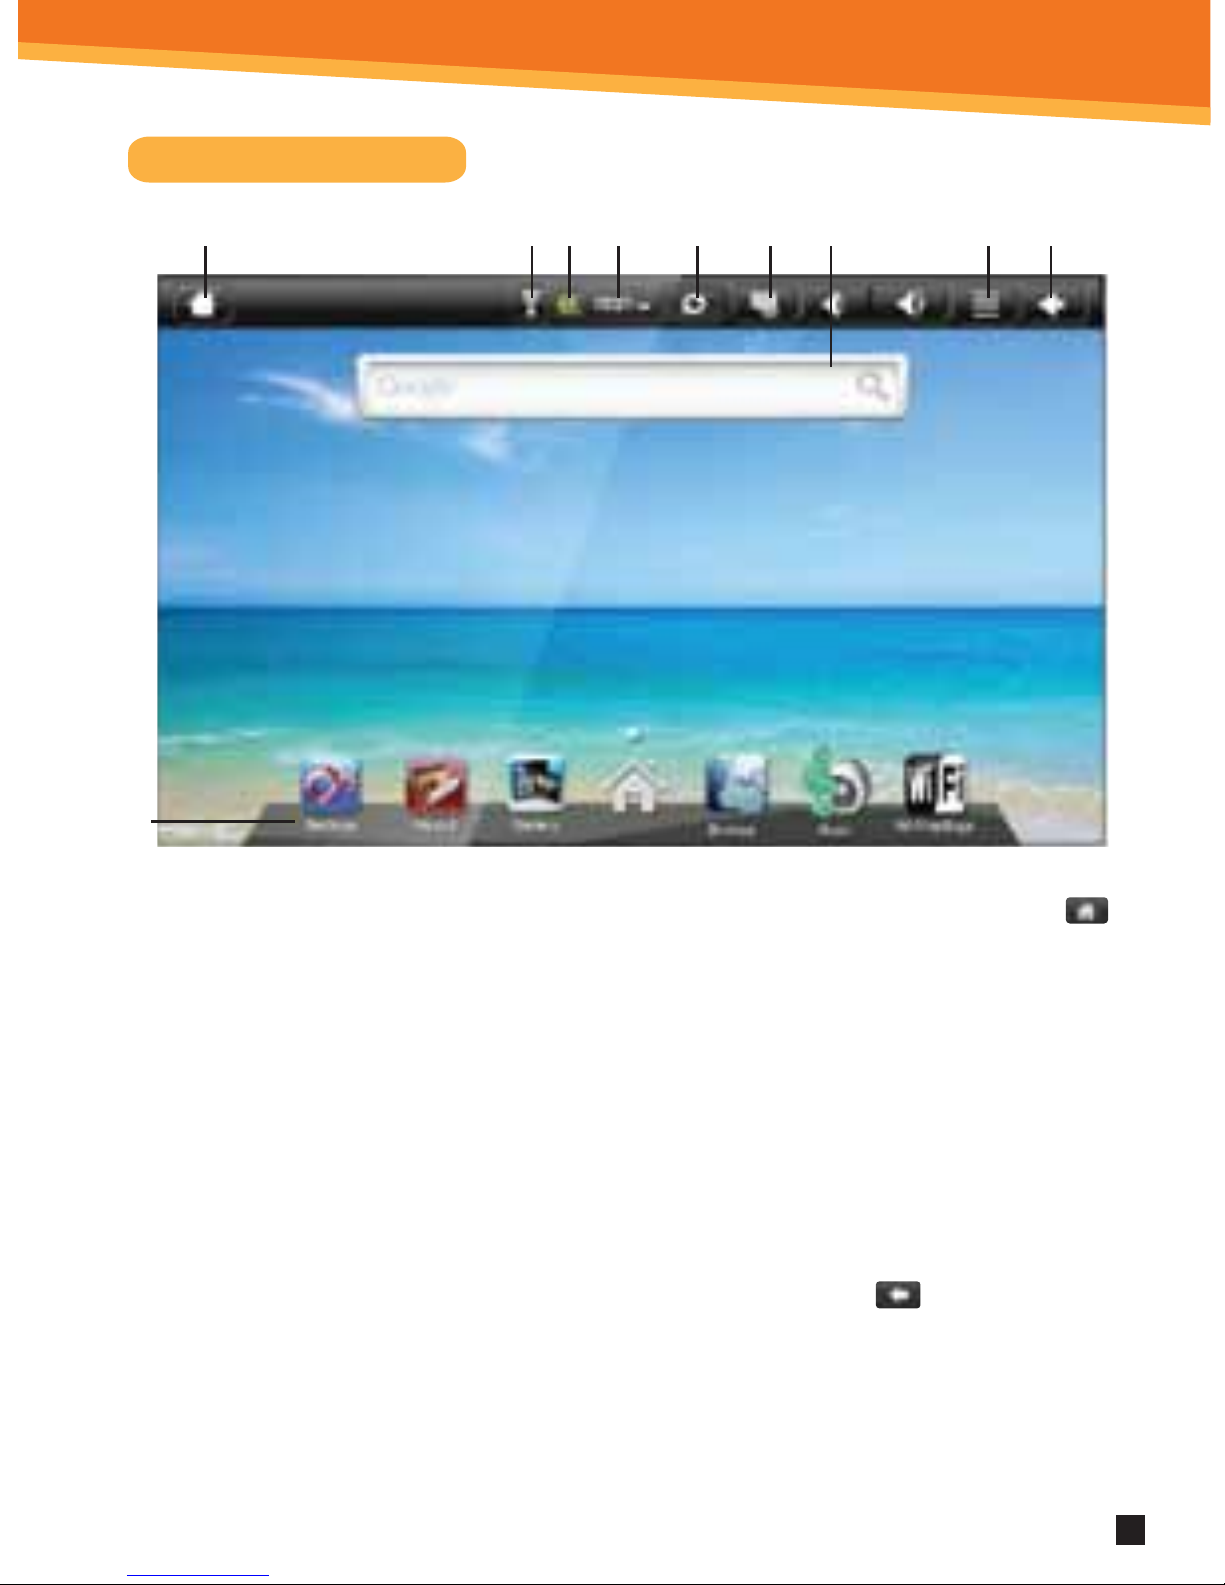
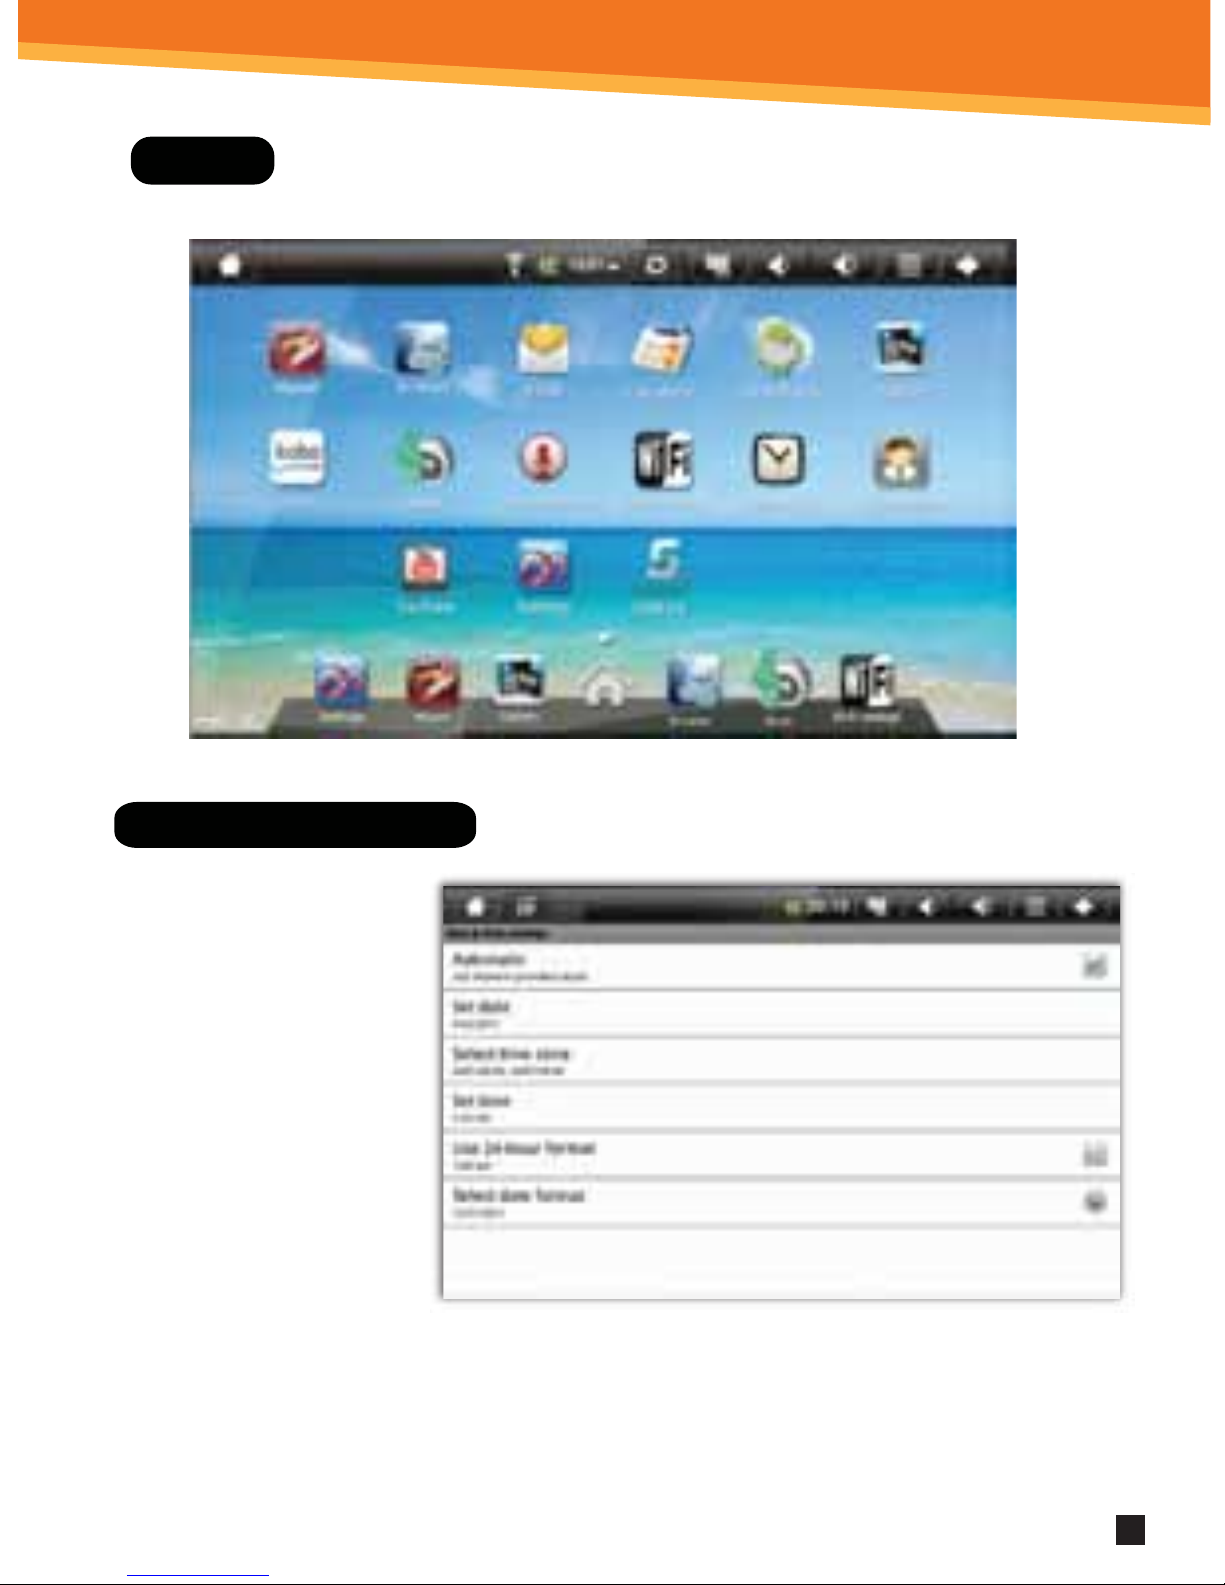
Home Screen Features
1. You can go back directly to the Home screen by clicking on the Home icon
2. Wi-Fi Connection Status
3. Battery Level
4. Time Display
5. Scan Media
6. Screen Shot: click to take a picture of your screen
7. Settings Menu
8. Use the return icon will bring the screen page backwards.
9. Search Bar
10. Application Quick Launch Bar: Frequently used applications can be dragged to
the bar to be displayed. Click the icon to access the application.
10
1 2 3 4 6 8795
Page 9
7
SYNETA7
Display
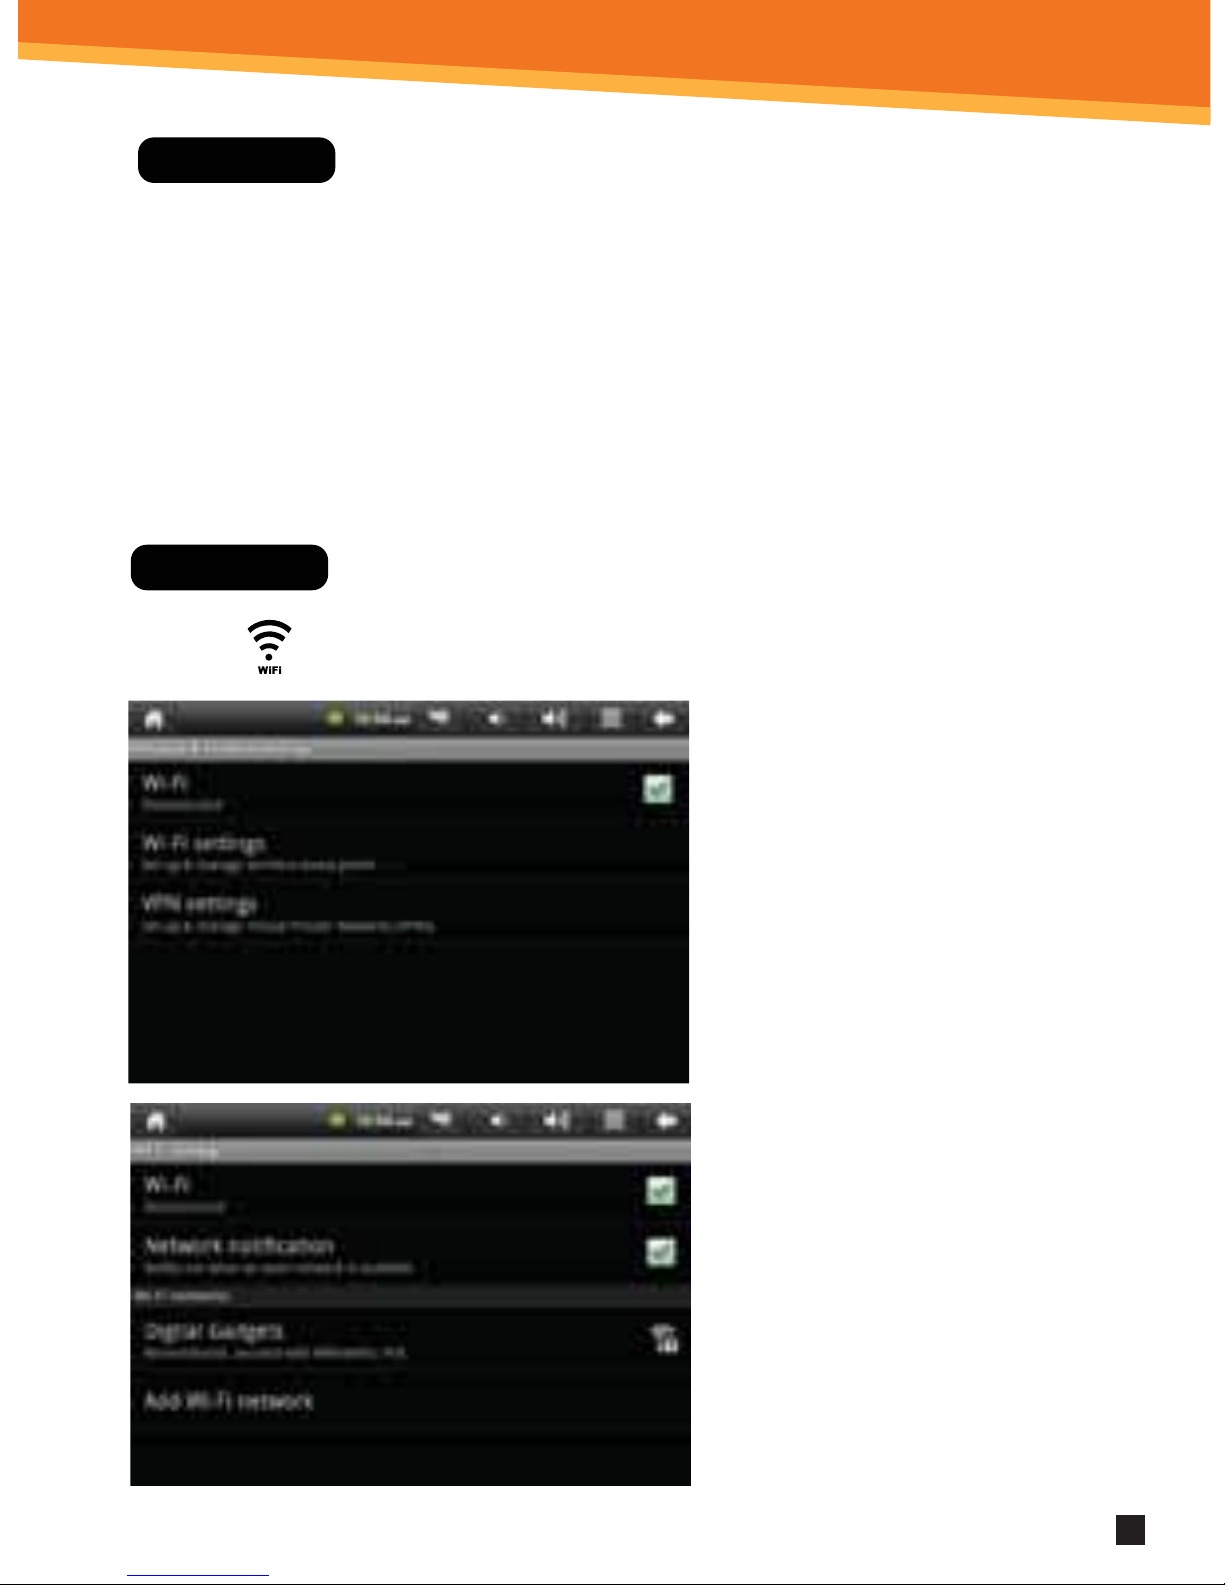
Setting Date And Time
1. Click Settings from the
Home Screen to access
the device settings.
2. By default, your device
should be set to
“Automatic” that will
update your time and
date via the internet.
3. Click Time zone and
select your region
and GMT oset.
4. Change the way in which the date and time are displayed by clicking the Use
24-hour format and Select date format options.
NOTE: When Automatic option to deactivated, you can manually
set the date and time.
Page 10
8
SYNETA7
When connecting to the internet, please make sure it is a network you
can trust such as your own home network, that of a friend or a public
Wi-Fi hotspot such as library, restaurant, hotel or school campus. It is
unsafe to connect to internet or Wi-Fi sources that you do not own or
cannot be trusted. If you do not have an Internet connection in your
home you may have to contact your local ISP to purchase service.
INTERNET
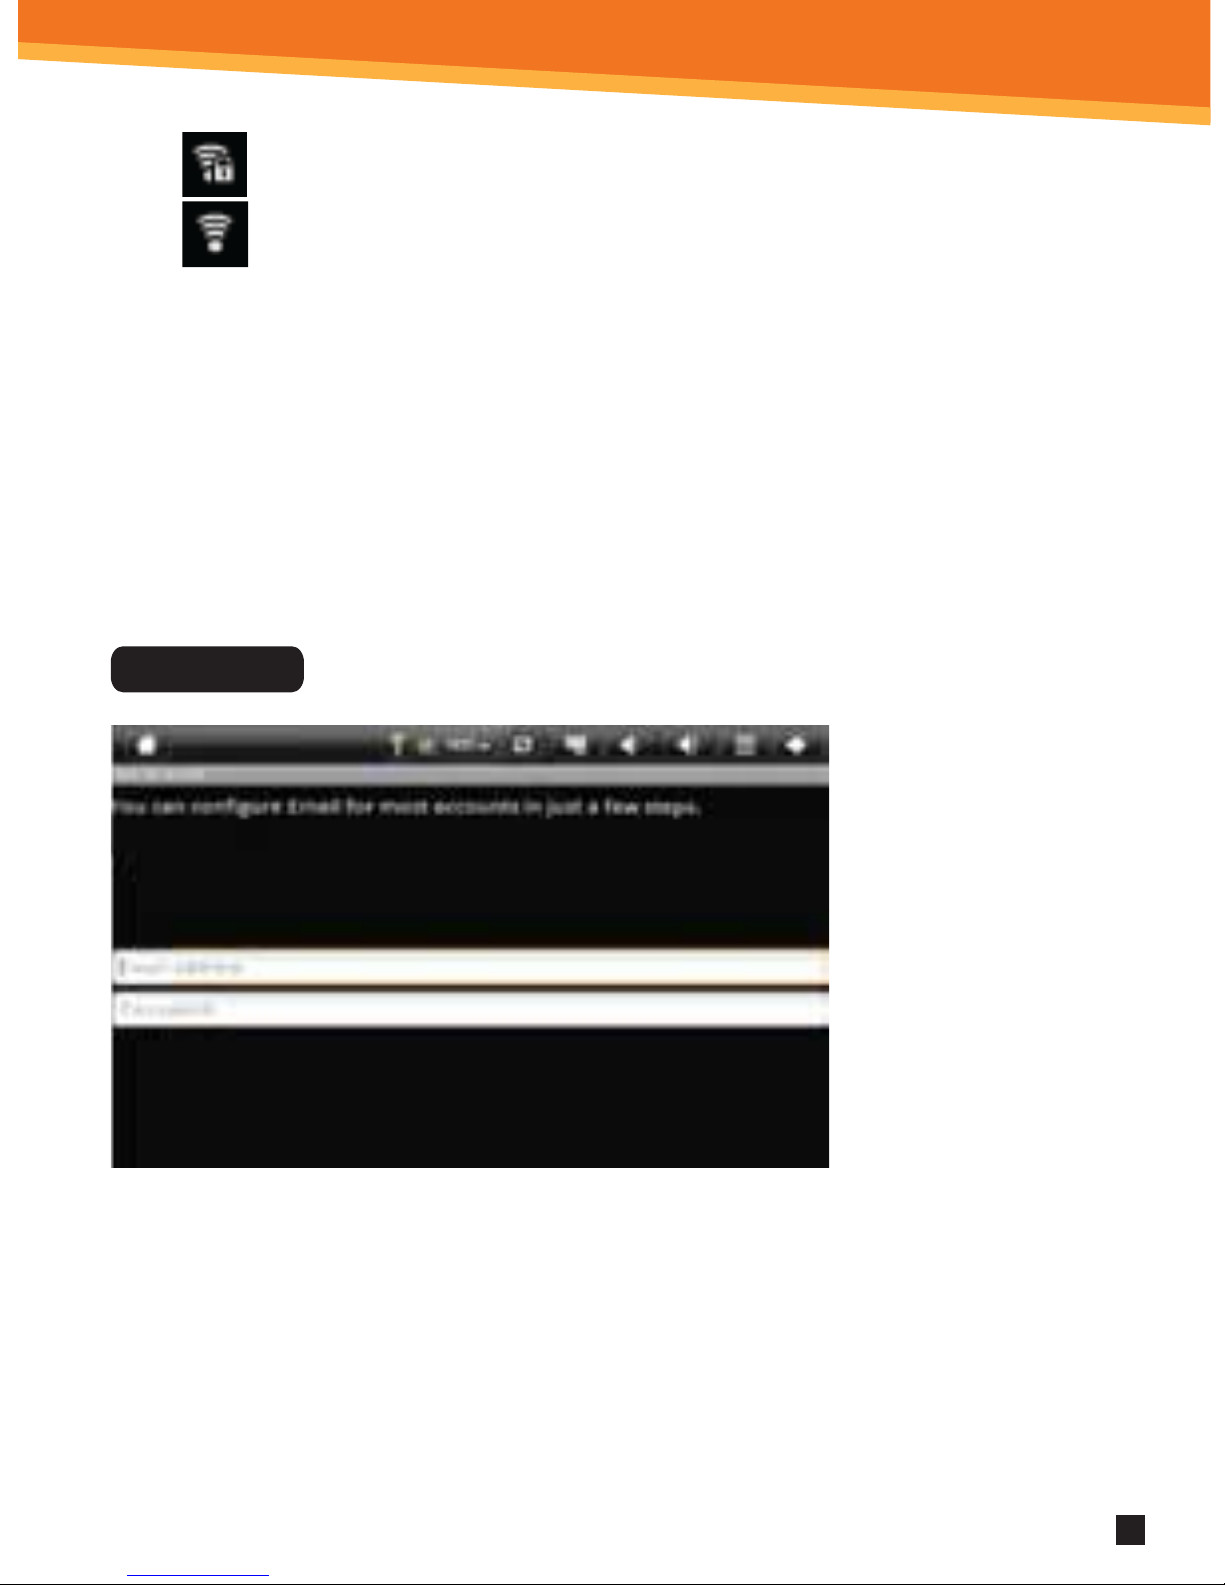
Wi-Fi Setup
WiFi ON
1. To set up Wi-Fi, click Wi- Fi
settings on the Application
Home Screen Panel. Click or
make sure the “Network
notication setting” is active
and check.
2. Click Turn on Wi-Fi. The device
will automatically scan and
list local Wi-Fi networks
that it nds. A lock image
indicates a secure network
that requires a password
for access.
You must be connecting to
your netbook to your own
home or oce Wi-Fi Access
Point (AP) or a trusted free
unsecured Wi-Fi hotspot
Page 11
9
SYNETA7
Secure Wi-Fi network; must have a password.
Unsecure Wi-Fi network; anyone can access.
3. Click the network that you would like the device to connect to.
4. If a password is required, a notication screen will appear to allow you to enter
the password. Click the Wireless password box to access the keyboard and enter
the password. Click Done when nished.
5. A wireless icon will appear in the toolbar to indicate that you are connected to
the wireless network.
6. Click the back arrow to exit to the Home Screen.
* POP3, IMAP, and
other common
email accounts
are supported.
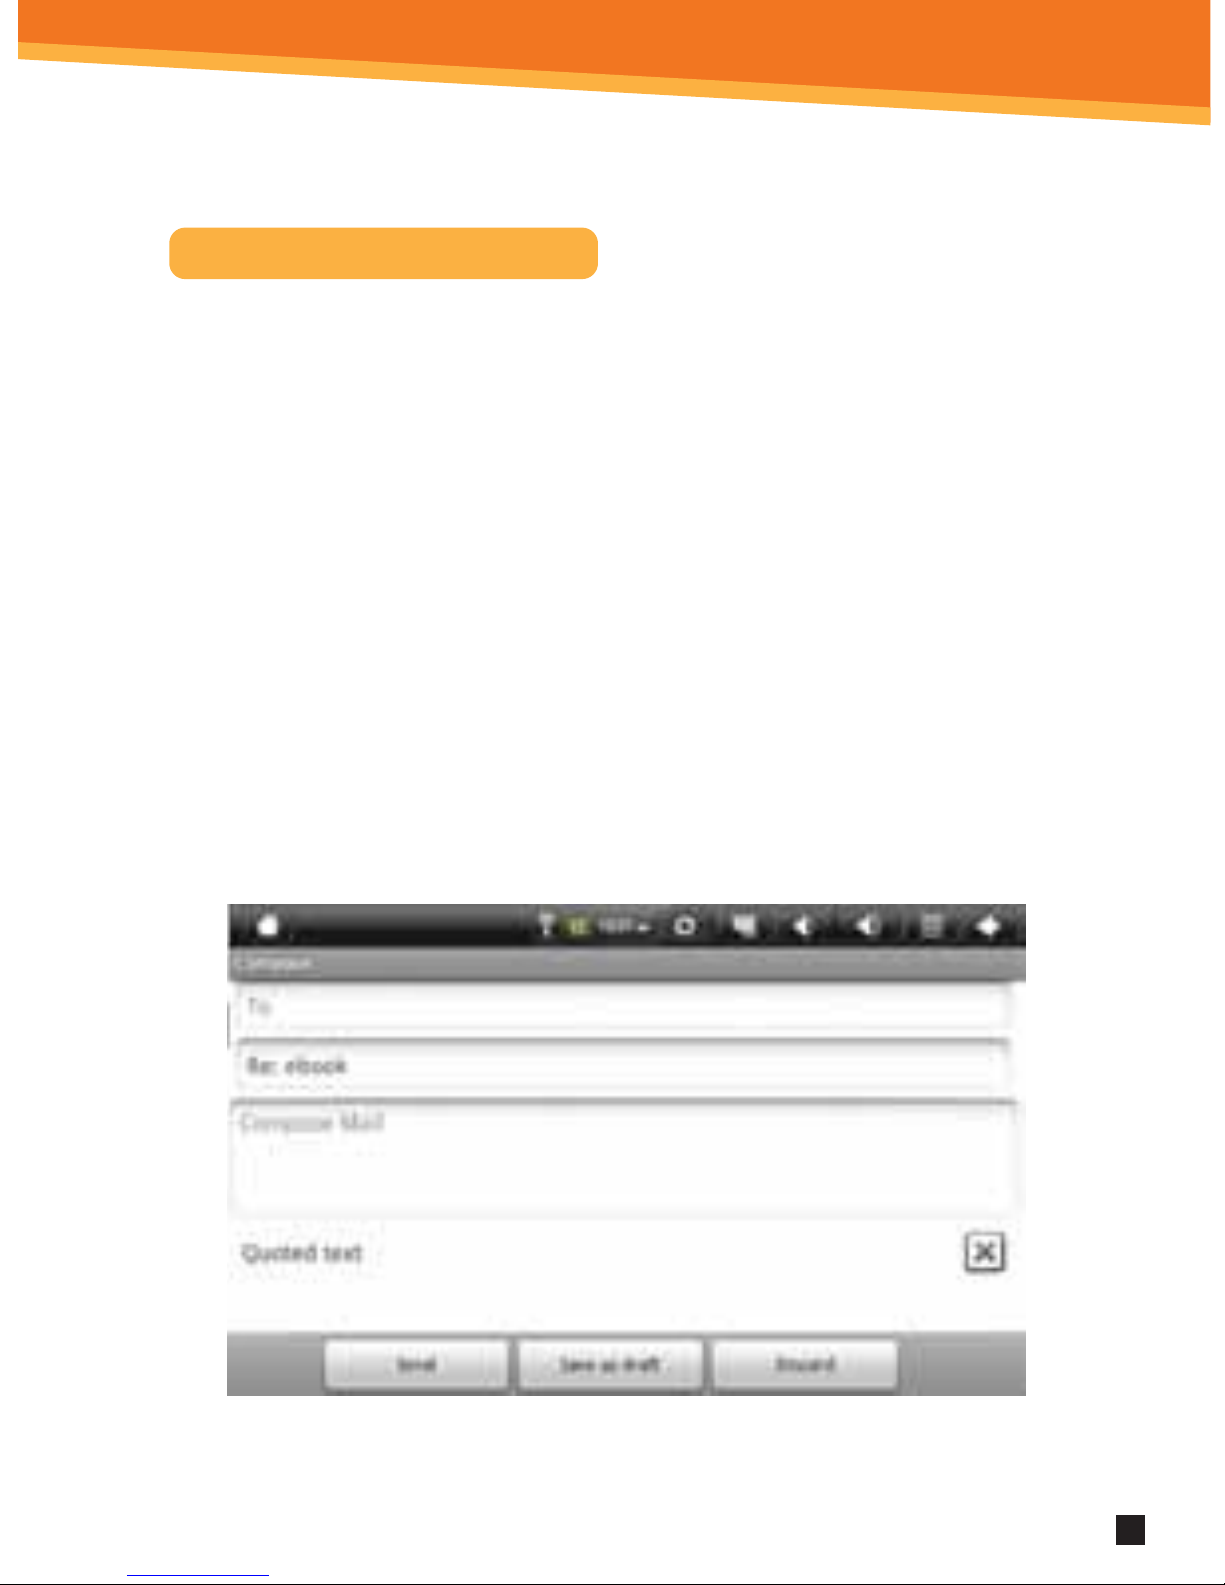
1. To set up Email,
click Email on the
Application Home
Screen Panel.
2. Enter your email
address and
password.
3. Click Next.
This will be
your default account unless you add another email address. After you have more than
one account set up, you can select a dierent address as the default account.
(optional)
To select the account type, or modify individual account settings, click Manual
Setup after entering your email address and password. Click Settings Menu then
click Account Settings to change your email Settings.
Email Setup
Page 12
10
SYNETA7
Sending and Receiving Email
After email setup is complete, you can access
your current email account Inbox.
1. Click Email on the Home Screen Application Panel to access your Inbox.
2. Click an email message in your Inbox to read the message.
3. Reply to or delete the message by clicking the buttons at the bottom
of the screen.
4. To compose a new message, click the Settings button while in the Inbox.
5. Click in any of the message entry elds to display the keypad.
6. Click Send to send the message.
Page 13
11
SYNETA7
Your device displays the Home Screen when there are no other applications or menus
open. The Home Screen allows you to organize all of your favorite applications, widgets
and other tools for easy access.
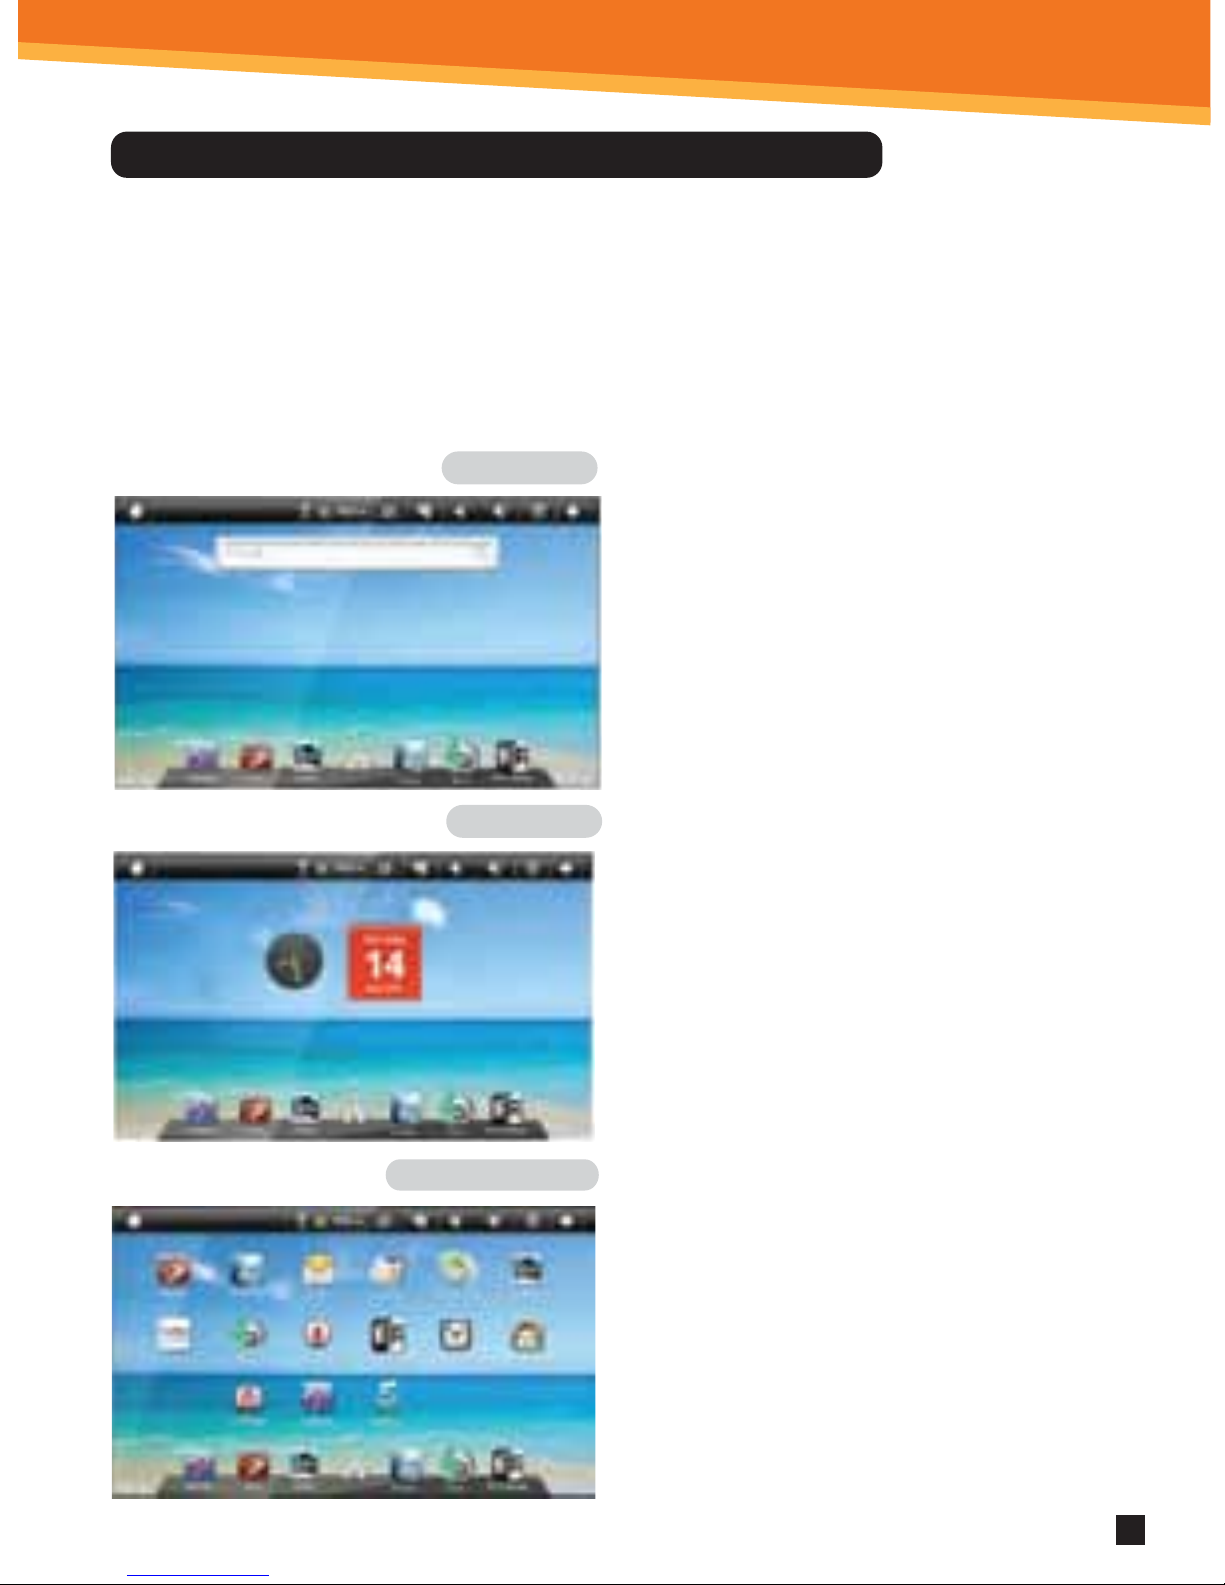
The Home Screen is divided into three panels: the Search Panel, the Widget Panel and
the Application Panel. Take the mouse cursor across the screen to the right or left to
change panels.
Navigating The Home Screen And Application Panels
Search Panel
Widget Panel
Application Panel
• The Search Panel allows you to quickly search
the web.
• The Widget Panel allows you to customize a
variety of tools, or “Widgets” that run right on
the Home Screen, such as a calendar, mp3 player
and local weather updates.
• The Application Panel displays the Android®
applications pre-installed on the device. To go
from the Home Screen to the Application Panel,
click the middle icon, which is a group of white
small boxes, on the bottom part of the screen.
Click an application icon to launch the application
on your device. To return to the Home
Screen click the icon of the house.
Page 14

12
SYNETA7
Widgets:
1. Digital Clock Displays the time with an animated digital clock.
2. Calendar Displays the date in a monthly calendar view.
3. Music Play and manage audio les (MP3, WAV, AAC, OGG).
4. Gallery Allows you to view photos, play video and audio
les.
5. Power Control Turn Wi-Fi, Account Sync and Screen Brightness
on and o to save battery life.
6. Weather Displays local weather conditions (Requires Wi-Fi
connection).
Other Settings:
ANIMATION:
You can change your screen animation from some animations (default) to more animations.
1. Click on Settings Menu and go to Display option.
2. Click Animation to change the setting.
ADDING APPLICATIONS
You can easily add applications to your device using the SAM 4.0 app store to search for
and install Android applications.
Please note that not all applications will work with netbooks, as some applications were
made to work only on Android smartphones. Some applications will not perform properly.
MOVING ICONS
To move any of the icons on your screen, click and hold using the mouse cursor. The icon
will highlight and then increase in size and allow you to drag and drop it anywhere on
the screen, or into the trash bin. When you have selected an icon, the trash bin will
pop-up on the side of the screen. Dropping an icon into the trash bin will simply
remove it from view; it will not uninstall the application from your device.
Included Widgets
Page 15

13
SYNETA7
Included Applications
APPLICATIONS
1. My Pad Manage les stored on the SD Card or on local memory.
2. Browser Access the Internet and surf the web.
3. Email Send and receive email using your existing email accounts.
4. Gallery Allows you to view photos, play video and audio les.
5. Alarm Clock Set and schedule alarms.
6. Settings View and change settings to personalize your device.
7. Contacts Create, view and edit your personal contacts.
8. Calculator Perform simple mathematical calculations.
9. YouTube View and share popular videos online.
10. Wi-Fi Settings View and update Wi-Fi settings and access points.
11. Recorder Record voice notes or sound using the netbook’s on-board
microphone.
12. Music Player Play and manage audio les.
13. Sam 4.0 Application store: Choose applications to use on your netbook.
14. Droid Reader Open PDF les.
15. System Update Use this application to update your system to make sure you
have the most up to date software for your netbook.
Updating the Software
The software on your netbook is updated frequently to ensure your netbook is always
optimized. Make sure to check for updates frequently.
Important: Make sure all your data is backed up.
Before performing an update, remove your SD card from the device.
Updating the software will clear all private data stored in your device.
Page 16
14
SYNETA7
To Update Software or Check for Updates:
1. Click Settings Application
2. Scroll to System Update and select
3. Click System Update from the Application screen
4. Click OK to continue
Surng The Web
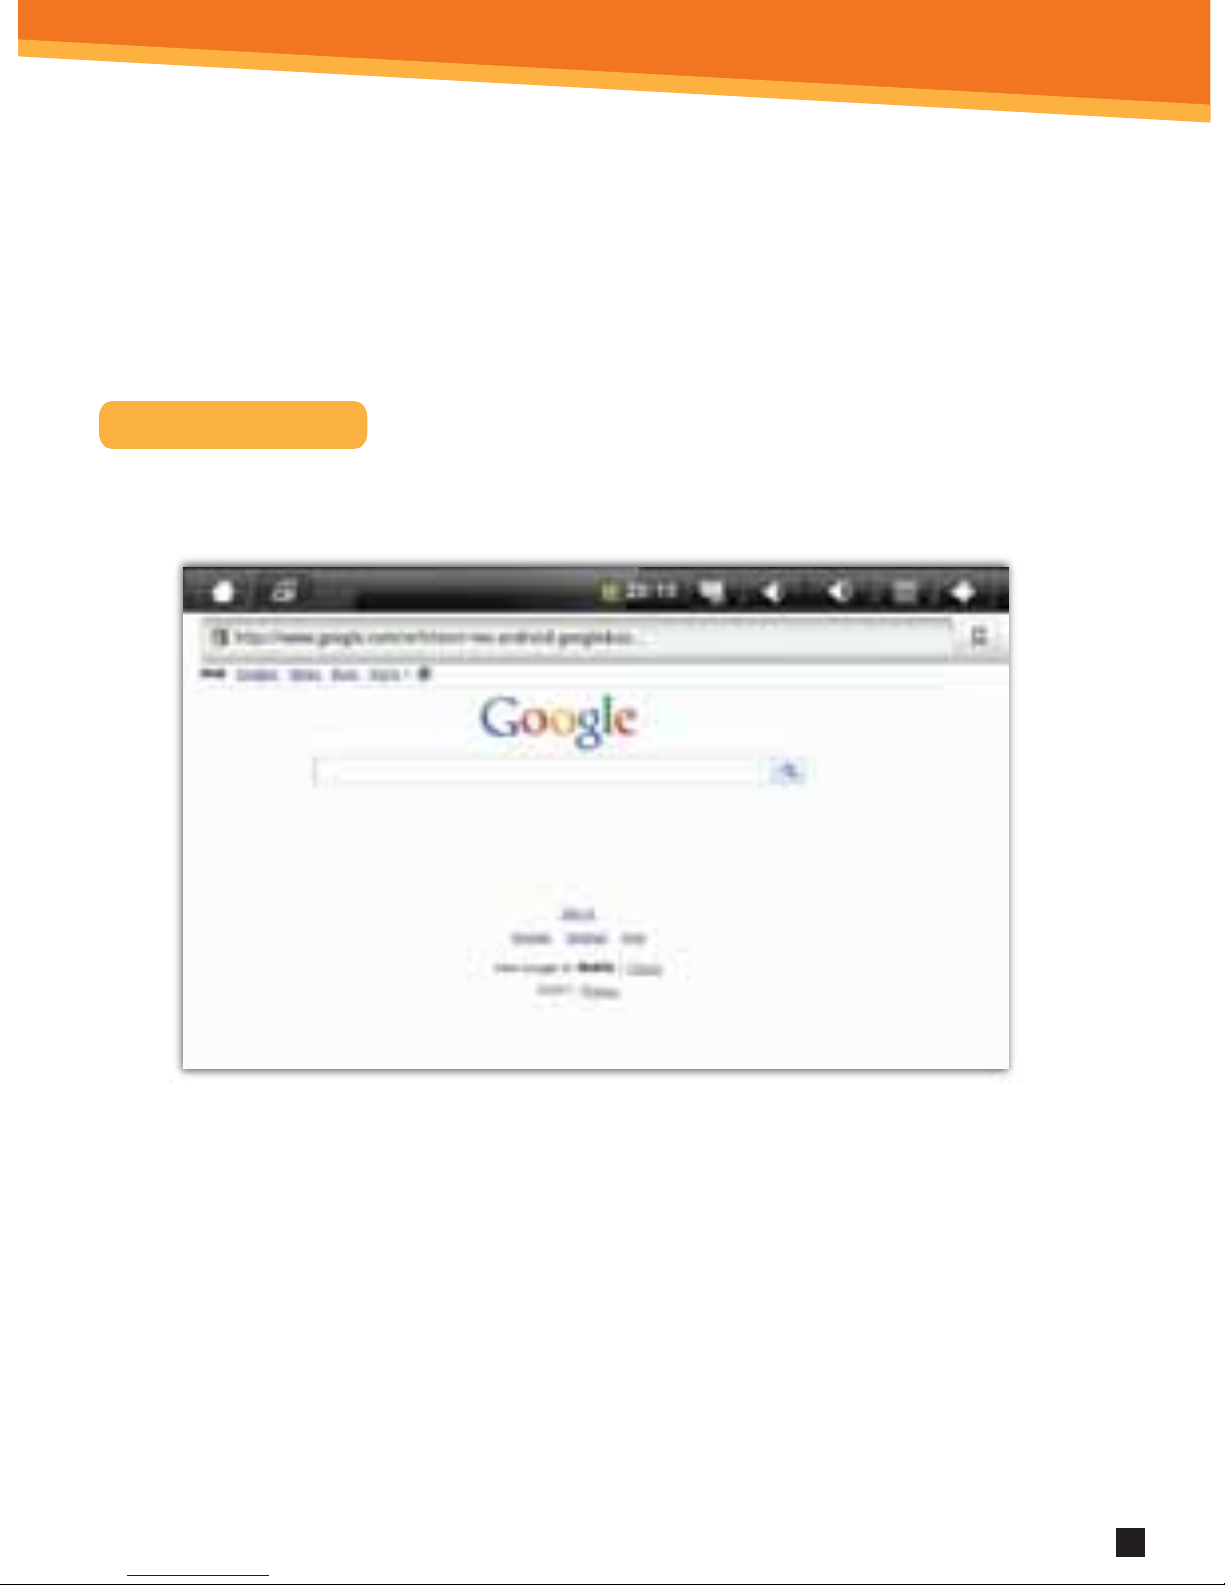
Use the Browser application to surf the web easily and securely.
1. Select the Browser from the Application Quick Launch Bar to launch the
Internet browser.
2. Click in the top entry eld to enter a web address (e.g. google.com) or click in the
search box to search the Internet. The keypad will appear so that you can type
the web address or search term.
3. Click Done when nished.
Page 17
15
SYNETA7
Customer Service
Most issues can be resolved by visiting our web site at: www. digitalgadgets.com.
Locate your product and check out the instructional videos, FAQ, and download
section, for the new updates.
If you are experiencing problems with this product,
please contact customer service before
contacting your retailer.
www.digitalgadgets.com | 888–571–0866
Digital Gadgets, 21 Englehard Drive, Monroe, NJ 08831
Call 888–571–0866
or email:
Digital Gadgets warrants this product against defects in workmanship and materials for a
period of 12 months from the original date of purchase. If the product fails during normal and
proper use within the warranty period, Digital Gadgets will, at its option, repair or replace any
products or parts determined to be defective in workmanship or material. All components
repaired or replaced by Digital Gadgets’ service site will be under warranty for the remaining
period of the warranty.
This Limited Warranty covers only products manufactured by Digital Gadgets. This Limited
Warranty does not include failure caused by improper installation, operation, cleaning or
maintenance, accident, damage caused by extreme temperature, humidity or extreme electrical
stress, misuse, abuse, unauthorized modifications to the product, software faults, normal wear
and tear or any other event, act, default, or omission outside of Digital Gadgets’ control or if the
serial number has been defaced, altered or removed and the casing has been opened.
To obtain warranty service, please contact Digital Gadgets for specific instructions at the
telephone number below. Dated, documented proof of the original purchase is required.
Digital Gadgets Customer Service Representatives are available by calling 888–571–0866 or
by emailing [email protected]
Digital Gadgets Limited Warranty Statement
Page 18

16
SYNETA7
FCC Notices:
The FCC requires that you will be advised of certain requirements involving the use of this equipment.
This device complies with Part 15 of the FCC Rules. Operation is subject to the following two conditions:
(1) This device may not cause harmful interference, and (2) this device must accept any interference
received, including interference that may cause undesired operation. Privacy of communications may
not be ensured when using this device. Changes or modications not expressly approved in writing
by the responsible party may void the user’s authority to operate this equipment.
Note: This equipment has been tested and found to comply with the limits for Class B digital devise,
pursuant to Part 15 of the FCC Rules. These limits are designed to provide reasonable protection against
harmful interference in a residential installation. This equipment generates, uses, and can radiate radio
frequency energy and, if not installed and used in accordance with the instructions, may cause harmful
interference to radio communications. However, there is no guarantee that interference will not occur
in a particular installation. If this equipment does cause harmful interference to radio or television
reception, which can be determined by turning the equipment o and on, the user is encouraged to
try to correct the interference by one or more of the following measures:
(1) Reorient or relocate the receiving antenna. (2) Increase the separation between the equipment and
receiver. (3) Connect the equipment into an outlet on a circuit dierent from that to which the receiver
is connected. (4) Consult the dealer or an experienced radio TV technician for help.
SYLVANIA is a registered trademark of OSRAM SYLVANIA INC., used under license.
Android is a trademark of Google Inc. Use of this trademark is subject to Google Permissions.
All other trademarks are those of their respective owners.
Notices And Disclaimer
PRINTED IN CHINA 2011 Digital Gadgets LLC
©
 Loading...