

Page 1
Bluetooth CD Mirco System
Model : SRCD804BT
Please read and follow these instructions, before using your unit.
SAFETY INSTRUCTION
•
TO PREVENT FIRE OR SHOCK HAZARD. DO NOT EXPOSE THIS APPLIANCE TO RAIN
OR MOISTURE.
• THIS APPLIANCE SHALL NOT BE EXPOSED TO DRIPPING OR SPLASHING WATER AND
THAT NO OBJECT FILLED WITH LIQUIDS SUCH AS VASES SHALL BE PLACED ON
APPARATUS.
The lightning flash with
arrowhead symbol, within an
equilateral triangle, is
intended to alert the user to
the presence of uninsulated
“dangerous voltage” within
the products enclosure that
may be of sufficient
magnitude to constitute a risk
of electric shock to persons.
CAUTION
The exclamation point within
an equilateral triangle is
intended to alert the user to
the presence of important
operating and maintenance
(servicing) instructions in the
literature accompanying the
appliance.
RISK OF ELECTRIC SHOCK
DO NOT OPEN
Warning: To reduce the rise of
electric shock, do not remove
cover (or back) no
user-serviceable parts inside.
Refer servicing to qualified service
personnel.
IMPORTANT SAFETY INSTRUCTIONS
1. Read these instructions.
2. Keep these instructions.
3. Heed all warnings.
4. Follow all instructions.
5. Do not use this apparatus near water.
6. Clean only with dry cloth.
7. Do not block any ventilation openings. Install in accordance with the manufacturer’s
instructions.
8. Do not install near any heat sources such as radiators, heat registers, stoves, or other
apparatus (including amplifiers) that produce heat.
9. Do not defeat the safety purpose of the polarized or grounding-type plug. A polarized plug
has two blades with one wider than the other. A grounding type plug has two blades and a
third grounding prong. The wide blade or the third prong are provided for your safety. If the
provided plug does not fit into your outlet, consult an electrician for replacement of the
obsolete outlet.
10. Protect the power cord from being walked on or pinched particularly at plugs, convenience
receptacles, and the point where they exit from the apparatus.
11. Only use attachments/accessories specified by the manufacturer.
- EN 1 -
Page 2

12. Use only with the cart, stand, tripod, bracket, or table specified by the
manufacturer, or sold with the apparatus. When a cart is used, use caution
when moving the cart/apparatus combination to avoid injury from tip-over.
13. Unplug this apparatus during lightning storms or when unused for long periods of time.
14. Refer all servicing to qualified service personnel. Servicing is required when the apparatus
has been damaged in any way, such as power-supply cord or plug is damaged, liquid has
been spilled or objects have fallen into the apparatus, the apparatus has been exposed to
rain or moisture, does not operate normally, or has been dropped.
15. Grounding or Polarization – This product may be equipped with a polarized
alternating-current line plug (a plug having one blade wider than the other). This plug will fit
into the power outlet only one way. This is a safety feature. If you are unable to insert the plug
fully into the outlet, try reversing the plug. If the plug should still fail to fit, contact your
electrician to replace your obsolete outlet. Do not defeat the safety purpose of the polarized
plug.
16. Alternate Warnings – This product is equipped with a three-wire ground-type plug, a plug
having a third (grounding) pin. This plug will only into a grounding-type power outlet. This is a
safety feature. If you are unable to insert the plug into the outlet, contact your electrician to
replace your obsolete outlet. Do not defeat the safety purpose of the grounding-type plug.
17. Ventilation – Slots and openings in the cabinet are provided for ventilation and to ensure
reliable operation of the product and to protect it from overheating, and these openings must
not be blocked or covered. The openings should never be blocked by placing the product on a
bed, sofa, rug, or other similar surface. This product should not be placed in a built-in
installation such as a bookcase or rack unless proper ventilation is provided or the
manufacturer’s instructions have been adhered to.
18. The MAINS plug or an appliance coupler is used as the disconnect device, the disconnect
device shall remain readily operable.
19. 回: CLASS II apparatus with double insulation, and no protective earth provided.
- EN 2 -
FCC NOTICE
This equipment has been tested and found to comply with the limits for a Class B digital device,
pursuant to Part 15 of the FCC Rules. These limits are designed to provide reasonable protection
against harmful interference in a residential installation. This equipment generates, uses and can
radiate radio frequency energy and, if not installed and used in accordance with the instructions,
may cause harmful interference to radio communications.
However, there is no guarantee that interference will not occur in a particular installation. If this
equipment does cause harmful interference to radio or television reception, which can be
determined by turning the equipment off and on, the user is encouraged to try to correct the
interference by one or more of the following measures:
– Reorient or relocate the receiving antenna.
– Increase the separation between the equipment and receiver.
– Connect the equipment into an outlet on a circuit different from that to which the receiver is
needed.
– Consult the dealer or an experienced radio/TV technician for help.
WARNING:
Changes or modifications to this unit not expressly approved by the party responsible for
compliance could void the user's authority to operate the equipment.
CARE AND MAINTENANCE
Precautions
y Always turn off the unit after use.
y Keep the unit away from magnetic objects, water or heat sources.
y Use a clean soft cloth moistened with lukewarm water to clean the cabinet. Never use
chemical cleaners that could damage the finish of the unit.
y Never touch the CD pickup and lens. If fingerprints get on the pickup lens, clean it gently with
a commercial lens cleaner.
y Disconnect the unit from any power sources before cleaning.
y To remove a disc from its storage case, press down on the centre of the case and lift the disc
out, holding it carefully by the edges.
y Fingerprints and dust should be carefully wiped off the disc’s recorded surface with a soft
cloth. Unlike conventional records, compact discs have no grooves to collect dust and
microscopic debris so gently wiping with a soft cloth should remove most particles. Wipe in a
straight line from the inside to the outside of the disc. Small dust particles and light stains will
have absolutely no effect on reproduction quality.
y Never use chemicals such as record sprays, anti-static sprays, benzene or thinners to clean
compact discs. These chemicals can irreparably damage the disc’s surface.
y Discs should be returned to their cases after use. This avoids serious scratches that could
cause the Laser pickup to skip.
y Do not expose discs to direct sunlight, high humidity, or high temperatures for extended
periods. Long exposure to high temperatures can warp the disc.
y Do not stick paper or write anything with a ballpoint pen on the label side of the disc.
- EN 3 -
Page 3
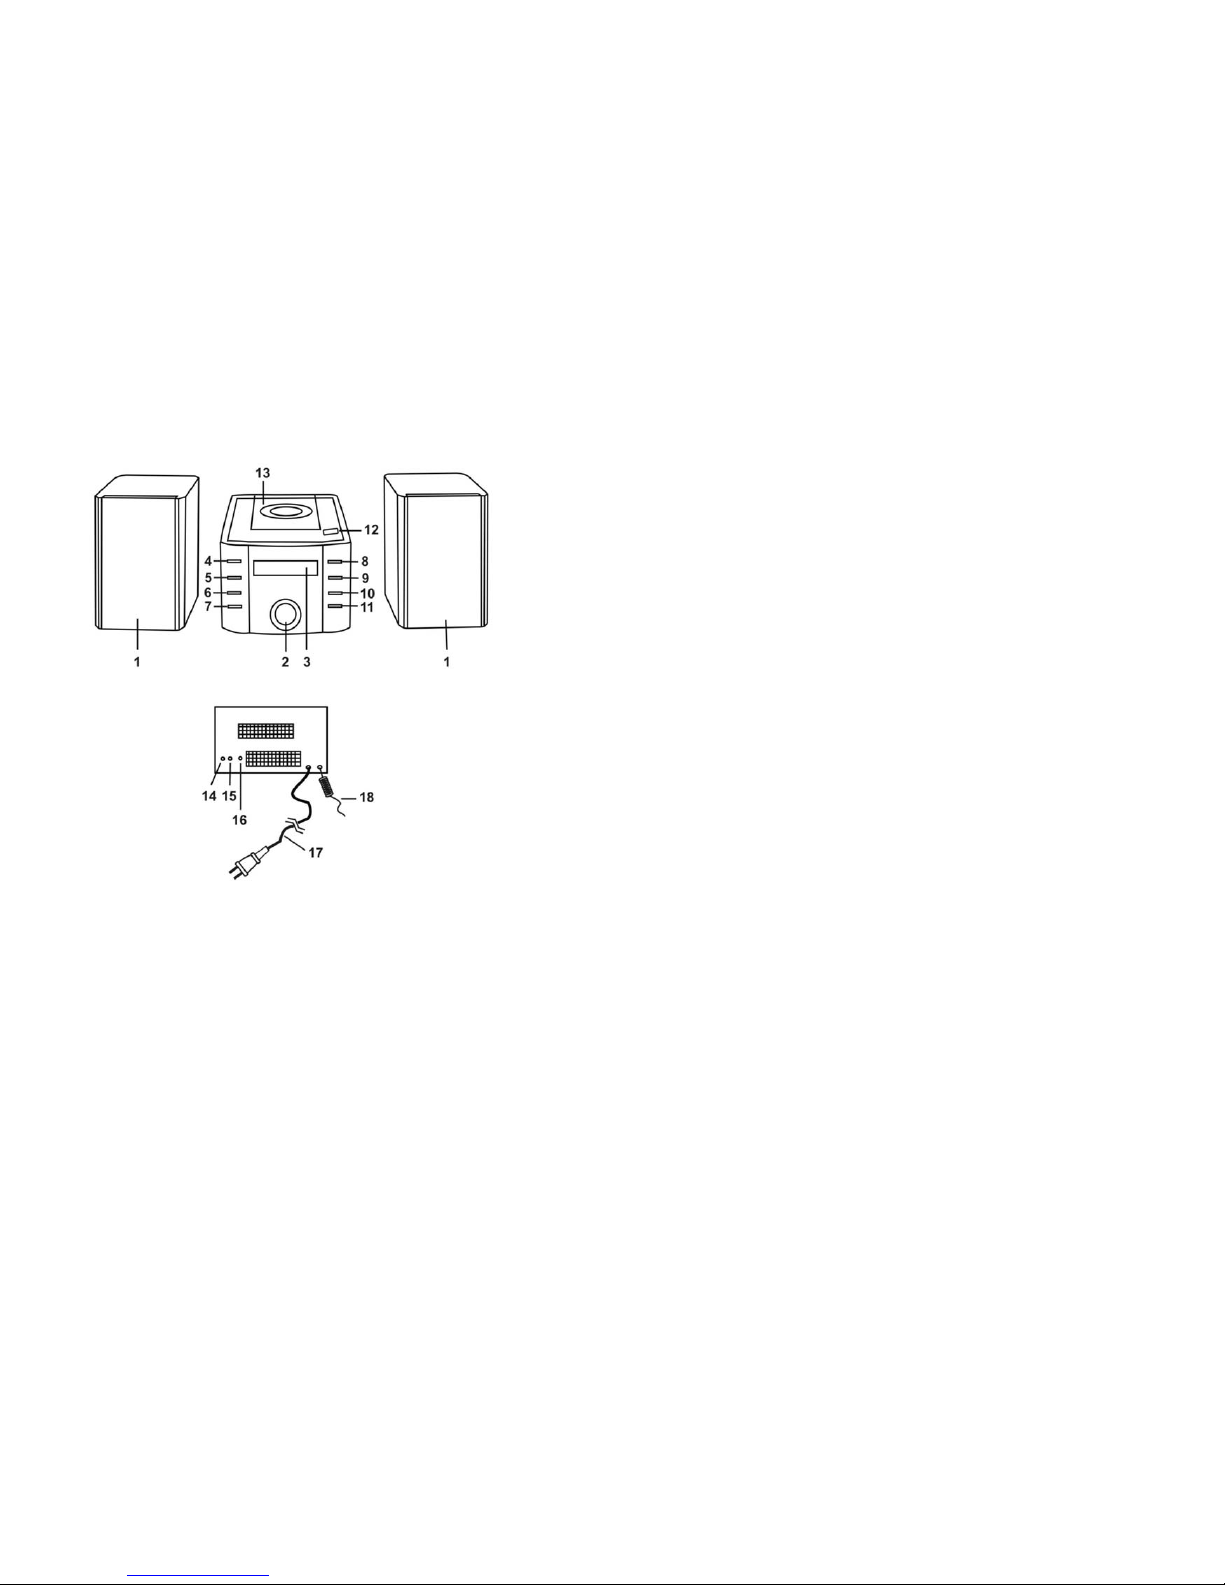
LOCATION OF CONTROLS
1 Speaker 11
SKIP−/TU− button
2 VOLUME knob 12 CD door OPEN button
3 LCD display 13 CD compartment
4 ON/OFF button 14 Speaker jack R
5 SOURCE button 15 Speaker jack L
6 MODE button 16 Phones jack
7 PROG/MEM button 17 AC power cord
8 PLAY/PAUSE button 18 FM wire antenna
9
STOP/M+ button
10
SKIP+/TU+ button
- EN 4 -
CONNECTING THE LOUDSPEAKERS
Connect the cables of the two loudspeakers to the corresponding input (R) for the right speaker
and input (L) for the left speaker, located at the back of the unit.
Warni ng:
y Connect the loudspeakers before powering the unit:
y The unit may not work properly or get damaged if you use speakers different than the ones
supplied with the unit.
AC OPERATION
Connect the power cable plug to the wall outlet.
ATTENTION
1. Do not plug or unplug the power cable while you have wet hands;
2. When planning n ot to use this unit for a long time, disconnect the power cable from the wall
outlet;
3. When disconnecting the power cord from the wall outlet, do n ot pull on the cord in order to
avoid shock risks caused by damaged cable.
RADIO OPERATION
1. Press SOURCE button to select AM or FM radio mode.
2. Press the SKIP+/TU+ button or S KIP−/TU− button step by step to tune to the desired radio
stations.
3. Press and hold the SKIP+/TU+ button or SKIP−/TU− button to search the next radio station
in the direction of the search. The search operation simply finds stations with strong signals,
Stations with weak signal can only tuned in step by step
4. Use the VOLUME knob to adjust the volume to the desired listening level.
SAVING RADIO STATIONS IN THE MEMORY
Note : If you use this unit in the first time, or after plug off the AC/DC adaptor from a wall outlet, the
unit memory number will be starting from P01.
1. Tune to the desired stations.
2. Press the PROG/MEM button, the display will show the next memory station number and
flash continuously.
3. Press the SKIP+/TU+ or SKIP−/TU− button to select memory number, then press
PROG/MEM button again to store the station into the memory.
4. Repeat step 1 to 3 to store more radio stations in the memory.
5. Up to 20 AM and 20 FM radio stations can be stored in the memory.
TO SELECT A STORED RADIO STATION IN THE MEMORY
Press the STOP/M+ button to skip to the next stored radio station.
CD OPERATION
1. Press the SOURCE button to select CD mode.
2. Insert an audio CD disc in the CD compartment and close the CD door, the unit will start
reading the disc, it will show the total number of tracks of the entire disc after reading and start
playing the first track of the entire disc.
3. During playing, press the PLAY/PAUSE button to temporarily pause playing. To resume,
press the PLAY/PAUSE button again.
4. To stop playing the disc, simply press the STOP/M+ button
- EN 5 -
Page 4

Skip Mode
1. In PLAY or PAUSE mode, press the SKIP+/TU+ button to go to the next track.
2. In PLAY or PAUSE mode, press the SKIP−/TU− button to go back to the previous track.
3. In PLAY mode, press the SKIP button to go back to the beginning of the track.
4. In PLAY mode, press the SKIP button twice to go back to the previous track.
Different Play Mode
In CD mode, press the MODE button to select different kinds of play mode with the following
sequence.
Repeat 1 ¨ Repeat ALL ¨ Normal
y Repeat – repeat the track being played.
y Repeat ALL – repeat all the tracks in the entire disc.
y Normal – play the tracks in sequence.
Programming
The programming can only be done in STOP mode
1. Press the PROG/MEM button, the LCD display will show P01 and flash.
2. Use the SKIP+/TU+ button or SKIP−/TU− button to select the desired track.
3. Press the PROG/MEM button again to store the selected track in the memory, the LCD
display will show P02.
4. Repeat steps 2 to 3 to store more tracks in the memory. You can store up to 20 tracks in the
memory.
5. Press the PLAY/PAUSE button to start playing the disc in the programmed order.
6. To stop playing, press the STOP button.
7. To cancel the programming list, press the STOP button again.
AUX-IN CONNECTION
1. Press the ON/OFF button to turn on the unit.
2. Press the SOURCE button to select the AUX mode.
3. Insert one side of the audio cable (not included) into the Line-Out or Phone Jack on your MP3
Player or audio device and the other side into the AUX-IN jack of the unit.
4. Turn on your MP3 player or audio device and follow its playback instructions.
- EN 6 -
BLUETOOTH OPERATION
Connecting BLUETOOTH
1. Press the SOUCRE button to select BLUETOOTH mode, ‘ bt ‘ will show in the LCD display.
2. Turn on the Bluetooth of your device and search the unit for connection. Your Bluetooth
device should find “SRCD804BT”.If password is needed for connection, please enter “0000”.
3. If connection is successful, your Bluetooth device may show Bluetooth is connected.
4. Select and play the audio file though your Bluetooth device.
5. You can use the SKIP+/TU+ button to go to the next track or press the SKIP−/TU− button to
go back to the previous track.
6. Press the PLAY/PAUSE button to temporarily pause playing. To resume, press the
PLAY/PAUSE button again.
Turn Off the Bluetooth Operation
To turn off the BLUETOOTH operation, press SOURCE button to select other mode.
Turn Off the Unit
Press and hold the ON/OFF button for about 1 second, the unit will turn off
SPECIFICATIONS
Power supply: AC 120V ~ 60Hz
Frequency range: FM 87.5 – 108 MHz
AM 522 – 1710 KHz
Specifications are subject to change without further notice.
- EN 7 –
Page 5
Système Mircochaîme CD Bluetooth
Modèle: SRCD804BT
Lisez et respectez ces instructions avant d’utiliser votre appareil.
.
•
POUR ÉVITER LES RISQUES D'INCENDIE OU D’ÉLECTROCUTION, NE PAS EXPOSER
CET APPAREIL À LA PLUIE OU À L'HUMIDITÉ
• CET APPAREIL NE DOIT PAS ÊTRE EXPOSÉ AUX ECLABOUSSURES ET AUCUN
OBJET REMPLI DE LIQUIDES NE DOIT ÊTRE POSÉ SUR L’APPAREIL.
L'éclair fléché au centre d'un
triangle équilatéral prévient
l'utilisateur de la présence de
courants élevés dans
l'appareil, pouvant constituer
un risque d'électrocution en
cas de mise en contact avec
les composants internes.
ATTENTION
Le point d’exclamation au
centre d’un triangle
équilatéral prévient
l’utilisateur de la présence
d’instructions importantes
dans le mode d'emploi
concernant la mise en
œuvre et l'entretien de
l'appareil.
RISQUE DE CHOC
ÉLECTRIQUE, NE PAS
OUVRIR
ATTENTION : POUR RÉDUIRE
LES RISQUES
D'ÉLECTROCUTION, N'OUVREZ
PAS LE PANNEAU ARRIÈRE OU
LE CAPOT DE L'APPAREIL. IL
NE CONTIENT AUCUN
COMPOSANT QUI PUISSE
ÊTRE ENTRETENU PAR
L'UTILISATEUR. ADRESSEZ
VOUS À UN SERVICE DE
MAINTENANCE QUALIFIÉ.
IMPORTANTES CONSIGNES DE SECURITE
1. Lisez ces instructions.
2. Gardez ces instructions.
3. Respectez tous les avertissements.
4. Respectez toutes les instructions.
5. N’utilisez pas cet appareil près d’une source d’eau.
6. Nettoyez seulement avec un chiffon sec
7. N’obstruez pas les aérations de l’appareil. Installez conformément aux instructions du
fabriquant.
8. N’installez pas l’appareil près de sources de chaleur comme radiateurs, plaques de cuisson
ou de tout autre appareil (y compris amplificateurs de son) qui produit de la chaleur.
9. Ne supprimez jamais la sécurité de la fiche polarisée ou de mise à la terre. Une fiche
polarisée possède deux lames dont une est plus large que l'autre. Une prise de terre possède
deux lames et une broche de terre. La lame large ou la troisième broche sont prévues pour
votre sécurité. Si la fiche fournie ne rentre pas dans votre prise, consultez un électricien pour
faire remplacer la prise obsolète.
10. Veillez à ce que l'on ne puisse pas marcher sur les cordons d'alimentation ou qu'ils ne
puissent pas être coincés sous des meubles ou objets ou derrière ceux-ci. Faites
particulièrement attention au niveau des fiches, des prises multiples et des sorties
d’appareils.
- FR 1 -
A
TTENTION
Page 6

11. N’utilisez que les cordons et accessoires spécifiés par le fabriquant
12. Utilisez seulement avec le, socle, charriot, trépied, support, ou table spécifiés par le fabricant
ou vendus avec l’appareil. Si un chariot est utilisé, déplacez l’ensemble avec prudence pour
éviter toute blessure et chute d’objet.
13. Débranchez cet appareil pendant les orages ou s’il n’est pas utilisé pendant de longues
périodes.
14. Contactez un personnel qualifié pour toute maintenance ou réparat ion. La maintenance ou
réparation est nécessaire quand le cordon d'alimentation ou la prise est endommagé(e), des
objets ou du liquide ont pénétré dans l'appareil, quand il a été soumis à la pluie ou des
aspersions d'eau, ou quand l'appareil ne fonctionne pas correctement en dépit du respect
des instructions de manipulation.
15. Mise à la terre ou polarisation - Ce produit peut être équipé d'une prise de courant alternatif
polarisée (une fiche ayant une lame plus large que l'autre). Cette fiche ne s'insère dans la
prise de courant que dans un sens. Il s'agit d'un dispositif de sécurité. Si vous n'arrivez pas à
insérer complètement la fiche dans la prise, inversez la fiche. Si la fiche ne s'adapte toujours
pas, contactez votre électricien pour remplacer la prise obsolète. Ne pas éliminer la sécurité
de la fiche polarisée.
16. Autres avertissements - Ce produit est équipé d'une fiche à trois broches appelée « mise à la
terre ». Cette fiche peut seulement s'insérer dans une prise de courant mise à la terre. Il s'agit
d'un dispositif de sécurité. Si vous ne parvenez pas à insérer la fiche dans la prise, contactez
votre électricien pour remplacer la prise obsolète. Ne détruisez pas la sécurité de la prise de
terre.
17. Ventilation - Les fentes et ouvertures du boitier sont prévues pour la ventilation et pour
assurer un fonctionnement fiable du produit et le protéger de la surchauffe, ces ouvertures ne
doivent pas être bloquées ou couvertes. Les ouvertures ne doivent jamais être obstruées en
plaçant l'appareil sur un lit, canapé, un tapis ou toute autre surface similaire. Ce produit ne
doit pas être placé dans une installation encastrée comme une bibliothèque ou une étagère à
moins qu'une ventilation adéquate ne soit prévue ou que les instructions du fabricant aient
été respectées.
18. La prise SECTEUR ou un coupleur d'appareil est utilisé comme dispositif de déconnexion, ce
dispositif doit rester facilement accessible.
19. 回: Appareil de classe II possédant une double isolation des parties actives. Pas de liaison à
la terre des parties métalliques.
- FR 2
-
AVIS FCC
Cet équipement a été testé et trouvé conforme aux limites pour un dispositif numérique de classe
B, conformément à la Partie 15 des règlements de la FCC. Ces limites sont conçues pour fournir
une protection raisonnable contre les interférences nuisibles dans une installation résidentielle.
Cet équipement génère, utilise et peut émettre des fréquences radio et, s'il n'est pas installé et
utilisé conformément aux instructions, peut causer des interférences nuisibles aux
communications radio.
Cependant, il n'existe aucune garantie que des interférences ne se produiront pas dans une
installation particulière. Si cet équipement provoque des interférences nuisibles à la réception
radio ou de télévision, ce qui peut être déterminé en mettant l'équipement hors tension, l'utilisateur
est encouragé à essayer de corriger l'interférence par une ou plusieurs des mesures suivantes:
- Réorienter ou déplacer l'antenne de réception.
- Augmenter la distance entre l'équipement et le récepteur.
- Brancher l'équipement dans une prise liée à un circuit différent de celui du récepteur.
- Consulter le revendeur ou un technicien radio / TV.
.
AVERTISSEMENT:
T oute modification non agréée de cet appareil pourrait annuler l'autorisation de l'utilisateur de faire
fonctionner l'équipement.
- FR 3 -
Page 7
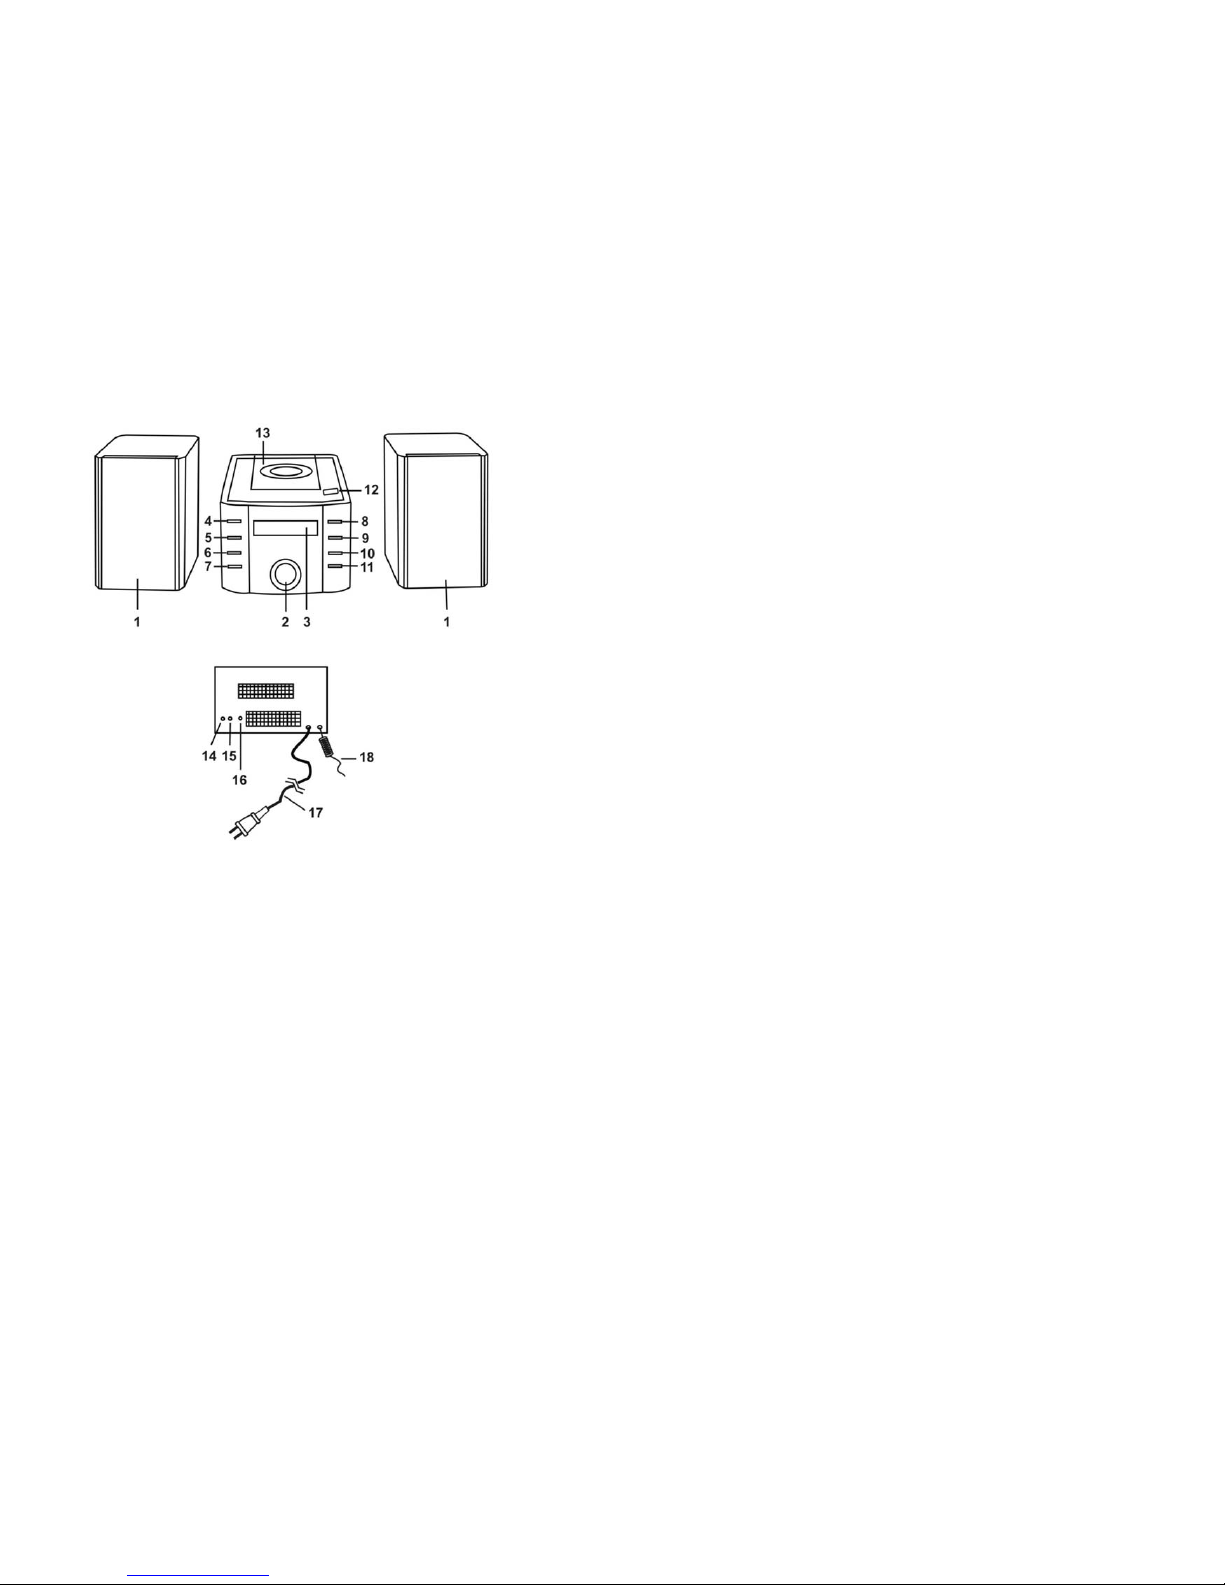
1 Haut-parleurs 11
Bouton SKIP−/TU−
2 Bouton volume 12 Bouton ouverture de porte CD
3 Affichage 13 Compartiment à CD
4 Bouton ON/OFF 14 Prise Haut Parleur droit
5 Bouton SOURCE 15 Prise Haut Parleur Gauche
6 Bouton MODE 16 Prise Phones
7 Bouton PROG/MEM 17 Câble CA
8 Bouton PLAY/PAUSE 18 Câble antenne FM
9
Bouton STOP/M+
10
Bouton SKIP+/TU+
- FR 4 -
Connexion de l’appareil au secteur
Branchez une extrémité de l'adaptateur AC / DC dans la prise DC-IN, puis branchez l'autre
extrémité dans une prise murale. Avant d'allumer l'appareil, assurez-vous que la tension de votre
approvisionnement en électricité est la même que celle indiquée sur la plaque signalétique.
Connexion des enceintes
Connectez les câbles des deux haut-parleurs à l'entrée correspondante (R) pour le haut-parleur
droit et l'entrée (L) pour l'enceinte gauche. Les entrées sont situées à l’arrière de l’appareil.
Avertissement: Connectez les haut-parleurs avant d'allumer l'appareil. L'appareil peut ne pas
fonctionner correctement ou peut être endommagé si vous utilisez des enceintes différentes de
celles fournies avec l'appareil.
FONCTIONNEMENT DE LA RADIO
1. Appuyez sur la touche ON/OFF pour allumer l'appareil.
2. Appuyez sur la touche SOURCE pour sélectionner le mode radio AM ou FM.
3. Appuyez sur la touche SKIP+/TU+ ou le bouton SKIP−/TU− de l’appareil pendant env. 1
seconde, il se mettra à rechercher la prochaine station radio dans le sens de la recherche.
L'opération de recherche trouve les stations avec un signal fort. Les stations avec un signal
faible peuvent être réglées manuellement.
4. Appuyez sur les boutons VOLUME pour régler le niveau sonore.
ENREGISTRER LES STATIONS RADIO EN MÉMOIRE
Remarque: Si vous utilisez cet appareil pour la première fois, ou après l’avoir débranché de la
prise murale, le numéro de la mémoire commencera à P01.
1. Réglez les stations souhaitées.
2. Appuyez sur la touche PROG/MEM, l'écran affichera le numéro de mémoire correspondant à
la prochaine station et clignotera.
3. Appuyez sur la touche SKIP+/TU+ ou SKIP+/TU− pour sélectionner le numéro de la
mémoire, puis appuyez sur PROG/MEM pour mémoriser la station.
4. Répétez les étapes 1 à 3 pour stocker plus de stations radio dans la mémoire.
5. Un maximum de 20 stations de radio peuvent être stockées dans la mémoire.
Pour sélectionner une station radio déjà enregistrée dans la MÉMOIRE
Appuyez sur la touche STOP/M+ pour sauter jusqu'à la prochaine station en mémoire.
UTILISATION DU LECTEUR CD
1. Appuyez sur la touche ON/OFF pour allumer l'appareil.
2. Appuyez sur la touche SOURCE pour sélectionner le mode CD.
3. Insérez un CD dans le compartiment CD et fermez la porte, l'appareil commencera la lecture
du disque, il va jouer la première piste suivie du disque entier.
4. Appuyez sur les touches VOLUME pour régler le volume au niveau désiré.
5. Pendant la lecture, appuyez sur la touche PLAY/PAUSE pour arrêter temporairement la
lecture. Pour reprendre, appuyez sur la touche PLAY/PAUSE à nouveau
6. Pour arrêter la lecture, appuyez sur la touche STOP.
- FR 5 -
Page 8

Changements de piste
1. En mode lecture ou pause, appuyez sur la touche SKIP+/TU+ pour accéder à la piste
suivante.
2. Pendant la lecture, appuyez sur le bouton SKIP−/TU− de l’appareil pour revenir au début de
la piste. Appuyez sur la touche SKIP−/TU− deux fois pour revenir à la piste précédente.
3. En mode pause, appuyez sur le bouton SKIP−/TU− pour revenir à la piste précédente.
Mode recherche
1. Maintenez enfoncées les touches SKIP+/TU+ ou SKIP−/TU− de l’appareil pour avancer ou
reculer rapidement sur la piste.
2. Relâchez le bouton pour revenir en lecture normale.
Différents modes de lecture
Appuyez sur la touche MODE pour sélectionner les différents mode de lecture avec la séquence
suivante.
Rejouer ¨ Rejouer tout ¨ Normal
REJOUER - la piste en cours et sera rejouée en continu.
REJOUER TOUT - le disque entier se répète continuellement.
Programmation
La programmation doit être faite en mode ARRÊT.
1. Appuyez sur la touche PROG/MEM de l'appareil ou sur le bouton PROG de la télécommande,
l'écran LCD affichera P01 PROG et clignotera.
2. Utilisez le 'bouton SKIP+/TU+ ou SKIP−/TU− pour sélectionner la piste désirée.
3. Appuyez sur la touche PROG/MEM de l'appareil ou sur le bouton PROG de la télécommande
pour mémoriser la piste sélectionnée, l'écran LCD affichera P02 PROG et clignotera.
4. Répétez les étapes 2 à 3 pour stocker plus de titres dans la mémoire. Vous pouvez stocker
jusqu'à 20 plages dans la mémoire.
5. Appuyez sur la touche PLAY/PAUSE pour démarrer la lecture du disque dans l'ordre
programmé.
6. Pour arrêter la lecture, appuyez sur la touche STOP.
7. Pour annuler la liste de programmation, appuyez sur la touche STOP et ouvrez la porte du
compartiment de CD.
FONCTIONNEMENT BLUETOOTH
Connexion BLUETOOTH
1. Appuyez sur le bouton FONC/RÉG.HR pour sélectionner BLUETOOTH, bt apparaît sur
l’écran LCD.
2. Activez le Bluetooth sur votre périphérique Bluetooth et recherchez l’appareil pour le
connecter. Votre appareil Bluetooth doit trouver ‘SRCD804BT’.Si un mot de passe est
nécessaire pour la connexion, veuillez saisir ‘ 0000’.
3. Couplez votre périphérique Bluetooth avec l’appareil.
4. Sélectionnez et lisez le fichier audio avec votre périphérique Bluetooth.
- FR 6 -
Désactiver le fonctionnement Bluetooth
Pour désactiver le fonctionnement du BLUETOOTH, appuyez sur le bouton SOURCE pour
sélectionner d’autres fonctions (CD, FM ou AM)
Connexion Auxiliaire
1. Appuyez sur la touche ON/OFF pour allumer l'appareil.
2. Appuyez sur la touche SOURCE pour sélectionner le mode AUX.
3. Insérez un côté du câble audio (non inclus) dans la prise sortie de votre lecteur MP3 (ou
appareil audio) et l'autre côté du câble dans la prise AUX-IN de l’appareil.
4. Allumez votre lecteur MP3 (ou appareil audio) et suivez les instructions de lecture.
ENTRETIEN ET MAINTENANCE
y Toujours éteindre l'appareil après utilisation.
y Gardez l'appareil loin des objets magnétiques, des sources d'eau ou de chaleur.
y Utilisez un chiffon doux et propre imbibé d'eau tiède pour nettoyer le boitier. Ne jamais
utiliser de nettoyants chimiques qui pourraient endommager le fini de l’appareil.
y Ne touchez jamais la tête de lecture de CD et la lentille. S’il y a des empreintes de doigts sur
la lentille de lecture, nettoyez-la doucement avec un liquide de nettoyage pour tête de
lecture.
y Débranchez l'appareil de toute source d’électricité avant de le nettoyer.
y Pour retirer un disque de son boîtier, appuyez sur le centre de la base et soulevez le disque
en le tenant délicatement par les bords.
Les empreintes digitales et la poussière doivent être soigneusement nettoyées de la surface
enregistrée du disque avec un chiffon doux. Contrairement aux disques conventionnels, les
disques compacts n'ont pas de rainures qui pourraient recueillir de la poussière ou des
débris microscopiques. Ainsi, essuyer doucement avec un chiffon doux suffit à enlever la
plupart des particules. Essuyez en ligne droite depuis l'intérieur vers l'extérieur du disque.
Les petites particules de poussière ou les légères taches n’ont absolument aucun effet sur la
qualité de la reproduction.
y Ne jamais utiliser de produits chimiques tels que des sprays, des antistatiques, du benzène
ou des diluants pour nettoyer les disques compacts. Ces produits chimiques peuvent
endommager irrémédiablement la surface du disque.
y Les disques doivent être remis dans leur boîtier après utilisation. Cela évite des rayures
profondes qui pourraient causer des difficultés de lecture au capteur.
y Ne pas exposer les disques directement au soleil, à une forte humidité ou à des
températures élevées pendant des périodes prolongées. Une exposition prolongée à des
températures élevées peut déformer le disque.
y Ne collez pas de papier et n’écrivez pas avec un stylo à bille sur le côté étiquette du disque.
SPECIFICATIONS
Fréquence: FM 88 à 108 MHz
AM 522 à 1710 KHz
Alimentation : 120V AC ~ 60Hz
Les spécifications sont sujettes à changement sans préavis.
- FR 7 -
 Loading...