

Page 1
Page 2

Safety Instructions
Read all the safety instructions before using the stereo cassette recorder.
Power source
Before switching on the mains supply, make
sure the voltage is compatible.
Positioning your appliance
• Position the power supply lead and other
leads so that they are not likely to be
walked on or pinched by things placed on
or against them.
• Do not use the appliance in humid or
damp conditions. Do not allow the
appliance to get wet, ie. dripping or
splashing, as this may be dangerous. Do
not place water filled objects, such as vases,
on top of the appliance.
• Make sure that no naked flame sources,
such as candles, are placed on top of the
appliance.
Cleaning
• Unplug the appliance before you clean it.
• Do not use liquid or aerosol cleaners.
• Clean your appliance with a soft, damp
(not wet) cloth.
Ventilation
• The slots and openings on the appliance are
for ventilation. Do not cover or block them
as it could lead to overheating.
• NEVER let children push anything into the
holes or slots on the cases.
Battery disposal
Please ensure batteries are disposed of safely.
Electrical information
Make sure that the voltage of your electricity
supply is the same as that indicated on the
rating plate.
Servicing
• There are no user serviceable parts in your
portable stereo.
• When servicing, refer to qualified service
personnel.
• Consult your dealer if you are ever in doubt
about the installation, operation or safety
of your equipment.
- 1 -
CAUTION
RISK OF ELECTRIC SHOCK
Page 3
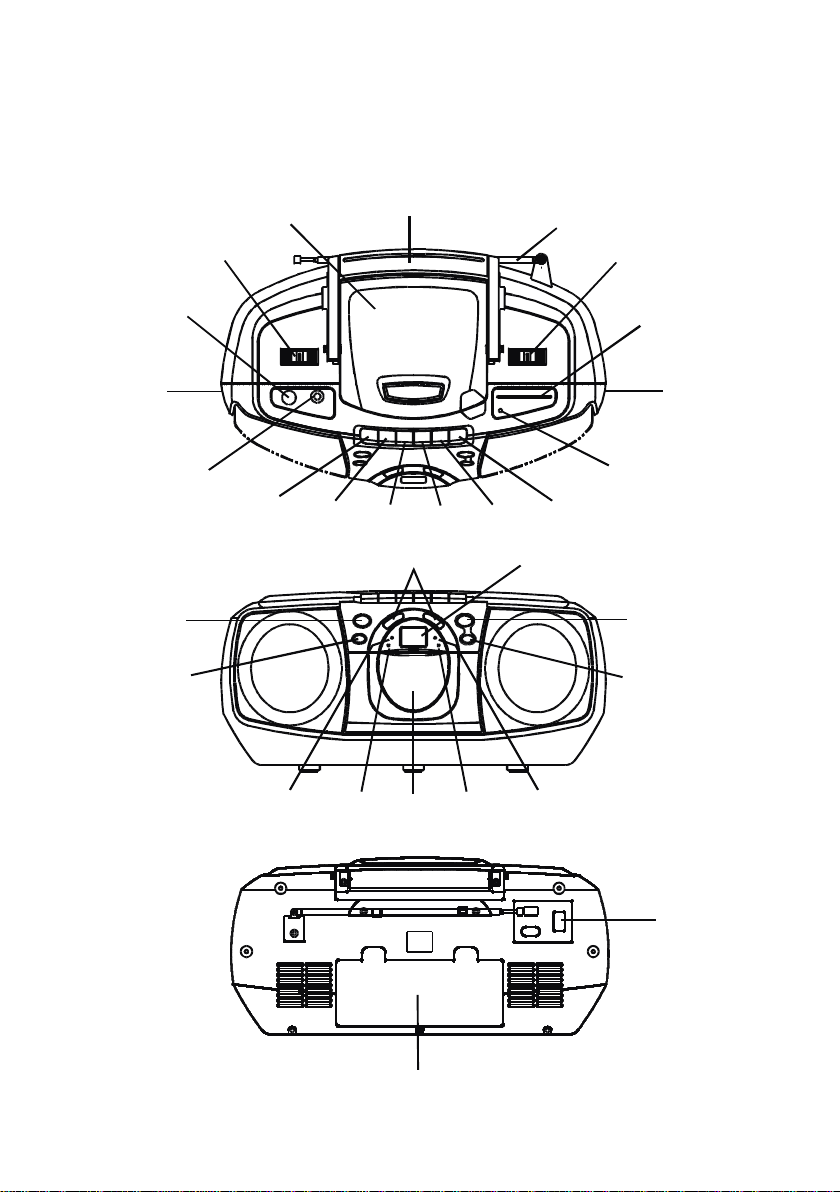
Quick view
A
BBS Butt on
Volume
Knob
(on side)
Headphone
Socket
CD Program
Button
CD Repeat
Button
CD Compartment Lid
Function
Selector
Pause
Stop/Eject
Handle
Fast F.
Rewind
CD <Skip/Search>
Buttons
Play
LED disp lay
FM Aerial
Record
Band Selector
Dial Scale
FM Stereo
Indicator
CD Play/Pause
Button
Stop
Button
Tuning
Knob
(on side)
Power
Indicator
Program
Indicator
Cassette
Door
Batteries Compartment
Play/Pause
Indicator
Repeat
Indicator
C Socket
- 2 -
Page 4

Getting started
Remove the unit carefully from the box.
You may wish to store the packaging for
future use.
Switching on
Mains power
The unit comes with a mains power cable.
When not in use, unplug the unit from the
mains power.
Batteries
Always remove the mains power lead from
the unit for battery operation.
• Remove the battery compartment door at
the back of stereo.
• Load 6 x LR14 “ C “ Size batteries into the
compartment. Make sure the (+) and (-)
ends of the batteries are positioned as
shown outside the battery door (batteries
not included).
Please note
If you are not going to use the unit for some
time remove the batteries.
Adjusting the sound
Turn the Volume knob located on the side to
set the sound level.
BBS
The Bass Boost (BBS) Button is used to
enhauce bass boost sound.
Using headphones
Plug your headphones into the headphones
socket on the side.
The sound will be heard through the headphones, not the speakers.
Please note
Headphones should have a 3.5mm diameter
stereo plug and an impedance of 8-32 ohms.
Battery low indication
The Power light will not come on when the
batteries are exhausted.
Please note
If the unit is connected to the mains, the
Power light will come in.
- 3 -
Page 5

Using the radio
Select the Function Selector to Radio.
Use the AM/FM band selector to select the
band.
Turn the Tuning knob on the side to select
the channel you want.
To turn the radio off
Set the Function Selector to Tape with all
keys released.
Stereo indicator (FM ST. band only)
When an FM stereo station is tuned in, the
red Stereo light comes on.
When stereo signals are weak and the
reception is noisy, it is often preferable to
receive the program in mono. Switch the band
selector to FM, reception will be less noisy.
Aerial
For best FM reception, extend the telescopic
aerial located at the back of the unit. Move it
around until you get the best reception.
There is a built in ferrite aerial for AM signal.
Move or rotate the unit to obtain the best
Ampitude Modulation(AM) reception.
- 4 -
Page 6

Using the CD player
Handling Compact Discs
To remove a CD from its storage case, press
down on the centre of the case and lift the disc
out.
Hold the disc by the edges. Avoid touching
the recorded side of the disc.
Loading CDs
• Set the Function Selector to CD position.
• Press the “ OPEN” pad on the top of the
CD lid to click open.
• Place the CD in the compartment with the
label side facing upwards.
• Close the lid. When fully closed the CD
player starts to spin the disc. The display
shows the total number of tracks on the
CD.
• You can open the CD compartment at any
time by pressing the stop button lifting the
disc compartment lid.
• Only remove the CD when it has stopped
spinning.
Please note
• Do not put anything other than a CD in the
compartment. Other objects can damage
the mechanism.
• Do not force open the lid by hand during
use.
• Keep the lid closed when not in use to
prevent dirt and dust from getting into the
mechanism.
• Never insert more than one CD at a time.
• If a disc is deeply scratched or too dirty, it
may not play.
Error compensation
The unit has built in error compensation
circuits which enable it to keep playing
despite any minor defects in the disc.
However, if the defects are too great, the play
may skip some tracks during play.
If you encounter this problem play a new disc
and if the CD player operates normally, the
skipping problem is probably due to a
defective disc.
Playing CDs
• Once you have loaded a CD, press the CD
Play/Pause button. The display shows the
track currently playing.
• To stop play, press Stop.
Skip forward or back through tracks
• To select the next track, press >> Skip/
Search. If you are on the last track of the
disc, the player will move to track 1.
• T o go back to the beginning of the current
track press << Skip/Search once.
• To go back to the previous track press <<
Skip/Search twice.
• To play a particular track, load the disc in
the CD player and press >> Skip/Search
until the track number you want is shown
in the display.
Pause
• To stop a track temporarily, press the Play/
Pause button. The disc will pause at the
current play position. The Play/Pause
indicator will flash.
• To resume play, press the Play/Pause
button again.
- 5 -
Page 7

Programmed track selection
You can set the unit to play a selection of
tracks from your disc.
To select specific tracks
• Make sure CD is at stop mode.
• Press Program button. The display
flashes “ 01” and the Programme light
comes on.
• Press >> Skip/Search or << Skip/Search
to select the track number you want.
Press the Program button to memorize the
track. The display flashes “ 02” .
• Now press << Skip/Search or >> Skip/
Search to select the next track you want.
• Press the Program button to memorize the
track.
• Repeat these steps until all the tracks you
want are stored. You can store a maximum
of 20 tracks. You can select a track more
than once.
• Press the Play button. The first programmed track is displayed and your
selection starts playing.
• After all the programmed tracks have been
played, the CD player stops automatically.
To clear your programmed tracks, simply
press Stop and open the CD door.
Please note
if, during track selection, you press the Play/
Pause button before pressing the Program
button, the track will not be stored in the
program memory and the disc will start
playing from the first selected track.
Repeat disc play
You can set your CD player to repeat play a
single track, the whole disc or your programmed track selection.
To repeat a single track
• Press << Skip/Search or >> Skip/Search
to select a track.
• Press the Repeat button once. The display
will show a flashing dot to indicate “ track
repeat” is on.
• Press Play/Pause to play the track.
• The selected track will play continuously
until you press Stop or press the Repeat
button twice more.
To repeat the whole disc
• Press the Repeat button twice. The
display will show a solid dot to indicate
“ disc repeat” is on.
• Press Play. The entire disc will play
continuously until you press Stop or press
the Repeat button once more.
To repeat a programmed selection
• Select your tracks.
• Press the Repeat button once.
• Press Play. The programmed tracks will
play continuously until you press Stop or
press the Repeat button twice more.
Caution
This product uses a Caution Laser. Avoid any
direct exposure to the laser beam. Use of
controls, adjustments or procedures not listed
in this guide may result in hazardous
exposure.
- 6 -
Page 8

Using the cassette player
Inserting/removing
cassettes
• Set the Function Selector to Tape.
• Press the Stop/Eject button to open the
cassette door.
• Slide the cassette tape into the door with
the exposed section of tape facing upwards.
• Push the cassette door closed.
• To remove a cassette, press the Stop/Eject
button to open the door and lift out your
tape.
Playing cassettes
• Once you have inserted a tape, press the
Play button.
• Press the Pause button to stop playback
temporarily.
• Press the Fast Fwd button to fast forward
through the tape.
• Press the Rewind button to go backwards
through the tape.
• Press the Stop/Eject button when finished.
Recording
Cassette player has “ Automatic Level
Control” which automatically sets the
recording level for optimum performance.
The volume control will not affect the
recording level.
To record from the radio
• Set the Function Selector to Radio and
tune in the AM/FM station you want.
• Insert your cassette tape.
• To start recording, press the Record and
Play buttons at the same time. The
recording level is set automatically.
• To stop recording, press the Stop/Eject
button.
To record from a CD
• Set the Function Selector to CD.
• Insert the CD you want to record.
• Insert your cassette tape.
• To start recording, press the Record and
Play buttons at the same time.
• Press CD Play/Pause button.
The recording level is set automatically.
• To stop recording, press the cassette Stop/
Eject button.
- 7 -
Page 9

Care & maintenance
Cleaning tape heads
The tape heads, roller and capstan require
occasional cleaning to remove particles of
metal oxide coating that wear off the tape.
• Press the Power button to switch the
power off.
• Press the Stop/Eject button to open the
cassette door.
• Press Play.
• Clean the tape head, pinch roller and
capstan with a soft cloth or cotton bud
dampened in iso-propylacohol or a special
tape head cleaner.
Cleaning CDs
Use a soft cloth to wipe off any fingerprints
and dust from the disc surface. Wipe in a
straight line from the centre to the outside of
the disc. Small dust particles and light stains
will not affect reproduction quality.
• Never use chemicals such as record sprays,
anti-static sprays, benzine or thinners to
clean your CDs.
• To reduce the risk of scratches, always put
CDs back in their case after use.
• Do not expose CDs to direct sunlight, high
humidity or high temperatures for long
periods.
• Do not stick paper or write anything on
either side of the CD.
Only discs displaying this
symbol can be played on
this unit.
Cassette care
You can help avoid two of the most common
problems of cassette usage.
These are:
• jamming - which causes uneven playback
speed.
• tangling - where the tape wraps itself
around the playing mechanism.
T o reduce the likelihood of these problems
occurring, the following precautions should be
observed.
Check that there are no loose layers of tape
visible through the window in the cassette.
Use a pencil or hexagonal shaped ballpoint
pen to wind along any loose lauers before
inserting the cassette into your machine.
If the cassette feels “ tight” when winding the
tape with a pencil or pen, the tape may be
jamming due to ridges formed in the winding
of the tape. You can see these through the
cassette eindow. In most cases, you can
remove these ridges by fast forwarding the
tape from one end to the other in your
cassette player.
• Use only well known brands of tape.
• Avoid C-120 cassettes, as the tape material
deteriorates much quicker.
• Always avoid exposing cassettes to direct
sunlight, dust or oil. Do not touch the
surface of the tape.
- 8 -
Page 10

Prevention of Accidental Erasure
To prevent erasing a recorded tape accidentally,
break off the tabs on the rear of the tape as
shown.
Recording on this side is no longer possible.
Y ou can stop this being ef fective by covering
the hole with a piece of adhesive tape.
Technical specifications
Power supply
AC 120V~60Hz
Batteries 6 x UM2 LR14 “ C “ Size (batteries not included)
Radio frequency coverage
FM 87.5 - 108 MHz
AM 530 - 1710 KHz
CD player
Pick Up 3-beam, Semi-conductor Laser
Encodin 1 Bit DA Converter
8 x Oversampling
Recording system DC Bias
Erasing system Magnetic Erase
General
Speaker 8 Ohms
Headphones 3.5mm stereo jack plug, 8-32 Ohms (headphones not included)
- 9 -
 Loading...