

Page 1
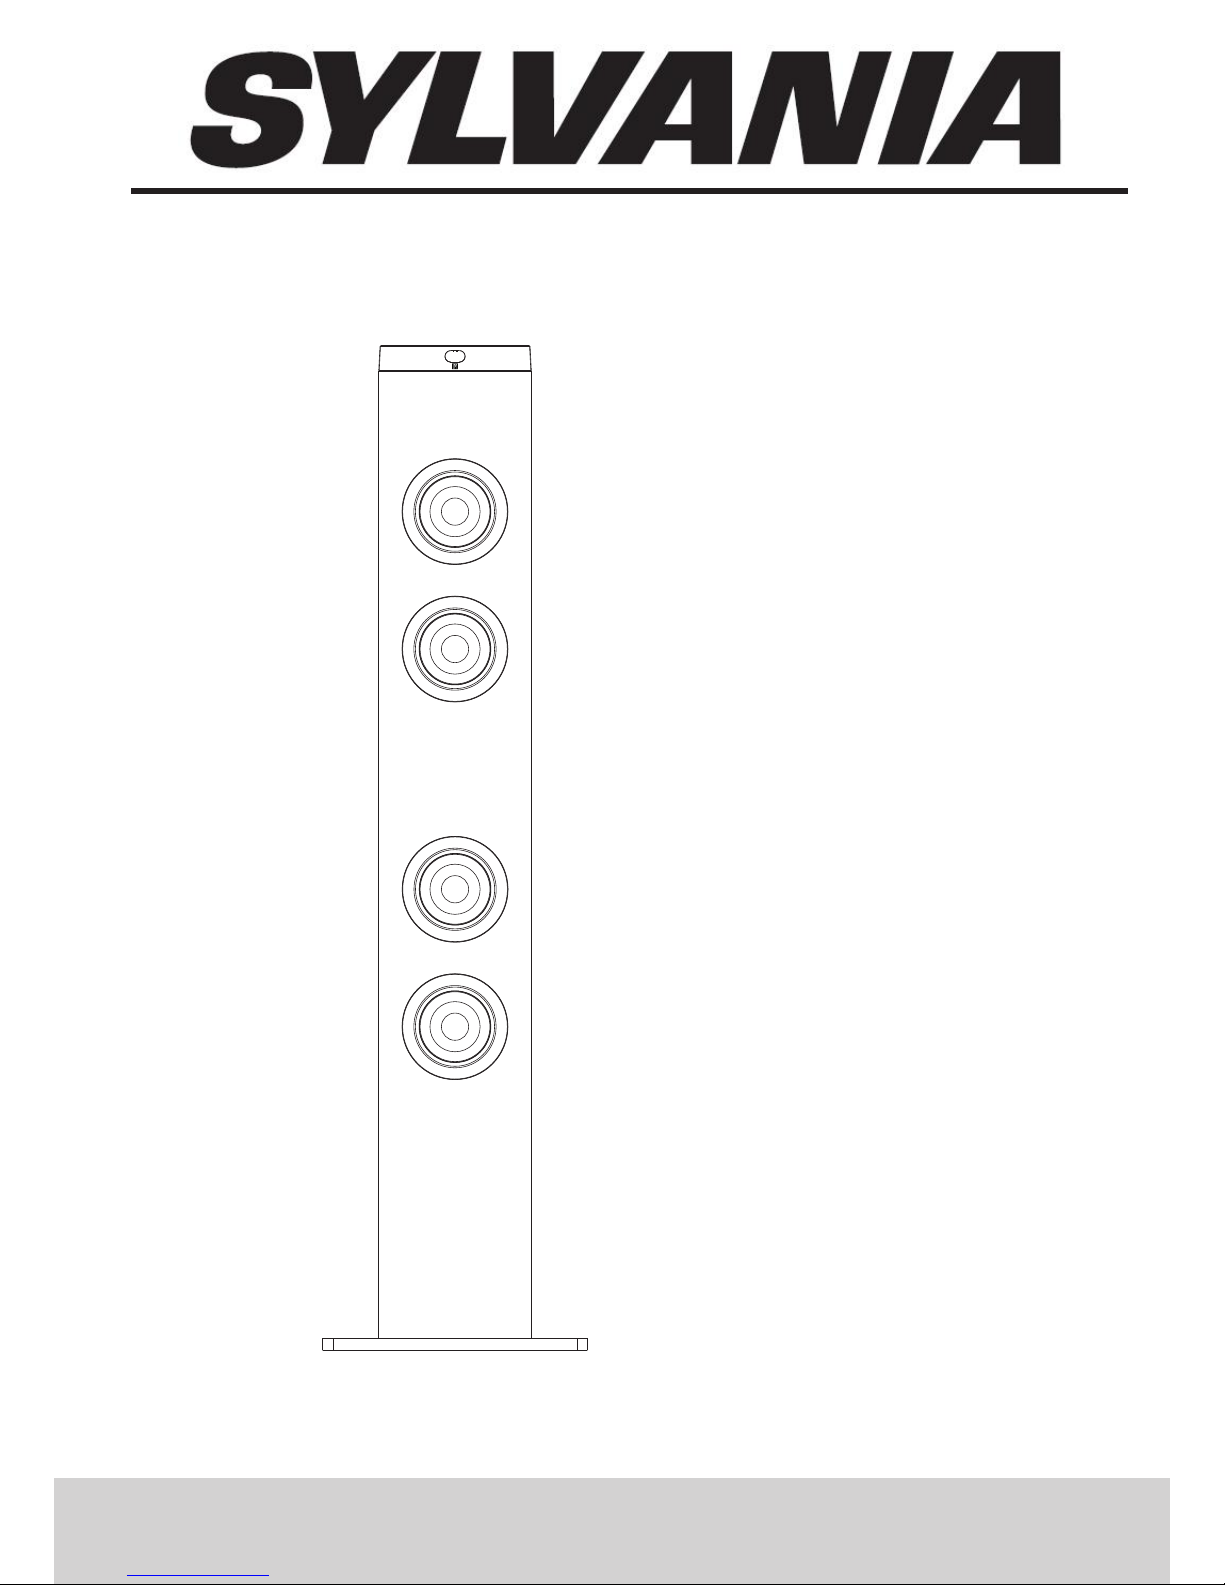
TOWER STEREO SYSTEM
USER MANUAL
Model: SP288
PLEASE READ BEFORE OPERATING THIS EQUIPMENT.
Page 2
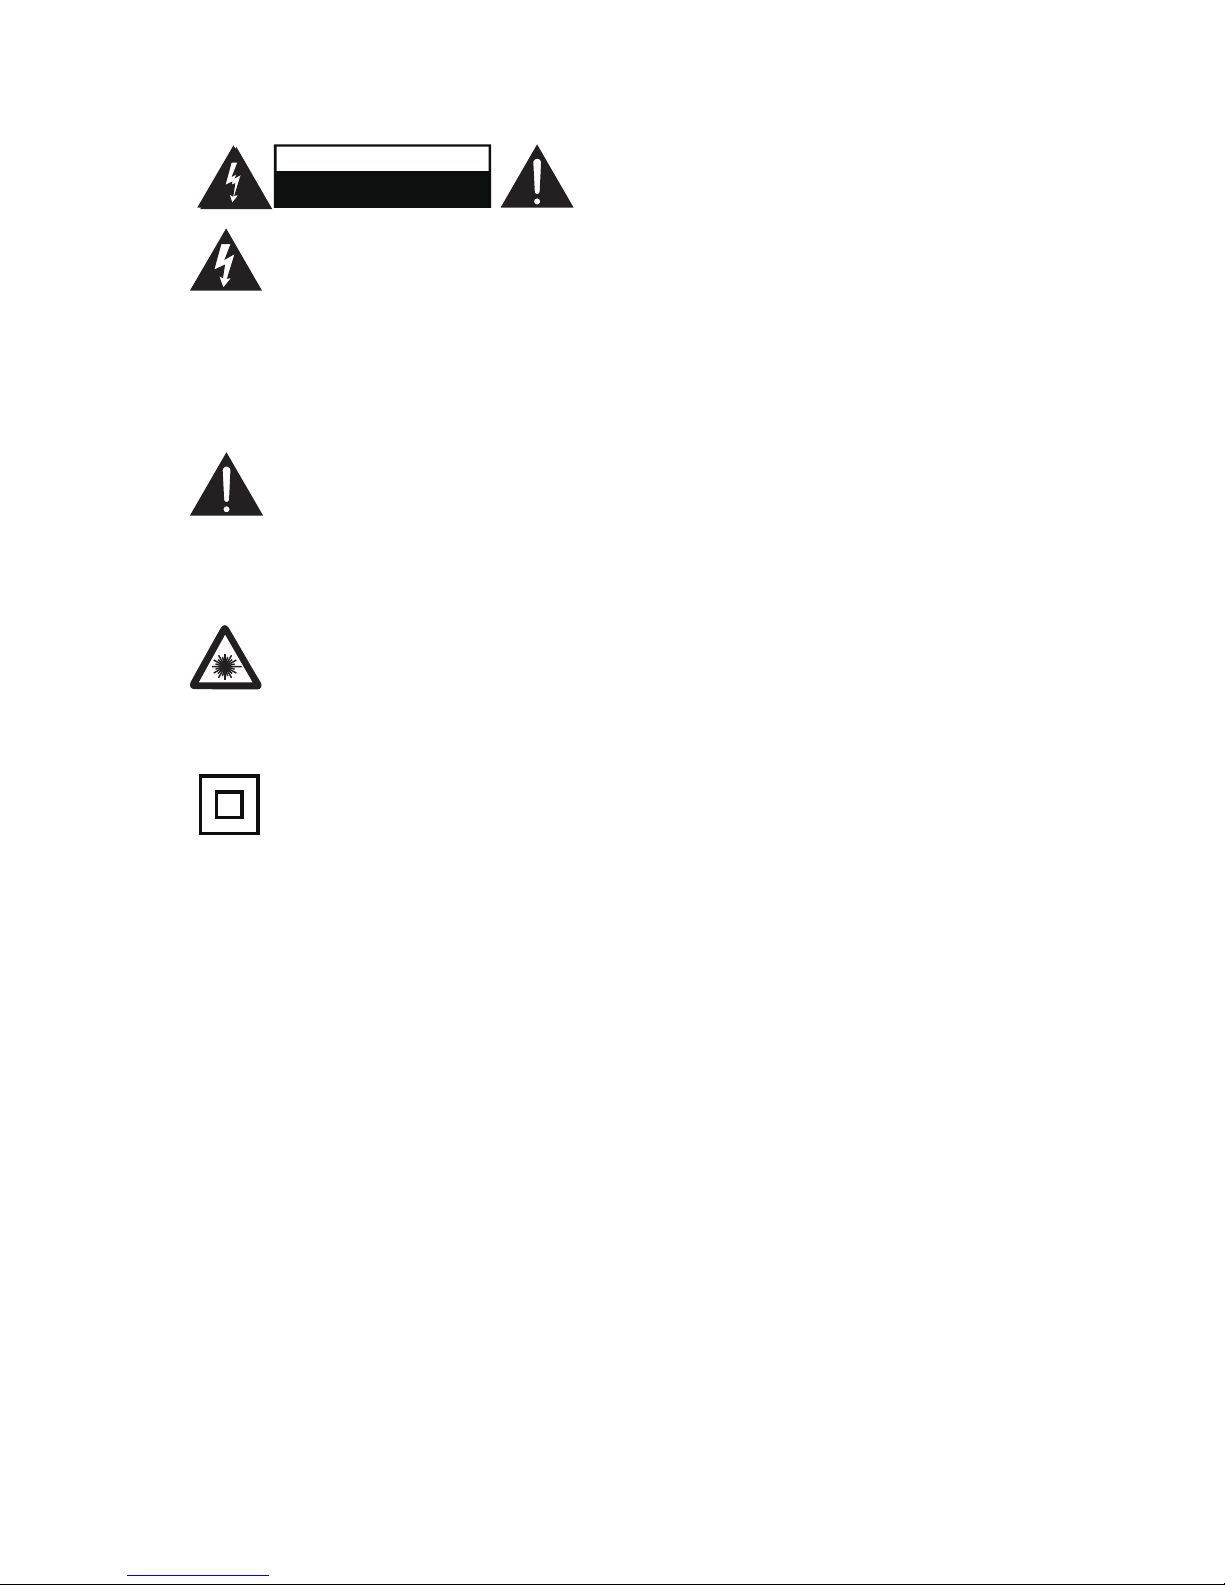
T h e l i g h t n i n g f l a s h w i t h
arrowhead symbol, within an
equilateral triangle, is intended
to alert the us er to t he prese n ce of
uninsulated “dangerous voltage” within
the product’s enclosure that may be of
sufficient magnitude to constitute a risk of
electric shock to persons.
The exclamation point within an
equilateral triangle is intended
to alert the user to the presence
of important operating and maintenance
(servicing) instructions in the literature
accompanying the appliance.
DANGER:
Invisible and hazardous laser
radiation when open and interlock
failed or defeated. Avoid direct exposure to
beam.
This symbol indicates that this
produc t in corporates d o uble
insulation between hazardous
mains voltage and user accessible parts.
• CAUTION: TO PREVENT ELECTRIC
SHOCK, MATCH WIDE BLADE OF PLUG
TO WIDE SLOT, FULLY INSERT.
• WARNING: To reduce the risk of fire
or electric shock, do not expose this
apparatus to rain or moisture.
• CAUTION: Use of controls or adjustment
s
or performance of procedures other than
those specified may result in hazardous
radiation exposure.
• WARNING: Changes or modifications
to this unit not expressly approved by the
party responsible for compliance could
void the user’s authority to operate the
equipment.
• WARNING: Do not place the unit on top
of any soft, porous, or sensitive surfaces
to avoid damaging the surface. Use a
protective barrier between the unit and
surface to protect the surface.
• WARN I NG: Use of this unit near
fluorescent lighting may cause interference
regarding use of the remote. If the unit
is displaying erratic behavior move away
from any fluorescent lighting, as it may be
the cause.
• CAUTION: Danger of explosion if battery
is incorrectly replaced. Replace only with
the same or equivalent type.
• WAR N I NG: Th ere is a dange r o f
explosion if you attempt to charge standard
Alkaline batteries in the unit. Only use
rechargeable NiMH batteries.
• WARNING: Lithium batteries, like all
rechargeable batteries are recyclable
and should be recycled or disposed of in
normal household waste. Contact your
local government for disposal or recycling
practices in your area. They should never
be incinerated since they might explode.
• WARNING: Shock hazard - Do Not Open.
Main plug is used as disconnect device
and it should remain readily operable
during intended use. In order to disconnect
the apparatus from the main completely,
the main plug should be disconnected form
the main socket outlet completely.
CAUTION
RISK OF ELECTRIC SHOCK
DO NOT OPEN
WARNINGS AND PRECAUTIONS
1
Page 3

2
1. Read these Instructions.
2. Keep these Instructions.
3. Heed all warnings.
4. Follow all instructions.
5. Do not use this apparatus near water.
6. Clean only with a dry cloth.
7.Do not block any ventilation openings.
Install in accordance with the
manufacturer’s instructions.
8. Do not install near any heat sources
such as radiators, heat registers, stoves, or
other apparatus (including amplifiers) that
produce heat.
9. Do not defeat the safety purpose of
the polarized or grounding - type plug. A
polarized plug has two blades with one
wider than the other. A grounding type
plug has two blades and a third grounding
prong. The wide blade or the third prong
are provided for your safety. When the
provided plug does not fit into your outlet,
consult an electrician for replacement of
the obsolete outlet.
10. Protect the power cord from being
walked on or pinched particularly at plugs,
convenience receptacles, and the point
where they exit from the apparatus.
11. Only use attachments/accessories
specified by the manufacturer.
12. Use only with a ca rt,
s t an d, t ri p o d , br ac k e t ,
or t able sp ecified by the
manufacturer, or sold w
ith
the apparatus. When a cart
is used, use caution when moving the cart/
apparatus combination to avoid injury from
tip-over.
13.Unplug this apparatus during lightning
storms or when unused for long periods of
time.
14. Refer all servicing to qualified service
personnel. Servicing is required when
the apparatus has been damaged in any
way, such as power-supply cord or plug
is damaged, liquid has been spilled or
objects have fallen into the apparatus, the
apparatus has been exposed to rain or
moisture, does not operate normally, or has
been dropped.
Additional Warnings
• The apparatus shall not be exposed to
dripping or splashing and that no objects
filled with liquids, such as vases, shall be
placed on apparatus.
• Main plug is used as disconnect device
and it should remain readily operable
during intended use. In order to disconnect
the apparatus from the main completely,
the main plug should be disconnected from
the main socket outlet completely.
• Battery shall not be exposed to excessive
heat such as sunshine, fire or the like.
• Caution marking is located
at the rear or
bottom of the apparatus.
• The marking information is located at the
rear or bottom of apparatus.
FCC Warnings
This device complies with part 15 0f the
FCC Rules. Operation is subject to the
following two conditions: 1) this device
may not cause harmful interference, and 2)
This device must accept any interference
received, including interference that may
cause undesired operation.
Warning: Changes or modifications to this
unit not expressly approved by the party
responsible for compliance could void the
user’s authority to operate the equipment.
NOTE: This equipment has been tested
and found to comply with the limits for a
Class B digital device, pursuant to Part 15
of the FCC Rules.
IMPORTANT SAFETY INSTRUCTION
Page 4
3
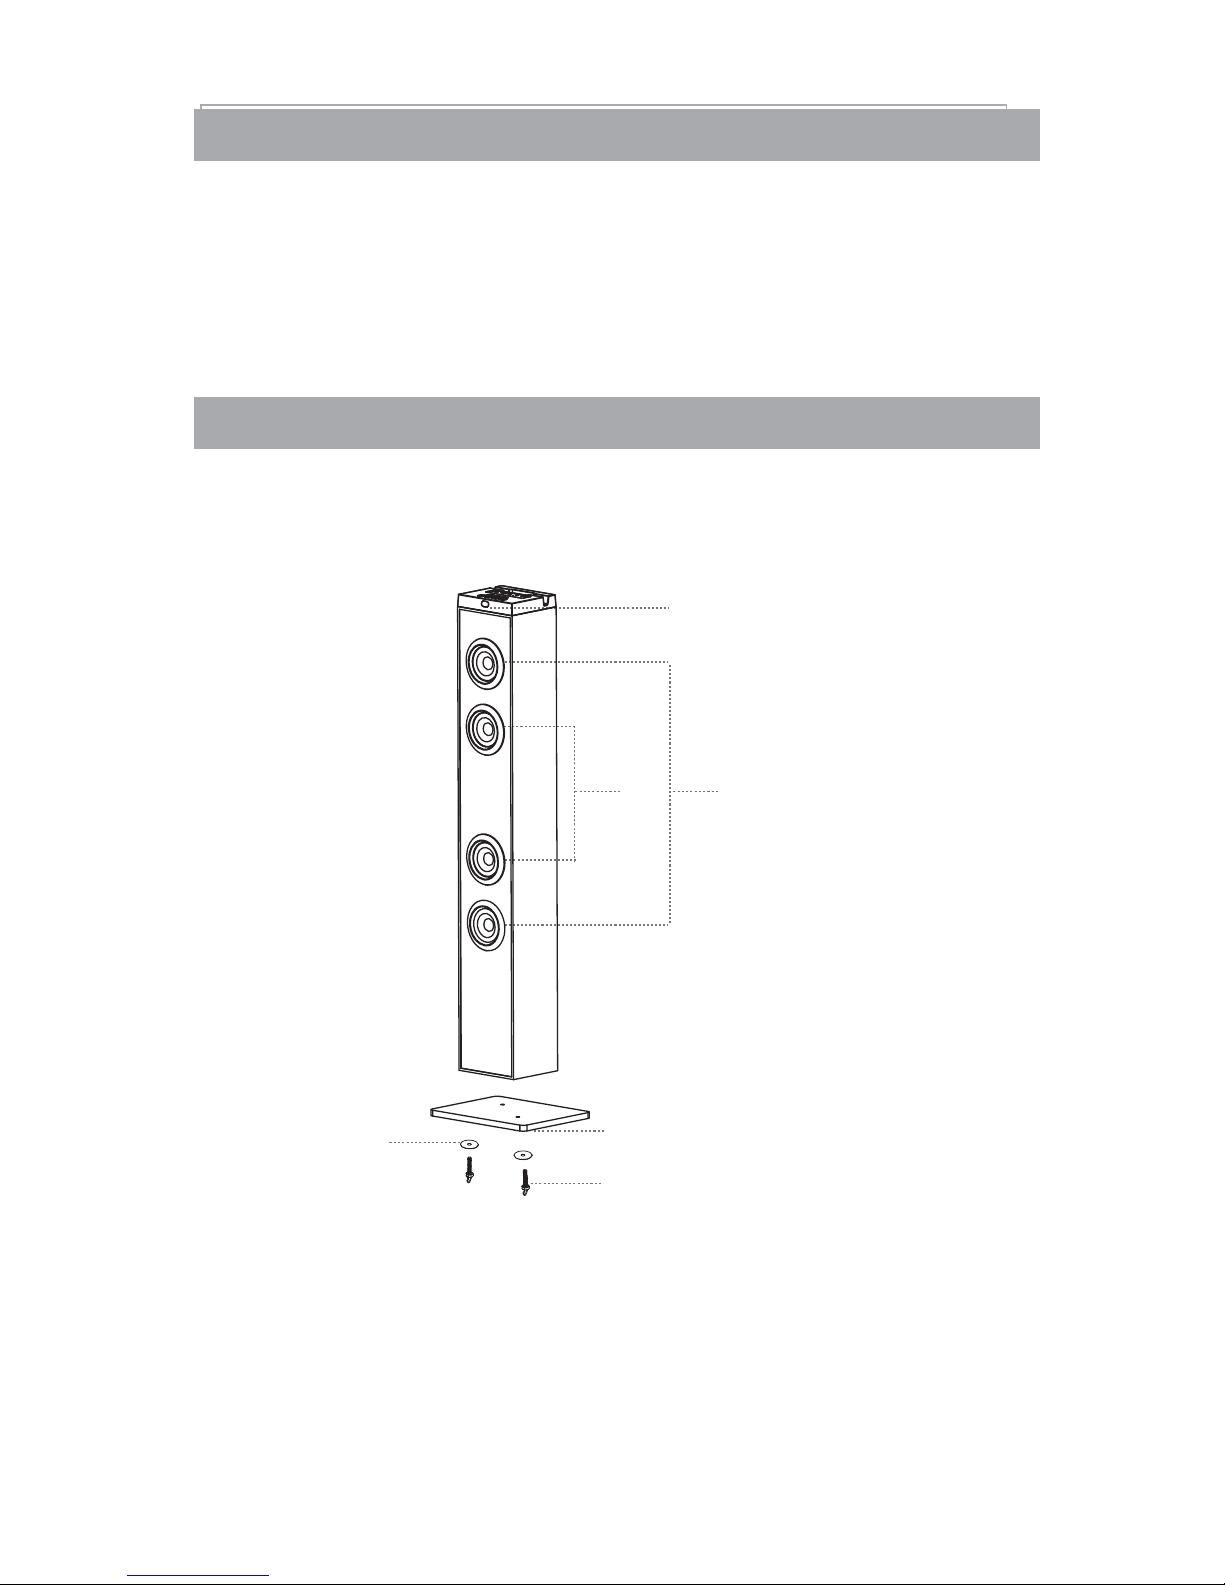
When you unpack your new unit, make sure that you have removed all the
accessories and information papers:
-Speaker tower
-User manual
-Remote Control
-1 piece of Stereo audio connection cable with 3.5 stereo plug
-2 pieces of Assembly screws / washers
INSTALLATION
Assemble the wooden base to the main body by the supplied screws and washers.
PACKAGE CONTENTS
1. Remote Sensor
2. Tweeters
3. Loud Speakers
4. Base
5. Screws
6. Washers
Note:
1
32
4
5
6
Page 5
4
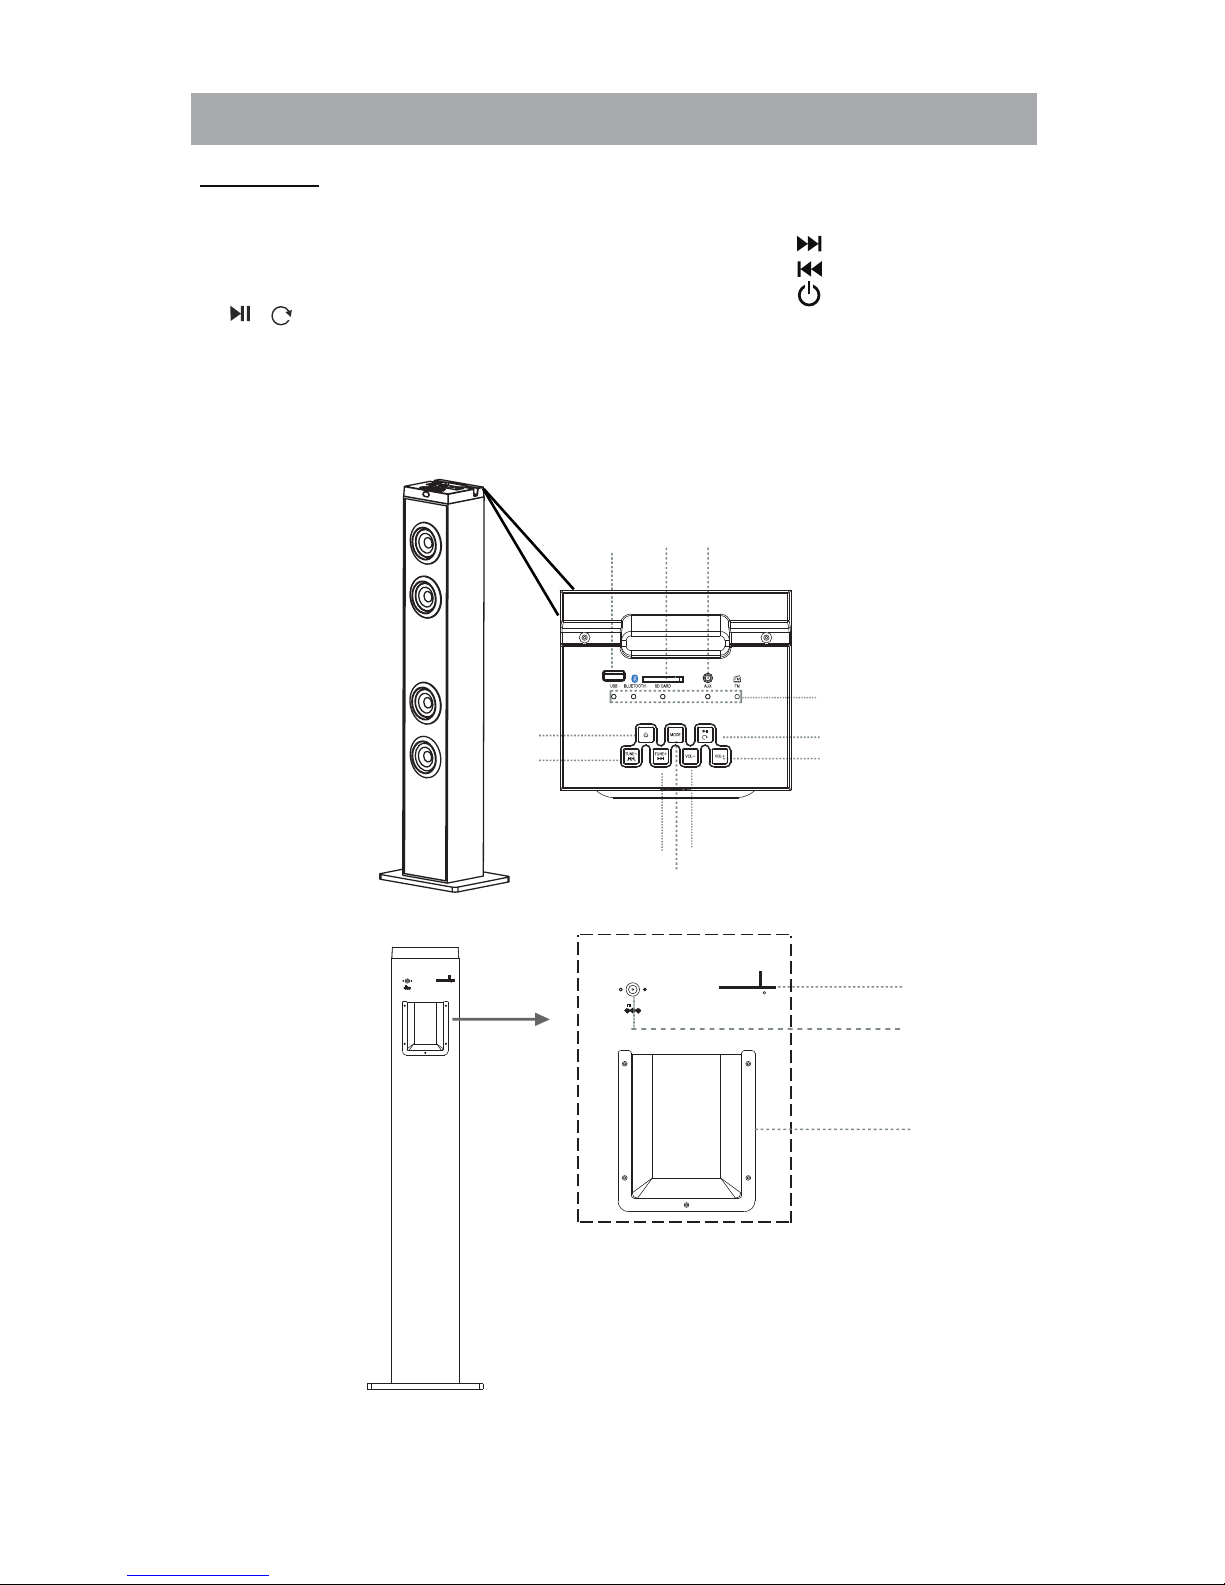
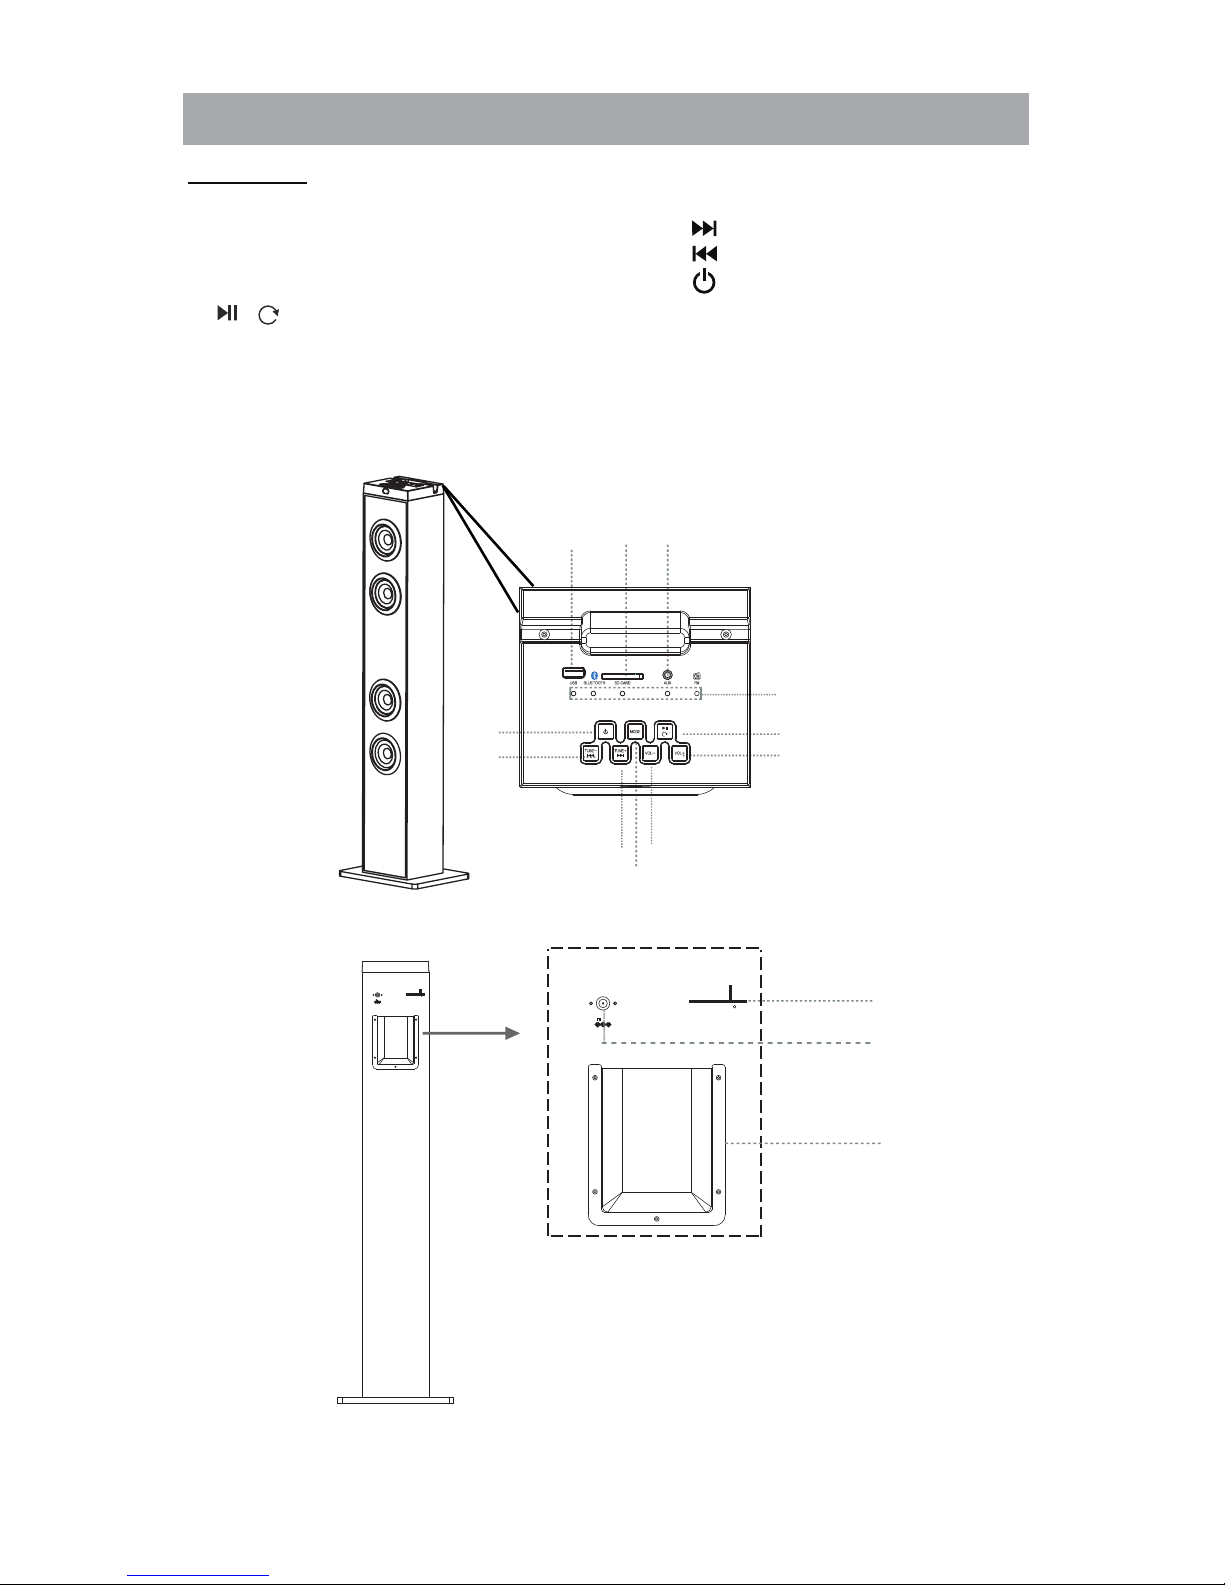
TUNE- button
9.
VOL- button
TUNE+ button
11.
14.
STANDBY button
LOCATION AND DESCRIPTION OF CONTROLS
MAIN UNIT
1.
USB PORT
2.
SD CARD SLOT
3.
4.
5.
SOURCE INDICATORS
PLAY/PAUSE/FM SCAN button
MODE button
/
7.
VOL+ button
12.
ACCESSORY BAG
ANTENNA
6.
/
8.
10.
/
2 3
4
5
6
7
8
9
10
11
1
12
13
ANT
DC IN
DC 12V, 2A
ANT
DC IN
DC 12V, 2A
14
13.
DC IN J
AUX IN jack
jack
Page 6
5
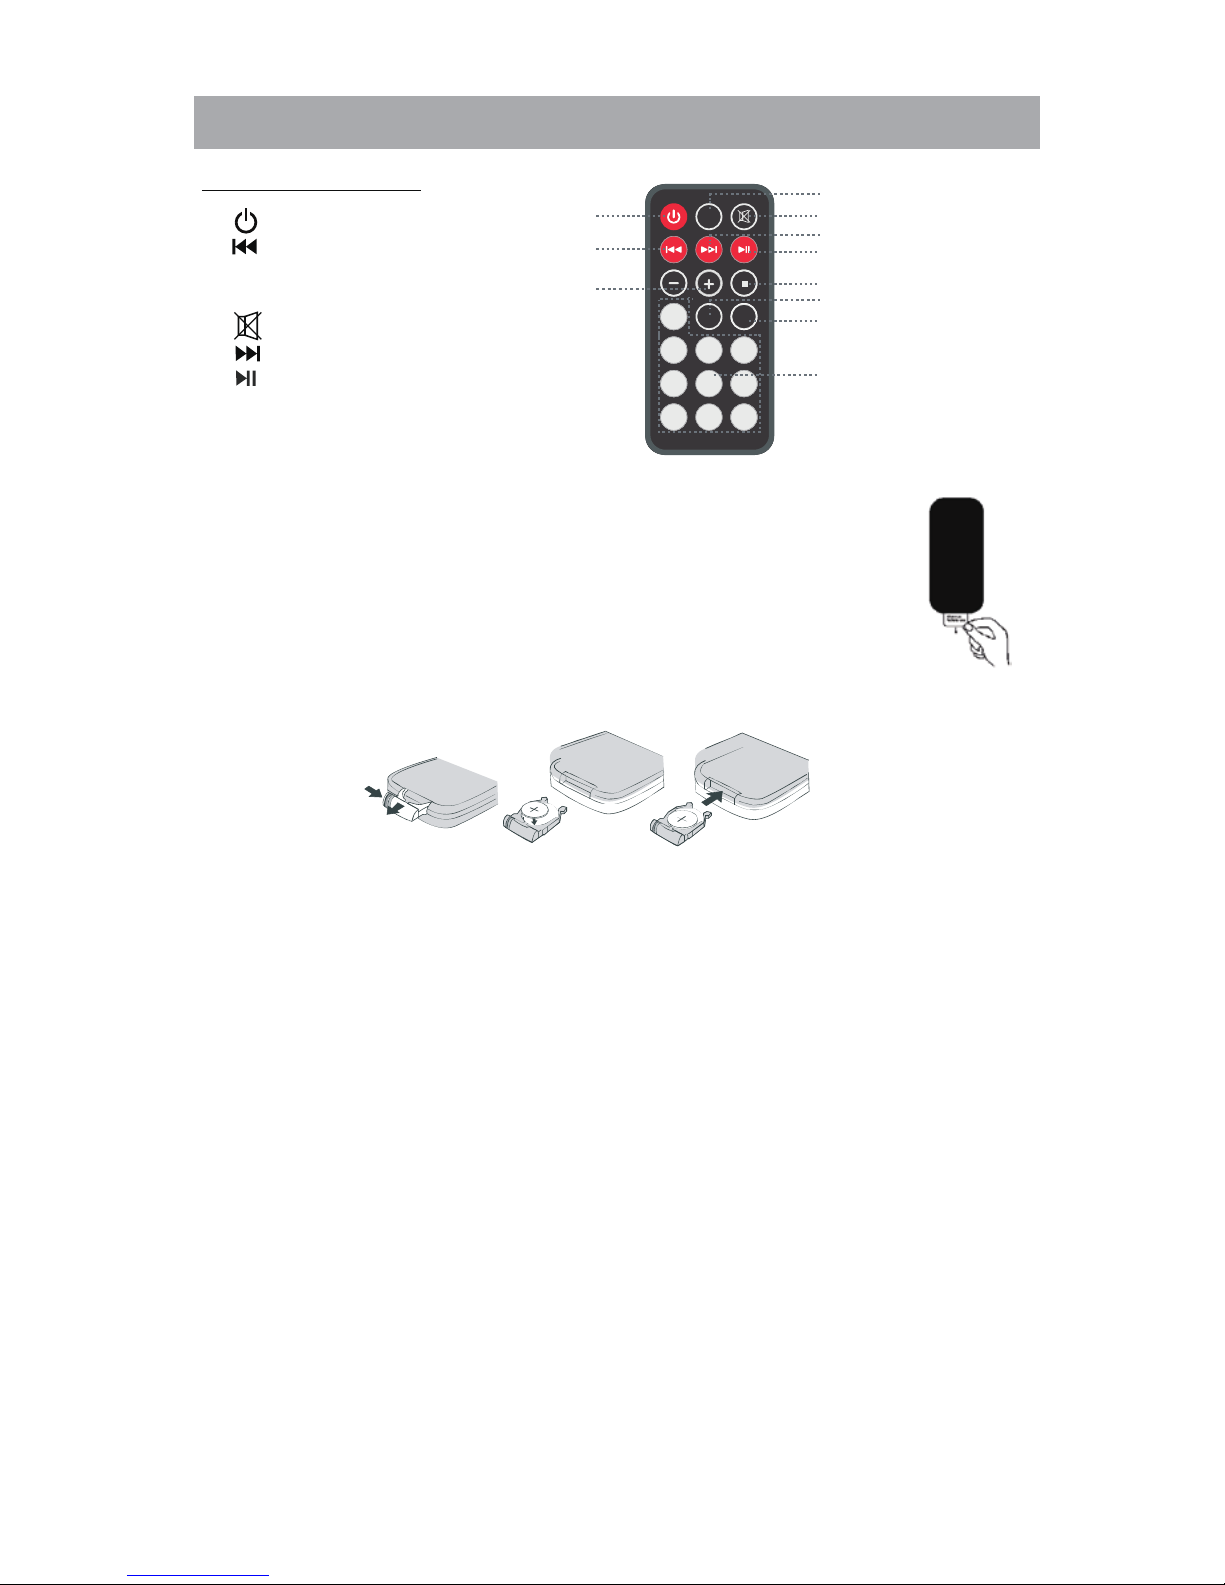
REMOTE CONTROL
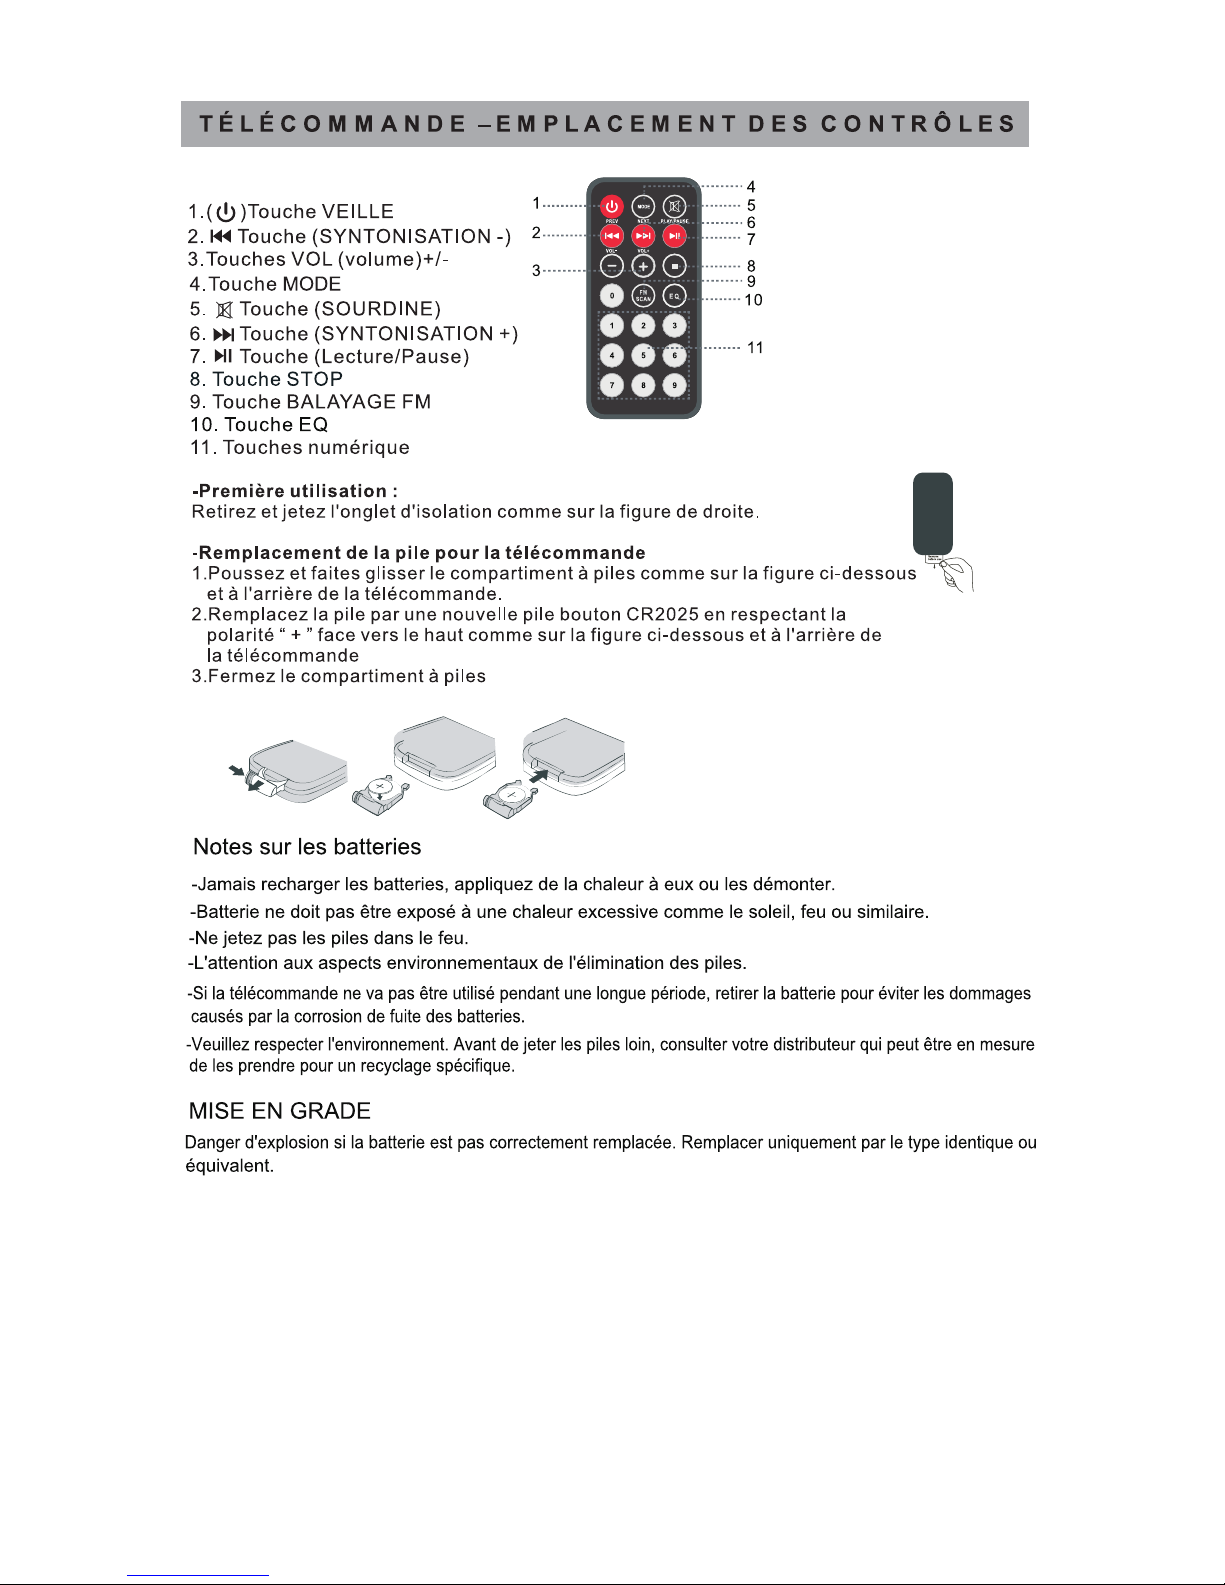
1. STANDBY Button
2. (TUNE -) Button
3. VOL (Volume)+/- Buttons
4. MODE Button
5. (MUTE) Button
6. (TUNE+) Button
7. (Play/Pause) Button
8. STOP Button
9. FM SCAN Button
10. EQ Button
1
MODE
1 2
3
6
98
5
4
7
0
SCAN
FM
PREV NEXT PLAY/PAUS E
VOL+VOL
-
1
2
3
4
5
6
7
8
9
10
11
E Q
“1” “2” “3”
The remote control operates on 1pc “CR2025” lithium battery
(included). To power up the remote control, remove the insulation
tab from the back of unit.
Replacing battery for the remote control
1. Push and slide out the battery door.
2. Replace the battery with a new CR2025 button cell with the polarity “+” facing up.
3. Slide the cover back.
Notes on batteries
• Never recharge the batteries, apply heat to them or take them apart.
• Battery shall not be exposed to excessive heat such as sunshine, fire or the like.
• Do not throw the batteries in fire!
• Attention should be drawn to the environmental aspects of battery disposal.
• If the remote control is not going to be used for a long time, remove the battery
to avoid damage caused by battery leakage corrosion.
• Please respect the environment. Before throwing any batteries away, consult
your distributor who may be able to take them back for specific recycling.
CAUTION:
Danger of explosion if battery is incorrectly replaced. Replace only with the same
or equivalent type.
LOCATION AND DESCRIPTION OF CONTROLS
1. Numeric Buttons
Page 7

6
POWER SOURCE
Inert the AC/DC adapter plug into a conveniently located AC outlet having AC 120V~60Hz.
WARNING: This unit has a long cord that can easily be tripped on or pulled
on, causing injury. Please make sure it is arranged so it will not drape over a
tabletop, etc. where it can be pulled on by children or tripped over accidentally.
GENERAL OPERATION
1. Press button to turn on or turn off the unit.
2. Press the MODE button repeatedly to select the playback source. The source
Note: If no USB device or CARD was inserted, USB or CARD mode cannot
be selected by MODE button.
3. Press the VOL(Volume)+/- Buttons to adjust volume level.
4. Press the EQ button to set EQ (equalizers) mode as desired.
5. Press the
Button on the remote control to turn o ff the sound. Press it again
to turn it back.
6. If the unit is not used for a long period of time, pull out the plug to turn off the
unit completely.
PLAY RADIO
Press the button to turn on the unit.
1. Press button repeatedly until the FM Indicator turns green.
stations then stored into the memory automatically.
3. After finished FM SCAN, press numeric buttons then wait for approx 3
seconds, you can select 1-20 preset stations. eg: pressing “1”, means preset
station 1. pressing “2” + “0” means preset station 20. Or press to cycle through
To enhance radio reception ability:
FM: Fully unwind the antenna wire. Extend the antenna wire and place it in the
indicator will light green accordingly.
MODE
and listen to the preset stations.
all available
the FM SCAN button or press and hold button and then the unit will start
to search
LISTENING TO AUXILIARY SOURCE
1. Connect your auxiliary source (e.g. iPod / iPad / MP3 player) to the
AUX jack.
2. Press
button to turn on the unit.Press the
Button repeatedly until
the AUX indicator turns green.
3. Start playback from your auxiliary source.
4. Adjust the volume to desired level.
5. To stop playback, disconnect your auxiliary source from the AUX jack.
MODE
WARNING:
Note:
2. Press
Page 8

7
USB OR SD CARD PLAYBACK
You can connect a USB flash drive (not included) to the USB port or a SD card
(not included) to the memory expansion card slot on the unit
to play MP3 files.
1. Press button to turn on the unit. Press the Button repeatedly until
the USB Indicator or SD indicator turns green.
2. Press to suspend momentarily the playing track. Press again to resume
playing.
3. Press button to skip forward to next track and to skip backward to
previous track. Press and hold or to search quickly within a track.
4. Using numeric buttons to your desired track. eg: pressing “1”, means track 1.
pressing “2”+“0”+”9 means track 209.
Note:
• Supporting format: MP3 (32kbps-320kbps)
• The total number of MP3 files on the Memory Device should not exceed 999.
• If you can not easily insert the memory card, you may have inserted it incorrectly.
Try to turn over the card and then insert again.
• For playing files on USB flash drive or SD card, you should plug in the
• There are many USB devices in the market. We cannot guarantee to support all
different models. Please try another USB device if your device is not supported.
• Some SD cards may be incompatible.
MODE
Wait for a few seconds, the unit
will play the music files automatically.
USB flash
drive or SD card when the unit is in standby mode. Turn ON
the unit and use MODE
button to select USB or SD card mode.
BLUETOOTH PAIRING & LINKING OPERATION
1. Turn off the Bluetooth functionality of other devices that were paired with your unit.
2. Press button to turn on the unit.
3. Press MODE button to select Bluetooth mode. The Bluetooth indicator will
turn green.
4. Turn on Bluetooth functionality on your Bluetooth device. Typically, Bluetooth
controls are found on the device’s tools or settings menu (see your user manual).
Turn on Bluetooth connectivity and make your device “discoverable”.
5. Clean out the paring list on your Bluetooth device.
6. Choose “add a new Bluetooth device” or “setup Bluetooth device” on your device.
It will start to search. Once
shows on your device, select it. If your
device prompts you for a pass code, please enter 0000. If the pairing attempt fails
or times out, please start pairing procedure again (see steps 2-6).
7. After your device and the “SP288” have connected each other, a
Play MUSIC from Bluetooth devices.
Make sure the Bluetooth connection between the unit and the device is active.
1. Press to suspend momentarily the playing track. Press again to resume
playing.
2.Press button to skip forward to next track and to skip backward to
previous track.
“SP288”
sound
can be heard.
Page 9
8
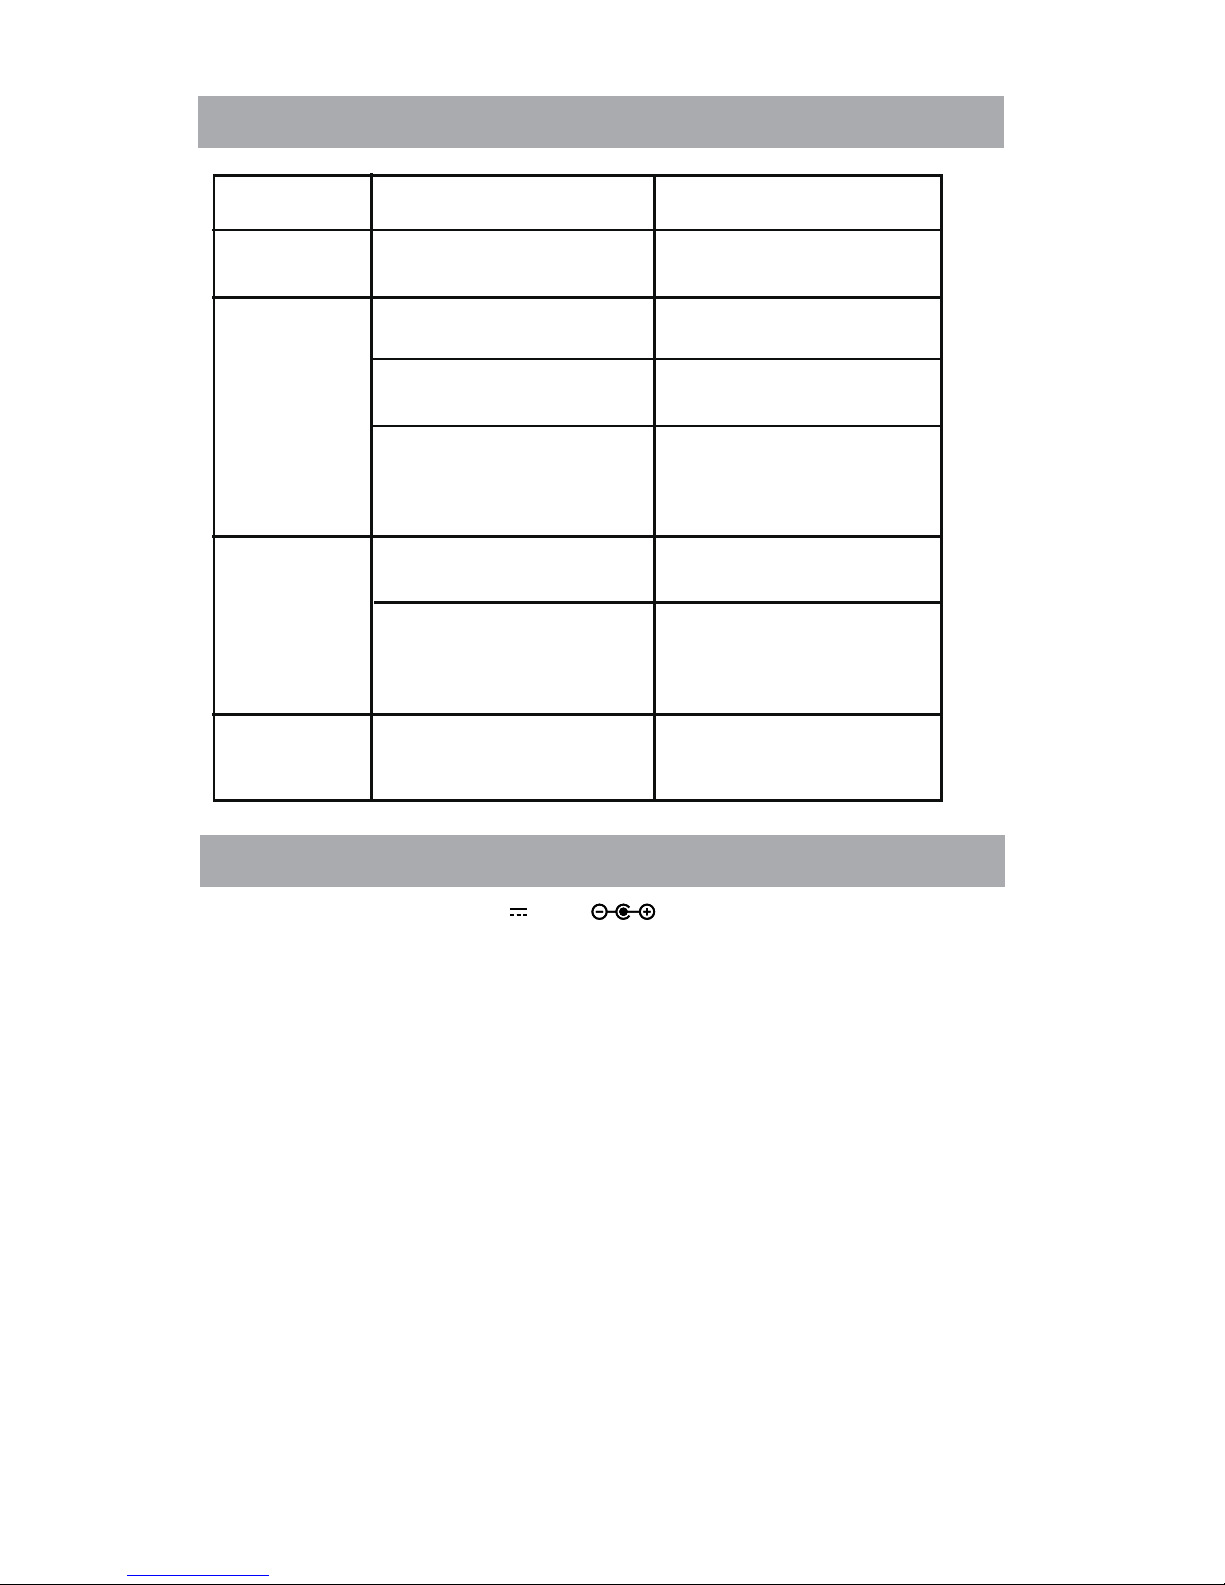
TROUBLESHOOTING GUIDE
Symptom
Cause
Solution
No power
Adapter plug not plugged
into wall outlet.
Plug it to the wall outlet
properly.
No sound
Volume in minimum.
Adjust volume to a
desired level.
The connected device is
not in playback mode.
Play the music in the
connected device.
Sound output of the
connected device weak.
(AUX IN & BLUETOOTH
mode)
Adjust volume of connected
device.
Sound
distortion
Volume level too high
Reduce the volume level
by press the VOL- button.
Volume level of the
connected device too high.
(AUX IN & BLUETOOTH
mode)
Reduce the volume level of
the connected device.
Bluetooth
reception
failure
Not in the Bluetooth
mode.
Try to do connection
again.
SPECIFICATIONS
Power source:
Audio Power: 20W(RMS)
Radio Coverage: FM 87.5 -108.0 MHz
Bluetooth working distance:
Wall
and structures may affect range of device)
Remote working distance: Up to 5 meters, +/- 30 degree.
Impedance of Speakers:
Loud speakers
8 Ohm, 10W x 2
Tweeters
8 Ohm, 5W x2
Up to 10 meters measured in open space.
(
DC 12V, 2A
Page 10
TOUR SYSTÈME STÉRÉO
TOUR SYSTÈME STÉRÉO
MANUEL DU PROPRIÉTAIRE
Modèle:
SP288
VEUILLEZ LIRE AVANT DE FAIRE FONCTIONNER CET APPAREIL.
Page 11
1
Page 12
2
Page 13
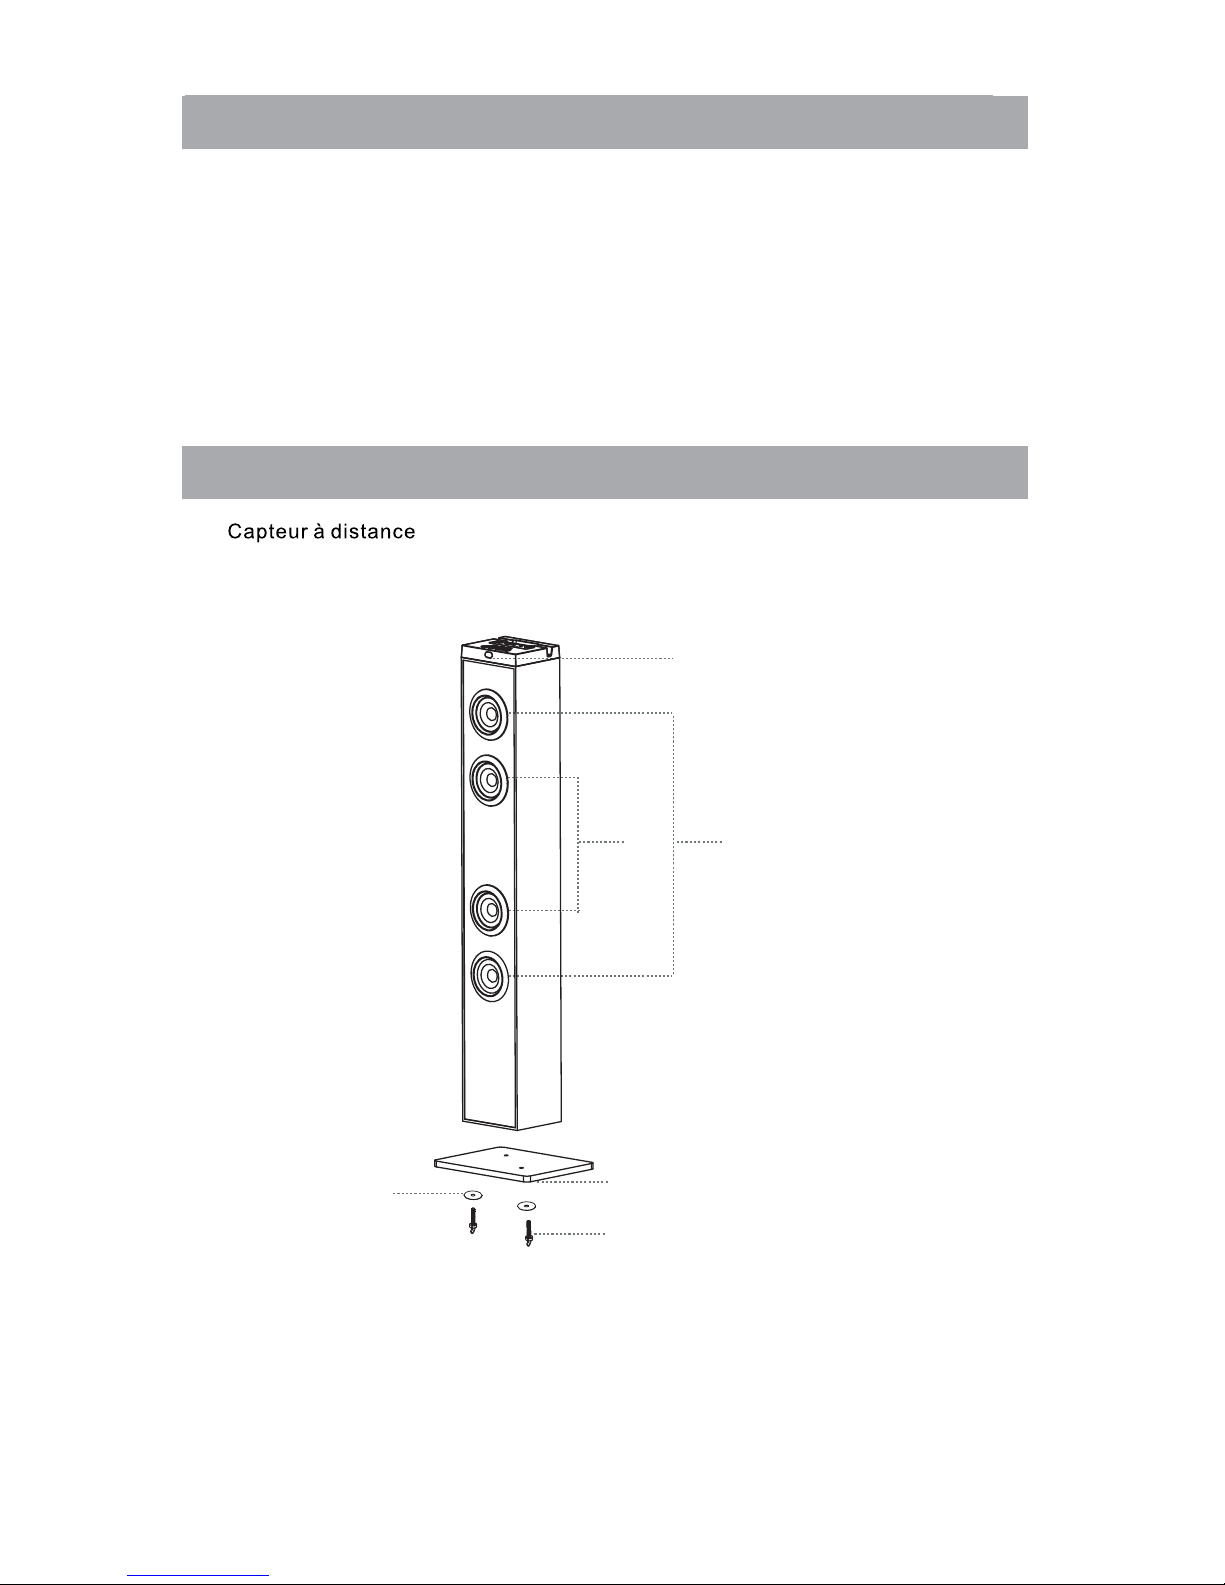
-Unité principale
-Manuelle
-Télécommande infrarouge
-
-
INSTALLATION
Assemblez la base en bois au corps par des vis et des rondelles.
1.
2. Tweeters
3. Haut parleurs
4. Base
5. Vis
6. Rondelle
Note:
3
CONTENU DE L'EMBALLAGE
Quand vous déballez votre nouvelle unité, assurez-vous que le youhave a enlevé tous
accessoires et papiers de l'information
1 x Câble audio de 3,5 mm avec fiche stéréo
2×Vis d'installation / rondelles
1
32
4
5
6
Page 14
4
TUNE- touche
9.
TUNE+ touche
11.
12.
STANDBY button
Unité principal
1
2
3.
4.
5.
Lecture/PAUSE/FM balayage touche
MODE Touche
/
Aaccessoire sac
EMPLACEMENT DES CONTRÔLES
ANT (Antenne pour radio FM)
INDICATEUR
Prise AUX IN
.Port USB
. Fente pour carte SD
6.
/
7.
Touche VOL+(Augmenter volume)
8.
Touche VOL-(Augmenter volume)
10.
/
2 3
4
5
6
7
8
9
10
11
1
14.
13.
12
13
ANT
DC IN
DC 12V, 2A
ANT
DC IN
DC 12V, 2A
14
PORT DC
Page 15
5
Page 16

6
ou appuyez sur la touche pour passer en revue
2.Appuyez sur le bouton SCAN FM ou appuyez et maintenez enfoncé le bouton et ensuite
l'unité commencera à rechercher toutes les stations disponibles, puis stockées dans la
mémoire automatiquement.
impossible de sélectionnerle bouton MODE.
Remarque : Si aucun périphérique USB ou la carte a été insérée, mode USB ou la carte
s'allume en vert en conséquence.
RADIO
station 1. pressing “2” + “0” means preset station 20. Or press to cycle through
and listen to the preset stations.
Veuillez vous assurer que c'est arrangé donc ne devra pas encombrer un dessus de table,
etc. où il peut être tiré par des enfants ou trébuche accidentellement.
SOURCE D'ALIMENTATION
FONCTI ONNEMENT GÉNÉRAL
1.Appuyer sur le bouton POWER( ) sur l'appareil ou sur la télécommande afi
e
sortir
du mode veille.
3. Appuyez sur la VOL(Volume) touches pour ajuster le niveau du volume +/-.
4.Appuyez sur le bouton EQ pour définir ou redéfinir le mode EQ (Égalisateur
omme
5.Appuyez sur le bouton SOURDINE sur la télécommande pour couper le son,
Appuyez de nouveau pour le
rétablir.
6.Si l'appareil n'est pas utilisé pendant une longue période de temps, éteindr
'appareil
n appuyant sur l'interrupteur d'alimentation (OFF).
Mettre l'appareil sous tension selon les procédures précédentes.
1.Appuyez sur le bouton MODE jusqu'à ce que l'indicateur FM passe au vert.
/
3.Après un SCAN FM fini, appuyez sur les touches du clavier numérique, puis attendez
pendant environ 3 secondes
,vous pouvez sélectionner des stations préréglées 1-20.
et d'écouter les stations préréglées.
Capacité de réception de radio enchance
Allonger le cable de l'antenne.
voyant AUX vert.
2. Appuyez sur le bouton d'alimentation pour allumer l'appareil. Appuyez sur le bouton
À L'ÉCOUTE DE LA SOURCE AUXILIAIRE
1.Connectez votre source auxiliaire (p. ex. iPod / iPad / lecteur MP3) à la prise AUX.
3.Démarrer la lecture de la source auxiliaire.
4.Régler le volume au niveau désiré.
5.Pour arrêter la lecture, débranchez votre source auxiliaire de la prise AUX.
vous le souhaitez.
AVERTISSEMENT :
Cet appareil dispose d'un long cordon qui peut
facilement être déclenché sur ou tiré.
Insérez l'adaptateur CA/CC Branchez dans une prise de AC idéalement située ayant
AC 120V ~ 60Hz.
e
l
e
)
c
e
l
n
d
2.Appuyez sur le bouton MODE pour sélectionner la source de lecture. L'indicateur de
source
Page 17

7
2. Appuyez sur le bouton pour passer au morceau suivant et pour remonter à la piste précédente.
pour reprendre la lecture.
1. Appuyez sur la touche Play/Pause pour interrompre momentanément la lecture piste. Appuyez à nouveau
7. Une fois votre appareil et le SP288 ont relié entre eux, vous entendrez un son " Du ".
à expiration, s'il vous plait continuer le jumelage procédure à nouveau (voir les étapes 2-6)
Si votre appareil vous invite à entrer un code d'accès, entrez 0000. Si la tentative de pairage échoue ou arrive
appareil. Il va commencer à chercher. Une fois " SP288 " présente sur votre périphérique, sélectionnez-le.
6. Choisir " ajouter un nouveau périphérique Bluetooth" ou " configurer un périphérique Bluetooth " sur votre
4. Allumez la fonctionnalité Bluetooth sur votre périphérique Bluetooth. En général, Bluetooth controles sont
Tournez sur la connectivité Bluetooth et que votre appareil puisse être détecté.
trouvent sur les outils ou le menu paramètres du périphérique (consultez votre manuel de l'utilisateur).
tous les différents modèles. Veuillez essayer un autre périphérique USB si votre appareil n'est pas pris en charge.
-Il y a de nombreux périphériques USB sur le marché. Nous ne pouvons pas garantir pour prendre en charge
le mode de carte USB ou SD.
lorsque l'appareil est en mode veille. Mettre sous le bouton MODE unitaire et utilisation pour sélectionner
-Pour lire des fichiers sur un lecteur flash USB ou carte SD, vous devez brancher la clé USB ou carte SD
suivre 1. appuyant sur " 2 " + " 0 " + " 9 " signifie suivre 209.
4.Appuyez sur les touches numériques de votre piste désirée. par exemple: en appuyant sur " 1", signifie
précédente. Appuyez et maintenez or pour rechercher rapidement dans une piste.
3. Appuyez sur le bouton de à sauter vers l'avant à la prochaine piste et pour remonter à la piste
reprendre la lecture.
2. Appuyez sur la touche pour interrompre momentanément la lecture piste. Appuyez à nouveau pour
indicateur de l'USB ou SD vert. Attendez quelques secondes, l'appareil jouera automatiquement les fichiers
de musique.
1. Appuyez sur le bouton pour allumer l'appareil. Appuyez sur le bouton MODE jusqu'à ce que le voyant
(non incluse) à l'emplacement pour carte mémoire expansion sur l'appareil pour lire des fichiers MP3.
Vous pouvez connecter un lecteur flash USB (non inclus) au port USB ou une carte SD
Note:
LECTURE DE CARTE USB OU SD
-Soutien format : MP3 (32 kbps-320 kbps)
-Le nombre total de fichiers MP3 sur le périphérique de mémoire ne doit pas dépasser 999.
-Si vous ne pouvez pas facilement insérer la carte mémoire, vous pouvez avoir inséré incorrectement.
Essayer de retourner la carte et puis insérez à nouveau.
Certaines cartes SD peuvent être incompatibles.
DISPOSITIFS D'ÉCOUTE BLUETOOTH
1.Désactiver la fonctionnalité Bluetooth d'autres périphériques qui ont été jumelés avec votre appareil.
2. Appuyez sur le bouton pour allumer l'appareil
3. Appuyez sur le bouton MODE pour sélectionner le mode Bluetooth. Le voyant Bluetooth se change en vert.
5. Nettoyer la liste de synchronisation sur votre périphérique Bluetooth.
Jouer de la musique de périphériques Bluetooth.
Assurez-vous que la connexion Bluetooth entre l'appareil et le périphérique est active.
Page 18
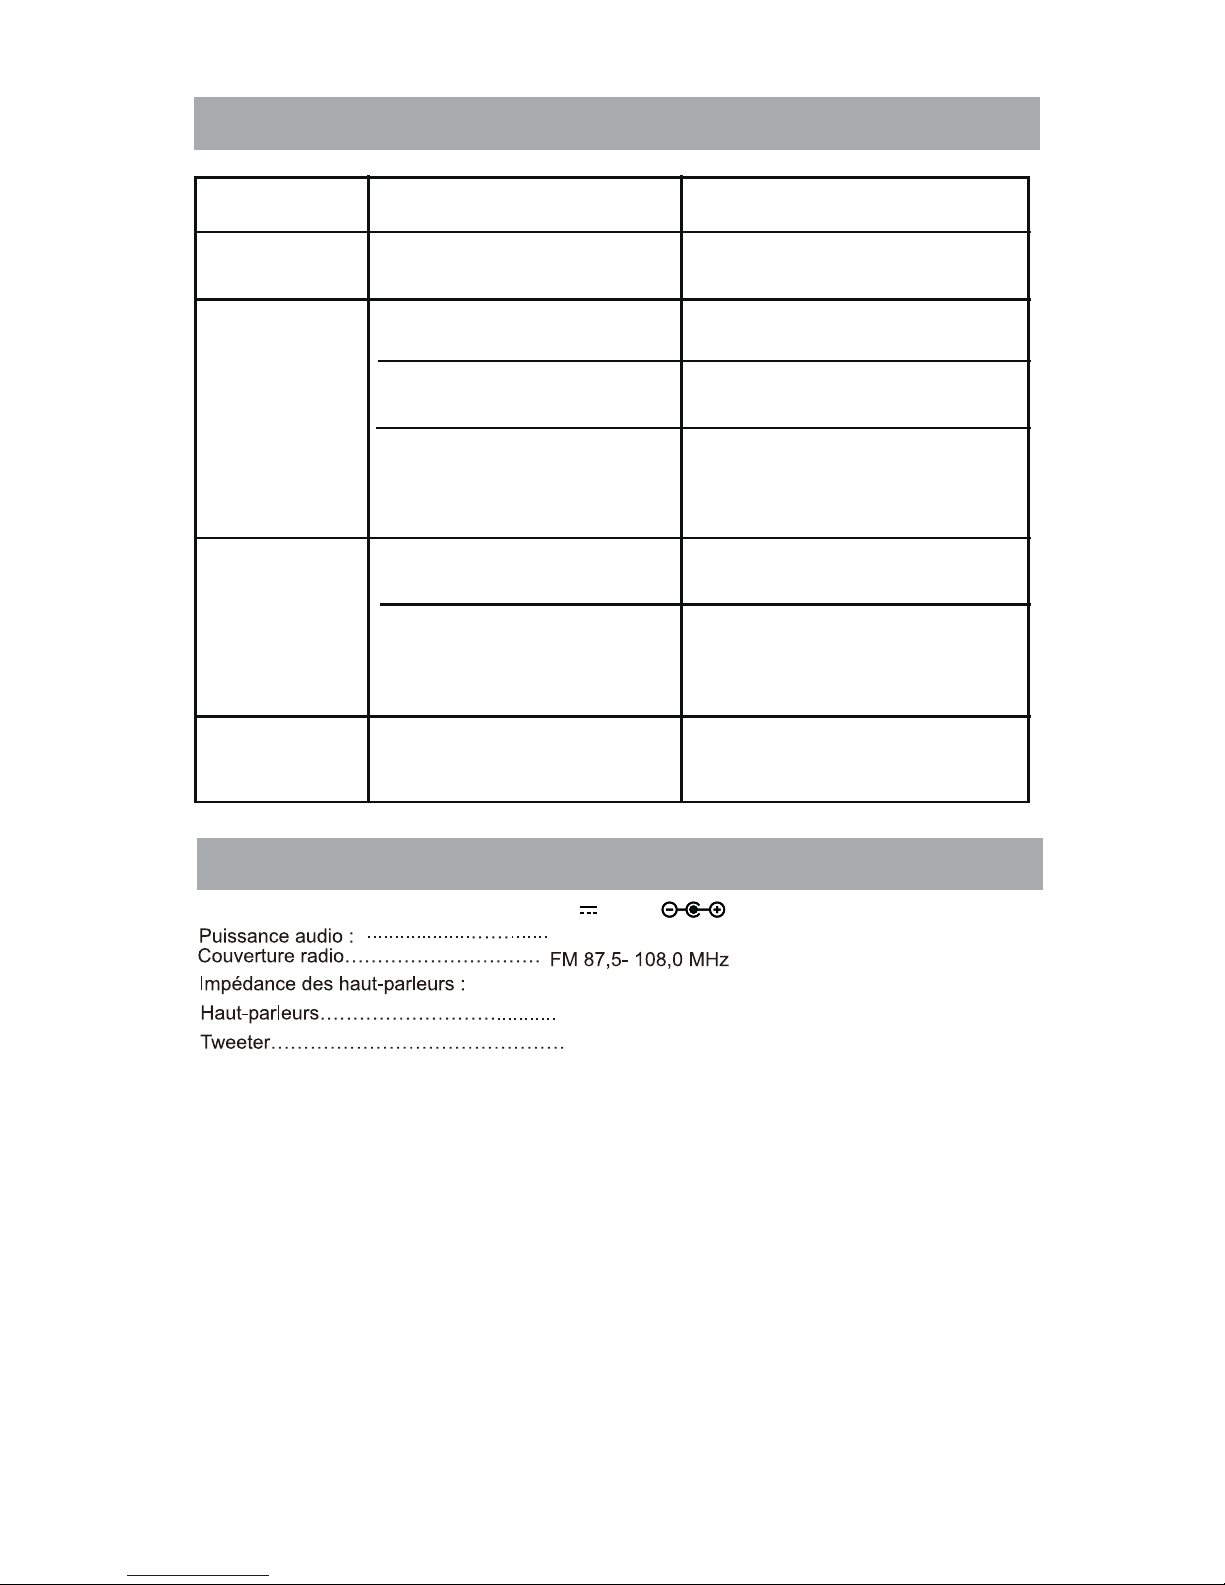
8
(Mur et structures peuvent affecter le gamme de périphérique)
Jusqu'à 10 mètres, mesurées en espace ouvert.
20W(RMS)
8 Ohm, 10W x 2
8 Ohm, 5W x2
SYMPTÔME
CAUSE POSSIBLE SOLUTION POSSIBLE
G U I D E D E D É P A N N A G E
Pas de couran
Branchez correctement la fiche
dans la prise murale
Pas de son
Volume est à la position
minimale
Le dispositif branché n'est pas
en mode de lecture
La sortie sonore du dispositif
branché est faible
ugmen ez e n veau sonore en
appuyant sur la touche VOL+
Faire la lecture de la musique / film
dans le dispositif branché
Augmentez le niveau sonore du
disp
ositif branché
A
Distorsion du
son
Niveau sonore trop élevé
Le niveau sonore du dispositif
branché trop élevé
Réduire le niveau sonore en
appuyant sur le bouton VOL-
Réduire le niveau sonore du
dispositif branché
Mode AUX IN & Bluethooth
Mode AUX IN & Bluethooth
échec de
réception
Bluetooth
Pas en mode Bluetooth.
Essayez de faire à nouveau.
Source d'alimentation .................
.
Bluetooth distance de travail :
Distance de travail à distance : Jusqu'à 5 mètres, +/-30 degrés.
Spécifications
DC 12V, 2A
Fiche de l'adaptateur ne
branché pas
 Loading...