

Page 1

User Manual – SMPK8858
1
Page 2
IntroductionⅠ
Product features:
z Display: 2.8-inch touch TFT screens.
z Operation interface: Friendly operation interface, easy for operation.
z Memory: Built–in flash memory
z Card slot: Micro-SD card slot to expand memory.
z Speaker: A high quality speaker.
z Interface: USB2.0.
z Language: Multi-languages.
z Audio: MP3, WMA format files, etc.
z Video: AVI format files.
z Photo: JPEG format files.
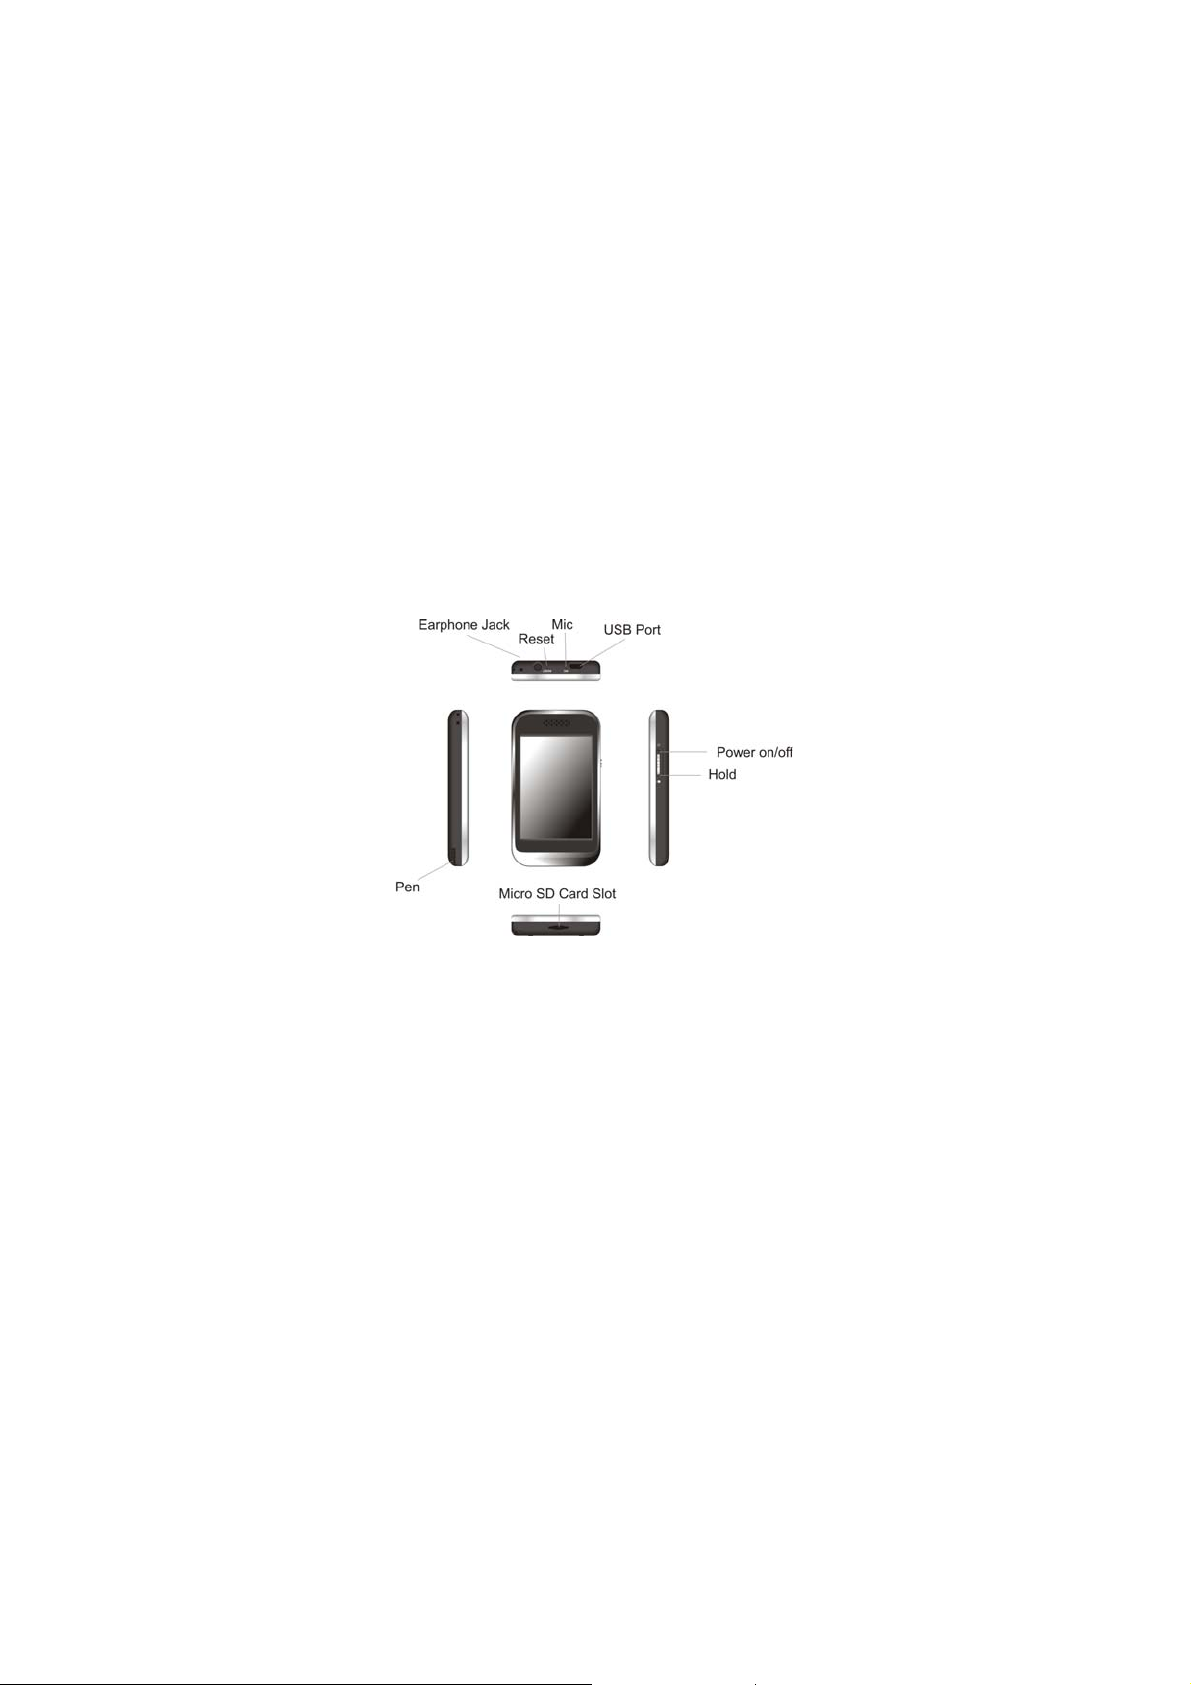
Appearance and KeysⅡ
OperationsⅢ
1. Playing Music
Choose “Music” option on the main menu, and double click the corresponding icon to enter it.
2
Page 3
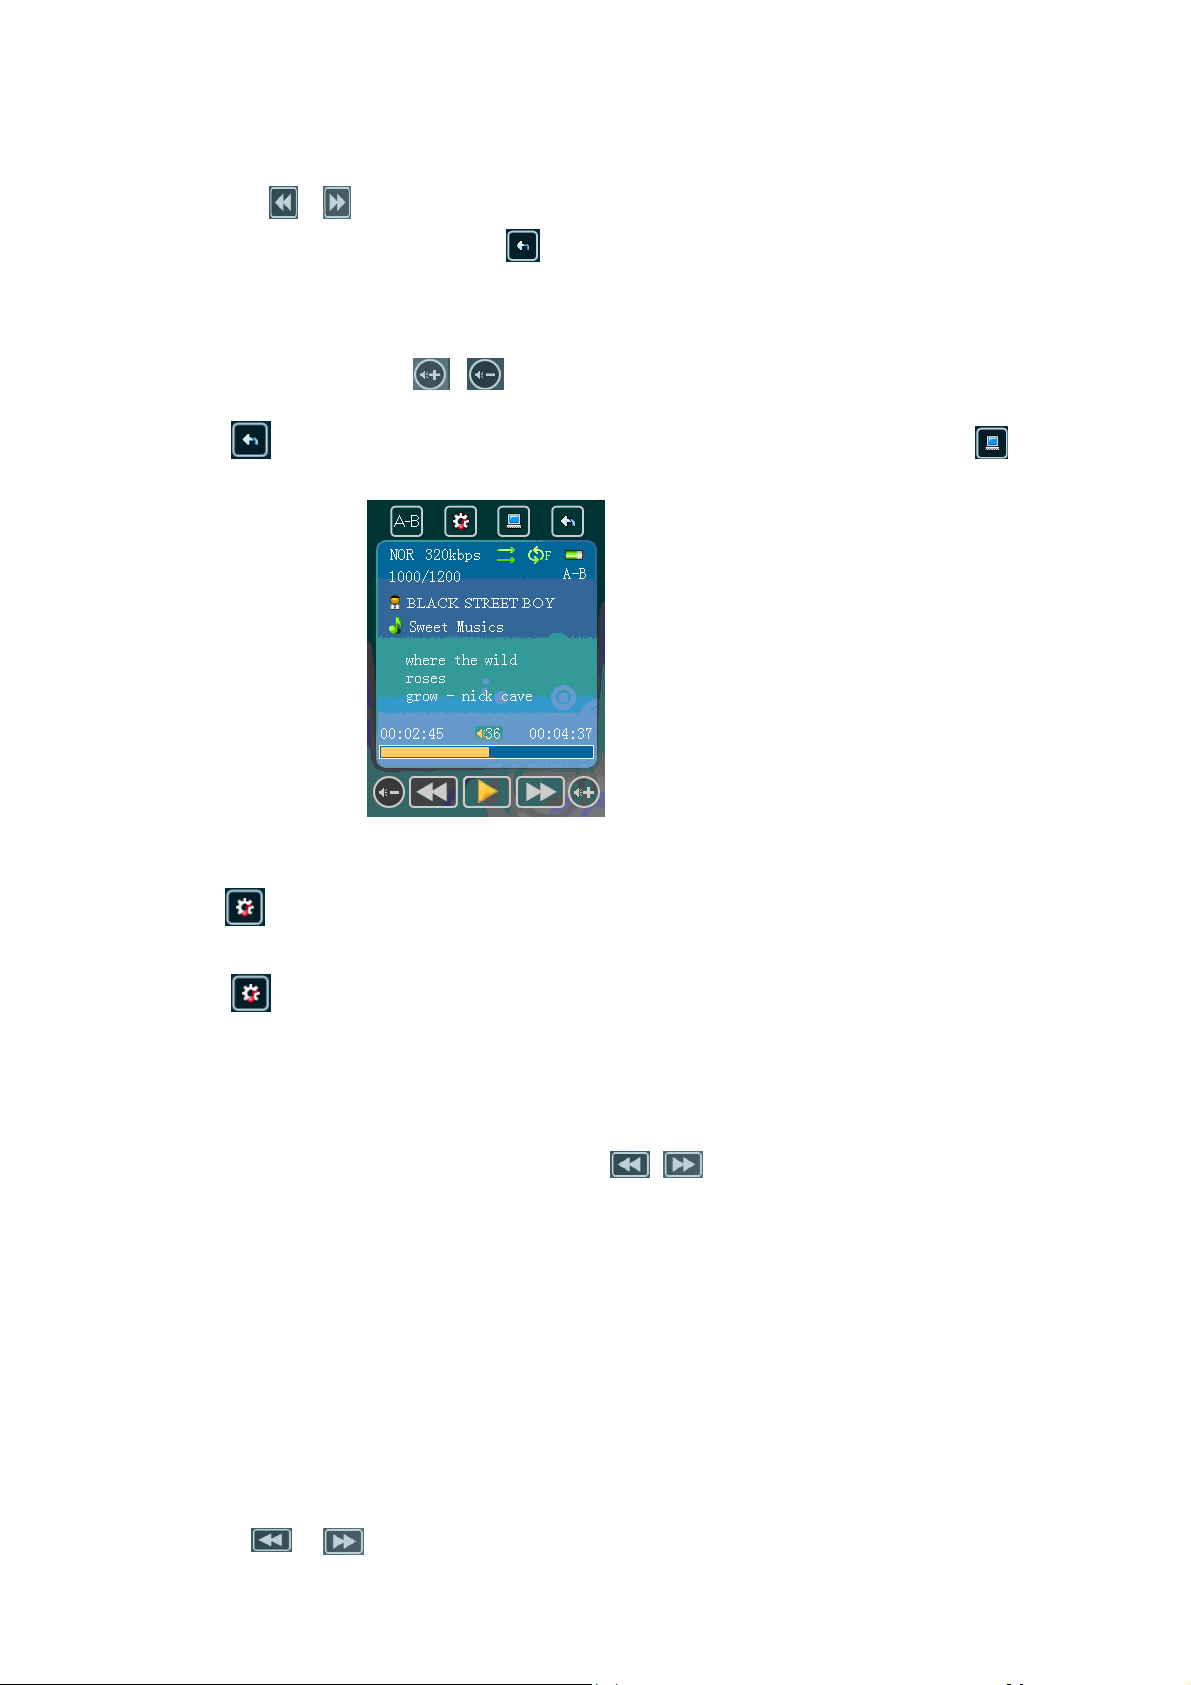
Keys:
Click “ / ” previous song / next song
Click to play the music file and click “ ” key to return to the main menu while playing music
Functional Description:
⑴ Adjust Volume
Click on speaker volume key “ / ”on th e bottom of screen to adjust the volume.
⑵ Play List
Click “
directly return to main menu.
” to enter the “Play List” and you can choose the song here. When playing music click “ ” to
(4) Repeat mode
Click “
(5) EQ Setup
Click “
(6) A-B Repeat and Pause
Click “A-B” to mark the starting point of the “A-B Repeat” Mode, click “A-B” again to mark the end point.
Click “A-B” again to quit the “A-B Repeat” Mode. You can’t enter “A-B Repeat” mode when the music is in
pause.
” to choose once, repeat one, folder repeat, all once, all repeat, intro under repeat mode file.
” to choose 8 EQ modes: NOR/3D/ROCK/POP/CLASS/BASS/JAZZ/USER EQ.
When the player is under “A-” or “A-B” state, click “ / ”to play the previous or next song, and then
“A-B Repeat” function will be ineffective.
Click “Play” on the screen to pause the music.
(7) Lyric Display
Naming lyric files as same as the music file and the player will directly display the lyric.
3. Playing Video
Click “Video” on the main menu.
Keys:
z “ / ”previous song / next video
3
Page 4

z Click on the selected video file and play. And click “ ” to return to the main menu.
Functional Description:
(1) Forward/ Backward
While playing the video, click “
(2) Adjust V olume
/ ” to go forward or backward.
Click the speaker volume key “ / ”on bottom of the screen to adjust the volume.
Notice: While playing the video, the menu bar will be hidden and it will be showed after pointing the screen
by pen.
4. Photo Browser
Choose “Photo” option on the main menu. Select and play image from the “picture list”.
Double click “M” key to return to the main menu
4
Page 5

Click to play slideshow
Click
Click to return to main menu.
Click to hide the menu bar
Click
Click
to return to the picture list
and to go forward and backward
to set the time interval of slideshow
5. Recording
Double click the “Recording” logo on the main menu.
Operations:
Recording:
“ ”: Start Recording
“ ”: Pause
“ ”: Save the file
”: Return
“
Playing the file:
(1) Enter the music mode
(2) Press“
(3) Press“ / ” to adjust the volume
/ ” and select the file
6. Explorer
Double click the “Recording” logo on the main menu.
Note: An additional folder “SD card” will be shown after inserting the TF card.
5
Page 6

File Manager
7. Setting
z Play the file: Double click the file on the list
z Delete file: Select the file and Click “
confirmation.
”. An alert message will be pop out for final
Double click “Setting” logo on the main menu.
1. Music
z Repeat Mode
a. Once Stop after playing all the songs in all directories
b. Repeat 1 The currently played song will be played repeatedly until this function is disabled.
c. Folder once All music in the selected folder would be played once until this function is disable.
d. All once The current folder will be played randomly
e. All repeat All music will be played from the beginning to the last one repeatedly
f. Intro All music will be played for 10 seconds from the beginning
6
Page 7

z EQ Setup and User EQ
After entering the music option, click on “
Normal/3D/Rock/Pop/Classic/bass/Jazz/User EQ”. Or you can edit your favorite EQ mode in the “User EQ set”
“
option.
” and press “EQ Select” to choose the EQ mode
z Play mode
You can choose “Order” or “Shuffle” in the “play mode” folder
Order: Choose “Order” mode to play songs in sequence
Shuffle: Choose “Shuffle” to play songs randomly
2. Record
Double click “Record” option and select “REC Quality” or “REC Volume”
z REC Quality: high quality, normal quality
z REC Volume: five options of volume level “+1, +2, +3, +4 and +5”
*The recorded voice file will be saved in “Music”
*If the player “Full Space”, it indicates that there is no space to save new file
3. Display Setup
①Backlight time: six options of 5 sec., 10 sec., 15 sec., 20 sec., 30 sec., and always on.
②Lum: five options of +1, +2 , +3, +4 and +5, the higher level, the brighter.
③Backlight mode: Normal and Po wer save modes.
4. Auto play set
There are text and jpeg under this file: 1s, 2s, 3s, 4s, 5s.
5. System Setup
Four sub-options: Language, about, Upgra d e and Default set.
①Languages: Simplified Chinese, Traditional Chinese, English, Korean, Japanese, and French
②About: Player information
③Touc h Screen Calibration
Click the three "+" shown on screen consecutively to complete the touch screen calibration. You can press the
"power" to quit the calibration at anytime. It is recommended to set the touch screen calibration everytime when
you operate your player.
.
6. Power Off Time
There are six options of Power: Off, 10 min., 15 min., 30 min., 60 min. and 120 min.
7. Defaulted set
Click “yes” to format the player or click “no” to return to the main menu
*The recorded voice file will be saved in “Music”
*If the player “Full Space”, it indicates that there is no space to save new file
Firmware UpdateⅦ
The player can be upgraded or reset by the software program stored inside the installation CD.
1. Insert the installation CD. Open the file \Firmware Upgrade tool\ConsumerUpdate 3.1.2.0\setup.exe
2. Install and run the program.
3.
Click “Open” and select the firmware file (.rfw)
Click Update to start the firmware upgrade process
4.
7
Page 8

Note: Firmware upgrade is to improve and optimize the performance of the player, but the normal operation
would not be affected without the firmware upgrade. However, an inappropriate upgrade may damage the
player.
Ⅷ Appendixes
1. Video File Format Conversion
The file format WMV, RM, AVI, VOB or DAT could be converted to AVI format by a software program
1. Insert the installation CD. Open the file \Firmware Upgrade tool\ConsumerUpdate 3.1.2.0\setup.exe
2. Install and run the program.
3. Click the "Add" button and a dialog will be pop out.
Resolution: 320 x 240 (set as default)
Source File: Select the source file
Target File Path: Select the folder for saving the converted file
Target File Name: Edit the file name
Setting – Quality: High / Medium / Low
Setting – Aspect Ratio: Full / 4:3 / 16:9
Scope: Enter the Starting time and duration
Click “Convert Now” to start the file conversion
2.FAQ
(1) Unable to turn on the player
·Check the battery level (by connecting to the power)
(2) The keys don’t work.
·Check the key lock status
(3) Messy code on the screen
·Check the language setting
3.Technical Specifications
8
Page 9

Screen
Dimension
Connection Speed
Build-in Memory
Power supply
Record
MP3、WMA、
Music Format
Service Temperature -5 ~40℃
System Requirement Windows98/SE/ME/2K/XP/Vista
dot matrix(320*240)262K color
96.9mm( length)×55mm(width)×12.6mm(height)
USB2.0 (HIGH SPEED)
high speed flash memory:1G/2GB/4GB/8G(optional)
polymer lithium battery 700mAh
Sampling Frequency 8KHz/16KHz
Record Format
Record Time
Earphone’s Max
Output
MP3 Bit Rate 64K bps –320K bps
WMA Bit Rate 64K bps –384K bps
FR 20Hz~20KHz
SNR 83dB
Degree of Distortion 0.4%
Preservation No. 20
Earphone’s Max
Output
SNR 45dB
MP1、MP2、MP3、WMA、WAV、FLAC、APE
WMA(32kbps,64 kbps)
68 hours(1GB)
(L)5mW+(R)5mW(32Ohm)
(L)5mW+(R)5mW(32Ohm)
9
 Loading...