

Page 1

English
SMP1036
USER’S MANUAL
THIS INSTRUCTION BOOK MAY CONTAIN ERRORS AND OMISSIONS.
DESIGN AND SPECIFICATION ARE SUBJECT TO CHANGE WITHOUT NOTICE.
No part of this document may be reproduced or transmitted in any form or by any means,
electronics or mechanical, including photocopying and recording or translated to another
language for any purpose without the prior written consent of the manufacturer.
All brand names, logos and registered trademarks mentioned are property of their respective
owners.
© 2006. All right reserved.
Version 1.0 10092006
Please read this booklet and note the warning statements before using the product.
Warning! Improper use of charger might cause the battery to turn hot or explode.
Note:
Sylvania is a registered trademark of OSRAM Sylvania Inc. Used under license.
Electric al and electr onic equipment ( EEE ) contains materials, parts and
substances which can be dangerous to the env iroment and harmful to human
health if waste of electrical and electronic equipment ( WEEE ) is not disposed
of correctly.
Equipments which are marked with the WEEE logo (as shown on the left ),
should not be thrown away with your hou sehold waste. Contact your Local
Authority Waste Disposal Department as they will be able to provide details
of the recycl in g options av ailable in your area.
1
Page 2

English
Table of Contents
Introduction-------------------------------------------- -------------------------------------------------------------------- 3
Features--------------------------------------------------------------------------------------------------------------------- 3
Package Contents--------------------------------------------------------- ------------------------------------------------ 3
Overview-------------------------------------------- --------------------------------------------------- --------------------- 4
Buttons Operation------------------------------------- -------------------------------------------------------------------- 5
Display----------------------------------------------------------------------------------------------------------------------- 6
On-screen-menu Operation--------------------------------------------------------- ------------------------------------ 7
Power On and Off-------------------------------------------------------------------------------------------------------- 8
Entering Main Menu Page-------------------------------------------------------------------------------------------- 8
Navigation------------------------------------------------------------------------------------------------------------------- 9
Playing Music ------------------------------------------------------------------------------------------------------------- 9
Skip a Song------------------------------------------------------------------------------------------- 10
Play Voice------------------------------------------------------------------------------------------------------------------- 10
Skip a Voice------------------------------------------------------------------------------------------- 11
Fast Forward and Backward---------------------------------------------------------------------- 11
Setting----------------------------------------------------------------------------------------------------------------------- 11
EQ Set-------------------------------------------------------------------------------------------------- 11
Backlight----------------------------------------------------------------------------------------------- 13
Backlight Color--------------------------------------------------------------------------------------- 13
Power Save------------------------------------------------------------------------------------------ 13
Recordset--------------------------------------------------------------------------------------------- 14
Language----------------------------------------------------------- --------- -------- -------- ---------- 14
Exit------------------------------------------------------------------------------------------------------ 15
Record----------------------------------------------------------------------------------------------------------------------- 15
Delete------------------------------------------------------------------------------------------------------------------------ 16
About------------------------------------------------------------------------------------------------------------------------- 16
Exit---------------------------------------------------------------------------------------------------------------------------- 16
Driver------------------------------------------------------------------------------------------------------------------------ 17
Format the MTP Player------------------------------------------------------------------------------------------------ 18
Synchronize MP3 and WMA Files to the Player----------------------------------------------------------------18
MTP Function being changed into USB Storage Function-------------------------------------------------26
USB Storage Function being changed into MTP Function-------------------------------------------------28
Trouble Shooting-------------------------------------------------------------------------------------------------------- 31
Technical Specifications---------------------------------------------------------------------------------------------- 32
Fast Forward and Backward---------------------------------------------------------------------- 10
PlayMode-------------------------------------------- -------- ------- --------- -------- -------- -------- -- 12
Contrast---------------------------------------------- -------- ------- --------- -------- -------- -------- -- 13
2
Page 3

English
Introduction
Thank you for choosing our digital MP3 player. You can use this versatile MP 3
player not only for playing MP3 and WMA songs, but also recording voice and
serving as a USB flash disk.
Features
z Large LCD display with backlight
z Support MP3 (MPEG1/2 Layer2), WMA, OGG music playback
z Digital voice recorder
z USB mass storage function for data storage
z 7 EQ settings
z 1xAAA battery supports long playing time
z No driver installation is required (except Windows® 98/98SE)
Package Contents
z User's manual
z Warranty Card
z Earphones
z Neck Strap
z 1xAAA battery
z USB cable
z CD including the driver
3
Page 4
English
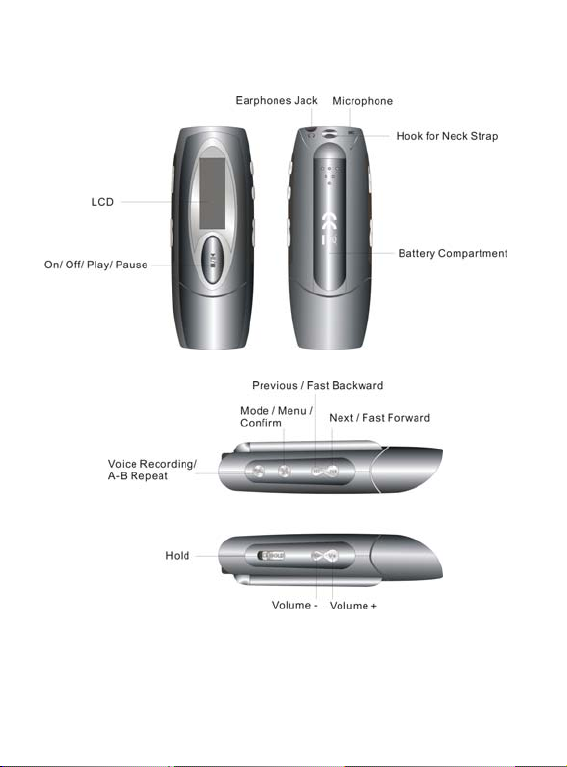
Overview
Front and Back
Left and Right
4
Page 5
English
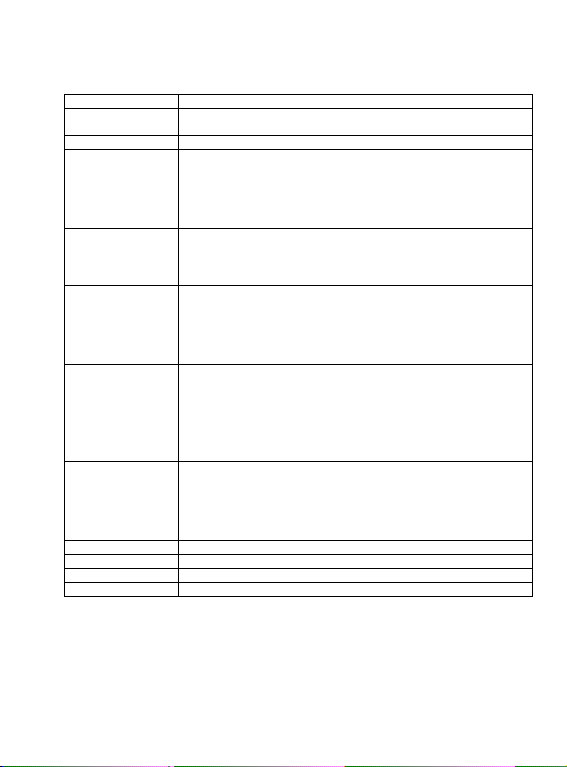
Buttons Operation
Operation
EARPHONES
JACK
MIC Microphone for voice recording
NEXT/
FAST FORWARD
MODE/
CONFIRM/
PREVIOUS/
FAST BACKWARD
ON/
OFF/
PLAY/
PAUSE/
REC
A-B Repeat
HOLD Push to lock and unlock the button
VOLUME + Press and hold the button to increase the volume
VOLUME - Press and hold the button to decrease the volume
DISPLAY Display the operating status, lyric with backlight
Insert the earphones into the earphones jack
z In PLAYING mode, press the button and release it
immediately to jump to next song
z Under Menu or Sub-menu page, press the button and
release it immediately to jump to next menu items
z In PLAYING mode, press the button and hold it to fast
forward
z In STOP mode, press the button to enter the Main Menu
page for changing the modes
z Under Menu or Sub-menu page, press the button to
confirm to the selection of menu items
z In PLAYING mode, press the button and release it
immediately to jump to previous song
z Under Menu or Sub-menu page, press the button and
release it immediately to jump to previous menu items
z In PLAYING mode, press the button and hold it to fast
backward the song
z In IDLE mode, press and hold the button to turn on the
player
z In STOP mode, press and hold the button to turn off the
player
z In STOP mode, press the button to play the songs
z In PLAYING mode, press the button to pause the
playing song
z In STOP mode, press the button to enter VOICE mode,
then press the button again to start voice recording
z In PLAYING mode, press the button to set Mark A, then
press the button again to set Mark B, the music will be
playback from Mark A to Mark B. You can press the
button again to disable this function
5
Page 6
English
Display
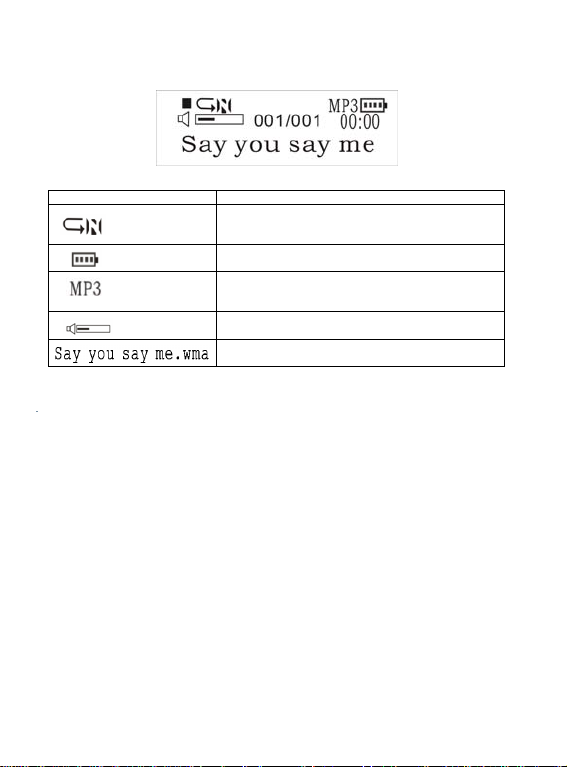
Display Icon Function
Battery Level
The Format of the Playing Music
Volume
The Name of Playing Song
Repeat Mode
Show the current repeat mode used.
Show the battery level.
Indicate the format of the playing music, MP3 or
WMA.
Show the volume of the song
Show the playing song currently
6
Page 7
English
On-screen-menu Operation
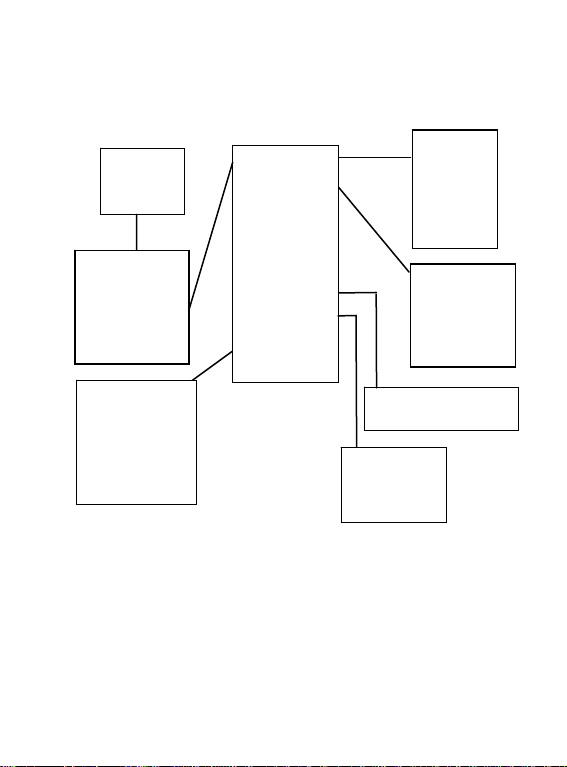
In STOP/PLAYING mode, press the MODE/CONFRIM button to enter the Main
Menu page
Main
Manu
Navigation
Music
Voice
Setting
Record
Delete
About
Exit
English
French
German
Spanish
Dutch
Italian
Portuguese
Greek
Exit
EQ Set
PlayMode
Contrast
Backlight
Backlight
Color
Powerset
Recordset
Language
Exit
Source
Encoder
Sample
Exit
Normal
Rock
Jazz
Bass
Pop
Classical
Soft
Normal
Repeat All
Repeat One
Random
Random All
Preview
DISABLE 2MINS
10MINS 30MINS
7
Page 8
English
Power On and Off
Inserting Battery
Insert 1xAAA battery into battery compartment. Align the “+” and “-“ sign as
indicated on the battery slot.
Power On
Press and hold ON/OFF button to turn on the player. Release ON/OF F button un til
“Welcome” appears on the display.
Power Off
In STOP mode, press and hold ON/OFF button to turn off the player. Release
ON/OFF button until “BYEBYE” appears on the display.
Battery Level
The battery icon on the display shows the battery level.
Low Battery
When the battery icon shows in , it indicates the battery power is running
out. You should replace a new AAA battery.
Entering Main Menu Page
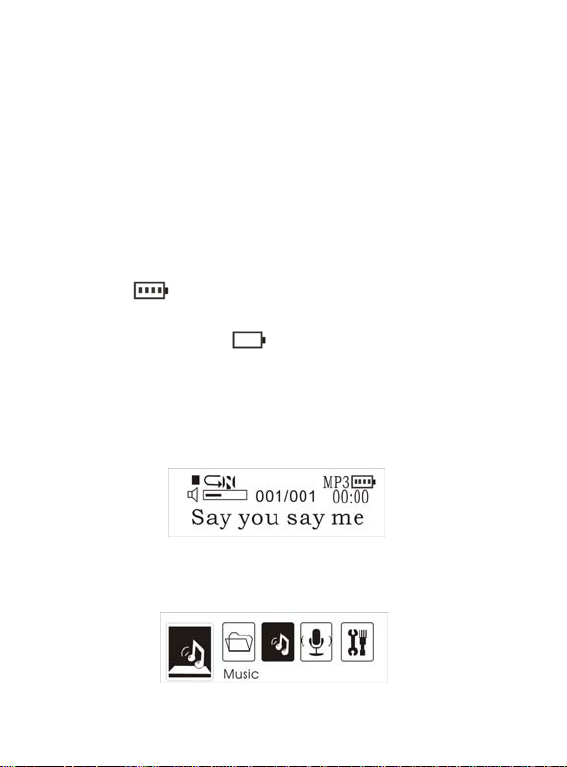
1 Switch the player into STOP mode (No music is pla ying). T he display shows
as below.
2 Press the MODE/CONFIRM button, then you reach the below Main Menu
page. You’ve entered the Main Menu page.
8
Page 9

English
3 Press NEXT button to jump to other menu items in sequence of Navigation,
Music,
4 Select your desired menu item and press MODE/CONFIRM button again to
Navigation
1. After entering Main Menu page, select Navigation and press MODE/CONFIRM
2. The display will enter to Root folder. Press NEXT/ PREV button to select your
3. Press the MODE button to enter sub-folder.
4. After entering the folder, press NEXT/ PREV button to select your desired
5. Press PLAY button to play the songs
6 Press REC/HOLD button to return to previous folder.
Voice, Setting, Record, Delete, About and Exit.
enter sub-menu page.
button to enter Multi-level folder management mode.
desired folder.
song.
Play Music
1. After entering Main Menu page, select Play Music and press
MODE/CONFIRM button to enter Playing Song mode.
Note: Only .MP3 and .WMA format will be played under Playing Song mode.
9
Page 10
English
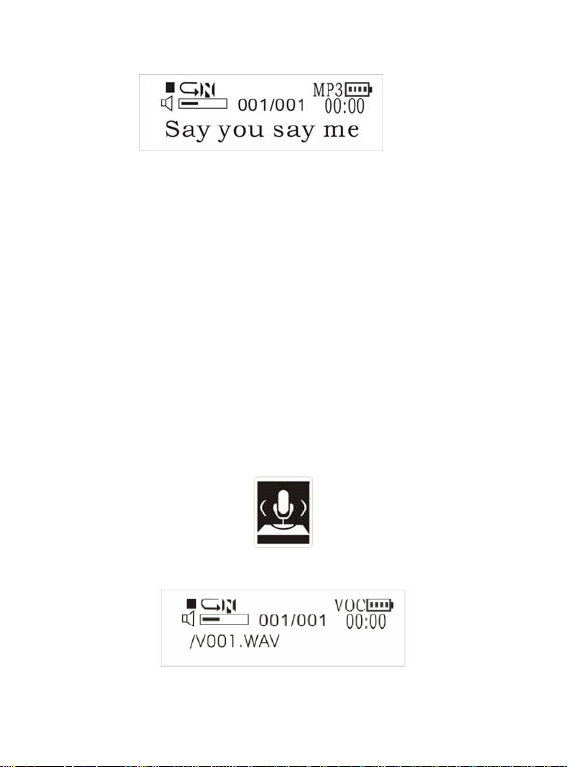
2. The display will return to the following screen in STOP mode.
3. Press PREV/ NEXT button to select your desired song.
4. Press PLAY button to start playing selected MP3 or WMA music. If there is
no MP3 and WMA file, “No Music Files” will show on the display.
Skip a Song
Press PREV/NEXT button and release it immediately to jump to next or previous
song.
Fast Forward and Backward
Press PREV/NEXT button and hold it to fast forward or backward.
Note: Refer to Overview section for detailed buttons operation.
Play Voice
1. After entering Main Menu page, select Play Voice and press
MODE/CONFIRM button to enter Playing Recorded Voice mode.
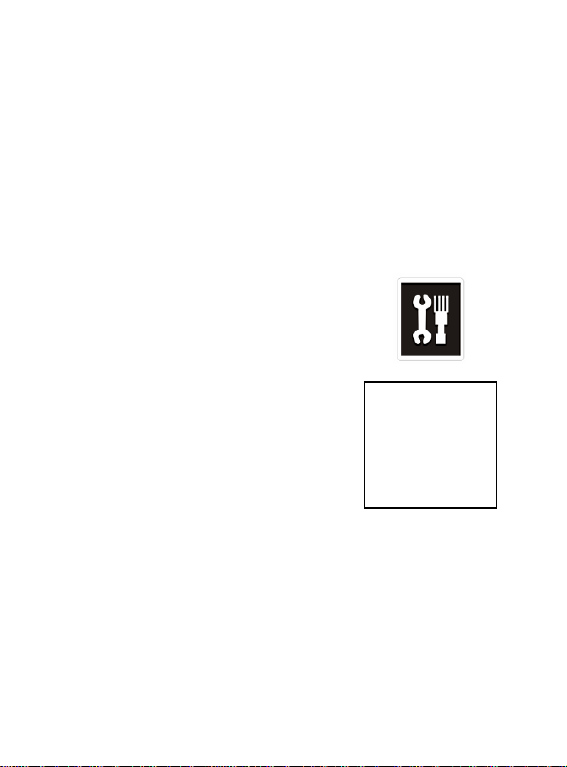
2. The display will return to the following screen in STOP mode.
3. Press PREV/ NEXT button to select your desired voice.
10
Page 11
English
4. Press PLAY button to start playing selected audio files. If there is no
recorded audio file, “No VOC File” will show on the display.
Skip a Voice
Press PREV/NEXT button and release it immediately to jump to next or previous
recorded voice.
Fast Forward and Backward
Press PREV/NEXT button and hold it to fast forward or backward.
Note: Refer to Overview section for detailed buttons operation.
Setting
1. After entering Main Menu page, press
PREV/NEXT to select Setting Function.
2. Press MODE/CONFIRM button to enter
Sys Function menu page.
EQ Set
1. In Setting menu, press MODE/CONFIRM button to select EQ Set to enter
the EQ mode. Seven EQ modes are available: Normal, Rock, Jazz, Bass,
Pop, Classical and Soft.
2. Press PREV/NEXT button to change the desired EQ mode and press
MODE/CONFIRM button to confirm the EQ mode.
3. The setting of EQ mode is able to apply in Playing Song and Playing
Recorded Voice mode.
EQ Set
PlayMode
Contrast
Backlight
Backlight Color
Powerset
Recordset
Language
Exit
11
Page 12

English
The setting of Repeat mode is able to apply in Playing Song and Playing
Recorded Voice mode.
PlayMode
In PlayMode Menu, press PREV/NEXT button to select the d esired Repeat mode.
Seven Repeat Modes are available: Normal, Repeat One, Repeat All, Random,
Random All, Preview.
Normal
All music will be played one by one and stopped at the last music until you
disable this function
Repeat One
The playing music will be re-played until you disable this function.
Repeat All
All music will be played from the beginning to the last one and then repeated
again and again until you disable this function.
Random
All music in the player will be randomly played until all music are finished
playing.
Random All
All music in the player will be randomly playback until you disable this
function.
Preview
All music from the current one to the last one will play for 10 seconds one by
one until you disable this function.
The setting of Repeat mode is able to apply in Pla ying Song and Playing
Recorded Voice mode.
.
12
Page 13
English
Contrast
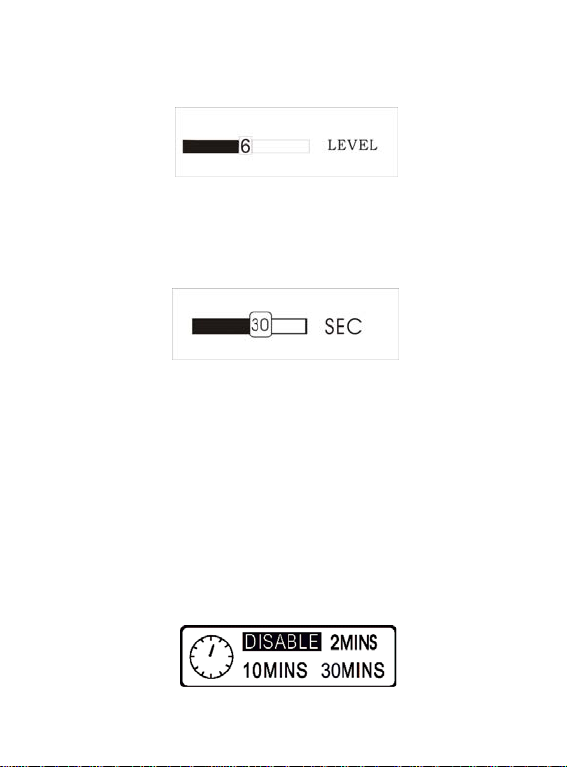
1. After entering Setting menu, select Contrast by press PREV/NEXT to
increase or decrease the contrast of the display.
2. Press MODE/CONFIRM button to confirm the desired contrast rate.
Backlight
1. After entering Setting menu, select Backlight by press PREV/NEXT button to
set the backlight duration. The backlight duration can be set in the range of 0
to 45 seconds.
2. Press MODE/CONFIRM button to confirm the desired backlight duration.
Backlight Color
After entering Setting menu, select Backlight Color. The backl ight color can be set
in seven colors.
You can press PREV/NEXT button to select your desired col or, or select Auto that
the backlight color will be changed in sequence once any button is pressed.
Power Save
In order to save power, it can be allowed to set an off time.
After entering Setting menu, select Power Save by pressing MODE/CONFIRM
button to enter this menu. The Off Time can be set in the sequence of DISABLE,
2MINS, 10MINS, 30MINS.
You may set “DISABLE” to disable this function.
13
Page 14
English
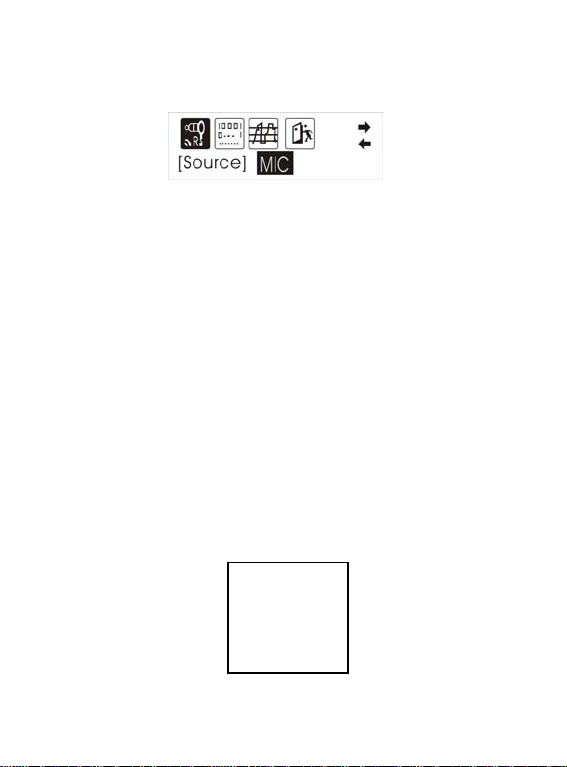
Recordset
After entering Setting menu, select Recordset by pressing MODE/CONFIRM
button to enter this menu.
Press the PREVIOUS/NEXT button to select items including Source, Encoder,
Sample and Exit.
Source
Only MIC mode is available in Source.
Encoder
Press MODE/CONFIRM button to select the different Encoder including IMADPC M,
MSADPCM and ADPCM.
Sample
Press MODE/CONFIRM button to select the different data including 8000Hz and
11025Hz.
Exit
Press MODE/CONFIRM button to select this item to get back to the Setting Menu.
Language
After entering Sys Function menu page, press PREVIOUS/NEXT to select
Language Function. Languages are available as below.
English
French
German
Spanish
Dutch
Italian
Portuguese
Greek
14
Page 15
English
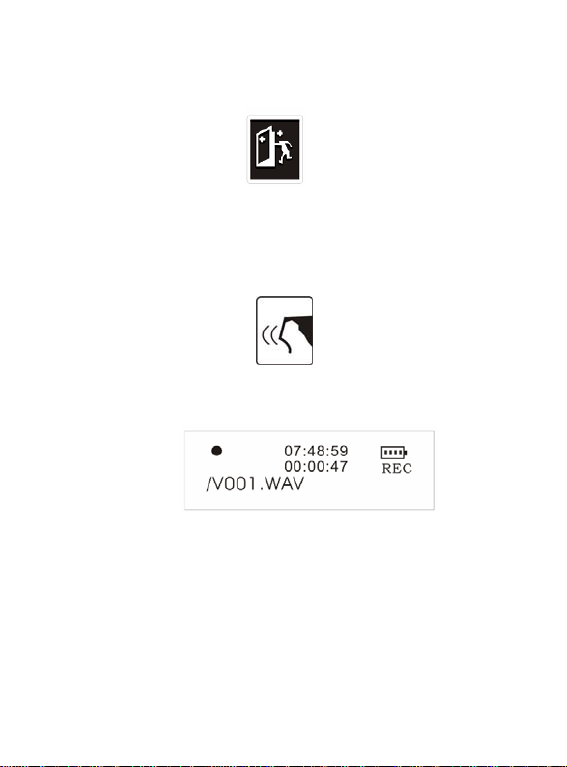
Exit
Press this Exit item to get back to the Setting mode.
Record
1. After entering Main Menu page, select Record and press MODE/CONFIRM
button to enter Recording Voice mode.
2. The following display will be shown once you’ ve ent ered Rec o rd Voi ce mode
and start record
3. Put the sound source near the built-in microphone. You are allowed to press
PAUSE/PLAY button to pause or continue the recording.
When you finished the recording, press MODE/CONFRIM bu tton and get back to
the STOP mode. The recorded audio files will be automatically saved under Ro ot
Directory as default. You can check the recorded audio files by pressing
PREV/NEXT button.
15
Page 16
English
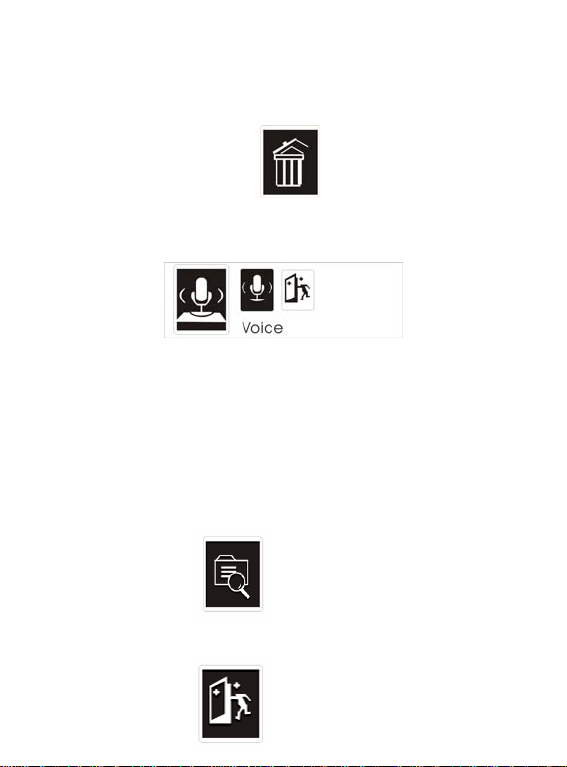
Delete
1, After entering Main Menu page, select “Delete” and press MODE/CONFIRM
button to enter Delete function.
Note: This function is able to delete Voice file only.
2, The following display will be shown once you’ ve entered Delete function and
select Voice by pressing MODE/CONFIRM button.
3, Press PREVIOUS/ NEXT button to sele ct the Voice files that you want to
delete.
4, Press Volume + /Volume – to select “Yes” o r “N o”. If you selected “Yes”, press
MODE/CONFIRM button, then “file deleted” will show on the display. You can
press REC button to get back to the Sub-menu.
About
After entering Setting menu page, select About item by pressing MODE/CONFIR M
button. The MEM Info and the version of the fir mware will be sho wn on the disp lay
for reference.
Exit
Press this Exit item to get back to the STOP Mode.
16
Page 17

English
Driver
Windows® 98 and MAC OS
Windows® 98 (first edition) and MACOS are not supported.
Windows® 98SE
If the player is running on Windows® 98SE, please install the driver by going
through the following instruction in details before using the player. The dri ver must
be installed on your computer to make your player work properly with your
computer. Please skip the following instructions for driver installation.
Step 1. Before you install the driver, please don’t connect the player to the
computer
Step 2. Insert the CD into your computer, click Setup.exe and the installation will
start.
Step 3. Follow the on-screen instructions to complete the driver installation and
restart your computer.
Step 4. Connect the player to your computer and a Removable Disk will appear for
drag-and-drop of the music files
*Note”For Windows®Me/XP platform, it is unnecessary for installing driver before
using.
System Requirements
z PC with Pentium class or faster processor
z 64MB RAM
z USB port
z CD-ROM drive for software installation
z 30MB free hard disk space
z Windows® 98SE
17
Page 18
English
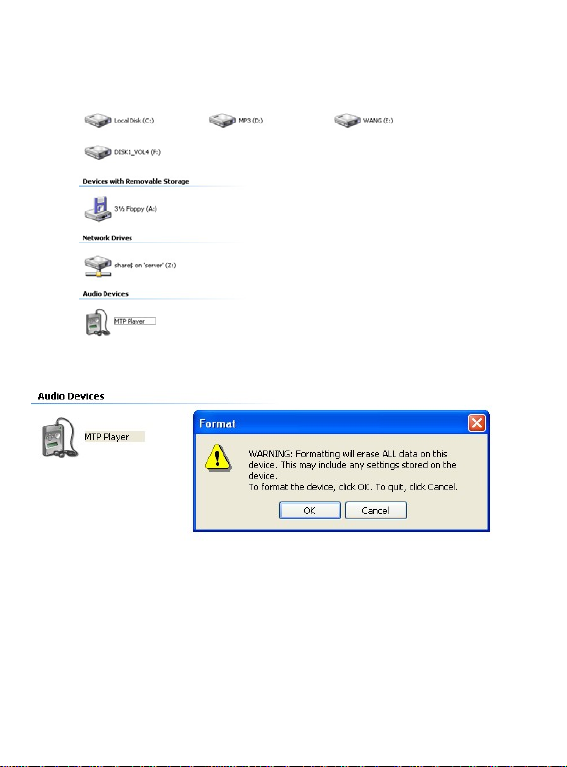
Format the MTP Player
Step 1: Click the MTP Player in My Computer by pressing the right button of the
mouse and select “Format…”
Step 2: A dialog box will appear to guide how to format. Click OK to proceed.
Then the MTP Player will be format accordingly.
Synchronize MP3 and WMA Files to the Player
Please operate the following procedure in licensed Windows® XP operation
system with Windows® Me dia Player 10.
18
Page 19
English
Noted: MAC OS and Windows® 98/98SE/Me are not supported for WMDRM songs
playback.
Note: The player with WMDRM10 is only allowed for user to download music legally and
validly from the distribution licensees of WMA songs which are posted on the corporate
website of Microsoft®. Please make sure that the WMA songs are downloaded from these
distribution licensees and frequently check the most updated distribution licensees on
the corporate website of Microsoft®.
If the music is downloaded illegally, the songs could not be played normally.
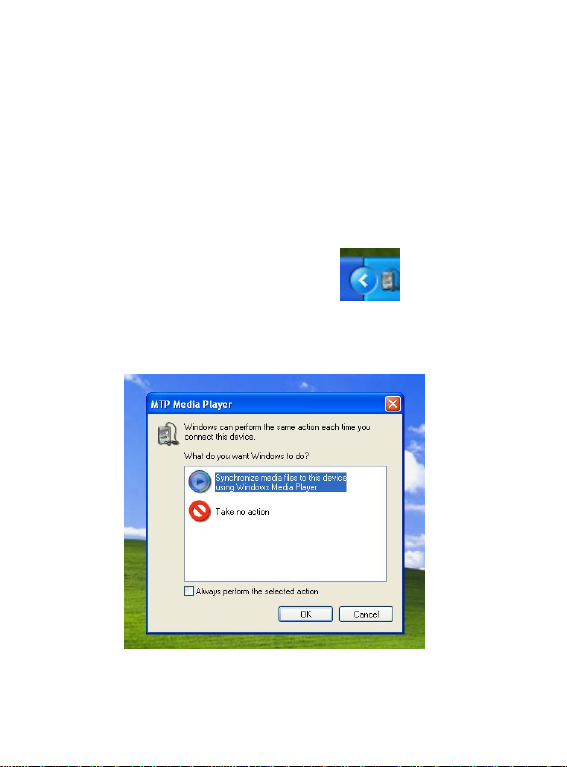
Step 1. Connect the MP3 player to the computer with USB Cable, It will sho w an
icon at the right-bottom corner of the desktop.
Step 2. A dialog box will appears as follows, choose the Media Player icon and
click OK to proceed.
19
Page 20
English
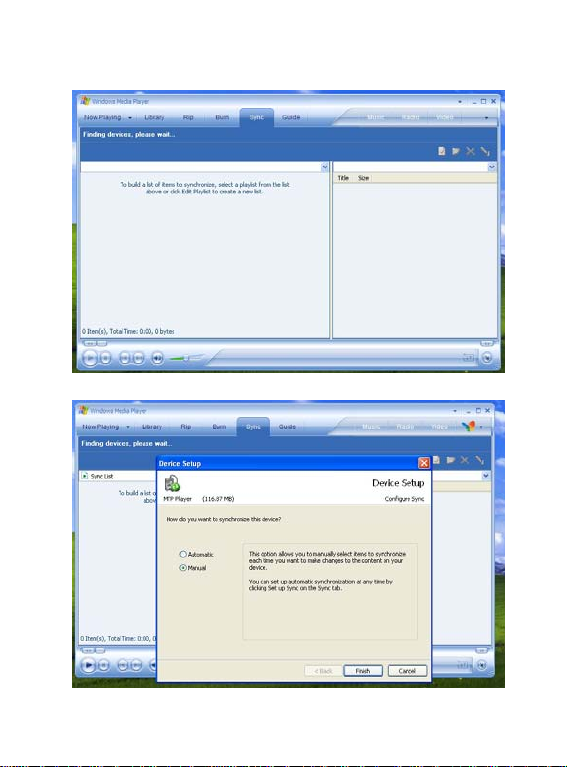
Step 3. The Media Player will find device automatically as follows
Step 4. Soon a dialog box will appear, Choose Manual and click Finish to proceed.
20
Page 21
English
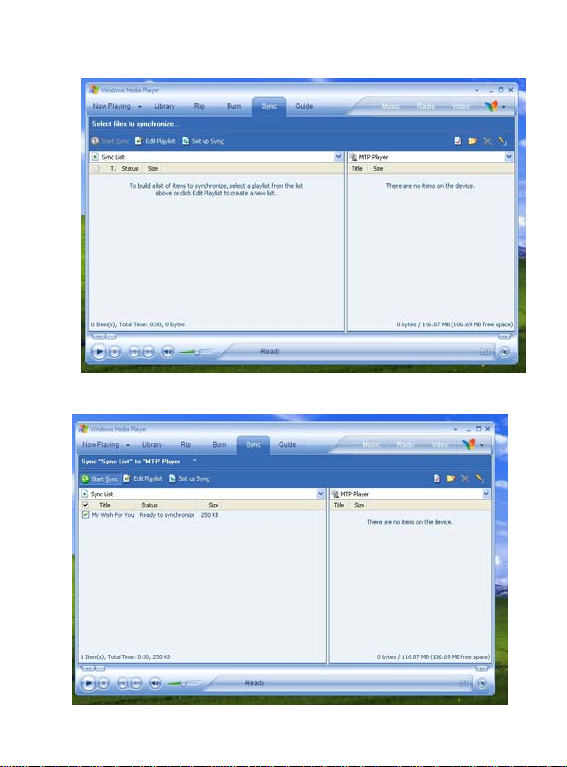
Step 5.The Media Player will enter the operation status as follows.
Step 6.Select your desired songs into the Media Player and press Start Sync.
21
Page 22
English
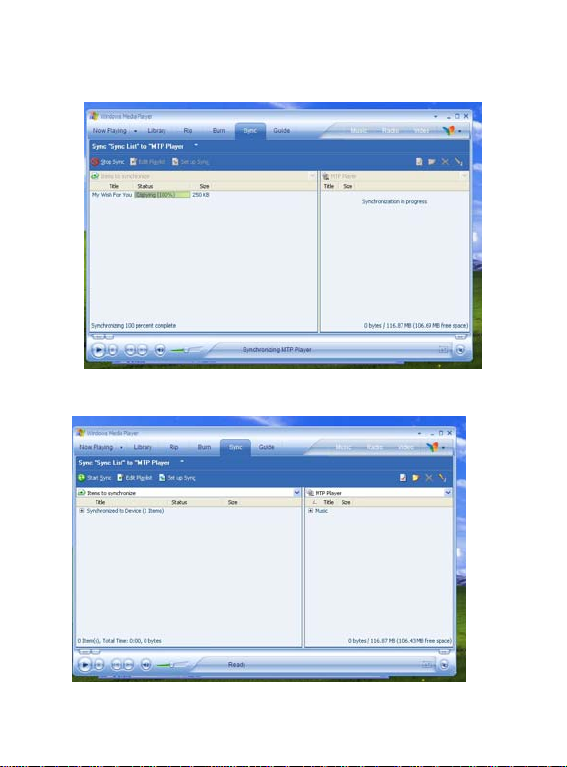
Step 7.The song you selected will be synchronized into the Software of Media
Player and the MP3 Player.
Step 8.Once the song has been synchronized, it will appear as follows.
22
Page 23
English
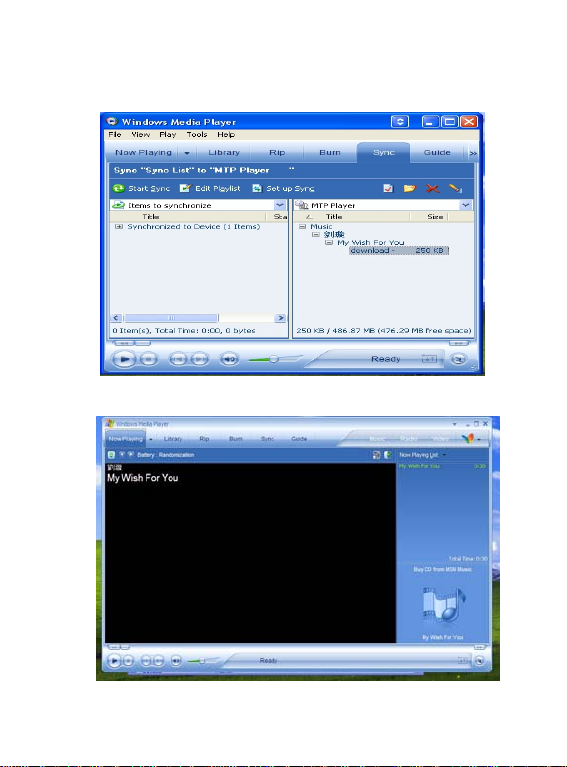
Step 9. Click + on the right hand side to expand “Music”, the same song name of
“My Wish For You” should appear on the right hand side. It will appear as follows:
Step 10. Click Now Playing and start to play your desired song.
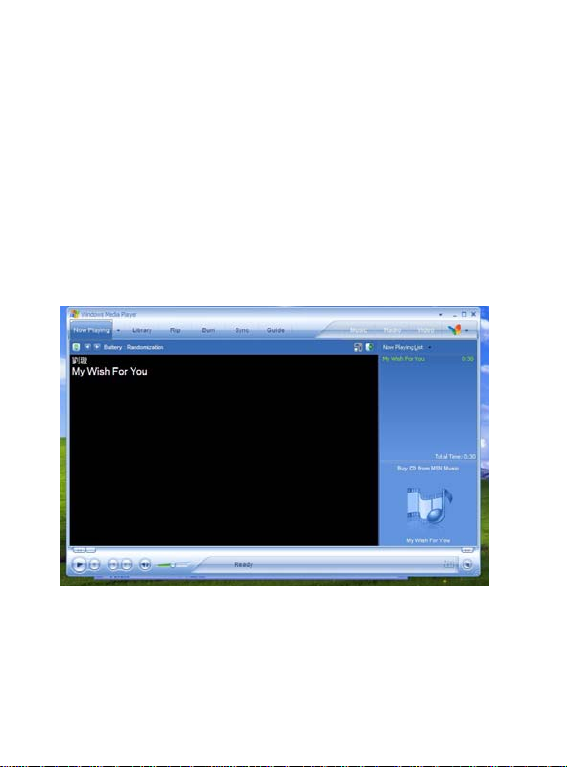
23
Page 24
English
Tips: Each WMDRM song is limited by an expiry date or number of times for
synchronization from the computer to the player. This limitation of the expiry dates the
synchronization times depend on different distribution licensees and different songs when
you purchase. The WMDRM songs should be synchronized from the computer to the
player within number of synchronization times by the specified expiry date.
Note: The songs cannot be played if the synchronization time is exceeded or the
synchronization is performed beyond the expiry date.
If WMDRM song cannot be played on the player normally or the synchronization cannot
done successfully from the computer to the player, please check whether the song is
expired or not. Please operate the following procedure.
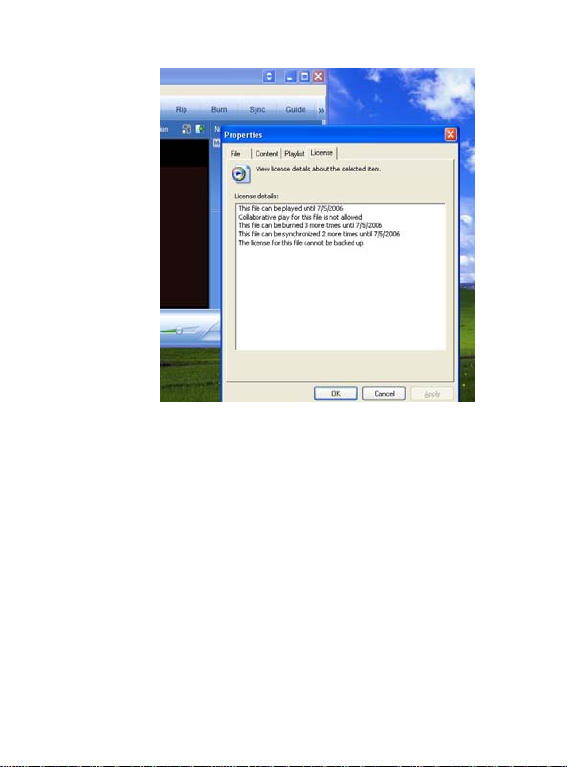
Step1: Click the song by pressing the right button of the mouse and select
“Properties”.
24
Page 25
English
Step 2. A dialog box will appears as follows, Click the license for checking the song
is expired or not.
25
Page 26
English
MTP Function being changed into USB Storage
Function
MTP function is the default one for the MP3 player with WMDRM10. It could be
used as a Portable USB also. The following steps could be guided to finish this
transferation
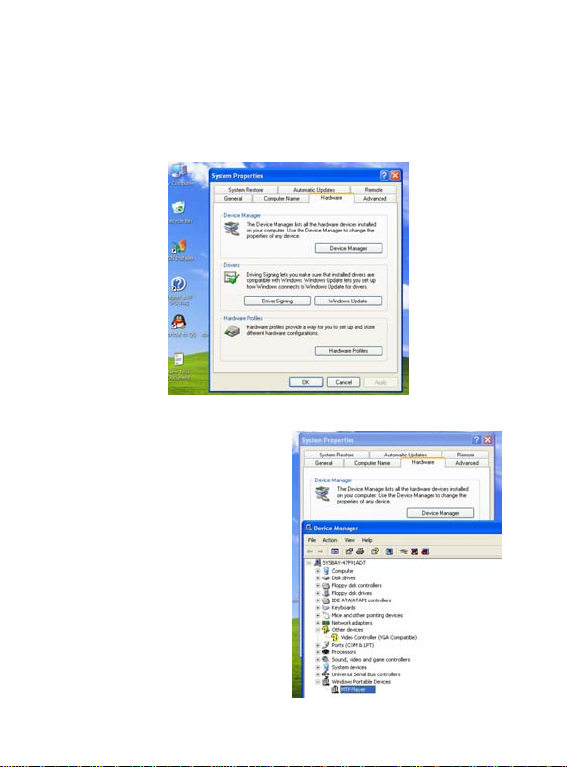
Step 1: Click My Computer by pressing the right bottom of the mouse, choose the
Hardware menu.
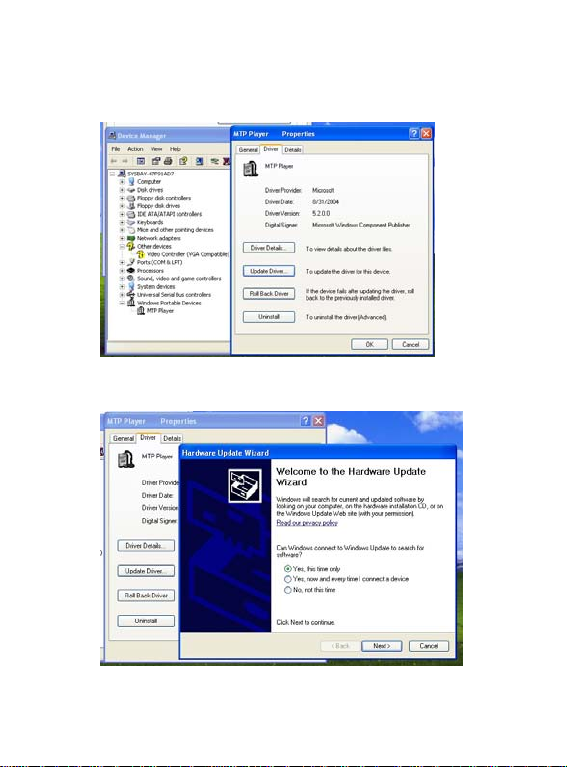
Step 2: Select Device Manager and pick up MTP Player on the sub-menu of
Windows Portable Devices.
26
Page 27
English
Step 3: Click MTP Player by pressing right Button of the mous e and choose Driver
menu.
Step 4: Click “Update Driver …” to proceed.
27
Page 28
English
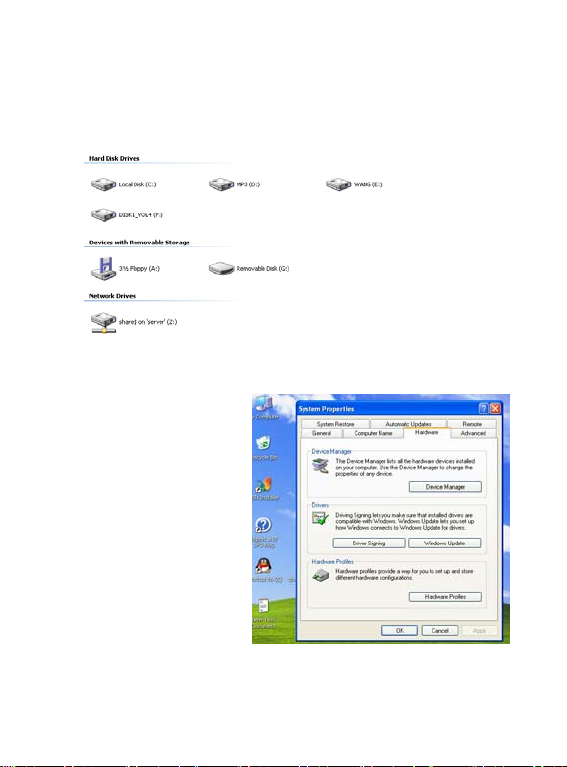
Step 5: Follow the tips of Dialog Box by clicking the “Next >” button to finish
updating. The procedure should be : Install from a list or specific location
(Advanced) - Don’t search. I will choose the driver to install - USB Mass Storage
Device- Finish. The Removable Disk will appear in My Computer.
USB Storage Function being changed into MTP
Function
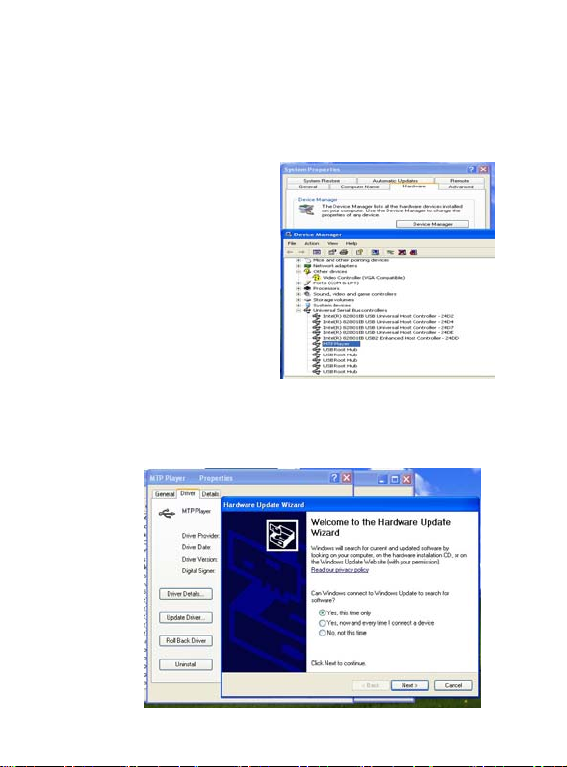
Step 1: Click My Computer by
pressing the right bottom of the
mouse, choose the Hardware
menu.
28
Page 29
English
Step 2: Select Device Manager and pick up MTP Player on the sub-menu of
Universal Serial Bus controllers.
Step 3: Click MTP Player by pressing right Button of the mous e and choose Driver
menu.
Step 4: Click “Update Driver …” to proceed.
29
Page 30
English
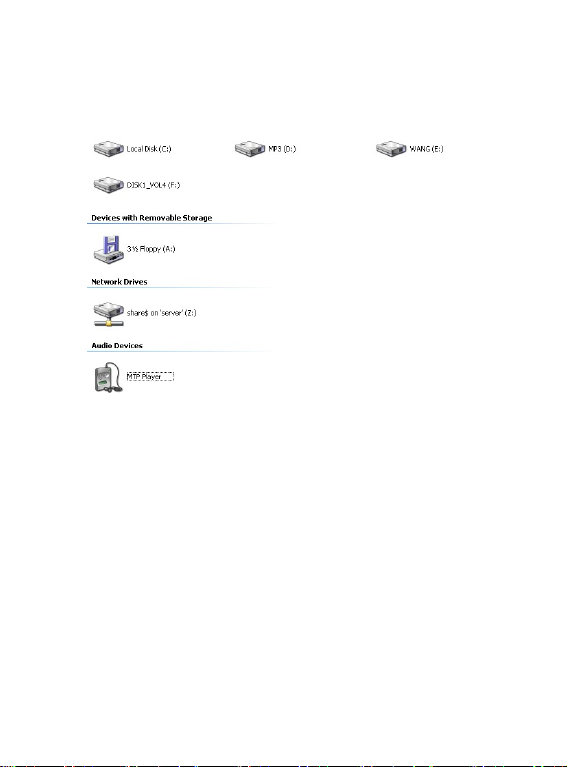
Step 5: Follow the tips of Dialog Box by clicking the “Next >” button to finish
updating. The procedure should be : Install from a list or specific location
(Advanced) - Don’t search. I will choose the driver to install - MTP Player -
Finish. The MTP Player will appear in My Computer.
30
Page 31
English
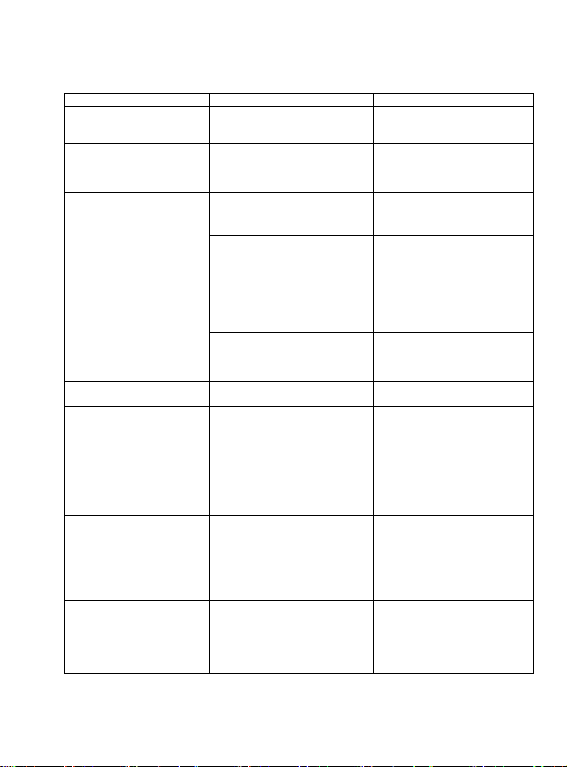
Trouble Shooting
Symptom Reasons Solution
Press the POWER
button, the display does
not turn on
After turning on the
player, no response is
given when pressing any
buttons
After plugging the player
into the USB port of your
computer, Removable
Disk Drive cannot be
found in My Computer
The music file on the
player cannot be deleted
The playing time displays
in disorder when playing
a mp3 music
When the player is
connected or disconnect
to/from your computer,
there is an unusual error
on the computer
My player can’t play the
mp3 music files
The battery run out Replace new battery
HOLD button is locked Check if HOLD button is
It runs in the default MTP
Player status
The software utilities of the
player (included in CD)
conflicts with other software
drivers which were installed
on your computer
Your motherboard doesn’t
support the USB connection
The attribute of the music file
sets as Read Only
An mp3 music file is currently
compressed in VBR format,
which can vary the
compression speed of a mp3
music. When the mp3 music
is playing, the variable speed
will cause the playing time
displays in disorder
It’s due to the sudden
disconnection of USB port
during transferring the files
Most of mp3 music files in the
market are compressed in
MPEG1, MPEG2, LAYER3
standard. In earlier days,
some mp3 music is
compressed in MPEG1
locked, press and hold Mode
to unlock button
Change the MTP Player
moded into USB Storage
Mode accordingly
z Uninstall the
software utilities of
the player
z Restart your
computer
z Re-install the
software utilities
again
Contact the manufacturer of
your motherboard to
upgrade the motherboard
driver
Change the attribute of the
music file
Compress the mp3 music in
fix compression speed rather
than variable compression
speed
It is recommended the user
should not suddenly unplug
the player from the USB port
of computer when the files
are being transferred or the
internal memory is being
formatted.
If the mp3 player can’t play
the mp3 music file, skip to
the next song until the mp3
music files are not
compressed in MPEG1
LAYER1 /MPEG1 LAYER2.
31
Page 32
English
LAYER1 and MPEG1
If the music file can’t be
played normally or you
hear a long beep sound
the USB cable
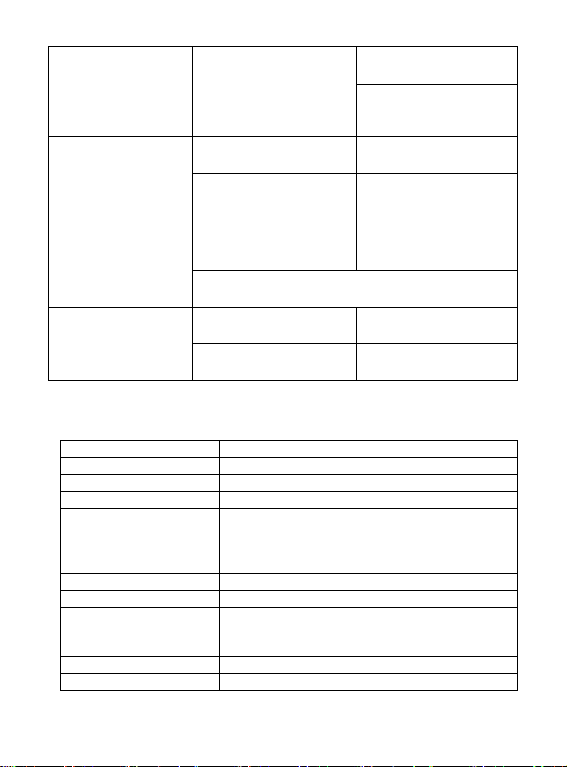
Technical Specifications
LAYER2. Please note our
player doesn’t support
MPEG1 LAYER1, MPEG1
LAYER2 or an mp3
compressed in more than
one compression standards.
The player doesn’t support
such compression standard
of the playing music file
Out of the range of
compression speed
Tips: If you don’t know the compression standard and
speed of the music file, you should use those common
music players (i.e. Winamp) to check the music information.
No driver was installed on
Windows® 98/98SE
Unsafely remove the USB
cable
Delete those files which
can’t be played in the player
Change the compression
standard of a mp3 musi c file
in MPEG1 LAYER3
The player just can support
MPEG1 MPEG2 LAYER3
and WMA music files
z The range of MP3
compression
speed:
32Kbps~384Kbps
z The range of WMA
compression
speed:
64Kbps~128Kbps
Install driver The computer can’t detect
Format the internal memory
Capacity 1GB
Display LCD display with backlight
Interface USB 2.0 full speed
Power 1xAAA battery
File type
S/N ratio 90dB
Earphones output power 9mWx, 32ohm
Operating System
Dimensions 32.5mm(W) x 90mm(H) x 22mm(D)
Weight 23g
.MP3 (32kbps – 384kbps), .WMA (64kbps –
128kbps) for music at Constant Bit Rate
.ACT and .WAV for recorded audio files
.OGG Vorbis Encoded File Format
Windows® 98SE/Me/2000/XP
MAC OS and Windows® 98 (first edition) are not
supported.
32
 Loading...