

Page 1
MODEL NO. SIP1527
HOME MUSIC SYSTEM FOR IPHONE AND IPOD
INSTRUCTION MANUAL
PLEASE READ BEFORE OPERATING THIS EQUIPMENT
Page 2

Warnings and Precautions
TO PREVENT FIRE OR SHOCK HAZARDS, DO NOT EXPOSE THIS UNIT TO
RAIN OR MOISTURE.
This symbol, located on back or bottom of the unit, is intended to alert the
user to the presence of un-insulated “dangerous voltage” within the product’s’s
enclosure that may be of sufficient magnitude to constitute a risk of electric
shock to persons.
This symbol, located on back or bottom of the unit, is intended to alert the
user to the presence of important operating and maintenance (servicing)
instructions in the literature accompanying the appliance.
Any use of the controls or an adjustment to the procedures other than those
specified herein may result in hazardous radiation.
CAUTION : TO PREVENT ELECTRIC SHOCK, MATCH WIDE BLADE
OF PLUG TO WIDE SLOT, FULLY INSERT.
To reduce the risk of electric shock, do not remove cover (or back). There are no
user-serviceable parts inside. Please refer any servicing to qualified service personnel.
WARNING: Changes or modifications to this unit not expressly approved by the
party responsible for compliance could void the user’s authority to operate the
equipment.
NOTE: This equipment has been tested and found to comply with the limits for a
Class B digital device, pursuant to Part 15 of the FCC Rules. These limits are
designedo provide reasonable protection against harmful interference in a residential
installation. This equipment generates, uses, and can radiate radio frequency energy
and, if not installed and used in accordance with the instructions, may cause harmful
interference to radio communications. However, there is no guarantee that interference
will not occur in a particular installation. If this equipment does cause harmful
interference to radio or television reception, which can be determined by turning the
equipment off and on, the user is encouraged to try to correct the interference by one or
more of the following measures:
•
Reorient or relocate the receiving antenna.
•
Increase the separation between he equipment and receiver.
•
Connect he equipment into an outlet on a circuit different from that to which the
receiver s connected.
•
Consult the dealer or an experienced radio/TV technician for help.
2
Page 3
Features
14
1
2
3
4
5
6
7
8
13
12
11
10
9
3
15
16
18
17
Page 4

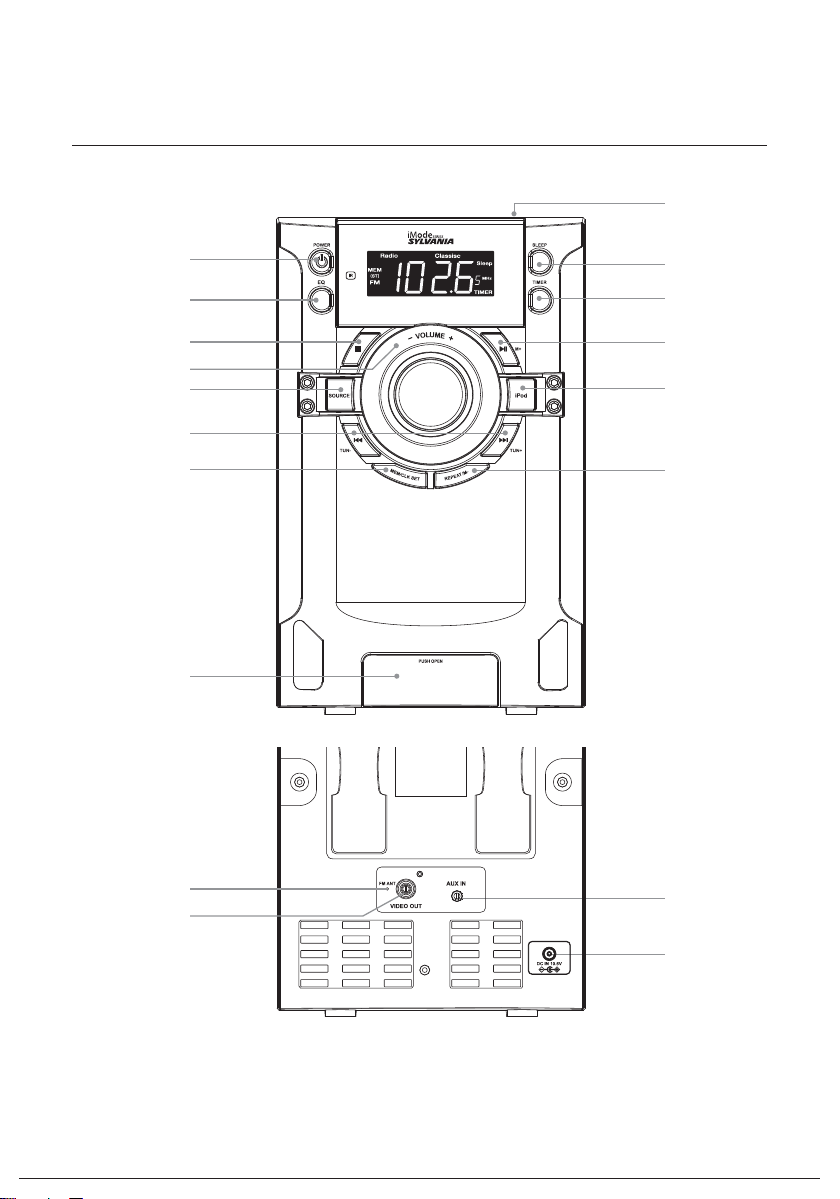
Features Defined
1
POWER Press to power the music system off or on.
2
EQ Press to adjust the preset EQ to Rock, Classic, Jazz, Pop, or Normal.
3
STOP Press to stop a CD during play.
4
VOLUME Turn to adjust the volume.
5
SOURCE Press to switch to radio, CD, Aux, or iPod modes.
6
SKIP/SEARCH TUNE (+/-)/TIME(+/-) Press to skip between tracks on a docked iPod, iPhone, or
loaded CD. Press and hold to search through an individual track. Press to tune the FM radio. Press to
adjust the time when setting the clock or timer.
7
MEM/CLK SET Press to set the clock or save a radio station. Press to program a CD.
8
DOCK for iPhone and iPod
9
REPEAT/MEM– Press to repeat the current track or an entire album/playlist. Press to cycle through
saved radio stations.
10
iPod Press to switch to iPod mode.
11
PLAY/PAUSE/MEM+ Press to play or pause a docked iPhone or iPod or a loaded CD. Press the cycle
through saved radio stations.
12
TIMER Press to view, set, and activate or deactivate the timer.
13
SLEEP Press repeatedly to set the sleep timer or turn the sleep timer off.
14
OPEN/CLOSE Press to open or close the CD door.
15
FM WIRE ANTENNA
16
COMPOSITE VIDEO OUTPUT
17
DC POWER INPUT
18
3.5MM AUDIO INPUT
4
Page 5
Peripherals
WARNING: Danger of explosion
if batteries are incorrectly installed.
Replace only with the same or
equivalent type.
The button cell battery contains
mercury. Do not put in the trash,
instead recycle or dispose of as
hazardous waste.
19
20
21
22
23
24
25
26
27
28
29
Notes: Buttons that are not defined in the Periperals section, are defined in the Features
section.
36
35
34
33
32
31
30
5
Page 6

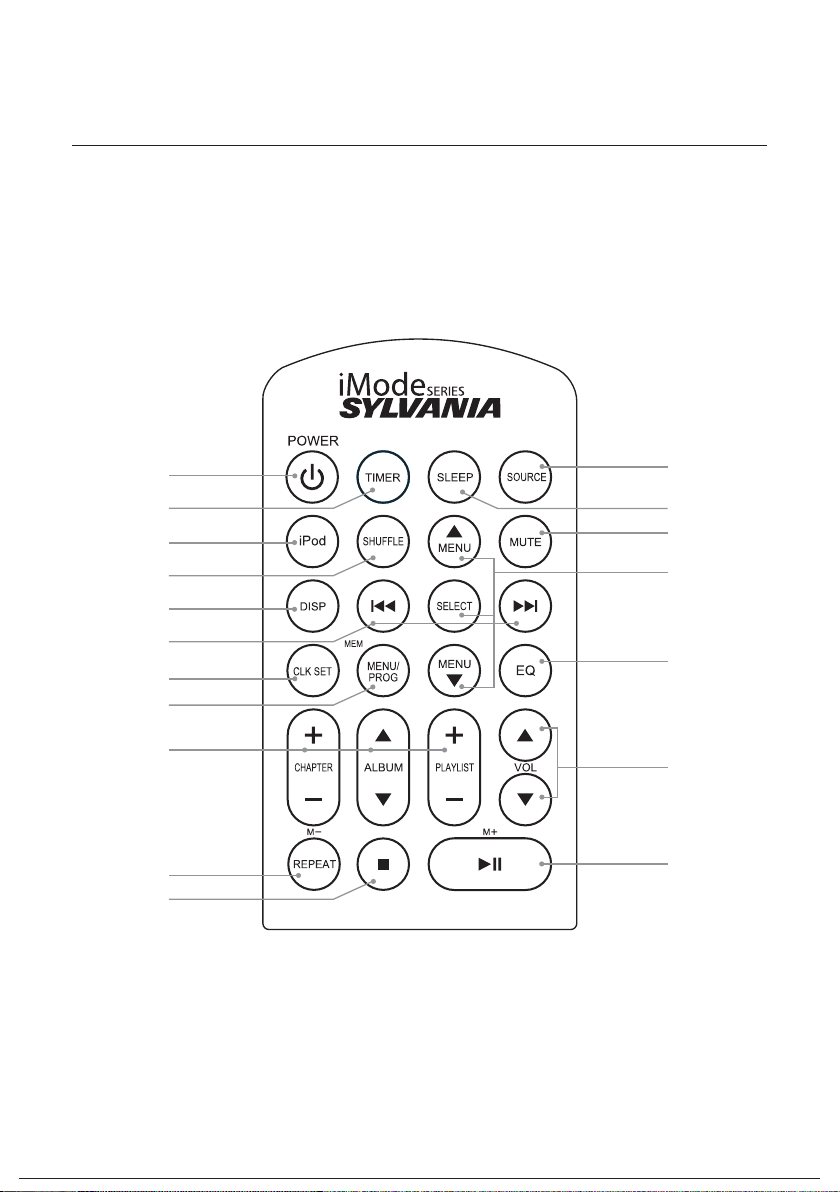
Peripheral Defined
19
POWER Press to power the music system off or on.
20
TIMER Press to view, set, and activate or deactivate the timer.
21
iPod Press to switch to iPod mode.
22
SHUFFLE Press to play tracks in a random order from a docked iPhone or iPod.
23
DISPLAY Press to view the time when in radio mode.
24
SKIP/SEARCH Press to skip between tracks on a docked iPod, iPhone, or loaded CD. Press and hold
to search through an individual track. Press to tune the FM radio. Press to adjust the time when setting
the clock or timer.
25
CLK SET Press and hold to set the clock.
26
MENU/PROG/MEM Press to cycle through menus on a docked iPhone or iPod. Press to program a CD.
Press to save a radio station as a preset.
27
CHAPTER/ALBUM/PLAYLIST Press to skip between chapters, albums, and playlists on a docked
iPhone or iPod.
28
REPEAT/M– Press to repeat the current track or an entire album/playlist. Press to cycle through
saved radio stations.
29
STOP Press to stop a CD during play.
30
PLAY/PAUSE/M+ Press to play or pause a docked iPhone or iPod or a loaded CD. Press the cycle
through saved radio stations.
31
VOLUME Press to adjust the volume.
32
EQ Press to adjust the preset EQ to Rock, Classic, Jazz, Pop, or Normal.
33
MENU/SELECT Press to navigate the menu on a docked iPhone or iPod and make selections.
34
MUTE Press to mute the volume.
35
SLEEP Press repeatedly to set the sleep timer or turn the sleep timer off.
36
SOURCE Press to switch to radio, CD, Aux, or iPod modes.
6
Page 7

Setup
Power
Plug the included AC/DC power
adapter into the DC POWER INPUT on
the music system and an AC power
outlet to power the music system.
Battery Power
Requires 1, CR2025, battery (preinstalled).
CR2025
OPEN
PUSH
Y
R
E
3V
T
T
2025
A
R
B
C
M
HIU
LIT
CR2025
RY
E
T
BAT
2025
R
HIUM
C
3V
T
I
L
OPEN
PUSH
7
Page 8

Clock and Sleep Timer
Setting the Clock
1. Press the POWER button to turn
2. Press and hold the CLK SET/MEM
button on the music system.
“12 Hr” will appear on the display.
3. Press the SKIP/SEARCH buttons to
switch between 12 and 24 hour.
4. Press the CLK SET/MEM button to
select 12 or 24 hour.
The hour will begin to blink on the
display.
5. Press the SKIP/SEARCH buttons to
adjust the hour.
An “AM” indicator will appear on the
display when the time is set to the
AM. A “PM” indicator will appear on
the display when the time is set to
the PM.
6. Press the CLK SET/MEM button to
set the adjusted hour.
Using the Sleep Timer
1. Press the POWER button to turn
the music system on.
2. While listening to music in iPod
mode, radio mode, aux mode, or
CD mode, press the SLEEP button
repeatedly to set the sleep timer to
the desired time.
3. After the selected time has
expired, the music system will
The minute will begin to blink on the
display.
7. Press the SKIP/SEARCH buttons to
adjust the minute.
8. Press the CLK SET/MEM button to
8
Page 9

Timer
Setting the Timer
1. Press the POWER button to turn
2. Press the TIMER button.
The current timer settings will
appear on the display.
3. Press and hold the TIMER button
while the timer settings are on the
display.
The “On Timer” hour will begin to
blink. “On Timer” refers to the time
that the music system will power on.
4. Press the SKIP/SEARCH buttons to
adjust the “On Timer” hour. Press
the TIMER button.
The “On Timer” minute will begin to
blink.
5. Press the SKIP/SEARCH buttons to
adjust the “On Timer” minute. Press
the TIMER button.
Activating or Deactivating the Timer
1. Press the POWER button to turn
2. Press and hold the TIMER button.
“TIMER” will appear on the display,
indicating the timer is activated.
3. To deactivate the timer, press and
hold the TIMER button again until
“TIMER” on the display disappears.
6. Press the SKIP/SEARCH buttons to
the TIMER button.
blink.
7. Press the SKIP/SEARCH buttons to
the TIMER
the timer.
8. Follow the instructions for
Activation or Deactivating the
Timer.
9
Page 10

iPod and iPhone
Docking an iPod and iPhone
1. Locate the numbered bracket that
be docked.
Each included bracket has a number
on it, indicating which iPhone/iPod
model that bracket is compatible
with. See the separate bracket chart
page to identify which bracket is
needed.
2. Push the face of the dock to open
the dock for iPhone and iPod.
3. Snap the bracket into place over
the iPhone/iPod connector in the
dock for iPhone/iPod.
4. Connect the iPhone or iPod to
the connector inside the Dock for
iPhone/iPod.
When the tower speaker is plugged
in, using AC power, the docked
iPhone or iPod will charge.
10
Playing an iPod and iPhone
1. Follow the instructions for Docking
an iPod and iPhone.
2. Press the POWER button to power
on the music system.
3. Press the iPod button to switch to
iPod/iPhone mode.
“iPod” and an iPod icon will appear
on the display.
4. Press the PLAY/PAUSE button
to begin playing music from the
docked iPhone or iPod.
Page 11

CD
Loading a CD
1. Press the OPEN/CLOSE button
on the top of the music system to
open the CD door.
2. Load a CD into the music system,
label side facing up.
3. Close the CD door.
Playing a CD
1. Follow the instructions for Loading
a CD.
2. Press the POWER button to power
the music system on.
3. Press the SOURCE button to
switch to CD mode.
The track number will appear on the
display, to the right of the time, when
the music system is in CD mode.
4. Press the PLAY/PAUSE button to
begin playing the loaded CD.
Programming a CD
1. Follow the instructions for Playing
a CD.
2. Press the STOP button.
The loaded CD must be stopped to
create a program.
3. Press the MENU/PROG./MEM
button on the remote.
“PROG” and a number, indicating
the order in which the next selected
track will play, will appear on the
display.
4. Press the SKIP/SEARCH buttons to
select a track.
5. Press the MENU/PROG./MEM
button on the remote to save the
selected track to the program.
6. Repeat steps 4 and 5 to program
up to 20 tracks to play in the order
they were selected.
Cancelling a Programmed CD
1. After programming the CD, press
the STOP button twice to cancel
the program.
11
Page 12

FM Radio
Tuning the FM Radio
1. Press the POWER button to power
the music system on.
2. Press the SOURCE button to
switch to FM radio mode.
“Radio” will appear on the display.
3. Press the TUNE +/- buttons to tune
the FM radio.
Adjust the position of the FM wire
antenna to improve FM radio
reception.
Saving an FM Radio Station
1. Follow the instructions for Tuning
the FM Radio.
2. Press the TUNE +/- buttons to tune
the FM radio to the desired station.
3. Press and hold CLK SET/MEM
button on the music system or the
MENU/PROG./MEM button on the
remote.
A preset number (P01) will appear on
the display, indicating which preset
the current station will be saved to.
4. Press the TUNE +/- buttons to
adjust the preset number (P01 P10).
5. Once the desired preset is selected,
press the CLK SET/MEM button
on the music system or the MENU/
PROG./MEM button on the remote
to save the current FM radio
station to the selected preset.
Playing a Saved Radio Station
1. Follow the instructions for Tuning
the FM Radio and Saving an FM
Radio Station.
12
2. Press the MEM± or M± buttons to
cycle through saved radio stations.
Page 13

Video Output
Connecting Other Digital Audio Devices
Using the Video Output
The COMPOSITE VIDEO OUTPUT will only output video from a docked iPhone or
iPod with video capabilities.
Requires a composite RCA video cable (not included).
1. Follow the instructions for Docking an iPod or iPhone and Playing an iPod or
iPhone
2. Check your iPod or iPhone video settings to make sure “TV OUT” is set to “ON”
or “ASK”.
3. Connect a composite RCA video cable to the COMPOSITE VIDEO OUTPUT on
the music system and a composite video input on a television.
4. Adjust the connected television to the input setting used when connecting the
two devices.
5. Video played through the docked iPod or iPhone will now be output to the
connected TV.
3.5mm Audio Input
Using the 3.5mm Audio Input
Requires a 3.5mm audio cable (not included).
1. Connect a 3.5mm audio cable to the 3.5MM AUDIO INPUT on the music system
and the headphone jack or 3.5mm audio output on an MP3 player or other audio
source.
2. Press the POWER button to power on the music system.
3. Press the SOURCE button to switch to AUX mode.
4. Use the native controls on the connected MP3 player or other audio source to
control the music played through the music system.
13
Page 14

LIMITED PRODUCT WARRANTY
This quality product is warranted to be free from manufacturer’s defects in material and workman-ship,
provided that the unit is used under the normal operating conditions intended by the manufacturer.
Should you have any problem with this product, please and it is highly recommended to visit our website
www.curtisint.com
at
operating manuals and trouble shooting tips on our website which gives you the answer on most of the
questions you could have in operating the unit.
C.I. Service Dept. warrants this product to be free from defects in materials and workmanship for 90 days on
parts and 90 days on labor. If you originally purchased your product more than 90 days ago, a repair fee
may apply.
Nothing within this warranty shall imply that C.I. will be responsible or liable for any damage to any items
placed in this product, whether due to any defect of the product, or its use, whether proper or improper.
Save as herein provided, C.I. Service Dept. (Canada) or C.I. Service Dept. (USA), there are no other
warranties, conditions, representations or guarantees, express or implied, made or intended by C.I. or its
authorized distributors and all other warranties, conditions, representations or guarantees, including any
warranties, conditions, representations or guarantees under any Sale of Goods Act or like legislation or
statue is hereby expressly excluded. Save as herein provided, C.I. Service Dept. (Canada) or C.I. Service
Dept. (USA), shall not be responsible for any damages to persons or property, including the unit itself,
howsoever caused or any consequential damages arising from the malfunction of the unit and by the
purchase of the unit, the purchaser does hereby agree to indemnify and save harmless C.I. from any claim
for damages to persons or property caused by the unit.
1. The original purchaser must present a copy of the original bill of sale and the service warranty card.
2. Any alterations, abuse, misuse, battery corrosion or accidental damage voids the warranty.
3. The warranty does not cover cabinets and accessories.
4. No warranty or insurance contained or set out shall apply when damage or repair is caused by power
failure; damage in transit or when moving the unit; improper power supply; use for commercial or
industrial purposes; service calls resulting in customer education, etc.
5. The defective product should be mailed to:
before you take any other steps as we have additional copies of instruction manuals,
TERMS OF WARRANTY
EXCLUSIONS
TO OBTAIN REPAIRS UNDER THE TERMS OF THIS WARRANTY
Canada U.S.A
C.I. Service Dept. Curtis International Ltd
315 Attwell Drive 2215 Kenmore Avenue, Suite 100
Toronto, Ontario Buffalo, NY 14207
M9W 5C1 14207
For service assistance and product information, please call: 1-800-968-9853.
If mailing the product, the freight must be prepaid and a money order for $7.00 should be included
to cover the cost of insurance and the return of the product.
6. C.I. reserves the right to repair or replace the parts which have become defective.
Model No. Date Purchased Serial No.
is a registered trademark of OSRAM SYLVANIS Inc. used under licence.
 Loading...