

Page 1
Internal
120
Volt
Timer
Model: SA 306 (DPST):
120 Volt 40 AMP
Digital Industrial Timer Switch
Double-Pole, Single Throw
Indoor Industrial Timer
Please read this manual, before installing your new Sylvania Timer.
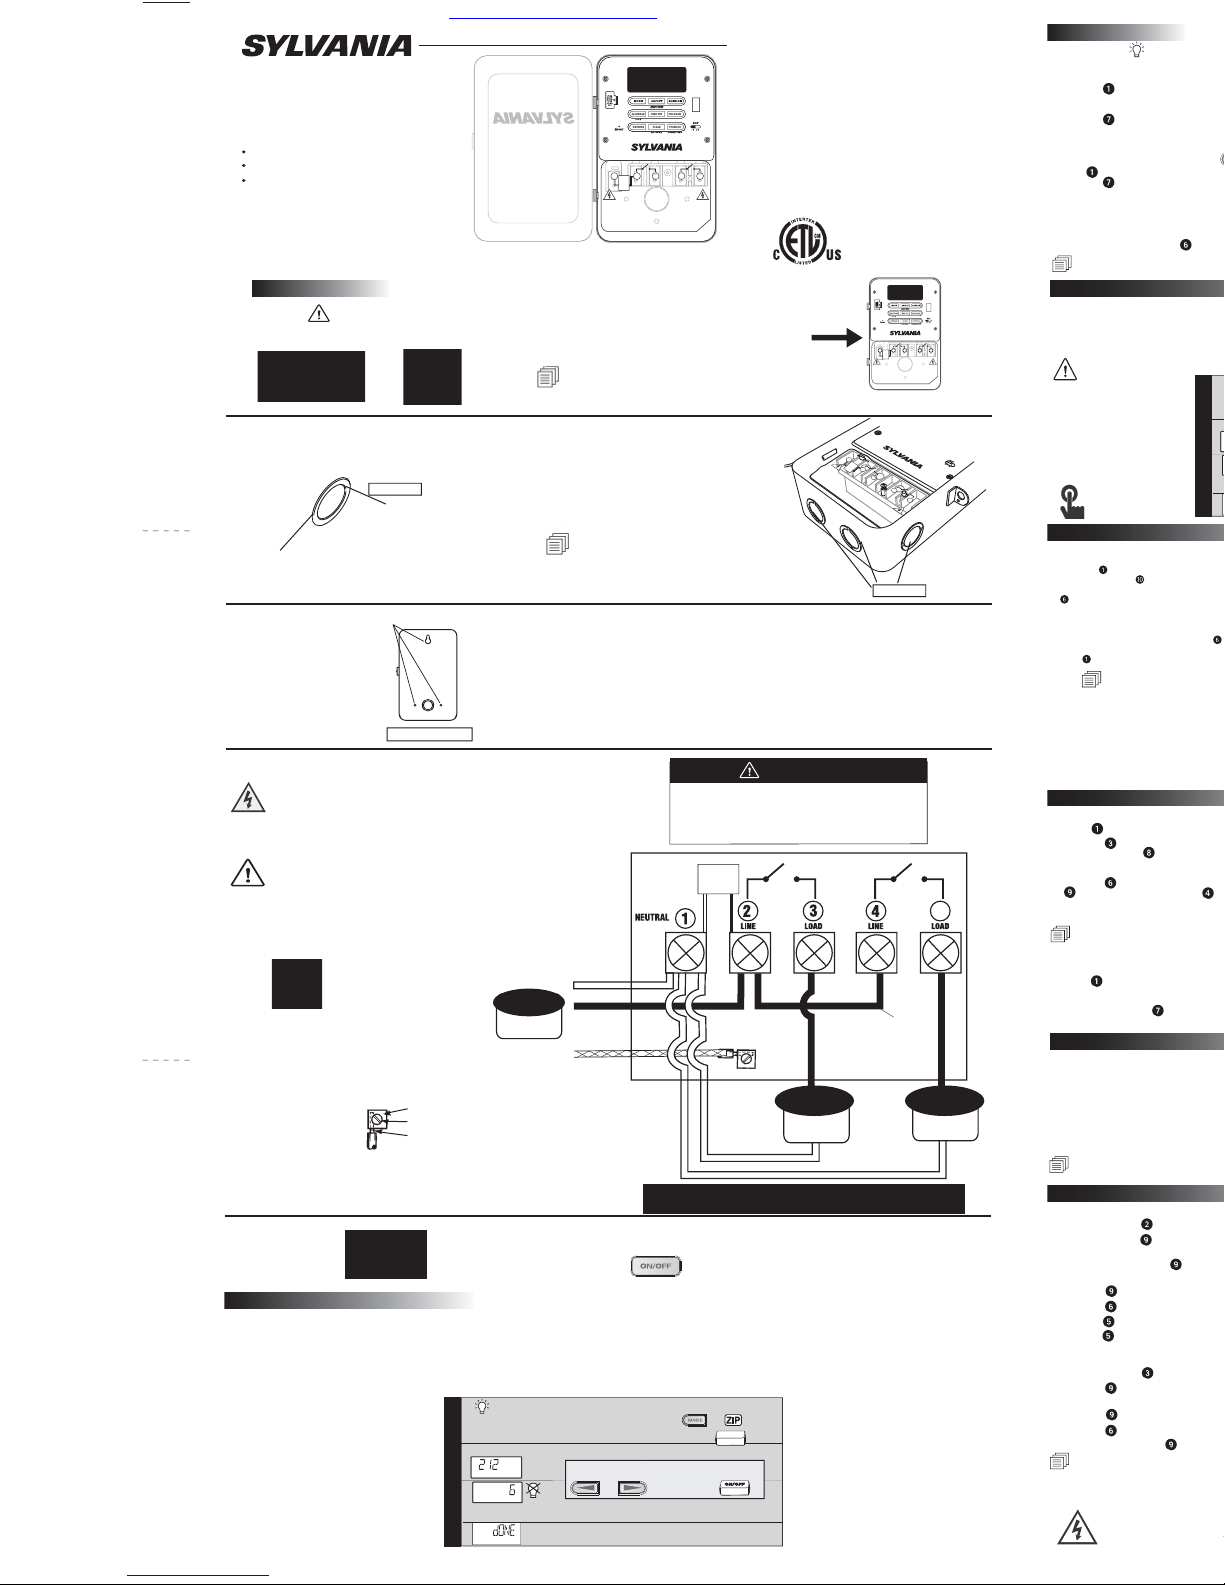
Installation
Step 1
WARNING:
Turn power OFF at circuit
breaker or remove fuse.
Mount case in a vertical position
using mounting holes provided.
Indoor Timer’s 3 mounting hole location
Mount the timer in the desired location using the three mounting holes (A,B,C) provided. The best
mounting position for the timer is at eye level with sufficient room for the door cover to swing fully open.
Affix box to wall
The top mounting hole (A) is a slotted type mounting hole, so measure and secure this to the wall with the first (A) screw.
The head of the screw (or fastener) should be slightly larger than the narrow portion of the slotted hole.
Hang the timer on screw A. Screw timer into the wall using the remaining two mounting holes (B & C) to provide
a secure permanent mounting for the timer.
Step 4
Study your wiring diagram and decide which knockouts to use. Select the knockouts to be used for your
wire cable clamp or conduit connector and remove the appropriate knockout. Install the wire cable clamps with locknuts.
You are now ready to mount the timer on the wall.
Step 3
Back of timer unit
Knockout
BATTERY
A
CB
Neutral
Ground
Jumper wire
(not included)
BATTERY
120 VAC
Input Only
Line
Zip-Set Quick Set-up
Detailed set up and function instructions are on back side of this manual.
Set your area code
Yes- You are DONE!
Find and press “Mode” button, until you see the Zip-Set icon
Then depress & hold the Clear (Zip-Set) button until the display flashes.
1
2
3
Fast Set Up Instructions for Zip-Set™ Timers
to
ZIP-SET
CLEAR
To set:
use “Reverse” / “Forward” buttons and ON/OFF
to Confirm or Enter.
or
then to set press
Set how many hours after sunset that you wish the fixture to
turn the power off (2, 4, 6, 8, 10, 12, 14 or 16 hrs).
Knockouts
(130mm) W
5.1 inch
(200mm) H
7.9 inch
Indoor timer case
Step 6
Restore power at fuse
box or circuit breaker.
Turn Power ON
Step 7
Test Timer:
Press ON/OFF
Button
Inner circle is fit for 1/2 (3/8) inch
cable clamp wire connector or
conduit
Outer Circle is fit for a 3/4 inch
cable
clamp wire connector or
conduit
Ensure that the timer position and its knockouts are
in line with your planned wiring.
Knockouts
are made to industrial standards: 1/2 , 3/8, or 3/4 inch wire
cable clamp connectors and locknuts.
Attach appropriate wire cable clamps to the timer box.
Step 2
Remove the old timer, identify wiring and
disconnect wires from the timer you are replacing
or map out a new location for your timer.
When m
ounting the timer, it is important
that it is in an environment which is free from
excessive contaminant such as oil, moisture, or dirt.
Always mount timer case in a vertical position.
Do not mount indoor timer where rain
or water can get in.
Positioning Timer
This product has passed
ETL testing. It is certified
and complies with both
U.S. and Canadian
product safety standards.
Thank you for purchasing the SA 306 an Industrial 40
Amp digital Timer.
It is an easy to set up and operate industrial timer with
Zip-Set Auto Sunset On Technology and other
advanced features.
Features:
• Zip-Set Technology; automatically turns lights on at
sunset time – just enter your phone area code.
• 4 independent on/off programmable timers with 1 minute
setting intervals.
• Daylight Savings Time (DST) switch.
• Timers can be set to work weekends(2), weekdays(5), or
all week(7).
• Random function for security.
• Manual Override.
• 40 Amp Heavy Duty Relay
Step 5
PRESSURE PLATE
TERMINAL SCREW
MAKE SURE WIRE
INSULATION CLEARS
PRESSURE PLATE
1. Strip
5/8 inch of the wire insulation.
5/8”
Easy wiring
2. Unscrew, lift and twist plastic protective cover
to access the terminals.
3. Identify your Line and Load wires.
4. Run your wires through the knockouts and
cable
clamp wire connectors (not provided).
5. Connect and tighten the ground wire to
grounding terminal at bottom of case.
7.Insert the wire ends under the proper terminal
plates and tighten the screws firmly.
8. Replace the plastic protective cover.
Caution: Only use for 120 VAC
loading only. Otherwise the
timer can be damaged.
WIRING:
Connect in accordance with Local and
National Electrical Codes (NEC). See
suggested circuit diagram below. DO
NOT USE ALUMINIUM WIRE.
SA306
SA306
S
A
3
0
6
5
Zip-set Technology “Sunset Auto on” is easy to program. The clock is set at the factory to the (212) Eastern time zone so you just need to enter
your area code before using. The timer will automatically adjust for your location to turn your appliances and lighting on at sunset. Your SA 306 will
automatically adjust to the changing sunset times as the year progresses.
Your program settings are protected by the integrated back-up battery; even with brown-outs or black-outs, the Zip-set will store settings and turn
your lights and appliances correctly on at sunset once the electric current resumes.
Zip-Set Technology Auto Sunset On
Illuminated Display and Keypad
Battery Backup (batteries included)
Ratings:
Total load: 40 Amps Resistive & Inductive, 40 Amps Tungsten & Incandescent, 3 HP, 120VAC 60Hz.
DO NOT USE THE TIMER TO TURN OFF POWER FOR MAINTENANCE
WORK (repairs, removing broken bulbs, etc.). ALWAYS TURN POWER
OFF AT THE SERVICE PANEL BY REMOVING A FUSE OR TRIPPING
THE CIRCUIT BREAKER BEFORE DOING ANY ELECTRIC REPAIRS.
NEVER SUBMERGE THE UNIT INTO WATER.
WARNINGS:
Please make the jumper wire according to the load requirement.
The minimum size wire for a 15 AMP general purpose circuit is
AWG 14 wire. For 20 AMP circuit, use AWG 12 wire. For larger
loads such as dryers, use not less than AWG 10 wire and follow
National Electrical Codes.
Jumper Wire
120 VAC
Input Only
Load 2Load 1
120 VAC
Input Only
Line (Hot)
“The maximum loading of Load 1 and Load 2 in any circumstance
should not exceed the timer’s maximum rating combined load”
3
NEUTRAL
1 2
Internal
120 Volt
Timer
NEUTRO
Temporizador
Interno De
120 Voltios
LÍNEA CARGA
LINE LOAD
54
LÍNEA CARGA
LINE LOAD
3
NEUTRAL
1 2
Internal
120 Volt
Timer
NEUTRO
Temporizador
Interno De
120 Voltios
LÍNEA CARGA
LINE LOAD
53
LÍNEA CARGA
LINE LOAD
3
N
E
U
T
R
A
L
1 2
I
nt
ernal
12
0
V
o
l
t
T
i
m
er
N
EU
T
RO
T
e
mp
or
i
z
a
d
or
In
te
rn
o
De
1
20
V
o
l
t
ios
L
Í
NE
AC
A
RG
A
L
INE
L
OAD
5
4
LÍ
NE
A
C
ARGA
L
I
NE
L
OAD
Model: SA306
Do not remove this plastic protective cover
ALL POWER TO THIS CONTROL MUST BE TURNED OFF AT THE
MAIN PANEL BEFORE INSTALLING OR SERVICING THIS
SWITCH OR THE EQUIPMENT IT CONTROLS.
DO NOT USE ALUMINUM WIRES.
TO WIRE, UNSCREW, LIFT AND SWING. REPLACE AFTER WIRING.
CAUTION
M
o
de
l
:
S
A
30
6
D
o not remo
v
e t
hi
s
pl
a
s
ti
c
pr
ot
e
c
ti
v
e
c
o
v
er
ALL POWER
TO
THI
S
CO
N
T
R
O
L
M
U
S
T
B
E
TURNED OFF A
T
T
HE
MAIN
PAN
EL
BEFORE
IN
S
TA
L
L
ING O
R
S
E
RV
ICING THI
S
SWIT
C
H
OR
THE EQU
IP
M
E
N
T I
T
C
O
N
T
RO
L
S
.
D
O N
OT U
SE
A
LU
M
INU
M
WIRES.
TO
W
I
RE,
UNS
CR
E
W,
LI
FT
A
ND
S
WIN
G
.
RE
PLA
CE AFT
E
R
W
IRI
NG
.
CAUTION
Model: SA306
Do not remove this plastic protective cover
ALL POWER TO THIS CONTROL MUST BE TURNED OFF AT THE
MAIN PANEL BEFORE INSTALLING OR SERVICING THIS
SWITCH OR THE EQUIPMENT IT CONTROLS.
DO NOT USE ALUMINUM WIRES.
TO WIRE, UNSCREW, LIFT AND SWING. REPLACE AFTER WIRING.
CAUTION
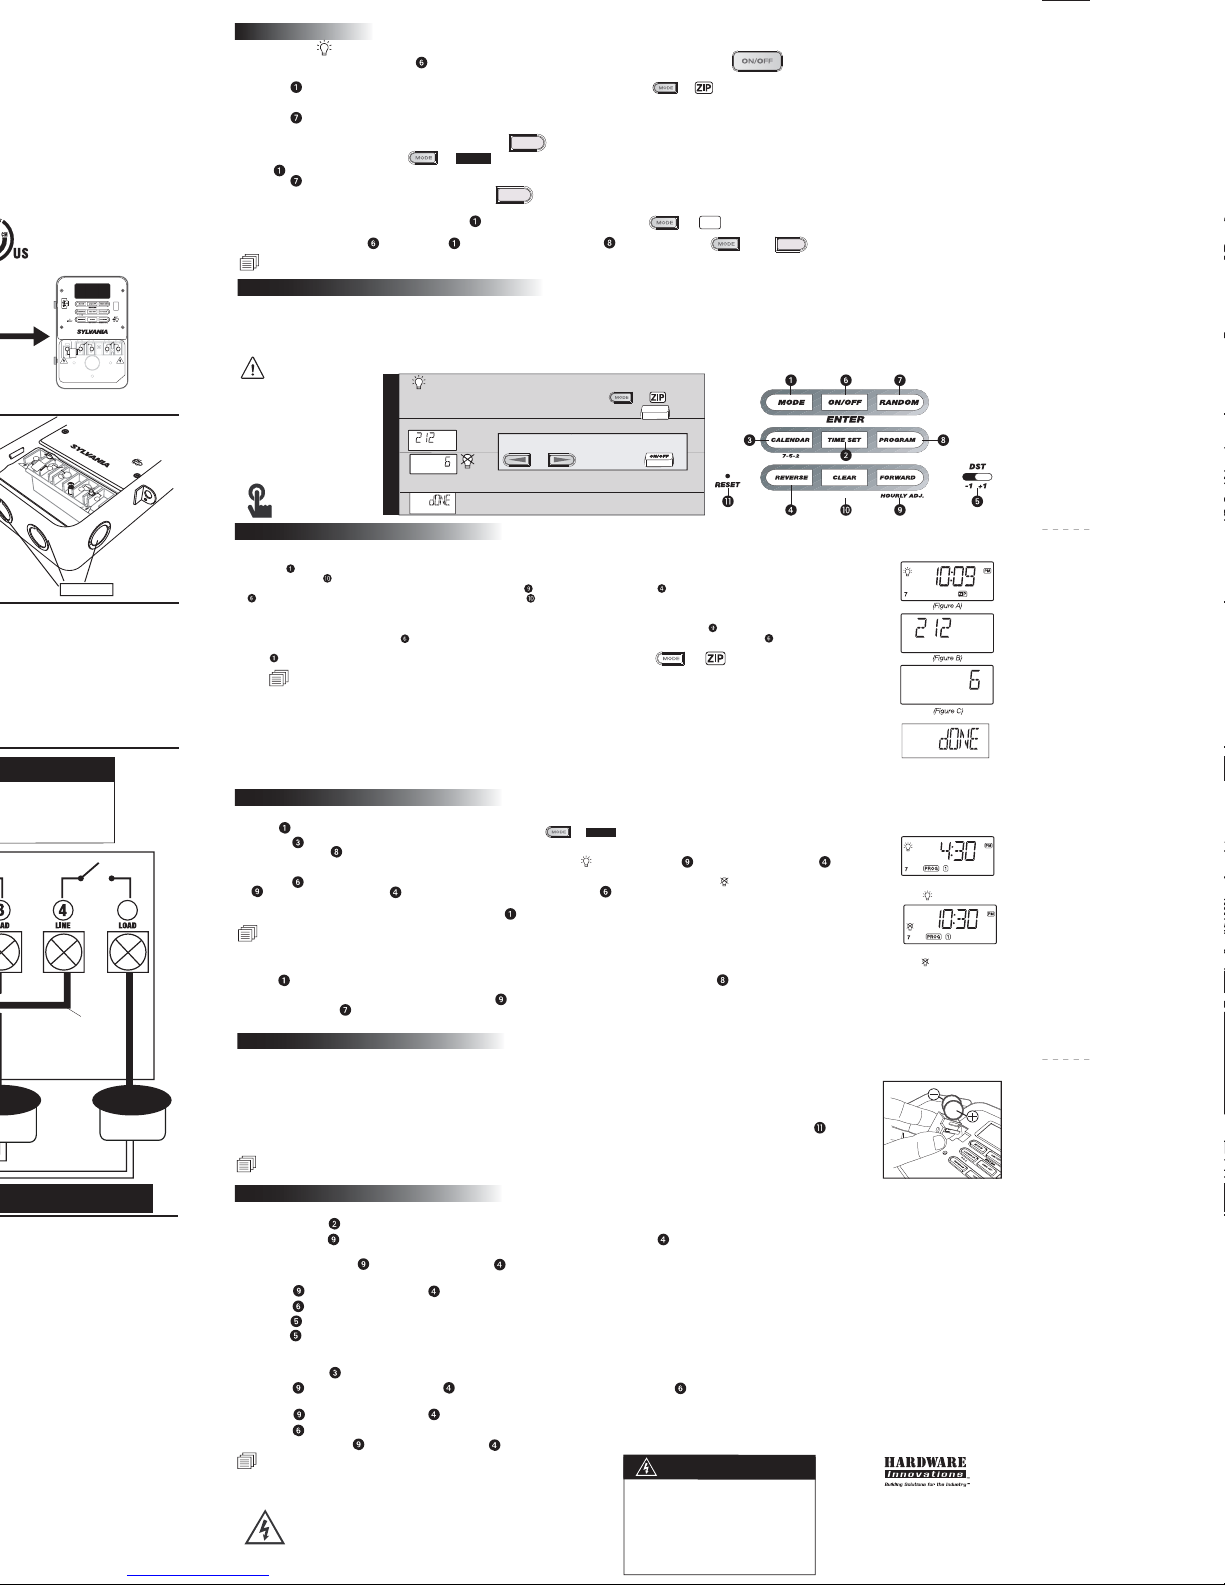
Zip-Set is pre-set to the 212 area code (New York City) time zone, so if you live in New York within the 212 area code, you are already finished. Simply press
the “Mode” button to “ZIP” and it will automatically turn on your lights and appliance at sunset and turn off after 6 hours. But if you live in another area code,
please follow Zip-Set area code instructions.
Do not touch the time setting! It must always be set to the Default Preset Factory Time (NYC - (212) local time) for the zip-set program to work.
Setting Zip-Set Telephone Area Code
Understanding the Zip-Set Mode
Clock Setting (this function is usually used when batteries must be replaced) Set only to Eastern Time- 212 area code.
1. Press and hold the
TIME SET Button until the display is flashing.
2. Press and hold the
Forward/Hourly Adjust Button to rapidly advance the time forward, or the
backward. Release button when the approximate correct Eastern time is displayed. PM Indicator is on the upper right corner of the display.
Note: While pressing either
Forward/Hourly Adjust or
help you in setting the time faster and accurately.
3. Press the
Forward/Hourly Adjust or Reverse Button repeatedly until the correct Eastern time is displayed.
4. Press the
On/Off/Enter Button or wait for approx. 10 seconds to exit time setting mode.
5. Slide the
DST Switch to ON to have timer increase the current time by 1 hour for daylight saving time. The DST Indicator is to the right of the display.
Slide the
DST Switch again to turn it off. Current time will decrease 1 hour.
Calendar Setting (This function is usually used when batteries must be replaced)
1. Press and hold the
Calendar/7-5-2 Button until “Y 04” (default) flashes on the display.
2. Press the
Forward/Hourly Adjust or the
Reverse Button to adjust to current year then press
seconds. The display will show month/date and flash.
3. Press the
Forward/Hourly Adjust or Reverse Button repeatedly until the correct month/date is displayed.
4. Press the
On/Off/Enter Button or wait for approx. 10 seconds to exit calendar setting mode.
Note: While pressing either
Forward/Hourly Adjust or
you in setting the date faster and accurately.
Battery Installation
– This unit comes with 2 x CR2032 batteries for time keeping and back-up. You should replace the batteries every 2 years. To replace the
batteries, please follow these steps:
1. Turn power off at circuit breaker to remove fuse.
2. Use a small Philips screw driver to remove screw holding the battery compartment.
3. Use a small flat screw driver gently pry the battery door open. Remove the 2 x old CR2032 batteries.
4. Install 2 x new CR2032 batteries into the battery compartment, making sure that the + and – polarities match up with the diagram printed on the unit.
5.
When the batteries are in place, return the battery door its original position and tighten the screws.
6. If you find the timer is not running after installing new batteries, you may need to reset it first. Using the point of a pencil or paperclip, press the RESET
Button located on the front panel. You will then need to reset the time and date.
Using Programmable ON and OFF Time Settings
The SA 306 has 4 independent programmable ON/OFF time settings so you can turn
times.
1. Press
MODE Button until the “PROG” and “1” icons are displayed.
2. Press the
Calendar/7-5-2 Button to select the timer frequency. “7” means the timer will operate all week, “5” for weekdays and “2” for just the weekend.
3. Press and hold the
Program Button until the display is flashing. (Figure E)
4. The display will change to show the ON time for program 1 and flash. The ON Icon will appear. Press the
Button to adjust the ON time.
5. Press the
On/Off/Enter Button or wait for approx. 10 seconds. The display will show OFF time, and the Off Icon will appear. (Figure F) Press the
Forward/Hourly Adjust or
Reverse Button to adjust OFF time. Press the
return to normal mode. Display will change back to show the clock time.
6. To program 2nd, 3rd or 4th timer, just follow step 1-5 but press
NOTE: Do not program the same on and off time when setting programs 1, 2, 3 or 4. Y ou can not set the turn on and turn of f to the same time (i.e., T urn on at 5:00
am and turn off at 5:00 am). Doing so will produce an error message on the display. To resolve the error message, change the off time by at least one minute using
the forward or reverse button.
Activating the Programmable timer
1. Press
MODE Button until one of the program icons appears. That programmed timer is now active. (Press the
preset times).
2. There is a simpler way to adjust turn on time by pressing the
3. If you wish, press the
Random Button once to activate the random feature. The timer on/off time will fluctuate +/-10 to
this feature, just press the button again.
Battery Replacement
Setting Clock and Calendar
Set your area code
Yes- You are DONE!
Find and press “Mode” button, until you see the Zip-Set icon
Then depress & hold the Clear (Zip-Set) button until the display flashes.
1
2
3
Fast Set Up Instructions for Zip-Set™ Timers
To set:
to Confirm or Enter.
Set how many hours after sunset that you wish the fixture to
turn the power off (2, 4, 6, 8, 10, 12, 14 or 16 hrs).
NOTE: When changing batteries, make sure to reset the current time to the correct time in the Eastern time zone.
When you enter your telephone area code, it will then automatically adjust to the proper time for your location/time zone.
If Reset: Zip-Set must have the area code, year and date and Eastern time entered properly to function.
Zip-Set is the easiest way to set a light or an appliance to automatically turn on at sunset. Just set the phone area code where you live, make sure the Zip-Set
mode is activated, and you are finished.
The SA 306 internal clock is pre-set at the factory to the (212-NYC area code) Eastern time zone. (If you live in another area code other than 212- you need to
change the area code). Simply enter your telephone area code by following these easy steps to have the time adjust to your location:
1. Press the Mode Button until “ZIP” appears in the display. (Figure A)
2. Press and hold the
Zip Set/Clear Button until the display shows the 3-digit area code input mode (Figure B).
3. The 1st digit of the telephone area code should be flashing. Press the Forward/Hourly Adjust or Reverse Button to adjust it, then press
On/Off/Enter Button to enter it and edit the next digit. Press the
correct telephone area code is displayed. (Note: For special area code time zones see note below)
4. Once your telephone area code is entered, select a turn off time for the Zip-Set automatic sunset timer (the default turn off time of 6 should flash) (Figure C). You
can have the timer turn off 2, 4, 6, 8 ,10, 12, 14 or 16 hours after sunset. While the turn off time is flashing, press the Forward/Hourly Adjust to cycle to
the desired turn off setting, then press On/Off/Enter Button to enter it. When DONE appears in the display (Figure D), press On/Off/Enter Button to
confirm or wait 10 seconds.
5. Press
Mode Button to Zip (display icon) to confirm the timer is set for ZIP-SET Auto ON at Sunset.
NOTE:
(1.) After entering the Area codes for certain states, a “C” may appear next to the telephone area code, indicating a central location in the state. Press Forward or
Reverse to toggle to W (West) or E (East) and N (North) or S (South) if needed for proper time setting.
(2.) There are also area codes that may have different time zones; for example the 208 area code; by default will flash PST or by pressing Forward or Reverse will
toggle to MST)
(3.) Telephone area codes can change and may not appear in the timer’s table. Should that occur, please use the closest adjacent area code to set the timer correctly
for your location.
(4.) If a new area code was issued after this unit was manufactured or if you enter an invalid/nonexistent area code, you will get an error message stating 'AREA CODE
NOT FOUND'. Enter the closest correct area code for zip set mode to function properly.
(5.) If the clock/calendar is not correct or time is lost after replacing batteries, zip-Set mode will not function properly. Please see Setting Clock and Calendar (below).
Timer Operation
Manual Override
To override the On or Off settings, press the
On/Off Button. The override setting will not change the next timed event.
Activate the Zip-Set Sunset timer
1. Press the
MODE Button until "ZIP" icon is displayed. The Zip-Set sunset timer is set and active.
2. SA 306 once properly set, knows the sunset time of your location. It will automatically turn on at sunset and turn off after your selected duration time of 2,4,6,8,10, 12, 14 or
16 hrs.(see ZIP-Set Telephone Area Code Setting)
3. Press the
Random Button once to activate the random feature so the timer on/off time will fluctuate between +/-10 minutes to +/-120 minutes randomly. To cancel this
feature, just press the button again
(random disappears). When your home or office is left unattended, this is an excellent security feature to simulate
household activity and random should be activated.
Activate the Programmable timer
1. Press
MODE Button until the wanted program icon (PROG 1,2,3,or 4) is displayed and the chosen timer program will be activated.
2. Press the
Random Button once to activate the random feature so the timer on/off period will fluctuate between +/-10 minutes to +/-120 minutes randomly. To cancel
this feature, just press the button again (random disappears).
Turn off all timer functions:
If you don’t want to use any timer functions, just press the
MODE Button until "OFF" is displayed.
Confirm timer settings for
ON/OFF: Press
MODE, select program then press
to
PROG
RANDOM
NOTE: Display and keypad will illuminate when any key is activated
http://waterheatertimer.org/Boxtype.html
http://waterheatertimer.org/Sylvania-timers-and-manuals.html
Page 2
Timer Operation
Manual Override
To override the On or Off settings, press the
Activate the Zip-Set Sunset timer
MODE Button until "ZIP" icon is displayed. The Zip-Set sunset timer is set and active.
16 hrs.(see ZIP-Set Telephone Area Code Setting)
Random Button once to activate the random feature so the timer on/off time will fluctuate between +/-10 minutes to +/-120 minutes randomly. To cancel this
feature, just press the button again
household activity and random should be activated.
MODE Button until the wanted program icon (PROG 1,2,3,or 4) is displayed and the chosen timer program will be activated.
Random Button once to activate the random feature so the timer on/off period will fluctuate between +/-10 minutes to +/-120 minutes randomly. To cancel
this feature, just press the button again (random disappears).
(random disappears). When your home or office is left unattended, this is an excellent security feature to simulate
ON/OFF: Press
NOTE: Display and keypad will illuminate when any key is activated
Understanding the Zip-Set Mode
Do not touch the time setting! It must always be set to the Default Preset Factory Time (NYC - (212) local time) for the zip-set program to work.
1
2
3
This product has passed
ETL testing. It is certified
and complies with both
U.S. and Canadian
product safety standards.
S
A
3
0
6
N
E
U
N
T
EU
R
A
T
L
RO
1
I
nt
ernal
12
0
T
V
T
e
i
ALL POWER
o
m
mp
l
t
er
In
or
te
i
1
z
rn
2
a
0
d
o
or
De
V
2
o
l
t
MAIN
ios
L
INE
L
Í
NE
TO
AC
PAN
D
TO
CAUTION
o not remov
SWIT
W
I
THI
RE,
EL
L
OAD
C
A
UNS
BEFORE
RG
S
H
A
OR
D
CO
CR
O N
N
THE EQU
E
T
W,
OT U
R
IN
e t
O
LI
S
L
FT
TA
SE
M
hi
A
U
s
L
A
ND
IP
L
S
pl
LU
ING O
T
M
S
E
a
WIN
B
M
N
s
INU
T I
ti
G
R
.
c
S
RE
T
M
pr
C
WIRES.
PLA
O
ot
CE AFT
e
c
ti
v
E
e
R
c
o
v
BATTERY
SA306
NEUTRAL
NEUTRO
Internal
3
1 2
120 Volt
LINE LOAD
LINE LOAD
Timer
Temporizador
LÍNEA CARGA
LÍNEA CARGA
Interno De
120 Voltios
Model: SA306
CAUTION
ALL POWER TO THIS CONTROL MUST BE TURNED OFF AT THE
MAIN PANEL BEFORE INSTALLING OR SERVICING THIS
SWITCH OR THE EQUIPMENT IT CONTROLS.
DO NOT USE ALUMINUM WIRES.
TO WIRE, UNSCREW, LIFT AND SWING. REPLACE AFTER WIRING.
Do not remove this plastic protective cover
(130mm) W
5.1 inch
3
M
o
4
de
L
I
l
NE
LÍ
:
NE
S
A
A
30
E
6
TURNED OFF A
5
L
E
OAD
C
RV
ARGA
N
ICING THIS
T
RO
L
S
T
.
T
W
HE
IRING
er
.
(200mm) H
7.9 inch
53
Indoor timer case
1. Press the
2. SA 306 once properly set, knows the sunset time of your location. It will automatically turn on at sunset and turn off after your selected duration time of 2,4,6,8,10, 12, 14 or
3. Press the
Activate the Programmable timer
1. Press
2. Press the
Turn off all timer functions:
If you don’t want to use any timer functions, just press the
Confirm timer settings for
Zip-Set is the easiest way to set a light or an appliance to automatically turn on at sunset. Just set the phone area code where you live, make sure the Zip-Set
mode is activated, and you are finished.
Zip-Set is pre-set to the 212 area code (New York City) time zone, so if you live in New York within the 212 area code, you are already finished. Simply press
the “Mode” button to “ZIP” and it will automatically turn on your lights and appliance at sunset and turn off after 6 hours. But if you live in another area code,
please follow Zip-Set area code instructions.
Setting Zip-Set Telephone Area Code
The SA 306 internal clock is pre-set at the factory to the (212-NYC area code) Eastern time zone. (If you live in another area code other than 212- you need to
change the area code). Simply enter your telephone area code by following these easy steps to have the time adjust to your location:
Knockouts
Jumper wire
(not included)
Load 2Load 1
5
120 VAC
Input Only
1. Press the Mode Button until “ZIP” appears in the display. (Figure A)
2. Press and hold the
3. The 1st digit of the telephone area code should be flashing. Press the Forward/Hourly Adjust or Reverse Button to adjust it, then press
On/Off/Enter Button to enter it and edit the next digit. Press the
correct telephone area code is displayed. (Note: For special area code time zones see note below)
4. Once your telephone area code is entered, select a turn off time for the Zip-Set automatic sunset timer (the default turn off time of 6 should flash) (Figure C). You
can have the timer turn off 2, 4, 6, 8 ,10, 12, 14 or 16 hours after sunset. While the turn off time is flashing, press the Forward/Hourly Adjust to cycle to
the desired turn off setting, then press On/Off/Enter Button to enter it. When DONE appears in the display (Figure D), press On/Off/Enter Button to
confirm or wait 10 seconds.
5. Press
NOTE:
(1.) After entering the Area codes for certain states, a “C” may appear next to the telephone area code, indicating a central location in the state. Press Forward or
Reverse to toggle to W (West) or E (East) and N (North) or S (South) if needed for proper time setting.
(2.) There are also area codes that may have different time zones; for example the 208 area code; by default will flash PST or by pressing Forward or Reverse will
toggle to MST)
(3.) Telephone area codes can change and may not appear in the timer’s table. Should that occur, please use the closest adjacent area code to set the timer correctly
for your location.
(4.) If a new area code was issued after this unit was manufactured or if you enter an invalid/nonexistent area code, you will get an error message stating 'AREA CODE
NOT FOUND'. Enter the closest correct area code for zip set mode to function properly.
(5.) If the clock/calendar is not correct or time is lost after replacing batteries, zip-Set mode will not function properly. Please see Setting Clock and Calendar (below).
Using Programmable ON and OFF Time Settings
The SA 306 has 4 independent programmable ON/OFF time settings so you can turn outdoor holiday, landscape and security lighting, etc. on and off at specific
times.
1. Press
2. Press the Calendar/7-5-2 Button to select the timer frequency. “7” means the timer will operate all week, “5” for weekdays and “2” for just the weekend.
3. Press and hold the
4. The display will change to show the ON time for program 1 and flash. The ON Icon will appear. Press the Forward/Hourly Adjust or Reverse
Button to adjust the ON time.
5. Press the
Forward/Hourly Adjust or
return to normal mode. Display will change back to show the clock time.
6. To program 2nd, 3rd or 4th timer, just follow step 1-5 but press
NOTE: Do not program the same on and off time when setting programs 1, 2, 3 or 4. Y ou can not set the turn on and turn of f to the same time (i.e., T urn on at 5:00
am and turn off at 5:00 am). Doing so will produce an error message on the display. To resolve the error message, change the off time by at least one minute using
the forward or reverse button.
Activating the Programmable timer
1. Press
preset times).
2. There is a simpler way to adjust turn on time by pressing the
3. If you wish, press the
this feature, just press the button again.
Battery Replacement
Battery Installation
batteries, please follow these steps:
1. Turn power off at circuit breaker to remove fuse.
2. Use a small Philips screw driver to remove screw holding the battery compartment.
3. Use a small flat screw driver gently pry the battery door open. Remove the 2 x old CR2032 batteries.
4. Install 2 x new CR2032 batteries into the battery compartment, making sure that the + and – polarities match up with the diagram printed on the unit.
5.
When the batteries are in place, return the battery door its original position and tighten the screws.
6. If you find the timer is not running after installing new batteries, you may need to reset it first. Using the point of a pencil or paperclip, press the RESET
Button located on the front panel. You will then need to reset the time and date.
Setting Clock and Calendar
Clock Setting (this function is usually used when batteries must be replaced) Set only to Eastern Time- 212 area code.
1. Press and hold the
2. Press and hold the
backward. Release button when the approximate correct Eastern time is displayed. PM Indicator is on the upper right corner of the display.
Note: While pressing either
3. Press the
4. Press the
5. Slide the
Slide the
Calendar Setting (This function is usually used when batteries must be replaced)
1. Press and hold the
2. Press the
seconds. The display will show month/date and flash.
3. Press the
4. Press the
Note: While pressing either
Ratings:
Total load: 40 Amps Resistive & Inductive, 40 Amps Tungsten & Incandescent, 3 HP, 120VAC 60Hz.
WARNINGS:
Zip Set/Clear Button until the display shows the 3-digit area code input mode (Figure B).
Mode Button to Zip (display icon) to confirm the timer is set for ZIP-SET Auto ON at Sunset.
MODE Button until the “PROG” and “1” icons are displayed.
Program Button until the display is flashing. (Figure E)
On/Off/Enter Button or wait for approx. 10 seconds. The display will show OFF time, and the Off Icon will appear. (Figure F) Press the
MODE Button until one of the program icons appears. That programmed timer is now active. (Press the
NOTE: When changing batteries, make sure to reset the current time to the correct time in the Eastern time zone.
When you enter your telephone area code, it will then automatically adjust to the proper time for your location/time zone.
If Reset: Zip-Set must have the area code, year and date and Eastern time entered properly to function.
help you in setting the time faster and accurately.
Forward/Hourly Adjust or Reverse Button repeatedly until the correct Eastern time is displayed.
On/Off/Enter Button or wait for approx. 10 seconds to exit time setting mode.
DST Switch to ON to have timer increase the current time by 1 hour for daylight saving time. The DST Indicator is to the right of the display.
DST Switch again to turn it off. Current time will decrease 1 hour.
Forward/Hourly Adjust or the
Forward/Hourly Adjust or Reverse Button repeatedly until the correct month/date is displayed.
On/Off/Enter Button or wait for approx. 10 seconds to exit calendar setting mode.
you in setting the date faster and accurately.
DO NOT USE THE TIMER TO TURN OFF POWER FOR MAINTENANCE
WORK (repairs, removing broken bulbs, etc.). ALWAYS TURN POWER
OFF AT THE SERVICE PANEL BY REMOVING A FUSE OR TRIPPING
THE CIRCUIT BREAKER BEFORE DOING ANY ELECTRIC REPAIRS.
NEVER SUBMERGE THE UNIT INTO WATER.
Reverse Button to adjust OFF time. Press the On/Off/Enter Button once more or wait for approx. 10 seconds to
Random Button once to activate the random feature. The timer on/off time will fluctuate +/-10 to
– This unit comes with 2 x CR2032 batteries for time keeping and back-up. You should replace the batteries every 2 years. To replace the
TIME SET Button until the display is flashing.
Forward/Hourly Adjust Button to rapidly advance the time forward, or the
Forward/Hourly Adjust or
Calendar/7-5-2 Button until “Y 04” (default) flashes on the display.
Forward/Hourly Adjust or
On/Off Button. The override setting will not change the next timed event.
RANDOM
PROG
to
RANDOM
MODE Button until "OFF" is displayed.
MODE, select program then press
Fast Set Up Instructions for Zip-Set™ Timers
Find and press “Mode” button, until you see the Zip-Set icon
Then depress & hold the Clear (Zip-Set) button until the display flashes.
Set your area code
Set how many hours after sunset that you wish the fixture to
turn the power off (2, 4, 6, 8, 10, 12, 14 or 16 hrs).
To set: use “Reverse” / “Forward” buttons and ON/OFF
to Confirm or Enter.
or
Yes- You are DONE!
Zip Set/Clear Button to go back to / edit the previous digit. Continue until the
MODE Button until “PROG” and corresponding (“2”, “3” or “4”) icons are displayed.
Forward/Hourly Adjust Button. The turn On can be adjusted by +/-90 minutes.
then to set press
PROG
to
PROGRAM button.
to
CLEAR
ZIP-SET
(PROG 1,2,3,or 4)
Reverse Button the minutes will begin at a moderate pace, and then get faster. This will
Reverse Button to adjust to current year then press
Reverse Button the date will begin at a moderate pace, and then get faster. This will help
SAFETY WARNING
Risk of electric shock
• Connect in accordance with Local and National Electrical Codes.
• Install by qualified electricians only
• Do not open or tamper with actual timer.
• Always connect a ground to the timer case
• Switch off the circuit breaker before cleaning
• Keep children away from timer; lock timer case whenever possible.
Risk of fire
• Always insure input and load voltage are compatible with timer.
• Use only proper size AWG wire per your electrical code specification
• Never USE ALUMINIUM WIRE.
• Do not exceed the recommended electrical ratings
to
OFF
to
then
PROGRAM
ZIP-SET
to
Program Button to view the existing
+/-
120 minutes randomly. To cancel
Reverse Button to rapidly change the time
On/Off/Enter Button or wait for approx. 10
(Figure D)
Program Times
(Figure E)
(Light ON)
(Figure F)
(Light OFF)
Battery
Installation
Manufactured by Hardware
Innovations LLC.
Technical Support 888-548-4484
www.hardwareinnovations.com
SA306 - 7 - 2006 V - 2
Made in China
Page 3

Capacidades Nominales:
Carga total: 40 Amperios resistiva e inductiva, 40 Amperios tungsteno e incandescente,
3 HP, 120VCA 60Hz.
Ajuste rápido de Zip-Set
Al dorso de este manual hay instrucciones detalladas para el ajuste y las funciones.
Adjuste su código de área
Sí- ¡Está LISTO!
Busque y presione el botón "Mode" (Modo) hasta que vea el icono Zip-Set [MODE] a [ZIP]
Presione luego y mantenga presionado el botón Clear (Eliminar) (Zip-Set) hasta que la pantalla destelle.
1
2
3
Instrucciones para el ajuste rápido de los temporizadores Zip-Set™
to
ZIP-SET
CLEAR
Para ajustar: Use los botones “Reverse” / “Forward” (Atrás / Adelante) y
ON/OFF (ENCENDIDO/APAGADO) para Confirmar o Entrar.
o
luego para hacer el ajuste presione
Establezca la cantidad de horas después de la puesta del sol que quiere que
el accesorio apague la alimentación (2, 4, 6, 8, 10, 12, 14 ó 16 horas).
Modelo: SA 306 (DPST)
120 Voltios 40 AMP
Interruptor Digital Industrial Temporizado
Bipolar, vía única
Temporizador industrial para interiores
Gracias por comprar el SA 306, un temporizador digital
industrial de 40 amp.
Es un temporizador industrial fácil de instalar y usar con
Zip-Set Auto Sunset On Technology y otras características de
avanzada.
Características:
• La tecnología Zip-Set; enciende las luces automáticamente a la
hora de la puesta del sol – simplemente ingrese el código de
área de su teléfono.
• 4 temporizadores programables independientes de encendido y
apagado con intervalos de 1 minuto entre ajustes.
• Interruptor de Daylight Savings Time (DST) (hora de verano).
• Se puede ajustar los temporizadores para que trabajen fines de
semana (2), días de semana (5), o toda la semana (7).
• Función aleatoria para seguridad.
• Control manual
• Relé de servicio pesado de 40 Amperios
Por favor lea este manual antes de instalar su temporizador Sylvania nuevo.
Instalación
Paso 1:
ADVERTENCIA:
APAGUE la alimentación en el
disyuntor o extraiga el fusible.
Zip-Set Technology Auto Sunset On
Pantalla y teclado iluminados
Batería de reserva (no incluye las
baterías)
Monte la caja en posición vertical
usando los agujeros de montaje
proporcionados.
Ubicación de los 3 agujeros de montaje del temporizador para interiores.
Monte el temporizador en el lugar deseado usando los tres agujeros de montaje proporcionados (A,B,C). La mejor posición de
montaje para el temporizador es a nivel de la vista con suficiente espacio para que se pueda abrir completamente la cubierta de la puerta.
Fije la caja a la pared
El agujero superior de montaje (A) es de tipo de agujero de montaje con ranuras, por lo tanto, mida y fije esto a la pared usando el
primer tornillo (A). La cabeza del tornillo (o sujetador) debe ser ligeramente mayor que la parte angosta del agujero ranurado.
Cuelgue el temporizador en el tornillo A. Atornille el temporizador en la pared usando los dos agujeros de montaje restantes (B y C)
para proporcionar un montaje permanente seguro para el temporizador.
Paso 4
Paso 5
Paso 6:
Restablezca la alimentación en la
caja de fusibles o en el disyuntor.
Encienda (ON) la alimentación
Paso 7
Pruebe el temporizador:
Presione ON/OFF
(ENCENDIDO/APAGADO)Botón
Estudie el diagrama de cableado y decida qué placas desprendibles usar. Seleccione las placas desprendibles a ser usadas para sus mordaza
de cable o conector de conductor y extraiga la placa desprendible correspondiente. Instale las mordazas de cable con contratuercas.
Ahora está listo para instalar el temporizador en la pared.
El círculo exterior es para un conector
de cable de mordaza de cable o un
conducto de 3/4 pulg.
Placas desprendibles
Paso 3
Parte posterior de la unidad de temporizador
Placa desprendible
Asegúrese de que la posición del temporizador y de las placas
desprendibles estén alineados con el cableado que ha planeado.
Las placas desprendibles están fabricadas de acuerdo a normas
industriales: Conectores y contratuercas de mordazas de cable de
1/2, 3/8, o 3/4 pulg. Fije las mordazas de cable correspondientes
en la caja del temporizador.
A
CB
BATTERY
BATTERY
TORNILLO DE TERMINAL
DE LA PLACA DE PRESIÓN
ASEGÚRESE DE QUE EL AISLAMIENTO
QUEDE SEPARADO DE LA PLACA DE
PRESIÓN
1. Pele 5/8 del aislamiento del cable.
5/8”
Fácil de cablear
2. Destornille, levante y gire la cubierta protectora
de plástico para tener acceso a los terminales.
3. Identifique los cables de Línea (Line) y de Carga
(Load).
4. Tienda los cables a través de las placas
desprendibles de agujeros y los conectores de
cables de las abrazaderas (no proporcionados).
5. Conecte y apriete el cable de tierra al terminal de
puesta a tierra en la parte inferior de la caja.
7. Inserte los extremos de los cables debajo de las
placas de terminales correspondientes y apriete
firmemente los tornillos.
8. Vuelva a instalar la caja protectora de plástico.
Precaución: Use sólo para cargar 120 VCA.
De otra manera se dañará el temporizador.
(130mm) Ahcho
5.1 pulg
(200mm) Alto
7.9 pulg
Caja del
temporizador para
interiores
ADVERTENCIAS:
CABLEADO:
Conecte de acuerdo a los Códigos Eléctricos
Local y Nacional (NEC). Consulte el diagrama
del circuito sugerido de más abajo.
NO USE CONDUCTORES DE ALUMINIO.
SA306
SA306
S
A
3
0
6
Este producto pasó la prueba ETL.
Está certificado y cumple con
ambas normas de seguridad de
productos, las de los EE.UU. y
las de Canadá.
Paso 2:
Extraiga el temporizador viejo, identifique el cableado y desconecte
los cables del temporizador que está cambiando o planifique un
lugar nuevo para su temporizador.
Al instalar el temporizador, es importante que se encuentre en un
ambiente que esté libre de exceso de contaminantes como aceite,
humedad o suciedad.
Siempre monte la caja del temporizador en posición vertical.
No instale el temporizador para interiores donde pueda entrarle
lluvia o agua.
La tecnología “Sunset Auto on” de Zip-Set es fácil de programar. El reloj está ajustado en la fábrica de acuerdo a la zona de la hora del este (212) de manera
que sólo tiene que ingresar su área de código antes de usar. El temporizador se ajustará automáticamente para su localidad para encender sus artefactos y la
iluminación a la puesta del sol. Su SA 306 ajustará automáticamente el cambio de las horas de la puesta del sol a medida que pasa el año.
Los ajustes de su programa están protegidos por la batería de respaldo; aún con oscurecimientos parciales o apagones, el Zip-Set almacenará los ajustes, y
encenderá y apagará las luces correctamente a la puesta del sol una vez restablecida la corriente eléctrica.
NO USE EL TEMPORIZADOR PARA APAGAR LA ALIMENTACIÓN PARA
TAREAS DE MANTENIMIENTO (reparaciones, extraer lámparas quemadas, etc.).
APAGUE SIEMPRE LA ALIMENTACIÓN EN EL PANEL DE SERVICIO
EXTRAYENDO UN FUSIBLE O DISPARANDO EL DISYUNTOR ANTES DE
HACER REPARACIONES ELÉCTRICAS.
NUNCA SUMERJA LA UNIDAD EN AGUA.
3
NEUTRAL
1 2
Internal
120 Volt
Timer
NEUTRO
Temporizador
Interno De
120 Voltios
LÍNEA CARGA
LINE LOAD
54
LÍNEA CARGA
LINE LOAD
3
NEUTRAL
1 2
Internal
120 Volt
Timer
NEUTRO
Temporizador
Interno De
120 Voltios
LÍNEA CARGA
LINE LOAD
53
LÍNEA CARGA
LINE LOAD
3
N
E
U
T
R
A
L
1
2
I
nt
ernal
1
2
0
Vo
l
t
T
i
mer
N
EUTRO
T
e
m
p
or
i
z
a
d
o
r
In
te
rn
o De
1
2
0
Vol
t
io
s
LÍ
NE
A
C
AR
G
A
LI
NE
LOAD
5
4
L
Í
NE
A
C
A
R
G
A
LI
NE
L
OA
D
120 VCA
Sólo entrada
Línea
5
Por favor haga el alambre del puente del tamaño adecuado para la exigencia de
la carga. El tamaño mínimo del alambre para un circuito de servicio general de 15
amperios es AWG 14. Para un circuito de 20 amperios, use un alambre AWG 12.
Para cargas mayores como las de una secadora de ropa use no menos que un
alambre ASW 10 y siga los Códigos Eléctricos Nacionales.
Alambre De Puente
Neutro
Línea (Vivo)
Tierra
“La carga máxima de la Carga 1 y la Carga 2 en cualquier circunstancia no debe
ser mayor que la carga combinada de la capacidad nominal máxima del temporizador.
Temporizador de
120 voltios para
interiores
NEUTRO
LÍNEA CARGA LÍNEA CARGA
Alambre de puente
(no se incluye)
120 VCA
Sólo entrada
120 VCA
Sólo entrada
Carga 1 Carga 2
El círculo interior acepta un conducto
portacables, conector o abrazadera
de cables de 12,7 (9,5) mm (1/2 [3/8]
de pulgada).
Posicionamiento Del Temporizador
Modelo: SA306
PRECAUTIÓN
SE DEBE APAGAR TODA ALIMENTACIÓN A ESTE CONTROL EN
EL PANEL PRINCIPAL ANTES DE INSTALAR O EFECTUAR
TAREAS DE SERVICIO EN ESTE INTERRUPTORO EN EL
EQUIPO QUE CONTROLA. NO USE CONDUCTORES DE ALUMINIO
PARA CABLEAR, DESATORNILLE, LEVANTE Y DESPLACE.
VUELVA A INSTALAR DESPUÉS DE HACER EL CABLEADO
No quite esta cubierta protectora de plástico
M
o
de
l
o
:
SA
3
0
6
PRE
CAU
TI
Ó
N
SE D
E
BE
APAGAR TODA ALIMEN
T
A
C
I
ÓN
A
EST
E
CON
TRO
L
E
N
EL
P
ANEL
P
RIN
CIP
AL ANTE
S DE INST
AL
A
R
O
E
FECT
U
A
R
TAR
EAS DE SER
VICI
O EN
E
ST
E
INT
E
R
RUPT
O
R
O
EN
EL
E
Q
U
IPO QUE CONTRO
LA.
NO
U
S
E
C
O
NDUCT
O
RES
DE
A
L
UMINIO
P
AR
A
C
A
B
L
E
A
R
,
DE
S
A
TO
R
NIL
L
E,
L
E
VA
N
T
E
Y
D
E
S
P
L
A
C
E
.
VU
E
L
VA
A
I
N
S
T
AL
A
R
DE
S
P
U
É
S
DE
H
ACE
R
E
L
C
A
B
LE
A
D
O
No
q
u
i
te es
t
a cu
b
i
e
r
ta pr
ot
e
c
t
ora
de
p
l
á
stic
o
¡No toque el ajuste de hora para la luz! Siempre debe estar ajustado a la hora predeterminada de fábrica (Default Preset Factory Time) (NYC - (212) hora local) para que funcione el
programa Zip-Set.
Configuración del código de área de teléfono Zip-Set
Para entender el modo Zip-Set
Uso de ajustes de hora programables de ON (ENCENDIDO) y OFF (APAGADO)
El SA 306 tiene 4 ajustes de hora independientes programables para ON/OFF (ENCENDIDO/APAGADO) para que pueda encender y apagar decoraciones
para las fiestas, iluminación de paisajismo y de seguridad, etc. a horas específicas.
1. Presione el
botón MODE (MODO) hasta que se visualice los iconos “PROG” y “1”.
2. Presione el
botón Calendar (Calendario)/7-5-2 para seleccionar la frecuencia del temporizador. “7” quiere decir que funcionará toda la semana, “5” para
días de semana y “2” sólo para el fin de semana.
3. Presione y mantenga presionado el
botón Program (Programa) hasta que la pantalla destelle. (Figura E)
4. La pantalla cambiará para mostrar la hora de ON (ENCENDIDO) para el programa 1 y destellará. Aparecerá el icono ON (ENCENDIDO). Presione el
Forward/Hourly Adjust (Adelante/Ajuste horario) o
Reverse (Atrás) para ajustar la hora de ON (encendido).
5. Presione el
botón On/Off/Enter (Encendido/Apagado/Entrar) o espere aproximadamente 10 segundos. La pantalla mostrará la hora de OFF (APAGADO) y
aparecerá el icono Off (Apagado). (Figura F) Presione el botón Forward/Hourly Adjust (Adelante/Ajuste horario) o Reverse (Atrás) para ajustar la
hora de OFF (APAGADO). Presione el
botón On/Off/Enter (Encendido/Apagado/Entrar) una vez más o espere aproximadamente 10 segundos para volver al
modo normal. La pantalla volverá a cambiar nuevamente para mostrar la hora del reloj.
6. Para programar el 2do, 3er o 4to temporizador, simplemente siga los pasos 1-5 pero presione el
íconos (“2”, “3” o “4”) correspondientes.
NOTA: Al fijar la hora de las alarmas para los programas 1, 2, 3, o 4, no programe la misma hora de encendido y apagado. No podrá tener la misma hora de
encendido y apagado en los programas (por ejemplo: encendido a las 5:00 am y apagado a las 5:00 am). De ser así, verá un anuncio de error en el visor. Para
resolver el problema, modifique la hora de apagado retrocediendo o avanzando por lo menos un minuto usando los botones de avance o retroceso.
Activación del temporizador programable
1. Presione el botón
MODE (MODO) hasta que aparezca uno de los iconos de programación. Ese temporizador programado ahora está activo. (Presione el
botón Program (Programa) para ver las horas predeterminadas existentes).
2. Hay una manera más simple para ajustar la hora de encendido presionando el
hora de On (Encendido) en +/-90 minutos.
3. Si quiere, presione una vez el
botón Random (Azar) para activar la característica de accionamiento al azar. La hora de on/off (encendido/apagado) fluctuará
al azar +/- 10 hasta +/- 120 minutos. Para cancelar esta característica, simplemente presione nuevamente el botón.
Cambio de la batería
NOTA: Al cambiar baterías, asegúrese de volver a reponer la hora actual a la hora correcta en la zona horaria del Este. Cuando ingrese el código telefónico
de su área, lo ajustará automáticamente a la hora correcta en su localidad/zona horaria. Si se repone: Para que Zip-Set funcione debe tener el
código de área, año y fecha y la hora del este ingresada correctamente.
Zip-Set es la manera más fácil para ajustar una luz o un accesorio para que se enciendan automáticamente a la puesta del sol. Simplemente ajuste el código telefónico del área adonde vive,
asegúrese que el modo Zip-Set esté activado y estará listo.
Zip-Set está preajustado a la zona de hora del código de área 212 (Ciudad de New York), de manera que si vive en New York en el área del código 212, ya ha terminado. Simplemente presione
el botón “Mode” (Modo) hasta llegar a “ZIP” y automáticamente encenderá sus luces y el artefacto a la puesta del sol y los apagará después de 6 horas. Pero, si vive en cualquier otro código de
área, por favor siga las instrucciones de Zip-Set para el código de área.
Funcionamiento del temporizador
Control manual
Para usar control manual en los ajustes On u Off (Encendido u Apagado), presione el botón
temporizado.
Active el temporizador Zip-Set Sunset
1. Presione el
Botón MODE hasta que se visualice el icono "ZIP". El temporizador Zip-Set está ajustado y activo.
2. Una vez correctamente ajustado, el SA 306 sabe la hora de la puesta del sol de su localidad. Se encenderá automáticamente a la puesta del sol y se apagará después de que usted haya
seleccionado el tiempo de duración de 2, 4, 6, 8, 10, 12, 14 ó 16 horas. (Consulte el Ajuste del Código de Área del Teléfono ZIP-Set)
3. Presione el una vez el
Botón Random para activar la característica de azar para que el tiempo de on/off (encender/apagar) del temporizador fluctúe entre +/-10 minutos y +/-120
minutos al azar. Para cancelar esta característica, simplemente presione el botón nuevamente (desaparece random [al azar]). Cuando queda desatendida su casa o su oficina,
esta es una característica de seguridad excelente para simular actividad en la casa y "random" (al azar) debe estar activado.
Active el temporizador programable
1. Presione el
Botón MODE hasta que se visualice el icono deseado del programa (PROG 1,2,3, ó 4) y se activará el programa deseado del temporizador.
2. Presione una vez el
Botón Random para activar la característica de azar para que el período de on/off (encender/apagar) del temporizador fluctúe entre +/-10 minutos y +/-120
minutos al azar. Para cancelar esta característica, simplemente presione el botón nuevamente (desaparece random [al azar]).
Apague todas las funciones del temporizador:
Si no quiere usar ninguna función del temporizador, simplemente presione el
Confirme los ajustes del temporizador para
ON/OFF (ENCENDIDO/APAGADO): Presione MODE (MODO), seleccione el programa, luego presione el botón
PROGRAM (PROGRAMA).
a
PROG
PROGRAM
then
NOTA: La pantalla y el teclado se iluminarán cuando se acciona cualquier tecla.
Adjuste su código de área
Sí- ¡Está LISTO!
Busque y presione el botón "Mode" (Modo) hasta que vea el icono Zip-Set [MODE] a [ZIP]
Presione luego y mantenga presionado el botón Clear (Eliminar) (Zip-Set) hasta que la pantalla destelle.
1
2
3
Instrucciones para el ajuste rápido de los temporizadores Zip-Set™
Para ajustar: Use los botones “Reverse” / “Forward” (Atrás / Adelante) y
ON/OFF (ENCENDIDO/APAGADO) para Confirmar o Entrar.
Establezca la cantidad de horas después de la puesta del sol que quiere que
el accesorio apague la alimentación (2, 4, 6, 8, 10, 12, 14 ó 16 horas).
Al dorso de este
manual hay
instrucciones
detalladas para el
ajuste y las
funciones.
Instalación de la batería – Esta unidad viene con 2 baterías CR2032 para mantener la hora y como resguardo. Usted debiera cambiar las baterías cada 2
años. Para cambiar las baterías, por favor siga estos pasos:
1. Apague la alimentación en el disyuntor para extraer el fusible.
2. Use un destornillador Phillips pequeño para extraer el tornillo que sostiene el compartimiento de la batería.
3. Use un pequeño destornillador de hoja plana para abrir suavemente la puerta de la batería. Extraiga las 2 baterías CR2032 viejas.
4. Instale 2 baterías CR2032 nuevas en el compartimiento de baterías asegurándose que las polaridades + y – coincidan con el diagrama impreso en la unidad.
5. Cuando las baterías estén instaladas en su lugar, vuelva a colocar la puerta de la batería en la posición original y apriete los tornillos.
6. Si encuentra que el temporizador no funciona después de instalar baterías nuevas, es posible que lo deba reponer primero. Usado la punta de un lápiz o de
un clip de papel, presione el botón RESET (REPONER) situado en el panel delantero. Tendrá que reponer luego la hora y la fecha.
Ajuste del reloj (esta función normalmente se usa cuando se deben cambiar las baterías) Ajuste sólo para el horario del este – código de área 212.
1. Presione y mantenga presionado el
botón TIME SET (AJUSTE DE LA HORA) hasta que la pantalla destelle.
2. Presione y mantenga presionado el
botón Forward/Hourly Adjust (Adelante/Ajuste horario) para avanzar rápidamente el horario, o el botón Reverse
(Atrás) para cambiar rápidamente la hora hacia atrás. Suelte el botón cuando se visualice la hora correcta aproximada del este. El indicador PM (pasado el medio día)
está en la esquina superior derecha de la pantalla.
NOTA: Mientras presiona el
botón Forward/Hour ly Adjust (Adelante/Ajuste horario) o el Reverse (Atrás) los minutos comenzarán a una velocidad
moderada, y luego irán más rápido. Esto le va a ayudar a ajustar la hora de manera más rápida y precisa.
3. Presione repetidamente el
botón Forward/Hourly Adjust (Adelante/Ajuste horario) o el Reverse (Atrás) hasta que se visualice la hora correcta del este.
4. Presione el
botón On/Off/Enter (Encendido/Apagado/Entrar) una vez más o espere aproximadamente 10 segundos para salir del modo de ajuste de la hora.
5. Deslice el interruptor
DST a ON (ENCENDIDO) para que el temporizador aumente la hora actual en 1 hora para la hora de verano. El indicador DST se encuentra
en el lado derecho de la pantalla. Deslice nuevamente el interruptor
Ajuste del calendario (Esta función normalmente se usa cuando se deben cambiar las baterías)
1. Presione y sostenga presionado el
botón Calendar (Calendario)/7-5-2 hasta que destelle “Y 04” (predeterminado) en la pantalla.
2. Presione el
botón Forward/Hourly Adjust (Adelante/Ajuste horario) o Reverse (Atrás) para ajustarlo al año en curso, luego presione el botón
On/Off/Enter (Encendido/Apagado/Entrar) o espere durante aproximadamente 10 segundos. La pantalla mostrará el mes/fecha y destellará.
3. Presione repetidamente el
botón Forward/Hourly Adjust (Adelante/Ajuste horario) o Reverse (Atrás) hasta que se visualice el mes/fecha correcto.
4. Presione
botón On/Off/Enter (Encendido/Apagado/Entrar) una vez más o espere aproximadamente 10 segundos para salir del modo de ajuste del calendario.
NOTA: Mientras presiona el botón Forward/Hourly Adjust (Adelante/Ajuste horario) o
moderada, y luego cambiará más rápido. Esto le va a ayudar a ajustar la fecha de manera más rápida y precisa.
Ajuste del reloj y del calendario
El reloj interno del SA 306 está ajustado de fábrica a la zona horaria del este (código de área 212-NYC). (Si vive en otra área con un código distinto de 212, tiene que cambiar el
código de área). Simplemente ingrese el código de área de su teléfono siguiendo estos sencillos pasos para que la hora se ajuste para su localidad.
1. Presione el
Botón MODE (MODO) hasta que aparezca el icono "ZIP" en la pantalla. (Figura A)
2. Presione y mantenga presionado el botón
Zip Set/Clear (Zip Set/Borrar) hasta que la pantalla muestre el modo de ingreso del código de área de 3 dígitos (Figura B).
3. El 1er dígito del código del área de teléfono debe estar destellando. Presione el
ajustarlo, luego presione el
botón On/Off/Enter (Encendido/Apagado/Entrar) para ingresarlo y editar el dígito siguiente. Presione el botón Zip Set/Clear (Zip
Set/Borrar) para volver al dígito anterior o para editarlo. Siga hasta que se visualice el código de área de teléfono correcto. (Nota: Para zonas horarias de códigos de área
especiales, consulte la nota de más abajo)
4. Una vez ingresado su código de área, seleccione una hora para apagar el temporizador automático Zip-Set (debe destellar la hora predeterminada para apagar 6) (Figura C).
Usted puede hacer que el temporizador apague 2, 4, 6, 8 , 10, 12, 14 o 16 horas después de la puesta del sol. Mientras destella la hora de apagado, presione
Adjust (Adelante/Ajuste horario) para ir al ajuste de apagado deseado, luego presione el
DONE (TERMINADO) en la pantalla (Figura D), presione el
botón On/Off/Enter (Encendido/Apagado/Entrar) para confirmar o espere 10 segundos.
5. Presione el
botón Mode (Modo) hasta (visualizar el icono) Zip para confirmar que el temporizador está ajustado para ZIP-SET Auto ON (encendido) a la puesta del sol.
NOTA:
1. Luego de ingresar el código de área de algunos estados, la letra “C” puede aparecer junto al código de área telefónica, indi cando una ubicación central en el estado. De ser necesario cambiarla,
oprima el botón FORWARD (avance) o REVERSE (retroceso) para cambiar a W (Oeste) o E (Este) y N (Norte) o S (Sur).
2. Existen códigos de área telefónica que pueden tener zonas horarias distintas; por ejemplo el código de área 208 destellara PST. Oprimiendo el botón FORWARD o REVERSE
cambiara a MST.
3. Los códigos de área telefónica pueden cambiar o no figurar en la tabla del temporizador. De ser así, por favor utilice el código de área más cercano a su ubicación para programar
la unidad.
4. Si hubiesen habilitado un nuevo código de área después de la producción de esta unidad o si ha ingresado un código de área inválido/inexistente, verá el siguiente mensaje de
error en el visor: “ÁREA CODE NOT FOUND”. Para que la función “zip set” funcione correctamente, deberá ingresar un código de área correcto y aceptable con el cual tenga la
mayor cercanía.
5. Si el reloj/calendario no tiene la información correcta, o si la hora se borró después de reemplazar las baterías, diríjase a la sección Programación del reloj (a continuación).
Page 4

Funcionamiento del temporizador
Control manual
Para usar control manual en los ajustes On u Off (Encendido u Apagado), presione el botón
temporizado.
Active el temporizador Zip-Set Sunset
Este producto pasó la prueba ETL.
Está certificado y cumple con
ambas normas de seguridad de
productos, las de los EE.UU. y
las de Canadá.
BATTERY
SA306
NEUTRAL
NEUTRO
Internal
3
1 2
53
120 Volt
LINE LOAD
LINE LOAD
Timer
Temporizador
LÍNEA CARGA
LÍNEA CARGA
Interno De
120 Voltios
Modelo: SA306
PRECAUTIÓN
SE DEBE APAGAR TODA ALIMENTACIÓN A ESTE CONTROL EN
EL PANEL PRINCIPAL ANTES DE INSTALAR O EFECTUAR
TAREAS DE SERVICIO EN ESTE INTERRUPTORO EN EL
EQUIPO QUE CONTROLA. NO USE CONDUCTORES DE ALUMINIO
PARA CABLEAR, DESATORNILLE, LEVANTE Y DESPLACE.
VUELVA A INSTALAR DESPUÉS DE HACER EL CABLEADO
No quite esta cubierta protectora de plástico
(130mm) Ahcho
5.1 pulg
S
A
3
0
6
N
E
U
N
T
EUTRO
R
A
L
1
I
nt
ernal
1
2
0
T
Vo
T
e
i
mer
m
l
t
p
In
or
te
SE D
i
1
z
rn
2
a
0
d
o De
Vol
o
2
r
t
io
s
LI
E
EL
NE
LÍ
BE
PRE
NE
E
P
Q
A
TAR
APAGAR TODA ALIMEN
ANEL
U
IPO QUE CONTRO
3
EAS DE SER
LOAD
P
P
C
AR
No
RIN
AR
VU
G
A
CAU
A
E
C
CIP
q
L
VA
u
A
B
i
AL ANTE
te es
A
L
VICI
E
I
A
N
R
S
LA.
O EN
,
4
T
t
DE
AL
a cu
M
LI
T
S DE INST
TI
NO
S
NE
o
A
A
L
Í
A
de
NE
E
R
C
TO
ST
A
I
b
U
DE
l
ÓN
o
i
S
R
:
e
E
S
SA
Ó
E
NIL
INT
r
A
P
ta pr
C
U
EST
3
L
O
AL
É
5
0
E,
S
NDUCT
E
N
6
L
L
A
R
OA
DE
C
E
R
ot
RUPT
E
A
D
R
VA
CON
O
H
G
e
A
ACE
N
c
E
O
T
t
FECT
O
RES
TRO
E
ora
R
R
Y
O
E
D
EN
L
DE
L
U
de
E
E
C
A
S
A
R
P
N
A
EL
B
p
L
L
LE
A
l
UMINIO
á
C
A
stic
E
D
.
O
o
(200mm) Alto
7.9 pulg
Caja del
temporizador para
interiores
1. Presione el
2. Una vez correctamente ajustado, el SA 306 sabe la hora de la puesta del sol de su localidad. Se encenderá automáticamente a la puesta del sol y se apagará después de que usted haya
3. Presione el una vez el
Active el temporizador programable
1. Presione el
2. Presione una vez el
Apague todas las funciones del temporizador:
Si no quiere usar ninguna función del temporizador, simplemente presione el
Confirme los ajustes del temporizador para
PROGRAM (PROGRAMA).
Botón MODE hasta que se visualice el icono "ZIP". El temporizador Zip-Set está ajustado y activo.
seleccionado el tiempo de duración de 2, 4, 6, 8, 10, 12, 14 ó 16 horas. (Consulte el Ajuste del Código de Área del Teléfono ZIP-Set)
minutos al azar. Para cancelar esta característica, simplemente presione el botón nuevamente (desaparece random [al azar]). Cuando queda desatendida su casa o su oficina,
esta es una característica de seguridad excelente para simular actividad en la casa y "random" (al azar) debe estar activado.
minutos al azar. Para cancelar esta característica, simplemente presione el botón nuevamente (desaparece random [al azar]).
Botón Random para activar la característica de azar para que el tiempo de on/off (encender/apagar) del temporizador fluctúe entre +/-10 minutos y +/-120
Botón MODE hasta que se visualice el icono deseado del programa (PROG 1,2,3, ó 4) y se activará el programa deseado del temporizador.
Botón Random para activar la característica de azar para que el período de on/off (encender/apagar) del temporizador fluctúe entre +/-10 minutos y +/-120
then
NOTA: La pantalla y el teclado se iluminarán cuando se acciona cualquier tecla.
Para entender el modo Zip-Set
Zip-Set es la manera más fácil para ajustar una luz o un accesorio para que se enciendan automáticamente a la puesta del sol. Simplemente ajuste el código telefónico del área adonde vive,
asegúrese que el modo Zip-Set esté activado y estará listo.
Zip-Set está preajustado a la zona de hora del código de área 212 (Ciudad de New York), de manera que si vive en New York en el área del código 212, ya ha terminado. Simplemente presione
el botón “Mode” (Modo) hasta llegar a “ZIP” y automáticamente encenderá sus luces y el artefacto a la puesta del sol y los apagará después de 6 horas. Pero, si vive en cualquier otro código de
área, por favor siga las instrucciones de Zip-Set para el código de área.
¡No toque el ajuste de hora para la luz! Siempre debe estar ajustado a la hora predeterminada de fábrica (Default Preset Factory Time) (NYC - (212) hora local) para que funcione el
programa Zip-Set.
Busque y presione el botón "Mode" (Modo) hasta que vea el icono Zip-Set [MODE] a [ZIP]
1
Al dorso de este
manual hay
instrucciones
detalladas para el
ajuste y las
funciones.
Presione luego y mantenga presionado el botón Clear (Eliminar) (Zip-Set) hasta que la pantalla destelle.
Adjuste su código de área
2
3
Establezca la cantidad de horas después de la puesta del sol que quiere que
el accesorio apague la alimentación (2, 4, 6, 8, 10, 12, 14 ó 16 horas).
Configuración del código de área de teléfono Zip-Set
El reloj interno del SA 306 está ajustado de fábrica a la zona horaria del este (código de área 212-NYC). (Si vive en otra área con un código distinto de 212, tiene que cambiar el
código de área). Simplemente ingrese el código de área de su teléfono siguiendo estos sencillos pasos para que la hora se ajuste para su localidad.
Botón MODE (MODO) hasta que aparezca el icono "ZIP" en la pantalla. (Figura A)
Placas desprendibles
Alambre de puente
(no se incluye)
1. Presione el
2. Presione y mantenga presionado el botón
3. El 1er dígito del código del área de teléfono debe estar destellando. Presione el
ajustarlo, luego presione el
Set/Borrar) para volver al dígito anterior o para editarlo. Siga hasta que se visualice el código de área de teléfono correcto. (Nota: Para zonas horarias de códigos de área
especiales, consulte la nota de más abajo)
4. Una vez ingresado su código de área, seleccione una hora para apagar el temporizador automático Zip-Set (debe destellar la hora predeterminada para apagar 6) (Figura C).
Usted puede hacer que el temporizador apague 2, 4, 6, 8 , 10, 12, 14 o 16 horas después de la puesta del sol. Mientras destella la hora de apagado, presione
Adjust (Adelante/Ajuste horario) para ir al ajuste de apagado deseado, luego presione el
DONE (TERMINADO) en la pantalla (Figura D), presione el
botón Mode (Modo) hasta (visualizar el icono) Zip para confirmar que el temporizador está ajustado para ZIP-SET Auto ON (encendido) a la puesta del sol.
5. Presione el
NOTA:
1. Luego de ingresar el código de área de algunos estados, la letra “C” puede aparecer junto al código de área telefónica, indi cando una ubicación central en el estado. De ser necesario cambiarla,
oprima el botón FORWARD (avance) o REVERSE (retroceso) para cambiar a W (Oeste) o E (Este) y N (Norte) o S (Sur).
2. Existen códigos de área telefónica que pueden tener zonas horarias distintas; por ejemplo el código de área 208 destellara PST. Oprimiendo el botón FORWARD o REVERSE
cambiara a MST.
3. Los códigos de área telefónica pueden cambiar o no figurar en la tabla del temporizador. De ser así, por favor utilice el código de área más cercano a su ubicación para programar
la unidad.
4. Si hubiesen habilitado un nuevo código de área después de la producción de esta unidad o si ha ingresado un código de área inválido/inexistente, verá el siguiente mensaje de
error en el visor: “ÁREA CODE NOT FOUND”. Para que la función “zip set” funcione correctamente, deberá ingresar un código de área correcto y aceptable con el cual tenga la
mayor cercanía.
5. Si el reloj/calendario no tiene la información correcta, o si la hora se borró después de reemplazar las baterías, diríjase a la sección Programación del reloj (a continuación).
Uso de ajustes de hora programables de ON (ENCENDIDO) y OFF (APAGADO)
El SA 306 tiene 4 ajustes de hora independientes programables para ON/OFF (ENCENDIDO/APAGADO) para que pueda encender y apagar decoraciones
para las fiestas, iluminación de paisajismo y de seguridad, etc. a horas específicas.
1. Presione el
2. Presione el
3. Presione y mantenga presionado el
4. La pantalla cambiará para mostrar la hora de ON (ENCENDIDO) para el programa 1 y destellará. Aparecerá el icono ON (ENCENDIDO). Presione el
5. Presione el
5
6. Para programar el 2do, 3er o 4to temporizador, simplemente siga los pasos 1-5 pero presione el
Activación del temporizador programable
1. Presione el botón
2. Hay una manera más simple para ajustar la hora de encendido presionando el
3. Si quiere, presione una vez el
botón MODE (MODO) hasta que se visualice los iconos “PROG” y “1”.
botón Calendar (Calendario)/7-5-2 para seleccionar la frecuencia del temporizador. “7” quiere decir que funcionará toda la semana, “5” para
días de semana y “2” sólo para el fin de semana.
Forward/Hourly Adjust (Adelante/Ajuste horario) o
botón On/Off/Enter (Encendido/Apagado/Entrar) o espere aproximadamente 10 segundos. La pantalla mostrará la hora de OFF (APAGADO) y
aparecerá el icono Off (Apagado). (Figura F) Presione el botón Forward/Hourly Adjust (Adelante/Ajuste horario) o Reverse (Atrás) para ajustar la
hora de OFF (APAGADO). Presione el
modo normal. La pantalla volverá a cambiar nuevamente para mostrar la hora del reloj.
íconos (“2”, “3” o “4”) correspondientes.
NOTA: Al fijar la hora de las alarmas para los programas 1, 2, 3, o 4, no programe la misma hora de encendido y apagado. No podrá tener la misma hora de
encendido y apagado en los programas (por ejemplo: encendido a las 5:00 am y apagado a las 5:00 am). De ser así, verá un anuncio de error en el visor. Para
resolver el problema, modifique la hora de apagado retrocediendo o avanzando por lo menos un minuto usando los botones de avance o retroceso.
botón Program (Programa) para ver las horas predeterminadas existentes).
MODE (MODO) hasta que aparezca uno de los iconos de programación. Ese temporizador programado ahora está activo. (Presione el
hora de On (Encendido) en +/-90 minutos.
al azar +/- 10 hasta +/- 120 minutos. Para cancelar esta característica, simplemente presione nuevamente el botón.
Zip Set/Clear (Zip Set/Borrar) hasta que la pantalla muestre el modo de ingreso del código de área de 3 dígitos (Figura B).
botón On/Off/Enter (Encendido/Apagado/Entrar) para ingresarlo y editar el dígito siguiente. Presione el botón Zip Set/Clear (Zip
botón Program (Programa) hasta que la pantalla destelle. (Figura E)
botón On/Off/Enter (Encendido/Apagado/Entrar) una vez más o espere aproximadamente 10 segundos para volver al
botón Random (Azar) para activar la característica de accionamiento al azar. La hora de on/off (encendido/apagado) fluctuará
Cambio de la batería
Instalación de la batería – Esta unidad viene con 2 baterías CR2032 para mantener la hora y como resguardo. Usted debiera cambiar las baterías cada 2
años. Para cambiar las baterías, por favor siga estos pasos:
1. Apague la alimentación en el disyuntor para extraer el fusible.
120 VCA
Sólo entrada
2. Use un destornillador Phillips pequeño para extraer el tornillo que sostiene el compartimiento de la batería.
3. Use un pequeño destornillador de hoja plana para abrir suavemente la puerta de la batería. Extraiga las 2 baterías CR2032 viejas.
4. Instale 2 baterías CR2032 nuevas en el compartimiento de baterías asegurándose que las polaridades + y – coincidan con el diagrama impreso en la unidad.
5. Cuando las baterías estén instaladas en su lugar, vuelva a colocar la puerta de la batería en la posición original y apriete los tornillos.
6. Si encuentra que el temporizador no funciona después de instalar baterías nuevas, es posible que lo deba reponer primero. Usado la punta de un lápiz o de
un clip de papel, presione el botón RESET (REPONER) situado en el panel delantero. Tendrá que reponer luego la hora y la fecha.
NOTA: Al cambiar baterías, asegúrese de volver a reponer la hora actual a la hora correcta en la zona horaria del Este. Cuando ingrese el código telefónico
de su área, lo ajustará automáticamente a la hora correcta en su localidad/zona horaria. Si se repone: Para que Zip-Set funcione debe tener el
código de área, año y fecha y la hora del este ingresada correctamente.
Ajuste del reloj y del calendario
Ajuste del reloj (esta función normalmente se usa cuando se deben cambiar las baterías) Ajuste sólo para el horario del este – código de área 212.
1. Presione y mantenga presionado el
2. Presione y mantenga presionado el
(Atrás) para cambiar rápidamente la hora hacia atrás. Suelte el botón cuando se visualice la hora correcta aproximada del este. El indicador PM (pasado el medio día)
está en la esquina superior derecha de la pantalla.
NOTA: Mientras presiona el
moderada, y luego irán más rápido. Esto le va a ayudar a ajustar la hora de manera más rápida y precisa.
3. Presione repetidamente el
4. Presione el
5. Deslice el interruptor
Ajuste del calendario (Esta función normalmente se usa cuando se deben cambiar las baterías)
1. Presione y sostenga presionado el
2. Presione el
3. Presione repetidamente el
4. Presione
NOTA: Mientras presiona el botón Forward/Hourly Adjust (Adelante/Ajuste horario) o Reverse (Atrás) la fecha comenzará a cambiar a una velocidad
moderada, y luego cambiará más rápido. Esto le va a ayudar a ajustar la fecha de manera más rápida y precisa.
botón On/Off/Enter (Encendido/Apagado/Entrar) una vez más o espere aproximadamente 10 segundos para salir del modo de ajuste de la hora.
en el lado derecho de la pantalla. Deslice nuevamente el interruptor
botón Forward/Hourly Adjust (Adelante/Ajuste horario) o Reverse (Atrás) para ajustarlo al año en curso, luego presione el botón
On/Off/Enter (Encendido/Apagado/Entrar) o espere durante aproximadamente 10 segundos. La pantalla mostrará el mes/fecha y destellará.
botón On/Off/Enter (Encendido/Apagado/Entrar) una vez más o espere aproximadamente 10 segundos para salir del modo de ajuste del calendario.
Capacidades Nominales:
Carga total: 40 Amperios resistiva e inductiva, 40 Amperios tungsteno e incandescente,
3 HP, 120VCA 60Hz.
NO USE EL TEMPORIZADOR PARA APAGAR LA ALIMENTACIÓN PARA
TAREAS DE MANTENIMIENTO (reparaciones, extraer lámparas quemadas, etc.).
APAGUE SIEMPRE LA ALIMENTACIÓN EN EL PANEL DE SERVICIO
EXTRAYENDO UN FUSIBLE O DISPARANDO EL DISYUNTOR ANTES DE
HACER REPARACIONES ELÉCTRICAS.
ADVERTENCIAS:
NUNCA SUMERJA LA UNIDAD EN AGUA.
botón TIME SET (AJUSTE DE LA HORA) hasta que la pantalla destelle.
botón Forward/Hourly Adjust (Adelante/Ajuste horario) para avanzar rápidamente el horario, o el botón Reverse
botón Forward/Hour ly Adjust (Adelante/Ajuste horario) o el Reverse (Atrás) los minutos comenzarán a una velocidad
botón Forward/Hourly Adjust (Adelante/Ajuste horario) o el Reverse (Atrás) hasta que se visualice la hora correcta del este.
DST a ON (ENCENDIDO) para que el temporizador aumente la hora actual en 1 hora para la hora de verano. El indicador DST se encuentra
botón Calendar (Calendario)/7-5-2 hasta que destelle “Y 04” (predeterminado) en la pantalla.
botón Forward/Hourly Adjust (Adelante/Ajuste horario) o Reverse (Atrás) hasta que se visualice el mes/fecha correcto.
On/Off (Encendido/Apagado). La configuración manual no cambiará en el próximo evento
a
PROG
a
RANDOM
Botón MODE (MODO) hasta que se visualice “OFF” (APAGADO).
ON/OFF (ENCENDIDO/APAGADO): Presione MODE (MODO), seleccione el programa, luego presione el botón
PROGRAM
Instrucciones para el ajuste rápido de los temporizadores Zip-Set™
Para ajustar: Use los botones “Reverse” / “Forward” (Atrás / Adelante) y
ON/OFF (ENCENDIDO/APAGADO) para Confirmar o Entrar.
luego para hacer el ajuste presione
o
to
CLEAR
ZIP-SET
Sí- ¡Está LISTO!
RANDOM
to
ZIP-SET
botón Forward/Hourly Adjust (Adelante/Ajuste horario) o Reverse (Atrás) para
botón On/Off/Enter (Encendido/Apagado/Entrar) para confirmar o espere 10 segundos.
botón On/Off/Enter (Encendido/Apagado/Entrar) para entrarlo. Cuando aparezca
Forward/Hourly
to
PROG
to
(PROG 1,2,3,or 4)
Reverse (Atrás) para ajustar la hora de ON (encendido).
botón
botón MODE (MODO) hasta que se visualice “PROG” y los
botón Forward/Hourly Adjust (Adelante/Ajuste horario). Se puede ajustar la
DST para apagarlo. La hora actual se reducirá en 1 hora.
ADVERTENCIA DE SEGURIDAD
Riesgo de descarga eléctrica
• Conecte de acuerdo a los Códigos Eléctricos Local y Nacional.
• La instalación debe ser hecha solo por electricistas calificados
• Do abra ni altere el temporizador.
• Conecte siempre a tierra la caja del temporizador
• Apague el disyuntor antes de limpiar
• Mantenga los niños alejados del temporizador; cierre la caja del temporizador
cuando sea posible.
Riesgo de incendio
Asegúrese siempre que el voltaje de entrada y de carga sea compatible con el temporizador.
•
• Use solo el cable de tamaño AWG correcto de acuerdo a la especificación de
su código eléctrico
• Nunca USE CONDUCTORES DE ALUMINIO.
• No exceda los valores eléctricos recomendados
Aportando Soluciones Para La Industria
Apoyo Técnico 888-548-4484
www.hardwareinnovations.com
OFF
(Figura A)
(Figura B)
(Figura C)
(Figura D)
Horario del programa:
(Figura E)
(Luz ENCENDIDA)
(Figura F)
(Luz APAGADA)
Instalación de
la batería
Fabricado por Hardware
Innovations LLC.
SA306 - 7 - 2006 V - 2
Fabricado en China
 Loading...