

Sylvania SA 220 Quick Start Manual
Zip-Set is pre-set to the 212 area code (New York City) time zone, so if you live in New York within the 212 area code, you’re already finished. Simply press the
“Mode” button to “ZIP” and it will automatically turn on your appliance at sunset and turn off after 6 hours. But if you live in another area code, please follow Zip-Set
area code instructions.
Do not touch the time setting! It must always be set to the Default Preset Factory Time (NYC - (212) local time) for the zip-set program to work.
Setting Zip-Set Telephone Area Code
Understanding the Zip-Set Mode
Clock Setting (this function is usually used when batteries must be replaced) Set only to Eastern Time- 212 area code.
1. Press and hold the
2. Press and hold the
backward. Release button when the approximate correct Eastern time is displayed. PM Indicator is on the upper right corner of the display.
NOTE: While pressing either
help you in set the time faster and more accurately.
3. Press the
Forward/Hourly Adjust or Reverse Button repeatedly until the correct Eastern time is displayed.
4. Press the
On/Off/Enter Button or wait for approx. 10 seconds to exit time setting mode.
5. Press the
DST Button to ON to have timer increase the current time by 1 hour for daylight saving time. The DST Indicator is to the right of the display.
Press the
DST Button again to turn it off. Current time will decrease 1 hour.
Calendar Setting (This function is usually used when batteries must be replaced)
1. Press and hold the
2. Press the
Forward/Hourly Adjust or the
seconds. The display will show month/date and flash.
3. Press the
Forward/Hourly Adjust or Reverse Button repeatedly until the correct month/date is displayed.
4. Press the
On/Off/Enter Button or wait for approx. 10 seconds to exit calendar setting mode.
NOTE: While pressing either
assist you in setting the time quickly and accurately.
Battery Installation – This unit comes with 2 x CR2032 batteries for time keeping and back-up. You should replace the batteries every 2 years. To replace the
batteries, please follow these steps:
1. Remove the SA 220 plug from the wall socket.
2. Unscrew mounting screws and remove unit from wall.
3. Turn unit over and using a small Phillips screw driver, remove the 2 screws holding the battery compartment cover (on back of unit).
4. Using a small flat screwdriver, gently pry the battery door open. Remove the 2 CR2032 batteries.
5. Install 2 new CR2032 batteries into the battery compartment, making sure that the + and – polarities match up with the diagram printed on the unit.
6.
When the batteries are in place, return the battery door its original position and tighten the screws.
7. If you find the timer is not running after installing new batteries, you may need to reset it first. Using the point of a pencil or paperclip, press the
Button located on the front panel. You will then need to reset the time and date.
8. Remount unit as before and plug the timer into the wall socket.
Using Programmable ON and OFF Time Settings
The SA 220 has 4 independent programmable ON/OFF time settings so you can turn outdoor holiday, landscape and security lighting, etc. on and off at specific
times.
1. Press
MODE Button until the “PROG” and “1” icons are displayed.
2. Press the
Calendar/7-5-2 Button to select the timer frequency. "7" means the timer will operate all week, “5” for weekdays and “2” for just the weekend.
3. Press and hold the
Program Button until the display is flashing. (Figure E)
4. The display will change to show the “on” time for program 1 and flash. The On Icon will appear. Press the
Button to adjust the ON time.
5. Press the
On/Off/Enter Button or wait for approx. 10 seconds. The display will show “off ” time, and the Off Icon will appear. (Figure F) Press the
000Forward/Hourly Adjust or
return to normal mode. Display will change back to show the clock time.
6. To program 2nd, 3rd or 4th timer, just follow step 1-5 but press
NOTE: Do not program the same on and off time when setting programs 1, 2, 3 or 4. You can not set the turn on and turn off to the same time (i.e., Turn on at
5:00 am and turn off at 5:00 am). Doing so will produce an error message on the display. To resolve the error message, change the off time by at least one
minute using the forward or reverse button.
Activating the Programmable timer
1. Press
MODE Button until one of the program icons appears. That programmed timer is now active. (Press the Program Button to view the existing
preset times).
2. There is a simpler way to adjust turn on time by pressing the
3. If you wish, press the
this feature, just press the button again
Ratings:
Total load: 15 AMP Resistive & Inductive, 600W Tungsten & Incandescent, 1/4 HP 120VAC, 60Hz.
Rated Impulse Voltage: 1500V Type 1.B Control Action
Battery Replacement
Setting Clock and Calendar
NOTE: When changing batteries, make sure to reset the current time to the correct time in the Eastern time zone.
When you enter your telephone area code, it will then automatically adjust to the proper time for your location/time zone.
If Reset: Zip-Set must have the area code, year and date and Eastern time entered properly to function.
Zip-Set is the easiest way to set a light or an appliance to automatically turn on at sunset. Just set the phone area code where you live, make sure the Zip-Set mode
is activated, and you’re finished.
DO NOT USE THE TIMER TO TURN OFF POWER FOR MAINTENANCE
WORK (repairs, removing broken bulbs, etc.). ALWAYS TURN POWER
OFF AT THE SERVICE PANEL BY REMOVING A FUSE OR TRIPPING
THE CIRCUIT BREAKER BEFORE DOING ANY ELECTRIC REPAIRS.
NEVER SUBMERGE UNIT INTO WATER.
The SA 220 internal clock is pre-set at the factory to the (212-NYC area code) Eastern time zone. (If you live in another area code other than 212- you need to change
the area code). Simply enter your telephone area code by following these easy steps to have the time adjust to your location:
1. Press the Mode Button until “ZIP” appears in the display. (Figure A)
2. Press and hold the
Zip Set/Clear Button until the display shows the 3-digit area code input mode (Figure B).
3. The 1st digit of the telephone area code should be flashing. Press the Forward/Hourly Adjust or Reverse Button to adjust it, then press
000On/Off/Enter Button to enter it and edit the next digit. Press the
correct telephone area code is displayed. (Note: For special area code time zones see note below)
4. Once your telephone area code is entered, select a turn off time for the Zip-Set automatic sunset timer (the default turn off time of 6 should flash) (Figure C). You
can have the timer turn off
desired turn off setting, then press On/Off/Enter Button to enter it. When DONE appears in the display (Figure D), press On/Off/Enter Button to
confirm or wait 10 seconds.
5. Press
Mode Button to Zip (display icon) to confirm the timer is set for ZIP-SET Auto ON at Sunset.
NOTE:
(1.) After entering the Area codes for certain states, a “C” may appear next to the telephone area code, indicating a central location in the state. Press Forward or
Reverse to toggle to W (West) or E (East) and N (North) or S (South) if needed for proper time setting.
(2.) There are also area codes that may have different time zones; for example the 208 area code; by default will flash PST or by pressing Forward or Reverse will
toggle to MST)
(3.) Telephone area codes can change and may not appear in the timer’s table. Should that occur, please use the closest adjacent area code to set the timer
correctly for your location.
(4.) If a new area code was issued after this unit was manufactured or if you enter an invalid/nonexistent area code, you will get an error message stating 'AREA
CODE NOT FOUND'. Enter the closest correct area code for zip set mode to function properly.
(5.) If the clock/calendar is not correct or time is lost after replacing batteries, zip-Set mode will not function properly. Please see Setting Clock and Calendar (below).
Push stake into
ground to
circular mark
Front of Timer
PROG
752
1 23 4 ZIP OFFRANDOM
PM
DST
10:09
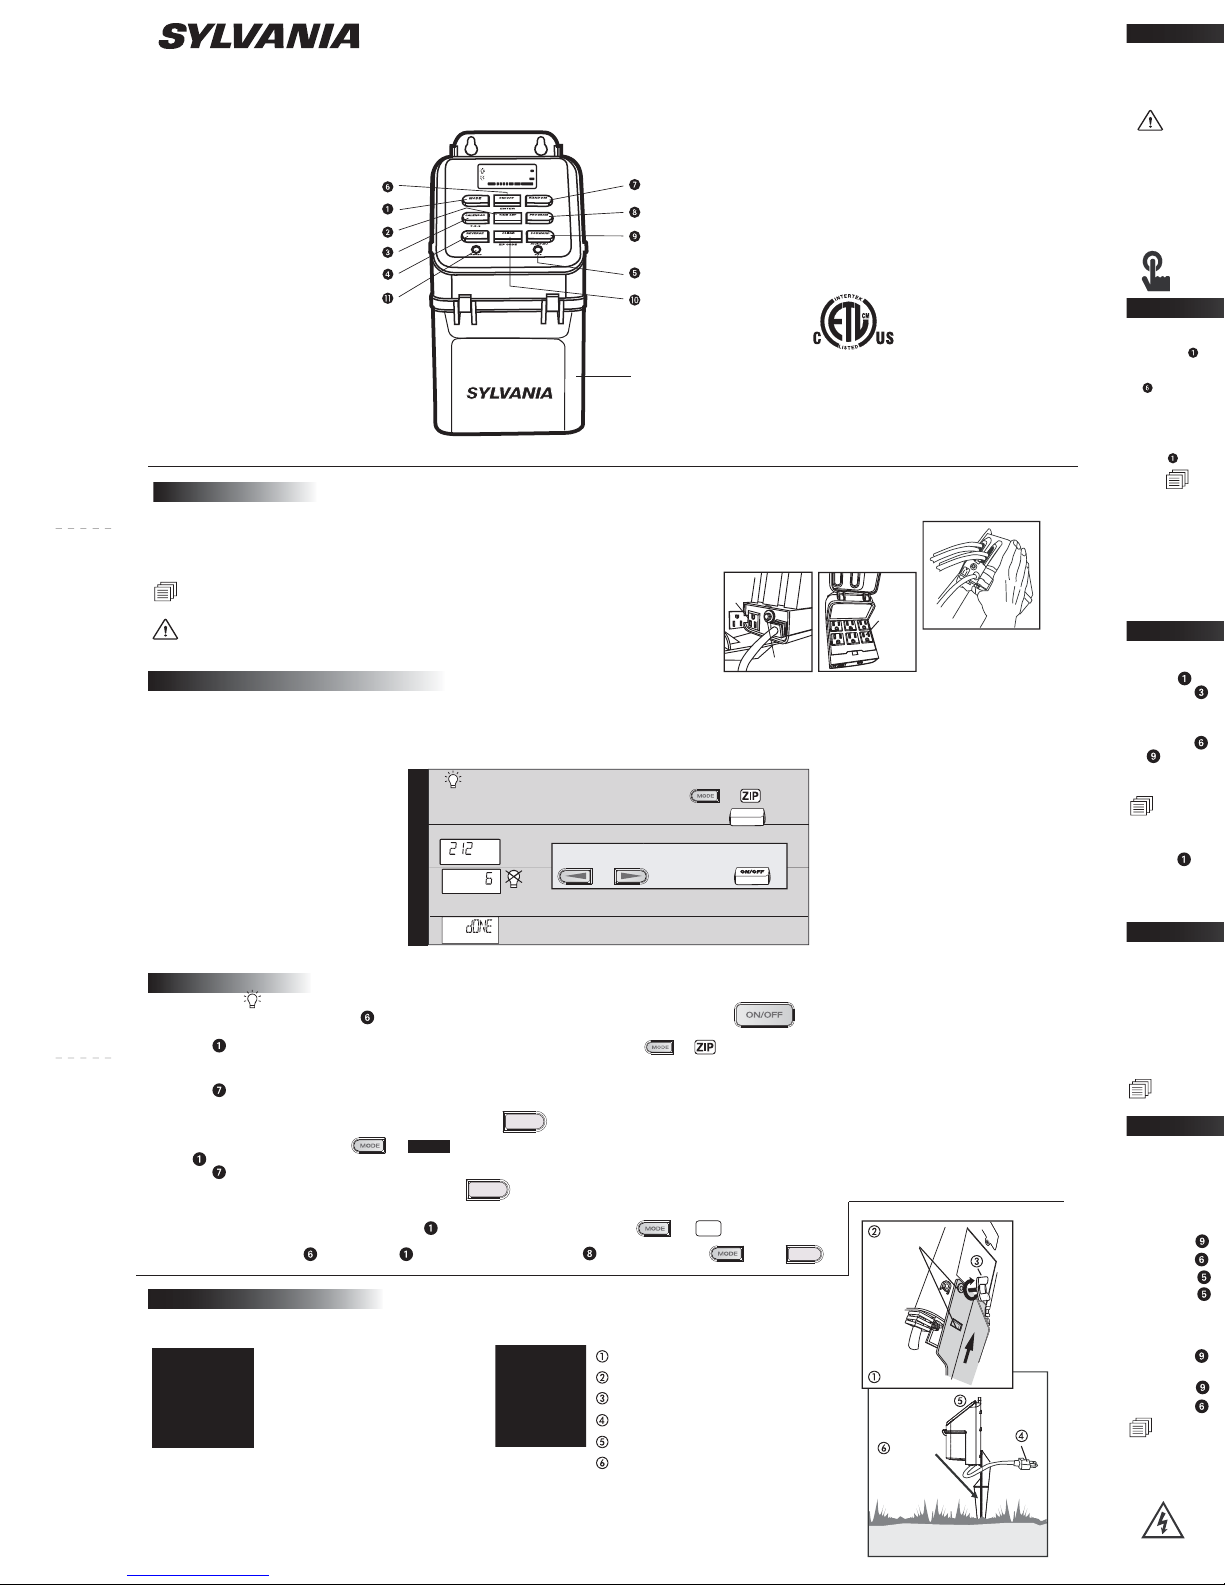
Model: SA 220
• Zip-Set Technology: Sunset Auto On
Digital Outdoor Timer with 7 Outlets
Thank you for purchasing the SA 220 outdoor digital
Timer, an easy to use outdoor digital timer with
Zip-Set Technology and other advanced features:
Designed for outdoor use, the SA 220 can be mounted inside or outside on a wall or in the ground. Controls outdoor holiday, landscape, pool, spa accessories
and security lighting.
Function – The SA 220 has 7 outlets: 6 timed outlets which are powered and controlled by the SA 220 timer; and 1 extra untimed outlet which always has power.
Make sure all the timered outlet wires are neatly channneled through the outlet door slots to protect them from water or rain. We suggest that you always plug
any outdoor timer to a GFCI outlet. Connect your outdoor lighting, etc. to the desired timed outlet.
Function
If you exceed 15 AMPs, the timer’s circuit breaker will trip.
To reset, press the red button on the bottom of the cabinet after reducing the load.
Zip-Set Quick Set-up
Timer Operation
Manual Override
To override the On or Off settings, press the
On/Off Button. The override setting will not change the next timed event.
Detailed set up and function instructions are on back side of this manual.
Activate the Zip-Set Sunset timer
1. Press the
MODE Button until "ZIP" icon is displayed. The Zip-Set sunset timer is set and active.
2. SA 220, once properly set, knows the sunset time of your location. It will automatically turn on at sunset and turn off after
your selected duration time of 2, 4, 6, 8, 10, 12,
14 or 16 hrs.(se
e ZIP-Set Telephone Area Code Setting)
3. Press the
Random Button once to activate the random feature so the timer on/off time will fluctuate between +/-10 minutes to +/-120 minutes randomly. To cancel this
feature, just press the button again
(random disappears). When your home is left unattended, this is an excellent security feature to simulate
household activity and random should be activated.
Activate the Programmable timer
1. Press
MODE Button until the wanted program icon (PROG 1,2,3,or 4) is displayed and the chosen timer program will be active.
2. Press the
Random Button once to activatate the random feature so the timer on/off period will fluctuate between +/-10 minutes to +/-120 minutes randomly. To cancel
this feature, just press the button again
(random disappears).
Turn off all timer functions:
If you don’t want to use any timer functions, just press the
MODE Button until "OFF" is displayed.
Confirm timer settings for
ON/OFF: Press
MODE, select program then press
PROGRAM button.
RANDOM
to
OFF
Features:
• Zip-Set Technology; automatically turns lights on at sunset
– just enter your phone area code.
• Outdoor Timer with large display and keypads
• 7 outlets – 6 timed controlled outlets and 1 untimed outlet
• 4 independent on/off programmable timers.
• DST (daylight savings time) switch.
• Timer settings are selectable to work weekends(2),
weekdays(5), or all week(7).
• Random function for security.
• Manual Override
• Resettable Circuit Breaker
• Battery Backup (batteries included)
Installing the Timer
There are 2 ways to install the SA220. You can either mount the unit on a wall or use the stake (provided) to insert into the ground.
(In order to meet the National Electrical Code 2002, you should use a receptacle cover that protects your outdoor receptacle, when timer is plugged in.
Please Note: the total rating (untimed extra outlet + timer outlets) of all items connected to the timer must not
exceed the SA 220 rating of 15 amps and that any timer settings applied are for all of the timed outlets; they cannot
operate independently.
Wall Mounting Instructions:
The SA 220 requires two (2) #8 screws or
similar (not included) for wall mounting.Select a
suitable location at least 3 feet above grond and
within easy reach (8 inches or so) of a 3 prong
outlet. Line up the unit against the desired
surface and use a pencil or marker to mark the
location of the two screw holes. You may wish
to make starter guide holes with an awl or
similar tool.
Screw the unit to the surface until it is firmly
attached. Make sure not to overtighten screws.
Look at the back of the unit for the stake
mounting holes.
Align the stake with the bottom lip on the
back of timer.
Slide stake in and screw the wingnuts into
holes and stake holes.
Thread the power cord into the stake wire
cutout hole.
Never use a hammer and DO NOT DRIVE
the STAKE INTO GROUND.
Insert the stake into the ground up to the
circular marking.
to
PROG
RANDOM
Channel wires through
bottom outlet conduits
Set your area code
Yes- You are DONE!
Find and press “Mode” button, until you see the Zip-Set icon
Then depress & hold the Clear (Zip-Set) button until the display flashes.
1
2
3
Fast Set Up Instructions for Zip-Set™ Timers
to
ZIP-SET
CLEAR
To set: use “Reverse” / “Forward” buttons and ON/OFF
to Confirm or Enter.
or
then to set press
Set how many hours after sunset that you wish the fixture to
turn the power off (2, 4, 6, 8, 10, 12, 14 or 16 hrs).
PROGRAM
then
Timed Outlets under front cover
Program Button
Reset Button
Time Set Button
Calendar / 7-5-2 Button
Random Button
Zip Set/Clear Button
On/Off/Enter Button
DST Button
Mode Button
Forward/Hourly
Adjust Button
Reverse
to
Align with lip
then screw
wingnuts
into hole
Back of unit
Ground Stake Instructions:
WARNINGS:
Zip-set Technology “Sunset Auto on” is easy to program. The clock is set at the factory to the (212) Eastern time zone so you just need to enter your area code before using. The
timer will automatically adjust for your location to turn
your outdoor holiday, landscape and security lighting on at sunset. Your SA 220 will automatically adjust to the changing
sunset times as the year progresses.
Your program settings are protected by the intergrated back-up battery; even with brown-outs or black-outs, the Zip-set will store settings and turn your lights and appliances
correctly on at sunset once the electric current resumes.
This product has passed
ETL testing. It is certified
and
complies with both
U.S. and Canadian
product safety standards.
Timed
Outlets
Reset
Circuit
Breaker
Extra
Extra
Untimed Untimed
OutletOutlet
Extra
Untimed
Outlet
Bottom of Timer Timer Outlets
Wall Mount
Ground Stake
Zip-Set is pre-set to the 212 area code (New York City) time zone, so if you live in New York within the 212 area code, you’re already finished. Simply press the
“Mode” button to “ZIP” and it will automatically turn on your appliance at sunset and turn off after 6 hours. But if you live in another area code, please follow Zip-Set
area code instructions.
Do not touch the time setting! It must always be set to the Default Preset Factory Time (NYC - (212) local time) for the zip-set program to work.
Setting Zip-Set Telephone Area Code
Understanding the Zip-Set Mode
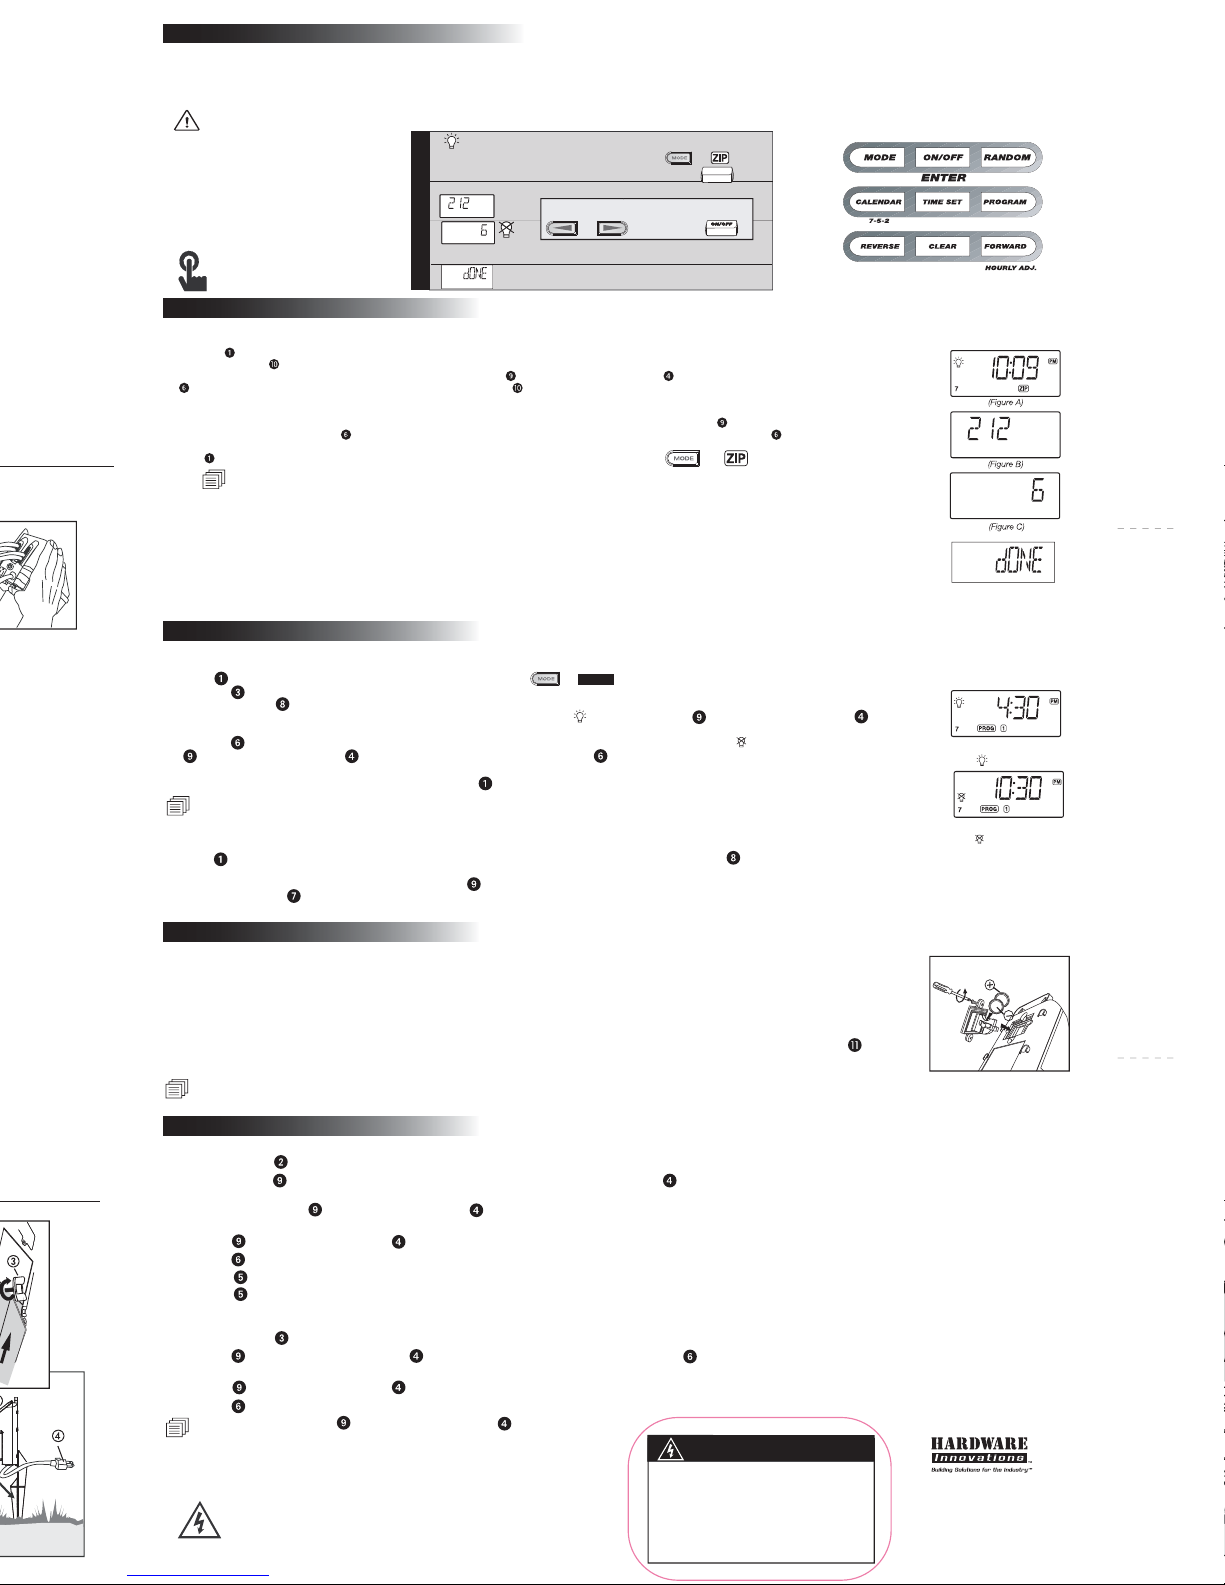
Clock Setting (this function is usually used when batteries must be replaced) Set only to Eastern Time- 212 area code.
1. Press and hold the
TIME SET Button until the display is flashing.
2. Press and hold the
Forward/Hourly Adjust Button to rapidly advance the time forward, or the
Reverse Button to rapidly change the time
backward. Release button when the approximate correct Eastern time is displayed. PM Indicator is on the upper right corner of the display.
NOTE: While pressing either
Forward/Hourly Adjust or
Reverse Button the minutes will begin at a moderate pace, and then get faster. This will
help you in set the time faster and more accurately.
3. Press the
Forward/Hourly Adjust or Reverse Button repeatedly until the correct Eastern time is displayed.
4. Press the
On/Off/Enter Button or wait for approx. 10 seconds to exit time setting mode.
5. Press the
DST Button to ON to have timer increase the current time by 1 hour for daylight saving time. The DST Indicator is to the right of the display.
Press the
DST Button again to turn it off. Current time will decrease 1 hour.
Calendar Setting (This function is usually used when batteries must be replaced)
1. Press and hold the
Calendar/7-5-2 Button until “Y 04” (default) flashes on the display.
2. Press the
Forward/Hourly Adjust or the
Reverse Button to adjust to current year then press
On/Off/Enter Button or wait for approx. 10
seconds. The display will show month/date and flash.
3. Press the
Forward/Hourly Adjust or Reverse Button repeatedly until the correct month/date is displayed.
4. Press the
On/Off/Enter Button or wait for approx. 10 seconds to exit calendar setting mode.
NOTE: While pressing either
Forward/Hourly Adjust or
Reverse Button the date will begin at a moderate pace, and then get faster. This will
assist you in setting the time quickly and accurately.
(Figure D)
Battery Installation – This unit comes with 2 x CR2032 batteries for time keeping and back-up. You should replace the batteries every 2 years. To replace the
batteries, please follow these steps:
1. Remove the SA 220 plug from the wall socket.
2. Unscrew mounting screws and remove unit from wall.
3. Turn unit over and using a small Phillips screw driver, remove the 2 screws holding the battery compartment cover (on back of unit).
4. Using a small flat screwdriver, gently pry the battery door open. Remove the 2 CR2032 batteries.
5. Install 2 new CR2032 batteries into the battery compartment, making sure that the + and – polarities match up with the diagram printed on the unit.
6.
When the batteries are in place, return the battery door its original position and tighten the screws.
7. If you find the timer is not running after installing new batteries, you may need to reset it first. Using the point of a pencil or paperclip, press the
RESET
Button located on the front panel. You will then need to reset the time and date.
8. Remount unit as before and plug the timer into the wall socket.
Using Programmable ON and OFF Time Settings
(Figure F)
(Figure E)
The SA 220 has 4 independent programmable ON/OFF time settings so you can turn outdoor holiday, landscape and security lighting, etc. on and off at specific
times.
1. Press
MODE Button until the “PROG” and “1” icons are displayed.
2. Press the
Calendar/7-5-2 Button to select the timer frequency. "7" means the timer will operate all week, “5” for weekdays and “2” for just the weekend.
3. Press and hold the
Program Button until the display is flashing. (Figure E)
4. The display will change to show the “on” time for program 1 and flash. The On Icon will appear. Press the
Forward/Hourly Adjust or Reverse
Button to adjust the ON time.
5. Press the
On/Off/Enter Button or wait for approx. 10 seconds. The display will show “off ” time, and the Off Icon will appear. (Figure F) Press the
000Forward/Hourly Adjust or
Reverse Button to adjust OFF time. Press the On/Off/Enter Button once more or wait for approx. 10 seconds to
return to normal mode. Display will change back to show the clock time.
6. To program 2nd, 3rd or 4th timer, just follow step 1-5 but press
MODE Button until “PROG” and corresponding (“2”, “3” or “4”) icons are displayed.
NOTE: Do not program the same on and off time when setting programs 1, 2, 3 or 4. You can not set the turn on and turn off to the same time (i.e., Turn on at
5:00 am and turn off at 5:00 am). Doing so will produce an error message on the display. To resolve the error message, change the off time by at least one
minute using the forward or reverse button.
Activating the Programmable timer
1. Press
MODE Button until one of the program icons appears. That programmed timer is now active. (Press the Program Button to view the existing
preset times).
2. There is a simpler way to adjust turn on time by pressing the
Forward/Hourly Adjust Button. The turn On can be adjusted by +/-90 minutes.
3. If you wish, press the
Random Button once to activate the random feature. The timer on/off time will fluctuate +/-10 to +/-120 minutes randomly. To cancel
this feature, just press the button again
Battery
Installation
Ratings:
Total load: 15 AMP Resistive & Inductive, 600W Tungsten & Incandescent, 1/4 HP 120VAC, 60Hz.
Rated Impulse Voltage: 1500V Type 1.B Control Action
Battery Replacement
Setting Clock and Calendar
Manufactured by Hardware
Innovations LLC.
Technical Support 888-548-4484
www.hardwareinnovations.com
to
PROG
(PROG 1,2,3,or 4)
ZIP-SET
SA220- 7-2006 V-2
Made in China
Set your area code
Yes- You are DONE!
Find and press “Mode” button, until you see the Zip-Set icon
Then depress & hold the Clear (Zip-Set) button until the display flashes.
1
2
3
Fast Set Up Instructions for Zip-Set™ Timers
to
ZIP-SET
CLEAR
To set: use “Reverse” / “Forward” buttons and ON/OFF
to Confirm or Enter.
or
then to set press
Set how many hours after sunset that you wish the fixture to
turn the power off (2, 4, 6, 8, 10, 12, 14 or 16 hrs).
NOTE: When changing batteries, make sure to reset the current time to the correct time in the Eastern time zone.
When you enter your telephone area code, it will then automatically adjust to the proper time for your location/time zone.
If Reset: Zip-Set must have the area code, year and date and Eastern time entered properly to function.
Zip-Set is the easiest way to set a light or an appliance to automatically turn on at sunset. Just set the phone area code where you live, make sure the Zip-Set mode
is activated, and you’re finished.
(Light OFF)
(Light ON)
Program Times
to
DO NOT USE THE TIMER TO TURN OFF POWER FOR MAINTENANCE
WORK (repairs, removing broken bulbs, etc.). ALWAYS TURN POWER
OFF AT THE SERVICE PANEL BY REMOVING A FUSE OR TRIPPING
THE CIRCUIT BREAKER BEFORE DOING ANY ELECTRIC REPAIRS.
NEVER SUBMERGE UNIT INTO WATER.
The SA 220 internal clock is pre-set at the factory to the (212-NYC area code) Eastern time zone. (If you live in another area code other than 212- you need to change
the area code). Simply enter your telephone area code by following these easy steps to have the time adjust to your location:
1. Press the Mode Button until “ZIP” appears in the display. (Figure A)
2. Press and hold the
Zip Set/Clear Button until the display shows the 3-digit area code input mode (Figure B).
3. The 1st digit of the telephone area code should be flashing. Press the Forward/Hourly Adjust or Reverse Button to adjust it, then press
000On/Off/Enter Button to enter it and edit the next digit. Press the
Zip Set/Clear Button to go back to / edit the previous digit. Continue until the
correct telephone area code is displayed. (Note: For special area code time zones see note below)
4. Once your telephone area code is entered, select a turn off time for the Zip-Set automatic sunset timer (the default turn off time of 6 should flash) (Figure C). You
can have the timer turn off
(2, 4, 6, 8, 10, 12, 14 or 16 hours after sunset. While the turn off time is flashing, press the Forward/Hourly Adjust to cycle to the
desired turn off setting, then press On/Off/Enter Button to enter it. When DONE appears in the display (Figure D), press On/Off/Enter Button to
confirm or wait 10 seconds.
5. Press
Mode Button to Zip (display icon) to confirm the timer is set for ZIP-SET Auto ON at Sunset.
NOTE:
(1.) After entering the Area codes for certain states, a “C” may appear next to the telephone area code, indicating a central location in the state. Press Forward or
Reverse to toggle to W (West) or E (East) and N (North) or S (South) if needed for proper time setting.
(2.) There are also area codes that may have different time zones; for example the 208 area code; by default will flash PST or by pressing Forward or Reverse will
toggle to MST)
(3.) Telephone area codes can change and may not appear in the timer’s table. Should that occur, please use the closest adjacent area code to set the timer
correctly for your location.
(4.) If a new area code was issued after this unit was manufactured or if you enter an invalid/nonexistent area code, you will get an error message stating 'AREA
CODE NOT FOUND'. Enter the closest correct area code for zip set mode to function properly.
(5.) If the clock/calendar is not correct or time is lost after replacing batteries, zip-Set mode will not function properly. Please see Setting Clock and Calendar (below).
WARNINGS:
Risk of electric shock
• No Serviceable parts inside- Do not open or tamper with unit.
• Plug directly into an electric outlet
• Connect to grounded 3-prong outlet only
• Do not use a 3- to 2-prong adaptor to defeat the grounding pin.
• Remove timer from outlet before cleaning
• Keep children away from timer & outlet
Risk of fire
• For only 120 volt usage
• Do not use to control irons and cooking appliances, etc.
• Do not exceed the recommended electrical ratings
SAFETY WARNING
 Loading...