

Page 1
Choosing a Channel
Your radio has 22 channels and 38 CTCSS codes
you can use to talk to others. In order to speak to
someone, each of you must set to the same
channel and CTCSS code.
To choose a channel:
With the radio in "Normal" mode press the CH key
and press the or key to increase or
decrease the channel number displayed.
Note: FRS Channels 8-14 have an expectancy
range of up to approximately 4.8 km.GMRS
channels 1-7, 15-22 have an expectancy range of
up to approximately 16 km by pressing the Power
boost button.You can know which GMRS or FRS
channel is active by the icon.The icon
indicates GMRS channel, and the icon indicates
FRS channel.
Choosing a CTCSS Code
Each of the channels 1-22 may have any one of
the codes, OFF or 1-38 selected. Code oF (OFF)
indicates no CTCSS code selected and your radio
can receive a signal regardless of the code settings
of the transmitting radio.
1) Enter the Menu. The CTCSS code on the LCD
display will appear.
2) Press the or key to increase or decrease
the code number displayed.You can also select
oF (OFF) at this stage.
3) Exit the Menu.
Talking on Your Radio
To talk to others using the radio:
1) Press and hold the PTT button and speak in a
clear, normal voice about 2-3 inches away from
the microphone.While you are transmitting, the
icon will appear on the display.To avoid
cutting off the first part of your transmission,
pause slightly after pressing the PTT button
before you start talking.
GMR225
14
26
1
2
3
4
5
6
7
8
9
10
11
12
13
15
16
17
18
19
27
20
21
22
23
24
25
* Range may vary depending on environmental and/or topographical conditions.
• Power Boost Button for
Maximum Range
• 15 GMRS / 7 FRS Channels
• Up to 16 km Range*
• 5 Selectable Call Tone Alerts
• Backlit LCD Display
• Roger Beep
• Key Beep on/off
• 38 CTCSS Code
• Headsets included
• Headset Jack
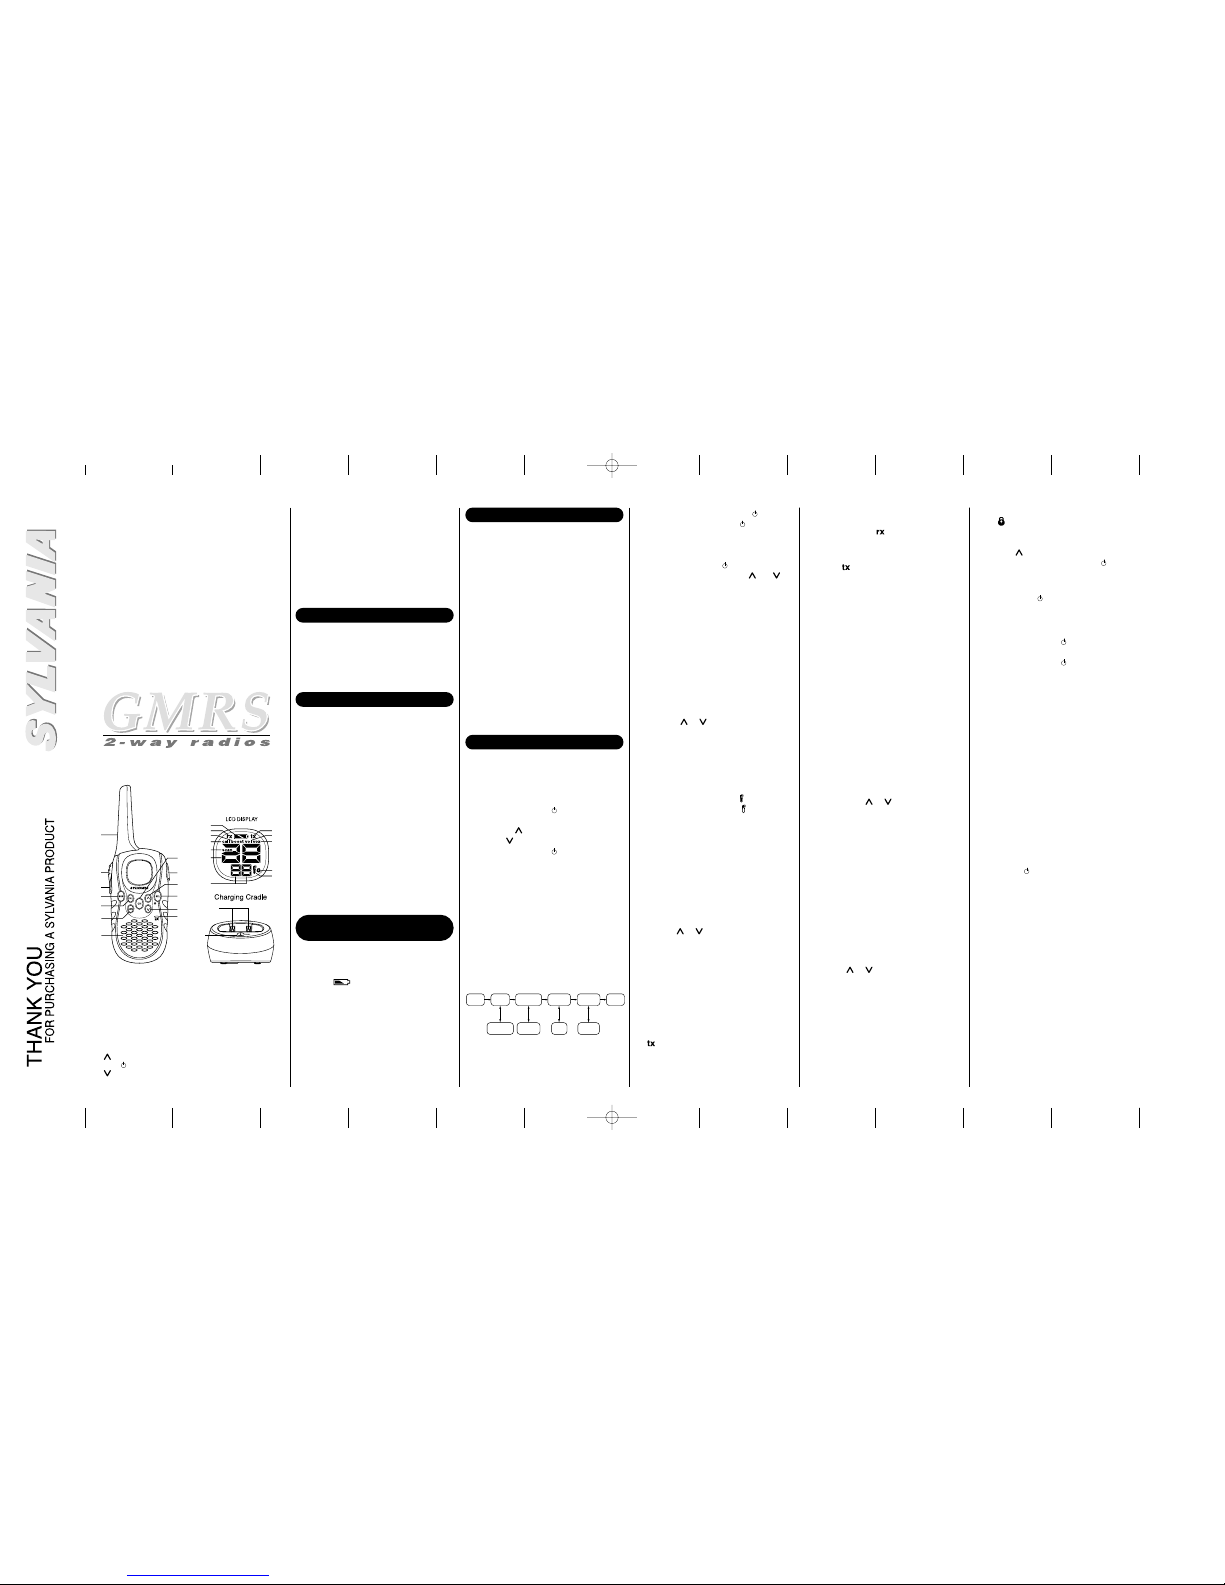
1 Antenna
2
PTT (Push-To-Talk) Button
3 Power boost Button
4 MON (Monitor) Key
5 CALL Key
6 SCN (SCAN) Key
7 Speaker
8 CH (Channel) Key
9 Headset Jack (Headsets
included)
10 (Volume Up) Key
11
SEL/ (Select/Power) Key
12 Down Key
13 Microphone
14 Battery Level Meter
15 Receive Indicator
16 Power Boost Indicator
17 Call Indicator
18 Scan Indicator
19 Channel Indicator
20 CTCSS Indicator
21 Transmit Indicator
22 Volume Setting Indicator
23 VOX Indicator
24 Keypad Lock Indicator
25 GMRS/FRS Indicator
26 Charging Contacts
27 Charging LED
Congratulations on your purchase of the Sylvania
GMR225 (General Mobile Radio Service) radios.
These products are lightweight, palm-sized radios.
Use them at sporting events to stay in contact with
family and friends, hiking, skiing, outdoors, or in a
neighborhood watch for vital communication.These
compact, state-of-the-art devices are equipped with
many features.
PACKAGE CONTENTS
Your package contains 2 x radios, this reference
guide, 2 x belt clips, 2 x rechargeable Ni-MH battery
packs, 2 x AC adapter, 2 x recharging cradles and 2
x headsets.
INSTALL THE BATTERIES
Your GMR225 radio uses the Ni-MH battery pack or
4 AAA alkaline batteries (not included). If alkaline
batteries are used, we recommend using high
quality alkaline batteries.
To install the Ni-MH battery pack:
1) Make sure your radio is OFF.
2) Remove the battery compartment door by
pressing up the tab at the bottom of the
compartment door allowing the door to be
removed.
3) Install the Ni-MH battery pack into the battery
compartment. Be certain to follow the instruction
written on the label on the battery pack.
Installing the battery pack incorrectly will prevent
the unit from operating.
4) Replace the battery compartment door.
USING THE RADIO
In order to get the most out of your new radio, read
this reference guide completely before attempting to
operate the unit.
Turning the Radio On and Adjusting the Volume
1) Press and hold the SEL/ key to turn the unit
ON, and increase the speaker volume by
pressing the key.To decrease the volume,
press the key.
2) Press and hold the SEL/ key again to turn the
unit OFF.
Adjusting the Sound (Key Beeps)
Your radio emits a beep each time one of the buttons
or keys (except for the PTT key.Power boost button,
and the CALL key) are pressed.To turn this sound
OFF, press and hold CALLkey while turning ON the
radio. Repeat this step to turn the sound ON.
Navigating through the Menu
To access the advanced features of the GMR225,
your radio has a Menu function.
• Battery Level Meter
• Channel Monitor
• Channel Scan
• Keypad Lock
• Belt Clip
• Ni-MH Battery Pack and
Charger
BATTERY LEVEL AND
LOW BATTERY ALERT
This unit has a battery level meter on the display to
indicate the status of the batteries. When the
batteries in the unit are very low, the battery level
meter icon will flash. Replace the alkaline
batteries immediately or if you are using the Ni-MH
battery pack, you must recharge the battery in
order to continue using the radio.
Warning! To avoid the risk of personal injury or
property damage from fire or electrical shock, only
use the Sylvania accessories specifically
designated for this product.
1) To enter the Menu, press the SEL/ key.
2) Additional presses of the SEL/ key will
advance you through the Menu until exiting to
"Normal" operating mode.
3) Other methods of exiting the Menu function are:
a.Press and hold the SEL/ key again.
b.Press buttons or keys (except the and
keys).
c. Wait 10 seconds until the unit automatically
returns to “Normal” mode.
2) When you have finished speaking, release the
PTT button.You can now receive incoming calls.
While receiving, the icon will appear on the
display.
Note: When you press the Power boost button,
boost and icon appear on the display.The
radio will transmit Maximum power when a GMRS
channel is selected. After one minute past when
the boost transmission is established, the
transmission stops automatically, and you will hear
a boost time out error tone.
Voice Operated Transmission
Your GMR225 radio is equipped with a user
selectable Voice Operated Transmitter (VOX) that
can be used for automatic voice transmissions.The
VOX feature is designed to be used with a headset
with a microphone.Transmission is initiated by
speaking into the remote microphone instead of
pushing the PTT button.
To select the VOX level:
1) Enter the
Menu. Advance through the Menu until
the vox icon appears on the display.The current
level (OFF, 1-3) will be indicated. Level oF(OFF)
disables VOX, while levels (1-3) set the
sensitivity of the VOX circuit.
2) Press either the or key to the desired
VOX sensitivity level.Use level 1 for increased
sensitivity to voice in normally quiet
environments, and use a higher level to reduce
undesired activation in very noisy environments.
3) Exit the Menu.
Transmitting a Call Tone
Your GMR225 radio is equipped with 5 selectable
call tones that will be transmitted when the CALL
key is pressed.
To select a call tone:
1) Enter the Menu. Advance through the Menu until
the
call icon is shown on the display.The current
call tone number (1-5) will be indicated.
2) Press the or key to increase or decrease
the number to the desired call tone. Each tone
will be heard through the speaker.
3) Exit the Menu.
To transmit the selected call tone, press the CALL
key.The selected tone will automatically be
transmitted for a fixed length of time.
Keypad Lock
To Lock the keypad:
Normal NormalCTCSS VOX Level Call Tone Key Lock
1-5
OFF, 1-38 OFF, 1-3
OFF-ON
GMR225 RADIO
USING THE CHARGING CRADLE
If you use the rechargeable Ni-MH battery pack, two
GMR225 radios can be charged by using the
charging cradles.
Make sure to turn the radio OFF before placing
the radio in the charging cradle, otherwise the
battery level meter icon won’t indicate properly.
1) Connect the AC adapter to DC IN 9V jack and to
a standard 120V AC wall outlet.
2) Set the charging cradle on the desk or tabletop,
and place the radio in the charging cradles with
the keypad facing forward.
3) Make sure that the LED illuminates. Charge the
battery pack for 16 hours and remove the radio
from the charging cradle after charge.
Note: The charge indicator LED will remain on as
long as the radios are left in the charger.
1) Enter the Menu. Advance through the Menu until
the icon appears on the display.The current
key Lock status oF (OFF) blinks on the display.
2) To switch the key Lock mode from OFF to ON,
press the key.
3) To confirm the setting, press the SEL/ key.
The radio returns to the "Normal" mode.
Note: If you exit the setting mode by pressing
other than the SEL/ key, the key Lock setting will
be set to OFF.
To Unlock the keypad:
1) Press and hold the SEL/ key to turn the unit
OFF.
2) Press and hold the SEL/ key again to turn
the unit ON. The keypad is unlocked.
Channel Scan Feature
Your GMR225 radio has a channel Scan feature
that allows you to easily Scan all 22
channels.When an active channel is detected, the
unit will pause on that channel until the channel is
clear.Then after a 2 second delay, the unit will
continue scanning. Pressing the PTT or Power
boost button while the Scan is paused on a
channel will allow you to transmit on that channel.
To turn ON channel scanning:
Press the
SCN key until the scan... icon is
displayed.The channel number on the display will
change as the radio rapidly cycles through the
channels.
To turn OFF channel scanning:
Press the
SEL/ key, CALL key, SCN key, PTT
button or Power boost button.
UT006CH_GMR225_ENG_0428 4/28/05 12:05 PM Page 1
Page 2
Channels 15 GMRS / 7 FRS
Operating Frequency UHF 462.5500-
467.7125 MHz
Power Source 4 AAA Alkaline Batteries (not
included) or Ni-MH Battery Pack
Range Channels 8-14 up to 4.8 km
Channels 1-7, 15-22 up to
9.7 km
(16 km with Power boost button)
Battery Life 22 Hours typical - Alkaline
Batteries
(5/5/90 duty cycle)
15 Hours typical - Ni-MH
Battery Pack
Frequency Chart
Ch. Freq. Cross
TX Power TX Power
No. (MHz) Reference (
ptt/vox) (Boost)
1 462.5625 FRS & GMRS 1 Mid High
2 462.5875 FRS & GMRS 2 Mid High
3 462.6125 FRS & GMRS 3 Mid High
4 462.6375 FRS & GMRS 4 Mid High
5 462.6625 FRS & GMRS 5 Mid High
6 462.6875 FRS & GMRS 6 Mid High
7 462.7125 FRS & GMRS 7 Mid High
8 467.5625 FRS8 Low Low
9 467.5875 FRS9 Low Low
10 467.6125 FRS10 Low Low
11 467.6375 FRS11 Low Low
12 467.6625 FRS12 Low Low
13 467.6875 FRS13 Low Low
14 467.7125 FRS14 Low Low
15 462.5500 GMRS11 Mid High
16 462.5750 GMRS8 Mid High
17 462.6000 GMRS12 Mid High
18 462.6250 GMRS9 Mid High
19 462.6500 GMRS13 Mid High
20 462.6750 GMRS10 Mid High
21 462.7000 GMRS14 Mid High
22 462.7250 GMRS15 Mid High
SPECIFICATIONS
Automatic Power Save Feature
Your GMR225 radio has a unique circuit designed
to dramatically extend the life of the batteries.
If there is no transmission nor an incoming call
within 3 seconds, your radio switches to the Power
Save mode.The radio is still able to receive
transmissions in this mode.
LCD Backlight
The LCD backlight will automatically turn ON when
any key (except for the PTTand Power boost
button) is pressed.The LCD display will
illuminate for 10 seconds before turning OFF.
Monitor Mode Feature
Your GMR225 radio allows you to listen for weak
signals on the current channel at the press of a
key.
To turn ON the monitor mode:
• Press
MON for brief listening, the icon will
blink.
• Press and hold MON for 2 seconds for
continuous listening.The receiver circuit will stay
open, and letting in both the noise & weak
signals.
To turn OFF monitor mode:
• Press
MON to return to "Normal" mode, and the
icon stops blinking.
Roger Beep
Roger Beep is a BEEP that is sent to notify the end
of transmission (PTT transmission, power boost
transmission and VOX.) Roger Beep can be heard
through the speaker when Key Beep is on.If key
beep is turned off, Roger Beep will not be heard
from the speaker.
To turn ON Roger Beep:
Press and hold the key while turning ON the
radio.
To turn OFF Roger Beep:
Press and hold the key while turning ON the
radio.
Operation is subject to the following two conditions:
(1) This device may not cause harmful interference.
(2) This device must accept any interference
received, including interference that may cause
undesired operation.
Important: Changes or modifications to this unit
not expressly approved by Sylvania could void your
authority to operate this unit.Your radio is set up
to transmit a regulated signal on an assigned
frequency.It is against the law to alter or adjust the
settings inside the radio to exceed those limitations.
Any adjustments to your radio must be made by
qualified technicians.
To be safe and sure:
• Never open your radio’s case.
• Never change or replace anything in your radio
except the batteries.
Your radio might cause TV or radio interference
even when it is operating properly.To determine
whether your radio is causing the interference, turn
it off. If the interference goes away, your radio is
causing it. Try to eliminate the interference by
moving your radio away from the receiver.If you
cannot eliminate the interference, the IC requires
that you stop using the radio.
Hazardous Environments:Do not operate the
radio in hazardous environments. Explosion or fire
may result. Do not operate the radio near
unshielded electrical blasting caps.
Under certain conditions, radios can interfere with
blasting operations and may cause an explosion.
Turn your radio OFF to prevent accidental
transmission when in a blasting area or in areas
posted: "Turn off two-way radio." Construction
crews often use remote control RF devices to set
off explosives.
Care and Safety: To clean the radio, use a soft
cloth dampened with water.Do not use cleaners or
solvents because they can harm the body of the
unit and leak inside, causing permanent damage.
Use a dry, lint-free cloth to clean the battery
contacts. Do not submerge the unit in water.If the
unit gets wet, turn it off and remove the batteries
immediately.
Dry the battery compartment with a soft cloth to
minimize potential water damage. Leave the battery
compartment cover off overnight to ensure
complete drying. Do not use the radio until the unit
is completely dry.
We appreciate your purchase of a SYLVANIA
Communication product. We take pride in the
quality of our products and have manufactured your
new Communication unit to exacting quality
standards. We feel confident that in normal use, it
will provide you with satisfactory performance.
However, should you experience difficulty, you are
protected under the provisions of this warranty.
SYLVANIA Communication products are warranted
against manufacturing defects in materials and
workmanship in normal use for the following period
from the date of purchase by the original user, and
is conditional upon the unit being installed and
used as directed in the instruction manual.
PRODUCT PARTS AND LABOUR
Cordless Telephone 1 Year
Corded Telephone 1 Year
Telephone Headset 1 Year
Communications 1 Year
SYLVANIA's obligation under this warranty shall be
limited to the repair, including all necessary parts
and the cost of the labour connected therewith, or
at our option the exchange of any Communication
product which shows evidence of a manufacturing
defect within the warranty period.
Replacement parts, furnished in connection with
this warranty shall be warranted for a period equal
to the unexpired portion of the original equipment
warranty.
CUSTOMER OBLIGATIONS
This warranty applies to the product from the
original date of purchase at retail. Therefore, the
owner must provide a copy of the original, dated bill
of sale. No warranty service will be performed
without a bill of sale. Transportation to and from
the service depot is the responsibility of the owner.
WARRANTY EXCLUSIONS
This warranty is extended to SYLVANIA
Communication products purchased and used in
Canada. This warranty shall not apply to
appearance or accessory items including but not
limited to: antenna, cabinet, cabinet parts, knobs,
batteries, connecting cables, cassette tapes,
compact discs. This warranty shall, in addition, not
apply to damages due to handling, transportation,
unpacking, set-up, installation, customer
adjustments that are covered in the instruction
book, repair or replacement of parts supplied by
other than the SYLVANIA authorized service depot,
any malfunction or failure caused by or resulting
from abnormal environmental conditions, improper
unauthorized service, improper maintenance,
modifications or repair by the consumer, abuse,
misuse, neglect, accident, fire, flood, or other Acts
of God, and incorrect line voltage.
This Communication product is only warranted to
the original retail purchaser. This warranty
becomes void in the event of commercial or rental
use. This warranty becomes void in the event
serial numbers are altered, defaced or removed.
SYLVANIA reserves the right to make changes in
design or to make additions to or improvements
upon this product without incurring any obligation to
install the same on products previously
manufactured. The foregoing is in lieu of all other
warranties expressed or implied and SYLVANIA
neither assumes nor authorizes any person to
assume for it any other obligation or liability in
connection with the sale or service of this product.
In no event shall SYLVANIA or its SYLVANIA
dealers be liable for special or consequential
damage arising from the use of this product, or for
any delay in the performance of this warranty due
to cause beyond our control.
The purchaser may have other rights under existing
provincial or federal laws, and where any terms of
this warranty are prohibited by such laws, they are
deemed null and void, but the remainder of the
warranty shall remain in effect.
HOW TO OBTAIN SERVICE
Should this product require service, you may obtain
specific information on how to obtain service by
contacting the SYLVANIA Dealer from whom this
product was purchased, or by contacting us
directly:
SYLVANIA SERVICE
300 Alden Road
Markham, Ontario
L3R 4C1
PHONE: (905) 940-5089 FAX:(905) 940-2303
1-800-287-4871
SYLVANIA WARRANTY STATEMENT
IC INFORMATION
WARNING! It is up to the user to properly operate
this radio transmitter to insure safe operation.
Please adhere to the following:
Use only the supplied or an approved antenna.
Unauthorized antennas, modifications, or
attachments could impair call quality, damage the
radio, or result in violation of regulations.
Do not use the radio with a damaged antenna.
If a damaged antenna comes into contact with the
skin, a minor burn may result. Please contact your
local dealer for a replacement antenna.
Body-worn Operation
This device was tested for typical body-worn
operations using the supplied belt-clip, which
typically provides a space of 1 inch from the body.
To maintain compliance with RF exposure
requirements, Body-worn operations are restricted
to the supplied belt-clip.
For hand-held operation, the radio should be held
1 inch from the user's face.The use of accessories
that do not satisfy these requirements may not
comply with RF exposure requirements and should
be avoided.
RF EXPOSURE INFORMATION
© 2005 SYLVANIA
300 Alden Road, Markham, Ontario L3R 4C1
Printed in China
UTZZ01006CZ
UT006CH_GMR225_ENG_0428 4/28/05 12:05 PM Page 2
Page 3

environnements normalement tranquilles et un
niveau plus élevé afin de réduire l’activation
indésirable dans les environnements très
bruyants.
3) Quittez le menu.
Transmettre une tonalité d’alerte d’appel :
Votre radio GMR225 est dotée de cinq tonalités
d’appel pouvant être sélectionnées par l’utilisateur
et transmises en appuyant sur la touche d’appel
call.
Pour sélectionner une tonalité d’appel :
1) Entrez dans le menu. Avancez à travers les
options jusqu’à ce que l’icône call apparaisse à
l’affichage. Le niveau actuel (1 à 5) sera
indiqué.
2) Appuyez sur la touche ou afin
d’augmenter ou diminuer le numéro de la
tonalité d’appel désirée. Vous entendrez chaque
tonalité à travers le haut-parleur.
3) Quittez le menu.
Pour transmettre la tonalité d’alerte d’appel choisie,
appuyez sur la touche call. La tonalité
sélectionnée sera automatiquement transmise
pendant une durée prédéterminée.
Verrouillage du clavier des touches
Pour verrouiller le clavier des touches :
1) Entrez dans le menu. Avancez à travers les
options jusqu’à ce que l’icône apparaisse à
l’affichage. Le statut actuel du verrouillage des
touches ‘oF’(‘OFF’) sera indiqué.
2) Pour commuter du mode de verrouillage des
touches ‘oF’(désactivé) au mode activé ‘on’,
appuyez sur la touche .
3) Pour confirmer le réglage, appuyez sur la touche
SEL/ La radio revient au mode ‘normal’.
Remarque : Si vous quittez le mode des réglages
avant de confirmer votre sélection en appuyant sur
la touche SEL/ le verrouillage des touches sera
réglé à ‘oF’(‘OFF’).
Pour déverrouiller le clavier :
1) Maintenez la touche
SEL/ enfoncée afin de
mettre la radio hors fonction.
2) Maintenez de nouveau la touche SEL/ afin
de mettre la radio en marche. Le clavier est
déverrouillé.
Choisir un canal
Votre radio possède 22 canaux et 38 codes de
silencieux de sous-porteuse (sous-canaux CTCSS)
que vous pouvez utiliser pour communiquer avec
d’autres usagers. Pour communiquer, vous devez
syntoniser le même canal et code CTCSS que
celui de votre interlocuteur.
Choisir un canal :
Lorsque la radio est en mode ‘normal’, appuyez sur
la touche
ch/scan et appuyez sur la touche de
augmentation ou de diminution afin
d’augmenter ou diminuer le numéro du canal
affiché.
Remarque : Les canaux FRS 8 à 14 ont une
portée maximale de 4,8 kilomètres. Les canaux
GMRS 1 à 7 et 15 à 22 ont une portée maximale
de 16 kilomètres en appuyant sur la touche
d’amplification de la puissance Power Boost. Vous
pouvez savoir quel canal GMTS ou FRS est actif
par l’icône affichée. L’icône indique que c’est un
canal GMRS et l’icône indique que c’est un
canal FRS.
Choisir un sous-canal ‘CTCSS’
Pour chaque canal GMRS de 1 à 22, vous pouvez
choisir ‘OFF’(hors fonction) ou les sous-canaux de
1 à 38. Le code oF(OFF) indique qu’aucun code
‘CTCSS’ n’a été choisi et votre radio peut recevoir
un signal, peu importe le réglage des codes de la
radio qui transmet.
GMR225
14
26
1
2
3
4
5
6
7
8
9
10
11
12
13
15
16
17
18
19
27
20
21
22
23
24
25
* La portée peut varier selon l’environnement ou les conditions topographiques.
• Touche d’amplification de la
puissance procurant une portée
maximale
• 15 canaux GMRS/7 canaux FRS
• Portée maximale de 16
kilomètres*
• 5 alertes de tonalités d’alerte
pouvant être sélectionnées par
l’utilisateur
• Écran ACL rétroéclairé
• Bip ‘Compris’
• Tonalité des touches en/hors
fonction
• 38 sous-canaux ‘CTCSS’
1 Antenne
2 Bouton de communication ‘PTT’
3 Touche d’amplification de la
puissance
4 Touche de monitorage
5 Touche d’appel
6 Touche de balayage
7 Haut-parleur
8 Touche des canaux
9 Casque d’écoute avec microphone
perche
10 Touche d’augmentation du volume
11 Touche de mise en/hors
fonction/Sélection
12 Touche de diminution du volume
13 Microphone
14 Indicateur du niveau de charge
des piles
15 Voyant de réception
16 Voyant d’amplification de la
puissance
17 Voyant d’appel
18 Voyant du balayage
19 Voyant des canaux
20 Voyant CTCSS
21 Voyant de transmission
22 Voyant du réglage du volume
23 Voyant ‘VOX’
24 Voyant de verrouillage du clavier
25 Voyant ‘GMRS/FRS’
26 Bornes de charge
27 Voyants à DEL de charge
Nous vous félicitons d’avoir acheté cette radio du
service mobile public "GMRS", modèle GMR225 de
Sylvania. Cet appareil est une radio légère qui fait
aisément dans votre main. Utilisez-la pour
demeurer en contact avec les membres de votre
famille ou des amis dans les centres d’achat, les
parcs d’attractions ou les événements sportifs; elle
peut également s’avérer indispensable pour la
surveillance de votre quartier. Ce dispositif
compact à la fine pointe de la technologie est doté
des caractéristiques les plus évoluées.
CONTENU DE L’EMBALLAGE
Votre emballage contient deux radios, ce guide de
référence, 2 attaches-ceinture, 2 bloc-piles
rechargeables au Ni-MH, 2 adaptateurs CA et 2
socles de charge et 2 casques d’écoute.
INSTALLATION DES PILES
Votre radio GMR225 est alimentée par un bloc-piles
au Ni-MH ou quatre (4) piles "AAA" alcalines (non
incluses). Si vous utilisez les piles alcalines, nous
vous suggérons d’utiliser des piles de haute qualité.
Pour installer le bloc-piles au Ni-MH :
1) Assurez-vous que votre radio est hors tension.
2) Retirez le couvercle du compartiment des piles
en appuyant sur les languettes situées dans le
bas de la porte du compartiment des piles pour
la dégager.
3) Insérez le bloc-piles au Ni-MH dans le
compartiment des piles. Assurez-vous de suivre
les instructions décrites sur l’étiquette du blocpiles. Si le bloc-piles est mal installé, l’appareil
ne fonctionnera pas.
4) Replacez couvercle du compartiment des piles.
UTILISER LA RADIO
Afin d’utiliser votre radio à son plein potentiel, lisez
ce guide en entier avant de la faire fonctionner.
Mettre la radio en marche et ajuster le volume
1) Appuyez sur la touche SEL/ et tenez-la
enfoncée afin de mettre la radio en marche, puis
augmentez le volume du haut-parleur en
appuyant sur la touche . Pour diminuer le
volume, appuyez sur la touche .
2) Appuyez de nouveau sur la touche SEL/ et
tenez-la enfoncée afin de mettre la radio hors
tension.
Ajuster le son (bips des touches)
Votre radio émet un bip à chaque pression des
touches (à l’exception des touches PTT, Power
Boost et Call). Pour désactiver ce son, appuyez sur
Call tout en la tenant enfoncée. Pour l’activer,
répétez cette étape.
• Casque d’écoute avec
microphone perche
• Prise de casque d’écoute
• Indicateur du niveau de
charge des piles
• Monitorage des canaux
• Balayage des canaux
• Verrouillage du clavier
des touches
• Attache-ceinture
• Bloc-piles au Ni-MH et
chargeur
NIVEAU DES PILES ET
ALERTE DE PILES FAIBLES
Cet appareil est doté d’un compteur du niveau
d’alimentation des piles qui apparaît à l’affichage
pour vous indiquer le statut des piles. Lorsque les
piles sont faibles, l’icône du compteur du niveau
des piles clignotera. Rechargez
immédiatement le bloc-piles au Ni-MH ou si vous
utilisez des piles alcalines, vous devez les
remplacer par des piles neuves afin de pouvoir
continuer d’utiliser la radio.
1) Pour entrer dans le menu, maintenez la touche
SEL/ enfoncée.
2) Chaque pression additionnelle de la touche
SEL/ vous permettra d’avancer dans le
menu jusqu’à ce que vous quittiez le mode de
fonctionnement ‘normal’.
3) Voici les autres méthodes pour quitter le menu :
a.Maintenez encore la touche SEL/ enfoncée.
b.Appuyez sur des touches, à l’exception des
touches et .
c. Attendez dix secondes, jusqu’à ce que l’appareil
revienne automatiquement au mode ‘normal’.
1) Entrez dans le menu. Le code ‘CTCSS’
apparaîtra à l’écran ACL.
2) Appuyez sur la touche ou afin
d’augmenter ou diminuer le numéro du code
affiché. Vous pouvez également choisir oF
(OFF) à cette étape-ci.
3) Quittez le menu.
Communiquer avec votre radio
Pour communiquer à d’autres personnes à l’aide de
votre radio :
1) Maintenez la touche PTT enfoncée et parlez
clairement, à environ 2-3 pouces du
microphone. Pendant que vous transmettez,
l’icône apparaîtra à l’affichage. Pour éviter
de couper la première partie de votre
transmission, faites une brève pause après avoir
appuyé sur la touche PTT avant de commencer
à parler.
2) Lorsque vous avez terminé de parler, relâchez la
touche PTT. Vous pouvez maintenant recevoir
des appels entrants. Lors de la réception, l’icône
apparaîtra à l’affichage.
Remarque : Lorsque vous appuyez sur la touche
Power Boost, les icônes boost et
apparaissent à l’affichage. La radio transmettra à
la puissance maximale lorsque vous choisissez un
canal GMRS. Une minute après avoir établi la
transmission amplifiée, la transmission arrête
automatiquement et vous entendrez une tonalité
d’erreur vous signifiant que le délai d’attente de
l’amplification de la puissance est expiré.
Transmission activée par la voix ‘VOX’
Votre radio GRMS225 est dotée d’un transmetteur
activé par la voix ‘VOX’pouvant être utilisé pour les
transmissions vocales automatiques. La fonction
‘VOX’ est conçue pour être utilisée avec un casque
d’écoute et un microphone perche. La
transmission est lancée en parlant dans le
microphone de type perche au lieu d’appuyer sur la
touche PTT.
Pour choisir le niveau d’activation vocale ‘VOX’:
1) Entrez dans le menu. Avancez à travers les
options jusqu’à ce que l’icône vox apparaisse à
l’affichage. Le niveau actuel (hors fonction, 1 à
3) sera indiqué. Le niveau oF (‘OFF’) désactive
la fonction ‘VOX’, tandis que les niveaux 1 – 3
règlent la sensibilité du circuit ‘VOX’.
2) Appuyez sur la touche ou afin
d’augmenter ou diminuer le niveau de sensibilité
désiré pour le réglage ‘VOX’. Utilisez le niveau 1
pour obtenir une sensibilité plus élevée dans les
ÉMETTEUR-RÉCEPTEUR GMR225
UTILISER LE SOCLE DE CHARGE
Si vous utilisez le bloc-piles rechargeable au Ni-MH,
deux radios GMR225 peuvent être chargées à l’aide
du socle de charge.
Assurez-vous de mettre la radio HORS TENSION
avant de la placer dans le socle de charge.
Sinon, le compteur du niveau des piles ne
pourra pas donner de lecture précise.
1) Raccordez l’adaptateur secteur CA à la prise
d’entrée CC de 9 V et à une prise de courant
standard de 120 V CA.
2) Installez le socle de charge sur un bureau ou le
dessus d’une table, et insérez-y la (les) radio(s),
en orientant le clavier des touches vers l’avant.
3) Assurez-vous que le voyant à DEL s’allume.
Chargez le bloc-piles pendant seize heures et
retirez la radio du socle lorsque la charge est
complétée.
Remarque : Le voyant à DEL de charge sera allumé
aussi longtemps que la radio demeurera dans le
chargeur.
Fonction de balayage des canaux
Votre radio GMR225 est dotée d’une fonction de
balayage des canaux qui vous permet de passer
aisément à travers les 22 canaux. Lorsqu’un canal
actif est détecté, l’appareil effectue une pause sur
ce canal, jusqu’à ce que ce canal soit clair.
Ensuite, après un délai de 2 secondes, l’appareil
continue son balayage. Appuyez sur PTT ou sur
Power Boost lorsque le balayage est arrêté sur un
canal afin de pouvoir transmettre sur celui-ci.
Pour activer le balayage des canaux :
Maintenez la touche ‘…’ou ‘…’ enfoncée jusqu’à ce
que l’icône ‘SCAN’apparaisse à l’affichage. Le
numéro du canal effectuera un cycle rapide à
travers les canaux.
Pour désactiver le balayage des canaux :
Appuyez sur la touche
SEL/ , call, Power
Boost, PTT et wx/alert ou maintenez la touche
ch/scan enfoncée pendant deux secondes.
Avertissement! Pour éviter le risque de blessures
personnelles ou de dommages causés par un
incendie ou une électrocution, n’utilisez que les
accessoires Uniden conçus spécifiquement pour
cet appareil.
Naviguer à travers le menu
Pour accéder aux fonctions avancées de la
GMSR225, votre radio est dotée d’une fonction de
menu.
Fonction de sauvegarde automatique de
l’alimentation
Votre radio GMR225 est dotée d’un circuit unique
conçu pour prolonger la vie des piles. S’il n’y a pas
de transmission ni d’appel entrant en moins de
trois secondes, votre radio change au mode
d’économie d’alimentation. La radio peut quand
même recevoir des transmissions dans ce mode.
Écran ACL rétroéclairé
L’écran ACL rétroéclairé s’allume automatiquement
lorsque vous appuyez sur n’importe quelle touche
(à l’exception des touches PTT et Power Boost).
L’écran ACL s’allume pendant dix secondes avant
de s’éteindre.
Mode de monitorage
Votre radio GMR225 vous permet, à la simple
pression d’une touche, d’entendre les signaux
faibles sur le canal en cours.
Pour activer le mode de monitorage :
• Appuyez sur mon afin d’écouter brièvement.
L’icône clignotera.
• Maintenez la touche mon enfoncée pendant
deux secondes pour une écoute continue. Le
circuit de réception demeurera ouvert, en
laissant entrer les signaux faibles et les bruits.
Pour mettre le mode de monitorage hors fonction
‘OFF’ :
• Appuyez sur
mon pour revenir au mode ‘normal’
et l’icône arrête de clignoter.
UT006CH_GMR225_FRN_0428 4/28/05 4:37 PM Page 1
Page 4

Canaux : 15 GMRS/7 FRS/7 météo
Codes ‘CTCSS’: 38 tonalités de sous-porteuse
Fréquences de fonctionnement :
GMRS/FRS 462,5500 – 467,7125 MHz
WX 162,4000 – 162,5500 MHz
Sources d’alimentation :Bloc-piles au Ni-MH ou
4 piles ‘AAA’alcalines
Portée : Canaux 8 à 14, jusqu’à
4,8 kilomètres
Canaux 1 à 7, 15 à 22 jusqu’à
9,7 kilomètres ou 16 kilomètres
en mode d’amplification de la
puissance ‘Power Boost’
Autonomie des piles : 22 heures typ. - Piles alcalines
(cycle de fonctionnement 5/5/90)
15 heures typ. – Bloc-piles au
Ni-MH
Tableau des fréquences des canaux (MHz)
Canal.Fréquence Cross TX Power TX Power
No. (MHz) Ref. (
ptt/vox) (Boost)
1 462.5625 FRS & GMRS 1 Mid High
2 462.5875 FRS & GMRS 2 Mid High
3 462.6125 FRS & GMRS 3 Mid High
4 462.6375 FRS & GMRS 4 Mid High
5 462.6625 FRS & GMRS 5 Mid High
6 462.6875 FRS & GMRS 6 Mid High
7 462.7125 FRS & GMRS 7 Mid High
8 467.5625 FRS8 Low Low
9 467.5875 FRS9 Low Low
10 467.6125 FRS10 Low Low
11 467.6375 FRS11 Low Low
12 467.6625 FRS12 Low Low
13 467.6875 FRS13 Low Low
14 467.7125 FRS14 Low Low
15 462.5500 GMRS11 Mid High
16 462.5750 GMRS8 Mid High
17 462.6000 GMRS12 Mid High
18 462.6250 GMRS9 Mid High
19 462.6500 GMRS13 Mid High
20 462.6750 GMRS10 Mid High
21 462.7000 GMRS14 Mid High
22 462.7250 GMRS15 Mid High
SPÉCIFICATIONS
© 2005 SYLVANIA
300 Alden Road, Markham, Ontario L3R 4CI
Imprimé en Chine
UTZZ01006CZ
Cet appareil est conforme aux règlements d’Industrie
Canada (IC). Son fonctionnement est assujetti aux deux
conditions suivantes :
(1) cet appareil ne doit pas causer d’interférences, et.
(2) cet appareil doit accepter toutes les interférences qu’il
reçoit, incluant les parasites pouvant nuire à son
fonctionnement.
Important: Toutes les modifications apportées à cet
appareil, si elles ne sont pas expressément approuvées
par Sylvania, peuvent annuler le droit de l’usager de faire
fonctionner celui-ci.Votre radio avec émetteur-récepteur
est réglé de manière à émettre un signal réglementé sur
une fréquence donnée. Il est illégal de modifier ou ajuster
les réglages internes de la radio dans le but
d’outrepasser ces limites.Tout ajustement de la radio doit
être effectué par un technicien qualifié.
Pour plus de sécurité :
• Ne tentez jamais d’ouvrir le boîtier de la radio
• Ne changez ni ne remplacez jamais aucune
composante de la radio, à l’exception des piles.
Votre radio peut être source d’interférence TV ou radio
même s’il fonctionne correctement. Pour déterminer si
votre radio cause de l’interférence, éteignez-la. Si
l’interférence disparaît, votre radio en est la source.
Essayez d’enrayer l’interférence en éloignant votre radio
du récepteur.Si vous n’arrivez pas éliminer l’interférence,
Industrie Canada exige que vous cessiez d’utiliser la
radio.
Environnements dangereux : ne faites pas fonctionner
la radio dans des environnements qui présentent des
risques. Cela pourrait causer une explosion ou un
incendie. N’utilisez pas la radio à proximité de
détonateurs électriques non blindés.
Dans certaines conditions, les radios peuvent interférer
dans les activités reliées à la détonation et causer des
explosions.Éteignez la radio afin de prévenir toute
transmission accidentelle dans une zone de dynamitage
ou dans les endroits où la consigne “Éteignez les radios
émetteur-récepteur” est affichée. Les équipes de
construction ont souvent recours à des appareils de
radiofréquences commandés à distance pour déclencher
des explosions.
Soin et sécurité : pour nettoyer la radio, utilisez un
chiffon doux et humide.N’utilisez pas de nettoyant ni de
solvant car ils pourraient endommager le boîtier de la
radio et s’infiltrer à l’intérieur, causant ainsi des
dommages irréparables.Utilisez un chiffon doux et sec
pour essuyer les contacts de piles. Ne submergez pas
l’appareil dans l’eau. S’il est mouillé, éteignez-le sur le
champ et retirez les piles.
Asséchez le compartiment à piles à l’aide d’un chiffon
doux et sec afin de minimiser les risques potentiels de
dommages par l’eau. Laissez sécher le compartiment
Nous vous remercions d'avoir acheté cet appareil de
télécommunication de SYLVANIA. Votre nouvel appareil,
comme tous ceux de notre production, est conforme à
des normes de qualité très rigoureuses. Dans des
conditions d’utilisation normales, nous sommes certains
qu'il vous donnera entière satisfaction, et ce, pendant de
nombreuses années. Cependant, s’il survient un
problème, vous êtes protégé en vertu des clauses de
cette garantie. Les appareils de télécommunication de
SYLVANIA sont garantis contre tout défaut, tant dans les
matériaux que la fabrication, pendant les périodes
spécifiées ci-dessous, à condition que lesdits appareils
aient été installés et utilisés selon les directives du guide
d’utilisation.
PRODUIT PIÈCES ET MAIN-D'OEUVRE
Téléphones sans fil 1 an
Téléphones à cordon 1 an
Casques d’écoute téléphoniques 1 an
Appareils de communications 1 an
L'obligation de SYLVANIA, en vertu des clauses de cette
garantie, est limitée à la réparation, y compris le
remplacement des pièces et le coût de la main-d'oeuvre
pertinente, ou à notre discrétion, au remplacement de
tout appareil de télécommunication qui présente des
défauts de fabrication pendant la période de garantie.
Les pièces de rechange fournies en rapport avec cette
garantie sont couvertes pendant une période égale à la
portion résiduelle de la garantie de l'équipement original.
OBLIGATIONS DU CLIENT
L'appareil est couvert par la garantie à partir de la date
de l'achat initial au détail. Par conséquent, le propriétaire
de l'appareil doit présenter la facture originale affichant
clairement la date.
Aucun service ne sera effectué sans présentation de la
facture. Le propr iétaire est seul responsable de
l'expédition de l'appareil à destination et en provenance
du centre de service.
EXCLUSIONS DE LA GARANTIE
Cette garantie ne s'applique qu'aux appareils de
télécommunication de SYLVANIA achetés et utilisés au
Canada. Cette garantie ne s'applique ni à l'apparence ni
aux accessoires y compris, mais ne s’y limitant pas, aux
antennes, boîtier, pièces du boîtier, boutons, piles,
couvercles, câbles de raccord, cassettes et disques
compacts. En outre, cette garantie ne s'applique pas
non plus aux dommages causés par ou survenus lors de
la manutention, le transport, le déballage, l'installation,
les réglages effectués par le client et mentionnés dans le
guide d’utilisation, les réparations ou le remplacement
des pièces fournies par un service autre que le Centre
de Service et de Réparations de SYLVANIA, à tout
mauvais fonctionnement ou toute panne causée par ou
résultant de conditions environnementales anormales, de
réparations inadéquates effectuées par un service non
autorisé, un entretien inadéquat, des réparations ou
modifications effectuées par le client, de mauvais
traitements ou un fonctionnement inadéquat, la
négligence, un accident, un incendie, une inondation ou
tout autre cas de force majeure, incluant le branchement
à un circuit à tension incorrecte.
La garantie de cet appareil de télécommunication ne
s'applique qu'à l'acheteur au détail initial. Cette garantie
est nulle en cas d'utilisation commerciale de l'appareil ou
à des fins de location, ou si les numéros de série ont été
modifiés, égratignés ou effacés.
SYLVANIA se réserve le droit de changer le concept, de
faire des modifications ou des améliorations à cet
GARANTIE DES APPAREILS DE
TÉLÉCOMMUNICATION DE SYLVANIA
RENSEIGNEMENTS RELATIFS AUX
RÈGLEMENTS D’INDUSTRIE CANADA
MISE EN GARDE ! Il incombe à l’utilisateur de se
servir de cette radio avec émetteur-récepteur appareil de
manière responsable et adéquate pour faire en sorte qu’il
soit utilisé en toute sécurité.
N’utilisez que l’antenne vendue avec l’appareil ou celle
approuvée par le fabricant. Les antennes, modifications
ou accessoires non autorisés pourraient altérer la qualité
des communications, endommager la radio ou constituer
une infraction à la réglementation en vigueur.
N’utilisez pas la radio lorsque l’antenne est
endommagée. Si une antenne endommagée vient en
contact avec la peau, il peut en résulter une légère
brûlure.Veuillez contacter votre marchand pour le
remplacement de toute antenne endommagée.
Utilisation de l’appareil en le portant sur soi
Le présent appareil a fait l’objet de tests reliés à son
fonctionnement lorsqu’il est porté au corps par les
utilisateurs au moyen de la pince pour ceinture, ce qui
habituellement procure un espace d’un pouce entre la
radio et le corps de l’utilisateur. Afin d’être conforme aux
règles édictées quant à l’exposition aux radiofréquences,
il est nécessaire d’utiliser la pince pour ceinture lorsqu’on
désire porter cette radio sur soi.
Lorsqu’on utilise cette radio en la tenant dans la main, il
importe de maintenir l’appareil à une distance minimale
d’un pouce du visage. L’emploi d’accessoires ne
répondant pas à ces exigences pourrait ne pas être
conforme à la réglementation édictée en matière
d’exposition aux radiofréquences et devrait être évité.
INFORMATION SUR L’EXPOSITION AUX
RADIOFREQUENCES
ainsi à découvert pendant une journée complète afin
d’assurer qu’il sèche complètement. N’utilisez pas la
radio jusqu’à ce qu’il soit entièrement sec.
appareil, sans avoir l'obligation d'effectuer les mêmes
changements aux appareils fabriqués auparavant.
Ce qui précède remplace toute autre garantie explicite ou
implicite et SYLVANIA n'assume aucune responsabilité ni
n’autorise quiconque d'accepter en son nom toute
obligation ou responsabilité liée à la vente, à l'entretien
ou aux réparations de ce produit.
En aucune circonstance, SYLVANIA et ses détaillants
SYLVANIA ne seront responsables des dommages
spéciaux ou indirects résultant de l'utilisation de ce
produit ni de tout retard dans l'application de cette
garantie attribuable à des causes indépendantes de
notre volonté.
En vertu de certaines lois provinciales ou fédérales,
l'acheteur peut avoir d'autres droits spécifiques et, si
certaines clauses de cette garantie sont interdites en
vertu de ces lois, ces clauses seront nulles et non
avenues, mais les autres clauses de cette garantie
resteront en vigueur.
COMMENT OBTENIR LES SERVICES OU
RÉPARATIONS
En cas de besoin, vous pouvez obtenir tous les
renseignements sur les services et réparations en vous
adressant au marchand SYLVANIA qui vous a vendu cet
appareil, ou en communiquant
directement avec nous :
SERVICE SYLVANIA
300 Alden Road
Markham, Ontario
L3R 4C1
TÉLÉPHONE : (905) 940-5089
TÉLÉCOPIEUR : (905) 940-2303
1-800-287-4871
Bip ‘Compris’
Le bip ‘compris’est un BIP envoyé pour signifier la fin de
la transmission (dans les modes ‘PTT’, d’amplification de
la puissance ‘Power Boost’et de transmission activée par
la voix ‘VOX’). Le bip ‘compris’ peut être entendu à
travers le haut-parleur lorsque le bip à la pression des
touches est activé. Le bip ‘Compris’est transmis même
si le bip à la pression des touches est désactivé.
Toutefois, le bip ‘compris’ ne sera pas entendu à travers
le haut-parleur.
Pour activer le bip ‘compris’:
Maintenez la touche enfoncée tout en mettant la
radio en marche.
Pour désactiver le bip ‘compris’:
Maintenez la touche enfoncée tout en mettant la
radio en marche.
UT006CH_GMR225_FRN_0428 4/28/05 4:37 PM Page 2
 Loading...