

Page 1
ElEctric FirEplacE HEatEr
GERRARD
Model: SRW913T-33BK (CTC #64-3535)
INSTRUCTION MANUAL
attENtiON:
1. Find a location for the fireplace heater that is protected from direct sunlight.
2. Do not plug the unit into the power outlet before reading all instructions.
SaVE tHESE iNStrUctiONS FOr FUtUrE USE.
IMPORTANT SAFETY INSTRUCTIONS
WHEN USiNG ElEctrical appliaNcES, BaSic prEcaUtiONS SHOUlD
alWaYS BE FOllOWED tO rEDUcE tHE riSK OF FirE, ElEctric SHOcK,
aND iNJUrY tO pErSONS, iNclUDi NG tHE FOllOWiNG:
1) Read all instructions before using this electric fireplace heater.
2) This electric fireplace heater is hot when in use. To avoid burns, do not let bare
skin touch hot surfaces. The grill directly in front of the heater outlet becomes
hot during heater operation. Keep combustible materials, such as furniture,
pillows, bedding, papers, clothes, and curtains at least 3 feet (0.9 m) away from
the front of the unit and keep them away from the sides and rear.
3) Extreme caution is necessary when any heater is used by or near children or
invalids and whenever the fireplace is left operating and unattended.
4) Always unplug fireplace when not in use.
5) Do not operate any electric fireplace with a damaged cord or plug or after the
heater malfunctions, has been dropped or damaged in any manner.
6) Do not use outdoors.
7) This electric fireplace heater is not intended for use in bathrooms, laundry
areas and similar indoor locations. Never locate heater where it may fall into a
bathtub or other water container.
8) Do not run cord under carpeting. Do not cover cord with throw rugs, runners, or
similar coverings. Arrange cord away from traffic area and where it will not be
tripped over.
9) To disconnect fireplace, turn controls to off, then remove plug from outlet.
10) Connect to properly grounded outlets only.
11) Do not insert or allow foreign objects to enter any ventilation or exhaust opening as this may cause an electric shock or fire, or damage the heater.
12) To prevent a possible fire, do not block air intakes or exhaust in any manner. Do
not use on soft surfaces, like a bed, where openings may become blocked.
13) A heater has hot and arcing or sparking parts inside. Do not use it in areas
where gasoline, paint, or flammable liquids are used or stored.
14) Use this fireplace heater only as described in this manual. Any other use not
recommended by the manufacturer may cause fire, electric shock, or injury to
persons.
15) Avoid the use of an extension cord because the extension cord may overheat
and cause a risk of fire. However, if you have to use an extension cord, the cord
shall be No.16AWG minimum size and rated not less than 1875 watts.
16) Caution: Do not plug this product into a receptacle controlled by a wall switch
or dimmer.
17) When storing or transporting the unit and cord, keep in a dry place, free from
excessive vibration and store so as to avoid damage.
SYLVANIA is a registered trademark of OSRAM SYLVANIA, used under license.
caUtiON:
iF YOU USE tHiS HEatEr iN cONJUNctiON WitH a tHErmal cONtrOl, a
prOGram cONtrOllEr, a timEr Or aNY OtHEr DEVicE tHat SWitcHES
tHE HEatEr ON aUtOmaticallY, rEmEmBEr tO OBSErVE all SaFEtY
WarNiNGS at all timES. tHE FirEplacE HEatEr HaS SaFEtY OVErHEat
prOtEctiON. iF tHE OVErHEat prOtEctiON tripS, SWitcH OFF all
SWitcH BUttONS aND Wait apprOximatElY 5 -10 miNUtES. it SHOUlD
rESEt aUtOmaticallY ONcE tHE UNit cOOlS DOWN.
WarNiNG:
Procedures and techniques if not carefully followed will result in damage to the
equipment and will expose the user to the risk of serious injury, illness or death.
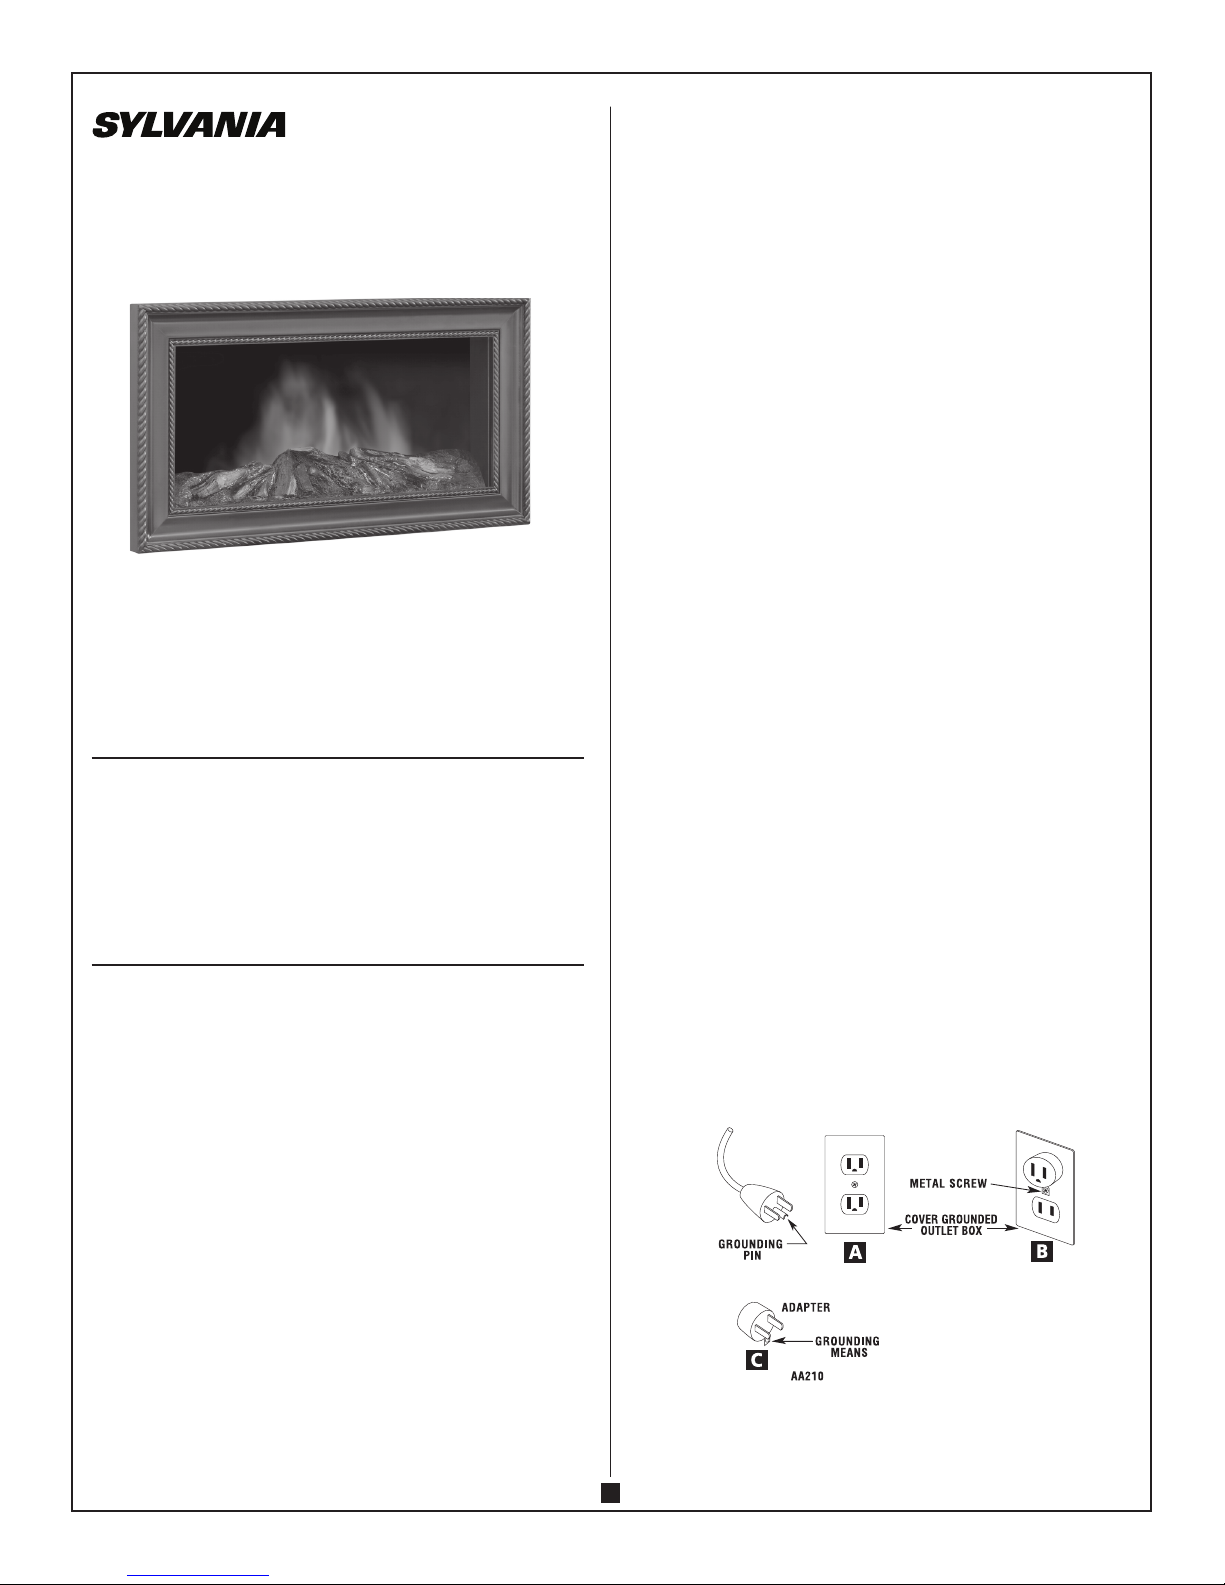
This electric fireplace heater is for use on 120 volts. The cord has a plug as shown
at A in illustration below. An adapter as shown at C is available for connecting
three-blade grounding-type plugs to two-slot receptacles. The green grounding
plug extending from the adapter must be connected to a permanent ground such
as a properly grounded outlet box. The adapter should not be used if a three-slot
grounded receptacle is available.
A 15 AMP circuit is required to operate this heater. If the breaker trips when the
heater is used then you may need to move the heater to another location or unplug
other appliances that are on the same circuit. If you require an extension cord use
one that is rated at 1875 watts.
impOrtaNt:
1
Page 2
Please note when you open the carton carefully check the unit and make sure there
are no damages. If you have any problems with the unit, with how the various
functions work or with hidden damages or missing parts, please call: 1-800-459-
4409 (EST) for customer service. NOTE: DO NOT RETURN UNIT TO THE STORE
BEFORE CALLING THE TOLL FREE NUMBER. Do not dispose of your packaging
cartons until you are completely satisfied with your new fireplace heater. Read
all instructions thoroughly before operating your new Electric Fireplace.
NOTE: Light bulbs may become loose during shipping. If the flame effect is dim or
does not work, please check that light bulb or bulbs are finger tight in socket. See
instructions for replacing bulb or bulbs.
5. Make sure all screws are tight. OPERATION
OPERATION
After reading complete instructions, confirm all controls on fireplace are in the OFF
position. Plug the fireplace into a 15AMP/120Volt outlet. If the cord does not reach,
you may use an extension cord rated for a minimum of 1875 WATTS. Once the
fireplace insert has been properly connected to a grounded electrical outlet, it is ready
to operate.
NOTE: The electric fireplace heater may emit a slight harmless odor when first turned
on. This is caused by activating the internal heater components for the first time and
should not occur again.
ASSEMBLY INSTRUCTIONS
partS liSt
Z. WALL ANCHOR SAFETY CABLE
Wall Anchor ......................................................................................................................... 1
Screw for wall anchor ....................................................................................................... 1
Screw for mantel ............................................................................................................... 1
Safety cable ........................................................................................................................ 1
CAUTION: Carefully move the assembled unit to the desired location. The Fireplace
Mantel should not be positioned in an area exposed to direct sunlight.
Wall aNcHOr SaFEtY caBlE
The use of WALL ANCHOR SAFETY CABLE is highly recommended in order to reduce
the risk of the fireplace being tipped over accidentally. WARNING: This CABLE may reduce possible risk of injury if the fireplace is improperly handled, but is not a substitute
for proper adult supervision. Children should not be left unattended near any heater.
1. Drill a 5/16” (8mm) hole in the wall. Insert the PLASTIC WALL ANCHOR into the
hole and gently tap until the flange on the anchor is against the wall surface.
2. Position the back edge of the mantle close to the wall.
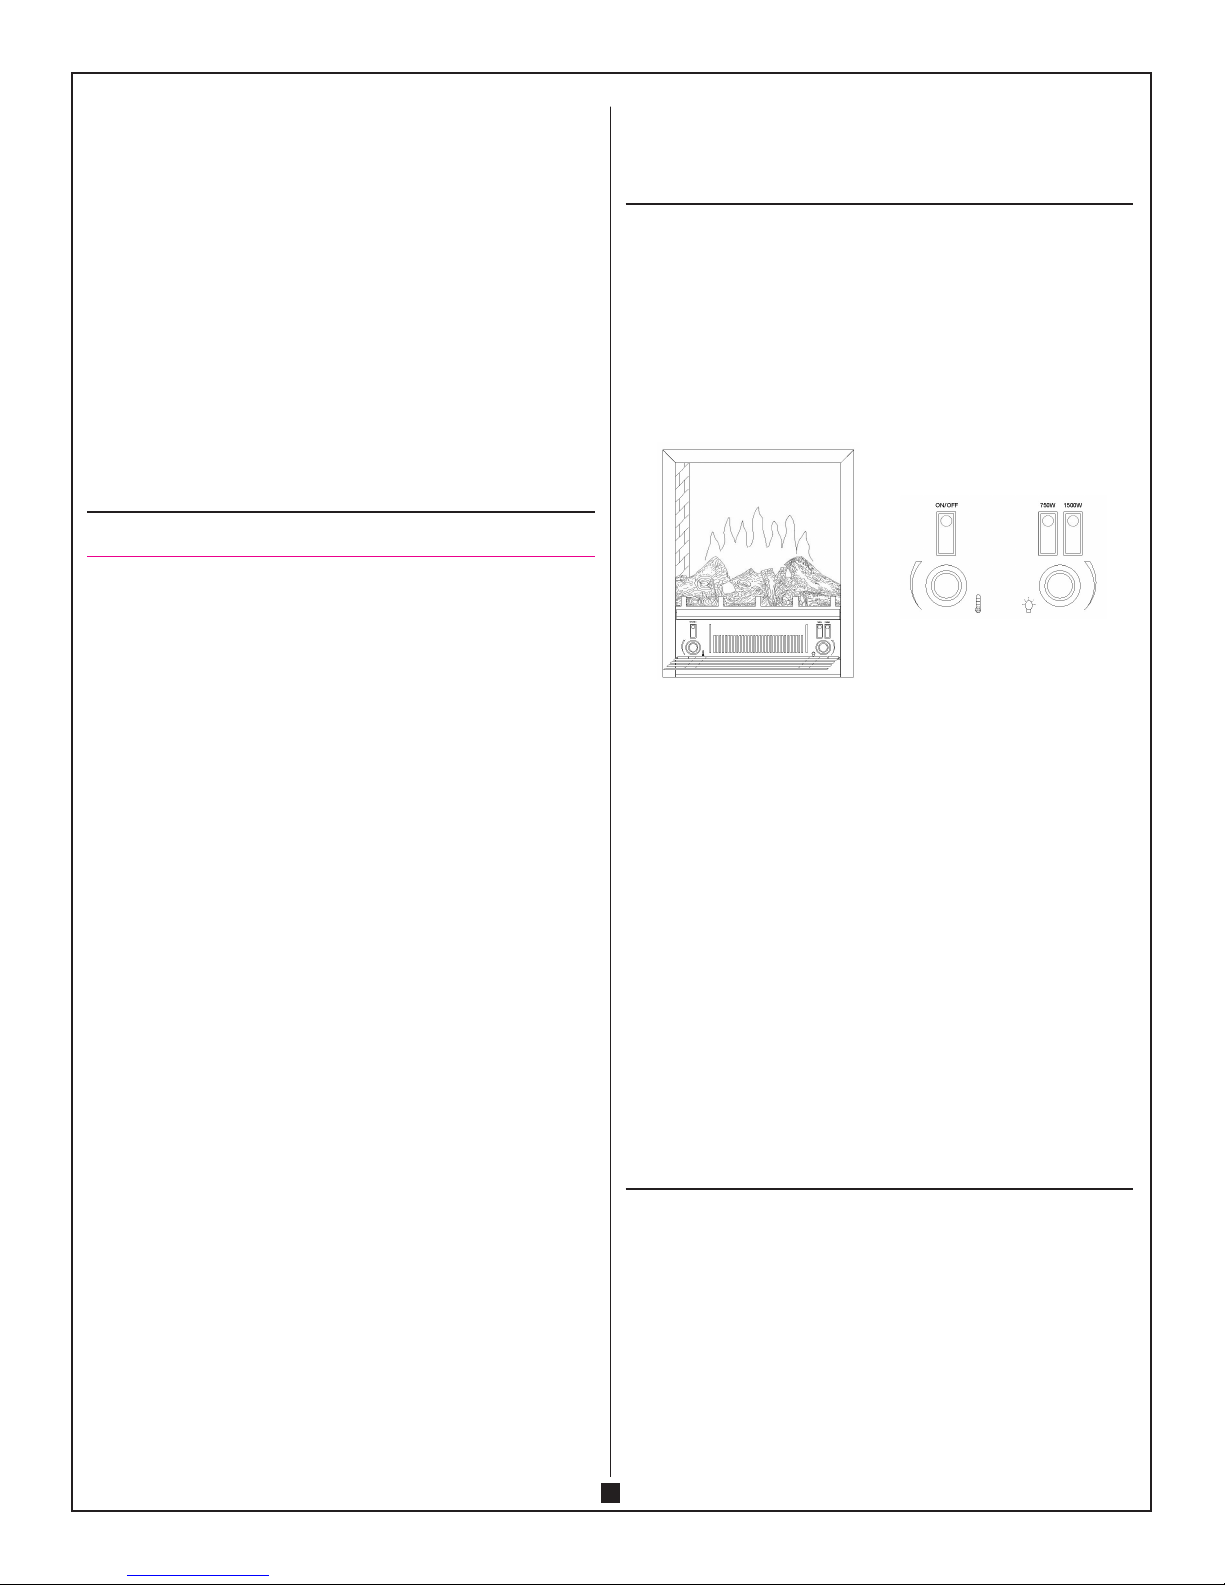
OpEratiON BY tHE cONtrOl paNEl
The controls are located behind the grill below the front glass and can be accessed by
pulling the grill from the top, forward and down.
ON/OFF: Press this button for main power and flame effect. The indicator light will
turn on. See below for other control switches.
750W: For low heat function - Press this switch while the ON/OFF switch is in the on
position for low heat. The indicator light will turn on.
1500W: For high heat function - Press this switch while the ON/OFF switch and the
750W switch are in the on position for high heat. The indicator light will turn on.
Temperature Control: To adjust the temperature to your individual requirements,
turn the temperature control dial to the right (clockwise) to increase the desired temperature and to the left for lower temperature. This temperature control dial can only
be used while the ON/OFF switch and 750W &1500W switches are in the ON position.
When the heater reaches to the desired temperature, the heater and 750W/1500W
indicator light will turn off but the fan still keeps working with air flow. Adjust this
knob to restart the heater.
Dimmer Control Knob: Turn the dimmer dial clockwise or counter clockwise to get
the desired flame intensity. The dimmer switch can only be used when the ON/OFF
switch is in the on position.
Note: When the ON/OFF switch is turned off, all other heater functions will stop even
though the switches may be in the on position.
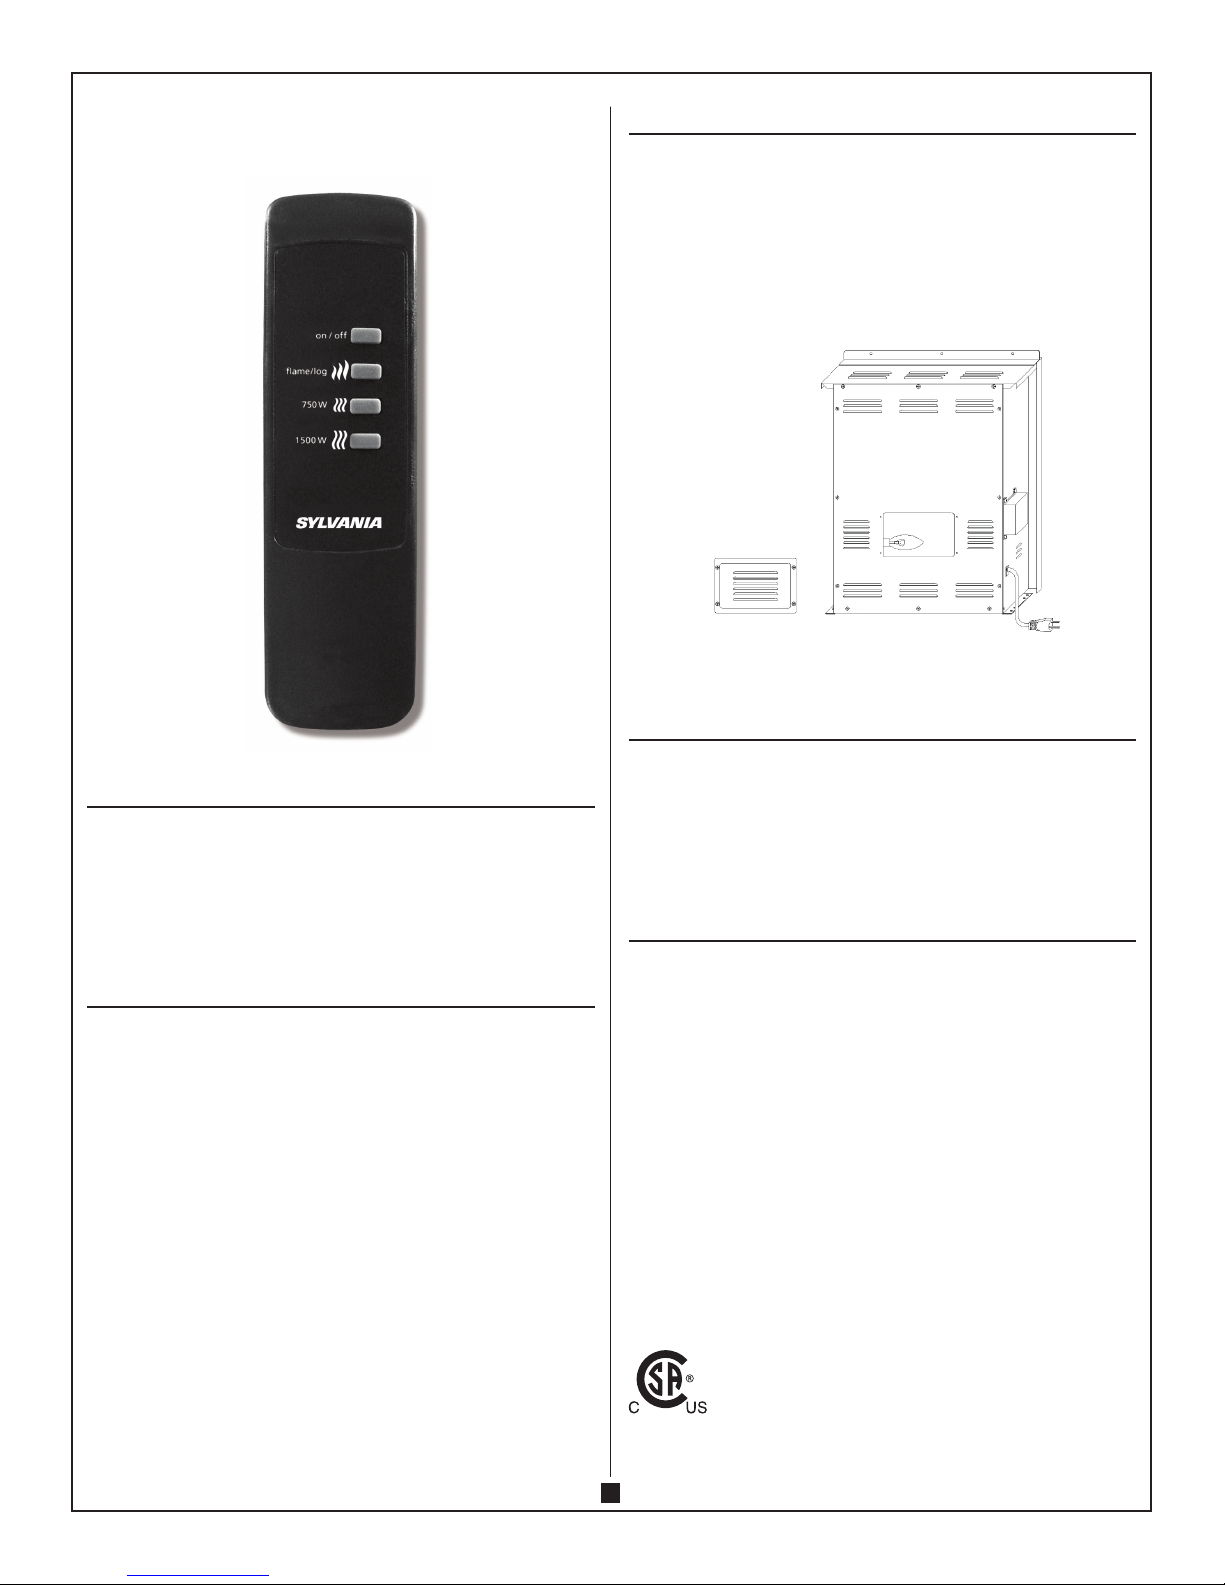
OPERATION BY THE REMOTE CONTROL
fig. A
3. Attach the SAFETY CABLE to the mantle using the SCREW FOR MANTLE. See fig. A
4. Use the SCREW FOR WALL to attach the other end of SAFETY CABLE to the wall.
Plug in your electric fireplace and it will beep once, this means you have power and
your remote is ready to operate your electric fireplace.
ON/OFF: Press this button for main power function. The unit will beep and the indicator light will be on. Pressing again will stop the main power function.
Once the heater is switched off, the indicator light will flash and the unit will keep
working with air flow for 5 more seconds.
FLAME/LOG: Press this button once for flame effect. The unit will be beep and the
indicator light will be on. The bulbs for flame effect & log-set will be on. Pressing button again will stop the light function.
750W: Press this button for low heat level. The unit will beep, the pilot light and
indicator light will be on. The fireplace heater will give low heat level. Pressing once
again will stop the low heat level function.
2
Page 3
1500W: Press this button for high heat level. The unit will beep, the pilot light and
indicator light will be on. The fireplace heater will give high heat level. Pressing once
again will stop the high heat level function.
REPLACING THE LIGHT BULBS
Step 1: Remove 4 screws on the back of fireplace and remove the rear cover
of the unit.
Step 2: You will find 1 X 40W Type B-10 bulb under log-set bed.
Step 3: Loosen and remove burnt out bulb and replace with new bulb.
Step 4: Close the rear cover and secure with the 4 screws.
Step 5: Plug in the unit.
REMOTE CONTROL BATTERY REPLACEMENT
Replace with 2 AAA batteries.
WarNiNG:
Do not mix old and new batteries Do not mix alkaline, standard (Carbon-Zinc), or
rechargeable (Nickel Cadmium) batteries.
MAINTENANCE
maiNtENaNcE WarNiNG
Disconnect power and unplug the power cord before attempting any maintenance or
cleaning to reduce the risk of fire, electric shock or damage to persons. The bulbs in
your unit can become extremely hot. Allow at least 10 minutes between turning off the
unit and removing the light bulbs to avoid the accidental burning of the skin.
riSK OF FirE: DO NOt ExcEED tHE rEcOmmENDED BUlB WattaGE.
CLEANING
To clean unit first turn off controls on unit and unplug the unit from power source. To
clean glass display panel; remove dust with clean dry cloth or to remove finger prints
and other marks clean glass with clean damp cloth. Do not use abrasive cleaners or
spray liquids on glass display panel surface. Metal and metal painted parts should be
cleaned with damp cloth. Do not use abrasive cleaners or spray liquids on these surfaces.
WARRANTY
Every electric fireplace heater is tested before it leaves the factory and it is guaranteed
for one year. If the unit should fail to operate correctly within one year from the date
of purchase, call customer service at 1-800-459-4409 (EST). We will, at our discretion
either repair or replace the unit. It will have to be returned to us freight prepaid and
we will return the repaired or replaced unit to you freight prepaid. The company’s
sole obligation is to repair or replace the unit. This warranty is void if in the opinion
of Quality Craft the unit has been tampered with, altered, misused, damaged, abused
or used with the wrong power source. Light bulbs are not covered by this warranty.
The warranty is for homeowner use only and does not cover units used in commercial
situations.
Imported by
Quality Craft Ltd.
Laval, Quebec, Canada H7S 2G7
1-800-459-4409 (EST)
www.qualitycraft.com
Made in China
3
Page 4

4
Page 5

FOYER ÉLECTRIQUE
GERRARD
Modèle : SRW913T-33BK (CTC #64-3535)
MANUEL D’INSTRUCTIONS
ATTENTION :
1. Choisissez pour votre poêle-foyer électrique un emplacement protégé contre
l’ensoleillement direct.
2. Ne branchez pas le poêle-foyer électrique dans la prise de courant avant d’avoir
lu toutes les instructions du manuel.
CONSERVEZ LES PRÉSENTES DIRECTIVES POUR TOUTE UTILISATION FUTURE.
DIRECTIVES DE SÉCURITÉ IMPORTANTES
POUR UTILISER UN APPAREIL ÉLECTRIQUE, IL FAUT TOUJOURS OBSERVER
DES PRÉCAUTIONS DE BASE, AFIN DE RÉDUIRE LES RISQUES D’INCENDIE,
DE DÉCHARGES ÉLECTRIQUES ET DE BLESSURES CORPORELLES, DONT LES
SUIVANTES :
1) Lisez toutes les directives avant d’utiliser le poêle-foyer électrique.
2) Le poêle-foyer électrique est chaud lorsqu’il fonctionne. Pour éviter des
brûlures, la peau nue ne doit pas entrer
l’appareil. La grille, placée devant la sortie du poêle devient chaude également
durant
le fonctionnement de l’appareil. Gardez toutes
telles que meubles, oreillers, literies, papiers, vêtements et
distance d’au moins 0,9 m (3 pi)
distance des côtés et de l’arrière.
3) Faites preuve de la plus grande prudence lorsqu’un poêle est utilisé à proximité
d’enfants ou de personnes invalides, ou par ceux-ci, et chaque fois que
l’appareil est laissé en état de marche, sans surveillance.
4) Débranchez toujours le poêle-foyer lorsqu’il ne sert pas.
5) N’utilisez pas un poêle-foyer électrique dont la fiche ou le cordon d’alimentation
est endommagé, ou après l’apparition d’un défaut de fonctionnement, ou après
qu’il ait été échappé au sol ou endommagé d’une manière quelconque.
6) N’utilisez pas cet appareil à l’extérieur.
7) Le poêle-foyer électrique n’est pas conçu pour être utilisé dans une salle
en contact avec les surfaces chaudes de
matières combustibles
rideaux à une
du devant de l’appareil, et gardez-les aussi à
8) N’acheminez pas le cordon d’alimentation de l’appareil sous des tapis ou
9)
10) Branchez l’appareil uniquement à une prise de courant mise à la terre de façon
11) N’insérez pas d’objets dans les ouvertures d’aération ou d’évacuation de
12) Pour éviter les risques d’incendie, ne bloquez en aucune façon les prises d’air
13)
14)
SYLVANIA est une marque déposée de OSRAM SYLVANIA, utilisée sous license.
15) Évitez d’utiliser un câble de rallonge : il pourrait surchauffer et causer un
16) Ne pas brancher ce produit dans une prise contrôlée pas un interrupteur
17) Lorsque vous rangez ou transportez l’appareil et son cordon d’alimentation,
MISE EN GARDE :
SI VOUS UTILISEZ CE POêLE-FOYER CONJOINTEMENT AVEC UNE COMMANDE
THERMIQUE, UN RÉGULATEUR à PROGRAMME, UNE MINUTERIE OU QUELQUE
AUTRE DISPOSITIF QUI MET L’APPAREIL EN CIRCUIT (ON) AUTOMATIQUEMENT,
N’OUBLIEZ PAS DE RESPECTER TOUS LES AVERTISSEMENTS RELATIFS à LA
SÉCURITÉ, EN TOUT TEMPS. CE POêLE-FOYER COMPORTE UNE PROTECTION
INCORPORÉE CONTRE LES SURCHAUFFES. SI LA PROTECTION CONTRE LA
SURCHAUFFE SE DÉCLENCHE, ÉTEIGNEZ TOUS LES INTERRUPTEURS ET
ATTENDEZ ENVIRON 5 à 10 MINUTES. ELLE DEVRAIT SE RÉENCLENCHER
AUTOMATIQUEMENT APRèS LE REFROIDISSEMENT DE L’UNITÉ.
AVERTISSEMENT :
Si vous ne respectez pas bien procédures et techniques d’utilisation, l’appareil sera
endommagé, et l’utilisateur s’expose à des risques de blessure grave, de maladie,
voire de décès !
Ce poêle-foyer électrique est conçu pour fonctionner sur un circuit de 120 V. Le cordon d’alimentation comporte une fiche, montrée dans l’illustration A ci-dessous. Un
adaptateur, tel que montré en C, est disponible, pour permettre de brancher une
fiche à mise à la terre à trois broches dans une prise de courant à deux broches.
La fiche de mise à la terre verte qui prolonge l’adaptateur doit être connectée à
un conducteur de terre du type permanent, comme par ex. une boîte à prises correctement mise à la terre. Si une prise de courant à trois broches de mise à la terre
effective est disponible, n’utilisez pas d’adaptateur. Un circuit de 15 ampères est
requis pour utiliser ce poêle-foyer. Si le disjoncteur déclenche lorsque vous utilisez
l’appareil, il vous faudra peut-être le déplacer, ou débrancher d’autres appareils
partageant le même circuit. Si vous devez utiliser un câble de rallonge, il doit avoir
une puissance nominale de 1875 W.
de bain, une salle de lavage ou un autre emplacement intérieur semblable.
N’installez jamais le poêle-foyer là où il risquerait de tomber dans une baignoire
ou un autre contenant d’eau.
moquettes. Ne recouvrez pas le cordon d’une carpette, d’un tapis d’escalier ni
d’un autre revêtement de sol semblable. Disposez le cordon à distance des aires
de circulation et de tout endroit où il risquerait de faire trébucher quelqu’un.
Pour débrancher le poêle-foyer, mettez d’abord les commandes en position hors
circuit (OFF), puis tirez sur la fiche du cordon pour l’extraire de la prise murale.
appropriée.
l’appareil, ni ne laissez d‘objets y pénétrer, ce qui risquerait de provoquer une
décharge électrique ou un incendie, ou d’endommager l’appareil!
de l’appareil ou ses sorties d’évacuation. N’utilisez pas l’appareil sur une surface
souple, comme un lit, où ses ouvertures risqueraient de devenir obstruées.
L’intérieur d’un poêle contient des pièces chaudes ou qui peuvent produire des
arcs électriques ou des étincelles. N’utilisez pas cet appareil en un endroit où l’on
utilise ou entrepose de la peinture, de l’essence ou autres liquides inflammables.
Utilisez le poêle-foyer électrique conformément aux instructions du manuel.
Toute autre utilisation qui n’est pas recommandée par le fabricant est susceptible
de causer un incendie, une décharge électrique ou des blessures corporelles.
incendie. Toutefois, si vous devez utiliser un câble de rallonge, il doit être d’un
calibre minimal AWG n˚ 16, et sa puissance nominale, d’au moins 1875 W.
murale ou un gradateur murale.
gardez-les en un lieu sec, exempt de toute vibration excessive, pour éviter de les
endommager.
1
Page 6

VEUILLEZ NOTER : Lorsque vous ouvrez le carton d’expédition du produit, vérifiez
attentivement l’appareil pour vous assurer qu’il n’est pas endommagé. Si vous avez
des problèmes avec l’unité ou de la difficulté à utiliser l’une ou l’autre de ses fonctions, ou si vous notez des dommages non apparents ou qu’il manque des pièces,
faites immédiatement le 1-800-459-4409 pour obtenir le service après-vente.
REMARQUE : NE RETOURNEZ PAS L’APPAREIL AU MAGASIN AVANT D’AVOIR
COMPOSÉ D’ABORD CE NUMÉRO SANS FRAIS. Ne mettez pas vos cartons
d’expédition au rebut tant que vous n’estimez pas être entièrement satisfait(e)
de votre nouveau poêle-foyer électrique. Lisez toutes nos directives à fond avant
de faire fonctionner votre nouveau poêle-foyer électrique.
REMARQUE : Les ampoules peuvent se desserrer en cours de transport. Si l’effet
de flamme semble faible ou ne fonctionne pas du tout, veuillez vous assurer que
l’ampoule ou les ampoules soient bien vissées dans leurs douilles. Lire les instructions
pour remplacer les ampoules. Veuillez ne pas retourner votre appareil au magasin
avant d’avoir vérifié les ampoules.
REMARQUE : Il est possible que le poêle-foyer électrique émette une légère odeur,
inoffensive, lorsque vous l’allumerez pour la première fois. Elle est causée par
l’activation initiale des composants internes de l’appareil; elle ne devrait plus être
émise par la suite.
recommandée, pour réduire le risque de déplacement accidentel du foyer.
AVERTISSEMENT: Le CÂBLE peut réduire le risque de blessures s’il est manipulé
imprudemment, mais n’est pas un substitut à la supervision appropriée d’un adulte.
Ne pas laisser un enfant seul près du foyer.
1. Percer un trou de 5/16” (8mm) dans le mur. Insérer L’ANCRAGE PLASTIQUE DE
MUR dans le trou et frapper doucement jusqu’à ce que la bride de l’ancrage soit
contre la surface du mur.
2. Placer le bord arrière du parement près du mur.
3. Attacher la CÂBLE DE SÉCURITÉ au parement avec la VIS DE PAREMENT. Reportezvous aux figures A
4.
Utiliser la VIS DE MUR pour attacher l’autre extrémité du CÂBLE DE SÉCURITÉ au mur.
5. S’assurer que toutes les vis soient bien vissées.
fig. A
OPÉRATION
Aprè s avoir lu toutes les instructions, assurez-vous que les contrôles du foyer sont
dans la position OFF. Branchez le foyer dans une prise de 15 ampères/120 volts. Si le
cordon est trop court, vous pouvez utiliser une rallonge cotée à un minimum de 1875
watts. Une fois la fiche du poêle-foyer électrique adéquatement branchée à une prise
de courant avec mise à la terre, l’appareil est prêt à fonctionner.
DIRECTIVES D’ASSEMBLAGE
LISTE DES PIèCES
Z) CÂBLE D’ANCRAGE DE SÉCURITÉ DU MUR
Ancrage du mur ................................................................................................................. 1
Vis d’ancrage du mur ........................................................................................................ 1
Vis de parement ................................................................................................................. 1
Câble de sécurité................................................................................................................ 1
ATTENTION :
de foyer ne doit pas être placé dans un endroit exposé aux rayons directs du soleil.
CÂBLE D’ANCRAGE DE SÉCURITÉ DU MUR
L’utilisation du CÂBLE D’ANCRAGE DE SÉCURITÉ DU MUR est fortement
Déplacez soigneusement l’unité montée à l’endroit souhaité. Le manteau
OPÉRATION à PARTIR DU TABLEAU DE COMMANDES
Les commandes de l’appareil sont derrière la grille, sous le panneau de verre avant; on y
accède en tirant la grille par sa partie supérieure, vers l’avant et vers le bas.
MARCHE/ARRÊT : appuyez sur ce bouton pour la puissance principale et l’effet de
flamme. La lumière indicatrice s’allumera. Voir plus bas pour les autres interrupteurs
de contrôle.
750 W: pour le fonctionnement à basse température,
que l’interrupteur MARCHE/ARRÊT est en position ON pour basse température Le
témoins s’allumera.
1500 W : pour le fonctionnement à haute température, appuyez sur cet interrupteur
pendant que l’interrupteur MARCHE/ARRÊT et l’interrupteur de 750 watts sont en
position ON pour la température élevée. Le témoin s’allumera.
appuyez sur cet interrupteur pendant
2
Page 7

Contrôle de la température : pour ajuster la température selon vos exigences,
tourner le cadran de contrôle de la température vers la droite (sens des aiguilles
d’une montre) pour augmenter la température et à gauche pour la diminuer. Ce
cadran de contrôle de la température ne peut être utilisé que lorsque l’interrupteur
MARCHE/ARRÊT et les interrupteurs 750W & 1500W sont dans la position ON. Lorsque l’appareil de chauffage atteint la température souhaitée, l’appareil de chauffage
et le voyant 750 W/1500 W s’éteindront, mais le ventilateur continuera de fonctionner
avec l’écoulement de l’air. Réglez cette commande pour remettre l’appareil de chauffage en fonction.
Bouton de contrôle du gradateur : tourner le cadran du gradateur dans le sens ou
dans le sens contraire de celui des aiguilles d’une montre pour recevoir l’intensité
de flamme désirée. L’interrupteur du gradateur ne peut être utilisé que lorsque
l’interrupteur marche/arrêt est dans la position ON.
Note : lorsque l’interrupteur marche/arrêt est fermé, toutes les autres fonctions du foyer
s’arrêteront même si les interrupteurs sont dans la position ON.
émet un bip sonore, et le témoin au-dessus du bouton s’allume. Le poêle-foyer
émettra alors une chaleur élevée. Appuyez une fois de nouveau pour arrêter la fonction de niveau de chaleur élevée.
REMPLACEMENT DES PILES DE LA TÉLÉCOMMANDE
Remplacez par deux (2) piles « AAA ».
AVERTISSEMENT : N’utilisez pas simultanément une pile neuve et une pile épuisée
N’utilisez pas simultanément de piles alcaline, standard (carbone-zinc) ou du type
rechargeable (nickel-cadmium).
ENTRETIEN
FONCTIONNEMENT À PARTIR DE LA TÉLÉCOMMANDE
Branchez votre poêle-foyer électrique; celui-ci émet un bip sonore pour indiquer qu’il
est effectivement sous tension et que vous pouvez l’utiliser à partir de la télécommande.
AVERTISSEMENT :
Avant de tenter toute intervention d’entretien ou de nettoyage de cet appareil,
mettez-le hors circuit (OFF) et débranchez-le, afin de
de décharges
pareil peuvent devenir extrêmement chaudes ! Pour éviter de vous brûler, attendez au
moins dix (10) minutes après avoir éteint l’appareil pour remplacer une ampoule.
RISQUES D’INCENDIE : NE DÉPASSEZ PAS LA PUISSANCE (W)
RECOMMANDÉE POUR LES AMPOULES.
électriques ou de blessures corporelles. Les ampoules dans votre ap-
réduire les risques d’incendies,
REMPLACEMENT D’UNE AMPOULE
Étape 1 : Retirer les quatre (4) vis du cou vercle arrière du poêle-foyer, puis enlever
le couvercle.
Étape 2 : Étape 2:Vous trouverez une (1) ampoule de 40W, de type B-10, sous l’assise
des bûches artificielles.
Étape 3 : Enlever l’ampoule et remplacer par une neuve.
Étape 4 : Referme le couvercle arrière, et fixez-le en place avec ses quatre (4) vis.
Étape 5 : Branchez l’appareil.
MARCHE/ARRÊT : Presser ce bouton pour mettre en marche. L’unité émettra un
signal sonore et le témoin lumineux s’allumera. Presser à nouveau pour arrêter.
Une fois l’appareil de chauffage éteint, le voyant clignotera et l’unité demeurera en
fonction avec un débit d’air pendant cinq secondes.
FLAMME/BÛCHE : Presser ce bouton à une reprise pour obtenir l’effet des flammes.
L’unité émettra un signal sonore et le témoin lumineux s’allumera. Les ampoules simulant les flammes seront allumées. Presser à nouveau pour éteindre les ampoules.
750 W : Appuyez sur ce bouton pour obtenir un niveau de chaleur faible. L’appareil
émet un bip sonore, et le témoin au-dessus du bouton s’allume. Le poêle-foyer
émettra alors une chaleur faible. Appuyez une fois de nouveau pour arrêter la fonction
de niveau de chaleur faible.
1500 W : Appuyez sur ce bouton pour obtenir un niveau de chaleur élevée. L’appareil
3
Page 8

NETTOYAGE
Pour nettoyer l’appareil, tournez ses commandes en position hors circuit (OFF), puis
débranchez-le de sa source d’alimentation. Pour nettoyer le panneau d’affichage
en verre, enlever la poussière à l’aide d’un chiffon sec et propre; pour enlever les
marques de doigts ou autres marques, nettoyer le verre avec un chiffon humide propre. N’utilisez pas de nettoyants abrasifs ou de liquides en aérosol sur la surface du
panneau d’affichage en verre. Nettoyez les surfaces en métal ou peintes métalliques
à l’aide d’un chiffon humide. N’utilisez pas non plus de nettoyants abrasifs ou de
liquides en aérosol sur ces surfaces.
GARANTIE
Chaque poêle-foyer électrique est testé en usine et est garanti pour une période de
un an. S’il arrivait que l’appareil ne fonctionne pas correctement au cours de cette
période de un an à compter de la date d‘achat, veuillez téléphoner à notre Service à
la clientèle, 1-800-459-4409 (H.N.E.). À notre
cerons
l’appareil. Celui-ci devra nous être retourné port payé, à la suite de quoi nous
vous retournerons, port payé, l’appareil réparé ou un appareil neuf. L’unique obligation de la compagnie à ce titre est de réparer ou de remplacer l’appareil. La présente
garantie
est déclarée nulle si, de l’avis de Quality Craft, l’appareil a éeé altéré, modifié,
mal utilisé, endommagé, ou utilisé avec une source d’alimentation inadéquate. Les
ampoules ne sont pas couvertes par la présente garantie. La garantie couvre uniquement l‘usage résidentiel, non les usages commerciaux.
discrétion, nous réparerons ou rempla-
Importé par
Quality Craft Ltd.
Laval, Quebec, Canada H7S 2G7
1-800-459-4409 (H.N.E.)
www.qualitycraft.com
Fabriqué en Chine
4
 Loading...