

Sylvac S_Dial WORK ANALOG Smart, S_Dial WORK CBG, S_Dial WORK BASIC, S_Dial WORK Smart, S_Dial WORK ANALOG Instructions Manual
...
INSTRUCTIONS
MODE D’EMPLOI
BEDIENUNGSANLEITUNG
MANUALE D’USO
MODO DE EMPLEO
E
S
D
F
I
DIAL GAUGE
COMPARATEUR
MESSUHR
COMPARATORE
COMPARADOR
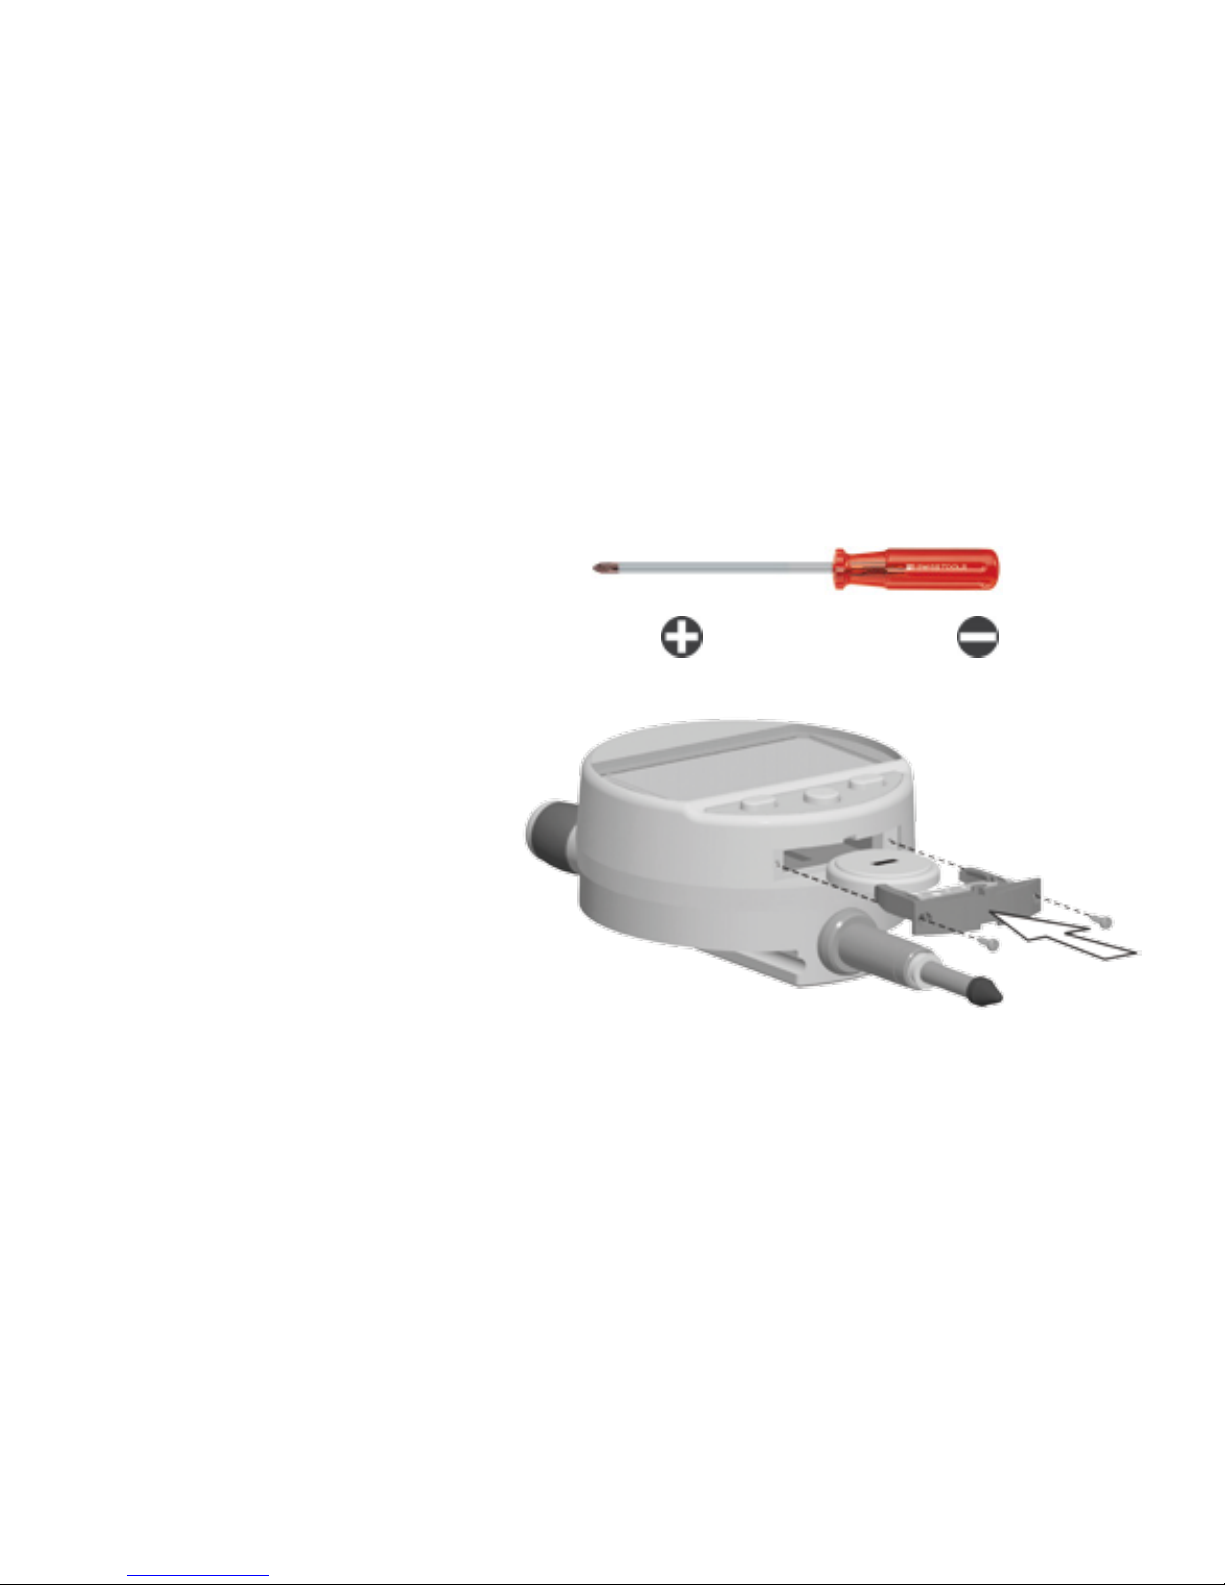
Installing and replacing the battery
(or Power cable)
Mise en place et remplacement de la
batterie (ou câble Power)
Einbau und Austausch von Batterie
(oder Netzkabel)
Installazione e sostituzione della batteria
(o del cavo di alimentazione)
Colocación y sustitución de la batería
(o cable Power)
No. 0 No. 0 (0,4x2,5mm)
Battery / batterie / batterie / batteria / bateria : lithium 3V, type CR2032
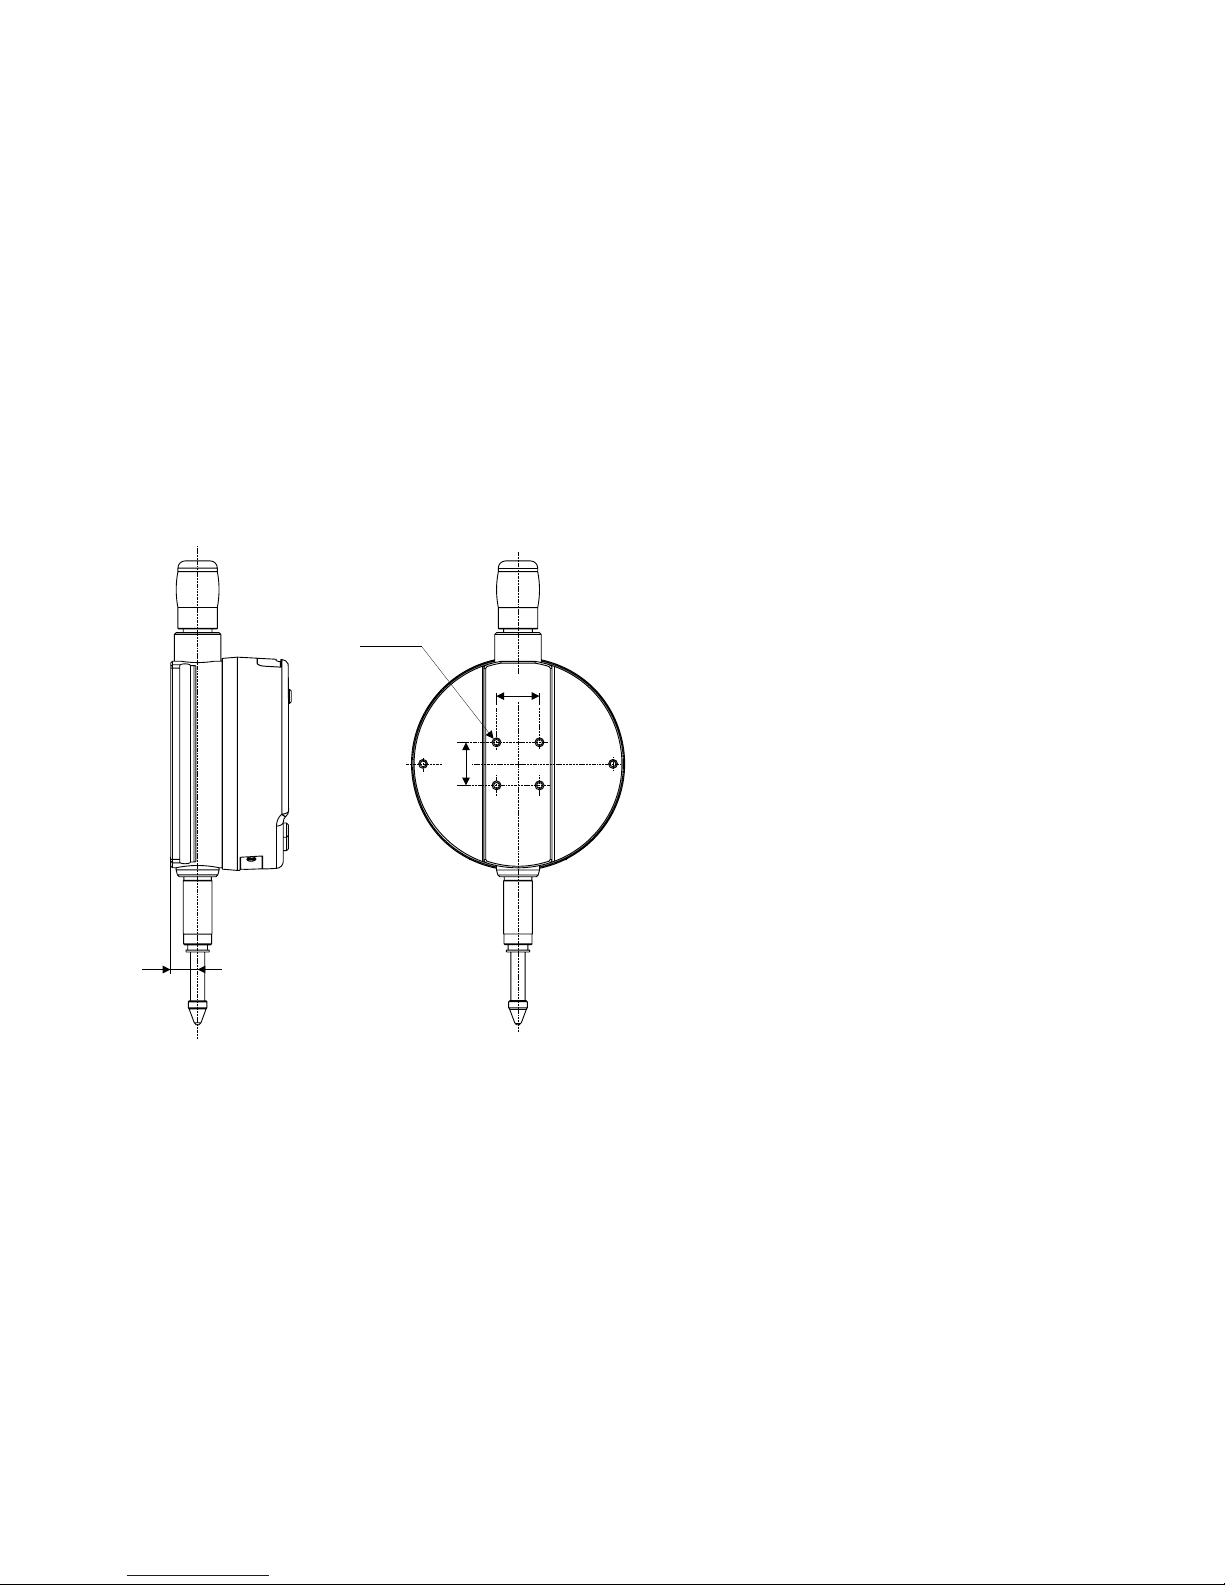
12
12
7.5
(4x) M2
L 3.5mm
Diagram for rear xings
Schéma de xation arrière
Schema für die Befestigung hinten
Schema di ssaggio posteriore
Esquema de jación posterior
9
14
18
20
10
17
13
12
1
5
2
4
7
8
16
19
3
6
22
15
11
21
4
E

5
E
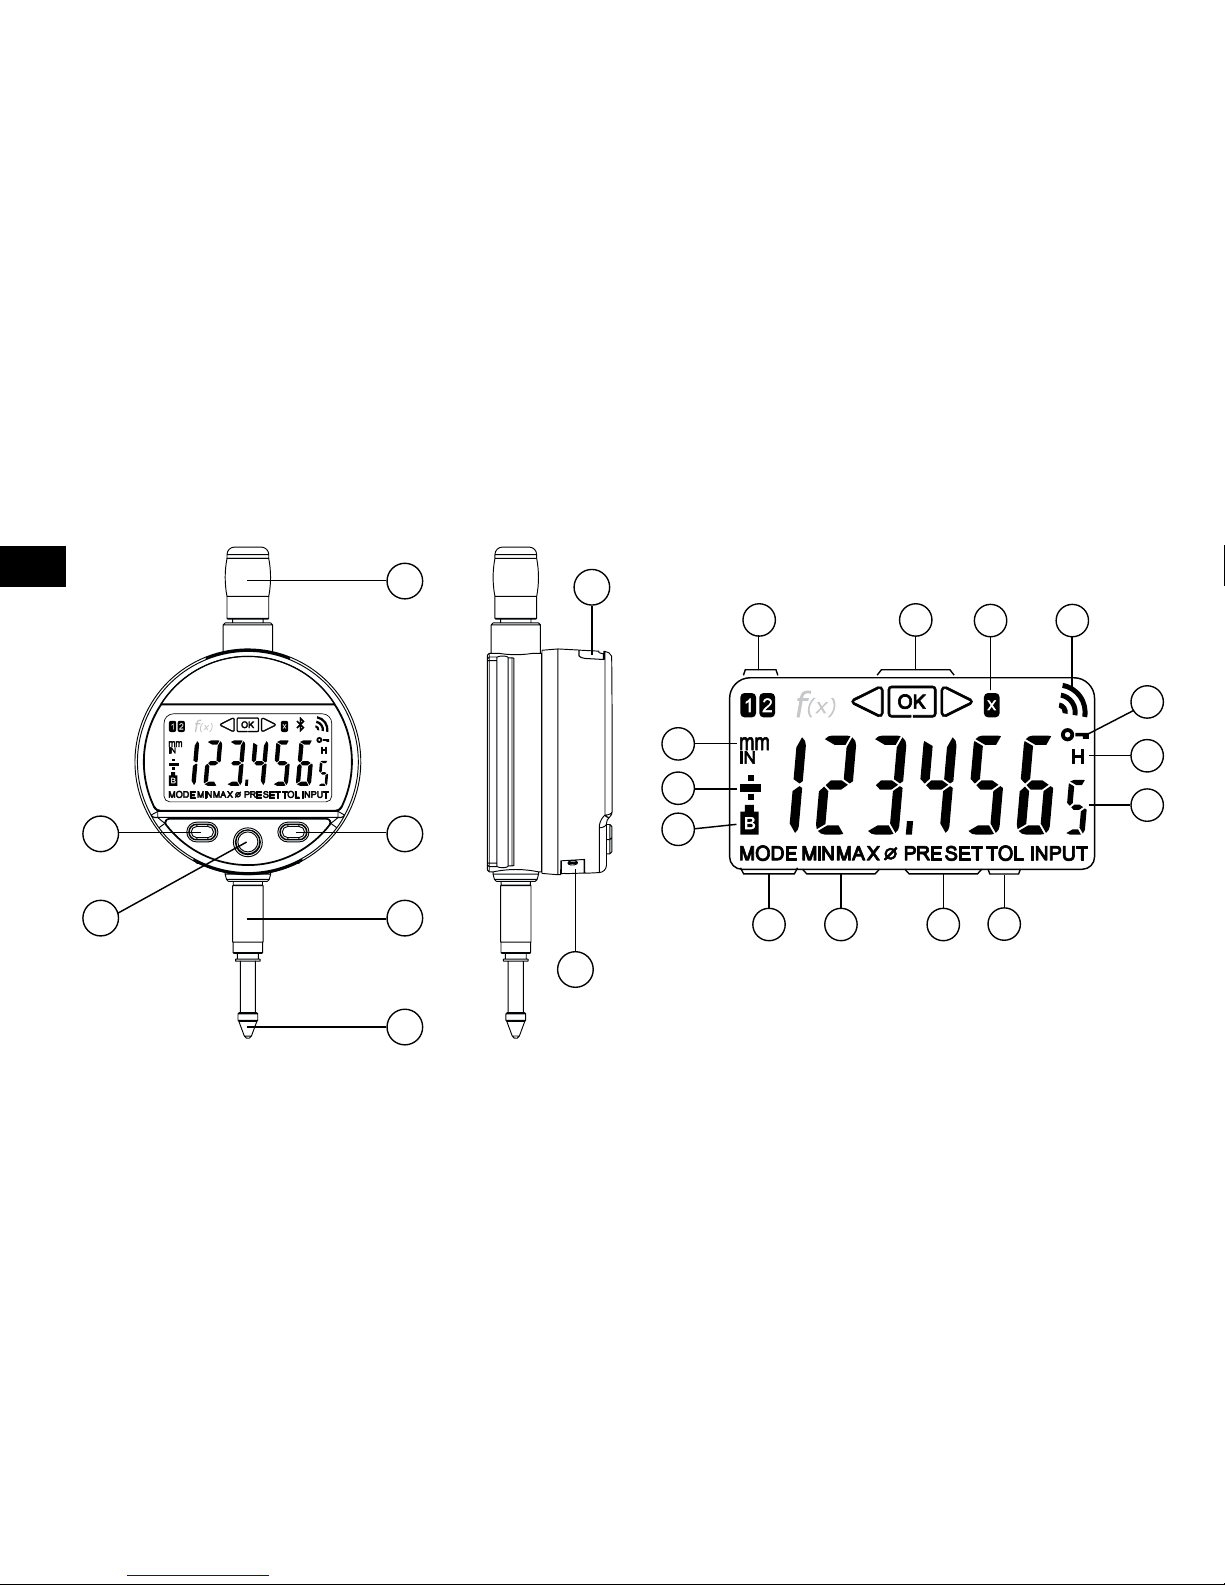
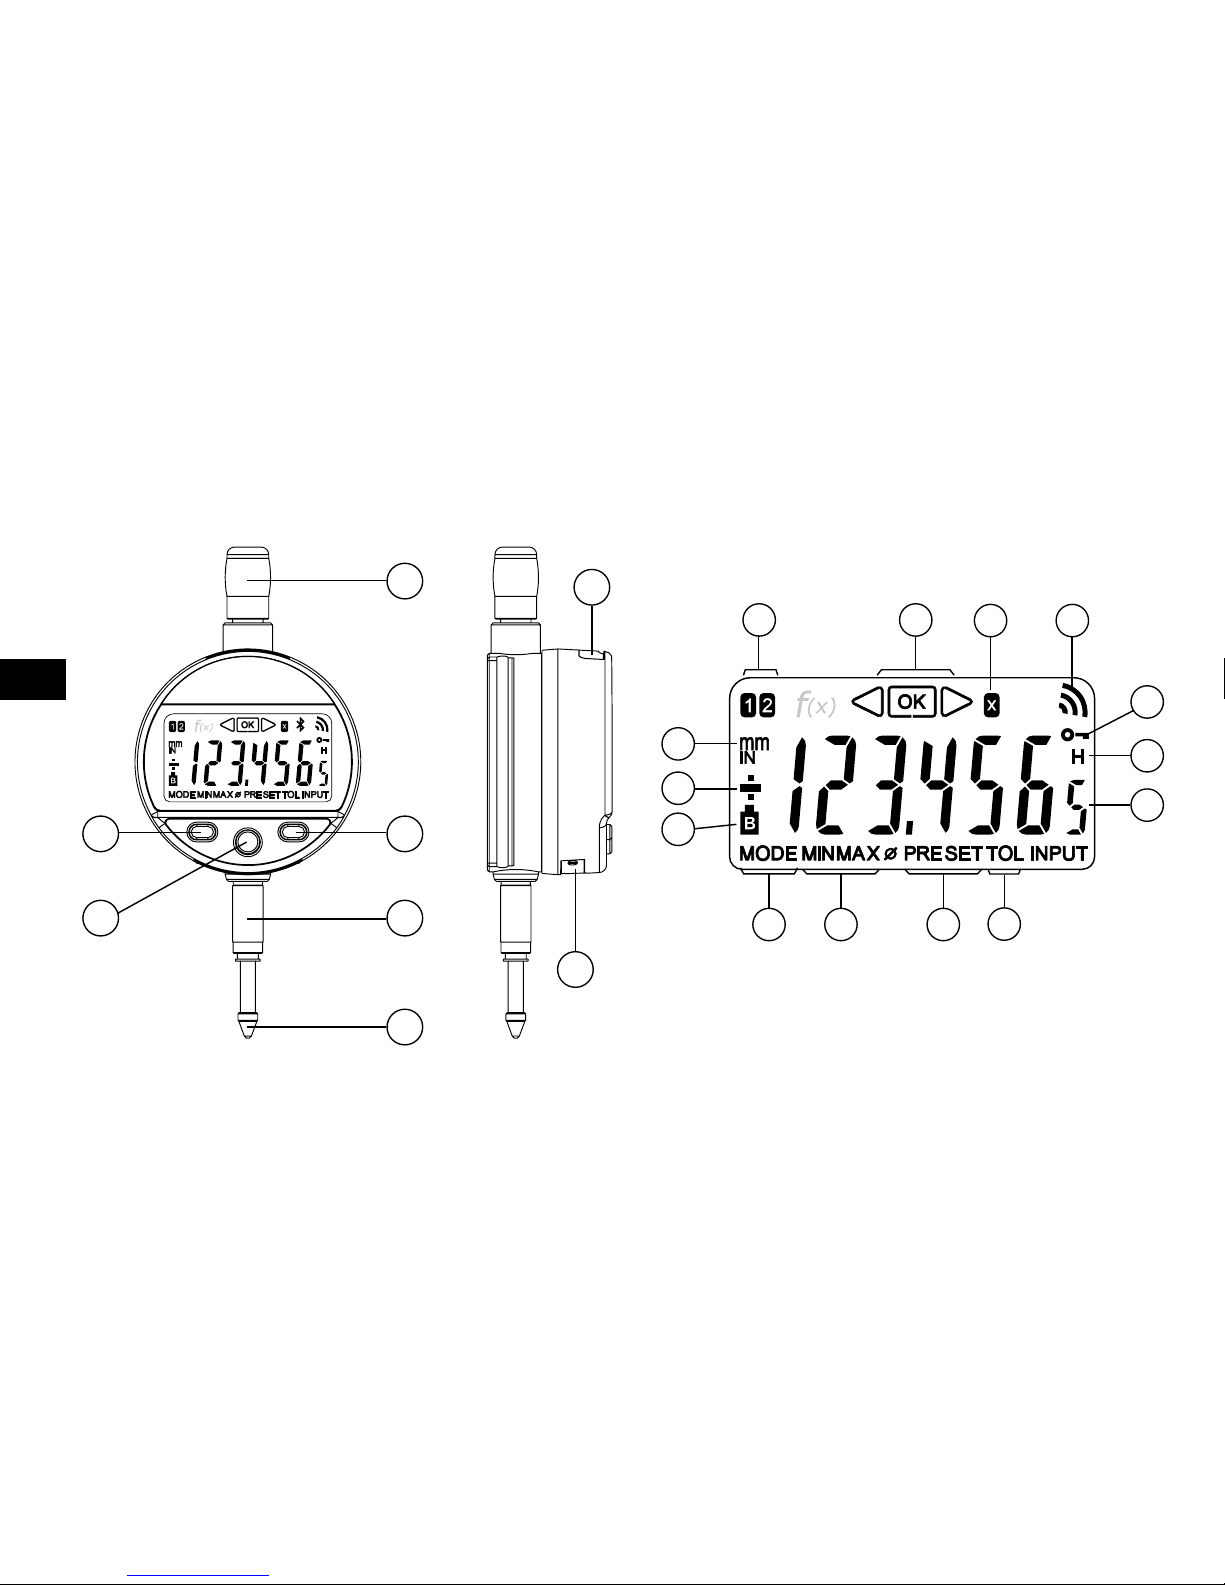
Description
1. MODE button
2. SET button
3. “ Favourite ” button
4. Clamping shaft Ø8 or 3/8”
5. Lifting cap
6. Contact point Ø2 / M2.5 or 4-48-UNF
7. Slot for Proximity cable
8. Slot for battery or Power Cable
9. Measurement units (mm / INCH)
10. + / - Indicator
11. Low battery
12. Mode menu display
13. MIN/MAX/DELTA mode
14. Preset mode
15. Tolerance mode
16. 6-digit display
17. Hold measured value
18. Button lock
19. Send data
20. Multiplication factor
21. Tolerance indicators
22. Active reference

SET
MODE
6
E
1 . Operating features of the instrument
- The instrument has two operating modes: basic functions (direct access) and advanced functions. In addition
to the conguration functions, 2 working reference functions can be accessed, in MIN, MAX and DELTA (TIR)
mode, plus tolerance dispay or input of multiplication factor other than 1:1 (see chaps. 3 and 4)
- The «favourite» key gives direct access to the function used most often (see chap. 6)
- Sets a Preset value, reset the MIN/MAX mode, veries a selection, and controls switching off the instrument.
By default, SIS mode enables automatic switch-off with no loss of origin (see chap. 7)
- Personalising the functions
It is possible to activate or de-activate certain functions of the instrument via RS232 (see chap. 9)
- Data transmission parameters
4800Bds, 7 bits, even parity, 2 stop bits
2. Start
Press a button.

MODE
MODE
SET
MODE
SET
MODE
SET
MODE
MODE
7
E
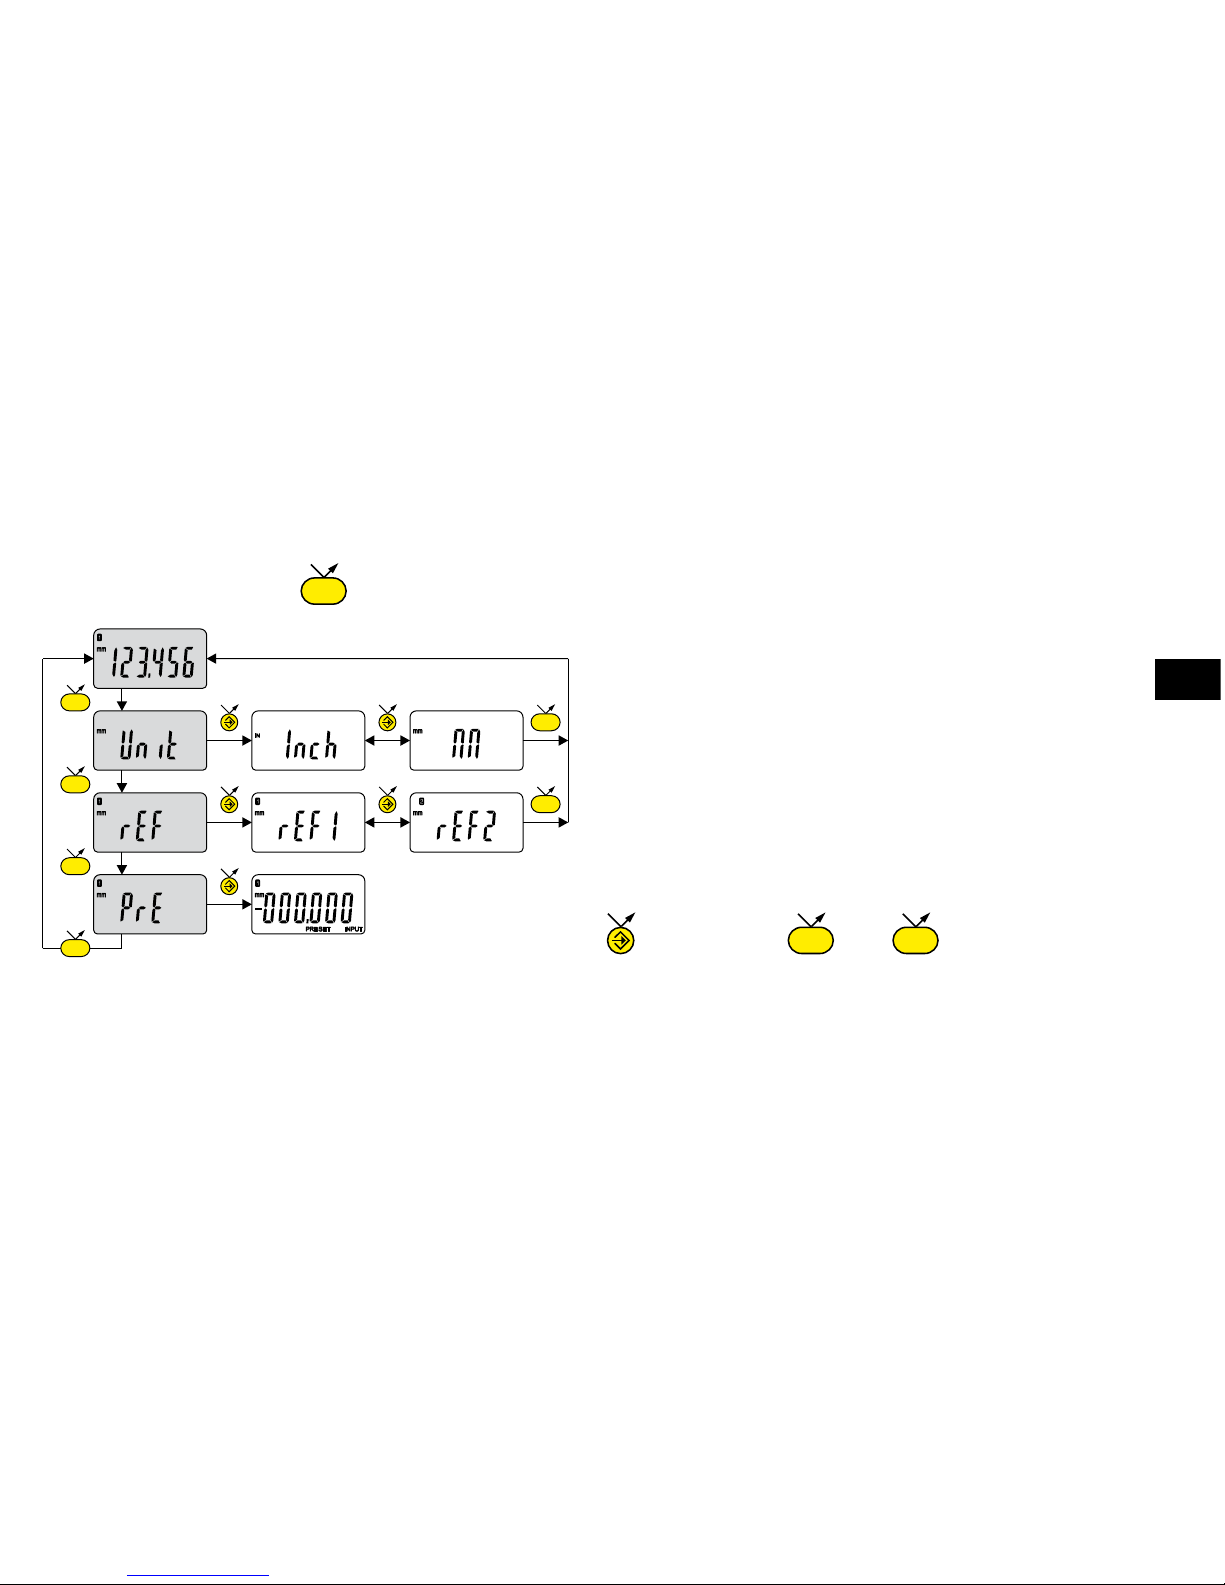
3. Basic functions
Each short press on gives direct access to the basic functions :
Note : It is possible to assign a different preset value to each of the 2 References. Similarly, different tolerance limits can
be assigned to References 1 and 2.
.......Units selection (mm or Inch)
.......Choice of reference (REF1 ou REF2)
.......Inputting a Preset value
next digit 0...9 save PRESET
MODE
MODE
MODE
SET
MODE
SET
MODE
SET
MODE
SET
MODE
8
E
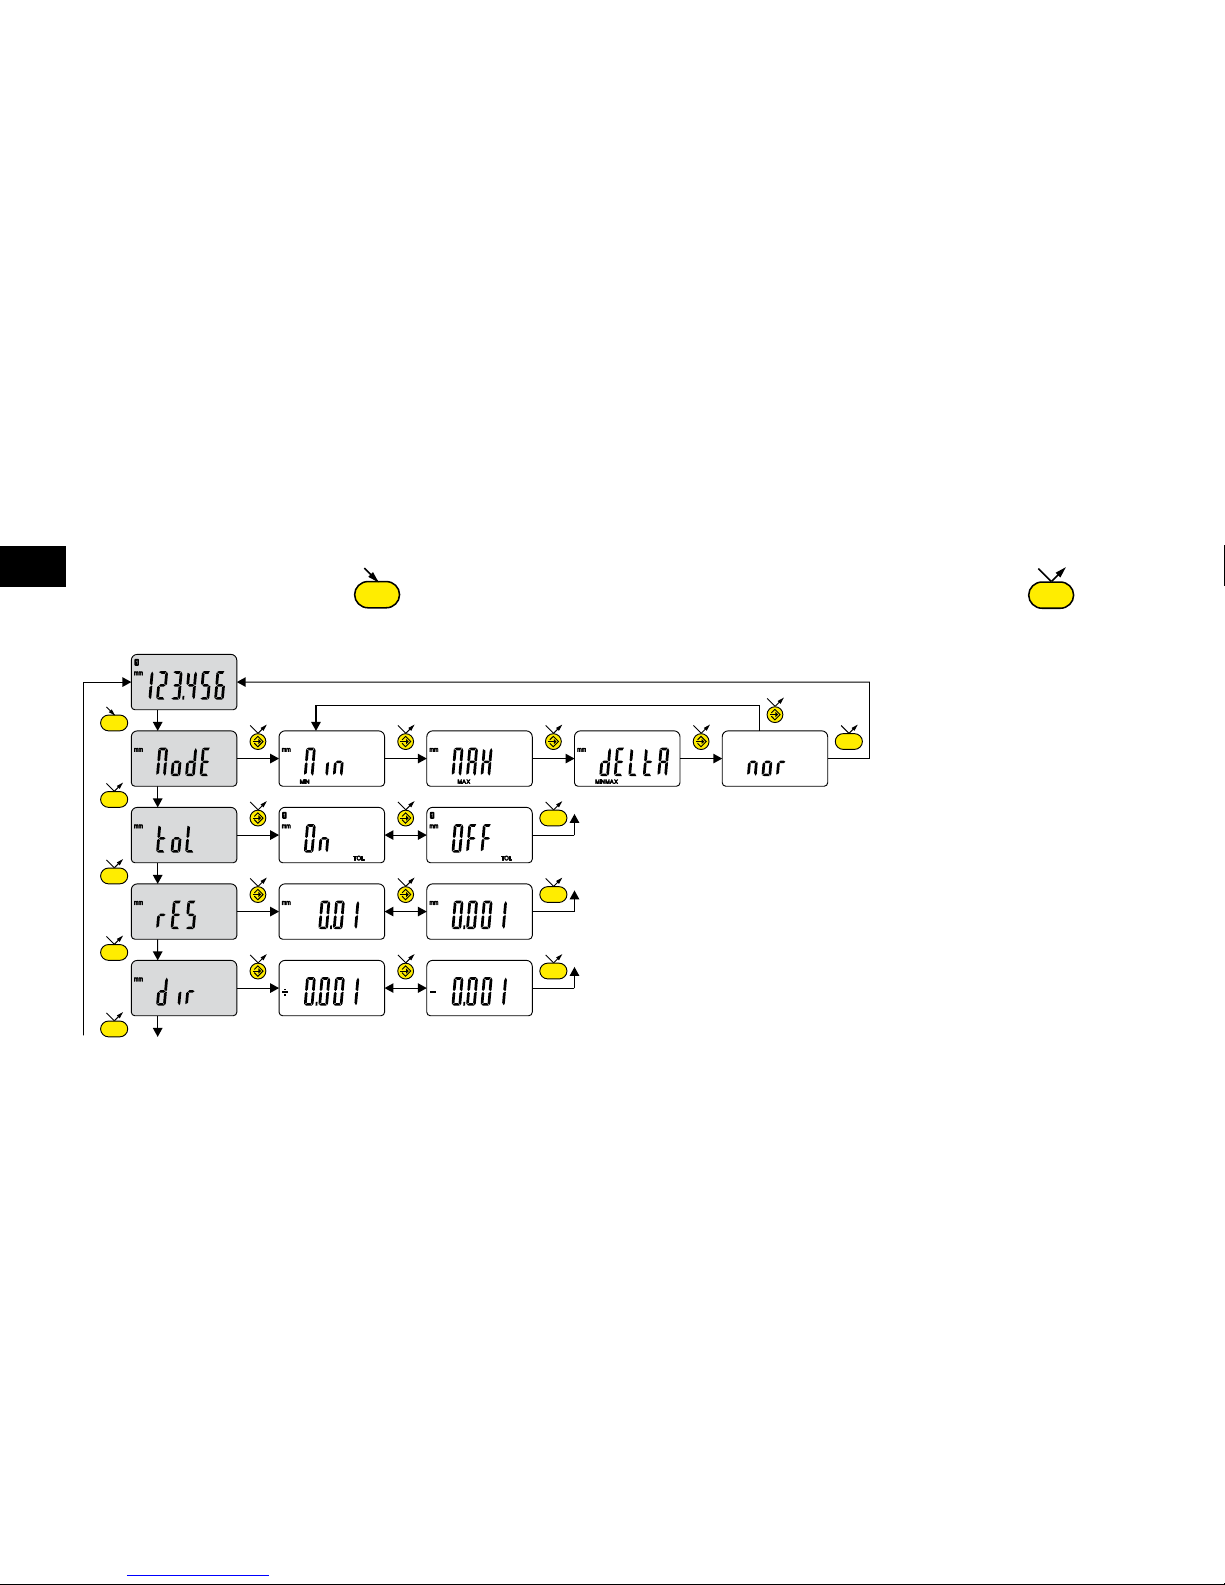
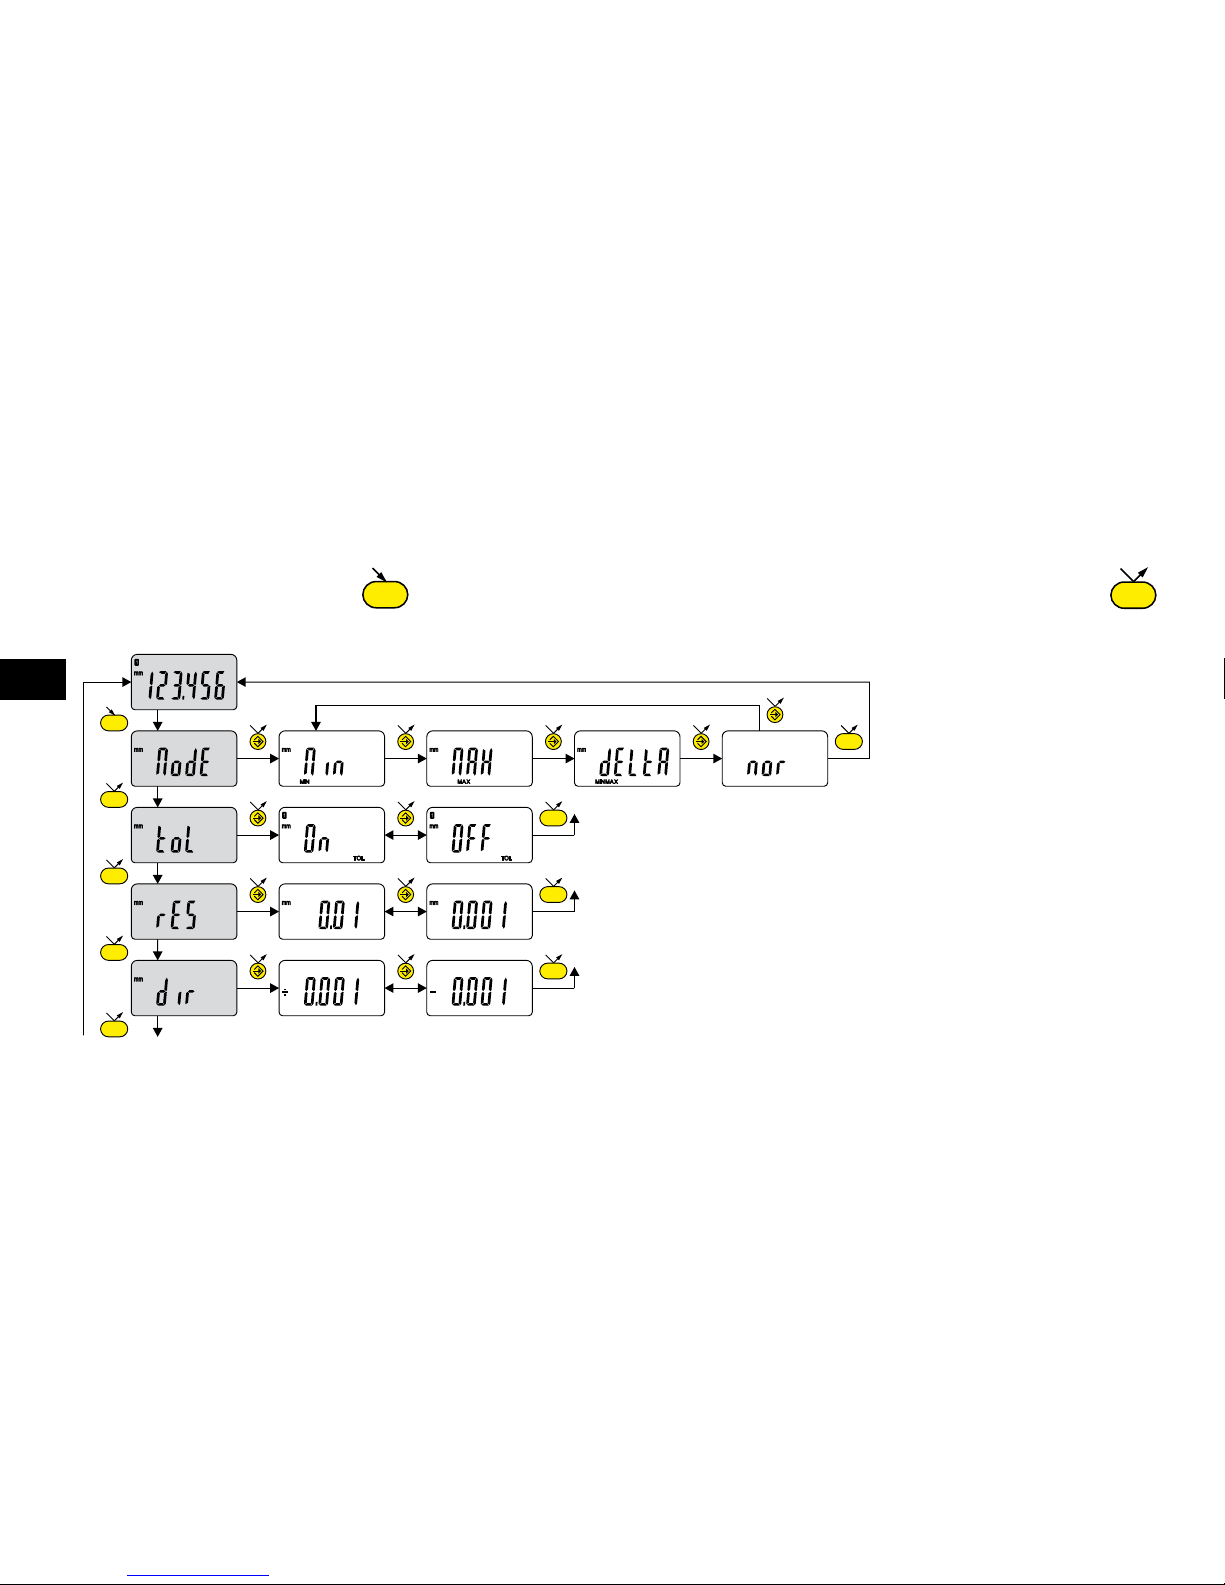
4. Advanced functions
Prolonged pressure (>2s) on gives access to the advanced functions. Then, each short press on accesses
the required function :
MIN, MAX measurement,
DELTA (TIR)
.................Tolerance display
(inputting tolerance limits, see chap. 5)
.................Choice of resolution
(depending on version)
.................Choice of measurement direction
(positive or negative sense)
SET
MODE
SET
OK
MODE
SET
MODE
SET
MODE
SET
MODE
9
E
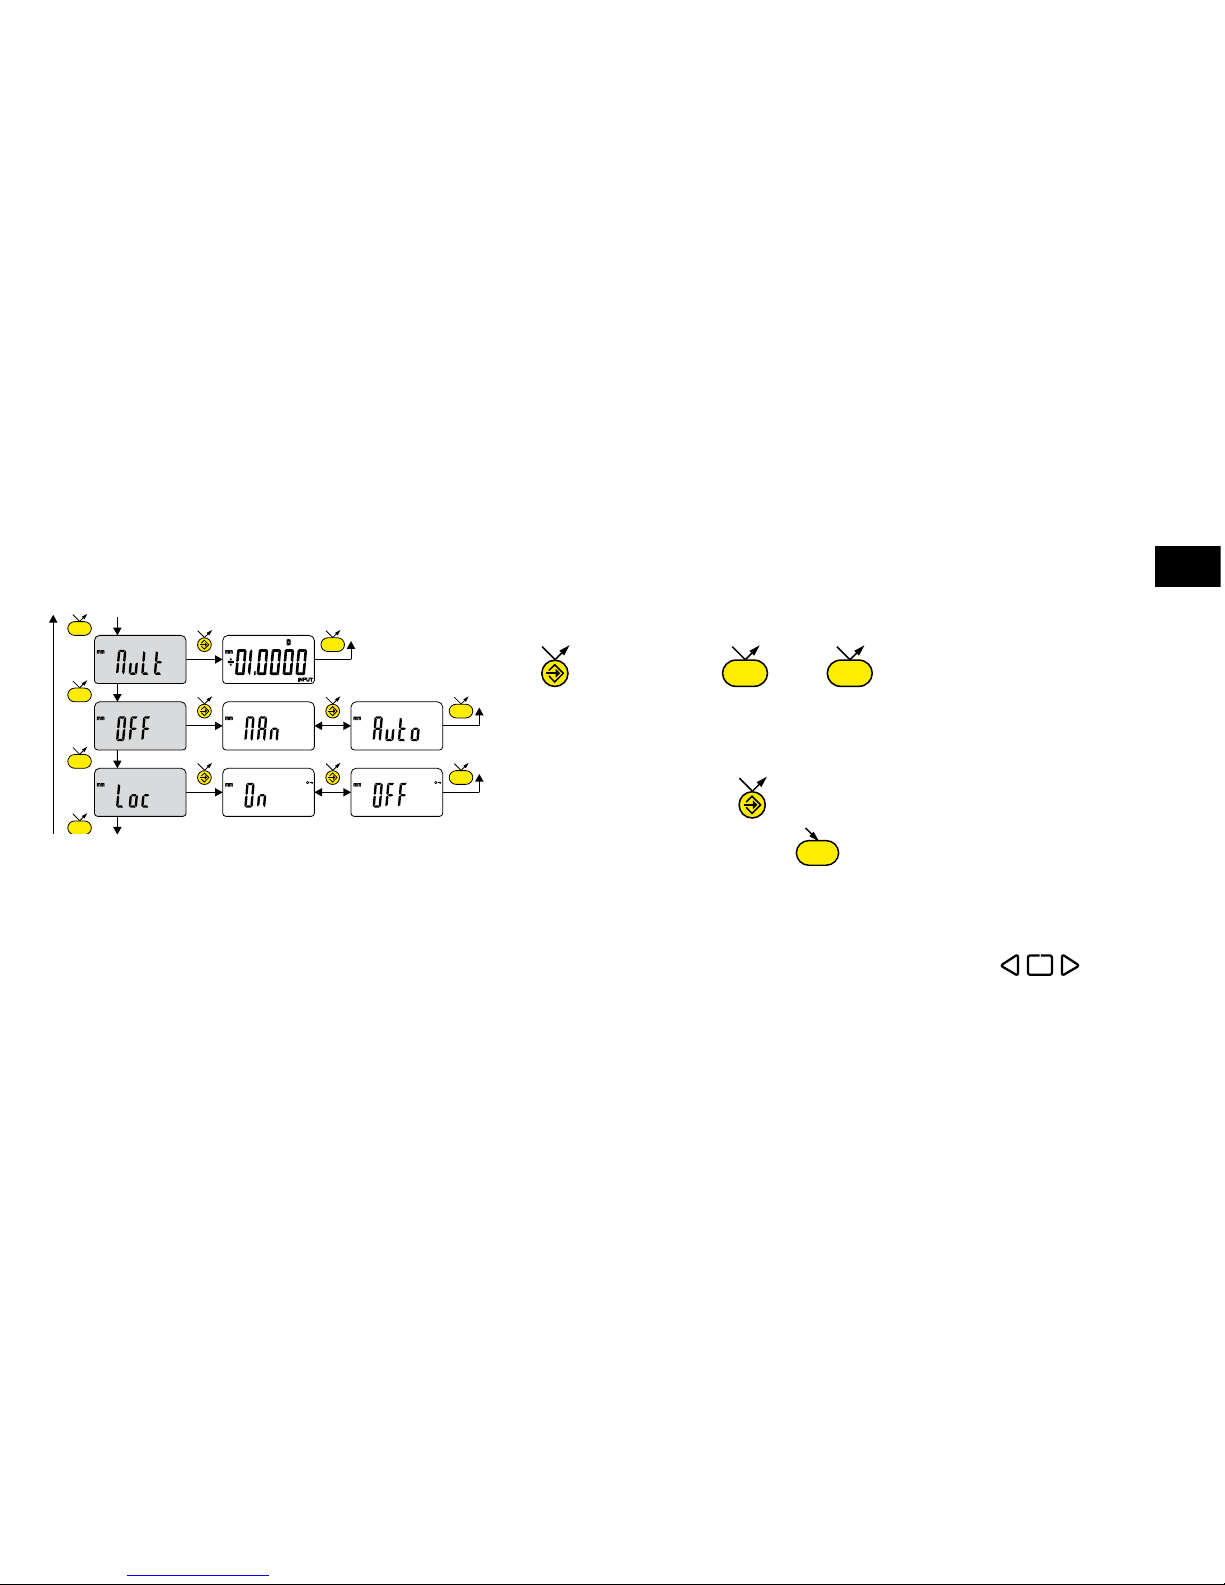
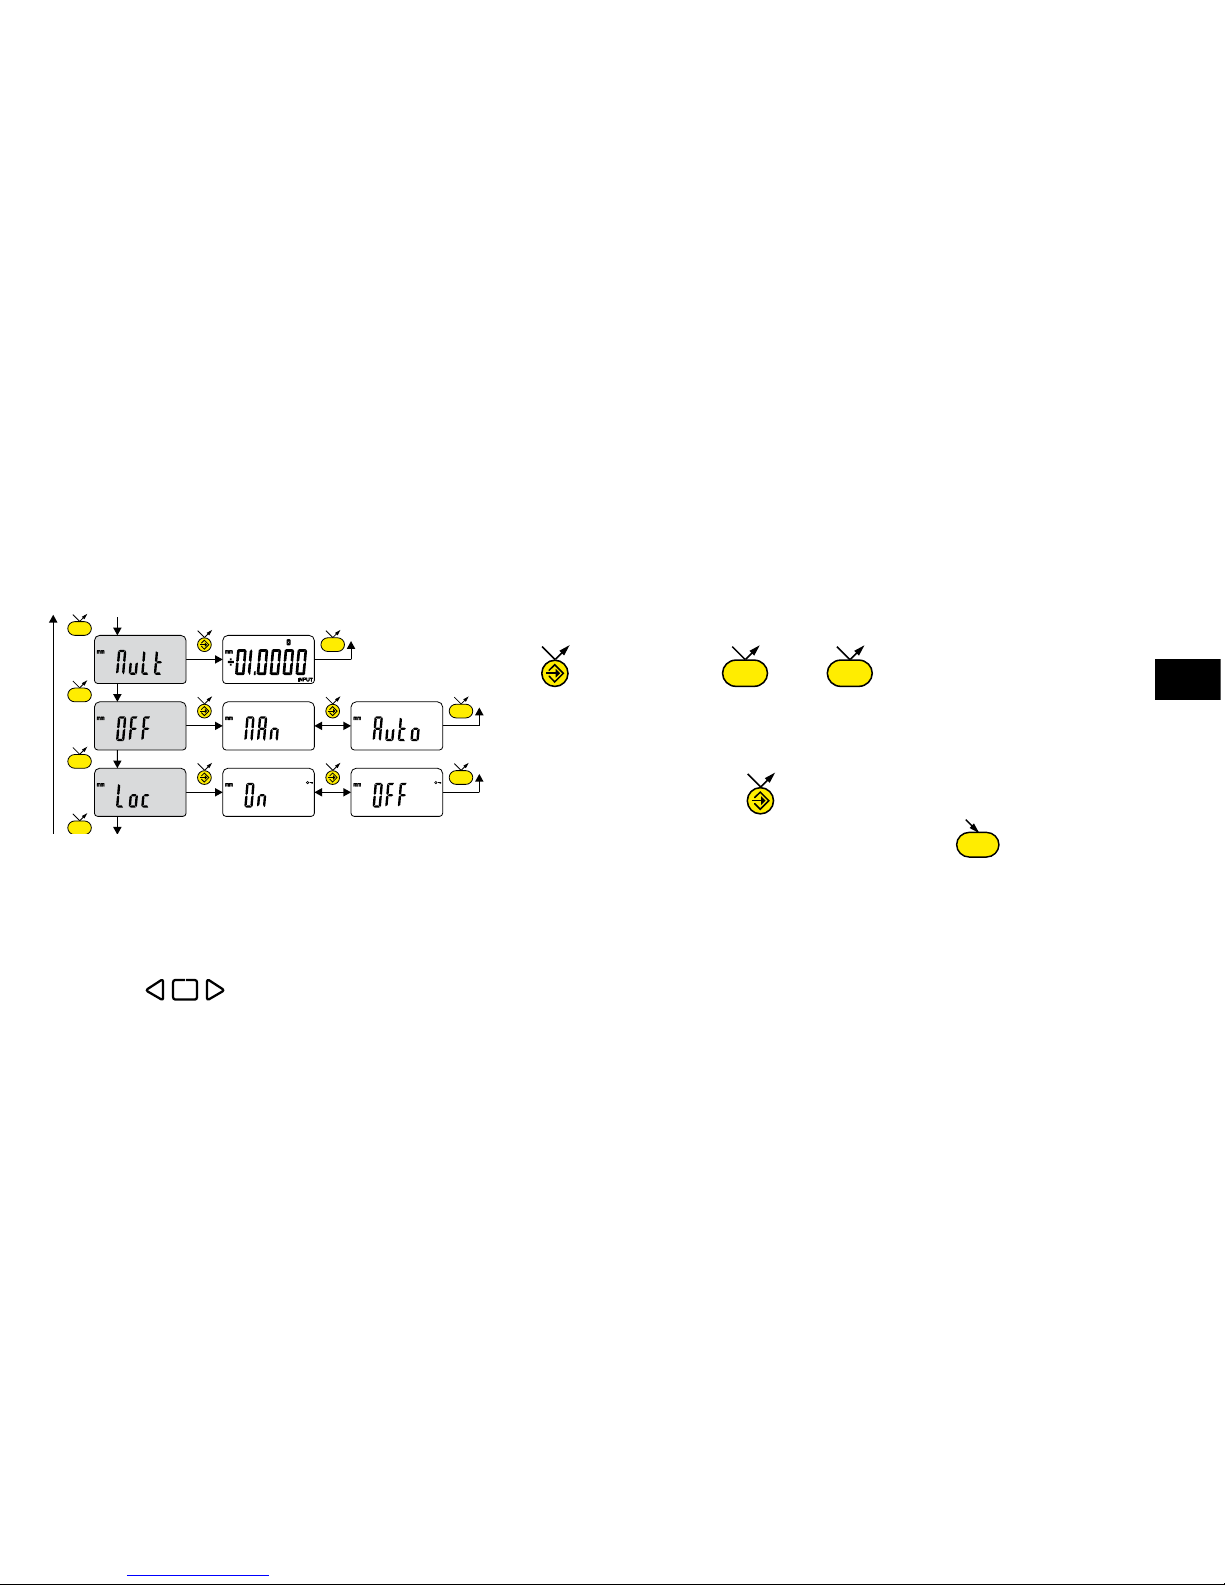
........ continuation
Note :
It is also possible to display the tolerance limits when the instrument is operating in MIN, MAX or DELTA (TIR) mode.
- If no tolerance limit has been dened by the user, the instrument will display the tolerance limit indicators , but
will not turn on the indicator lights (red - green - yellow)
.......Inputting a multiplication factor other than 1.0000
Next digit 0...9 save Preset
.......Automatic switch-off mode
MAn = de-activated, Auto = active (after 20 min.)
.......Keypad lock
Only the favourite key remains active
(to unlock the keypad, press for 5 sec)
MODE
MODE
SET
10
E
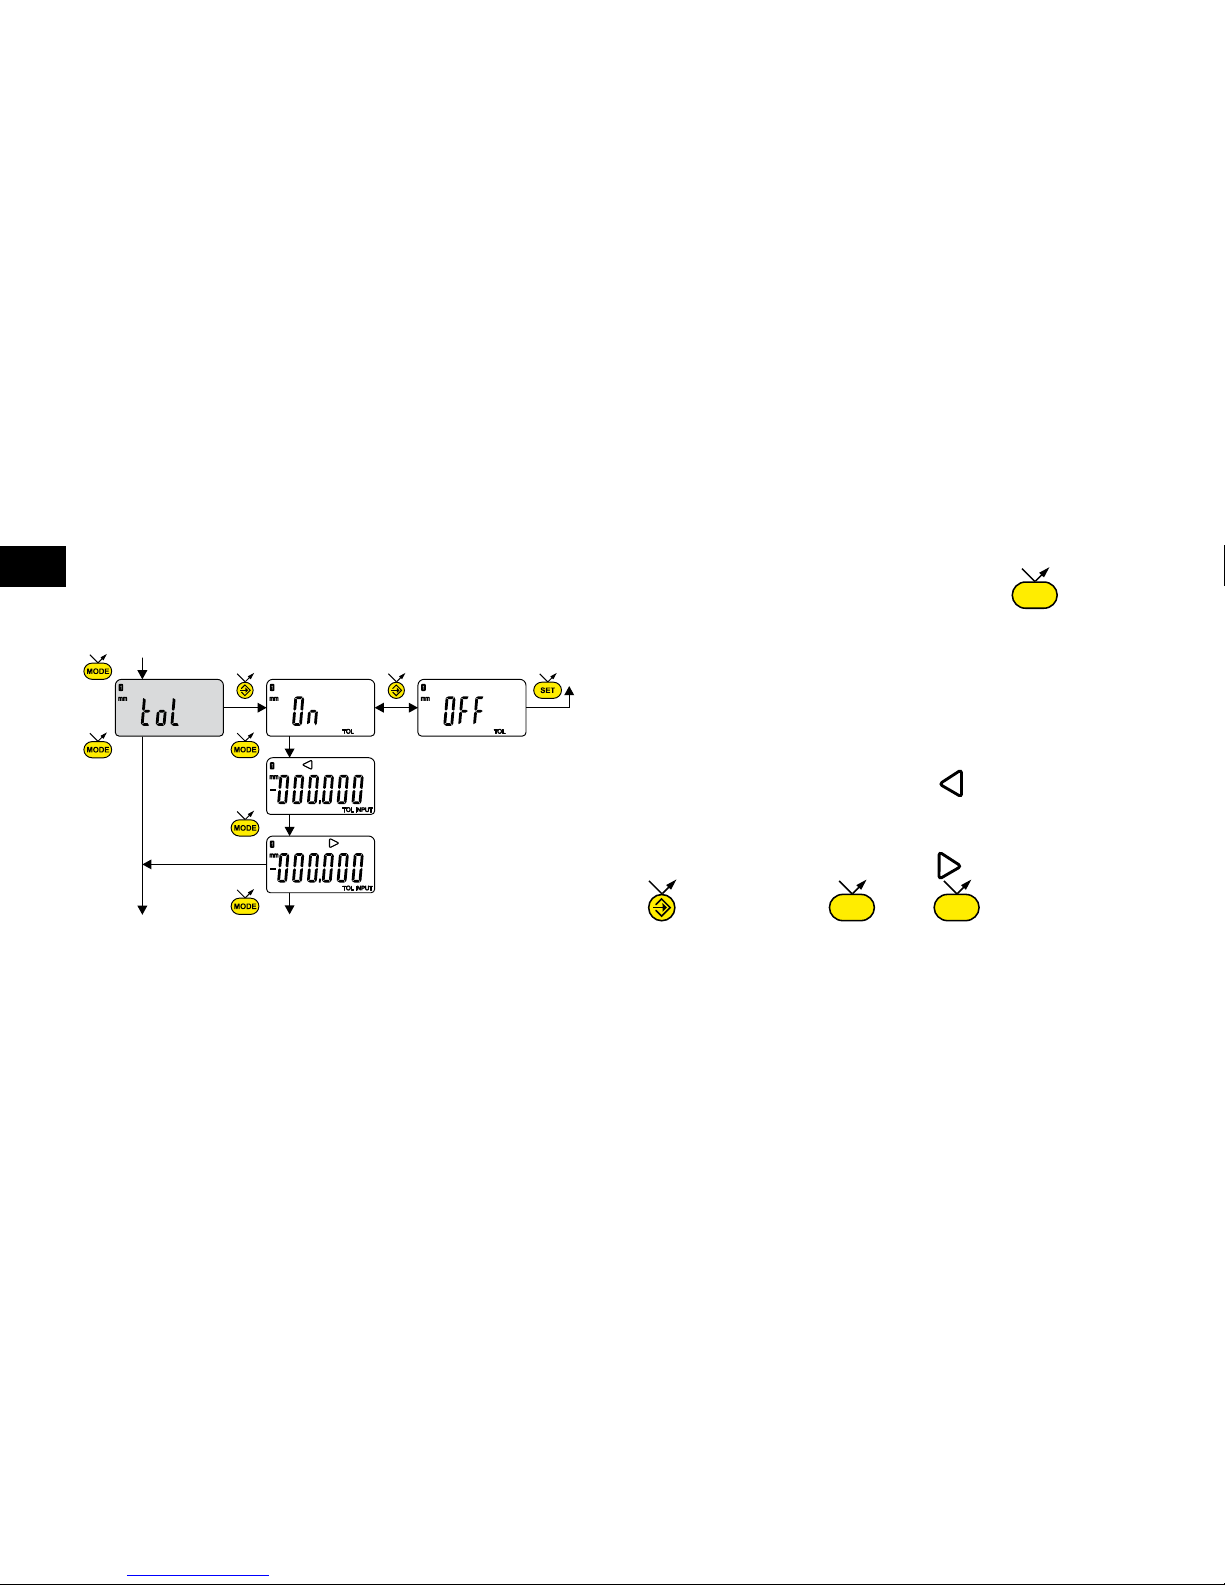
.......Input the lower tolerance limit
.......Input the upper tolerance limit
next digit 0...9 save PRESET
5. Inputting tolerance limits
To input or modify the tolerance limits, tol → On mode should be selected, followed by a short press on :
Note :
- For measuring internal dimensions, the red and yellow indicators can be switched over by reversing the order in which
the tolerance limits are input (lower limit > upper limit).
- It is possible to input different tolerances on REF1 and REF2.
MODE
SET
11
E
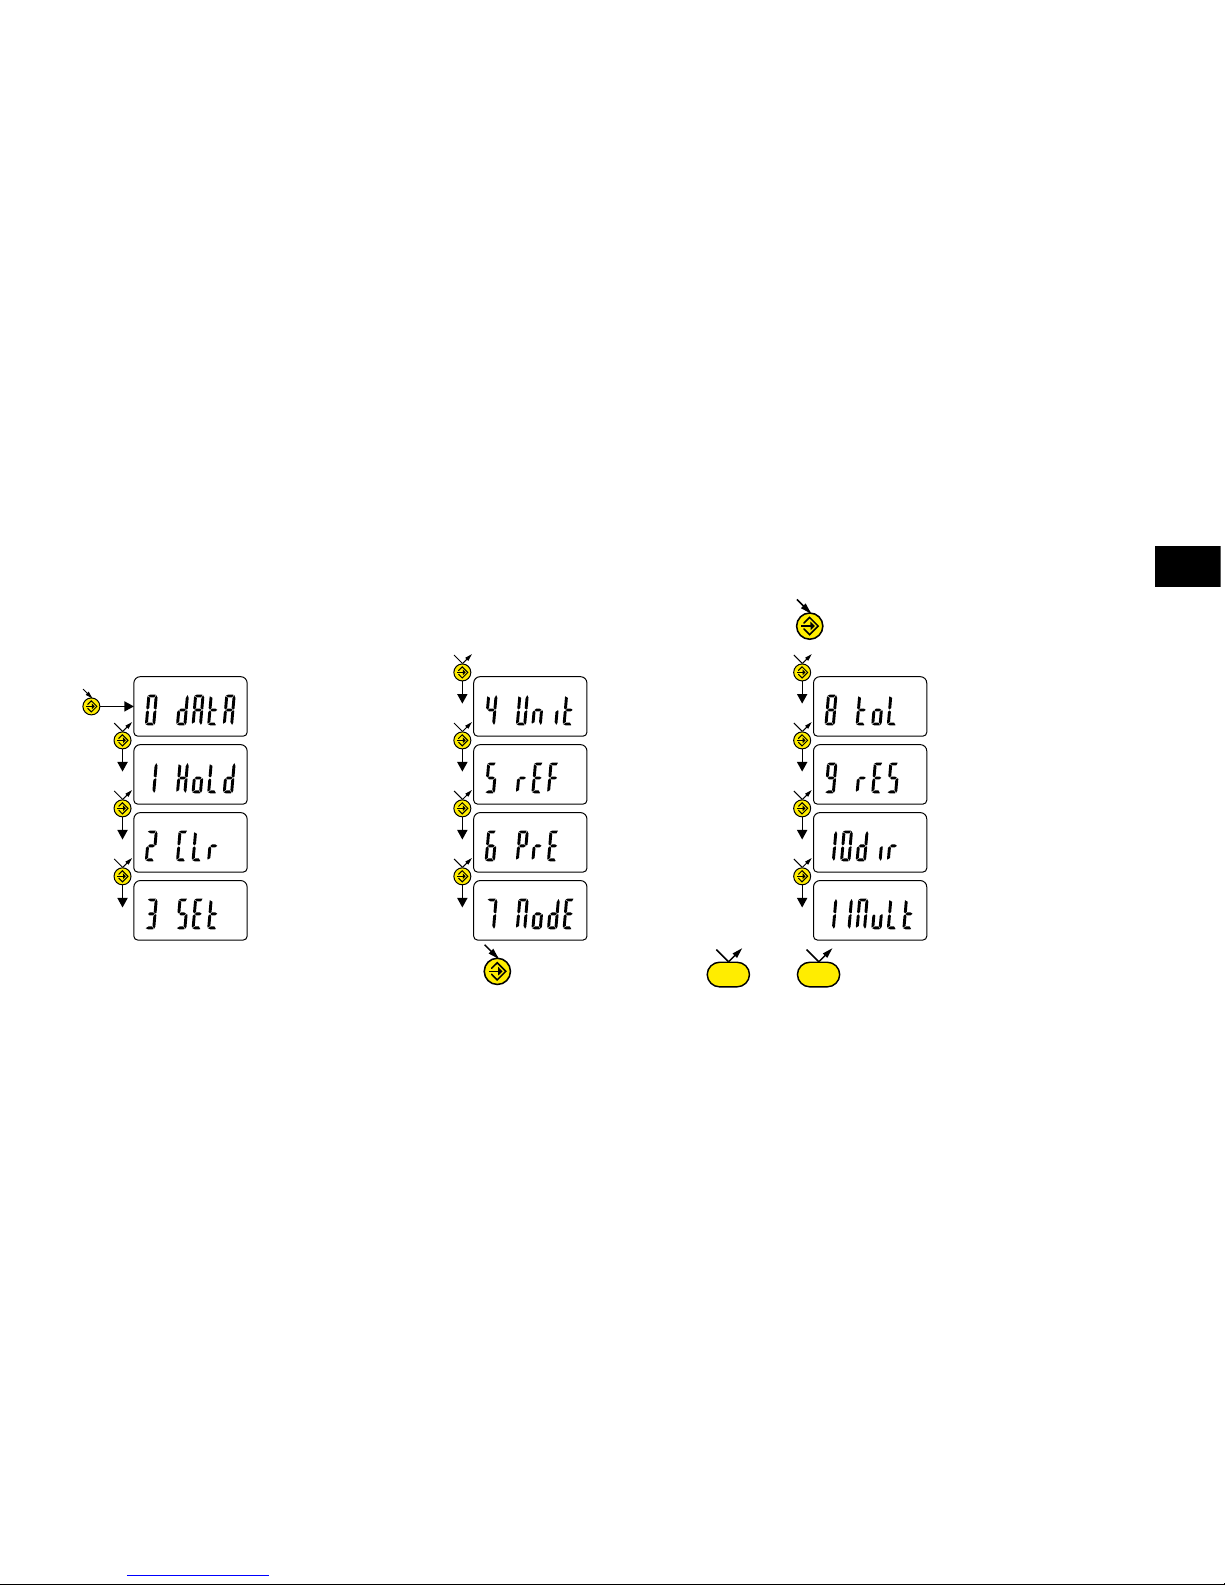
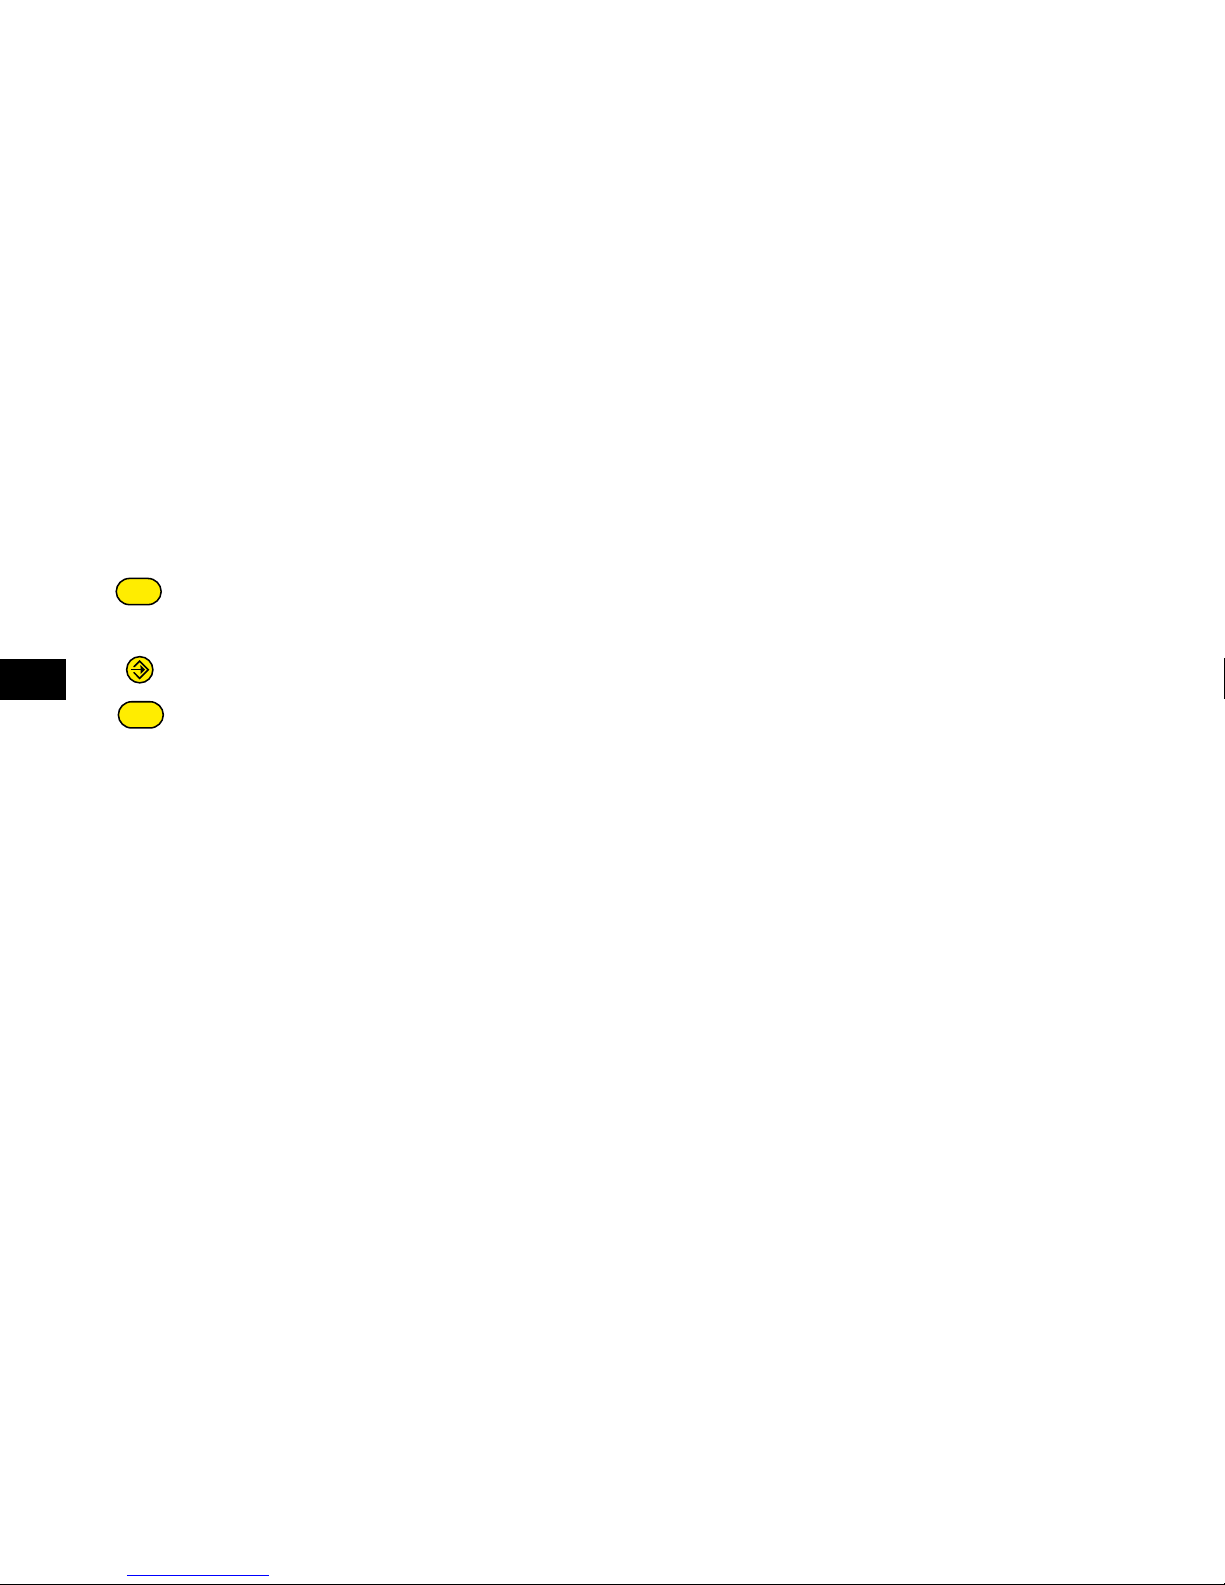
6. Favourite key
The «favourite» key gives direct access to a predened function, and can be congured according to the needs of the
user. In order to assign a function to the «favourite» key, give a prolonged press on , and then select the required
function :
Validation of selection: By a prolonged press on or a short press on or
Note : a function can also be assigned via RS232 using the command <FCT + Function No.>
example : Change of Unit = <FCT4>
Data transmission
(default)
Hold display
Re-initialise MinMax-Delta
Zero reset
mm – IN
REF1 - REF2
Recall Preset
Nor-Min-Max-Delta
Tol ON - Tol OFF
0.01 – 0.001
Measurement
sense, positive -
negative
1:1 - N:1 factor
SET
SET
SET
MODE
>2s
SET
>4s
SET
12
E
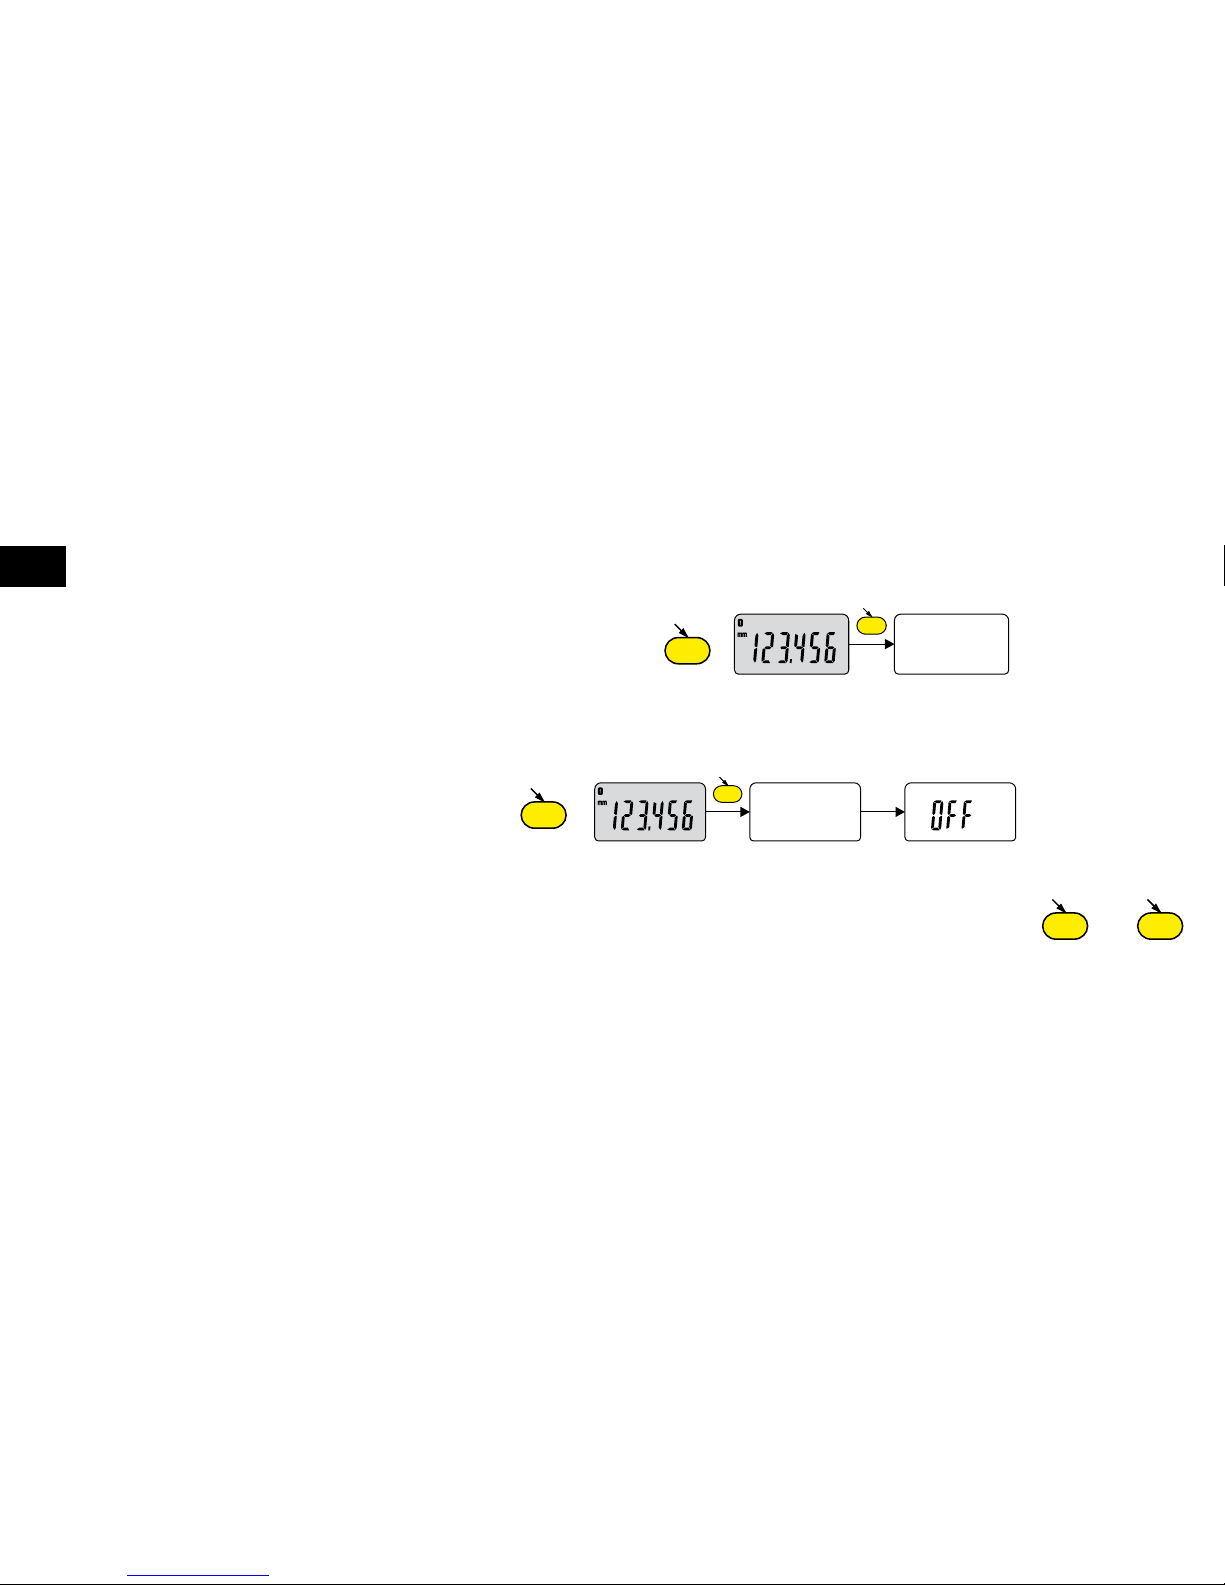
7. Switching off
The dial gauge goes automatically into stand-by if not used for 20 minutes, unless Auto OFF mode has been turned off
(see Chap. 4, advanced functions)
Stand-by mode can be forced by a prolonged press (> 2 sec) on :
In stand-by mode, the value of the origin is retained by the sensor (SIS mode), and the instrument automatically restarts
with any movement of the measurement probe, RS command or press a button.
The instrument can be switched off completely for a long period of non-use, but this will necessitate a zero reset on restart
(the origin will be lost) :
- Prolonged press (>4 sec) on :
8. Re-initialising the instrument
The initial instrument settings can be restored at any time by a prolonged press (>4 sec) simultaneously on and
until the message rESEt is displayed.
Nevertheless the instrument retains its conguration settings (units and resolution), as well as the last active reference.

13
E
9. Personalising the instrument
Access to the functions of your instrument can be personalised, for more information see manufacturer’s website (requires
you to connect your instrument via a Proximity or Power RS / USB cable).
Possibilities :
- De-activate or active the required functions
- Modify access to the advanced functions (direct access)
10. Connecting the instrument
The instrument can be connected to a peripheral via a Proximity (RS or USB), Power (RS or USB). See page 2 for
connecting the Power cable.
Measured values can be transmitted and the instrument driven using predened commands (see chap. 11 for a list of the
main retro-commands)
Note :
In Tolerance mode, the tolerance limit lights remain lit only for a few seconds while the measurement stabilises. On the
other hand, they will remain lit continuously if the instrument is connected to, and powered by, the Power RS (USB) cable.

14
E
11. List of the main commands
Selection and conguration Interrogation
CHA+ / CHA- Change measurement direction CHA? Measurement sense?
FCT0 ...9...A...F Assign «favourite» function FCT? «favourite» function active?
MM / IN Change measurement unit UNI? Measurement unit active?
KEY0 / KEY1 Lock / unlock keypad KEY? Keypad locked?
MUL [+/-]xxx.xxxx Modify multiplication factor MUL? Multiplication factor?
PRE [+/-]xxx.xxx Modify preset value PRE? Preset value?
REF1 / REF2 Change active reference REF? Reference active?
STO1 / STO0 Activate / de-activate HOLD STO? Status of HOLD function?
TOL1 / TOL0 Activate / de-activate tolerances TOL? Current tolerance limit values?
LCAL dd.mm.yy Modify last calibration date LCAL? Date of last calibration?
NCAL dd.mm.yy Modify next calibration date NCAL? Date of next calibration?
TOL +/-xxx.xxx +/-yyy.yyy Inputting nominal and current tolerance limits ? Current value (mode Tol, value followed by <=>)
+/-zzz.zzz
MIN /MAX /DEL /NOR Selecting MIN, MAX, Delta, Normal mode MOD? Active mode (MIN, MAX, Delta or Normal)?
CLE Re-initialisation of MIN, MAX or Delta SET? Main instrument parameters?
UNI1 / UNI0 Activate / de-activate change of units ID? Instrument identication code?
OUT1 /OUT0 Activate / de-activate contin. data transmission Maintenance functions
PRE ON / PRE OFF Activate / de-activate Preset function BAT? Battery status (BAT1 = OK, BAT0 = low battery)
PRE Recall Preset OFF Switch-off (wake up using a button or RS)
SET Zero reset RST Re-initialisation of the instrument
RES2 / RES3 Change of resolution SBY Put instrument in stand-by (SIS)
VER? Version No. and date of rmware
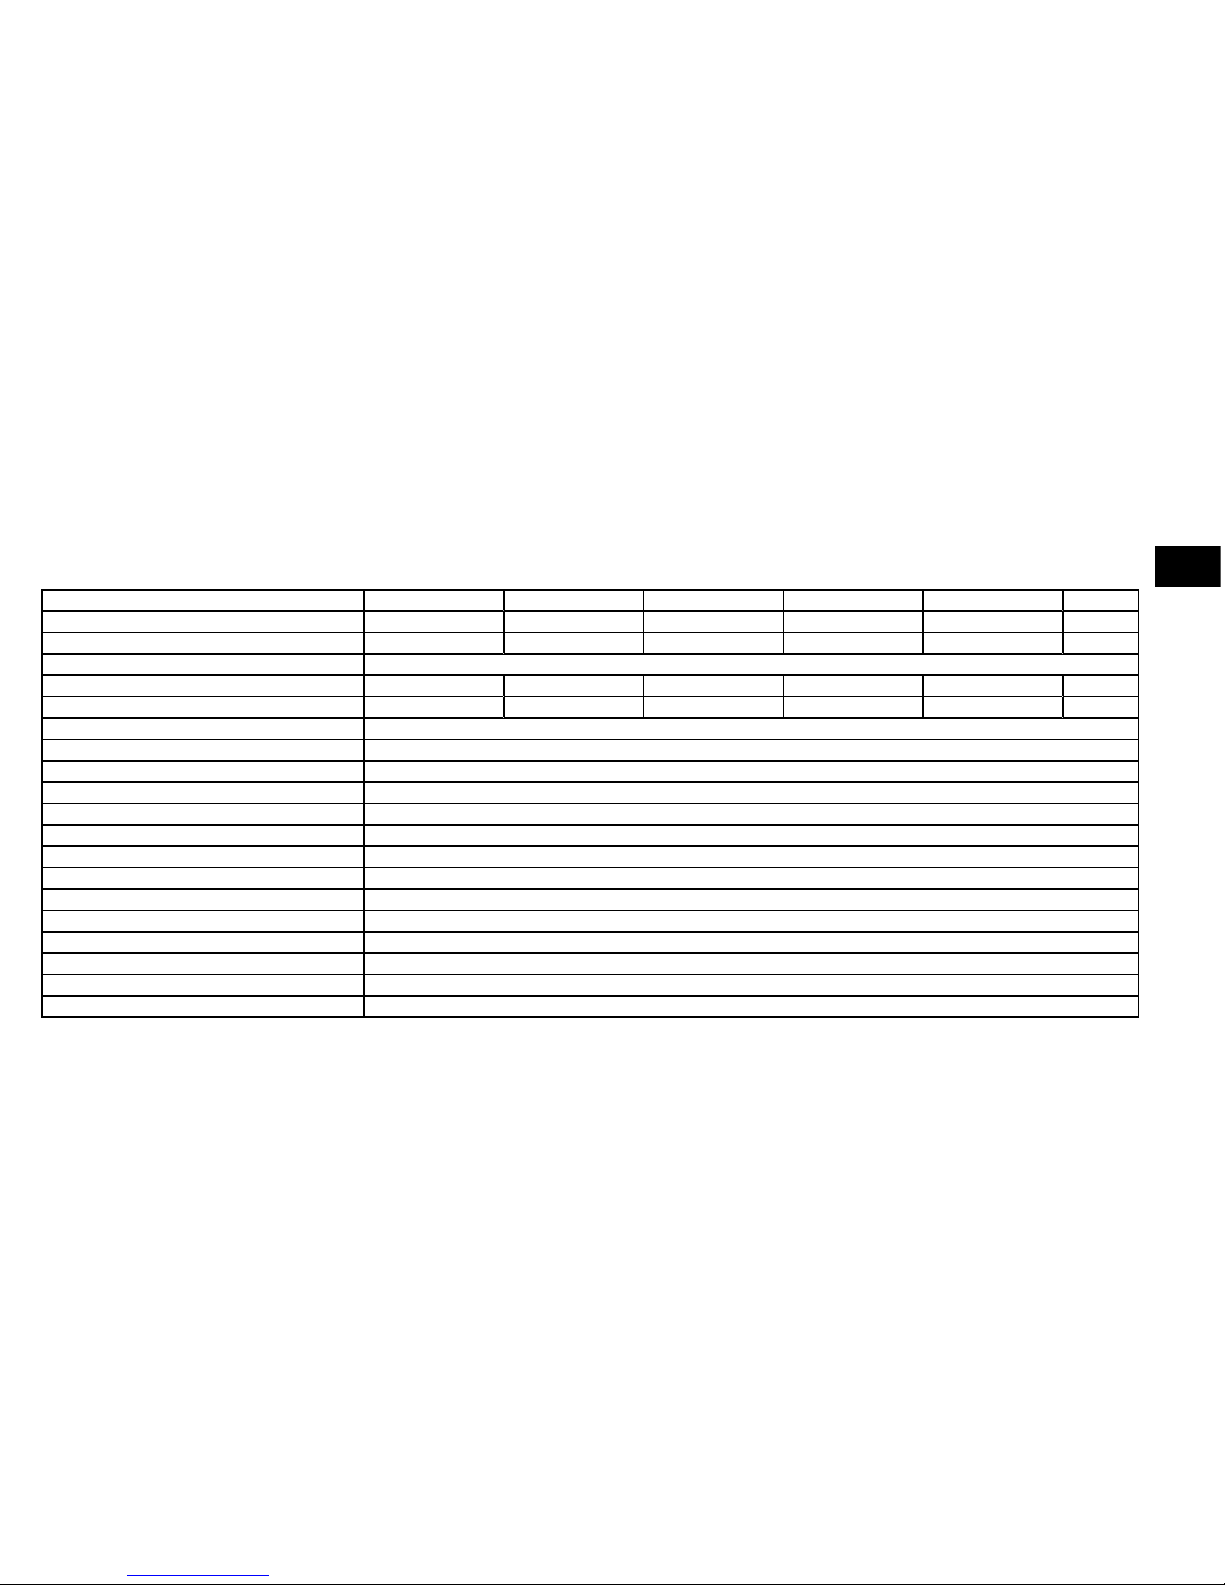
12. Specications
Measurement range : 12.5mm 25mm 50mm 100mm 150mm
Max error (0.01mm scale) : 10µm 10µm 20µm 20µm 20µm (±1 digit)
Max error (0.001mm scale) : 3µm 4µm 5µm 6µm 10µm
Repeatability : 2µm
Weight : 119g 123g 161g 208g 265g
Measurement force (standard) : 0.65-0.9N 0.65-1.15N 1.25-2.7N 1.6-3.5N 2.2-5.7N
Max. speed of travel : 1.7m/s
No. of measurements/ sec : measurement : 10 mes/s MIN/MAX mode : 20 mes/s
Measurement unit : metric/english (Inch)
Maximum Preset (0.01mm scale) : ±9999.99 mm / ±399.9995 IN
Maximum Preset (0.001mm scale) : ±999.999 mm / ±39.99995 IN
Measurement system : Sylvac inductive system (patented)
Power : 1 x 3V lithium battery, type CR2032, 220mAh
Average consumption : 75µA
Average battery life : 8’000 hours
Data output : RS232 compatible
Working temperature (storage) : +5 to +40°C (-10 to +60°C)
Electromagnetic compatibility : as per EN 61326-1
IP rating (in accordance with IEC60529) : IP 51 / IP 67 (depending on model)
Fixing and space envelope : Ø8h6 (3/8’’), interchangable M2.5 (4-48-UNF) probe (as per DIN 878)
15
E
9
14
18
20
10
17
13
12
1
5
2
4
7
8
16
19
3
6
22
15
11
21
16
F

17
F
Description
1. Bouton MODE
2. Bouton SET
3. Bouton “ Favoris ”
4. Canon de xation Ø8 ou 3/8”
5. Bonnette de relevage
6. Touche à bille Ø2 / M2.5 ou 4-48-UNF
7. Logement pour câble Proximity
8. Logement batterie ou câble Power
9. Unité de mesure (mm / INCH)
10. Indicateur + / -
11. Batterie faible
12. Indication du menu MODE
13. Mode MIN/MAX/DELTA
14. Mode Preset
15. Mode tolérance actif
16. Afchage 6 digits
17. Gel de la valeur de mesure
18. Verrouillage des boutons
19. Envoi de données
20. Facteur de multiplication
21. Indicateur des tolérances
22. Indicateur de la référence active
SET
MODE
18
F
1. Les fonctionnalités de l’instrument
- L’instrument possède 2 modes de travail : fonctions de base (avec accès direct) et fonctions avancées.
En plus des fonctions de conguration, vous pouvez accéder à 2 référence de travail, au mode MIN, MAX et
DELTA (TIR), à l’afchage des tolérances, ou à l’introduction d’un facteur de multiplication (voir chap. 3 et 4)
- Le bouton «favori» permet d’attribuer un accès direct à la fonction principalement utilisée (voir chap. 6)
- Le bouton «SET» permet d’attribuer une valeur de Preset, de réinitialiser le mode MIN/MAX, de quittancer une
sélection, et de gérer l’extinction de l’instrument. Par défaut, le mode SIS permet l’extinction automatique sans
perte de l’origine (voir chap. 7).
- Personnalisation des fonctions
Vous avez la possibilité d’activer ou désactiver certaines fonctions de l’instrument par RS232 (voir chap. 9)
- Paramètres de transmission de données
4800Bds, 7 bits, parité paire, 2 stop bits
2. Démarrer
Presser un bouton.
MODE
MODE
SET
MODE
SET
MODE
SET
MODE
MODE
19
F
.......Sélection de l’unité (mm ou Inch)
.......Choix de la référence (REF1 ou REF2)
.......Introduction d’une valeur de Preset
prochain digit 0...9 sauve le PRESET
3. Fonctions de base
Chaque pression courte sur permet un accès direct aux fonctions de base :
Remarque : Il est possible d’attribuer une valeur de preset différente à chacune des 2 Références. De même, on peut
attribuer des limites de tolérances différentes sur les références 1 et 2.
MODE
MODE
MODE
SET
MODE
SET
MODE
SET
MODE
SET
MODE
20
F
4. Fonctions avancées
Une pression longue (>2s) sur permet d’accéder aux fonctions avancées. Puis, chaque pression courte sur
accède à la fonction souhaitée :
Mesure du MINIMUM,
MAXIMUM et DELTA (TIR)
.................Afchage des tolérances
(introduction des limites de tolérance, voir chap. 5)
.................Choix de la résolution
(dépendant de la version)
.................Choix de la direction de mesure
(sens positif ou négatif)
SET
MODE
SET
OK
MODE
SET
MODE
SET
MODE
SET
MODE
21
F
........ suite
.......Introduction d’un facteur de multiplication autre que 1.0000
Prochain digit 0...9 sauve le preset
.......Mode d’extinction automatique
MAn = désactivé, Auto = actif (après 20 min.)
.......Blocage du clavier
Seule la touche favori reste active
(pour désactiver le blocage du clavier, presser pendant 5 s.)
Remarque :
Il est également possible d’afcher les limites de tolérance lorsque l’instrument travaille en mode MIN, MAX ou DELTA (TIR)
- Si aucune limite de tolérance n’a été dénie par l’utilisateur, l’instrument afchera les indicateurs de limites de
tolérances , mais sans activer les indicateurs lumineux (rouge – vert - jaune)
 Loading...