

Page 1

App Instruction Manual
Built-in Wi-Fi switch
Item no. 1911206
www.conradconnect.de
1911206_V1_0719_02_APPm_VTP_en
Page 2

Content
Intended use
General information
Important Information
Conrad Connect
Up-to-date operating instructions
System requirements
Legal Notice
Mobile Application (App)
Installing the app
Conguring the app
Create an account
Logging in
Creating a family
Functions on the home page of the app
Conguration and operation
Adding a new device
Operating the built-in Wi-Fi switch
Further device settings
Creating a group
Creating a scene
Functions on the prole and settings page
of the app
Prole of the current user (C1)
Family management (C2)
Settings (C6)
Page 3

Intended use
The software application (hereinafter - “app”)
enables wireless operation of the built-in Wi-Fi
switch.
This guide serves to explain the app
installation, operation and handling.
All company and product names are
trademarks of their respective owners. All rights
reserved.
TM
Android
LLC.
is a registered trademark of Google
General information
Important Information
Pay special attention to information in an
orange frame.
The blue frame provides tips for use and
product features.
Page 4
Conrad Connect
www.conradconnect.de
The product is compatible with the
Conrad Connect IoT platform.
Product integration with Conrad Connect
requires a Conrad Connect account.
Create an account using the URL.
Up-to-date operating
instructions
To download the latest operating
instructions, visit
www.conrad.com/downloads or
scan the QR code on this page.
Follow the instructions on the
website.
Page 5

System requirements
• Smartphone/tablet with 2.4 GHz Wi-Fi (5 GHz
is not supported)
• Wi-Fi router or access point with 2.4 GHz
Wi-Fi (5 GHz is not supported)
TM
• Operating system: Android
Apple iOS 8.0 or higher
4.4 or higher;
Legal Notice
This is a publication by Conrad Electronic SE,
Klaus-Conrad-Str. 1, D-92240 Hirschau
(www.conrad.com).
All rights including translation reserved.
Reproduction by any method (e.g.
photocopying, microlming or capturing in
electronic data processing systems) requires
prior written approval from the publisher.
Reprinting, also in part, is prohibited. This
publication reects the technical status at the
time of printing.
© Copyright 2019 by Conrad Electronic SE.
Page 6
Mobile Application
(App)
These instructions refer to a smartphone. In
TM
this case, an Android
smartphone or tablet
or iPhone or iPad is always meant.
Installing the app
• Open the respective App Store
on your smartphone
. If you are
TM
using Android
Play”. If you're using an Apple
device, open Apple's "iTunes
Store".
• Search for the “Smart Life - Smart Living”
app (house icon with blue background) and
, open “Google
install it.
• Alternatively, scan the QR code
on this page. You will be directed
to the page of the appropriate
store. The QR-code works on
TM
Android
and iOS devices.
Refer to the system requirements specied in
the technical data section and the app store
description.
Please note that the following instructions may
change for future app versions.
Page 7
Conguring the app
• Open the previously installed “Smart Life -
Smart Living” app.
• If you have not yet created a free account,
tap the button indicated with an arrow in the
gure below.
If you have already created an account, skip
the chapter “Creating an account” and go to the
You continue with the chapter “Loggin in”.
Page 8
• Tap the right button to accept the privacy
policy.
Page 9
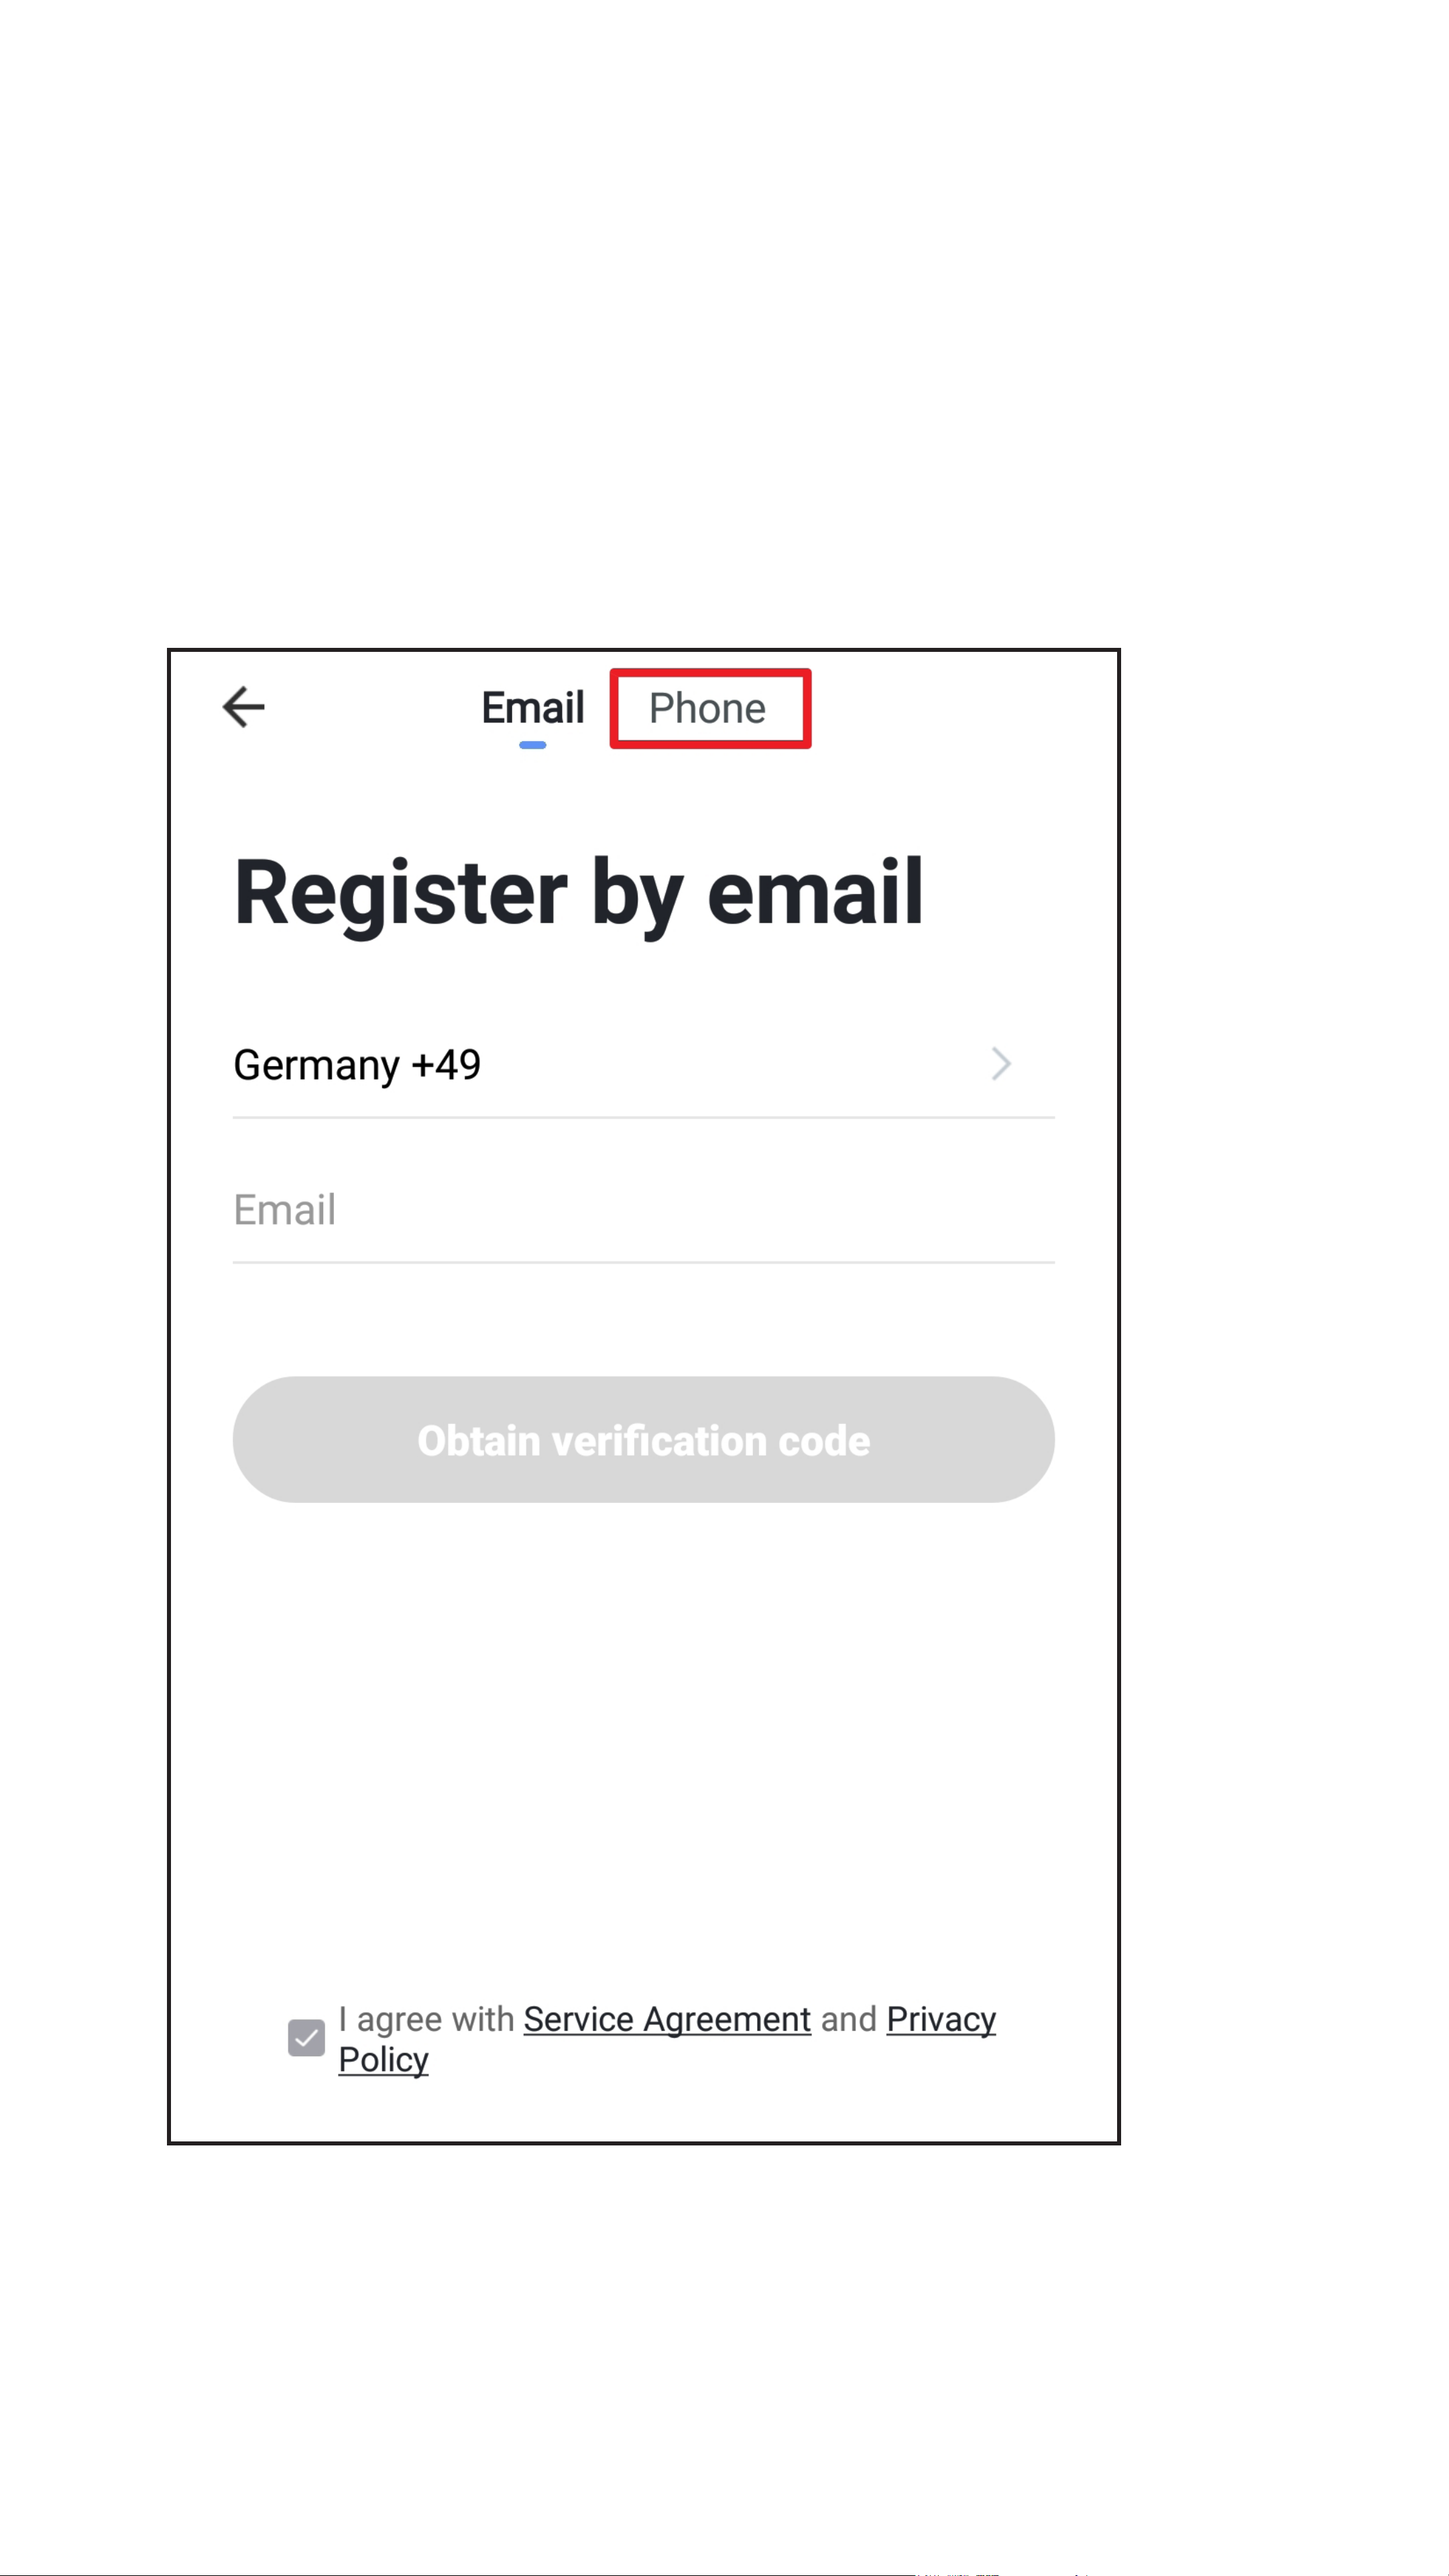
Create an account
• To create an account, you can use either an
e-mail address or a mobile number.
• If you want to create an account with a mobile
number, tap the “Phone” button at the top
right.
Page 10
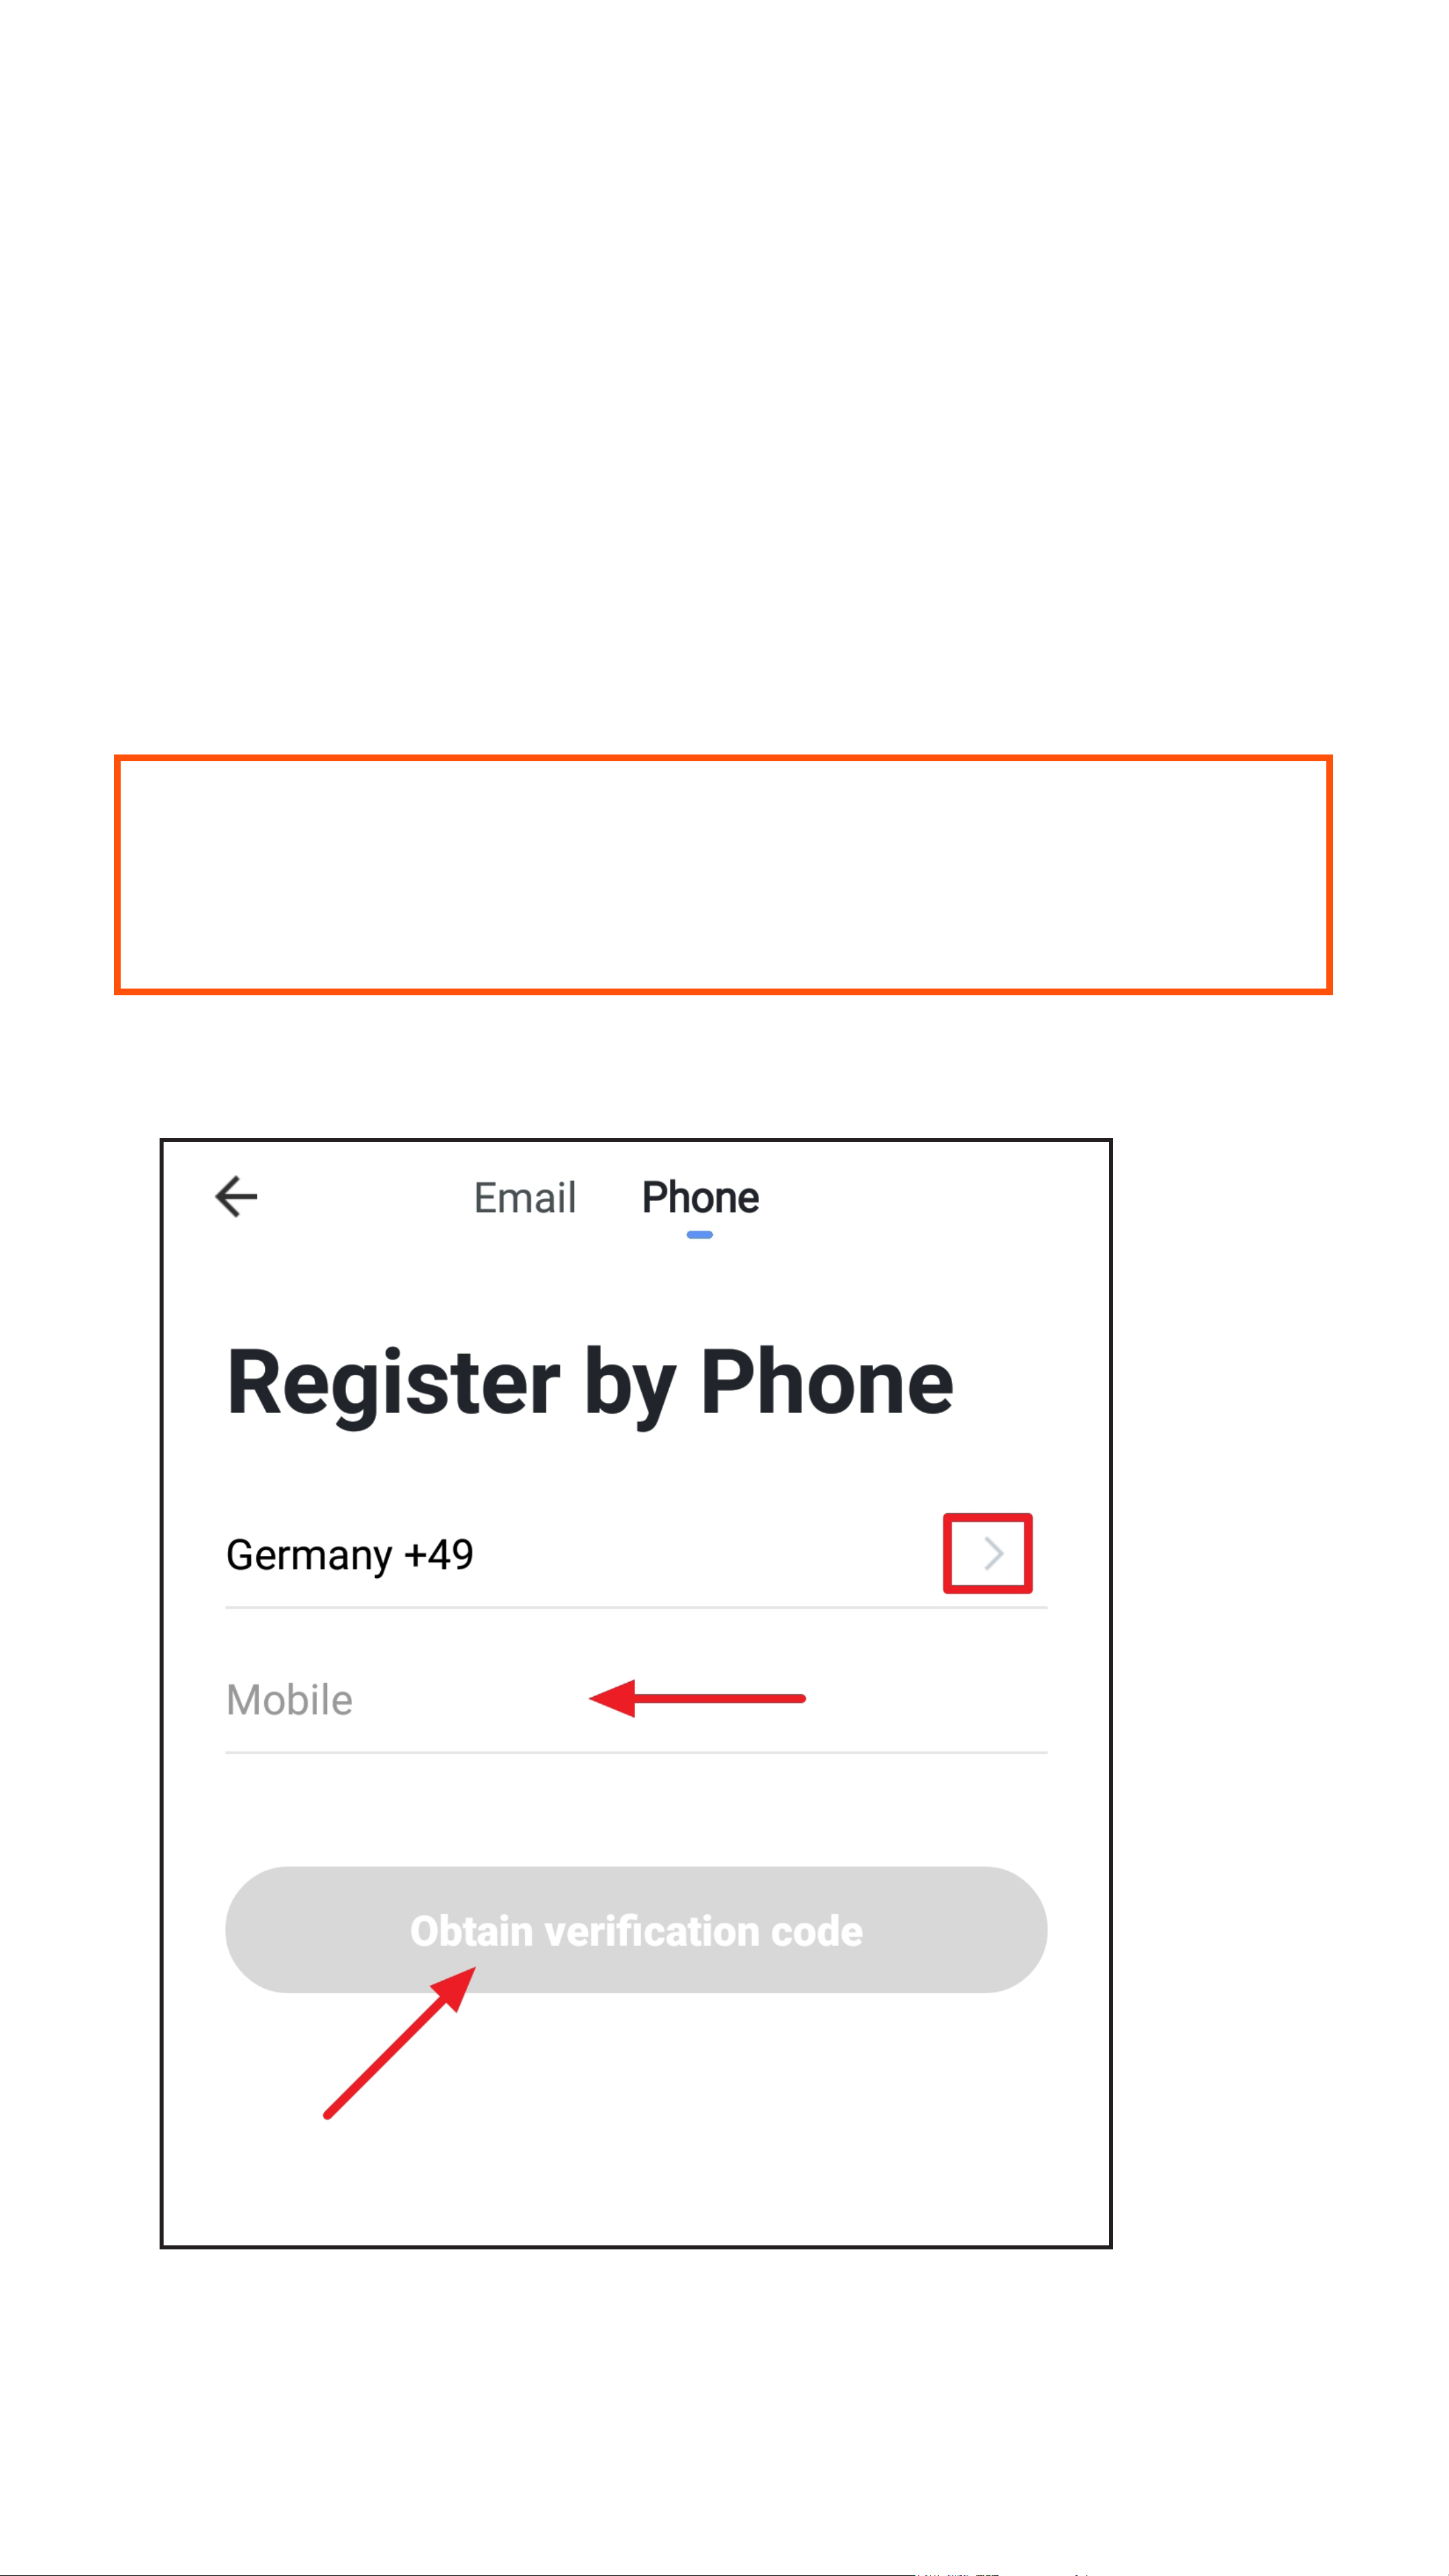
• Firstly, tap the right arrow (square in the
gure) and select your country. The country
code is then accepted automatically.
• Then enter your mobile number in the
corresponding eld (without country code and
without 0 at the beginning).
• Tap the button to conrm the entry and
request the verication code.
The checkbox at the bottom must be checked.
You can see the corresponding explanations
by tapping.
• Proceed with entering the verication code.
Page 11
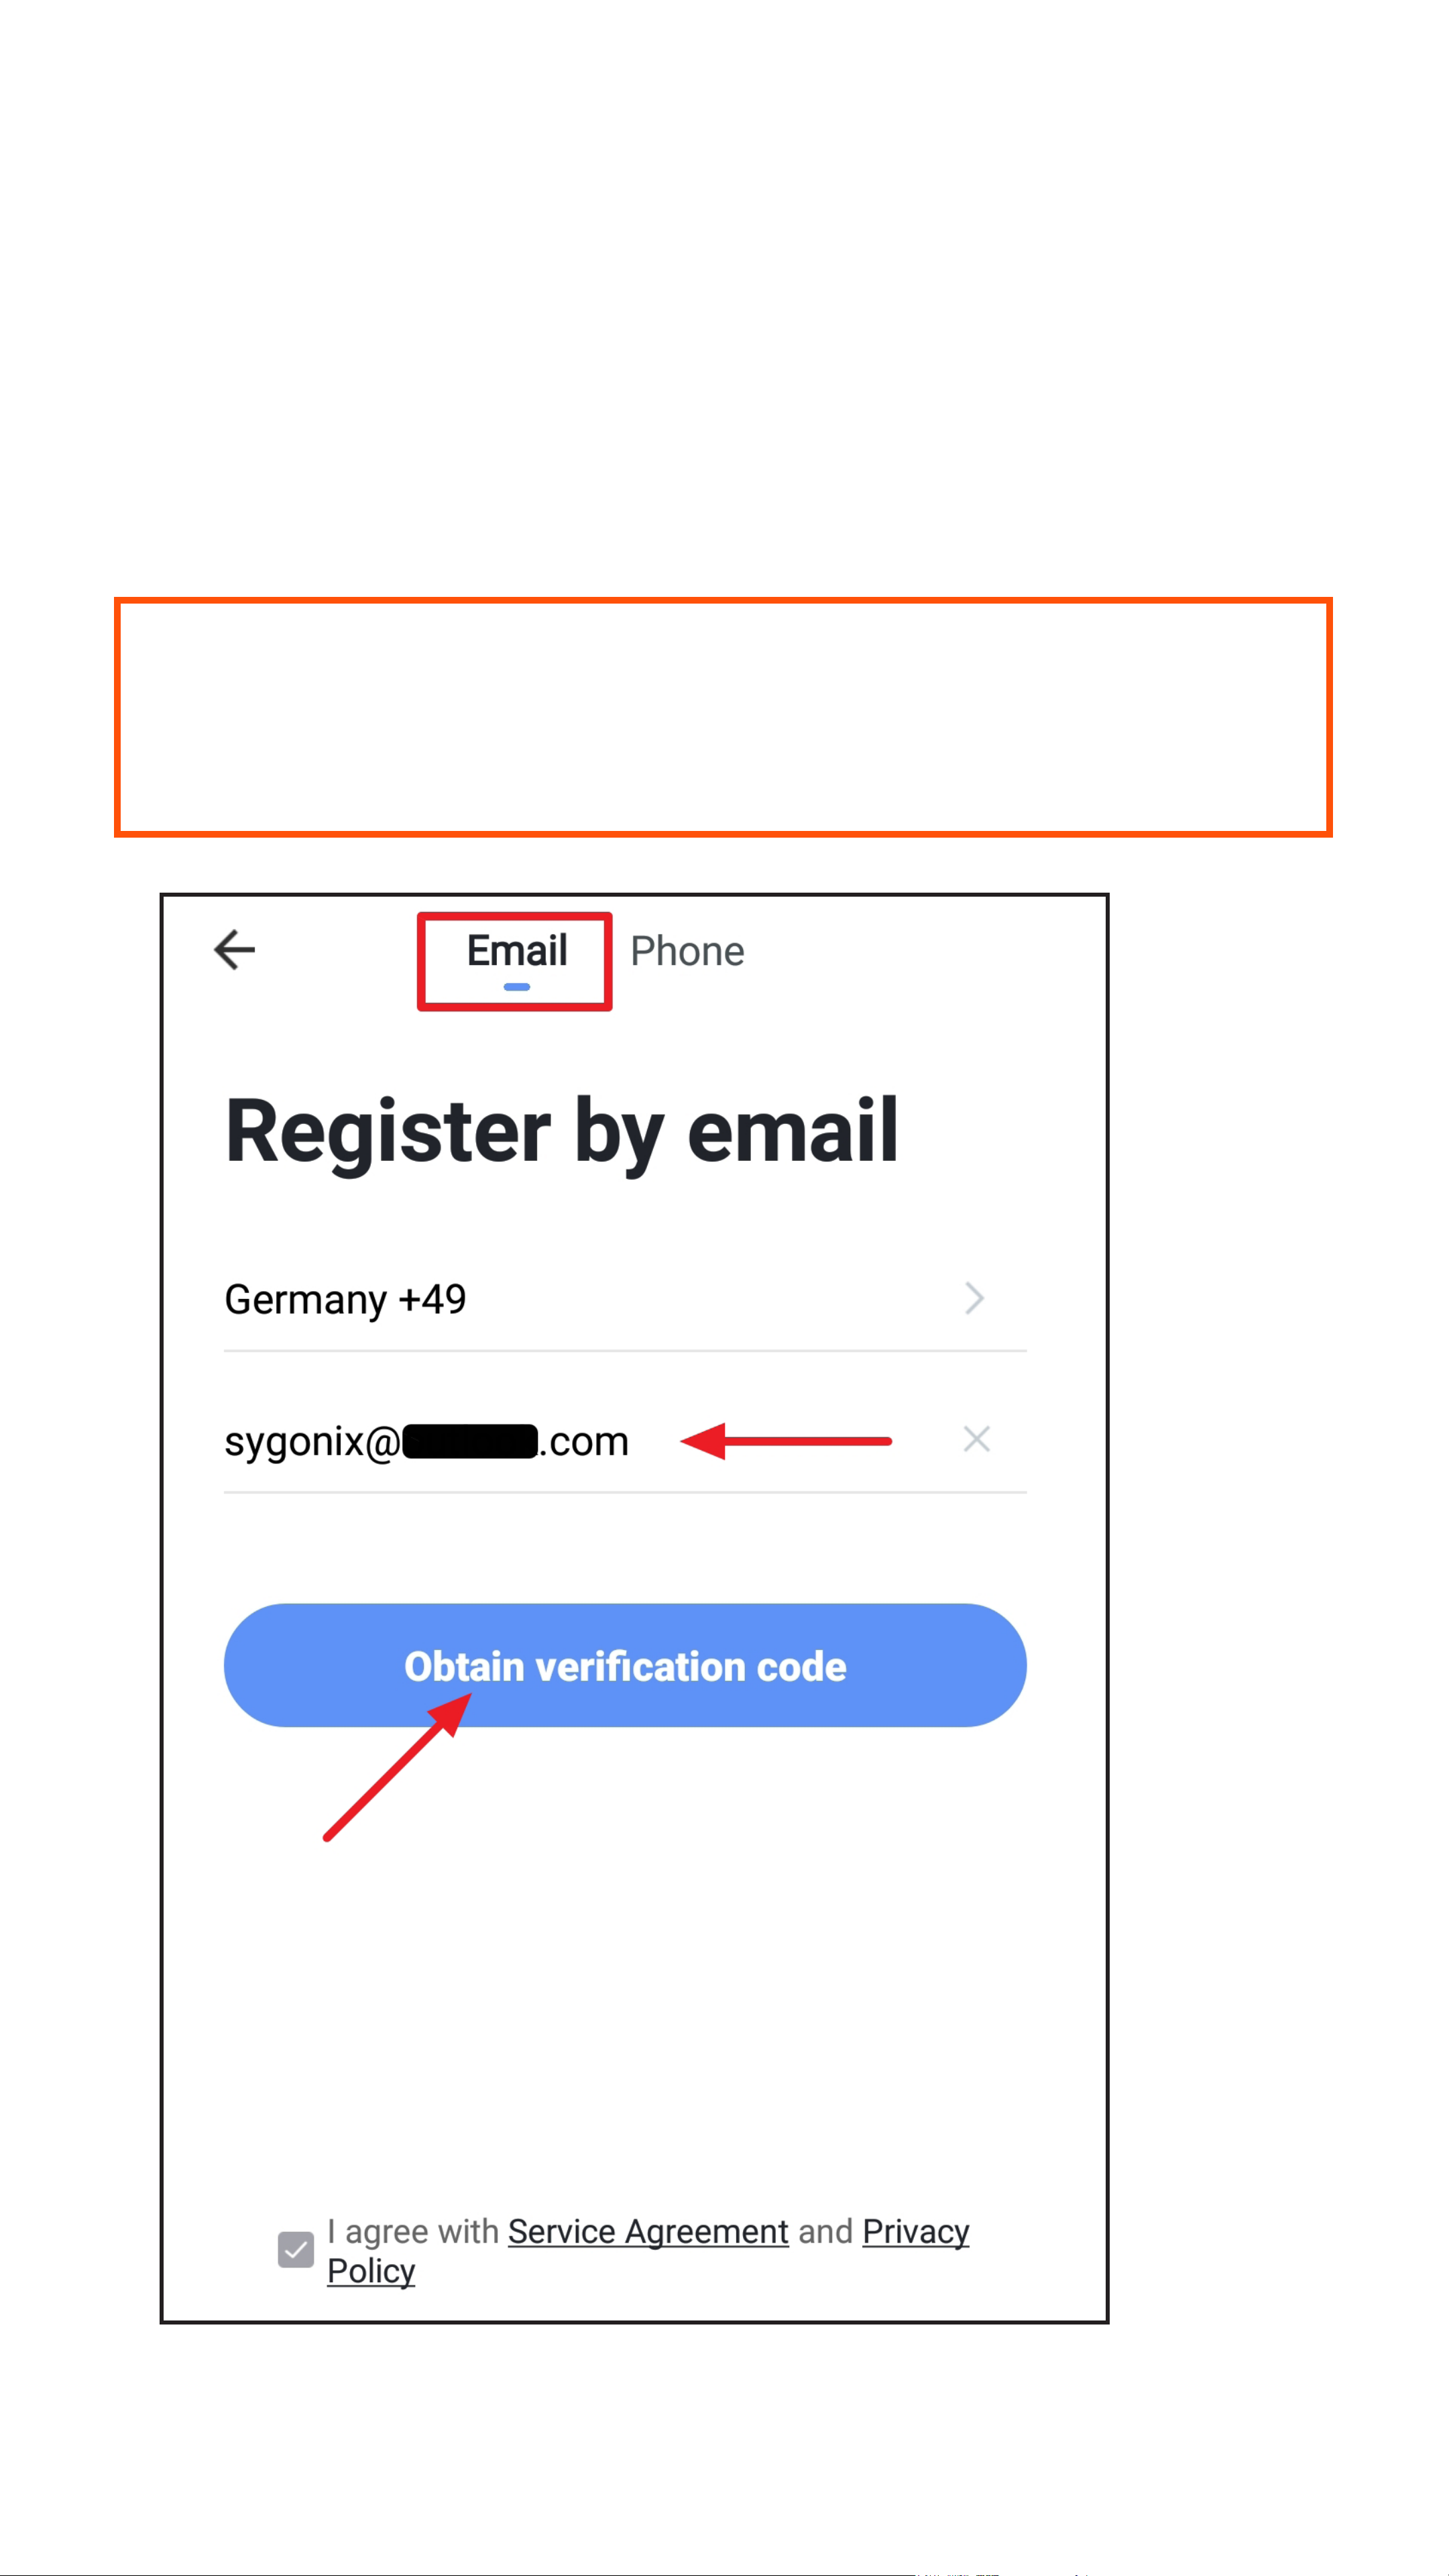
• To create an account using your e-mail
address, tap the “Email” button at the top left.
• Enter the e-mail address with which you want
to register.
• Tap the button to conrm the entry and
request the verication code.
The checkbox at the bottom must be checked.
You can see the corresponding explanations
by tapping.
Page 12
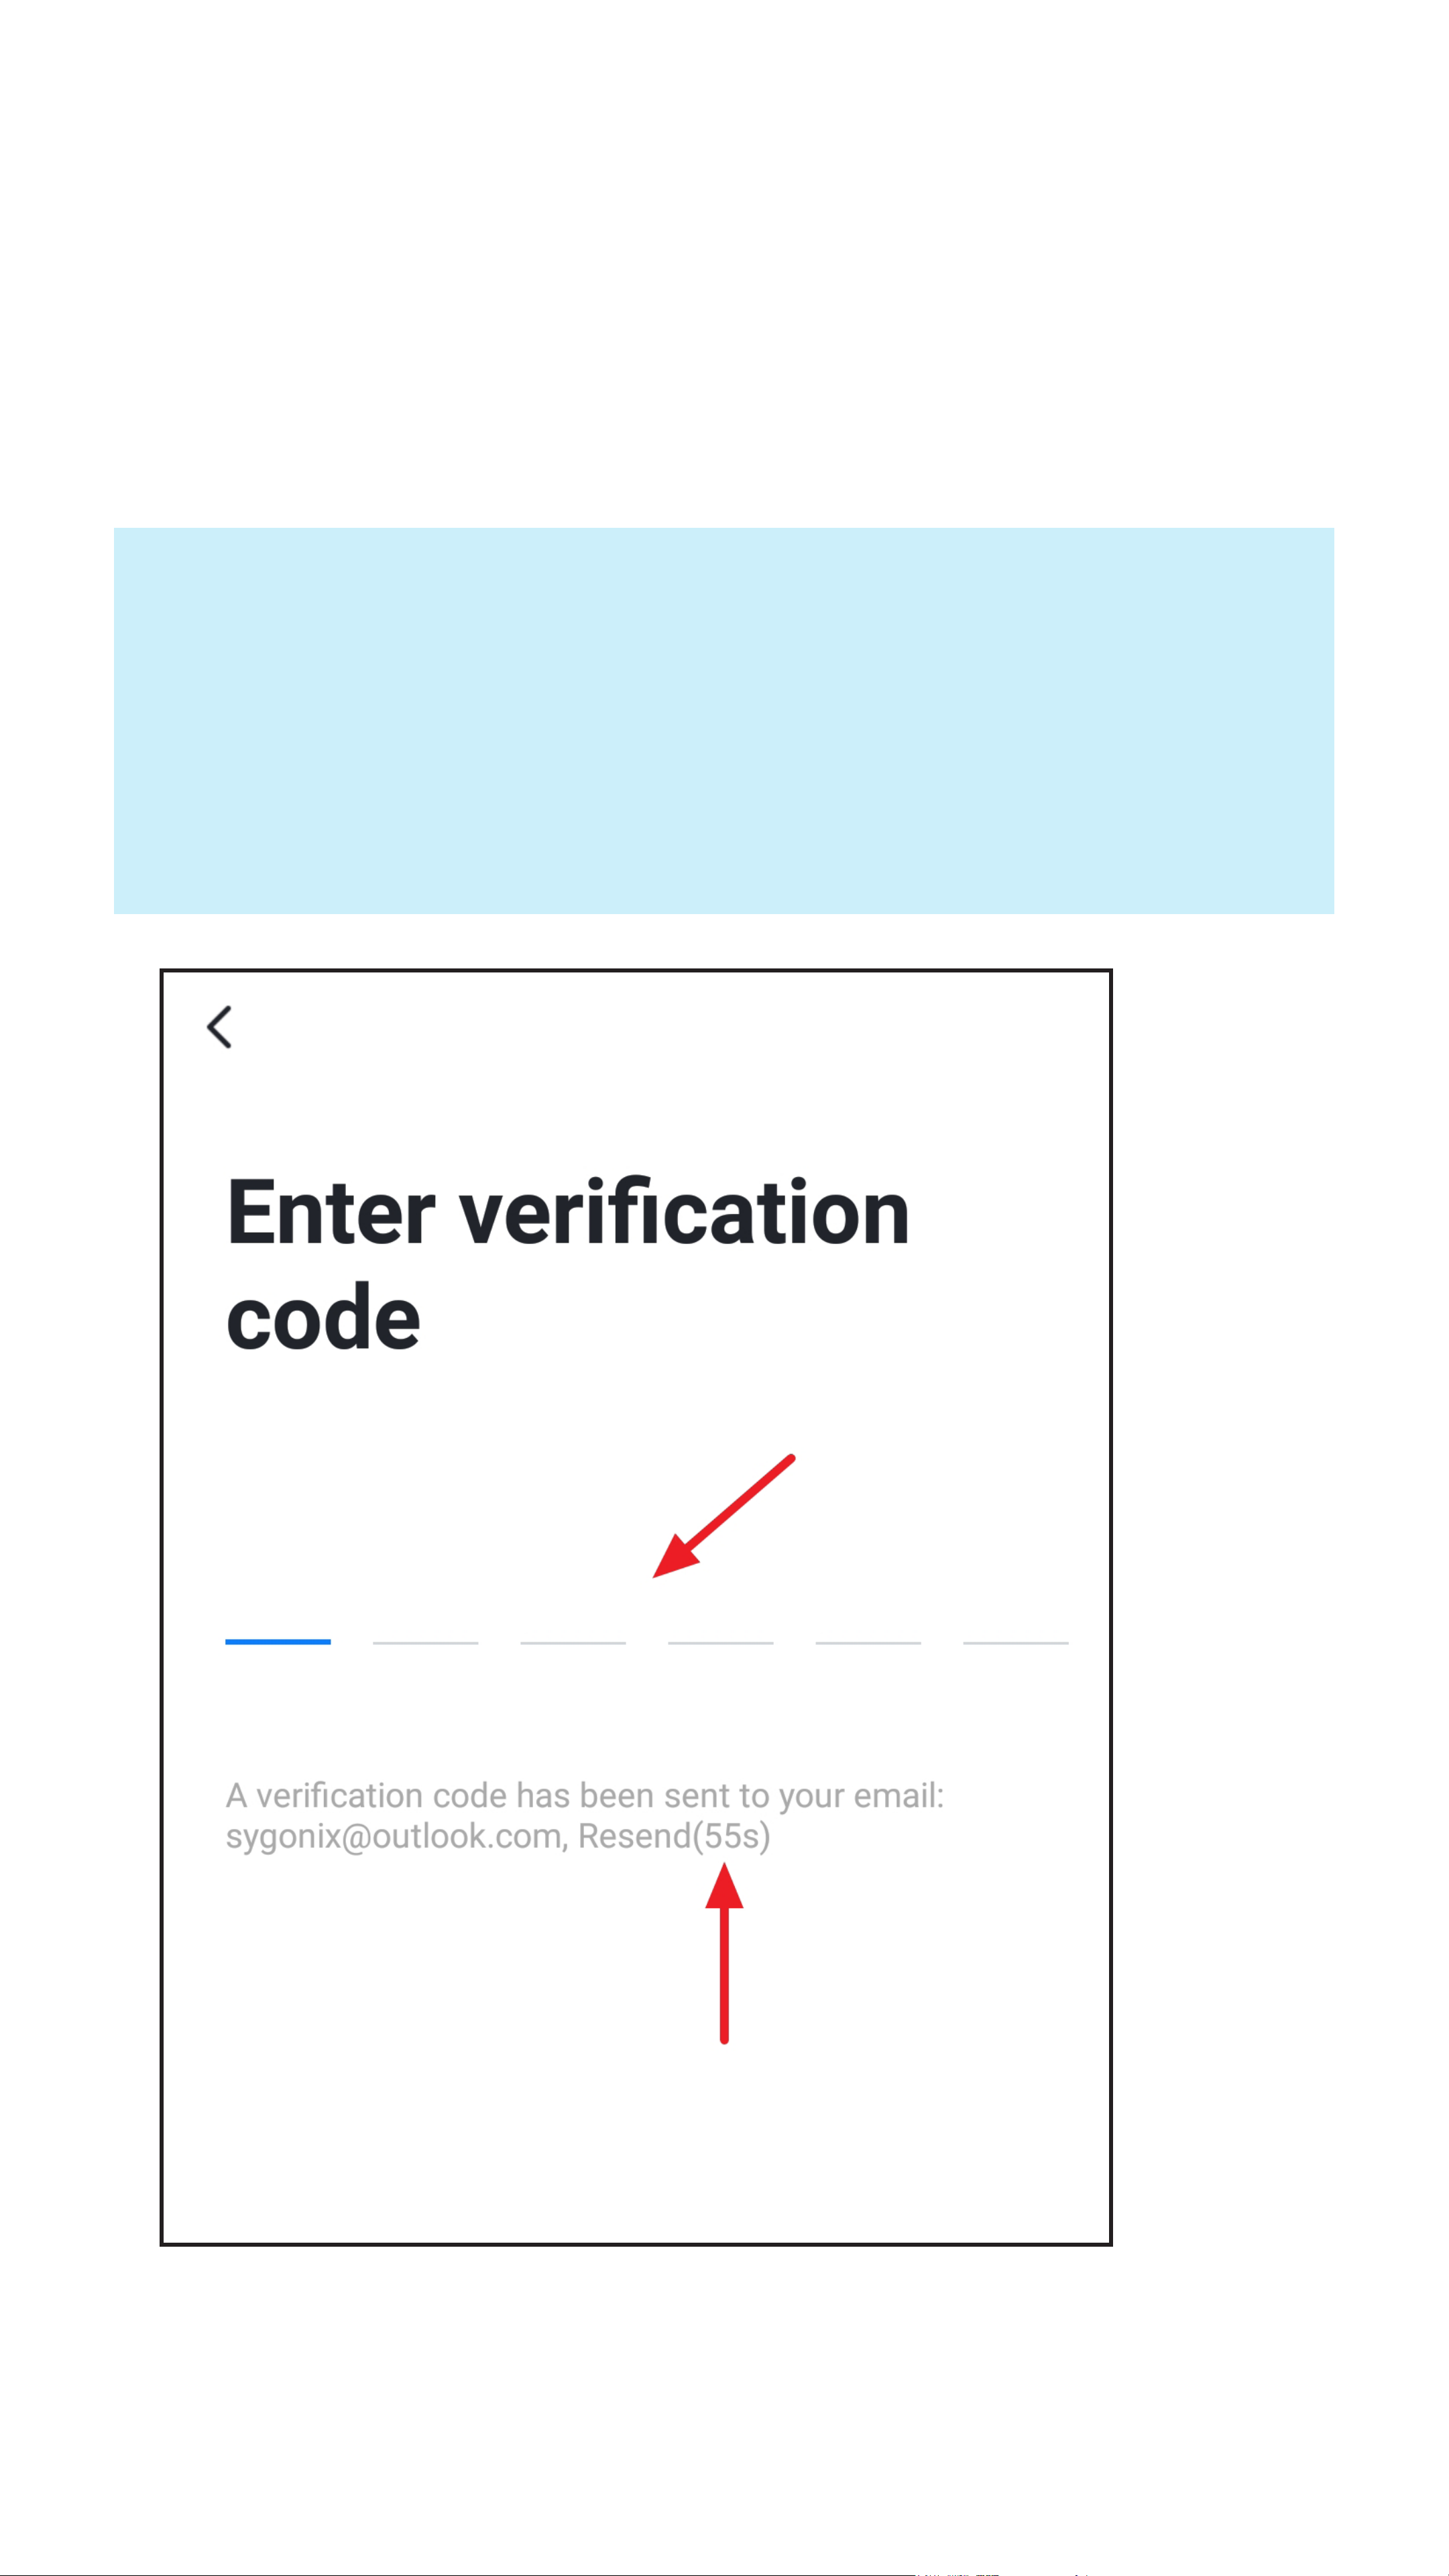
• Once you have requested the verication code,
you will receive either an SMS or an email
with the verication code, depending on which
registration method you have chosen.
• Enter the 6-digit verication code in the eld.
As soon as the timer at the bottom right has
run down, a new code will be sent.
If you do not receive the code, please check
your input, and if you register via email, also
the spam folder of your e-mail inbox.
Page 13
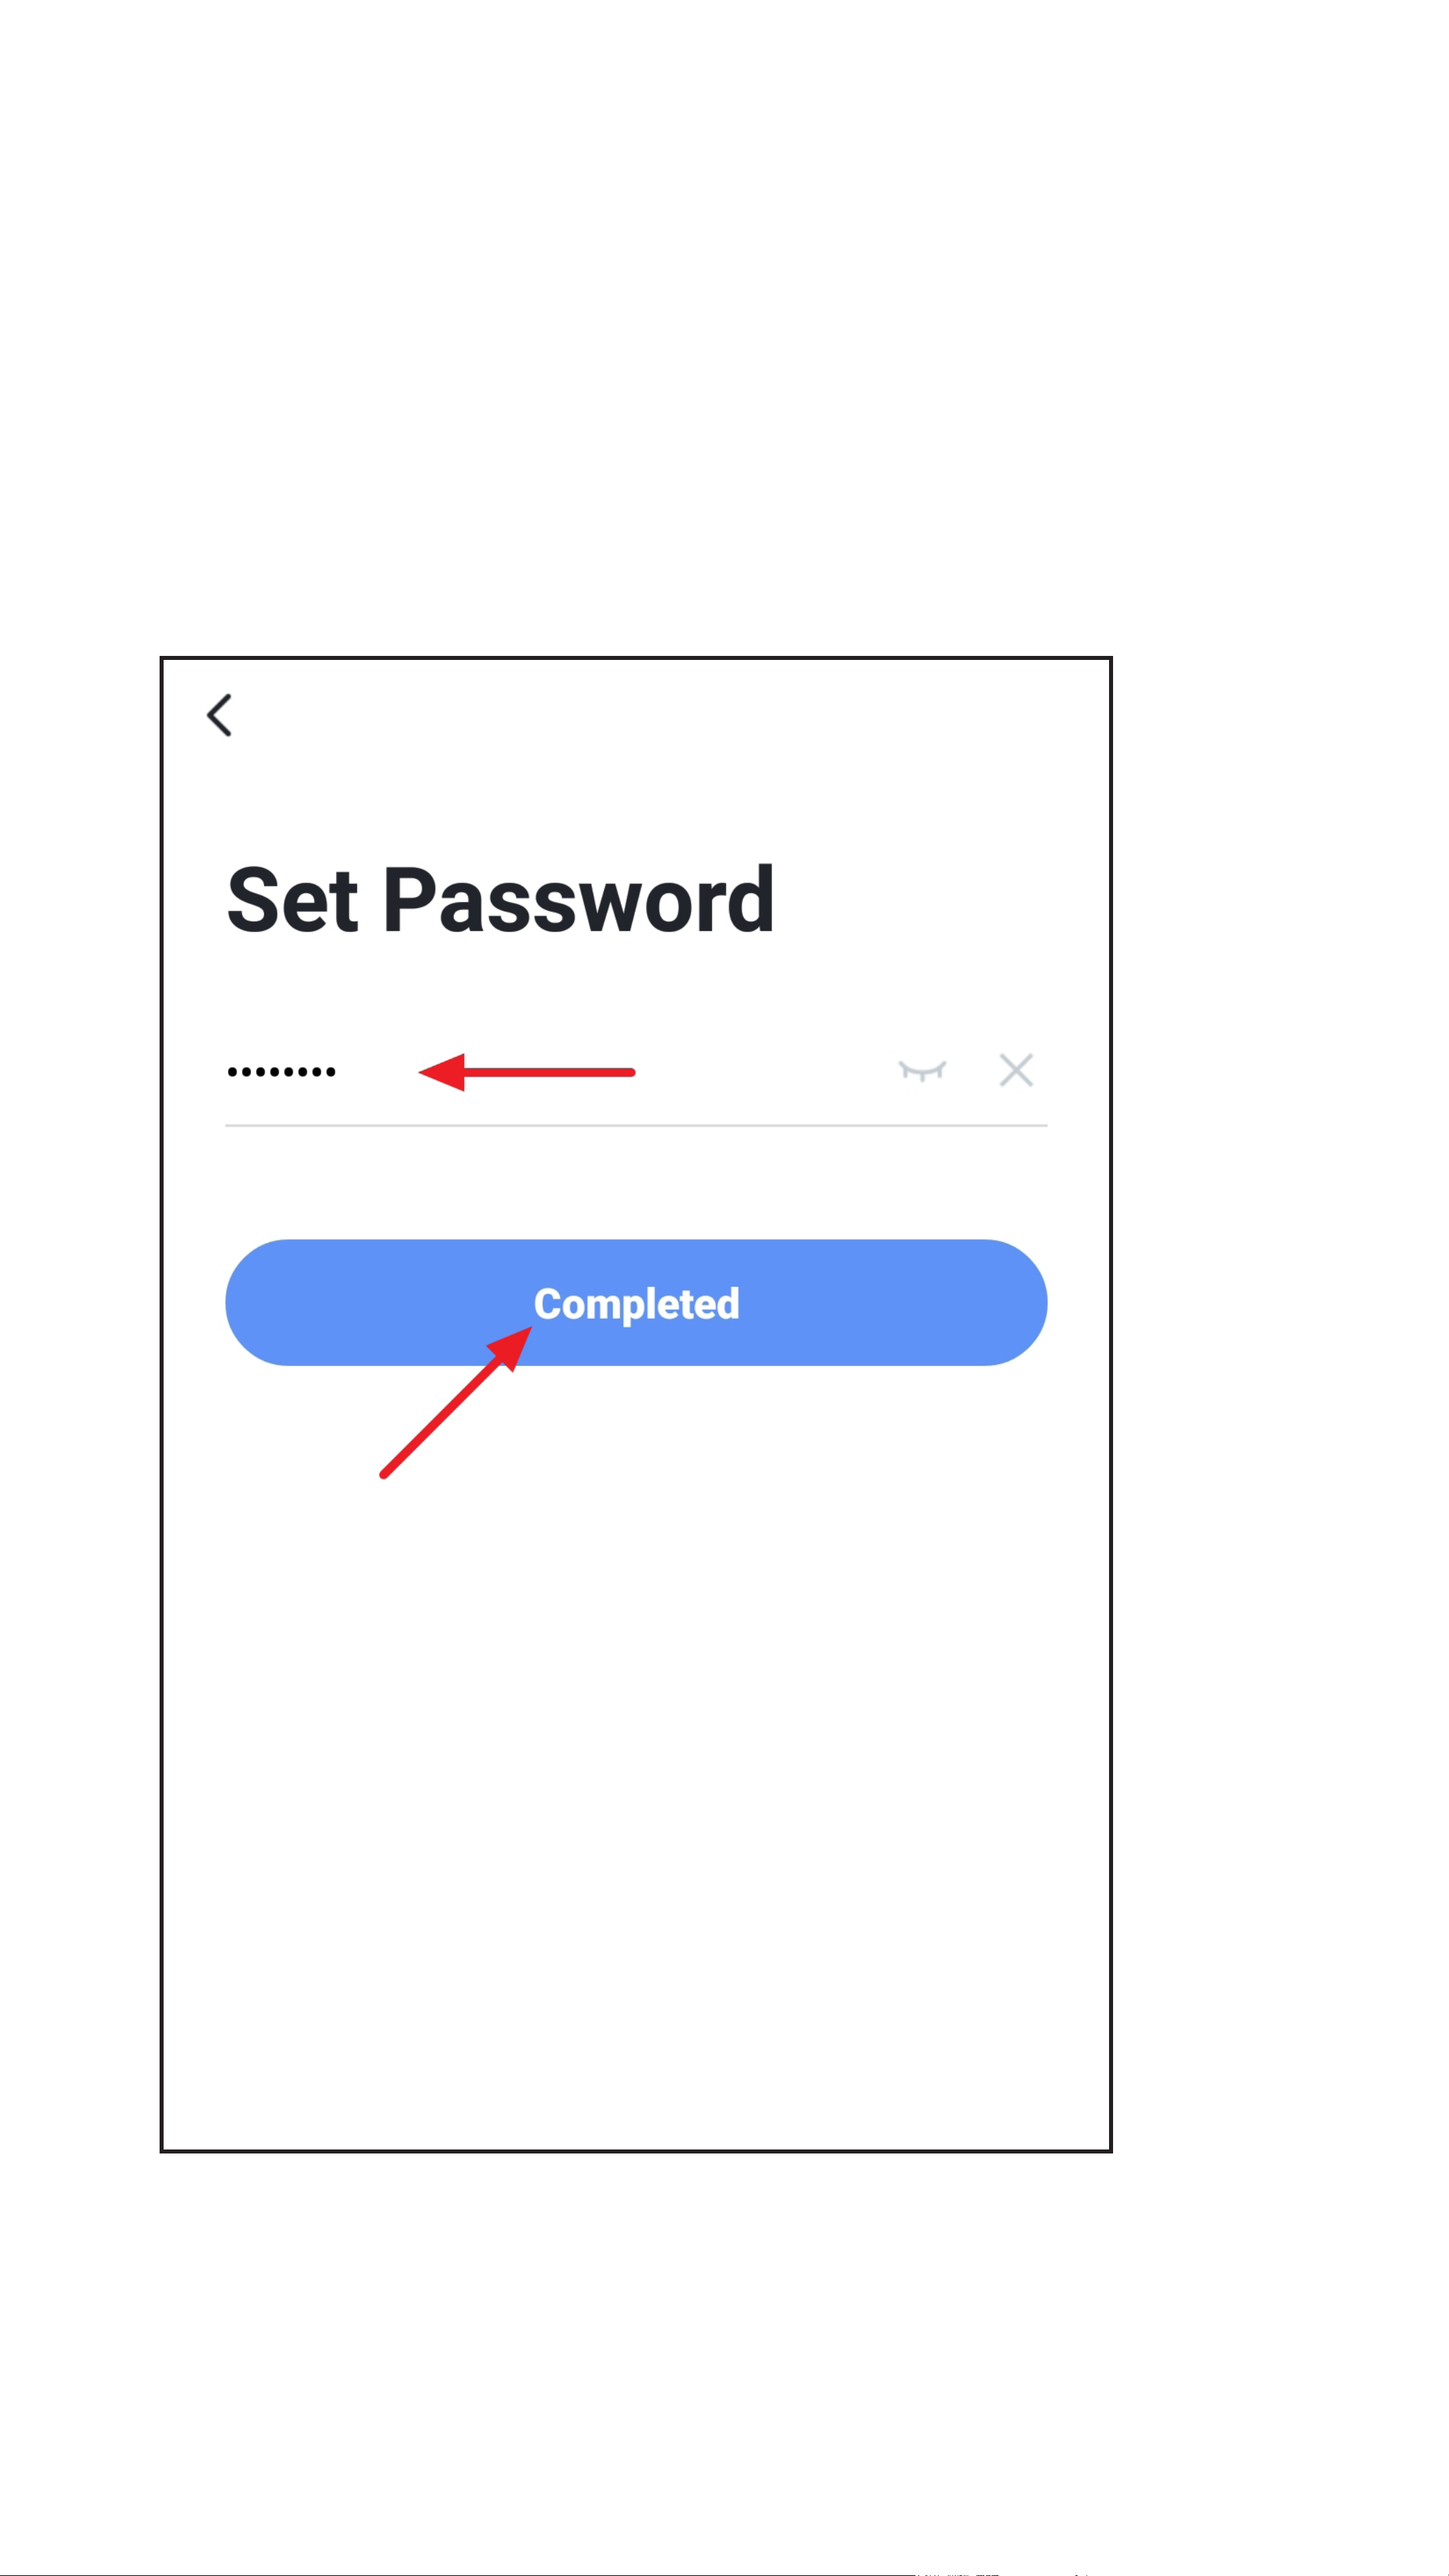
• Enter a secure password consisting of at
least 8 characters.
We recommend a password consisting of
uppercase and lowercase letters as well as
numbers and special characters.
• Tap the blue button below to complete the
registration.
Page 14
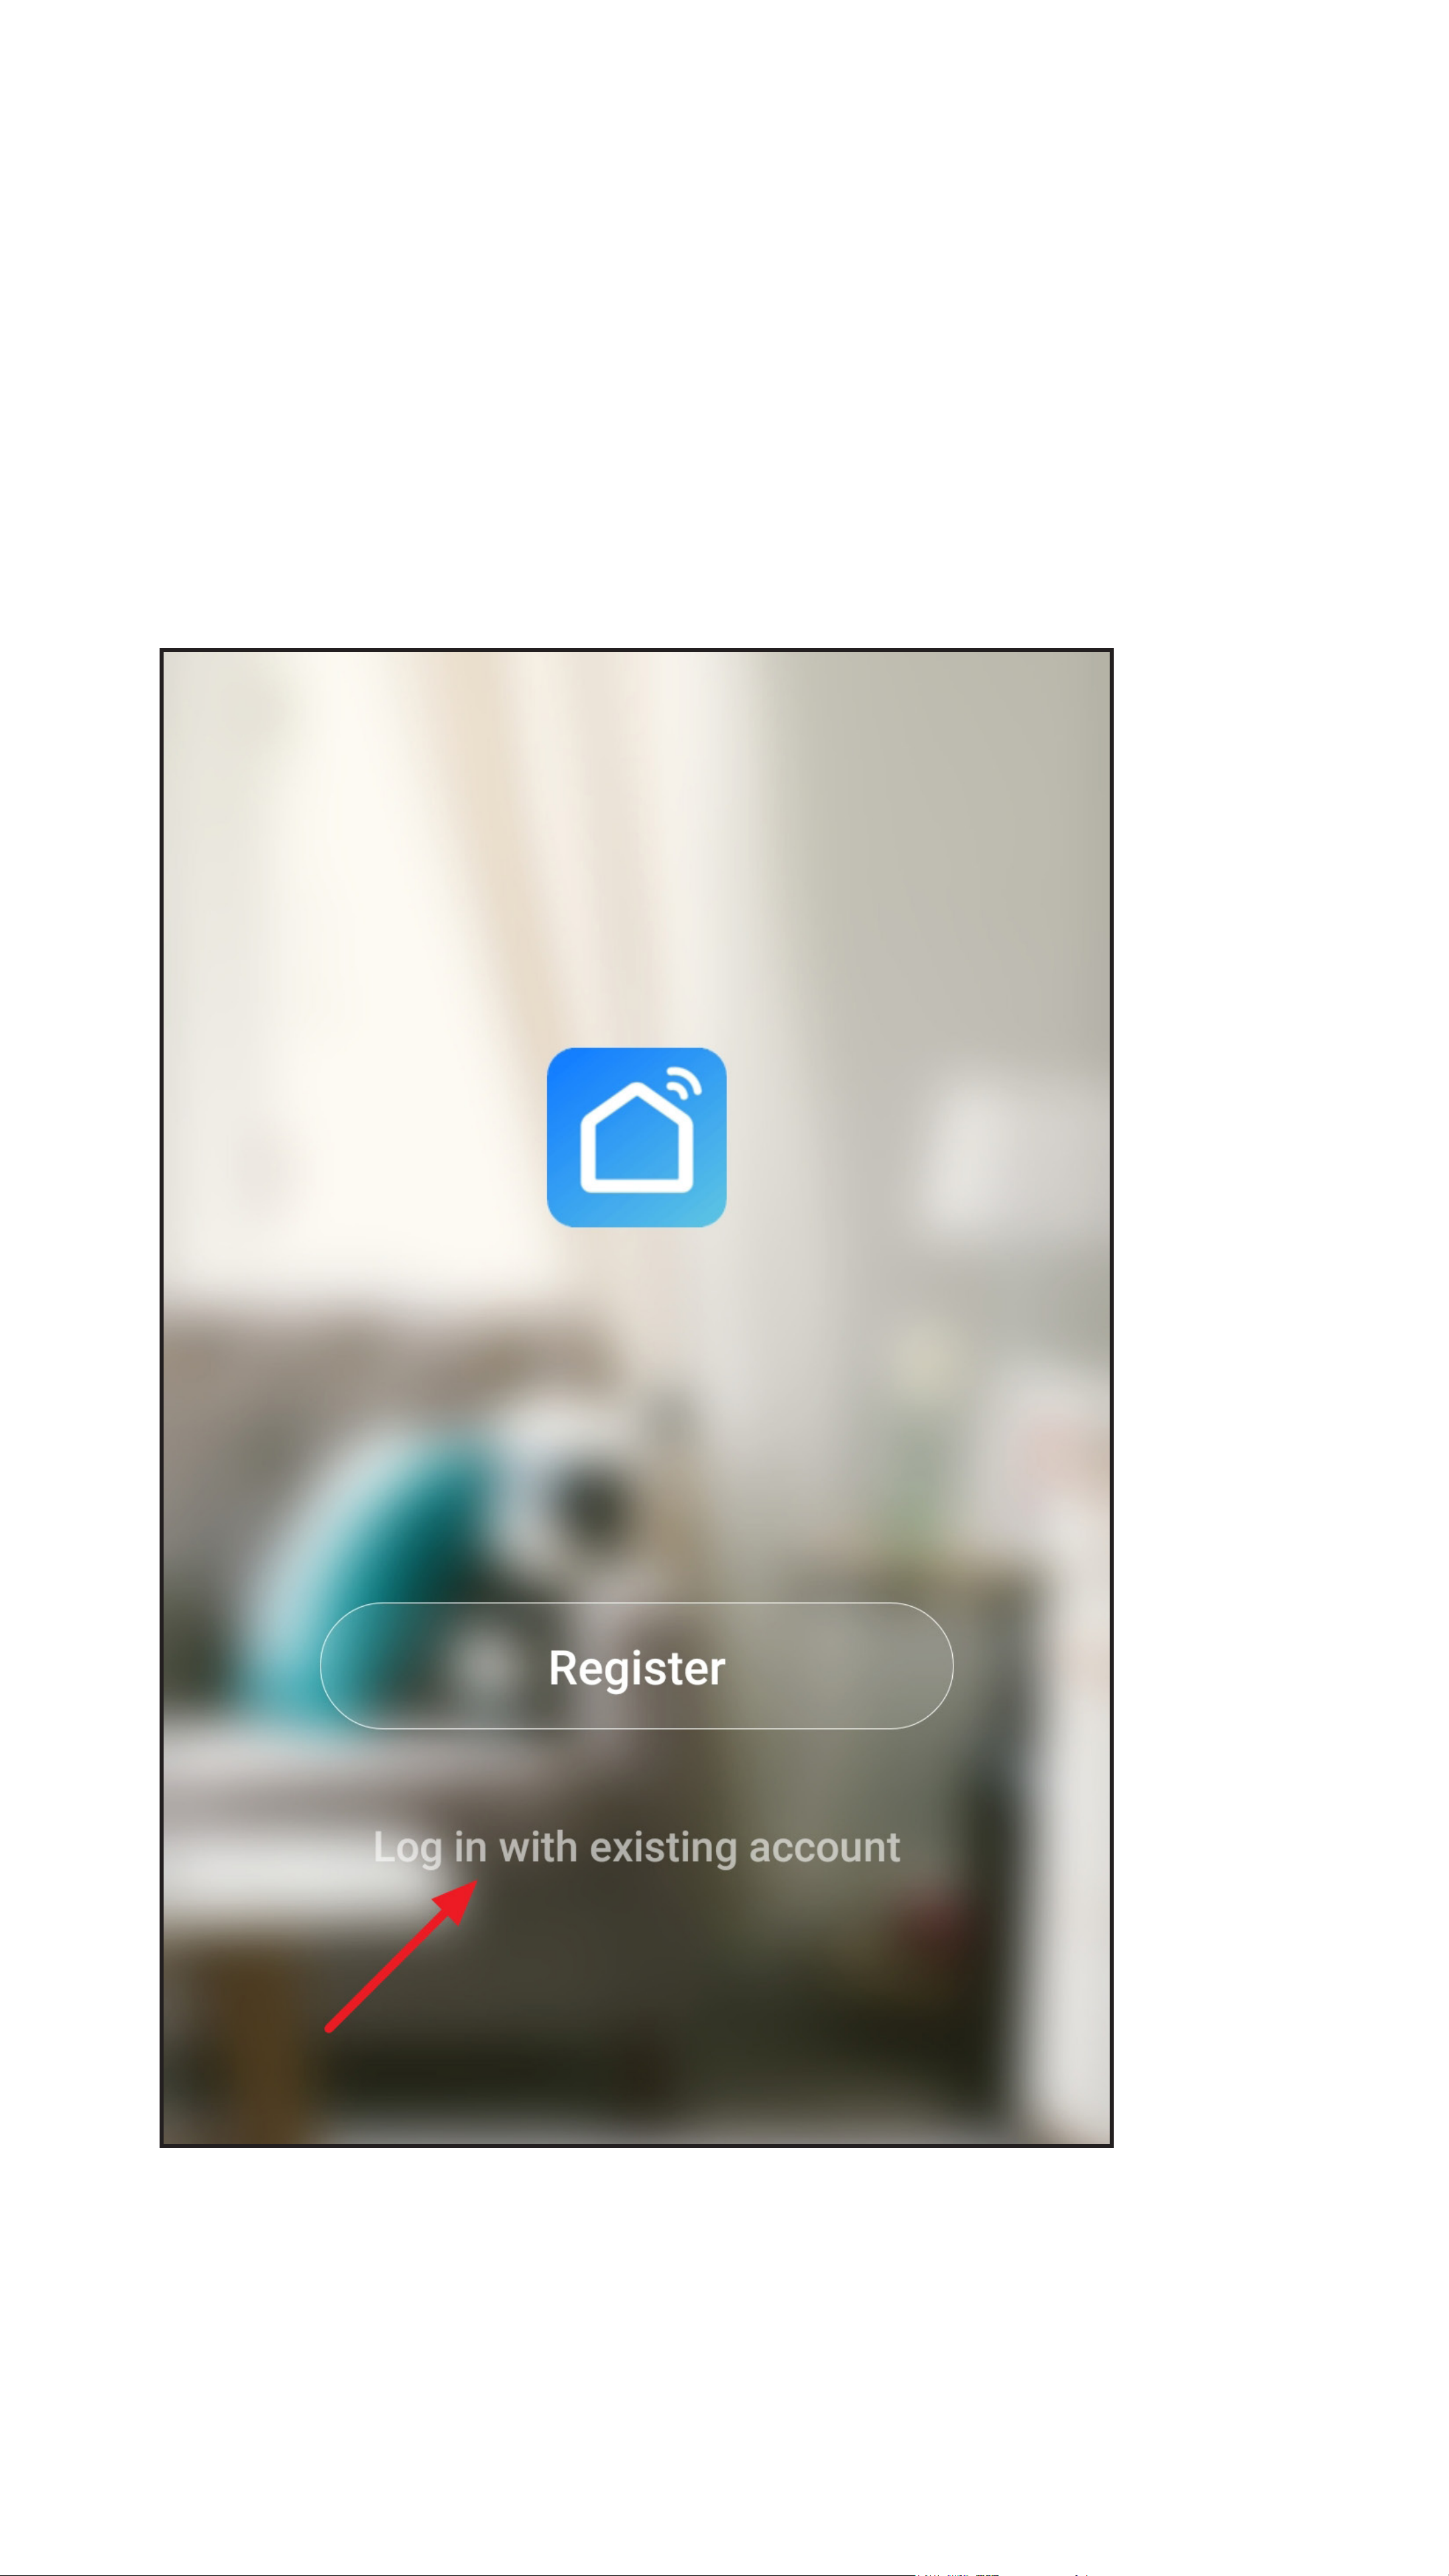
Logging in
• If you are not automatically logged in after
registering, or if you already have an account,
log in to the app now.
• To do this, tap the button below (see arrow in
the gure).
Page 15
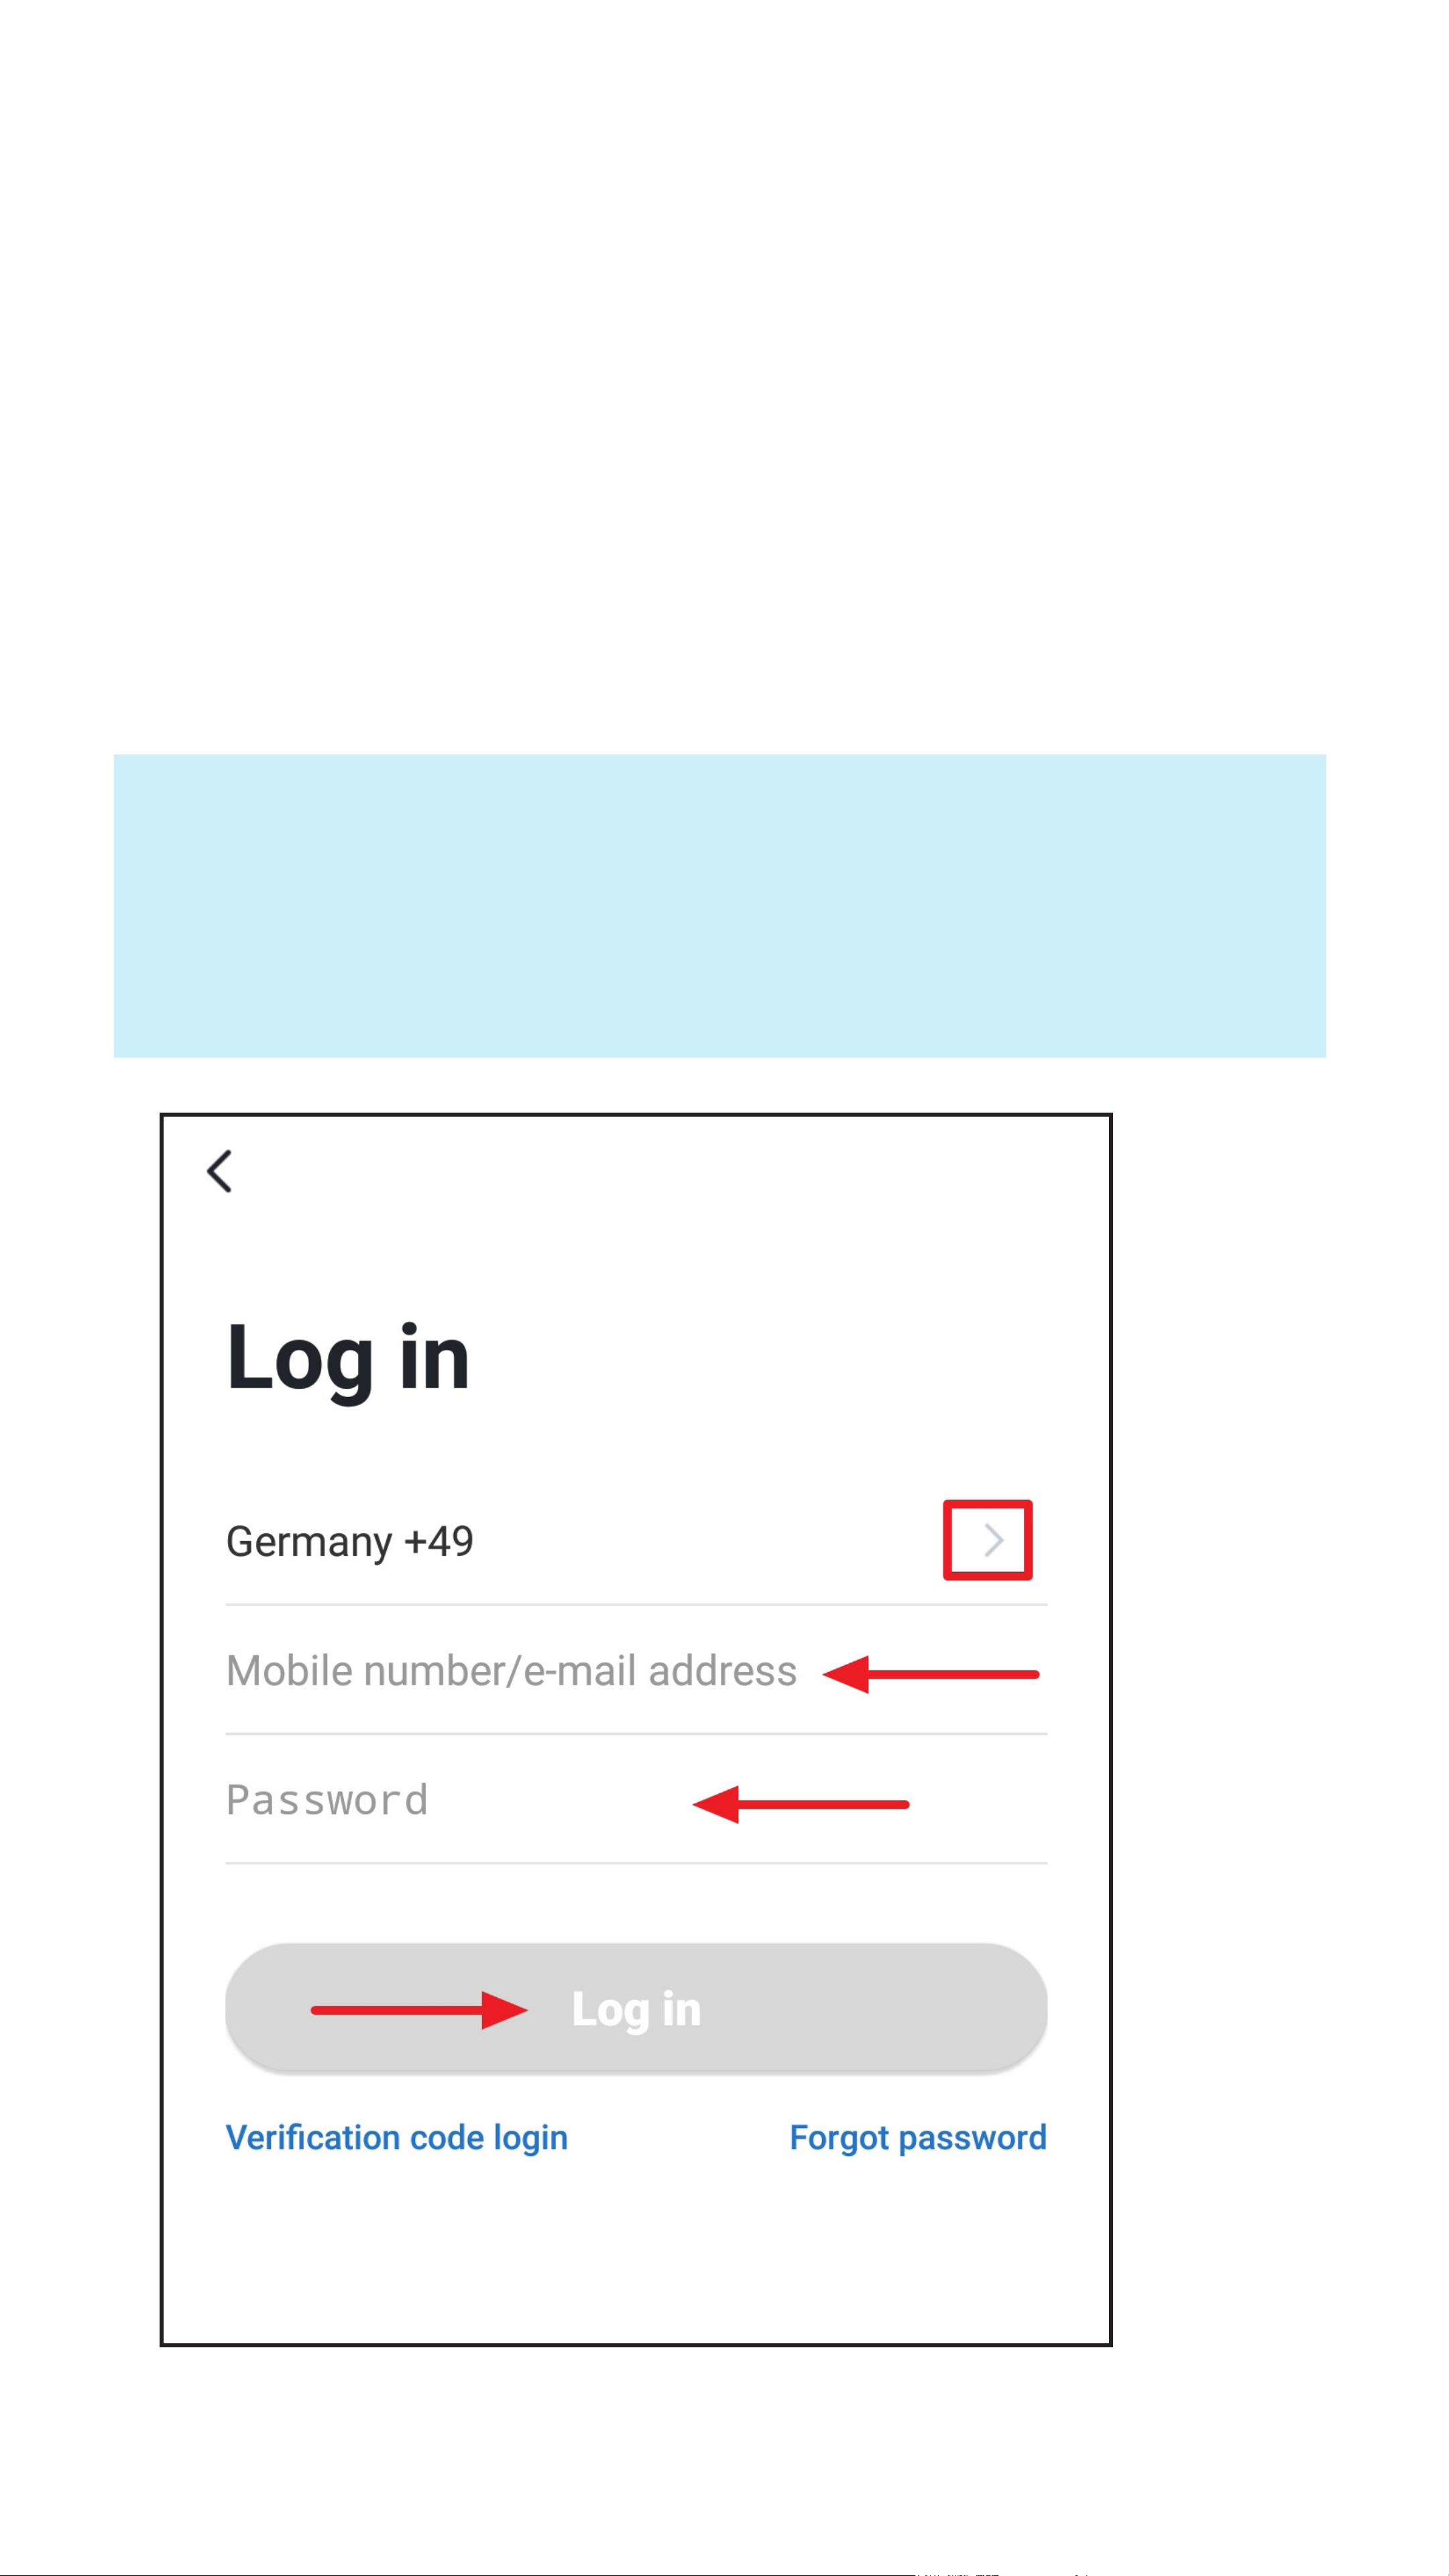
• If you have created your account using
your mobile number, rst tap the right
arrow (square in the gure) and select your
country. The country code is then accepted
automatically.
• Enter either your mobile number or e-mail
address in the corresponding eld.
• Now enter your password and tap “Log in”.
If you have forgotten your password, tap
the “
side under the login button. Then follow the
Forgot password
” on the right-hand
instructions.
Page 16
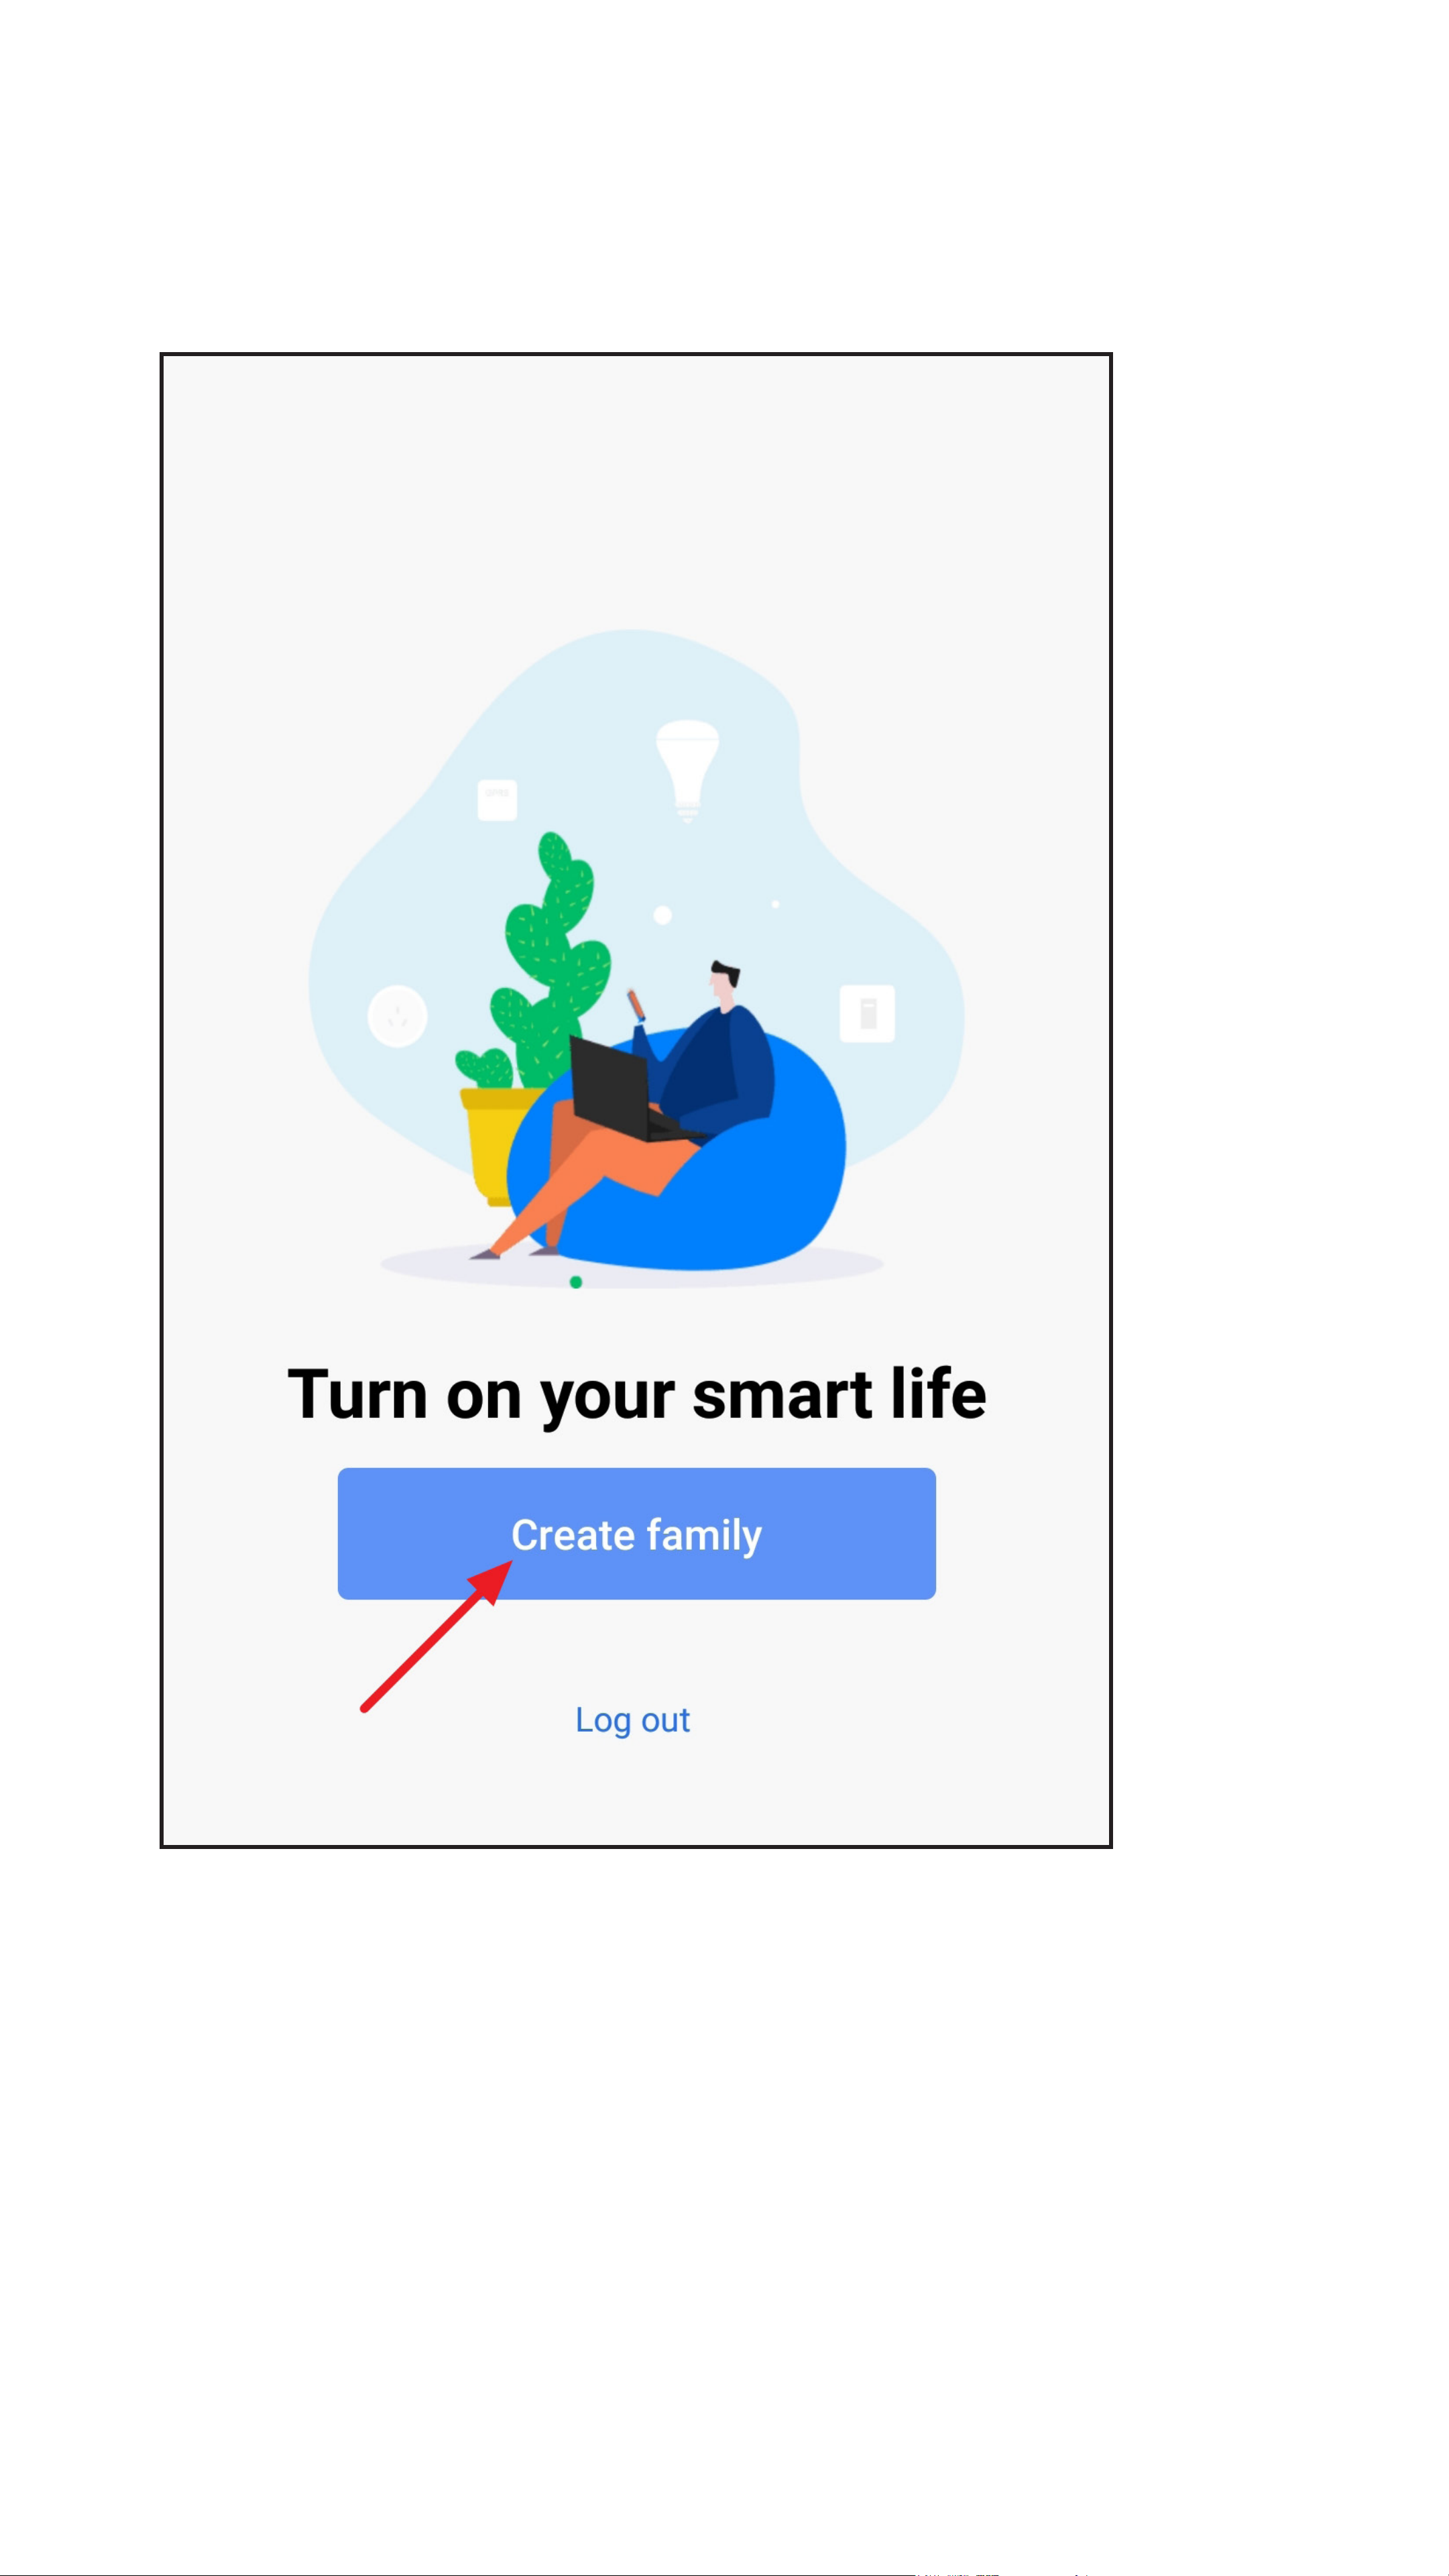
Creating a family
• To create a family, tap the blue button.
Page 17
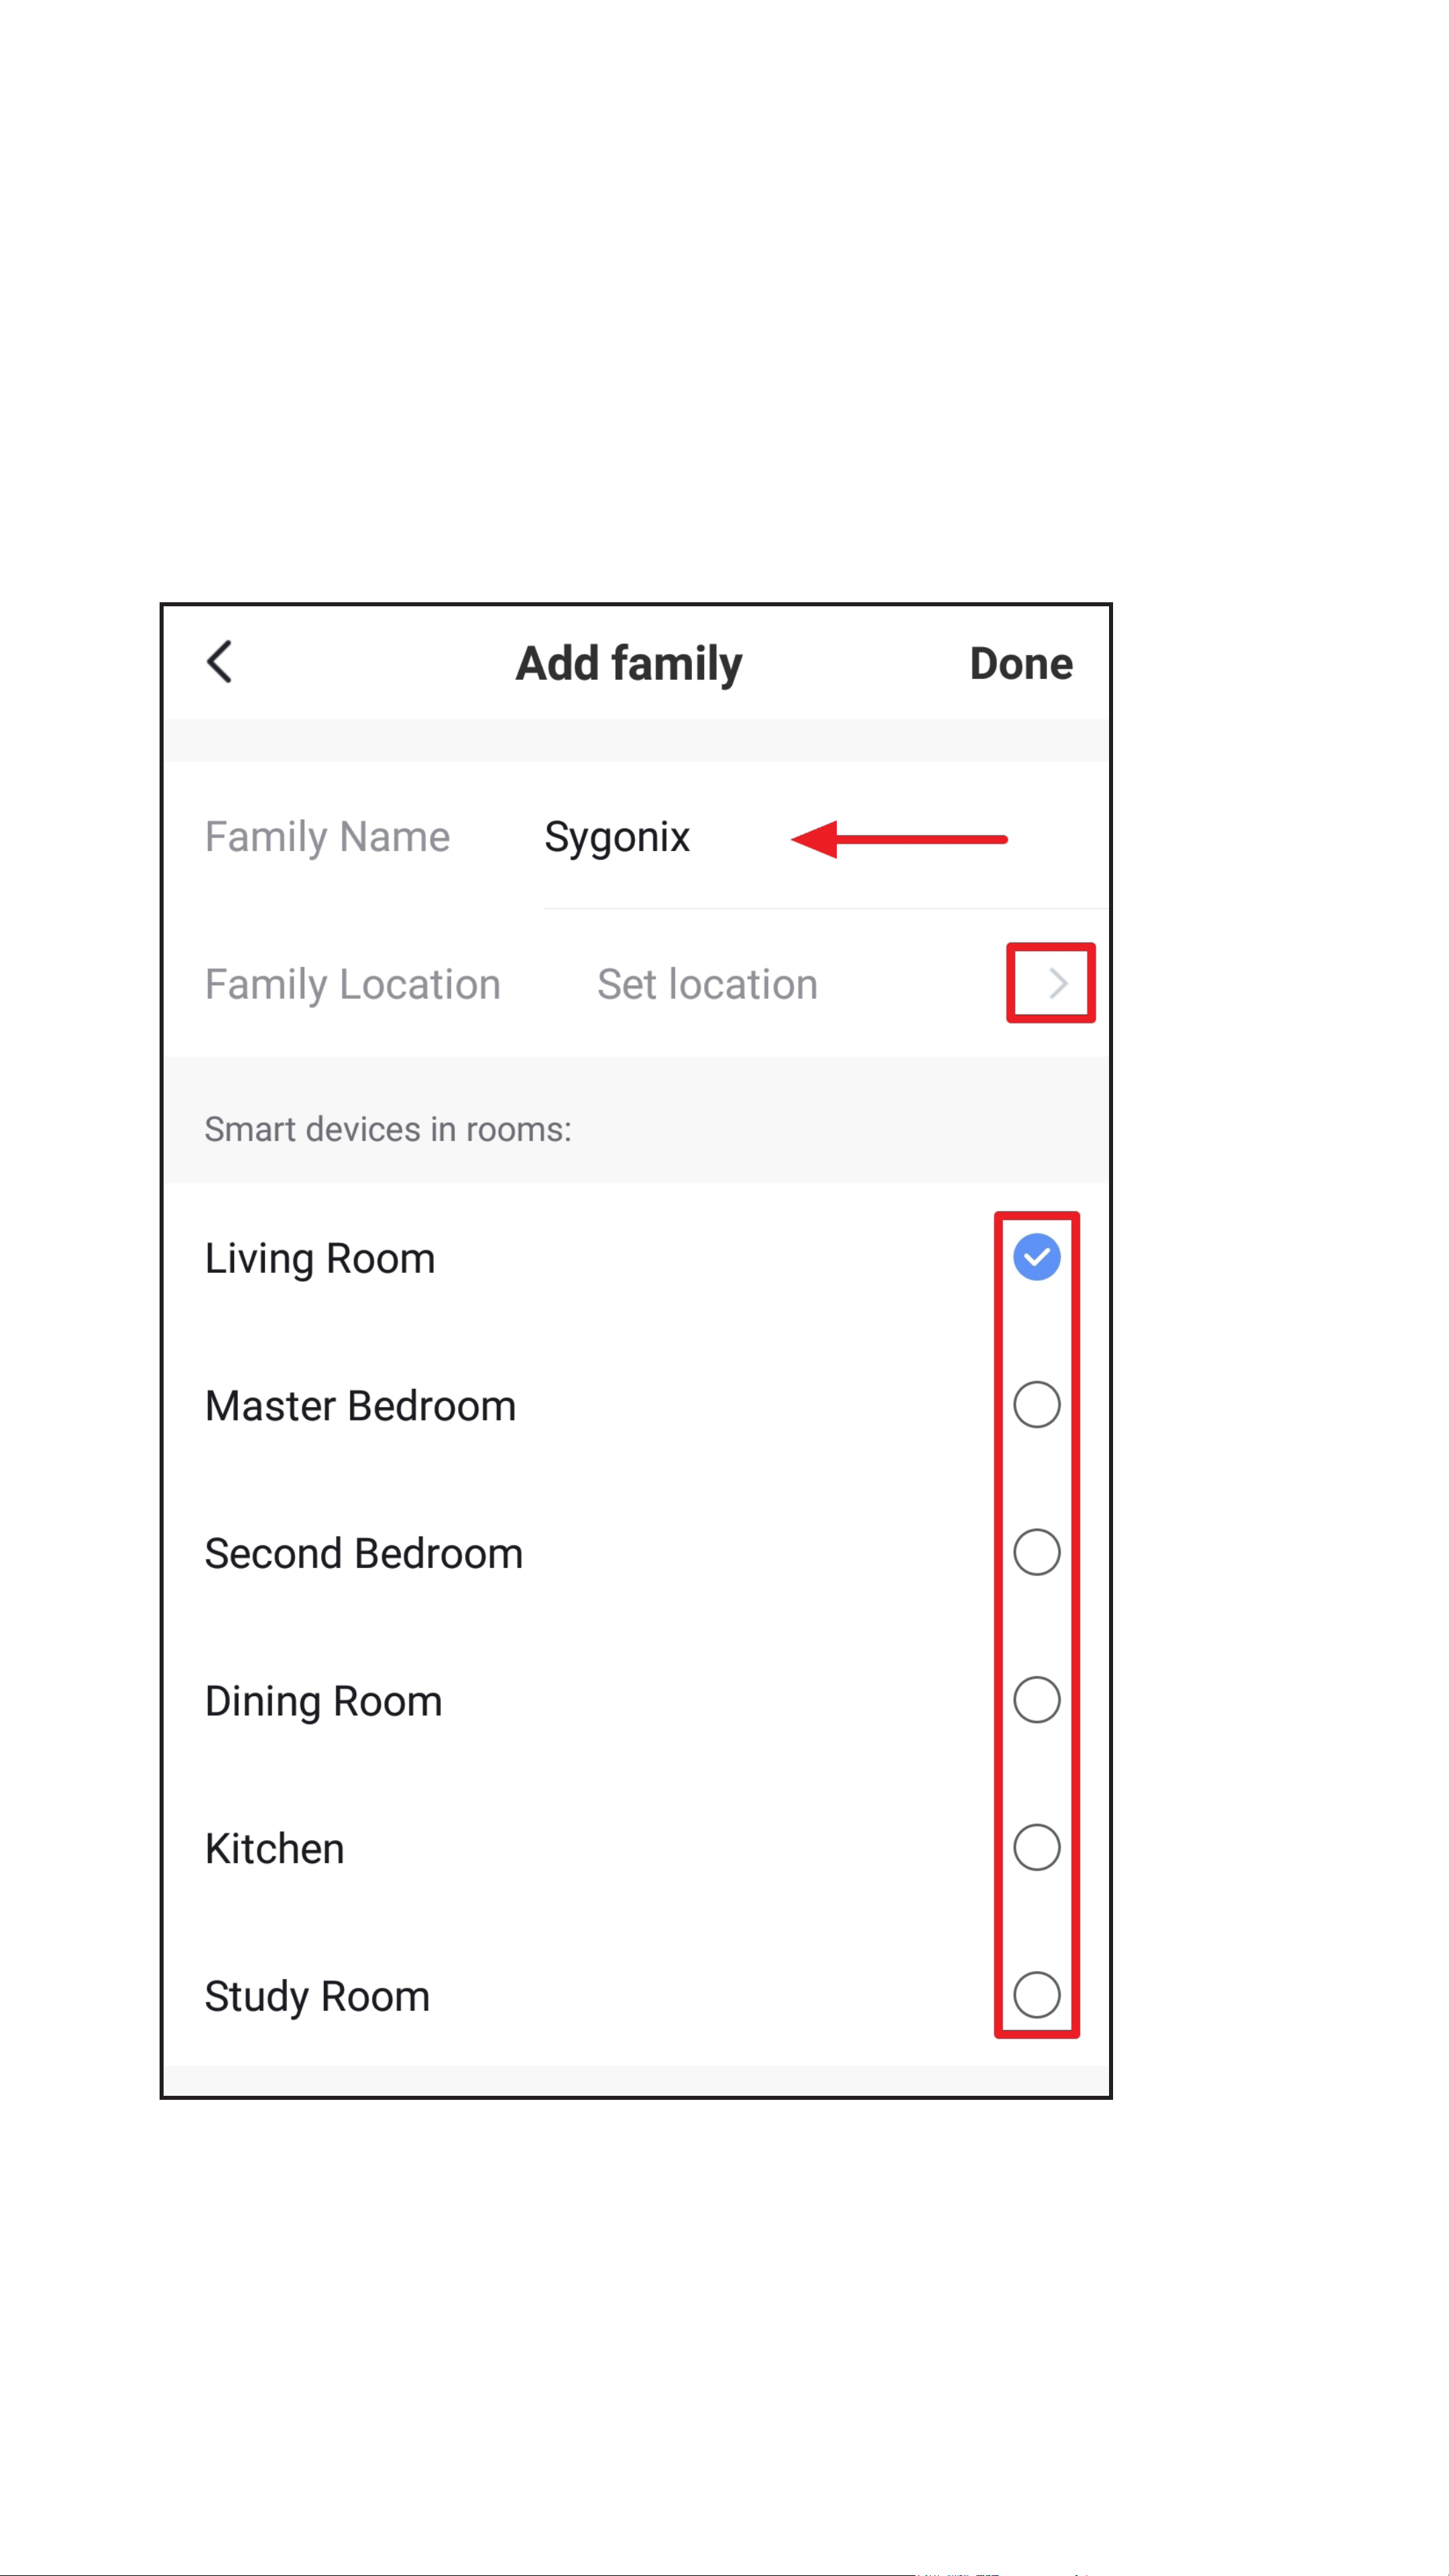
• Enter the desired name in the eld at the top.
• To add a location, tap the right arrow (square
in the gure).
• Then select one or more rooms, depending
on where you have Smarthome devices
installed.
Page 18
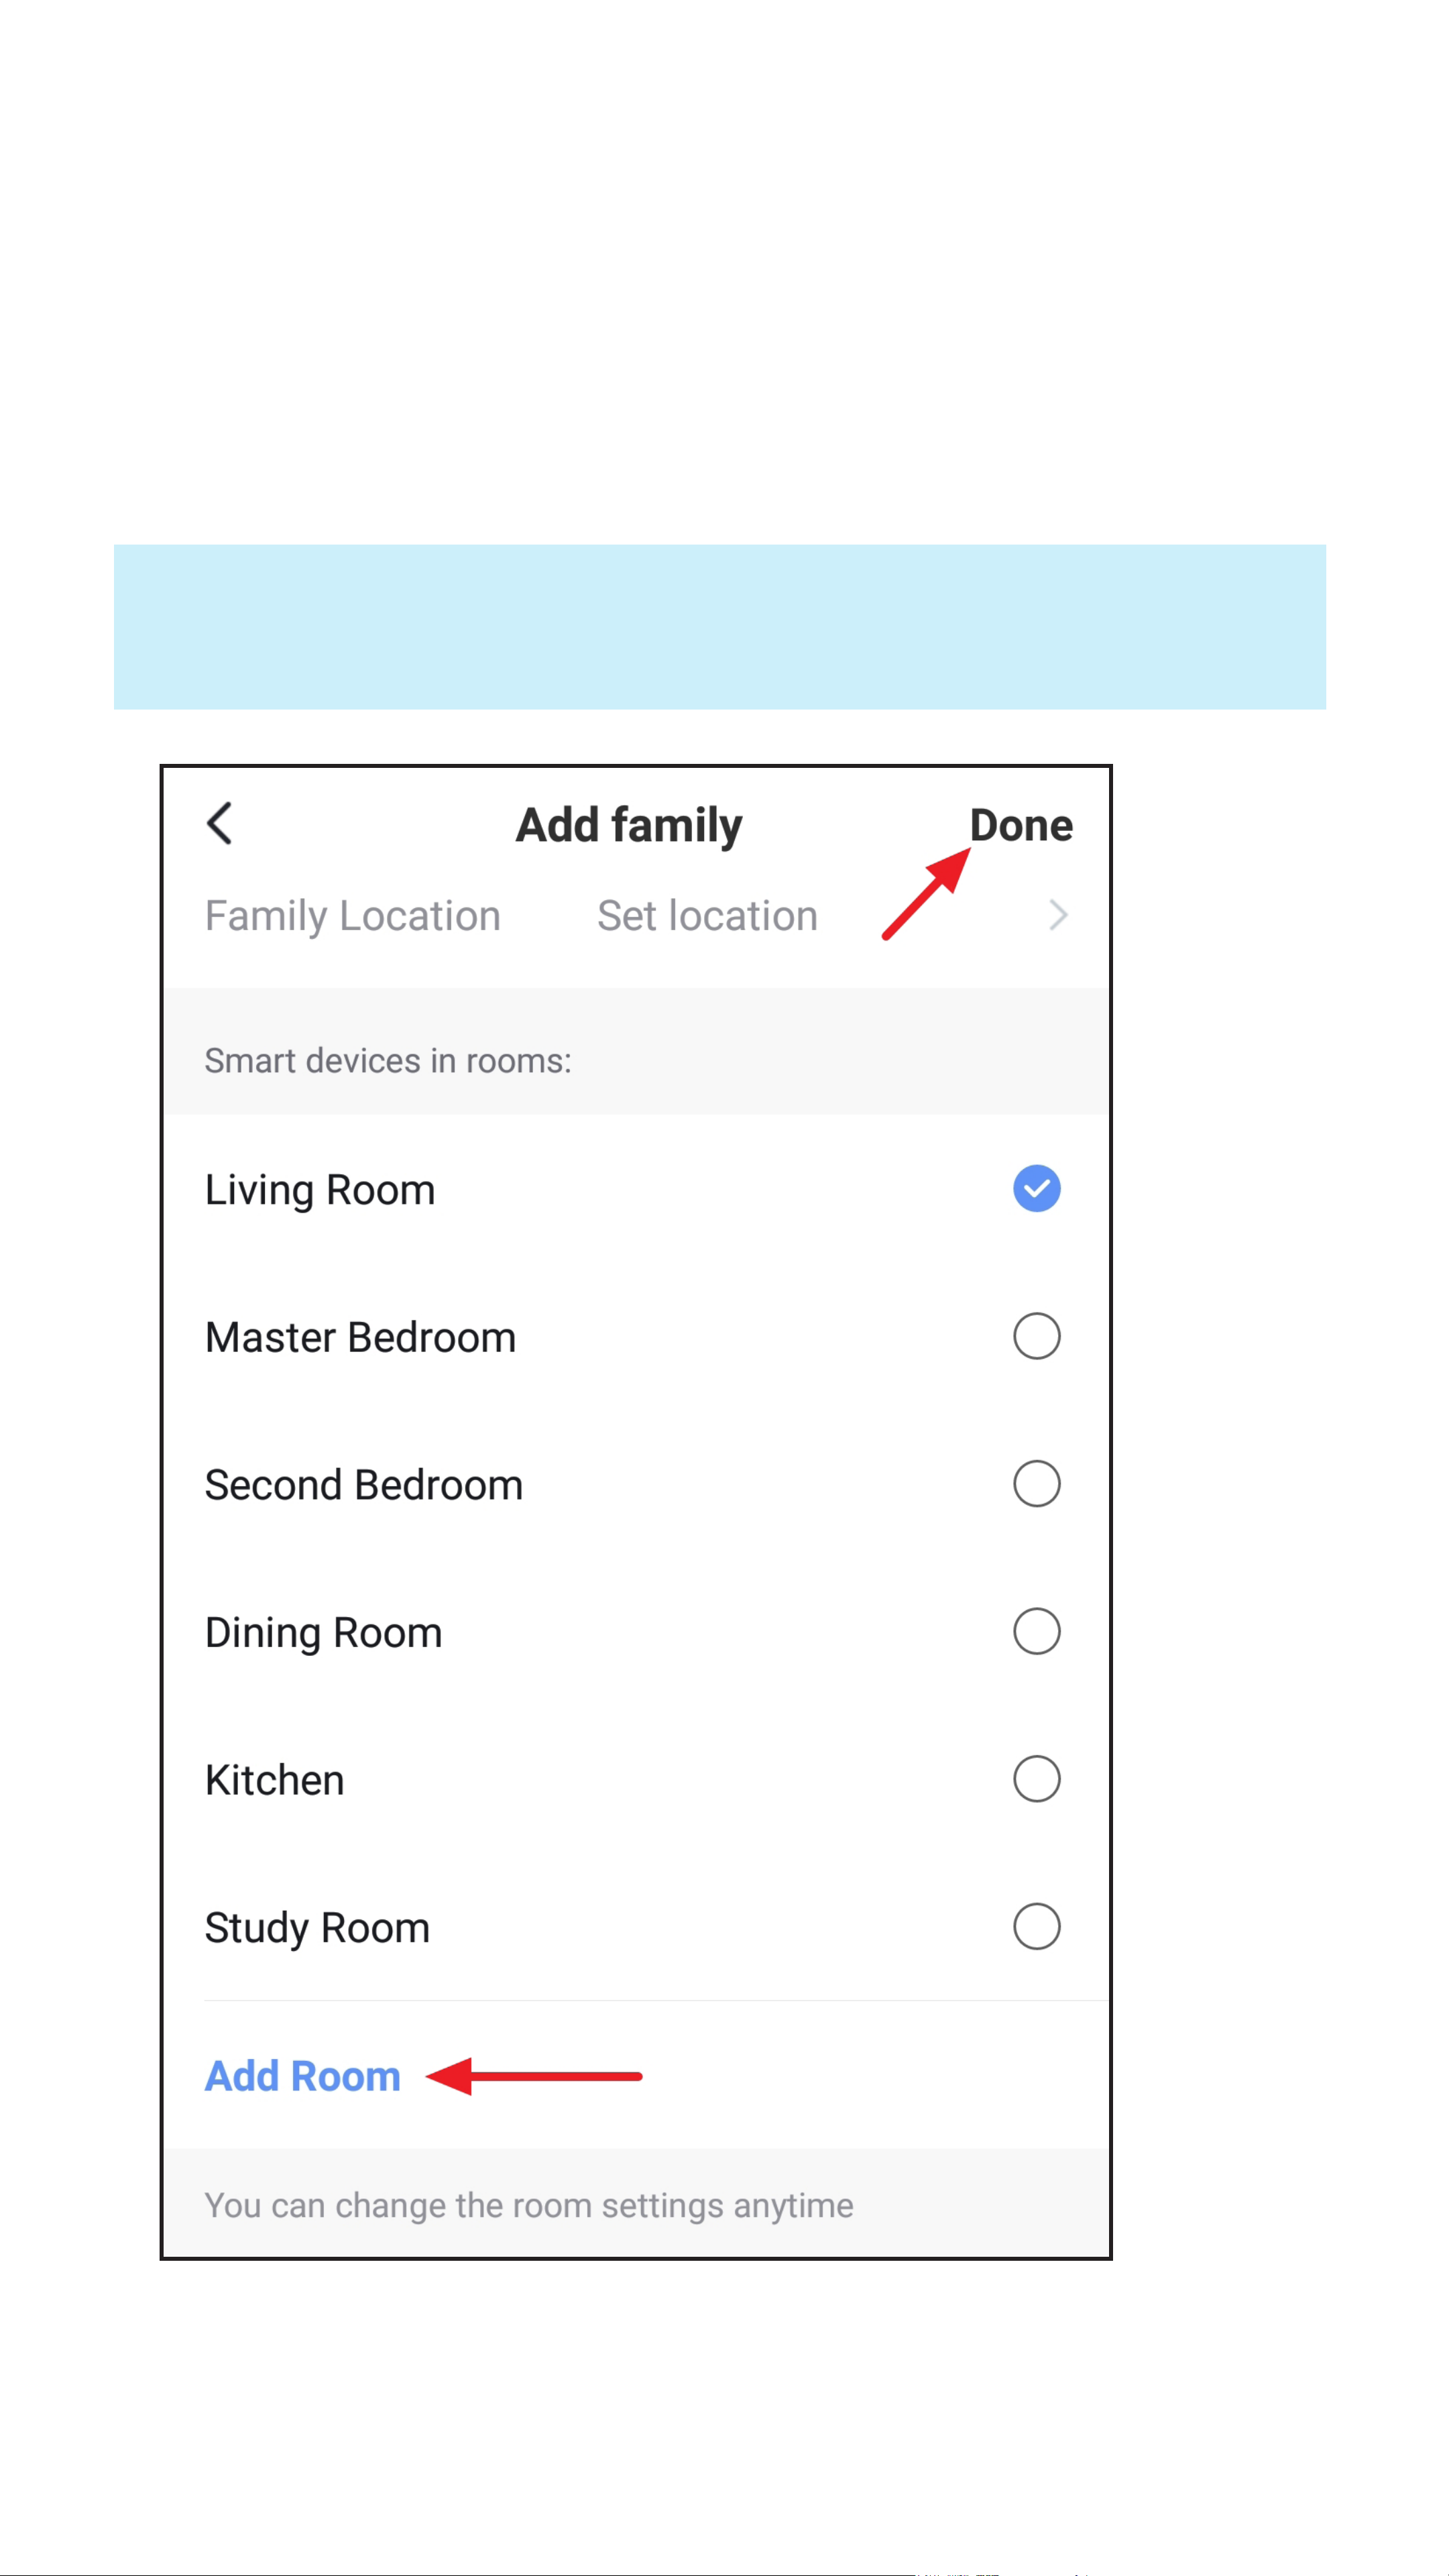
• If you swipe the display all the way down, you
can also add rooms yourself (lower arrow in the
gure).
• Finally, tap the button at the top right to save
the settings and create the family.
You can also edit the family later in the app
and, for example, add or remove rooms.
Page 19
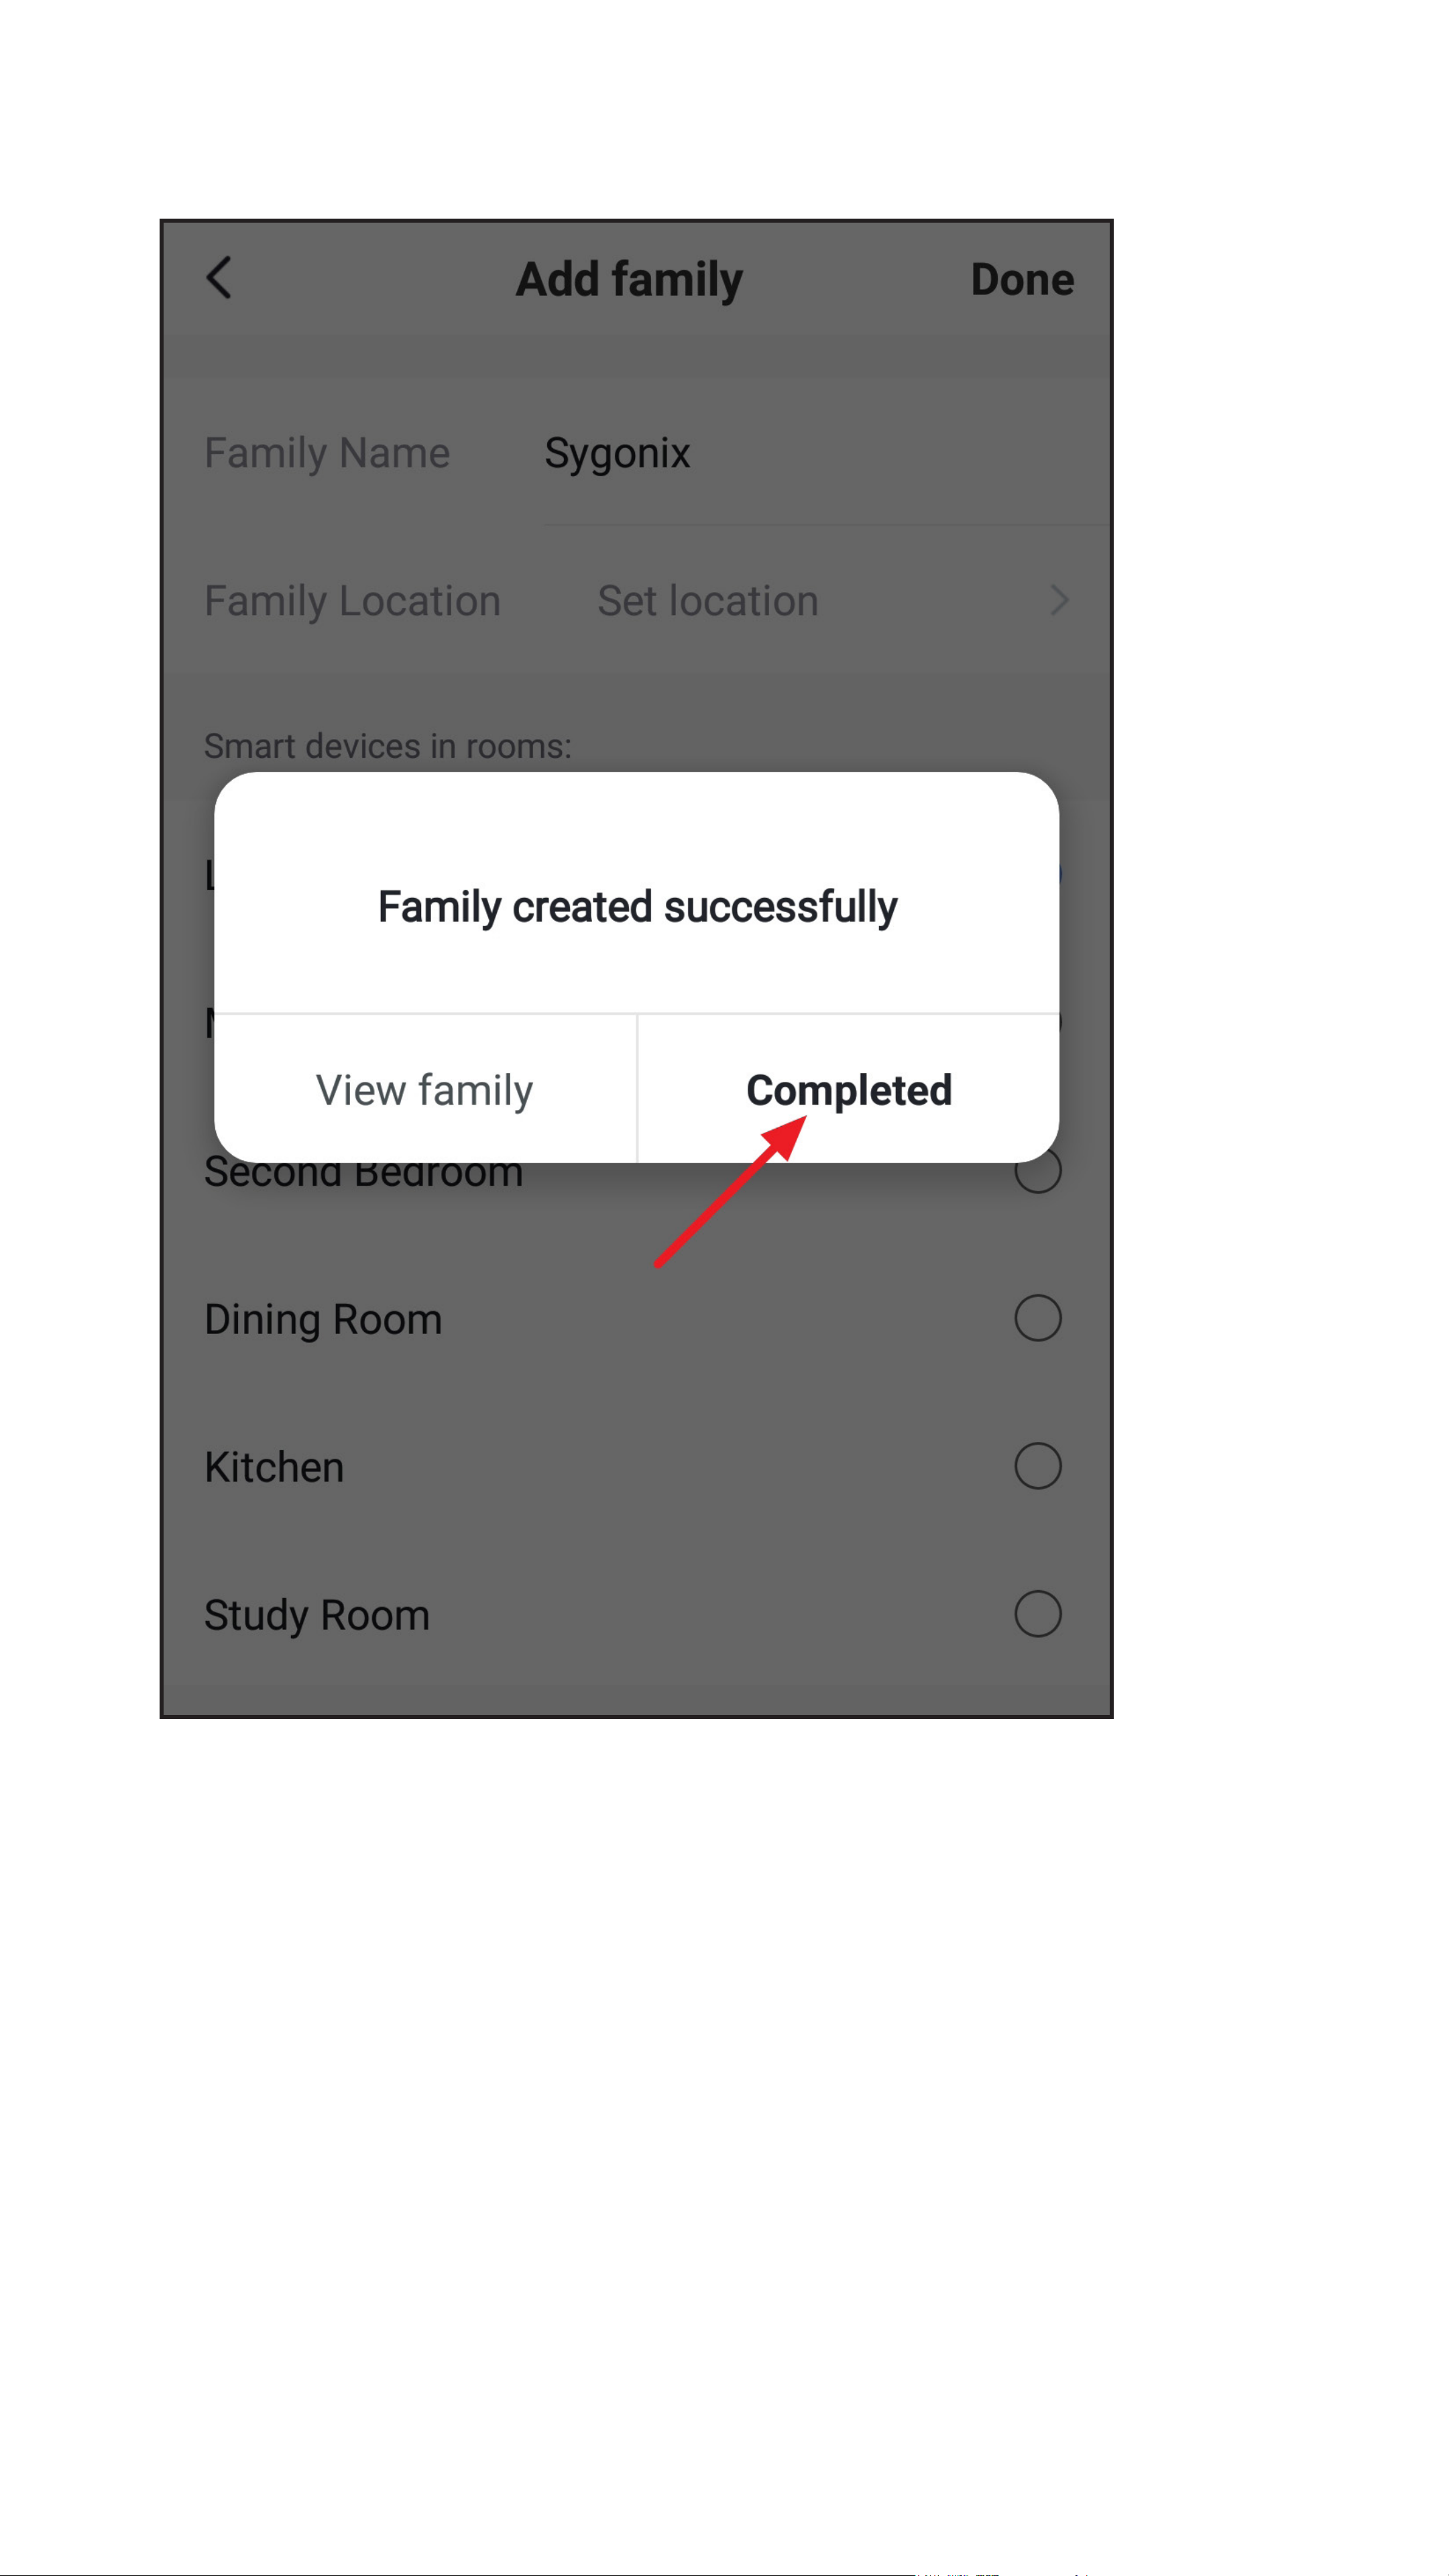
• Tap the right button (arrow in the gure).
Page 20
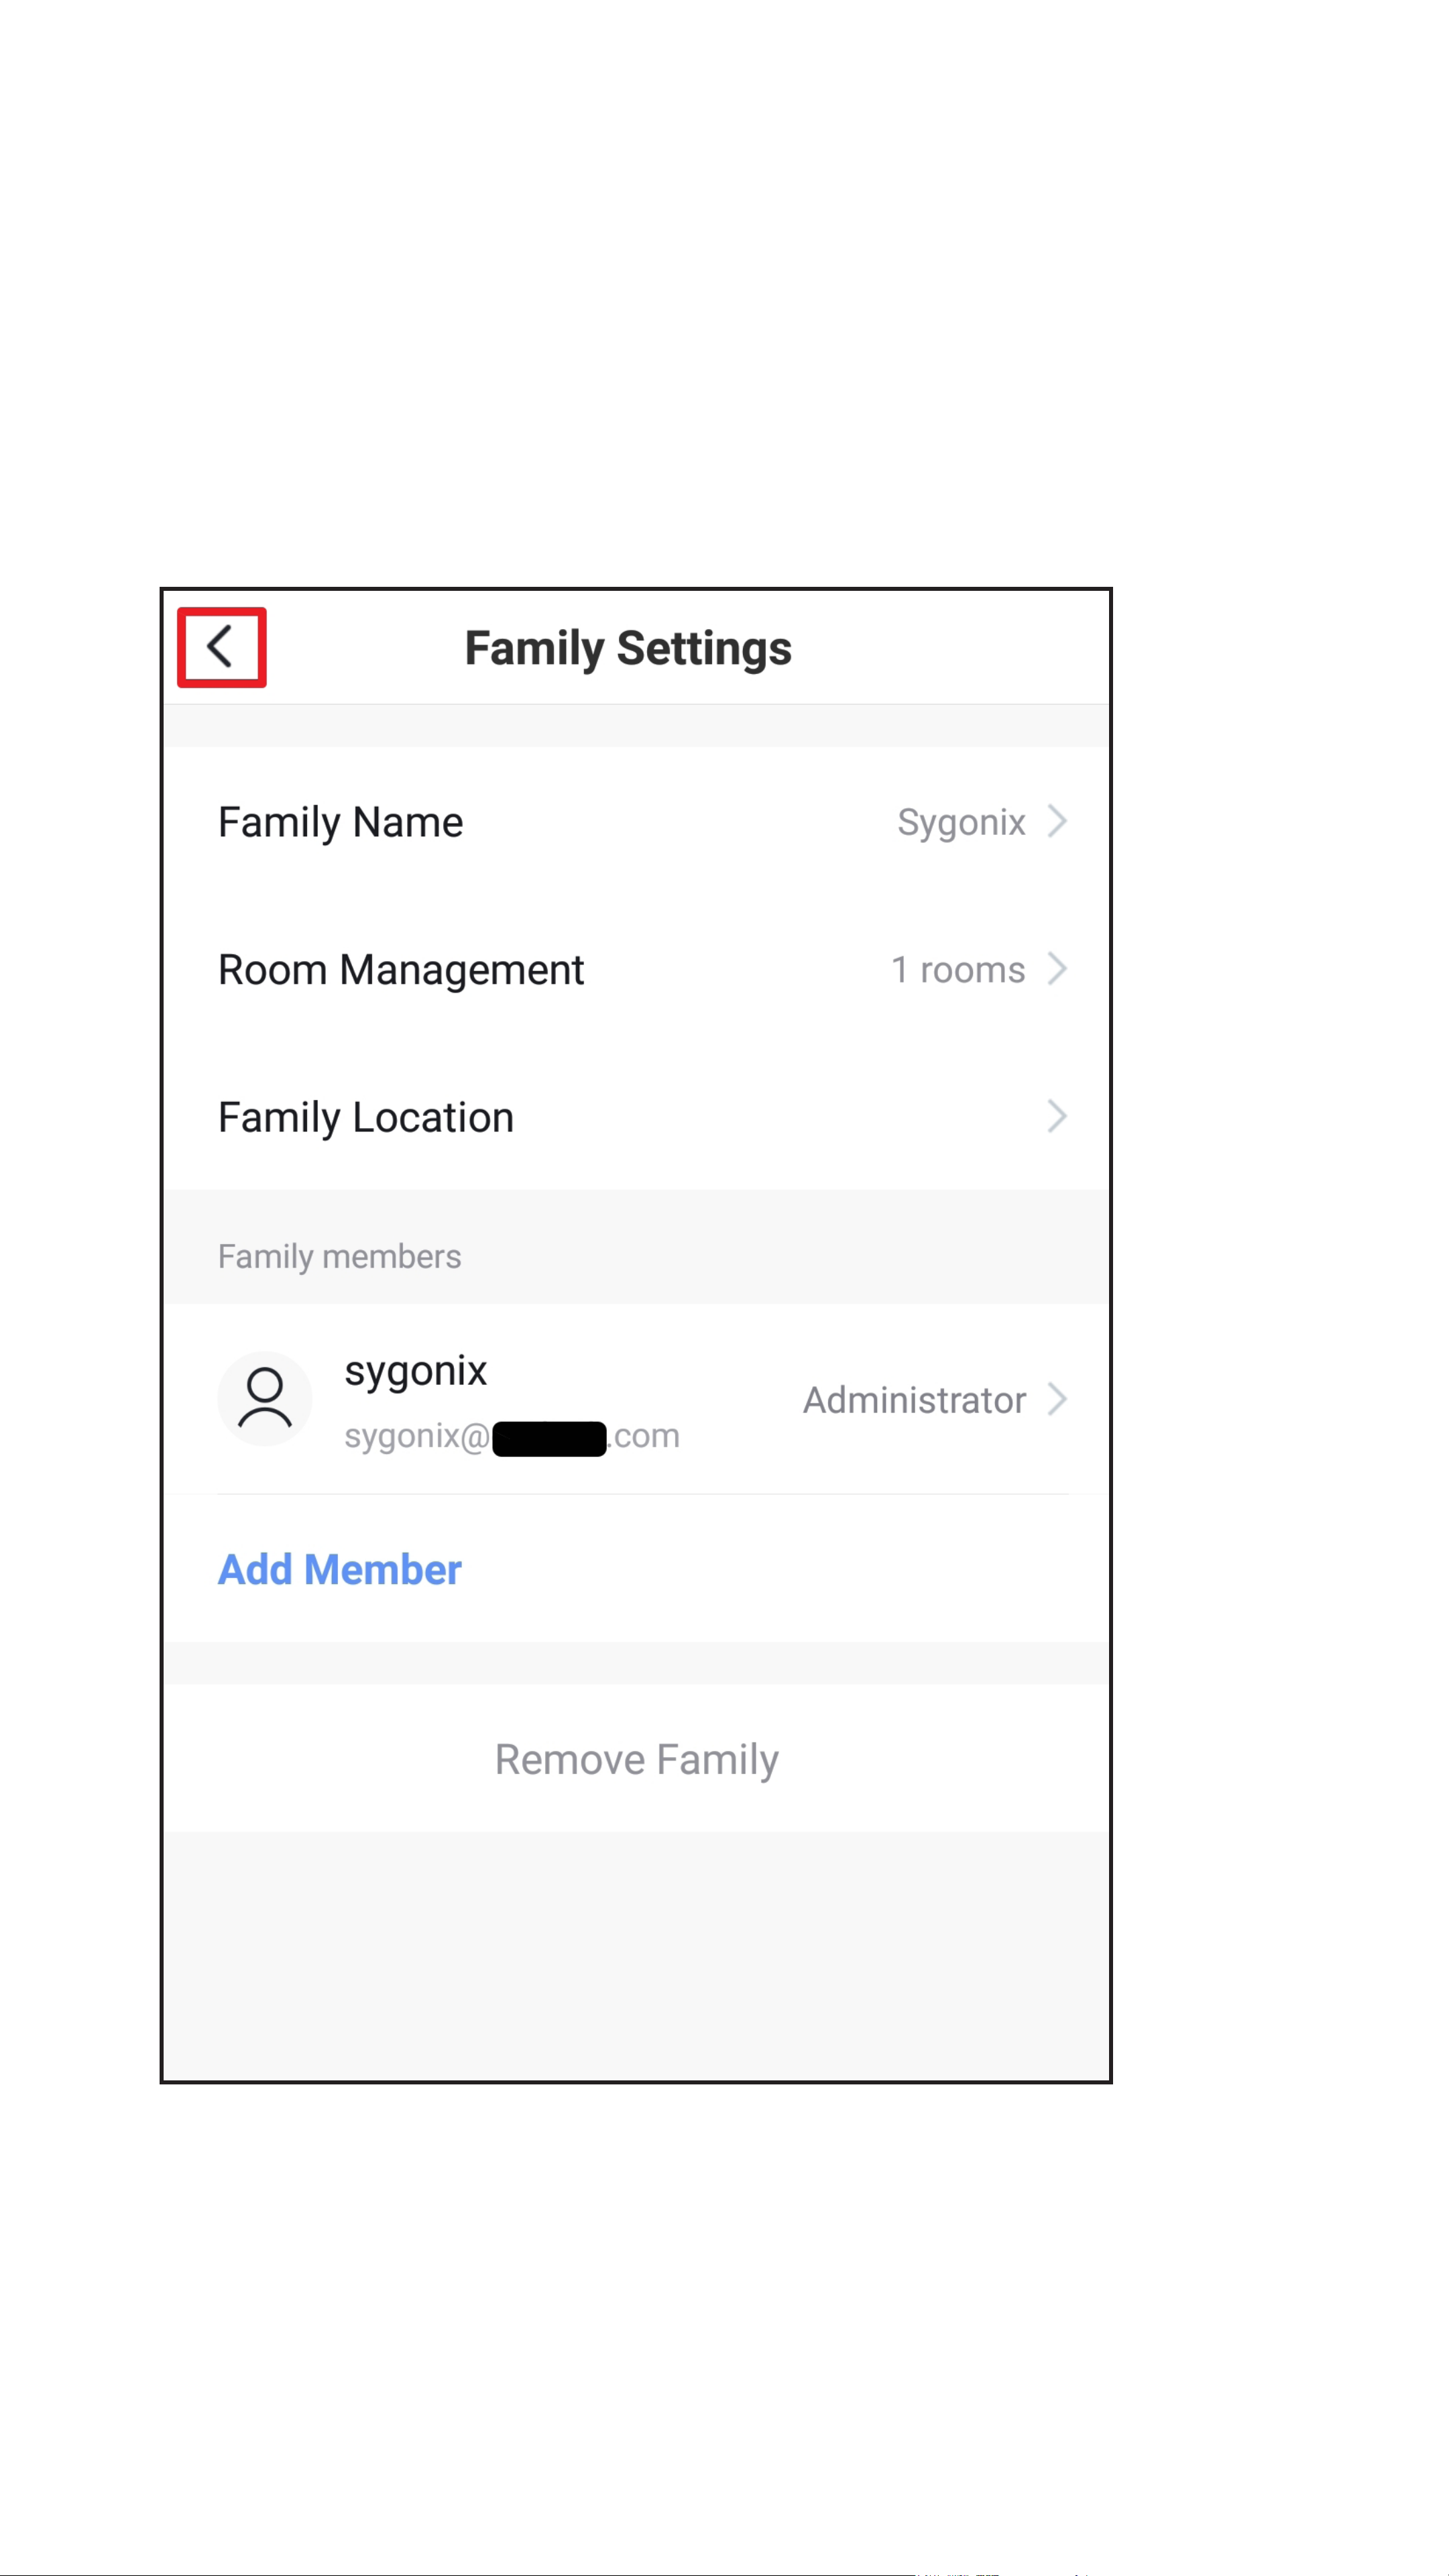
• You are now in the family settings.
Here you can change the family and, for
example, add more members (with their own
accounts).
• To exit the family settings, tap the top left
arrow (square in the gure).
Page 21

• After exiting the family settings, you will see
the main display of the app.
Page 22
Functions on the home
page of the app
Here you can get a brief overview of the control
functions on the home page of the app.
A1
A2
A14
A13
A12
A3
A11
A10
A9
A8
A4
A5
A6
A7
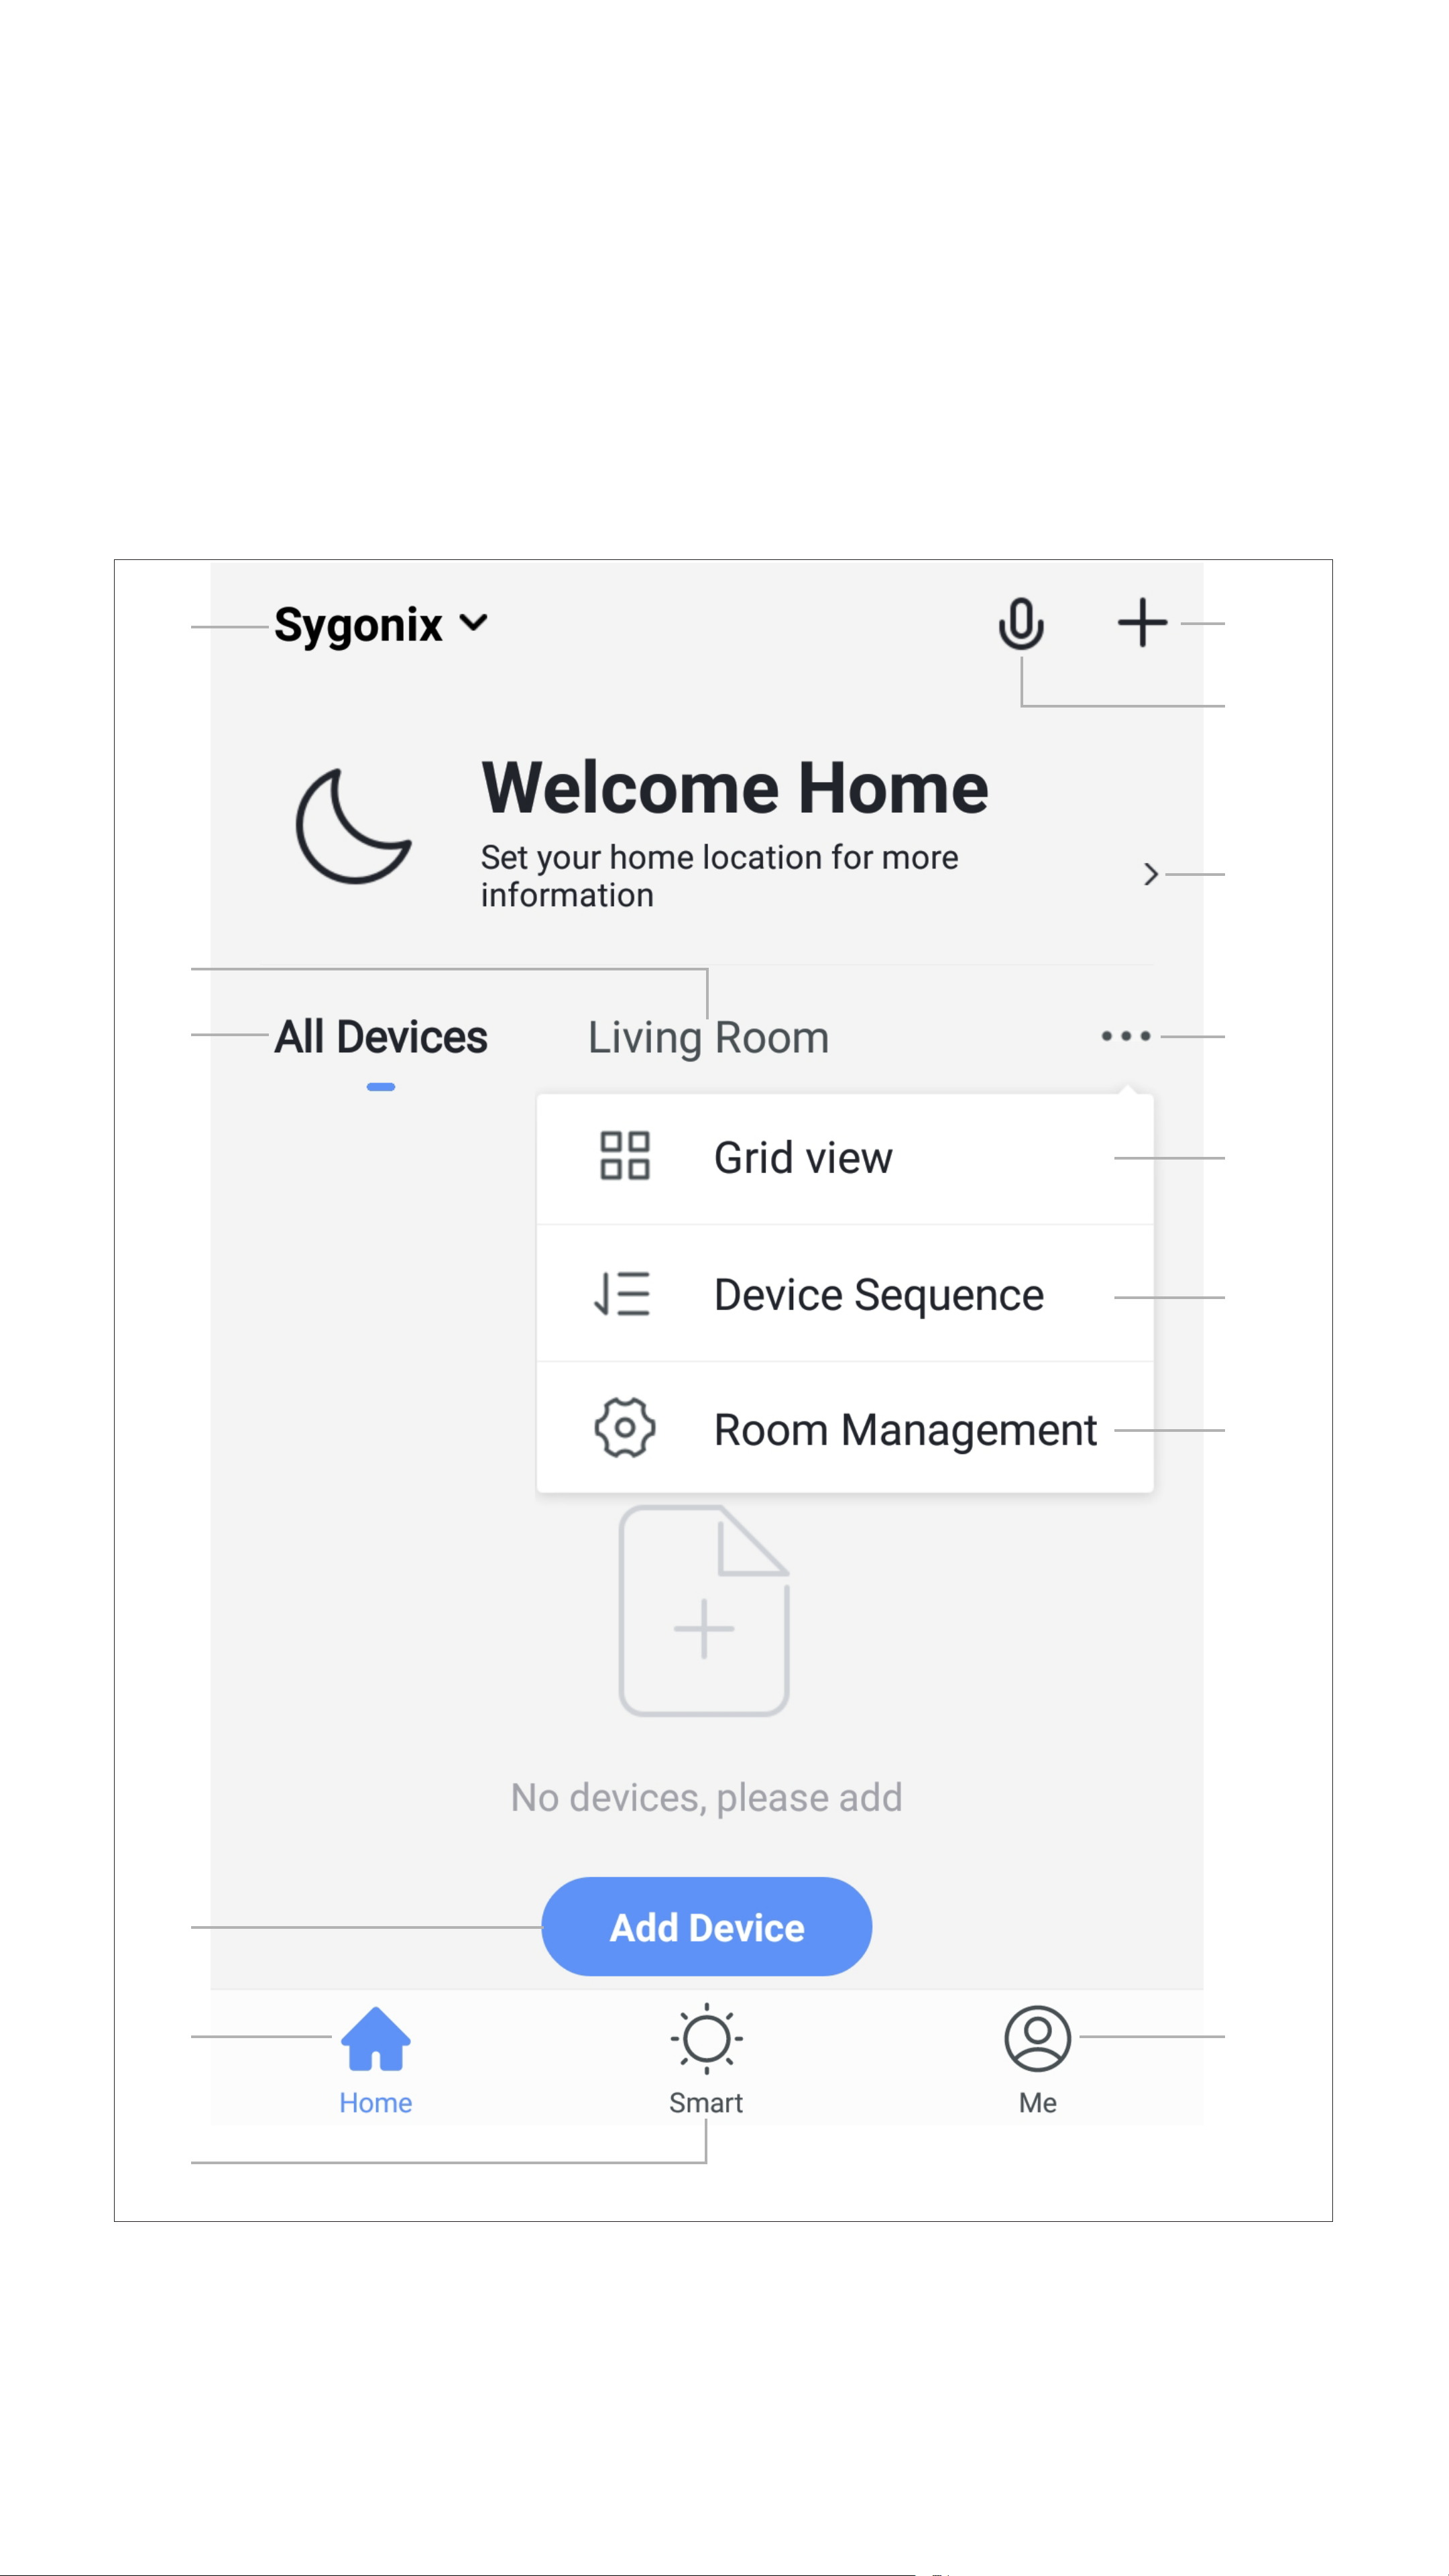
Page 23

A1 Opens a small menu, from which you can
open directly the family management
A2 Switches to the display of the respective
room
A3 Switches to the display of all devices
A4 Adds a new device; identical with A13
A5 Switches to the home page of the app
(this display)
A6 Switches to scenes and automation
A7 Switches to your prole and settings
A8 Directly opens the room management
A9 Switches to the device order settings page
A10 Switches the display of the devices and
groups in the main display between a list
display and a grid display (icons next to
each other)
A11 The three dots open the small menu, see
items A8 and A9
A12 Directly opens the location selection
A13 Opens the voice control of the app
A14 Adds a new device; identical with A4
To refresh, simply swipe down in the app view.
Page 24

Conguration and
operation
Adding a new device
• To add a new device, on the home page of
the app tap either “+” at the top right or the
blue “Add device” button at the bottom.
Page 25

• For the built-in Wi-Fi switch, on the next page
rst select the uppermost item in the menu on
the left and then “Switch” on the right-hand
side.
Page 26

• Before you continue, connect the built-in WiFi switch to the power supply, if you have
not already done so, and wait until the start
process is complete.
• Now keep the button on the built-in Wi-Fi
switch pressed until the built-in LED ashes
green quickly.
• Then tap the bottom blue button in the app.
Page 27

• If your Wi-Fi network has not been accepted
automatically, rst select it and then enter the
Wi-Fi password below.
• Tap the bottom blue button to save the
selection and continue.
Please note that only 2.4 GHz Wi-Fi
networks are supported.
Page 28
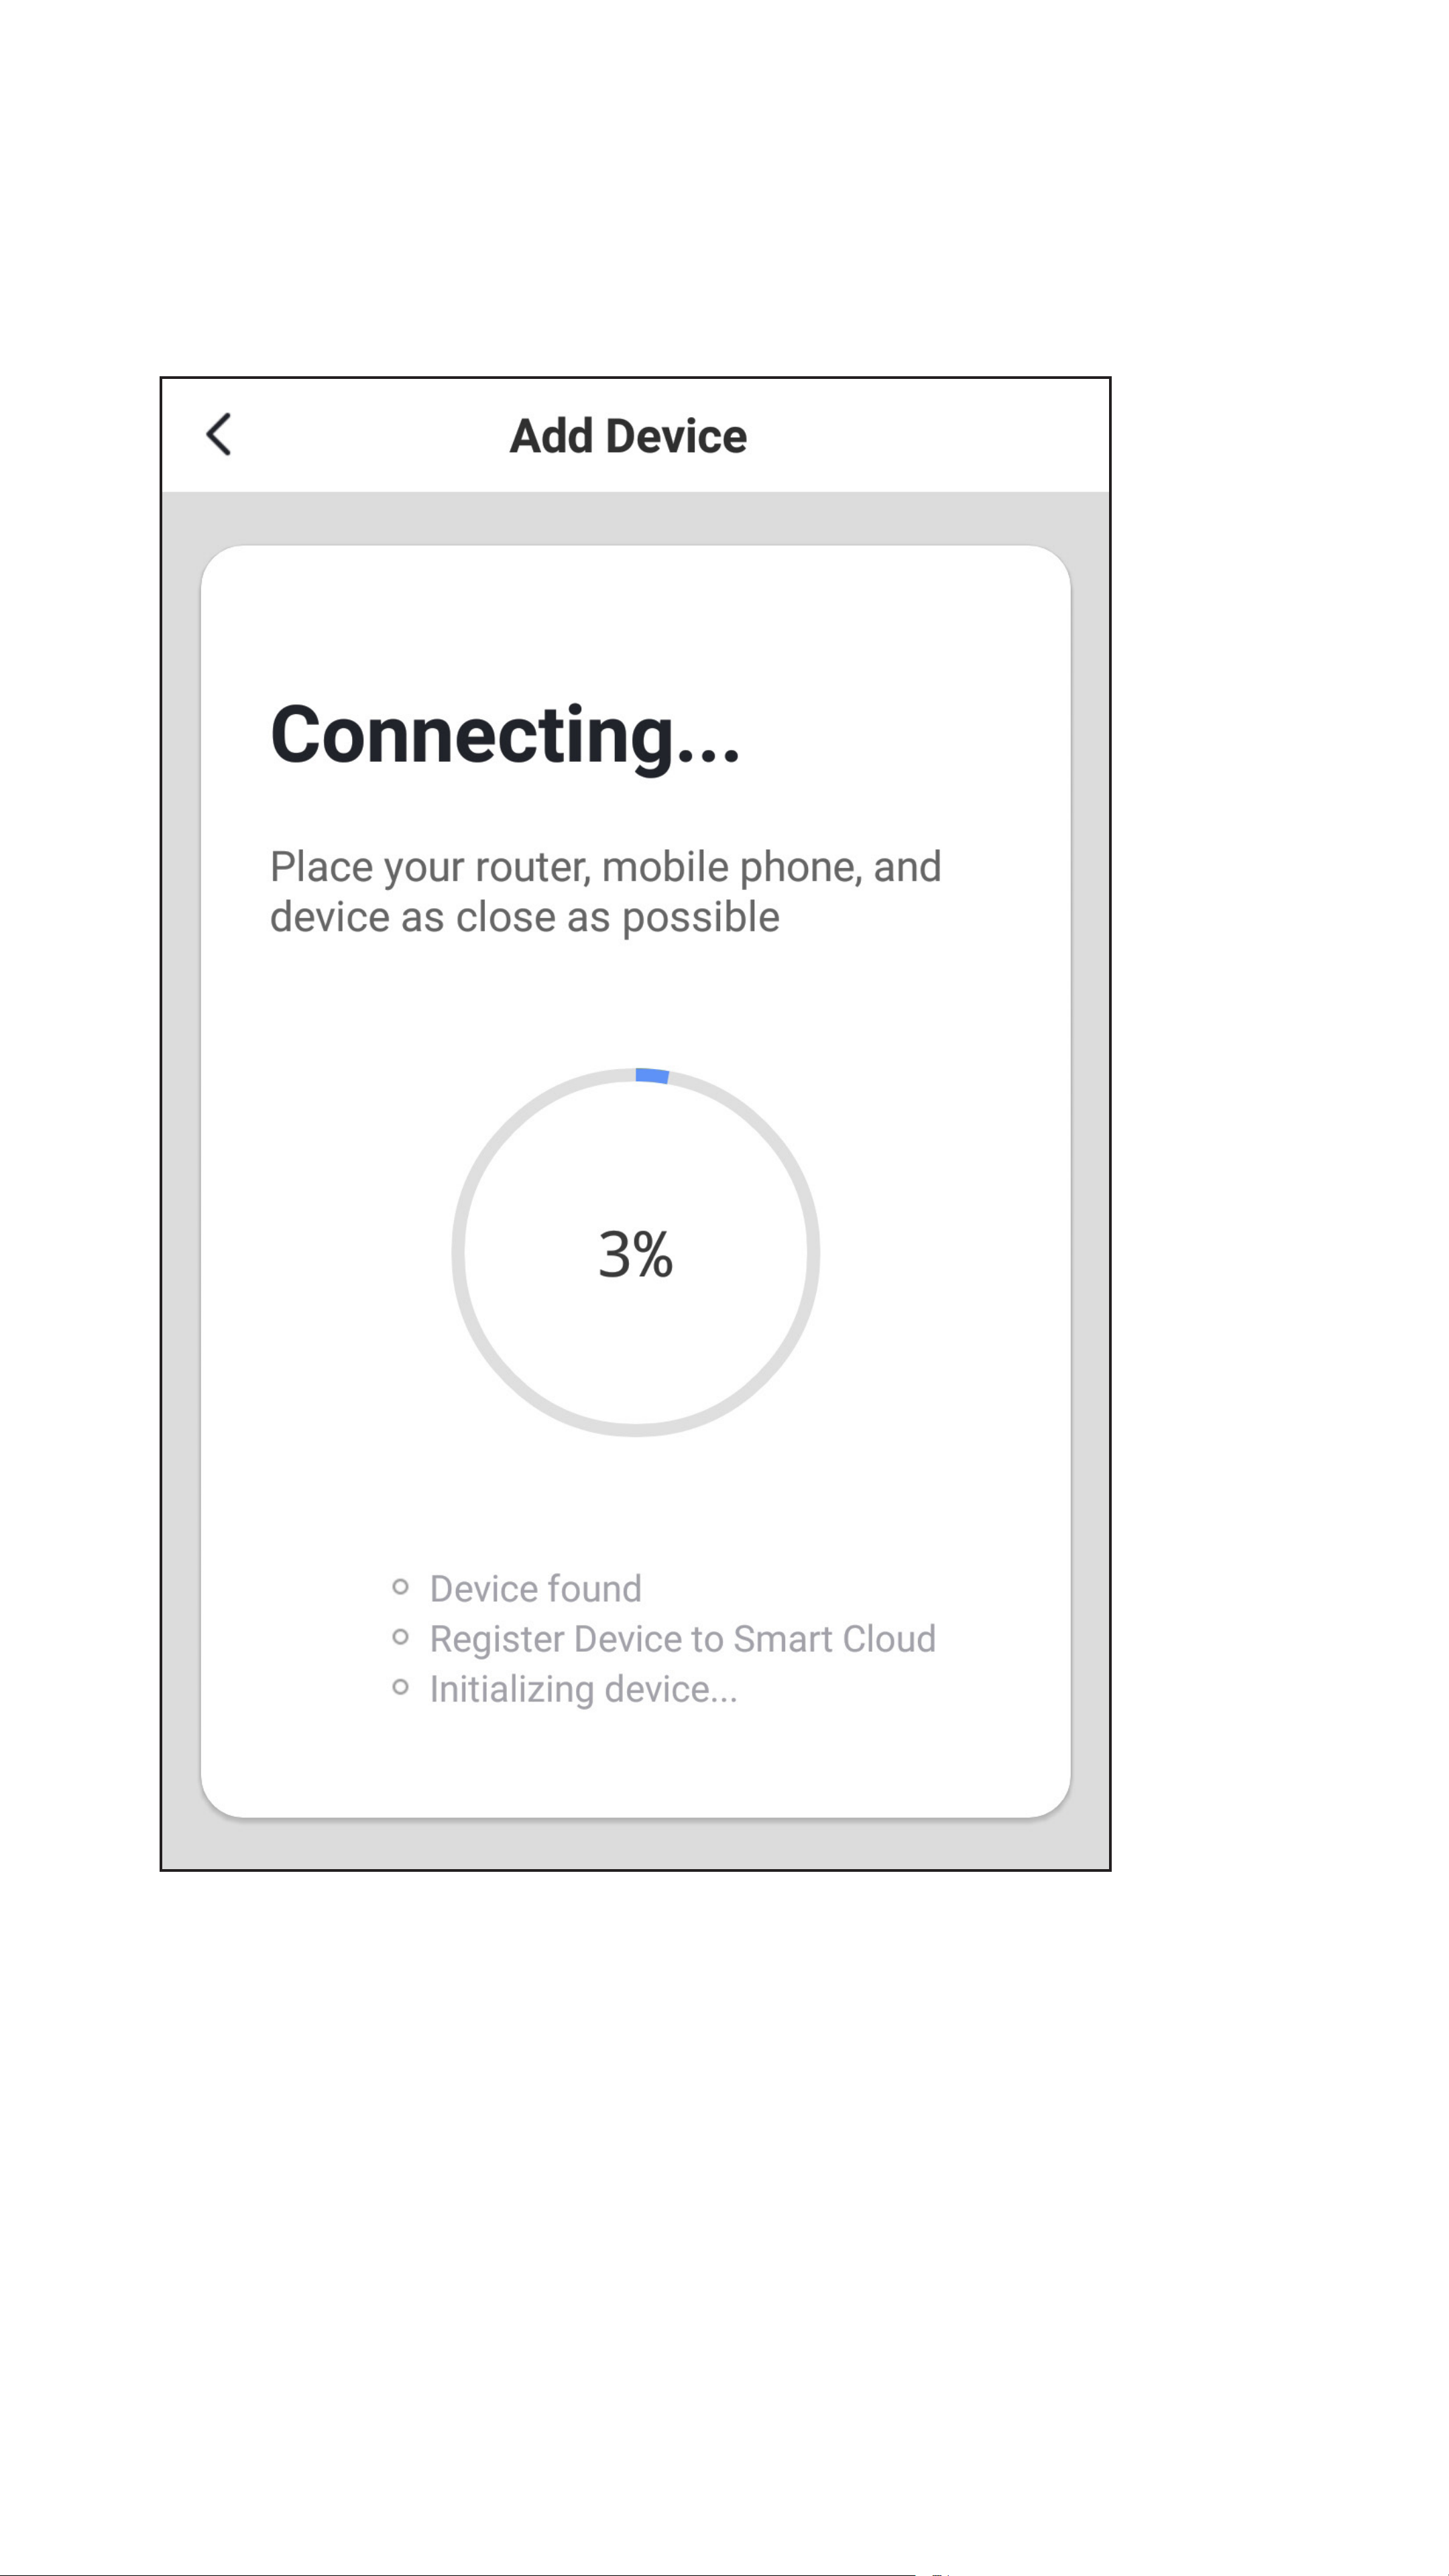
• The app will now search for the device and
connect to it.
• Then the Wi-Fi settings will be transferred.
Page 29

• The connection has been successfully
established. To assign the newly added
device to a room, tap the desired room under
the name of the device so that it is highlighted
with a dark background.
• Tap the pencil icon to assign an individual
name to the new device.
• Finally, tap the bottom blue button again to
complete the setup.
Page 30

• Now you see the main operating page of the
smart device. The operation is explained in
the following chapter.
• To return to the home page of the app, tap the
left arrow at the top left.
Page 31

• On the home page you will now see the newly
added device.
Page 32
Operating the built-in Wi-Fi
switch
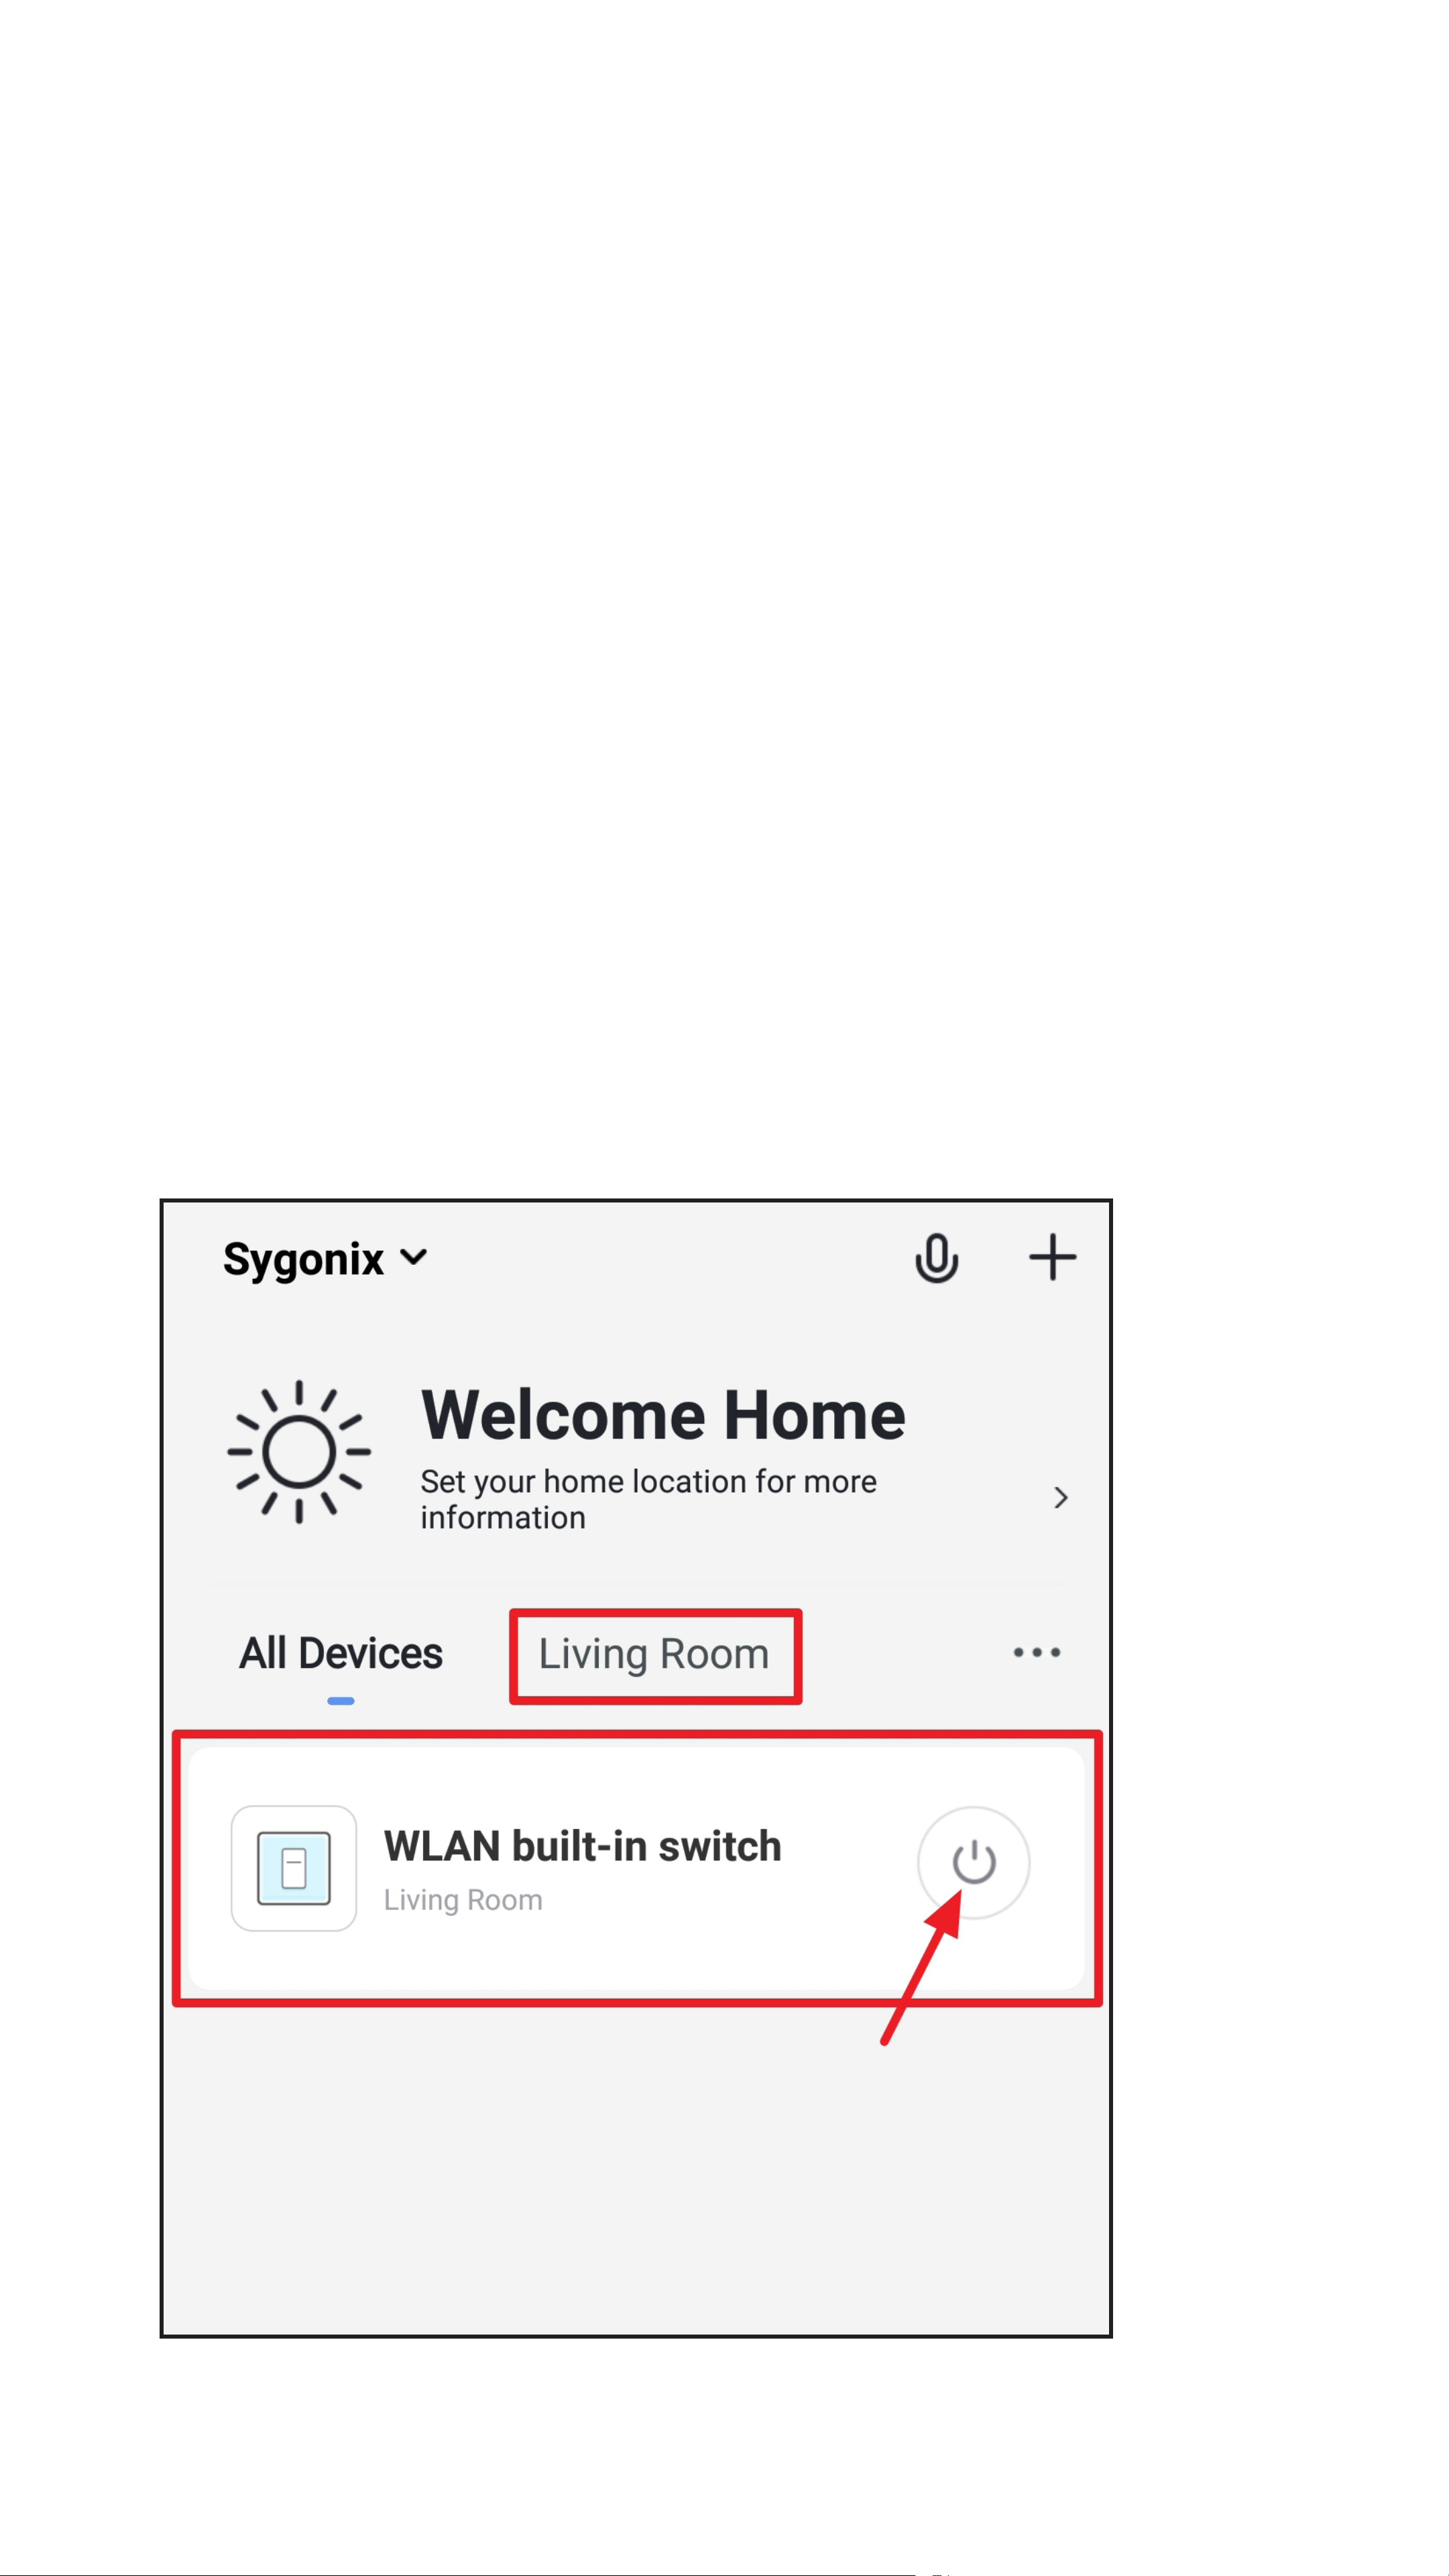
• You can turn the respective device on and off
using the home page of the app.
To do this, tap the on/off button depicted as an
icon of the respective switch (see arrow in the
gure).
• The gure shows the “All Devices” display. If
you tap to switch to a room, you will only see
the devices that are linked to the room (small
square in the gure).
• For further operation, simply tap the desired
device (big square in the gure).
Page 33

• Here you can also turn the device on and off.
To do this, tap either the on/off button in the
middle of the gure or the bottom left button
with two circles.
• Currently the switch is disabled. On the
one hand, it can be recognised by the dark
background, and, on the other hand, the
current status is displayed below the on/off
button (see small square in the gure).
• Turn on the built-in Wi-Fi switch.
Page 34
• The background will thus become light and
the status display will also change.
• To programme a countdown, tap the icon at
the bottom centre.
Page 35
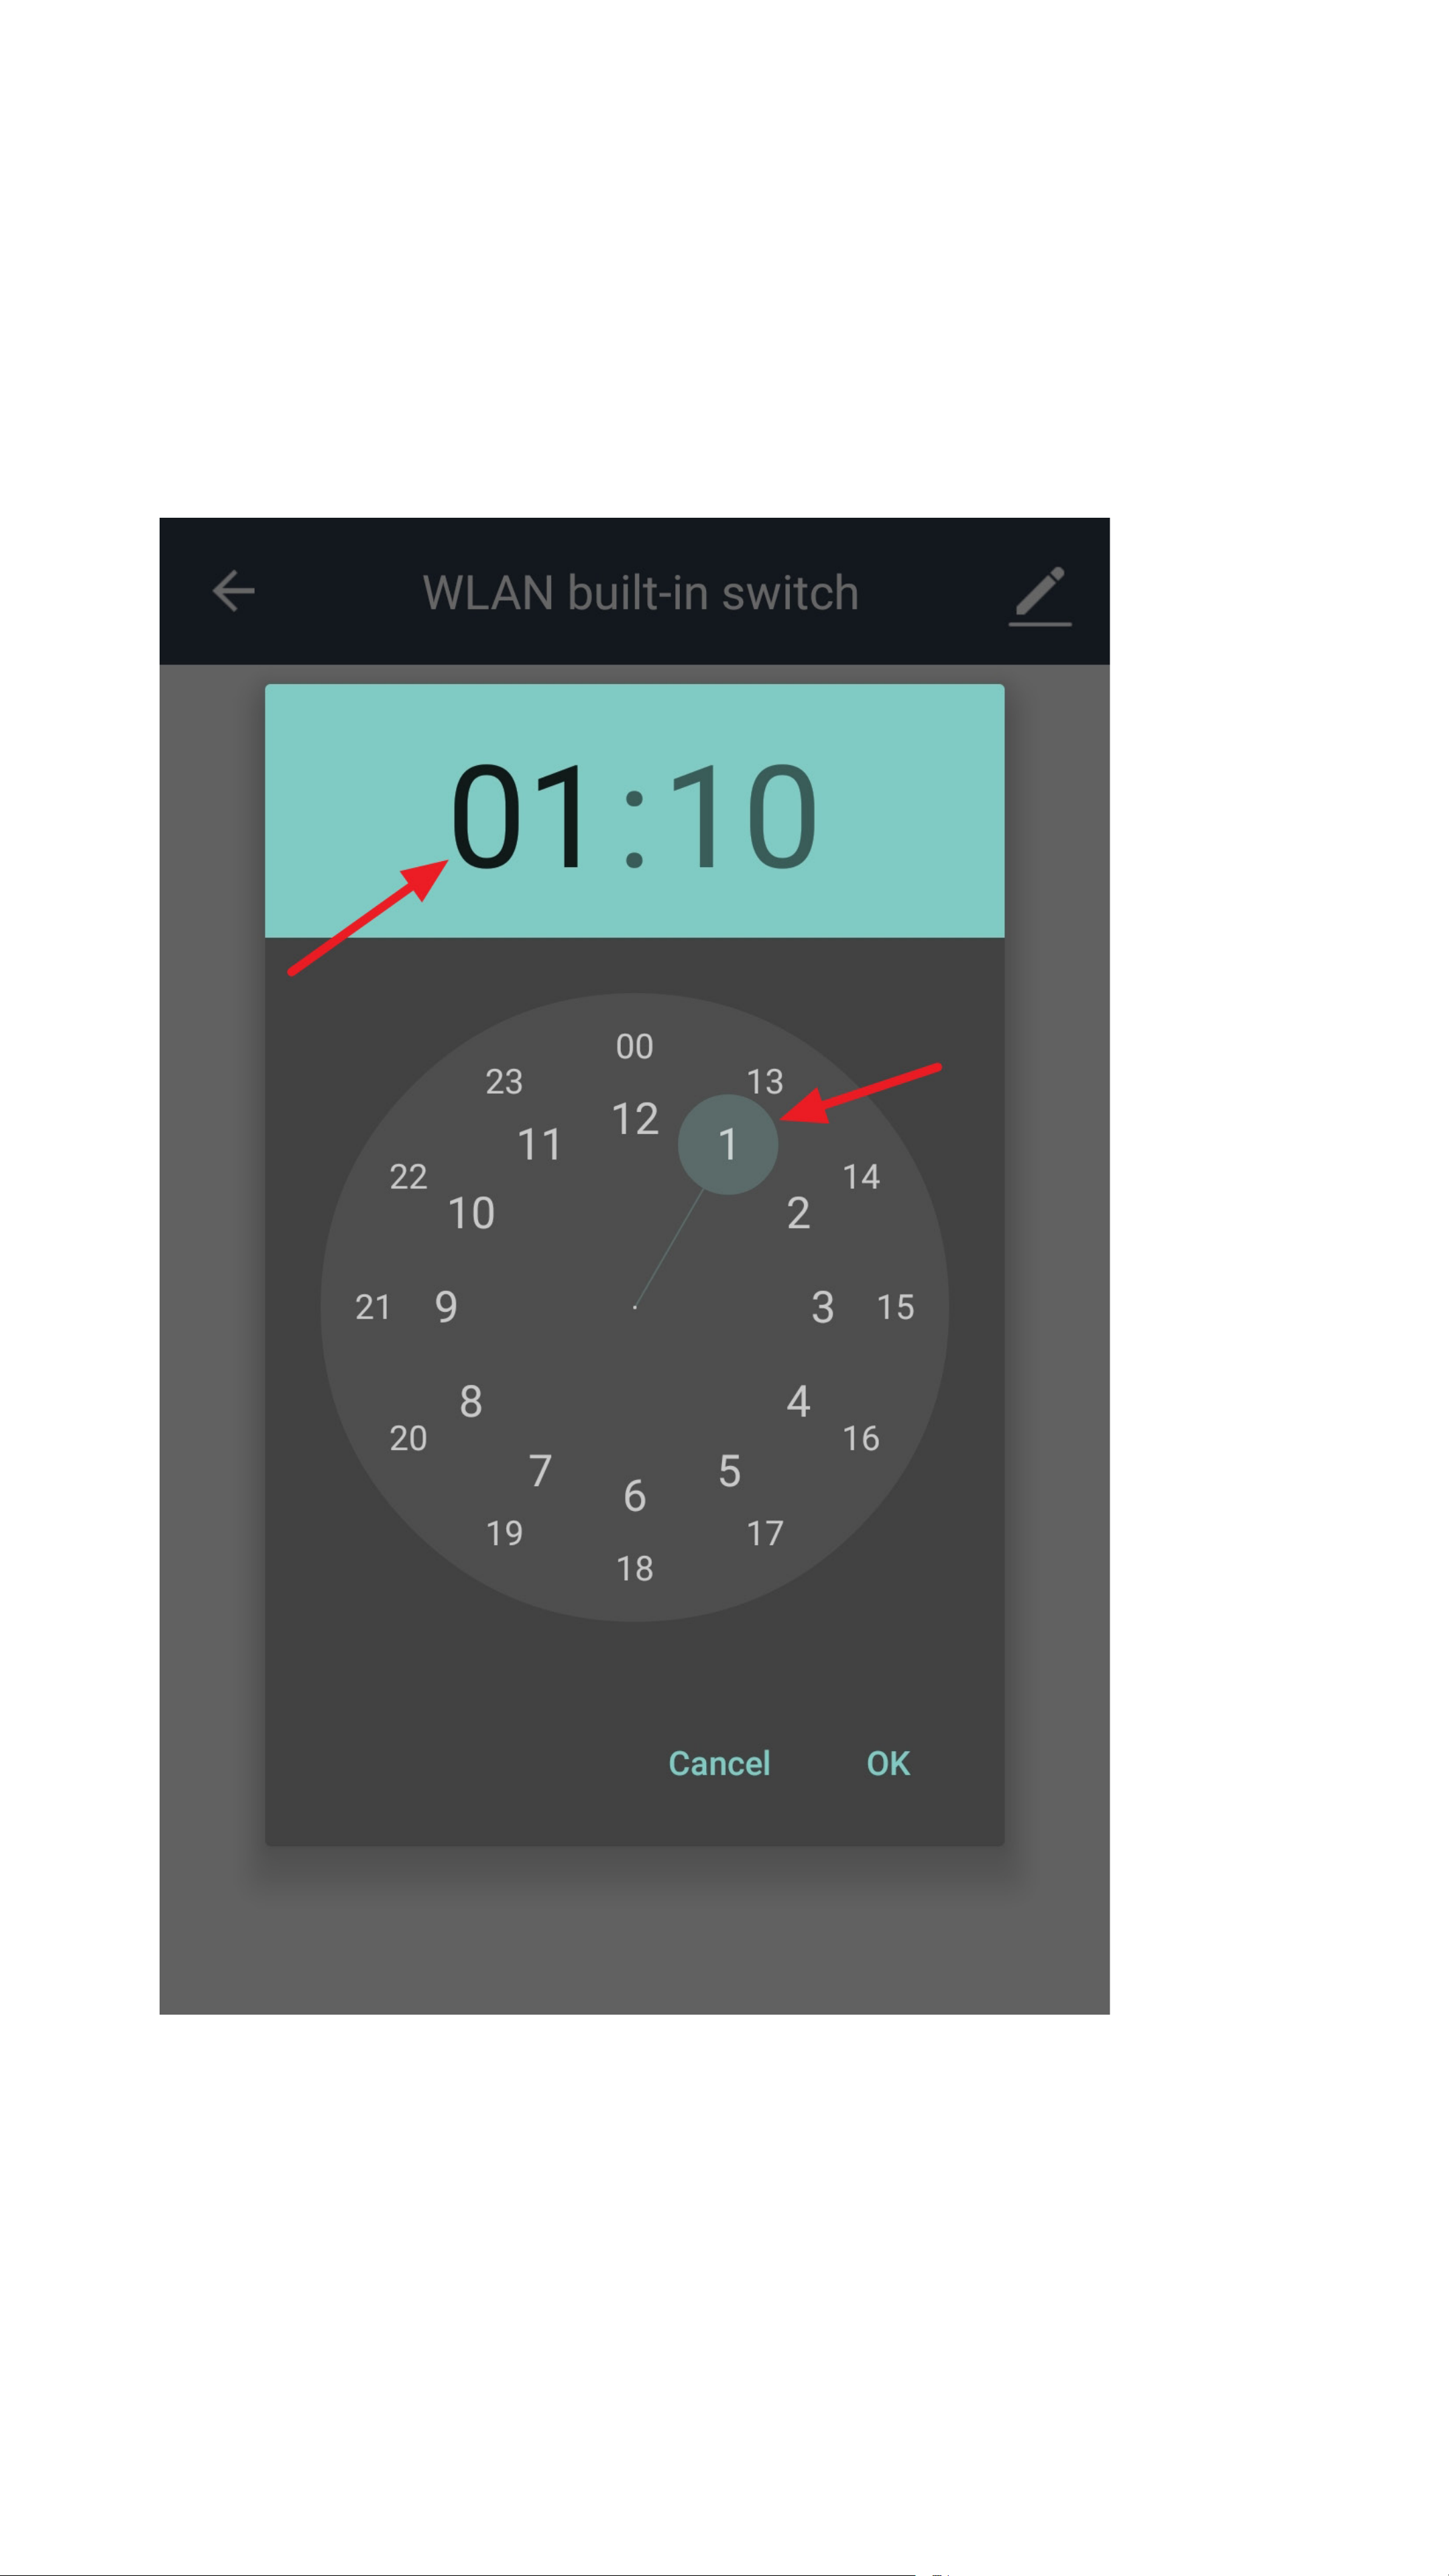
• The hour selection is enabled automatically.
• Set the desired hour.
To do this, simply move your nger around the
small circle (set on 1 in the gure), or just tap
the desired hour.
Page 36

• Tap the minute selection.
• Set the desired minutes in the same fashion
as the hour.
• Tap “OK” to conrm and save.
Page 37

• The status eld now shows the current status,
as well as the countdown and what will
happen at the end of the countdown.
In this case, the switch will turn off at the end
of the countdown.
• If you want the switch to remain enabled after
the countdown, it must be disabled during
programming.
• To clear the countdown, simply perform a
manual switching operation.
• To programme a timer, tap the icon at the
bottom right.
Page 38
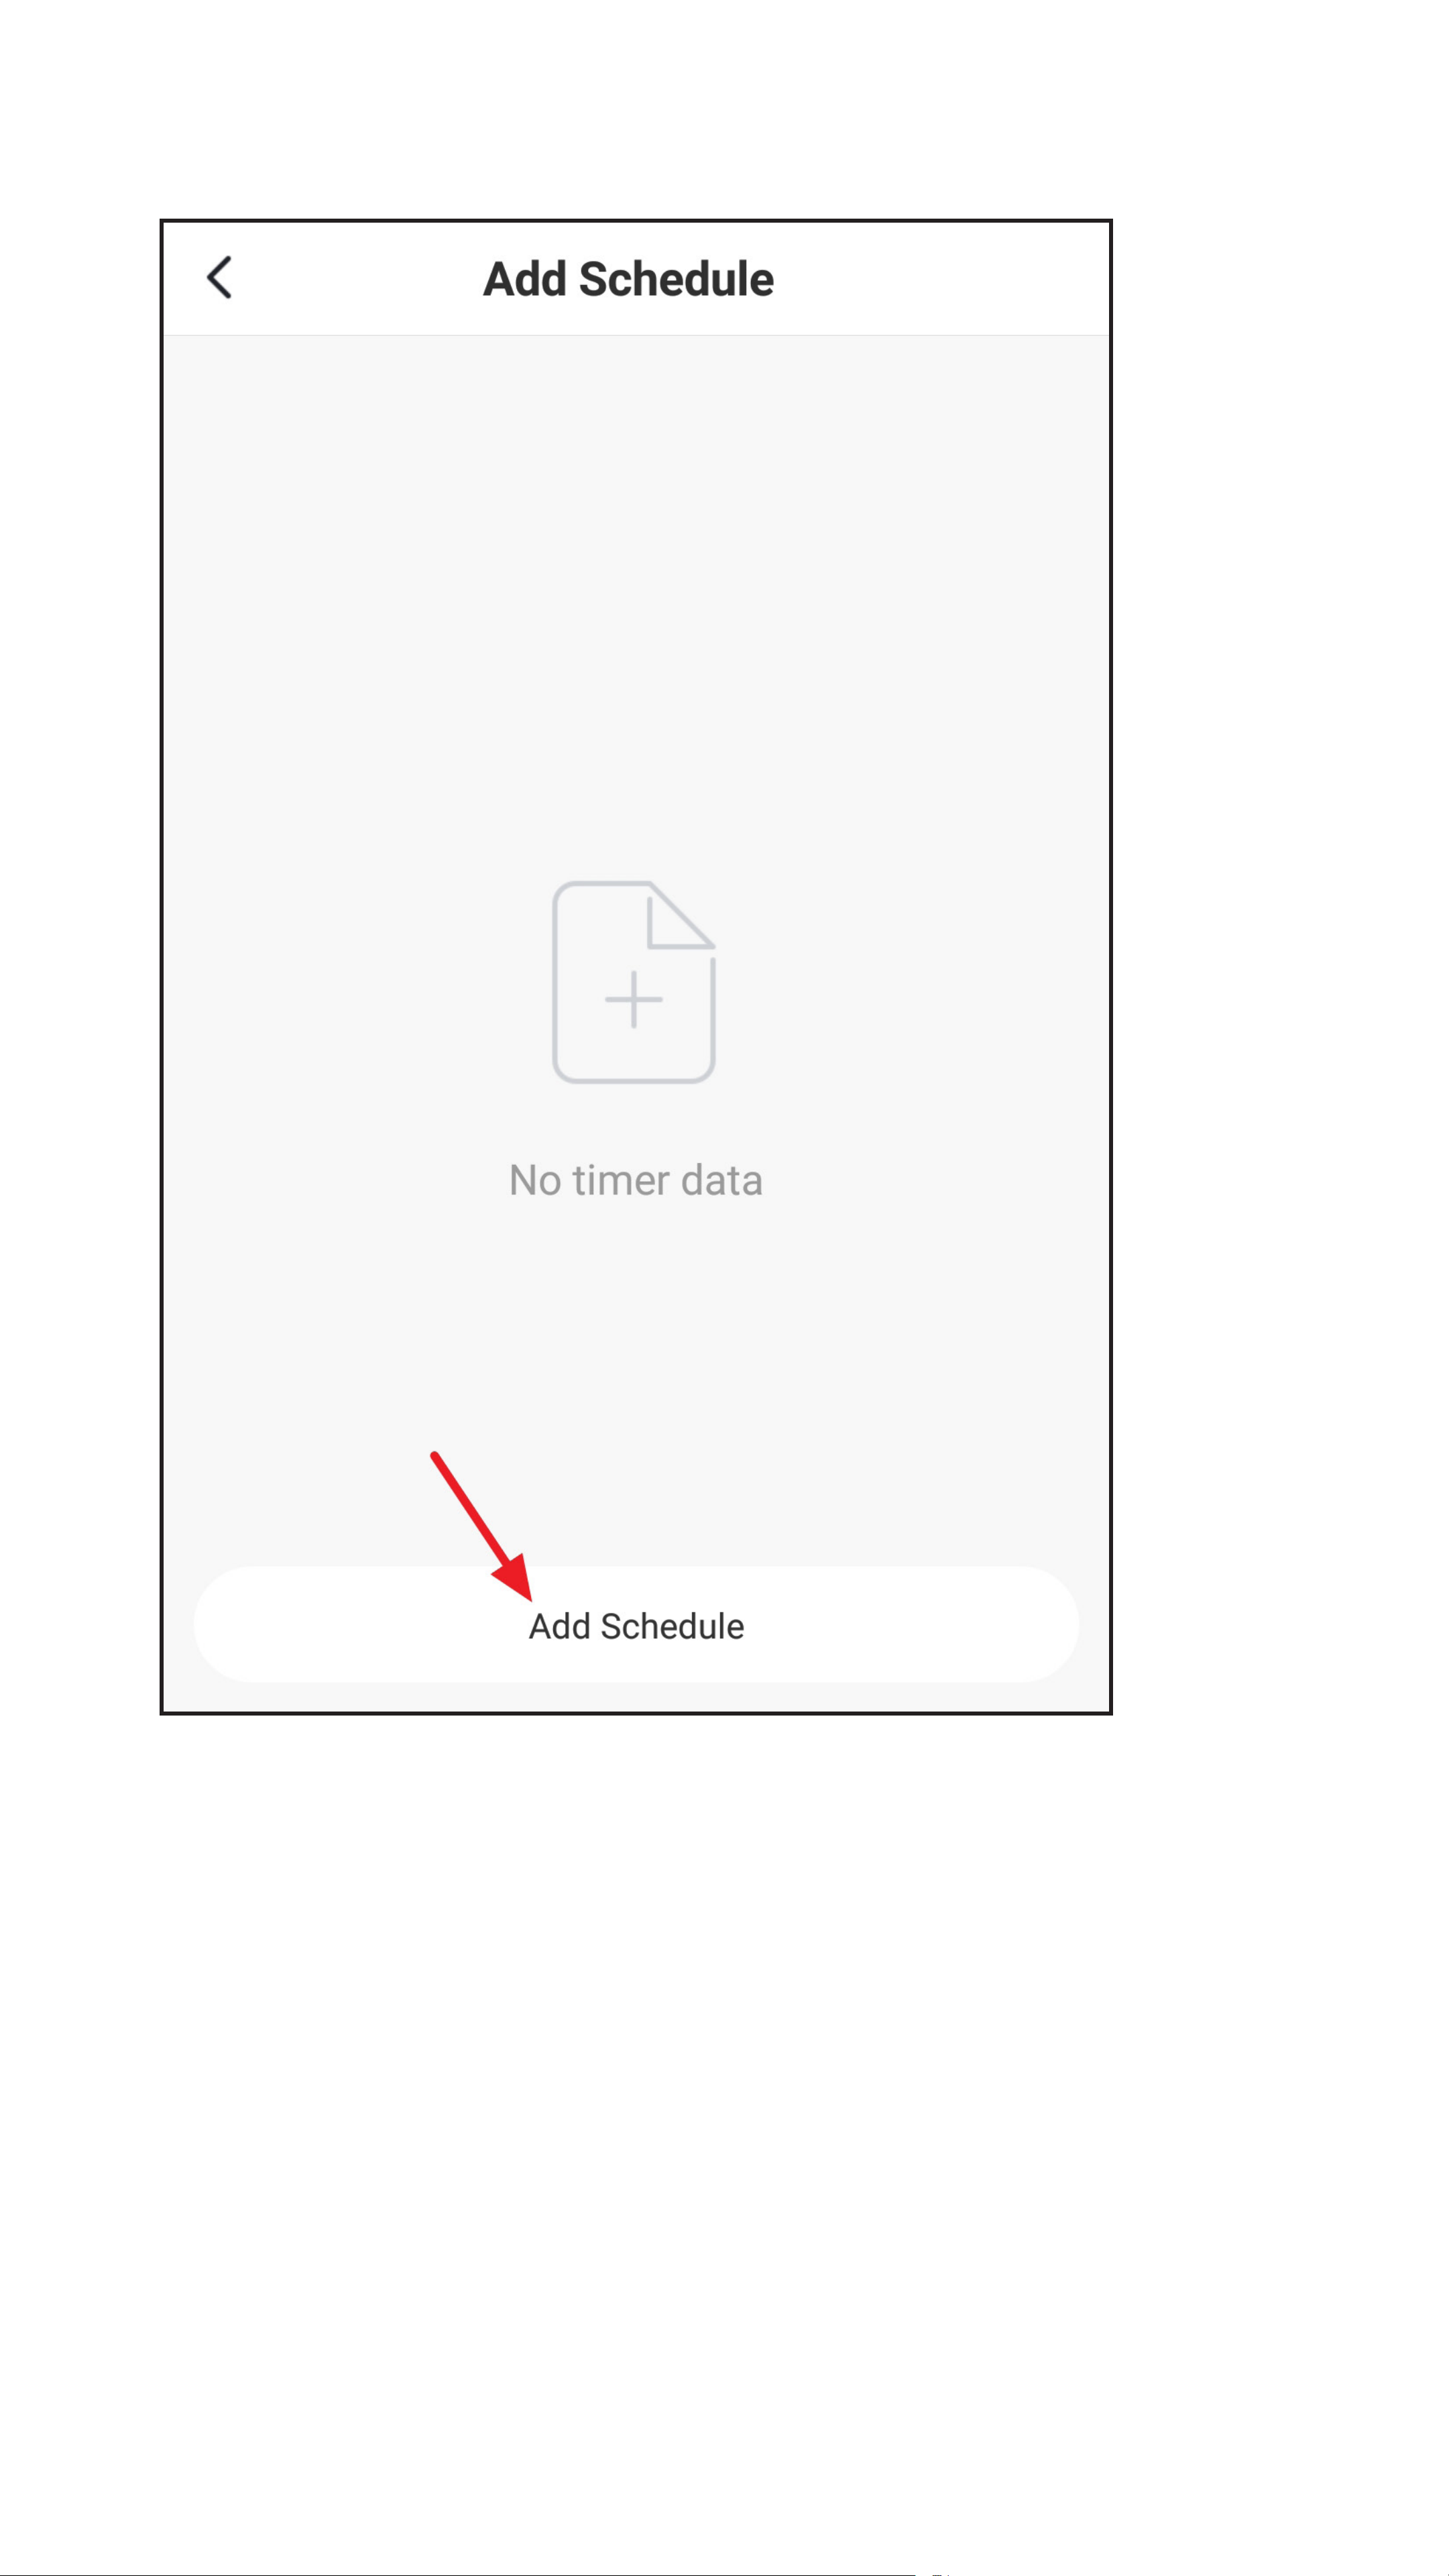
• To add a new timer, tap the bottom button.
Page 39
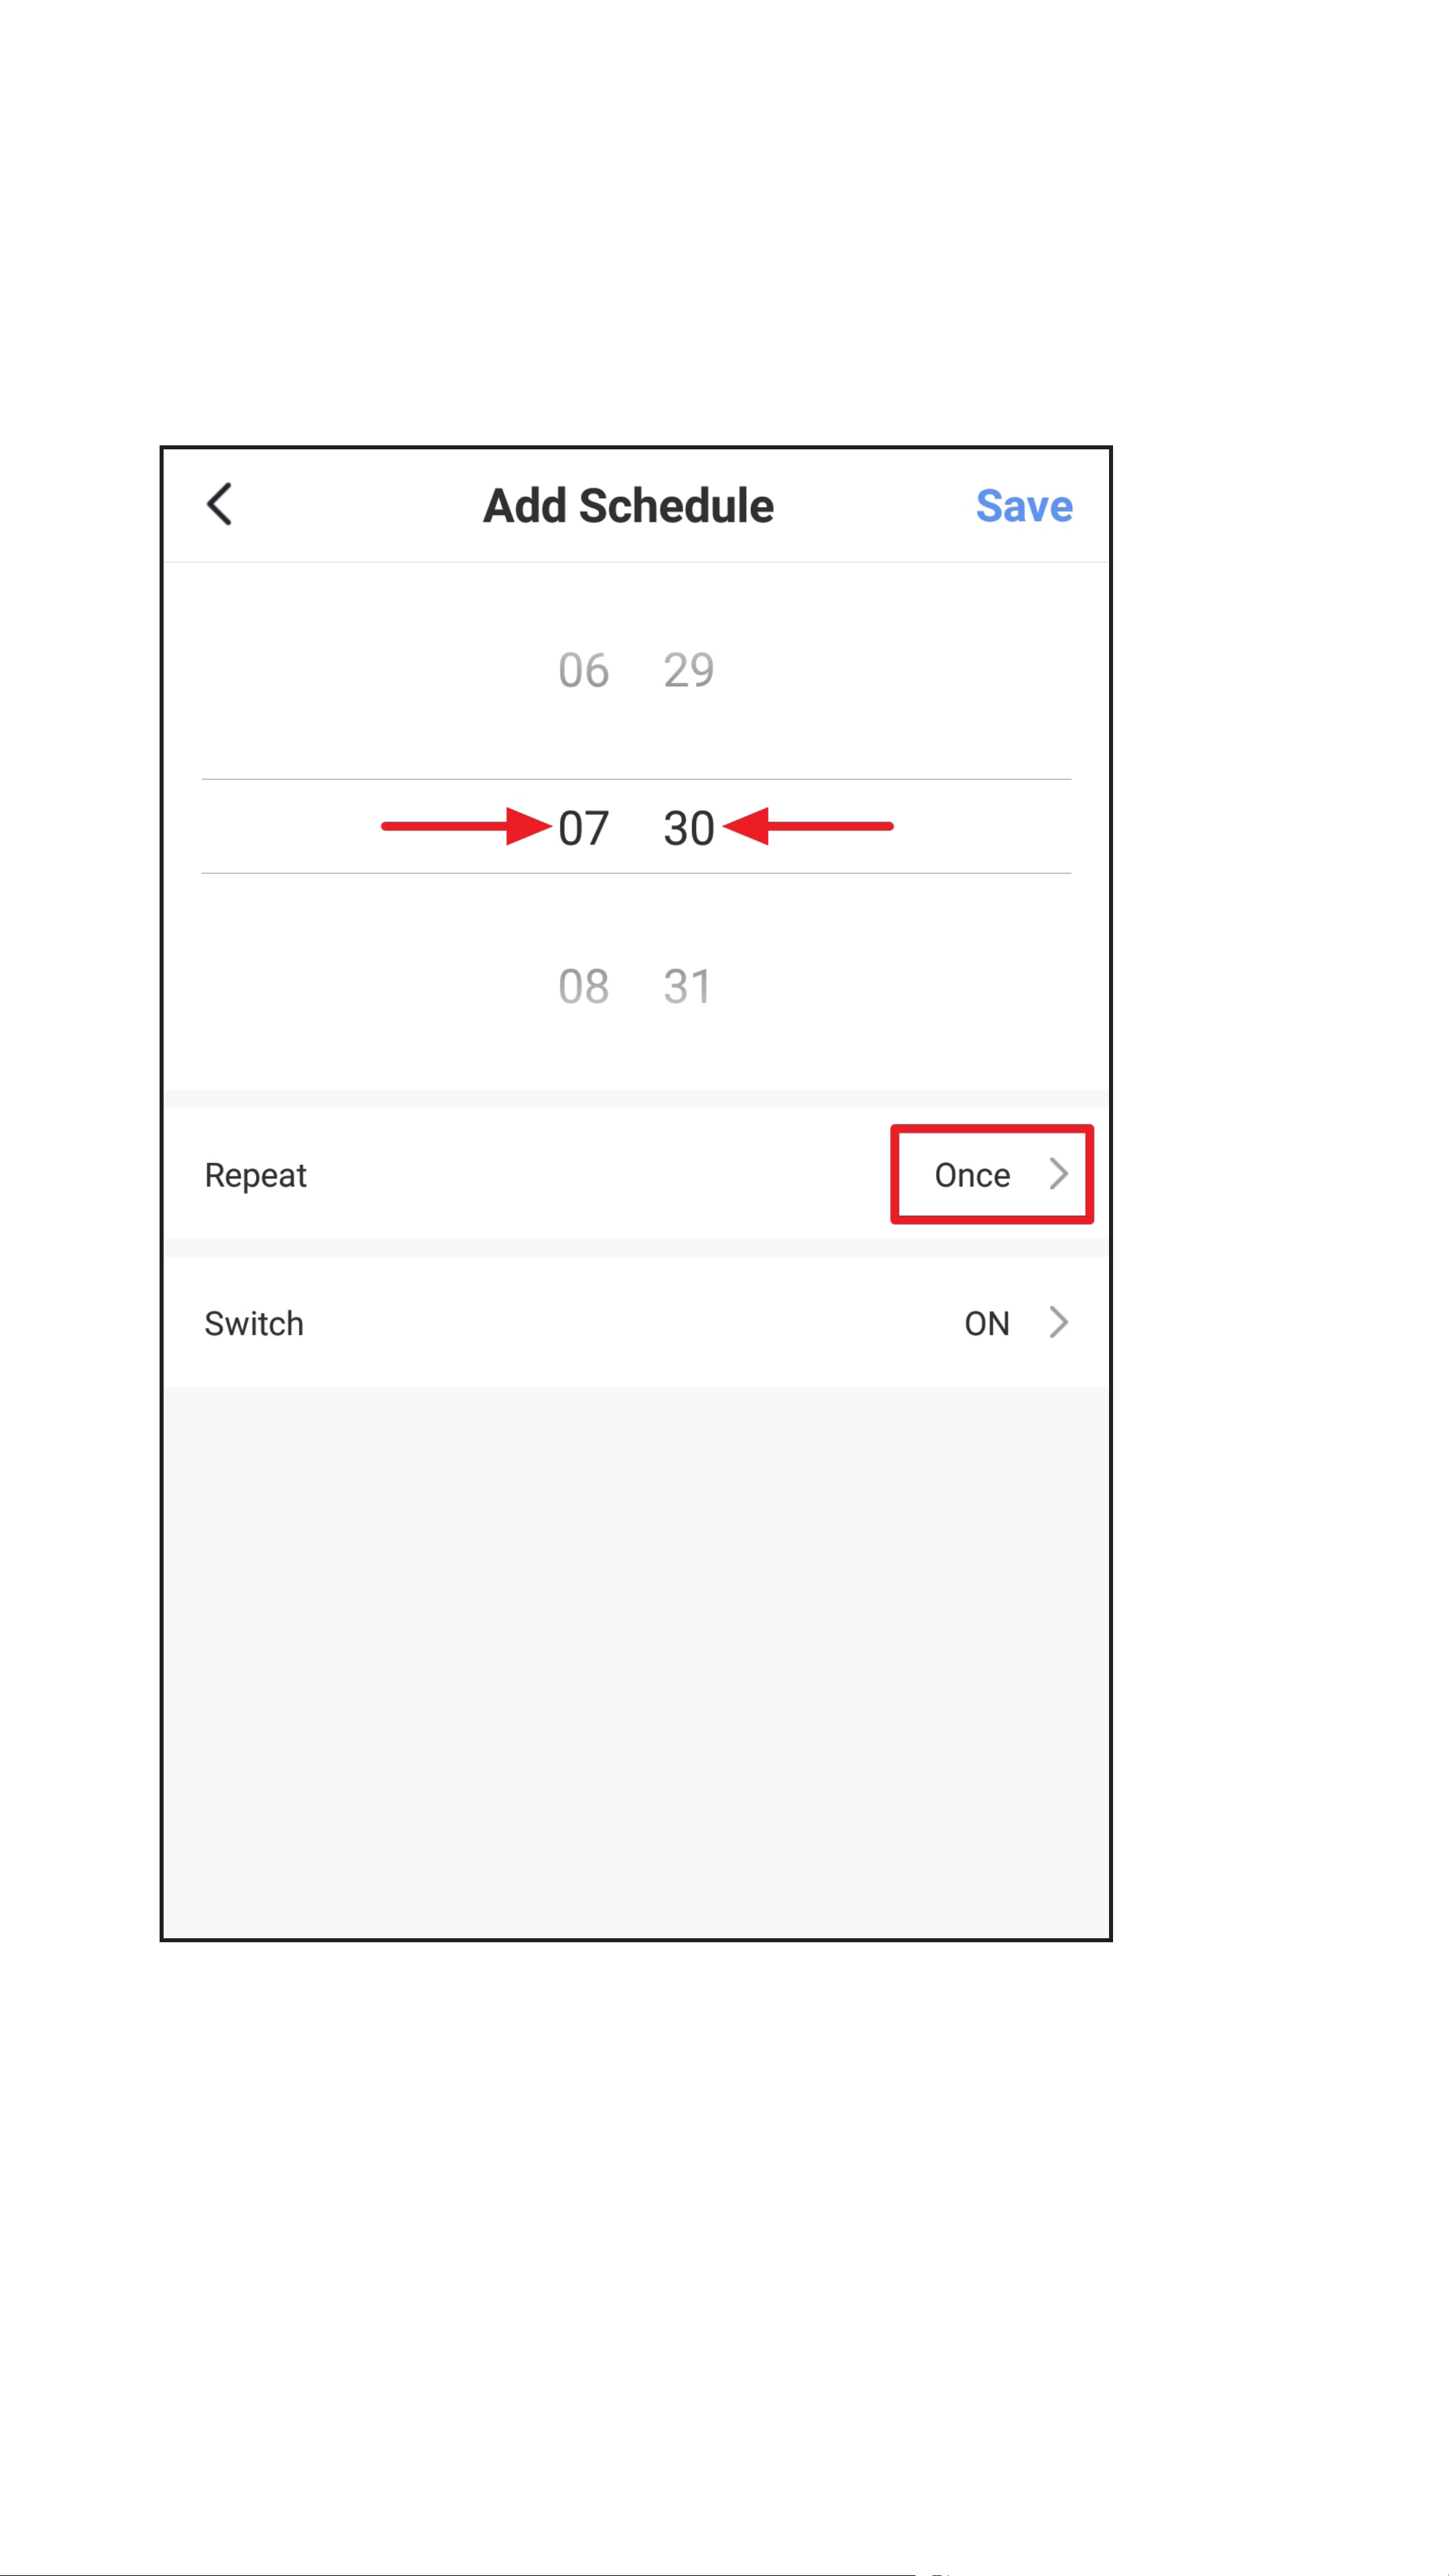
• Swipe up and down to set the hours and then
the minutes of the desired time.
• If you want the timer to run more than once,
tap the repeat button (square in the gure).
Page 40
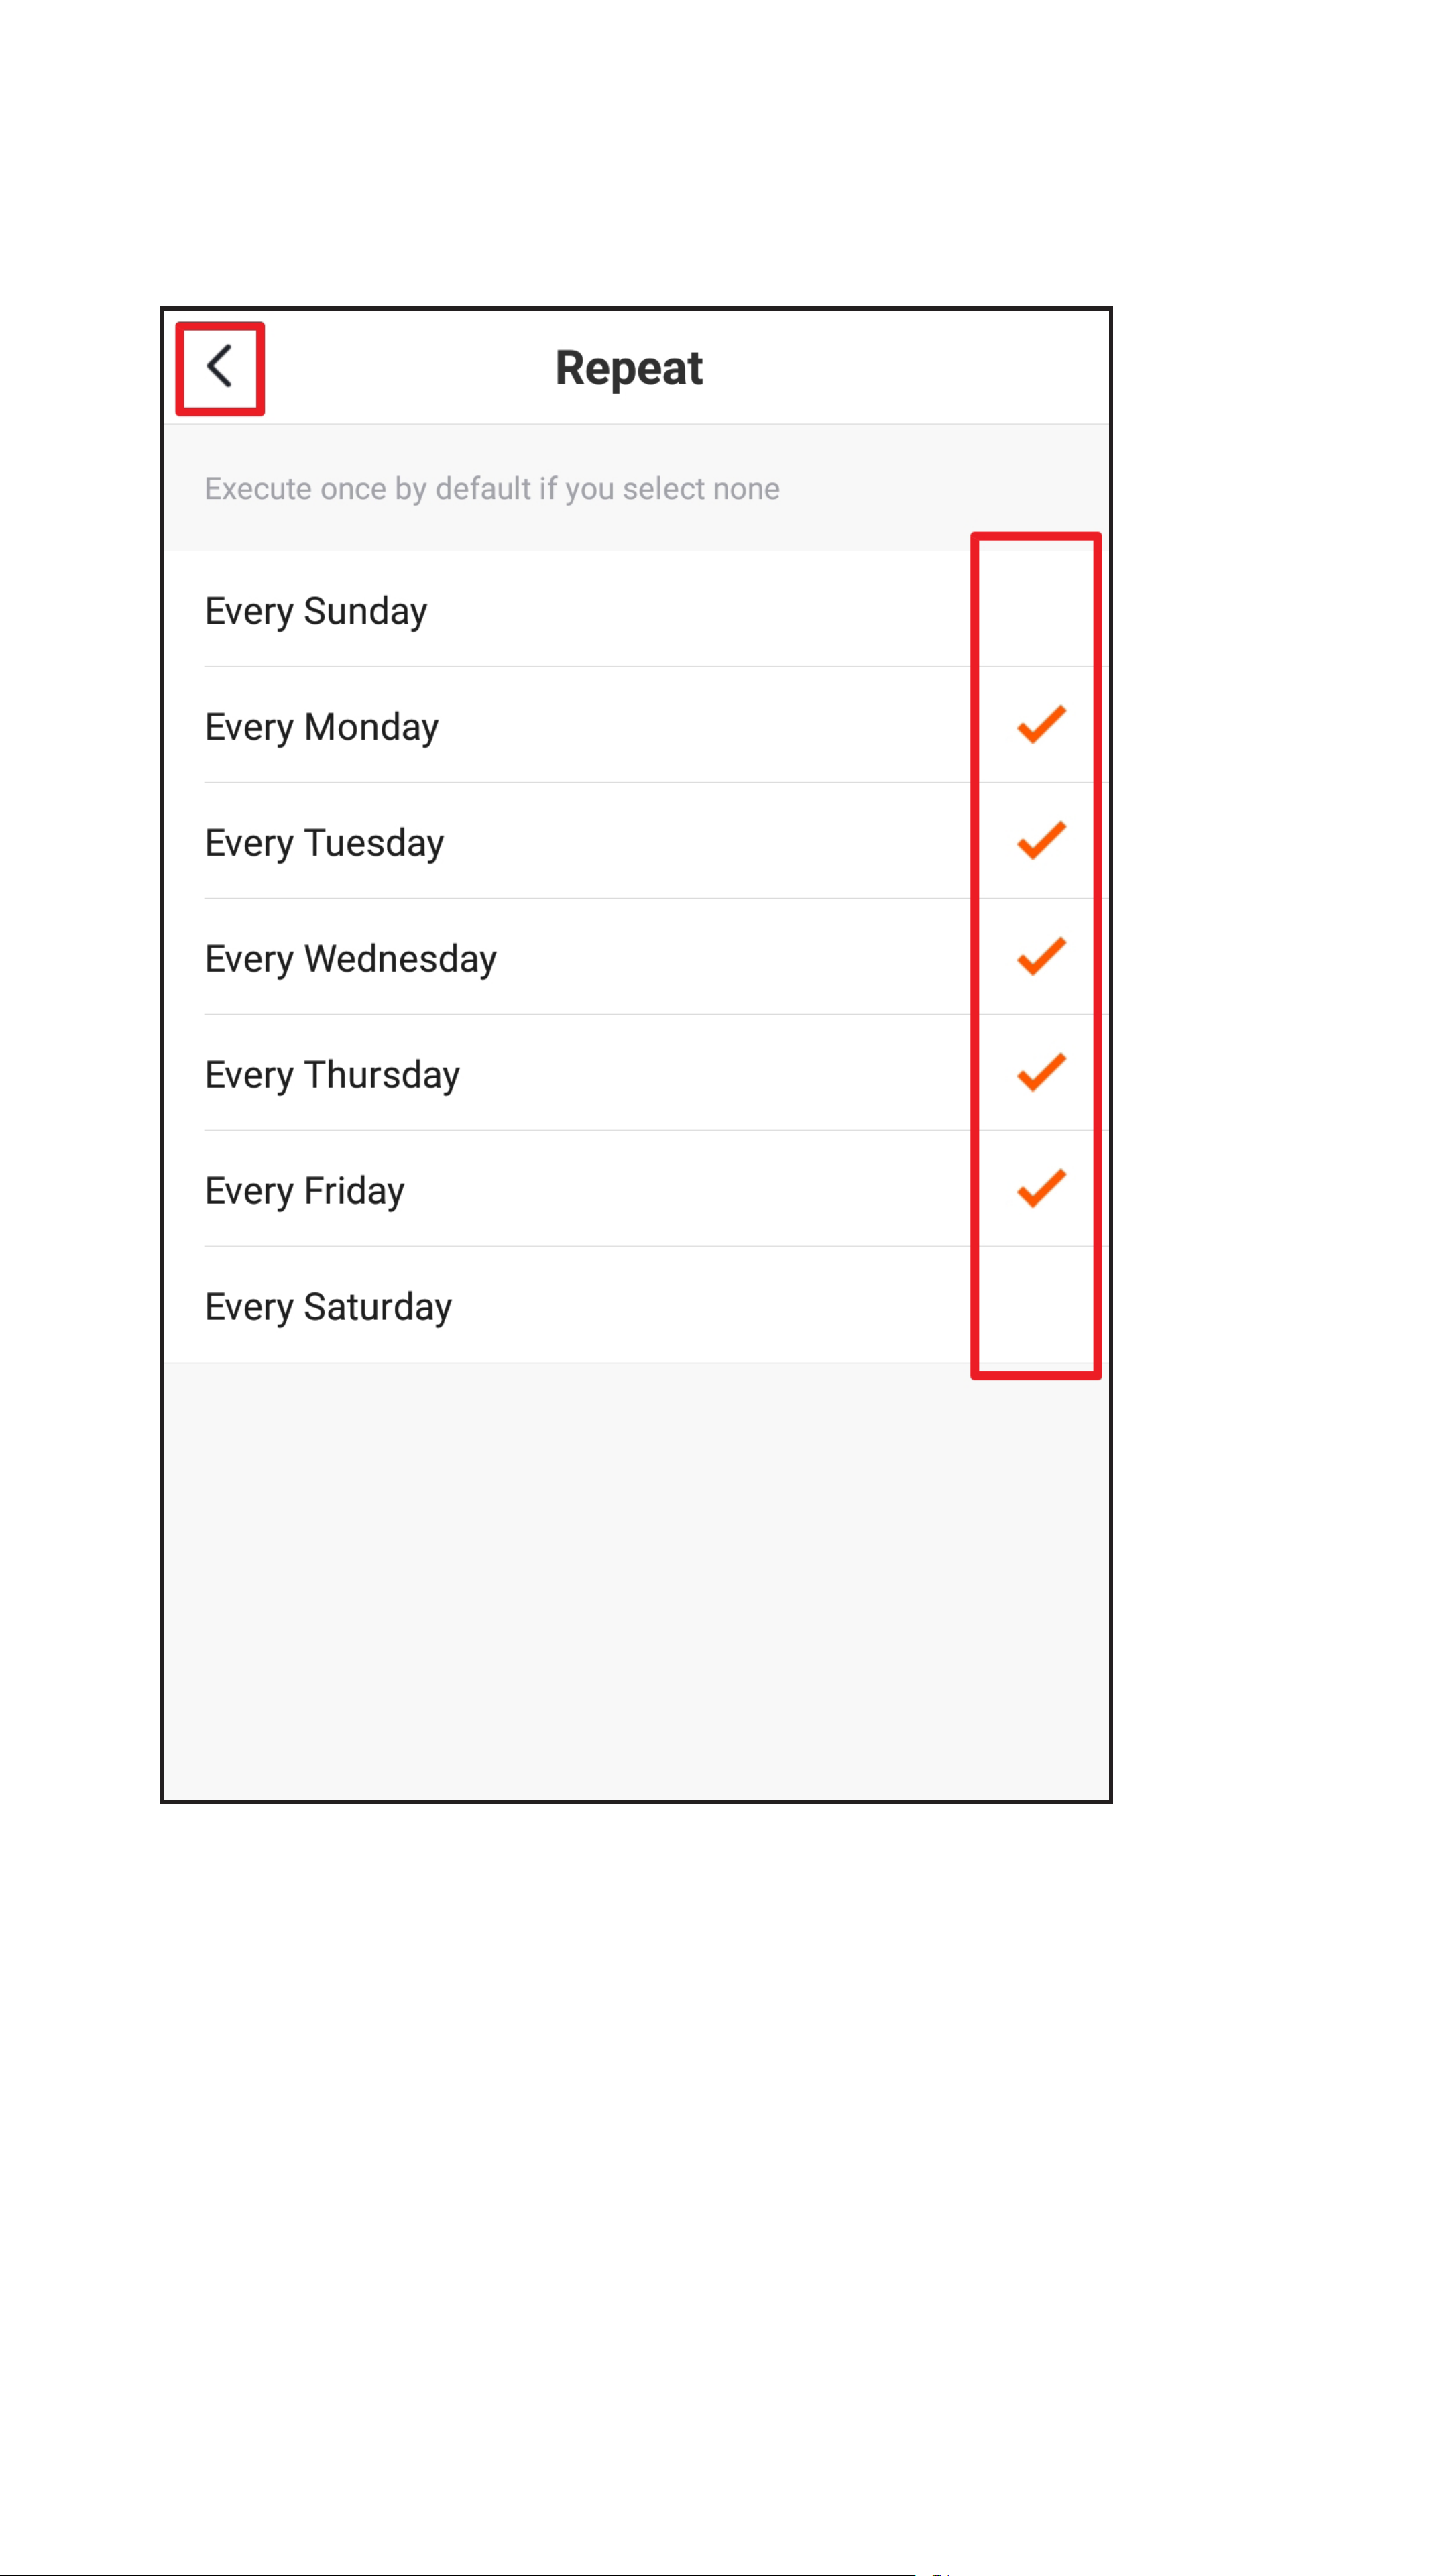
• Select the desired days by tapping.
• Then tap the arrow at the top left.
Page 41

• Now select what should happen at the
selected time.
• To do this, tap the respective button (small
square in the gure).
Page 42

• In this case, select either “ON” or “OFF”
and use the bottom right button to save the
selection.
Page 43

• On the timer overview page, you can turn
all timers on or off (just tap the switch),
whichever one you need.
• To delete the timer, tap it a little longer and
then conrm the deletion.
• To exit this display, tap the arrow at the top
left.
Page 44
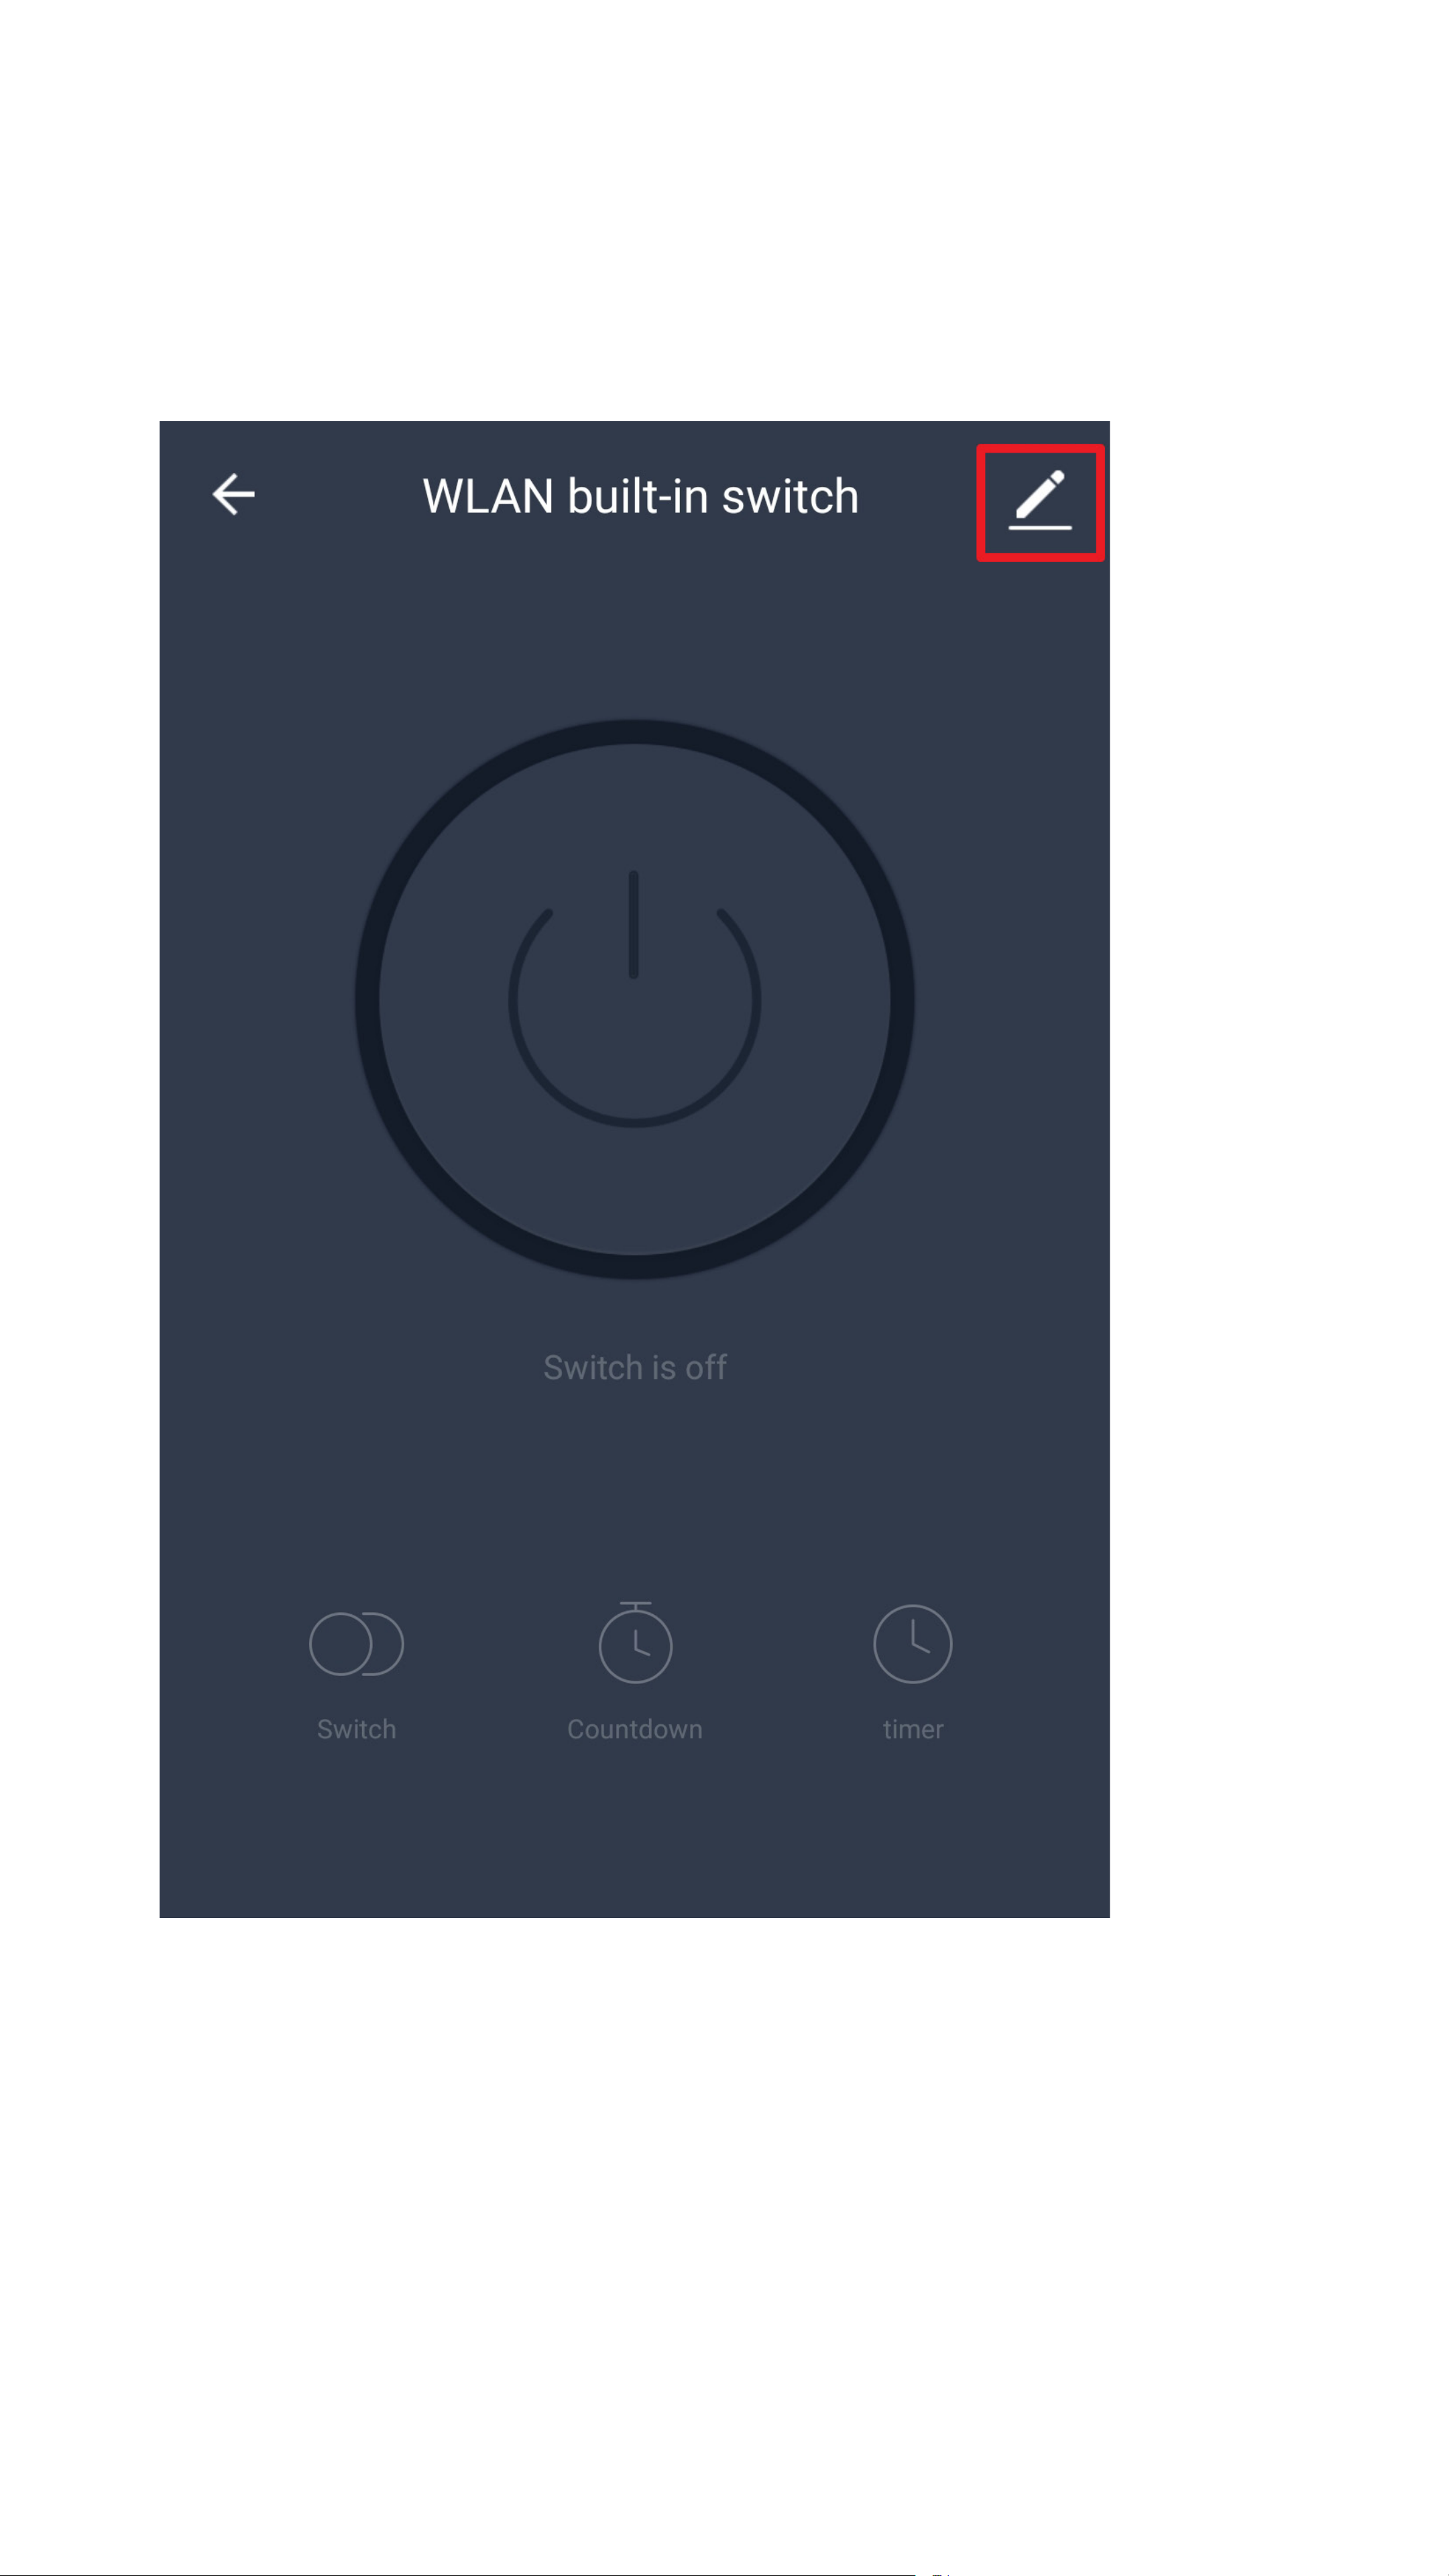
Further device settings
• To open further device settings, tap the pencil
icon at the top right in the device display.
Page 45
B1
B2
B3
B4
B5
B6
B7
B8
B9
B10
B11
B12
Page 46

B1 Use the arrow to go back to the device
display.
B2 Here you can change the name of the
device.
B3 Here you can adjust the location of the
device, provided you have selected or
created multiple rooms.
B4 Use this function to check the network
connection to the device.
B5 Here you can select a service you would
like to use to link the app and need help
with that.
B6 Here you can share the selected device
with another external user.
B7 Use this function to create a group in
which you can combine multiple devices.
B8 Here you can enter information such as
the IP address of the device.
B9 In this item you can give feedback to the
developers if there are any problems with
the app.
B10 Provides information about the rmware of
the device.
B11 Tap this button to remove the device from
the app. The device itself will not be reset
to factory settings.
B12 Tap this button to reset the device to
factory settings and remove it from the
app.
Page 47

Creating a group
• To create a group, open the devices display
and then tap the pencil icon at the top right.
Page 48
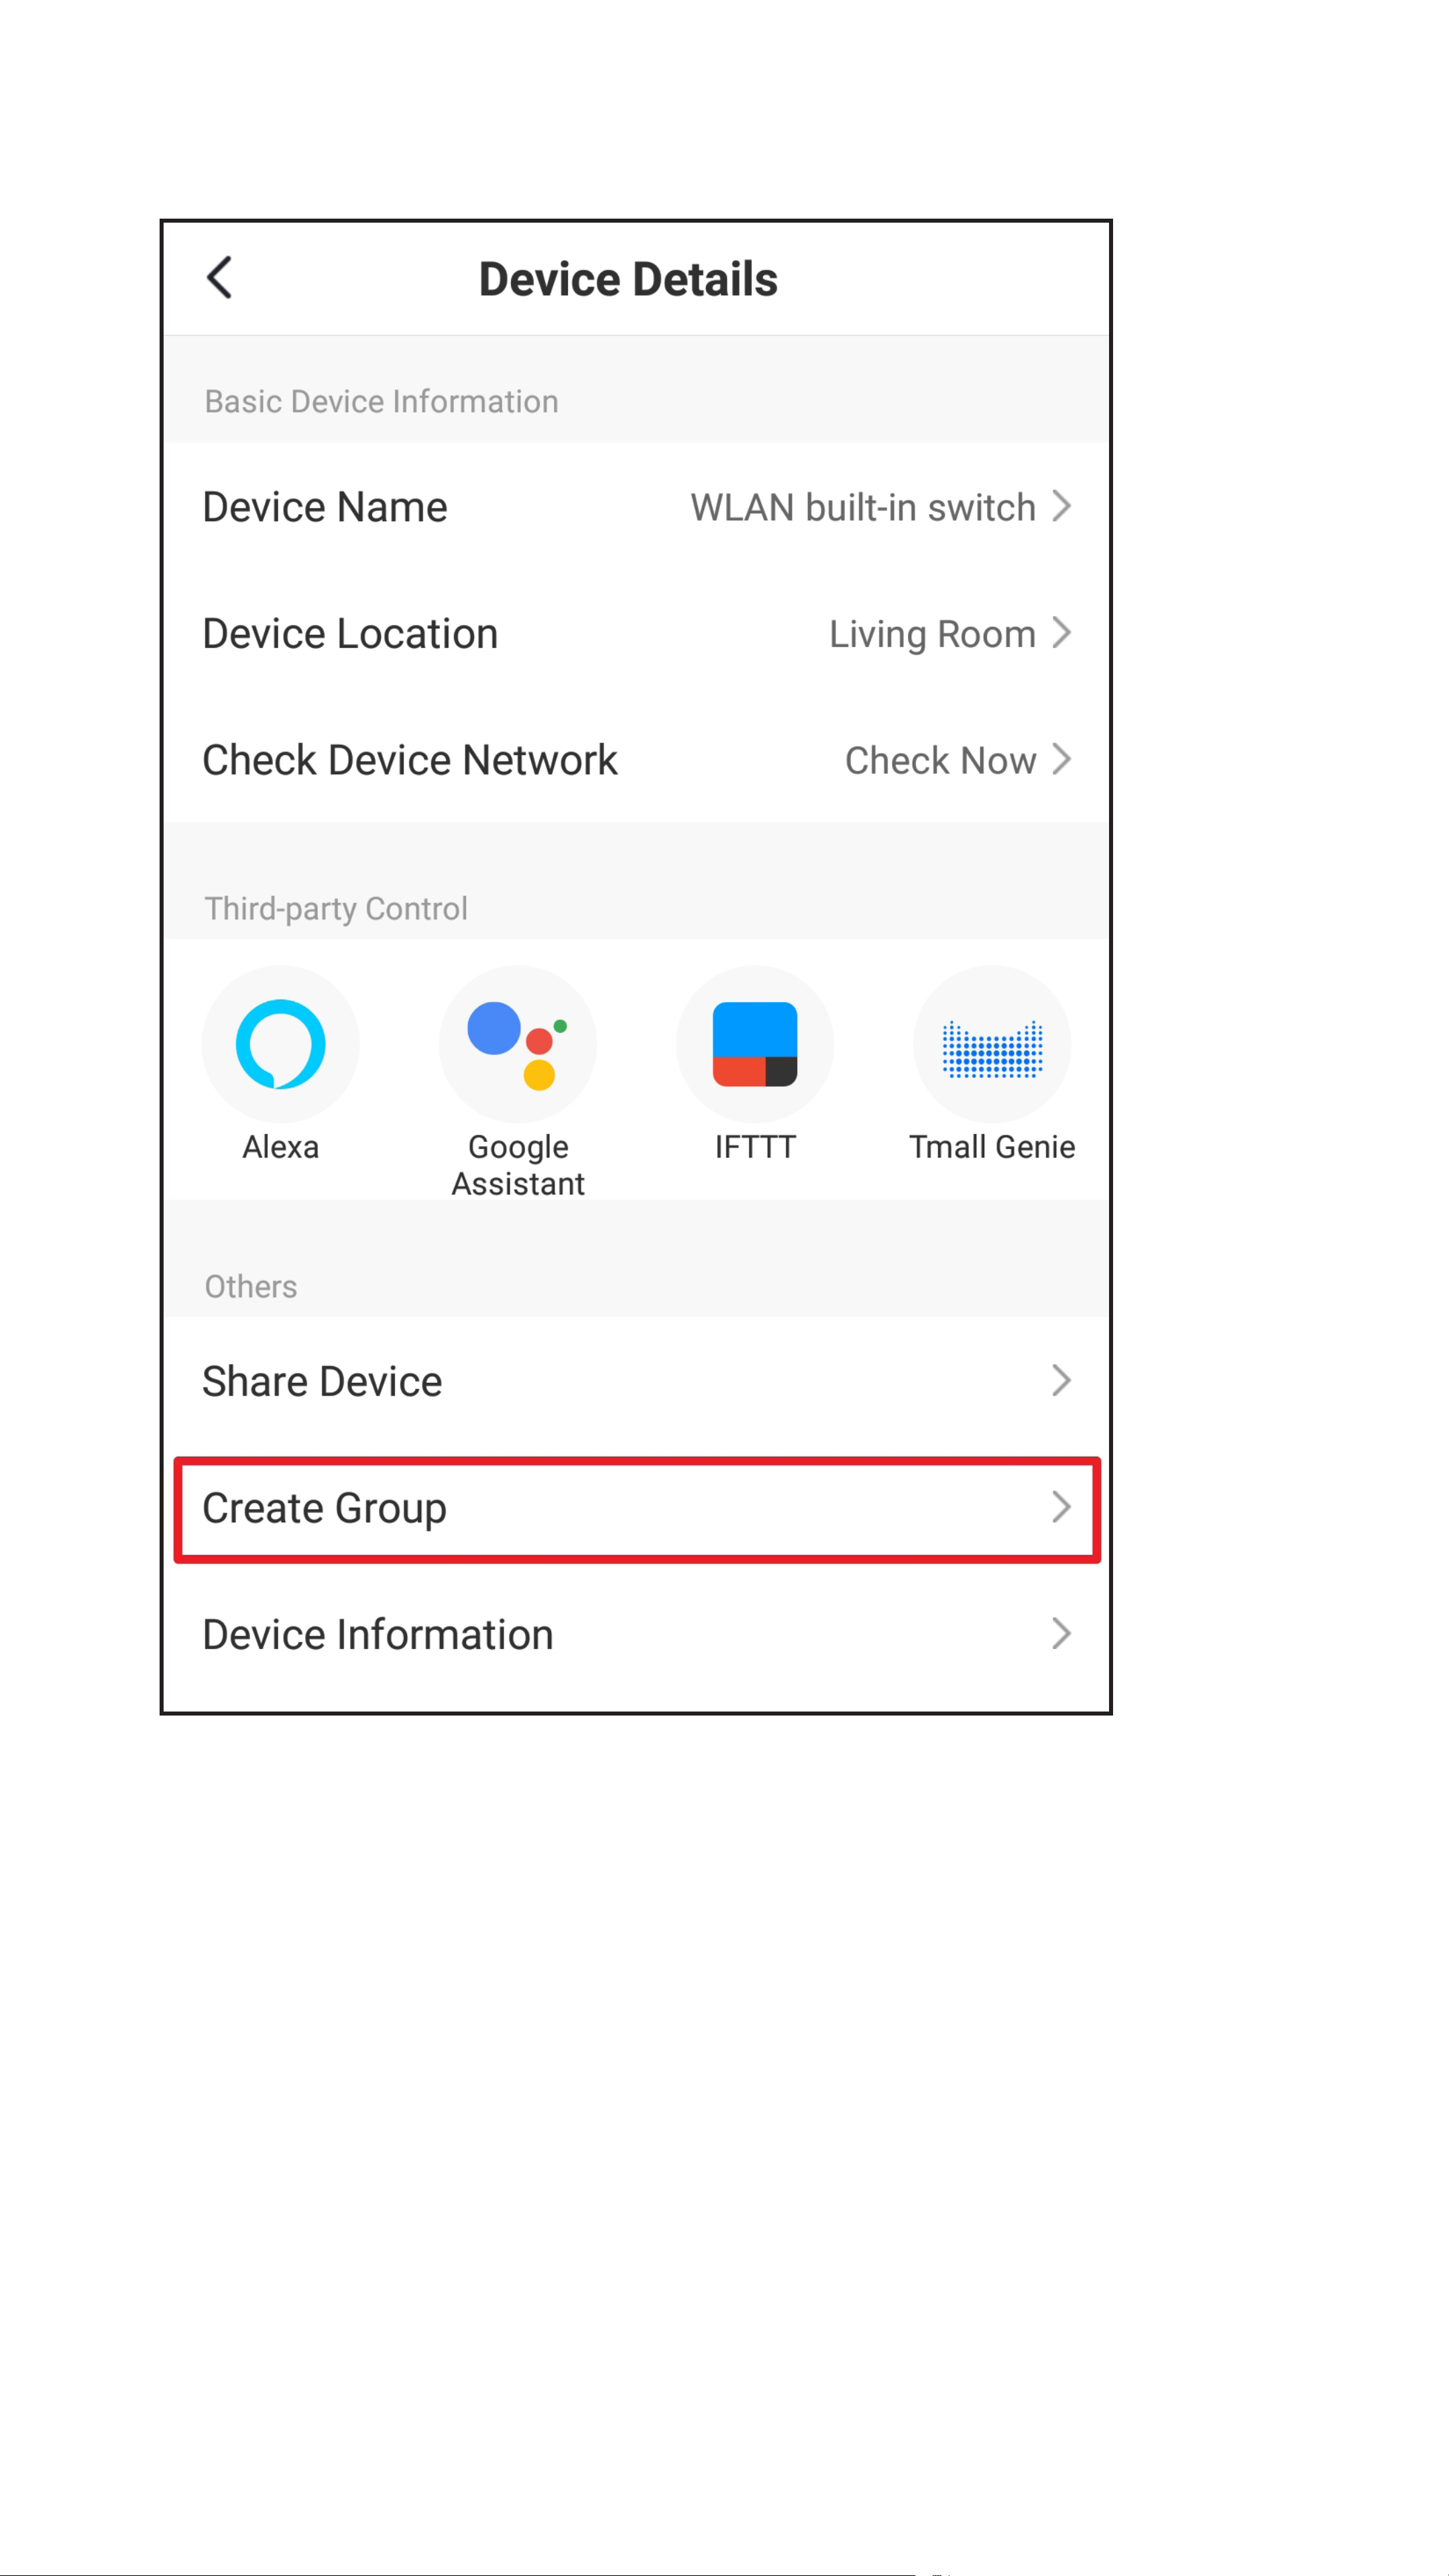
• In the device settings, tap “Create Group”.
Page 49

• Now select the devices you would like to have
in the group.
To do this, check the box in front of each device
you want to add to the group.
Of course, a group with one device, as in our
example, makes little sense.
If multiple devices are connected, they will
all be listed.
• Tap the save button at the top right.
Page 50

• Now enter a name for the group and save it.
Page 51

• It no longer shows the devices display, but
the groups display for the previously created
group.
• Go back to the home page (top left arrow).
Page 52
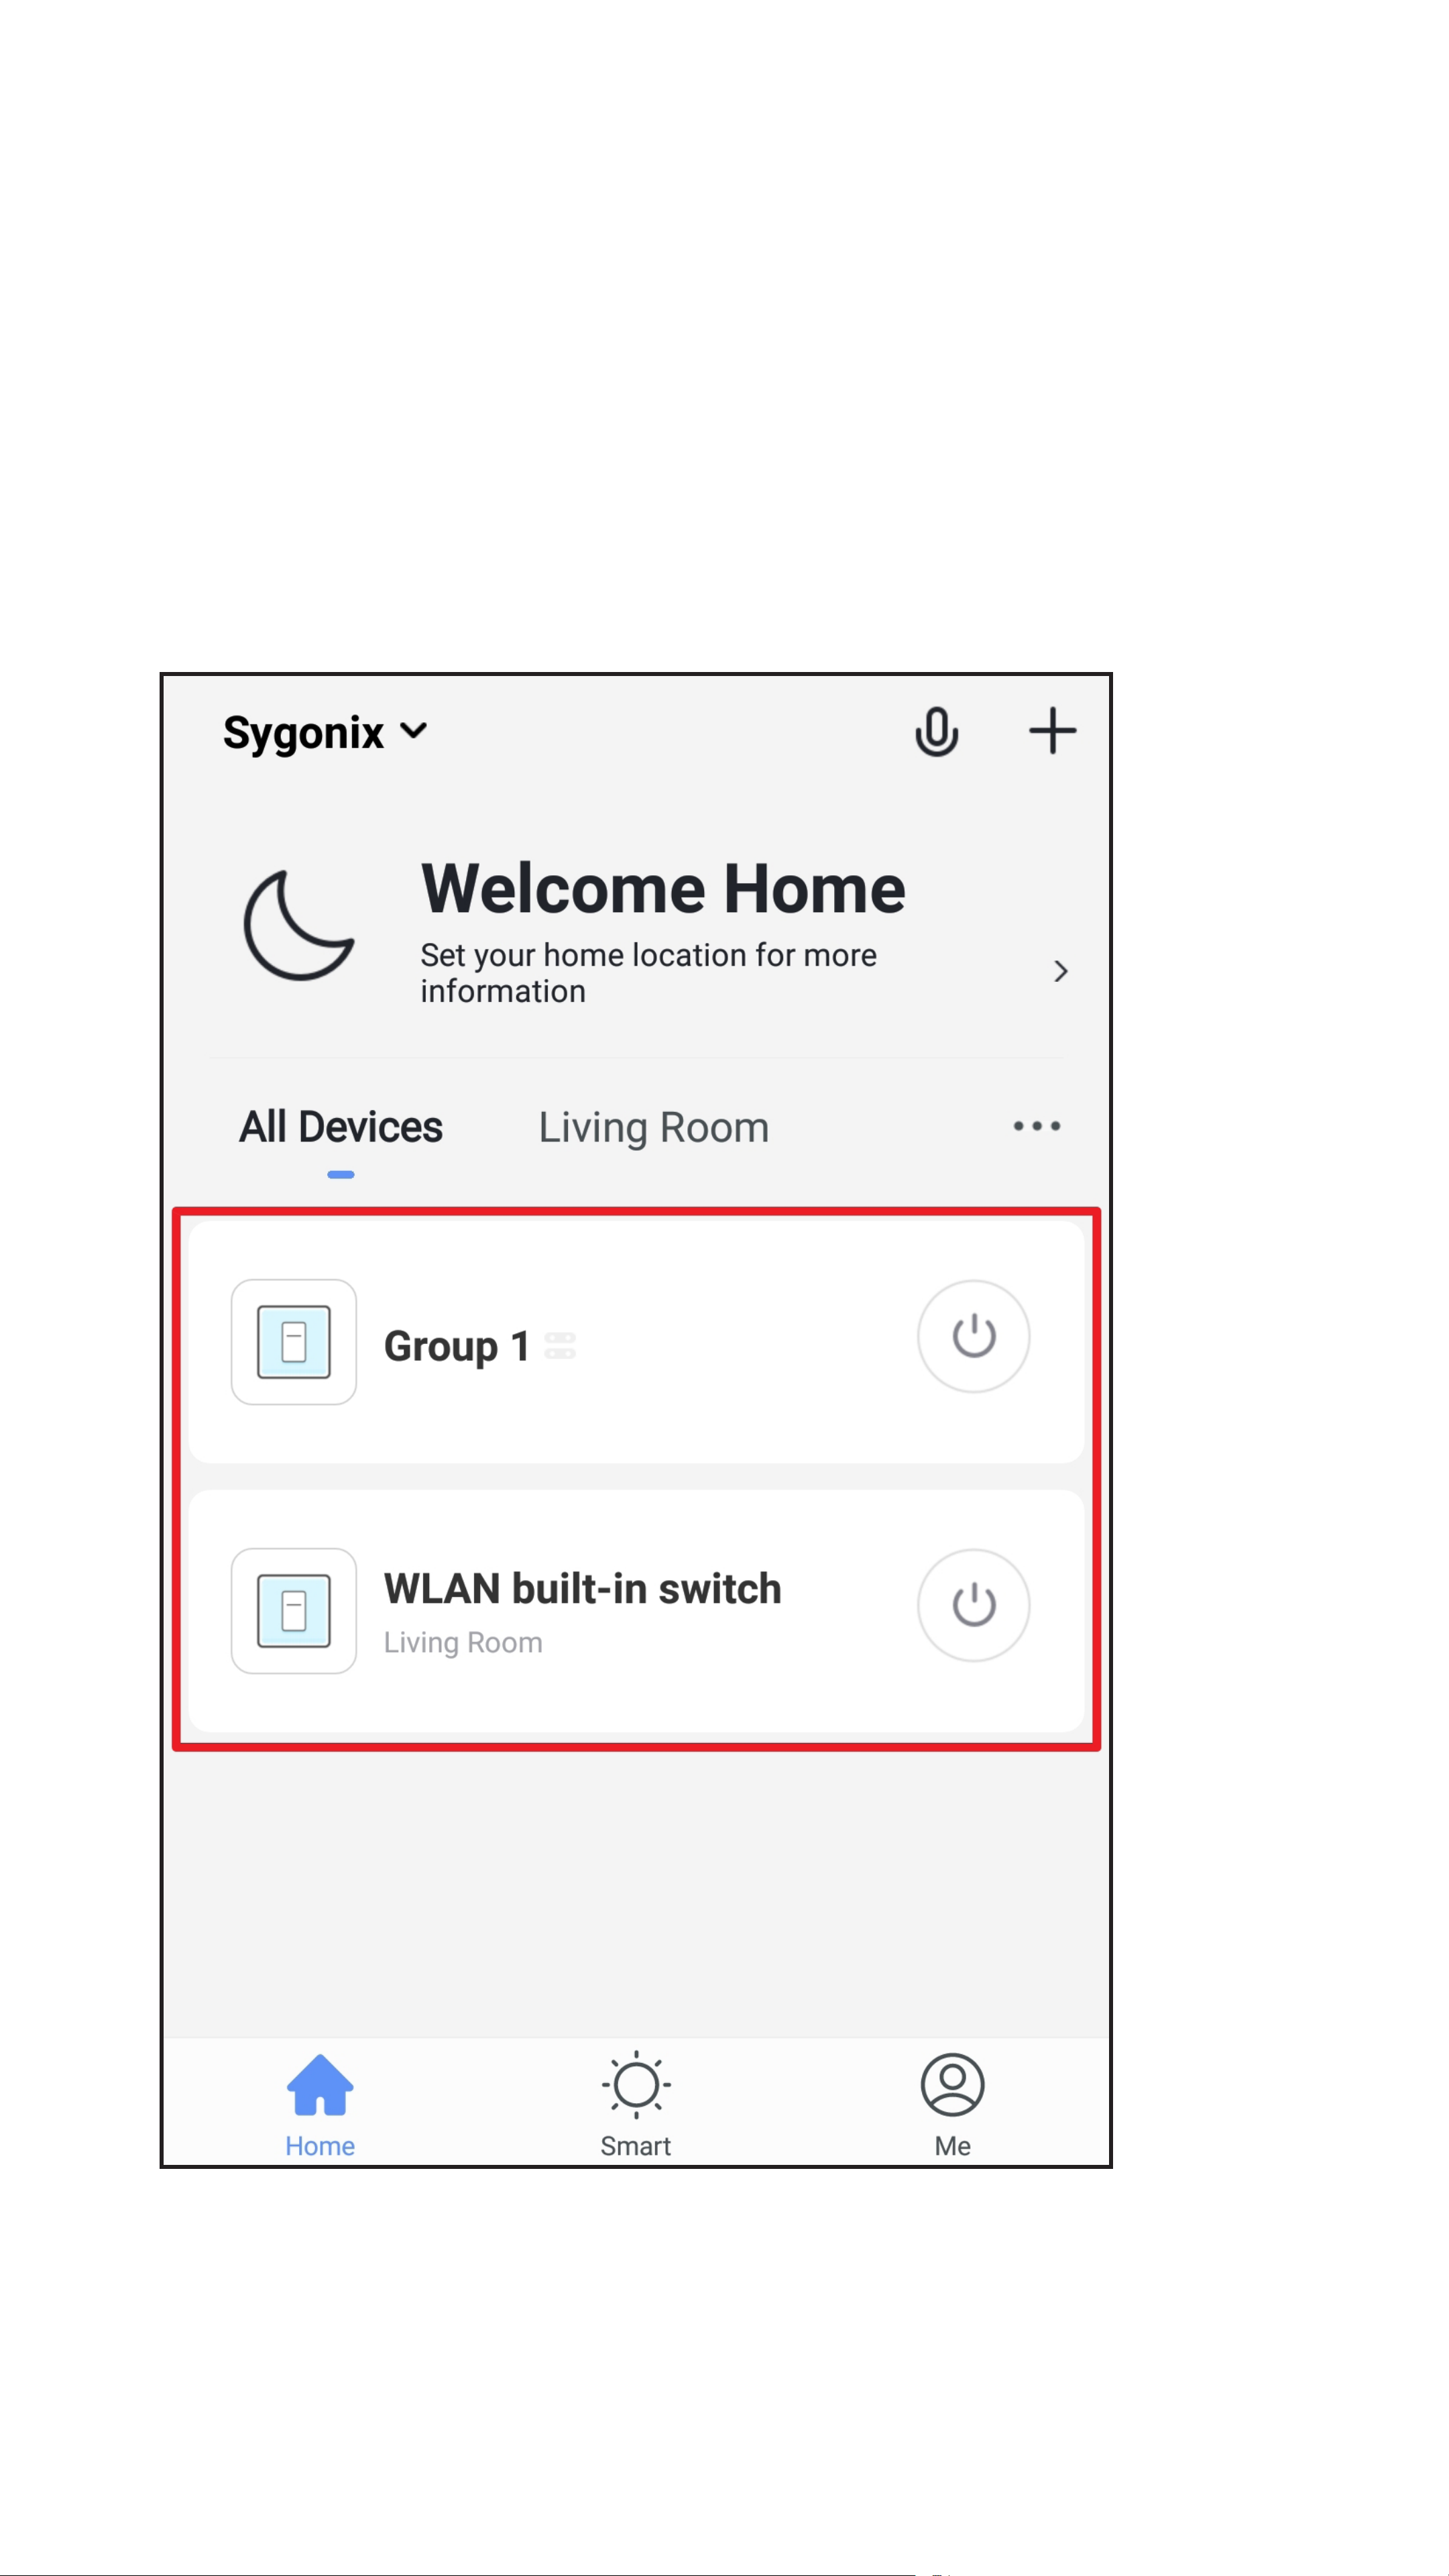
• The main display now shows the device
(lower button) and the newly created group
(upper button).
• To display the devices or the groups display,
press the respective button.
• To open the groups display again, tap the
group.
Page 53

• To open the groups settings, tap the pencil
icon at the top right again.
Page 54

• The group settings enable you to adjust all
settings for the group: change the name of
the group; move the group to another room;
remove and add devices; share the group;
give feedback on problems to the developer;
dissolve the group (no devices are removed).
Page 55

Creating a scene
• To create a scene, tap the sun icon at the
bottom centre in the main display of the app.
Page 56

• Tap “+” in the upper right corner or the blue
button in the middle.
Page 57

• Tap the background image to select another.
• Then tap the small “+”.
Page 58

• In our example, we are creating a scene with
delay. To do this, tap the button in the middle.
Since a delay always requires a device to follow
it, we will rst create the delay and then add the
device.
• Swipe up or down to set the desired minutes
and seconds.
• Then tap “Next” at the top.
Page 59

• The delay has been added to the scene.
• To add the device, tap the small “+” again.
Page 60
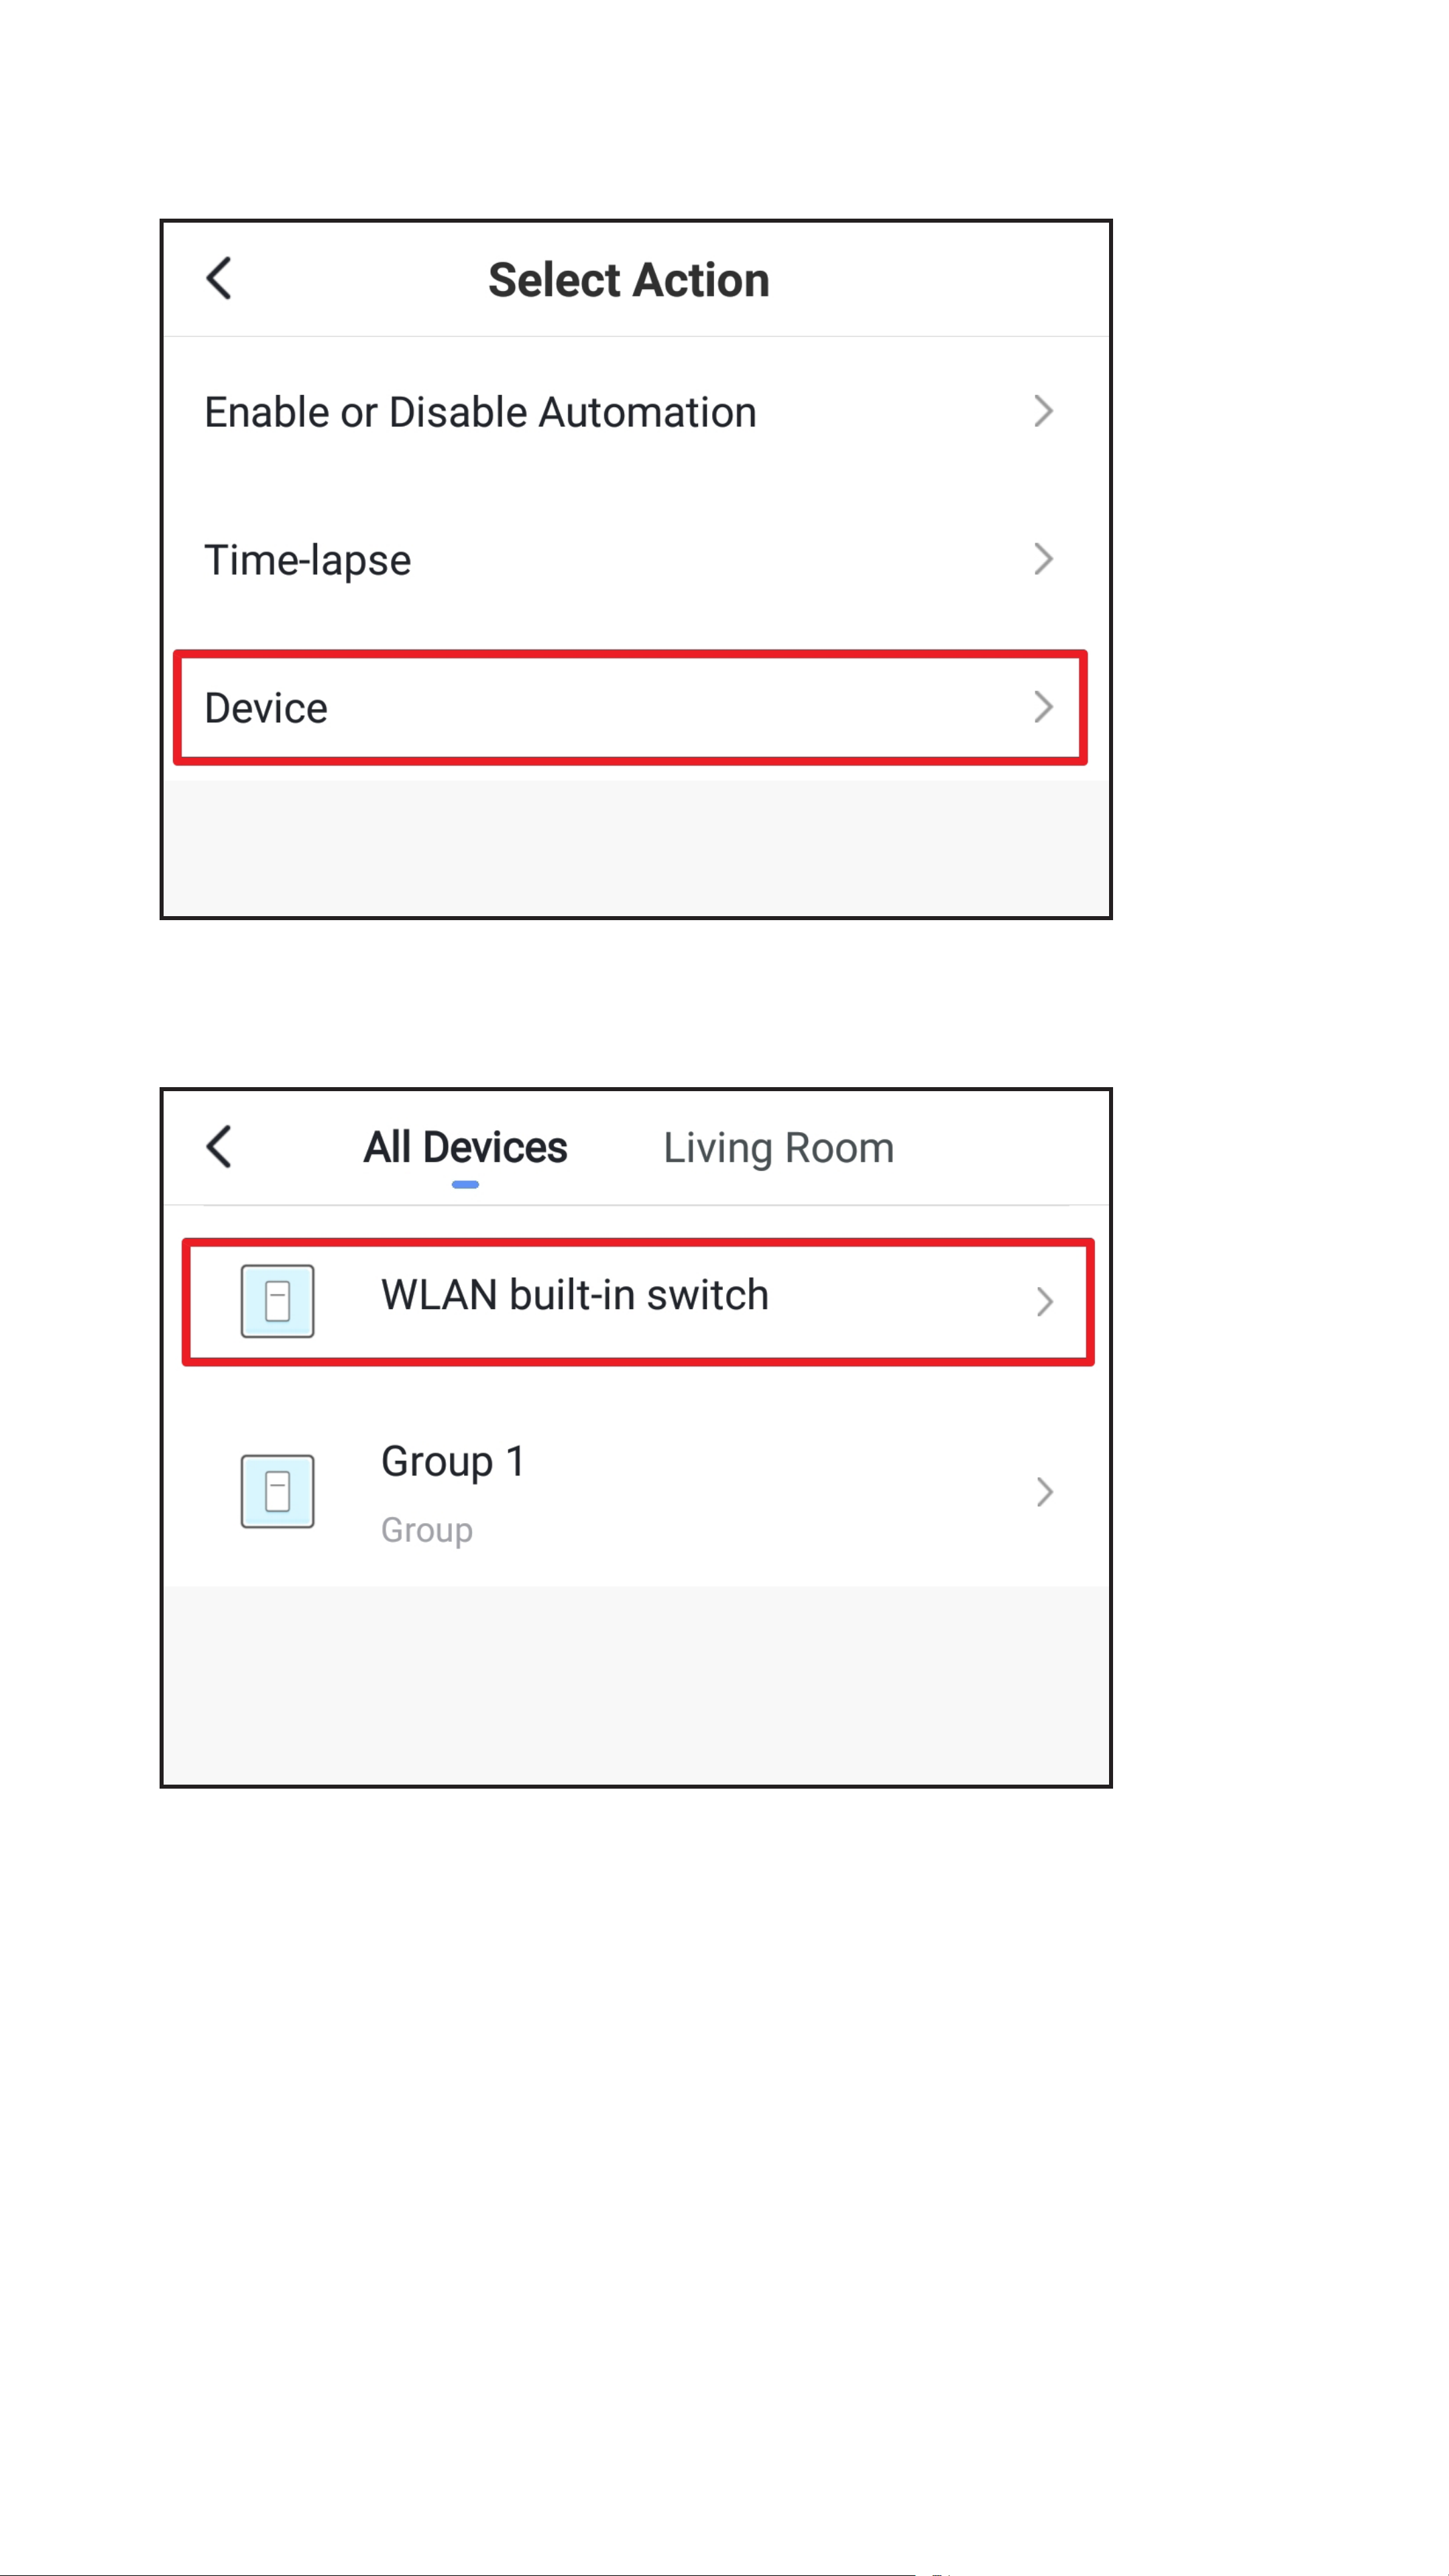
• Now tap the “Device” button.
• Select the desired device and tap it.
Page 61
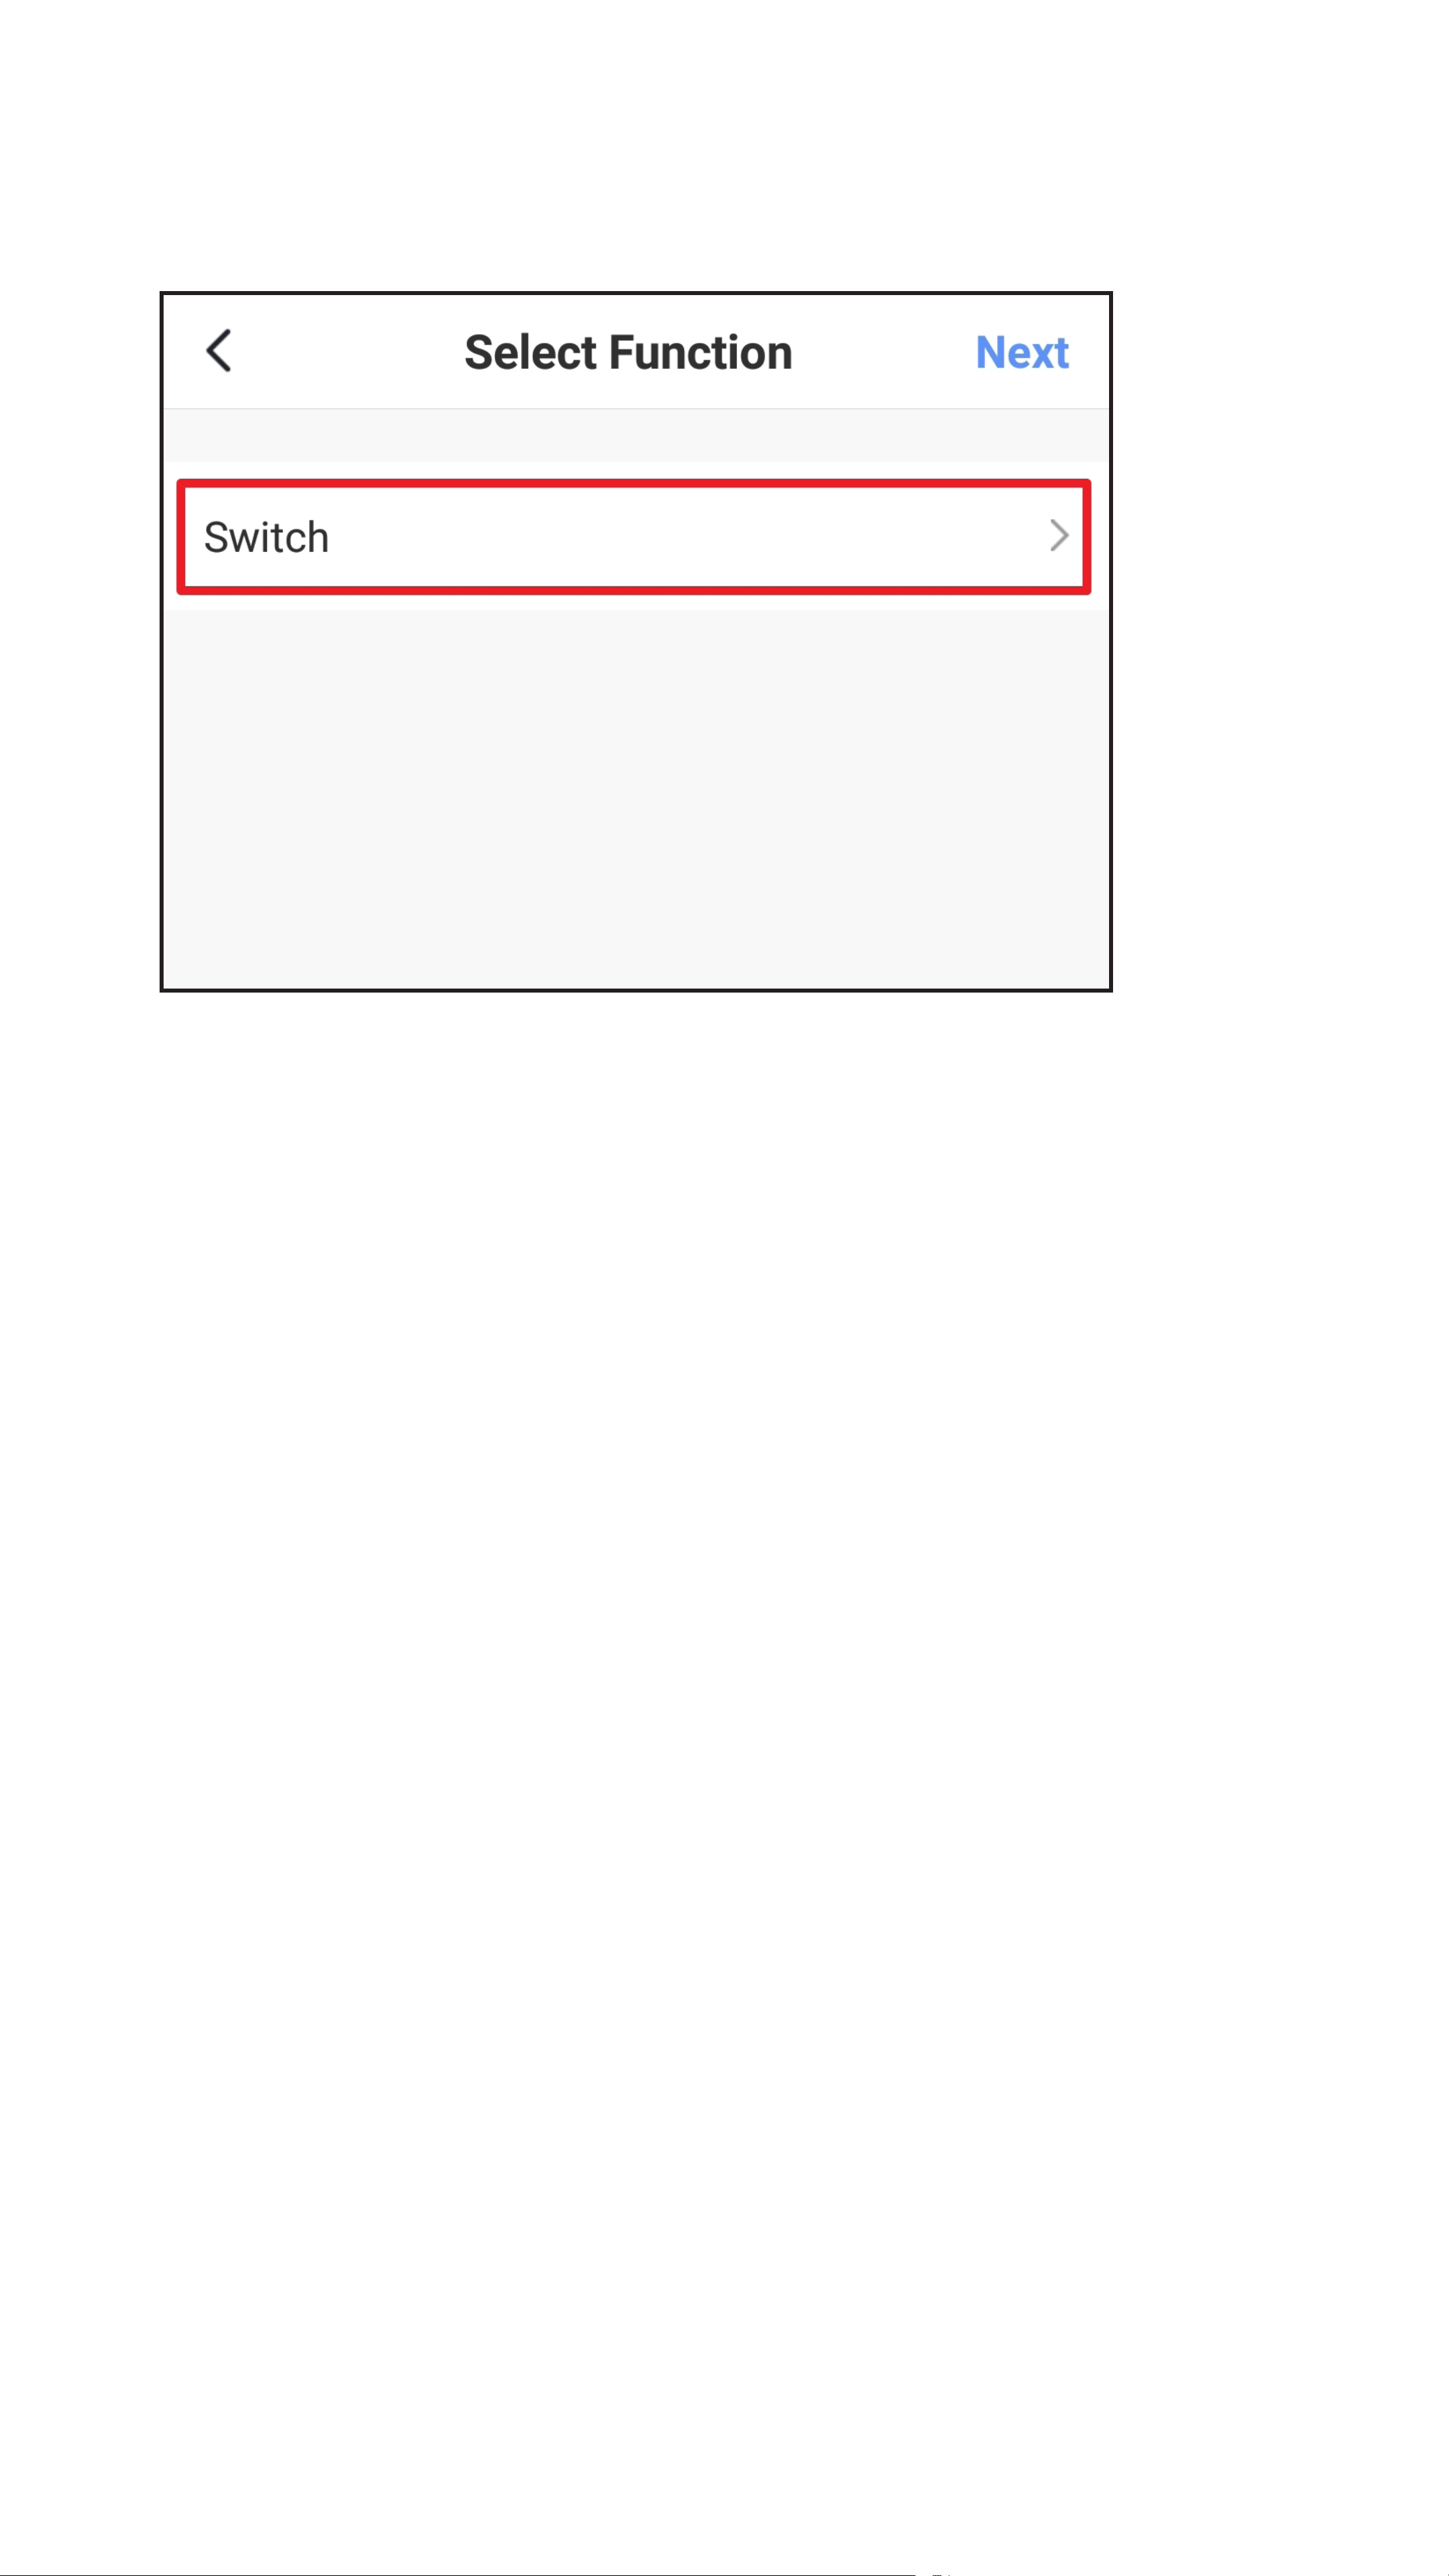
• In our case it is a switch.
Tap the button.
Page 62

• Now select whether the switch should be
disabled or enabled after the delay.
In our case, the switch should be enabled.
• Tap the bottom right button to save the
selection.
Page 63

• The desired function is now displayed behind
the switch.
• Tap the top right button to continue.
• In addition to the delay, the switch is now also
displayed in the scene.
• Now choose below whether the scene should
appear in the main display of the app.
If the switch is in the position as shown in the
gure below, the scene will appear in the main
display.
Of course, you can also add functions to this
scene.
• Tap the button at the top right to save the
scene.
Page 64

Page 65

• Now enter a name for the scene and save
again.
Page 66
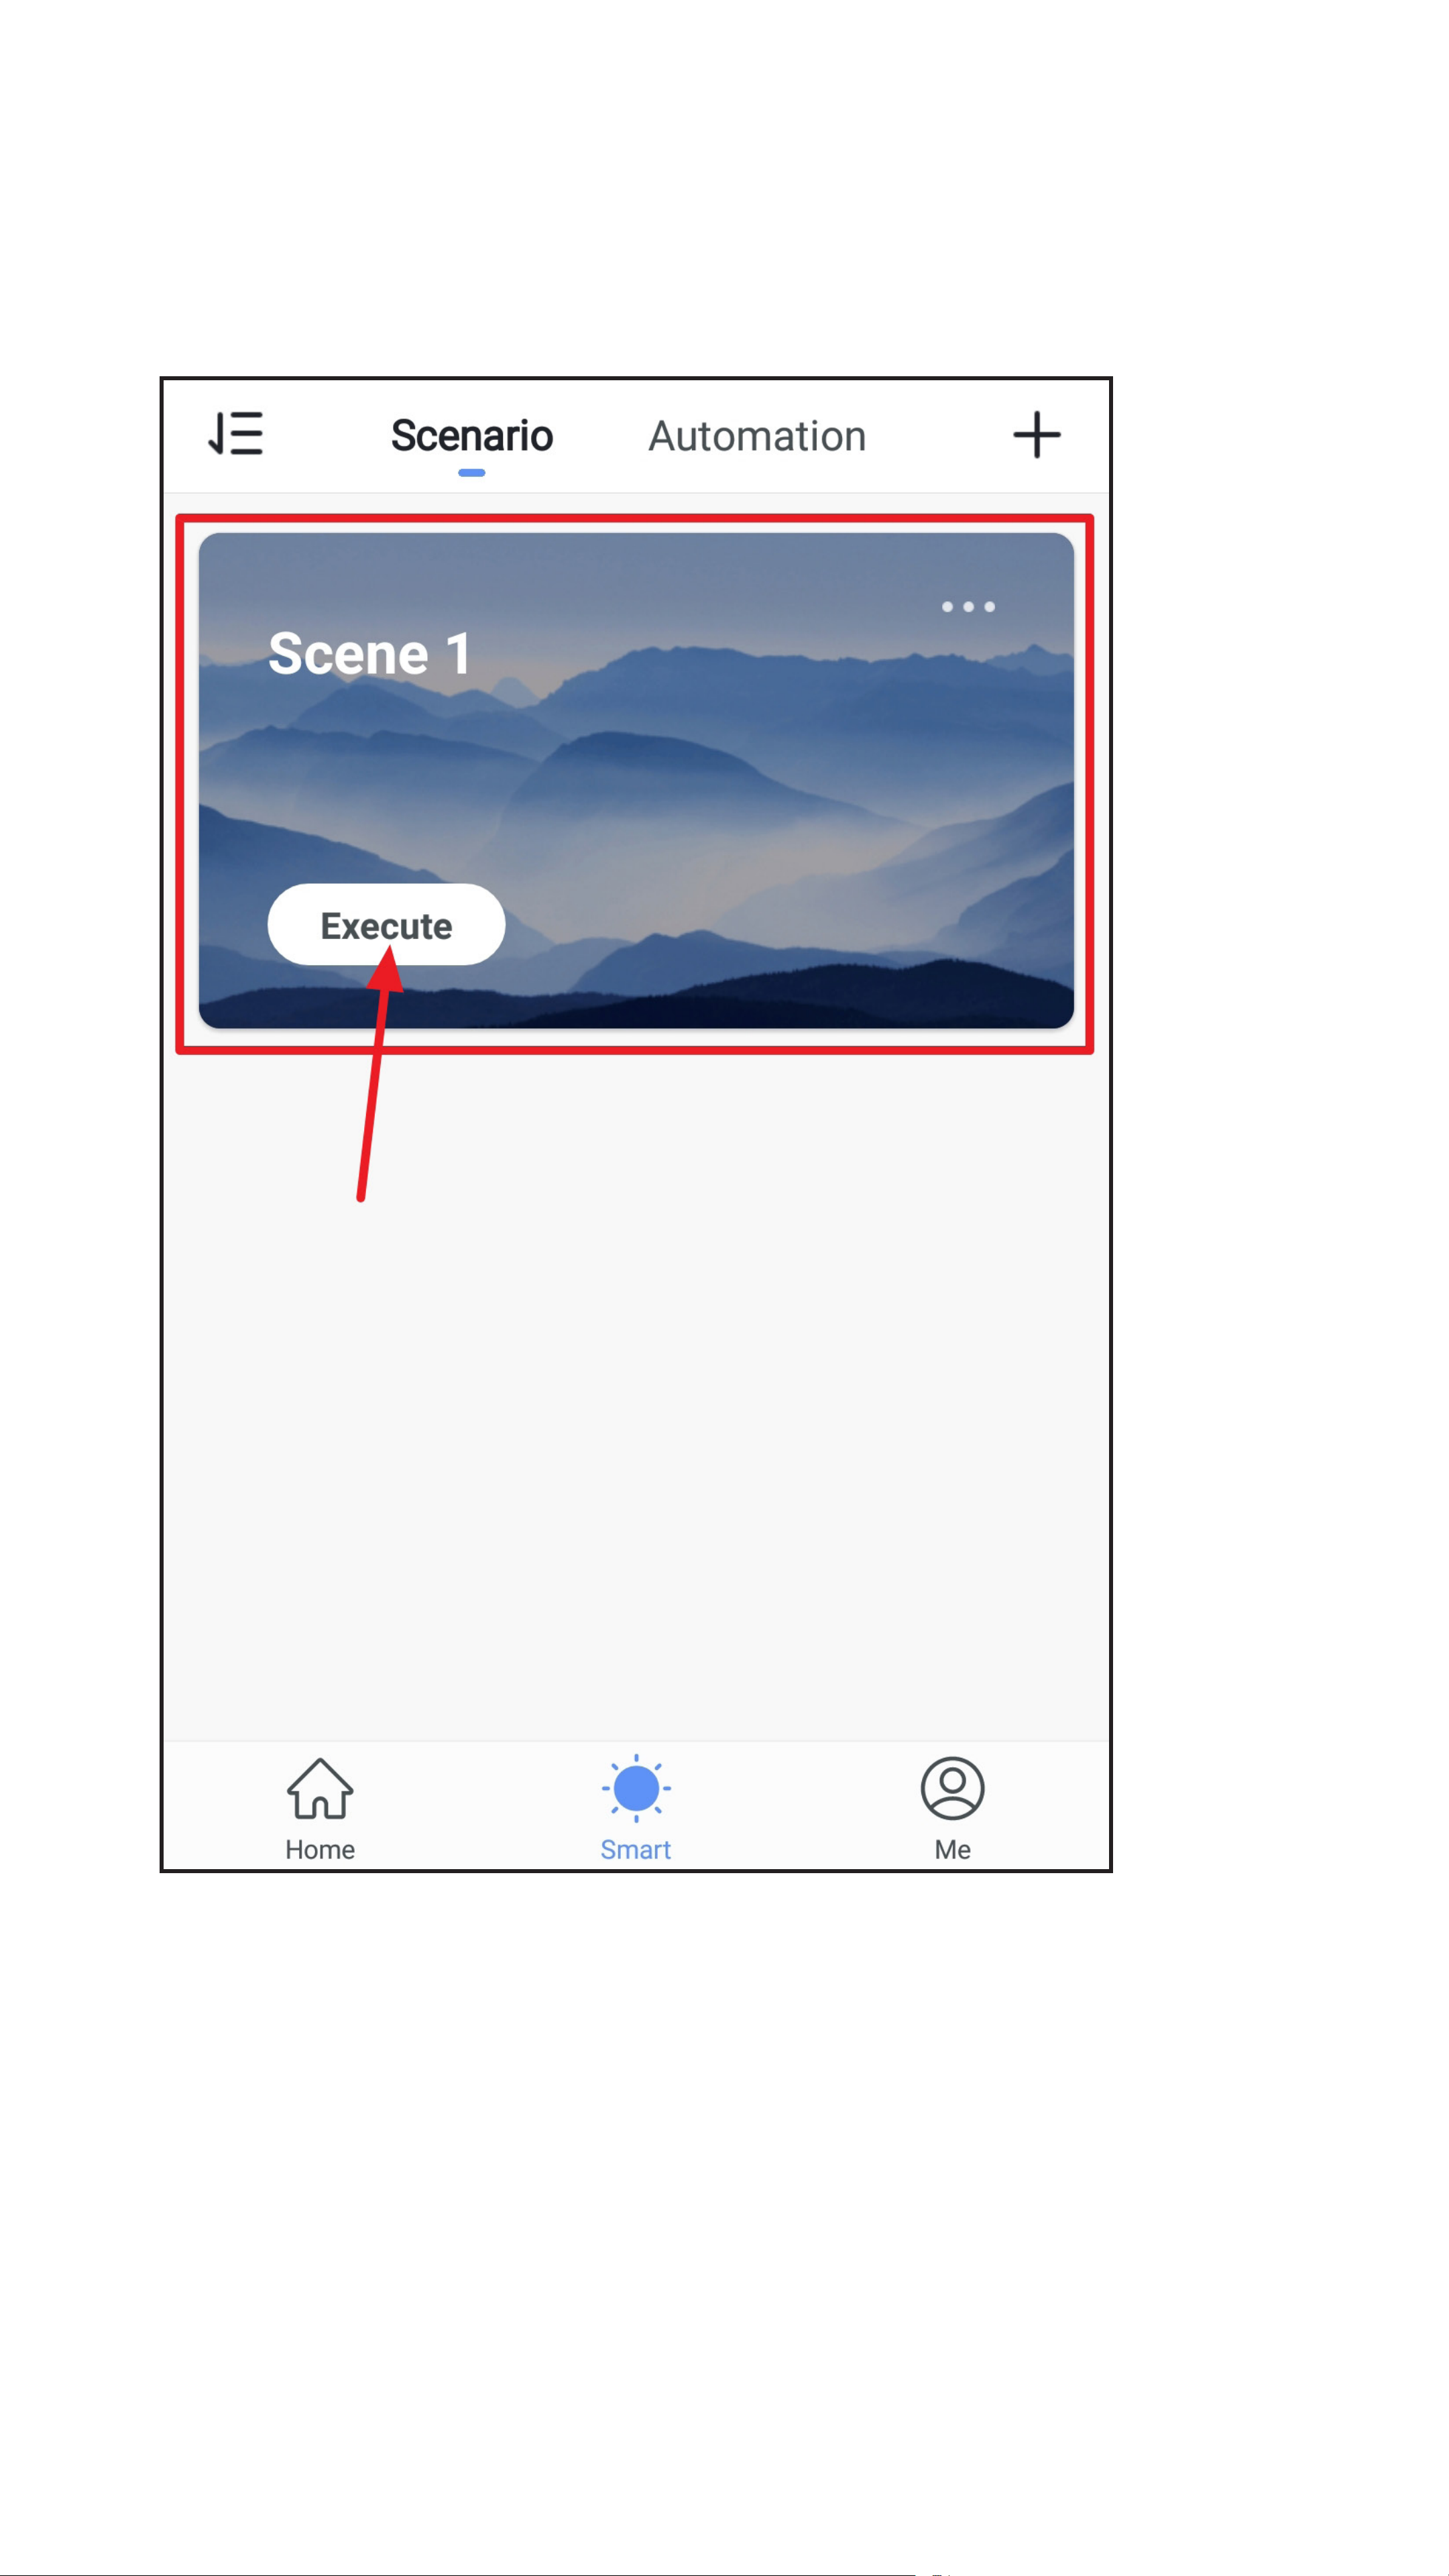
• The scene now appears in the scene display.
• To execute the scene now, tap the
corresponding button (arrow in the gure).
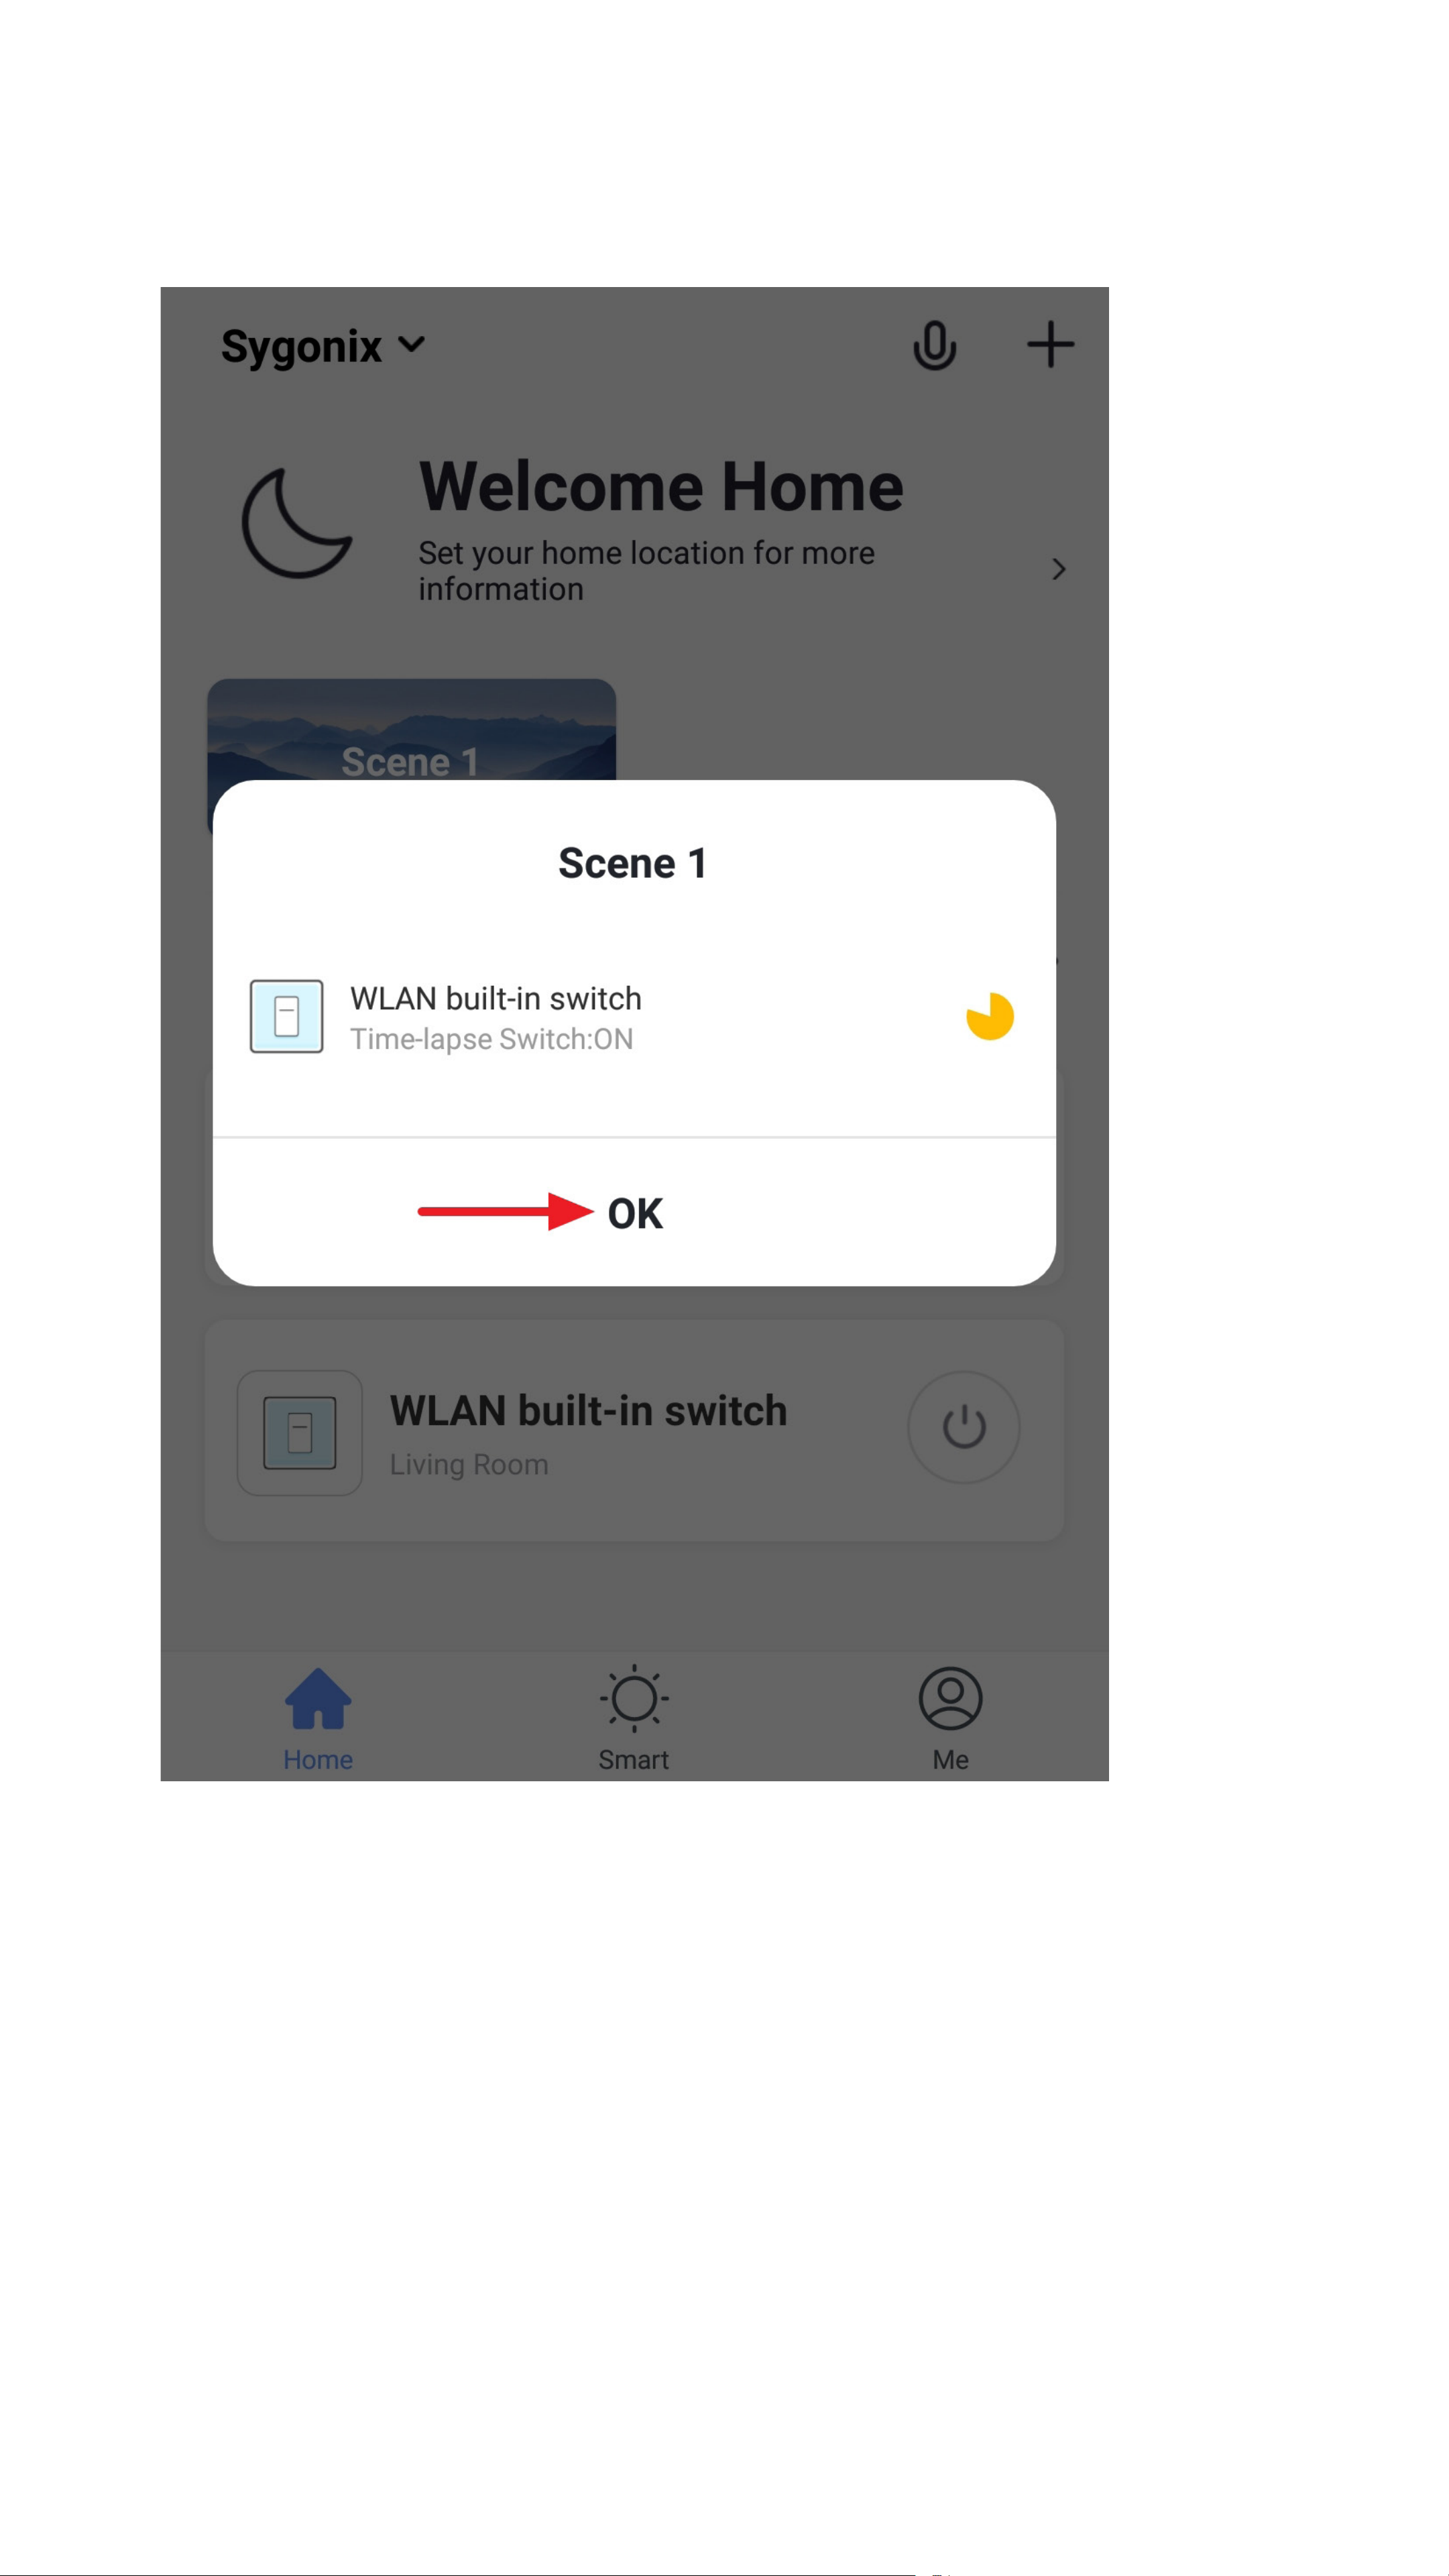
Page 67

• A pop-up will appear. You can either close it
or leave it open.
The switch will turn on after the delay.
Page 68

• If you have previously selected that the scene
should also appear in the main display, you
can also execute it from here.
• To do this, simply tap the scene.
Page 69
• A pop-up will appear again and the scene will
be executed.
Page 70

• To delete a scene, go back to the scene
display and select the desired scene.
• Swipe all the way down and tap the lowest
button.
• Then conrm the deletion.
Page 71

Similar to a scene, you can also create an
automation. The only difference is that you
have to set a condition here, an action and
nally an effect.
To do this, switch the tab at the top to
“Automation” after tapping the sun icon in
the main display of the app.
Page 72
Functions on the
prole and settings
page of the app
Here you can get a brief overview of the control
functions on the prole and settings page of the
app.
• To go to the page, tap the bottom right button
on the home page of the app.
C1
C2
C3
C4
C5
C6
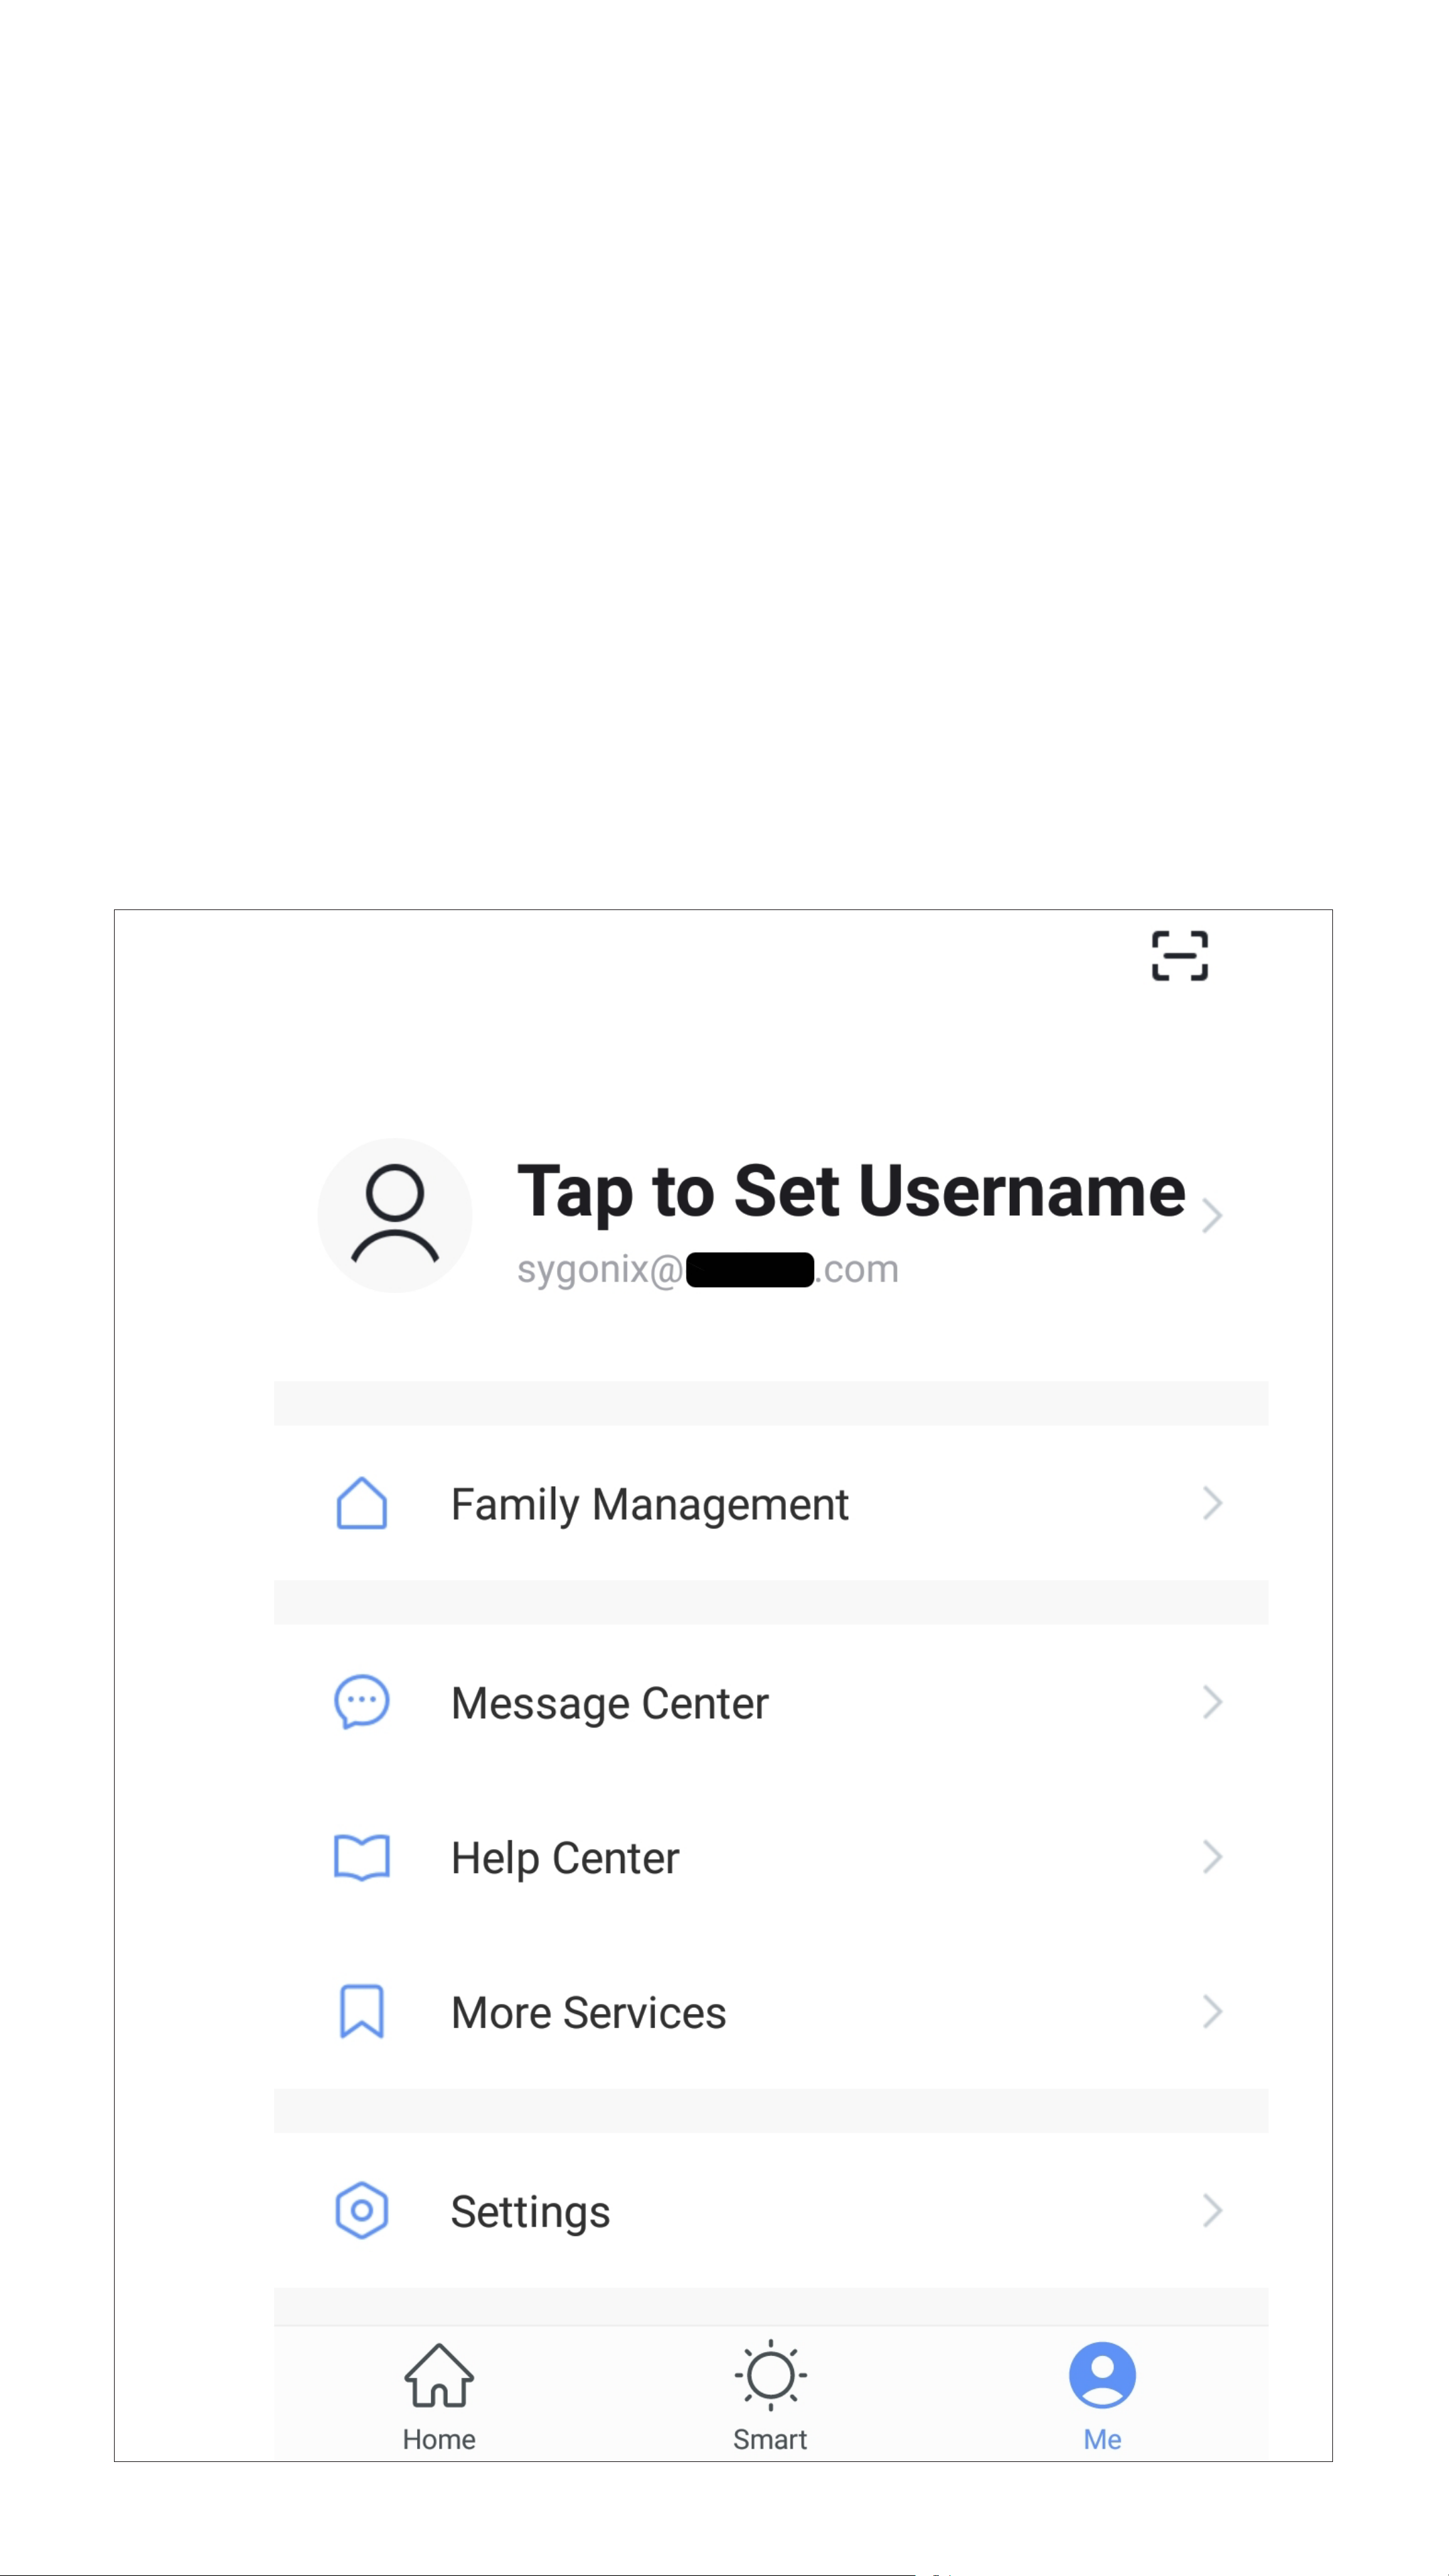
Page 73

C1 Opens the prole of the current user; see
D1 to D5
C2 Opens the family management; see E1 to
E6
C3 Opens the message centre; here you can
view and edit all notications
C4 Opens the help centre with some
questions and answers
C5 Here you can select a service you would
like to use to link the app and need help
with that.
C6 Opens the settings menu; see F1 to F6
Page 74

Prole of the current user
D1
D4
D2
D5
D3
(C1)
D1 Here you can set a prole image.
D2 This item enables you to add a nickname
for your prole.
D3 Here you can view and change all the
settings related to your account.
D4 Here you can select the temperature unit.
D5 In the last item you can set your time
zone.
Page 75

Family management (C2)
• Firstly, select the family you want to edit.
E1
E2
E3
E4
E5
E6
E1 Here you can change the family name.
E2 This item opens room management,
where you can, for example, add new
rooms or delete old ones.
E3 Here you can set the family location.
E4
Here you can manage the individual family
members. Just tap the member you want
to manage.
E5 This item enables you to add new
members to the family.
E6 Tap the last item if you want to remove the
current family.
Page 76

Settings (C6)
F1
F2
F3
F4
F5
F6
F1 Here you can turn the app sound on and
off.
F2 This item opens the notication settings.
F3 This item displays all information about
the app.
F4 Here you can perform a network
diagnosis.
F5 This item enables you to delete the
cached data of the app.
F6 Tap the last item if you want to log out of
the app.
 Loading...