


Gebrauchsanweisung
Schlüsseltresor „KeySafe C4“
Best.-Nr. 1732742
Bestimmungsgemäße Verwendung
Dieser Tresor bietet einen relativ sicheren Platz zur Aufbewahrung von Schlüsseln. Er verfügt über ein
4-stelliges Zahlenschloss, das durch eine Schiebefachabdeckung vor Witterungseinüssen geschützt
ist. Das kompakte Aluminiumgehäuse ist korrosions- und schlagfest. Es kann mit den mitgelieferten
Montageteilen an einer horizontalen Fläche befestigt werden.
Aus Sicherheits- und Zulassungsgründen dürfen Sie das Produkt nicht umbauen und/oder verändern. Falls
Sie das Produkt für andere als die zuvor genannten Zwecke verwenden, könnte das Produkt beschädigt
werden. Darüber hinaus kann eine unsachgemäße Verwendung zu anderen Gefahren führen. Lesen Sie
sich die Bedienungsanleitung genau durch und bewahren Sie diese auf. Reichen Sie das Produkt nur
zusammen mit der Bedienungsanleitung an dritte Personen weiter.
Dieses Produkt erfüllt die gesetzlichen nationalen und europäischen Anforderungen. Alle enthaltenen
Firmennamen und Produktbezeichnungen sind Warenzeichen der jeweiligen Inhaber. Alle Rechte vorbehalten.
Lieferumfang
• Schlüsselfach
• 4 Schrauben
Aktuelle Bedienungsanleitungen
Laden Sie aktuelle Bedienungsanleitungen über den Link www.conrad.com/downloads
herunter oder scannen Sie den abgebildeten QR-Code. Befolgen Sie die Anweisungen
auf der Webseite.
Symbol-Erklärungen
Das Symbol mit dem Ausrufezeichen im Dreieck weist auf wichtige Informationen in dieser
Bedienungsanleitung hin. Lesen Sie diese Informationen immer aufmerksam.
Das Pfeilsymbol weist auf besondere Informationen und auf Ratschläge zur Bedienung hin.
Sicherheitsanweisungen
Lesen Sie die Bedienungsanleitung sorgfältig durch und beachten Sie insbesondere
die Sicherheitshinweise. Falls Sie die Sicherheitshinweise und Informationen für einen
ordnungsgemäßen Gebrauch in dieser Bedienungsanleitung nicht beachten, haften
wir nicht für möglicherweise daraus resultierende Verletzungen oder Sachschäden.
Außerdem erlischt in solchen Fällen die Gewährleistung/Garantie.
• Das Produkt ist kein Spielzeug. Halten Sie es von Kindern und Haustieren fern.
• Lassen Sie das Verpackungsmaterial nicht achtlos liegen. Dieses könnte für Kinder zu einem
gefährlichen Spielzeug werden.
• Schützen Sie das Produkt vor extremen Temperaturen, direkter Sonneneinstrahlung, starken
Erschütterungen, hoher Luftfeuchtigkeit, Feuchtigkeit, brennbaren Gasen, Dampf und
Lösungsmitteln.
• Setzen Sie das Produkt keiner mechanischen Beanspruchung aus.
• Wenn kein sicherer Betrieb mehr möglich ist, nehmen Sie das Produkt außer Betrieb und
schützen Sie es vor unbeabsichtigter Verwendung. Der sichere Betrieb ist nicht mehr
gewährleistet, wenn das Produkt:
- sichtbare Schäden aufweist,
- nicht mehr ordnungsgemäß funktioniert
- über einen längeren Zeitraum unter ungünstigen Umgebungsbedingungen gelagert wurde oder
- erheblichen Transportbelastungen ausgesetzt wurde.
• Gehen Sie vorsichtig mit dem Produkt um. Stöße, Schläge oder sogar das Herunterfallen aus
geringer Höhe können das Produkt beschädigen.
• Wenden Sie sich an eine Fachkraft, wenn Sie Zweifel über die Arbeitsweise, die Sicherheit
oder den Anschluss des Gerätes haben.
• Lassen Sie Wartungs-, Anpassungs- und Reparaturarbeiten ausschließlich von einer
Fachkraft bzw. einer Fachwerkstatt ausführen.
• Sollten Sie noch Fragen haben, die in dieser Bedienungsanleitung nicht beantwortet werden,
wenden Sie sich an unseren technischen Kundendienst oder an andere Fachleute.
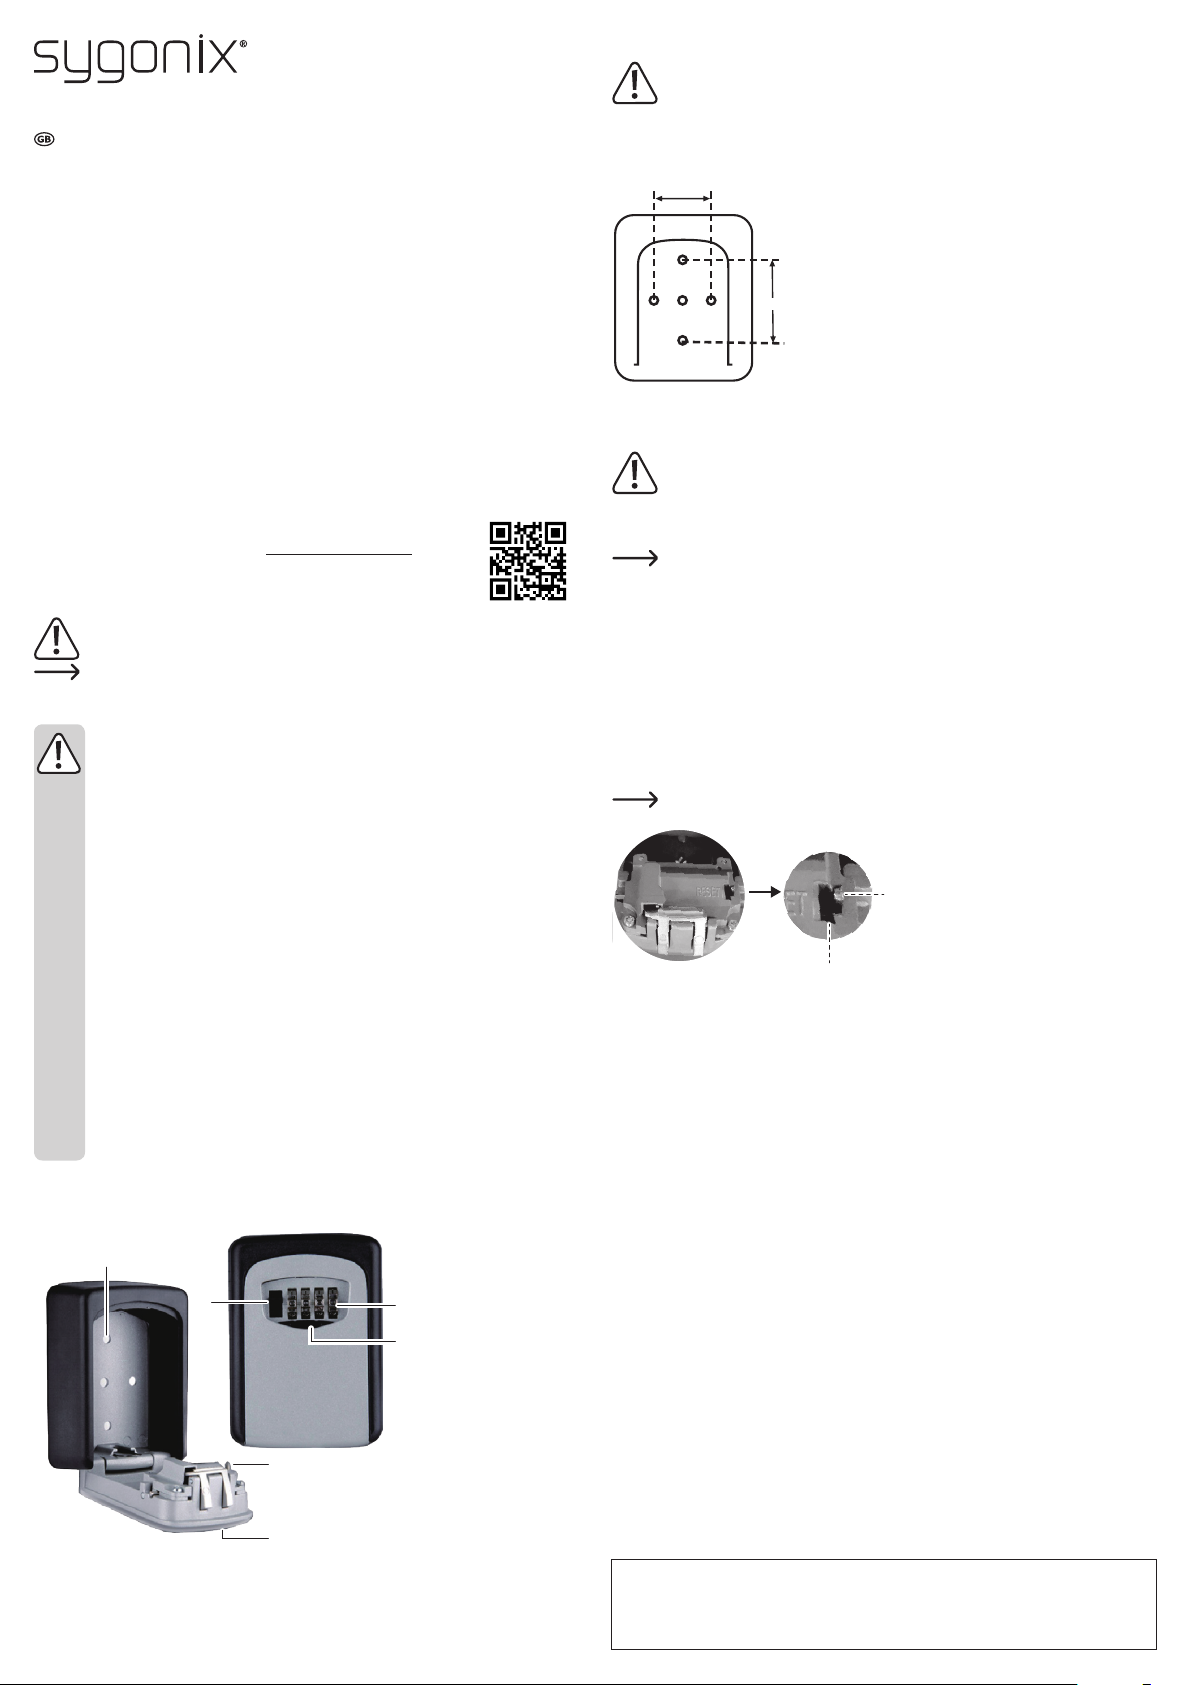
Bedienelemente
1
2
• 4 Kunststoffdübel
• Bedienungsanleitung
5
6
1 Befestigungspunkt
2 Freigabeschalter
3 Taste RESET
4 Tresortür
5 Zifferntasten
6 Fachabdeckung
Installation
Montieren Sie den Tresor an einer vertikalen Fläche, z. B. an der Wand, an der Tür oder im
Inneren eines Schranks. Überprüfen Sie, ob die mitgelieferten Schrauben für die Art der zu
Überprüfen Sie vor dem Bohren immer, ob sich unter der Oberäche verdeckte Drähte oder
Das mittlere Loch ist für eine Gucklochhalterung (nicht im Lieferumfang enthalten) vorgesehen.
befestigenden Oberäche geeignet sind. Im Zweifelsfall einen Fachmann konsultieren.
Rohre benden, die beschädigt werden könnten.
• Fachabdeckung (6) öffnen.
• Anweisungen zum Öffnen der Tresortür (4) nden Sie im Abschnitt
„Tresor entsperren“.
• Im Inneren benden sich 4 Befestigungspunkte (1). Halten Sie den
Tresor an die Wand und markieren Sie die Stelle für die Löcher mit
40 mm
einem Bleistift.
• Verwenden Sie eine Wasserwaage, um sicherzustellen, dass die
Löcher eben sind.
• Verwenden Sie einen Bohrer mit einem Durchmesser von 6 mm, um
Löcher für die mitgelieferten Schrauben zu bohren.
• Setzen Sie die Kunststoffdübel ein. Verwenden Sie einen Hammer,
um diese bei Bedarf einzufügen.
57 mm
• Setzen Sie den Tresor gegen die Löcher an der Wand und befestigen
Sie sie mit den mitgelieferten Schrauben.
• Schließen Sie die Tresortür (4) und verschlüsseln Sie die
Zifferntasten (5).
• Schließen Sie die Fachabdeckung (6).
Betrieb
Um die Sicherheit zu maximieren, sollte die Kombination so bald wie möglich von der
Halten Sie die Fachabdeckung (6) für erhöhten Wasserwiderstand geschlossen.
Rotieren Sie die Zifferntasten (5) wöchentlich, damit sie gut funktionieren.
Werkseinstellung „0000“ geändert werden.
a) Tresor entsperren
Wenn Sie die Kombination zum Entsperren des Tresors eingeben, decken Sie die Ziffertasten (5)
mit Ihrer Hand oder Ihrem Körper ab, um zu verhindern, dass andere die Kombination sehen. Die
Werkseinstellung ist „0000“.
• Schieben Sie die Fachabdeckung (6) auf, um die Zifferntasten (5) freizulegen.
• Drehen Sie die Zifferntasten (5) auf die eingestellte Kombination.
• Drücken Sie auf den Freigabeschalter (2), um die Tresortür (4) zu öffnen.
• Öffnen Sie die Tresortür (4) weit und legen Sie die Schlüssel in den Tresor oder entfernen Sie sie.
b) Tresor verriegeln
• Schließen Sie die Tresortür (4).
• Verschlüsseln Sie die Zifferntasten (5).
• Schieben Sie die Fachabdeckung (6) zu.
c) Stellen Sie eine neue Kombination ein.
Die Werkseinstellung ist „0000“.
• Öffnen Sie den Tresor. Siehe Abschnitt „Tresor
entsperren“.
- Belassen Sie die Zifferntasten (5) in der
Entsperr-Kombination.
• Schieben Sie den RESET- Knopf von Position
A nach B.
A
• Stellen Sie die Zifferntasten (5) auf eine neue
4-stellige Kombination ein.
• Schieben Sie den RESET- Knopf zurück in
B
Position A, um die neue Kombination zu xieren.
• Schließen Sie die Tresortür (4) und die
Fachabdeckung (6).
Pege und Reinigung
• Das Produkt ist wartungsfrei.
• Es wird empfohlen, die Tasten wöchentlich zu rotieren, damit sie gut funktionieren.
• Verwenden Sie keine aggressiven Reinigungsmittel, Alkohol oder andere chemischen Lösungsmittel, da
diese zu Schäden am Gehäuse und zu Fehlfunktionen führen können.
• Verwenden Sie zum Reinigen des Produkts ein trockenes, faserfreies Tuch.
Technische Daten
Zugang ................................................. zum 4-Tastenkombinationsschloss
Material ................................................. Aluminiumlegierung
Betriebsbedingungen ............................ -20 bis +60 °C, 40 – 85 % relative Luftfeuchte
Lagerbedingungen ................................ -20 bis +60 °C, 40 – 85 % relative Luftfeuchte
Abmessungen (B x H x T) .................... 87,5 x 41 x 120 mm
Gewicht ................................................. 441 g
3
4
Dies ist eine Publikation der Conrad Electronic SE, Klaus-Conrad-Str. 1, D-92240 Hirschau (www.conrad.com). Alle Rechte
einschließlich Übersetzung vorbehalten. Reproduktionen jeder Art, z. B. Fotokopie, Mikroverlmung oder die Erfassung in
elektronischen Datenverarbeitungsanlagen bedürfen der schriftlichen Genehmigung des Herausgebers. Nachdruck, auch
auszugsweise, verboten. Die Publikation entspricht dem technischen Stand bei Drucklegung.
Copyright 2018 by Conrad Electronic SE. *1732742_v1_1018_02_dh_m(1)_de
Operating Instructions
Key Safe ‘KeySafe C4’
Item No. 1732742
Intended Use
This safe box is designed to provide a relatively safe place to lock away keys. It has a 4-digit combination
lock that is protected from the elements by a sliding compartment cover. The compact aluminium housing
is corrosion and impact resistant. It can be secured to a horizontal surface using the included mounting
hardware.
For safety and approval purposes, you must not rebuild and/or modify this product. If you use the product
for purposes other than those described above, the product may be damaged. In addition, improper use can
result in other hazards. Read the instructions carefully and store them in a safe place. Make this product
available to third parties only together with its operating instructions.
This product complies with the statutory national and European requirements. All company names and
product names are trademarks of their respective owners. All rights reserved.
Delivery Content
• Key safe
• Screws x 4
Up-to-date Operating Instructions
Download the latest operating instructions at www.conrad.com/downloads or scan the
QR code shown. Follow the instructions on the website.
Explanation of Symbols
The symbol with the exclamation mark in the triangle is used to indicate important information in
these operating instructions. Always read this information carefully.
The arrow symbol indicates special information and advice on operation.
Safety Instructions
Read the operating instructions carefully and especially observe the safety information.
If you do not follow the safety instructions and information on proper handling in this
manual, we assume no liability for any resulting personal injury or damage to property.
Such cases will invalidate the warranty/guarantee.
• The device is not a toy. Keep it out of the reach of children and pets.
• Do not leave packaging material lying around carelessly. This may become dangerous playing
material for children.
• Protect the device from extreme temperatures, direct sunlight, strong jolts, high humidity,
moisture, ammable gases, steam and solvents.
• Do not place the product under any mechanical stress.
• If it is no longer possible to operate the product safely, take it out of operation and protect it
from any accidental use. Safe operation can no longer be guaranteed if the product:
- is visibly damaged,
- is no longer working properly,
- has been stored for extended periods in poor ambient conditions or
- has been subjected to any serious transport-related stresses.
• Please handle the product carefully. Jolts, impacts or a fall even from a low height can damage
the product.
• Consult an expert when in doubt about the operation, safety or connection of the device.
• Maintenance, modications and repairs must only be completed by a technician or an
authorised repair centre.
• If you have questions which remain unanswered by these operating instructions, contact our
technical support service or other technical personnel.
Operating Elements
1
2
• Plastic dowels x4
• Operating instructions
5
6
1 Mounting point
2 Release switch
3 RESET button
4 Safe door
5 Number dials
6 Compartment cover
Installation
Mount the safe to a vertical surface e.g. wall, door, inside of a cabinet. Check that the provided
screws are appropriate for the type of surface you intend to mount to. If in doubt consult a
Before drilling, always check for concealed wires or pipes beneath the surface that could be
The center hole is for a peep hole mount (not included).
professional.
damaged or cause harm.
40 mm
57 mm
• Open compartment cover (6).
• See section “Unlock Safe” for instructions on how to open the safe
door (4).
• Inside there will be 4 mounting points (1). Hold the box against the
wall and mark position for the holes with a pencil.
• Use a spirit level to make sure the holes are level.
• Use a 6 mm diameter bit to drill holes for the supplied screws.
• Insert the plastic dowels; use a hammer to insert these if necessary.
• Place the box against holes on the wall, then secure using the
provided screws.
• Close the safe door (4) then scramble the number dials (5).
• Close the compartment cover (6).
Operation
To maximize security, the combination should be changed from factory default combination
Keep the compartment cover (6) closed for increased water resistance.
Rotate the number dials (5) weekly to keep them working well.
“0000” as soon as possible.
a) Unlock Safe
When entering the combination to unlock the safe, cover the number dials (5) with your hand or
body to prevent others from seeing the combination. The factory default combination is”0000”.
• Slide the compartment cover (6) open to reveal the number dials (5).
• Rotate the number dials (5) to the set combination.
• Press down on the release switch (2) to open the safe door (4).
• Pull the safe door (4) all the way open then add or remove keys to or from the safe.
b) Lock Safe
• Close the safe door (4).
• Scramble the number dials (5).
• Slide the compartment cover (6) closed.
c) Set New Combination
The factory default combination is”0000”.
• Open the safe. See section “Unlock Safe”.
- Leave the number dials (5) at the unlock safe
combination.
• Slide the RESET button from position A to B.
A
• Set the number dials (5) to a new 4-digit
combination.
• Slide the RESET button back to position A to x
B
the new combination.
• Close the safe door (4) and compartment cover
(6).
Care and Cleaning
• This product is maintenance-free.
• It is recommended to rotate the dials weekly to keep them working well.
• Do not use any aggressive cleaning agents, rubbing alcohol or other chemical solutions as they can cause
damage to the housing and malfunctioning.
• Clean the product with a dry, bre-free cloth.
Technical Data
Access .................................................. 4-dial combination lock
Material ................................................. Aluminium alloy
Operating conditions ............................. -20 to +60 °C, 40 – 85 % relative humidity
Storage conditions ................................ -20 to +60 °C, 40 – 85 % relative humidity
Dimensions (W x H x D) ....................... 87.5 x 41 x 120 mm
Weight .................................................. 441 g
3
4
This is a publication by Conrad Electronic SE, Klaus-Conrad-Str. 1, D-92240 Hirschau (www.conrad.com). All rights
including translation reserved. Reproduction by any method, e.g. photocopy, microlming, or the capture in electronic data
processing systems require the prior written approval by the editor. Reprinting, also in part, is prohibited. This publication
represents the technical status at the time of printing.
Copyright 2018 by Conrad Electronic SE. *1732742_v1_1018_02_dh_m(1)_en

Mode d’emploi
Coffre à clés « KeySafe C4 »
N° de commande 1732742
Utilisation prévue
Ce coffre-fort est conçu pour offrir un endroit assez sécurisé pour ranger les clés. Il dispose d’une serrure à
combinaison de 4 chiffres protégée des intempéries par un couvercle du compartiment coulissant. Le boîtier
compact en aluminium résiste à la corrosion et aux chocs. Il peut être xé sur une surface horizontale à l’aide
du matériel de montage fourni.
Pour des raisons de sécurité et d’homologation, toute restructuration et/ou modication du produit est interdite.
Le produit pourrait être endommagé en cas d’utilisation autre que celle décrite ci-dessus. En outre, une mauvaise
utilisation vous expose à d’autres risques. Lisez attentivement les instructions du mode d’emploi et conservez-le
dans un endroit sûr. Si vous donnez l’appareil à une autre personne, donnez-lui également le mode d’emploi.
Ce produit est conforme aux exigences nationales et européennes en vigueur. Tous les noms d’entreprises et
appellations de produits sont des marques commerciales de leurs propriétaires respectifs. Tous droits réservés
Contenu d’emballage
• Coffre à clés
• 4 vis
Mode d’emploi actualisé
Téléchargez la dernière version du mode d’emploi sur www.conrad.com/downloads ou
scannez le code QR. Suivez les instructions gurant sur le site Web.
Explication des symboles
Le symbole avec le point d’exclamation dans un triangle sert à indiquer les informations
importantes présentes dans ce mode d’emploi. Veuillez lire ces informations attentivement.
Le symbole de la èche indique des informations spéciques et des conseils spéciaux pour le
fonctionnement.
Consignes de sécurité
Lisez attentivement les instructions d’utilisation et respectez particulièrement les
informations de sécurité. Nous ne saurions être tenus pour responsables des blessures
corporelles ou des dommages matériels résultant du non-respect des mises en garde et
des indications relatives à une utilisation correcte gurant dans ce mode d’emploi. Le
droit à la garantie s’annule dans de tels cas.
• Cet appareil n’est pas un jouet. Il doit rester hors de portée des enfants et des animaux domestiques.
• Ne laissez pas traîner le matériel d’emballage. Celui-ci peut se révéler dangereux si des
enfants le prennent pour un jouet.
• Gardez le produit à l’abri de températures extrêmes, de la lumière directe du soleil, de chocs
violents, de l’humidité élevée, de gaz inammables, de la vapeur et de solvants.
• N’exposez pas le produit à des contraintes mécaniques.
• Si vous n’êtes plus en mesure d’utiliser le produit en toute sécurité, arrêtez de l’utiliser et protégez-
le contre toute utilisation accidentelle. Le produit ne peut plus être utilisé en toute sécurité lorsqu’il :
- présente des traces de dommages visibles,
- ne fonctionne plus normalement,
- a été stocké pendant une période prolongée dans des conditions défavorables ou
- a été transporté dans des conditions très rudes.
• Manipulez le produit avec précaution. Les chocs, les impacts ou même une chute d’une
hauteur modérée peuvent endommager le produit.
• Si vous avez des doutes concernant le fonctionnement, la sécurité ou le raccordement de
l’appareil, consultez un expert.
• Toute manipulation d’entretien, d’ajustement ou de réparation doit impérativement être
conée à un professionnel ou à un centre de réparation agréé.
• Si vous avez des questions qui sont restées sans réponse après avoir lu toutes les instructions
d’utilisation, contactez notre service de support technique ou un autre technicien spécialisé.
Éléments d’utilisation
• 4 chevilles en plastique
• Mode d’emploi
Installation
Montez le coffre-fort sur une surface verticale, p. ex. sur le mur, la porte, à l’intérieur d’une
armoire. Vériez que les vis fournies sont adaptées au type de surface sur laquelle vous
Avant de percer, vériez toujours qu’aucun câble électrique ou tuyau cachés susceptibles d’être
Le trou central est destiné à un montage pour judas (non fourni).
souhaitez le monter. En cas de doute, consultez un professionnel.
endommagés ou de provoquer des blessures ne se trouvent sous la surface.
• Ouvrez le couvercle du compartiment (6).
• Voir la section « Déverrouiller le coffre-fort » pour savoir comment
ouvrir la porte du coffre-fort (4).
40 mm
• Il y aura 4 points de montage (1) à l’intérieur. Tenez le coffre contre le
mur et marquez la position des trous avec un crayon.
• Utilisez un niveau à bulle pour vous assurer que les trous sont au
même niveau.
• Utilisez un foret de 6 mm de diamètre pour percer les trous dans
lesquels les vis fournies seront enfouies.
• Enfoncez les chevilles en plastique ; utilisez un marteau pour le faire
57 mm
si nécessaire.
• Placez le coffre contre les trous du mur, puis xez-le à l’aide des
vis fournies.
• Fermez la porte du coffre-fort (4) puis brouillez les roulettes chiffrées (5).
• Fermez le couvercle du compartiment (6).
Fonctionnement
Pour maximiser la sécurité, la combinaison par défaut « 0000 » doit être changée le plus vite
Maintenez le couvercle du compartiment (6) fermé pour une meilleure résistance à l’eau.
Tournez les roulettes chiffrées (5) chaque semaine an qu’elles continuent de bien fonctionner.
possible.
a) Déverrouiller le coffre-fort
Lorsque vous entrez la combinaison pour déverrouiller le coffre-fort, couvrez les roulettes
chiffrées (5) avec votre main ou votre corps pour empêcher les autres de la voir. La combinaison
par défaut est « 0000 ».
• Ouvrez le couvercle du compartiment (6) en le faisant coulisser pour faire apparaître les roulettes chiffrées (5).
• Tournez les roulettes chiffrées (5) pour obtenir la combinaison dénie.
• Appuyez sur l’interrupteur de déverrouillage (2) pour ouvrir la porte du coffre-fort (4).
• Tirez la porte du coffre-fort (4) à fond pour l’ouvrir, puis mettez-y ou retirez-y des clés.
b) Verrouiller le coffre-fort
• Fermez la porte du coffre-fort (4).
• Brouillez les roulettes chiffrées (5).
• Fermez le couvercle du compartiment (6) en le faisant coulisser.
c) Dénir une nouvelle combinaison
La combinaison par défaut est « 0000 ».
• Ouvrez le coffre-fort. Voir la section sur
« déverrouiller le coffre-fort ».
- Laissez les roulettes chiffrées (5) sur la
combinaison de déverrouillage du coffre-fort.
• Faites coulisser le bouton RESET de la position
A à B.
A
• Réglez les roulettes chiffrées (5) sur une
nouvelle combinaison à 4 chiffres.
• Faites de nouveau coulisser le bouton RESET à
B
la position A an de xer la nouvelle combinaison.
• Fermez la porte du coffre-fort (4) ainsi que le
couvercle du compartiment (6).
Entretien et nettoyage
• Ce produit ne nécessite aucun entretien.
• Il est recommandé de tourner les roulettes chiffrées une fois par semaine an qu’elles continuent de bien
fonctionner.
• N’utilisez pas de produits de nettoyage abrasifs, d’alcool à frictionner ou autre produit chimique : ceux-ci
risqueraient d’abîmer le boîtier et de causer des dysfonctionnements.
• Nettoyez le produit avec un tissu sec, non pelucheux.
1
2
1 Point de montage
2 Interrupteur de
déverrouillage
3 Bouton RESET
5
4 Porte du coffre-fort
5 Roulettes chiffrées
6
6 Couvercle du
compartiment
Données techniques
Accès .................................................... Serrure à combinaison de 4 chiffres
Matériau ................................................ Alliage d’aluminium
Conditions de fonctionnement .............. de -20 à +60 °C, 40 - 85 % humidité relative
Conditions de stockage ........................ de -20 à +60 °C, 40 - 85 % humidité relative
Dimensions (L x h x l) ........................... 87,5 x 41 x 120 mm
Poids ..................................................... 441 g
3
Ce document est une publication de Conrad Electronic SE, Klaus-Conrad-Strasse 1, D-92240 Hirschau - Allemagne
4
(www.conrad.com). Tous droits réservés y compris la traduction. La reproduction par n’importe quel moyen, p. ex. photocopie,
microlm ou saisie dans des systèmes de traitement électronique des données, nécessite l’autorisation préalable par écrit de
l’éditeur. La réimpression, même en partie, est interdite. Cette publication représente l’état technique au moment de l’impression.
Copyright 2018 by Conrad Electronic SE. *1732742_v1_1018_02_dh_m(1)_fr

Gebruiksaanwijzing
Sleutelkluis ‘KeySafe C4’
Bestelnr. 1732742
Beoogd gebruik
Deze kluis is ontworpen om een relatief veilige plek te bieden om sleutels op te bergen. Het heeft een
4-cijferig combinatieslot dat is beschermd tegen de elementen door een schuivend compartimentdeksel.
De compacte aluminium behuizing is corrosie- en slagvast. Het kan worden bevestigd aan een horizontaal
oppervlak met behulp van de meegeleverde montagehardware.
Om veiligheids- en goedkeuringsredenen mag u niets aan dit product veranderen. Als het product voor
andere doeleinden wordt gebruikt dan hierboven beschreven kan het worden beschadigd. Bovendien kan
onjuist gebruik tot andere gevaren leiden. Lees de gebruiksaanwijzing goed door en bewaar deze op een
veilige plek. Het product mag alleen samen met de gebruiksaanwijzing aan derden ter hand worden gesteld.
Het product is in overeenstemming met de nationale en Europese wettelijke voorschriften. Alle bedrijfs- en
productnamen zijn handelsmerken van de betreffende eigenaren. Alle rechten voorbehouden.
Omvang van de levering
• Sleutelkluis
• Schroeven x 4
Meest recente gebruiksaanwijzing
Download de meest recente gebruiksaanwijzing via www.conrad.com/downloads of
scan de afgebeelde QR-code. Volg de aanwijzingen op de website.
Verklaring van de symbolen
Dit symbool met het uitroepteken in een driehoek wordt gebruikt om belangrijke informatie in
deze gebruiksaanwijzing te onderstrepen. Lees deze informatie altijd aandachtig door.
Het pijl-symbool duidt op speciale informatie en advies voor het gebruik.
Veiligheidsinstructies
Lees de gebruiksaanwijzing aandachtig door en neem vooral de veiligheidsinformatie in
acht. Indien de veiligheidsinstructies en de aanwijzingen voor een juiste bediening in deze
gebruiksaanwijzing niet worden opgevolgd, aanvaarden wij geen verantwoordelijkheid
voor hieruit resulterend persoonlijk letsel of materiële schade. In dergelijke gevallen
vervalt de aansprakelijkheid/garantie.
• Dit apparaat is geen speelgoed. Houd het buiten het bereik van kinderen en huisdieren.
• Laat verpakkingsmateriaal niet achteloos rondslingeren. Dit kan voor kinderen gevaarlijk
speelgoed worden.
• Bescherm het product tegen extreme temperaturen, direct zonlicht, krachtige stoten, hoge
luchtvochtigheid, vocht, ontvlambaar gas, stoom en oplosmiddelen.
• Stel het product niet bloot aan mechanische druk.
• Als het het product niet langer veilig gebruikt kan worden, stel het dan buiten bedrijf en zorg
ervoor dat niemand het per ongeluk kan gebruiken. Veilig gebruik kan niet langer worden
gegarandeerd als het product:
- zichtbaar is beschadigd,
- niet meer naar behoren werkt,
- gedurende een langere periode onder slechte omstandigheden is opgeslagen of
- onderhevig is geweest aan ernstige transportbelasting.
• Behandel het product met zorg. Schokken, stoten of zelfs een val van geringe hoogte kunnen
het product beschadigen.
• Raadpleeg een expert wanneer u twijfelt over het gebruik, de veiligheid of de aansluiting van
het apparaat.
• Onderhoud, aanpassingen en reparaties mogen alleen uitgevoerd worden door een technicus
of een daartoe bevoegd servicecentrum.
• Als u nog vragen heeft die niet door deze gebruiksaanwijzing worden beantwoord, kunt u
contact opnemen met onze technische dienst of ander technisch personeel.
Bedieningselementen
1
2
• Kunststof pluggen x4
• Gebruiksaanwijzing
5
6
1 Bevestigingspunt
2 Ontgrendelschakelaar
3 RESET-toets
4 Kluisdeur
5 Cijfertoetsen
6 Compartmentdeksel
Installatie
Monteer de kluis op een verticaal oppervlak bijv. muur, deur, binnenkant van een kast. Controleer
of de meegeleverde schroeven geschikt zijn voor het type oppervlak waarop u het wilt monteren.
Voordat u begint te boren, controleer altijd op verborgen draden of leidingen onder de
Het middelste gat is voor het monteren van een kijkgaatje (niet inbegrepen).
Raadpleeg in geval van twijfel een professionele monteur.
oppervlakte die beschadigd kunnen raken of letsel kunnen veroorzaken.
• Openen compartmentdeksel (6).
• Zie paragraaf "Kluis ontgrendelen" voor instructies over hoe de
40 mm
kluisdeur (4) te openen.
• Binnenin bevinden er zich 4 bevestigingspunten (1). Houd het kastje
tegen de muur en markeer de positie voor de gaten met een potlood.
• Gebruik een waterpas om te zorgen dat de gaten waterpas zijn.
• Gebruik een boor van 6 mm diameter om gaten te boren voor de
meegeleverde schroeven.
• Steek de kunststof pluggen erin; gebruik een hamer om deze indien
57 mm
nodig erin te slaan.
• Plaats het kastje tegen de gaten in de muur en zet het vast met de
meegeleverde schroeven.
• Sluit de kluisdeur (4) en verdraai de cijferknoppen (5).
• Sluit het compartmentdeksel (6).
Gebruik
Om de veiligheid te maximaliseren, moet de combinatie zo snel mogelijk worden gewijzigd in de
Houd het compartimentdeksel (6) gesloten voor verhoogde waterbestendigheid.
Draai wekelijks aan de cijfertoetsen (5) zodat ze goed blijven werken.
standaardinstelling "0000".
a) Kluis ontgrendelen
Wanneer u de combinatie invoert om de kluis te ontgrendelen, bedek dan de cijfertoetsen (5) met uw
hand of lichaam om te voorkomen dat anderen de combinatie zien. De fabriekscombinatie is "0000".
• Schuif het compartimentdeksel (6) open om de cijfertoetsen (5) zichtbaar te maken.
• Draai de cijfertoetsen (5) naar de ingestelde combinatie.
• Druk de ontgrendelschakelaar (2) in om de kluisdeur (4) te openen.
• Trek de kluisdeur (4) helemaal open en plaats of verwijder sleutels van of in de kluis.
b) Kluis vergrendelen
• Sluit de kluisdeur (4).
• Verdraai de cijfertoetsen (5).
• Schuif het compartimentdeksel (6) dicht.
c) Nieuwe combinatie instellen
De fabriekscombinatie is "0000".
• De kluis openen. Zie paragraaf “Kluis
ontgrendelen”.
- Laat de cijfertoetsen (5) op de kluiscombinatie
voor ontgrendeling staan.
• Schuif de RESET-toets van positie A naar B.
A
• Stel de cijfertoetsen (5) in op een nieuwe
4-cijferige combinatie.
• Schuif de RESET-toets terug naar de positie A
B
om de nieuwe combinatie aan te maken.
• Sluit de kluisdeur (4) en het compartimentdeksel
(6).
Onderhoud en reiniging
• Dit product is onderhoudsvrij.
• Het wordt aanbevolen om aan de toetsen wekelijks te draaien zodat ze goed blijven werken.
• Gebruik in geen geval agressieve schoonmaakmiddelen, reinigingsalcohol of andere chemische
oplossingen omdat deze schade aan de behuizing of storingen kunnen veroorzaken.
• Reinig het product met een droog, pluisvrij doekje.
Technische gegevens
Toegang ................................................4-cijferig combinatieslot
Materiaal ............................................... Aluminium legering
Bedrijfscondities ................................... -20 tot +60 °C, 40 – 85 % relatieve luchtvochtigheid
Opslagcondities .................................... -20 tot +60 °C, 40 – 85 % relatieve luchtvochtigheid
Afmetingen (B x H x D) ......................... 87,5 x 41 x 120 mm
Gewicht ................................................. 441 g
3
Dit is een publicatie van Conrad Electronic SE, Klaus-Conrad-Str. 1, D-92240 Hirschau (www.conrad.com). Alle rechten
4
incl. vertaling voorbehouden. Elke reproductie, ongeacht de methode, bijv. fotokopie, microverlming of de registratie in
elektronische gegevensverwerkingssystemen vereist een voorafgaande schriftelijke toestemming van de uitgever. Nadruk,
ook gedeeltelijk, is verboden. De publicatie voldoet aan de technische stand ten tijde van het drukken.
Copyright 2018 door Conrad Electronic SE. *1732742_v1_1018_02_dh_m(1)_nl
 Loading...