


User Manual
Art.Nr. xxx xxxx
Bedienungsanleitung
PILOT touch
May 2016

User Manual PILOT touch
Content
1 Overview ...................................................................................................................... 3
2 Scope of Delivery .......................................................................................................... 5
3 Power Supply................................................................................................................ 5
4 Programming ................................................................................................................ 6
4.1 User Language .............................................................................................................. 7
4.2 Scanmode settings ....................................................................................................... 8
4.3 Illumination Settings .................................................................................................... 9
4.4 Set the Functionality of the Keys ............................................................................... 10
4.4.1 Copying Infrared Signals ............................................................................................. 11
4.4.2 Voice Recording ......................................................................................................... 13
4.4.3 Choose Icons .............................................................................................................. 14
4.4.4 Delete Key Macros ..................................................................................................... 14
4.5 Voice Recording for Level Announcement................................................................. 15
4.6 Special modes ............................................................................................................ 16
4.6.1 Nurse Call Mode ......................................................................................................... 16
4.6.2 One-Button-Mode ...................................................................................................... 16
4.6.3 Double-Touch-Mode .................................................................................................. 17
4.6.4 Power Save Mode ...................................................................................................... 17
4.6.5 Dual A / B 3 sec .......................................................................................................... 17
4.7 Sysinfo ........................................................................................................................ 18
May 2016 Page 2 of 20

3,5mm stereo Connector for Switches*
Microphone
IR Receiver
Reset-Button
Multi-Connector
Key 8
Key 14
Key 1
Key 7
Next Level /
Exit
Upwards / downwards
OK
IR Sender
Name of the current level
Power Supply / Charging
Battery level
Current Function
Symbols of the right column
in the current level
Symbols of the left column
in the current level
Double Touch active
Single Switch connected
Dual Switch connected
One-Button-Mode
User Manual PILOT touch
1 Overview
* Pilot touch automatically detects whether single switch (mono plug) or a dual switch (stereo
plug) is connected. See the icons below that will appear in the display while the connector is in use.
The display in normal mode:
May 2016 Page 3 of 20

User Manual PILOT touch
What is a PILOT touch?
PILOT is a family of environmental control products. Different electrical devices that already have an
infrared remote control can be used with the PILOT touch and / or connected switches. In this way
you can for example control entertainment equipment and lights all with just one remote control.
PILOT touch learns the IR signals from the original remote controls and can replace several of your
remote controls.
PILOT touch can control up to 112 functions in 8 levels (14 functions each). For each button it can
store one icon, one voice recording und up to 4 IR signals (Macro).
PILOT touch can be used with the capacitive touch buttons or through one or two connected
switches (single- or dual-scanning).
During the scanning the display always shows the icon of the current function bigger in the middle
and all other function of the current level on the left and right side. If a voice recording is stored it
you can hear the playback every time the function changes.
When PILOT touch is powered up you can see this picture while loading before the first level is
displayed:
As soon as you can see the first level it is ready to use:
In single-switch scanning the current level is always scanned once.
Starting point is always the selected right column. When the scanning switch is activated the first
option is to change to the next level (to the right, if available), then to the previous level (to the left,
if available) and then to activate the keys of the current level if the scanning switch is hit again.
If there is a voice recording available it will be played when the selection changes.
May 2016 Page 4 of 20

User Manual PILOT touch
2 Scope of Delivery
- PILOT touch
- Charging Cable
- USB Charger
- User Manual
3 Power Supply
PILOT touch contains a Li-Ion rechargable battery which is automatically charged as soon as it is
connected to the USB power supply.
While the power supply is connected you can see a power plug icon in the display right abover the
battery icon.
The battery icon shows in 4 steps an estimation of the current capacity of the battery.
Charging time is up to 4 hours if the battery is completely empty.
Depending on the quantity of usage PILOT touch can be used up to 48 hours if it is turned off the
standby time is several days.
May 2016 Page 5 of 20

User Manual PILOT touch
4 Programming
All settings can be done in the programming mode. To enter programming mode please touch Key 7
and 14 simultaneously. You will see both LEDs lighting up green and after about 1 sec. you can see
the main programming menu.
To navigate in programming menu please use the “upwards”, “downwards”, “OK” and “Exit” button.
In some situations you will find soft keys shown at the bottom of the display, please use Key 1 and 8
to select them.
The “return” button also leaves the programming mode and changes back to normal use mode.
Depending on the changes you’ll see a message that asks you to wait until changes have been saved.
The following main options are available:
Languages Change Language
Scanmode Scanmode settings
Illumination Change brightness of display and key backlight
Key macros All settings for the keys, like icon, IR, voice recording
Levels Voice recording for level announcment
Special modes Activate special functions
Sysinfo Device information
May 2016 Page 6 of 20

User Manual PILOT touch
4.1 User Language
1. Enter programming mode
+ simultaneously
2. Select “Languages” and confirm with “OK”
3. Select the language you like to have and confirm with “OK”
4. The changes will be stored when leaving the programming mode.
When all changes are done in this menu, please use the “return” key to change
back to the main menu.
May 2016 Page 7 of 20
User Manual PILOT touch
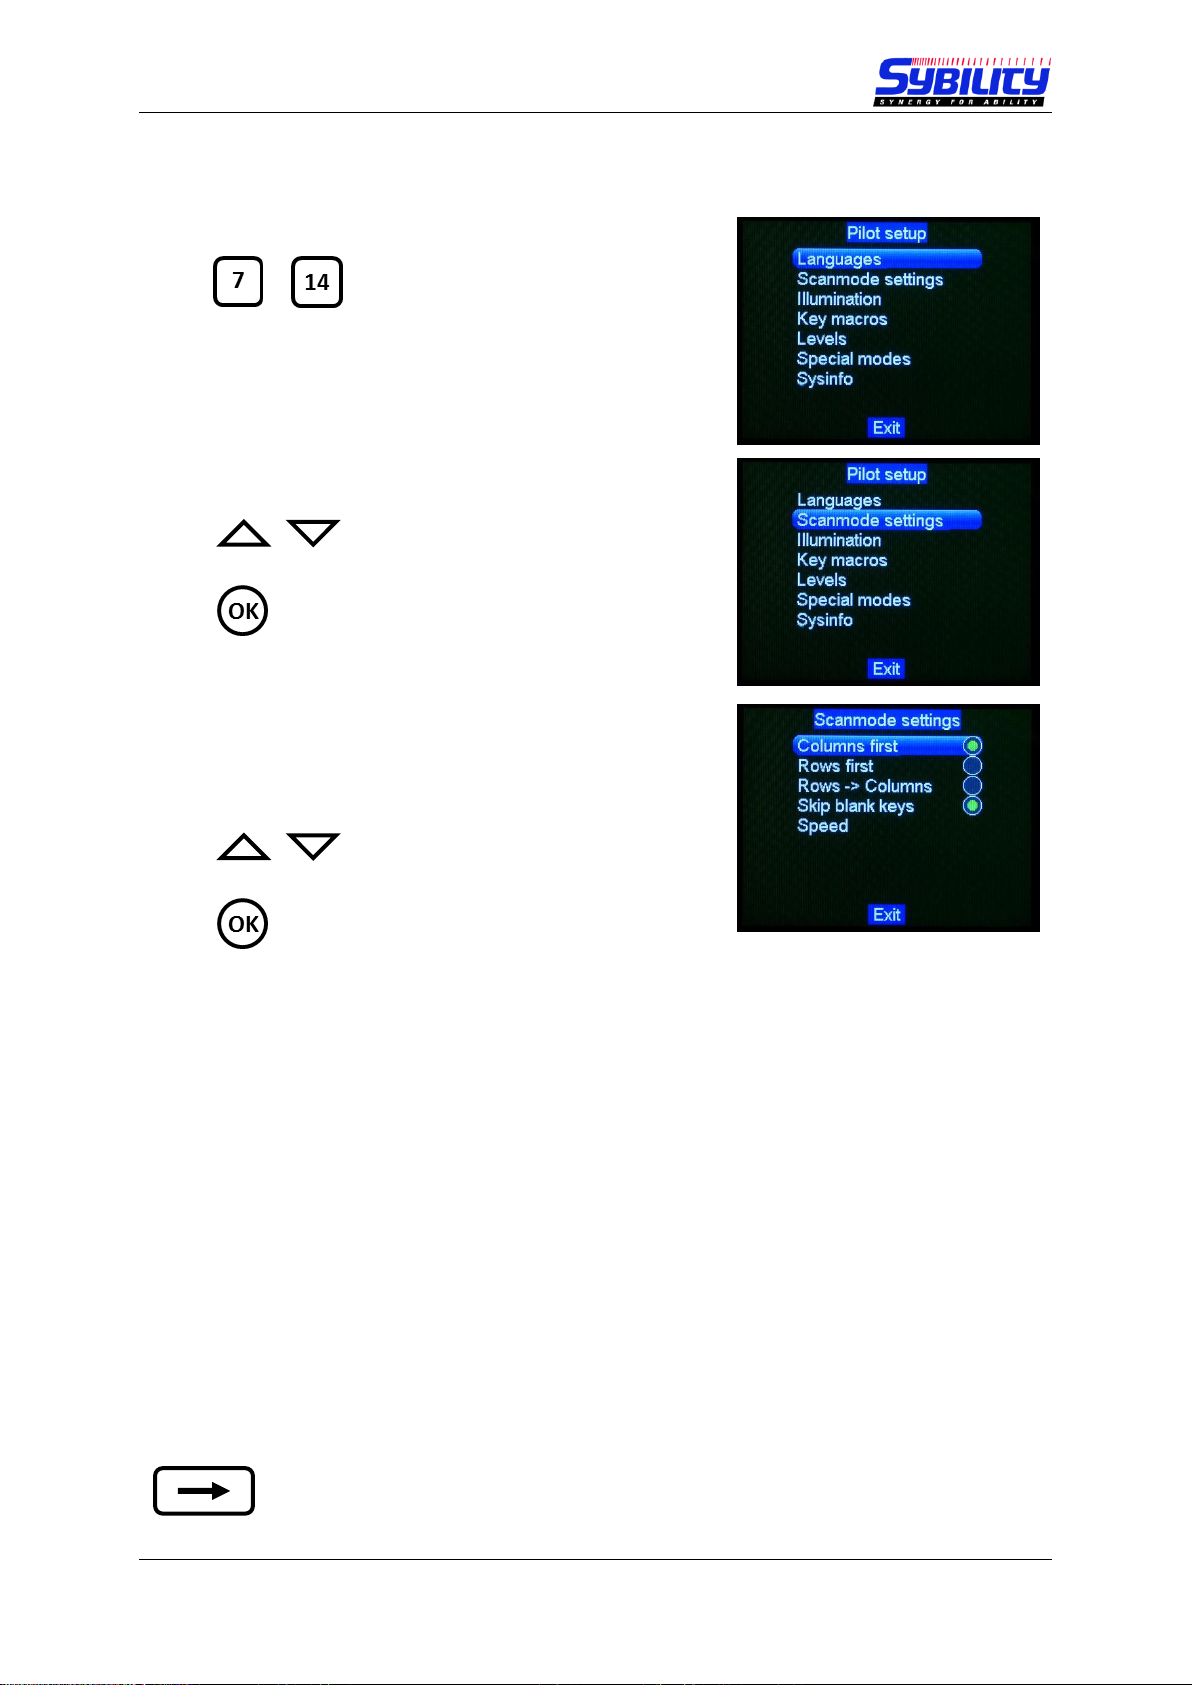
4.2 Scanmode settings
1. Enter programming mode
+ simultaneously
2. Select “Scanmode settings” and confirm with “OK”
3. Select one of the three options “columns first”,
“Rows first” or “Rows -> Columns” and confirm
with “OK”
Columns first
The keys will be scanned from top to bottom, left column first and then the right column.
Scan order: Key 1, 2, 3, … , 7, 8, … , 13, 14
Rows first
The keys of each row will scanned from left to right then next row and so on.
Scan order: Key 1, 8, 2, 9, 3, 10, … 7, 14
Rows -> Columns
The keys of each row will be scanned both together from top to buttom. If the scan switch is
activated the buttons in the current highlighted row will be scanned from left to right twice.
4. Skip blank keys should be selected all the time. Not used buttons will be skipped during
scanning if this option is activated.
5. Select Speed and confirm with “OK” to set the scanning speed. You can set the wait time in
0.25 second steps. Use the softkeys to change the value.
When all changes are done in this menu, please use the “return” key to change back
to the main menu.
May 2016 Page 8 of 20

User Manual PILOT touch
4.3 Illumination Settings
1. Enter programming mode
+ simultaneously
2. Select “Scanmode settings” and confirm with “OK”
3. Select the desired setting and confirm with “OK”
4. The changes will be stored when leaving the programming mode.
When all changes are done in this menu, please use the “return” key to change
back to the main menu.
May 2016 Page 9 of 20

1
14
User Manual PILOT touch
4.4 Set the Functionality of the Keys
1. Enter programming mode
+ simultaneously
2. Select “Key macros” and confirm with “OK”
3. Select the level where you want to configure the keys
and confirm with “OK”
Note
Here you can see up tu 8 levels. The number of available levels can be changed / set with the
configuration software.
4. Select the key that you would like to configure by using
the keys on the touch area. You can change the key at
any time and continue in this level.
…
Note
The keys can also be configured with the configuration software. If this is not done all keys
will be empty here.
May 2016 Page 10 of 20

User Manual PILOT touch
4.4.1 Copying Infrared Signals
Every key can store up to 4 IR signals. The signals will be sent in the same order as they have been
copied. The time between the signals is 0.5 s.
1. Select “Infrared” and confirm with “OK”
Note
The selected key can be change at any time by touching the new key. The current selected key
is marked with a white square.
2. Now you can choose between Teach-in IR, Test an
already stored macro, delete all stored IR signals or
analyze the signal of the remote control.
Note
Most IR signals use a carrier frequency between 38 and 40 kHz. If you realize problems with
the learned IR signal you should analyze the signal first to set the right frequency. There are
also a few systems that use a frequency of 455 kHz.
You can also test the stored macro just by pressing the key.
3. Select “Analyze remote“ and confirm with “OK“
Now you are asked to send a signal from the remote
control. Please position the remote control in front of
of the PILOT touch as shown below and press any key.
The displayed frequency will then be changed in case it
is different.
May 2016 Page 11 of 20

User Manual PILOT touch
4. Select “Tech-in IR” to store a signal and confirm with
“OK“
Position the remote control again in front of the PILOT touch as shown and press the desired
key you want to copy. If there is a signal recognized you can see a blinking icon in the PILOT
touch display.
As soon as the signal is stored you will see the softkeys at the bottom of the display. Now you
can choose if you want to add another signal or not. If you select “yes” please repeat the
procedure.
Note
You can store up to 4 IR signals.
5. Select “Test IR” to send the stored signals.
Note
The macro can also be tested just by pressing the key on the touch area.
6. Select “Delete IR” to delete all stored signals for the selected key.
Now you can choose another key and repeat the procedure from 2. to 6. until you have finished
copying IR signals for this level.
When all changes are done in this menu, please use the “return” key to change
back to the main menu.
May 2016 Page 12 of 20

User Manual PILOT touch
4.4.2 Voice Recording
1. Select “Sounds” and confirm with “OK”
Note
The selected key can be change at any time by touching the new key. The current selected key
is marked with a white square.
2. Now you can choose to record a new sound, play or
delete the stored sound.
Tech in sound
A bar will be shown in the display which shows you
when the recording will start. The maximum length
is 2 s. After the recording is done you can hear the
playback to make sure it is ok. If not you can repeat
this step.
Play Sound
If there is a stored sound you will hear the playback.
Delete Sound
Deletes the stored sound.
Now you can choose another key and repeat the procedure until you have finished recording for this
level.
When all changes are done in this menu, please use the “return” key to change
back to the main menu.
May 2016 Page 13 of 20

User Manual PILOT touch
4.4.3 Choose Icons
1. Select “Icons” and confirm with “OK”
Note
The selected key can be change at any time by touching the new key. The current selected key
is marked with a white square.
2. Now you can choose an icon for the selected key.
.
Note
The list of available icons can be changed with the configuration software and is transferred
to the PILOT touch together with the configuration.
Now you can choose another key and repeat the procedure until you have finished recording for this
level.
When all changes are done in this menu, please use the “return” key to change
back to the main menu.
4.4.4 Delete Key Macros
1. Select “Icons” and confirm with the softkey “yes” to
delete all stored settings for this key.
May 2016 Page 14 of 20

User Manual PILOT touch
4.5 Voice Recording for Level Announcement
1. Enter programming mode
+ simultaneously
1. Select “Levels” and confirm with “OK”
2. Select the level for which you would like to record
the playback and confirm with “OK“.
Note
You may see up to 8 levels here. The number of available levels can be defined with the
configuration software.
A bar will be shown in the display which shows you when the recording will start. The
maximum length is 2 s. After the recording is done you can hear the playback to make sure it
is ok. If not you can repeat this step.
3. Now you can repeat this step for the next level.
When all changes are done in this menu, please use the “return” key to change
back to the main menu.
May 2016 Page 15 of 20
User Manual PILOT touch
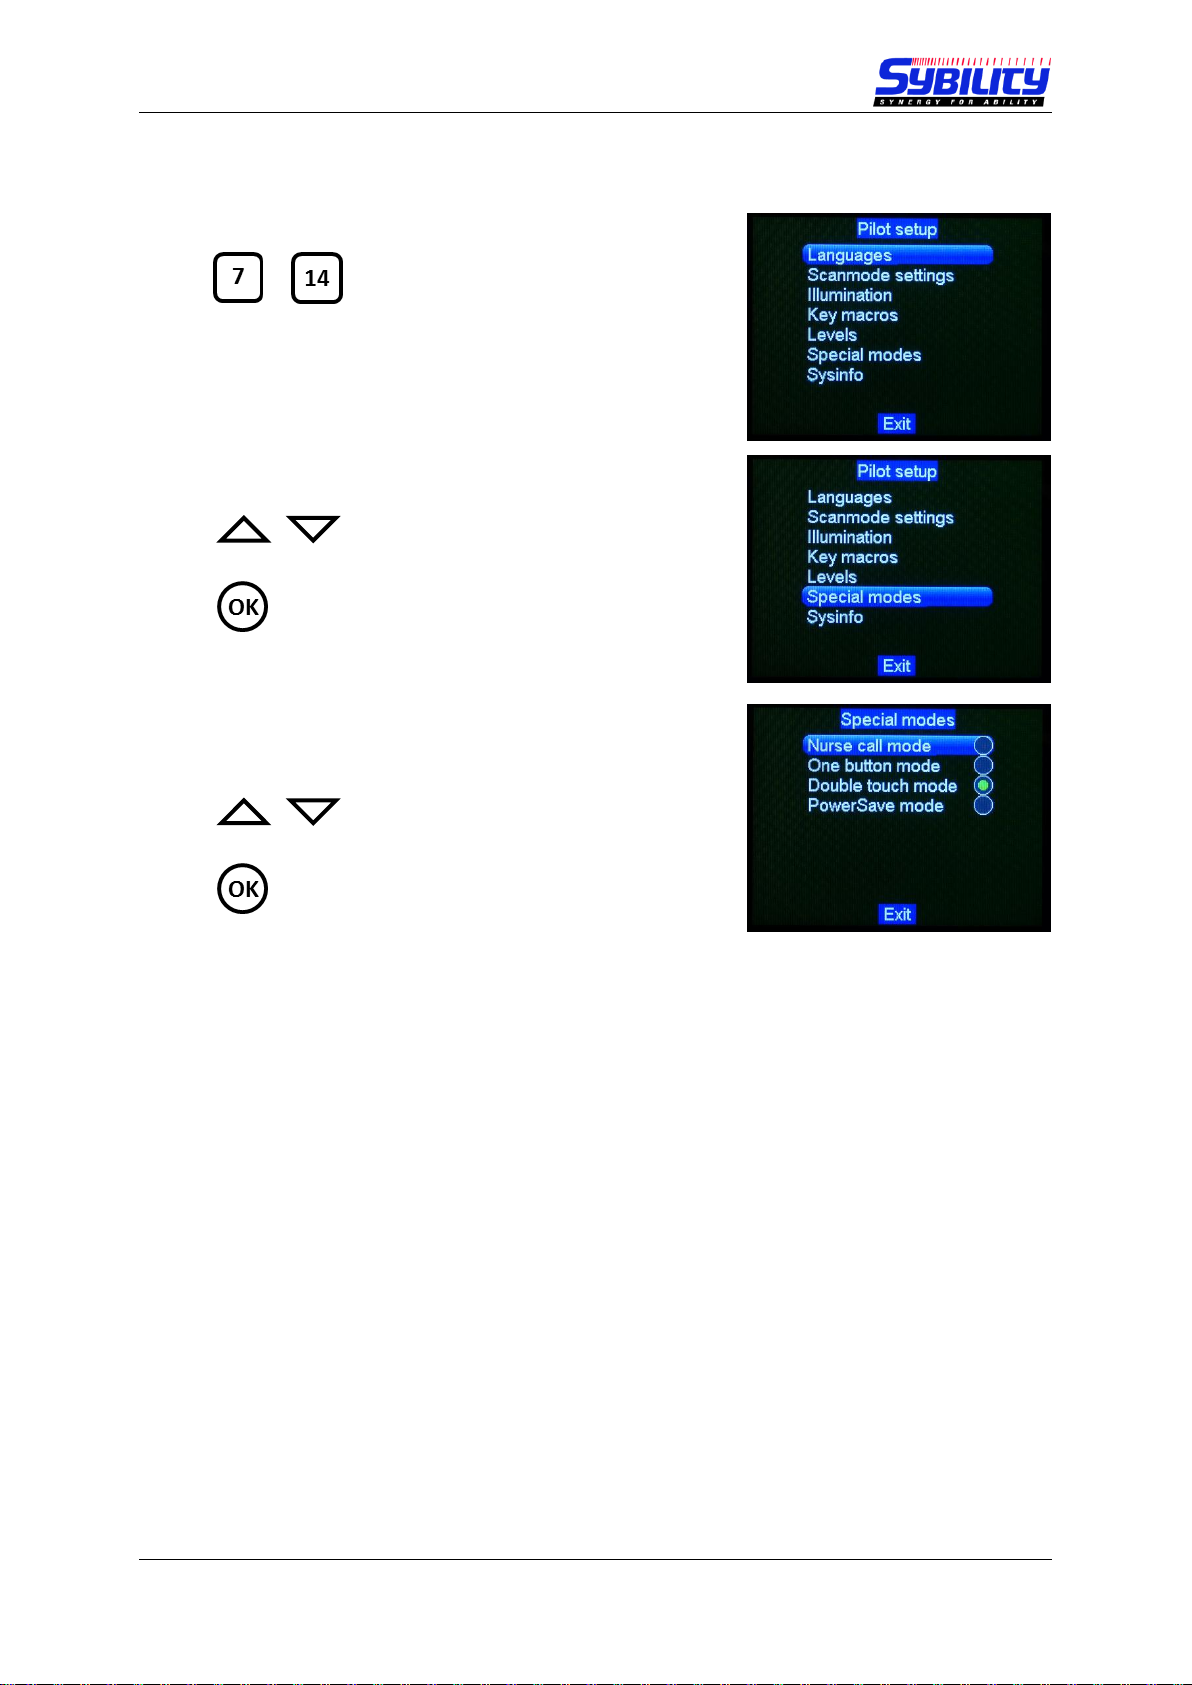
4.6 Special modes
1. Enter programming mode
+ simultaneously
1. Select “Special modes” and confirm with “OK”
2. Select the function you would like to edit and confirm
with “OK”
4.6.1 Nurse Call Mode
When you select this function you will be asked to choose a level and after that a key in this level.
The selected key can be released in normal mode when:
1. The PILOT touch is in power save (display dark) and
2. One or more keys on the touch area are activated and
3. This is held for at least 3 seconds (you can see a bar in the display).
4.6.2 One-Button-Mode
If this function is activated automatic scanning is turned on and you can use any key on the touch
area as the scanning switch. The functionality is similar to the single switch scanning mode when an
external switch is connected.
May 2016 Page 16 of 20

User Manual PILOT touch
4.6.3 Double-Touch-Mode
This function is helpful when the PILOT touch is used through the touch area.
The first touch of a key only shows the big icon in the display and if the same key is touched again
within 3 s it will be activated.
4.6.4 Power Save Mode
If this function is activated PILOT touch changes to a power save mode when no key is used for 10 s.
4.6.5 Dual A / B 3 sec
When you select this function you will be asked to choose a level and after that a key in this level.
This function is then linked to a long press on the A key (activate) or B key (next) in Dual-SwitchScanning.
As soon as you press and hold the A or B key you will see a bar in the display. After 3 s holding the
key depressed the here selected function is released independent from the current selected key.
When all changes are done in this menu, please use the “return” key to change
back to the main menu.
May 2016 Page 17 of 20

User Manual PILOT touch
4.7 Sysinfo
1. Enter programming mode
+ simultaneously
1. Select “Sysinfo” and confirm with “OK”
Now you can see the current hard- and software
versions.
May 2016 Page 18 of 20

User Manual PILOT touch
Notes
May 2016 Page 19 of 20

S/N:
User Manual PILOT touch
Änderungen vorbehalten
Sybility GmbH
Kreuzweg 15
91781 Weissenburg
T +49 9141 9131689
F +49 9141 9132855
info@sybility.de
May 2016 Page 20 of 20
 Loading...