

Page 1

OneBridge®
Real Time Server
4.1
User Guide
Page 2

Page 3

Copyright © 2000-2003 Extended Systems, Inc. and its licensors. All rights
reserved. OneBridge Products, including but not limited to OneBridge Mobile
Data Suite; and OneBridge Mob ile Groupware and its components, namely,
Presentation Server, Integration Server, Real Time Server, Sync Server, and
Mobile Agent; are trademarks of Extended Systems and its affiliates. All other
trademarks mentioned herein that are not the property of Extended Systems,
are the property of their respective owners.
This manual, as well as the software described in it, is furnished under a license
agreement. The content of this manual is furnished for informational use only,
is subject to change without notice, and should not be construed as a
commitment by Extended Systems, Inc.. Extended Systems, Inc. assumes no
responsibility or liability for any errors or inaccuracies that may appear in this
manual.
The software may be used or copied only in accordance with the te rms of its
license agreement. No part of this manual may be reproduced, stored in a
retrieval system, or transmitted in any form or by any means electronic or
mechanical, including photocopying and recording for any purpose other than
for the purchaser’s personal use without prior written permission of Extended
Systems, Inc..
Extended Systems, Inc.
5777 North Meeker Avenue
Boise, ID U.S.A
Phone – +1 208.322.7800
Toll Free (in North America) – 1.800 235 7576
Fax – +1 208 377 5009
Web – http://www.extendedsystems.com
Other notices
No endorsement of any third party products, standards or services is expressed
or implied by any information, material, or content referred to, included on, or
linked from this document.
i
Page 4

ii
Page 5

Table of Contents
Section 1: Welcome to OneBridge® Real Time Server........................ 1
About Real Time............................................................................................................................. 1
About this guide.............................................................................................................................. 2
Section 2: Getting started.............................................................................3
Palm functions................................................................................................................................... 4
Navigating Real Time.................................................................................................................. 4
Choosing menu item s......................................... .................................. ..................................... 5
Clicking buttons............................................................................................................................. 5
Entering text in text boxes...................................................................................................... 6
Choosing items from list boxes............................................................................................ 6
Mobile phone functions (UP.Link microbrowser)........................................................ 8
Navigating Real Time.................................................................................................................. 8
Clicking buttons............................................................................................................................. 9
Choosing menu item s......................................... .................................. .................................. 10
Entering text in text boxes................................................................................................... 11
Choosing items from list boxes......................................................................................... 12
Mobile phone functions (Nokia microbrowser)........................................................ 13
Navigating Real Time............................................................................................................... 13
Clicking buttons.......................................................................................................................... 13
Choosing menu item s......................................... .................................. .................................. 14
Entering text in text boxes................................................................................................... 15
Choosing items from list boxes......................................................................................... 15
RIM device functions.................................................................................................................. 17
Navigating Real Time............................................................................................................... 17
Choosing menu item s......................................... .................................. .................................. 18
Clicking buttons.......................................................................................................................... 18
Entering text in text boxes................................................................................................... 19
Choosing items from list boxes......................................................................................... 19
iii
Page 6

Table of Contents
Pocket PC functions.................................................................................................................... 21
Navigating Real Time.............................................................................................................. 21
Choosing menu item s................................................................. .................................. .......... 22
Clicking buttons.......................................................................................................................... 23
Entering text in text boxes.................................................................................................. 24
Choosing items from list boxes ........................................................................................ 25
Web browser functions............................ .... ... ... ............................. ... .... ... ... ............................ 26
Navigating Real Time.............................................................................................................. 26
Choosing menu item s................................................................. .................................. .......... 27
Clicking buttons.......................................................................................................................... 27
Entering text in text boxes.................................................................................................. 28
Choosing items from list boxes ........................................................................................ 28
Starting Real Time........................................................................................................................ 29
Exchange Username field...................................................................................................... 31
Section 3: Managing messages....................................................................33
Viewing messages......................................................................................................................... 33
Composing messages........................ ... ... ... .... ............................. ... ............................. ............... 36
Adding attachments........... ..... ..... .................................. .................................. ..... ................... 38
Removing attachments........................................................................................................... 38
Forwarding attachme n ts to a third party for conversion.. .................................. 38
Replying to messages.................................................................................................................. 39
Forwarding messages.................................................................................................................. 40
Deleting messages........................................................................................................................ 40
Using the recipient list................................................................................................................ 41
Adding recipients to me ss age s ........................... ..... .................................. ........................ 41
Removing recipients from messages.............................................................................. 43
Section 4: Using and managing contacts....... ..................................... ......45
Searching and browsing contact lists................................................................................. 46
Viewing contact details.............................................................................................................. 47
Dialing contacts.............................................................................................................................. 48
Emailing contacts..................... ... ... ............................. ... .............................. ... ... ............................ 49
Adding contacts............................................................................................................................. 49
Editing contacts.............................................................................................................................. 50
Deleting contacts.......................................................................................................................... 51
iv
Page 7

Table of Contents
Section 5: Managing meetings.....................................................................53
Viewing Day View........................................................................................................................ 54
Viewing Week View................................................................................................................... 55
Viewing Month View.................................................................................................................. 56
Scheduling meetings................................................................................................................... 57
Viewing details of meetings.................................................................................................... 59
Editing details of meetings............................ ... ... ... ... .............................. ... ... ........................... 60
Canceling meetings..................................................................................................................... 61
Enabling meeting reminders................................................................................................... 61
Section 6: Managing tasks............................................................................63
Viewing task details..................................................................................................................... 64
Adding tasks.................................................................................................................................... 65
Editing tasks..................................................................................................................................... 67
Marking tasks as complete...................................................................................................... 68
Deleting tasks................................................................................................................................. 68
Section 7: Setting options............................................................................69
Attachments.................................................................................................................................... 70
Auto login......................................................................................................................................... 70
Signature............................................................................................................................................ 72
Startup................................................................................................................................................ 73
Time zone........................................................................................................................................ 74
User profiles.................................................................................................................................... 75
About.................................................................................................................................................. 77
Section 8: Addendum for Lotus Domino and Notes............................79
Replicating personal address books ................................................................................... 79
Folder List....................... ... ... ... .............................. ... ............................. ... ........................................ 80
v
Page 8

Table of Contents
vi
Page 9

List of Figures
Palm handheld device and scrollbar..................................................................................4
Menu items on a Palm handheld device...........................................................................5
Buttons on a Palm handheld device..................................................................................5
Drop-down list boxes on a Palm handheld device........................................................6
List boxes on a Palm handheld device..............................................................................6
Mobile phone (UP.Link) arrow keys.................................................................................8
OK button on mobile phones (UP.Link)..........................................................................9
Choosing menu items on a mobile phone (UP.Link)..................................................10
Entering text on a mobile phone (UP.Link)..................................................................11
Using list boxes on a mobile phone (UP.Link).............................................................12
Choosing menu items on a mobile phone (Nokia).....................................................14
Entering text on a mobile phone (Nokia)......................................................................15
Using list boxes on a mobile phone (Nokia).................................................................15
RIM Handheld devices: trackwheel.................................................................................17
Choosing menu items on a RIM device ........................................................................18
Clicking buttons on a RIM device....................................................................................18
Entering text on a mobile phone.....................................................................................19
Using list boxes on a RIM device.....................................................................................19
Navigating Real Time..........................................................................................................21
Choosing menu items on a Pocket PC..........................................................................22
Clicking buttons on a Pocket PC.....................................................................................23
Entering text in text boxes on a Pocket PC.................................................................24
Choosing items from list boxes on a Pocket PC.........................................................25
Navigating Real Time in a Web browser.......................................................................26
Choosing menu items in a Web browser.....................................................................27
Clicking buttons in a Web browser................................................................................27
Entering text in text boxes in a Web browser............................................................28
Choosing items from list boxes in a Web browser....................................................28
Login screen.........................................................................................................................29
Message Body screen.........................................................................................................34
Message Header screen.....................................................................................................35
Composing messages..........................................................................................................36
Compose screen.................................................................................................................37
vii
Page 10

List of Figures
Recipient List screen..................................................................... ......... ......... ......... ..........41
Add Recipients screen.......................................................................................................42
Searching contacts..............................................................................................................46
Browsing contacts................................................................................... ......... ...................47
Viewing contact details......................................................................................................48
Contact name in the recipient list................................................................ ......... ..........49
Adding contacts to Contacts............................................................................................50
Delete confirmation screen.................................................................. ......... ...................51
Viewing calendars................................................................................................................53
Day View screen.................................................................................................................54
Week View screen................................................................................................... ......... .55
Month View screen.............................................................................................................56
Add Meeting screen............................................................................................................57
Start Date screen................................................................................................................58
Viewing the details of a meeting......................................................................................59
Meeting Detail screen........................................................................................................60
Meeting Reminder screen.................................................................................................62
Managing tasks.....................................................................................................................63
Task Details screen............................................................................................................64
Adding tasks.........................................................................................................................65
Add Task screen..................................................................................................................65
Start Date screen................................................................................................................66
Due Date screen..................................................................................... ......... ......... ..........66
Edit Task screen..................................................................................................................67
Enabling auto login..............................................................................................................70
Auto Login screen...............................................................................................................71
Signature screen..................................................................................................................72
Startup Screen.....................................................................................................................73
Time Zone screen...............................................................................................................74
Managing profiles.................................................................................................................75
Available Profiles screen....................................................................................................76
viii
Page 11

About Real Time
Section 1
®
Welcome to OneBridge
Real Time Server
Welcome to OneBridge Real Time S erver. T his section provi des
information about :
• Real Time. See page 1.
• This guide. See page 2.
Real Time is a personal information management (PIM) and messag ing
application that lets mobile business users access and use email and
contacts anywhere, at any time.
Real Time fits easily into your organization’s existing architecture, is
extensible and sca l ab le, and supports both current and future Webenabled mobile devices.
Real Time lets you:
• Read, move, and delete incoming messages
• Compose and send new messages
• Reply to and forward messages
• Add new contacts to Contacts
• Search and browse for existing contacts
1
Page 12

Welcome to OneBridge® Real Time Server
About this guide
This manual provides you with a comprehen s ive g uide to procedures
and requirements for using Real Time:
• Section 1 (this section) – overview of the Real Time manual
• Section 2 on page 3 – how to use your device to operate Real Time
and how to log in to Real Time
• Section 3 on page 33 – how to view, compose, send, and orga nize
messages
• Section 4 on page 45 – how to add contacts, and search for and
view contact infor mation
• Section 7 on page 69 – how to use the auto login and reminder
features
2
Page 13

Section 2
Getting started
This section outlines:
• How mobile devices differ in functionality and how to use
Real Time on them. Real Time is optimized for each device type.
It is important to be familiar with the use of your mobile device
before working with Real Time. For simplicity, this manual presents
generic instructions for using Real Time.
The following devices are discussed in this section:
• Palm and Palm OS wireless handheld devic es on page 4
• Mobile phones that use the UP.Link micr obrowser on pag e 8
• Mobile phones that use the Nokia WAP-compliant
microbrowser on page 13
• RIM Wireless Handhelds on page 17
• Pocket PC devices on page 21
• Internet Explorer and Netscape Navigator Web browsers on
page 26
Tip If you are familiar with your mobile device, you may proceed
directly to “Starting Real Time” on page 29.
• How to start Real Time from your mobile device. See “Starting
Real Time” on page 29.
3
Page 14

Getting started
Palm functions
This section guides you through using Real Time on Palm handheld
devices. This section reviews the following operations:
• Navigating Real Time
• Choosing menu items
• Clicking buttons
• Entering text in text boxes
• Choosing items from list boxes
Navigating
Real Time
When using a Palm handheld device, you can perform all operations—
including choosing options, clicking buttons, and scrolling through
menu items—by touching the stylus to the screen of the device
(tapping). You can use the stylus to highlight selections, enter text,
navigate through menu items, and click buttons.
If all information does not fit on the display screen of the device, a
scroll bar appears on the right side of the screen. Some scr eens in
Real Time use scroll bars. Tap the stylus on the scroll bar to view
different portions of the screen.
Figure 2-1: Palm handheld device and scrollbar
1
1: The scrollbar on a Palm handheld device
4
Page 15

Palm functions
Palm handheld devices let you navigate through screens that you have
already viewed in Real Time.
Note It is recommended that you use Real Time’s navigation to
move backward and forward through screens instead of using
the leftward and rightward pointing arrows.
Choosing menu
items
Clicking buttons
A menu item appears as underlined text on the screen of your device.
Choosing a menu item directs you to another screen in Real Time.
Figure 2-2: Menu items on a Palm handheld device
1
1. A menu item on a Palm handheld device
To choose a menu item
• Tap the menu item > Open.
Throughout Real Time, buttons appear at the bottom of the screen.
Tapp ing th e s tylu s on a bu tton is t he sam e as cl ic ki ng th e butt on. When
you click a button, it appears shaded.
To click a button
• Tap a button with the stylus.
Figure 2-3: Buttons on a Palm handheld de vice
1
1. A clicked button appears highlighted.
5
Page 16

Getting started
Entering text in text
boxes
Choosing items
from list boxes
Text boxes let you enter information in Real Time. Wh en you select a
text box, you can enter text or edit its contents.
To enter text in a text box
1 Tap a text box.
2 Typ e text.
You can enter text using Graffiti handwriting or the keypad. For more
information, see
Palm handheld devices use two types of list boxes:
• Drop-down list boxes look similar to menu items, but are
identifiable by a downward pointing arrow located on the left side.
See Figure 2-4 on page 6.
• List boxes appear as a list of items. See Figure 2-5 on page 6.
Figure 2-4: Drop-down list boxes on a Palm handheld device
1. Tap a list box.
2. Choose an item.
http://www.palm.com/products/input/.
1
2
Figure 2-5: List boxes on a Palm handheld device
1
1. Tap a list box item.
6
Page 17

Palm functions
To choose an item from a drop-down list box
1 Tap a list box.
If all items do not fit on one page, arrows appear at the top and
bottom of the list. Click these arrows to navigate the lis t.
2 Tap an item.
To choose an item from a list box
• Tap a list box item.
7
Page 18

Getting started
Mobile phone functions (UP.Link microbrowser)
This section guides you through using Real Time on mobile phones that
use the UP.Link microbrowser. This section reviews the following
operations:
• Navigating Real Time
• Clicking buttons
• Choosing menu items
• Entering text in text boxes
• Choosing items from list boxes
Navigating
Real Time
You navigate Real Time using the arrow keys on your mobile phone.
An arrow on the screen of your device indicates your location within
Real Time. You scroll the arrow to a menu item, button, or field by
clicking the arrow keys on your keypad. When the arrow points to an
item, that item is highlighted. The location of the arrow keys on the
keypad may differ depending on the type of mobile phone you have.
Figure 2-6: Mobile phone (UP.Link) arrow keys
1
2
1. Numbered menu items wit h selection arrow
2. Arrow keys
All fields and m enu items on the screen of your mobile phone are
numbered. Information on your device screen that is not numbered is
for display purpo ses onl y. You can use the nu mber ke ys on y our k eypad
to choose numbered menu items from the list.
8
Page 19

Mobile phone functions (UP.Link microbrowser)
Clicking buttons
Most models of mob ile phone s hav e tw o bu tton s locat ed directly belo w
the screen. These buttons correspond to the commands located at the
bottom of the screen, just above the buttons. When you press a button,
Real Time performs the command displayed on the screen above that
button.
Figure 2-7: OK button on mobile phones (UP.Link)
1
2
1. OK command
2. OK button
Due to the limited size of the display on mobile phones, it is common
for only two command buttons to be available at a time. When using a
mobile phone, you access most available Real Time commands by
clicking the Menu button.
The procedures in th i s ma nual are generic for most m o bil e devices. For
example, when comp letin g th e fol low ing proce dure on a mob ile ph one ,
you access the To command by clicking the Menu button.
Generic procedure
1 From the Main menu, choose Compose.
2 Click To.
Note For Step 2 using a mobile phone, you click the Menu button,
choose the To menu item, and click OK.
3 Add recipients from the Recipient list.
9
Page 20

Getting started
The following table lists some common buttons that you will encounter
on the screen of your mobile phone when using Real Time.
Button This command lets you...
OK Execute functions, such as choosing items from menus and
list boxes. When using a mobile phone, you must press the
OK button after every operation you perform.
Edit Edit the highlighted field or text box
Menu View available commands, additional fields, buttons, and
options
Note It is not recommended that you use the Back button on
mobile phones. Instead, use the Real Time navigation buttons.
Choosing menu
items
Menu items look similar to textual displays except, like all commands on
an UP .Link microbrowser-enabled mobile phone, they are numbered on
the screen of your device. Choos ing a menu item directs you to another
screen in Real Time.
Figure 2-8: Choosing menu items on a mobile phone (UP.Link)
1
2
1. Select a menu item (black triangle).
2. Press OK.
10
Page 21

Mobile phone functions (UP.Link microbrowser)
To choose a menu item
1 Highlight a menu item on the screen.
Scroll using the arrow keys until the arrow appears to the left of the
chosen menu item.
Tip You can also use the keypad to type the number
corresponding to the menu item.
2 Press the OK button.
Entering text in text
boxes
Text boxes look similar to menu items. Choosing a text box directs you
to another screen where you can type a text entry.
Figure 2-9: Entering text on a mobile phone (UP.Link)
1
2
3
4
1. Select a menu item (black triangle).
2. Press Edit.
3. Type the text.
4. Press OK.
To enter text in a text box
1 Highlight a text box on the screen.
2 Press the Edit button.
3 Type text using the keypad on your device.
4 Press the OK button.
11
Page 22

Getting started
Choosing items
from list boxes
List boxes look similar to text boxes and menu items. When you choose
a list box, the items in the list appear on the screen. You can then use
the arrow keys to sel ect an item from a list.
Figure 2-10: Using list boxes on a mobile phone (UP.Link)
1
2
1. Highlight an item.
2. Press OK.
To choose an item from a list box
1 Highlight the list box.
2 Press the Edit butto n.
The contents of the list box appear on screen.
3 Highlight an item in the list.
4 Press the OK button.
12
Tip After you have pressed OK, you can edit your selection by
pressing the Edit button.
Page 23

Mobile phone functions (Nokia microbrowser)
Mobile phone functions (Nokia microbrowser)
This section guides you through using Real Time on mobile phones that
use the Nokia WA P-compliant microbrowser. This section reviews the
following operations:
• Navigating Real Time
• Clicking buttons
• Choosing menu item s
• Entering text in text boxes
• Choosing items from list boxes
Navigating
Real Time
Clicking buttons
You navigate Real Time using the arrow keys on your mobile phone.
Reverse video (white text on a black background) on the screen of your
device indicates y our locat ion with in R eal Time. You scro ll the sel ection
to a menu item, button, or field by clicking the arrow keys on your
keypad. The current link or item is highlighted. The location of the
arrow keys on the keypad depends on the type of mobile phone you
have.
Most models of mob ile phone s hav e tw o bu tton s locat ed directly belo w
the screen. These buttons correspond to the commands located at the
bottom of the screen, just above the buttons. When you press a button,
Real Time performs the command displayed on the screen above that
button.
Due to the limited size of the display on mobile phones, it is common
for only two command buttons to be available at a time.
13
Page 24

Getting started
The following table lists some common buttons that you will encounter
on the screen of your Nokia mobile phone when using Real Time.
Button This command lets you...
Link Go to the selected link. This is how you choose underlined
menu items and buttons.
Edit Edit the highlighted text box on the screen of your device
List View the contents of a list box
Select Select the highligh te d li s t ite m
OK End text editing or list item selection
Note It is not recommended that you use the Back button on
mobile phones. Instead, use the Real Time navigation buttons.
Choosing menu
items
A menu item appears as underlined text on the screen of the device.
Choosing a menu item directs you to another screen in Real Time.
Figure 2-11: Choosing menu items on a mobile phone (Nokia)
1
1. A highlighted menu item on the screen of a Nokia phone
To choose a menu item
1 Use the arrow keys to navigate to a menu item.
The menu item appears in reverse video, indicating that it is
selected.
2 Click the Link button.
14
Page 25

Mobile phone functions (Nokia microbrowser)
Entering text in text
boxes
Choosing items
from list boxes
You can identify text boxes by the brackets that surround them. When
you select a text box, you can enter text or edit its contents.
Figure 2-12: Entering text on a mobile phone (Nokia)
1
2
1. Screen to select a text box: click Edit.
2. Screen to edit text.
To enter text in a text box
1 Use the arrow keys to navigate to a text box.
2 Click the Edit button.
3 Type text using the keypad on your device.
4 Press the OK button.
A list box is distinguished from a text box by brackets surrounding the
list. When the list box is selected, the left phone button changes to List.
Choosing a list box reveals a list of items.
Figure 2-13: Using list boxes on a mobile phone (Nokia)
1
2
1. Screen to select a list box: click List
2. Contents of a list box
15
Page 26

Getting started
To choose an item from a list box
1 Use the arrow keys to navigate to a list.
2 Click the List button.
3 Click the Select button to select an item in the list.
The radio button changes to selecte d (filled), indicating tha t item is
chosen.
4 Click the OK button.
16
Page 27

RIM device functions
This section guides you through using Real Time on RIM Handheld
devices. This sectio n revi ew s th e fol lo w i ng oper ati o ns :
• Navigating Real Time
• Choosing menu item s
• Clicking buttons
• Entering text in text boxes
• Choosing items from list boxes
RIM device functions
Navigating
Real Time
When using a RIM device, use the trackwheel to move between menu
items, highlight and select options, and click buttons. The trackwheel is
on the right-han d si de o f y our devi ce . You can use it to move the cursor
on the screen of your device. When the cursor moves over an menu
item, text box or list, a box forms around it, indicating that it is
highlighted. You can press the wheel to choose a highlighted item. For
the purpose of this manual, pressing the wheel is called clicking.
Figure 2-14: RIM Handheld devices: trackwheel
1
1. The trackwheel is located on the right side of a RIM device.
RIM Handheld devices let you navigate screens that you have already
viewed in Real Time. To move backward in Real Time, click the
trackwheel and choose Back from the list of options. To move forward
in Real Time, click the trackwheel and choose Forward from the list of
options.
17
Page 28

Getting started
Choosing menu
items
Clicking buttons
A menu item appears as text on the screen of the device. Choosing a
menu item directs you to another screen in Real Time.
Figure 2-15: Choosing menu items on a RIM device
1
1. A highlighted menu item on the screen of a RIM device
To choose a menu item
1 Highlight a menu item.
A box appears around th e menu item, indicating that it is
highlighted.
2 Click the trackwheel to open the menu.
3 Select and click the GoToLink menu item.
Buttons may also appear at the bottom of the screen. You must
highlight a button to select it. When highligh ted, a button appears
shaded.
Figure 2-16: Clicking buttons on a RIM device
18
1
1. A highlighted button on the screen of a RIM device
To click a button
1 Highlight a button.
2 Click the trackwheel to open the menu.
3 Select and click the GoToLink menu item.
Page 29

RIM device functions
Entering text in text
boxes
Choosing items
from list boxes
Te xt bo xe s are iden tified b y the b rack ets t hat surround them. When y ou
select a text box, you can enter text or edit its contents
Figure 2-17: Entering text on a mobile phone
1
2
1. Text box
2. Editable text box
To enter text in a text box
1 Highlight a text box.
2 Start typing using the keypad on your RIM Handheld device.
Tip You can also click the trackwheel and choose Edit.
3 Click the trackwh eel.
A list box is distinguishabl e from a text box by a downward pointing
arrow located on the right-hand side. Choosing a list box reveals a list of
items.
Figure 2-18: Using list boxes on a RIM device
1. An arrow indicates that a field is a list box.
2. Contents of a list box
1
2
19
Page 30

Getting started
To choose an item from a list box
1 Highlight the list.
2 Click the trackwheel to open the menu.
3 Select and click the ShowList menu item.
The contents of the list appear on screen.
4 Highlight an item in the list.
5 Click the trackwheel.
20
Page 31

Pocket PC functions
This section guides you through using Real Time on Pocket PC devices.
This section reviews the following operations:
• Navigating Real Time
• Choosing menu item s
• Clicking buttons
• Entering text in text boxes
• Choosing items from list boxes
Pocket PC functions
Navigating
Real Time
When using a P oc ket PC dev ice, y ou per form all opera tions b y to uching
the screen wit h a stylus (tapping).
When the page is larger than the screen can dis pl a y, a scroll bar displ a ys
to the right-hand side of the screen. You can move the scroll bar to see
the rest of the page.
Figure 2-19: Navigating Real Time
1
1. A scroll bar on a Pocket PC
21
Page 32

Getting started
Choosing menu
items
A menu item appears as a link in a W eb browser. Choosing a menu item
follows the link.
Figure 2-20: Choosing menu items on a Poc ket PC
1
1. A menu item on a Pocket PC
To choose a menu item
• Tap the link.
22
Page 33

Pocket PC functions
Clicking buttons
Buttons in the browser on a Pocket PC are similar to thos e in a
Windows desktop application. However, instead of clicking them using
a mouse, you tap them using a stylus.
Figure 2-21: Clicking buttons on a Pocket PC
1
1. A button on a Pocket PC
To click a button
• Tap the button.
23
Page 34

Getting started
Entering text in text
boxes
Text boxes in a Web browser on a Pocket PC are similar to those in a
Windows desktop application. However, a Pocket PC does not have a
keyboard, so you must tap the letters on the on-screen keyboard.
Figure 2-22: Entering text in text boxes on a Pocket PC
1
2
24
1. Tap the text box.
2. Tap characters on the on-screen keyboard
To enter text in a text box
1 Tap a text box.
2 Tap characters on the on-screen keyboard.
Page 35

Pocket PC functions
Choosing items
from list boxes
List boxes in a Web browser on a Pocket PC are similar to those in a
Windows desktop application. However, instead of clicking them using
a mouse, you tap them using a stylus.
Figure 2-23: Choosing items from list boxes on a Pocket PC
1
1. A list box on a Pocket PC
To choose an item from a list box
• Tap the list box, and tap a list item.
25
Page 36

Getting started
Web browser functions
This section guid es you through using Real Time on Web browsers,
such as Internet Explorer or Netscape Navigator. This section reviews
the following operations:
• Navigating Real Time
• Choosing menu items
• Clicking buttons
• Entering text in text boxes
• Choosing items from list boxes
Navigating
Real Time
W eb browsers have many advantages over smaller Web-enabled devices,
such as RIM handheld devices. These advantages include:
• Larger screen size. Most often, you view HTML pages using a
Web browser on a desktop PC. Real Time can display more
information on the screen of a desktop monitor than on the screen
of a smaller Web-enabled device.
• HTML browsing, including:
• Frame capability. Real Time displays the Main menu in a
toolbar on the side of the screen. This lets you access it at any
time.
• Single-click. Unlike many handheld devices, you need only to
click list items instead of first choosing, then clicking the m.
Figure 2-24: Navigating Real Time in a Web browser
26
1. The Main menu appears in a toolbar on the side of the screen.
Page 37

Web browser functions
Choosing menu
items
Clicking buttons
A menu item appears as a link in a Web browser. Choosing a men u item
follows the link.
Figure 2-25: Choosing menu items in a Web browser
1. A menu item in a Web browser
Buttons in a Web browser are similar to those in a Windows desktop
application.
Figure 2-26: Clicking buttons in a Web browser
1. A button in a Web browser
27
Page 38
Getting started
Entering text in text
boxes
Choosing items
from list boxes
Text boxes in a Web browser are similar to those in a Windows desktop
application.
Figure 2-27: Entering text in text boxes in a Web browser
1. A text box in a Web browser
List boxes in a Web browser are similar to those in a Windows desktop
application.
Figure 2-28: Choosing items from list boxes in a Web browser
28
1. A list box in a Web browser
Page 39

Starting Real Time
Starting Real Time
Now that you are familiar with Real Time’s standard operations, you ar e
ready to start using Real Tim e.
Figure 2-29: Login screen
Logging in to Real Time takes you to the Main menu. From the Main
menu, you can access all other features. When you are finished using
Real Time, you must log out to exit.
Note For Domino, use the Short Name field to specify the
username for authentication.
To log in to Real Time
1 Enter the Real Time URL in your mobile browser.
Tip If you add a bookmark to the Real Time site in your browser,
you do not have to type the URL each time you start
Real Time from yo ur device.
2 From your portal, choose RealTime.
3 Type your user name.
4 Type your password.
You can edit your user name and password by clicking Edit.
29
Page 40

Getting started
5 Click Login.
If you have created a user profile, the following screens appear:
• Profile Password. The profile contains information about one
mail server. This screen appears if you have not specified a
password for the profile.
T ype y our passw ord for th e mail server . R eal Time authenticates
you against the mail server that you specified in the profile.
• Available Profiles. User profiles contain information about
which mail server to use.
Choose which profile to use. The Profile Password screen
appears. Type your password for the mail server, if necessary.
Real Time authenticates you against the mail server.
The Main Menu screen ap pears.
For information about using and managing user profiles, see “User
profiles” on page 75.
Note If you enable the auto login feature, you can start Real Time
without logging in. For more information about the auto login
feature, see “Auto login” on page 70.
30
To log out of Real Time
• From the Main menu, choose Logout.
Page 41

Starting Real Time
Exchange
Username field
Real Time for Exchange allows the user to enter the following
information in the Use rname field:
• NT Username - The Exchange Server NT Domain name will be
used from the metabase settings or the Params field. Alias value is
used from the Params field or is assumed to be the same as the NT
Username.
• NT Domain\NT Username - The Exchange Server will be used
from the metabase settings or the Params field. Alias value is used
from the Params field or is assumed to be the same as the NT
Username.
• NT Domain\NT Username\Exchange Alias - The Exchange
Server will be used from the metabase setting s or th e Params field.
• NT Domain\NT Username\Exchange Alias\Exchange
Server - All Real Time metabase configuration settings and Params
field are ignored.
Note Values specified in the username field override any metabase
settings or paramete rs that are specified using the Params
field.
31
Page 42

Getting started
32
Page 43

Section 3
Managing messages
Real Time lets you access many messaging features available in your
mail server.
In this section, you will learn how to:
• View messages. See “Viewing messages” on page 33.
• Compose, reply to, forward, and delete messages. See:
• “Composing messages” on page 36
• “Replying to messa ges” on page 39
• “Forwarding messages” on page 40
• “Deleting messages” on page 40
• Use the recipient list to add recipients to messages. See “Usin g
the recipient list ” on page 41.
Viewing messages
You can:
• View messages from your Inbox
• Sort messages by either the da te recei v e d, th e pers on who sent it , or
the priority
• Filter or Find messages to view only the ones that meet certain
criteria, such as from a particular person or with a certain priority.
Filtering differs from sorting in that it hid es the messages that do
not meet the criteria.
Note An exclamation mark (!) is displayed in front the subject of
High Prior ity email mes s ages.
The complete message header or message body (with selected headers)
appear on two se parate screens. You can view eithe r the header or th e
33
Page 44

Managing messages
message directly from the Inbox list. You can access many operations,
such as forwarding and replying to messages, from both the Message
Header and the Message Body screens. For more information, see
“Replying to messages” on page 39 and “Forwarding messages” on
page 40.
To view a message in the Inbox
1 From the Main menu, choose Inbox.
2 Choose a message.
3 Click Msg (that is, “Message”).
This displays the Message Body screen, which includes selected
headers.
If the message contains attachments, the headers include
attachments.
Note The attachments feature is available only on Pocket PC
devices and desktop Web browsers, such as Internet Explorer
and Netscape Navigator.
34
Figure 3-1: Message Body screen
Tip You can go directly to the Message Header screen from the
Message Body by clicking Header.
Page 45

Viewing messages
To view a message header
1 From the Main menu, choose Inbox.
2 Choose a message.
3 Click Header.
This displays the Message Header screen.
If the message contains attachments, the headers include
attachments.
Note The attachments feature is available only on desktop Web
browsers such as Internet Explorer a nd Netscape Navigator.
Figure 3-2: Message Header screen
Tip You can go directly to the Message Body screen from the
Message Header by clicking Msg.
To sor t messages
1 From the Main menu, choose Inbox.
2 Click the Find & Sort button.
3 Choose Sort By.
4 Click Edit.
5 Choose one of the following:
• Received
•From
•Priority
35
Page 46

Managing messages
To filter messages
1 From the Main menu, choose Inbox.
2 Click the Find & Sort button.
3 Choose one or more of the following and enter the criteria to sort
4 Click Apply.
Your Inbox appears with only the messages that match the filter
displayed.
Composing messages
Real Time lets you compose and send messages from your mobile
device. You can acces s th e compose feature from eithe r th e M ai n m enu
or the Inbox.
by:
•From
•Subject
•Priority
36
Figure 3-3: Composing messages
Page 47

Composing messages
To compose a message
1 From the Main menu, choose Compose.
Tip You can also click Compose from the Inbox.
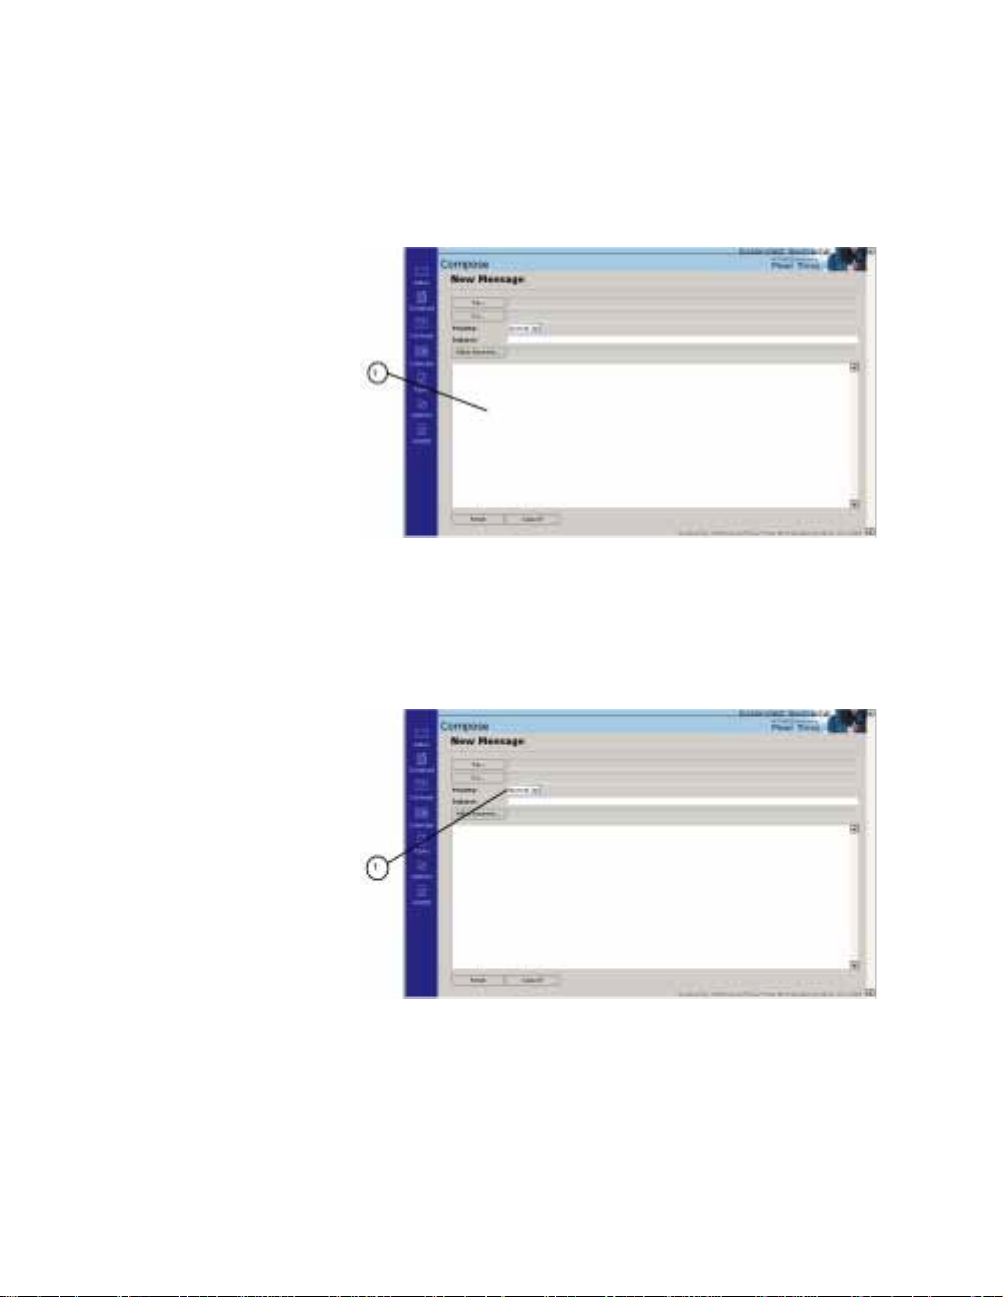
Figure 3-4: Compose screen
2 Click To.
Note You can add To, CC, Subject, Priority, Message, and
Attachment information in any order. The order in this
procedure is recommended.
3 Add recipients from the recipient list.
For information about adding recipients, see “Adding recipients to
messages” on page 41
4 Click Subject.
5 In the Subject text box, type a subject.
6 Click Priority.
7 Choose one of the following priorities:
•Low
•Normal
•High
8 Click Attachment.
You can add one or more attachments from this screen.
For more information, see “Adding attachments” on page 38.
9 Click Message.
10 In the Message box, type text.
11 Click Send.
37
Page 48

Managing messages
Adding
attachments
Removing
attachments
If you are se nding email f rom a platfo rm that supports i t, y ou can a ttac h
files to your emails.
Currently, adding attachments is supported on Web browsers only; that
is, on Netscape Navigator and Internet Explorer.
To add attachments
1 From the Main menu, choose Compose.
Tip You can also click Compose from the Inbox.
2 Click Attachme nt.
The Attachment screen appears.
3 In the File text box, type the path to and name of the file you want
to attach, or click Browse to choose a file.
The file name and bite size appear in the Attachments List.
4 Click Add.
5 Repeat steps 3 and 4 for any additional files you want to attach.
6 Click Done.
You can remove attachments once you have added them.
To remove attachments
1 In the Attachments List, click Remove beside the attachment file
name.
The Remove Attachment confirmation screen appears.
2 Click Yes.
Forwarding
attachments to a
third party for
conversion
38
You can forward your messa ges to a third party for conversion.
Note This feature is supported only on mobile devices, not on PC
Web browsers such as Netscape Navigator and Internet
Explorer.
You must set the email address where you want your email to be
forwarded. For more information, see “Attachments” on page 70.
Page 49

To forward your attachments to a third party for conversion
1 From the Main menu, choose Inbox.
2 Choose a message.
3 Click Msg or Header.
4 Click Attcmts (Attachments).
A status message is returned, indicating the attachments that were
forwarded on for pr ocessing.
The third-party conversion e ngine will send the contents of the
attachments back to you in an email messa ge.
Replying to messages
You can reply to messages from the Inbox. You can reply to either the
sender or all recipients of a message.
To reply to a message
1 From the Main menu, choose Inbox.
2 Choose a message.
3 Click Msg or Header.
4 Click one of the following:
5 Follow steps 4-11 from the “To compose a message” procedure on
Replying to mess ages
• Reply. The name of the sender automatically populates the
recipient list in the ne w message.
• Reply All. The names of the sender and all re cipients
automatically popu late the recipient li st in the new message.
page 37.
39
Page 50

Managing messages
Forwarding messages
You can forward messages from the Inbox.
To forward a message
1 From the Main menu, choose Inbox.
2 Choose a message.
3 Click Msg or Header.
4 Click Forward.
5 Follow steps 2-11 from “To compose a message” on page 37.
Note If you forward a message that has an attachment, the
Deleting messages
attachment is forwarded as well.
40
You can delete messages from the Inbox. Deleting a message moves it
to the Deleted Items folder in Microsoft Outlook or to the Trash folder
in Lotus Notes.
To delete a message
1 From the Main menu, choose Inbox.
2 Choose a message.
3 Click Msg or Header.
4 Click Delete.
A message appears to confirm that you want to delete the message.
5 Click Yes.
Note Web browser interfaces such as Microsoft Internet Explorer
and Netscape Communicator allow multiple messages to be
deleted at once.
Page 51

Using the recipient list
You can use the recipient list when you are:
• Composing, replying to, and forwarding messages
• Scheduling and editing meetings
The recipient list lets you add any number of recipients from Contacts
to your message or meeting request. For information about Contacts,
see “Using and managing contacts” on page 45.
Tip It is strongly recommended that you keep your recipient list
Figure 3-5: Recipient List screen
Using the recipient list
small, as large recipient lists can overload devices, such as
certain mobile ph ones, that have a limited amount of memor y.
Adding recipients
to messages
The recipient list displays the names of all recipients you have attached
to your message or meeting request. If there are no recipients, you can
add some when composing a new message or forwarding a message.
When scheduling meetings and replying to messages, Real Time directs
you to the recipient list, where you can view and edit the current
recipients.
You can add recipients to a message from Contacts, or you can add
recipients who are not in either contacts list.
To add a recipient from Contacts
1 Compose a message.
See “To compose a message” on page 37.
2 In the Recipient List screen, click Add.
3 In the Add Recipients screen, choose Contacts.
41
Page 52

Managing messages
Figure 3-6: Add Recipients screen
The Sear ch screen appears.
4 Type in a first name or last name to search, or click Browse to
browse your contacts.
Tip You can also search by name fragments. For example, entering
a “J” in the First Name text box returns all first names
beginning with a “J.”
5 Click OK.
The name appears in the recipient list.
42
To add a recipient who is not in Contacts
1 Compose a message.
See “To compose a message” on page 37.
2 In the Recipient List screen, click Add.
3 In the Add Recipients screen, choose Other.
The Add Other Recipient screen a ppears.
4 Type an email address in the Email box.
5 Click OK.
The email address appears in the recipient list.
Page 53

Using the recipient list
Removing
recipients from
messages
You can remove any of the recipients from the recipient list before you
send a message. The recipient list must contain at least one name to
send a message.
To delete a recipient from a message
1 Compose a message.
See “To compose a message” on page 37.
2 From the recipient list, choose a recipient.
3 Click Remove.
A message appea rs to confir m that you want to delete the recipient
from the list.
4 Click Y es.
43
Page 54

Managing messages
44
Page 55

Section 4
Using and managing contacts
Real Time lets you view lists of contacts and maintain your own list of
contacts. A contact list contains information, including names, address,
fax and phone numbers, and email addresses.
In this section, you will learn how to:
• Search and browse Contacts. See “Searching and browsing
contact lists” on page 46.
• View contact details. See “Viewing contact details” on page 47.
• Dial contacts and send email directly to a contact from Contacts.
See “Dialing contacts” on page 48 a nd “Emailing contacts” on
page 49.
• Add contacts to, edit contacts, and delete contacts from
Contacts. See “Adding contacts” on page 49, “Editing contacts” on
page 50, and “D eleting contacts” on page 51.
45
Page 56

Using and managing contacts
Searching and browsing contact lists
Real Time lets you search for contacts by first and last name an d browse
the contents of your Contacts. When you browse a contacts list, you
view a list of contact names.
To search Contacts
1 From the Main menu, choose contacts.
The Contact Search screen appears.
Figure 4-1: Searching contacts
2 Type one or both of the following:
•First name
•Last name
3 Click OK.
The search results appear in the search results list. If no matches are
found, a message appears to inform you.
46
Tip You can also search by name fragments. For example, entering
a “J” in the First Name text box returns all first names
beginning with a “J”.
To browse Contacts
1 From the Main menu, choose Conta cts.
The Contact Search screen appears.
2 Click Browse.
A list of names contained in the contact list appears.
Page 57

Figure 4-2: Browsing contacts
Viewing contact details
Y o u can vi ew th e de tai ls of any contact. The contact details can incl ud e
information such as the name, address, email, phone number, and fax
number of the contact.
To view the contact details
1 Search or browse a contact list.
See “To search Contacts” on page 46 or “To browse Contacts” on
page 46.
2 Click View.
The Contact Details screen appears.
Viewing contact details
47
Page 58

Using and managing contacts
Dialing contacts
Figure 4-3: Viewing contact details
Tip After viewing contact details, you can also:
• Dial the contact. See “Dialing contacts” on page 48.
• Email the contact. See “Emailing contacts” on page 49.
48
If you are using Real Time on a mobile phone, you can call a contact
directly from the contact details.
To call a contact
1 View the contact details.
See “To view the contact details” on page 47.
2 Click Call.
The phone numbers included in the contact details appear.
3 Choose a phone number from the list.
Tip You can chan ge the phone number bef ore dialing it b y clicking
Edit and entering a new number.
4 Click Dial .
Note This feature is not supported on all mobile phones.
Page 59

Emailing contacts
Emailing contacts
You can compose an email message to a contact directly from the
contact details.
To send an email message to a contact
1 View the contact detai ls.
See “To view the contact details” on page 47.
2 Click Email.
The New Message screen appears. The name of the contact
automatically populates the recipient list in the new message.
Figure 4-4: Contact name in the recipient list
Adding contacts
3 Follow steps 4-11 from “To compose a message” on page 37.
You can add contact information to Contacts, including:
• First and last name
• Company name
• Email address
• Home phone number
• Business phone number
• Mobile phone number
•Fax number
49
Page 60

Using and managing contacts
Figure 4-5: Adding contacts to Contacts
To add a contact
1 From the Main menu, choose Conta cts.
2 Choose Add Contact.
The Add/Edit screen appears.
3 Type text in some or all of the following text boxes:
• First Name
• Last Name
• Company
•Email
•Home
•Business
•Fax
• Mobile
Only a first, last, or company name is required.
4 Click OK.
Editing contacts
50
Real Time lets you change contact information in your Contacts.
To edit a contact
1 View the contact details.
See “To view the contact details” on page 47.
2 Click Edit.
The Add/Edit screen appears.
3 Edit the contact information.
4 Click OK.
Page 61

Deleting contacts
Deleting contacts
Real Time lets you delete contacts.
To delete a contact
1 View the contact detai ls.
See “To view the contact details” on page 47.
2 Click Delete.
A message appears confirming that you want t o permanently delete
the contact from the list.
Figure 4-6: Delete confirmation screen
3 Click Y es.
4 Click OK.
51
Page 62

Using and managing contacts
52
Page 63

Section 5
Managing meetings
Real Time has a calendar that lets you keep track of all of your meetings.
You can schedule meetings in your calendar and change, delete, and
send meeting reminders for all meetings that you schedule. You can also
schedule meetings with contacts from Global Contacts.
In this section, you will learn how to:
• View a list of meetings in your calendar. You can the list either
by days, weeks, or months. See “Viewing Day View” on page 54,
“Viewing Week View” on page 55, and “Viewing Month View” on
page 56.
• Schedule meetings in your calendar or from a list of contacts. See
“Scheduling meetings” on page 57.
• View meeting details. See“Viewi n g det ai l s of me etings” on
page 59.
• Edit meetings. See “Editing details of meetings” on pag e 60.
• Cancel meetings. See “Canceling meetings” on page 61.
• Use the meeting reminder. See “Enabling meeting reminders” on
page 61.
When you view the calendar, a list of meetings for th e current date
appears. However, you can also view t he meet ing s for the current we ek
or month.
Figure 5-1: Viewing calendars
53
Page 64

Managing meetings
Viewing Day View
When you view the calendar, the Day View appears by default,
displaying a list of meetings for the current date. Y o u have the ability to
view previous and upcoming meetings on a daily, weekly, or monthly
basis.
Figure 5-2: Day View screen
To view the Day View
• From the Main menu, choose Calendar.
The Day View screen appears, displaying a list of meetings
scheduled for the current date. The selected appointment scrolls to
reveal the subject.
54
Tip You can also access the Day View by:
• Clicking Today from the Week View and Month View
screens to access the Day View for the current date
• Clicking ViewDay from the Week View and Month View
screens to access the Day View for the date of a selected
appointment
To view the previous or next day
1 View the Day View.
2 Click one of the following buttons:
•NextDay
•PrevDay
Page 65

Viewing Week View
The Week View lets you view al l meet i n gs s c heduled within the span of
an entire week. You can also view meetings sch ed ul ed in up coming and
previous weeks.
Figure 5-3: Week View screen
To view the Week View
1 From the Main menu, choose Calendar.
2 Click ViewWeek.
Viewing Week View
The Day View screen appears.
Tip You can also click ViewWeek from the Month View screen.
To view the previous or next week
1 View the Week View.
2 Click one of the following buttons:
• NextWeek
• PrevWeek
55
Page 66

Managing meetings
Viewing Month View
The Month View lets you view all meetings scheduled within the span
of the current month. You can also view meetings scheduled in the
upcoming and previous months.
Figure 5-4: Month View screen
To view the Month View
1 From the Main menu, choose Calen da r.
2 Click ViewMonth.
The Day View screen appears.
56
Tip You can also click ViewMonth from the Week View screen.
To view the previous or next month
1 View the Month View.
2 Click one of the following buttons:
•NextMonth
•PrevMonth
Page 67

Scheduling meetings
Real Time lets you schedule meetings and add them to your calendar.
You can specify the details of a meeting, including the date, subject,
location, start ti me, duration, and attendees.
You can schedule a meeting with a contact directly from the contact
detail in Global or Personal Contacts. The contact is automatically
added to the recipi ent list, but you can also add additional attendees.
When you schedule a meeting, email meeting requests are sent to all
recipients.
To schedule a meeting
1 From the Main menu, choose Calendar.
2 Click Add.
Figure 5-5: Add Meeting screen
Scheduling meetings
The Day View appears.
The Add Meeting screen appears.
In the Add Meeting screen, you can edit the Subject, Location, Description, or
Show Time fields.
3 Choose a field.
4 Click Edit.
57
Page 68

Managing meetings
5 Type text in the followin g text boxes:
•Subject
•Location
•Description
6 Repeat until you have filled in all the fields you want.
7 From the Show Time list box, choose one of the following values:
•Busy
•Free
• Out Of Office
• Tentative
8 When you have finished editing, click OK.
The Start Date screen appears.
Figure 5-6: Start Date screen
58
9 Type text in the followin g text boxes:
•Month
•Day
•Year
•Hour
•Minute
10 Click OK.
The Duration screen appears.
11 Type text in the following boxes:
•Hours
•Minutes
12 Click OK.
The Add Recipients screen appears.
The Recipient List screen displays a list of meeting attendees. You can
add and remove attendees from the recipient list. For more
information, see “Using the recipient list” on page 41.
Page 69

To schedule a meeting with a current contact
1 View the contact detai ls.
See “To view the contact details” on page 47.
2 Click Meet.
The Edit Meeting screen appears.
3 Follow steps 3-12 from “To schedule a meeting” on page 57.
Viewing details of meetings
Real Time lets you view the details of meetings scheduled in your
calendar. The details include information such as the date, subjec t,
location, start time, description, duration, and attendees. From the detail
view, you can choose to cancel a m eeting, set a re minder for a m eeting,
or edit the details of meetings you have set up.
Figure 5-7: Viewing the details of a meeting
Viewing details of meetings
1. Appears if you are the meeting organizer
2. Appears if you have a reminder email address set
To view the details of a meeting
1 From the Main menu, choose Calendar.
The Day View appears.
2 Choose a meeting from one of the following:
• Day View. See “Viewing Day View” on page 54.
• Week View. See “Viewing Week View” on page 55.
• Month View. See “Viewing Month View” on page 56.
3 Click View.
1
2
59
Page 70

Managing meetings
Editing details of meetings
Real Time lets you change the details of meetings. These details include
the date, subject, locatio n, start time, descrip t ion, duration, and
attendees.
You can only change the details of meetings that you have created.
Figure 5-8: Meeting Detail screen
To edit the details of a meeting
1 View the details of a meeting.
See “To view the details of a meeting” on page 59.
2 Click Edit.
3 Edit the details of the meeting.
For more information, see “Scheduling meetings” on page 57.
60
Page 71

Canceling meetings
When using Real Time, you can cancel the meeti ngs th at you organized
in your calen dar.
Note You can cancel only the meetings that you have created.
To cancel a meeting
1 View the details of a meeting.
See “To view the details of a meeting” on page 59.
2 Click CancelMeeting.
This cancels the meeting and notifies all recipients that the meeting
has been cancelled.
Enabling meeting reminders
Canceling meetings
You can set the meeting reminder to trigger a message to remind you of
an upcoming meeting. Real Time lets you specify a time prior to the
meeting when the meeting reminder will be sent.
Meeting reminders operate only with phones that support text
messaging. T o determine if you have text messaging capabilities on your
mobile phone, contact your cellular service provider.
Note Before using the meeting reminder, you must configure it. To
do this, y ou must specify the email address to wh i c h you want
the reminder to be sent.
To enable a meeting reminder
1 View the details of a meeting.
See “To view the details of a meeting” on page 59.
2 Click Remind.
The Meeting Reminder screen appears.
61
Page 72

Managing meetings
Figure 5-9: Meeting Reminder screen
3 Choose Enab le.
4 Type text in the followin g text boxes:
•Hours
•Minutes
This is the length of time pr ior to the meeting that the meeting
reminder will be sent.
5 Click OK.
To disable the meeting reminder
1 View the details of a meeting.
See “To view the details of a meeting” on page 59.
2 Click Remind.
3 Choose Disable.
62
Page 73

Section 6
Managing tasks
Real Time lets you maintain and update a list of existing tasks and create
new tasks from your mobile device. In this section you will learn how
to:
• View task details. See “Viewing task details” on page 64.
• Add new tasks. See “Adding tas k s” on page 65.
• Edit existing tasks. See “Editing tasks” on page 67.
• Mark tasks as complete. See “Mark ing tasks as complete” on
page 68.
• Remove tasks from your task list. See “Deleting tasks” on
page 68.
Note By default, you can see only incomplete tasks in the task list.
Your system administrator can change this setting.
Figure 6-1: Managing tasks
63
Page 74

Managing tasks
Viewing task details
You can view detailed information about existing tasks. This includes
the subject, priority, status, description, star t date, and due date.
To view the details of a task
1 From the Main menu, choose Tasks.
2 Choose a task from the task list.
The selected t ask scrolls to show the subj ect, start date, d ue date,
and status.
3 Click View.
The Task Detail screen appears.
Figure 6-2: Task Details screen
64
To view the complete task description
1 From the Main menu, choose Tasks.
2 From the task list, choose a task.
3 Click View.
4 Click Description.
Page 75

Adding tasks
Adding tasks
Real Time lets you add new tasks to the task list. You can specify
information—such as the subject, priority, status, and start and due
dates—for each task that you create.
Figure 6-3: Adding tasks
To add a task
1 From the Main menu, choose Tasks.
2 Click Add.
The Add Task screen appears.
Figure 6-4: Add Task screen
In the Add Task screen, you can edit the Subject, Priority, Status, or Description
fields.
3 Choose one of these fields.
4 Click Edit.
5 Type text in the following text boxes:
• Subject
• Description
65
Page 76

Managing tasks
6 Choose an item from the following list boxes:
•Priority
•Status
7 Click Save when you are finished, or click StartDate.
8 If you click StartDate, click Edit to add a start date.
Figure 6-5: Start Date screen
9 Type text in the following te xt boxes, using the following formats:
•Month (MM)
•Day (DD)
• Year (YYYY)
10 Click Save when you are finished, or click DueDate.
The Due Date screen appears.
11 If you click DueDate, click Edit to add a due date.
66
Figure 6-6: Due Date screen
12 Type text in the following text boxes:
•Month (MM)
•Day (DD)
• Year (YYYY)
13 Click Save.
Your task is saved.
Page 77

Editing tasks
Editing tasks
Real Time lets you edit the details of any task in your task list. When you
edit a task, you can change any or all of its details.
To edit a task
1 From the Main menu, choose Tasks.
2 From the task list, choose a task.
3 Click View.
4 Click Edit.
Figure 6-7: Edit Task screen
5 Type or modify text in the following text boxes:
• Subject
• Description
6 Choose an item from the following list boxes:
•Priority
• Status
67
Page 78

Managing tasks
Marking tasks as complete
When you have accomplished a task, you can mark that task as
complete in Real Time. After you mark a task as complete, it no longer
appears in your list of uncompleted tasks, by default. This setting can be
changed by your syst em administrator.
To mark a task as complete
1 From the Main menu, choose Tasks.
2 From the task list, choose a task.
3 Click View.
4 Click Complete.
Deleting tasks
Deleting a task removes it permanently from the task list.
68
To delete a task
1 From the Main menu, choose Tasks.
2 From the task list, choose a task.
3 Click View.
4 Click Delete.
A message appears to confirm that you want to delete the task.
5 Click Yes.
Page 79

Section 7
Setting options
You can set options, such as:
• Attachments. Allows you to configure attachments to be
forwarded to a third party for conversion.
• Auto login. When auto login is enabled, you can access the
Real Time Main menu from your portal without entering a user
name or password. See “Auto login” on page 70.
• Signature. You can add a signature to the bottom of each email that
you send from Real Time. See “Signature” on page 72.
• Startup. You can set the screen that appears by default once you log
in. See “Startup” on page 73.
• Time Zone. You can set the time zone your mobile device is
currently in. See “Time zone” on page 74.
• User profiles. You can manage profiles for each mail server that
your system administrator has enabled. See “User profiles” on
page 75.
In the Options module, you can also get information about the version
of Real Time you are running. For more information, see “About” on
page 77.
69
Page 80

Setting options
Attachments
This option allows you to configure the email address of a third party
for converting attachments (for example,
http://www.equin.com/). When viewing messages or headers, you
have the option to forward the email to t hat email address. A separate
email for each attachment is returned, converted to text format.
For more information, see “Forwarding attachments to a third party for
conversion” on p age 38.
To set up the conversion address for attachments
1 From the Main menu, choose Opti ons.
2 Choose Attachments.
3 In the Attachment Conversion Recipient text box, enter the email
address of the t hird-party conversio n tool.
4 Click OK.
Auto login
70
When auto login is enabled, you can:
• Start RealTime on your device without entering a user name or
password
• Disable it. Disabling auto login means that you must enter a user
name and password to start Real Time.
Figure 7-1: Enabling auto login
For information about logging in, see “Starting Real Time” on page 29.
Page 81

Auto login
To enable auto login
1 From the Main menu, choose Options.
2 Choose Auto Login.
The Auto Login screen appears.
Figure 7-2: Auto Login screen
3 Choose Enable.
A security warning appears to inform you that you will no longer
need a user name or password to sig n on to Real Time.
4 Choose Yes.
To disable auto login
1 From the Main menu, choose Options.
2 Choose Auto Login.
The Auto Login screen appears.
3 Choose Disable.
A security warning appears to inform you that you will need a user
name or password to sign on to Real Time.
4 Choose Yes.
71
Page 82

Setting options
Signature
You can configure a signature to add to the bottom of each mail th at
you send from Real Time.
Note The signature can be text only.
To configure a signature
1 From the Main menu, choose Opti ons.
2 Choose Sig nature.
The Signature screen appears.
Figure 7-3: Signature screen
72
3 Typ e a signature.
Page 83

Startup
Startup
You can set your default startup loca tion. This is the location that will
appear after you log in to Real Time, either manually or automatically.
To choose your default starting location
1 From the Main menu, choose Options.
2 Choose Startup.
The Startup screen appears.
Figure 7-4: Startup Screen
3 From the list, choose the location where you want Real Time to
start. Your choices are:
•Inbox
•Calendar
•Compose
•Contacts
•Tasks
4 Click OK.
73
Page 84

Setting options
Time zone
Y ou can set the time zone you are currently in to facilitate appointment,
calendar, and other time-based activities on your mobile device.
To set your current time zone
1 From the Main menu, choose Opti ons.
2 Choose Time Zone.
The Time Zone screen appears.
Figure 7-5: Time Zone screen
3 From the list, choose the current time zone.
Many cities are listed; choose whichever one is in the current time
zone.
4 Click OK.
The administrator can edit th is list a nd add or remov e t ime zone entri es .
For more information, see the Real Time Administration Guide.
74
Page 85

User profiles
User profiles
While installing Real Time, the system administrator chooses which
mail servers are enabled. For information about mail se rvers, see the
Real Time Administration Guide.
Yo u can add, edit, and delete personal profiles for each mail server that
the system admi nistrator has enable d. These profiles contain
personal information—such as y ou r user name and pass word—and
mail server information—such as its name and domain.
Note These profiles are for Real Time only; they do not change your
profile or account of the mail server.
After creating a profile, you log in to Real Time using it. For
information about logging in, see “Starting Real Time” on
page 29.
Figure 7-6: Managing profiles
To add a mail provider profile
1 From the Main menu, choose Options.
2 Choose User Profiles.
The Available Profiles screen, which displays your previously
created profiles, appears.
75
Page 86

Setting options
Figure 7-7: Available Profiles screen
3 Click Add.
4 Choose a mail provider.
Different mail providers appear depending on the mail providers
that your system administrator has enabled.
5 Depending on the mail provider, specify values for the following:
• Display – the name of the profile. This is the name that appears
in the Available Providers screen.
• Username – the user name you use to log in to the mail server
• Password – the password you use to log in to the mail server
• Confirm Password – you must confirm the password by
re-entering it.
76
To edit a mail provider profile
1 From the Main menu, choose Opti ons.
2 Choose User Profiles.
The Available Profiles screen appears.
3 Choose a profile.
4 Click Edit.
5 Follow step 5 from the “To add a mail provider profile” procedure
on page 75.
To delete a mail provider profile
1 From the Main menu, choose Opti ons.
2 Choose User Profiles.
The Available Profiles screen appears.
3 Choose a profile.
4 Click Delete.
Page 87

About
About
You can get information about the version of Real Time you are
running.
To get information about Real Time
1 From the Main menu, choose Options.
2 Choose About.
77
Page 88

Setting options
78
Page 89

Addendum for
Lotus Domino and Notes
This short addendum to the User Manual describes slight differences in
the user experience if you are using Real Time with Lotus Domino.
Replicating personal address books
The personal address book must be replicated to the mail server so that
mobile clients can see it. If the address book resides on the machine
that is usually used to access Lotus Notes, there is no way for a mobile
client—which has a connection to the mail server only—to view them.
The mail administrator must grant permission to users to replicate their
address books to the mail server.
Section 8
79
Page 90

Addendum for Lotus Domino and Notes
To replicate a Lotus Notes personal address book to the Domino
server
1 Start Lotus Notes.
2 Go to your workspace, and select your local address book.
3 From the File menu, choose Replication > New Replica.
4 Select the correct server.
For the file name of your local address book replica that resides on
the server, you must use the following convention:
Loginname_pab.nsf (for example: fflintstone_pab.nsf)
You must follow this convention for Real Time to use your address
book.
5 From the File menu, choose Mobile > Edit Current Lo cation.
A properties sheet appears.
6 In the Replication section, enable replic ation.
Folder List
80
When using Real Time with Lotus Notes/Domino, the folder list is not
available in a tree view as displayed when using with Microsoft
Exchange.
Page 91

Index
A
adding
appointment
contact
meeting
recipient
task
address book
Lotus Notes
personal
appointment
adding
cancelling
changing
deleting
detail
editing
removing
scheduling
attachment
viewing
auto login
enabling
setting
...........................................49, 50
.................................................57
email
message
........................................................65
....................................................57
.................................................61
......................................................60
....................................................60
...........................................34, 35
....................................................70
.................................................71
....................................................71
B
browsing
contact
..................................................46
.........................................57
................................................41
................................................41
..........................................41
.........................................80
................................................80
..............................................61
................................................60
...............................................61
.............................................57
C
calling
contact
cancelling
appointment
meeting
changing
appointment
contact
meeting
task
choosing
item from list box
menu item
clicking button
using a mobile phone
using a Palm handheld device
using a Pocket PC
using a RIM device
using a Web browser
completing
task
composing
email
message
..................................................48
.........................................61
..................................................61
.........................................60
..................................................50
..................................................60
.........................................................67
using a mobile phone
using a Palm handheld device
using a Pocket PC
using a RIM device
using a Web browser
using a mobile phone
using a Palm handheld device
using a Pocket PC
using a RIM device
using a Web browser
...............................23
..............................18
.........................................................68
.......................................................37
.................................................37
........... 12, 15
......6
........................25
.......................19
..................28
........... 10, 14
......5
........................22
.......................18
..................27
....................9, 13
.............5
........................27
81
Page 92

Index
contact
adding
browsing
calling
changing
deleting
detail
viewing
dialing
editing
emailing
information
viewing
phoning
searching
creating
email
message
task
........................................................65
D
day
viewing
Day View
deleting
appointment
contact
email
meeting
message
task
........................................................68
detail
appointment
meeting
task
........................................................64
....................................................50
...............................................46
....................................................48
................................................ 50
.................................................51
......................................................47
...........................................47
....................................................48
............................................50, 51
.................................................49
..........................................47
...........................................47
.................................................48
..............................................46
......................................................37
................................................37
..................................................54
....................................................54
........................................................43
........................................61
..................................................51
......................................................40
.................................................61
................................................40
........................................60
.................................................60
device
Palm
......................................................... 3
phone
......................................................3
RIM
..........................................................3
dialing
contact
..................................................48
E
editing
appointment
contact
meeting
task
.........................................................67
email
adding recipient
composing
creating
deleting
filtering
forwarding
removing
replying
sending
sorting
viewing
writing
emailing
contact
enabling
auto login
reminder
entering text in text box
using a mobile phone
using a Palm handheld device
using a Pocket PC
using a RIM device
using a Web browser
.........................................60
...........................................50, 51
.................................................60
...................................41
............................................37
.................................................37
.................................................40
..................................................36
............................................40
...............................................40
.................................................39
..................................................49
...................................................35
..................................................34
...................................................37
..................................................49
..............................................71
...............................................61
...............................24
..............................19
..................11, 15
............6
........................28
82
Page 93

Index
F
filtering
email
......................................................36
message
finishing
task
forwarding
email
message
function
mobile phone
Pocket PC
RIM device
Web browser
.................................................36
........................................................68
......................................................40
.................................................40
Nokia
..............................................13
UP.Link
.............................................8
............................................21
...........................................17
......................................26
I
Inbox
viewing
Internet Explorer
..................................................34
......................................26
L
logging in .....................................................29
logging out
Lotus Domino
server
Lotus Notes
address book
..................................................30
....................................................80
.......................................80
meeting
adding
....................................................57
cancelling
changing
deleting
detail
editing
reminder
removing
scheduling
message
adding recipient
composing
creating
deleting
filtering
forwarding
removing
replying
sending
sorting
viewing
writing
Microsoft Internet Explorer
mobile phone
function
month
viewing
Month View
...............................................61
.................................................60
..................................................61
......................................................60
....................................................60
...............................................61
...............................................61
.............................................57
...................................41
............................................37
..................................................37
..................................................40
..................................................36
............................................40
...............................................40
..................................................39
..................................................49
...................................................35
...................................................34
...................................................37
...................26
............................................8, 13
...................................................56
................................................56
N
Navigator .....................................................26
Netscape Navigator
..................................26
M
marking as complete
task
........................................................68
marking as finished
task
........................................................68
O
option
setting
....................................................69
83
Page 94

Index
P
Palm ............................................................... 3
function
using
personal
address book
personal address book
replicating
personal information management
phone
phoning
contact
PIM
................................................................. 1
Pocket PC
function
................................................... 4
........................................................ 4
.......................................80
.............................................80
......... 1
............................................................. 3
..................................................48
.................................................21
R
recipient ......................................................43
adding
....................................................41
deleting
removing
recipient list
using
reminder
enabling
meeting
setting
removing
appointment
email
meeting
message
recipient
task
.................................................43
..............................................43
......................................................41
.................................................61
.................................................61
...................................................61
........................................61
......................................................40
.................................................61
................................................40
...............................................43
........................................................68
replicating
personal address book
replying
email
......................................................39
message
RIM
.................................................................3
RIM device
function
.................................................39
.................................................17
......................80
S
scheduling
appointment
meeting
searching
contact
sending
email
message
server
Lotus Domino
setting
auto login
option
reminder
sorting
email
message
starting
.........................................................29
.........................................57
.................................................57
..................................................46
......................................................49
.................................................49
.....................................80
..............................................71
....................................................69
...............................................61
......................................................35
.................................................35
84
Page 95

Index
T
task
adding
....................................................65
changing
completing
creating
deleting
detail
editing
finishing
marking as complete
marking as finished
removing
viewing
typing text in text box
using a mobile phone
using a Palm handheld device
using a Pocket PC
using a RIM device
using a Web browser
................................................67
............................................68
.................................................65
.................................................68
......................................................64
....................................................67
.................................................68
.............................68
...............................................68
..................................................64
...............................24
..............................19
U
using
recipient list
.........................................41
..........................68
..................11, 15
............6
........................28
V
viewing
attachment
contact detail
contact information
day
..........................................................54
email
Inbox
message
month
task
week
...................................34, 35
.......................................47
............................47
.......................................................34
......................................................34
.................................................34
....................................................56
.........................................................64
......................................................55
W
Web browser
function
week
viewing
Week View
writing
email
message
.................................................26
...................................................55
.................................................55
.......................................................37
.................................................37
85
Page 96

Index
86
 Loading...