

Page 1
SwyxPhone L400
User Documentation
SwyxPhone L400 The perfect Desktop Phone for
Computer Telephony Integration using SwyxIt!
Please replace the included documentation from Siemens with this user
documentation.
As of: May 2004
Page 2

© 2000-2004 Swyx. All rights reserved.
Legal Information
hilst Swyx attempt to convey accurate and current information relative to the creation of
W
SwyxPhone L400 and this documentation, the information provided in this user guide may
contain typographical or technical errors.
This documentation, including all information contained herein is provided “as is”, without any
warranty of any kind, whether expressed or implied, including, but not restricted to, any implied
warranties of merchantability or fitness for a particular purpose or non-infringement.
Trademark: Swyx, SwyxIt!, the integration smiley and „Click. Phone. Smile.“ are registered
trademarks of Swyx. All other trademarks and product names are trademarks or registered
trademarks of the respective owners. Siemens and CorNet® are registered trademarks of
Siemens AG. This documentation is proprietary intellectual property of Swyx. Reproduction,
adaptation, or translation of this documentation without the express written consent of Swyx is
prohibited and will be prosecuted as a violation of intellectual property rights.
Swyx
Joseph-von-Fraunhofer-Straße 13a
D-44227 Dortmund
www.swyx.com
Page 3

Table of Contents
Preface .........................................................................................................................i
1 Illustration of SwyxPhone L400 with a Description of the Buttons
1.1 Defined Function Keys ........................................................................... 1-1
1.1.1 Numeric Keypad ................................................................................ 1-1
1.1.2 +/- Buttons ....................................................................................... 1-1
1.2 Configurable Function Keys (Default Setting) ........................................ 1-2
1.2.1 Lines .............................................................................................. 1-2
1.2.2 Speed Dials...................................................................................... 1-2
1.2.3 Redirection....................................................................................... 1-2
1.2.4 Voicemail......................................................................................... 1-3
1.2.5 Call transfer...................................................................................... 1-3
1.2.6 Redial ............................................................................................. 1-3
2 Telephoning with SwyxPhone
2.1 How do I call a subscriber? .................................................................... 2-1
2.2 Other Options for Calling a Number ....................................................... 2-1
2.3 How do I answer a call? ......................................................................... 2-1
2.4 How do I pick up a call? ......................................................................... 2-2
2.5 How do I end a call? ............................................................................... 2-2
2.6 How do I start an inquiry call? ................................................................ 2-3
2.7 How do I switch between two subscribers (Call Swap)? ........................ 2-4
2.8 How do I connect two subscribers to one another? ............................... 2-4
2.9 How do I transfer a call without using Inquiry Call?................................ 2-5
2.10 How do I redirect a call? ......................................................................... 2-5
2.11 Speaker .................................................................................................. 2-6
2.11.1 Activating the Speaker During a Call ....................................................... 2-6
2.11.2 Deactivating the Speaker During a Call.................................................... 2-6
2.11.3 Regulating the Volume ........................................................................ 2-6
2.12 Configuring the ringing tone ................................................................... 2-6
2.13 Further Functions ................................................................................... 2-7
3 Configuration of SwyxPhone L400
3.1 Configuration on SwyxPhone L400 directly............................................ 3-1
3.2 Configuration of SwyxPhone in SwyxIt!.................................................. 3-2
4 Remote control of your SwyxPhone orvia CTI-SwyxIt!
Table of Contents 1
Page 4

App. A: Set It Up & Log On
A.1 Items Included in the Delivery ................................................................A-1
A.2 System Requirements ............................................................................A-1
A.3 Connect SwyxPhone L400 .....................................................................A-1
A.4 Logging on to SwyxServer......................................................................A-3
App. B: Technical Details
B.1 Care Instructions ....................................................................................B-1
B.2 Technical Data SwyxPhone L400...........................................................B-1
B.2.1 Restore the factory settings ..................................................................B-2
Index ........................................................................................................................... 1
Table of Contents2
Page 5

Preface
Your SwyxPhone L400 is a modern telephone for a new generation of telephone exchanges.You
no longer require a separate, in-house telephone network with complicated switching
technology. Now your PC network (LAN) also serves as an inhouse telephone network. The
sophisticated software operating on your network server provides a much more powerful
connection management, with far more extensive telephony functions than have previously
been available.
SwyxWare offers you all these new telephone exchange functions! In addition to the PC phone
SwyxIt! and the system telephone SwyxPhone L420, SwyxPhone L400 is a second telephone
device which allows you to use telephone functions in an IP environment, even without a PC.
If you have already installed SwyxIt! with your PC turned on, it is possible to dial from either
your SwyxPhone L400 or your PC (CTI). So you can dial from your PC, e.g. from any
application, but you make the call using your SwyxPhone L400.
SwyxPhone L400 is a new member of the SwyxPhone family. Using SwyxPhone L400, you
have a fully-fledged phone on your desk also if your PC is turned off.
This manual will describe SwyxPhone L400 for you. For further information please refer to the
SwyxIt! documentation.
SwyxWare
Why SwyxWare?
Until now, two isolated communication infrastructures have existed side by side. On the one
side, you have the LAN (Local Area Network) for data communication and, on the other side,
you have the private branch exchange (PBX) network for voice communication. Both networks
are usually equipped with interfaces to the outside world. The introduction of new technologies
which are based in the Internet Protocol (IP) make this separation unnecessary.
IP is the technology behind SwyxWare and it represents a specific type of data transfer. IP-based
telephone systems no longer transfer calls via permanently switched lines, but rather via
networks which are based on Internet technology. This new type of technology for voice
transmission provides the user with a high degree of flexibility. It makes it possible to place
telephone calls via the internal company LAN, as well as via the Internet. This allows you to
reach colleagues at other company locations far away with the same telephone and exchange
functionalities as you would use to contact colleagues in the same building. This not only
provides new application options for business communication and easier use of telephones, it
also offers companies a significant cost-saving potential.
SwyxServer
SwyxServer is the heart of the new SwyxWare telephony generation. You have the option of
using either a phone of the SwyxPhone family as desk telephone, or SwyxIt! as a softwarebased telephone for the PC. These components have been optimally adjusted on SwyxServer.
This ensures that you have unlimited use of all of the functions provided by SwyxServer.
Compared to classic systems, your new SwyxWare telephony solution offers a wide range of
new uses, e.g. a high-performance Voicemail functionality for every subscriber. This
functionality provides you with an answering machine which records those calls which don’t
Preface 1-i
Page 6

reach you, and it allows you to set various announcement texts. The voice messages from your
telephone are then found in the form of e-mails in your e-mail inbox.
SwyxPhone L400
SwyxPhone L400 is the smallest member of the SwyxPhone family. In collaboration with
SwyxIt! it offers comfortable telephony via CTI. The user can use the telephone also if the PC
turned off.
SwyxPhone L420 and SwyxPhone L440
SwyxPhone L420 and SwyxPhone L440 combine the familiar and easy operation of a telephone
with the new IP technology and, therefore, it offers a multitude of attractive additional
functions, such as centrally stored user data, a display driven menu mode, and freely assignable
function keys. Due to the use of the CorNet®-Protocol (basis for the PhoneManager), your
SwyxPhone L420 or SwyxPhone L440 has access to all of the important SwyxIt! properties and,
at the same time, it remains independent of your PC. In order to be able to install SwyxPhone
L420 or SwyxPhone L440, PhoneManager must already be installed in the network.
SwyxIt!
SwyxIt! is a telephony application, which can be installed on your PC and will turn your PC into
an extremely high-performance telephone. SwyxIt! uses the Internet Protocol and interacts
excellently with Microsoft Outlook 97/98/2000/XP and Microsoft Exchange. For example, you
can use Drag & Drop to “drag” the numbers of an Outlook contact onto the SwyxIt! interface or,
in the Outlook “Contacts” folder, you can click on the contact you want in order to call this
subscriber. Depending on the Outlook Calendar and the Call Routing Manager, it is also
possible to define intelligent call redirections. All of your Voicemails can be opened in Outlook
which you can then listen to them using a headset, the SwyxIt! Handset, or the PC speakers.
The Layout and Organization of this Documentation
• Chapter 1 - In this chapter SwyxPhone L400 the buttons and the pre-configured
funcionality will be explained.
• Chapter 2 - This chapter describes the following basic telephone functions.
• Chapter 3 - In this chapter the configuration of the function keys of SwyxPhone L400 will
be explained.
• Chapter 4 - In this chapter you will find out how you can control your SwyxPhone L400
remotely using a CTI-SwyxIt! on your PC. This means, you dial a number from your PC,
but you make the call using your telephone.
• Appendix A - This chapter provides information concerning the requirements and settings
necessary for initial operation of SwyxPhone L400.
• Appendix B - In this section you will find the technical details of Your SwyxPhone.
Preface1-ii
Page 7
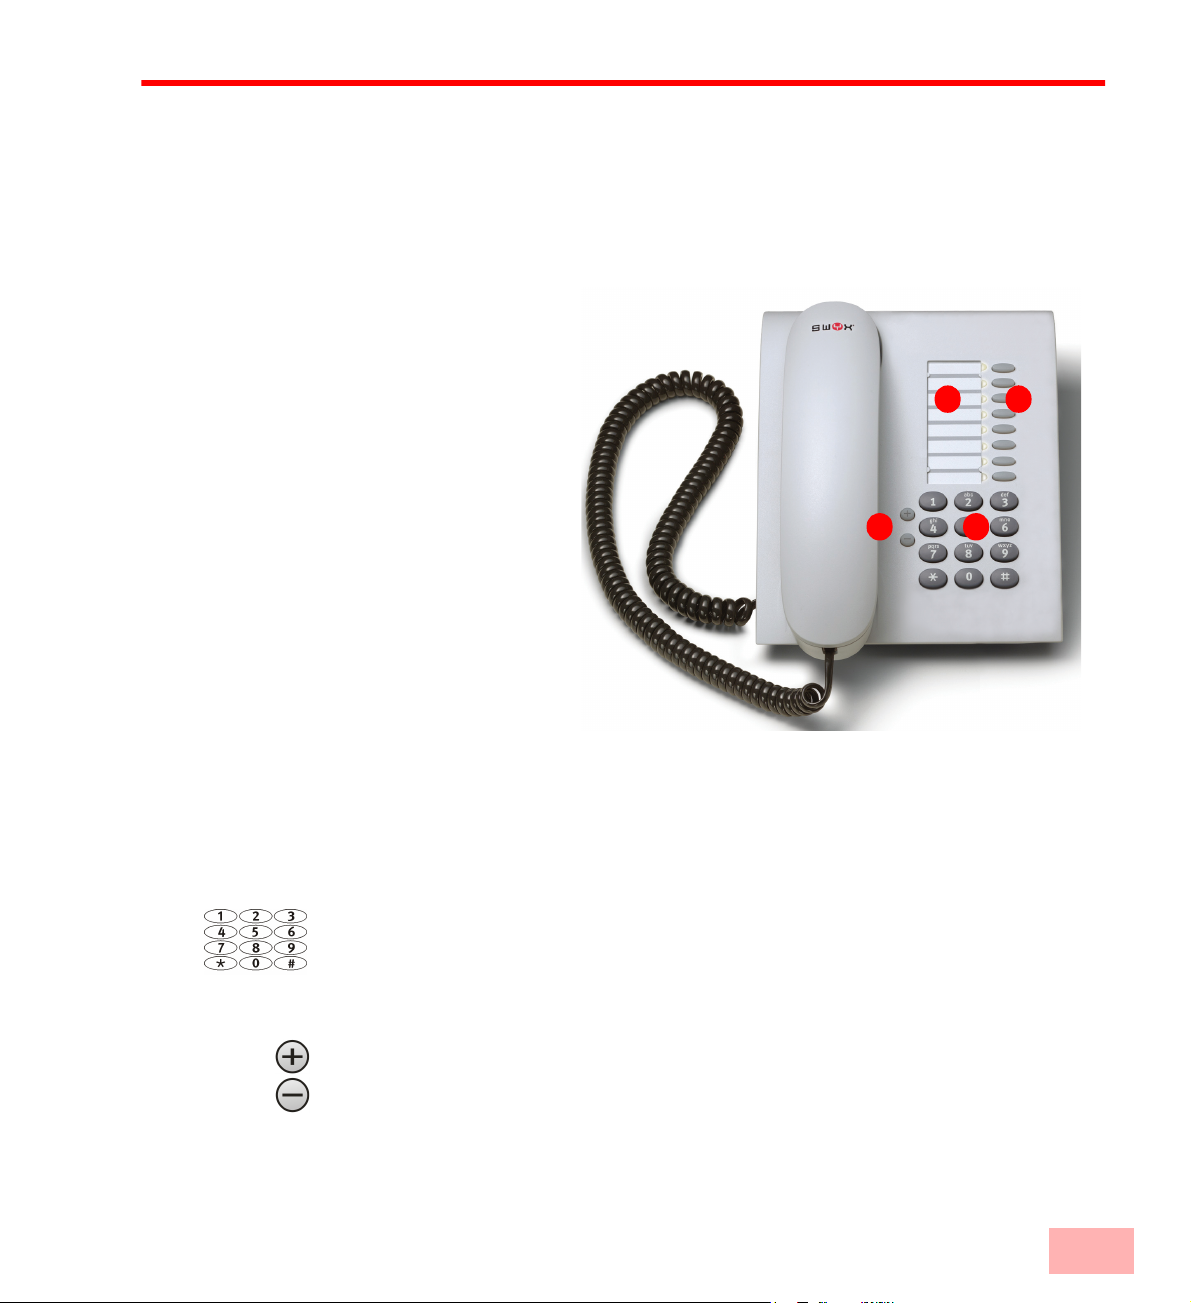
1 Illustration of SwyxPhone L400 with a Description of the Buttons
1 2
43
In this chapter SwyxPhone L400 the buttons and the pre-configured funcionality will be
explained.
All SwyxPhone L400 LED buttons can be configured, i.e. functions, lines or phone numbers
can be assigned to LED buttons. All of the descriptions listed in this manual are based on the
default button assignments present at the time of purchase.
1. Labels
2. Function Keys
3. Volume Adjustment
4. Numeric Keypad
1.1 Defined Function Keys
The following SwyxPhone L400 buttons are preset and cannot be assigned to other functions.
1.1.1 Numeric Keypad
1.1.2 +/- Buttons
The numeric keypad is used to enter a telephone number.
You can use the +/- buttons to adjust the volume of the speaker and the handset, depending on
which one is currently active. The volume setting will stay at this level for the next call. Further
you can set the volume of the ringing tone during a ringing call.
Fig. 1-1 The Buttons of SwyxPhone L400
Illustration of SwyxPhone L400 with a Description of the Buttons 1-1
Page 8
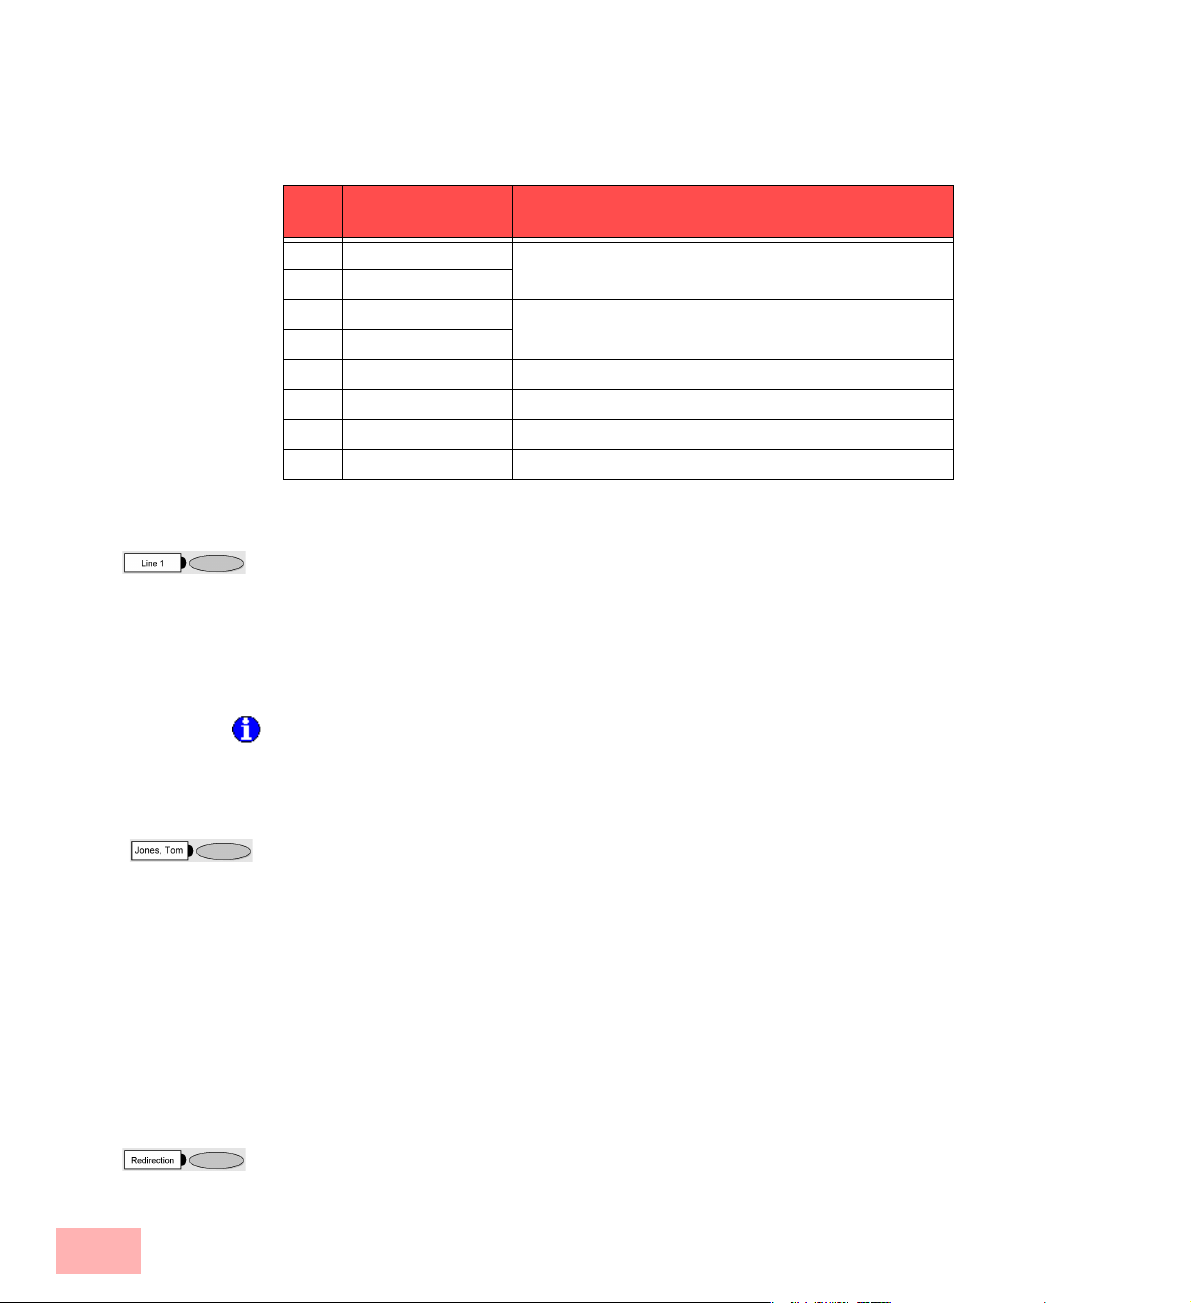
1.2 Configurable Function Keys (Default Setting)
All function keys on SwyxPhone L400 can be individually configured. All function keys are
pre-configured upon purchase. You have the option of assigning theses keys to meet your needs.
The keys described in the following are pre-configured upon purchase.
Butt
Function Explanation
on
1 Line 1
2 Line 2
3 Speed dial 1
4 Speed dial 2
5 Redirection see chapter 1.2.3, Redirection, page 1-2
6 Voicemail see chapter 1.2.4, Voicemail, page 1-3
7 Call Transfer see chapter 1.2.5, Call transfer, page 1-3
8 Redial see chapter 1.2.6, Redial, page 1-3
see chapter 1.2.1, Lines, page 1-2
see chapter 1.2.2, Speed Dials, page 1-2
1.2.1 Lines
1.2.2 Speed Dials
With SwyxPhone L400, you have access to two (default setting) or more lines. By pressing the
appropriate Line button, you can select the line you want to speak on, switch between lines, and
pair lines in order to unite two subscribers.
To select a specific line, just press short the Line button you want. A red LED signals the
currently active Line. When you then call a subscriber, the selected line will be used for this
call. If a call is received on this line, the corresponding LED will blink and the telephone will
ring. Is the call on hold the assigned Line button also blinks.
The call will be terminated by pressing the line button for two seconds. This occurs independent
of the status of this line (active or on hold). If you press the line button for two seconds in the
event of an incoming call, the call will be redirected to the Voicemail.
Speed Dials function just like abbreviated dialing buttons. If the Speed Dial is pressed the
assigned number will be dialed immeadiately. SwyxPhone L400 offers in the pre-configuration
two Speed Dials which can be configured by the user. Write the name on the insertion card
supplied. Printable templates for the insertion card you will find as a PDF or a Word file on the
SwyxWare-CD. For more information, please contact your administrator.
To configure the Speed Dials, please refer to Chapter 3, Configuration of SwyxPhone
L400, page 3-1.
Configuring a Speed Dial in SwyxIt!, you can define wether the button will be used for an
Intercom Connection. In this situation the call will be accepted by the device of the called
person automatically and you can speak to him immediately.
1.2.3 Redirection
Press the redirection button to redirect calls immediately to another subscriber or to your
Voicemail. You must configure a redirection befor you can use it. For further information please
refer to chapter 3, Configuration of SwyxPhone L400, page 3-1.
Illustration of SwyxPhone L400 with a Description of the Buttons1-2
Page 9

1.2.4 Voicemail
A Voicemail is a spoken message in the form of a WAV file, which is sent via e-mail.
If the caller couldn't reach you, he can leave a Voicemail. You can listen to the Voicemail, when
You are back at your desk or from an other phone using the remote inquiry.
If you have e-mail access, your Voicemails will be sent to your e-mail address if this has been
set for your SwyxPhone during installation:
When a new Voicemail has been left for you, this will be indicated by
• a glowing LED for the “Voicemail” button
• a briefly interrupted (stuttered) dial tone
This is how you check your new Voicemails
1. Press the “Voicemail” button.
Checking Your New
Voicemail
A connection for querying the SwyxServer will be initiated immediately.
This is how you check your Voicemail
1. Press the “Voicemail” button.
Voicemail inquiry
A connection for querying the SwyxServer will be initiated immediately.
You can also check your Voicemail per Remote Inquiry. To do this, your Standard Voicemail
must be configured appropriately.For further information please refer to the SwyxIt!
documentation.
1.2.5 Call transfer
The Call Transfer button can be used to connect the currently active call to a call which is on
hold.
After the subscribers have been connected, both of your lines will automatically become
inactive.
1.2.6 Redial
The Redial button will dial immedeatly the number you dialed last.
Configurable Function Keys (Default Setting) 1-3
Page 10

Illustration of SwyxPhone L400 with a Description of the Buttons1-4
Page 11

2 Telephoning with SwyxPhone
This chapter describes the following basic telephone functions.
• How do I call a subscriber? (page 2-1)
• How do I answer a call? (page 2-1)
• How do I end a call? (page 2-2)
• How do I switch between two subscribers (Call Swap)? (page 2-4)
• How do I connect two subscribers to one another? (page 2-4)
• How do I redirect a call? (page 2-5)
• Speaker (page 2-6)
2.1 How do I call a subscriber?
SwyxPhone is inactive, but logged on.
This is how you call a subscriber
1. Simply lift the handset.
Call Subscriber
2.2 Other Options for Calling a Number
You will then hear the dial tone.
2. Enter the number you want using the numeric keypad.
The subscriber is then immediately called.
• Lift the SwyxPhone-handset and press the Redial button. The number of the last call will
be redialed immediately.
• Press a Speed Dial. The number assigned to the Speed Dial will be dialed immediately.
2.3 How do I answer a call?
If an incoming call is received, which is directed to you, or a call is forwarded to you, or if a
Group Call is received for a group of which you are a member,
• a ringing sound will be produced and
• the Line button, on which the call is received, will blink.
This is how you pick up a telephone call
1. To pick up the call,
Pick up Call
• simply lift the handset. The handset is activated so that you can speak to the caller.
If you pick up a call by pressing the Speaker button only, please note that there is no microphone
in SwyxPhone L400. In this instance you only can listen to the caller. If you like to talk to the
caller, you must lift the handset. The Handset button is not available in the preconfiguration.
Telephoning with SwyxPhone 2-1
Page 12

2.4 How do I pick up a call?
You can pick up a direct call, a forwarded call and a call to a group of which you are a member,
by lifting the handset. In the case of a signaled call, it only will be indicated by a brief tone that
another user or a group has received a call. Signaling is set up by the system administrator. You
can pick up a signaled call pressing the "Pick Up" button.
If a call is signaled to you,
• the Pick Up button will blink, if there is one, and
• if one exists, the Speed Dial, which has been assigned to the number called, will blink.
If the call is not picked up within 10 seconds by the subscriber originally called, you will then
hear an additional acoustic signal.
This is how you pick up a signaled call
To pick up the call,
Activating a
Telephone Call
Activating a Second
Call
1. press the Pick Up button, if there is one, and lift the handset off the hook
or
1. press the blinking Speed Dial, if there is one.
This is how you pick up a telephone call if you are currently involved in a different telephone
call
1. press the Pick Up button, if there is one
or
1. press the blinking Speed Dial, if there is one.
The previously active connection is put on hold, the subscriber hears music on hold, and the
incoming call is picked up.
2.5 How do I end a call?
You have been speaking to a caller and now you would like to end the call.
This is how you end a telephone call
1. To disconnect the call,
End Call
Ending one of several
calls
Telephoning with SwyxPhone2-2
• simply put the SwyxPhone handset back on the hook
or
• press the Line button for two seconds.
If you end a call and you have a second call on hold, a single telephone beep will be produced
after 5 seconds have passed. Pick up the handset once again in order to directly connect to the
caller on hold.
This is how you end one of several calls
1. You can end either a active line or a line on hold.
• Place the handset on the hook.
or
• press the Line button for two seconds.
The connection will be terminated. If the call was on hold the line won't be activated before
termination.
Page 13

If you have created the active connection yourself, putting the handset on hook will result in the
transfer of this call to the call on hold.
2.6 How do I start an inquiry call?
You are having a telephone conversation and you would like to call another subscriber (Inquiry
Call). Then you would like to alternately speak to both subscribers (Call Swap).
Example:
• You are speaking to a customer (subscriber A) and you would like to ask someone in the
warehouse (subscriber B), whether a certain article is on stock.
• You begin a second call at the same time with subscriber B. Then you can alternately speak
with subscriber A and subscriber B.
• While you are speaking with one subscriber (the corresponding Line button is activated),
the other subscriber will hear music on hold.
• If you end the call with one of the subscribers (pressing the line button for two seconds),
the corresponding line will be free again. You can then switch to the line on hold.
If you initiated the call on the active line and you place the handset on hook, the callers will be
connected to each other.
This is how you call an additional subscriber
1. Press a free Line button during an active connection.
Inquiry Calls
You will hear the dial tone and you can now call a second subscriber.
2. Insert the number and wait until the connection is established.
While you do this, the first call will be placed on hold and your conversation partner will hear
music on hold. The LED for this line on hold blinks.
How do I start an inquiry call? 2-3
Page 14

2.7 How do I switch between two subscribers (Call Swap)?
You are having conversations with two subscribers at the same time. The active connection is
the connection to the person you are currently talking to. The other subscriber,is on the line on
hold. Switching between callers is called “Call Swap”.
Example:
Several calls are received at the operator desk and you would like to redirect these calls to
various colleagues, who, however, cannot be reached immediately. You can put the callers on
Hold, so that these callers will hear music on hold. You can switch to these connections on
hold at any time in order to inform the callers on the progress of your efforts to connect them
to the correct colleagues.
This is how to swap between an active call and a call on hold
Requirement: You have one active line and at least one other line on hold.
Switch between Calls
1. Press the Line button with the connection on hold; this line will now become active after a
delay.
The activation of the corresponding line will be delayed. The LED of the active line is on, the
LED for the line on hold blinks.
You can have as many calls simultaneously as you have lines. This means, however, that whilst
you have several (one) calls on hold and one active line at the most.
2.8 How do I connect two subscribers to one another?
You are connected with two subscribers simultaneously. While you are talking to one
subscriber, the other subscriber is placed on hold, which means that he will hear music on hold.
You can now connect these two subscribers to each other.
Example:
You are talking to Subscriber A on Line 1. Line 2 has a connection on hold with
Subscriber B. You connect Subscriber A with Subscriber B. Then both of your lines are
free again (inactive).
Connecting
Subscribers
Telephoning with SwyxPhone2-4
This is how you connect two subscribers
1. Press the button “Call Transfer” (default: function key “Call Transfer”).
The subscribers are now connected to one another. Both lines become inactive.
If you have initiated the call on the active line, for example for an Inquiry Call, you can connect
these two lines by putting the handset on hook. If you were called on this line, this connection
will be terminated if you put the handset on hook. The line previously on hold will once again
be active.
When you directly connect subscribers, you may still incur costs, even if you are no longer
involved in their telephone call. This will only occur if you set up one or both of the
connections. If, for example, Subscriber A called you and you then called Subscriber B to
inquire about something, you will only incur telephone costs for the connection to Subscriber B.
No costs will be incurred if you are called by both Subscriber A and Subscriber B. However, if
you have called both subscribers, you will be charged for both connections.
Page 15

2.9 How do I transfer a call without using Inquiry Call?
Your SwyxPhone can be used to accept incoming calls and then to transfer these calls to another
subscriber, without waiting for the new subscriber to answer. This means you can connect two
subscribers even though there is not yet an active connection to one of the subscribers.
This is how you transfer a call without inquiry
You currently have a call (e.g. with Subscriber A) and the line is active.
Transferring a Call
Without Inquiry
1. Press a free Line button.
2. Now select the number of the subscriber, to whom you would like to transfer the call
(Subscriber B).
3. Then press the “Call Transfer” button or simply go on hook.
Subscriber A hears a ringing tone. The Line on which you initiated the second call will
become free and the first line will change its status from “Hold” to “Transferring”. Your
previous caller (Subscriber A) hears the telephone ring.
The call will be accepted directly by Subscriber B.
If the call is not accept within 20 seconds or if the call is redirected to Voicemail, the call
attempt will be terminated and the caller will be placed once again on “Hold”. He will hear
the usual music on hold.
4. You can activate the call again by pressing the Line button.
In case the caller to whom the call should be transferred is not available, please remember that
the call may be redirected with some delay. If the call is redirected to Voicemail, the call transfer
will automatically be interrupted, the caller is once again put on “Hold” and will hear the normal
music on hold.
2.10 How do I redirect a call?
You can redirect incoming calls
• to another telephone number (internal or external) or
• to your Standard Voicemail.
This is how you activate immediate redirection
1. Press the “Redirection” button on your SwyxPhone
Redirection:switch
on/off
The assigned LED glows/goes out. The redirection is activated resp. deactivated.
To configure the immediate redirection on your SwyxPhone L400 directly, please refer to
Chapter 3, Configuration of SwyxPhone L400, page 3-1.
For further information please refer to the SwyxIt! documentation.
How do I transfer a call without using Inquiry Call? 2-5
Page 16

2.11 Speaker
With SwyxPhone L400 you can activate the speaker so that people present in the room can
follow the telephone conversation.
For this, please configure a function key as a Speaker button. For further information please
refer to chapter 3, Configuration of SwyxPhone L400, page 3-1.
2.11.1 Activating the Speaker During a Call
Requirement: You are telephoning and using the handset.
Switch on the speaker by pressing the Speaker button. This will allow those present in the room
to listen to the call. If the speaker is active, this will be indicated by the red LED next to the
Speaker button. The call will continue to be held via the microphone in the handset.
2.11.2 Deactivating the Speaker During a Call
Requirement: You are making a call via the handset and the speaker is activated.
Switch off the speaker by pressing the Speaker button. You can now telephone as usual using
the handset. The LED for the Speaker button will go off.
2.11.3 Regulating the Volume
The “+/-“ buttons located next to the numeric keypad can be used to regulate the speaker
volume. These settings can also be made during a call. Please remember that the speaker must
be switched on to allow the adjustment of the speaker volume.
If you press the “+/-” buttons located next to the numeric keypad while the speaker is off, the
volume of the handset speaker will change.
2.12 Configuring the ringing tone
You can configure the ringing tone.
Requirement: You are called and your SwyxPhone L400 is ringing.
The “+/-“ buttons located next to the numeric keypad can be used to regulate the volume of the
ringing tone.
Telephoning with SwyxPhone2-6
Page 17

2.13 Further Functions
Using SwyxIt!, you can assign other functions to the function keys. For further information
about the configuration on the SwyxIt! please refer to Chapter 3.2, Configuration of SwyxPhone
in SwyxIt!, page 3-2.
You can use the following functions:
Function Explanation
Hold The line is put on hold
Hook on/off Hook on / off (e.g. for using a headset instead of a handset)
Incognito Suppress your number for the next call
Conference Starts a conference
Speaker Switches on or off the speaker or activates a line
Line button Represents an additional line (max. 9)
Swap call Switches between lines
Mute Switches on or off the microphone during a call
Speed dial Abbreviated dialing button
Callback Request Requests a Callback
Do not Disturb Redirection of all calls to the Standard Voicemail.
Disconnect Terminates the active connection
Pickup call Picks up a signaled call
Redirection Switches on or off the Immediate Redirection.
Call Transfer Connects the active line and a line on hold.
Voicemail LED glows, if a new Voicemail is available
Redial The number last dialed will be dialed again
Secondary call Enables or disables a second incoming call during a conversation.
Default setting: Two Lines on Button 1 and 2
Default setting: Two Speed Dials on Button 3 and 4
LED indicates, if the redirection is active
Default setting: Button 5
Default setting: Button 7
Press the button to start the Remote Inquiry.
Default setting: Button 6
Default setting: Button 8
Further Functions 2-7
Page 18

Telephoning with SwyxPhone2-8
Page 19

3 Configuration of SwyxPhone L400
In this chapter the configuration of the function keys of SwyxPhone L400 will be explained.
You can configure the Speed Dials and the function keys directly on SwyxPhone L400 or - more
comfortably - using SwyxIt!, which is logged on with the same user account.
Please note, that the configuration of the Line buttons and the Speed Dials are assigned to the
user account. So they are identical for all devices.
Example:
On your SwyxIt! you have the <Speed Dial1> assigned with the number "0555777888". In
this case the button on your SwyxPhone L400 or on SwyxPhone L420 assigned to the
<Speed Dial 1>, is also assigned to the same number. If you change the assigned number
on your SwyxPhone L400, the number in the user profile of SwyxIt! will be changed too.
3.1 Configuration on SwyxPhone L400 directly
You can define the numbers assigned to the Speed Dials or the Immediate Redirection on your
SwyxPhone L400 directly.
If you want to define your function keys different from the standard settings, please use a
SwyxIt!, which is logged on with the same user account or ask your administrator.
This is how you assign a Speed Dial to a number
1. Press the Speed Dial you want to configure for two seconds.
Speed Dial assign
The assigned LED begins to blink.
2. Enter the destination number you want.
3. Press the Speed Dial once again to save the number.
LED goes out. The number is saved.
Configure the
Immediate
Redirection
The property of the speed Dial "Dial immediately" or "Intercom" remains unchanged. This
setting you only can change usingSwyxIt!.
This is how you configure the Immediate Redirection
1. Press the Redirection button for two seconds.
The assigned LED begins to blink.
2. Enter the number to which all calls should be redirected.
3. Press the Redirection button once again to save the number.
LED goes out. The number is saved.
The Immediate Redirection on SwyxPhone L400 is switched on or off by pressing the
Redirection button. If the Immediate Redirection is activated, the assigned LED glows.
Configuration of SwyxPhone L400 3-1
Page 20

This is how you configure the Redirection to your Voicemail
To configure a Redirection to your Voicemail, the button Voicemail must be available on your
Immediate
Redirection to
Voicemail configure
SwyxPhone L400. This is like the standard configuration.
1. Press the Redirection button for two seconds.
The assigned LED begins to blink.
2. Press the “Voicemail” button.
LED goes out. The Redirection to the Standard Voicemail ist saved.
The Immediate Redirection on SwyxPhone L400 is switched on or off by pressing the Redirection
button. If the Immediate Redirection is activated, the assigned LED glows.
Voicemails are recorded Voice messages which are sent as an e-mail to you. For the
configuration of your Standard Voicemail please refer to the SwyxIt! documentation.
3.2 Configuration of SwyxPhone in SwyxIt!
SwyxIt! offers a comfortable configuration for the buttons of your SwyxPhone.
This is how you configure SwyxPhone on SwyxIt!
Requirement: SwyxIt! is logged on with the same user account as the SwyxPhone is logged on.
SwyxPhone
configured on SwyxIt!
1. Open in SwyxIt! under „Settings | User
profile...“ the tab „SwyxPhone“.
2. Select which kind of SwyxPhone you
want to configure.
Choose between the following phones:
• SwyxPhone L400
• SwyxPhone L420
• SwyxPhone L420-2
• SwyxPhone L440
• optiPoint 600
3. Click on "Configure...".
Configuration of SwyxPhone L4003-2
Page 21

4. The following window appears:
“Properties of ..." the selected
SwyxPhone.
You see an image of the selected device.
The buttons are displayed like they are
placed on the phone.
5. Click on a button to configure it.
The following window appears:
"Properties of..."
6. Select the type of this button.
Configuration of SwyxPhone in SwyxIt! 3-3
Page 22

Depending on the type of the key (here:
Line button) an additional tab appears.
Enter more parameters (e.g. the number)
directly.
7. Click on “OK” to confirm the parameters.
8. Select the next button of the phone and
handle it in the same way.
9. If you assigned all buttons you want, click
on "OK".
10. Click on "OK" to close the dialog
"Properties of ..." of the User Profile.
The new parameters are stored and they
are now available on your SwyxPhone.
Configuration of SwyxPhone L4003-4
Page 23

4 Remote control of your SwyxPhone orvia CTI-SwyxIt!
In this chapter you will find out how you can control your SwyxPhone L400 remotely using a
CTI-SwyxIt! on your PC. This means, you dial a number from your PC, but you make the call
using your telephone.
With the CTI functionality you can dial the person you wish to speak to from your PC, e.g. from
Outlook Contacts but the call will be carried out as usual on the telephone device. Even if
SwyxPhone is remotely controlled from another CTI-SwyxIt!, all telephony functions are
available to you at all times directly on SwyxPhone.
Please note that a user must also have a PIN in order to use SwyxPhone. Did you use only
SwyxIt! until now, please ask your administrator.
SwyxIt! can only remotely control a SwyxPhone or an additional SwyxIt! which is logged on as
same user on SwyxServer. To do this, the SwyxIt! used for operation sets into the CTI mode. If
only one other telephony terminal (SwyxIt! or SwyxPhone) is logged on under the same user to
SwyxServer, the link will take place automatically.
If you want to use a SwyxPhone L400 as your telephony device, please see that at this time
there is no other device logged in using your account. Only in this case a unique pairing
between SwyxIt! and SwyxPhone L400 is possible.
You are provided with the following options on the CTI-SwyxIt! for the remotely controlled
telephony client:
•Dial
You can dial from Outlook or from another application, via the Caller List or Redial List
and from the phonebooks. In this case, highlight the telephone number and click on the
handset (block dialing). Alternatively, you can click on the handset first (the line becomes
active) and enter individual digits on the PC.
• Telephony functions such as Hold, Call Swap, Transfer, Start Conference, Callback or
Callback on busy
• Settings
Button assignments (Speed Dials and Shortcuts), signaling (call and status signaling),
Redirections, Voicemail and Call Routing Manager or Skin (only for SwyxIt!), are
assigned to the user account and are therefore the same for the remotely controlled
telephone and the CTI SwyxIt!.
You can only pick up or end calls using a CTI SwyxIt! via the SwyxIt! interface per mouse
click. Picking up a handset which is connected to the CTI SwyxIt! will not result in the
activation of a line. If you lift the handset of the remotely controlled SwyxPhone or SwyxIt!,
this will activate the line.
Remote control of your SwyxPhone orvia CTI-SwyxIt! 4-1
Page 24

Configuring a CTI
SwyxIt!
With a CTI SwyxIt! you cannot use the following properties of the remotely controlled client:
• Conversation Recording
• Application Sharing
• The Speaker button and the microphone of the CTI SwyxIt! have no effect
This is how you configure the SwyxIt! as CTI SwyxIt!
1. Go to the menu bar and click on "Settings | CTI | Run as CTI SwyxIt!".
2. SwyxIt! will log off and then log on again as a CTI SwyxIt! on SwyxServer.
After logon, SwyxIt! searches for a telephony terminal that is logged on to this SwyxServer
under the same user account.
• If only one other terminal (SwyxIt! and SwyxPhone) is logged on, a pairing will be
created immediately.
• If there is more than one other terminal logged on, “Looking for controlled device” will
appear in the display. A message appears on all telephony devices (SwyxIt! and
SwyxPhone) to accept the remote control request. Accept this by clicking on “OK” on
SwyxIt! or select in the menu bar “Settings | CTI | Accept Pairing“ or by pressing the OK
button on SwyxPhone.
3. If a telephony device accepts the control request, the pairing will be started. You can now
carry out all functions for the remote controlled telephony devices on the CTI SwyxIt!.
4. You can terminate the CTI SwyxIt! search for a telephony device by selecting “Settings | CTI
| Cancel Pairing”.
If you want to use a SwyxPhone L400 as your telephony device, please see that at this time
there is no other device logged in using your account. Only in this case a unique pairing
between SwyxIt! and SwyxPhone L400 is possible.
For every Windows user account, only one SwyxIt! can be operated in CTI mode at the same
time. Please remember that a CTI SwyxIt! can not log on if there are not sufficient CTI licenses
on SwyxServer. Ask your system administrator should you have questions about this.
If a SwyxPhone is remotely controlled, there will only be as many available lines as offered on
the interface of the CTI SwyxIt!.
If during installation of SwyxIt! the CTI functionality is already activated, this will be valid for
all users who start on this PC SwyxIt!. Regardless of this, each user of this PC can use the “Run
as CTI SwyxIt!” checkbox to deactivate the CTI functionality.
Remote control of your SwyxPhone orvia CTI-SwyxIt!4-2
Page 25

Ending Remote
Control
Ending Remote
Control
Start remote control
again
This is how you end the remote control using CTI SwyxIt!
Requirement: SwyxIt! is in CTI mode, i.e. SwyxIt! operates another SwyxIt! or SwyxPhone
remotely.
1. Click in the menu bar of the CTI SwyxIt! on “Settings | CTI | Release Pairing”.
The connection between the CTI SwyxIt! and the remotely controlled SwyxIt! or SwyxPhone
is released. SwyxIt! remains in CTI mode.
This is how you end the remote control on the remotely controlled SwyxIt!
Requirement: SwyxIt! is remote controlled by another SwyxIt!
1. Click in the menu bar of the remote controlled SwyxIt! on “Settings | CTI | Cancel Pairing”.
The connection between the CTI SwyxIt! and the remote controlled SwyxIt! is cancelled.
The connection cannot be cancelled from a remote controlled SwyxPhone. In this case please
cancel the connection using the CTI SwyxIt!.
This is how you start the remote control using CTI SwyxIt! again
1. Go to the menu bar and click on “Settings | CTI | Start Pairing”.
SwyxIt! will once again search for a telephony device which is logged on to this SwyxServer
under the same user.
• If only one other terminal (SwyxIt! and SwyxPhone) is logged on, a pairing will be
created immediately.
• If there is more than one other terminal logged on, “Looking for controlled device” will
appear in the display. A message appears on all telephony devices (SwyxIt! and
SwyxPhone) to accept the remote control request. Accept this by clicking on “OK” on
SwyxIt! or select in the menu bar “Settings | CTI | Accept Pairing“ or by pressing the OK
button on SwyxPhone.
2. If a telephony device accepts the control request, the pairing will be started. You can now
carry out all functions for the remote controlled telephony device on the CTI SwyxIt!.
Remote control of your SwyxPhone orvia CTI-SwyxIt! 4-3
Page 26

Configuring ringing
Configuring the Ringing
If you use a CTI SwyxIt! to operate a SwyxPhone or another SwyxIt! remotely, you can indicate
which of these telephony clients will ring.
This is how you configure the ringing in CTI mode
1. Go to the menu bar and click on "Settings |
User Profile…".
The “Properties of…” page opens.
2. Select the “Ringing” tab.
3. You have several options:
• Only controlled device
In this case, only the controlled
SwyxPhone or SwyxIt! will ring.
• Only CTI SwyxIt!
Only the CTI SwyxIt! will ring. Here you
can vary the ringing accordingly within
SwyxIt!.
• Both devices
Both the CTI SwyxIt! and the controlled
SwyxPhone or SwyxIt! will ring.
Remote control of your SwyxPhone orvia CTI-SwyxIt!4-4
Page 27

App. A: Set It Up & Log On
This chapter provides information concerning the requirements and settings necessary for initial
operation of SwyxPhone L400.
A.1 Items Included in the Delivery
The following items are included in the package:
• SwyxPhone L400
• telephone handset and spiral cable
• network cable
• insertion cards and plastic covers for the programmable function keys
A.2 System Requirements
The following requirements must be fulfilled to be able to make phone calls with SwyxPhone
L400:
• Power supply (Mains Power Supply or Power over LAN)
• network with TCP/IP protocol
• operable 10/100 Base-T-Ethernet connection
• installed and operable SwyxServer
• SwyxWare account and PIN must be configured on the SwyxServer. (’Automatic logon’
must be activated for SwyxPhone L400.)
For the configuration of SwyxPhone L400 a configured DHCP server is mandatory.
You will find additional information in the SwyxWare documentation. The server will then
configure SwyxPhone L400 automatically.
A.3 Connect SwyxPhone L400
Optionally, the power supply for your SwyxPhone L400 can be provided over the LAN cable or
over a mains power supply.
Power Supply Over Mains Power Supply
A mains power supply for power supply can be delivered together with your SwyxPhone L400.
This device must be ordered additionally. A mains power supply can provide power to two
SwyxPhone L400 at the same time.
Power Supply Over LAN
If your networks supports power supply over the LAN (Power over LAN), you can supply
power to your SwyxPhone L400 even without a mains power supply.
Set It Up & Log On A-1
Page 28

Connect SwyxPhone
L420
This is how you connect SwyxPhone L400
Both ends of the handset cable are equipped with identical four-pole RJ-11 plugs.
1. Connect the handset cable (short straight end) to the telephone handset.
2. Plug the long end of the handset cable into the RJ-11 jack (3) on the underside of the
telephone.
3. Plug the LAN cable (RJ-45 plug) in the LAN jack (2) on the underside of the telephone and
then connect your SwyxPhone L400 to the Ethernet data network.
4. If necessary, plug the RJ-11 plug of the mains power supply into the jack for the power
supply (1). The mains power supply has two jacks which are equivalent. Please ignore the
labels. You can connect two SwyxPhone L400 to the power supply.
5. Place the handset cable in the provided guide groove on the underside of the telephone.
Fig. A-1 Back of the SwyxPhone L400
SwyxPhone L400 must be disconnected from the power supply each time you connect or
disconnect the cable!
Set It Up & Log OnA-2
Page 29

A.4 Logging on to SwyxServer
When you connect SwyxPhone L400 to the power supply, a restart will automatically be
initiated. The IP network configuration and the address of the PhoneManager are identified
during the start. This process may take several seconds in some cases.
Normally, for example after a power failure the SwyxPhone L400 will be logged on to
SwyxServer automatically. If you logged on for the first time or if your administratior has
deactivated the automatic logon, enter yout PIN and a '#' when all LEDs are blinking.
Always use the configuration via DHCP. The network settings cannot be displayed because
SwyxPhone L400 does not have a display. So you cannot change these settings. Therefore the
use of static IP addresses makes no sense.
In the SwyxWare-Administration please configure the 'Automatic Log on' for the SwyxPhone
L400. The user logged on cannot be displayed and it is not possible to log off the user. So the
sharing of the SwyxPhone L400 for several users makes no sense.
This is how you install SwyxPhone L400
Please note that for a successful assignment the automatic log on for the SwyxPhone must be
enabled and the field for the MAC address must be empty. Both are fullfilled creating a new
user using the configuration wizard.
1. Start the SwyxWare-Administration and open the tab "PhoneController" under the
Connect SwyxPhone
L400
properties of the server.
2. Configure the IP address range the IP address will be selected from (via DHCP) (e.g.
192.168.0.10-192.168.0.254 with PhoneManager address 192.168.0.2).
3. Start the automatic configuration of SwyxPhone (Scan).
4. Connect the Phones to the network and the power supply.
5. All LEDs of the SwyxPhone L400 light short and remain dark for zwei minutes. There are
two options for this:
• Alle LEDs turn on
This status should take 30 seconds. Otherwise check the settings of the
PhoneController and verify, if he is active.
• All LEDs are blinking.
You can now enter the PIN. Enter the PIN of the user account you will this phone assign
to. End your input with '#'.
SwyxPhone L400 is ready for operation. If the user has already installed a SwyxIt! on his PC, he
can now use the SwyxPhone L400 with CTI.
Logging on to SwyxServer A-3
Page 30

Set It Up & Log OnA-4
Page 31
App. B: Technical Details
In this section you will find the technical details of Your SwyxPhone.
B.1 Care Instructions
Use a slightly damp cloth, or even better, an anti-static cloth, to wipe off the case of your
SwyxPhone. Do not use any detergents or scouring agents.
Do not use a dry cloth because this may cause a static charge which could destroy the
electronics.
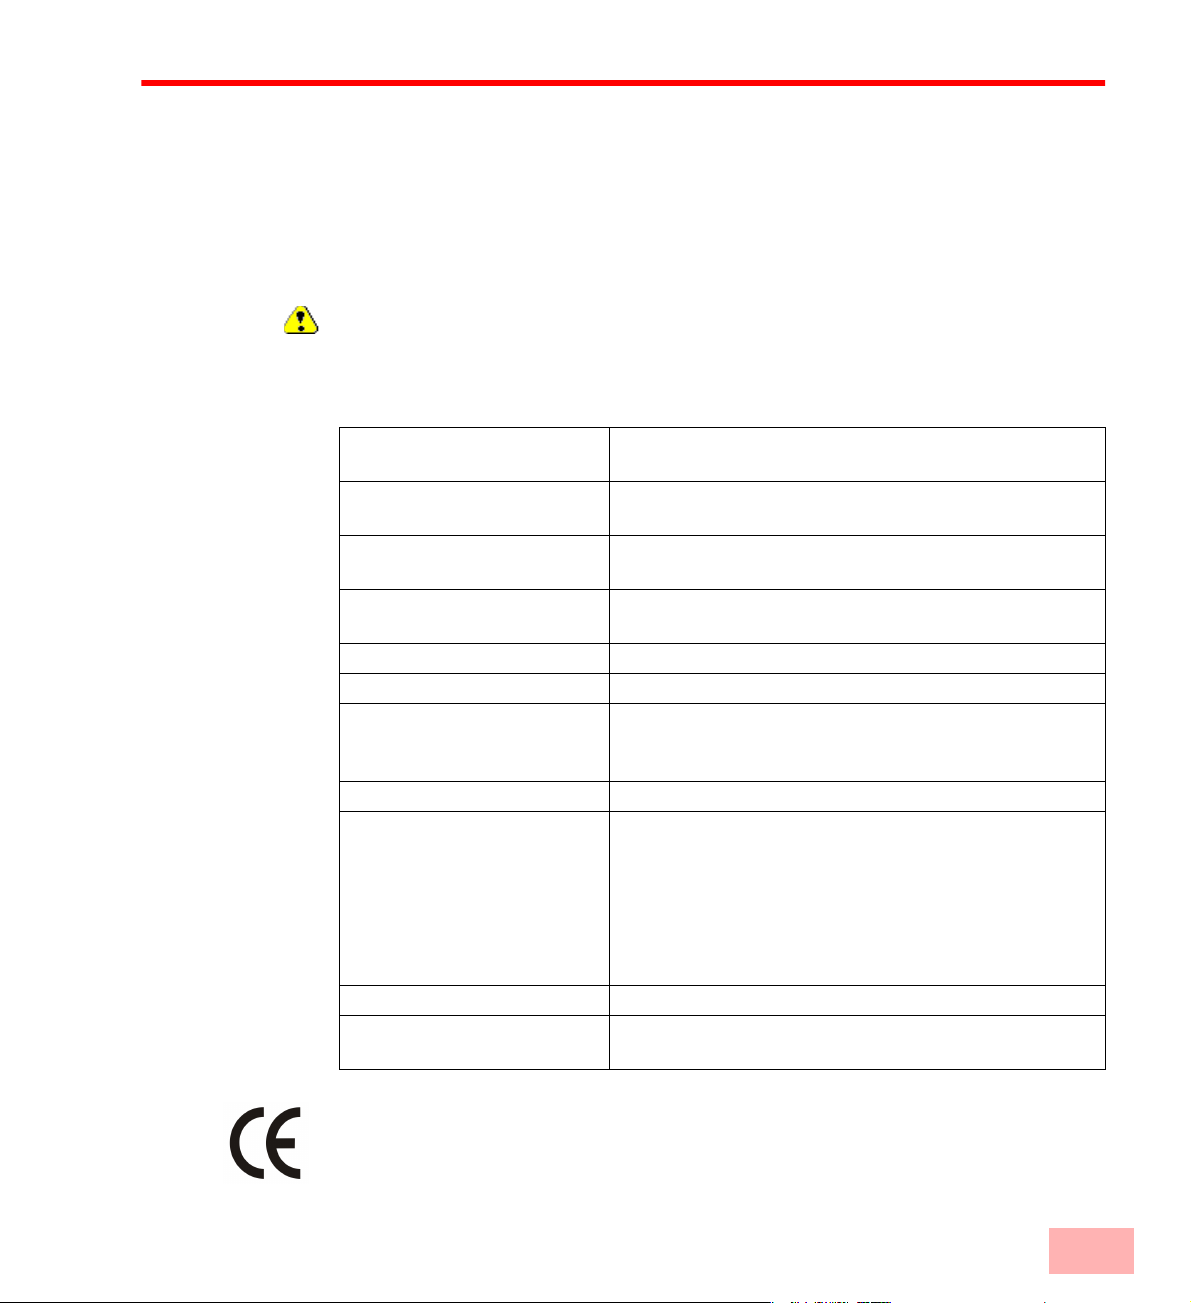
B.2 Technical Data SwyxPhone L400
Acceptable Environmental
Conditions for Operation:
Dimensions ( complete device
with handset, L * H * W):
Weight (complete device with
handset):
Connection Cable Length: Network Cable: 3m
Mains Power Supply - Input: 230v, 50Hz, 40W
Mains Power Supply - Output 2 x 36V, 480mA
Radio Interference Suppression: SwyxPhone L400 complied to EN55024 (Immunity) and
Voicemail Announcement Text: length: 10 seconds
Text: “Hello. The person you have called is not available at the
Message Length: maximum of 180 seconds.
Voicemail Memory: Limited by the size of your mailbox. 16 KB of memory are
+5°C to +40°C
220 mm x 64 mm x 160 mm
600g
Power Supply Cable: Mains Power Supply – Telephone: 3m
EN55022 Class B (Emission). It can be operated without
interference in living quarters.
moment. Please leave your message after the tone. Thank
you!”
This announcement is the standard announcement and can
be changed by the administrator or you can do it yourself
using SwyxIt!. For further information please refer to the
SwyxIt! documentation.
required for each recorded second.
The device conforms to the EU guideline 1999/5/EG, as attested by the CE mark.
Technical Details B-1
Page 32

B.2.1 Restore the factory settings
You can reset the SwyxPhone L400, to get the factory settings once again.
So you reset the settings of SwyxPhone L400
1. Disconnect the power cable; in case of Power over LAN disconnect the LAN cable.
Factory settings restore
2. Connect the cable once again.
3. Simply lift the handset.
4. Press simutaneously the digits „2“, „8“ and „9“ for one minute (!).
5. Afterwards enter the digits "124816" and confirm it with #.
6. Place the handset on the hook.
7. SwyxPhone L400 will reboot and after 2 minutes you will have the factory settings once
again.
Technical DetailsB-2
Page 33

Index
- A -
Abbreviated dialing button 1-2
Activating a call
2-2
- B -
Brief Description of the Buttons 1-1
Button
Numeric Keypad
1-1
- C -
Cable Length B-1
C
all
2
E
-2
xit
P
ickup call
Redirect All
transfer
Call Check
Exit
Pickup call
redirect
Redirect All
Call Redirection
Call Transfer
Call Transfer without Inquiry
Calling
Subscriber
Care Instructions
Connect
SwyxPhone
Connection
switch between
CorNet® protocol
4-1
CTI
configure
End
Ringing settings
2-2
4-3
2
-2
2-5
2-5
2-2
2-5
2-5
2-5
1-3, 2-4
2-1
B-1
A-2
4-2
2-5
2-4
1-ii
4-4
- H -
Handsfree Telephone 2-6
- I -
Inquiry Calls 2-3
Items Included in the Delivery
A-1
- L -
L1-L4 1-2
Line button
Log in
o
1-2
n SwyxServer
A
-3
- M -
Message length (maximum) B-1
- N -
Numeric Keypad 1-1
- P -
Phoning
with SwyxPhone
Power Input
2-1
B-1
- R -
Redial 1-3
2-5
redirect
2-5
All Calls
Call Check
Redirect Immediately
Redirection
Remote control of SwyxIt!
Remote control of SwyxPhone
Restore factory settings
2-5
2-5
1-2
4-1
4-1
B-2
SwyxPhone
care instructions
A-2
connect
figure
1-1
SwyxPhone L420
SwyxServer
log in
A-3
SwyxWare
System Requirements
B-1
1-ii
1-i
1-i
A-1
- T -
Technical Data B-1
Terminating a call
transfer
2-5
Call
2-2
- V -
Voicemail 1-3
Volume
Volume Regulation (Button)
1-3
“Send”.
Announcement Text
1-3
listen
record
1-3
Hook
2-6
Speaker
2-6
B-1
- W -
Weight B-1
1-1
- D -
Delivery settings restore B-2
Dimensions
B-1
- E -
Environmental Conditions for the Phone
B-1
- F -
Function Key
Configurable
1-2
- S -
Set Up A-1
Speaker
2-6
Speed dial
Subscriber
Swap call
switch
Swyx Family
SwyxIt!
1-2
call swap between
Call Transfer
2-1
Calling
2-4
2-4
2-4
between several connections
1-i
1-ii
2-4
Index 1-1
Page 34

Index1-2
 Loading...