

Page 1

SwyxConnect 1722
SwyxConnect 1723
SwyxConnect 1724
Documentation
SwyxWare Branch Office Solution
As of: September 2006
Page 2

© 2000-2006 Swyx. All rights reserved.
Legal Information
Whilst Swyx attempt to convey accurate and current information relative to the creation of
SwyxWare and this documentation, the information provided in this user guide may contain
typographical or technical errors.
This documentation, including all information contained herein is provided “as is”, without any
warranty of any kind, whether expressed or implied, including, but not restricted to, any implied
warranties of merchantability or fitness for a particular purpose or non-infringement.
Trademark: Swyx, SwyxIt!, the integration smiley and „Click. Phone. Smile.“ are registered
trademarks of Swyx. All other trademarks and product names are trademarks or registered
trademarks of the respective owners. Siemens and CorNet® are registered trademarks of
Siemens AG. This documentation is licensed for Swyx. Reproduction, adaptation, or translation
of this documentation without the express written consent of Swyx is prohibited and will be
prosecuted as a violation of intellectual property rights.
This product includes software developed by the OpenSSL Project for use in the OpenSSL
Toolkit http://www.openssl.org/
This product includes cryptographic software written by Eric Young (eay@cryptsoft.com
This product includes software developed by the NetBSD Foundation, Inc. and its contributors.
.
).
Swyx Solutions
Joseph-von-Fraunhofer-Str. 13a
D-44227 Dortmund
www.swyx.com
110436/0906
Page 3

Preface
Thank you for your confidence in us!
Swyx VoIP Routers provide the comprehensive functions of an access
router, professional firewall and high-quality VPN gateway and
WLAN access point in a single, compact device. They thus combine
investment protection and cost savings as a reliable voice over IP
solution for small and mid-sized enterprises, home and branch
offices.
Standard features of the different models are integrated interfaces for
ADSL and ISDN, and a LAN switch. SwyxConnect 1723
additionally provides interfaces for analog telephone systems.
In addition to data communications functions, VoIP support
transforms SwyxConnects into fully fledged, integrated VoIP
communications solutions. Along with Quality of Service functions
which are optimized for VoIP, the Swyx VoIP Routers offer the full
range of options required for voice communications over data
networks and the step-by-step, cost-effective and simple migration
from existing telecommunications systems to corporate Voice over IP.
The particular characteristics of Swyx VoIP Routers include, among
others:
• SIP proxy for registration with providers and upstream VoIP
PBXs
• SIP trunking for multiple parallel lines with extension numbers
over a single account with a switchboard number.
• SIP gateway with transparent transition between SIP and
ISDN/analog telephony
• SIP remote gateway provides local SIP, ISDN or analog lines to
remote IP-PBXs.
• Intelligent call routing and number translation
• Support of point-to-point and point-to-multipoint connections
• Multiple configurable ISDN interfaces (NT/TE), some with lifeline support and power relay to the internal ISDN bus
Information about your model's functionality in detail is available
from the table 'Just what can your Swyx VoIP Router do?'.
SwyxConnect products undergo continuous development. For precise
information about their features and for the latest version of the
LCOS operating system, please visit the SwyxConnect website.
III
Page 4

Model restriction
Model variants
This documentation is to be used for different models:
• SwyxConnect 1722
• SwyxConnect 1723
• SwyxConnect 1724
The sections of the documentation that refer only to a range of
models are marked either in the corresponding text itself or with
appropriate comments placed beside the text.
In the other parts of the documentation, all described models have
been classified under the general term Swyx VoIP Router.
Security settings
To maximize the security available from your product, we
recommend that you undertake all of the security settings (e.g.
firewall, encryption, access protection, charge limits) that were not
already activated when you purchased the product. The LANconfig
Wizard 'Security Settings' will help you with this task. Further
information is also available in the chapter 'Security settings'.
We would additionally like to ask you to refer to our Internet site
www.swyx.com for the latest information about your product and
technical developments, and also to download our latest software
versions.
IV
User manual and reference manual
The documentation of your device consists of three parts: The
installation guide, the user manual and the reference manual.
You are now reading the user manual. It contains all information you
need to put your device into operation. It also contains all of the
important technical specifications.
The reference manual can be found on the LANCOM product CD as
an Acrobat (PDF) document. It is designed as a supplement to the
user manual and goes into detail on topics that apply to a variety of
models. These include, for example:
• The system design of the operating system LCOS
• Configuration
• Management
• Diagnosis
• Security
Page 5

• Routing and WAN functions
• Firewall
• Quality of Service (QoS)
• Virtual Private Networks (VPN)
• Virtual Local Networks (VLAN)
• Voice communication in computer networks with Voice over IP
(VoIP)
• Backup solutions
• Further server services (DHCP, DNS, charge management)
This documentation was created by …
... several members of our staff from a variety of departments in order
to ensure you the best possible support when using your
SwyxConnect
In case you encounter any errors, or just want to issue critics
enhancements, please do not hesitate to send an email directly to:
info@swyx.de
Our online services www.swyx.com are available to you around the
clock should you have any queries regarding the topics discussed in
this manual or require any further support. The area 'Support' will
help you with many answers to frequently asked questions (FAQs).
Furthermore, the knowledgebase offers you a large reserve of
information. The latest drivers, firmware, utilities and documentation
are constantly available for download.
In addition, SwyxConnect support is available. For telephone
numbers and contact addresses of SwyxConnect support, please see
the enclosed leaflet or the Swyx website.
product.
Information symbols
Very important instructions. Failure to observe this
may result in damage.
Additional information that may be helpful but
which is not required.
V
Page 6

Contents
Introduction 1-1
How do ADSL and ADSL 2+ work? ........................... 1-1
What does VPN offer? ............................................... 1-3
Firewall....................................................................... 1-4
Voice over IP.............................................................. 1-5
Example Applications ..........................................................1-5
The central position of the Swyx VoIP Router ................... 1-10
VoIP characteristics of the Swyx VoIP Routers................. 1-13
Just what can your Swyx VoIP Router do? .............. 1-15
Installation 2-1
Package content ........................................................ 2-1
System requirements ................................................. 2-2
Introducing the SwyxConnect .................................... 2-2
Status displays .................................................................... 2-2
Device connectors ............................................................... 2-7
Hardware installation.................................................. 2-9
Configuring the ISDN and analog interfaces............ 2-11
ISDN interface in NT or TE mode...................................... 2-11
Bus termination, life-line support and power supply .......... 2-12
Protocol setting.................................................................. 2-14
ISDN connection timing ..................................................... 2-15
Software installation ................................................. 2-16
Starting Software Setup..................................................... 2-17
Which software should I install? ........................................2-17
VI
Configuring the VoIP functions 3-1
LANconfig Wizards..................................................... 3-1
Configuration examples ............................................. 3-2
Using VoIP telephony as an extension to an analog PBX... 3-2
Using VoIP telephony to complement the ISDN PBX.......... 3-8
VoIP telephony with extension numbers (SIP trunking) .... 3-14
Configuring the VoIP terminal equipment ................ 3-19
Setting up the VoIP client to register itself with the
Swyx VoIP Router................................................. 3-19
Setting up the VoIP client to register at a PBX .................. 3-20
Setting up the VoIP telephone to register itself with the
Swyx VoIP Router................................................. 3-22
Page 7

Basic configuration 4-1
Which information is necessary? ............................... 4-1
TCP/IP settings ................................................................... 4-1
Configuration protection ...................................................... 4-3
Settings for the DSL connection.......................................... 4-3
Connect charge protection .................................................. 4-3
Instructions for LANconfig .......................................... 4-4
Instructions for WEBconfig......................................... 4-5
TCP/IP settings to workstation PCs ........................... 4-9
Setting up Internet access 5-1
Instructions for LANconfig .......................................... 5-2
Instructions for WEBconfig......................................... 5-2
Linking two networks 6-1
What information is necessary? ................................. 6-2
General information............................................................. 6-2
Settings for the TCP/IP router ............................................. 6-4
Settings for the IPX router................................................... 6-6
Settings for NetBIOS routing............................................... 6-7
Instructions for LANconfig .......................................... 6-7
Instructions for WEBconfig......................................... 6-8
Providing dial-in access 7-1
Which information is required? .................................. 7-1
General information............................................................. 7-2
Settings for TCP/IP ............................................................. 7-3
Settings for IPX ................................................................... 7-4
Settings for NetBIOS routing............................................... 7-4
Settings for the dial-in computer ................................ 7-5
Dial-up via VPN................................................................... 7-5
Dial-up via ISDN.................................................................. 7-5
Instructions for LANconfig .......................................... 7-5
Instructions for WEBconfig......................................... 7-6
Security settings 8-1
The security settings wizard....................................... 8-1
Wizard for LANconfig .......................................................... 8-1
Wizard for WEBconfig ......................................................... 8-2
VII
Page 8

The firewall wizard .....................................................8-2
Wizard for LANconfig........................................................... 8-3
Configuration under WEBconfig .......................................... 8-3
The security checklist.................................................8-3
Troubleshooting 9-1
No DSL connection is established ............................. 9-1
DSL data transfer is slow ........................................... 9-1
Unwanted connections under Windows XP ............... 9-2
Appendix 10-1
Performance data and specifications ............... 10-1
Contact assignment ................................................. 10-2
ADSL interface .................................................................. 10-2
ISDN interface ⌧ .............................................................. 10-3
ISDN interface .............................................................. 10-3
ISDN/Analog interface ⌧ .................................................. 10-3
Analog interface ............................................................ 10-4
Ethernet interface 10/100Base-TX .................................... 10-4
Configuration interface (Outband) .....................................10-5
Declaration of conformity ......................................... 10-5
VIII
Page 9

1 Introduction
Swyx VoIP Routers are fully functional routers with an integrated
firewall to provide local networks with secure access to the Internet.
With the VPN option included, these devices work as powerful
Dynamic VPN gateways for external locations or mobile users.
Along with the ADSL connection, these devices also feature ISDN
connections, and some feature analog telephone connections. An
ISDN line can be used to backup the WAN connection, for remote
management of the router, as a basis for office communications via
LANCAPI, and for establishing Dynamic VPN connections to
external locations that use dynamic IP addresses.
By using the Voice over IP function, these devices can transfer voice
data over broadband Internet as well as over ISDN and analog
telephone connections.
1.1 How do ADSL and ADSL 2+ work?
ADSL (Asymmetric Digital Subscriber Line) is currently the most
common technology for broadband Internet connections. Standard
and almost ubiquitous telephone lines (analog or DSL) are the basis
for DSL data transfer to the nearest telephone exchange. From here,
the data is passed directly on to the Internet over high-speed
connections.
The asymmetric DSL variant ADSL was developed for applications
where users receive large amounts of data but transmit only small
amounts, such as when surfing in the WWW. ADSL subscribers can
receive data at up to 8 Mbps ("downstream") and transmit at up to
800 kbps ("upstream"). ADSL providers are able to reduce these
maximum rates as they please.
To satisfy the strongly increasing demand for higher bandwidths, the
standards ADSL
for applications such as video streaming or high-definition TV
(HDTV) over the Internet. Depending on the Internet provider,
ADSL
2 devices support downstream data rates of up to 12 Mbps,
and ADSL
during connection establishment ensure that the standards ADSL,
ADSL
2 and ADSL 2+ are intercompatible.
Parallel to data transfer, ADSL also provides full and unlimited
support for the classic applications in telephony (telephone, fax,
2 and ADSL 2+ provider higher data rates as a basis
2+ devices support up to 24 Mbps. Handshake routines
Introduction 1-1
Page 10
answering machine, PBX). This is facilitated by splitters which
separate the voice frequencies from the data frequencies.
The Swyx VoIP Router features an integrated modem for
ADSL/ADSL
2+. It can be directly connected to the splitter with the
supplied cable.
Internet
PSTN
Switching
nodes
DSLAM
ADSL prover
Splitter
Router with integrated
Splitter
ADSL modem
Telephone
Subscribers
ADSL can operate over both ISDN- and analog telephone lines
(POTS – Plain Old Telephone Service). Devices with an integrated
modem are supplied in two versions. Information about the supported
telephone system is to be found on the type designation on the
underside of the device. The device name is marked on the label
along with a suffix which indicates the supported telephone system:
Suffix
Supported telephone system
'Annex A' ADSL-over-POTS
'Annex A' ADSL-over-ISDN
Annex A-type devices are exclusively to be operated at ADSL-overPOTS connections. Annex B-type devices are exclusively to be
operated at ADSL-over-ISDN connections. Your network operator
will be able to inform you of the version you need. These devices
cannot be altered or upgraded to a system other than that for which it
is equipped.
There are even ADSL-over-ISDN connections which are not
combined with an ISDN connection, but with a standard analog
telephone connection instead. In Germany, for instance, all T-DSL
connections from Deutsche Telekom AG are implemented as ADSLover-ISDN connections.
1-2 How do ADSL and ADSL 2+ work?
Page 11

1.2 What does VPN offer?
A VPN (Virtual Private Network) can be used to set up secure data
communications over the Internet.
The following structure results when using the Internet instead of
direct connections:
Headquar-
LAN
LAN
Branch office
Internet
Computers using remote access
All participants have fixed or dial-up connections to the Internet.
Expensive dedicated lines are no longer needed.
1. All that is required is the Internet connection of the LAN in the
headquarters. Special switching devices or routers for dedicated
lines to individual participants are superfluous.
2. The subsidiary also has its own connection to the Internet.
3. The RAS PCs connect to the headquarters LAN via the Internet.
The Internet is available virtually everywhere and typically has low
access costs. Significant savings can thus be achieved in relation to
switched or dedicated connections, especially over long distances.
The physical connection no longer exists directly between two
participants; instead, the participants rely on their connection to the
Internet. The access technology used is not relevant in this case:
Broadband technology such as DSL (Digital Subscriber Line) is
ideal. A conventional ISDN line can be used, too.
The technologies of the individual participants do not have to be
compatible to one another, as would be the case for conventional
What does VPN offer? 1-3
Page 12
direct connections. A single Internet access can be used to establish
multiple simultaneous logical connections to a variety of remote
stations.
The resulting savings and high flexibility makes the Internet (or any
other IP network) an outstanding backbone for a corporate network.
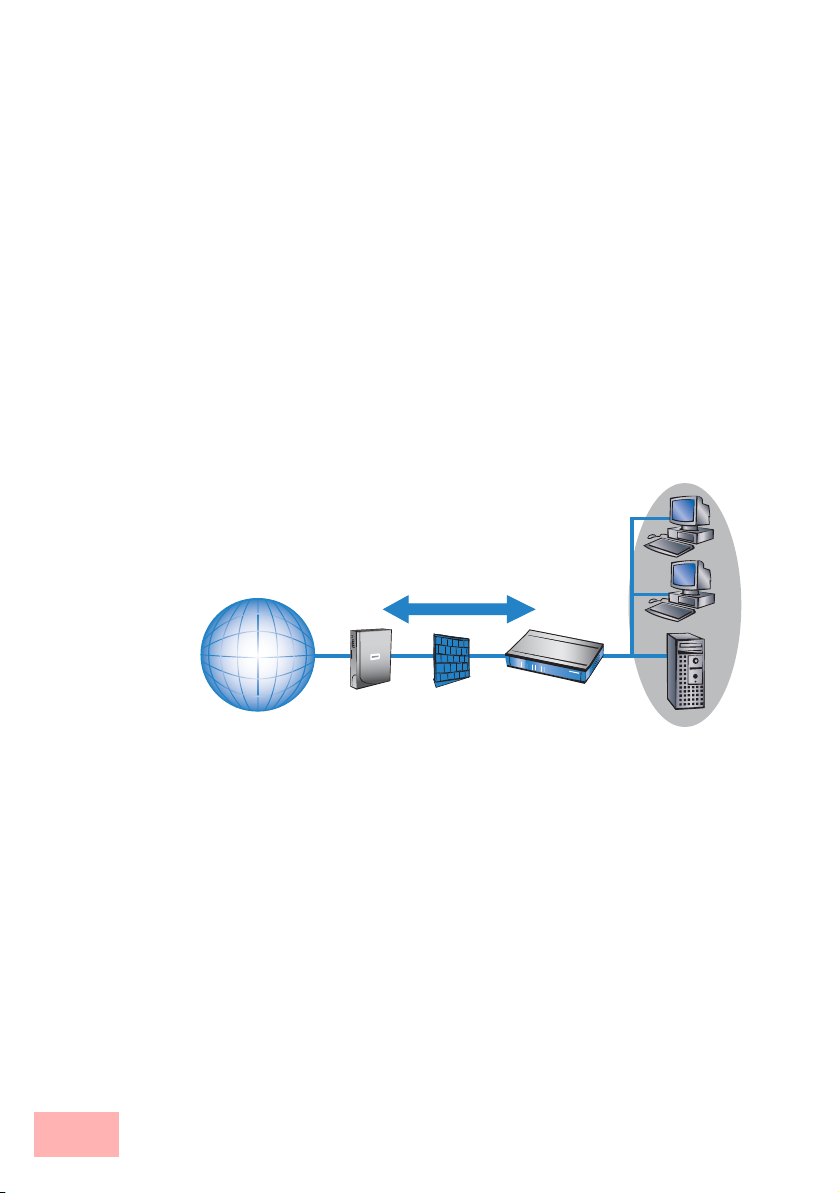
1.3 Firewall
The integrated stateful-inspection firewall is an effective barrier to
unwanted data traffic as it only permits the entry of data as a response
to outgoing data traffic. The IP masquerading function in the router
conceals LAN workstations accessing the Internet behind a single
public IP address. The true identities (IP addresses) of the individual
workstations remain masked. Router firewall filters allow the
blocking of individual IP addresses, protocols and ports. MAC
address filters also offer effective control over the access of LAN
workstations to the IP routing functions in the device.
LAN
Internet
1-4 Firewall
Firewall
SwyxConnect
Further important features in the firewall are:
• Intrusion detection
Attempts to break in to the local network or central firewall are
recognized, repelled and recorded by the Intrusion Detection
System (IDS) in the SwyxConnect. There is a choice of alarms
including in-device logging, e-mail messaging, SNMP traps or
SYSLOG alarms.
• Denial-of-Service protection
In addition to conventional break-ins, attacks from the Internet
may aim to block the availability of individual services. For this
reason, the SwyxConnect router is equipped with appropriate
security mechanisms to recognize popular hacker attacks and
guarantee router functionality.
Page 13

• Quality of Service/traffic management
The term Quality of Service (QoS) embraces a range of functions in your SwyxConnect. QoS functions consider the powerful classification methods used by firewalls (e.g. restriction to
subnets, individual workstations or certain services). These
enable Quality of Service to be very precisely controlled.
By guaranteeing a minimum bandwidth, precedence can be assigned to enterprise-critical applications, VoIP telephony or certain user groups.
Details about the functions of the SwyxConnect stateful-inspection
firewall are available in the reference manual.
1.4 Voice over IP
The term Voice over IP (VoIP) refers to voice communications over
computer networks based on the Internet protocol (IP). The core idea
is to provide the functions of traditional telephony via cost-effective
and wide-spread networking structures such as the Internet. VoIP
itself is not a standard, rather it is a collective term for the various
technologies (equipment, protocols, voice encoding, etc.) which
make voice communications in IP networks possible.
1.4.1 Example Applications
Voice over IP solutions offers advantages across a broad spectrum of
applications, starting with small companies and extending to large
corporations with extensive networks of subsidiaries. In the following
section, we will demonstrate a number of examples.
Detailed information about configuration is available in the chapter
'Configuration of VoIP functions' or in the LCOS reference manual.
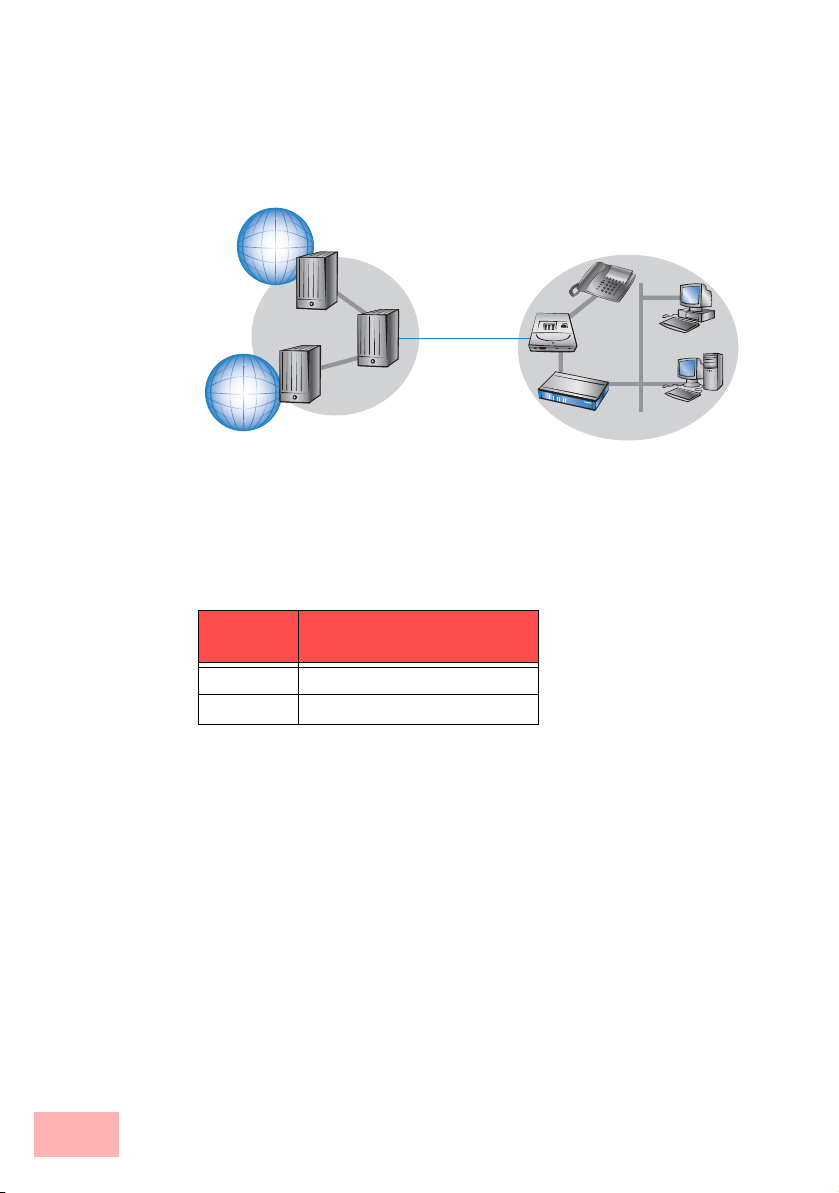
1.4.1.1 Supplementing existing PBXs
VoIP functions can be conveniently added in to existing telephone
structures by using a Swyx VoIP Router. The Swyx VoIP Router is
simply connected between the public exchange line (e.g. ISDN
NTBA or analog telephone line) and the PBX.
Voice over IP 1-5
Page 14
Example: ISDN PBX
VoIP telephoneVoIP softphone
Public SIP provider
Internet
Analog fax
machines and
telephones
ISDN PBX
ISDN telephones
Swyx VoIP Router between NTBA and PBX
ISDN NTBA
PSTN
ISDN network subscribers
Telephone calls over the PBX and the telephones connected to it
remain possible just as before; the telephones remain available under
the familiar telephone numbers. This application additionally offers
the following options:
• In addition to the ISDN and analog telephones, VoIP telephones
or VoIP softphones can be included in the telephone
infrastructure.
• VoIP subscribers in the internal LAN are also able to call
external PSTN subscribers.
• The ISDN and analog telephones continue to function, and
additionally they can call all of the internal VoIP telephones
and softphones in the LAN.
• Calls to external SIP subscribers who use the same Internet
provider are often available at no cost.
• With the appropriate connection to a public SIP provider, any
other SIP subscriber worldwide can be called, irrespective of the
provider network. As an alternative to a direct telephone
connection, public telephone network subscribers can also be
reached over a diversion via the SIP provider. The costs depend
on the provider's particular tariff models. Frequently, longdistance and overseas calls via an SIP provider are significantly
cheaper than the traditional telephone connection.
In this constellation, the Swyx VoIP Router takes over the switching
of the calls. The device can be individually configured, for example,
1-6 Voice over IP
Page 15
to use the access codes to decide upon the switching of a call either
via the ISDN interface, or via the Internet as a VoIP call.
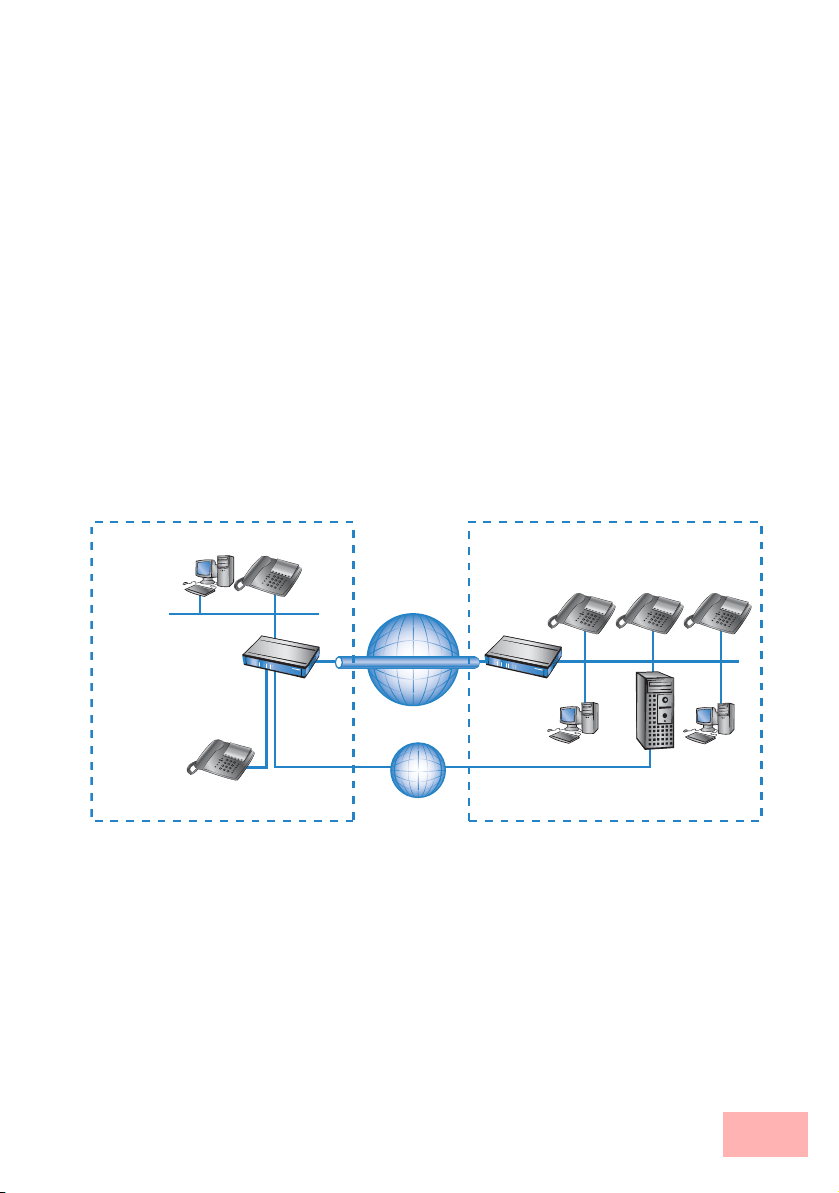
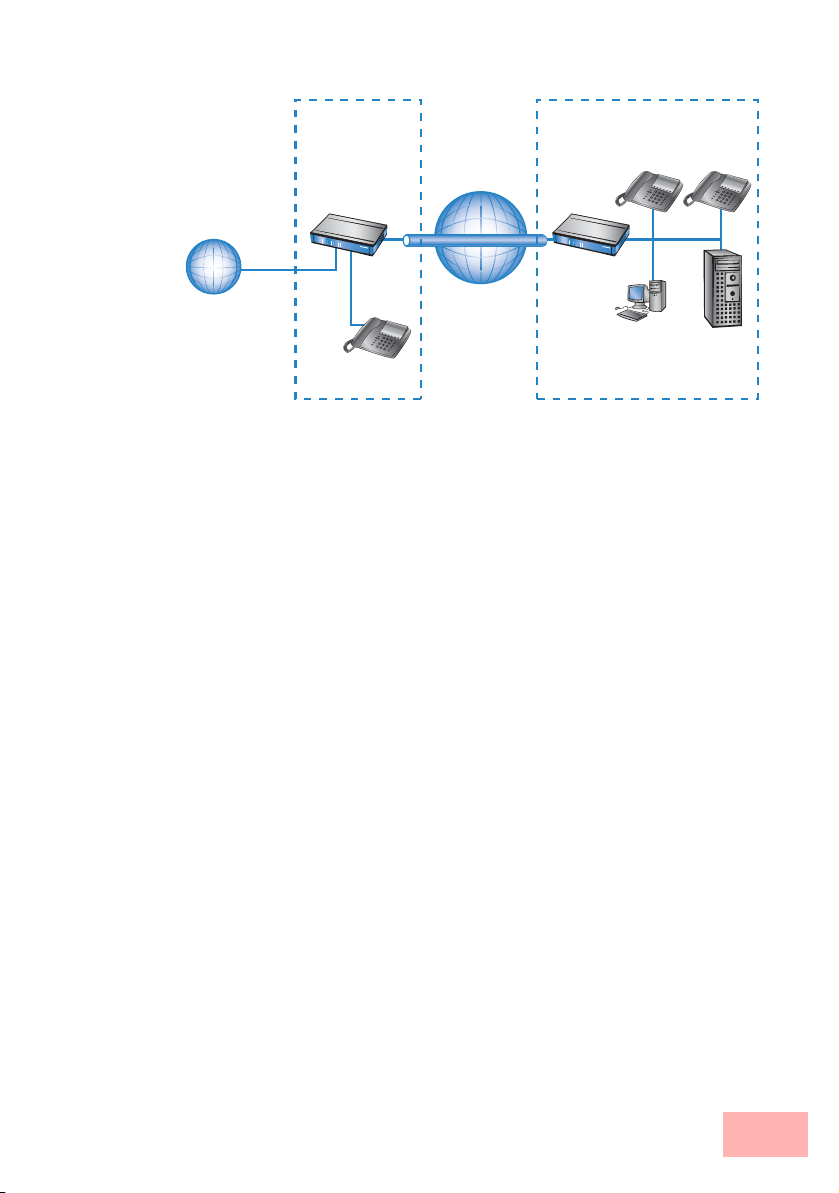
1.4.1.2 Connecting subsidiaries or home offices to the headquarters
Many subsidiaries or home offices already have a connection to the
network at headquarters over VPN. These connections are normally
limited to conventional data transmission. By using VoIP, internal
company calls can be made for free over the existing VPN connection
and—
thanks to the VPN encryption —these calls are secured against
eavesdropping.
With a Swyx VoIP Router located in the branch or home office, the
two worlds of traditional (ISDN and analog) and VoIP telephony can
be united in a single telephone: A VoIP telephone or an existing
analog or ISDN telephone can be used for free telephone calls via
VPN to the headquarters, or to make standard calls via the
conventional telephone network.
Example: Branch office with analog telephone connection, headquarters with VoIP-capable PBX
VoIP telephone
VoIP telephones
Swyx VoIP Router
Analog tele-
Branch office Headquarters
Internet
VPN tunnel
SwyxConnect
PSTN
The advantages of a telephone connection to headquarters:
• The configuration of telephone functions can be carried out
centrally in the VoIP PBX at headquarters.
• Subscribers at their branch or home offices connect with the
central PBX.
• Calls within the company network are free.
• Outgoing calls are automatically directed to the optimal line for
cost optimization.
VoIP PBX connected to
the ISDN network
Voice over IP 1-7
Page 16

1.4.1.3 VoIP for companies through SIP trunking
One of the biggest hurdles for companies that fully migrate to VoIP is
to maintain the existing telephone numbers. Normal provider SIP
accounts come with a telephone number for the transition to the
landline telephone network, but generally these numbers are selected
from a pool of numbers available to the provider. However, for
companies with a large number of telephone subscribers and
numbers, it is of decisive importance that existing telephone and
extension numbers are maintained after migrating to VoIP.
With the SIP trunking function, entire ranges of telephone numbers
made up of external numbers and their associated extensions can be
mapped by Swyx VoIP Routers over a single connection to a SIP
provider, assuming that the provider also supports Direct Dialing In
(DDI) and can provide multiple connections simultaneously.
Generally speaking, SIP providers that offer SIP trunking can acquire
the existing telephone numbers from the former telecomms provider.
1.4.1.4 Connecting local exchange lines with a remote SIP gateway
Companies with nation-wide and internationally distributed sites are
often interconnected with VPN already. A Swyx VoIP Router can be
used not only to connect the SIP, ISDN and analog telephones at a
branch office to the SIP-PBX at headquarters; it can also integrate the
branch office's local telephone lines into corporate communications
with help of the "SIP Remote Gateway" function.
The SIP remote gateway is active for outgoing and incoming calls.
• A company headquarters in New York can, for example, use a
Swyx VoIP Router with SIP gateway located at the Los Angeles
branch office to telephone with customers and suppliers located
in Los Angeles at local rates ("local break-out").
• For improved availability to customers located abroad, the New
York headquarters can, for example, use a Swyx VoIP Router
with SIP remote gateway located at their sales office in Italy.
Customers can then reach support or service numbers via a
standard national telephone number. Calls over the local
exchange line are received and directed within the company
network to the responsible employee. Call routing can be used
which identifies the customer's calling number and
automatically selects the appropriate connection to be used for
forwarding the call.
1-8 Voice over IP
Page 17
Swyx VoIP
Local telephone network
Router
Branch office Headquarters
Internet
VPN tunnel
Advantages of the SIP remote gateway:
• The local telephone connection at any site is available for use by
any of the offices throughout the entire company.
• National and international long-distance calls can be mapped to
local or regional calls, so saving costs.
• Automatic routing of incoming calls to the responsible
employee.
1.4.1.5 Connecting sites without a SIP PBX
Companies with widely disperse offices and without their own SIP
PBX can also take advantage of VoIP site coupling. In this "Peer-toPeer" scenario, a Swyx VoIP Router has been implemented at both
locations.
VoIP telephones
SwyxConnect
VoIP PBX
Along with data transfer via VPN, it is also possible to use VoIP
functions between the two locations.
The advantages of peer-to-peer site coupling
• ISDN and analog PBXs at different locations can form a
common internal telephone network.
• An SIP PBX is not necessary.
• Calls within the company network are at no charge.
• Outgoing calls are automatically directed to the optimal line for
cost optimization.
• Incoming calls can be switched directly to the appropriate
employee at a different location.
Voice over IP 1-9
Page 18
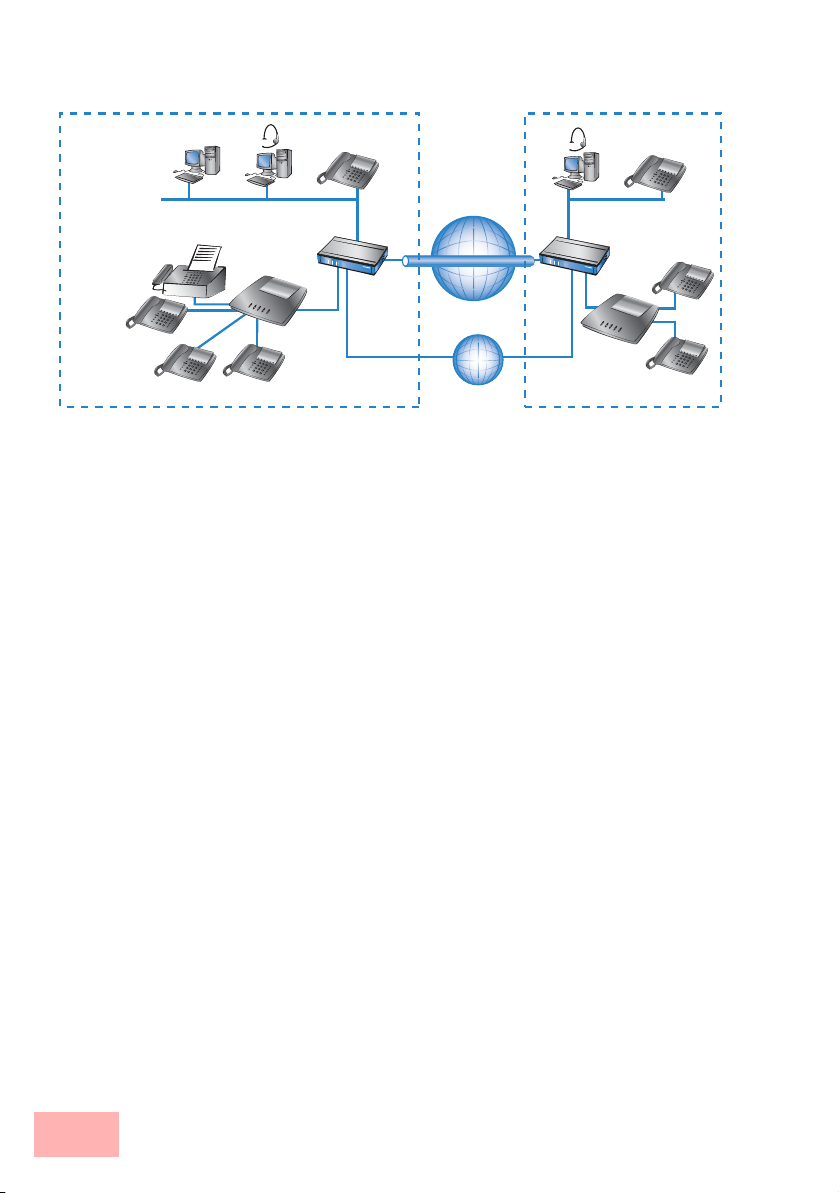
Example: Sites with ISDN or analog lines
VoIP subscribers
Analog fax
machines and
telephones
Swyx VoIP Router
ISDN PBX
ISDN telephones
Internet
VPN tunnel
PSTN
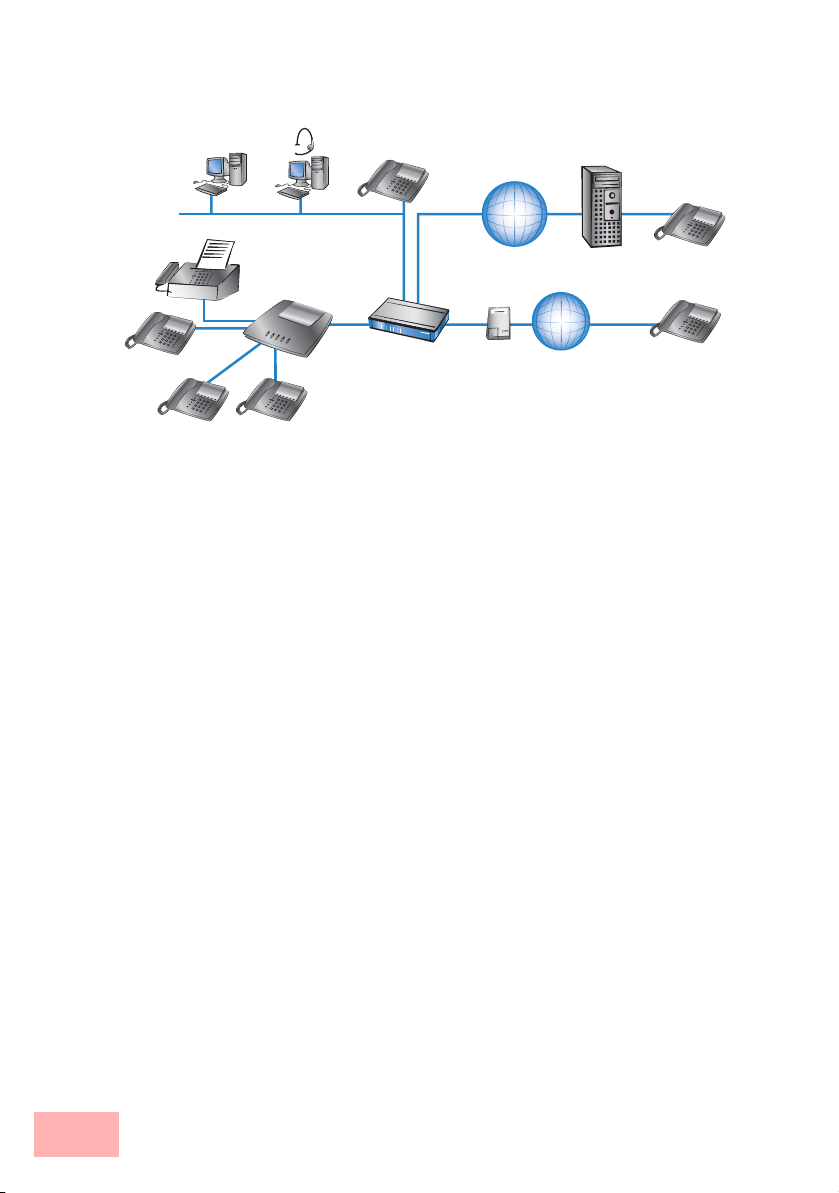
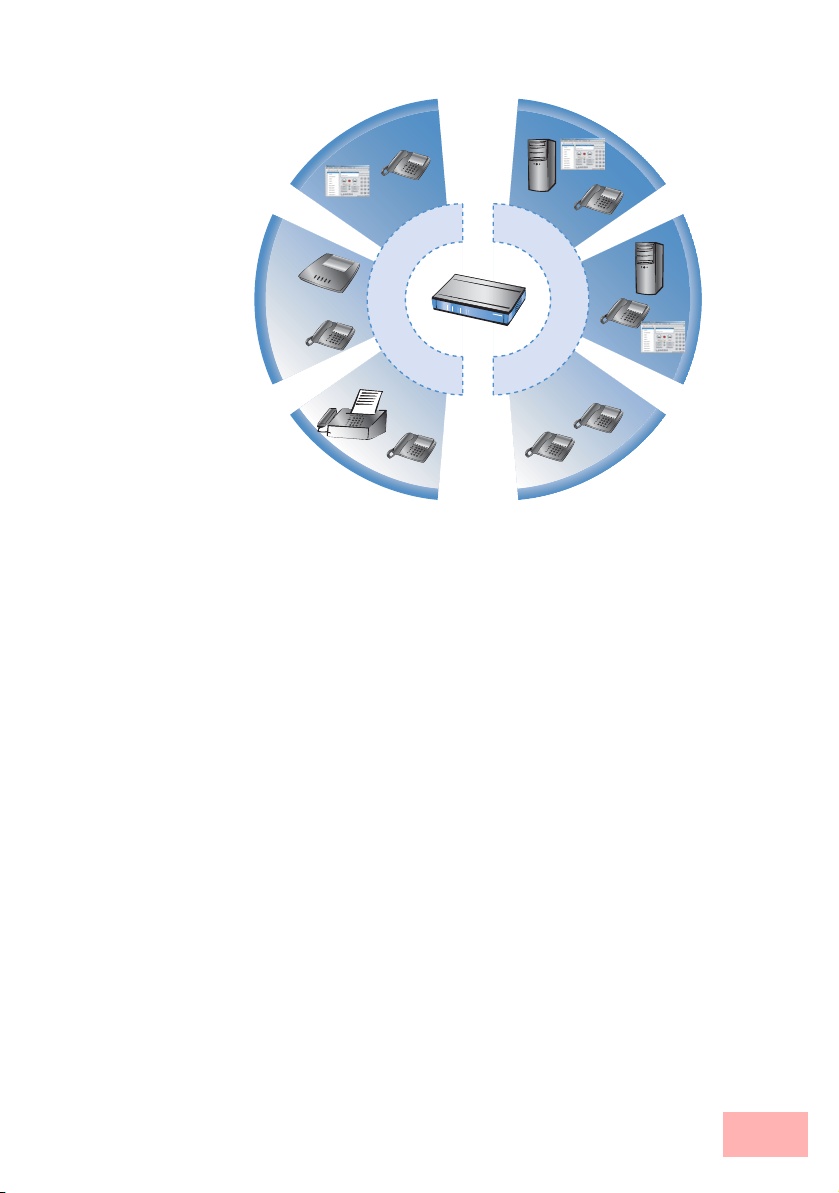
1.4.2 The central position of the Swyx VoIP Router
Swyx VoIP Router take up a central position in the switching of
telephone calls between internal and external subscribers over the
different channels of communication. Depending on the model and
equipment, the devices interconnect the following communication
participants and channels into a common telephone infrastructure.
1. Internal VoIP terminal devices connected to LAN, WLAN and
DMZ, such as SIP telephones and SIP softphones
2. The internal telephone infrastructure with ISDN or analog PBX
and ISDN and analog telephones
3. Analog terminal devices, internally connected either into the
ISDN network via a PBX with a/b ports, or alternatively into the
VoIP network over an ATA (Analog Telephone Adapter)
4. External SIP providers and all of the external subscribers attainable via them
5. Upstream SIP PBXs with all of the internal and external subscribers attainable through it
6. The external telephone world via an exchange line or upstream
PBX, and all of the external subscribers available via the land-line
network
VoIP subscribers
Swyx VoIP Router
Analog
telephones
Analog PBX
1-10 Voice over IP
Page 19
S
I
r
e
s
u
P
I
S
s
N
r
e
D
s
S
I
u
a
n
u
a
s
l
o
e
g
r
e
s
P
p
r
o
v
i
d
e
r
S
I
P
P
B
X
k
r
o
w
t
e
n
N
D
S
I
1.4.2.1 Users and lines
Telephony subscribers in internal areas can take part in voice
communications and, in the SwyxConnect VoIP environment, are
referred to as "users". The SwyxConnect differentiates between:
• ISDN users
A maximum of 40 terminal devices connected over the ISDN
network, including ISDN and analog devices connected to an
upstream ISDN PBX.
When connecting downstream PBXs to point-to-point lines, the
number of possible ISDN subscribers is determined by the
length of the extension number (DDI). In this case, all of the
telephones and terminal equipment connected to the PBX can be
mapped with a single ISDN user entry.
• Analog users
Two devices connected to the analog interfaces
• SIP users
A maximum of 32 SIP terminal devices connected over LAN,
WLAN and DMZ and analog devices connected with an ATA.
The external paths of communication available to the users are
known as "lines". The SwyxConnect differentiates between the
following lines:
Voice over IP 1-11
Page 20

•ISDN
A connection to an ISDN NTBA over the TE interface. The NT
interface can additionally be used to connect ISDN terminal
devices directly or via a downstream ISDN PBX.
•Analog
A connection to an analog exchange line or to an extension line
of an upstream analog PBX.
• SIP lines
Maximum 16 SIP lines There are three different types of SIP
line:
• A "Single account" line acts like a normal SIP account with a
single telephone number. The internal users can all make use
this account for making SIP calls, although only one call can
be conducted at a time.
Depending on the provider services, these lines can be used to
reach subscribers in the provider networks, subscribers in other
SIP networks (partner networks), or even land-line subscribers.
Your own availability at your own telephone number or even
solely with an SIP name over the Internet also differs from provider to provider.
• A "trunk" line acts like an extended SIP account with a main
external telephone number and multiple extension numbers.
Internal users use this account in parallel and several calls can
be made simultaneously (until the maximum available
bandwidth is exhausted).
• As a "SIP gateway" line, the Swyx VoIP Router provides a
remote SIP PBX with a transition to the local ISDN network.
The SIP gateway is registered at the SIP PBX with a single
number, although several calls can be conducted at once
(until the maximum available bandwidth is exhausted). The
connection between the SIP PBX and the Swyx VoIP Router
is normally established over a VPN connection.
• A "link" line acts like a trunk line without limitation to one
main external telephone number and multiple extension
numbers. Internal users use this account in parallel and
several calls can be made simultaneously (until the maximum
available bandwidth is exhausted).
1-12 Voice over IP
Page 21

•SIP PBXs
Maximum 4 connections to upstream SIP PBXs. These lines are
generally connections to large PBXs in the network at headquarters which can be reached via a VPN connection.
The precise number of users and lines available varies between
models and software options.
1.4.3 VoIP characteristics of the Swyx VoIP Routers
1.4.3.1 Multiple ISDN/analog interfaces
The ISDN/analog interfaces of the Swyx VoIP Router can be
switched as internal or external connections and, depending on the
model, offer up to eight parallel voice channels. This allows, for
example, an existing PBX to be additionally equipped with SIP and
connected to an upstream VoIP PBX. Subscribers can simultaneously
make calls via ISDN and analog telephones, SIP equipment, or
softphones to other telephone subscribers, both internally and
externally. The transition between SIP and ISDN/analog is automatic
and invisible to the user.
1.4.3.2 Telephone even during a power cut
With life-line support and power relay to the internal ISDN port, it
remains possible to telephone over the conventional telephone
network even in case of a power outage. ISDN backup, load
balancing and VRRP in combination with Ethernet ports as WAN
interfaces provide SIP connections with redundancy and high
reliability. If a SIP remote station should fail, switching automatically
reverts to the conventional telephone network. This ensures that
telephony is just as reliable as ever, even with VoIP.
1.4.3.3 Point-to-multipoint and point-to-point connections with ISDN
For ISDN, Swyx VoIP Routers support point-to-multipoint and pointto-point connections:
• Point-to-multipoint connection (point-to-multipoint): Up to 8
ISDN terminal devices can be connected to this type of
connection. Terminal equipment can include ISDN telephones
and ISDN PBXs, which can be used for connecting yet more
equipment. As an alternative, a Swyx VoIP Router can be
connected to a point-to-multipoint connection.
Voice over IP 1-13
Page 22

• Point-to-point connection (point-to-point): This type of device is
suitable for the connection of one ISDN device only, generally
an ISDN PBX. As an alternative, a Swyx VoIP Router can be
connected to a point-to-point connection.
To connect a Swyx VoIP Router, the interface that is used is set up
for the type of line in use.
Equipment connected to an ISDN connection can be addressed in two
ways:
• The devices are addressed with a multiple subscriber number
(MSN) that is linked to the ISDN connection and cannot be
influenced.
• Terminal devices are addressed via a Direct Dialing In-Number
(DDI). However, only the main external number is associated
with the telephone line; the extension numbers that address the
individual terminal devices can be chosen at will and are merely
suffixes to the main number. The main number, extension and
area selection code (not including the leading zero) can be at the
most 11 characters long.
The terms "point-to-multipoint connection" and "point-to-point
connection" are used in many countries to describe the technical
implementation of point-to-multipoint with MSN and point-to-point
with DDI. Other countries may use different types of connection and
other combinations of protocol and call-number type, or even
different names. Please refer to your telephone network operator for
the technical specifications of your ISDN connection.
1.4.3.4 Bandwidth reservation with failover
High-performance VPN functions allow the reliable transmission of
voice and data between company sites. This spares the telephone bill
from internal communications. A professional firewall, versatile
routing functions and excellent Quality of Service mechanisms make
the Swyx VoIP Router a comprehensive solution for secure voice and
data communication in a single compact device. All functions are
integrated into the central management functions.
1-14 Voice over IP
Page 23

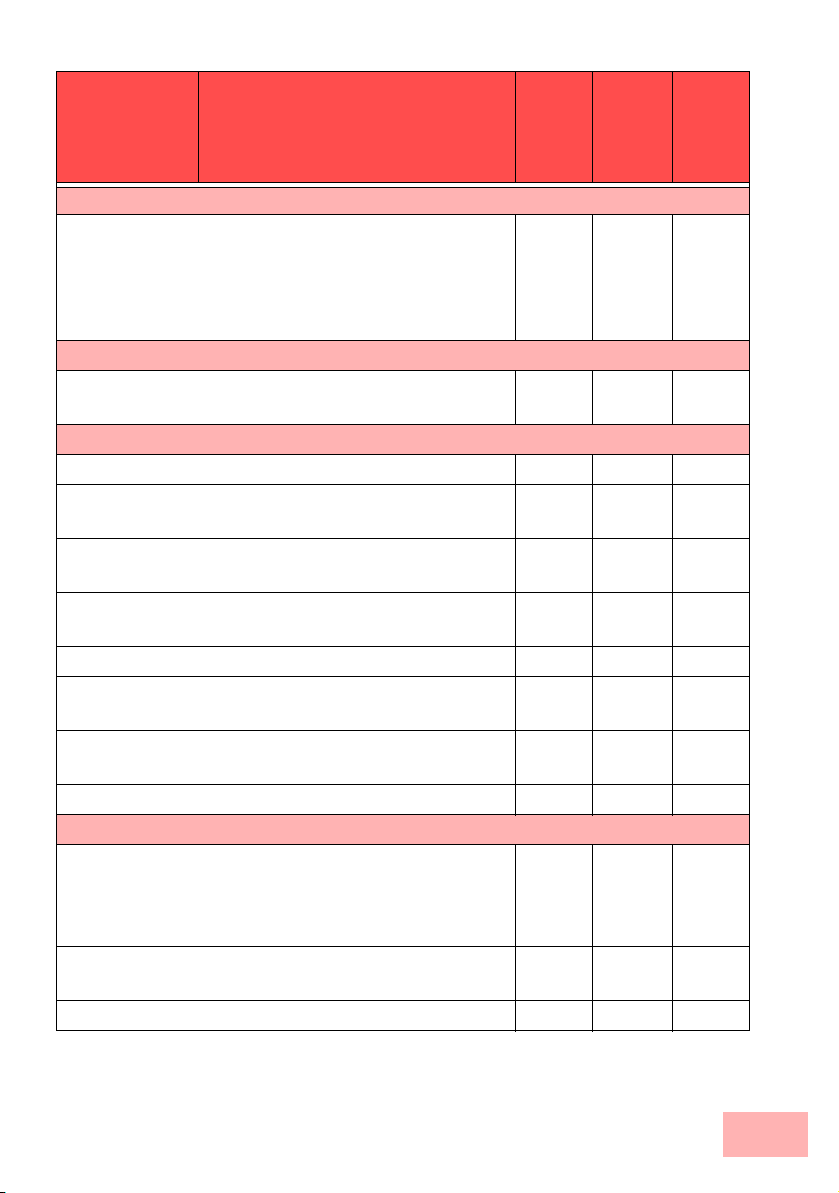
1.5 Just what can your Swyx VoIP Router do?
The following table provides a comparison of the properties and
functions of your device.
1722
SwyxConnect
1723
SwyxConnect
1724
SwyxConnect
Applications
Internet access ✔✔✔
LAN-LAN coupling over VPN ✔✔✔
LAN-LAN coupling over ISDN ✔✔✔
RAS server (over VPN) ✔✔✔
RAS server (over ISDN) ✔✔✔
IP router ✔✔✔
IPX router (over ISDN), for example for coupling
✔✔✔
Novell networks or for dialing in to Novel networks
NetBIOS proxy for coupling Microsoft peer-to-peer
✔✔✔
networks over ISDN
DHCP- and DNS server (for LAN and DMZ) ✔✔✔
N:N mapping for routing networks with the same IP-
✔✔✔
address ranges over VPN
Configuring LAN ports as additional WAN ports ✔✔✔
Policy-based routing ✔✔✔
Load balancing for bundling multiple DSL channels 4 chan-
nels
2 chan-
nels
2 chan-
nels
Backup solutions and load balancing with VRRP ✔✔✔
NAT Traversal (NAT-T) ✔✔✔
DMZ with configurable IDS checks ✔✔✔
ISDN leased lines ✔✔✔
LANCAPI server to provide office applications such as
✔✔✔
fax or answering machine via the ISDN interface.
VoIP functions
SIP proxy Management of local SIP users (regis-
✔✔✔
tration/authentication)
Just what can your Swyx VoIP Router do? 1-15
Page 24

SIP, ISDN and
analog
gateway
1722
SwyxConnect
Mapping of public SIP-provider
✔✔✔
accounts as telephone lines
SIP trunking for mapping SIP
✔✔✔
accounts with external root numbers
and extensions.
Registration at and switching to
✔✔✔
upstream SIP PBXs
Individual/shared password for
✔✔✔
authentication
Automatic registration and forwar-
✔✔✔
ding of SIP users
Automatic bandwidth management
✔✔✔
and prioritization of SIP connections
Number of local subscribers 32 x
SIP
40 x
ISDN
Free choice from available ISDN S0
✔✔✔
buses
Operation at exchange lines or exten-
✔✔✔
sion lines
Operation at point-to-multipoint lines
✔✔✔
or point-to-point lines
Automatic registration and authenti-
✔✔✔
cation of local ISDN subscribers as
SIP users
Registration of ISDN and analog
✔✔✔
users as SIP users at upstream SIP
PBXs
Switching between local and remote
✔✔✔
ISDN, analog and SIP users
1723
SwyxConnect
32 x
SIP
40 x
ISDN
2 x ana-
log
1724
SwyxConnect
32 x
SIP
40 x
ISDN
1-16 Just what can your Swyx VoIP Router do?
Page 25

Remote gateway function for
mapping local exchange lines to a
remote SIP PBX
ISDN supplementary services CLIP,
CLIR
En-block and individual dialing with
adjustable wait time until completion
Inband tone signaling to the German
standard for ISDN users
Call router Central switching of all connections
(SIP and ISDN/analog)
Number translation by mapping,
numeral replacement and number
supplementation
Rules for routing according to dialed,
outgoing call number, line and
domain
Multiple cycles, also forced after
number replacement
Up to two destinations per routing
rule as a backup
Rule-based rejection of calls ✔✔✔
Supplementation of call-number
prefixes per line
Supplement/remove root numbers per
line
Voice processing
Echo canceling and de-jitter buffer for
SIP connections
Transparent pass-through for negotiated codecs
Interaction on codec negotiation
(filter, quality, bandwidth)
1722
SwyxConnect
1723
SwyxConnect
1724
SwyxConnect
✔✔✔
✔✔✔
✔✔✔
✔✔✔
✔✔✔
✔✔✔
✔✔✔
✔✔✔
✔✔✔
✔✔✔
✔✔✔
✔✔✔
✔✔✔
✔✔✔
Just what can your Swyx VoIP Router do? 1-17
Page 26

1722
SwyxConnect
1723
SwyxConnect
1724
SwyxConnect
WAN connections
Connector for DSL or cable modem ✔✔✔
Integrated ADSL modem (with ADSL2+) ✔✔✔
ISDN S
connection in NT mode for connecting
0
1
1
2
downstream ISDN devices (ISDN telephones, ISDN
PBXs) to the Swyx VoIP Router.
Switchable to TE mode.
✔
✔*
✔
* Not suitable for connection to external exchanges
(e.g. telephone network).
ISDN S
connection in TE mode for connecting the
0
1
1
2
Swyx VoIP Router to an external ISDN connection, e.g.
to an NTBA or to an upstream ISDN PBX.
Switchable to NT mode.
Power relay; ISDN voltage available at the external
connector is passed through to the internal ISDN port,
providing power to any connected equipment.
Internal power supply for the ISDN NT connector,
✔
ISDN1
to
ISDN2
✔
✔
✔
ISDN1
to
ISDN3
providing power to a maximum of two connected
telephones.
Analog connector to connect an analog terminal device
2
or an analog PBX (tone dialing).
Analog connector for connecting the Swyx VoIP Router
1
to an analog exchange line or to an upstream analog
PBX (tone dialing), combined with ISDN1.
Relay of signals and power from the analog exchange
✔
line to Analog1 when router switched off (life-line)
Internal power supply for the analog connections,
✔
providing power to one connected device each.
Life-line support to ensure functional telephony during
✔✔
power outages or with a non-configured VoIP Call
Manager
Connection of external analog or GPRS modem to the
✔✔✔
COM port (requires the LANCOM Modem Adapter
Kit)
1-18 Just what can your Swyx VoIP Router do?
Page 27
1722
SwyxConnect
1723
SwyxConnect
1724
SwyxConnect
LAN connection
Separate FastEthernet LAN ports, individually
422
switchable, e.g. as LAN switch or separate DMZ ports;
auto crossover.
Alternatively switchable as a WAN interface for
connecting SDSL modems.
USB connector
USB 2.0 host port (full speed: 12 Mbps) for connecting
✔✔✔
a USB printer and for future extensions
Security functions
IPSec encryption via external software (VPN client) ✔✔✔
5 integrated VPN tunnels for secure network connec-
✔✔✔
tions
IPSec encryption in hardware (optional; activated with
✔✔✔
the VPN-25 option)
IP masquerading (NAT, PAT) to conceal individual
✔✔✔
LAN workstations behind a single public IP address.
Stateful-inspection firewall ✔✔✔
Firewall filter for blocking individual IP addresses,
✔✔✔
protocols and ports
MAC address filter regulates, for example, LAN-
✔✔✔
workstation access to the IP routing function
Protection of the configuration from brute-force attacks. ✔✔✔
Configuration
Configuration with LANconfig or via web browser;
✔✔✔
additional terminal mode for Telnet or equivalent terminal programs; SNMP interface and TFTP server
function.
Remote configuration via ISDN (with ISDN PPP
✔✔✔
connections, e.g. via Windows Dial-Up Networking).
Serial configuration interface ✔✔✔
Just what can your Swyx VoIP Router do? 1-19
Page 28

Call-back function with PPP authentication mecha-
1722
SwyxConnect
✔✔✔
1723
SwyxConnect
1724
SwyxConnect
nisms allowing only predefined ISDN call numbers
FirmSafe for no-risk firmware updates ✔✔✔
1-20 Just what can your Swyx VoIP Router do?
Page 29

2 Installation
This chapter will assist you to quickly install hardware and software.
First, check the package contents and system requirements. The
device can be installed and configured quickly and easily if all
prerequisites are fulfilled.
2.1 Package content
Before beginning with the installation, please check that nothing is
missing from your package. Along with the device itself, the box
should contain the following accessories:
Power adapter
LAN connector cable (green connectors)
ADSL connector cable (transparent connectors)
ISDN connector cable (light-blue connectors)
Adapter to cross-over the contacts for
reconfigured ISDN interfaces
Analog cable, RJ11 connector to TAE-NF socket
(German standard) for connecting analog terminal
devices or PBXs
Analog cable, RJ45 connector (yellow marking) to
RJ11 connector for connecting to an analog
exchange line.
Adapter, RJ11 socket to TAE-F plug (for Germany)
Connector cable for the configuration interface
SwyxConnect CD
Printed documentation (Installation Guide, manual)
1722
1723
1724
SwyxConnect
SwyxConnect
SwyxConnect
✔✔✔
111
111
112
112
2
1
1
✔✔✔
✔✔✔
✔✔✔
Should anything be missing, please take up immediate contact to your
dealer or to the address on the delivery note supplied with your
device.
Installation 2-1
Page 30
2.2 System requirements
LANCOM
1722
VoIP
Power
Online
ADSL
ETH 3
ETH 4
ISDN 1
ISDN 2
ETH 1
ETH 2
VPN
SwyxConnect
1723
Analog/ADSL
Power
Online
ADSL
ETH 1
ETH 2
ISDN 1
ISDN 2
Analog (⌧)
Analog 1
VPN
Analog 2
Computers that connect to a SwyxConnect must meet the following
minimum requirements:
• Operating system that supports TCP/IP, e. g. Windows XP,
Millennium Edition (Me), Windows 2000, Windows 98,
Windows 95, Windows Windows NT, Linux, BSD Unix, Apple
Mac OS, OS/2.
• Access to the LAN via the TCP/IP protocol.
The LANtools also require a Windows operating system. A web
browser under any operating system provides access to WEBconfig.
2.3 Introducing the SwyxConnect
This section introduces your device. You will find an overview of all
status displays, connectors and switches here.
2.3.1 Status displays
Depending on the range of functions of the model, SwyxConnects
have different numbers of front-mounted status displays.
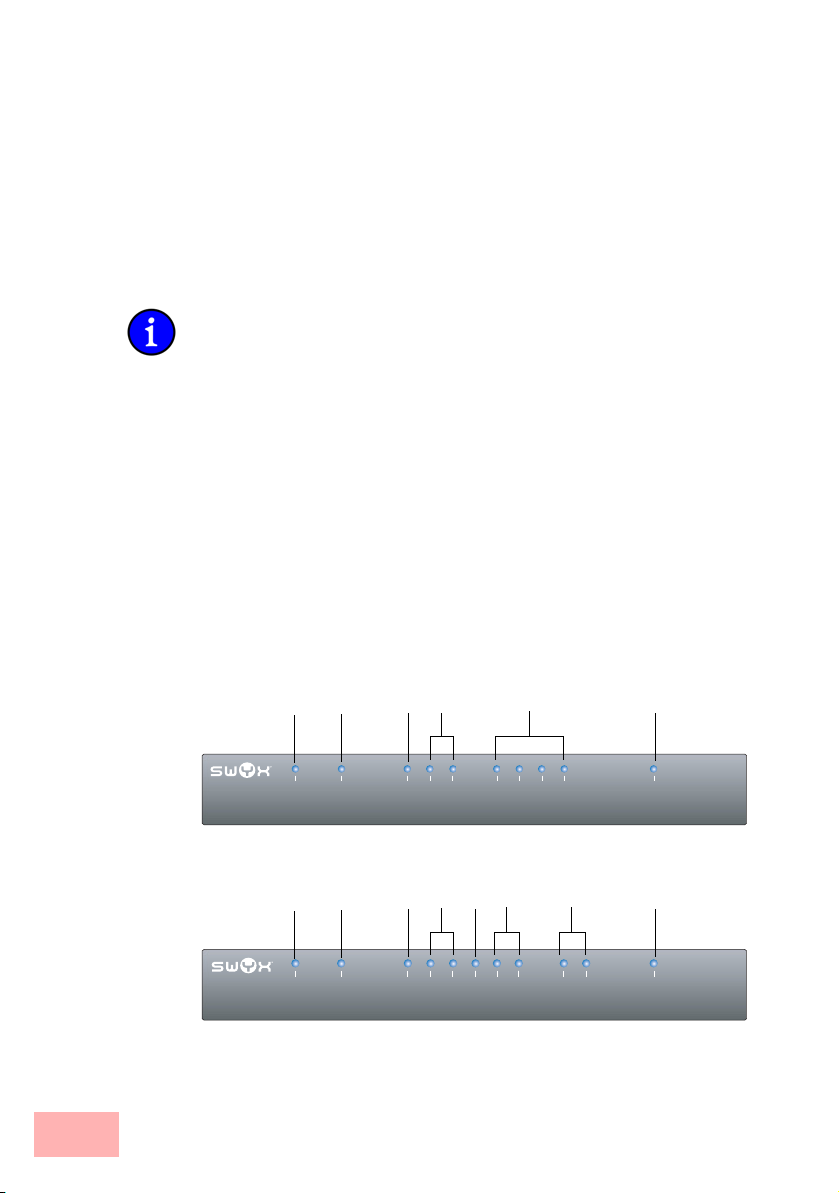
2.3.1.1 Front
Status displays on the front of the device provide information about
operational and connection status:
SwyxConnect 1722
SwyxConnect 1723
2-2 System requirements
Online
Power
Online
Power
LANCOM
1722
VoIP
ADSL
ISDN 1
ISDN 2
ETH 1
ETH 2
ETH 3
ETH 4
ADSL
ISDN 1
ISDN 2
Analog (
Analog 1
Analog 2
ETH 1
ETH 2
VPN
VPN
SwyxConnect
Analog/ADSL
1723
Page 31

SwyxConnect 1724
SwyxConnect
1724
ISDN/ADSL
Power
Online
ADSL
ETH 1
ETH 2
ISDN 1
ISDN 2
ISDN 3
ISDN 4
VPN
Power
2.3.1.2 Top
The two top-mounted LEDs enable the main function status to be
assessed even if the device is positioned vertically.
2.3.1.3 Meanings of the LEDs
In the following sections we will use different terms to describe the
behaviour of the LEDs:
• Blinking means, that the LED is switched on or off at regular
intervals in the respective indicated colour.
• Flashing means, that the LED lights up very briefly in the
respective colour and stay then clearly longer (approximately
10x longer) switched off.
• Inverse flashing means the opposite. The LED lights
permanently in the respective colour and is only briefly
interrupted.
• Flickering means, that the LED is switched on and off in
irregular intervals.
Power
This LED provides information on the device's operating state. After
being switched on, it blinks green during the self-test. The LED then
shines constantly to indicate operational readiness, unless an error is
detected as indicated by a code blinked in red.
Off Device switched off
Green Blinking Self-test after power-up
Online
Power
Online
VPN
SwyxConnect
1724
ISDN/ADSL
ISDN 4
ETH 1
ETH 2
ADSL
ISDN 1
ISDN 2
ISDN 3
Introducing the SwyxConnect 2-3
Page 32

Green On (perma-
nently)
Red/green Blinking
alternately
Red Blinking Charge or time limit reached
Device operational
Device insecure: Configuration password
not set
The power LED blinks alternately in red/green until a configuration
password has been set. Without a configuration password, the
configuration data in the SwyxConnect are unprotected. Normally
you would set a configuration password during the basic
configuration (instructions in the following chapter). Information
about setting a configuration password at a later time is available in
the section 'The Security Wizard'.
The power LED is blinking and no connection can
be made?
If the power LED blinks red and no WAN connections
can be established, there is no cause for concern. This
merely means that a pre-set charge or time limit has been
reached.
There are three ways to remove the lock:
• Reset the toll protection.
• Increase the limit.
• Deactivate the lock completely (set limit to '0').
LANmonitor shows you when a charge or time limit has been reached. To reset the
toll protection, activate the context menu (right-mouse click) Reset charge and time
limits. The charge settings are defined in LANconfig under Management Costs
(these settings are only available if the 'Complete configuration display' is activated
under Tools Options).
With WEBconfig, resetting the toll protection and all parameters are found under
Expert configuration Setup Charges.
Signal that a
charge or time
Power
limit has been
reached
Online
2-4 Introducing the SwyxConnect
The online LED displays the general status of all WAN interfaces:
Off No active connection
Green Flashing Opening the first connection
Green Inverse
flashing
Opening an additional connection
Page 33

Green On (perma-
nently)
Red On (perma-
nently)
At least one connection is established
Error establishing the last connection
ADSL
ISDN
Connection status at the ADSL connector:
Off Interface deactivated
Orange Blinking Initialization (establishing contact to provider)
Orange Flashing Opening the first connection
Orange Inverse flashing Opening an additional connection
Orange On (perma-
nently)
Orange Flickering Data traffic (send or receive)
Orange Flashing Error (CRC error, framing error, etc.)
Red On (perma-
nently)
Green Permanently Synchronization successful
Green Blinking/
flashing
Red/
orange
Blinking Hardware error
At least one logical connection is established
No synchronization, searching for remote
station
Handshake/training
Status display for the ISDN interfaces:
TE mode
(external ISDN connection)
Off Interface off or Layer 1
deactivated or no Layer
2 TEI
Green Blinking Establishing D-channel Layer 1/establishing
Layer 2 TEI
Green On (perma-
nently)
Orange Blinking Establishing the first ISDN connection
Orange Flashing Establishing an additional ISDN connection
D-channel activated
(Layer 1 active and
Layer 2 TEI available)
NT mode
(internal ISDN connection)
Interface switched off.
When switched off, the
line may, under certain
circumstances, still be
connected to another
ISDN interface via a
life-line relay.
D channel activated
Introducing the SwyxConnect 2-5
Page 34

Analog (⌧)
TE mode
(external ISDN connection)
Orange Inverse
flickering
Red Blinking B-channel error
Red On (perma-
nently)
Red/
orange
Blinking ISDN hardware error
Data traffic being sent
Abort due to error in
establishing D-channel
Layer 1 or Layer 2
NT mode
(internal ISDN connection)
Abort due to error in
establishing D-channel
Layer 1.
If the LED of an ISDN interface automatically goes off in TE mode,
this does not indicate an error at the S
several ISDN connections and PBXs switch the S
bus. It is in fact because
0
bus into power-
0
saving mode after a certain period of inactivity. When needed, the S
bus automatically reactivates and the ISDN status LED illuminates in
green.
Connection status at the analog exchange line:
Off Interface switched off.
Green On (perma-
nently)
Orange Blinking Call being established from exchange towards
Orange On (perma-
nently)
Orange
/red
Red On (perma-
Blinking Hardware error
nently)
Analog exchange line is switched on.
SwyxConnect. The line is "ringing" at the
SwyxConnect.
The SwyxConnect has an analog connection—the handset of an analog device is offhook.
No line voltage available (cable may be interrupted)
0
Analog
(1 and 2)
2-6 Introducing the SwyxConnect
Connection status at the analog terminal equipment connector:
Off Interface switched off.
Green On (perma-
nently)
Orange Blinking Call being established from SwyxConnect
Orange On (perma-
nently)
Analog connection is switched on. Handset onhook or the device is not connected.
towards the terminal equipment (ringing)
Handset off-hook.
Page 35

Orange
Blinking Hardware error
/red
Red On (perma-
nently)
Calibration interrupted or temporary error (e.g.
in case of shutdown due to temperature)
ETH
LAN connector status in the integrated switch:
Off No networking device attached
Green On (perma-
nently)
Green Flickering Data traffic
Red Flickering Data packet collision
VPN
Status of a VPN connection.
Off No VPN tunnel established
Green Blinking Connection establishment
Green Flashing First connection
Green Inverse
flashing
Green On (perma-
nently)
2.3.2 Device connectors
The connectors and switches of the device are located on the back
panel:
SwyxConnect 1722
DC12V
Connection to network device operational, not
data traffic
Other connections
VPN tunnels are established
ETH3ETH4 ETH2 ETH1
ConfigUSB (COM)
ISDN 1 (⌧)ISDN 2 ()
ADSL(2+)
Reset
SwyxConnect 1723
DC12V
ETH1ETH2
ConfigUSB (COM)
ISDN1/Analog(⌧)ISDN2Analog1 ()Analog2 ()
Introducing the SwyxConnect 2-7
ADSL(2+)
Reset
Page 36

SwyxConnect 1724
Only SwyxConnect
1723
DC12V
ETH1ETH2
ConfigUSB (COM)
ISDN 1 (⌧)ISDN 2 (⌧)ISDN 3 ()ISDN 4 ()
1. Power switch
2. Connection for the supplied power adapter
3. Switch with 10/100Base-Tx connectors
4. USB connector (USB host)
5. Serial configuration port (RS 232/V.24)
6. Connectors for analog terminal equipment
7. ISDN connections
Default SwyxConnect 1722
ISDN 1: TE mode, corresponds to the external ISDN line, alternatively
switchable to NT mode
ISDN 2: NT mode, corresponds to the internal ISDN S
switchable to TE mode
Default SwyxConnect 1724
ISDN 1 and ISDN 2: TE mode, alternatively switchable to NT mode
ISDN 3 and ISDN 4: NT mode, alternatively switchable to TE mode
Default SwyxConnect 1723
ISDN 2: NT mode, alternatively switchable to TE mode
Reset
ADSL(2+)
, alternatively
0
For safety reasons, interface ISDN 2 on the SwyxConnect 1723 must
not be directly or indirectly connected to an external exchange (e.g.
the telephone network)!
8. Combined ISDN-analog interface
Default SwyxConnect 1723
ISDN 1: TE mode, alternatively switchable to NT mode or as an interface to the analog exchange line
9. ADSL connector (ADSL, ADSL 2, ADSL 2+)
10. Reset switch
The reset switch fulfill two different functions depending upon
how long the key remains pressed:
2-8 Introducing the SwyxConnect
Page 37

• Restart the device (soft reset)—the switch is pressed for less
than 5 seconds. The device will restart.
• Reset the device (hard reset)—the switch is pressed for longer
than 5 seconds. All LEDs on the device light up continuously.
Once the reset switch is released the device will restart with
the restored factory settings.
2.4 Hardware installation
Installation of the SwyxConnect involves the following steps:
1. LAN – first of all connect your SwyxConnect to the LAN or to an
individual PC. Plug in one end of the supplied network cable
(green connectors) to a LAN connector on the device
other end into an available network connector socket in your local
network, a free socket on a switch or hub, or the networking
connector of an individual PC.
The LAN connectors use autosensing to recognize the data rate
(10/100 Mbit) and the type (node/hub) of attached network
devices. It is possible to connect devices of different speeds and
types in parallel.
Avoid having multiple unconfigured SwyxConnects at once within a
single network segment. Any unconfigured SwyxConnect takes on
the same IP address (ending in '254'), and so address conflicts could
arise. To avoid problems, multiple SwyxConnects should be
configured one after the other with the respective device being
assigned with a new and unique IP address (not ending in '254') each
time.
, and the
2. ADSL – connect the ADSL interface with the splitter by using
the supplied ADSL connector cable (transparent connectors).
3. Connection to the ISDN – to connect the Swyx VoIP Router to
the ISDN, plug in one end of a supplied ISDN cable (light-blue
connectors) to an ISDN interface in TE mode. When shipped, the
ISDN interfaces marked with
Plug in the other end of the ISDN cable into an ISDN/S
mode.
point-to-point line connector or point-to-multipoint line connector.
⌧ are set up in TE (external)
0
For the model SwyxConnect 1723, the interface ISDN2 is not to be
connected to the ISDN network, even after being reset to TE mode!
Please also observe the notices about configuring the ISDN interfaces
(→ page 14).
Hardware installation 2-9
Page 38

4. Connecting ISDN terminal devices—to connect ISDN terminal
devices (ISDN telephones or ISDN PBXs) to the Swyx VoIP
Router, connect these to an ISDN interface in NT mode. When
shipped, the ISDN interfaces marked with
(internal ISDN connection) mode.
are set to NT
For the model SwyxConnect 1723, the ISDN2 interface can
supply a maximum of two telephones with power from the ISDN
feed. Please also observe the notices about configuring the ISDN
interfaces (→ page 14).
5. Connecting to the analog telephone network—to connect the
Swyx VoIP Router to the analog telephone network, plug the end
of the supplied analog connector cable marked in yellow (RJ45)
into the combined ISDN/analog interface
analog connector cable (RJ11) is to be plugged into an analog
exchange line (e.g. a splitter). If the exchange line has a TAE-N/F
socket, you can use the supplied adapter (RJ11 plug to TAE
plug).
6. Connecting analog terminal equipment—use an analog interface
on the Swyx VoIP Router (RJ11 socket marked with
connecting analog terminal equipment (telephones or PBXs). If
your terminal equipment features a TAE-F or TAE-N connector,
please use the supplied adapter cable (RJ11 plug to TAE-N/F
socket).
. The other end of the
) for
The Swyx VoIP Router supplies power to the analog terminal
equipment connected to it. With life-line support, the voltage
supplied from the analog exchange line is relayed to the terminal
equipment via the Analog1 interface (
). Please also observe the
notices about life-line support (→ page 12).
7. Configuration interface – optionally, the router can be connected
directly to the serial interface (RS-232, V.24) of a PC. Use the
connection cable supplied for this. Connect the SwyxConnect
configuration interface
PC.
8. Connecting an external modem—optionally, an external analog
or GPRS modem can be connected to the device's serial
interface with the SwyxConnect Modem Adapter Kit, so enabling
tasks such as remote maintenance, backup connections or
Dynamic VPN to be implemented over an additional WAN
connection via an analog line.
9. Power supply – the socket
power supply unit.
2-10 Hardware installation
to an available serial interface on the
is for connecting the supplied
Page 39

Use only the supplied power supply unit! The use of the wrong power
supply unit can be of danger to the device or persons.
10. Ready for operation? – After a brief self-test, the power LED
lights up continuously. Green LAN LEDs show which LAN
connectors are being used for a connection.
Devices with integrated ADSL modems can become very warm
during operation. For these models, environmental temperatures are
not to exceed 35°C. Sufficient ventilation is of vital importance. Do
not stack the devices and do not expose them to direct sunlight.
2.5 Configuring the ISDN and analog interfaces
Swyx VoIP Router routers feature several interfaces for connection to
ISDN or analog exchange lines, or for connecting ISDN or analog
terminal equipment.
2.5.1 ISDN interface in NT or TE mode
Depending on the model, the ISDN interfaces can be used for
connecting to an ISDN exchange line or for connecting up ISDN
terminal equipment. The interfaces are switched into the NT or TE
mode for this:
• ISDN TE interface ("external ISDN connection"): An ISDN
interface in TE mode for connection to the ISDN bus of an
upstream ISDN PBX or to an ISDN NTBA. This ISDN interface
can be used for backup connections over ISDN or as a dial-in
interface for remote stations.
With the SwyxConnect 1723, the ISDN2 interface can be switched
into TE mode, but it must not be connected to the telephone network
(NTBA), either directly or indirectly via a PBX (by means of relay/
emergency switching)!
• ISDN NT interface ("internal ISDN connection"): With its ISDN
interface in NT mode, the Swyx VoIP Router itself provides an
internal ISDN bus. This ISDN interface can be used to connect
ISDN PBXs or ISDN telephones.
The factory settings have the ISDN interfaces marked with ⌧ set to
TE mode and the ISDN interfaces marked with
These ISDN settings can be altered according to your requirements:
• Multiple TE interfaces provide, for example, all available B
channels as a backup or for dial-in.
Configuring the ISDN and analog interfaces 2-11
set to NT mode.
Page 40

• With multiple NT interfaces, for example, a downstream ISDN
PBX can be provided with all available B channels.
Depending on the combination of ISDN interfaces in TE and NT
mode, the hardware must be set up with the functions for bus
termination, life-line support and power relay, and the software must
be set up with the appropriate protocol. The setting for the protocol
allows for the type of ISDN connection to be used (point-tomultipoint or point-to-point).
The supplied adapter must be used if a connection is to be made to an
ISDN interface which is set differently to its default settings. This
adapter serves to cross-over the contacts in the ISDN interface. Not
using the adapter can cause damage to both the Swyx VoIP Router
and to the devices connected with it!
2.5.2 Bus termination, life-line support and power supply
The hardware function modes of the ISDN interfaces are set by DIP
switches on the underside of the device.
• Bus termination is obligatory with an ISDN interface in NT
mode.
Bus termination is generally deactivated for ISDN interfaces in
TE mode. If the Swyx VoIP Router is the last device at a longer
ISDN bus and this itself is not terminated, it may be advantageous to activate the bus termination for an ISDN interface in TE
mode.
Not including
SwyxConnect 1724
•If life-line support is activated, the interfaces ISDN 1 and
ISDN 2 are bridged if the device is unavailable due to a power
outage or if the ISDN 2 interface is switched off (default: on).
The life-line support is used when the SwyxConnect 1722 is
connected to an external ISDN line over a TE interface with the
simultaneous operation of ISDN terminal devices at the internal
ISDN connection of an NT interface. If bridged, the ISDN
devices can then use the external ISDN bus directly.
To activate life-line support, all four DIP switches (3 to 6) must
be up; to deactivate, all four DIP switches must be down.
Life-line support is to be deactivated when both ISDN interfaces are
to be operated in the same mode, i.e. as two TE or two NT interfaces.
The interfaces are not to be bridged in case of power failure when
being operated in this manner!
2-12 Configuring the ISDN and analog interfaces
Page 41

SwyxConnect 1722
and SwyxConnect
1724 only
Only SwyxConnect
1723
• The ISDN power relay means that the bus voltage of an external
ISDN bus at ISDN 1 is switched through to the terminal
equipment connected to ISDN 2 (SwyxConnect 1722) and/or
ISDN 3 (SwyxConnect 1724). As a consequence, ISDN
equipment operated at the internal ISDN bus of the Swyx VoIP
Router can be operated without its own power supply.
Be sure to deactivate the ISDN power relay if both ISDN interfaces
are to be operated in TE mode, such as when both ISDN interfaces
are connected to an ISDN NTBA, for example. A power relay in this
situation would result in a short-circuit which would damage the
device and the ISDN NTBAs!
To activate the power relay, the corresponding DIP switches (7
and 8 on the SwyxConnect 1722, 5 and 6 on the SwyxConnect
1724) must be up; to deactivate, the DIP switches must be down.
• With the internal power supply, the model SwyxConnect 1723
supports a maximum of two telephones without their own
supply; power is fed from the ISDN2 interface .
To activate the internal power supply, the corresponding DIP
switches (1 and 2) must be up; to deactivate, the DIP switches
must be down.
The power supply switches off automatically in case of overload, and
switches on again once the load drops.
1. Before altering the DIP switch settings, remove all cables from
their sockets.
2. Remove the see-through cover of the DIP switch.
3. We suggest that you use a screwdriver to set the DIP switch to
the desired position.
SwyxConnect 1722 SwyxConnect 1723
DIP Meaning Default Meaning Default
1 + 2 ISDN 2 Rx/Tx
(100 Ω bus termination)
3 + 4 Life-line support up (on)
5 + 6 up (on) Life-line support up (on)
7 + 8 ISDN power relay
ISDN 1 > ISDN 2
Configuring the ISDN and analog interfaces 2-13
up (on) Power supply
ISDN2
up (on) up (on)
up (on)
Page 42

SwyxConnect 1722 SwyxConnect 1723
DIP Meaning Default Meaning Default
9 + 10ISDN 1 Rx/Tx
(100 Ω bus termination)
SwyxConnect 1724
down
(off)
ISDN 1 Rx/Tx
(100 Ω bus termination)
down
(off)
DIP Meaning Default
1 + 2 ISDN 4 Rx/Tx
(100 Ω bus termination)
3 + 4 ISDN 3 Rx/Tx
(100 Ω bus termination)
5 + 6 ISDN power relay
ISDN 1 > ISDN 3
7 + 8 ISDN 2 Rx/Tx
(100 Ω bus termination)
9 + 10ISDN 1 Rx/Tx
(100 Ω bus termination)
4. Plug the cable in again and start the device.
up (on)
up (on)
down
(off)
down
(off)
down
(off)
A change to the software configuration is also necessary if the ISDN
interfaces are to be set to a different mode. If devices are to be
connected to an ISDN interface which is set differently to its default
settings, the supplied adapter must be used. This adapter serves to
cross-over the contacts in the ISDN interface.
2.5.3 Protocol setting
Parameters for the ISDN interfaces are entered into LANconfig in the
configuration area 'Interfaces' on the 'WAN' tab. Under WEBconfig,
Telnet or SSH client you will find the settings for the ISDN interface
parameters under
Select the protocol for each ISDN interface according to its
application and the ISDN connection type: Point-to-multipoint and
point-to-point connections can be used in various combinations at a
Swyx VoIP Router. The following options are available:
2-14 Configuring the ISDN and analog interfaces
Setup/Interfaces/WAN
.
Page 43

SwyxConnect 1724
only
• Automatic for automatic selection of the operating mode (only in
TE mode)
• DSS1 TE (Euro ISDN) for connection to a point-to-multipoint
ISDN bus.
• DSS1 TE point-to-point for connection to a point-to-point ISDN
bus.
• 1TR6 TE (German ISDN) for connection an ISDN bus which
uses this protocol (in Germany only).
• DSS1 NT (Euro ISDN) to provide point-to-multipoint ISDN
interfaces
• DSS1 NT reverse to provide point-to-multipoint interfaces while
maintaining the ISDN timing of the connected ISDN line, please
refer to ’ISDN connection timing’
• DSS1 NT (point-to-point) to provide point-to-point ISDN
interfaces
• DSS1 NT point-to-point reverse to provide point-to-point
interfaces while maintaining the ISDN timing of the connected
ISDN line, please refer to ’ISDN connection timing’
• DSS1 timing to adopt the ISDN timing of the connected ISDN
line (please refer to ’ISDN connection timing’), without
signaling and other functions
• Leased-line GRP0 for Group 0 leased lines over ISDN
•Off
NT mode operation always has to be set manually. With the
SwyxConnect 1722, if the ISDN 2 connector is set to 'Off' there may
be a connection to ISDN 1 in the case that the device has been set up
for life-line support by means of the DIP switches.
If an ISDN device is attached to an ISDN interface that is set to auto
and is not recognized properly, set the required protocol manually.
2.5.4 ISDN connection timing
To ensure trouble-free transmission, all of the components in the
ISDN system (Swyx VoIP Router, upstream and downstream ISDN
PBXs, ISDN terminal devices and external ISDN telephone
networks) have to use the same ISDN timing. In the Swyx VoIP
Router, an ISDN interface in TE mode can take on the timing of the
ISDN line. The TE interface enables the device itself to behave like a
terminal device. In NT mode, the Swyx VoIP Router can pass on the
Configuring the ISDN and analog interfaces 2-15
Page 44

on this timing over the ISDN interfaces to any connected terminal
equipment or downstream ISDN PBXs. The NT interface enables the
device itself to behave like an exchange.
Various settings are available to define the ISDN interfaces with
which a Swyx VoIP Router receives the ISDN timing (to be passed on
to the devices at the NT interfaces).
• PCM synchronization bus: Automatically selects one of all TE
or (reverse configured) NT interfaces currently supplying a
timing. If the selected interface stops supplying a timing (e.g.
because the bus is inactive), the Swyx VoIP Router switches to
the next available interface that is supplying a timing.
• ISDN/S0 Bus: This setting takes on the ISDN timing from the
connection for use by the Swyx VoIP Router and further devices
connected over the NT interface. In this way, the timing can be
switched through in parallel to an existing ISDN PBX at a pointto-point connection.
The selected ISDN interface has to be configured for TE mode.
The ISDN-interface settings contain two more modes which play a
particular role in this context:
• DSS1 NT reverse or DSS1 NT point-to-point reverse: When all
ISDN interfaces are operated in NT mode, the timing system
runs "freely" because there is no TE interface to take on the
ISDN timing. If in this case the ISDN connections are
connected, for example, to an ISDN PBX which is being
supplied with ISDN timing from another source, then
interference to the transmission may arise because the timing of
the Swyx VoIP Router is not synchronous to that of the PBX. In
such cases, the reverse setting allows the ISDN timing to be
taken from an NT-mode interface, so ensuring that the Swyx
VoIP Router runs synchronously with the overall system.
The PBX or remote station with an interface in TE mode must be able
and configured to transmit the timing.
2.6 Software installation
The following section describes the installation of the Windowscompatible system software LANtools, as supplied.
2-16 Software installation
Page 45

You may skip this section if you use your SwyxConnect exclusively
with computers running operating systems other than Windows.
2.6.1 Starting Software Setup
Place the product CD into your drive. The setup program will start
automatically.
If the setup does not start automatically, run AUTORUN.EXE in the
root directory of the product CD.
In Setup, select Install Software. The following selection menus will
appear on screen:
2.6.2 Which software should I install?
• LANconfig is the Windows configuration program for all
SwyxConnect routers and SwyxConnect access points.
WEBconfig can be used alternatively or in addition via a web
browser.
•With LANmonitor you can use a Windows computer to
monitor all of your SwyxConnect routers and SwyxConnect
access points.
•With Documentation you copy the documentation files onto
your PC.
Select the appropriate software options and confirm your choice
with Next. The software is installed automatically.
Software installation 2-17
Page 46

3 Configuring the VoIP functions
Prerequisites for the configuration of the VoIP functions in a Swyx
VoIP Router are suitable basic settings and a functional Internet
connection. To this end, please ensure that you use the Wizards in
LANconfig to configure the basic settings, the Internet connection
and the security settings before you configure VoIP.
Further information about these settings can be found under 'Basic
configuration', 'Setting up the Internet Access' and 'Security Settings'.
3.1 LANconfig Wizards
For the configuration of VoIP functions, too, you can rely upon
LANconfig's Wizards.
1. Mark your SwyxConnect in the selection window. From the
command line, select Extras Setup Wizard.
2. In the selection menu, select the Setup Wizard, Configure Voice
over IP Call Manager and confirm the selection with Continue.
3. In the following windows, you will choose the lines and
subscribers that you want to create. Enter the required
information for this.
4. The wizard will inform you as soon as the entries are complete.
Close the configuration with Finish.
3-1 Configuring the VoIP functions
Page 47

3.2 Configuration examples
5
The possible applications of the Swyx VoIP Router are just as diverse
as the steps required for their configuration. The following examples
demonstrate the configuration of particular applications which, taken
together, cover a great proportion of the possibilities.
3.2.1 Using VoIP telephony as an extension to an analog PBX
SwyxConnect 1723
only
This example shows how to configure a SwyxConnect when an
existing analog PBX is enhanced with VoIP telephony capability.
The SwyxConnect is connected between the analog exchange line
and the PBX.
The PBX is configured to allow subscribers to receive immediate
access to an outside line when they pick up the receiver.
VoIP softphone
Internal number '14'
PCs in the LAN
Analog
PBX
Analog telephones
Internal numbers '11' and '12'
VoIP telephone
Internal number '15'
The following functions are available to you after configuring the
Swyx VoIP Router:
• Internal calls with analog and SIP telephones and between SIP
• External telephony with analog and SIP terminal equipment over
• External calls to defined ranges of telephone numbers (e.g.
SIP provider with the following
account information
Domain: sipprovider.com
Telephone number: 0123-456 789
LAN
Analog fax
Internal number '13'
ADSL
SwyxConnect
Analog telephone connection
Telephone number: 0123-555
Internet
PSTN
softphones.
the analog exchange line.
overseas calls) via the SIP account for cheaper calls.
Configuration examples 3-2
Page 48

3.2.1.1 Hardware installation
The following steps should be taken before configuring the Swyx
VoIP Router:
1. Use the supplied LAN cable (green connectors) to connect the
LAN interface to an available network connector, a switch, or
directly to a PC.
2. Connect the ADSL interface with the splitter by using the
supplied ADSL connector cable (transparent connectors).
3. Connect the yellow end of the supplied analog connector cable to
the combined ISDN-analog interface. Plug the other end of this
cable into an analog exchange line. Use the supplied adapter
(RJ11 socket to TAE plug (in Germany)) if necessary.
Example SwyxConnect
1723
Fax
4. Connect the analog PBX with an analog interface on the Swyx
VoIP Router. Use the supplied adapter cable (RJ11 plug to TAE
socket (in Germany)) if necessary.
5. An analog terminal device, such as a fax, can optionally be
connected to the second analog interface.
6. Use the supplied power supply unit to provide the device with
power.
Detailed information about each step of the hardware installation can
be found under ’Hardware Installation’.
3.2.1.2 Other requirements
Apart from the hardware installation, the following preparations are
necessary for configuring the Swyx VoIP Router:
ETH1
ETH2
USB
Config (COM)
Analog2 (
)
Analog1 (
)
ISDN2 (
)
ISDN1/Analog ( )
⌧
ADSL 2+
Splitter
PBX
3-3 Configuration examples
Page 49

1. Set up Internet access on the Swyx VoIP Router.
2. Set up a dialing plan with a unique internal telephone number for
each piece of terminal equipment to be connected. In general,
the numbers used are predetermined by the PBX, which often
only allows certain number ranges.
3. Order an account from a SIP provider, and have the assess
information at hand.
3.2.1.3 Configuring the Swyx VoIP Router
When configuring the SwyxConnect, the following steps must be
carried out:
• Set up the line to the SIP provider
• Activate the analog line and assign the internal telephone
number in the Swyx VoIP Router.
• Create analog users
• Adapt the call routing table
Detailed instructions on configuring the SwyxConnect:
1. Under LANconfig, start the setup wizard for configuring the VoIP
Call Manager. Enable the options 'SIP provider', 'Analog PBX or
central exchange (POTS)' and 'Analog users'.
2. Enter a unique domain for the local VoIP domain which identifies
the local VoIP range for the site (e.g. 'mycompany.internal'.)
3. In the 'Single account' mode, configure the line to the SIP
provider (e.g. named 'SIPPROVIDER') with the following values:
Configuration examples 3-4
Page 50

The following description applies to a "user-defined configuration".
If you select a special SIP provider from the list, then some of the
parameters will be pre-configured automatically.
• Internal standard number: All calls that come in through the
SIP provider are forwarded to this internal number. Enter an
internal number from your dialing plan here, e.g. '11'.
• SIP domain/realm: You received this domain from your SIP
provider; it is usually entered in the format 'sipdomain.tld'
without the part that designates a specific server.
• Registrar (FQDN / IP) (optional):
• Outbound proxy (optional)
The server description is generally not required; the DNS query for
the SIP domain returns this information. Enter a server designation
here only if your provider has informed you of the corresponding
addresses.
• SIP ID / user: Enter the SIP number with local area code here,
providing that the SIP provider does not require any other
information.
• Display name (optional): The display name is only required if
the SIP provider verifies this during registration. If you enter
a display name here, then this name will be displayed at the
remote site. If the field remains empty, then the display name
for the corresponding internal user is transmitted.
• Authentication name (optional): Special authentication names
are not supported by all SIP providers. In many cases, the
authentication name is the same as the SIP ID or the user
name. Complete this field only if your SIP provider has
issued you a special authentication name.
• Password: Enter the password for SIP access here.
4. Enter the analog PBX and any other directly connected analog
terminal devices as analog users with the following values:
• Internal telephone number: This number will be assigned to
the terminal device as an internal number.
• Interface: Here you select the analog interface that the
respective terminal device is connected to.
5. Enable spontaneous outside line access for analog and SIP
users in order to keep the subscribers' telephone behavior as
consistent as possible.
3-5 Configuration examples
Page 51

6. The call routing table suggested by the setup wizard
automatically allows spontaneous outside line access for analog
and SIP users
and .
As a result of both of these routes, any stars '*' that might have
preceded the numbers are removed before each call from a local
user. For all other calls from local users, the number is preceded
with a '0', as it is automatically assumed that the user is trying to
establish an outside connection.
The other routes are used to carry out international and national long distance calls as well as local calls as standard
over the analog line. The Call Router removes the preceding
zeros from the number again and sends the call out to the analog
line.
In order to channel calls to special destinations, such as international and national long distance calls, over the SIP provider and
not over the analog exchange line, double-click on the corresponding entry in the table and switch the line used form 'ANALOG' to 'SIPPROVIDER'.
Configuration examples 3-6
Page 52

To ensure that fax connections are always established over the analog
exchange line, you can optionally generate a line with priority '1' for
all called numbers '#', with the comment 'Fax via POTS', with the
unchanged destination number '#', for the destination line 'ANALOG'
for calls made from internal number '13' by the users
'USER.ANALOG' .
This call routing table is only valid for PBX systems that forward the
special character star '*' for internal calls on their external bus. If the
PBX processes this character in a different manner, then the table
must be adapted accordingly.
3-7 Configuration examples
Page 53

3.2.2 Using VoIP telephony to complement the ISDN PBX
This example shows how to configure a SwyxConnect when a
downstream ISDN PBX is enhanced with VoIP telephony capability.
Until now, the MSNs '11' to '13' for the ISDN connection have been
used for two ISDN telephones and one analog fax. The SwyxConnect
will now be switched between the public ISDN connection and the
ISDN PBX.
The PBX is configured to allow subscribers to receive immediate
access to an outside line when they pick up the receiver.
VoIP softphone
Internal number '14'
PCs in the LAN
ISDN PBX
ISDN telephones
Internal numbers '11' and '12'
VoIP telephone
Internal number '15'
The following functions are available to you after configuring the
Swyx VoIP Router:
• Internal telephony with ISDN and SIP telephones and SIP
• External telephony with ISDN and SIP terminal equipment over
• Accessing internal terminal equipment (ISDN and SIP) via the
• External calls to defined ranges of telephone numbers (e.g.
SIP provider with the following
account information
Domain: sipprovider.com
Telephone number: 0123-456 789
LAN
SwyxConnect
ADSL
ISDN
Analog fax
Internal number '13'
Internet
ISDN connection
MSNs: 0123-555 555 1 to
0123-555 555 9
ISDN
softphones.
ISDN.
MSNs.
overseas calls) via the SIP account for cheaper calls.
Configuration examples 3-8
Page 54

3.2.2.1 Hardware installation
The following steps should be taken before configuring the Swyx
VoIP Router:
1. Use the supplied LAN cable (green connectors) to connect the
LAN interface to an available network connector, a switch, or
directly to a PC.
2. Connect the ADSL interface with the splitter by using the
supplied ADSL connector cable (transparent connectors).
3. Connect one end of the supplied ISDN cable (light-blue
connectors) to an ISDN interface in TE mode (
settings). Plug the other end of this cable into an ISDN exchange
line (e.g. directly into the ISDN NTBA).
Example SwyxConnect
1723
⌧ with factory
DECT
Fax
4. Connect the ISDN PBX with an ISDN interface in NT mode (
with factory settings).
5. You can optionally connect analog terminal equipment such as
fax machines or DECT telephones to the analog interfaces.
6. Use the supplied power supply unit to provide the device with
power.
Detailed information about each step of the hardware installation can
be found under ’Hardware Installation’.
3.2.2.2 Other requirements
Apart from the hardware installation, the following preparations are
necessary for configuring the Swyx VoIP Router:
Splitter
NTBA
ETH1
ETH2
USB
Config (COM)
Analog2 (
)
Analog1 (
)
ISDN2 (
)
ISDN1/Analog (
⌧
)
ADSL 2+
ISDN PBX
3-9 Configuration examples
Page 55

1. Set up Internet access on the Swyx VoIP Router.
2. Set up a dialing plan with a unique internal telephone number for
each piece of terminal equipment to be connected. In general,
the numbers used are predetermined by the PBX, which often
only allows certain number ranges.
3. Order an account from a SIP provider, and have the assess
information at hand.
3.2.2.3 Configuring the Swyx VoIP Router
When configuring the SwyxConnect, the following steps must be
carried out:
• Set up the line to the SIP provider
• Activate the ISDN line and assign the internal telephone number
in the Swyx VoIP Router.
• Create analog users
• Adapt the call routing table
Detailed instructions on configuring the SwyxConnect:
1. Under LANconfig, start the setup wizard for configuring the VoIP
Call Manager. Enable the options 'SIP provider', 'ISDN phone
system' and 'ISDN users'.
2. Enter a unique domain for the local VoIP domain which identifies
the local VoIP range for the site (e.g. 'mycompany.internal'.)
3. In the 'Single account' mode, configure the line to the SIP
provider (e.g. named 'SIPPROVIDER') with the following values:
Configuration examples 3-10
Page 56

The following description applies to a "user-defined configuration".
If you select a special SIP provider from the list, then some of the
parameters will be pre-configured automatically.
• Internal standard number: All calls that come in through the
SIP provider are forwarded to this internal number. Enter an
internal number from your dialing plan here, e.g. '11'.
• SIP domain/realm: You received this domain from your SIP
provider; it is usually entered in the format 'sipdomain.tld'
without the part that designates a specific server.
• Registrar (FQDN / IP) (optional):
• Outbound proxy (optional)
The server description is generally not required; the DNS query for
the SIP domain returns this information. Enter a server designation
here only if your provider has informed you of the corresponding
addresses.
• SIP ID / user: Enter the SIP number with local area code here,
providing that the SIP provider does not require any other
information.
• Display name (optional): The display name is only required if
the SIP provider verifies this during registration. If you enter
a display name here, then this name will be displayed at the
remote site. If the field remains empty, then the display name
for the corresponding internal user is transmitted.
• Authentication name (optional): Special authentication names
are not supported by all SIP providers. In many cases, the
authentication name is the same as the SIP ID or the user
name. Complete this field only if your SIP provider has
issued you a special authentication name.
• Password: Enter the password for SIP access here.
4. Enable the external ISDN outside line and the internal ISDN bus
in order to use the VoIP functionality. Enter all external MSNs for
the ISDN outside line in the ISDN mapping table with their
assignment to the internal numbers in the VoIP range.
5. Enter all connected ISDN terminal devices as ISDN users with
the following values:
3-11 Configuration examples
Page 57

• Internal telephone number: This number will be assigned to
the ISDN terminal device as an internal number. The
telephone structure will remain clear if you use the same
internal number for a terminal device here as it uses in its own
ISDN environment.
• MSN/DDI: Enter the external MSNs for the ISDN outside
line here; this will also be assigned to the terminal device by
the ISDN PBX.
6. Enter the directly connected analog terminal devices as analog
users with the following values:
• Internal telephone number: This number will be assigned to
the terminal device as an internal number.
• Interface: Here you select the analog interface that the
respective terminal device is connected to.
7. Enable spontaneous outside line access for ISDN and SIP users
in order to keep the subscribers' telephone behavior as
consistent as possible.
8. The call routing table suggested by the setup wizard
automatically allows spontaneous outside line access for ISDN
and SIP users
and .
As a result of both of these routes, any stars '*' that might have
preceded the numbers are removed before each call from a local
user. For all other calls from local users, the number is preceded
with a '0', as it is automatically assumed that the user is trying to
establish an outside connection.
Configuration examples 3-12
Page 58

The other routes are used to carry out international and national long distance calls as well as local calls as standard
over the analog line. The Call Router removes the preceding
zeros from the number again and sends the call out to the analog
line.
In order to channel calls to special destinations, such as international and national long distance calls, over the SIP provider and
not over the analog exchange line, double-click on the corresponding entry in the table and switch the line used form 'ISDN'
to 'SIPPROVIDER'.
To ensure that fax connections are always established over the ISDN
exchange line, you can optionally generate a line with priority '1' for
all called numbers '#', with the comment 'Fax via ISDN', with the
unchanged destination number '#', for the destination line 'ISDN' for
calls made from internal number '13' by the users 'USER.ANALOG'
.
3-13 Configuration examples
Page 59

This call routing table is only valid for PBX systems that forward the
special character star '*' for internal calls on their external bus. If the
PBX processes this character in a different manner, then the table
must be adapted accordingly.
3.2.3 VoIP telephony with extension numbers (SIP trunking)
This example explains the configuration of a SwyxConnect if an
existing ISDN PBX is to be extended with VoIP functions and where
the SIP line is to function as the main external "telephone line". The
SIP account is to work with a central switchboard number and
multiple extension numbers. All of the ISDN interfaces on the Swyx
VoIP Router will be connected to the ISDN PBX so that the
maximum possible number of lines is available for parallel calls.
The PBX is configured to allow subscribers to receive immediate
access to an outside line when they pick up the receiver.
VoIP telephones and softphones
Internal numbers '20' to '99'
ISDN PBX
ISDN telephones
Internal numbers '10' to '18'
The following functions are available to you after configuring the
Swyx VoIP Router:
• Internal telephony with ISDN and SIP telephones and SIP
• Simultaneous external telephone calls from ISDN and SIP
SIP provider
Exchange: '0'
Analog fax
Internal number '19'
LAN
ADSL
SwyxConnect 1724
Switchboard number: '0456-54321
2-digit extension numbers'
ISDN extension numbers: '10' to '99'
Internet
softphones.
equipment over the SIP account with multiple lines via the SIP
account.
Configuration examples 3-14
Page 60

• Accessing internal terminal equipment (ISDN and SIP) via the
extension numbers.
3.2.3.1 Hardware installation
The following steps should be taken before configuring the Swyx
VoIP Router:
1. Use the supplied LAN cable (green connectors) to connect the
LAN interface to an available network connector, a switch, or
directly to a PC.
2. Connect the ADSL interface with the splitter by using the
supplied ADSL connector cable (transparent connectors).
3. Connect the ISDN interfaces on the Swyx VoIP Router to the
exchange-line inputs on the ISDN PBX.
Important for the models SwyxConnect 1722 and SwyxConnect
1723: It is vital that power relay, power supply and life-line are
deactivated with the DIP switches under the devices before
connecting the cables and adapters to the PBX! Detailed information
about each step of the hardware installation can be found under
’Hardware Installation’.
• For ISDN interfaces in NT mode (
you can use the ISDN connector cable (light-blue connectors)
to directly connect the interface to the ISDN PBX.
• For ISDN interfaces in TE mode (
the supplied cross-over adapter must be used for a connection
to the exchange-line input of a PBX! Connect the ISDN
connector cable (light-blue connectors) to the cross-over
adapter, and connect this to the ISDN PBX via a standard
ISDN cable.
When switching ISDN interfaces from TE to NT mode, it is also
necessary to activate bus termination.
3-15 Configuration examples
with factory settings)
with factory settings),
Page 61

Example SwyxConnect
1724
4. Use the supplied power supply unit to provide the device with
power.
For the model SwyxConnect 1723, you can optionally connect analog
terminal equipment such as fax machines or DECT telephones to the
analog interfaces.
3.2.3.2 Other requirements
Apart from the hardware installation, the following preparations are
necessary for configuring the Swyx VoIP Router:
1. Set up Internet access on the Swyx VoIP Router.
2. Set up a dialing plan with a unique internal telephone number for
each piece of terminal equipment to be connected. In general,
the numbers used are predetermined by the PBX, which often
only allows certain number ranges.
3. Order a trunk account from a SIP provider (including a
switchboard number and a range of extension numbers) and
have the assess information at hand.
ETH1
ETH2
On
Off
USB
Config (COM)
4xS
1 2 3 4 5 6 7 8 9 10
ISDN4 (
)
ISDN3 (
)
ISDN2 (
⌧
)
ISDN1 (
⌧
)
ADSL 2+
Splitter
0
ISDN PBX
3.2.3.3 Configuring the Swyx VoIP Router
When configuring the SwyxConnect, the following steps must be
carried out:
• Set up the line to the SIP provider
• Activate the internal ISDN busses for VoIP use
• Create an ISDN user with placeholders
• Adapt the call routing table
Configuration examples 3-16
Page 62

Detailed instructions on configuring the SwyxConnect:
1. Under LANconfig, start the setup wizard for configuring the VoIP
Call Manager. Enable the options 'SIP provider' and 'ISDN users'.
2. Enter a unique domain for the local VoIP domain which identifies
the local VoIP range for the site (e.g. 'mycompany.internal'.)
3. In the 'Trunk' mode, configure the line to the SIP provider (e.g.
named 'SIPPROVIDER') with the following values:
The following description applies to a "user-defined configuration".
If you select a special SIP provider from the list, then some of the
parameters will be pre-configured automatically.
• Internal standard number: Incoming calls are directed to the
call router along with the extension number as communicated
from the SIP trunk account. If the call router does not contain
a matching entry, the call is forwarded directly to the internal
number recorded here: Enter an internal number from your
dialing plan here, e.g. '11'.
• SIP domain/realm: You received this domain from your SIP
provider; it is usually entered in the format 'sipdomain.tld'
without the part that designates a specific server.
• Registrar (FQDN / IP) (optional):
• Outbound proxy (optional)
The server description is generally not required; the DNS query for
the SIP domain returns this information. Enter a server designation
here only if your provider has informed you of the corresponding
addresses.
3-17 Configuration examples
Page 63

• SIP ID / user: Enter the SIP number with local area code here,
providing that the SIP provider does not require any other
information.
• Display name (optional): The display name is only required if
the SIP provider verifies this during registration. If you enter
a display name here, then this name will be displayed at the
remote site. If the field remains empty, then the display name
for the corresponding internal user is transmitted.
• Authentication name (optional): Special authentication names
are not supported by all SIP providers. In many cases, the
authentication name is the same as the SIP ID or the user
name. Complete this field only if your SIP provider has
issued you a special authentication name.
• Password: Enter the password for SIP access here.
4. Enable the internal ISDN bus at all ISDN interfaces in order to
use the VoIP functionality. Select all ISDN interfaces to be used
for internal ISDN users and terminal equipment.
5. Enter one common ISDN user for all of the connected ISDN
terminal devices. For each of these, enter the placeholder '#' as
'Internal number' and 'MSN/DDI'. This ensures that extension
numbers coming from the Call Manager are forwarded to the
internal ISDN busses without being changed.
6. Enable spontaneous outside line access for ISDN and SIP users
in order to keep the subscribers' telephone behavior as
consistent as possible.
7. The call routing table suggested by the setup wizard
automatically allows spontaneous outside line access for ISDN
and SIP users
and .
As a result of both of these routes, any stars '*' that might have
preceded the numbers are removed before each call from a local
user. For all other calls from local users, the number is preceded
with a '0', as it is automatically assumed that the user is trying to
establish an outside connection.
Configuration examples 3-18
Page 64

The other routes are used to carry out international and national long distance calls as well as local calls as standard
over the SIP line. The call router removes the leading zeros from
the telephone number again.
This call routing table is only valid for PBX systems that forward the
special character star '*' for internal calls on their external bus. If the
PBX processes this character in a different manner, then the table
must be adapted accordingly.
3.3 Configuring the VoIP terminal equipment
A Swyx VoIP Router located in your local network can function as a
SIP proxy for the VoIP terminal equipment in the network. VoIP
softphones such as a SwyxIt! Now or VoIP telephones can register
themselves locally with the Swyx VoIP Router. The SIP proxy
handles the switching of calls to a public SIP provider or to a VoIP
PBX at a different site. Alternatively, the Swyx VoIP Router acting as
a SIP gateway can itself perform the conversion to other telephone
networks (e.g. to analog or ISDN exchange lines).
3.3.1 Setting up the VoIP client to register itself with the Swyx VoIP Router
To use a softphone for telephony, it has to be set up with a
corresponding account. Here we describe a configuration of this type
taking the SwyxIt! Now as an example.
1. On the ' SIP accounts' tab, use the Add button to create a new
SIP account.
2. For the provider setting, leave the entry as 'Custom' and activate
the new account.
3-19 Configuring the VoIP terminal equipment
Page 65

3. For the 'User ID' enter the internal telephone number to be used
by SwyxIt! Now for taking calls and, optionally, enter a name for
your phone under 'Description'; this name will be displayed on
the other phone at the other end of the connection.
4. With the button Details, open the dialog for the advanced settings
and enter the following data:
• As the 'SIP proxy' and 'Registrar', enter the internal VoIP
domain for your Swyx VoIP Router (default: 'internal') if this
also acts as the DNS server for the client; if not, enter the
LAN IP address.
• 'Realm' is always the internal VoIP domain.
On the tab 'Location' enter your international country code and local
code, each without their leading zero(s), and enter the national and
international prefixes (e.g. '0' and '00'). The field 'Public line access
prefix' is for the character your PBX or Swyx VoIP Router uses to
access an outside line (e.g. '0' or '*').
With this information, the SwyxIt! Now can register locally at a Swyx
VoIP Router and use the telephone lines defined there.
3.3.2 Setting up the VoIP client to register at a PBX
If the SwyxIt! Now is to register itself with an upstream SIP PBX
(e.g. at company Headquarters) as well as with the Swyx VoIP
Router, then extra settings for the SIP account have to be set up which
suit the PBX.
Configuring the VoIP terminal equipment 3-20
Page 66

1. Create a new user-defined SIP account with 'User ID' and
'Description'.
2. Switch to the dialog for advanced settings and fill out the entries
for 'SIP proxy', 'Registrar' and 'Realm' with the VoIP domains of
the SIP PBX at Headquarters.
On the Swyx VoIP Router, an appropriate SIP-PBX line has to be
configured with the same domain, and the router has to be the DNS
server for the SwyxIt! Now.
3. Enter the SIP-account user name and password for logging in to
the SIP PBX.
Under normal circumstances (when using authentication) a SIP user
should also be created on the Swyx VoIP Router which uses the same
internal telephone number and, most importantly, the same user name
and the same password as those in the client configuration.
4. You can check if the registration was successful by looking at the
list of recent messages (via button or menu).
3-21 Configuring the VoIP terminal equipment
Page 67

3.3.3 Setting up the VoIP telephone to register itself with the Swyx VoIP Router
Generally speaking, VoIP telephones contain configuration software
which is accessed via a web browser. By way of example, we explain
how a telephone from the company Snom is configured so that it
registers at a Swyx VoIP Router.
1. From the Setup menu, select one of the possible lines, e.g. 'Line
2'.
2. Enter the following values:
• Registrar: Internal VoIP domain for the SwyxConnect.
• Account: Internal number for the user.
• Displayname: Name of the user as it is to be displayed at the
remote site.
If you are using a different VoIP telephone, please consult the
documentation for this device for information on configuring the
software.
Configuring the VoIP terminal equipment 3-22
Page 68

4 Basic configuration
The basic configuration can be performed on a step-by-step basis
using a convenient setup wizard to guide you through the setup
process and prompt you for the required information.
First, this chapter will tell you which information is required for the
basic configuration. Use this section to assemble the information you
will need before you launch the wizard.
Next, enter the data in the setup wizard. Launching the wizard and the
process itself are described step by step — with separate sections for
LANconfig and WEBconfig. Thanks to the information that you have
collected in advance, the basic configuration is quick and effortless.
At the end of this chapter we will show you the settings that are
needed for the LAN's workstations to ensure trouble-free access to
the router
4.1 Which information is necessary?
The basic configuration wizard will take care of the basic TCP/IP
configuration of the router and protect the device with a configuration
password. The following descriptions of the information required by
the wizard are grouped in these configuration sections:
• TCP/IP settings
• protection of the configuration
• information on DSL connection
• configuring connect charge protection
• security settings
.
4.1.1 TCP/IP settings
The TCP/IP configuration can be realized in two ways: either as a
fully automatic configuration or manually. No user input is required
for the fully automatic TCP/IP configuration. All parameters are set
automatically by the setup wizard. During manual TCP/IP
configuration, the wizard will prompt you for the usual TCP/IP
parameters: IP address, netmask etc. (more on these topics later).
Fully automatic TCP/IP configuration is only possible in certain
network environments. The setup wizard therefore analyses the
connected LAN to determine whether it supports fully automatic
configuration.
4-1 Basic configuration
Page 69

4.1.1.1 New LAN—fully automatic configuration possible
If all connected network devices are still unconfigured, the setup
wizard will suggest fully automatic TCP/IP configuration. This may
be the case in the following situations:
• a single PC is connected to the router
• setup of a new network
Fully automatic TCP/IP configuration will not be available when
integrating the SwyxConnect in an existing TCP/IP LAN. In this
case, continue with the section ’Information required for manual
TCP/IP configuration’.
The result of the fully automatic TCP/IP configuration: the router will
be assigned the IP address '172.23.56.1' (netmask '255.255.255.0'). In
addition, the integrated DHCP server will be enabled so that the
SwyxConnect can automatically assign IP addresses to the devices in
the LAN.
4.1.1.2 Configure manually nevertheless?
The fully automatic TCP/IP configuration is optional. You may also
select manual configuration instead. Make your selection after the
following considerations:
• Choose automatic configuration if you are not familiar with
networks and IP addresses.
• Select manual TCP/IP configuration if you are familiar with
networks and IP addresses, and one of the following conditions
is applicable:
• You have not yet used IP addresses in your network but
would like to do so now. You would like to specify the IP
address for your router, selecting it from the address range
reserved for private use, e.g. '10.0.0.1' with the netmask
'255.255.255.0'. At the same time you will set the address
range that the DHCP server uses for the other devices in the
network (provided that the DHCP server is switched on).
• You have previously used IP addresses for the computers in
your LAN.
4.1.1.3 Information required for manual TCP/IP configuration
During manual TCP/IP configuration, the setup wizard will prompt
you for the following information:
Which information is necessary? 4-2
Page 70

• IP address and netmask for the SwyxConnect
Assign a free IP address from the address range of your LAN to
the SwyxConnect and specify the netmask.
• Enable DHCP server?
Disable the DHCP server function in the SwyxConnect if you
would like to have a different DHCP server assign the IP
addresses in your LAN.
4.1.2 Configuration protection
The password for configuration access to the SwyxConnect protects
the configuration against unauthorized access. The configuration of
the router contains a considerable amount of sensitive information
such as your Internet access information. We therefore strongly
recommend protecting it with a password.
Multiple administrators can be set up in the configuration of the
SwyxConnect, each with differing access rights. For a SwyxConnect,
up to 16 different administrators can be set up. Further information
can be found in the section 'Managing rights for different
administrators' in the LCOS reference manual.
4.1.3 Settings for the DSL connection
For the WAN connection it may be necessary to enter the transfer
protocol being used. The wizard will e.g. automatically enter the
correct settings for major DSL providers. You only need to enter the
protocol used by your access provider if the wizard does not list your
provider.
4.1.4 Connect charge protection
Connect charge protection blocks DSL connections that go beyond a
previously set limit, thus protecting you from unexpectedly high
connection charges.
If you run the SwyxConnect via DSL access with a flat-rate tariff,
you can set the maximum connecting-time in minutes.
Any budget can be deactivated by entering the value '0.'
In basic settings the charge protection is defined to maximum 600
minutes within seven days. Adapt this setting to your personal needs
or deactivate the charge protection if you have arranged a flatrate
with your provider.
4-3 Which information is necessary?
Page 71

4.2 Instructions for LANconfig
1. Start up LANconfig by clicking Start Programme LANCOM
LANconfig
LANconfig automatically detects the new SwyxConnect in the
TCP/IP network. Then the setup wizard starts that will help you
make the basic settings of the device or will even do all the work
for you (provided a suitable network environment exists).
If you cannot access an unconfigured SwyxConnect, the problem
may be due to the netmask of the LAN: with less than 254 possible
hosts (netmask > '255.255.255.0'), please ensure that the IP address
'x.x.x.254' is located in your own subnet.
If you have chosen automatic TCP/IP configuration, please continue with Step .
2. If you would like to configure the TCP/IP settings manually,
assign an available address from a suitable address range to the
SwyxConnect. Confirm your choice with Next.
3. Specify whether or not the router should act as a DHCP server.
Make your selection and confirm with Next.
4. In the following window, specify the password for configuration
access. Note that the password is case-sensitive and ensure that
it is sufficiently long (at least 6 characters).
In addition, you may specify whether the device may only be
configured from the local network or whether remote configuration via the WAN (i.e. a remote network) is also permissible.
Please note that enabling this will also permit remote configuration
via the Internet. You should always make sure that the configuration
access is protected with a password.
5. Enter the wireless parameters. Select a network name (SSID)
and a radio channel. Turn on if necessary the function for ’closed
network’. Confirm your choice with Next.
Instructions for LANconfig 4-4
Page 72

6. In the next window, select your DSL provider from the list that is
displayed. If you select 'My provider is not listed here,' you must
enter the transfer protocol used by your DSL provider manually.
Confirm your choice with Next.
7. Connect charge protection can limit the cost of DSL connections
to a predetermined amount if desired. Confirm your choice with
Next.
8. Complete the configuration with Finish.
Section 'TCP(IP settings to workstation PCs' will describe the settings
required for the individual workstations in the LAN.
4.3 Instructions for WEBconfig
To configure the router with WEBconfig you must know how to
address it in the LAN. The reaction of the devices, as well as their
accessibility for configuration via web browser is dependent on
whether a DHCP server and a DNS server are already active in the
LAN, and whether these two server processes exchange the
assignment of IP addresses to symbolic names within the LAN
between each other.
After powered on, unconfigured SwyxConnect devices check first,
whether a DHCP server is already active in the LAN. Dependent on
the situation, the device is able to switch on its own DHCP server or,
alternatively, to activate its DHCP client mode. In this second
operating mode, the device itself can obtain an IP address from a
DHCP server already existing in the LAN.
4.3.0.1 Network without DHCP server
In a network without DHCP server, unconfigured SwyxConnect
devices activate their own DHCP server service after starting, and
assign appropriate IP addresses and gateway information to the other
workstations within the LAN, provided that the workstations are set
to obtain their IP address automatically (auto-DHCP). In this
constellation, the device can be accessed with any web browser from
4-5 Instructions for WEBconfig
Page 73

each PC with activated auto-DHCP function through the name Swyx
or by its IP address 172.23.56.254.
http://Swyx
If the configuration PC does not obtain its IP address from the
SwyxConnect DHCP server, figure out the current IP address of this
PC (with Start Execute cmd and command ipconfig at the
prompt under Windows 2000 or Windows XP, with Start Execute
cmd and the command winipcfg at the prompt under Windows Me
and Windows 9x, or with the command ifconfig on the console under
Linux). In this case, the SwyxConnect is reachable under the IP
address x.x.x.254 ( “x” stands for the first three blocks in the IP
address of the configuration PC).
4.3.0.2 Network with DHCP server
If a DHCP server is active in the LAN to assign IP addresses, an
unconfigured SwyxConnect device will turn off its own DHCP
server. It will change into DHCP client mode and will obtain an IP
address from the DHCP server of the LAN. This IP address is not
known at first. The accessibility of the device depends on the name
resolution:
• If there is a DNS server for name resolution in the LAN, which
interchanges the assignment of IP addresses to names with the
DHCP server, then the device can be accessed by the name
“Swyx <MAC address>” (e.g. “Swyx-00a057xxxxxx”).
http://172.23.56.254
http://Swyx-00a05700094A
The MAC address can be found on a label at the bottom of the device.
• If there is no DNS server in the LAN, or it is not linked to the
DHCP server, then the device can not be reached by the name.
The following options remain in this case:
Instructions for WEBconfig 4-6
Page 74

• Figure out the DHCP-assigned IP address of the
SwyxConnect by suitable tools and contact the device
directly with this IP address.
• Use LANconfig.
4.3.0.3 Starting the wizards in WEBconfig
1. Start your web browser (e.g. Internet Explorer, Netscape
Navigator, Opera) and call the SwyxConnect there:
http://<IP address of the SwyxConnect>
(or with a name as discribed above)
If you cannot access an unconfigured SwyxConnect, the problem
may be due to the netmask of the LAN: with less than 254 possible
hosts (netmask > '255.255.255.0'), please ensure that the IP address
'x.x.x.254' is located in your own subnet.
The WEBconfig main menu will be displayed:
The setup wizards are tailored precisely to the functionality of the
specific SwyxConnect. As a result, your device may offer different
wizards than those shown here.
If you have chosen automatic TCP/IP configuration, please continue with Step .
4-7 Instructions for WEBconfig
Page 75

2. If you would like to configure the TCP/IP settings manually,
assign an available address from a suitable address range to the
SwyxConnect. Also set whether or not it is to operate as a DHCP
server. Confirm your entry with Apply.
3. Enter the wireless parameters. Select a network name (SSID)
and a radio channel. Turn on if necessary the function for ’closed
network’. Confirm your choice with Next.
4. In the following 'Security settings' window, specify a password for
configuration access. Note that the password is case-sensitive
and ensure that it is sufficiently long (at least 6 characters).
You may specify whether the device may only be configured
from the local network or whether remote configuration via the
WAN (i.e. a remote network) is also permissible.
Please note that enabling this will also permit remote configuration
via the Internet. You should always make sure that the configuration
access is suitably protected, e.g. with a password.
Entering the password in the web
browser
When you are prompted for a user name
and password by your web browser when
accessing the device in the future, enter
your personal values to the corresponding
fields. Please note that the password is
case-sensitive.
If you are using the common configuration
account, enter the corresponding password
only. Leave the user name field blank.
Entering the configuration password
5. In the next window, select your DSL provider from the list that is
displayed. Confirm your choice with Apply.
If you select 'My provider is not listed here,' you must enter the
transfer protocol used by your DSL provider manually in the
next window. Confirm your choice with Apply.
6. Connect charge protection can limit the cost of DSL connections
to a predetermined amount if desired. Confirm your choice with
Apply.
7. The basic setup wizard reports that all the necessary information
has been provided. You can end the wizard with Go on.
Instructions for WEBconfig 4-8
Page 76

4.4 TCP/IP settings to workstation PCs
The correct addressing of all devices within a LAN is extremely
important for TCP/IP networks. In addition, all computers must know
the IP addresses of two central points in the LAN:
• Default gateway – receives all packets that are not addressed to
computers within the local network.
• DNS server – translates network names (www.lancom.de) or
names of computers (www.lancom.de) to actual IP addresses.
The SwyxConnect can perform the functions of both a default
gateway and a DNS server. In addition, as a DHCP server it can also
automatically assign valid IP addresses to all of the computers in the
LAN.
The correct TCP/IP configuration of the PCs in the LAN depends on
the method used to assign IP addresses within the LAN:
IP address assignment via the SwyxConnect (default)
In this operating mode the SwyxConnect not only assigns IP
addresses to the PCs in the LAN, it also uses DHCP to specify
its own IP address as that of the default gateway and DNS server. The PCs must therefore be configured so that they automatically obtain their own IP address and the IP addresses of the
standard gateway and DNS server (via DHCP).
IP address assignment via a separate DHCP server
The workstation PCs must be configured so that they automatically obtain their own IP address and the IP addresses of the
standard gateway and DNS server (via DHCP). The IP address
of the SwyxConnect must be stored on the DHCP server so that
the DHCP server transmits it to the PCs in the LAN as the standard gateway. In addition, the DHCP server should also specify
the SwyxConnect as a DNS server.
Manual IP address assignment
If the IP addresses in the network are assigned static ally, then
for each PC the IP address of the SwyxConnect must be set in
the TCP/IP configuration as the standard gateway and as a DNS
server.
4-9 TCP/IP settings to workstation PCs
Page 77

For further information and help on the TCP/IP settings of your
SwyxConnect, please see the reference manual. For more information
on the network configuration of the workstation computers, please
refer to the documentation of your operating system.
TCP/IP settings to workstation PCs 4-10
Page 78

5 Setting up Internet access
All computers in the LAN can take advantage of the central Internet
access of the SwyxConnect. The connection to the Internet provider
can be established via the WAN interface which is connected to an
ADSL or cable modem. For models without WAN interface one LAN
interface is configurted as DSLoL interface.
5.0.0.1 Does the setup wizard know your Internet provider?
A convenient wizard is available to help you set up Internet access.
The wizard knows the access information of major Internet providers
and will offer you a list of providers to choose from. If you find your
Internet service provider on this list, you normally will not have to
enter any further transfer parameters to configure your Internet
access. Only the authentication data that are supplied by your
provider are required.
5.0.0.2 Additional information for unknown Internet providers
If the setup wizard does not know your Internet provider, it will
prompt you for all of the required information step by step. Your
provider will supply this information.
• Connection via DSL modem
• Protocol: PPPoE
• Connection via access router with fixed IP address
• Protocol: Plain Ethernet
5.0.0.3 Additional connection options
You may also enable or disable further options in the wizard,
depending on whether or not they are supported by your Internet
provider:
• Time-based billing or flat rate – select the accounting model
used by your Internet provider.
• When using time-based billing, you can set the SwyxConnect
to automatically close existing connections if no data has
been transferred within a specified time (the so-called idle
time).
In addition, you can activate a line monitor that identifies inactive remote stations faster and therefore can close the connection
before the idle time has elapsed.
5-1 Setting up Internet access
Page 79

• Active line monitoring can also be used with flat rate billing
to continuously check the function of the remote station.
You also have the option of keeping flat rate connections alive if
required. Dropped connections are then automatically re-established.
5.1 Instructions for LANconfig
1. Highlight the SwyxConnect in the selection window. From the
menu bar, select Tools Setup Wizard.
2. From the menu, select the Setup Internet access wizard and
click Next.
3. In the following window select your country and your Internet
provider if possible, and enter your access information.
4. Depending on their availability, the wizard will display additional
options for your Internet connection.
5. The wizard will inform you as soon as the entered information is
complete. Complete the configuration with Finish.
LANconfig: Quick access to the
setup wizards
Under LANconfig, the fastest way to
launch the setup wizards is via the button
on the toolbar.
5.2 Instructions for WEBconfig
1. In the main menu, select Setup Internet access.
2. In the following window select your country and your Internet
provider if possible, and enter your access information.
Instructions for LANconfig 5-2
Page 80

3. Depending on their availability, the wizard will display additional
options for your Internet connection.
4. The wizard will inform you as soon as the entered information is
complete. Complete the configuration with Apply.
5-3 Instructions for WEBconfig
Page 81

6 Linking two networks
With the network interconnection (also known as LAN to LAN
coupling) of the SwyxConnect, two local networks are linked. The
LAN to LAN coupling can be realized in principle in two different
ways:
• VPN: For coupling via VPN, the connection between both LANs
is established over a specially secured connection through the
public Internet. A router with VPN support is required in both
LANs.
• ISDN: For coupling via ISDN, a direct connection between both
LANs is established over an ISDN connection. A router with
ISDN interface is required in both LANs.
6.0.0.1 Always configure both sides
Both routers involved in the network interconnection must be
configured. Care must be taken to ensure that the configuration
information provided matches.
The following instructions will assume that SwyxConnect devices are
being used on both sides. A network interconnection may also be
realized with routers from other manufacturers. A mixed setup
usually requires more extensive configuration measures for both
devices, however. Please refer to the reference manual for more
information in this regard.
A setup wizard handles the configuration of the connection in the
usual convenient manner.
6.0.0.2 Security aspects
You must, of course, protect your LAN against unauthorized access.
A SwyxConnect therefore offers a whole range of security
mechanisms that can provide an outstanding level of protection:
• VPN: Network couplings via VPN transmit data by IPSec. The
data are encrypted by AES, 3-DES, Blowfish or CAST
encryption algorithms.
• ISDN: For network couplings via ISDN, the connection
password, the checking of the ISDN number and the callback
function ensure the security of the connection.
Linking two networks 6-1
Page 82

The ISDN call back function cannot be configured using the wizard.
It can only be set up in the expert configuration. For details, please
see the reference manual.
6.1 What information is necessary?
The wizard will prompt you for the necessary information on a stepby-step basis. If possible, however, you should have it available
before launching the wizard.
To explain the significance of the information requested by the
wizard, we will be using a typical deployment as an example: setting
up a link between a branch office and its headquarters. The routers
involved are named 'HEAD_OFFICE' and 'BRANCH'.
Please refer to the following tables for the entries to be made for each
of the routers. Arrows mark the dependencies between the entries.
6.1.1 General information
The following details are required for the installation of LAN to LAN
couplings. The first column indicates, whether the information is
required for network couplings over VPN (standard method using
“preshared keys“) and/or ISDN.
Further details to network couplings via VPN using enhanced
methods (e.g. digital certificates) can be found in the LCOS reference
manual.
Coupling
VPN ISDN connection available? yes/no yes/no
VPN Type of the local IP address static/dynamic static/dynamic
VPN Type of the remote IP address static/dynamic static/dynamic
VPN +
ISDN
VPN +
ISDN
VPN +
ISDN
VPN +
ISDN
6-2 What information is necessary?
Entry Gateway 1 Gateway 2
Name of the local device 'HEAD' 'BRANCH'
Name of the remote station 'BRANCH' 'HEAD'
Remote ISDN calling number (0123) 123456 (0789) 654321
Remote ISDN caller ID (0789) 654321 (0123) 123456
Page 83

Coupling
VPN +
ISDN
Entry Gateway 1 Gateway 2
Password for secure transmis-
'Password' 'Password'
sion of the IP address
VPN Shared secret for encryption 'Secret' 'Secret'
VPN IP address of remote station '10.0.2.100' '10.0.1.100'
VPN IP network address of the
'10.0.2.0' '10.0.1.0'
remote network
VPN Netmask of the remote network 255.255.255.0 255.255.255.0
VPN Domain name of the remote
'head' 'branch'
network
VPN Hide local stations for access to
yes/no yes/no
remote network (Extranet
VPN)?
ISDN TCP/IP routing for access to
yes/no yes/no
remote network
ISDN IPX routing for access to remote
yes/no yes/no
network
VPN +
ISDN
VPN +
ISDN
NetBIOS routing for access to
remote network?
Name of remote workgroup
(NetBIOS only)
yes/no yes/no
'workgroup1' 'workgroup2'
ISDN Data compression on/off on/off
ISDN Channel bundling on/off on/off
• In case your device has an ISDN connection, the wizard asks
whether the remote site has ISDN as well.
• The type of IP address must be stated for both sides for VPN
connections via the Internet. There are two types of IP
addresses: static and dynamic. An explanation of the two IP
address types can be found in the reference manual.
Thanks to Dynamic VPN, connections can be enabled not
only between gateways with fixed, static IP addresses, but even
between gateways with dynamic IP addresses. The active initiation of VPN connections towards remote sites with dynamic
IP addresses requires ISDN.
What information is necessary? 6-3
Page 84

• If you haven't already named your SwyxConnect, the wizard
will ask you for a new, unique device name. With this entry,
you will rename your SwyxConnect. Be sure to give the two
devices different names.
• The name of the remote station is needed for its identification.
• Enter the subscriber number of the remote station in the ISDN
subscriber number field. The complete subscriber number
including all necessary area and country codes is required.
• The stated ISDN caller ID is used to identify and authenticate
callers. When a SwyxConnect receives a call, it compares the
ISDN caller ID entered for the remote station with the actual
caller ID transferred via the D channel. An ISDN caller ID
generally consists of an area code and an MSN.
• The password for the ISDN connection is an alternative to the
use of the ISDN caller ID. It is always used to authenticate
callers that do not send an ISDN caller ID. The exact same
password must be entered on both sides. It is used for calls in
both directions.
• The Shared Secret is the central password for security within
the VPN. The exact same password has to be entered on both
sides
• Data compression increases the transfer speed of the connection
at no additional cost. This is completely unlike the bundling of
two ISDN- channels with MLPPP (Multi Link PPP): The
transfer rate will be doubled but there will also be additional
telephone costs for two connections.
6.1.2 Settings for the TCP/IP router
In TCP/IP networks, addressing has a special significance. Please
note that two interconnected networks are logically separate from one
another. Each must therefore have its own network number (in our
example, '10.0.1.x' and '10.0.2.x'). These network numbers may not
be identical.
6-4 What information is necessary?
Page 85

10.0.
1
.2
1
.100
10.0.
(0123) 123456
server
.head.company'
'
'
pc1
.branch.comany
VPN or ISDN
connection
10.0.
2
.10
10.0.
2
.100
(0789) 654321
LAN of head office.
1.0
IP: 10.0.
Netmask: 255.255.255.0
Domain: '
,
head
.company'
Unlike when accessing the Internet, all of the IP addresses in the
involved networks are visible on the remote side when coupling
networks, not just those of the router. The computer with the IP
address 10.0.2.10 in the branch office LAN sees the server 10.0.1.2 in
the headquarters and can access it (assuming it has the appropriate
rights), and vice versa.
6.1.2.1 DNS access to the remote LAN
Thanks to DNS, it is not only possible to access remote computers in
a TCP/IP network via their IP address, but also by using freely
defined names.
For example, the computer with the name 'pc1.branch.company' (IP
10.0.2.10) will not only be able to access the server of the head office
via its IP address, but also via its name, 'server.head.company'. The
only precondition: the domain of the remote network in the wizard
must be specified.
The domain can only be specified in the LANconfig wizard. In
WEBconfig, enter the appropriate information later in the expert
configuration. For more information, see the SwyxConnect reference
manual.
LAN of branch office.
2.0
IP: 10.0.
Netmask: 255.255.255.0
Domain: '
,
branch
.company'
6.1.2.2 Extranet VPN
Finally, one can decide whether access to local stations is permitted.
In this 'Extranet VPN' operating mode, the IP stations do not expose
What information is necessary? 6-5
Page 86

their IP address to the remote LAN, rather they will be hidden behind
the VPN gateway's IP address instead.
Therefore, the stations within the remote LAN cannot access IP
stations in the other LAN directly. For example, if a headquarters.
LAN in 'Extranet VPN' mode is hidden behind its gateway's address
'10.10.2.100', and on of its IP stations (e.g. '10.10.2.13') accesses the
IP station '10.10.1.2' of the branch office, then the branch office.s IP
stations deems to be a accessed by '10.10.2.100'. The true IP address
of the accessor ('10.10.2.13') is hidden.
If two LANs shall be coupled in Extranet mode, please ensure to
enter the 'outbound' Extranet IP address of the remote site, not its
Intranet address. According to the example, this was '10.10.2.100'.
The appropriate netmask for the Extranet IP address would be
'255.255.255.255' then.
6.1.3 Settings for the IPX router
The coupling of IPX networks via VPN cannot be configured using
the wizard. It can only be set up in the expert configuration. For
details, please see the reference manual.
Coupling two typical IPX networks to form a WAN requires three
IPX network numbers:
• for the LAN of the head office
• for the LAN of the branch office
• for the higher-level WAN
The IPX network numbers in the head and branch offices are
specified to the respective remote sides.
The three required network numbers are designated as “External
Network Numbers” by the IPX conventions. Like IP network
addresses, the apply to an entire LAN segment. On the other hand,
internal IPX numbers are used to address specific Novell servers in
the LAN. All three specified network numbers must be distinct from
one another and from all used internal IPX network numbers.
In addition, it may be necessary to enter the frame type (“binding”).
Specifying the IPX network number and binding used is not
necessary if the remote network also contains a Novell server. It is
only necessary to enter the network number for the WAN manually in
this case.
6-6 What information is necessary?
Page 87

IPX internal net:
00020002
WAN
IPX network no.:
00000009
VPN or ISDN
connection
(0123) 123456
LAN of the head office
IPX network no.: 00000001
Binding: Ethernet_II
6.1.4 Settings for NetBIOS routing
NetBIOS routing can be set up quickly: All that is required in
addition to the information for the TCP/IP protocol used is the name
of a Windows workgroup from in the router's own LAN.
Remote Windows workgroups do not appear in the Windows
Network Neighbourhood, but can only be contacted directly (e. g. via
Find Computers).
6.2 Instructions for LANconfig
Perform the configuration on both routers, one at a time.
1. Launch the 'Connect two local area networks' wizard. Follow the
wizard's instructions and enter the required information.
(0789) 654321
LAN of the branch office
IPX network no.: 00000002
Binding: Ethernet_II
Instructions for LANconfig 6-7
Page 88

2. The wizard will return a message to indicate that it has all the
information it needs. Close the wizard with Finish.
3. After finishing the configuration of both routers, you can test the
network connection. Try to contact a computer in the remote LAN
(e.g. with a
a connection to the remote station and contact the required
computer.
ping
). The SwyxConnect should automatically set up
Ping – quick testing for TCP/IP
connections
To test a TCP/IP connection, simply
send a
computer in the remote network. For
more information on the 'ping'
command, please see the
documentation of your operating
system.
IPX and NetBIOS connection can be
tested by searching for a remote Novel
Server or a computer in the remote
Windows workgroup from your
computer.
ping
from your computer to a
6.3 Instructions for WEBconfig
Under WEBconfig, the coupling of networks via VPN cannot be
configured using the wizard. It can only be set up in the expert
configuration. For details, please see the reference manual.
Perform the configuration on both routers, one at a time.
1. From the main menu, launch the 'Connect two local area
networks' wizard. Follow the wizard's instructions and enter the
required information.
2. The wizard will return a message to indicate that it has all the
information it needs. Close the wizard with Terminate.
3. After finishing the configuration of both routers, you can test the
network connection. Try to contact a computer in the remote LAN
(e.g. with a
a connection to the remote station and contact the required
computer.
6-8 Instructions for WEBconfig
ping
). The SwyxConnect should automatically set up
Page 89

7 Providing dial-in access
Your SwyxConnect supports dial-in connections to permit individual
computers full access to your network. This service is also known as
RAS (Remote Access Service). In principle, the RAS access can be
realized in two different ways:
• VPN: For a RAS access via VPN, the connection between the
LAN and the dial-in PC is established over a specially secured
connection through the public Internet. The router in the LAN
requires VPN support, the dial-in PC an access to the Internet
and the LANCOM VPN Client.
• ISDN: For a RAS access via ISDN, a direct connection between
the LAN and the dial-in PC is established over an ISDN dial-up
connection. The router in the LAN requires an ISDN interface,
the dial-up PC an ISDN adapter or an ISDN modem. The data
transfer protocol is PPP. Therefore, the support of all usual
devices and operating systems is ensured.
A setup wizard handles the configuration of the dial-in connection in
the usual convenient manner.
7.0.0.1 Security aspects
You must, of course, protect your LAN against unauthorized access.
A SwyxConnect therefore offers a whole range of security
mechanisms that can provide an outstanding level of protection:
• VPN: Network couplings via VPN transmit data by IPSec. The
data are encrypted by AES, 3-DES, Blowfish or CAST
encryption algorithms.
• ISDN: For network couplings via ISDN, the connection
password, the checking of the ISDN number and the callback
function ensure the security of the connection.
The ISDN call back function cannot be configured using the wizard.
It can only be set up in the expert configuration. For details, please
see the reference manual.
7.1 Which information is required?
The wizard will set up dial-up access for only one user. Please run the
wizard again for each additional user.
Providing dial-in access 7-1
Page 90

7.1.1 General information
The following entries are required to set up a RAS connection. The
first column indicates whether the information is required for a VPN
(standard method using “preshared keys“) and/or an ISDN
connection.
Further details to network couplings via VPN using enhanced
methods (e.g. digital certificates) can be found in the LCOS reference
manual.
Coupling
VPN +
ISDN
VPN +
ISDN
VPN Shared secret for encryption
VPN Hide local stations for access to remote network
ISDN Incoming number of remote station
ISDN TCP/IP routing for access to remote network
ISDN IPX routing for access to remote network
VPN +
ISDN
VPN +
ISDN
VPN +
ISDN
Notes to the individual values:
• User name and password: Users authenticate themselves with
• Incoming number: The SwyxConnect uses the optional ISDN
Entry
User name
Password
(Extranet VPN)?
IP addresses for the dial-up PCs: static or dynamic by
address range (IP address pool)
NetBIOS routing for access to remote network?
Name of remote workgroup (NetBIOS only)
this information when dialling in.
caller ID as an additional user authentication. This security
function should not be used when users dial in from differing
locations.
7-2 Which information is required?
Page 91

Please refer to chapter ’Linking two networks’ → page 39 for advice
about the other values required for the installation of a RAS access.
The ISDN calling line identity (CLI)
The ISDN caller ID—also known as CLI (Calling Line Identity)—this is the
telephone number of the caller which is transmitted to the participant receiving the
call. As a rule, it consists of the country and area codes and an MSN.
The CLI is well-suited for authentication purposes for two reasons: it is very
difficult to manipulate, and the number is transferred free of charge via the ISDN
control channel (D-channel).
7.1 . 2 Se tt i ng s fo r TC P /I P
Each active RAS user must be assigned an IP address when using the
TCP/IP protocol.
LAN of the head
office. IP: 10.0.
1.0
VPN or ISDN
connection
Remote
workstation
1.101
IP: 10.0.
ISDN adapter
10.0.1.100
(0123) 123456
User: 'SAMPLE'
(0123) 777888
This IP address can be permanently assigned when setting up a user.
However, it is simpler to let the SwyxConnect automatically assign
free IP addresses to users when they dial in. In this case you only
need to specify the IP address range that the SwyxConnect should use
for RAS users.
During both manual and automatic IP address assignment, please
ensure that only free addresses from the address range of your local
network are used. In our example, the IP address '10.0.1.101' will be
assigned to the PC when connecting.
This IP address makes the computer a fully-fledged member of the
LAN: with the appropriate rights, it can access all of the other devices
in the LAN. The same applies in the other direction as well:
computers in the LAN will also be able to access the remote machine.
Which information is required? 7-3
Page 92

7.1.3 Settings for IPX
Two IPX network numbers must be provided for remote access to an
IPX network:
• the IPX network number of the head office
• an additional IPX network number for the higher-level WAN
IPX internal net:
00020002
(0123) 123456
LAN of the head office
IPX network no.: 00000001, Binding: Ethernet_II
The required network numbers are designated as “External Network
Numbers”. Like IP network addresses, they apply to an entire LAN
segment. On the other hand, internal IPX numbers are used to address
specific Novell servers in the LAN. All three specified network
numbers must be distinct from one another and from all used internal
IPX network numbers.
In addition, it may be necessary to enter the frame type (“binding”).
Specifying the IPX network number and binding used is not
necessary if the remote network also contains a Novell server. A
network number for the WAN must also be entered manually in this
case, however.
7.1.4 Settings for NetBIOS routing
All that is required to use NetBIOS is the name of a Windows
workgroup from the router's own LAN.
WAN
IPX network no.:
00000009
VPN or ISDN
connection
Remote
workstation
ISDN adapter
User: 'SAMPLE'
(0123) 777888
The connection is not established automatically. The RAS user must
manually establish a connection to the SwyxConnect via Dial-Up
Networking first. When connected, they can search for and access
computers in the remote network (via Find Computers, not through
the Network Neighbourhood).
7-4 Which information is required?
Page 93

7.2 Settings for the dial-in computer
7.2 .1 Di al- u p v ia V PN
For dialing into a network via VPN a workstation requires:
• an Internet access
• a VPN client
Please consult the documentation of your VPN client concerning the
necessary settings.
7.2.2 Dial-up via ISDN
A number of settings must be configured on the dial-in computer.
These are briefly listed here, based on a Windows computer:
• Dial-Up Networking (or another PPP client) must be correctly
configured
• Network protocol (TCP/IP, IPX) installed and bound to the dialup adapter
• New connection in Dial-Up Networking with the call number of
the router
• Terminal adapter or ISDN card set to PPPHDLC
• PPP selected as the Dial-Up server type, 'Enable software
compression' and 'Require data encryption' unchecked
• Select desired network protocols (TCP/IP, IPX)
• Additional TCP/IP settings:
• Assignment of IP address and name server address enabled
• 'IP header compression' disabled
These settings will permit a PC to dial into a remote LAN via ISDN
and access its resources in the usual manner.
7.3 Instructions for LANconfig
1. Launch the 'Provide Dial-In access (RAS)' wizard. Follow the
wizard's instructions and enter the required information.
Settings for the dial-in computer 7-5
Page 94

2. The wizard will return a message to indicate that it has all the
information it needs. Close the wizard with Finish.
3. Configure Dial-Up Networking access on the dial-in PC as
described. Next, test the connection (see box ’Ping – quick
testing for TCP/IP connections’ → page 46).
7.4 Instructions for WEBconfig
RAS access via VPN cannot be configured using the wizard under
WEBconfig yet. It can only be set up in the expert configuration. For
details, please refer to the reference manual.
4. From the main menu, launch the 'Connect two local networks'
wizard. Follow the wizard's instructions and enter the required
information.
5. Configure Dial-Up Networking access on the dial-in PC as
described. Next, test the connection (see box ’Ping – quick
testing for TCP/IP connections’ → page 46).
7-6 Instructions for WEBconfig
Page 95

8 Security settings
Your SwyxConnect base station has numerous security functions.
You find in this chapter all information needed for an optimal
protection of the base station.
8.1 The security settings wizard
Access to the configuration of a device permits not only to read out
critical information (e.g. Internet password). Rather, also the entire
settings of the security functions (e.g. firewall) can be altered then. So
an unauthorized configuration access endangers not only a single
device, but the entire network.
Your SwyxConnect has a password protection for the configuration
access. This protection is already activated during the basic
configuration by entering a password.
The device locks access to its configuration for a specified period of
time after a certain number of failed log-in attempts. Both the number
of failed attempts and the duration of the lock can be set as needed.
By default, access is locked for a period of five minutes after the fifth
failed log-in attempt.
Besides these general settings you can also check the security settings
of the wireless network with the security wizard as far as your device
has a WLAN interface.
8.1.1 Wizard for LANconfig
1. Mark your SwyxConnect in the selection window. Select from the
command bar Extras Setup Wizard.
2. Select in the selection menu the setup wizard Control Security
Settings and confirm your choice with Next.
Security settings 8-1
Page 96

3. Enter your password in the following windows and select the
allowed protocols for the configuration access from local and
remote networks.
4. In a next step parameters of the configuration lock like number of
failed log-in attempts and the duration of the lock can be
adjusted.
5. Now activate Stateful Inspection, ping-blocking and Stealth mode
in the the firewall configuration.
6. The wizard will inform you when entries are complete. Complete
the configuration with Finish.
8.1.2 Wizard for WEBconfig
Under WEBconfig you have the possibility to run the wizard Security
settings to control and change the settings. The following values are
handled:
• password for the device
• allowed protocols for the configuration access of local and
remote networks
• parameters of configuration lock (number of failed log-in
attempts and duration of the lock)
8.2 The firewall wizard
The SwyxConnect incorporates an effective protection of your LAN
when accessing the Internet by its Stateful Inspection firewall and its
firewall filters. Basic idea of the Stateful Inspection firewall is that
only self-initiated data transfer is considered allowable. All unasked
accesses, which were not initiated from the local network, are
inadmissible.
The firewall wizard assists you to create new firewall rules quickly
and comfortably.
Please find further information about the firewall of your
SwyxConnect and about its configuration in the reference manual.
8-2 The firewall wizard
Page 97

8.2.1 Wizard for LANconfig
1. Mark your SwyxConnect in the selection window. Select from the
command bar Extras Setup Wizard.
2. Select in the selection menu the setup wizard Configuring
Firewall and confirm your choice with Next.
3. In the following windows, select the services/protocols the rule
should be related to. Then you define the source and destination
stations for this rule and what actions will be executed when the
rule will apply to a data packet.
4. You finally give a name to the new rule, activate it and define,
whether further rules should be observed when the rule will apply
to a data packet.
5. The wizard will inform you as soon as the entries are complete.
Complete the configuration with Finish.
8.2.2 Configuration under WEBconfig
Under WEBconfig it is possible to check and modify all parameters
related to the protection of the Internet access under Configuration
Firewall / QoS Rules Rule Table.
8.3 The security checklist
The following checklist provides a comprehensive overview of all
security settings for professionals. Most of the points on this checklist
are no subject of concern in simple configurations, since these
generally adequate security settings are already implemented during
basic configuration and by the security wizard.
Detailed information on the security settings listed here can be found
in the reference manual.
The security checklist 8-3
Page 98

Have you assigned a password for the configuration?
The simplest option for the protection of the configuration is the
establishment of a password. As long as a password hasn't been
set, anyone can change the configuration of the device. The box
for entering the password is located in LANconfig in the
'Management' configuration area on the 'Security' tab. It is particularly advisable to assign a password to the configuration if you
want to allow remote configuration.
Have you permitted remote configuration?
If you do not require remote configuration, then deactivate it. If
you require remote configuration, then be sure to assign a password protection for the configuration (see previous section). The
field for deactivating the remote configuration is also contained
in LANconfig in the 'Management' configuration area on the
'Security' tab. Select here under 'Access rights - of remote networks' for all types of configuration the option 'not allowed'.
Have you assigned a password to the SNMP configuration?
Also protect the SNMP configuration with a password. The field
for protection of the SNMP configuration with a password is
also contained in LANconfig in the 'Management' configuration
area on the 'Security' tab.
Have you activated the Firewall?
The Stateful Inspection Firewall of the SwyxConnect ensures
that your local network cannot be attacked from the outside. The
Firewall can be enabled in LANconfig under ’Firewall/QoS’ on
the register card ’General’.
Do you make use of a ’Deny All’ Firewall strategy?
For maximum security and control you prevent at first any data
transfer through the Firewall. Only those connections, which are
explicitly desired have to allowed by the a dedicated Firewall
rule then. Thus ’Trojans’ and certain E-mail viruses loose their
communication way back. The Firewall rules are summarized in
LANconfig under ’Firewall/Qos’ on the register card ’Rules’. A
guidance can be found in the reference manual.
8-4 The security checklist
Page 99

Have you activated the IP masquerading?
IP masquerading is the hiding place for all local computers for
connection to the Internet. Only the router module of the unit
and its IP address are visible on the Internet. The IP address can
be fixed or assigned dynamically by the provider. The computers
in the LAN then use the router as a gateway so that they themselves cannot be detected. The router separates Internet and intranet, as if by a wall. The use of IP masquerading is set
individually for each route in the routing table. The routing table
can be found in the LANconfig in the 'IP router' configuration
section on the 'Routing' tab.
Have you closed critical ports with filters?
The firewall filters of the SwyxConnect devices offer filter functions for individual computers or entire networks. Source and
target filters can be set for individual ports or for ranges of ports.
In addition, individual protocols or any combinations of protocols (TCP/UDP/ICMP) can be filtered. It is particularly easy to
set up the filters with LANconfig. The 'Rules' tab under 'Firewall/QoS' can assist you to define and change the filter rules.
Have you excluded certain stations from access to the router?
Access to the internal functions of the devices can be restricted
using a special filter list. Internal functions in this case are configuration sessions via LANconfig, WEBconfig, Telnet or TFTP.
This table is empty by default and so access to the router can
therefore be obtained by TCP/IP using Telnet or TFTP from
computers with any IP address. The filter is activated when the
first IP address with its associated network mask is entered and
from that point on only those IP addresses contained in this initial entry will be permitted to use the internal functions. The circle of authorized users can be expanded by inputting further
entries. The filter entries can describe both individual computers
and whole networks. The access list can be found in LANconfig
in the 'TCP/IP' configuration section on the 'General' tab.
The security checklist 8-5
Page 100

Is your saved SwyxConnect configuration stored in a safe
place?
Protect the saved configurations against unauthorized access in a
safe place. A saved configuration could otherwise be loaded in
another device by an unauthorized person, enabling, for
example, the use of your Internet connections at your expense.
Have you activated the mechanism that protects your WAN
lines if the device is stolen?
After being stolen, the device can theoretically be operated at
another location by unauthorized persons. Password-protected
device configurations offer no protection from the operation of
the RAS access, LAN coupling or VPN connections that are set
up in the device; a thief could gain access to a protected network.
The device's operation can be protected by various means; for
example, it will cease to function if there is an interruption to the
power supply, or if the device is switched on in another location.
With the ISDN site verification, the device can only be operated
at one particular ISDN connection. After being switched on, the
device calls itself at the corresponding telephone number to
check that it is still connected to the "proper" ISDN connection.
The scripting function can store the entire configuration in RAM
only so that restarting the device will cause the configuration to
be deleted. The configuration is not written to the non-volatile
flash memory. A loss of power because the device has been relocated will cause the entire configuration to be deleted. Further
information can be found in the reference manual.
8-6 The security checklist
 Loading...