

Page 1
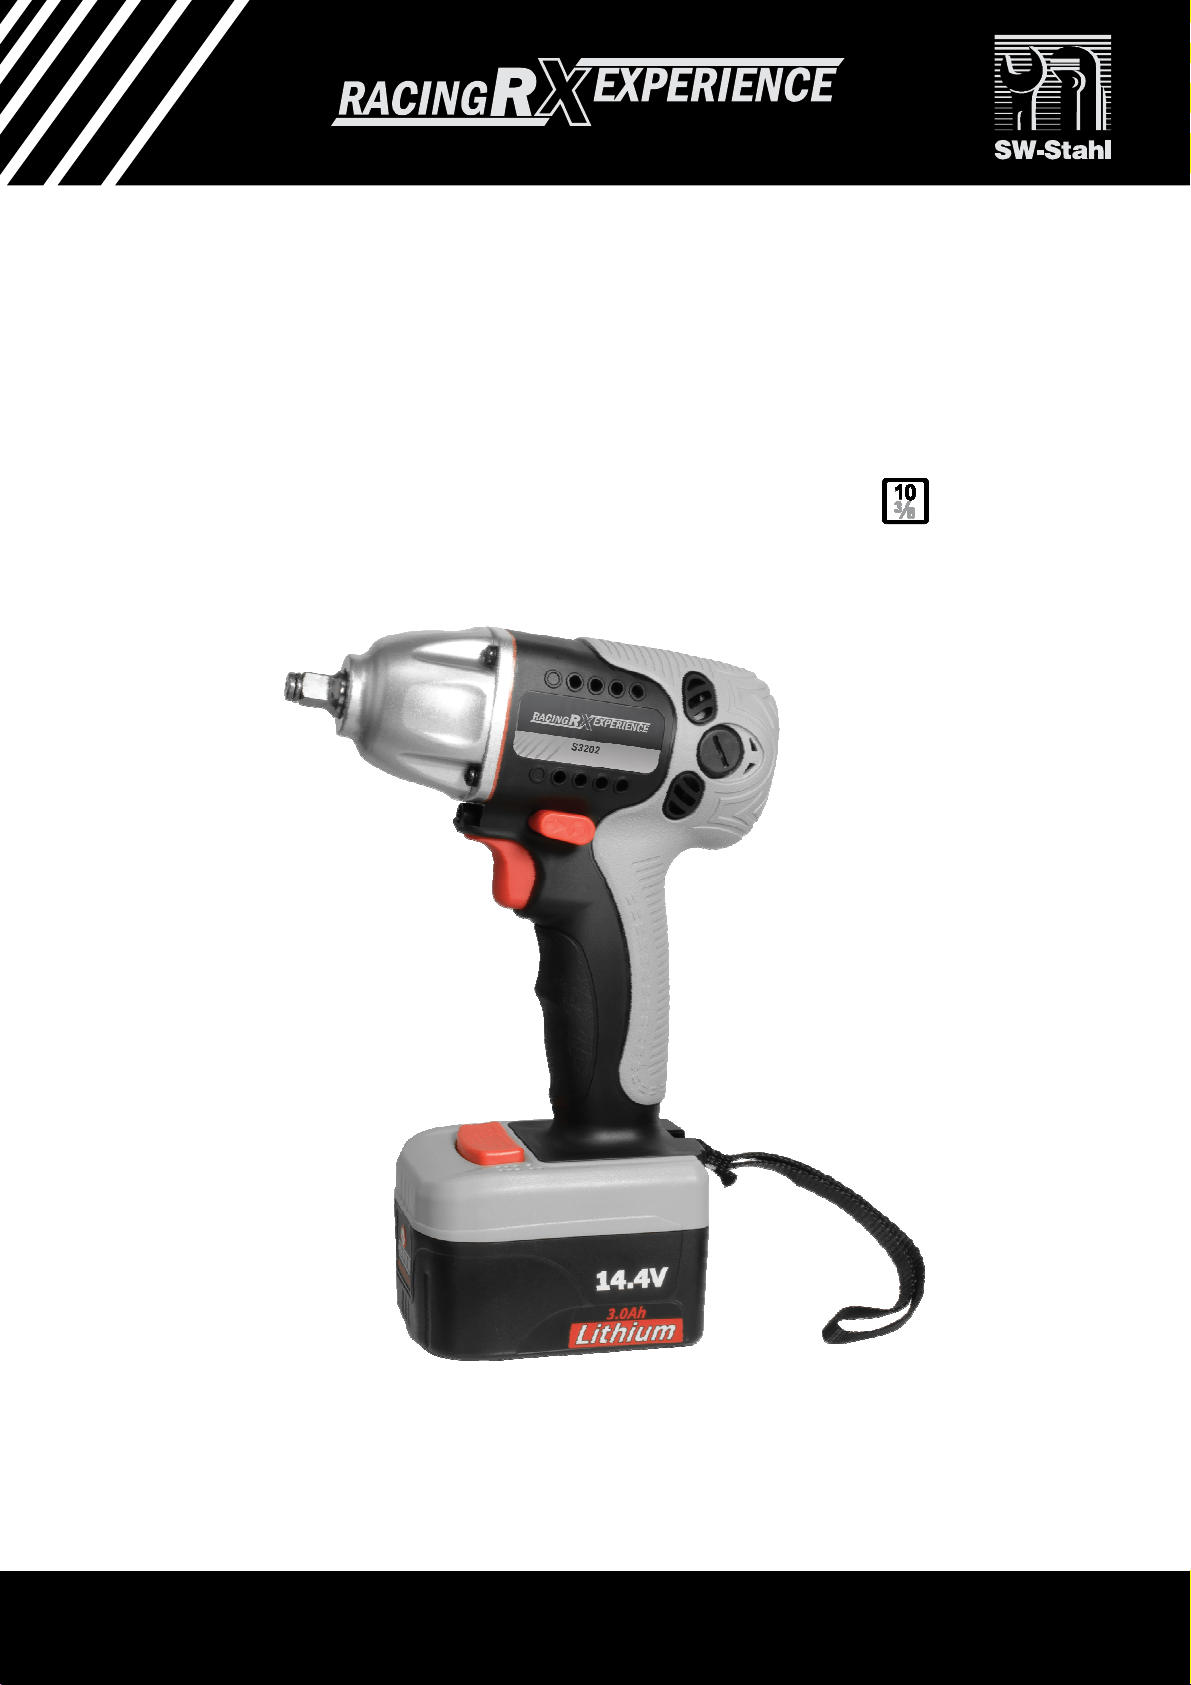
Instruction Manual
S3202
CORDLESS IMPACT WRENCH
with LED-Lighting, Li-Ion-battery and fast charger.
10 mm (3/8“) square drive.
14,4V / 3,0A ▪ Li-Ion ▪ Max. 217 Nm ▪
SW-Stahl und Werkzeugvertriebs GmbH Tel. +49 (0) 2191 / 46438-0 www.swstahl.de
Leverkuser Straße 65 Fax +49 (0) 2191 / 46438-40
D-42897 Remscheid E-Mail: [email protected]
Page 2
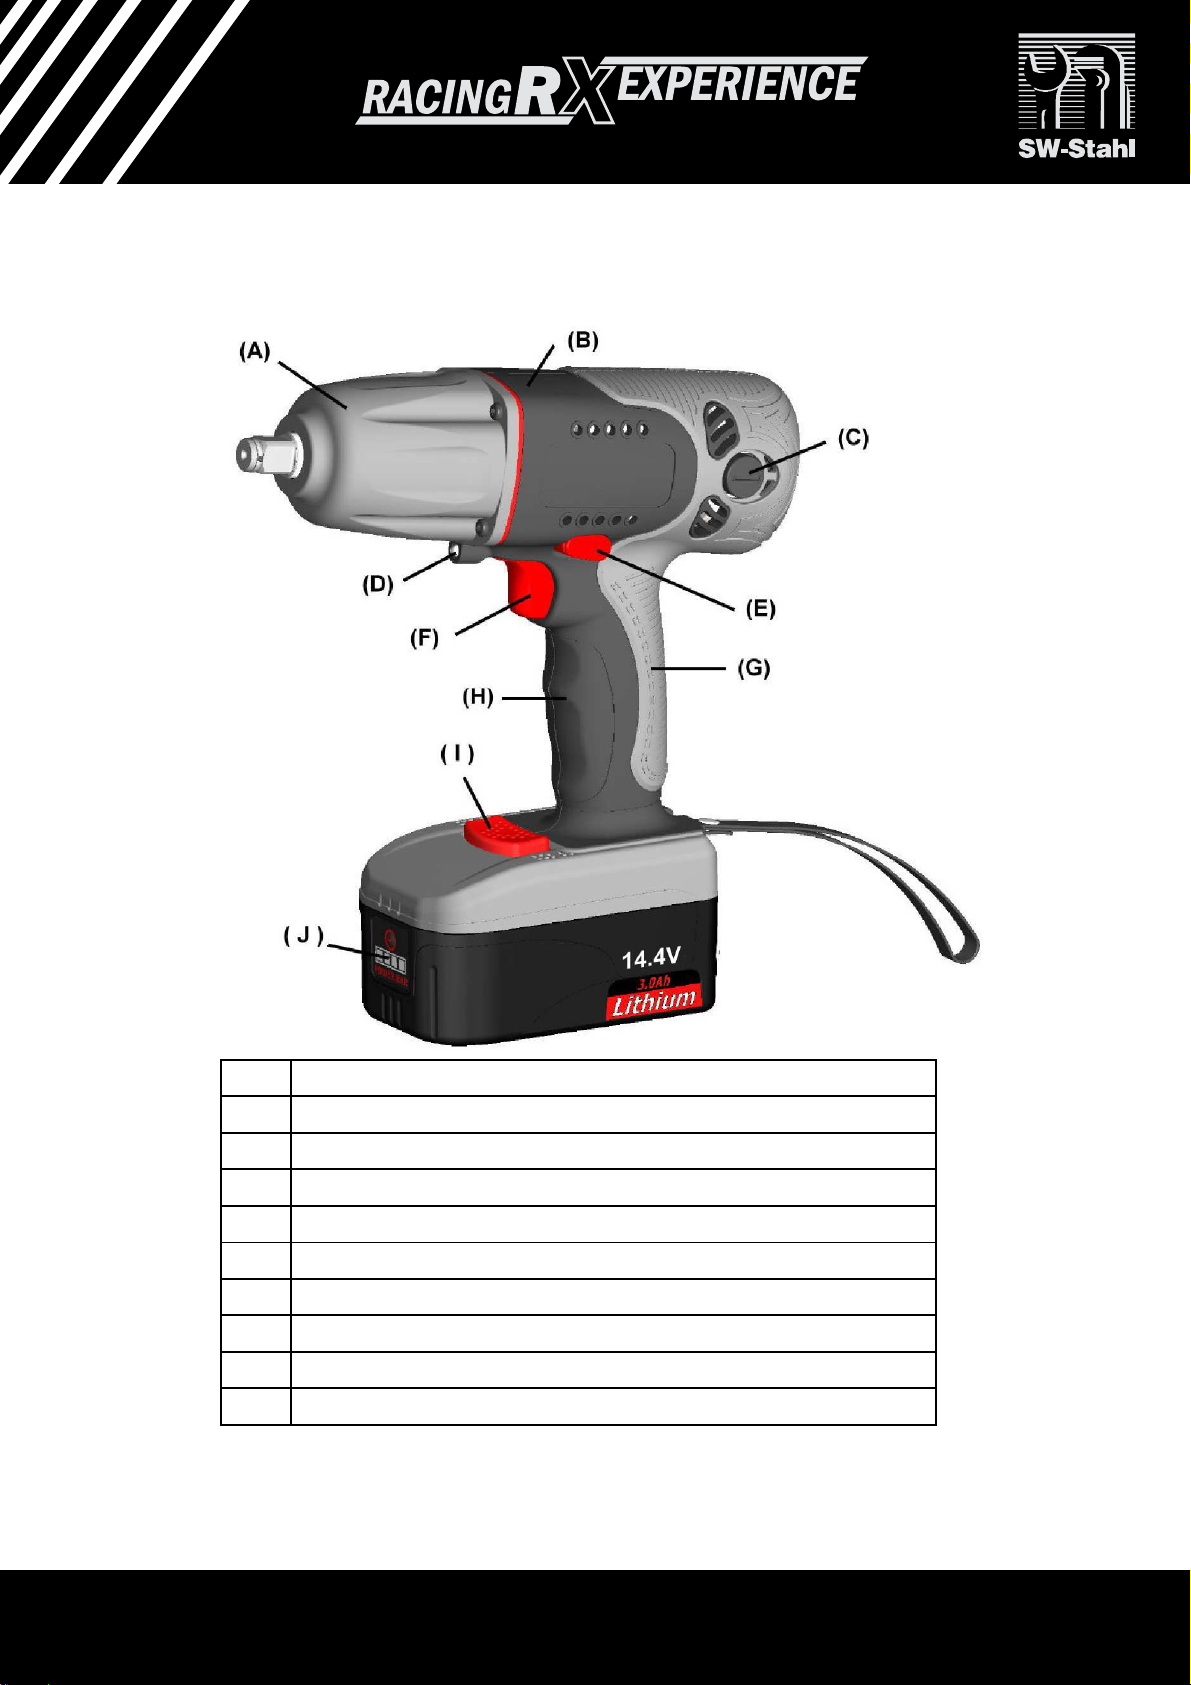
S3202 FUNCTIONAL GUIDELINES
(A) ALUMINUM HAMMER CASE
(B) IMPACT RESISTANT COMPOSITE HOUSING
(C) EASY CHANGE REPLACEABLE CARBON BRUSHES
(D) LED LIGHT for dark area working
(E) EASY TOUCH FORWARD/ REVERSE BUTTON
(F) VARIABLE SPEED CONTROL TIRGGER with electronic brake
(G) NON-SLIP, SOFT GRIP HANDLE reduces vibration and fatigue
(H) ERGONOMICAL DESIGNED HANDLE provides a well- balance
(I) EASY CONNECT SLIDING BATTERY SYSTEM
(J) BATTERY FUEL GAUGE (LI-ION ONLY)
- 2 –
SW-Stahl und Werkzeugvertriebs GmbH Tel. +49 (0) 2191 / 46438-0 www.swstahl.de
Leverkuser Straße 65 Fax +49 (0) 2191 / 46438-40
D-42897 Remscheid E-Mail: [email protected]
Page 3

Keep your work area clean and well lit.
Stay alert, watch what you are doing and
Use safety equipment. Always wear
Tool Use and Care
WARNING! READ ALL INSTRUCTIONS
Always observe the safety regulations applicable in your country to reduce the risk of fire,
electric shock and personal injury. Understand the following safety instructions before
attempting to operate this product. Always wear eye protection when working with power tools.
Keep these instructions in a safe place.
SAVE THESE INSTRUCTIONS
General Safety Rules
Work Area Safety
Cluttered benches and dark areas invite
accidents.
Do not operate power tools in explosive
atmospheres, such as in the presence of
flammable liquids, gases, or dust. Power
tools create sparks which may ignite the
dust or fumes.
Keep bystanders, children, and visitors
away while operating a power tool.
Distractions can cause you to lose control.
Personal Safety
use common sense when operating a
power tool. Do not use tool while tired or
under the influence of drugs, alcohol, or
medication. A moment of inattention while
operating power tools may result in serious
personal injury.
Dress properly. Do not wear loose
clothing or jewelry. Contain long hair.
Keep your hair, clothing, and gloves
away from moving parts. Loose clothes,
jewelry, or long hair can be caught in
moving parts.
Do not overreach. Keep proper footing
and balance at all times. Proper footing
and balance enables better control on the
tool in unexpected situations.
- 3 -
eye protection. Dust mask, non-skid
safety shoes, hard hat, or hearing
protection must be used for appropriate
conditions.
Use clamps or other practical ways to
secure and support the work piece to a
stable platform. Holding the work piece
by hand or against your body is unstable
and may lead to loss of control.
Do not force tools. Use the correct tool
for your application. The correct tool will
do the job better and safer at the rate for
which it is designed.
Do not use tool if switch does not turn
it on or off. Any tool that cannot be
controlled with the switch is dangerous
and must be repaired.
Store idle tools out of reach of children
and other untrained persons. Tools are
dangerous in the hands of untrained
users.
Check for misalignment or binding of
moving parts, breakage of parts, and
any other condition that may affect the
tool operation. If damaged, have the
tool serviced before using. Many
accidents are caused by poorly
maintained tools.
SW-Stahl und Werkzeugvertriebs GmbH Tel. +49 (0) 2191 / 46438-0 www.swstahl.de
Leverkuser Straße 65 Fax +49 (0) 2191 / 46438-40
D-42897 Remscheid E-Mail: [email protected]
Page 4

Use only accessories that are
Service
Battery Pack
cord when disconnecting
persons.
recommended by the manufacture for
your model. Accessories that may be
suitable for one tool, may become
hazardous when used on another tool.
Tool service must be performed only
by qualified repair personnel. Service
or maintenance performed by unqualified
personnel could result in a risk of injury.
When servicing a tool, use only
identical replacement parts. Follow
instructions in the Maintenance
section of this manual. Use of
unauthorized parts or failure to follow
maintenance instructions may create a
risk of electric shock or injury.
Make sure cord for charger is located so that it
will not be stepped on, tripped on, tripped over,
or otherwise subjected to damage or stress.
Do not abuse the power cord. Never use the
cord to carry the charger. Keep cord away from
heat, oil, water, sharp edges, or moving parts.
Replace damaged cords immediately.
Do not operate charger if it has been damaged
in any way, take it to a qualified service center
for repair.
To reduce risk of electric shock, unplug charger
from outlet before attempting any maintenance
or cleaning. Turning off controls will not reduce
this risk.
Do not disassemble charger or battery cartridge,
take it to a qualified service center when repair
is required. Incorrect reassembly may result in a
risk of electric shock or fire.
Additional Safety Rules for
Cordless Impact Wrench
Battery Charger
Caution: To reduce risk of injury, charge
only the authorized batteries. Other types
of battery may burst, causing personal
injury and damage.
Before using battery charger, read all
instructions and cautionary markings on
batteries, chargers and products using
batteries.
Do not allow anything to cover or clog the
charger vents.
Do not expose charger to rain, snow or
wet conditions.
To reduce the risk of damage to electric
plug and cord, pull by plug rather than
charger.
Use of an attachment not recommended
or sold by the manufacturer may result in
a risk of fire, electric shock, or injury to
Do not charge battery pack when temperature is
below 0oC (32oF) or above 40oC (104oF).
Do not attempt to use a step-down transformer,
an engine generator or DC power receptacle.
Do not short the battery pack: Do not touch the
terminals with any conductive material. Avoid
storing battery cartridge in a container with other
metal objects such as nails, coins, paper clips,
etc.
Do not expose battery cartridge to water or rain.
A battery short can cause large current flow,
overheating, possibly burns and even a breakdown.
SW-Stahl und Werkzeugvertriebs GmbH Tel. +49 (0) 2191 / 46438-0 www.swstahl.de
Leverkuser Straße 65 Fax +49 (0) 2191 / 46438-40
D-42897 Remscheid E-Mail: [email protected]
- 4 -
Page 5
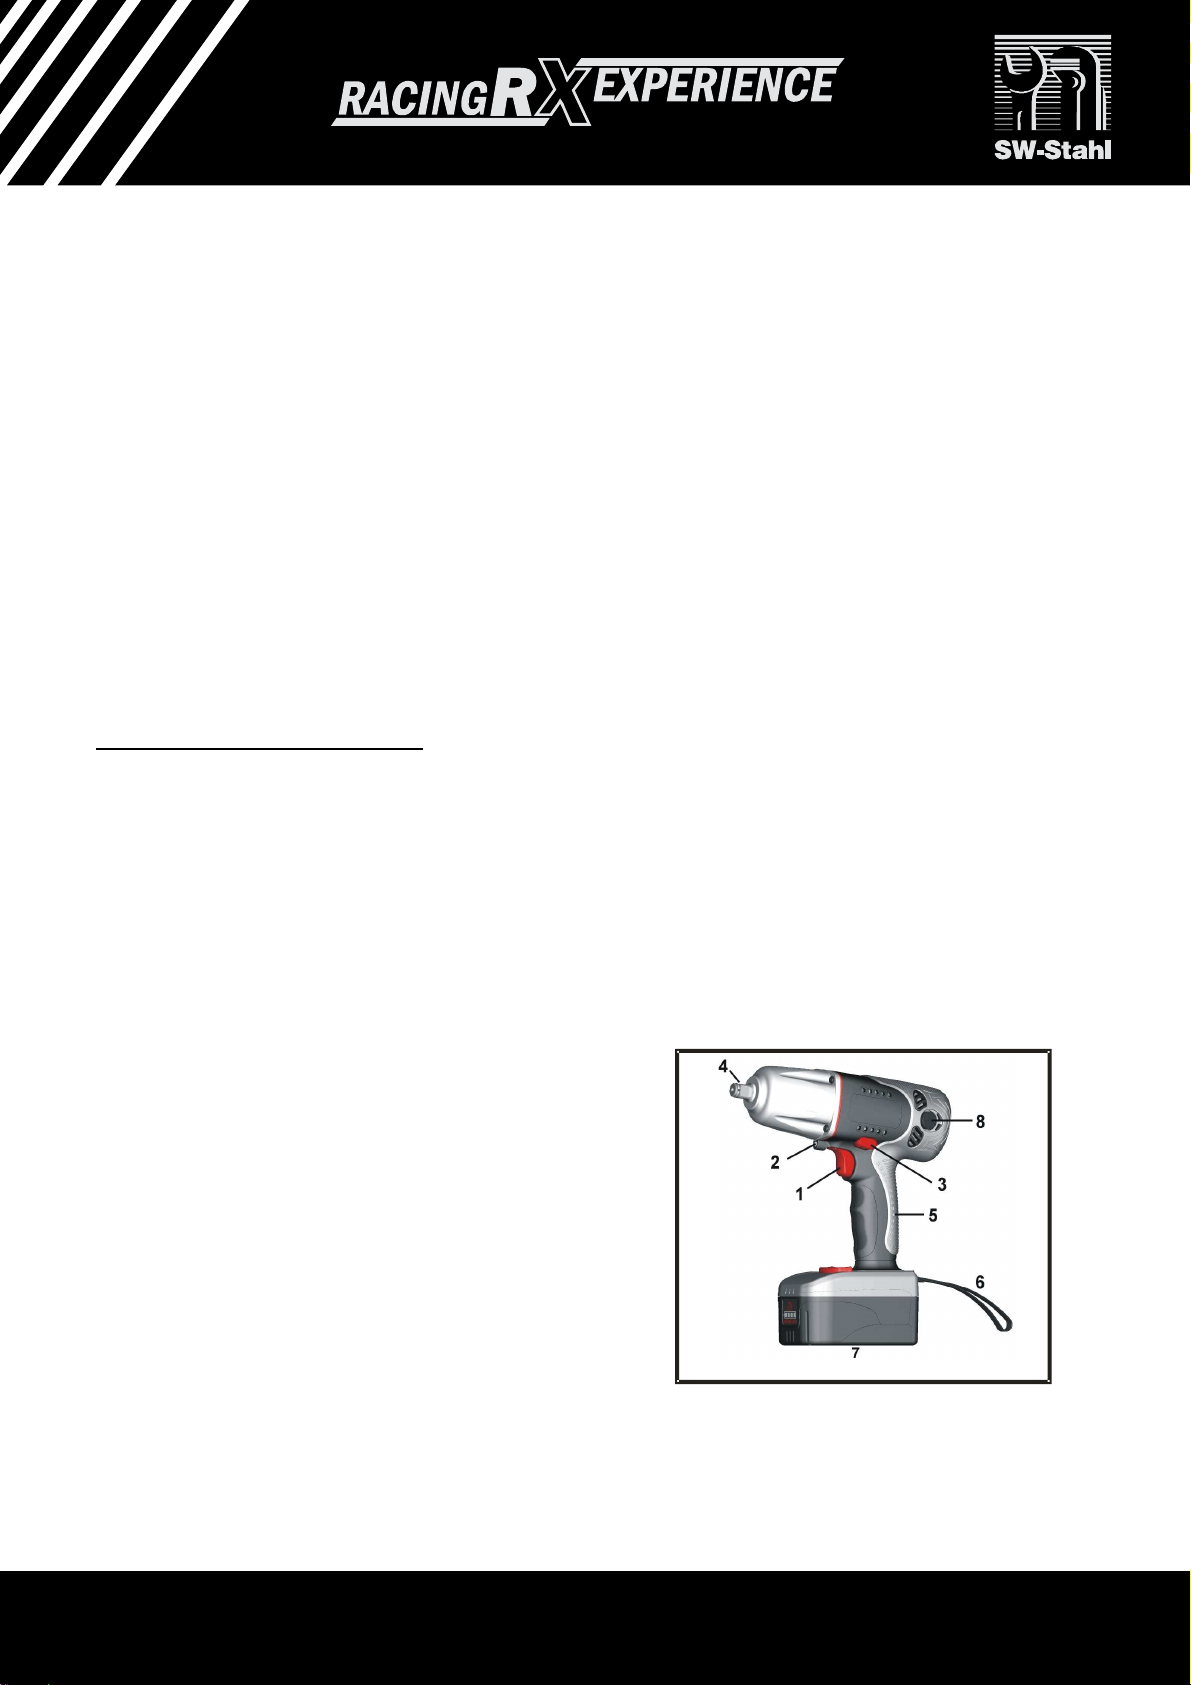
FUNCTIONAL DESCRIPTION
. Rotation Direction Switch
Figure 1
Do not store the machine and battery pack
in locations where the temperature may
reach or exceed 50oC (122oF).
Do not incinerate the battery pack even if it
is severely damaged or completely worn
out. The battery pack can explode in a fire.
Be careful not to drop, shake, or strike the
battery.
Do not charge inside a box or container of
any kind. The battery must be placed in a
well ventilated are during charging.
Do not dispose of battery packs into
household waste, fire or water. Battery
packs should be collected, recycled or
disposed of in an environmentally-friendly
manner. Call the authorized warranty
centers for places to dispose of damaged
or inoperable batteries.
This cordless impact is designed for use on
bolts and nuts installation and removal.
Please refer to the figure on this page to
familiarize yourself with the major components
of this tool before use.
1. Power Switch
Depressing the power switch partially will
energize the LED light (2) in front. Further
depressing will start the impact. The speed
increases with the amount of depression.
When released, the electronic speed brake
will stop anvil rotation within one second. A
small amount of sparks may appear next to
the motor. This is normal as energy is
being converted to heat for dissipation.
3
Pushing this switch to the left will cause the
chuck to spin in a “forward” direction, and
“reverse” when pushed to the right.
NOTE: In the center position, this switch will
lock out the power switch.
4. Anvil (Drive Shaft)
The anvil will accept any ½” drive hex
socket. Be sure the socket is fully inserted
before operating tool. Otherwise, the socket
may fly off and cause property damage or
personal injury. Use only impact-type
sockets.
5. Non-slip Handle
The “rubberized” part of the handle gives a
more comfortable grip during operation,
shields operator from motor heat buildup,
and helps in reducing vibration and fatigue.
6. Lanyard(Shown in Fiqure1)
The lanyard is provided to help minimize the
occurrence of tool being dropped. Please
use it to your advantage and do not remove.
7. Li-ion/Ni-MH Battery
This battery provides electrical power to the
motor. Please charge it according to the
charging instruction listed in this manual.
8. Easy Brush Access Cover
The cover allows the user to access the
carbon brush for replacement.
SW-Stahl und Werkzeugvertriebs GmbH Tel. +49 (0) 2191 / 46438-0 www.swstahl.de
Leverkuser Straße 65 Fax +49 (0) 2191 / 46438-40
D-42897 Remscheid E-Mail: [email protected]
- 5 -
Page 6
ASSEMBLY
Socket Insertion
WARNING!
OPERATIONS
with the amount of
WARNING!
Check for damage to the tool, parts or
accessories which may have occurred during
transport. Take the time to thoroughly read
and understand this manual prior to
operation.
This tool kit contains:
- 1 cordless impact wrench
- 1 or 2 quick charge batteries
- 1 one-hour quick charger
- 1 power cord
- 1 instruction manual
- 1 impact resistant case
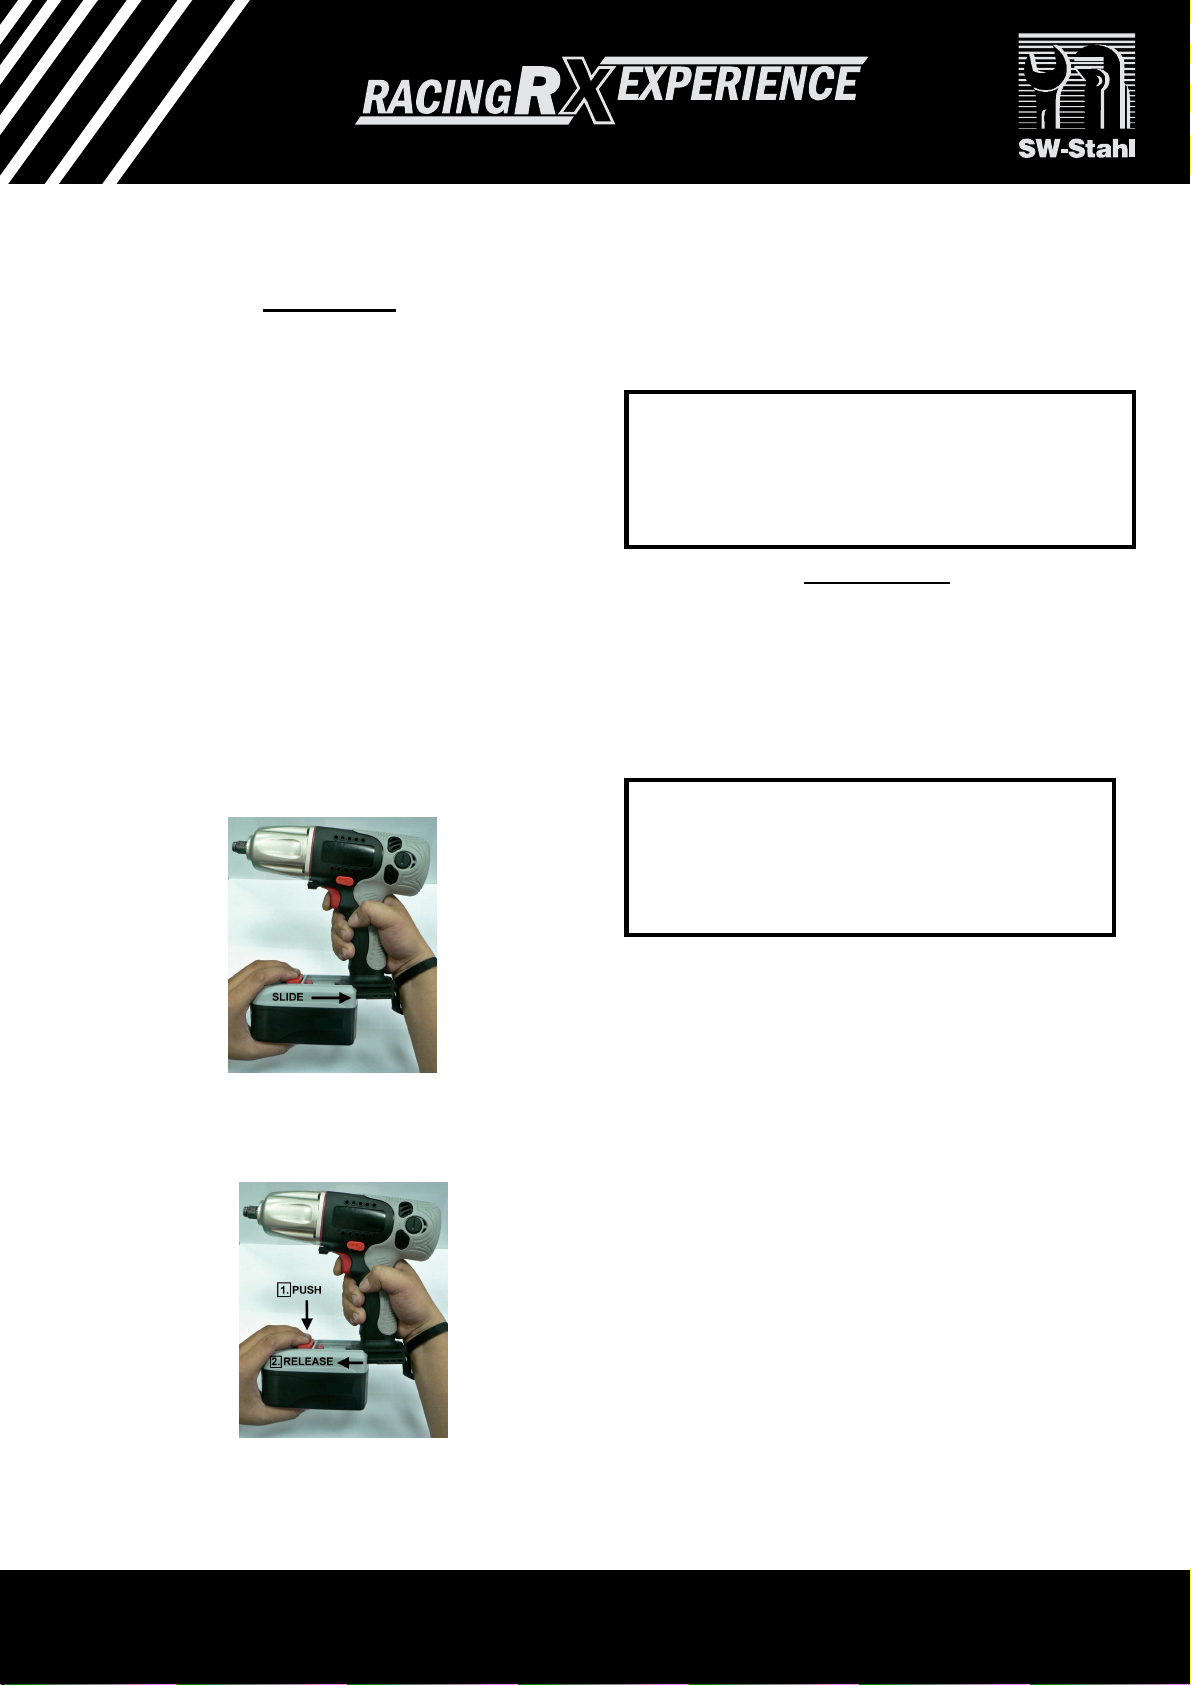
Attaching or Removing Battery Pack
1. To connect battery, line up the tracks and
attach the battery pack. Slide toward the
battery pack until it locks into positions with
a click.
2. To remove the battery pack, push on the
RED button on the top and release the
battery pack.
- 6 -
Use only 10 mm (3/8”) drive impact sockets with
this tool. Push all the way down the anvil so that is
will not come loose.
impact uses. Other sockets may break due to
the high stress associated with impact
operations. Always wear eye protection device.
Use only sockets designed for
This product had been carefully inspected prior to
leaving the factory. It should provide you with years
of satisfying service under normal operating
conditions. Do not, however, force the tool to
perform outside its design parameters. Such usage
will void the warranty.
Always wear safety glasses or
face-shields when operating this product.
Failure to do so can result in dust, shavings or
loose particles being thrown into your eyes.
1.
Slide battery into the bottom of the housing
handle until a click sound occurs. Do not force
battery as it should slide easily into place with
nominal force. Any difficulty doing so would
indicate an incorrect alignment.
2. Select a proper size impact socket and insert into
the quire drive anvil.
3. Pull back power switch slowly to engage the
LED, then pull back further to achieve desired
speed.
4. Depress the trigger switch slightly to start the tool
slowly. The speed increases
depression of the trigger for efficient tightening or
loosening of screws.
- 6 -
SW-Stahl und Werkzeugvertriebs GmbH Tel. +49 (0) 2191 / 46438-0 www.swstahl.de
Leverkuser Straße 65 Fax +49 (0) 2191 / 46438-40
D-42897 Remscheid E-Mail: [email protected]
Page 7
Forward/ Reverse Rotation Switch
WARNING!
important.
Battery Pack
-
Operation
To prevent damage, do not press
Forward/Reverse button until the anvil
comes a complete stop.
Forward Rotation Operation
Push the button for forward rotation. After
use, set the lever to its center position.
Reverse Rotation Operation
Push the button for reverse rotation. Check
the direction of rotation before use. After
use, set the button to its center position.
This tool is designed only
to speed the installation and removal
process, and is not intended to replace
a torque wrench. We strongly
recommend the use of a torque wrench
during the installation process after
using this tool, especially for
applications where the proper torque is
Li-ion Battery Pack
1. For Optimum battery life, store the Li-ion
battery pack following use without
charging it.
2. Do not charge battery when ambient
temperature is below 0oC (32oF) or above
40oC (104oF). If the battery pack is used
when the battery temperature is below
0oC (32oF), the tool may fail to function
properly.
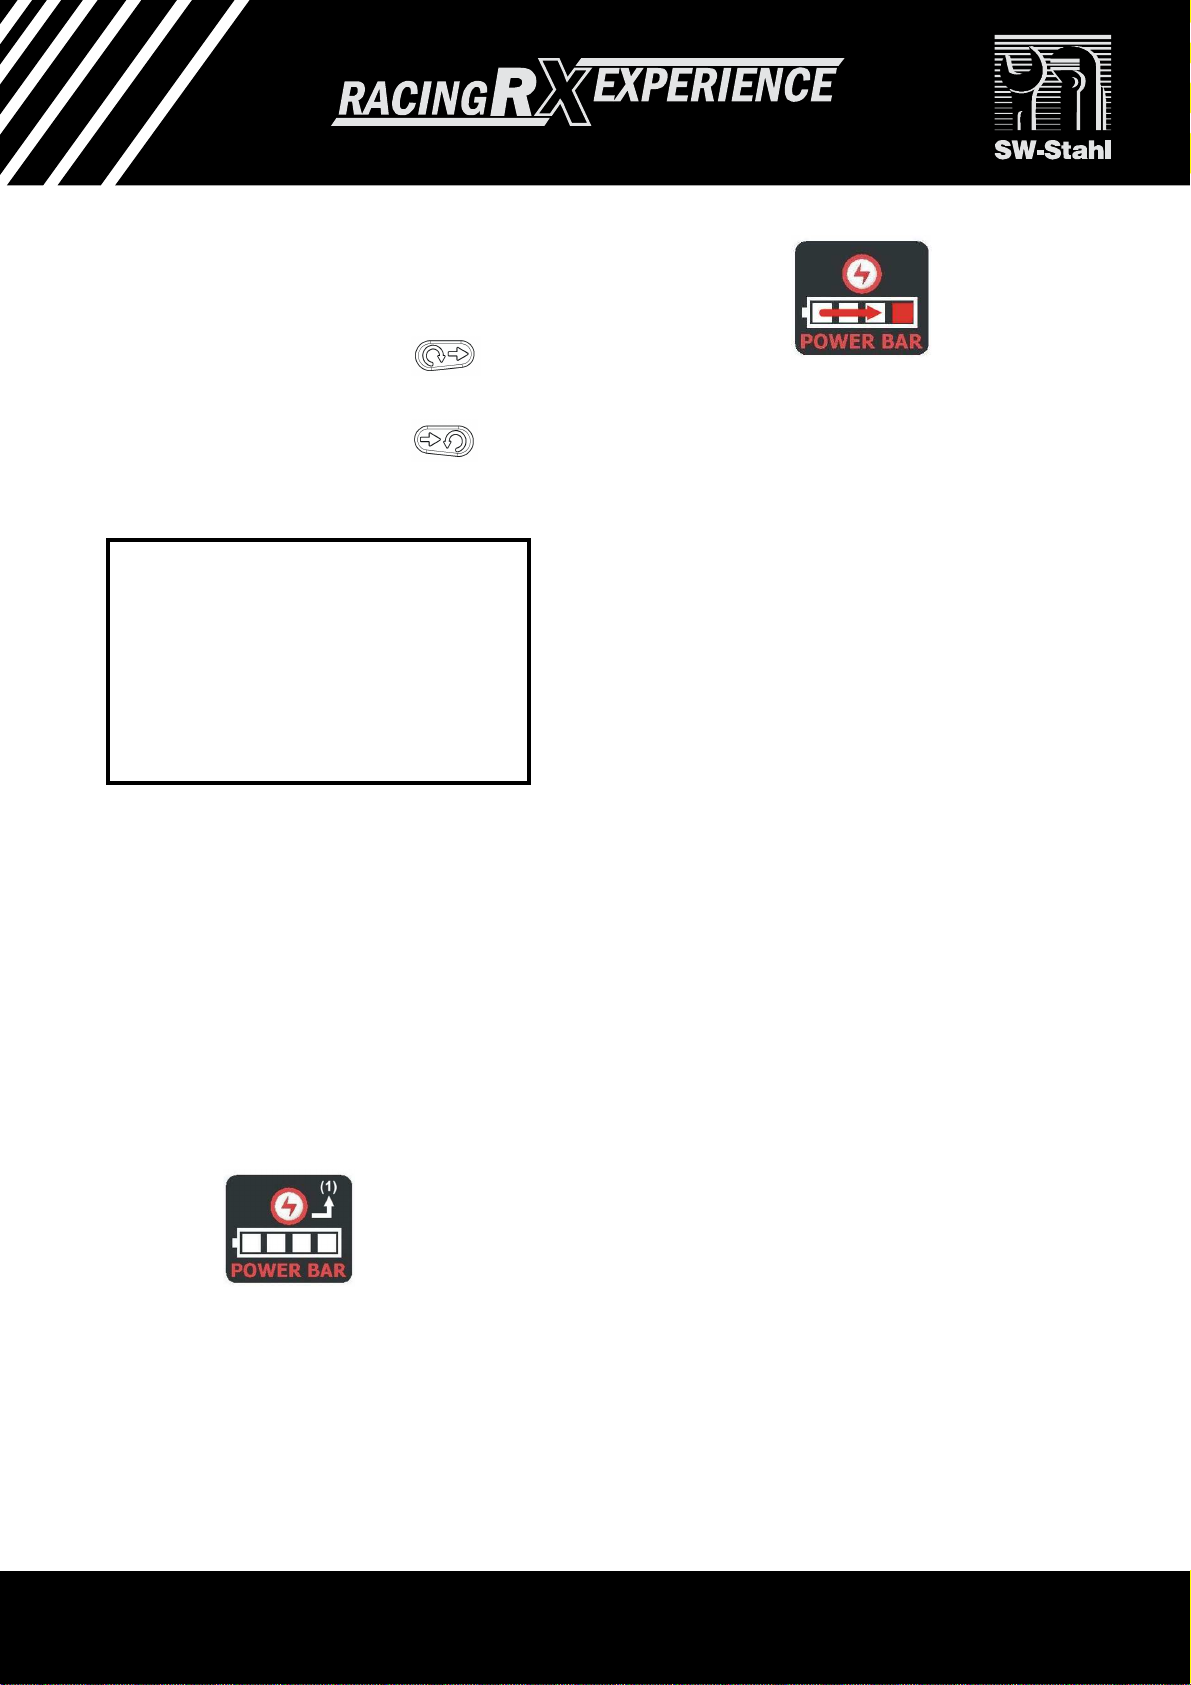
3. This battery pack has the built-in “Battery
Fuel Gauge” Press the gauge button (1)
to check the fuel condition of the battery
pack.
If you notice the battery fuel gauge only
left with one red light that means the
battery is running low.
- 7 -
Charge the battery pack immediately, or the
power of the tool may not reach to your desired
torque.
Battery Pack Life
The rechargeable batteries have a limited life. If
the operation time becomes extremely short
after recharging, replace the battery pack with a
new one.
Battery Recycling
The batteries must be recycled or disposed
properly.
Charging the battery for Li-ion/ Ni-MH battery
When charging a cool battery pack (below
0oC (32oF) in a warm place, leave the battery
pack at the place and wait for more than one
hour to warm up the battery to the level of
the ambient temperature. Otherwise battery
pack may not be fully charged.
Cool down the charger when charging more
than two battery packs consecutively.
Do not insert your fingers/nails into contact
hole, when holding charger or any other
occasions.
1. Place charger in a relatively cool and wellventilated area.
2. Plug charger into the AC outlet.
CAUTION: Ensure that the power source to
be utilized conforms to the power requirement
specified on the product nameplate.
SW-Stahl und Werkzeugvertriebs GmbH Tel. +49 (0) 2191 / 46438-0 www.swstahl.de
Leverkuser Straße 65 Fax +49 (0) 2191 / 46438-40
D-42897 Remscheid E-Mail: [email protected]
Page 8
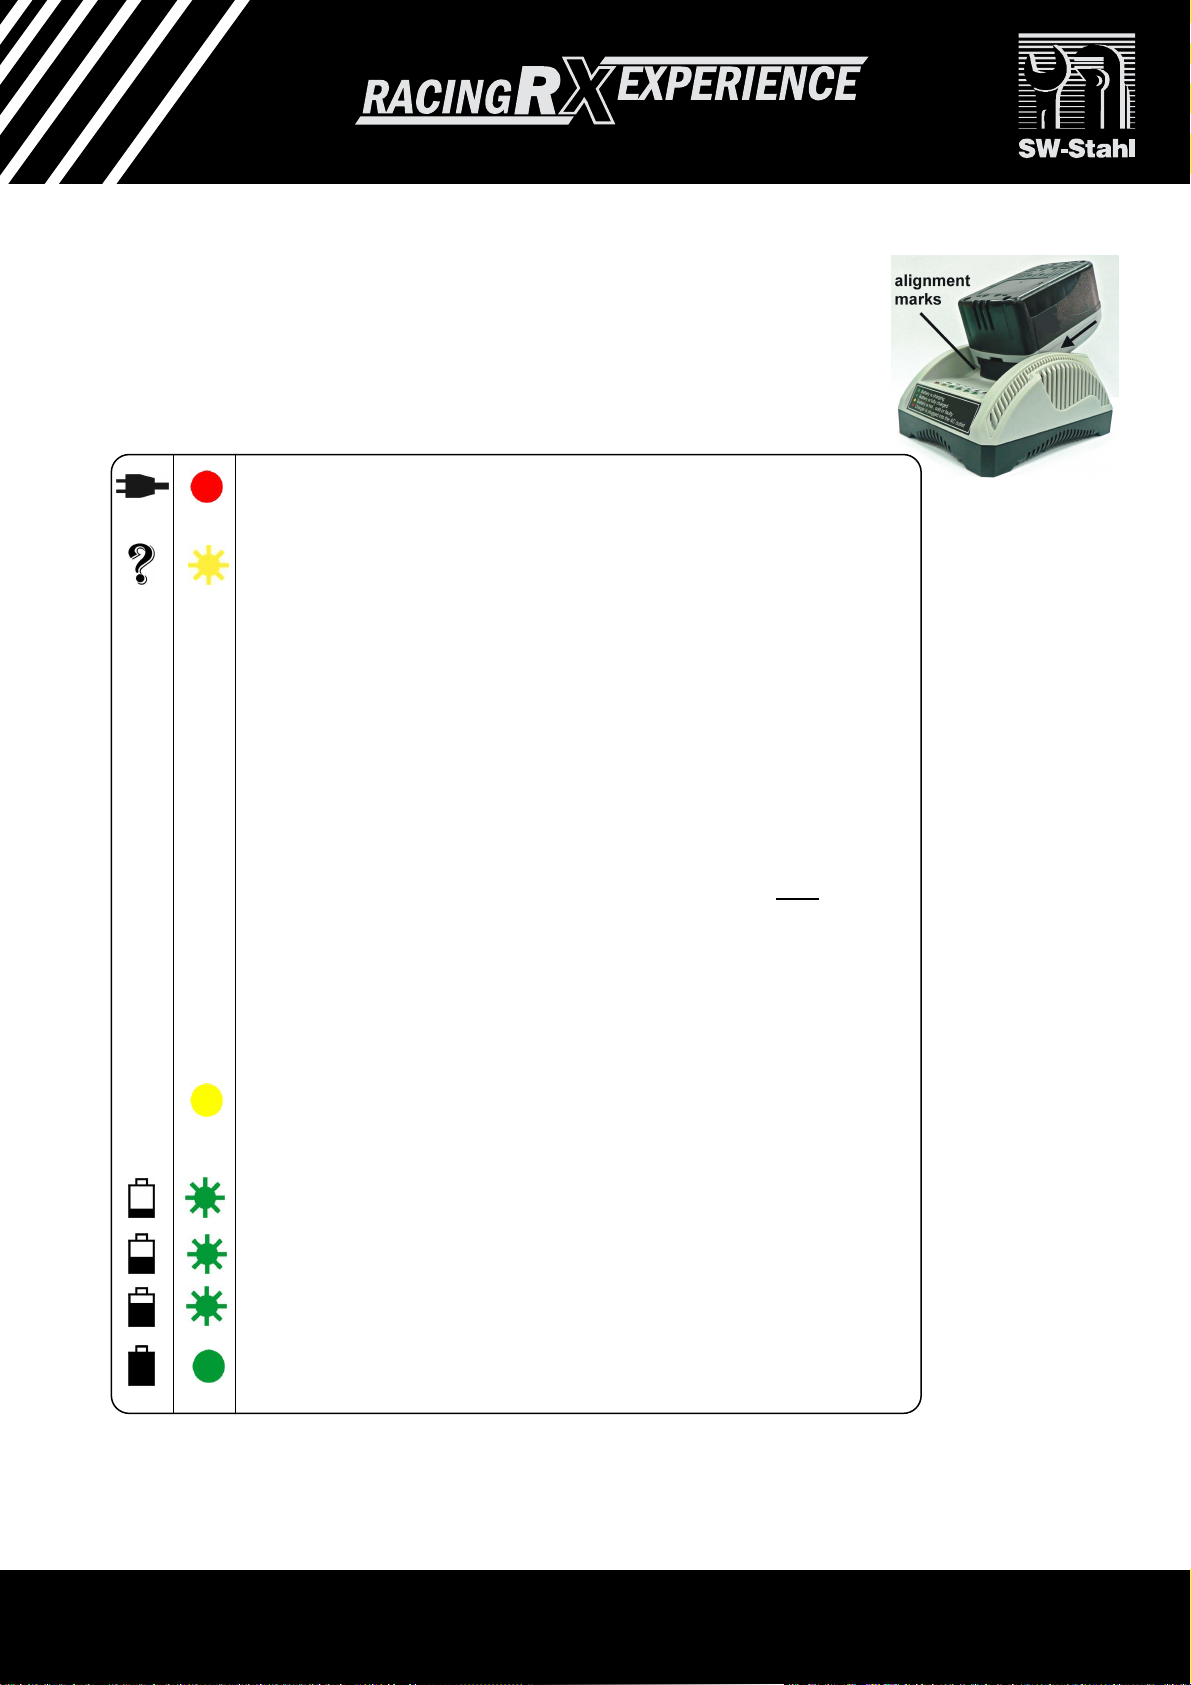
Red Lit
3. Turn the battery up-side-down and slide the battery into charger
while keeping the alignment marks line up. Slide the forward in the
direction of the arrow. Do not force battery as it should slide easily
into place with nominal force. Any difficulty doing so would indicate
an incorrect alignment.
LAMP INDICATIONS
Charger is plugged into the AC outlet. Ready to charge.
Yellow Flashing
(1) When the temperature of the battery is too low (<0oC (<32oF)),
it is in a trickle charge mode until the temperature of the
battery goes up to over 0oC (<32oF). The lamp will change
from the Yellow Flashing to Green Flashing automatically and
start to charge. (If after 70 minutes, the lamp changes from
yellow flashing to yellow lit, consult an authorized dealer.)
(2) When the temperature of the battery is too high (>40oC
(104oF)), it is in a trickle charge mode until the temperature of
the battery drops to under 40oC(104oF). The lamp will change
from the Yellow Flashing to Green Flashing automatically and
start to charge. (If after 70 minutes, the lamp changes from
yellow flashing to yellow lit, consult an authorized dealer.)
(3) When the voltage of the battery is too low (below 14.4 voltage
for 19.2V tools), it is in a trickle charge mode until the voltage
of the battery reaches to the standard value. The lamp will
change from the Yellow Flashing to Green Flashing
automatically and start to charge. (If after 20 minutes, the
lamp changes from yellow flashing to yellow lit, consult an
authorized dealer.)
Yellow Lit
The battery and the charger are not connected. If the yellow lit
still on after trying re-attach the battery, consul the an authorized
dealer.
Green Flashing
Now start charging
Green Flashing
Battery is approximately 50% charged.
Green Flashing
Battery is approximately 80% charged.
Green Lit
Charging is complete. (Fully charged.)
- 8 -
SW-Stahl und Werkzeugvertriebs GmbH Tel. +49 (0) 2191 / 46438-0 www.swstahl.de
Leverkuser Straße 65 Fax +49 (0) 2191 / 46438-40
D-42897 Remscheid E-Mail: [email protected]
Page 9

CAUTION:
repairs, maintenance or adjustment shou
ld be
4. If the power lamp (red) does not light
immediately or goes out soon after the
charger is plugged in, consult an
authorized dealer.
5. During charging, the charging lamp (green)
will start flashing. When charging is
completed, an internal electronic switch
will automatically be triggered to prevent
overcharging.
- Charging will not start if the battery pack is
warm. For example, immediately after
heavy-duty operation. The yellow standby
lamp will be flashing until the battery cools
down.
6. If the temperature of the battery pack is
0oC or less, charging takes longer to fully
charge the battery pack than the standard
charging time. Even when the battery is
fully charged, it will have approximately
50% of the power of a fully charged battery
at normal operation temperature.
7. Once the battery is fully charged, the
green lamp will be lit to indicate the gone
into a trickle charge mode.
Ni-MH Battery Pack
When you charge the battery pack for the
first time, or after prolonged storage, charge
it for about 24 hours to bring the battery up to
full capacity.
Li-ion Battery Pack
Your battery pack is not fully charged at the
time of purchase. Be sure to charge the
battery before first use.
Tightening Bolts and Nuts
1. Use the correct size socket. A larger
socket than needed will cause “rounding”
of the bolt and loose metal shaving to fly
off.
2. Start slowly to engage and not damage the
threads. Once the thread is positively
engaged, the speed can be increased to
facilitate the work.
DO NOT push tool in a forward
direction against the fastener. Doing so will put
undue stress on the bearings and the
impression that the tool has lost some of its
power.
3. The proper torque can be reached in a
relatively short time. Stop the tools as soon as
the impact sound heard. When tightening
smaller nuts and bolts, carefully adjust
pressure on the power switch so that the nut is
not damaged.
NOTE: Since the torque is determined by many
factors (battery condition, size of socket, drive
extension used, nut and bolt condition, etc.), for
repeat operations, perform a torque test with a
torque wrench before use.
Removing Bolts and Nuts
Use the maximum torque available to remove
nuts and bolts. Be sure to slow the speed
when the fastener is nearly removed or the
high rotation speed will cause the fastener to
“fly out” and cause damage of injury.
MAINTENANCE
Maintenance of the DC motor. Exercise due
care to ensure the motor does not burn out due
to overloading.
Do not allow brake-fluids, gasoline, petroleum-
based products, penetrating oils, etc. to come
in contact with plastic parts. They contain
chemicals that can damage, weaken or destroy
the tool and battery housing.
Repairs should only be done by a qualified
service technician using identical parts to
ensure the safe and effective use of this
product.
Always ensure that the machine is switched off
and the battery cartridge is removed before
carrying out any work on the machine.
To maintain product safety and reliability,
- 9 -
SW-Stahl und Werkzeugvertriebs GmbH Tel. +49 (0) 2191 / 46438-0 www.swstahl.de
Leverkuser Straße 65 Fax +49 (0) 2191 / 46438-40
D-42897 Remscheid E-Mail: [email protected]
Page 10

Lubrication
WARRANTY
ct per minute:
Tool Weight:
Battery Weight:
MH/ 2.0Ah)
ion/ 3.0Ah)
Charger accepted:
All of the bearings in this tool are lubricated
with a sufficient amount of high grade lubricant
for use under normal conditions before leaving
the factory. Regular addition or replacement of
the lubricating grease is not necessary.
However, on occasions when new or more
lubricant is needed, take the tool to a qualified
technician to do the job.
NOTE: Do not use oil as a grease substitute.
It will leak and degrade the performance of
this product.
All accessories designed for this tool is
included with this product. Storage spaces for
sockets and extension bar are provided in the
carrying case for your convenience. Sockets
and extension bar can be obtained through
your local retailers. If the retailer does not
have the parts you need, simply contact the
authorized dealers for instruction on how to
order. Be sure to have ready the model
ACCESSORIES
number of the product.
SPECIFICATIONS
Model: S3202
Voltage:
Square Drive:
No-load Speed:
Impa
Max Torque:
(without battery)
(Ni-
(LiLength:
Charge Time:
This product carries a one-year warranty. We will
repair, without charge, any defects due to faulty
material or workmanship. Before you send back
the product please first call your dealer or the local
service center.
Experience has shown that over 90% of the
problems can be resolved over the phone; saving
much time and money for both parties. If a return
is necessary, simply return 1. only the part in
question; 2. copy of original sales receipt; and 3.
freight prepaid to an authorized warranty center.
This warranty does not apply to
- Accessories
- damage caused where repairs have been made
or attempted by others
- damage due to abuse, misuse, neglect, normal
wear and tear, alteration or modification
- products used as a rental unit
In no event shall the manufacture be liable for any
incidental or consequential damages.
14.4 VDC
9.5 mm (3/8“)
0 ~ 2,300 rpm
0 ~ 3,000 bpm
160 ft-lbs (217 N-m)
4.3 lbs (1.95 kgs)
1.9 lbs (0.85 kgs)
1.3 lbs (0.6 kgs
173 mm (6.8“)
approx. 60 mins
Ni-MH/ Li-ion
SW-Stahl und Werkzeugvertriebs GmbH Tel. +49 (0) 2191 / 46438-0 www.swstahl.de
Leverkuser Straße 65 Fax +49 (0) 2191 / 46438-40
D-42897 Remscheid E-Mail: [email protected]
- 10 -
Page 11

WARRANTY CARD
NOTE: Please fill out and send in the registration card within 7 days of purchase.
Please record the following information to expedite warranty work or parts order:
Model No. _____________________________________________________
Description Cordless 14.4V impact wrench
Serial No. _____________________________________________________
Purchase Date: _________________________________________________
Purchased From: __________________________________________________
________________________________________________________________
Address of Retailer: ________________________________________________
________________________________________________________________
________________________________________________________________
________________________________________________________________
Please affix original or copy of sales receipt here to facilitate warranty works.
- 11 –
SW-Stahl und Werkzeugvertriebs GmbH Tel. +49 (0) 2191 / 46438-0 www.swstahl.de
Leverkuser Straße 65 Fax +49 (0) 2191 / 46438-40
D-42897 Remscheid E-Mail: [email protected]
Page 12
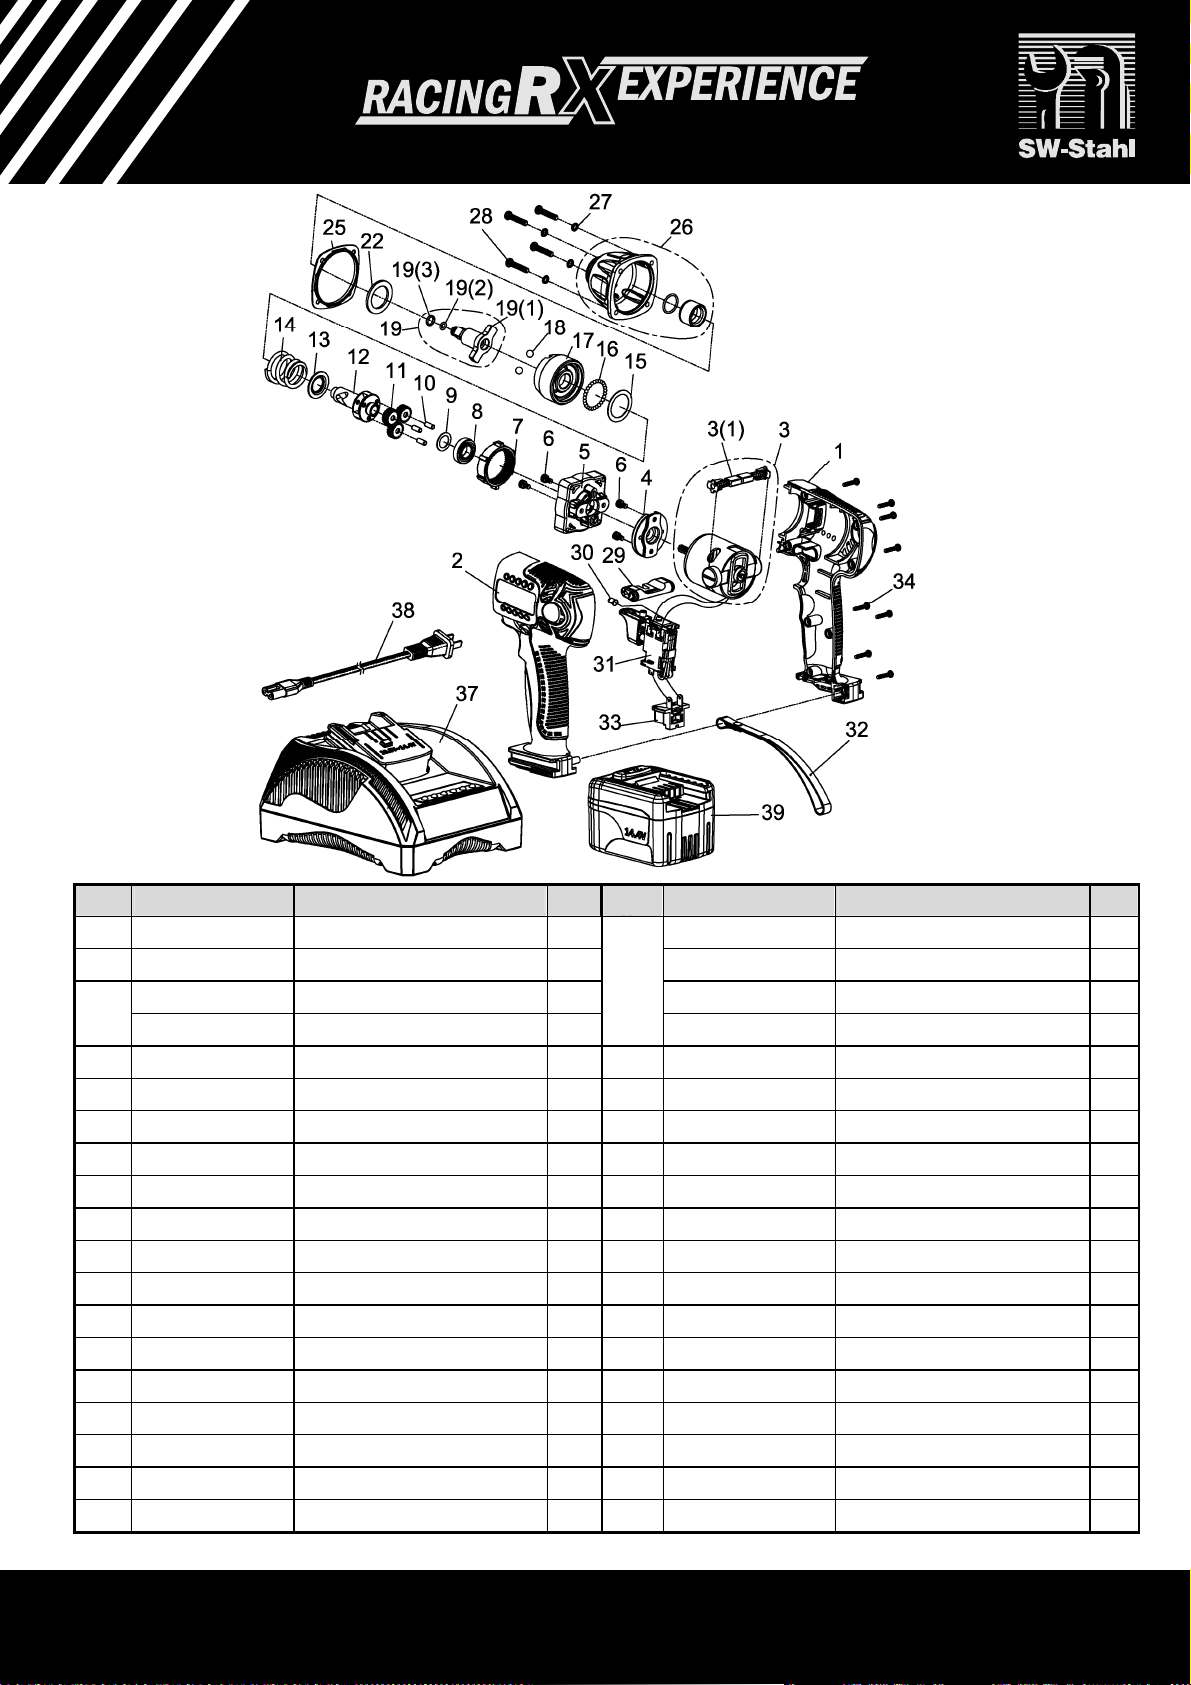
Index
1
2
3
4
5
6
7
8
9
10
11
12
13
14
15
16
17
18
Part No. Description Q'ty
C01IW144B#B1 Housing Upper Cover 1
C02IW144B#B1 Housing Lower Cover 1 D43IW144B3 (1)Anvil 1
B83IW144B DC 14.4V Motor Assembly 1 000-4103 (2)O-Ring (φ5×φ1.5)
D15IW144B (1)Carbon Brush 2 D44IW144A (3)C-Ring
D52IW144B Motor Plate 1
D50IW144B Gear Box 1
000-0243 Screw (M4×6L) 2
D49IW144A-3 Gear Ring 1
000-2305 Ball Bearing (6901ZZ) 1
D39IW144A Washer 1
000-3446 Pin (φ4×9.8L) 3
D49IW144A-5 Planet Gear 3
D43IW144B Shaft 1
D39IW144B Spring Seat 1
D48IW144B Spring 1
D39IW144A-2 Washer 1
000-3831 Steel Ball (φ3) 28
D45IW144B Driving Hammer 1
000-3853 Steel Ball (7/32”) 2
Index
19
22
25
26
27
28
29
30
31
32
33
34
37
38
39
Part No. Description Q'ty
BAIW144B3 Anvil Assembly 1
D39IW144B-2 Washer 1
C39IW144B#R1 Gasket 1
B41IW144B#CZ Front Cover Assembly 1
000-1840 Spring Washer 4
000-1140 Screw (M4×20L) 4
C05IW144A#R1 Forward/Reverse Rod 1
E82IW180A LED 1
E81IW192B#R1 Trigger Switch 1
D40IW192B#B1 Lanyard 1
B06144B-B#B1 Connector 1
000-0930 Screw (φ3×14L) 8
B84B Battery Charger 1
E86B AC Wire 1
BB144B-330 Li-ion 3.0Ah Battery Pack 1
1
1
SW-Stahl und Werkzeugvertriebs GmbH Tel. +49 (0) 2191 / 46438-0 www.swstahl.de
Leverkuser Straße 65 Fax +49 (0) 2191 / 46438-40
D-42897 Remscheid E-Mail: [email protected]
 Loading...