

Page 1
www.swramps.com
Page 2

ENGLISH - PAGES ...........6-9
ESPAÑOL - PAGINAS ........10-13
FRANÇAIS - PAGES ..........14-17
ITALIANO - PAGINE .........18-21
DEUTSCH - SEITEN ..........22-25
PORTUGUÊS - PAGINA. . . . . . .26-29
.............30-33
IMPORTANT SAFETY INSTRUCTIONS
The lightning flash wi th arrowhead symbol within an e quilateral triangle is intende d
to alert the user to the presence of uninsulated “dangerous voltage” within the
product ’s enclosure that may be of suf ficient magnitude to constitute a risk of electric
shock to persons.
The exclamation point within an equilateral triangle is intended to aler t the user to
the presence of important operating and maintenance (servicing) instructions in the
literature accomp anying the pro duct.
1) Read these instructions.
2) Keep these instructions.
3) Heed all warnings.
4) Follow all instructions.
5) Do not use this apparatus near water.
6) Clean only wit h dry cloth.
7) Do not block any ventilation openings. Install in accordance with the manuf acturer’s
instructions.
8) Do not install near any heat sources such as radiators, heat regis ters, stoves, or other
apparatus (including amplifiers) that produce heat.
9) Do not defeat the safety purpose of the polarized or grounding-type plug. A polarized plug
has t wo blades with one wider than the other. A grounding type plug has two blades and
a third grounding prong. The wide blade or the third prong are provided f or your safet y. If
the provided plug doe s not fit into your outle t, consult an electrician for replacement of the
obsolete ou tlet.
10) Protect the power cord from b eing walked on or pinched particularly at plugs, convenience
receptacles and the point where they exit f rom the apparatus.
11) Only use at tachments/accessories specified by the manufact urer.
12) Use only with the car t, stand, tripod, bracket, or table speci fied by the
manufact urer or sold w ith the apparat us. When a cart is used, use caution
when moving the cart/apparatus combination to avoid injur y from tipove r.
13) Unplug this app aratus during lightning s torms or when unused for long periods of time.
14) Refer all servicing to qualified service personnel. Servicing is required w hen the ap paratus
has been damaged in any way, such as power-supply cord or plug is damaged, liquid has been
spilled or obje cts have fallen into the appar atus, the app aratus has been exposed to rain or
moisture, does not operate normally, or has been dropped.
15) To comple tely disconnec t this apparatus from the AC mains, dis connect the power supply
cord plug from the AC receptacle.
16) The mains plug of the power supply cord shall remain readily operable.
17) WARNING – To reduce the risk of fire or electric shock, do not expose this apparatus to rain
or moisture.
18) Do not expose this equipment to dripping or splashing and ensure that no objects filled with
liquids, such as vases, are placed on the equipment .
19) Maintain at least 6 inches (15.25 cm) of unobstructed air space behind the unit to allow for
proper ventilation and cooling of the unit.
20) CAUTI ON – For rac k mounted power amplifiers, keep all wiring and materials away from
the sides of the unit and allow the unit to cool down for 2 minutes before pulling f rom a rack
enclosure.
21) Amplifiers and loudspeaker systems are capable of producing very high sound pressure levels
which may cause temporary or permanent hearing damage. Use care when setting and
adjusting volume levels during use.
22) FCC Part 15 Compliance Statement (for digi tal products, as applicable) - Part 15.21: Changes
or modifications not expressly approved by the part y responsible for compliance could void
the user’s authority to operate the e quipment. NOTE: The manufac turer is not responsible f or
any radio or TV inter ference caused by unauthorized modifications to this equipment. Such
modifications could void the user ’s authority to operate the equipment.
23) WARNING – To maintain pro duct safet y, products with internal or external (batter y pack)
batterie s: •Batter ies and/or the product in which they are installed, shall not be exposed to
excessive heat such as sunshine, fire or the like. •There may be a danger of explosion if the
batter y is incorrectly connected/replaced. Replace only with the s ame or equivalent type
batter y specified in the instructions or on the p roduct.
Page 3

INSTRUCCIONES DE SEGURIDAD IMPORTANTES
INSTRUCTIONS DE SÉCURITÉ IMPORTANTES
El relámpago con el símbolo de cabeza de f lecha dentro de un triángulo equilátero
tiene por objeto alertar al usuario de la presencia de “voltaje peligroso” no aislado
dentro del gabinete d el producto, que puede ser de magnitud suficiente como para
constituir un riesgo de desc arga eléctrica par a las personas.
El signo de admiración dentro de un triángulo equilátero tiene p or objeto alertar al
usuario a la presencia de importantes instrucciones de operación y mantenimiento
(servicio) en los documentos que acompañan al producto.
1) Lea estas instrucciones.
2) Conser ve estas instr ucciones.
3) Atienda todas las advertencias.
4) Siga to das las instrucciones.
5) No use este aparato cerca del agua.
6) Limpie sólo con un paño seco.
7) No bloquee ningún orificio de ventilación. Instale de acuerdo con las instruccione s del
fabricante.
8) No lo instale cerca de ninguna fuente de c alor, como radiadores, registros de calefacción,
estufas u otros aparatos (incluidos los amplif icadores) que produzcan c alor.
9) No elimine el objetivo de seguridad de la clavija polariz ada o con conexión a tierra. Una
clavija polariz ada tiene dos hojas, una de ellas más ancha que la otra. Una clavija con
conexión a tierra tiene dos hojas y una tercera pata de tierra. La hoja ancha o la tercera pata
se suministr an para su seguridad. Si la clavija suministr ada no encaja en su enchufe, consulte
a un elec tricista para que reemplace el enchufe obsoleto.
10) Proteja el cable de alimentación para que no sea pisado o pellizcado, especialmente en las
clavijas, receptáculos de conveniencia y en el punto en el que salen del aparato.
11) Use únicamente aditamentos o accesorios especificados por el fabr icante.
12) Úselo únicamente con el carrito, soporte, trípode, abrazadera o mesa
especif icados por el fab ricante o que se venden con el aparato. Cuando se
use un carrito, sea prec avido al mover la combinación de carrito y aparato
para evitar lesiones por volcadura.
13) Desenchuf e este aparato durante las tormentas eléctricas o cuando no se use durante
períodos prolongados de tiempo.
14) Refiera todo el servicio a personal cualificado. Se re quiere servicio cuando el aparato se ha
dañado de cualquier forma, como si se dañan el cable de alimentación o la clavija, si se ha
vertido un líquido o han caído objetos al interior del aparato, si el aparato ha es tado expuesto
a la lluvia o la humedad, no funciona normalmente o ha caído.
15) Para desconec tar completamente este aparato de la red de CA, desconec te el cable de
alimentación elé ctrica del recept áculo de CA.
16) La clavija elé ctrica del cable de alimentación se mantendrá fácilmente operativa.
17) ADVERTENCIA – Para reducir el riesgo de incendio o descarga eléctrica, no ex ponga este
aparato a la lluvia o la humedad.
18) No exponga este equipo a escurrimientos o salpicaduras, y asegúrese de que no se coloquen
objetos llenos de líquido, como jarrones, s obre el equipo.
19) Mantenga al menos 6 pulgadas (15.25 cm) de espacio de ventilación sin obst rucciones detrás
de la unidad para permitir su ventilación y enfriamiento adecuados.
20) PRECAUCIÓN – En el cas o de amplificadores de potencia montados en anaqueles, conser ve
todo el cableado y materiales alejados de los lados de la unidad y per mita que la unidad se
enfríe dur ante 2 minutos antes de retirarla de un gabinete de anaquel.
21) Los sistemas de amplif icadores y altavoces son capaces de pro ducir niveles de presión de
sonido muy elevados, lo que puede ocasionar daños temporales o permanentes a la audición.
Sea cuidadoso al establecer y ajus tar los niveles de volumen durante el uso.
22) ADVERTENCIA – Para mantener la seguridad de los productos con baterías internas o
externas (paquete de baterías): •Las baterías y el producto en el que están instaladas no
deberán exponerse a calor excesivo, como la luz del sol, fuego y similares. •Puede haber
peligro de explosión si la batería se conecta o reemplaza de modo incorrecto. Reemplácelas
sólo con baterías del mism o tipo o equivalente especific adas en las instrucciones o en el
produc to.
La lumière clignotante avec la f lèche dans un triangle équilatéral a pour but d’avertir
l’utilisateur de la présence d ’une « tension dangereuse » non isolée dans le boît ier du
produit, laquelle peut être d’une ampleur suff isante pour constituer un risque de choc
électrique pour le s personnes.
Le point d’exclamation dans un tr iangle équilatéral a pour but d’avertir l’utilisateur de
la présence d’impor tantes in structi ons relatives au fonct ionnement et à la
maintenance (entretien) dans la documentat ion qui accompagne le produi t.
1) Lisez ces instructions.
2) Conser vez ces instruc tions.
3) Tenez-compte de tous les avertissements.
4) Suivez toutes les instructions.
5) N’utilise z pas cet appareil près d’un point d’eau.
6) Net toyez-le uniquement avec un chiffon sec.
7) Ne bloquez pas les ouver tures de ventilation. L’installez selon les instruc tions du fabricant.
8) Ne l’installez pas près d’une source de chaleur comme un radiateur, registre de chaleur, four
ou autre appareil (y compris des amplificateurs) qui produisent de la chaleur.
9) Ne rende z pas inopérant le système de sécurité de la fiche polarisée ou de mise à la terre. Une
fiche polarisé e dispose de deux broches, l’une étant plus large que l’autre. Une fiche avec mise
à la terre dispose de trois broche s, l’une étant dédiée à la mise à la terre. La bro che large ou la
troisième broche sont là pour votre sécurité. Si la fiche fournie ne correspond pas à votre prise
de courant, f aites intervenir un éle ctricien pour remplacer la prise obsolète.
10) Évitez de marcher sur le cordon d'alimentation ou de le pincer, en particulier au niveau des
fiches, des prises de courant et de l'endroit où il sort de l’appareil.
11) N’utilisez que les pièces/accessoires spé cifiés par le fabricant.
12) N’utilisez que le chariot, le pied, le trépied, la console ou tab le spécifiés par
le fabricant ou vendus avec l’appareil. En utilisant un chariot, faite s attention
en déplaçant l’ensemble chariot-appareil à ce qu'il ne blesse personne en se
renversant.
13) Débranchez l’appareil pendant les orages ou si vous ne l’utilisez pas pendant de longues
périodes.
14) Tout entretien doit être ef fectué par du personnel qualifié. L’entretien est nécessaire
lorsque l’appareil a été endommagé d’une façon ou d’une autre, par exemple si le cordon
d’alimentation ou une fiche sont endommagés, si du liquide s’est répandu ou que des objets
sont tombées dans l’appareil, si l’appareil a été exposé aux intempéries ou à l’humidité, s'il ne
fonctionne pas correctement ou s'il est tombé.
15) Pour déconnecter entièrement l’appareil du ré seau élec trique c.a., débranchez la fiche du
cordon d’alimentation de la prise c.a.
16) La fiche du cordon d’alimentation doit ê tre prête à servir.
17) AVERTISSEMENT – Afin de réduire les risques d’incendie ou de chocs élect riques, n’exposez
pas cet appareil aux intempéries ou à l'humidité.
18) N’exposez pas cet équipement à l’humidité ou aux éclaboussures et assurez-vous qu’aucun
objet rempli de liquide, tels que des vases, ne soit placé dessus.
19) Maintenez un espace non obstrué d’au moins 15,25 cm (6 pouces) pour laisser circuler l’air
derrière l’unité et ainsi permettre une ventilation correc te et un refroidiss ement de l’unité.
20) ATTENTION – Concernant les amplificateurs de puissance montés sur châssis, tout le câblage
et tous les matériaux doivent être tenus à l’écart de s côtés de l’unité et permet tre à celle-ci de
refroidir pendant 2 minutes avant de les retirer du boîtier de châssis .
21) Les amplificateurs et les haut-parleurs peuvent produire des niveaux de pression sonore très
élevés ce qui peut provoquer des dommages auditifs temporaires ou permanent. Agissez avec
précaution lorsque vous réglez ou ajustez le niveau sonore pendant l ’utilisation.
22) AVERTISSEMENT – Afin de maintenir la sécurité du produit, de s produits disposant de piles
internes ou e xternes : •Les piles et/ou le produit dans lequel elles se trouvent, ne doivent
pas être exposés à une chaleur excessive comme le rayonnement solaire, le feu ou autre. •Il
peut y avoir un danger d’explosion si la pile n’est pas correctement connectée/remplacée.
Remplacez-la uniquement par un t ype de pile identique ou équivalant spécif ié dans les
instruc tions ou sur le produit.
Page 4
IMPORTANTI ISTRUZIONI DI SICUREZZA
WICHTIGE ANWEISUNGEN ZU IHRER SICHERHEIT
La luce lampeggiante con il simbolo a freccia in un t riangolo equilatero
avvisa l’utente della pre senza di tensione pericolosa non isolata all’interno
dell’involucro del pro dotto che può es sere di grandezza sufficiente a
costituire un rischio di shock elettrico per le persone.
Il punto esclamativo all’interno di un triangolo equilatero avvisa l’utente di
importanti istruzioni per il funzionamento e la manutenzione nel materiale
informativo che accompagna il prodotto.
1) Leggere queste istruzioni.
2) Conser vare queste istruzioni.
3) Rispet tare tutte le av vertenze.
4) Seguire tutte le istruzioni.
5) Non usare questo apparecchio vicino all’acqua.
6) Pulire solo con un panno asciutto.
7) Non bloccare le aperture di ventilazione. Installare secondo le istruz ioni del
fabbricante.
8) Non installare vicino a fonti di calore come radiatori, diffus ori di calore, stufe o altri
apparecchi (compresi amplificatori) che producono calore.
9) Non tr ascurare la sicurez za garantita della spina polarizzata o di messa a terra. La
spina polarizzat a ha due lame di cui una più grande dell’altra. L a spina di messa
a terra ha due lame e una terza di messa a terra. La lama grande o la terza sono
destinate alla sicurezza. Se la spina in dotazione non si adatta alla presa, consultare
un elett ricista per sost ituire la presa obsoleta.
10) Proteggere il cavo di alimentazione perché non vi si cammini sopra e non si pieghi
sopratt utto vicino alle pres e e al punto in cui esso esce dal dispositivo.
11) Usare solo accessori/componenti specificati dal produttore.
12) Usare solo carrelli, supporti, trep piedi, staffe o tavolini specificati
dal produttore o venduti assieme all’apparecchio. Quando si usa un
carrello, fare at tenzione nello spostare il gruppo carrello/apparecchio
per evitare lesioni causate dal ribaltamento.
13) Scollegare il dispositivo durante tempeste con fulmini o se non è usato per molto
tempo.
14) Per l’assistenza rivolger si sempre a pers onale qualificato. È ne cessaria l’assistenza
quando il dispositivo è stato danneggiato in qualunque modo, come cavo
di alimentazione o spina danneggiata, liquido versato o oggetti caduti nel
dispositivo, dispositivo espos to a pioggia o umidità, funzionamento non normale
o dispositivo caduto.
15) Per scollegare completamente l’apparecchio dalla presa di rete CA togliere la spina
del cavo di alimentazione dalla presa C A.
16) La spina di rete del cavo di alimentazione deve restare facilmente utilizzabile.
17) AVVERTENZA - Per ridurre il rischio di incendio o di shock elettrico, non esporre
questo apparecchio alla pioggia o all’umidità.
18) Non esporre il dispositivo a gocciolii o a spruzzi ed assic urarsi che nessun oggetto
pieno di liquidi, come vasi, sia messo su di esso.
19) Lasciare almeno 15.25 cm di spazio libero dietro al dispositivo per consentire la
corrett a ventilazione e il raf freddamento dello ste sso.
20) ATTENZIONE- Per amplificatori montati su mensola tenere tutt i i cavi e i materiali
lontano dai lati del disposit ivo e lasciarlo raf freddare per 2 minuti prima di estrarlo
da un abitacolo sulla mensola.
21) Amplificatori e altoparlanti po ssono produrre livelli di pressione sonora molto alt i
che possono causare danni temporanei o permanenti all’udito. Fare at tenzione
quando si impo sta e si regola il livello dell’audio durante l’uso.
22) AVVERTENZA – Per conservare la sicurezz a del prodotto, prodotti con batterie
(comparto batterie) interne o esterne. • Le batter ie e/o il prodotto in c ui sono
montate non devono es sere esposti a calore e ccessivo, come luce solare, fuoco o
simili. • Se la batteria viene colle gata/sostituita in modo non corretto ci può essere
il rischio di esplosione. S ostituire solo con bat teria dello stesso tipo o equivalente
come specificato nelle istruzioni present i sul prodotto.
Das Symbol Blitz und Pfeil in einem gleichseitigen Dreieck soll den Benutzer vor dem
Vorhandensein nicht isolierter „gefährlicher Spannung“ im Gehäuse des Produkts
warnen, die möglicherweise hoch genug ist, um ein Stromschlagrisiko darzustellen.
Das Ausrufezeichen in einem gleichseitigen Dreieck soll den Benut zer auf wichtige
Bedienungs- und Wartungsanweisungen (Serviceanweisungen) in den dem Produkt
beiliegenden Broschüren au fmerksam machen.
1) Lesen Sie die se Anweisungen.
2) Bewahren Sie diese Anweisungen auf.
3) Beachten Sie alle Warnhinweise.
4) Befolgen Sie alle Anweisungen.
5) Benutzen Sie die Vorrichtung nie in der Nähe von Wass er.
6) Nur mit tro ckenem Tuch reinigen.
7) Belüf tungsöffnungen nicht bloc kieren. Den Anweisung en des Herstell ers ent sprechend
installieren.
8) Installieren Sie die Vorrichtung nicht in der Nähe von Wärmequellen wie Radiatoren,
Heizkörpern, Herden oder anderen Geräten (insbesondere Verstärkern), die Wärme erzeugen.
9) Achten Sie darauf, den Sicher heitszweck des verpolungssicheren oder geerdeten Steckers
nicht zu umgehen. Ein verpolungssicherer Stecker ist mit zwei flachen Stiften ausgestattet ,
von denen einer breiter ist als der andere. Ein geerdeter Stecker ist mit zwei Stif ten und einer
Erdbuchse ausgestattet. Der breitere Stift oder die Erdbuchse dienen Ihrer Sicherheit. Sollte
der mitgelieferter Stecker nicht in Ihre Steckdose passen, wenden Sie sich zum Austausch der
veralteten Steckdo se an einen Elektriker.
10) Schützen Sie das Stromkabel davor, dass darauf getreten oder dass es besonders am Stecker, an
Steckerleisten oder an der Austrit tsstelle aus dem Ger ät geknickt wird.
11) Verwenden Sie nur vom Hers teller zugelassenes Zubehör.
12) B enutzen Sie das Gerät nur mi t den vom Hersteller festgelegten oder gemeinsam mit
dem Gerät verkau ften Wagen, Ständern, Stativen, Halterungen oder Tischen. Achten
Sie bei Benutzung eines Wagens darauf, dass das gemeinsam mit dem Wagen bewegte
Gerät nicht kippt und zu Ver letzungen führt.
13) Ziehen Sie bei Gewit tern oder bei längeren Stills tandzeiten den Netz stecker des Gerät s.
14) Überlassen Sie alle Wartungsarbeiten qualifiziertem Personal. Ein Service wird erforderlich,
wenn das Gerät in irgendeiner Weise beschädigt wurde, beispielsweise bei Beschädigung des
Netzs teckers oder des Netzkabels, wenn Flüssigkeiten über das Gerät vergossen wurden oder
Gegenstände in das Gerät gefallen sind, das Gerät Regen oder Feuchtigkeit ausgesetzt war,
nicht ordnungsgemäß funk tioniert oder fallen gelassen wurde,
15) Ziehen Sie den Netzstecker aus der Steckdose, um das Gerät vollständig vom Wechselstromnet z
zu trennen.
16) Der Netzstecker des Netzkabels muss jederzeit betriebsbereit sein.
17) WARNHINWEIS: Um die Gefahr vom Feuer oder Stromschlag zu vermeiden, darf das Gerät
nicht Regen oder Feucht igkeit ausgesetzt werden.
18) L assen Sie nicht zu, dass Flüssigkeiten auf das Gerät tropfen oder gespritzt werden können,
und achten Sie darauf, dass keine mit Wasser ge füllten Gegenstände wie Vasen auf das Gerät
gestellt werden.
19) Achten Sie auf mindestens 15 cm Abstand hinter dem Gerät für die ungehinderte Luftzirkulation
und Kühlung des Geräts.
20) VORSICHT: Bei in Regalen (Racks) montierten Ver stärkern ist die gesamte Verkabelung und
sämtliches Material von den Seiten des Geräte s f ernzuhalten; lassen Sie das Gerät vor Entnahme
aus dem Rack zwei Minuten lang abkühlen.
21) Verstärker und Lautsprechersysteme sind imstande, sehr hohe Schalldruckp egel zu erzeugen,
die zu vorübergehenden oder dauerhaften Gehörschäden führen können. Die Einstellung oder
Korrektur von Lauts tärkepegeln während des Gebrauchs ist daher mit ent sprechender Vorsicht
vorzunehmen.
22) WARNHINWEIS: Zur Aufrechterhaltung der Sicherheit von mit inter nen oder externen Batterien
(Akkumulatoren) betriebenen Produkten ist folgendes zu beachten: • Die Batterien sowie das Produk t,
in dem sie installiert sind, dürfen keiner übermäßigen Hitze (durch Sonneneinstrahlung, Feuer usw.)
ausgeset zt werden. • Bei unsachgemäßem Anschluss/Austausch der Batterien bes teht Explosionsgefahr.
Der Austausch darf nur mit Bat terien des gleichen oder gleichwer tigen Typs er folgen, der in den
Anweisungen oder am Produkt angegeben ist.
Page 5
INSTRUÇÕES DE SEGURANÇA IMPORTANTES
安全にご使用いただくために
O relâmpago com símbolo de c abeça de fle cha dentro de um tr iângulo
equilátero destina-se a alertar o utilizador para a presença de “tensão perigo sa”
dentro da es trutura do produto que pode ter magnitude suficiente p ara
representar um risco de choque eléctrico para as pessoas.
O ponto de exclamação dentro do triângulo equilátero destina-se a alertar o
utilizador p ara a presença de instr uções de funcionamento e manutenção
(assistência téc nica) na documentação que acompanha o pro duto.
1) Leia e stas instruções.
2) Guarde estas instruçõe s.
3) Cumpra todas as advertências.
4) Siga to das as instruções.
5) Não u tilize este aparelho próximo de água.
6) Limpe apenas com um pano seco.
7) Não bloqueie quaisquer orifícios de ventilação. Instale de acordo com as instruções do
fabricante.
8) Não instale próximo de fontes de calor, tais como radiadores, saídas de ar quente,
fogões ou outros aparelhos (incluindo amplificadores) que produzam calor.
9) Não anule a finalidade de segurança da ficha polarizada ou de ligação à terra. Uma ficha
polarizada possui duas lâminas, sendo uma delas mais larga do que a out ra. Uma ficha
de ligação à terra possui duas lâminas e um terceira ponta de ligação à terra. A lâmina
larga ou a terceira ponta são fornecidas para sua segurança. Se a ficha fornecida não
couber na sua tomada, consulte um elect ricista para substituir a tomada obsolet a.
10) Proteja o cabo de alimentação eléc trica do aparelho para que não s eja pisado ou
dobrado especialmente nas fichas, nos receptáculo s ou no ponto onde o cabo sai do
aparelho.
11) Utilize apenas acessórios/peças esp ecificados pelo f abricante.
12) Utilize o aparelho apenas com o carrinho, supor te, tripé ou mesa
especif icados pelo fabricante ou vendidos com o aparelho. Quando
utilizar um carrinho, tenha cuidado ao deslocar a combinação carrinho/
aparelho para evitar ferimentos provocados por uma possível queda.
13) Desligue este aparelho durante trovoadas ou quando não for utilizá-lo por um longo
período de tempo.
14) Solicite todas as reparações a pessoal de assistência qualificado. É necessária assistência
técnica quan do o aparelhos se tiver danific ado de alguma forma como, por exemplo, o
cabo de alimentação ou a ficha es tão danificados, foram derramados líquidos ou caíram
objectos para dentro do aparelho, o aparelho esteve exposto a chuva ou humidade, o
aparelho não f unciona normalmente ou sofreu uma queda.
15) Para desligar por completo este aparelho da corrente eléctrica de CA, desligue a ficha do
cabo de alimentação do receptáculo de CA.
16) A ficha elé ctrica do cabo de alimentação irá permanecer pronta a funcionar.
17) ADVERTÊNCIA – Para reduzir o risco de incêndio ou choque eléctrico, não ex ponha
este aparelho a chuva ou humidade.
18) Não ex ponha este equipamento a gotejamento ou salpicos e certifique-se de que não
são colocados objec tos com líquidos, tais como jarras, sobre o equip amento.
19) Mantenha des obstruído pelo menos 15,25 cm de e spaço por trás da unidade para que
a unidade disponha de ventilaç ão e arrefecimento adequados.
20) CUIDADO – Para amplificadores montados numa es tante, mantenha todas as ligações
eléctricas e mater iais afastados das partes laterais da unidade e deixe a unidade
arrefecer durante 2 minutos antes de retirar de uma estante.
21) Os amplificadores e sistemas de colunas são capazes de produzir níveis de pressão sonora
muito elevados que podem provocar danos auditivos temporários ou permanentes.
Tenha cuidado ao definir e ajus tar os níveis de volume durante a utilização.
22) ADVERTÊNCIA – Para manter a segurança do produto, no caso de produtos com pilhas
(conjunto de pilhas) internas ou externas: • As pilhas e/ou o produto no qual e stão
instaladas, não devem ser expostos a temperaturas excessivas, tal como a luz solar
directa, fogo, ou temperaturas semelhantes. • Pode existir um risco de explosão se a
pilha estiver ligada/colocada de forma incorrecta. Substitua apenas por pilhas de tipo
equivalente ou idêntico ao especificado nas instruções ou no pro duto.
二等辺三角形の中の矢印のついた稲妻の閃光のシンボルは、
人に電気ショックを与えるに十分な、絶縁されていない「高電
圧の危険 」が製品のケース内にあることを警告するものです。
二等辺三角形の中の感嘆符合は、重要な操作方法およびメン
テナンス方法の記述が製品に付属の説明書にあることを示し
ます。
1) 以下の説明をお読みください。
2) 本 説明 書 を保 存してく だ さ い 。
3) 警告にはすべて注意してください。
4) 使 用 方 法に は すべ て 従 ってくだ さ い 。
5) 本装置は 水の近くでは使用しないでください。
6) 清 掃 は 、乾 い た 布 で の み 行 っ て く だ さ い 。
7) 通気孔はふさがないでください。製造元の手順書に従って設置して
ください。
8) ラジエーター、ヒート レジスター、調理用コンロ、音響用アンプリフ
ァイア等の、熱を発する機 器 の近くには設 置しないでください。
9) 極性プラグや接地プラグの安 全 機能を妨げ ないようにしてくださ
い。極性プラグは二つのブレードの一方が他方より幅広くなってい
ます。接地型プラグには、二つのブレードに加えて接地プロングがあ
りま す。幅 の広 い ブ レード または 3 番 目 のプ ロング は 、安 全 用で す。
プラグがコンセントに合わないときは、電気技師に相談して旧式の
コンセントを付け替えてください。
10) 電源コードが踏まれたり、特にプラグ、便利レセプタクル、または装
置 か ら出 てくる 箇 所 で ねじ れ な い よ う に 保 護 してくだ さ い 。
11) メーカー指 定の付属品/アクセサリーのみを使用してください。
12) カード、スタンド、三 脚、ブラケット、テーブルは、メーカ
ー指定のもの、または装置と共に販売されているものの
みを使用してください。カートをご使用の場合は、カー
トと装置を一緒に移動させるとき、転倒によって怪我を
されないようご注意ください。
13) 稲妻が光っている間、また長期間ご使用にならないときは、本装置
の電 源をプラグから抜 いてください。
14) メンテナンスはすべ て、資 格 の あるメンテナン スサービス要 員に依
頼してください。メンテナンスは装置が 何らかの形で損傷した場合、
例えば次のような場合に必要となります: 電 源コードまたはプラ
グが損傷した場合、装置の中に液体がこぼれて入ったり、ものが落ち
て入ったりした場合、装置が雨や湿気にさらされた場合、装置が正
常に動作しない場合、装置を落とした場合。
15) 本装 置をAC主電 源から完全に切り離 すには、電 源コードのプラグ
を A Cコン セ ント か ら 抜 いてく ださ い 。
16) 電源コードの電源プラグは、常に操作可能な状態にしておいてくだ
さい。
17) 警告-火災や電気ショックの危険を減らすため、本装置を雨や湿
気 に さら さ な い ようにしてく だ さ い 。
18) 本装置を水のしずくや水はねにさらさないでください。また、花瓶な
どの水の入ったものは本装置の上には絶対に置かないようにしてく
ださい。
19) 本装置ユニットの適切な通気および冷却のため、その背後に少なく
とも15.5cm のスペースを確保し、そこにはさえぎるようなものは
置 か な い ようにしてくだ さ い 。
20) 注意 - ラックに搭載したパワー アンプリファイアの場合は、配線
そ の 他 を ユ ニ ッ ト の 側 面 か ら 離 し て お い て く だ さ い 。ま た 、ラ ッ ク の
ケース か ら ユ ニット を 取 り 出 す 前 に ユ ニット を 2 分 間 冷 却 さ せ てくだ
さい。
21) アンプリファイアおよびラウド スピーカー システムは、非常に高い
音圧レベルを生じさせる能力があり、聴覚に一時的または永久的な
損傷を起こす恐れがあります。使用中にボリュームの設定および調
整 を 行 う と き は 、注 意 し て く だ さ い 。
22) 警告 - 安全確保のため、バッテリー を 内 臓した、または外 部 バッ
テリー(バッテリーパック)を使用した製品をご使 用の際は、次のこ
とにご注意ください: * バッテリーおよび/またはバッテリーが
入った製品は、太陽光線、火、等の過度の熱にはさらさないでくださ
い。* バッテリーの接続/交 換方法を誤ると、爆発の危険性があり
ます。交換するときは、説明書または製品上に記載されたものと同
じか、同等の種 類のバッテリーのみ を 使 用してください 。
Page 6

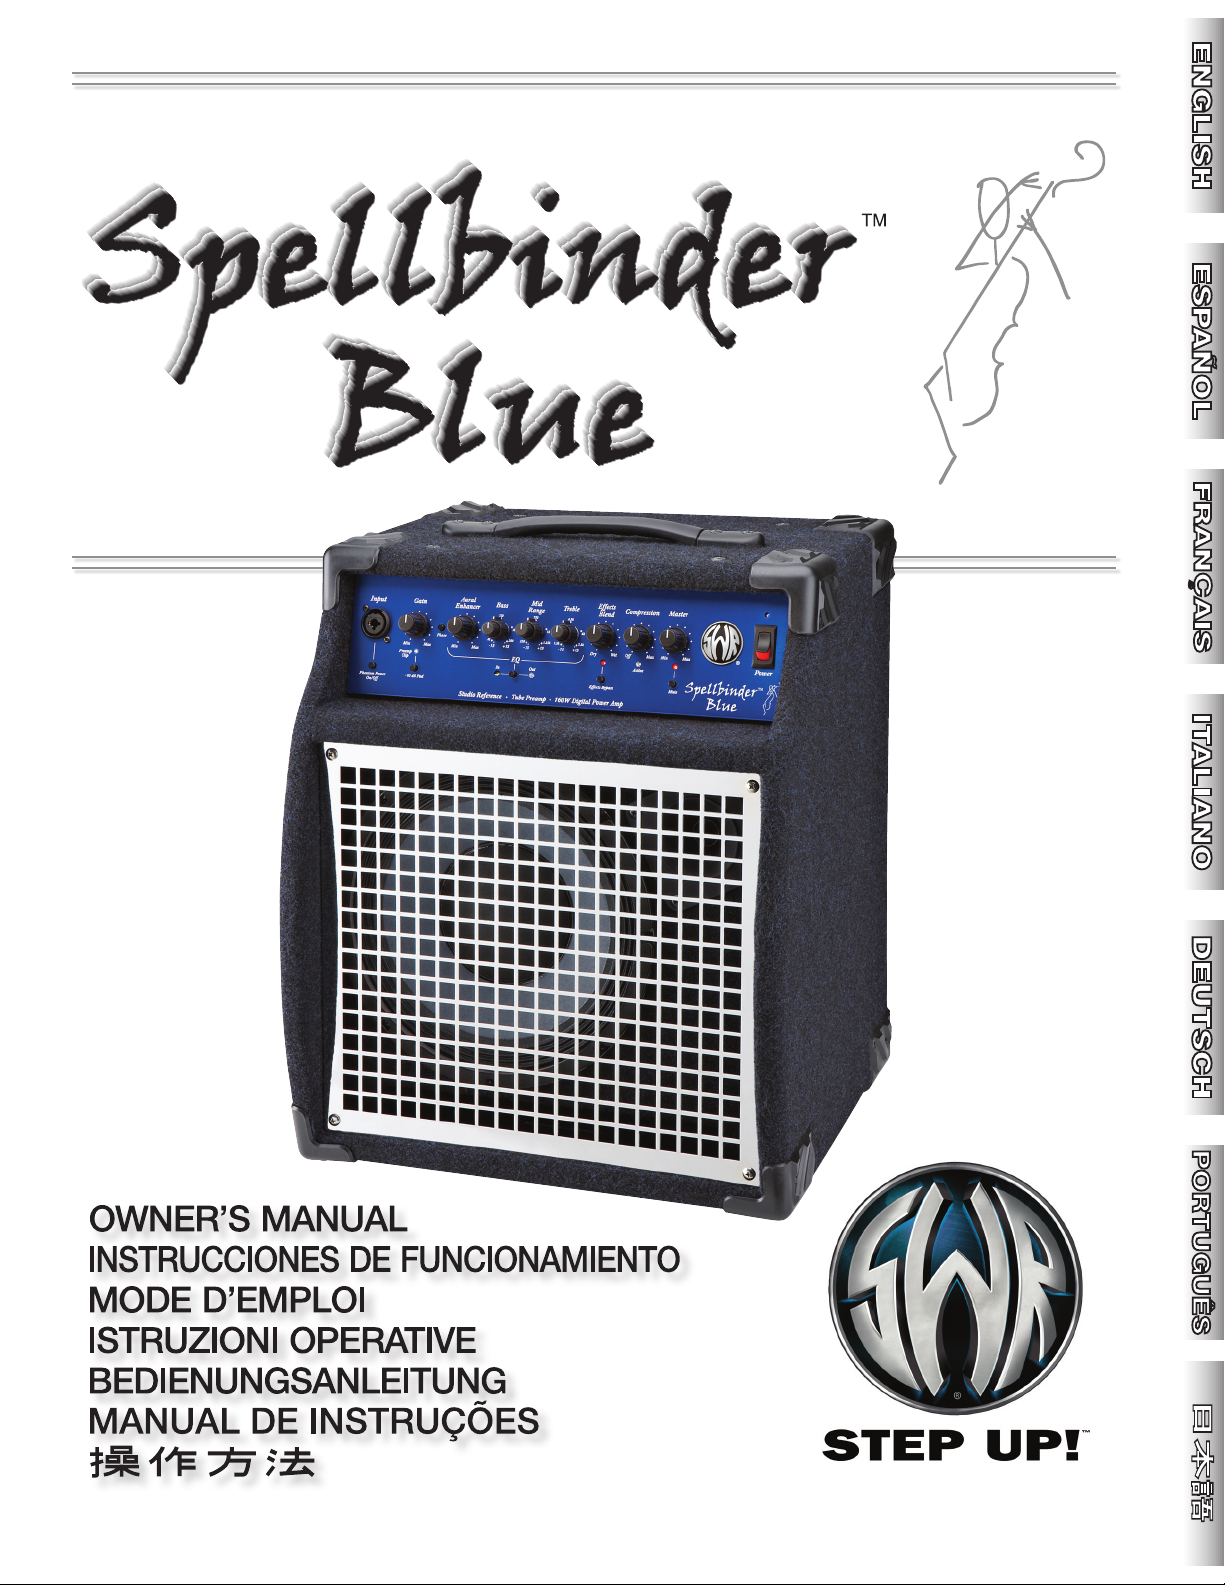
SWR® Spellbinder™ Blue
Congratulations on your purchase of the SWR® Spellbinder™ Blue
combo bass amplifier!
When our old friend (and longtime SWR artist) Stanley Clarke told us
of his plans to partner with luthier Tom Lieber to offer the Spellbinder
line of bass-centric products, we were intrigued. When they asked us
to supply a lightweight, portable combo for this exclusive line, we
were honored and thrilled—especially since their request fit perfectly
with our plans to redesign the Baby Baby Blue™ combo!
The Spellbinder Blue is the result of merging cutting-edge technologies with the classic SWR Baby Blue™ preamp to produce an extremely compact bass amplifier of professional quality and exceptional tonal
range. With new technology, including a 160-watt digital power
amplifier, a 10” neodymium driver, an Eminence® super-tweeter and
a lightweight Italian poplar cabinet, the Spellbinder Blue weighs in
at just 26.5 pounds (11.6 kg) and is the perfect blend of power, highfidelity tone and lightweight portability.
SWR® Spellbinder™ Blue Features
• Neutrik® combo 1/4"/XLR input jack
• +15V Phantom Power w/ On/Off switch
• –10dB input pad switch
• Phase switch
• Mute switch w/ LED indicator
• Preamp clip LED
• EQ In/Out switch w/ LED indicators
• Aural Enhancer control
• Stacked sweepable tone controls
• Effects Blend control
• Effects Blend Bypass switch w/ LED indicator
• Compression Ratio control w/ LED Indicator
We are confident that you will enjoy your new Spellbinder Blue for
many years to come—and thank you for “Stepping Up” to SWR.
A Note From Spellbinder:
There is an agreed upon philosophy between Lieber and Clarke that
products designed by or in collaboration with Spellbinder Corp reflect
all levels of musicianship, affording each musician a genuine opportunity to own quality equipment (instruments, amps, accessories) that
far exceeds expectations. Product concepts and designs, as well as
quality standards, are set by Clarke and Lieber.
SWR has long been an industry leader in amp design, and that’s why,
when Stanley decided he wanted a small, lightweight monster of an
amplifier for practice and small gigs, SWR was singularly the company
of choice. You need only to listen to the Spellbinder Blue and you will
know he was right!
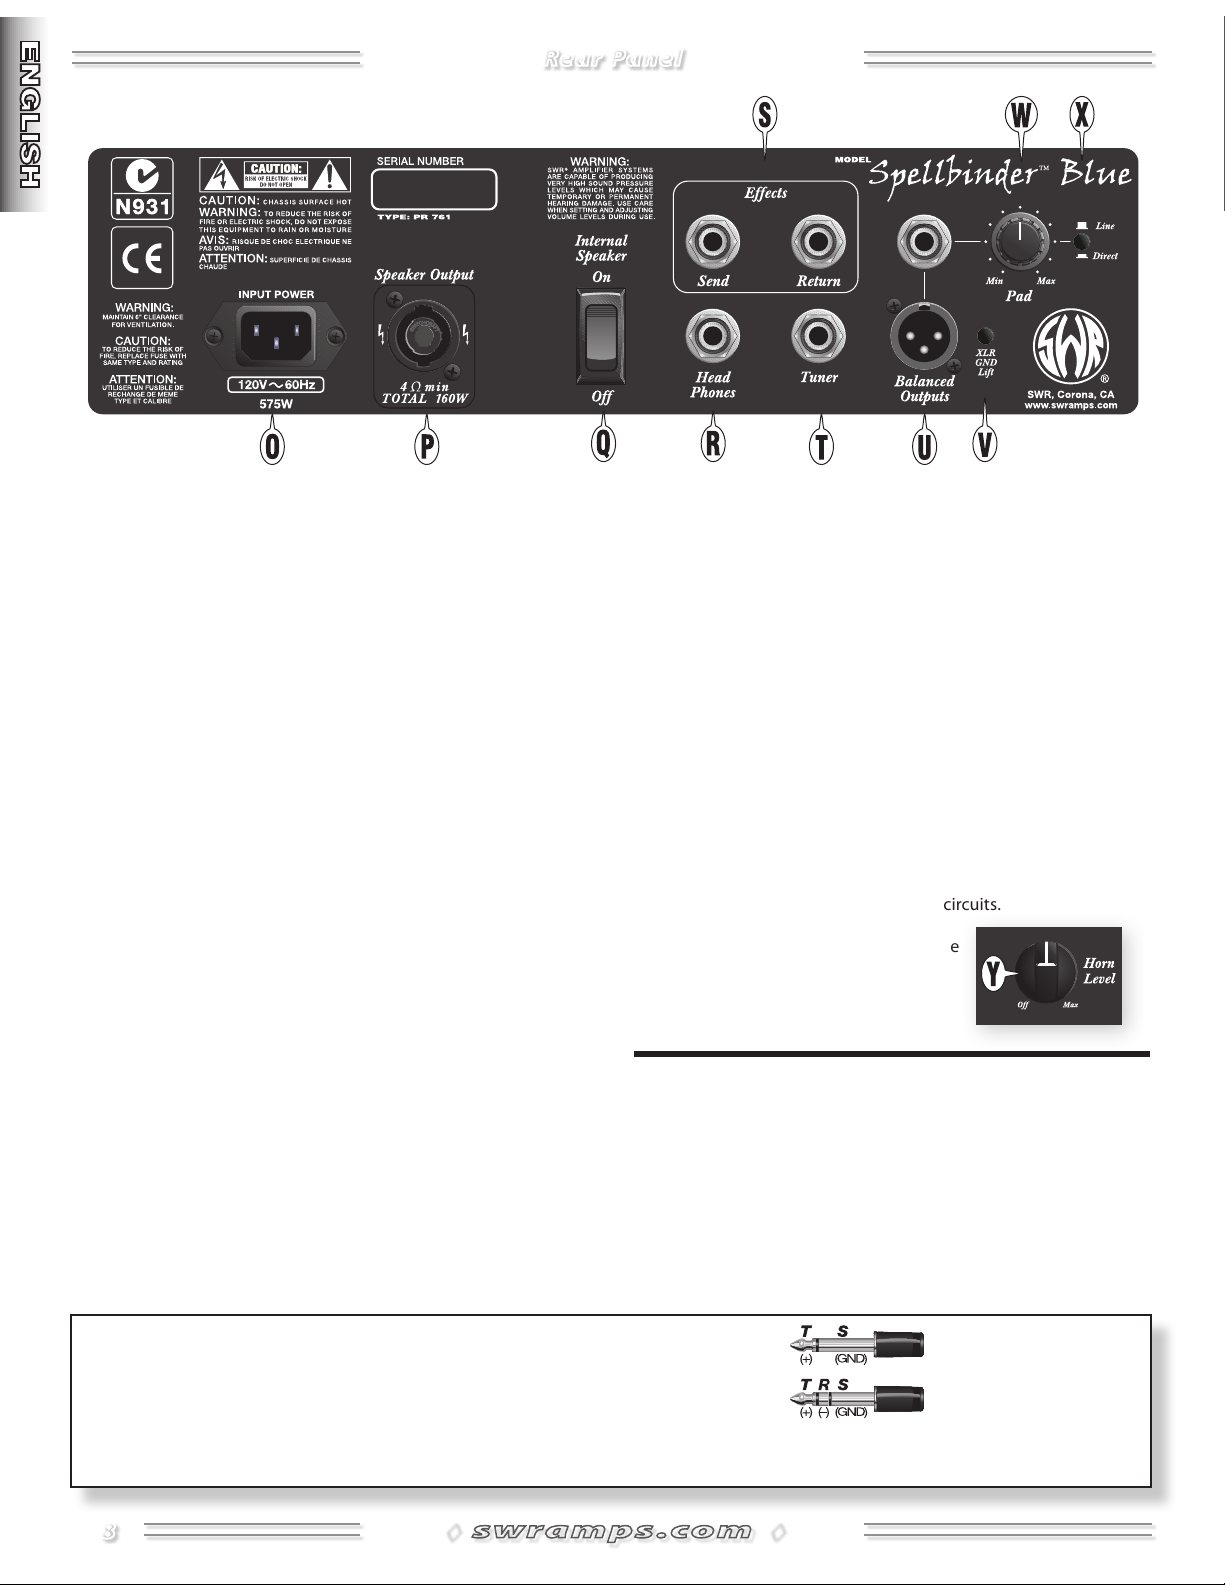
Rear Panel Features
• Balanced Line Outputs (XLR & 1/4") w/ ground lift on XLR
• Direct/Line selector switch for Line Output jacks
• Output level control for Line Output jacks
• Tuner Out jack
• Stereo Headphone jack
• Effects Loop Send & Return jacks
• Speakon® jack (for extension speaker cabinet)
◊
6
◊
Page 7
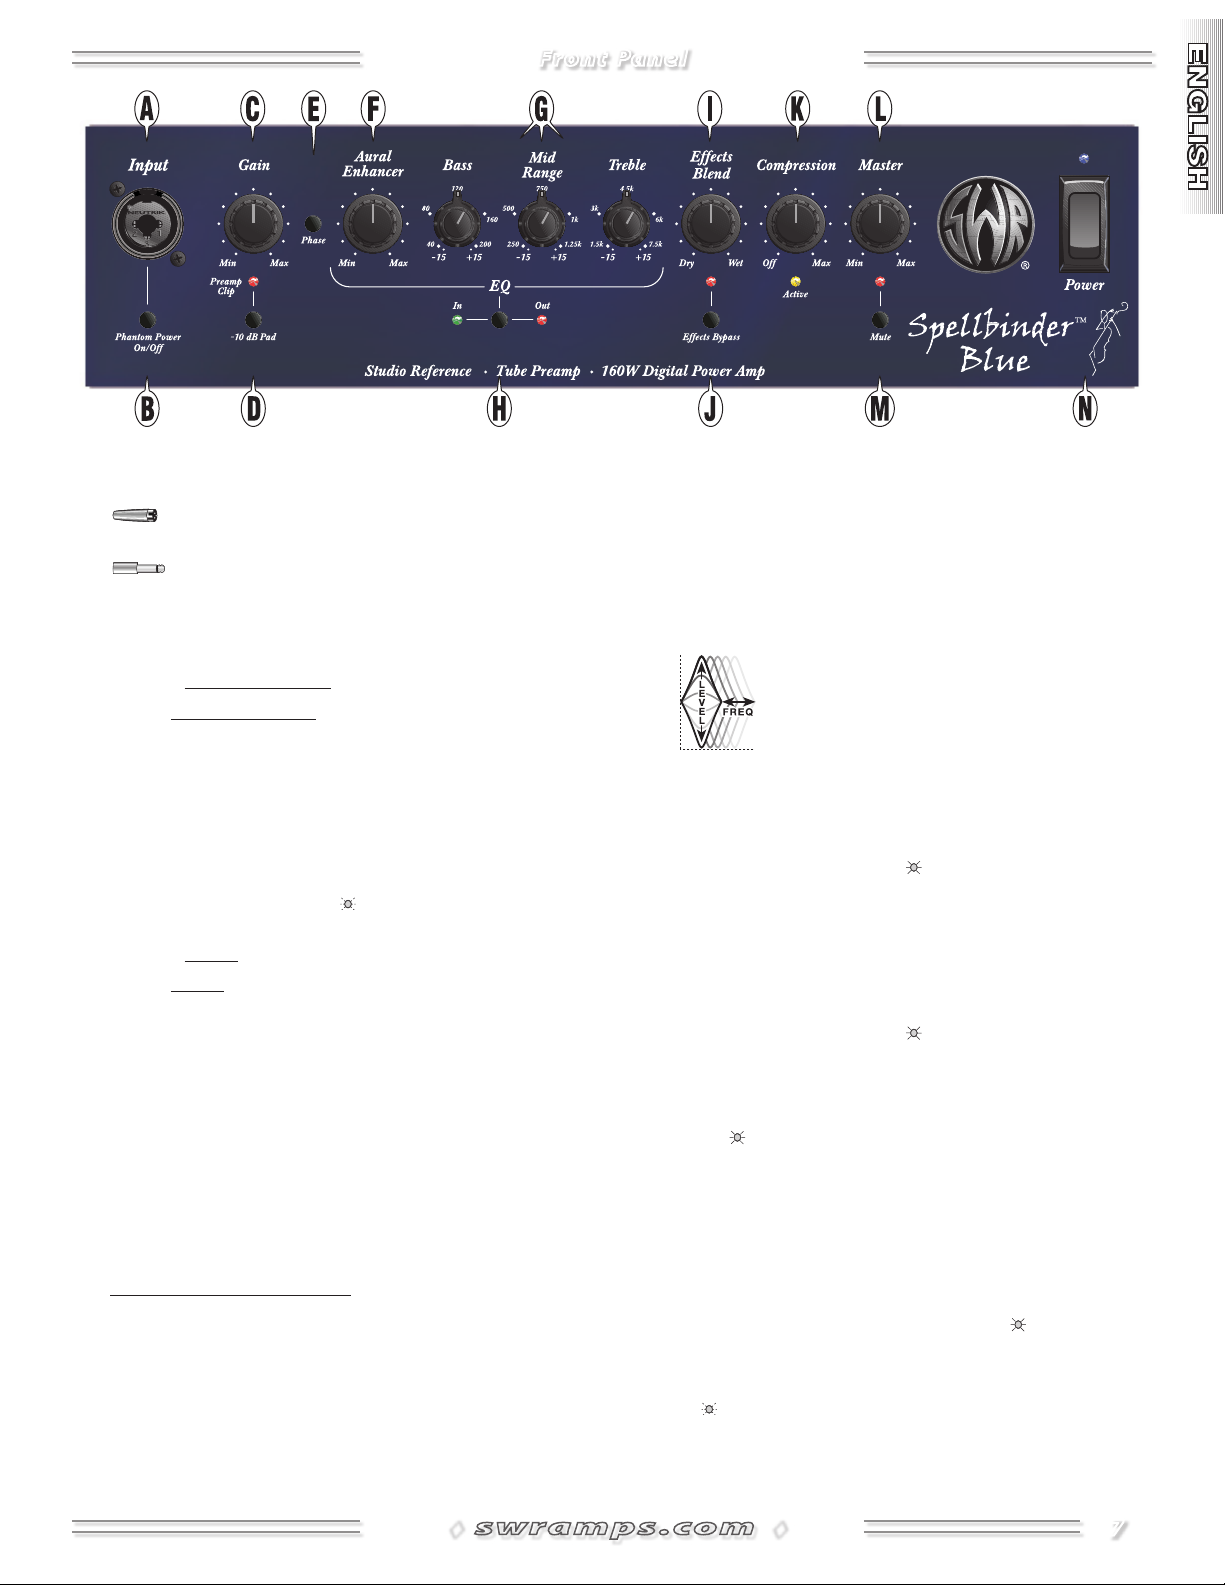
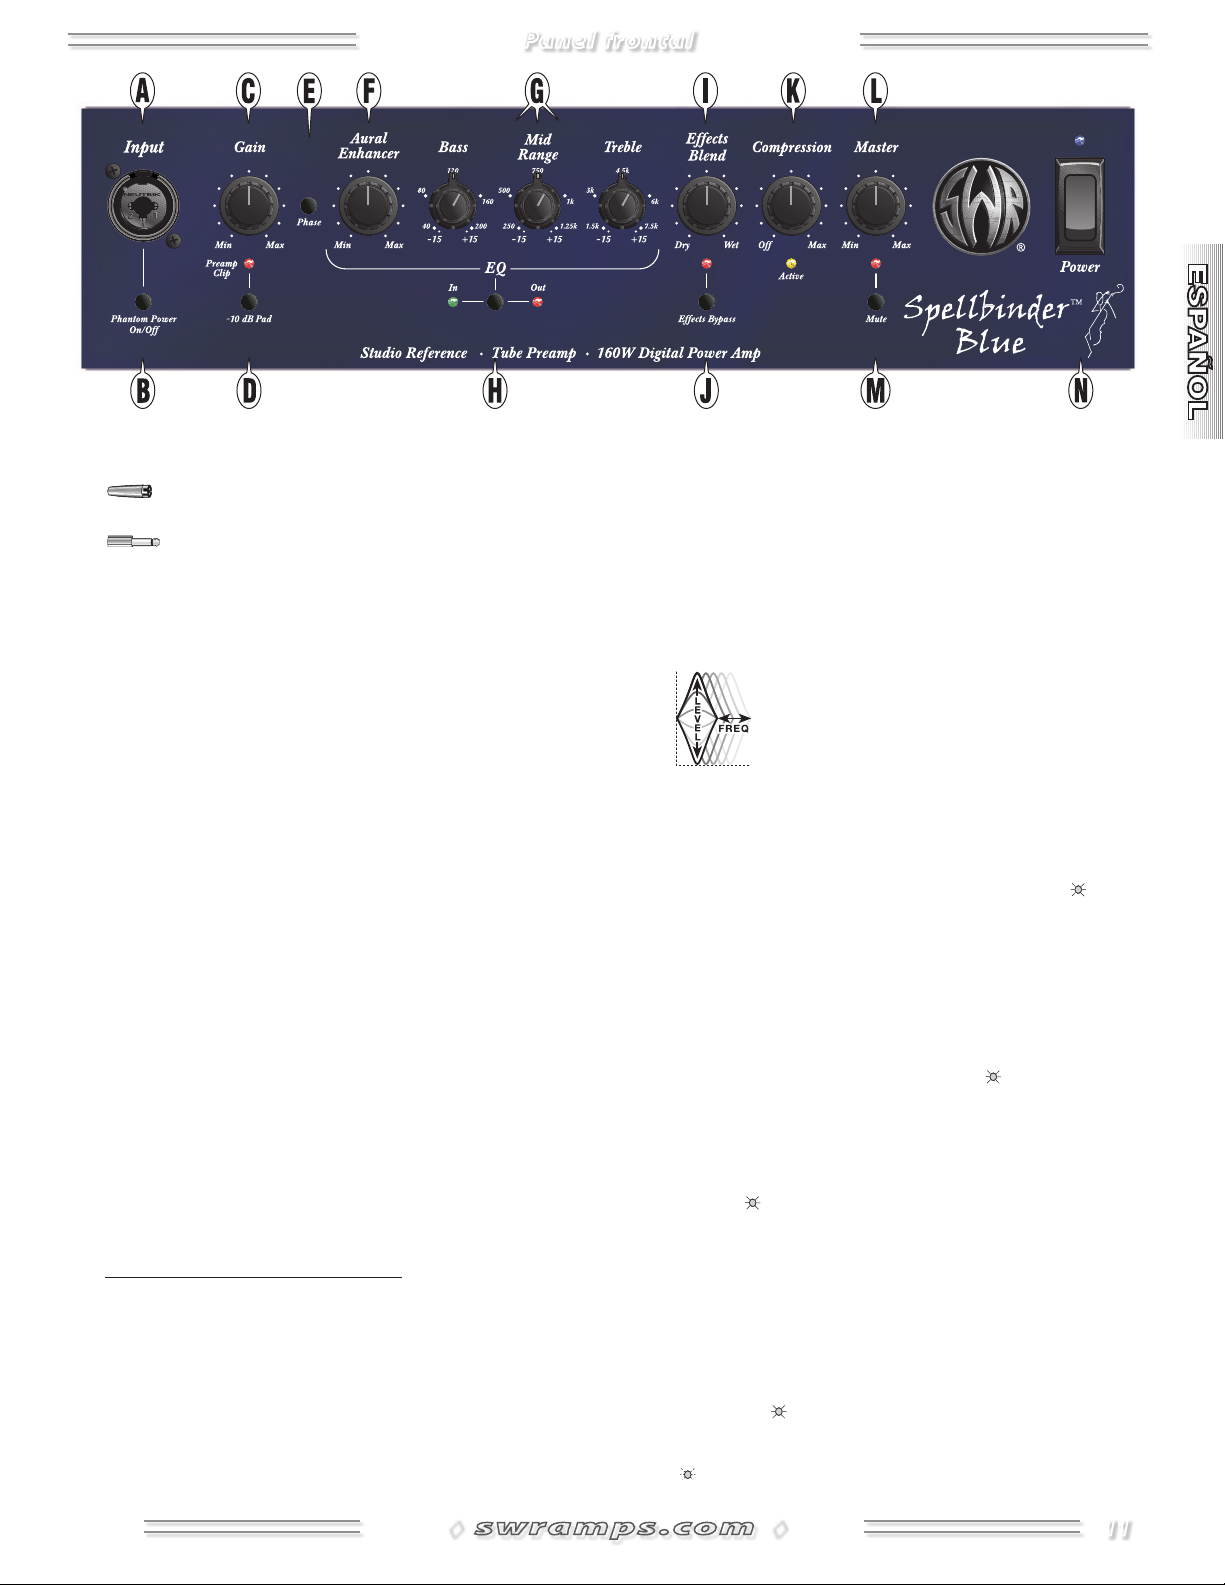
Front Panel
A. INPUT This input accepts either an XLR or /" plug:
The XLR connection is a balanced input:
(Pin 1=ground, Pin 2=positive, Pin 3=negative)
The /" connection is an unbalanced "TS" input:
(Tip=positive, Sleeve=ground)
B. PHANTOM POWERUse as needed for microphones
connected to the XLR input {A}. This button does not affect the
/" input.
Out—Phantom Power off
In—Phantom Power on
C. GAINAdjusts the preamp signal level. Gain is also the primary
level control for the Effects Send {S} jack on the rear panel and
can be used to accommodate the input sensitivity of your
effects equipment, if necessary.
D. – dB PAD / PREAMP CLIP—The Pad button reduces input
sensitivity by –dB to provide cleaner response with high
output sources. Use Pad if the Preamp Clip LED indicates that
the input buffer is being overdriven.
Out—Pad off
In—Pad on
E. PHASEReverses the phase of the input circuit, useful for
reducing "regenerative" feedback generated when you are
standing at a particular distance from the amplifier. You can
also reduce feedback by changing your position or distance
from the amplifier.
F. AURAL ENHANCER A trademark SWR® feature, the Aural
Enhancer brings out the fundamental low notes of the bass,
brightens high-end transients and reduces certain frequencies
that mask the fundamentals. The ultimate effect is a more
transparent sound that opens up the sibilance characteristics of
all instruments without being harsh.
How the Aural Enhancer works: Think of it as a variable tone
control that changes frequency range and level according to
where you set the Aural Enhancer control:
As you rotate the control clockwise from the Min position, you
are elevating low, mid, and high frequency levels in ranges that
are different, yet complementary to the Bass and Treble tone
controls. The “ o’clock” position—a favorite for many players—
brings out both low end fundamentals and crisp highs, while at
the same time, adds a little lower midrange helping you to
cut through the band. Then, as you rotate further clockwise,
selected mids will drop off—specifically, a group of frequencies
centered around Hz. While apparent, the Aural Enhancer
is gentle compared to the extreme response curves you can
create with the EQ tone controls.
G. BASS / MID / TREBLEThree semi-parametric tone controls
that allow you to boost or cut signal levels at the
frequencies you choose. Select a frequency range
center point using the outer knob, then adjust
signal level in that range with the inner knob. Mid
range adjustment is critical for most instruments
and what sounds good will depend on your situation—what
sounds harsh while playing alone may sound just right in a
crowded room, or on a recording.
H. EQ BYPASSPuts the tone control circuits in or out of the
signal path as indicated by the LEDs.
I. EFFECTS BLENDFunctional only when a plug is inserted into
the Effects Return {S} jack, this knob sets your effects level by
controlling the amount of "wet" effects loop signal blended
into the "dry" preamp signal.
J. EFFECTS BYPASSTakes the effects loop circuit out of the
signal path as indicated by the LED.
K. COMPRESSIONAdjusts the level of signal compression.
Rotate fully counterclockwise for no compression and rotate
clockwise to increase the ratio of compression. The brightness
of the LED indicates the active amount of compression
moderating peak signal levels.
L. MASTER VOLUMEUse to set the loudness output from the
speakers after all other levels are set, including any external
effects levels.
M. MUTEDisables all unit outputs except the Tuner {T},
Headphones {R} and Effects Send {S} jacks. Useful when tuning
your instrument and for quiet sessions. The LED illuminates
when Mute is active.
N. POWER SWITCHSwitches the unit ON-OFF as indicated by
the LED.
◊
◊
7
Page 8
Rear Panel
O. IEC POWER CORD SOCKETConnect the included power
cord to a grounded AC electrical outlet in accordance with the
voltage and frequency ratings specified on the rear panel of
your amplifier.
P. SPEAKER OUTPUTSpeakon® connector for an external
speaker cabinet. The speaker load must be ohms minimum
and rated for Watts minimum. Read the Speaker Guidelines
on the next page before using this jack.
NOTE: Speaker Output will not operate with Internal Speaker
switch in the “On” position.
Q
. INTERNAL SPEAKER
or "Off" to use the Speakon® connector {P}.
R. HEADPHONESPlug your headphones in here. Use Mute {M}
to disable output to the speakers.
S. EFFECTS SEND / RETURN*Connect Send to the input on
your effects device and connect Return to the effects output.
NOTE: Set any "wet/dry" control on your effects to the fully
WET position to prevent phasing problems, and set any effects
input level as close to dB as possible.
The Effects Send output signal includes onboard tone shaping
and the output level is primarily controlled by the Gain {C}
knob. Effects Return provides a line level input that can be
blended in any ratio with the onboard preamp signal using the
Effects Blend {I} knob.
The Effects Loop circuit is on a “side chain” of the main circuit
(as in studio recording consoles) to provide the full sound of
your instrument and the diversity of your effects units. This
also reduces noise from effects units by being located after
gain in the signal path.
Select "On" to use the " internal speaker
T. TUNER OUTPUT*Plug your instrument tuner in here. Use
Mute {M} to disable audio output while using your tuner.
U. BALANCED LINE OUTPUTS*True electronically balanced
outputs, suitable for studio and “front-of-house” (live) mixing
consoles.
V
. XLR
GROUND LIFT Disconnects the ground connection (pin-)
from the XLR jack to reduce ground loop noise generated from
non-standard wiring. Leave this switch out, normally.
W
. PAD
Adjusts the output level of the Balanced Outputs {U} to
accommodate a variety of sound equipment connections and
input sensitivities.
X
. DIRECT / LINE
Outputs {U}. Direct is a true all-tube signal path taken
immediately after the first tube preamp stage. Line includes all
gain, tone, compression and effects circuits.
Y
. HORN LEVEL
level of the high-frequency horn.
NOTE: See Spellbinder Blue block diagram on page .
Selects the signal source for the Balanced
Adjusts the volume
* NOTE: The rear panel 1/4" jacks {R, S and T} are balanced TRS (Tip/Ring/Sle eve) t ypes:
Tip=positive (+)
Ring=negative (–)
Sleeve=ground.
While standard shielded TS (Tip/Sleeve) "mono" guitar cables may certainly be used, the use of "stereo" TRS cables may improve
signal-to-noise ratio and/or reduce hum, especially when longer connections are required.
◊
8
◊
Page 9
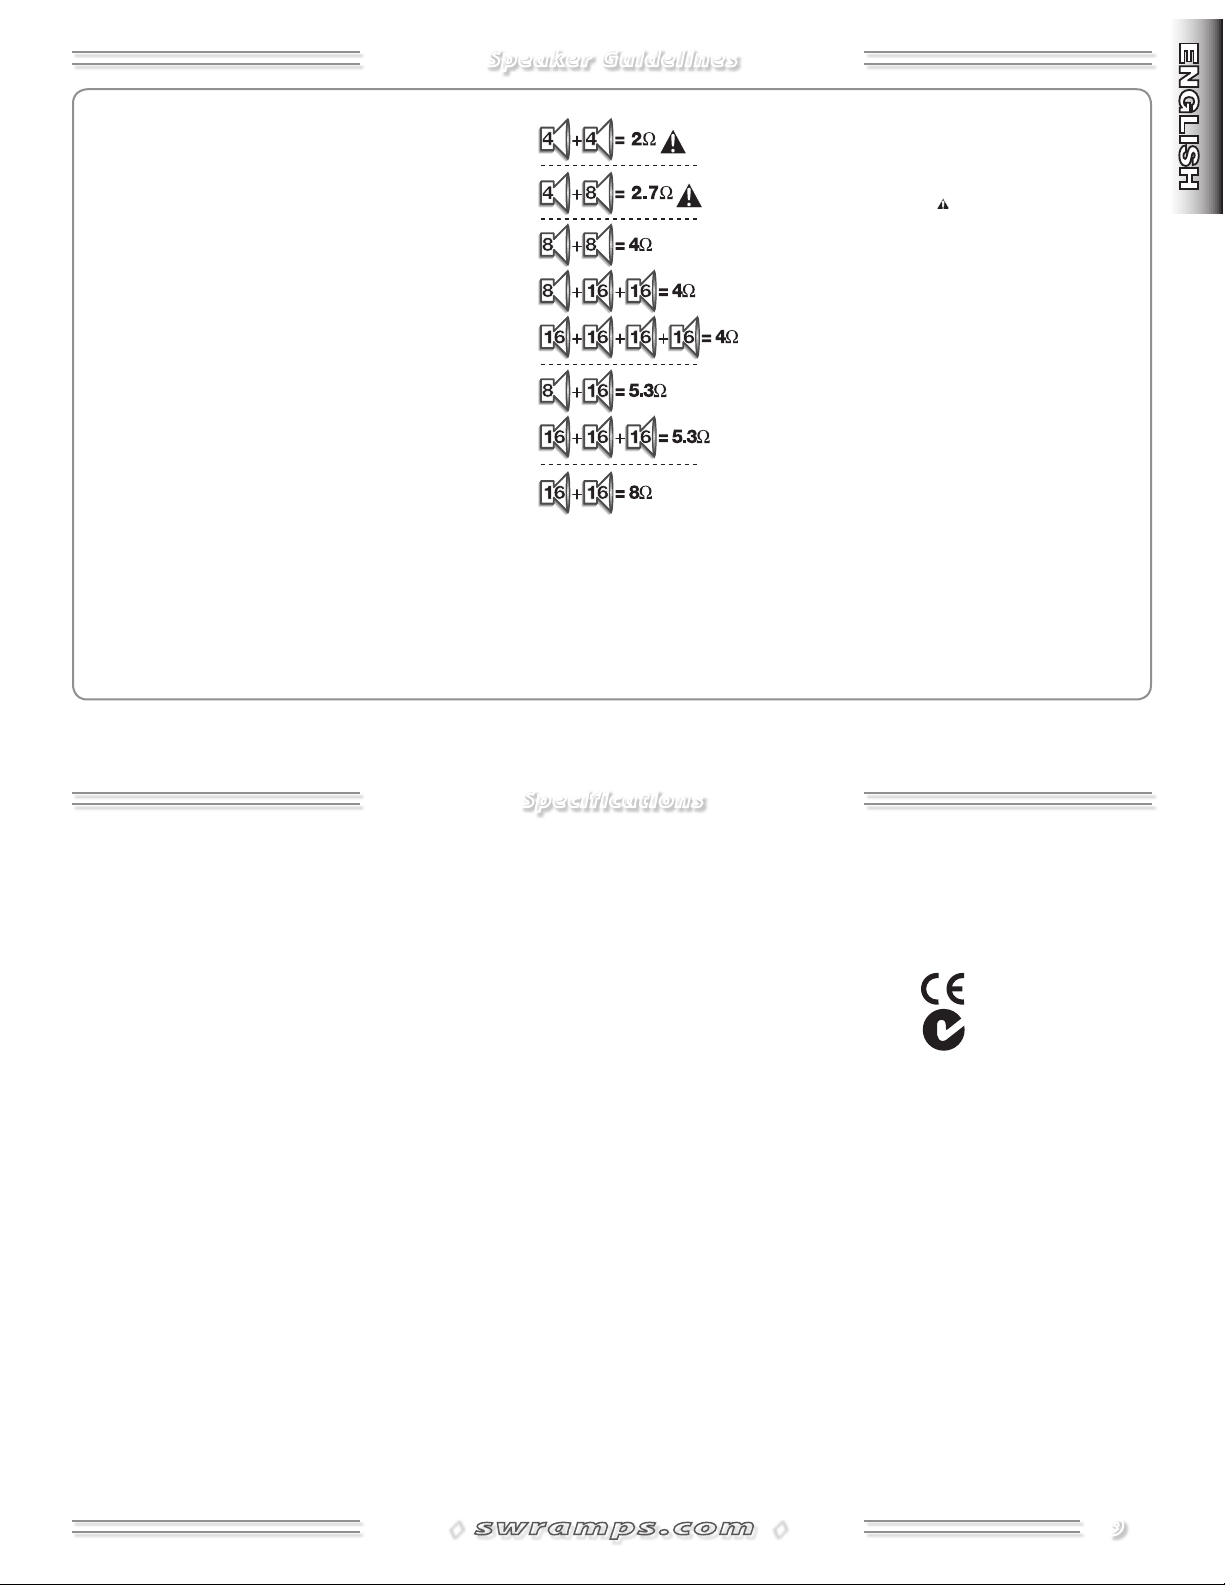
Speaker Guidelines
• DO NOT connect a speaker load with a total
impedance below the minimum rating of your
amplifier to prevent damage to your equipment.
• DO NOT connect speaker(s) with a total power
handling capacity that is less than the power output
rating of your amplifier to prevent damage to your
equipment.
• ALWAYS switch your system power OFF before
connecting or disconnecting speakers.
• ONLY use unshielded speaker cable of 18 gauge or
heavier (16 or 14 gauge) for speaker connections.
Shielded instrument cable WILL NOT work and may
damage your equipment.
• ONLY connect one amplifier to each speaker load.
Two amplifiers connected to a single load WILL NOT
work and may damage your equipment.
Use the impedance and power ratings on your amplifier
and speakers to determine if a particular combination
of speakers is appropriate for your amplifier. NOTE: All SWR®
speaker enclosures, as well as most others, will be connected
in parallel (NOT series) when linked (daisy-chained) together.
Therefore, these guidelines apply only to parallel speaker
configurations.
The speaker illustration gives you the total impedance
load calculations for various speaker impedance
combinations (=ohms). The ideal speaker load (total
impedance) is equal to the minimum impedance
rating of your amplifier. Operating below the
amp's minimum impedance rating can overheat
your amplifier and cause damage. Operating above
the amp's minimum impedance rating, while safe,
reduces the amplifier’s maximum power output.
Something else to consider: You can obtain the
same group total impedance load from different
combinations of speaker impedances (see
illustration). If each speaker in a group has the
same impedance, each speaker will receive the same
amount of power from your amplifier. However, if
impedances are not all equal, the lowest impedance
speakers will get the most power. For example, if you
connect an 8Ω and a 16Ω speaker to an amp output
of 30 watts, the 8–ohm speaker will receive about 20 of
those watts (and be twice as loud as the 16-ohm speaker).
Take this into consideration when calculating power handling
capacities and when positioning your speaker enclosures.
For an in-depth discussion of setup tips for amplifiers and speakers
(including a look at impedance and power rating issues), visit the
Support area of the SWR website at www.swramps.com.
Specifications
TYPE: PR 761
PART NUMBERS: 442050 0010 (120V, 60Hz) 4420503010 (240V, 50Hz) AUS
442050 4010 (230V, 50Hz) UK 4420506010 (230V, 50Hz) EUR
4420507010 (100V, 50Hz) JPN
POWER REQUIREMENT: 5 75W
POWER AMP: MINIMUM OUTPUT IMPEDANCE: 4Ω
POWER OUTPUT: 160W RMS into 4Ω @ < 1% THD, 1kHz
PRE AMP: INPUT IMPEDANCE: 4.7MΩ (1/4" input); 20kΩ (XLR input)
SENSITIVIT Y AT FULL POWER: 9mV (1/4" input); 900µV (XLR input)
TONE CONTROLS: ±15dB @ frequenc y knob setting
COMPRESSION: RATIO: 1:1 to 20:1
EFFECTS LOOP: SEND IMPEDANCE: 1kΩ
RETURN IMPEDANCE: 10k Ω
BALANCED LINE OUT: SEND IMPEDANCE: 50Ω
SPEAKERS: WOOFER: Eminence Neo 10" 4 ohm (0076017000)
HORN: Eminence 8 ohm (00672540 00)
DIMENSIONS: HEIGHT: 19.5 in (49.5 cm) WIDTH: 15 3/8 in (39 cm) DEPTH: 14.5 in (36.8 cm)
WEIGHT: 26.5 lb (11.6 kg)
Product specif ications are subject to change without notice.
◊
◊
9
Page 10

SWR® Spellbinder™ Blue
¡Enhorabuena por su adquisición del amplificador de bajos en
combinación SWR® Spellbinder™ Blue!
Cuando nuestro viejo amigo (y antiguo artista de SWR) Stanley Clarke
nos dijo de sus planes de hacer equipo con el luthier Tom Lieber para
ofrecer la línea Spellbinder de productos centrados en bajos, nos
vimos intrigados. Cuando nos pidieron suministrar una combinación
ligera y portátil para esta línea exclusiva, nos sentimos honrados
y emocionados, ¡especialmente dado que su solicitud se ajustaba
perfectamente a nuestros planes de rediseñar la combinación Baby
Baby Blue™!
El Spellbinder Blue es el resultado de la fusión de tecnologías de punta
con el preamplificador clásico SWR Baby Blue™ para producir un
amplificador de bajo extremadamente compacto de calidad profesional
y alcance tonal excepcional. Con nueva tecnología, incluyendo un
amplificador digital de potencia de 160 vatios, un impulsor de
neodimio de 10 pulgadas, un súper-tweeter Eminence® y un gabinete
ligero italiano de poplar, el Spellbinder Blue pesa sólo 26.5 libras
(11.6 Kg.) y es la mezcla perfecta de potencia, tono de alta fidelidad y
ligera portabilidad.
Confiamos en que usted disfrutará su nuevo Spellbinder Blue durante
muchos años, y le agradecemos por “dar un paso arriba” a SWR.
Una nota de Spellbinder:
Hay una filosofía acordada entre Lieber y Clarke de que los productos
diseñados por Spellbinder Corp. o en colaboración con ella reflejen
todos los niveles de habilidad musical, permitiendo a todos los músicos
una genuina oportunidad de poseer equipo de calidad (instrumentos,
amplificadores, accesorios) que supere con mucho las expectativas.
Los conceptos y diseños de los productos, así como los estándares de
calidad, son fijados por Clarke y Lieber.
Características del SWR® Spellbinder™
• Conector de entrada Neutrik® combinado de 1/4 de pulgada/XLR
• Potencia Phantom de +15V con interruptor Encendido/Apagado
• Interruptor de almohadilla de entrada de –10dB
• Interruptor de fase
• Interruptor de silencio con indicador LED
• LED de clip de preamplificador
• Interruptor de entrada y salida de ecualizador con indicadores LED
• Control optimizador auditivo
• Controles de tono barribles apilados
• Control de mezcla de efectos
• Interruptor de desvío de mezcla de efectos con indicador LED
• Control de cociente de compresión con indicador LED
Características del panel trasero
• Salidas de línea equilibradas (XLR y de 1/4 de pulgada) con
elevador de tierra en XLR
• Selector de Directo/Línea para los conectores de salida de línea
• Control de nivel de salida para los conectores de salida de línea
• Conector de sintonizador desactivado
• Conector para auriculares estéreo
• Conectores de envío y retorno de bucle de efectos
• Conector Speakon® (para gabinete de altavoces de extensión)
SWR ha sido durante mucho tiempo líder del sector en el diseño
de amplificadores, y es por ello que, cuando Stanley decidió que
deseaba un pequeño y ligero monstruo de amplificador para ensayos y
pequeñas actuaciones, SWR fue singularmente la empresa ideal. ¡Sólo
tiene que escuchar el Spellbinder Blue y sabrá que tenía razón!
◊
10
◊
Page 11
Panel frontal
A. INPUTEsta entrada acepta una clavija XLR o / de pulgada:
La conexión XLR es una entrada balanceada:
(Pin =tierra, Pin =positivo, Pin =negativo)
La conexión de / de pulgada es una entrada "TS" no balanceada:
(Punta= positiva, Funda=tierra)
B. PHANTOM POWERÚsela según sea necesario para micrófonos
conectados a la entrada XLR {A}. Este botón no afecta la entrada de
/ de pulgada.
Fuera—Potencia Phantom apagada
Dentro—Potencia Phantom encendida
C. GAINAjusta el nivel de señal del preamplificador. La ganancia
es también el control de nivel primario para el conector de Envío
de efectos {S} del panel trasero y puede usarse para ajustar la
sensibilidad de entrada de su equipo de efectos, de ser necesario.
D. – dB PAD / PREAMP CLI—El botón de almohadilla reduce la
sensibilidad de entrada en –dB para dar una respuesta más clara
con fuentes de gran salida. Use Almohadilla si el [ICON] indicador
LED de clip del preamplificador indica que se está forzando el
amortiguador de entrada.
Fuera—Almohadilla apagada
Dentro—Almohadilla encendida
E. PHASEInvierte la fase del circuito de entrada, útil para reducir
la realimentación "regenerativa" generada cuando uno está de
pie a una distancia determinada del amplificador. También puede
reducir la realimentación cambiando su posición o distancia
del amplificador.
bajo para ayudarle a escucharse entre la banda. Luego, al girar
más en sentido de las manecillas del reloj, ciertas frecuencias
medias seleccionadas bajarán, específicamente un grupo de
frecuencias centradas alrededor de los Hz. Aunque es
notorio, el optimizador auditivo es suave en comparación
con las curvas de respuesta extremas que puede crear con los
controles de tono del ecualizador.
G. BASS / MID / TREBLETres controles de tono semiparamétricos
que le permiten aumentar o cortar niveles de señal en las
frecuencias que elija. Seleccione un punto medio del rango
de frecuencias utilizando la perilla exterior y
luego ajuste el nivel de señal de ese rango con
la perilla interior. El ajuste del rango medio es
esencial para la mayoría de los instrumentos, y
lo que se escucha bien cambiará de acuerdo con
su situación. Lo que suena áspero mientras toca solo puede
sonar perfectamente bien en una habitación atestada o en una
grabación.
H. EQ BYPASSPone los circuitos de control de tono dentro o
fuera de la trayectoria de la señal como lo indican los LED.
I. EFFECTS BLENDFuncional sólo cuando hay una clavija
insertada en el conector Retorno de Efectos {S}, esta perilla
ajusta su nivel de efectos controlando la cantidad de señal de
bucle de efectos "húmedos" que se mezclan con la señal "seca"
del preamplificador.
J. EFFECTS BYPASSElimina el circuito de bucle de efectos de
la trayectoria de la señal como lo indica el LED.
F. AURAL ENHANCERUna característica distintiva de SWR®,
el optimizador auditivo Aural Enhancer hace resaltar las notas
bajas fundamentales del bajo, da brillantez a los transitorios
de gran altura y reduce ciertas frecuencias que ocultan las
fundamentales. El efecto final es un sonido más transparente que
abre las características de sibilancia de todos los instrumentos sin
ser áspero.
Cómo funciona el optimizador auditivo: Véalo como un control
de tono variable que cambia el rango de frecuencias y el nivel de
acuerdo con dónde ajuste el control del Aural Enhancer:
Al girar el control en sentido de las manecillas del reloj desde
la posición Min, está elevando los niveles de las frecuencias
bajas, medias y altas en rangos que son distintos, pero
complementarios a los controles de tono de Bajos y Agudos.
La posición de las “ en punto”, favorita de muchos intérpretes,
resalta tanto los fundamentales más bajos como los claros
agudos, y al mismo tiempo añade un rango medio un poco más
◊
K. COMPRESSIONAjusta el nivel de compresión de la señal.
Gírelo completamente en sentido contrario al de las manecillas
del reloj para anular la compresión y gírelo en sentido de las
manecillas del reloj para aumentar el cociente de compresión.
El brillo de LED indica la cantidad activa de compresión que
está moderando sus niveles máximos de señal.
L. MASTER VOLUMEÚselo para ajustar la salida de volumen
de los altavoces después de que se han fijado todos los demás
niveles, incluidos los niveles de todos los efectos externos.
M. MUTEDeshabilita todas las salidas de la unidad excepto
los conectores de Sintonizador {T}, Auriculares {R} y Envío
de Efectos {S}. Útil al afinar el instrumento y para sesiones
silenciosas. El LED se ilumina cuando el silencio está activo.
N. POWER SWITCHApaga y enciende la unidad como lo indica
el LED.
◊
11
Page 12

Panel trasero
O. IEC POWER CORD SOCKETConecte el cable de alimentación
incluido a un enchufe eléctrico conectado a tierra de CA de acuerdo
con los valores de voltaje y frecuencia indicados en el panel trasero
de su amplificador.
P. SPEAKER OUTPUTConector Speakon® para un gabinete de
altavoces externo. La carga del altavoz debe ser de ohmios mínimo
y con valor nominal de Vatios mínimo. Lea los Lineamientos para
altavoces en la siguiente página antes de usar este conector.
NOTA: La salida de altavoces no funcionará con el interruptor de Altavoz
interno en la posición "On" (encendido).
Q
. INTERNAL SPEAKER
pulgadas u "Off" para usar el conector Speakon® {P}.
R. HEADPHONESConecte sus auriculares aquí. Use Silencio {M} para
deshabilitar la salida a los altavoces.
S. EFFECTS SEND / RETURN*Conecte Envío a la entrada en su
dispositivo de efectos, y conecte Retorno a la salida de efectos.
NOTA: Ajuste cualquier control "húmedo/seco" en sus efectos a la
posición totalmente WET (húmeda) para evitar problemas de fase y
ajuste cualquier nivel de entrada de efectos tan cerca de dB como
sea posible.
La señal de salida Envío de efectos incluye un formado de tonos a
bordo y el nivel de salida se controla principalmente mediante la
perilla Ganancia {C}. Retorno de efectos proporciona una entrada de
nivel de línea que se puede mezclar a cualquier tasa con la señal de
preamplificador a bordo usando la perilla de Mezcla de efectos.
Seleccione "On" para usar el altavoz interno de
El circuito de Bucle de efectos está en una “cadena lateral” del
circuito principal (como en las consolas de grabación de estudio) para
proporcionar el sonido total de su instrumento y la diversidad de sus
unidades de efectos. Esto también reduce el ruido de las unidades
de efectos al estar situado después de la ganancia en la trayectoria
de la señal.
T. TUNER OUTPUT*Conecte el sintonizador de su instrumento aquí.
Use Silencio {M} para deshabilitar la salida de audio mientras está
usando el sintonizador.
U. BALANCED LINE OUTPUTS*Salidas verdaderas electrónicamente
balanceadas, adecuadas para el estudio y las consolas de mezcla
“delante del foro” (en vivo).
V
. XLR
GROUND LIFT Desconecta la conexión de tierra (pin-) del
conector XLR para reducir el ruido ce bucle de tierra generado por
cableados no estándares. Deje fuera este interruptor normalmente.
W
. PA D
Ajusta el nivel de salida de las Salidas balanceadas {U} para
ajustarse a una variedad de conexiones de equipo de sonido y
sensibilidades de entrada.
X
. DIRECT / LINE
balanceadas {U}. Directo es una ruta de señal totalmente de lámparas
que se toma inmediatamente después de la primera etapa de
preamplificador de lámparas. Línea incluye todos los circuitos de
ganancia, tono, compresión y efectos.
Y
. HORN LEVEL
de la bocina de alta frecuencia.
NOTA: Vea el diagrama de bloques de Spellbinder Blue en la página .
Selecciona la fuente de la señal para las Salidas
Ajusta el nivel de volumen
* NOTA: Los conectores de 1/4 de pulgada del panel trasero TRS (Tip/Ring/Sleeve o punta, anillo y
funda) balanceados:
Punta=positivo (+)
Anillo=negativo (–)
Funda=tierra
Aunque se pueden usar cables de guitarra blindados estándar “mono” TS (Tip/Sleeve, punta y funda), el uso de cables TRS “estéreo” puede mejorar el índice
señal-ruido o reducir el hum, especialmente cuando se requieren conexiones más largas.
◊
12
◊
Page 13

Lineamientos de los altavoces
• NO conecte una carga de altavoces con una impedancia total
por debajo del valor nominal mínimo de su amplificador
para evitarle daños a su equipo.
• NO conecte de altavoces con una capacidad total de manejo
de potencia que sea menor que el valor nominal de salida
de potencia de su amplificador para evitarle daños a su
equipo.
• SIEMPRE apague la alimentación de su sistema (OFF) antes
de conectar o desconectar altavoces.
• ÚNICAMENTE use cable de altavoces no blindado de calibre
18 o más pesado (calibre 16 o 14) para las conexiones de
altavoces. El cable de instrumentos blindado NO funcionará
y puede dañar su equipo.
• ÚNICAMENTE conecte un amplificador a cada carga de
altavoces. Dos amplificadores conectados a una sola carga
NO funcionarán y pueden dañar su equipo.
Use los valores nominales de impedancia y potencia de su
amplificador y altavoces para determinar si una combinación
determinada de altavoces es adecuada para su amplificador.
NOTA: Todas las cajas de altavoces de SWR®, así como la
mayoría de los demás, estarán conectados en paralelo (NO en
serie) cuando se enlacen entre sí (conexión en cadena). Por tanto,
estos lineamientos se aplican sólo a configuraciones de altavoces
en paralelo.
La ilustración de los altavoces le da los cálculos totales de carga
de impedancia para diversas combinaciones de impedancia de
altavoces (=ohmios). La carga ideal de altavoces (impedancia
total) es igual al valor nominal mínimo de impedancia de su
amplificador. Operar por debajo del valor nominal mínimo
de impedancia del amplificador puede sobrecalentar su
amplificador y provocar daños. Operar por encima del
valor nominal mínimo de impedancia del amplificador,
aunque es seguro, reduce la salida máxima de potencia
del amplificador.
Algo más que debe tener en consideración: Puede
obtener la misma carga de impedancia total de
grupo de distintas combinaciones de impedancias de
altavoces (vea la ilustración). Si cada altavoz del grupo
tiene la misma impedancia cada altavoz recibirá la misma
cantidad de potencia de su amplificador. No obstante, si
las impedancias no son todas iguales, los altavoces con
la impedancia más baja recibirán la mayor cantidad de
potencia. Por ejemplo, si conecta un altavoz de 8Ω y uno de
16 a una salida de amplificador de 30 vatios, el altavoz de
8 ohmios recibirá alrededor de 20 de esos vatios (y tendrá un
volumen dos veces más alto que el altavoz de 16 ohmios). Tenga
esto en consideración al calcular las capacidades de manejo de potencia
y al posicionar sus cajas de altavoces.
Para un análisis a fondo de sugerencias de conf iguración para amplificadores
y altavoces (incluida una ojeada a los problemas de la i mpedancia y la
potencia n ominal), visite el área de Soporte del sitio Web d e SWR en www.
swramps.com.
Especificaciones
TIPO: PR 761
NÚMEROS DE PIEZAS: 4420500010 (120V, 60Hz) 4420503010 (240V, 50Hz) AUS
442050 4010 (230V, 50Hz) UK 4420506010 (230V, 50Hz) EUR
4420507010 (100V, 50Hz) JPN
REQUISITOS DE ALIMENTACIÓN: 5 75W
AMPLIFICADORES
DE POTENCIA: IMPEDANCIA MÍNIMA DE SALIDA: 4Ω
SALIDA DE POTENCIA: 160W RMS en 4Ω @ < 1% THD, 1kHz
PREAMPLIFICADOR: IMPEDANCIA DE ENTRADA: 4.7MΩ (entrada de 1/4 de pulgada); 20kΩ (entrada XLR)
SENSIBILIDAD A MÁXIMA POTENCIA: 9mV (entrada de 1/4 de pulgada); 900μV (entrada XLR)
CONTROLES DE TONO: ±15 dB al ajuste de la perilla de frecuencia
COMPRESIÓN: COCIENTE: 1:1 a 20:1
BUCLE DE EFECTOS: IMPEDANCIA DE ENVÍO: 1k Ω
IMPEDANCIA DE RETORNO: 10 kΩ
LÍNEA DE SALIDA BALANCEADA: IMPEDANCIA DE ENVÍO: 50Ω
ALTAVOCES: WOOFER: Eminence Neo 10 pulgadas 4 ohmios (0076017000)
BOCINA: Eminence 8 ohmios (0067254000)
DIMENSIONES: ALTURA: 19.5 pulg. (49.5 cm) ANCHO: 15 3/8 pulg. (39 cm) FONDO: 14.5 pulgadas (36.8 cm)
PESO: 26.5 lb (11.6 kg)
Las especificacion es de producto están sujetas a cambios sin aviso.
◊
◊
13
Page 14

SWR® Spellbinder™ Blue
Nous vous félicitations de votre achat de l’ampli combo basse SWR®
Spellbinder™ Blue !
Lorsque notre vieil ami (et artiste SWR de longue date) Stanley Clarke
nous a communiqué ses projets de partenariat avec le luthier Tom
Lieber afin de proposer la ligne Spellbinder de produits centrés sur la
basse, nous étions intrigués. Lorsqu’ils nous ont demandé de fournir un
combo portable et léger pour cette ligne exclusive, nous fûmes honorés
et ravis – en particulier car leur demande s’adapte parfaitement à nos
projets de modification du Baby Baby Blue™ combo !
Le Spellbinder Blue est le résultat de la fusion de technologies de
pointe avec le préampli classique SWR Baby Blue™ pour produire un
ampli combo basse extrêmement compact de qualité professionnelle
et d’une gamme de tonalités exceptionnelles. Avec la nouvelle
technologie, dont un ampli de puissance numérique de 160 W, un
pilote en néodyme de 10 pouces, un super tweeter Eminence® et un
léger coffret italien en peuplier, le SpellBinder blue pèse juste 26,5
livres (11,6 kg) et représente un mélange parfait de puissance, de ton
haute fidélité et de portabilité avec sa légèreté.
Nous sommes persuadés que vous apprécierez votre nouveau
Spellbinder Blue pour les années à venir – et nous vous remercions «
d’être passé » au SWR.
Une note de Spellbinder :
Lieber et Clarke se sont entendus sur la philosophie que les produits
conçus par ou en collaboration avec Spellbinder Corp reflètent tous les
niveaux de sens de la musique, apportant à chaque musicien, une véritable opportunité d’acquérir un équipement de qualité (instruments,
amplis, accessoires) qui dépasse de loin leurs attentes. La conception
et les modèles de produit, ainsi que les normes de qualité, sont établis
par Clarke et Lieber.
Caractéristiques du SWR® Spellbinder™ Blue
• Entrée Neutrik® combo jack 1/4"/XLR
• Alimentation fantôme +15 V avec un sélecteur activé/désactivé
• Sélecteur de bloc d’entrée -10 dB
• Inverseur de phase
• Sélecteur de discrétion avec voyant DEL
• Clip DEL du préampli
• Sélecteur d’égalisation activé/désactivé avec voyants DEL
• Contrôle Aural Enhancer
• Réglages de tonalité à balayage superposé
• Commande de mise en phase (blend) d’effets
• Sélecteur de dérivation de mise en phase d’effets avec voyant DEL
• Commande du rapport de compression avec voyant DEL
Caractéristiques du panneau arrière
• Sorties de ligne symétrique (XLR & 1/4") avec une mise à la terre
sur XLR
• Sélecteur direct/ligne pour des jacks de sortie de ligne
• Commande du niveau de sortie pour les jacks de sortie de ligne
• Jack de sortie du syntonisateur
• Jack du casque stéréo
• Jacks des boucles d’envoi & de retour des effets
• Jack Speakon® (pour une enceinte supplémentaire)
SWR est depuis longtemps un leader dans la conception d’amplis, voilà
pourquoi, lorsque Stanley a décidé qu’il voulait un petit monstre léger
en guise d’ampli pour les répétitions et les petits spectacles, SWR fut
la société de son choix. Vous n’avez qu’à écouter le Spellbinder Blue et
vous saurez qu’il a raison !
◊
14
◊
Page 15

Panneau avant
A. INPUTCette entrée accepte soit une prise XLR soit /" :
Le branchement XLR est une entrée symétrique :
(Broche = masse, Broche = positif, Broche = négatif)
Le branchement /" est une entrée asymétrique « TS » :
(Tip [Pointe] = positif, Sleeve [Corps] = masse)
B. PHANTOM POWERUtiliser selon les besoins pour les microphones
branchés à l’entrée XLR {A}. Ce bouton n’affecte pas l’entrée /".
Sortie —Alimentation fantôme désactivée
Entrée —Alimentation fantôme activée
C. GAINRègle le niveau du signal du préampli. Gain est également la
commande principale du niveau du jack d’envoi {S} des effets sur
le panneau arrière et peut être utilisé pour adapter la sensibilité
d’entrée de votre équipement d’effets, si nécessaire.
D. – dB PAD / PREAMP CLIP—Le bouton Bloc réduit la sensibilité
de l’entrée de - dB pour fournir une réponse plus nette avec des
sources de sortie élevées. Utiliser Bloc si le clip DEL du préampli
indique que l’entrée tampon a été suractivée.
Sortie —Bloc désactivé
Entrée —Bloc activé
E. PHASERenverse la phase du circuit d’entrée, utile pour réduire le
retour « régénérateur » produit lorsque vous vous trouvez à une
distance particulière de l’ampli. Vous pouvez également réduire
le retour en changeant votre position ou la distance à partir de
l’ampli.
F. AURAL ENHANCER Une caractéristique déposée de SWR®, l’Aural
Enhancer met en valeur les notes basses fondamentales de la
basse, avive les transitoires de haut de gamme et réduit certaines
fréquences qui masquent les fondamentaux. L’effet final est un
son plus transparent qui ouvre les caractéristiques sifflantes de
tous les instruments sans être stridents.
Comment fonctionne l’Aural Enhancer: pensez-y comme une
commande de variation tonale qui change la gamme et le niveau
de fréquence selon la manière dont vous le réglez :
Comme vous tournez la commande dans le sens des aiguilles d’une
montre, de la position Min, vous élevez les niveaux de fréquences
basses, moyennes et hautes dans des gammes différentes tout
en étant complémentaires des commandes de basse et d’aigus.
La position « heures » - favorite de nombreux joueurs – met
en valeur à la fois les fondamentaux de bas de gamme et ceux
nets et élevés, tout en ajoutant un peu de milieu de gamme qui
vous aide à couper à travers la bande. Ensuite, si vous continuez
à tourner dans le sens des aiguilles d’une montre, les moyennes
sélectionnées seront laissées tomber—Spécifiquement, un groupe
de fréquences centrées autour de Hz. Lorsqu’il est apparent,
l’Aural Enhancer est gentiment comparé aux courbes de réponses
extrêmes que vous pouvez créer avec les commandes d’égalisation
de tonalité.
G. BASS / MID / TREBLETrois commandes de tonalité à
demiparamétrique qui vous permettent d’amplifier
ou de couper les niveaux de signaux à des fréquences
choisies. Sélectionner un point central de la gamme
de fréquences en utilisant le bouton extérieur et
régler ensuite le niveau de signal de cette gamme
avec le bouton intérieur. Le réglage de la gamme moyenne est
critique pour la plupart des instruments et ce qui paraît bien varie
en fonction de votre situation. Ce qui paraît strident lorsqu’on joue
seul peut résonner correct dans une salle remplie de monde ou sur
un enregistrement.
H. EQ BYPASSIntroduit ou sort les circuits de commande de tonalité
du parcours du signal selon les indications des DEL
I. EFFECTS BLENDFonctionnant uniquement lorsqu’une prise est
insérée dans le jack de retour {S} d’effets, ce bouton règle vos
niveaux d’effets en contrôlant le volume de signal à boucle d’effets
« non traités » mélangé dans le signal « traité » du préampli.
J. EFFECTS BYPASSSort le circuit de boucle d’effets du parcours du
signal selon l’indication du DEL .
K. COMPRESSIONRègle le niveau de la compression du signal
Tourner entièrement dans le sens contraire des aiguilles d’une
montre pour une absence de compression et dans le sens des
aiguilles d’une montre pour augmenter le taux de ompression.
L’intensité du DEL indique le volume de compression actif qui
modère vos niveaux de crête de signaux.
L. MASTER VOLUMEUtilisé pour régler l’intensité de la sortie des
enceintes une fois tous les autres niveaux réglés, dont les niveaux
d’effets externes.
M. MUTEDésactive toutes les sorties de l’unité sauf le syntonisateur
{T}, le casque {R} et les jacks d’envoi {S} d’effets. Utile pendant
l’accord de votre instrument et pour les séances calmes. Le DEL
est allumé lorsque la Sourdine est activée.
N. POWER SWITCHAllume et éteint l’unité selon l’indication du
DEL .
◊
◊
15
Page 16

Panneau arrière
O. IEC POWER CORD SOCKETBranche le cordon d’alimentation
inclus à une prise CA reliée à la terre conformément à la tension
et à la capacité en fréquence spécifiées sur le panneau arrière de
votre ampli.
P. SPEAKER OUTPUTConnecteur Speakon® pour une enceinte
externe. La charge de l’enceinte doit être de et de W nominale
au minimum. Lire les directives de l’enceinte à la page suivante avant
d’utiliser ce jack.
NOTE: La sortie de l’enceinte ne fonctionnera pas si le sélec teur de
l’enceinte interne est en position « activée ».
Q
. INTERNAL SPEAKER
interne de " ou « Désactivé » pour utiliser le connecteur {P} Speakon®.
R. HEADPHONESBrancher votre casque ici. Utiliser Sourdine {M} pour
désactiver la sortie des enceintes.
S. EFFECT S SEND / RETURN*Connecter Envoi à l’entrée
de votre dispositif d’effets et Retour à la sortie des effets.
NOTE : Règle toute commande « non traité/traité » de vos effets en
position complètement NON TRAITE afin d’empêcher les problèmes
de mise en phase et règle tout niveau d’entrée d’effets aussi près que
possible de dB.
Le signal de sortie de l’Envoi d’effets comprend le traitement de la
tonalité et le niveau de sortie est principalement contrôlé par le bouton
Gain {C}. Le Retour d’effets fournit une entrée de niveau de ligne qui
peut être mélangé à n’importe quel taux de signal de préampli en
utilisant le bouton de mise en phase {I} d’effets.
Le circuit de boucle d’effets est sur une « chaîne latérale » du circuit
principal (comme sur une console de studio d’enregistrement) afin de
fournir un son plein de votre instrument et la diversité de vos unités
d’effets. Ceci réduit également les bruits des unités d’effets situés
après le gain du parcours du signal.
Sélectionner « Activé » pour utiliser l’enceinte
T. TUNER OUTPUT*Brancher ici le syntonisateur de votre instrument.
Utiliser la Sourdine {M} pour désactiver la sortie audio lorsque vous
utilisez votre syntonisateur.
U. BAL ANCED LINE OUTPUTS*Sorties réellement symétriques
électroniquement parlant, convenant aux tables de mixage de studio
et « principales » (direct).
V
. XLR
GROUND LIFT Déconnecte le branchement à la terre (broche-)
du jack XLR pour réduire le bruit de boucle de masse généré par un
câblage non normalisé. Exclure normalement ce sélecteur.
W
. PA D
Règle le niveau de sortie des sorties symétriques {U} afin de
s’adapter à une variété de connexions d’équipement sonore et de
sensibilités d’entrée.
X
. DIRECT / LINE
symétriques {U}. Le Direct est un véritable signal tous tubes pris
immédiatement après le premier étage du préampli à tube. La ligne
inclut tous les gains, tonalités, compressions et circuits d’effets.
Y
. HORN LEVEL
de haute fréquence.
NOTE : Voir le schéma synoptique du Spellbinder Blue à la page .
Sélectionne la source de signal pour les sorties
Règle le volume du pavillon
* NOTE : Les jacks 1/4" du panneau arrière {R, S et T} sont de type symétrique TRS (Tip/Ring/Sl eeve) :
Tip (pointe) = positif (+)
Ring (bague) = négatif (-)
Sleeve (corps) = masse.
Bien que des connecteurs blindés normalisés TS (Tip/Sleeve) de guitare « mono » peuvent être utilisés, l’utilisation de connecteurs « stéréo » TRS peut
améliorer le rapport signal/bruit et/ou réduire bourdonnement, en particulier lorsque des connexions plus longues sont nécessaires.
◊
16
◊
Page 17

Directives sur l’enceinte
• NE PAS connecter la charge d’une enceinte avec
une impédance totale en dessous de la capacité
minimale de votre ampli afin de ne pas endommager
votre équipement.
• NE PAS connecter une(des) enceinte(s) dont la puissance
admissible totale est inférieure à la puissance nominale
de sortie de votre ampli afin de ne pas endommager
votre équipement.
• TOUJOURS éteindre l’alimentation de votre système avant
de connecter ou de déconnecter des enceintes.
• Utiliser UNIQUEMENT un câble d’enceinte non blindé de
calibre 18 ou plus (calibre 16 ou 14) pour les connexions
d’enceinte. Un câble d’instrument blindé NE fonctionnera
PAS et peut endommager votre équipement.
• Brancher UNIQUEMENT un ampli à chaque charge
d’enceinte. Deux amplis connectés à une seule charge
NE fonctionneront PAS et peuvent endommager
votre équipement.
Utiliser l’impédance et la puissance nominale de votre ampli
et de vos enceintes afin de déterminer si une combinaison
d’enceintes convient à votre ampli. NOTE: Toutes les enceintes
acoustiques SWR®, ainsi que la plupart des autres, seront connectées
en parallèle (et NON en série) lorsqu’elles sont liées (guirlande)
ensemble. Par conséquent, ces directives s’appliquent uniquement à
des configurations d’enceintes en parallèle.
L’illustration de l’enceinte vous donne les calculs de charge de
l’impédance totale pour diverses combinaisons d’impédance
d’enceinte (=ohms). La charge d’enceinte idéale (impédance
totale) est égale à l’impédance nominale minimale de votre
ampli. Fonctionner en dessous de l’impédance nominale
minimale de l’ampli peut le surchauffer et l’endommager.
Fonctionner au-dessus de l’impédance nominale
minimale de l’ampli, bien que sûr, réduit sa puissance
fournie maximale.
Autre chose à considérer : Vous pouvez obtenir la
même charge d’impédance totale de groupe à partir
de différentes combinaisons d’impédances d’enceinte
(voir illustration). Si chaque enceinte d’un groupe a la
même impédance, elle recevra la même quantité de
puissance de votre ampli. Cependant, si les impédances
sont différentes, les enceintes ayant les plus basses auront
le plus de puissance. Par exemple, si vous connectez une
enceinte de 8 Ω et une de 16 Ω à une sortie d’ampli de 30
W, l’enceinte de 8 Ω en recevra 20 W (et sera jusqu’à deux
fois plus forte que l’enceinte à 16 ). Prenez ceci en compte
pour calculer les puissances admissibles et pour positionner vos
enceintes acoustiques.
Pour une discussion approfondie sur les conseils de réglage des
amplis et enceintes (dont les problèmes d’impédance et de puissance
nominale), consulter la section Soutien du site Web de SWR sur
www.swramps.com.
Caractéristiques
TYPE : PR 761
NUMEROS DES PIECES : 4420500 010 (120V, 60Hz) 4420503010 (240V, 50Hz) AUS
442050 4010 (230V, 50Hz) UK 4420506010 (230V, 50Hz) EUR
4420507010 (100V, 50Hz) JPN
PUISSANCE NECESSAIRE : 575W
AMPLIFICATEUR IMPEDANCE DE
DE PUISSANCE : SORTIE MINIMALE : 4Ω
PUISSANCE FOURNIE : Puissance eff icace 160 W dans 4 Ω à THD < 1 %, 1 kHz
PRÉAMPLI : IMPEDANCE D’ENTREE : 4,7 MΩ (entrée 1/4") ; 20 kΩ (ent rée XLR)
SENSIBILITE A
PLEINE PUISSANCE : 9 mV (entrée 1/4") ; 900 μV (entrée XLR)
COMMANDES DE TONALITE : ±15 dB au bouton de réglage de fréquence
COMPRESSION : TAUX : 1:1 à 20:1
BOUCLE D’EFFETS : IMPEDANCE D’ENVOI : 1kΩ
IMPEDANCE DE RETOUR : 10 kΩ
SORTIES DE LIGNE SYMETRIQUES : IMPEDANCE D’ENVOI : 50Ω
ENCEINTES : HAUT-PARLEUR DE GRAVES : Nouvelle hauteur 10" 4 ohm (0 076017000)
PAVILLON : Hauteur 8 ohm (0067254000)
DIMENSIONS : HAUTEUR : 19,5 pouces (49,5 cm) LARGEUR : 15 3/8 pouces (39 cm) PROFONDEUR : 14,5 pouces (36,8 cm)
POIDS : 26,5 liv res (11,6 kg)
Les caractéristiques d u produit peuvent changer sans préavis.
◊
◊
17
Page 18

SWR® Spellbinder™ Blue
Complimenti per aver scelto di acquistare un amplificatore combo per
basso SWR® Spellbinder™ Blue!
Quando il nostro grande amico (e da molti anni artista SWR) Stanley
Clarke ci parlò della sua idea di mettersi in società con il liutaio Tom
Lieber per realizzare la linea di prodotti per il basso Spellbinder, la
cosa ci incuriosì. Quando ci chiesero di fornire loro un combo leggero e
portatile per questa linea esclusiva, per noi fu un onore e un’emozione
al tempo stesso – in particolare perché la loro richiesta coincideva con
la nostra idea di ri-progettare il combo Baby Baby Blue™!
Spellbinder Blue è il risultato dell’incontro fra le tecnologie
all’avanguardia con il preamplificatore classico SWR Baby Blue™,
per produrre un amplificatore per il basso compatto, di qualità
professionale e dotato di un’eccezionale gamma tonale. Grazie alle
nuove tecnologie, fra cui un amplificatore digitale da 160 watt, un
driver al neodimio da 10’’, un super-tweeter Eminence® e una struttura
in multistrato leggero di provenienza italiana, Spellbinder Blue pesa
solo 11.6 kg e rappresenta il connubio perfetto fra potenza, toni a
elevata fedeltà e portabilità.
Siamo certi del fatto che sarete soddisfatti del vostro Spellbinder Blue
per molti e molti anni. Grazie per deciso di compiere un “salto di
qualità” con SWR.
Nota da Spellbinder:
Lieber e Clarke sono uniti da una filosofia condivisa secondo la quale
i prodotti studiati o realizzati con Spellbinder Corp riflettono tutti i
livelli di abilità in campo musicale, consentendo a ciascun musicista
di disporre di una strumentazione di qualità (strumenti, amplificatori,
accessori), che vanno ben al di là di ogni aspettativa. Le idee e i
progetti dei prodotti, oltre che gli standard qualitativi, vengono stabiliti
da Clarke e Lieber.
SWR® Spellbinder™ Blue - Caratteristiche
• Jack ingresso 1/4"/XLR Neutrik® combo
• Alimentazione Phantom +15V con interruttore di Accensione/
Spegnimento
• interruttore pad –10dB
• Interruttore fase
• Interruttore Mute con spia LED
• LED clip preamp
• Interruttore ingresso/uscita EQ con spie LED
• Controllo Aural Enhancer
• Regolatori di tono espandibili impilati
• Blend control per gli effetti
• Interruttore Bypass Effects Blend con spia LED
• Controllo rapporto di compressione con spia LED
Rear Panel Features
• Uscite di linea bilanciate (XLR & 1/4") con Ground Lift su XLR
• Interruttore selettore Diretto/Linea per jack uscite di linea
• Controllo del livello di output per i jack di uscita di linea
• Jack uscita Accordatore
• Jack cuffia stereo
• Jack effetti Loop Send & Return
• Jack Speakon® (per l’estensione della struttura dell’altoparlante)
SWR è da molti anni un’azienda leader nella progettazione degli
amplificatori; è questo il motivo per il quale quando Stanley ha deciso
di creare un nuovo capolavoro in termini di dimensioni e leggerezza sia
per fare esercizio che per le serate musicali ha pensato direttamente a
SWR. Basta ascoltare Spellbinder blu per capire che non aveva torto!
◊
18
◊
Page 19

Pannello frontale
A. INPUTQuesto ingresso accetta sia un connettore XLR che uno /'':
Il collegamento XLR è un ingresso bilanciato:
(Pin =terra, Pin =positivo, Pin =negativo)
Il connettore /'’ è un ingresso “TS” non bilanciato:
(Tip=positivo, Sleeve=terra)
B. PHANTOM POWERUtilizzare, a seconda delle necessità, per i
microfoni collegati all’ingresso XLR {A}. Questo tasto non influisce sull’
ingresso /'’.
Uscita—Alimentazione Phantom spenta
Ingresso—Alimentazione Phantom accesa
C. GAINRegola il livello del segnale di preamplificazione. Il Gain è
inoltre il principale controllo del livello per il jack Effects Send {S}
posizionato sul pannello posteriore e può essere utilizzato per regolare
la sensibilità di ingresso della strumentazione per gli effetti, qualora ciò
fosse necessario.
D. – dB PAD / PREAMP CLIP—Il tasto Pad riduce la sensibilità
dell’ingresso di -dB per fornire una risposta più chiara con le
sorgenti ad output elevato. Utilizzare il Pad se il LED Clip Preamp
indica che il buffer in ingresso è in overdrive.
Uscita—Pad spento
Ingresso—Pad acceso
E. PHASECapovolge la fase del circuito in ingresso, utile per la riduzione
della reazione “rigenerativa” che si viene a creare quando ci si trova a
una particolare distanza dall’amplificatore. È inoltre possibile ridurre la
reazione modificando la posizione o la distanza dall’amplificatore.
è possibile esaltare le frequenze basse fondamentali e allo stesso
tempo aggiungere una leggera quantità di frequenze medio-basse
che consentono di dare maggior risalto al suono, rendendolo ben
distinguibile. Se da questa posizione si continua a ruotare la manopola
in senso orario, le frequenze medie selezionate faranno diminuire, più
specificatamente, un gruppo di frequenze centrato attorno ai Hz.
Anche se solo apparentemente, l’azione dell’Aural Enhancer risulta
essere più delicata rispetto agli effetti estremi che si possono creare
creare con i normali controlli di tono EQ.
G. BASS / MID / TREBLETre controlli di tono semiparametrici che
consentono di aumentare o tagliare i livelli di segnale
alle frequenze scelte. Selezionare il punto di centro
della gamma di frequenza servendosi della manopola
esterna, quindi regolare il livello di segnale della gamma
servendosi della manopola interna. La regolazione delle
frequenze medie è molto importante per la maggior
parte degli strumenti, e le impostazioni variano da una situazione
all’altra. Un suono che può sembrare sgradevole suonando da soli
può rivelarsi perfetto in una stanza affollata o durante una sessione
di registrazione.
H. EQ BYPASSInserisce o toglie i circuiti di controllo del tono dal
percorso del segnale come indicato dai LED .
I. EFFECTS BLENDSi attiva solo quando viene inserito un jack in una
delle connessioni Effects Return{S}; questa manopola imposta il livello
di effetti verificando il quantitativo di segnali di effects loop esterni
“wet” mescolati con il segnale di preamplificazione diretto “dry”.
J. EFFECTS BYPASSSposta il circuito effects loop fuori dal dal percorso
del segnale come indicato dal LED .
F. AURAL ENHANCER Marchio di fabbrica dei prodotti SWR®, l’Aural
Enhancer evidenzia al meglio le basse frequenze fondamentali del
basso, esalta i transienti delle frequenze alte e riduce le frequenze
che “mascherano” quelle fondamentali. L’effetto finale è un suono più
trasparente che consente di esaltare le caratteristiche sibilanti di ogni
strumento senza risultare fastidioso.
Come funziona l’Aural Enhancer: Bisogna concepirlo come un
controllo di tono variabile che modifica la gamma di frequenza e
il livello in base alla posizione in cui viene posizionato il controllo
dell’Aural Enhancer:
Ruotando la manopola in senso orario partendo dalla posizione Min, è
possibile aumentare il livello delle frequenze basse, medie e alte in aree
di frequenze differenti (ma sempre complementari) rispetto a quelle
regolabili mediante i controlli di tono Bass e Treble. Posizionando
la manopola “a ore ”—una delle più utilizzate da molti bassisti—
◊
K. COMPRESSIONRegola il livello di compressione del segnale. Ruotare
completamente in senso antiorario per non avere compressione, e
ruotare in senso orario per aumentare il rapporto di compressione. La
luminosità del LE indica il livello di compressione attivo che modera
il livello dei picchi del segnale.
L. MASTER VOLUMEUtilizzato per impostare l’output in uscita dai
diffusori, dopo che sono stati impostati tutti gli altri livelli, compresi
eventuali livelli di effetto.
M. MUTEDisattiva tutti gli output tranne il Tuner (Accordatore) {T}, le
Headphones (Cuffie) {R} e le prese Effects Send {S}. È utile quando si sta
accordando lo strumento oltre che per suonare senza disturbare. Il LED
si illumina quanto Mute è attivo.
N. POWER SWITCHACCENDE-SPEGNE l’unità come indicato
dal LED .
◊
19
Page 20

Pannello posteriore
O. IEC POWER CORD SOCKETCollegare il cavo di alimentazione
in dotazione a una presa elettrica CA conforme alla tensione e al
frequency rating indicato sul pannello posteriore dell’ amplificatore.
P. SPEAKER OUTPUTConnettore Speakon® per altoparlante esterno.
Il carico dell’altoparlante deve essere di ohm minimo e supportare
almeno Watts. Consultare le informazioni sull’altoparlante nella
pagina successiva prima di utilizzare questa presa.
NO TA: Speaker Output non funziona se l’interruttore dell’altoparlante
interno è in posizione “On”.
Q
. INTERNAL SPEAKER
interno da '' oppure “Off” per utilizzare il connettore Speakon® {P}.
R. HEADPHONESCollegare qui le proprie cuffie. Utilizzare Mute {M}
per disattivare l’output negli altoparlanti.
S. EFFECTS SEND / RETURN*Collegare Send all’ingresso sul rack effetti
e collegare Return all’uscita effetti. NOTA: Impostare qualsiasi controllo
“wet/dry” sugli effetti in posizione WET per evitare problemi di fase, e
impostare qualsiasi livello di ingresso effetti il più vicino possibile a dB.
Il segnale di output Effects Send comprende il circuito di
tone-shaping mentre il livello di output è controllato principalmente
dalla manopola del Gain {C}. Effects Return fornisce un ingresso di
livello linea che può essere miscelato in qualsiasi rapporto con il
segnale di preamplificazione di bordo servendosi della manopola
Effects Blend {I}.
Il circuito Effects Loop si trova su un “circuito di rilevazione” del
circuito principale (come nelle console degli studi di registrazione)
per rendere tutti i suoni del vostro strumento e la diversità dei diversi
rack effetti. Questa opzione riduce il rumore delle unità degli effetti
trovandosi dopo il gain nel percorso del segnale.
Selezionare “On” per utilizzare l’altoparlante
T. TUNER OUTPUT*Connessione per l’accordatore. Utilizzare il tasto
Mute {M} per silenziare l’uscita del segnale in fase di accordatura.
U. BALANCED LINE OUTPUTS*Uscite realmente bilanciate
elettronicamente, adatte sia per mixing console in studio che dal
vivo.
V
. XLR
GROUND LIFT Scollega il collegamento di terra (pin-) dalla
presa XLR per ridurre il rumore di ground loop generato da cablaggi
non standard. Normalmente questo tasto deve essere disinserito.
W
. PA D
Regola il livello del segnale dell’uscita Balanced Output {U} in
modo da adattarsi alle connessioni di diverse apparecchiature e alle
diverse sensibilità di ingresso.
X
. DIRECT / LINE
le uscite bilanciate Balanced Outputs {U}. Direct è un percorso di
segnale che corre per tutto il tubo preso subito dopo il passaggio di
premplificazione del primo tubo. Line comprende tutti i circuiti di gain,
tono, compressione ed effetti.
Y
. HORN LEVEL
delle trombe ad alta frequenza.
NOTA: Consultare il diagramma a blocchi di Spellbinder Blue a
pagina .
Seleziona la sorgente del segnale presente per
Regola il livello di volume
* NOTA: Le prese del pannello posteriore da 1/4'' {R, S e T}sono di tipo TRS bilanciato TRS
(Tip/Ring/Sleeve):
Tip=positivo (+)
Ring=negativo (–)
Sleeve=terra.
I cavi per chitarra “mono” standard schermati TS (Tip/Sleeve) possono sicuramente essere utilizzati, anche se l’utilizzo di cavi TRS “stereo”
potrebbe migliorare il rapporto segnale/rumore e/o ridurre il ronzio, in particolare quando è necessario servirsi di cavi più lunghi.
◊
20
◊
Page 21

Informazioni sull’altoparlante
• NON collegare un carico d’impedenza con un’impedenza
totale inferiore al rating minimo dell’amplificatore per evitare
danni alla strumentazione.
• NON collegare altoparlanti con una capacità totale inferiore
al rating di uscita dell’amplificatore per evitare danni
alla strumentazione.
• SPEGNERE SEMPRE l’alimentazione prima di collegare o
scollegare altoparlanti.
• Utilizzare SOLO cavi per casse di diametro 18 o più pesanti
(16 o 14) per i collegamenti ad altoparlanti. I cavi schermati
per strumenti NON funzioneranno e potrebbero danneggiare
la strumentazione.
• Collegare SOLO un amplificatore a ogni carico
d’impedenza. Due amplificatori collegati a un carico
unico NON funzioneranno e potrebbero danneggiare
la strumentazione.
Servirsi dei rating di impedenza e alimentazione
sull’amplificatore e sulle casse per capire se una determinata
combinazione di casse è adatta all’amplificatore. NOTA:
Tutte le casse SWR® come anche molte altre del resto,
saranno collegate in parallelo (NON in serie) fra di loro (collegamento
a margherita). Queste informazioni valgono quindi solamente per le
configurazioni di casse in parallelo.
L’illustrazione delle casse fornisce i calcoli di carico di impedenza
totali per le diverse combinazioni di impedenza delle casse
(Ω=ohms). Il carico d’impedenza ideale (impedenza totale)
corrisponde al rating minimo di impedenza dell’amplificatore.
Lavorare a valori inferiori al rating di impedenza minima
dell’amplificatore potrebbe surriscaldare l’amplificatore e
provocare danni. Lavorare a valori superiori rispetto al
rating di impedenza minima dell'amplificatore, seppure
sicuro, riduce la potenza massima dell’amplificatore.¬
Altro punto da prendere in considerazione: è possibile
ottenere lo stesso carico di impedenza totale del gruppo
da diverse combinazioni di impedenze delle casse
(vedi immagine). Se ogni cassa nel gruppo ha la stessa
impedenza, ogni cassa riceverà lo stesso quantitativo
di potenza dall’amplificatore. Comunque sia, se le
impedenze non sono tutte uguali, le casse con impedenza
più bassa riceveranno più potenza. Se si collega ad esempio
una cassa 8Ω e una 16 Ω e a un amplificatore in uscita da
30 watt, la cassa a 8Ω riceverà all’incirca 20 dei watt totali
(e produrrà lo stesso suono di quella a 16 ohm). TSi tra tta di
informazioni importanti da prendere in considerazione quando
si analizzano le diverse configurazioni e le posizioni delle casse.
Per informazioni più dettagliate e suggerimenti sul posizionamento
di amplificatori e casse (oltre che per un’analisi delle questioni relative
all’impede nza e alla potenza), consultare l ’area Support del sito web SWR:
www.swramps.com.
Specifiche tecniche
TIPO: PR 761
NUMERO PARTI: 4420500010 (120V, 60Hz) 4420503010 (240V, 50Hz) AUS
442050 4010 (230V, 50Hz) UK 4420506010 (230V, 50Hz) EUR
4420507010 (100V, 50Hz) JPN
CONSUMO ENERGETICO: 5 75W
POWER AMP: IMPEDENZA MINIMA: 4Ω
POTENZA IN USCITA: 160W RMS in 4Ω @ < 1% THD, 1kHz
PRE AMP: IMPEDENZA IN INGRESSO: 4.7MΩ (ingresso 1/4"); 20kΩ (ingresso XLR)
SENSIBILITÀ A MASSIMA POTENZA: 9mΩ (ingresso 1/4"); 900ìΩ (ingresso XLR)
CONTROLLI DI TONO: manopola regolazione frequenza a ±15dB
COMPRESSIONE: RAPPORTO: 1:1 a 20:1
EFFECTS LOOP: SEND IMPEDANCE: 1k Ω
IMPEDENZA DI RITORNO: 10k Ω
USCITA DI LINEA BILANCIATA: SEND IMPEDANCE: 50Ω
SPEAKERS: WOOFER: Eminence Neo 10" 4 ohm (0076017000)
TROMBA: Eminence 8 ohm (0067254000)
DIMENSIONI: ALTEZZA 19.5 in (49.5 cm) LARGHEZ ZA: 15 3/8 in (39 cm) PROFONDITÀ: 14.5 in (36.8 cm)
WEIGHT: 26.5 lb (11.6 kg)
Le specifiche p ossono essere soggette a variazio ni senza alcun preavviso.
◊
◊
21
Page 22

SWR® Spellbinder™ Blue
Wir beglückwünschen Sie zum Kauf Ihres SWR® Spellbinder™ Blue
Combo-Bassverstärkers!
Als unser Freund (und langjähriger SWR-Künstler) Stanley Clarke
uns seine Pläne verriet, sich mit dem Gitarrenbauer Tom Lieber
zusammenzutun, um die basszentrierte Produktlinie Spellbinder
anzubieten, waren wir fasziniert. Als die beiden uns dann baten, für
diese exklusive Produktlinie einen leichten, tragbaren Combo-Verstärker
zu liefern, fühlten wir uns geehrt – und waren gleichzeitig begeistert,
da der Auftrag perfekt zu unseren Plänen für den Neuentwurf des
Baby Baby Blue™ Combo passte!
Der Spellbinder Blue ist das Ergebnis der Verschmelzung modernster
Technologie mit dem klassischen SWR Baby Blue™ Vorverstärker: Es
entstand ein extrem kompakter Bassverstärker von professioneller
Qualität und außergewöhnlichem Tonbereich. Mit neuer Technologie,
speziell einem digitalen 160-Watt-Verstärker, einem 10-Zoll
Neodym-Treiber, einem Eminence® Super-Hochtöner und dem
Leichtgehäuse aus italienischer Pappel wiegt der Spellbinder Blue
nur 11,6 kg und ist damit die perfekte Kombination aus Leistung, Hi-
Fidelity-Klang und problemloser Tragbarkeit.
Wir sind uns sicher, dass Sie mit Ihrem neuen Spellbinder Blue viele
Jahre Freude haben werden, und danken Ihnen, dass Sie zu SWR
„aufgestiegen“ sind.
Eine Mitteilung von Spellbinder:
Zwischen Lieber und Clarke herrscht Einigkeit, dass Produkte, die von
oder in Zusammenarbeit mit Spellbinder Corp. entworfen wurden, dem
musikalischen Können auf jedem Niveau Rechnung tragen und jedem
Musiker den Besitz qualitativ hochwertiger, die Erwartungen weit
übertreffender Ausrüstung (Instrumente, Anlagen, Zubehör) erlauben.
Konzeption, Design und Qualitätsstandards der Produkte werden von
Clarke und Lieber festgelegt.
SWR® Spellbinder™ Blue – Features
• Neutrik® Combo 1/4-Zoll/XLR Eingangs-Jack
• +15 V Phantomspannung mit On/Off-Schalter
• –10 dB Eingangs-Padschalter
• Phasenschalter
• Stummschalter mit LED-Anzeige
• Vorverstärker-Clip-LED
• EQ-In/Out-Schalter mit LED-Anzeigen
• Aural-Enhancer-Regler
• Gestapelte Wobble-Tonregelung
• Effektmischer-Regler
• Effektmischer Bypass-Switch mit LED-Anzeige
• Regler für Kompressionsverhältnis mit LED-Anzeige
Hintere Konsole – Features
• Symmetrische Ausgänge (XLR u. 1/4 Zoll) mit Ground-Lift auf XLR
• Wahlschalter Direct/Line für Line-Output-Buchsen
• Ausgangsniveauregler für Line-Output-Buchsen
• Tuner-Ausgangsbuchsen
• Stereo-Kopfhörerbuchse
• Effektschleife Send & Return-Buchsen
• Speakon® Buchse (für Verlängerungslautsprechergehäuse)
SWR ist seit langem führend im Verstärker-Design. Als sich daher
Stanley auf die Suche nach einem kleinen, leichten und richtig fiesen
Verstärker für Proben und kleine Auftritte begab, war SWR die
allererste Wahl. Wenn Sie sich den Spellbinder Blue anhören, dann
wissen Sie, dass er Recht hatte.
◊
22
◊
Page 23

Vordere Konsole
A. INPUTDieser Eingang nimmt entweder einen XLR- oder
/-Zoll-Stecker auf:
Die XLR-Verbindung ist ein symmetrischer Eingang:
(Pin = Erde, Pin = positiv, Pin = negativ)
Der /-Zoll-Anschluss ist ein unsymmetrischer „TS“-Eingang:
(Tip = positiv, Sleeve = Erde)
B. PHANTOM POWERNach Bedarf für an den XLR-Eingang {A}
angeschlossene Mikrofone zu verwenden. Diese Taste hat keinen
Einfluss auf den /-Zoll Eingang.
Out—Phantomspannung ab
In—Phantomspannung an
C. GAINRegelt das Vorverstärker-Signalniveau. Gain ist auch der
Hauptregler für die Effects Send {S} Jack an der hinteren Konsole und
kann bei Bedarf zur Aufnahme der Eingangsempfindlichkeit Ihrer
Soundeffektanlage eingesetzt werden.
D. – dB PAD / PREAMP CLIP—Die Pad-Taste senkt die
Eingangsempfindlichkeit um – dB für eine Resonanz
von größerer Sauberkeit bei Quellen mit hohem
Ausgang. Benutzen Sie Pad, wenn die Preamp Clip LED
anzeigt, dass der Eingangspuffer überbeansprucht wird.
Out—Pad ab
In—Pad an
E. PHASEKehrt die Phase des Eingangsschaltkreises um. Dies eignet
sich zur Senkung der „regenerativen“ Rückkopplung, die erzeugt wird,
wenn Sie in einem bestimmten Abstand zum Verstärker stehen. Sie
können eine Rückkopplung auch durch Veränderung der Position oder
Entfernung vom Verstärker verringern.
F. AURAL ENHANCER Der Aural Enhancer, ein spezielles SWR®
Funktionsmerkmal, hebt die fundamental tiefen Noten des Basses
hervor, macht die am hohen Ende liegenden kurzzeitigen Töne
heller und verringert bestimmte Frequenzen, die die Grundtöne
überdecken. Das Ergebnis ist ein Klang von höherer Transparenz, der
die Zischeigenschaften aller Instrumente steigert, ohne dabei rau
zu wirken.
Wie funk tioniert der Aural Enhancer: Man muss sich den Aural
Enhancer als variablen Tonregler vorstellen, der Frequenzbereich
und Pegel der am Aural Enhancer vorgenommenen Einstellung
entsprechend ändert.
Bei Drehung des Reglers aus der Position Min. im Uhrzeigersinn
werden die niederen, mittleren und hohen Frequenzpegel in
Bereiche angehoben, die zwar unterschiedlich sind, die Bass- und
Treble-Tonregler jedoch ergänzen. In der „Zwei-Uhr-Stellung”, einer
Lieblingseinstellung vieler Musiker, werden sowohl die Grundtöne am
unteren Ende wie auch die klaren Höhen hervorgehoben, gleichzeitig
wird der untere Mittelbereich ein wenig gestützt und lässt so den
Ton besser durch die Band dringen. Bei weiterer Drehung werden
ausgewählte mittlere Frequenzen – insbesondere eine Gruppe von
Frequenzenum Hz herum – zurückgenommen. Der Aural Enhancer
ist zwar wahrnehmbar, jedoch schonend im Vergleich zu den
extremen Reaktionskurven, die sich mit den EQ-Tonreglern
erzielen lassen.
G. BASS / MID / TREBLEDrei halbparametrische Tonregler, mit
denen sich Signalpegel der von Ihnen ausgewählten
Frequenzen verstärken oder zurücknehmen lassen. Mit
dem äußeren Drehschalter wird der Frequenz¬bereich
ausgewählt, während mit dem inneren Drehschalter
der Signalpegel dieses Bereichs eingestellt wird. Bei
den meisten Instrumenten ist die richtige Einstellung
des mittleren Bereichs entscheidend; der gute Klang hängt von der
jeweiligen Situation ab. Dinge, die rau klingen, wenn man allein spielt,
klingen unter Umständen in einem mit Personen gefüllten Raum oder
in der Aufnahme gut.
H. EQ BYPASSFügt die Tonreglerschaltungen in den Signalpfad ein
oder entfernt sie daraus, wie von den LEDs angezeigt.
I. EFFECTS BLENDDieser Drehschalter, der nur bei eingestecktem
Stecker in den Jack Effects Return {S} wirksam ist, stellt den Effektpegel
ein, indem er die Menge des in das „trockene“ Vorverstärkungssignal
eingemischten „feuchten“ Signals (Wet-Signal) steuert.
J. EFFECTS BYPASSEntfernt die Tonreglerschaltungen aus dem
Signalpfad, wie von der LED angezeigt.
K. COMPRESSION Regelt den Pegel der Signalkompression. Für
den gänzlichen Wegfall der Kompression vollständig gegen den
Uhrzeigersinn drehen; zur Erhöhung des Kompressionsverhältnisses
im Uhrzeigersinn drehen. Die Helligkeit der LED zeigt die aktive
Kompressionshöhe an, mit der die Signalspitzen gedämpft werden.
L. MASTER VOLUMEZur Einstellung des Lautstärkeausgangs aus
den Lautsprechern nach erfolgter Einstellung aller anderen Pegel,
einschließlich der Pegel etwaiger externer Effekte.
M. MUTEDeaktiviert alle Geräteausgänge außer den Buchsen Tuner
{T}, Headphones {R} und Effects Send {S}. Praktisch zum Stimmen
des Instruments und für ruhige Sessions. Bei eingeschaltetem Mute
leuchtet die LED .
N. POWER SWITCHSchaltet das Gerät an/ab (ON-OFF), wie von der
LED angezeigt.
◊
◊
23
Page 24

Hintere Konsole
O. IEC POWER CORD SOCKETBeigelegtes Netzkabel in eine den
Spannungs- und Frequenzdaten an der hinteren Konsole des
Verstärkers entsprechende geerdete Wechselstromsteckdose
einstecken.
P. SPEA KER OUTP UTSpeakon® Anschluss für externes
Lautsprechergehäuse. Die Lautsprecherimpedanz muss mindestens
Ohm betragen, die Nennleistung mindestens W. Vor der
Benutzung dieses Jack Richtlinien für die Benutzung der Lautsprecher
auf der nächsten Seite lesen.
HINWEIS: „Speaker Output“ funktioniert nicht, wenn sich der Schalter für
den internen Lautsprecher in der Stellung „On” befindet.
Q
. INTERNAL SPEAKER
-Zoll-Lautsprecher benutzen wollen, oder „Off“, wenn der Speakon®
Anschluss {P} verwendet werden soll.
R. HEADPHONESHier werden die Kopfhörer eingesteckt. Zur
Abschaltung des Ausgangs an die Lautsprecher Mute
{M} verwenden.
S. EFFECTS SEND / RETURN*Verbinden Sie Send mit dem Eingang an
Ihrem Soundeffektgerät, und Return mit dem Effektausgang. HINWEIS:
Zur Vermeidung von Phrasierungsproblemen Regler „wet/dry“ am
Soundeffektgerät vollständig auf die Position WET einstellen, etwaige
Effekteingangspegel so nahe als möglich an dB
Das Ausgangssignal Effec ts Send beinhaltet eingebaute
Klangformung („Tone Shaping“), während der Ausgangspegel
hauptsächlich über den Drehknopf Gain {C} geregelt wird. Effects
Return stellt einen Line-Level-Eingang zur Verfügung, der mithilfe
des Drehschalters Effects Blend {I} in jedem beliebigen Verhältnis
mit dem vorverstärkten Onboard-Signal gemischt werden kann.
Der Kreis Effects Loop befindet sich in einer „Seitenkette” des
Hauptkreises (wie bei Studio-Aufnahmekonsolen). Er verleiht
Ihrem Instrument einen vollen Ton und Ihren Klangeffektgeräten
Vielseitigkeit. Dadurch wird auch Rauschen aus dem Klangeffektgerät
reduziert, da es im Signalpfad hinter der Verstärkung angeordnet ist.
Wählen Sie „On“, wenn Sie den internen
T. TUNER OUTPUT *Instrumentenstimmer hier einstecken. Zur
Abschaltung des Audioausgangs während der Verwendung des
Tuners Mute {M} benutzen.
U. BALANCED LINE OUTPUTS*Echte elektronisch abgeglichene
Ausgänge, geeignet für Live- und Studiomischpulte.
V
. XLR
W
X
. DIRECT / LINE
Y
. HORN LEVEL
GROUND LIFT Trennt die Erdverbindung (Pin-) vom XLR-
Jack zur Senkung des durch nicht standardmäßige Verdrahtung
verursachten Rauschens der Erdschleife. Dieser Schalter wird
normalerweise ausgelassen.
. PAD
Regelt den Ausgangspegel der symmetrischen Ausgänge
(„Balanced Outputs“) {U}, um unterschiedliche Tongeräteanschlüsse
und Eingangsempfindlichkeiten bedienen zu können.
{U}. Direct ist ein unmittelbar nach der ersten Röhrenvorverstärkerstufe
eingeschlagener echter Komplettröhrensignalpfad. Line schließt alle
Verstärkungs-, Ton-, Kompressions- und Effektschaltkreise ein.
des Hochfrequenzhorns.
HINWEIS: Siehe Spellbinder Blue Blockdiagramm auf Seite .
Wählt die Signalquelle für die symmetrischen Ausgänge
Regelt den Lautstärkepegel
* HINWEIS: Bei den 1/4-Zoll-Jacks {R, S und T} an der hinteren Konsole handelt es sich um
TRS- (Tip/Ring/Sleeve) Typen:
Tip = positiv (+)
Ring = negativ (–)
Sleeve = Erde.
Es können zwar sicher standardmäßige abgeschirmte TS (Tip/Sleeve) „Mono“ Gitarrenkabel benutzt werden, durch den Einsatz von „Stereo“
TRS-Kabeln wird jedoch wahrscheinlich der Signal-Rausch-Abstand verbessert und/oder das Brummen reduziert, insbesondere dann, wenn längere
Verbindungen erforderlich sind.
◊
24
◊
Page 25

Richtlinien für Lautsprecher
• Zur Vermeidung von Schäden an Ihrer Anlage NIEMALS
Lautsprecher anschließen, deren Gesamtimpedanz unter
der Mindestimpedanz Ihres Verstärkers liegt.
• Zur Vermeidung von Schäden an Ihrer Anlage NIEMALS
Lautsprecher anschließen, deren Nennleistungspotenzial
unter der Nennleistung Ihres Verstärkers liegt.
• Vor dem Anschließen oder Trennen der Lautsprecher IMMER
Systemspannung ABSCHALTEN.
• Für Lautsprecherverbindungen NUR unabgeschirmtes
18- Gauge - L a utspre cherka b el ode r schw erer
(16- oder 14-Gauge) benutzen. Abgeschirmte
Instrumentenkabel funktionieren NICHT und können Ihre
Anlage beschädigen.
• An jede Lautsprecherlast nur EINEN (1) Verstärker
anschließen. Zwei mit einer einzelnen Last verbundene
Verstärker funktionieren NICHT und können Ihre
Anlage beschädigen.
Richten Sie sich bei der Ermittlung, ob eine bestimmte
Kombination aus Lautsprechern für Ihren Verstärker geeignet
ist, nach den auf Lautsprechern und Verstärker angegebenen
Nennimpedanzen und Nennleistungen. HINWEIS: Alle SWR®Lautsprechergehäuse, wie auch die meisten anderen, werden bei
Reihenschaltung parallel (NICHT in Serie) geschaltet. Diese Richtlinien
gelten daher nur für Parallelkonfigurationen von Lautsprechern.
Aus den Lautsprecherillustrationen können Sie die
Berechnungen der Gesamtimpedanz für die unterschiedlichen
Lautsprecher-Impedanzkombinationen ersehen ( = Ohm).
Die ideale Lautsprecherlast (Gesamtimpedanz) entspricht
der angegebenen Mindestimpedanz Ihres Verstärkers. Beim
Betrieb unter der Mindestimpedanz kann sich der Verstärker
überhitzen und Schäden verursachen. Ein Betrieb oberhalb
der angegebenen Mindestimpedanz des Verstärkers ist
zwar sicher, senkt jedoch die maximale Ausgangsleistung
des Verstärkers.
Noch ein Punkt, der zu berücksichtigen ist: Mit
unterschiedlichen Gesamtimpedanzkombinationen
einer Gruppe kann die gleiche Gesamtimpedanzlast
erzielt werden (siehe Abbildung). Wenn jeder
Lautsprecher einer Gruppe dieselbe Impedanz aufweist,
wird jeder Lautsprecher vom Verstärker mit der gleichen
Leistung versorgt. We nn j edoch die Impedanzen ungleich
sind, geht die höchste Leistung an den Lautsprecher mit der
niedrigsten Impedanz. Werden beispielsweise ein 8 Ω und ein
16 Lautsprecher an einen Verstärker mit einer Leistung von
30 W angeschlossen, dann wird der 8–Ω Lautsprecher mit etwa
20 W dieser Leistung versorgt (und ist doppelt so laut wie der
16- Lautsprecher). Bei der Berechnung der Leistungskapazitäten und der
Positionierung der L autsprecherboxen muss das berücksichtigt werden.
Eine eingehende Besprechung von Einrichtungstipps für Lautsprecher
und Verstärker (einschließlich einer Untersuchung von Impedanz- und
Nennleistungsfragen) finden Sie im Bereich Support der SWR-Website unter
www.swramps.com.
Spezifikationen
TYP: PR 761
TEILENUMMERN: 4 420500010 (120V, 60Hz) 4420503010 (240V, 50Hz) AUS
442050 4010 (230V, 50Hz) UK 4420506010 (230V, 50Hz) EUR
4420507010 (100V, 50Hz) JPN
STROMBEDARF: 5 75W
LEISTUNG VERSTÄRKER: MINDESTAUSGANGSIMPEDANZ: 4Ω
LEISTUNG: 160 W RMS an 4 Ω bei < 1% THD, 1 kHz
VORVERSTÄRKER: EINGANGSIMPEDANZ: 4,7 MΩ (1/4-Zoll Eingang), 20 kΩ ( XLR-Eingang)
EMPFINDLICHKEIT BEI VOLLER LEISTUNG: 9 mV (1/4-Zoll Eingang), 900 μV (XLR-Eingang)
TONREGLER: ±15dB bei Frequenzknopfeinstellung
KOMPRESSION: VERHÄLTNIS: 1:1 bis 20:1
EFFEKTSCHLEIFE: SENDEIMPEDANZ: 1kΩ
RÜCKSENDEIMPEDANZ: 10 kΩ
SYMMETRISCHES LINE-OUT: SENDEIMPEDANZ: 50Ω
LAUTSPRECHER: WOOFER: Eminence Neo 10 Zoll 4 Ohm (0076017000)
HORN: Eminence 8 Ohm (00672540 00)
ABMESSUNGEN: HÖHE: 49,5 cm BREITE: 39 cm TIEFE: 36,8 cm (49,5 x 15 3/8 x 14,5 Zoll)
GEWICHT: 11,6 kg (26,5 lb)
Änderungen der Produktspezifikationen o hne Ankündigung vorbehalten.
◊
◊
25
Page 26

SWR® Spellbinder™ Blue
Parabéns pela sua aquisição do amplificador de graves combinado
SWR® Spellbinder™ Blue!
Quando o nosso velho amigo (e artista SWR de longa data) Stanley
Clarke nos contou os seus planos para se associar ao luteiro Tom
Lieber para oferecer a linha de produtos Spellbinder centrada no
âmbito dos graves, ficámos intrigados. Quando estes nos pediram
que fornecêssemos um combinado portátil e leve para esta linha
exclusiva, ficámos honrados e excitados—especialmente porque este
pedido se encaixava perfeitamente nos nossos planos de redesenhar o
combinado Baby Baby Blue™!
O Spellbinder Blue é o resultado da fusão de tecnologias de ponta
com o clássico pré-amplificador Baby Blue™ da SWR por forma a
produzir um amplificador de graves extremamente compacto de
qualidade profissional e de alcance tonal excepcional. Com nova
tecnologia, incluindo um amplificador de potência digital de 160
watts, um controlador de neodímio de 10 polegadas, um super
tweeter Eminence® e um armário em choupo leve, o Spellbinder Blue
pesa apenas 11,6 kg (26,5 libras) e é a mistura perfeita de potência,
tom de alta fidelidade e portabilidade leve.
Estamos confiantes de que irá desfrutar do nosso novo Spellbinder
Blue durante muitos anos vindouros—e muito obrigado por
“actualizar-se” com a SWR.
Uma nota da Spellbinder:
Existe uma filosofia acordada entre Lieber e Clarke no âmbito de que
os produtos concebidos por ou em colaboração com a Spellbinder
Corp reflictam todos os níveis de tipo de música, proporcionando a
cada música uma oportunidade genuína de possuir equipamento de
qualidade (instrumentos, amplificadores, acessórios) que excedam em
muito as expectativas. Os conceitos e desenhos dos produtos, bem
como os padrões de qualidade, são definidos por Clarke e Lieber.
Características do Spellbinder™ Blue da SWR®
• Conector de entrada 1/4"/XLR de combinado Neutrik®
• +15V de potência fantasma com interruptor de ligar/desligar
• Interruptor de amortecedor de entrada de –10dB
• Interruptor de fase
• Interruptor de entrada/saída de equalizador com indicadores LED
• Controlo Aural Enhancer
• Controlos de tom comutáveis agregados
• Controlo de mistura de efeitos
• Interruptor de contorno de mistura de efeitos com indicador LED
• Controlo de rácio de compressão com indicador LED
• Effects Blend Bypass switch w/ LED indicator
• Compression Ratio control w/ LED Indicator
Características do painel traseiro
• Saídas de linha equilibradas (XLR e 1/4") com elevação de terra
em XLR
• Interruptor de selector de linha/directo para conectores de saída
de linha
• Controlo de nível de saída para conectores de saída de linha
• Conector de saída de sintonizador
• Conector de auscultadores estéreo
• Conectores de envio e retorno de circuito de efeitos
• Conector Speakon® (para extensão do armário de altifalante)
A SWR há muito que é uma das líderes da indústria no âmbito de
concepção de amplificadores e é por esse motivo que, quando o
Stanley decidiu que pretendia um amplificador monstruoso pequeno
e leve para praticar e para pequenos espectáculos, a SWR era
singularmente a empresa de escolha. Apenas tem de escutar o
Spellbinder Blue e saberá que ele tinha razão!
◊
26
◊
Page 27

Painel dianteiro
A. INPUT Esta entrada aceita uma ficha XLR ou uma ficha /":
A ligação XLR é uma entrada equilibrada:
(Pino = terra, Pino = positivo, Pino = negativo)
A ligação de /" é uma entrada "TS" não equilibrada:
(Tip = positivo, Sleeve = terra)
B. PHANTOM POWERUse as needed for microphones connected to
the XLR input {A}. This button does not affect the /" input.
Para fora—Potência fantasma desligada
Para dentro—Potência fantasma ligada
C. GAINAjusta o nível de sinal do pré-amplificador. O ganho é também
o controlo de nível principal para o conector Effects Send (envio de
efeitos) {S} no painel traseiro e pode ser utilizado para acomodar
a sensibilidade de entrada do seu equipamento de efeitos, caso
seja necessário.
D. – dB PAD / PREAMP CLIP—Tprendedor de pré-amplificador) —
O botão PAD (amortecedor) reduz a sensibilidade de entrada em
–dB para fornecer uma resposta mais clara com fontes de saída
altas. Utilize o botão se o LED do prendedor de pré-amplificador
indicar que a memória-tampão de entrada está a ser sobrecarregada.
Para fora—Amortecedor desligado
Para dentro—Amortecedor ligado
E. PHASEInverte a fase do circuito de entrada, útil para reduzir o
feedback “regenerativo” gerado quando se encontra a uma distância
específica do amplificador. Também pode reduzir o feedback através
da alteração da sua posição ou distância em relação ao amplificador.
F. AURAL ENHANCER Uma característica de marca comercial da SWR®,
o Aural Enhancer liberta as notas baixas fundamentais dos graves,
alegra os transientes de gama alta e reduz determinadas frequências
que disfarçam os elementos fundamentais. O efeito final é um som
muito mais transparente que abre as características de sibilação de
todos os instrumentos sem ser demasiado áspero.
Como funciona o Aural Enhancer: Pense nele como um controlo de
tom variável que muda a gama e nível de frequência em conformidade
com onde define o controlo do Aural Enhancer:
Á medida que roda o controlo no sentido dos ponteiros do relógio a
partir da posição Min (mínimo), está a elevar os níveis de frequência
baixo, médio e alto em gamas que são diferentes, e no entanto
complementares, aos controlos de tom de Bass (graves) e Treble
(agudos). A posição “às horas”—uma das favoritas de muitos músicos
— realça tanto os elementos fundamentais de gama baixa bem como
◊
—realça tanto os elementos fundamentais de gama baixa bem como
altos cristalinos, ao mesmo tempo que acrescenta um pouco de
gama média inferior para o ajudar a cortar ao longo da banda. Assim,
à medida que roda no sentido dos ponteiros do relógio, os médios
seleccionados irão desaparecer—especificamente, um grupo de
frequências centrado por volta dos Hz. Apesar de aparente, o Aural
Enhancer é suave em comparação com as curvas de resposta extremas
que pode criar com os controlos de tom do equalizador.
G. BASS / MID / TREBLETrês controlos de tom semi-paramétricos que
irá mudar consoante a sua situação. O que pode ter um som áspero ao
tocar sozinho pode ter o som exactamente certo numa sala cheia de
gente, ou numa gravação.
H. EQ BYPASSColoca os circuitos de controlo de tom dentro ou fora do
caminho do sinal conforme indicado pelos LEDs .
I. EFFECTS BLEND Funcional apenas quando uma ficha é introduzida
na tomada Effects Return (retorno de efeitos) {S}, este botão rotativo
define o seu nível de efeitos através do controlo do volume do sinal
de circuito de efeitos “Wet” (húmido) misturado no sinal de préamplificador “Dry” (seco).
J. EFFECTS BYPASSRetira o circuito de efeitos do caminho do sinal
conforme indicado pelo LED .
K. COMPRESSIONAjusta o nível de compressão do sinal. Rode
completamente no sentido contrário aos ponteiros do relógio para
nenhuma compressão e rode no sentido dos ponteiros para aumentar
lhe permitem aumentar ou cortar níveis de sinal nas
frequências escolhidas. Seleccione um ponto central de
gama de frequência utilizando o botão rotativo exterior
e, em seguida, ajuste o nível de sinal nessa gama com o
botão rotativo interior. O ajuste de gama média é vital
para a grande maioria de instrumentos e o que soa bem
o rácio de compressão. O brilho do LED indica o volume
activo de compressão a moderar os seus níveis de sinal de pico.
L. MASTER VOLUMEUtilize para definir a saída de amplitude
sonora dos altifalantes depois de todos os outros níveis estarem
definidos, incluindo os níveis de efeitos externos.
M. MUTEDesactiva todas as saídas de unidade excepto os
conectores de Tuner (sintonizador) {T}, Headphones
(auscultadores) {R} e Effects Send (envio de efeitos) {S}. Útil
ao ligar o seu instrumento e para sessões calmas. O LED
acende-se quando MUTE (silenciar) está activo.
N. POWER SWITCHColoca a unidade na posição ON (ligado) ou
OFF (desligado) conforme indicado pelo LED .
◊
27
Page 28

Painel traseiro
O. IEC POWER CORD SOCKETLigue o cabo de alimentação incluído
a uma tomada eléctrica CA com ligação à terra em conformidade
com as indicações de tensão e de frequência especificadas no painel
traseiro do seu amplificador.
P. SPEAKER OUTPUTConector Speakon® para um armário de
altifalantes externos. A carga do altifalante tem de ser de um mínimo
de ohms e com uma tensão mínima de Watts. Leia as directrizes
do altifalante na página seguinte antes de utilizar este conector.
NOTA: A saída do altifalante não irá funcionar com o interruptor do
altifalante interno na posição “On” (ligado).
Q
. INTERNAL SPEAKER
altifalante interno de " ou "Off" (desligado) para utilizar o conector
Speakon® {P}.
R. HEADPHONESLigue os seus auscultadores aqui. Utilize MUTE
(silenciar) {M} para desactivar a saída para os altifalantes.
S. EFFECTS SEND / RETURN*Ligue o Send (envio) à entrada no seu
dispositivo de efeitos e ligue o Return (retorno) à saída de efeitos.
NOTA: Defina o controlo de “Wet/Dry” (seco/húmido) nos seus efeitos
para a posição máxima de WET (húmido) para impedir problemas
de fase, e defina todos os níveis de entrada de efeitos existente tão
próximos de dB quanto possível.
O sinal de saída do Effects Send (envio de efeitos) inclui a modulação
de tons a nível interno e o nível de saída é primariamente controlado
pelo botão rotativo Gain (ganho) {C}. O Effects Return (retorno
de efeitos) fornece uma entrada de nível de linha que pode ser
misturada em qualquer rácio com o sinal de pré-amplificador interno
utilizando o botão rotativo Effects Blend (mistura de efeitos) {I}.
O circuito de efeitos encontra-se numa “cadeia lateral” do circuito
principal (como nas consolas de gravação de estúdio) para fornecer
o som total do seu instrumento assim como a diversidade
Seleccione "On" (ligado) para utilizar o
das suas unidades de efeito. Isto também reduz o ruído de
unidades de efeitos através da sua localização após o ganho no
caminho do sinal.
T. TUNER OUTPUT*Ligue o sintonizador do seu instrumento aqui.
Utilize MUTE (silenciar) {M} para desactivar a saída de áudio enquanto
estiver a utilizar o seu sintonizador.
U. BALANCED LINE OUTPUTS*Saídas equilibradas electronicamente
efectivas, adequadas para estúdio e consolas de mistura (ao vivo)
“front-of-house”.
V
. XLR
GROUND LIFTDesliga a ligação de terra (pino ) do conector XLR
para reduzir o ruído de terra gerado por ligações eléctricas não padrão.
Deixe este interruptor normalmente para fora.
W
. PA D
Ajusta o nível de saída das Balanced Outputs (saídas equilibradas)
{U} para acomodar uma variedade de ligações de equipamento sonoro
e sensibilidades de entrada.
X
. DIRECT / LINE
(saídas equilibradas) {U}. A opção Direct (directo) é um caminho de
sinal pleno por tubo tirado imediatamente após a primeira etapa de
pré-amplificação de tubo. A opção Line (linha) inclui todo os circuitos
de ganho, tom, compressão e efeitos.
Y
. HORN LEVEL
buzina de alta frequência.
Selecciona a fonte de linha para as Balanced Outputs
Ajusta o nível de volume da
NOTA: Ver o esquema em blocos do Spellbinder Blue na página .
* N OTA: Os conectores de 1/4" do painel traseiro {R, S e T} são equilibrados de tipo TRS (Tip/Ring/Sleeve):
Tip = positivo (+)
Ring = negativo (–)
Sleeve = terra
Ao passo que os cabos de guitarra “mono” TS (Tip/Sleeve) blindados padrão sem dúvida que podem ser utilizados, a utilização de cabos TRS "estéreo" pode
melhorar a relação de sinal/ruído e/ou reduzir o zumbido, especialmente quando são necessários ligações mais compridas.
◊
28
◊
Page 29

Directrizes para os altifalantes
• NÃO ligue a carga de um altifalante com uma impedância
total abaixo da classificação mínima do seu amplificador
para impedir a ocorrência de danos ao
seu equipamento.
• NÃO ligue altifalantes com uma capacidade de gestão de
potência total que seja inferior à classificação de saída
de potência do seu amplificador de modo a impedir a
ocorrência de danos no seu equipamento.
• DESLIGUE SEMPRE o sistema antes de ligar ou
desligar os altifalantes.
• Utilize APENAS cabo para altifalantes não blindado de uma
grossura de 18 gauge ou mais pesado (16 ou 14 gauge) para
ligações de altifalantes. O cabo de instrumento blindado
NÃO funcionará e pode danificar o seu equipamento.
• Ligue APENAS um amplificador a cada carga do altifalante.
Dois amplificadores ligados a uma única carga NÃO
funcionará e pode danificar o seu equipamento.
Utilize a impedância e as classificações de potência no seu
amplificador e altifalantes para determinar se uma combinação
específica de altifalantes é apropriada para o seu amplificador. NOTA:
Todos os conjuntos para altifalantes SWR®, bem como a grande maioria
dos restantes, serão ligados em paralelo (NÃO em série) quando ligados
(ligação em cadeia) em conjunto. Portanto, estas directrizes apenas se
aplicam a configurações de altifalantes em paralelo.
A ilustração do altifalante disponibiliza-lhe os cálculos de
carga de impedância total para várias combinações de
impedância de altifalantes ( = ohms). A carga do altifalante
ideal (impedância total) é igual à classificação de impedância
mínima do seu amplificador. Operar abaixo da classificação
de impedância mínima do amplificador pode sobreaquecer
o seu amplificador e provocar danos. Operar acima da
classificação mínima de impedância do amplificador,
apesar de seguro, reduz a saída de potência máxima
do amplificador.
Algo mais a ter em consideração: Pode obter a mesma
carga de impedância total de grupo a partir de
diferentes combinações de impedâncias de altifalantes
(ver ilustração). Se cada altifalante num grupo tiver a
mesma impedância, cada altifalante irá receber a mesma
quantidade de potência a partir do seu amplificador.
Contudo, se as impedâncias não forem todas iguais, os
altifalantes de impedância mais baixa irão receber a maior
parte da potência. Por exemplo, se ligar um altifalante 8Ω e
um altifalante de 16 para uma saída de amplificador de 30
watts, o altifalante de 8 ohms irá receber cerca de 20 deste
watts (e será duas vezes mais alto que o altifalante de 16 ohms).
Tenha esta situação em consideração ao calcular as capacidades de gestão
de potência e ao p osicionar os seus conjuntos de altifalantes.
Para uma discussão aprofundada de sugestões de configuração para
amplificadores e altifalantes (incluindo uma análise das questões
relacionadas com a classificação de impedância e de potência), visite a área
Support (apoio) no site Internet da SWR em www.swramps.com.
Especificações
TIPO: PR 761
NÚMERO DE ARTIGO: 4 420500010 (120V, 60Hz) 4420503010 (240V, 50Hz) AUS
442050 4010 (230V, 50Hz) UK 4420506010 (230V, 50Hz) EUR
4420507010 (100V, 50Hz) JPN
REQUISITOS DE ALIMENTAÇÃO: 5 75W
AMPLIFICADOR
DE POTÊNCIA: IMPEDÂNCIA DE SAÍDA MÍNIMA: 4Ω
SAÍDA DE POTÊNCIA: 160W RMS para 4Ω a < 1% THD, 1kHz
PRÉ-AMPLIFICADOR: IMPEDÂNCIA DE ENTRADA: 4,7MΩ (entrada 1/4"); 20kΩ (entrada XLR)
SENSIBILIDADE EM POTÊNCIA TOTAL: 9mV (entrada 1/4"); 900ìV (entrada XLR)
CONTROLOS DE TOM: ±15dB em definição de botão rot ativo de frequência
COMPRESSÃO: RÁCIO: 1:1 a 20:1
CIRCUITO DE EFEITOS: IMPEDÂNCIA DE ENVIO: 1k Ω
IMPEDÂNCIA DE RETORNO: 10 kΩ
SAÍDA DE LINHA EQUILIBRADA: IMPEDÂNCIA DE ENVIO: 50Ω
ALTIFALANTES: WOOFER: Eminence Neo 10" 4 ohm (0076017000)
BUZINA: Eminence 8 ohm (0067254 000)
DIMENSÕES: ALTURA: 49,5 cm (19,5 pol.) L ARGURA: 39 cm (15 3/8 POL.) COMPRIMENTO: 36,8 cm (14,5 pol.)
PESO: 11,6 kg (26,5 lb)
As especificações do produto e stão sujeitas a alteração sem aviso prévio.
◊
◊
29
Page 30

SWR® Spellbinder™ Blue
SWR® のSpellbinder™ Blueコ ン ボ タ イ プ・ベ ース ア ン プ
をお買い上げいただき、誠にありがとうございま
す。
スタンレー・クラークは当社の古くからの友人で
長年SWR製 品 を 愛 用 し て い る ア ー チ ス ト で す が 、彼
がギター 製作者 のトム・リーバーと 組んでベースを
中心にしたスペルバインダーシリーズを製品 化す
る計画を持ちかけたとき、大変興味をかきたてら
れました。この高級なシリーズのために持ち運び
の出来る軽量のコンボタイプを作る事を依頼さ
れたとき、大変光栄に思い、また興奮を覚えまし
た。その時当社もコンボタイプのBaby Baby Blue™を
設計しなおす計画でしたので、丁度良い 機会でし
た。
Spellbinder Blueでは最 新の技術とBaby Blue™プリアンプ
でのSWR の伝 統を生かして、プロ向けの品質と類
稀な音色の幅を持つベースアンプを超小型のボ
デ ィ ー で 実 現 し ま し た 。1 6 0 ワ ッ ト の デ ジ タ ル パ ワ
ーアン プ、10インチのネオジムドライバー、Eminence®
スーパーツイーター、イタリアポプラの軽量キャビ
ネット を 搭 載 して 、Spellbinder Blueは11 .6 kg の軽量を実
現。パワー、忠実度の高い音色、軽量で持ち運び
の容易さを兼ね備えたアンプです。
皆様にはSpellbinder Blueをきっと長年ご愛用いただけ
ると 思い ま す。SWRに「 買 い 上 が っ て 」く だ さ い ま し
てありが とうご ざ い ま す。
Spellbinderから一言
Blueの音を聞いていただければスタンレーが正し
かったのがお分かりになるでしょう。
SWR® Spellbinder™ Blue の特徴
• Neutrik® コンビ ネーション1/4"/XLR 入 力ジャック
• +15V フ ァ ン ト ム パ ワ ー 、オ ン オ フ ス イ ッ チ 付 き
• –10dB 入 力 パ ッド スイッ チ
• フェーズ スイッ チ
• ミ ュ ー ト( LED表 示付き)
• プリアンプクリップ LED
• イコ ライザ ー入 力 /出 力 ス イ ッ チ( LED表示 付き)
• 音質高上コントロール
•スイープ機能付き積み重ね音質コントロール
• エフェクト 混 合コ ント ロ ー ル
• エ フ ェ ク ト 混 合 バ イ パ ス ス イ ッ チ( LED表示 付き)
• コンプレッション比コントロール(LED表示付き
リアパネル機 能
• 平 衡 ラ イ ン 出 力( XLR & 1/4インチ)XLRアース切 り離
し
付き
• ライン出力ジャック 直 接/ライン切り替えス
イチ
• ライン出力ジャック 出力レベルコントロール
• チュー ナー 出力ジャック
• ス テ レ オ ヘッド フ ォ ーン ジャッ ク
• 効 果 ル ープ出力&帰 還ジャック
• Speakon® ジ ャ ッ ク( 外 部 ス ピ ー カ ー へ )
リーバーとクラークとの間で同意した考え方
は、Spellbinder社 に よ っ て 、ま た は 共 同 し て 設 計 し た
製品は、期待をはるかに超えるほど品質の良い機
器( 楽 器 、ア ン プ 、ア ク セ サ リ )を 所 有 す る 機 会 を
真に一人一人 のミュー ジ シャンに 与えて、あらゆ る
レベルの音楽性を反映しなければならない、とい
う こ と で す 。製 品 の コ ン セ プ ト 、設 計 、品 質 の 基 準
はクラークとリーバーが設定しました。 SWRは長
年 ア ン プ の 設 計 で 業 界 を リ ー ド し て 来 た 。ス タ ン
レーが小型で軽量、かつ大きな力を秘めた練習
や小公演 用 のアンプ を 作りたいと思ったときにた
だ一社SWR社を 選 んだ の は このた めで す。Spellbinder
◊
30
◊
Page 31

フロントパ ネル
A. INPUT(入力)-入力にはXLRまたは/”のプラグを接続できます
XLR接続は平衡入力です:
(ピン=接 地 、ピ ン =正 、ピ ン =負)
/”プラグでの接続は不平衡のTS入 力 で す:
(Tip=正、Sle eve=接地)
B. PHANTOM POWER( フ ァ ン ト ム 電 源 )- 必 要 に 応 じ て XLR入 力{ A}
に接続したマイクに使用してください。このボタンは /インチの入
力には影響を与えません。
OUT—Phantom電源オフ
IN—Phantom 電源オン
C. GAIN(ゲイン)‐プリアンプの信号レベルを調節します。GAINは
またリアパネルの Effects Send {S}ジャックの主レベルコントロール
で、必要に応じてお使いの 効果機器の入力感度に合 わせる目的で
使用することが出来ます。
D. – dB PAD / PREAMP CLIP(-dBパッド/プリアンプクリッ
プ )- パ ッ ド ボ タ ン を 押 す と 入 力 感 度 を dB下げて出力レ
ベル の 高 い 信 号 源を 使 用している時 によりクリーンなレス
ポンスを得ることが出来ます。プリアンプ・クリップのLED
表示 が点 灯して入 力 バッファーがオーバードライブ状態
に な って い る と き に パッド を 使 用 し てく だ さ い 。
OUTPad off オフ
INPad onオン
E. PHASE(フェーズ )-入 力 回 路 のフェーズ(位 相 )を反 転 さ せます。
アンプからある特定の距離で演奏している場合に起こる「再生的
な」フィードバックを減少するのに用いてください。演 奏 者の位置
や距 離 を変える事 でもフィードバックを減 少することが出来ま す。
F. AURAL ENHANCER( オ ー ラ ル・エ ン ハ ン サ ー )-オ ー ラ ル・エ ン ハ ン
サーはSWR®のトレードマークとも言える機能で、ベースの基本的な
低音を引き出しつつ高域のトランジエント成分に輝きを持たせ、基
音をマスキングしてしまう特定の周波 数を抑えます。サウンドの 透
明度を増し、全ての楽 器のシビランス(歯擦音)特性を耳を痛くす
る事無くよりオープンにして、透明感のあるサウンドに仕立て上げ
ます。
オーラル・エンハンサーの仕組み: これは設定によって周波数レ
ンジとレベルが同時に変化するコントロールと考えることが出来ま
す。
最小の位置からツマミを時計回りに回して行くとロー/ミッド/ハ
イが順にベースとトレブルのトーン・コントロールとは異なるけれど
も
互いに補い合うような周波数帯で強調されて行 き ま す 。多
く の プ レ ー ヤ ー が 好 む「 時」の位置では、ローエンド
の 基 音 と 歯 切 れ の 良 い ハ イ を 両 方 引 き 出 し な が ら 、低
め のミッド の 領 域 を 若 干 持 ち 上 げ 、バ ン ド の 中 で の ユ ー ザ ー
のサウンドに存在感を与えます。さらに時計回りに設定する
と、HZ付近を中心としたミッドの特定のポイントは抑えら
れて行きます。オーラル・エンハンサーの効果は一聴して分か
るものですが、イコライザーのトーン・コントロールで行う極端
なブースト/カットに比べると、全体的な曲線は穏やかです。
G BASS / MID / TREBLE(ベース/ミッド/トレブル)-セミパラメ
トリックな つの音質調節ノブで、お好みの周波数帯
で信号レベルを強く、あるいはカットすることが出来
ます。先ず外側 のノブで周 波 数 帯 の中心を 決 め、そこ
での 信号レベルを内側 のノブで調節します。たいてい
の楽器ではミッドレンジの調節で成果が左右されま
すが、状況によってどういう設定が良いかは変わりま
す 。一 人 で 演 奏 中 は 耳 障 り な ほ ど 強 い 音 も 、込 み 合 っ た 部 屋 や レ
コー ディン グ で は 丁 度 良 いこと がありま す。
H. EQ BYPASS(イコライザーバイパス)-音質調 節回路を 信号経 路か
ら 出 し 入 れ す る こ と が 出 来 、こ れ は LED で 表 示 され ま す。
I. EFFECTS BLEND(エフェクト混合)- EFFECTS RETURN S にプラ
グが 挿入されている場合 にのみ機能するノブ で、この設 定 によって
「 ウ ェ ッ ト 」な 効 果 の 帰 還 信 号 を ど れ だ け「 ド ラ イ 」な プ リ ア ン プ の
信号に混合するかを設定します。
J. EFFECTS BYPASS(エフェクト バ イパ ス )-エフェ クト 帰 還 回 路を
信号経路から外します。これはLED で 表 示 され ま す。
K. COM PRESS ION(コンプレッション)- 信号 のコンプレッション
のレベルを調節します。反時計回りに回しきるとコンプレッション
は無くなり、時計回りに回すとコンプレッションの比率が上がりま
す。LED の明るさで信号のピークレベルをアクティブに抑えてい
る量 が 分 か りま す。
L. MASTER VOLUME(マスターボリューム)-スピーカーからの音の大
きさを設定します。その 他全てのレベル、外部のエフェクト機器の
設定が終わった後にお使いください。
M. MUTE( ミ ュ ー ト )- Tuner {T}( チ ュ ー ナ ー )、Headphones {R}(ヘッ
ド フ ォ ー ン )、Effects Send {S}( エ フ ェ ク ト )ジ ャ ッ ク 以 外 全 て の 出 力
をオフにします。楽器のチューニングや静かなセッションに便 利で
す 。ミ ュ ー ト が オ ン の と き は LED が点 灯します。
N. POWERSWITCH(電源スイッチ)-全体をオン、オフします。オンの
場合はLED が 点 灯しま す。
◊
◊
31
Page 32

リアパネル
O. IEC POWER CORD SOCKET(IEC電 源 ケ ー ブ ル ソ ケ ッ ト )- 付 属 の 電
源ケーブルで接地付きのコンセントに本機を接続します。リアパネ
ルに指定の定格電圧、周波数でご使用ください。
P. SP EAKE R OU TPU Tスピーカ ー 出 力)- 外 部 スピーカー へ の
SPEAKON® コネクタです。外部スピーカーは最小オ ー ム 、最 小 定 格
パワーWのものをご使用ください。このジャックに接続前に次
項のスピーカーガイドをお読みください。
注:
Q
R. HEADPHONES(ヘッド フ ォ ーン)- ヘッド フォーン は こ こ に 接 続 し ま
S. EFFECTS SEND / RETURN*エフェクト出力/入 力)外部のエフェクト
EFFECTS SENDの出力信号は内蔵の音質調整を含んでお
内部スピーカーが「オン」の 位置 で は スピーカー出 力 は オフに な
りま す。
. INTERNAL SPEAKER
際には「オン」に、
される場合には「オフ」にしてください。
す 。ミ ュ ー ト Mを使用してスピーカーへの出力を切ってください。
機器 の入 力にSendを 接 続 し ,そ の 出 力 に は Returnを 接 続してく だ さ
い 。 注 :「 wet/d ry」コ ン ト ロ ー ル は 完 全 に WETの位置まで回しき
ってフェーズの問 題 が 起き な いようにし、また エフェクト入力レベル
は出来るだけDBに近く設 定してください。
り 、こ の 出 力 レ ベ ル は 主 に Gain(ゲイン)C ノブで調節
しま す。Effects Returnの入力は ラインレベ ルで、E ff ects
Blend (エフェクト 混 合 )I のノブを用いて内蔵のプ
リアンプ信号と任 意の割合でミックスすることが 出 来
ます。
この エ フェクト の帰 還 回 路は ス タ ジ オ 用 のレ コ ー ディングコン ソー
ルの様に主回路の「サイドチェーン」に配置されています。この設計
により楽器 の サウンドをフルに活かしな がら、エフェクト機器がも
たらす幅 広いサウンドも同時に導入することが 出 来ます。この部分
内 部 ス ピ ー カ ー )-
SPEAKON®
コネクタ
”
の内部スピーカーご使用の
P
に外部スピーカーを接続
はゲイン・ステージの 後 の 信号経路に挿入されていますので、エフ
ェクト機器からのノイズも軽減されました。
T. TUNER OUTPUT*チューナー出 力)- 楽 器 の チュー ナ ー を 接 続してく
ださ い 。チューナ ー 使 用 中 は ミュート Mを 使 用して 音 声出 力をオフ
にしてくだ さ い 。
U. B AL AN CE D LI NE OU TP UT S*(平 衡ライン出力)
-電子的に真に平衡された出力で、スタジオや
ラ イ ブ で の ミ キ シ ン グ・コ ン ソ ー ル に 適 し て い
ます。
V
. XLR
GROUND LIFT (XLRア ー ス の 切 断 )- XLRジャックからアースの
接 続( ピ ン )を切り離し、標準的ではない配線のために起こるグラ
ンドループノイズを 軽 減します。通常はこのスイッチはオフにして置
いてくだ さ い 。
W
. PA D
( パ ッ ド )- Balanced Outputs(平衡出力){U} の出力レベルを
調節し、様々なサウンド機器の接続や入力の感度に合わせる様にし
ます。
X
. DIRECT / LINE
-Balanced Outputs(平 衡出力) {U} へ
の 出 力ソースを 選 択しま す。Directは真
の全真空管信号経路で、真空管式プ
リアンプの初段の直後から取っていま
す。Lineにすると全てのゲイン、音質、コ
ン プ レ ッ シ ョ ン 、エ フ ェ ク ト 回 路 を 含 み
ます。
Y
. HORN LEVEL
す。
ダイレクト/ライン)
(ホーンレベル)-高 音 域用ホーンの音 量を調節しま
* 注:リ アパ ネ ル の /"ジャックR、S、T は平 衡タイプのTRS TIP/RING/SLEEVEです。
Tip(先)=正 (+)
Ring(リング)=負(–)
Sleeve(スリーブ )=アース .
標準のモノラルタイプシールド付きTS(Tip/Sleeve)ギターケーブルもご使用いただけますが、ステレオのTRSケーブルをご使用になりますと、特にケ
ーブルの長い場合に信号対雑音比の高上やハムの減少をすることが出来ます
◊
32
◊
Page 33

スピー カ ー ガ イド
• 機器への損傷を防ぐため、アンプの最小定格以下
の総インピー ダン スのスピーカーを負荷として接
続しないでください 。
• 機器への損傷を防ぐため、アンプの定格出力を下
回る総パワー容量のスピーカー(組み合わせを含
む)を接 続しないでください。
• スピーカ ー 接続 前には 必ず 電源をオフにしてくだ
さい。
• スピーカーの 接 続にはシールド無しの18ゲージ以上
(16 ゲージや14ゲ ー ジ )の ケ ー ブ ル を 用 い て く だ さ
い。シールド付きのケーブルは機器をいためるこ
とがありますので使用しないでください。
• 各スピーカー負荷に接続するアンプは一つだけに
してく だ さ い 。2つ以上のアンプを一つの負荷に接
続 す る と 動 作 を し な い ば か り で は な く 、機 器 に 損
傷を与えることがあります。
アン プとスピーカー の インピー ダンスと定 格パ ワ
ーを用いて、お 使いのアンプとスピーカーの 組み合
わせが適切なものかどうかを決定してください。注:全ての
SWR®社製 のスピーカーエンクロージャー、並びにほとんどの
他社製のものは連結(デイジーチェーン)された場合に並列
( 直 列 で は なく)さ れ る よう に なって いま す。従 って、このス
ピーカー接続のガイドは並列接続の場合のみに当てはまり
ます。
ここに挙げるスピーカー の 接 続図には、様々なスピ
ーカーのインピーダンスの組み合わせでの総イン
ピ ー ダ ン ス を 示 し ま す( =オ ー ム )。ス ピ ー カ ー 負
荷(総インピーダンス)は、アンプの最小定格イ
ンピーダンスに等しいものが理想です。最小定
格インピーダンス以下でアンプを使用しますと
過熱を起こし、アンプに損傷を与えます。アン
プの最小インピーダンスを上回っての使用は安
全 で は あ り ま す が 、ア ン プ の 最 大 出 力 を 損 ね
ます。
もう一つの考慮点:同じ総インピーダンスを得
られるスピーカーのインピー ダン スの 組 み 合 わ
せ方は一つだけではありません(図参照)。一つ
のグル ープ内の 各スピーカー の インピー ダンス が
同じであれば、各スピーカーにはアンプから同じパ
ワーが 伝 わります。但しスピーカー 間 で のインピー
ダンス が異な れ ばインピーダンスが 最小 のスピーカ
ーが最大のパワーを受け取ります。例えば出力30ワッ
トのアンプに8オームと16 オームのスピーカーを接続す
ると、8オームのスピーカーには約 20ワット が 供 給 さ れ ま
す( そ の 結 果 16 オームのスピーカーよりも2倍大きな 音を出し
ます)。スピーカーのパワー容量の計算、配置に際してはこ
の点 を 考 慮してく だ さ い
ア ン プ 、ス ピ ー カ ー 設 置 に 関 し て 詳 し く は SWRホームページ
(www.swramps.com)の Supportをご覧ください。
仕様
タイ プ: PR 761
パ ー ツ 番 号: 442050 0010 (120V, 60Hz) 4420503010 (240V, 50Hz) AUS
442050 4010 (230V, 50Hz) UK 4420506010 (230V, 50Hz) EUR
4420507010 (100V, 50Hz) JPN
消 費 電 力: 5 75W
パワーアンプ: 最 小 出 力 イ ン ピ ー ダ ン ス: 4Ω
出 力 パ ワ ー: 160W RMS 4Ω負荷 @ < 1% THD, 1kHz
プリアンプ: 入力インピーダンス: 4.7MΩ (1/4" 入力); 20kΩ (XLR入力)
最大出力での感度: 9mV (1/4"入力); 900µV (XLR入力)
音 質 調 整: ±15 d B @ 周 波 数ノブの 設 定
コ ン プ レ ッ ション: 比 率: 1:1 から20 :1
エ フェ クト・ル ー プ: セ ン ド イ ン ピ ー ダ ン ス: 1k Ω
リ タ ーン イ ン ピ ー ダ ン ス: 10k Ω
平 衡 ラ イ ン 出 力: セ ンド イ ン ピー ダ ン ス: 50Ω
ス ピー カ ー: ウーファー: Eminence Neo 10" 4オーム(0076017000)
ホーン: Eminence 8 ohm (0067254000)
寸 法: 高 さ: 19.5 in (49.5 cm) 幅: 15 3/8 in (39 cm) 奥行き:14.5 in (36.8 cm)
重 量: 26.5 lb (11.6 kg)
製品の仕様は予告なしに変更となる場合があります。
◊
◊
33
Page 34

Notes
34
◊
◊
Page 35

Block Diagram
◊
◊
35
Page 36

AMPLIFICADOR DE SONIDO
᳝↦᳝ᆇ⠽䋼ܗ㋴
(Hazardous Substances’ Name)
䚼ӊ䚼ӊৡ⿄
(Part Name)
䪙
(PB)
∲
(Hg) 䬝 (Cd)
݁Ӌ䫀
(Cr6+)
⒈㘨㣃
(PBB)
⒈Ѡ㣃䝮
(PBDE)
䚼ߚ⬉ᄤܗӊ
x o o o o o
䚼ߚᴎ఼ࡴᎹ䞥ሲ䚼ӊ
x o o o o o
䚼ߚ݊Ҫ䰘ሲ䚼ӊ
x o o o o o
O: 㸼⼎䆹᳝↦᳝ᆇ⠽䋼䆹䚼ӊ᠔᳝ഛ䋼ᴤ᭭Ёⱘ䞣ഛ SJ/T 11363-2006 㾘ᅮⱘ⦄䞣㽕∖ҹϟ
X: 㸼⼎䆹᳝↦᳝ᆇ⠽䋼㟇ᇥ䆹䚼ӊⱘᶤϔഛ䋼ᴤ᭭Ёⱘ䞣䍙ߎ SJ/T 11363-2006 㾘ᅮⱘ⦄䞣㽕∖
IMPORTADO POR: Instrumentos Musicales Fender S.A. de C.V., Calle Huerta # 132, C.P. 22880, Col. Carlos Pacheco, Ensenada, Baja California.
RFC: IMF870506R5A Hecho en USA. Servicio de Cliente: 001-8665045875
A PRODUCT OF:
SWR MUSICAL INSTRUMENTS CORPORATION
CORONA, CALIFORNIA USA
SWR®, Spellbinder™ Blue™ and Aural Enhancer™ are trademarks of FMIC. Other trademarks are property of their respective owners.
© 2008 FMIC. All rights reserved. P/N 076021 REV. A
 Loading...