

SWRSound California Blonde II User Manual

Califor
Califor
nia
nia
Blonde
Blonde
™
™
II
II
ENGLISH - PAGES 6-9
ESPANOL - PAGINAS 10-13
FRANÇAIS - PAGES 14-17
ITALIANO - PAGINE 18-21
DEUTSCH - SEITEN 22-25
26-29
Important Safety Instructions
This symbol warns the user of dangerous voltage levels
localized within the enclosure.
This symbol advises the user to read all accompanying
literature for safe operation of the unit.
∆ Read, retain, and follow all instructions. Heed all warnings.
∆ Only connect the power supply cord to an earth grounded AC
receptacle in accordance with the voltage and frequency ratings
listed under INPUT POWER on the rear panel of this product.
∆ WARNING: To prevent damage, fire or shock hazard, do not
expose this unit to rain or moisture.
∆ Unplug the power supply cord before cleaning the unit exterior
(use a damp cloth only). Wait until the unit is completely dry
before reconnecting it to power.
∆ Maintain at least 6 inches (15.25 cm)of unobstructed air space
behind the unit to allow for proper ventilation and cooling of the
unit.
∆ This product should be located away from heat sources such as
radiators, heat registers, or other products that produce heat.
∆ This product may be equipped with a polarized plug (one blade
wider than the other). This is a safety feature. If you are unable
to insert the plug into the outlet, contact an electrician to replace
your obsolete outlet. Do not defeat the safety purpose of this
plug.
∆ Protect the power supply cord from being pinched or abraded.
∆ This product should only be used with a cart or stand that is
recommended by the manufacturer.
∆ The power supply cord of this product should be unplugged from
the outlet when left unused for a long period of time, or during
electrical storms.
∆ This product should be serviced by qualified service personnel
when: the power supply cord or the plug has been damaged; or
objects have fallen, or liquid has been spilled onto the product;
or the product has been exposed to rain; or the product does not
appear to operate normally or exhibits a marked change in
performance; or the product has been dropped, or the enclosure
damaged.
∆ Do not drip nor splash liquids, nor place liquid filled containers
on the unit.
∆ CAUTION: No user serviceable parts inside, refer servicing to
qualified personnel only.
∆ SWR
®
amplifiers and loudspeaker systems are capable of
producing very high sound pressure levels which may cause
temporary or permanent hearing damage. Use care when
setting and adjusting volume levels during use.
∆ Hazardous voltages may be present within the cabinet even when
the power switch is off and the power cord is connected.
Therefore, disconnect the power cord from the rear panel power
inlet before servicing. The power inlet must remain readily
operable.
Instrucciones de Seguridad Importantes
Este símbolo advierte al usuario que en el interior de la
carcasa hay niveles peligrosos de voltaje.
Este símbolo advierte al usuario que lea toda la
documentación adjunta para utilizar la unidad con
seguridad.
∆ Lea las atentamente instrucciones y sígalas al pie de la letra.
Tenga en cuenta todas las instrucciones.
∆ Conecte únicamente el cable de alimentación eléctrica a una
toma de CA de acuerdo con las especificaciones de voltaje y
frecuencia que se indican en la potencia de entrada INPUT
POWER del panel posterior de este producto.
∆ ADVERTENCIA: Para evitar daños, incendios y descargas
eléctricas, no exponga esta unidad a la lluvia ni a la humedad.
∆ Antes de limpiar el exterior de la unidad, desconecte el cable de
alimentación (utilícese únicamente un paño húmedo). Deje que
la unidad se seque completamente antes de volver a conectarla
a la corriente.
∆ Para una ventilación y refrigeración adecuadas, deje un espacio
mínimo de 15.25 cm detrás de la unidad.
∆ Este producto deberá estar situado lejos de fuentes de calor
tales como radiadores, registros de calefacción u otros
productos que generen calor.
∆ Es posible que este producto esté equipado con un enchufe
polarizado (un blade más ancho que el otro). Esta es una
función de seguridad. Si no puede introducir el enchufe dentro
de la toma de corriente, póngase en contacto con un electricista
para que la cambie ya que podría estar anticuada. No anule el
propósito de seguridad de este enchufe.
∆ Tenga cuidado de que el cable de alimentación no se pinche ni
se erosione.
∆ Este producto sólo se debe utilizar con el soporte recomendado
por el fabricante.
∆ El cable de alimentación de este producto deberá estar
desconectado de la toma de corriente cuando no se vaya a
utilizar durante un período de tiempo largo o en caso de
tormenta eléctrica.
∆ Este producto deberá ser reparado por personal cualificado si:
el cable de alimentación o el enchufe están dañados, ha caído
algún objeto o se ha derramado líquido encima, el producto ha
estado expuesto a la lluvia, no funciona normalmente o muestra
signos de cambio en el rendimiento, ha sufrido algún golpe o la
caja esta dañada.
∆ Evite que goteen o salpiquen líquidos y no coloque recipientes
con líquidos sobre la unidad.
∆ PRECAUCIÓN: Contiene piezas cuyo mantenimiento no lo
puede realizar el usuario, sino sólo personal cualificado.
∆ Los amplificadores y altavoces SWR
®
pueden producir niveles
de presión acústica muy elevados, que pueden provocar daños
temporales o permanenetes en el oído. Utilice la precaución al
ajustar el volumen nivela.
∆ Es posible que haya cargas eléctricas peligrosas dentro de la
caja, aunque se haya apagado, mientras esté conectado el
cable de alimentación. Por tanto, se debe desconectar el cable
de alimentación del panel posterior antes de proceder a su
reparación o mantenimiento. La toma de corriente debe
permanecer preparada para su funcionamiento.
Importanti Istruzioni per la Sicurezza
Questo simbolo indica che si avvisa l'utente della
presenza di livelli di tensione pericolosi all'interno della
struttura.
Questo simbolo indica che si consiglia all'utente di
leggere tutta la documentazione allegata ai fini del
funzionamento sicuro dell'unità.
∆ Leggere, conservare e seguire le istruzioni. Osservare le
avvertenze.
∆ Collegare il cavo di alimentazione solo a una presa c.a. con
messa a terra conforme ai requisiti di tensione e frequenza
indicati sull'etichetta INPUT POWER del pannello posteriore di
questo prodotto.
∆ AVVERTIMENTO: Per evitare danni, rischi di incendi o scosse
elettriche, non esporre questa unità alla pioggia o all'umidità.
∆ Scollegare il cavo di alimentazione prima di pulire l'esterno
dell'unità (usare solo un panno umido). Attendere che l'unità sia
completamente asciutta prima di ricollegarla all'alimentazione.
∆ Lasciare almeno 15.25 cm di spazio libero dietro all'unità per
consentirne il corretto raffreddamento tramite ventilazione.
∆ Questo prodotto va collocato lontano da fonti di calore come
radiatori, unità di riscaldamento o altri prodotti che producono
calore.
∆ Questo prodotto può essere dotato di spina polarizzata (con poli
grandi). Si tratta di una misura di sicurezza. Se non si riesce a
inserire la spina nella presa, far sostituire la presa obsoleta ad
un elettricista. Non eliminare la spina di sicurezza.
∆ Proteggere il cavo di alimentazione da danni e abrasioni.
∆ Questo prodotto deve essere usato solo con un carrello o con un
supporto consigliato dal produttore.
∆ Il cavo di alimentazione di questo prodotto deve essere
scollegato dalla presa quando il prodotto non viene usato per
lunghi periodi o durante le tempeste elettromagnetiche.
∆ La manutenzione per il prodotto deve essere eseguita da
personale di assistenza qualificato nei casi seguenti: danno del
cavo o della spina di alimentazione; caduta di oggetti o di liquido
sul prodotto; esposizione del prodotto alla pioggia;
funzionamento anomalo del prodotto o marcata variazione delle
prestazioni del prodotto; caduta del prodotto; danno della
struttura del prodotto.
∆ Non disporre alcun contenitore riempito di liquido sul prodotto.
∆ ATTENZIONE: Non contiene parti riparabili dall'utente: fare
eseguire la manutenzione soltanto da personale qualificato.
∆ I sistemi di amplificazione e gli altiparlanti SWR
®
sono in grado
di produrre livelli di pressione acustica molto alti che possono
provocare danni temporanei o permanenti all'udito. Prestare
attenzione all'impostazione e regolazione dei livelli di volume
durante l'uso.
∆ All'interno dell'apparecchiatura possono essere presenti livelli di
tensione pericolosi anche quando l'interruttore
dell'alimentazione è disinserito ma il cavo di alimentazione è
collegato. Si raccomanda, perciò, di staccare tale cavo dalla
presa dell'alimentazione posta sul pannello posteriore prima di
eseguire qualsiasi intervento di manutenzione. La presa
dell'alimentazione deve, tuttavia, rimanere sgombra e pronta per
l'uso in qualunque momento.
Consignes de Sécurité Importantes
Ce symbole avertit l'utilisateur de la présence de
niveaux de tension à risque dans l'appareil.
Ce symbole conseille à l'utilisateur de lire toute la
documentation jointe au produit pour garantir une
sécurité de fonctionnement.
∆ Veuillez lire attentivement toutes les instructions et vous y
conformer. Respectez scrupuleusement tous les avertissements.
∆ Connectez le câble d'alimentation électrique à une prise CA mise
à la terre selon le voltage et la fréquence indiqués sur le panneau
arrière de l'amplificateur sous INPUT POWER.
∆ AVERTISSEMENT: Pour éviter l’endommagement de l’appareil,
un départ d’incendie, ou un choc électrique, ne l’exposez jamais
a l’humidité ou à la pluie.
∆ Débranchez le câble d'alimentation avant de nettoyer le boîtier de
l'appareil (utiliser un chiffon légèrement humide). Attendez que
l'appareil soit complètement sec avant de le rebrancher sur le secteur.
∆ Conservez au moins 15.25 cm d'espace derrière l'appareil pour
permettre une aération appropriée de celui-ci.
∆ Il est conseillé d'entreposer cet appareil loin de toute source de
chaleur, telle que des radiateurs, des accumulateurs de chaleur
ou autres unités produisant de la chaleur.
∆ Cet appareil peut être équipé d'une prise polarisée (une fiche
plus large que l'autre). C'est une garantie de sécurité. Si vous ne
parvenez pas à insérer la prise dans la sortie, contactez un
électricien pour qu'il remplace la sortie. Ne modifiez rien qui
puisse supprimer les garanties de sécurité qu'offre cette prise.
∆ Veillez à ce que le câble d'alimentation ne soit pas coincé ou
abrasé.
∆ Cet appareil doit uniquement être utilisé avec un support à
roulettes ou un pied conseillé par le fabricant.
∆ Le câble d'alimentation de cet appareil doit être débranché de la
sortie lorsqu'il reste longtemps sans être utilisé ou en cas d'orage
électrique.
∆ Les réparations et la maintenance de cet appareil doivent être
effectuées par un personnel qualifié dans les cas suivants : le
câble d'alimentation ou la prise sont endommagés ; des objets
sont tombés sur l'appareil, du liquide a été renversé dessus ou
l'appareil a été exposé à la pluie ; l'appareil ne semble pas
fonctionner normalement ou vous notez des changements
notables dans la performance de l'amplificateur, ou encore le
produit est tombé ou l'enceinte est endommagée.
∆ Ne placez aucun récipient rempli de liquide sur le produit.
∆ ATTENTION: Aucune maintenance ne doit être effectuée pour
les pièces situées dans l’appareil. Les réparations et la
maintenance doivent être exécutées uniquement par une
personne qualifiée.
∆ Les niveaux sonores élévés émis par les systèmes
d'emplificateur et haut-parleurs SWR
®
peuvent entraîner des
lésions auditives durables. Faites attention lorsque vous réglez
ou ajustez le volume lors de l'utilisation des appareils.
∆ Voltage dangereux. Risque d'électrocution au niveau du coffret
lorsque le câble d'alimentation est branché même si l'appareil
n'est pas sous tension. Débranchez le câble d'alimentation du
panneau arrière avant de travailler sur l'appareil. L'entrée
électrique doit rester accessible.
W ichtige Sicherheitshinweise
Dieses Symbol warnt den Benutzer vor gefährlichen
Spannungen innerhalb des Gehäuses.
Dieses Symbol bedeutet für den Benutzer, dass er für
einen sicheren Betrieb des Geräts die gesamte
begleitende Dokumentation lesen muss.
∆ Befolgen Sie sämtliche Sicherheitshinweise und bewahren Sie
sie auf. Beachten Sie alle Warnungen.
∆ Das Netzkabel muss an eine geerdete Netzsteckdose
angeschlossen werden, die die auf der Rückseite des
Verstärkers unter INPUT POWER angegebene Spannung und
Frequenz liefert.
∆ WARNUNG: Setzen Sie dieses Gerät niemals Regen oder
Feuchtigkeit aus, um Beschädigung, Brandentwicklung und
elektrische Schläge zu vermeiden.
∆ Ziehen Sie den Netzstecker, bevor Sie das Gehäuse des Geräts
reinigen (verwenden Sie zum Reinigen nur ein feuchtes Tuch).
Stecken Sie den Netzstecker erst wieder ein, wenn das Gerät
vollständig getrocknet ist.
∆ Halten Sie hinter dem Gerät einen Freiraum von mindestens 15.25
cm ein, damit eine ausreichende Belüftung gewährleistet ist.
∆ Der Verstärker darf nicht in der Nähe von Wärmequellen wie
Heizkörpern oder anderen wärmeerzeugenden Geräten
aufgestellt werden.
∆ Dieses Produkt ist möglicherweise mit einem unvertauschbaren
Stecker ausgestattet (unterschiedlich breite Pole). Dabei
handelt es sich um eine Sicherheitsvorrichtung. Wenn Sie den
Stecker nicht in die Steckdose stecken können, lassen Sie Ihre
alte Steckdose von einem Elektriker auswechseln. Zerstören
Sie nicht die Sicherheitsfunktion des Steckers.
∆ Das Netzkabel darf nicht eingeklemmt oder abgescheuert werden.
∆ Das Produkt sollte nur mit vom Hersteller empfohlenen Karren
oder Ständern verwendet werden.
∆ Bei Gewitter oder wenn das Gerät längere Zeit nicht gebraucht
wird, sollte der Netzstecker gezogen werden.
∆ In folgenden Fällen sollte das Gerät repariert werden, und zwar
ausschließlich von qualifizierten Technikern: Schäden an
Netzkabel oder -stecker; Beschädigung durch herabfallende
Gegenstände, ausgelaufene Flüssigkeit oder Regen;
Funktionsstörungen oder deutlich verändertes
Betriebsverhalten; Beschädigung durch Herunterfallen; Schäden
am Gehäuse.
∆ Setzen Sie das Gerät keiner tropfenden oder spritzenden
Flüssigkeit aus; stellen Sie keine mit Flüssigkeit gefüllten
Behälter auf dem Gerät ab.
∆ VORSICHT: Im Gerät sind keine zu wartenden Teile.
Reparaturarbeiten dürfen nur von qualifizierten Technikern
durchgeführt werden.
∆ SWR
®
-Verstärker und Lautsprecher können sehr hohe
Lautstärkepegel erzeugen, die vorübergehende oder dauerhafte
Gehörschäden verursachen können. Gehen Sie beim Einstellen
bzw. Regulieren der Lautstärke vorsichtig vor.
∆ Im Gehäuse können auch im ausgeschalteten Zustand
gefährliche Spannungen auftreten, wenn das Netzkabel
eingesteckt ist. Ziehen Sie daher das Netzkabel aus der
Netzanschlussbuchse auf der Rückseite des Geräts bevor Sie
Wartungs- oder Reparaturarbeiten vornehmen. Die
Netzanschlussbuchse muss stets frei zugänglich bleiben.
∆
∆
∆
∆
∆
∆
∆
∆
∆
∆
∆
∆
∆
∆
∆
6
SSSSWWWWRR
RR
®
CCCCaaaalllliiiiffffoooorrrrnnnniiiiaaaa BBBBlllloooonnnnddddee
ee™ IIIIIIII
Congratulations! Your new SWR®California Blonde™ II
delivers the famous SWR®tone, clarity, and true full-range
response that has made SWR®the choice of professionals
for over twenty years. We sincerely thank you for choosing
SWR®, and remain committed to helping you Amplify Your
Future™.
Read through this Owner’s Manual before using your
amplifier not only to ensure your safety, but to realize the
full potential of the SWR®California Blonde™ II! Please
verify that the following items were included with your
amplifier: AC Cable, SWR®Catalog.
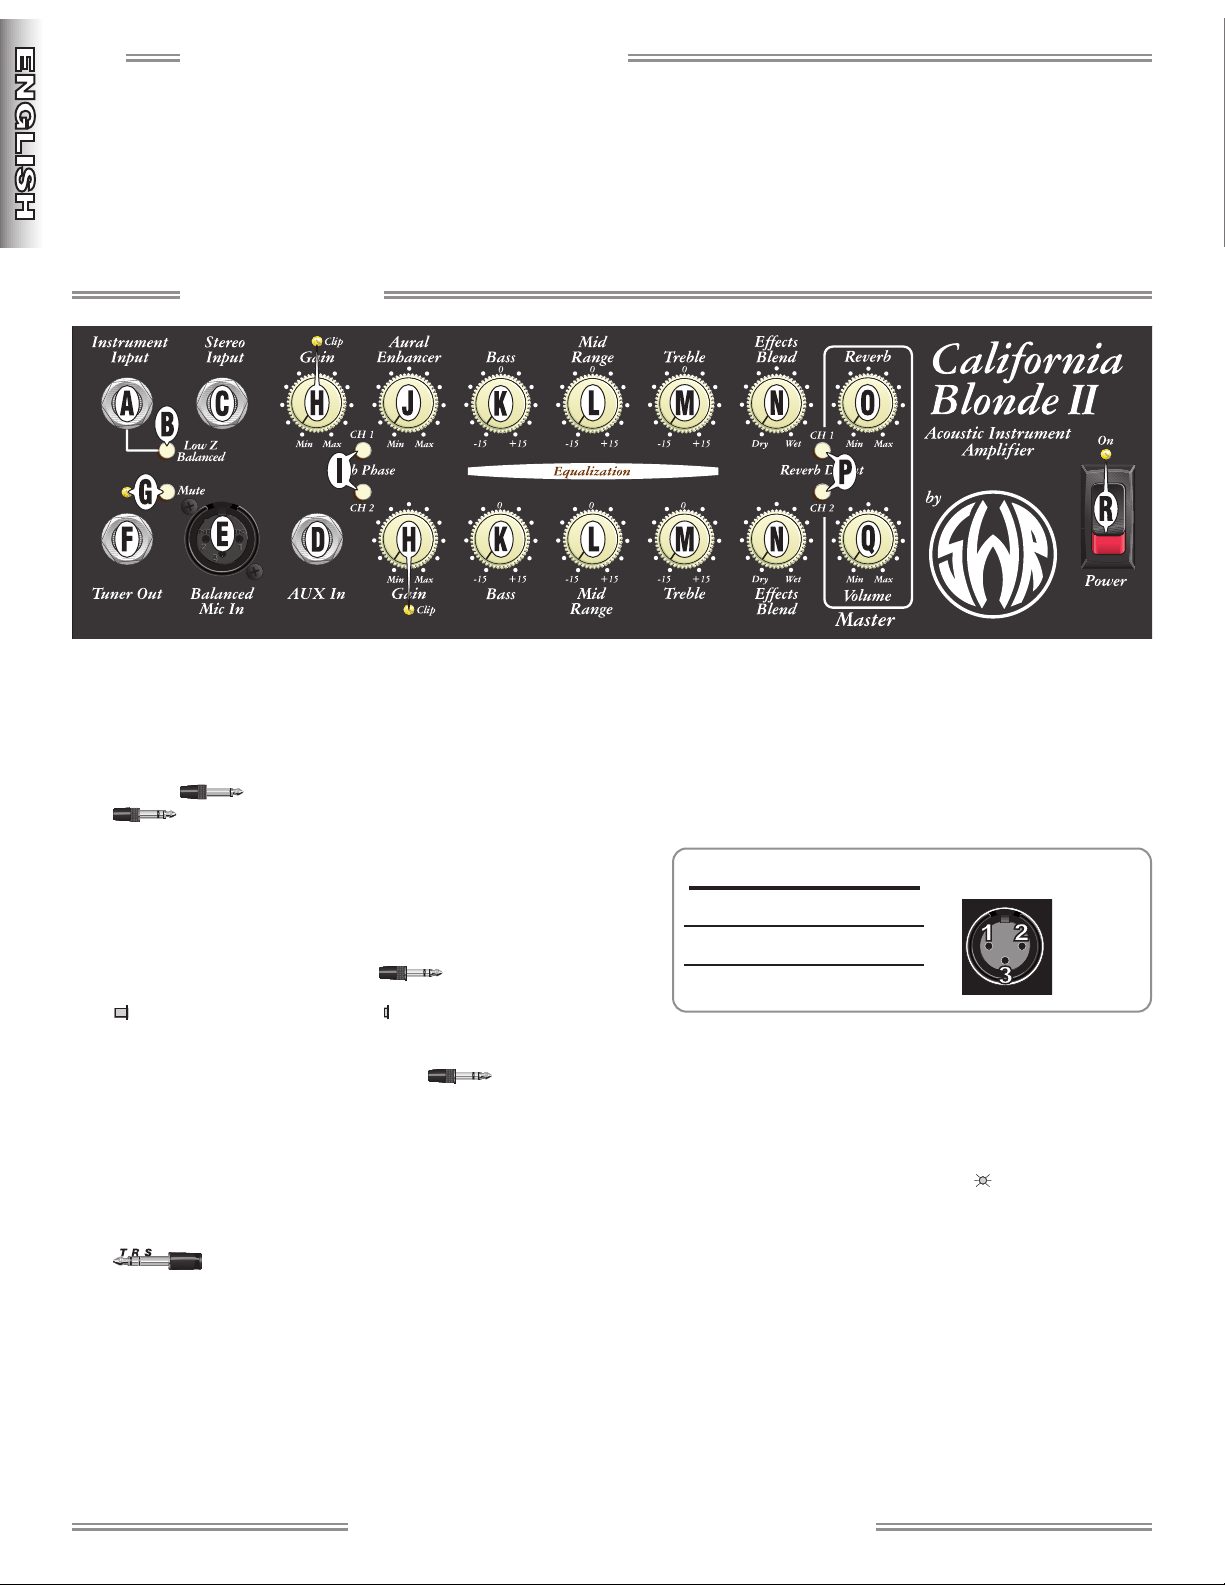
A. INSTRUMENT INPUT - Connect your (mono)
acoustic instrument here using a shielded instrument
cable. This input automatically “senses” either
magnetic or piezo pickup and accepts an unbalanced
signal (most guitars) or balanced signal
, according to the position of the LOW Z
BALANCED switch {B}.
B. LOW Z BALANCED - Press in to configure the input
circuit for low-impedance, balanced-output guitars
(such as the Taylor Expression System™). A balanced
connection offers superior dynamic range and noise
immunity and requires a TRS connection.
UNBALANCED (normal) LOW Z BALANCED
C. STEREO INPUT - Connect your (stereo) acoustic
instrument here using a stereo , shielded
instrument cable. This unique input offers
independent control of two pickups (a piezo pickup
and soundhole microphone, for example). You can
either mix the two channels for “mono” output or feed
one channel to an auxiliary amplifier for true stereo
output, see LINE OUT (CH 1) {W}.
The STEREO INPUT jack routes the signal:
Tip to Channel 1, Ring to Channel 2 and
Sleeve to ground.
NOTE: The MIC IN and AUX IN inputs are disabled
when a plug is inserted into STEREO INPUT.
D. AUX IN - Input for a second instrument or unbalanced
microphone; disabled when using the STEREO
INPUT {C}.
E. BALANCED MIC IN - True balanced XLR input, with
PHANTOM POWER SUPPLIED for a microphone;
disabled when using the STEREO INPUT {C}.
F. TUNER OUT - Plug your tuner in here to enable inline
tuning. Use MUTE {G} to disable audio output while
tuning.
G. MUTE - Disables all audio output except the TUNER
OUT {F} jack; useful when tuning up and during
instrument changes. The LED indicates when
MUTE is on.
Pin XLR Wiring (American Standard)
1 Ground
2 Positive
3 Negative
FFFFrrrroooonnnntttt PPPPaaaannnneeeell
ll
✧
ss ww rr ss oo uu nn dd .. cc oo mm
✧

7
H. GAIN - Adjusts the preamp signal level. Use GAIN to
balance the volume levels between the two channels
while maintaining the optimal signal–to–noise ratio as
indicated by the CLIP LED:
CLIP LED - Indicates when the preamp, tone circuits,
or output buffer are overdriven (clipping) and causing
signal distortion. The best GAIN setting for minimum
distortion is indicated when CLIP barely flashes at
peak channel input levels (maximum signal strength).
This clipping is not harmful to your amplifier, therefore,
reduce GAIN for unwanted distortion. Check the CLIP
LEDs after adjusting tone or Reverb controls, as they
contribute to the GAIN level.
GAIN also controls the level of all rear panel output
jacks, including EFFECTS SEND {Y} and can be used
to optimize external equipment connections such as
an effects device that is being overdriven (you may
need to adjust other levels to compensate for GAIN
changes). NOTE: If you still hear distortion even at low
GAIN settings (CLIP LED not flashing), check your
guitar battery.
I. PUSH PHASE - Reverses the input/output phase of
each channel which may reduce “regenerative”
feedback occurring at a particular distance from the
amplifier. If an instrument or microphone feedback,
reverse the phase of that channel or change your
position/distance from the amplifier.
J. AURAL ENHANCER - Featured on just about every
SWR®amplifier since the company’s inception in
1984, it is a trademark part of the “SWR Sound”
people have come to know and love. It was developed
to bring out the fundamental notes of the guitar,
enhance the high-end transients, and reduce certain
frequencies that “mask” the fundamentals. The
ultimate effect is a more transparent sound that opens
up the sibilance characteristics of all instruments
without being harsh.
How the AURAL ENHANCER works: Think of it as a
variable tone control that changes frequency range
AND level according to where you set the AURAL
ENHANCER control:
As you rotate the control clockwise from the “MIN”
position, you are elevating low, mid, and high
frequency levels in ranges that are different, yet
complementary to the BASS, MID and TREBLE tone
controls. The “2 o’clock” position—a favorite for many
users—brings out both low end fundamentals and
crisp highs while at the same time, adds a little lower
midrange helping you to cut through the band. Then,
as you rotate further clockwise, selected mids will
drop off—specifically, a group of frequencies centered
around 200Hz. While apparent, these curves are
gentle, as opposed to the extreme effects you can
create with the basic tone controls.
Your ears are the best judge when it comes to settings
that affect the tone of your instrument. Theories are
meaningless if the sound doesn’t satisfy! So, play a
chord, a repeated lick, or a harmonic, and turn the
AURAL ENHANCER control to various points on the
knob to hear it for yourself.
K. BASS - Adjusts the low-frequency response of each
channel. Centered at 110Hz, this range provides
fullness as well as the punch to your sound. The BASS
control has no affect at “0.”
L. MID RANGE - Adjusts middle-frequency response of
each channel. Centered at 800Hz, this range creates a
distinctive edge in your sound which is critical for
most instruments. The best setting will depend on the
situation and setting—a MID RANGE setting that
sounds harsh when alone may sound just right in a
crowded room or on a recording. MID RANGE has no
affect at “0.”
M. TREBLE - Adjusts high-frequency response of each
channel. Centered at 3.2kHz, this range adds the
bright sparkle to your sound and can bring a dull
instrument to life. Because high-frequencies are
“directional” by nature, it is important to listen from
different angles to find the best TREBLE setting and
the optimum placement for your amplifier. TREBLE
has no affect at “0.”
N. EFX BLEND - Controls the level of your effects loop,
or more precisely, the ratio of external effects loop
(wet) signal, to internal amplifier (dry) signal for each
channel. Used in conjunction with the rear panel
Effects Loop jacks, EFX BLEND is enabled when a
1/4" phone plug is inserted into EFFECTS
RETURN {S}.
O. REVERB - Adjusts the level of Reverb for both
channels.
P.
REVERB DEFEAT - Disables REVERB for each
channel:
REVERB ON REVERB OFF (DEFEATED)
Q. MASTER VOLUME - Adjusts the overall loudness of
of the amplifier after all other controls are set.
R. POWER SWITCH - Switches power on-off to the
amplifier as indicated by the LED.
FFFFrrrroooonnnntttt PPPPaaaannnneeeell
ll—continued
✧
ss ww rr ss oo uu nn dd .. cc oo mm
✧
8
RRRReeeeaaaarrrr PPPPaaaannnneeeell
ll
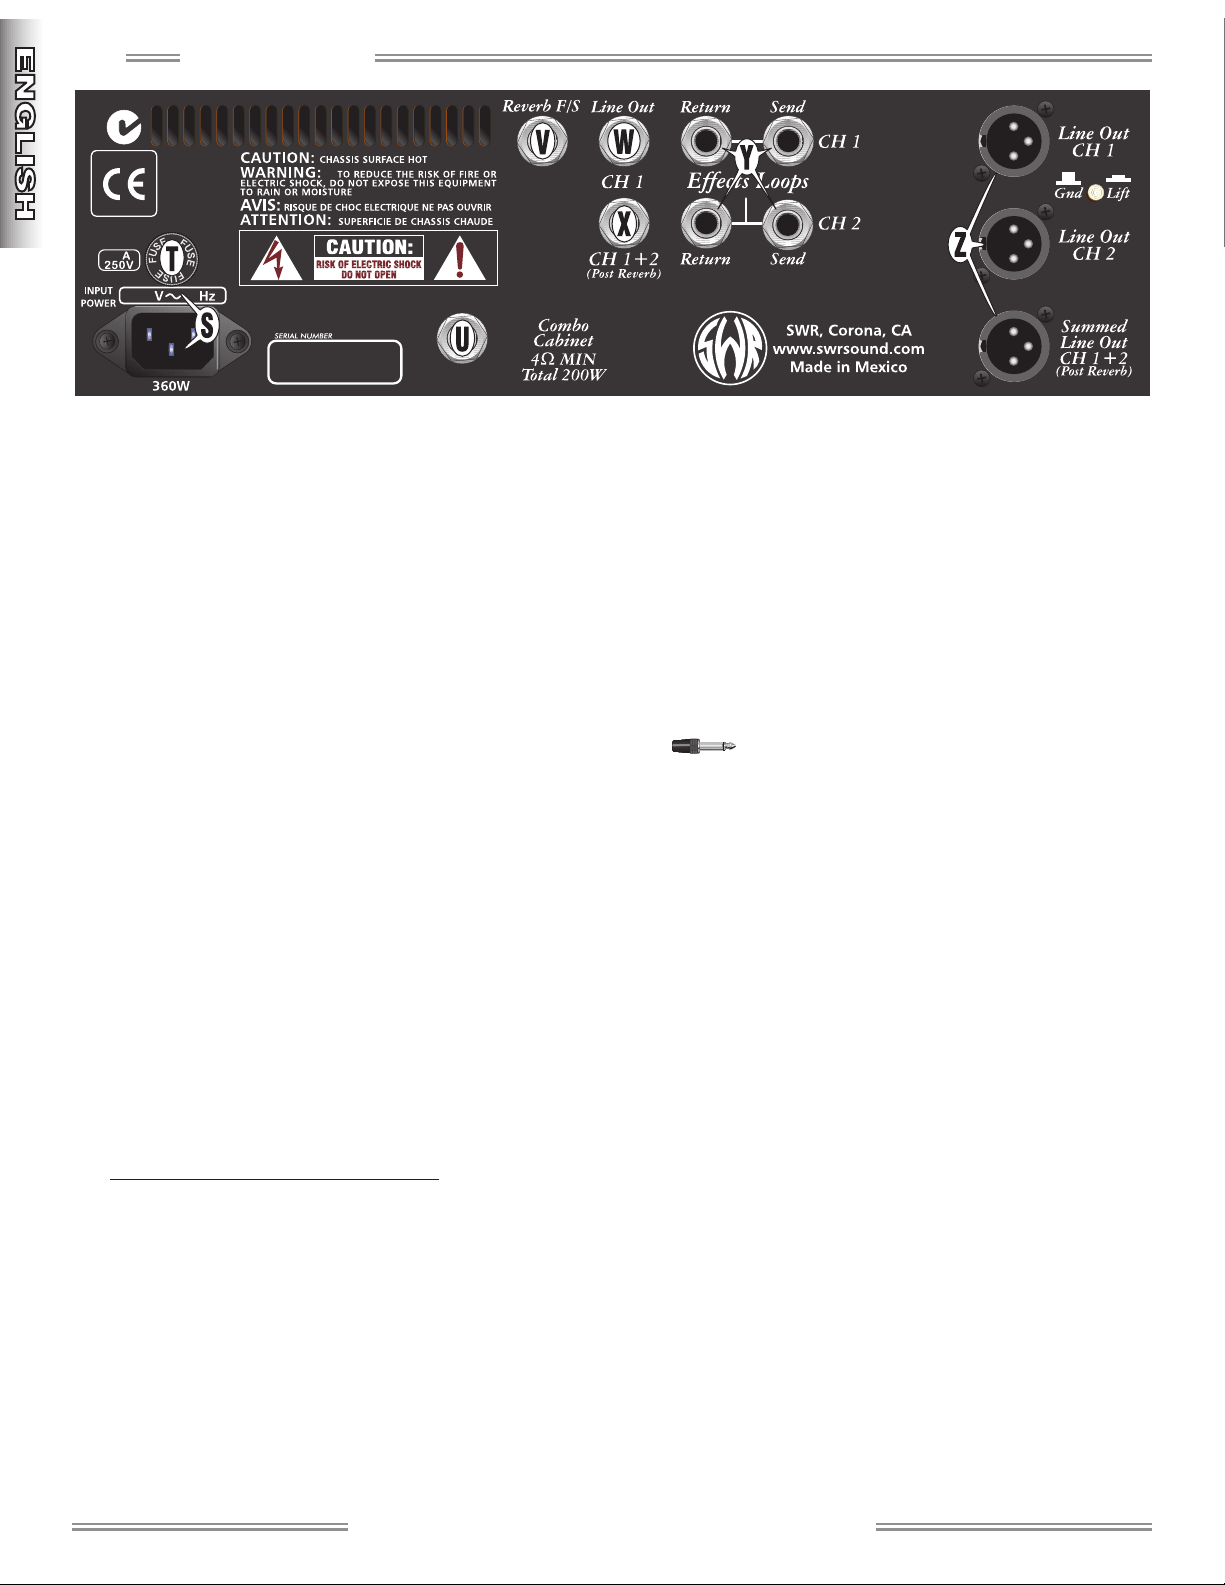
S. IEC POWER CORD SOCKET - Connect the included
power supply cord to a properly wired, grounded AC
electrical outlet in accordance with the voltage and
frequency ratings specified on the rear panel of your
amplifier.
T. FUSE - Protects the amplifier from electrical faults.
Replace a blown fuse ONLY with a fuse of the
type/rating specified on the rear panel of your
amplifier to protect your amplifier and maintain
warranty coverage.
U. COMBO CABINET OUTPUT - DO NOT unplug this
speaker connection. Your amplifier will be damaged if
powered on while disconnected. Intended only for
qualified service technicians during chassis removal.
V. REVERB FOOTSWITCH - Connect a standard latch-
type footswitch to enable remote on-off activation of
Reverb Defeat. (Reverb is defeated when the
footswitch is in the “closed” position.) Reverb Defeat
can be activated from either the front panel button or
the footswitch, but it can only be deactivated by the
same switch that activated it.
W. LINE OUT (CH 1) - Provides unbalanced Channel 1
preamp output for an auxiliary amplifier or sound
equipment. Channel 1 signal is disconnected from the
internal power amp when a plug is inserted into this
jack. This signal includes onboard tone shaping, the
effects loop signal, but not Reverb. Output level is
controlled by GAIN {H}.
California Blonde II Stereo Operation: When using the
STEREO INPUT {C}, connect the LINE OUT (CH 1)
jack to an external powered speaker (such as the
SWR®Blonde on Blonde™) or the power amp input of
an auxiliary amplifier. Connect a stereo effects unit
using both Effects Loops (including both EFFECTS
BLEND controls) on the California Blonde II to create
a fully ambient stereo field.
X. LINE OUT (CH 1+2) - Provides an unbalanced output
summed from both channel preamps for an auxiliary
amplifier or sound equipment. The power amp is NOT
disconnected when a plug is inserted into this jack.
This signal includes onboard tone shaping, the effects
loop signal, AND Reverb. Output level is controlled by
GAIN {H}.
Y. EFFECTS LOOPS (CH 1 and CH 2) - Jacks for
connecting your external effects units to each
channel. The SEND level is controlled by GAIN {H}.
The RETURN signal can be blended in any ratio with
the “dry” preamp signal using EFX BLEND {N}.
Use only shielded instrument cables with
standard 1/4" mono phone plugs with these jacks.
Use a stereo–to–mono adapter if your source has a
stereo plug. Connect EFFECTS SEND to your effects
device input, then connect the effects device output
to EFFECTS RETURN. NOTE: Set the wet/dry control
on external effects units to the fully WET position to
prevent phasing problems. Set the input level on
external effects as close to 0dB as possible.
The Effects Loop circuit is on a “side chain” of the
main circuit (as in studio recording consoles) to
provide the full sound of your instrument AND the
diversity of your effects units. Located after the gain
stages in the preamp signal path, this circuit also
reduces any noise generated by your effects units.
✧
ss ww rr ss oo uu nn dd .. cc oo mm
✧
9
Z. XLR OUTPUTS - Studio quality, true electronically
balanced outputs that provide the ability to send
Channel 1 and 2 separately or together for custom
mixing. All 3 XLR outputs include onboard tone
shaping and the effects loop signal, BUT only the
CH 1 + 2 output includes Reverb. Output level is
controlled by GAIN {H}, pin wiring is “American
Standard”: 1=Ground, 2=(+), 3=(–).
GROUND / LIFT - Disconnects the ground
connection (pin-1) from all 3 XLR outputs, which may
reduce hum noise due a ground loop (non-standard
XLR wiring somewhere in the signal path). Normally
leave this switch out.
GROUNDED (normal) GROUND LIFTED
Lifting the ground connection will not solve hum noise
due to bad cables, poor connections, miswired A/C
outlets, nearby fluorescent lighting (especially with
single-coil pickups) or a cell phone close to your
instrument.
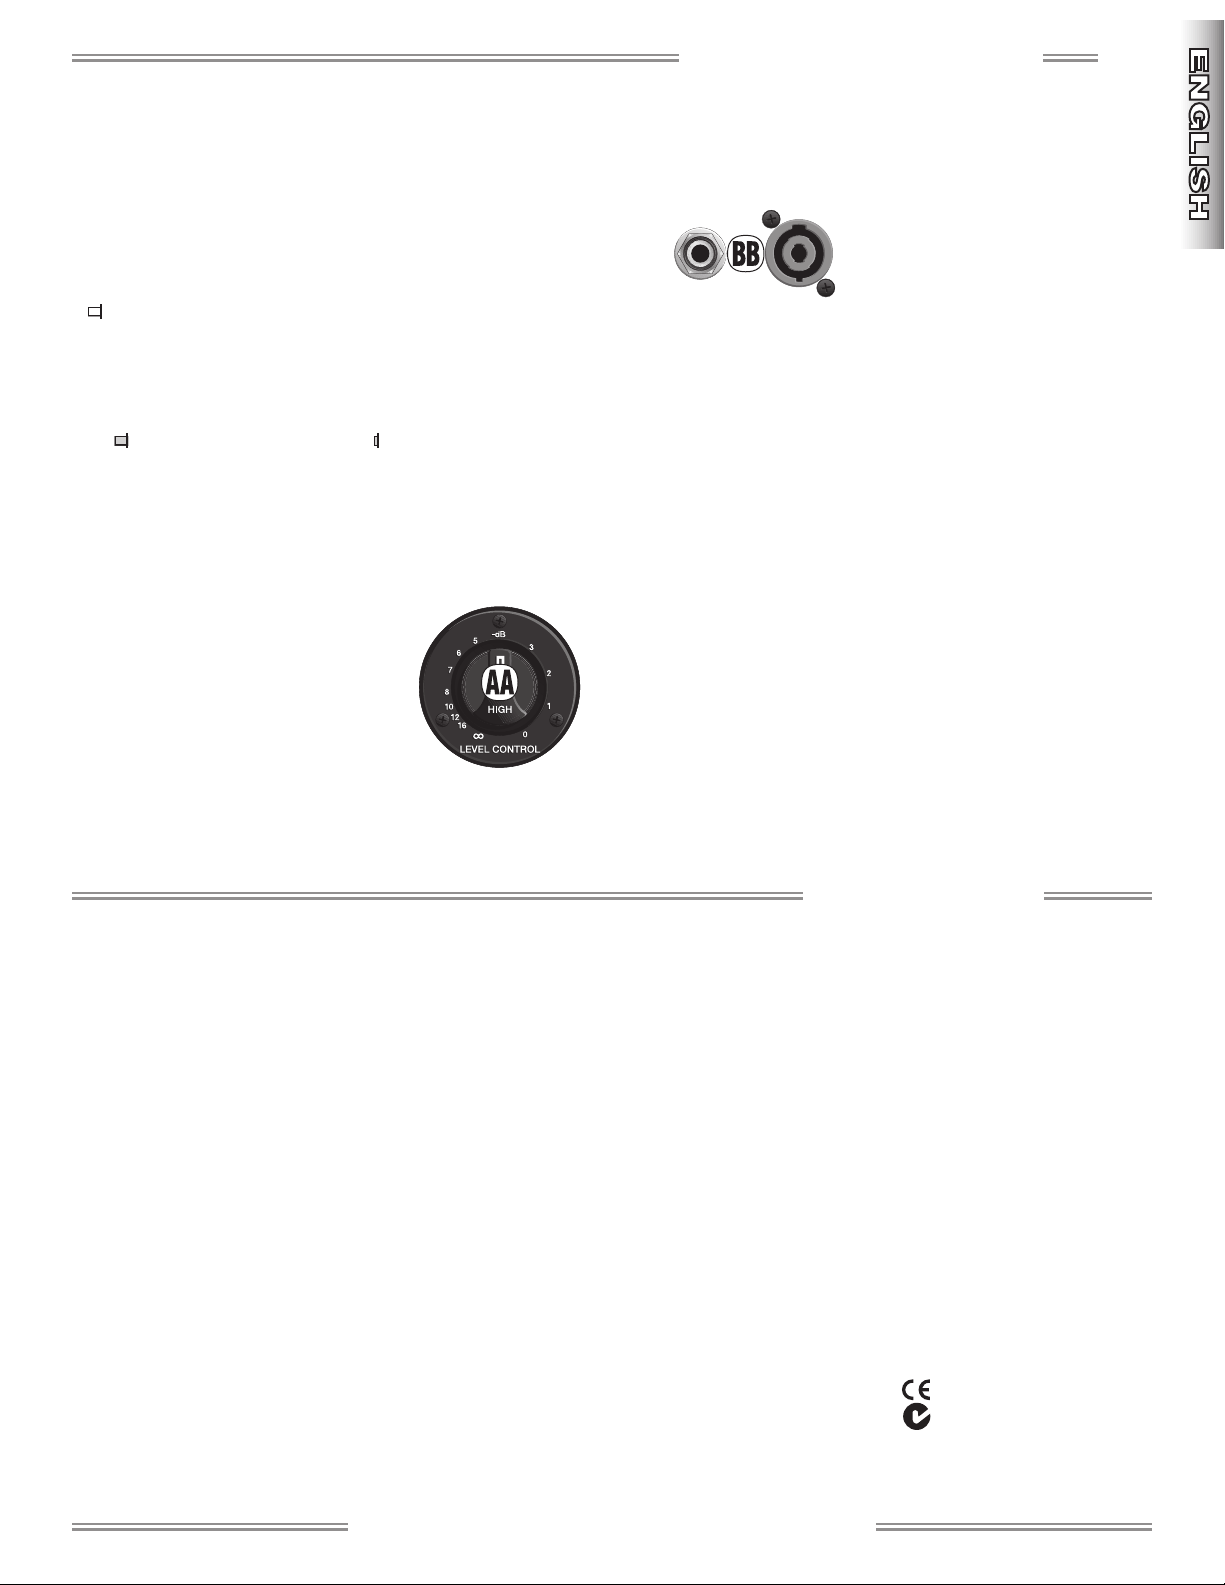
AA. TWEETER LEVEL CONTROL -
Controls the volume of the highfrequency tweeter. Normally,
start by setting this control to the
“12 o’clock” position, then adjust
as desired. Some instruments
such as violins, cellos and
upright basses may sound best
with the tweeter off (LEVEL CONTROL fully counterclockwise). The front panel TREBLE knob controls the
frequency range of the tweeter and can be used as a
“high-end pad.”
BB.EXTENSION SPEAKER OUTPUTS - The California
Blonde II amplifier features both Speakon®and
1/4" phone speaker output jacks
to provide flexibility in making
your extension speaker
connections. Use the Speakon
®
jack whenever possible to take
advantage of its superior power transfer efficiency and
locking connector. Both jacks are full range and wired
in parallel.
• Connect speakers with a total impedance load of 8-
ohms minimum to prevent damage to your
equipment (one 8-ohm speaker or two 16-ohm
speakers are acceptable).
• ONLY connect speakers to these outputs.
• ALWAYS switch the amplifier OFF before connecting
or disconnecting speakers.
• ONLY use unshielded speaker cable of 18 gauge or
heavier (such as 16 or 14 gauge) for speaker
connections. Shielded instrument cable WILL NOT
work and may damage your equipment.
RRRReeeeaaaarrrr PPPPaaaannnneeeell
ll—continued
TYPE: PR 628
PART NUMBER: 4460000010 (120V, 60Hz) US 4460001010 (110V, 60Hz) TW
4460003010 (240V, 50Hz) AUS 4460004010 (230V, 50Hz) UK
4460005010 (220V, 50Hz) ARG 4460006010 (230V, 50Hz) EUR
4460007010 (100V, 50Hz) JPN 4460009010 (220V, 60Hz) ROK
POWER REQUIREMENT: 360 W
POWER OUTPUT: 200 W RMS into 4 Ω @ 0.1%THD 150W RMS into 8 Ω @ < 0.02% THD
INPUT IMPEDANCES
INSTRUMENT: 3.9M Ω
STEREO: 1M Ω
AUX: 1M Ω
FUSES: F8A 250V for 100V–120V versions
F4A 250V for 220V–240V versions
SPEAKERS: One 8Ω, 200W, 12” stamped frame woofer (P/N 0067084000 )
One 16Ω, 25W, supertweeter (crossover 4kHz) (P/N 0067254000)
DIMENSIONS HEIGHT: 25 in (63.5 cm)
WIDTH: 15 in (38.1 cm)
DEPTH: 14 in (35.6 cm)
WEIGHT: 51 lb (23.1 kg)
Product specifications are subject to change without notice.
SSSSppppeeeecccciiiiffffiiiiccccaaaattttiiiioooonnnnss
ss
✧
ss ww rr ss oo uu nn dd .. cc oo mm
✧
 Loading...