

SWR SCIENCE SenseDisc, SenseDisc Physics, SD0010, SD0030, SenseDisc Biochem Basic User Manual
...
All-In-One
USER GUIDE
Brief Introduction
Hardware
System Specification
Connection of Sensor Modules
Stand-alone Mode
Usage of Combination with Other Systems
Notes
Common problems and their solutions
Configure Table of Sensor Modules
Contents
Standard Configuration
Buttons & ports
Interface of Built-in Software
Function
Connection Modes
Usage of Windows&Mac OSX System
Usage of Android Platform
Usage of iOS Platform
Clean
Applicable environment
Storage
Attentions
Reset
1
2
2
3
4
5
5
6
6
9
9
9
11
13
15
15
15
15
15
15
16
17

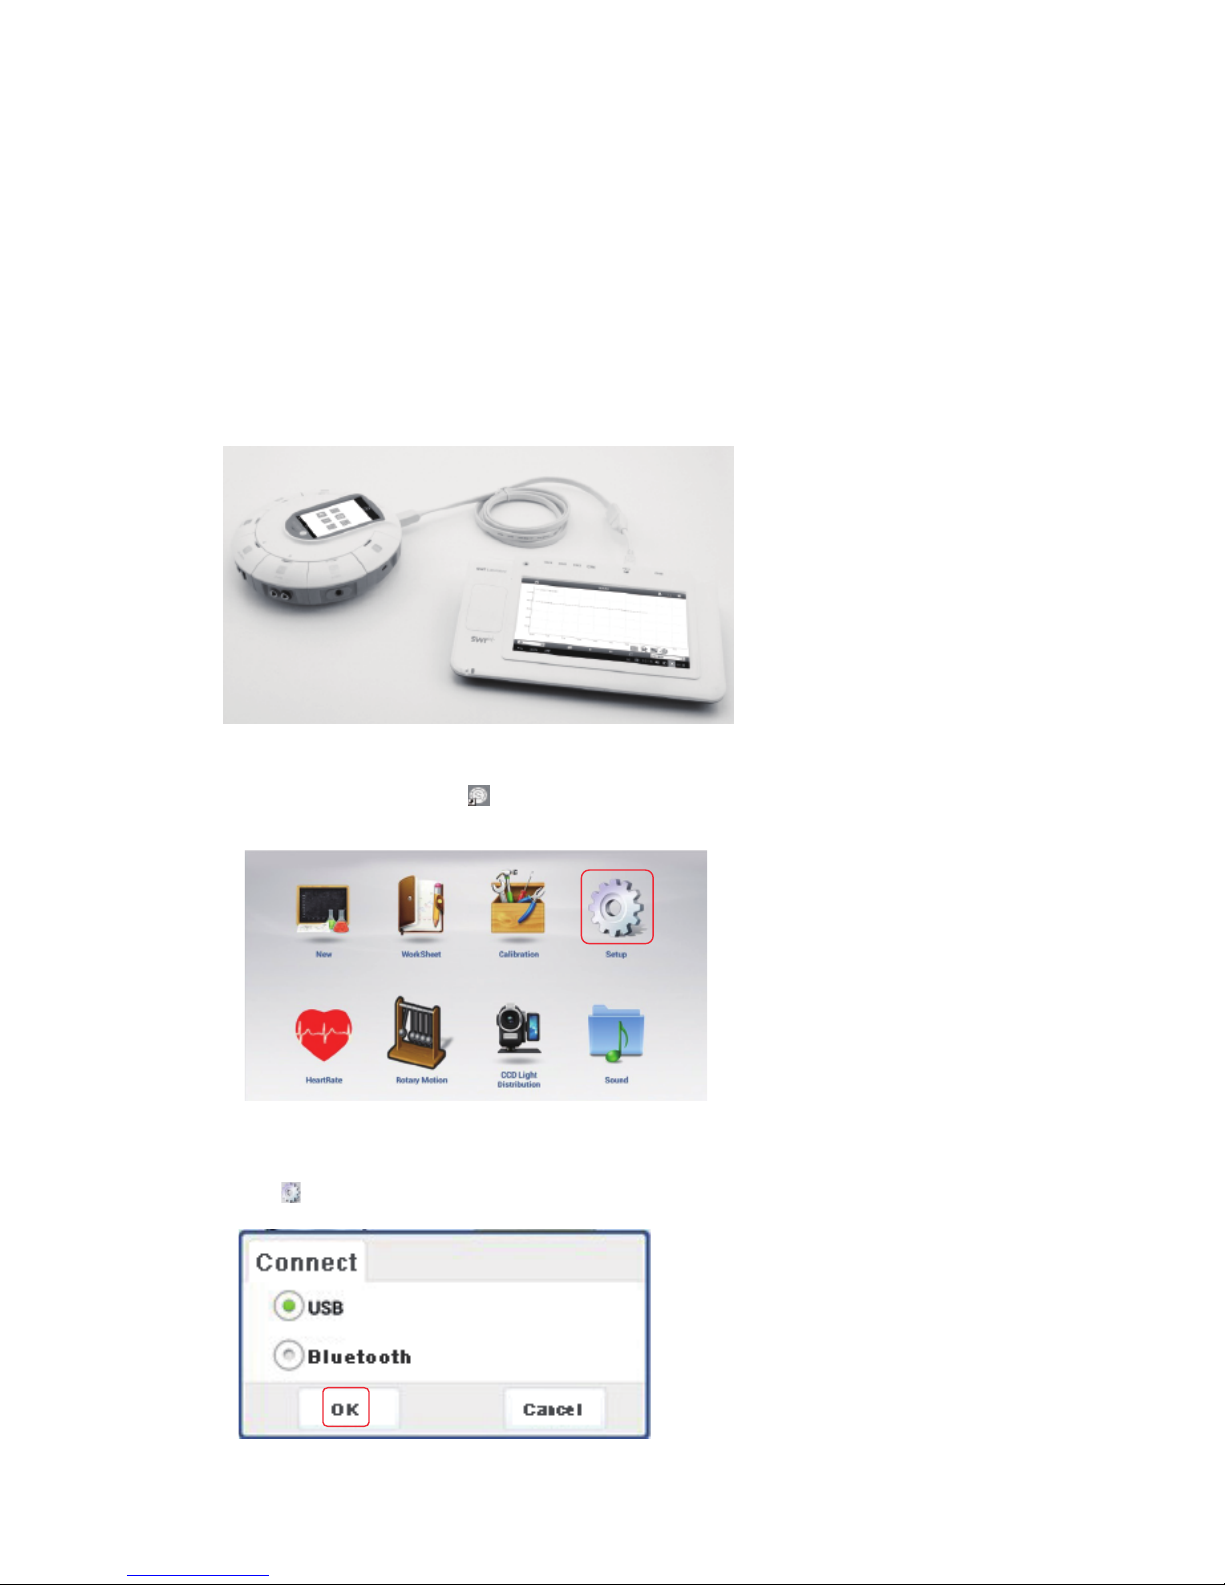
SenseDisc is a new concept of portable digital experimental
system with powerful function, which is available to the experimental teaching of primary and secondary schools all over the
world. Equipped with wireless & exquisite sensor modules, create
a simple and safe experimental environment for students, and
they can explore the science world as they wish.
SenseDisc is a multi-channel data logger, the entire�outward
appearance designs�succinctly�naturally and human friendly.
Every sensor modules are set around data logger flexibly, and has
its own independent connection port, not stereotypical. Each
series of SenseDisc data logger, has built-in accelerometer (3
Axis), GPS, ambient temp and barometer, more diversified and
high efficient.
SenseDisc adopts 3.5' TFT 480*320 touchscreen, and a built-in
1800mAh lithium battery (over 6 months of standby time). SenseDisc has two acquisition modes to choose from, stand-alone and
external equipment mode. When connect to an external equipment, can supports the Windows, Android, Mac OSX and iOS ope
ating systems, and provided wired mode and wireless linking
methods.
1
Brief Introduction
1
2
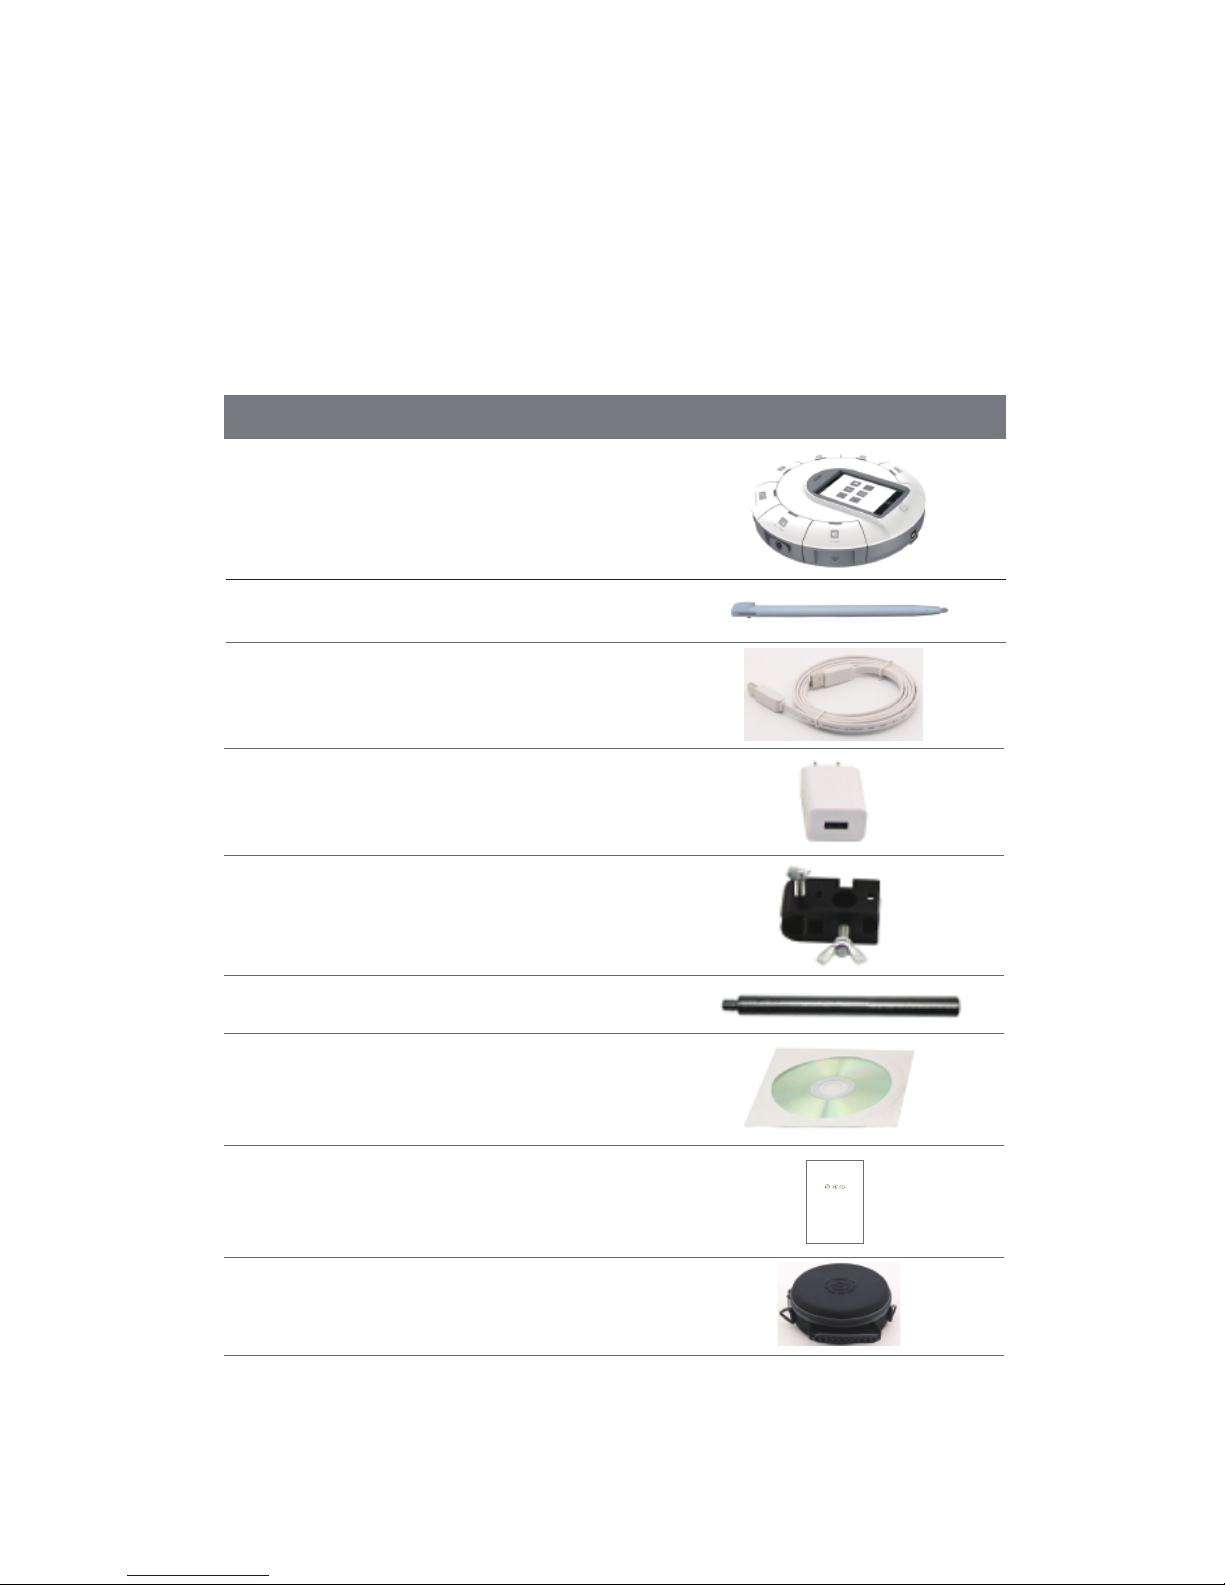
Hardware
Standard Configuration
NO. Name Picture
SenseDisc Data Logger 1
2
3
4
5
6
7
8
9
Screen Stylus
USB Cable
Power Adapter
Universal Joint
Aluminium rod
Software CD
Manual
Bag
2
All-In-One
USER GUIDE
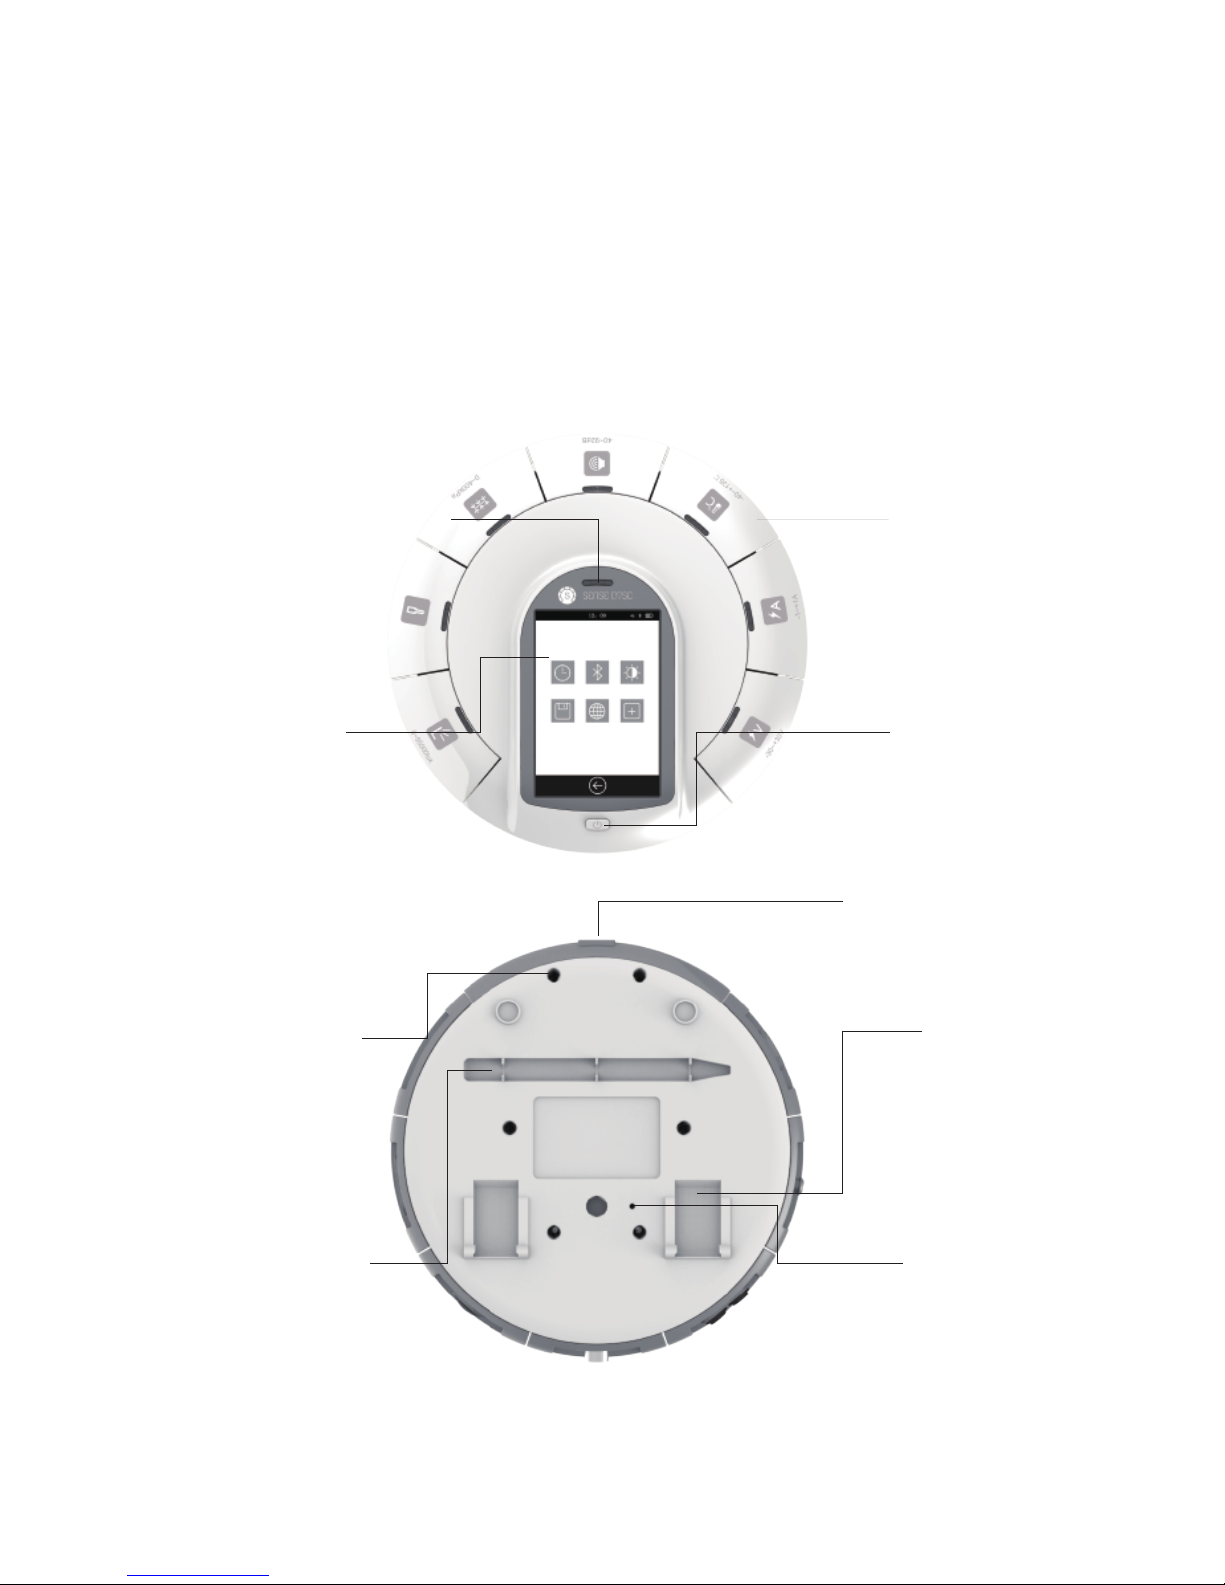
Buttons & ports
Touch Screen
Power Button
USB Port
Threaded Hole
Slot for Screen Stylus Reset Hole
Sensor Modules
Indicator Light of Power Supply
Bracket
3

3
System Information
Platform
GPS
Stand-alone mode
Max sampling rate
Sampling Resolution 12-bit
4MStorage
Battery 1800 mAh lithium battery
Stand-by > 6 months
3.5’TFT 480*320 touch screen
USB 2.0
Screen
Port
Wireless connection √
Size ɸ=170mm, H=46mm
Temperature Range -20∽70 °C
Power Adapter 100∽240V AC / 5V DC 1A
Software SenseDisc iLab
Sensor Port 7
√
√
100,000 times/s
Stand-alone mode, Windows, iOS,
Android, Mac and etc.
Accelerometer (3 Axis), GPS, ambient temp,
barometer and etc.
Built-in sensors
(Each series of different configuration)
Item Specification
4

4
Connection of Sensor Modules
SenseDisc uses surround-type
design philosophies, namely the
sensor modules and the data
logger to form a circle-type
connection, 7 sensor modules can
be connected to the main body
simultaneously; Using pluggable
measuring modulus, and these
modulus can according the
requirements of experiment to be
combined freely.
When in usage, only need to insert
one module into any port of the
main body. Indicated as follows:
5
5
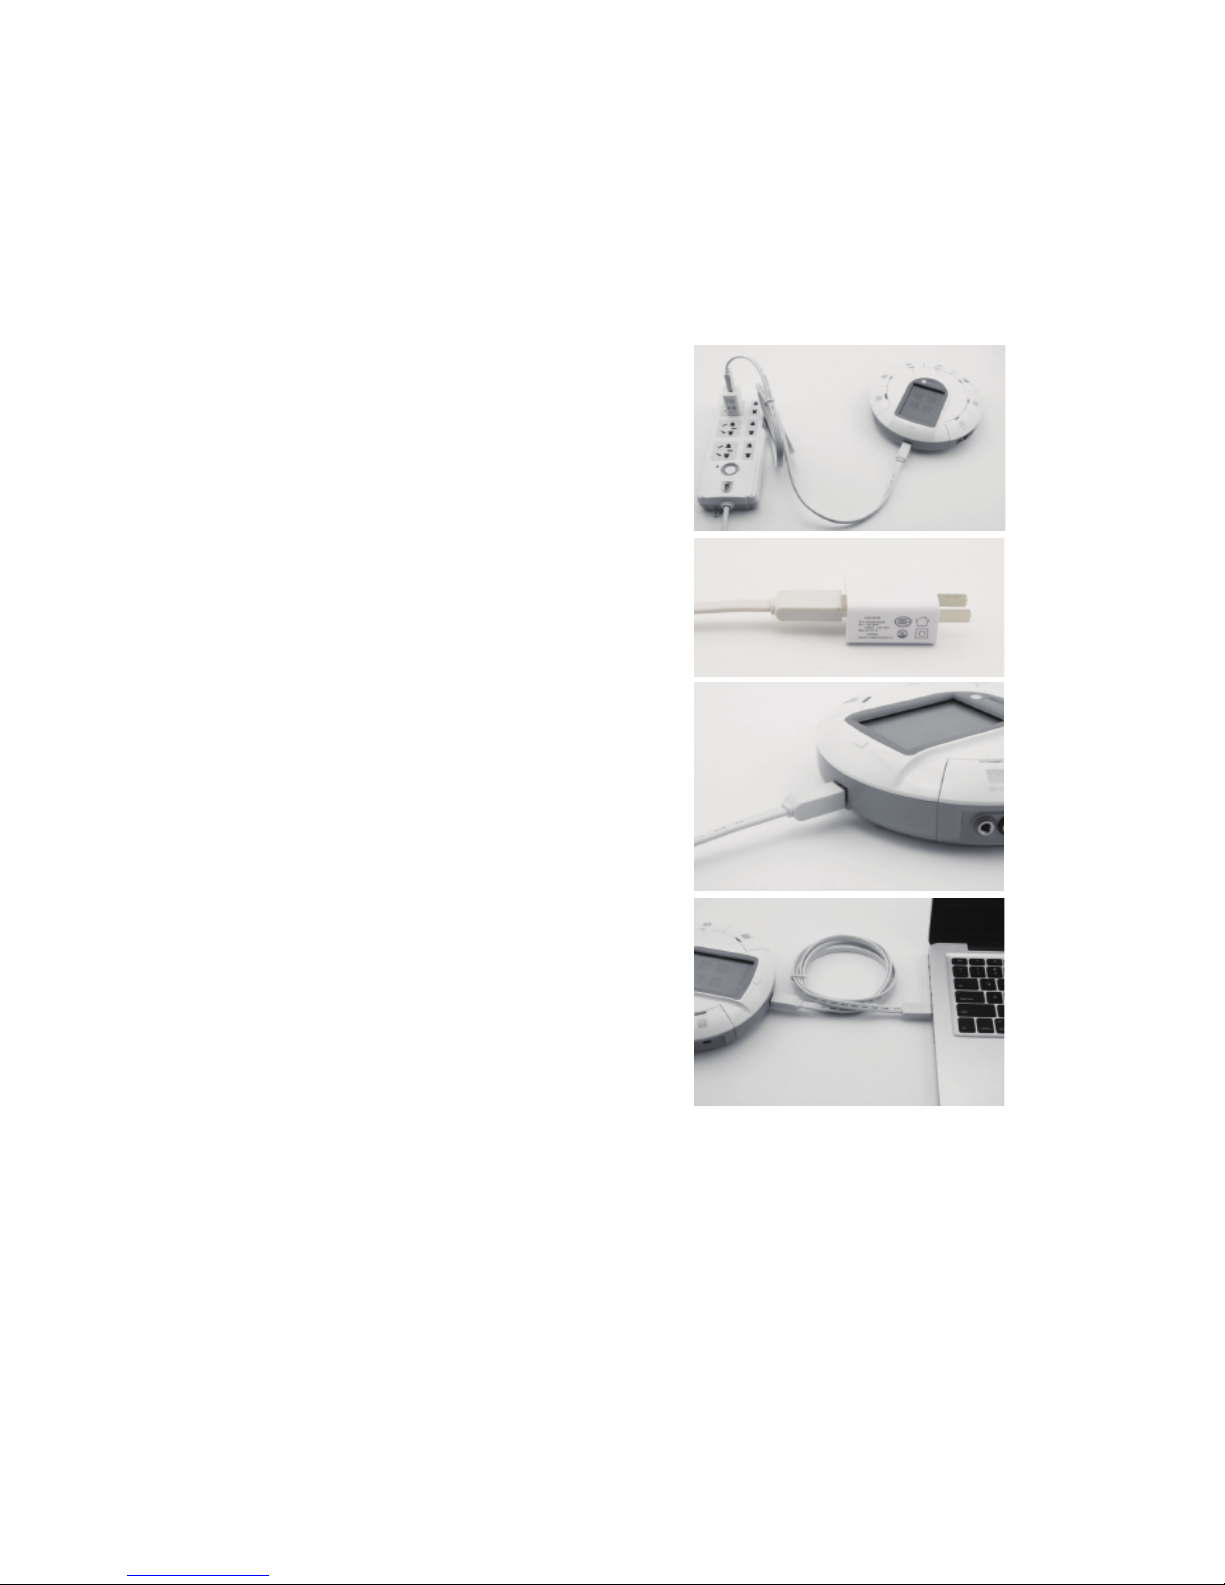
Stand-alone Mode
Before the first usage, please make
ensure the power is enough! In the
case of power shortage and power
unknown, please charging or connect
to power supply. When in charging,
1st, connect the USB cable to the
power adapter; 2nd, connect the USB
cable to the USB port of main body;
3rd, connect the power adapter to
power source.Or, connect the USB
cable to computer.
Power on: long press the power button
until the screen lit, and determines the
indicator light of sensor were lit (the
state of sensor communication can be
controlled via the built-in software:
when connecting to a sensor, the
indicator light is bright; Otherwise off).
Power off: long press the power button
until the screen turned off, and the
indicator light off.
6
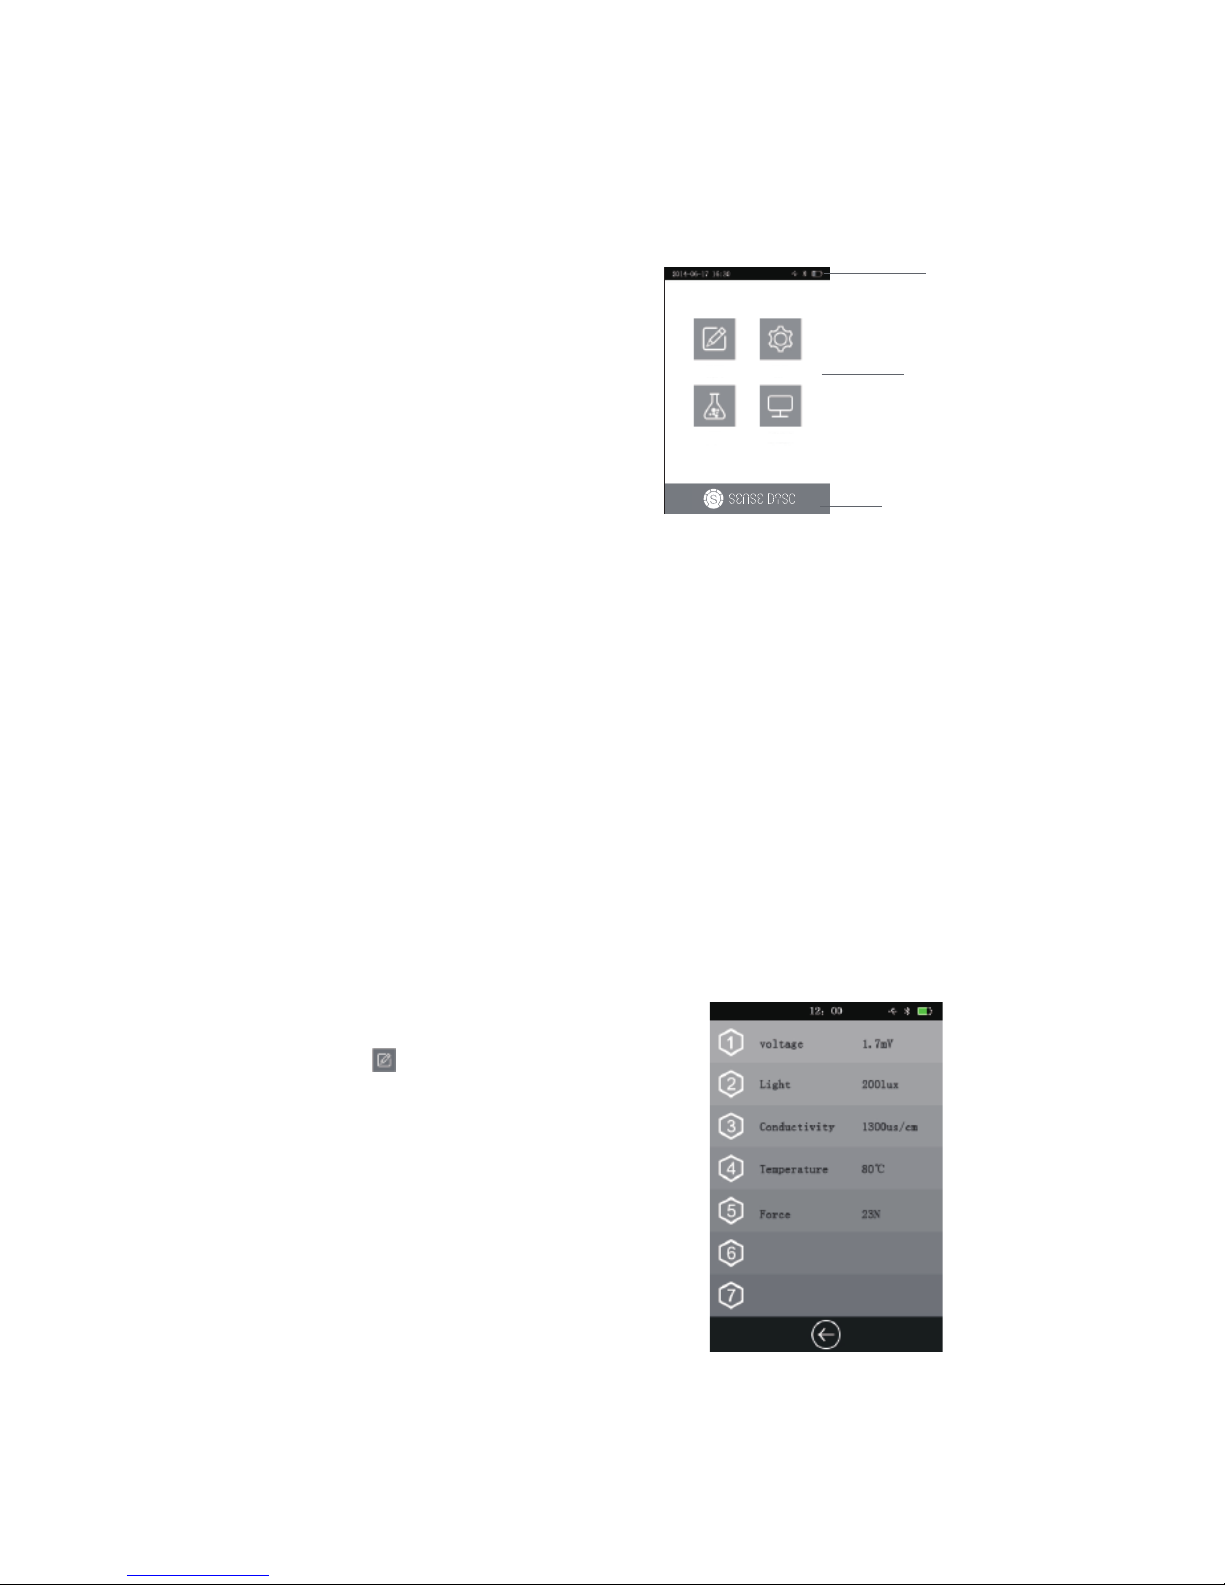
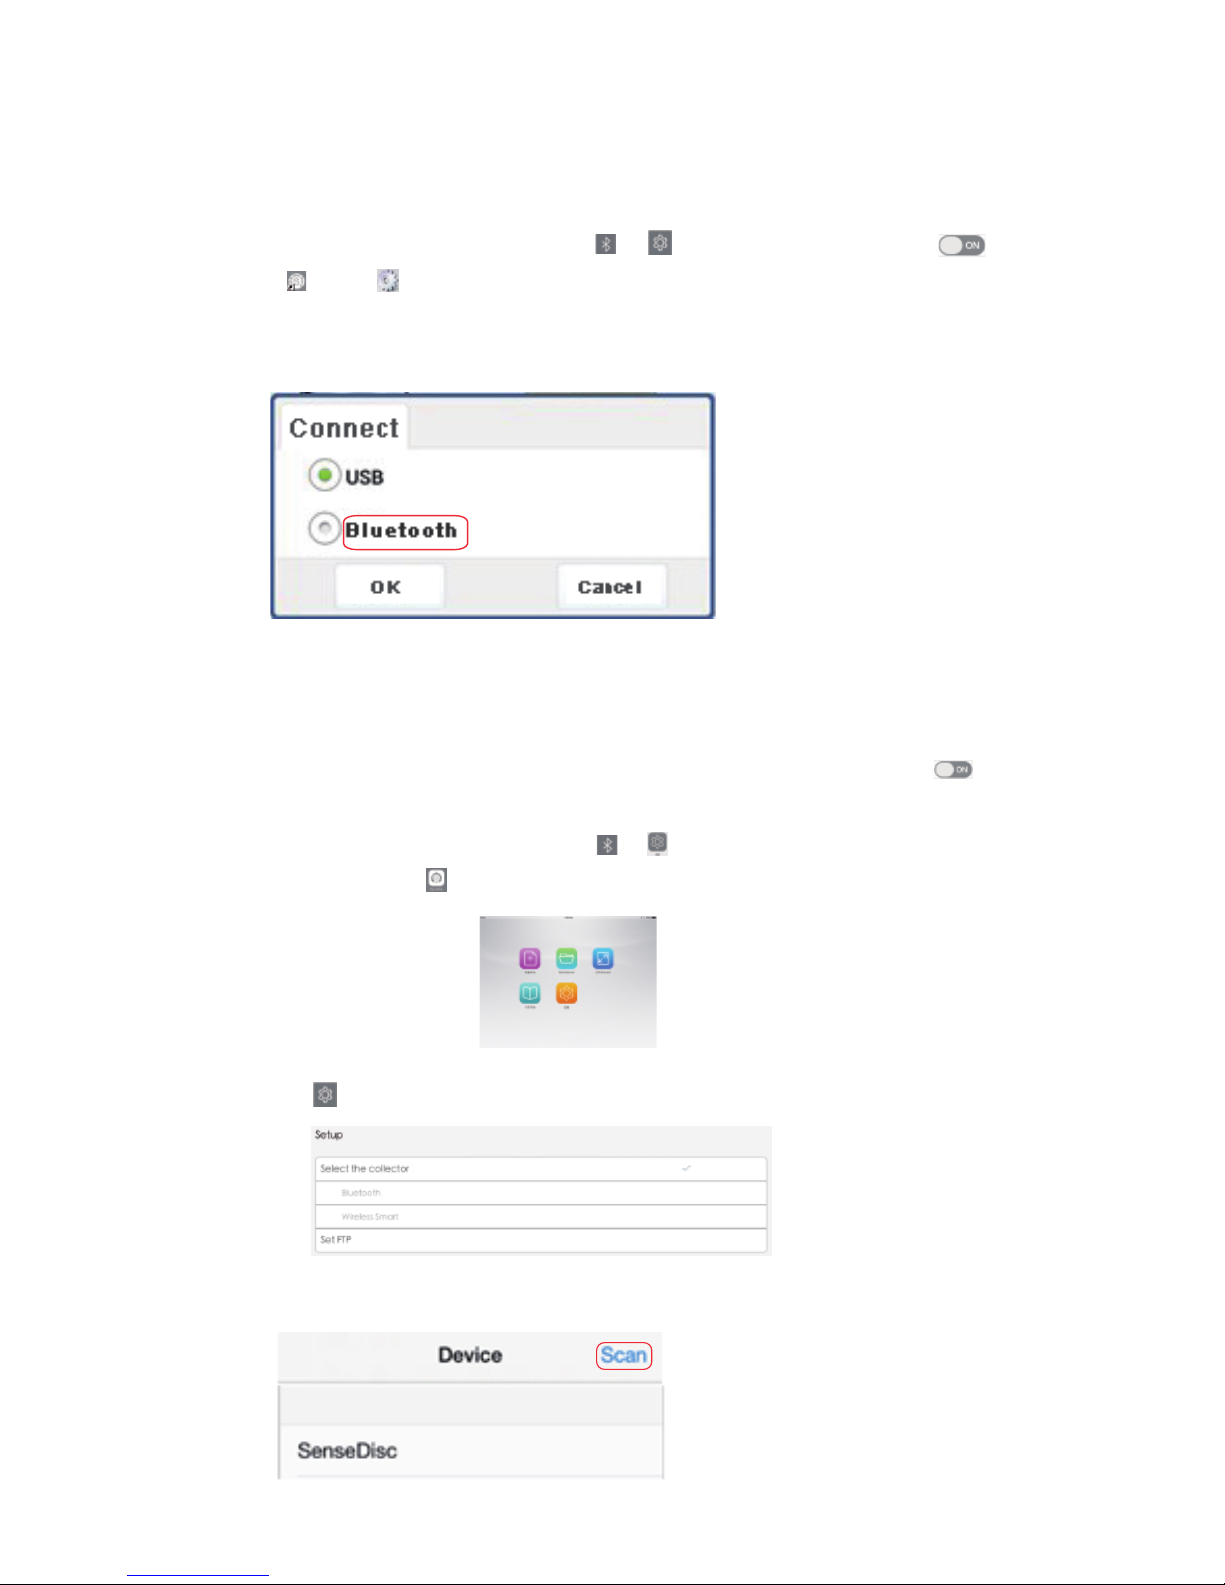
Interface of Built-in Software
status bar
main function area
function button bar
Function
Collect
After starting up the SenseDisc,
enter into the Home page, you
can find the status bar, major
functional areas and function
button.
Status bar: display the date&time,
battery, USB, Bluetooth, charging
state, sign of experimental
acquisition and etc.
Major functional areas: contains
collect, setting, experiment and
system info.
Function button: the Home page
will display our logo; other pages
will show the Return button.
click this icon ,SenseDisc will
identify the connected sensor
automatically, and real-time display
the acquired data of sensor.
The opened interface will show the
information of connected sensor
modules, such as name, real-time
value and etc. For instance:
7
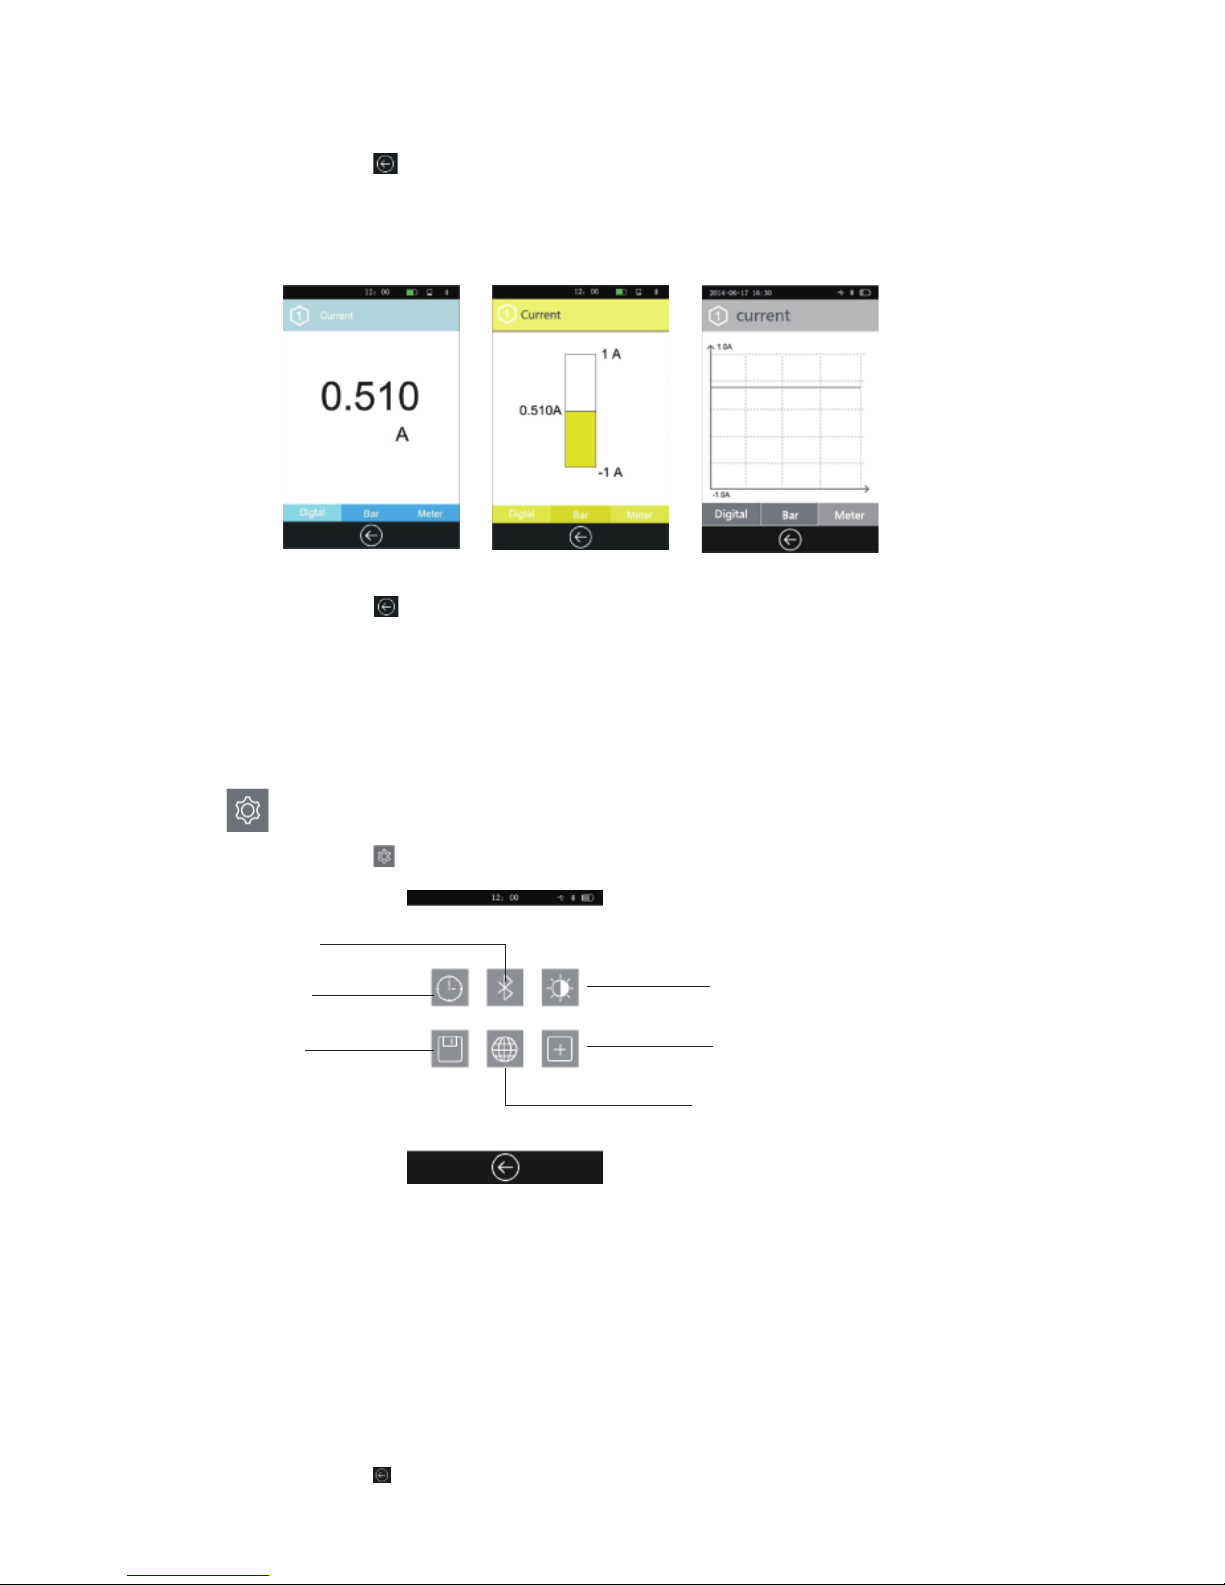
Setting
Click this icon or the Power button, will back to the Home page;
Click on any one of the sensor channel, can show the detail information of
the corresponding sensor and in three types: digital, bar, meter (e.g.
current sensor):
Click this icon or the Power button, will back to the previous interface.
Datetime: can set the date & time;
Bluetooth: turn on or off the Bluetooth communication, mainly used to
connect with external device;
Bright: set the brightness;
Storage: save the experimental data and import it to external device for
detailed analysis;
Language: switch language;
Calibration: calibrate the accuracy of screen;
Click this icon to enter into the setting interface:
Datetime
Storage
Bluetooth
Language
Bright
Calibration
8
: Setting of SenseDisc:
Click this icon or the Power button, will back to the Home page.
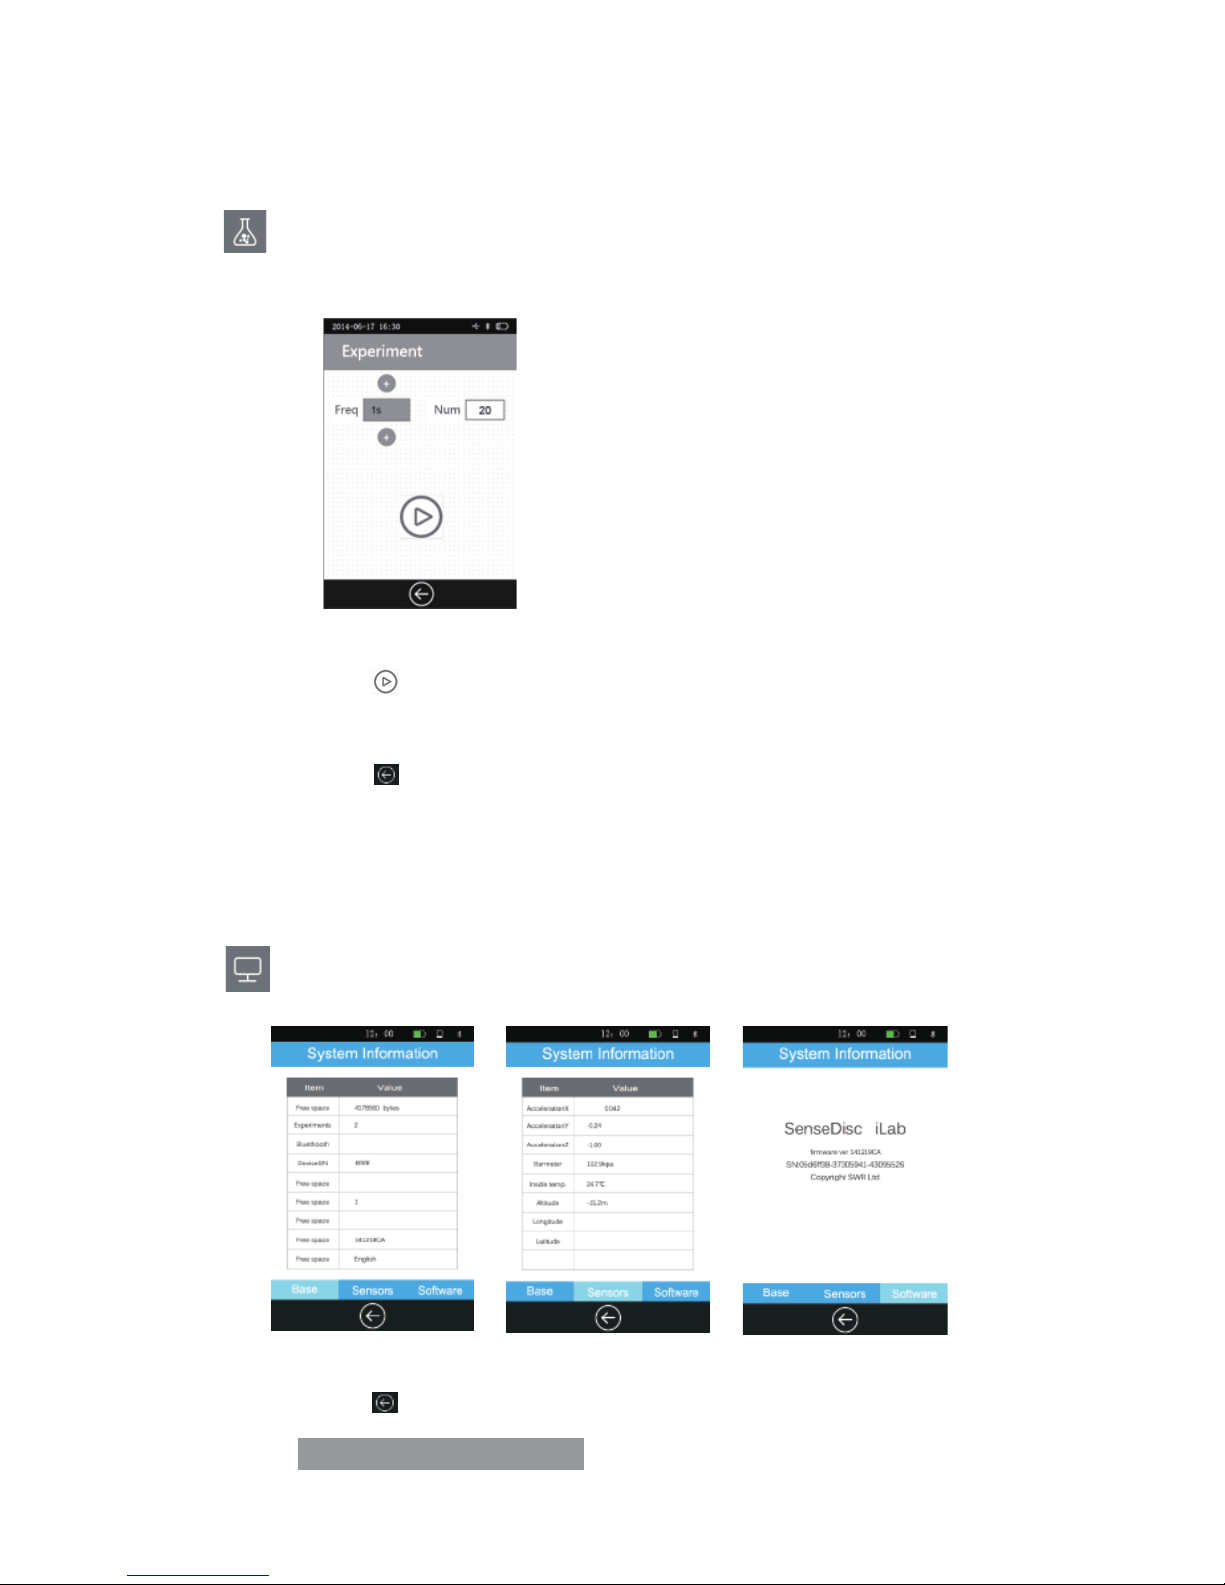
:Setting the experimental time and data acquisition frequency. The
default frequency is 1/s and with 20 samples.
: Contains basic infor., sensors info. and software info. of SenseDisc.
Click this icon or the Power button, will back to the Home page.
Experiment
System Information
Click this icon , system will start data acquisition; after completing the
acquisition, experimental data will be saved automatically.
Click this icon or the Power button, will back to the Home page.
9

6
Usage of Combination with
Other Systems
SenseDisc not only support the stand-alone mode, also support wired
and wireless connection mode. Multiple operating platforms like Windows,
Mac OSX, Android, iOS, can realize the real-time data acquisition via
combined with PC, laptop and ipad.
There is a briefly introduction as follows, and the detailed instructions
please refer to SenseDisc iLab software manual.
Connection Modes
Wired √
√
√
√
√
√
X
√Wireless
Connection mode Windows Mac OSX Android iOS
10
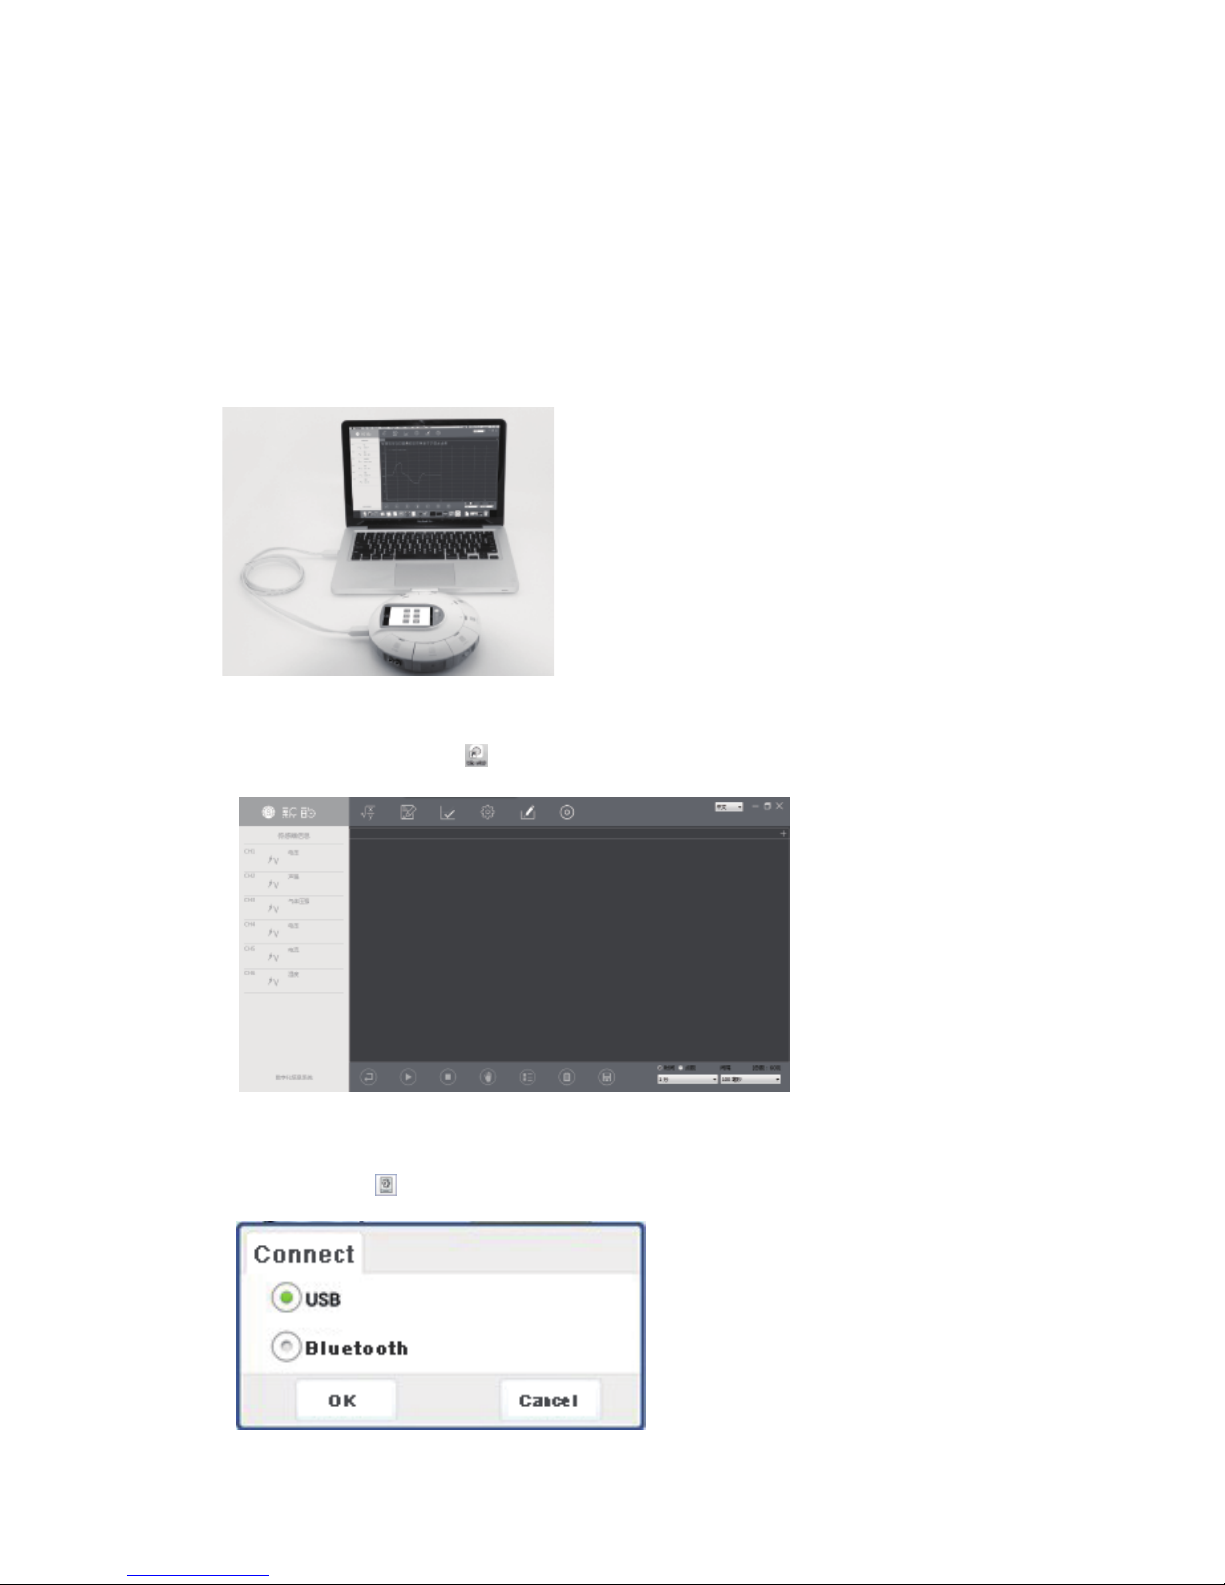
Connect SenseDisc to computer by USB cable:
Click the software icon , enter into the main interface:
Usage of Windows&Mac OSX System
Click this icon , choose “USB”, click“OK”:
Wired Connection
11

For example, click this , choose“current”, click “OK”, set the
“Current-Time” coordinate system, then click this icon to start data
acquisition:
Wireless Connection
Please make sure the power is sufficient before use!
Starting up the SenseDisc, choose in , slide to open Bluetooth ;
Click the software icon , click in the Home page, choose “Bluetooth”
then click “OK”; other steps are same with the wired connection:
12
Connect the SenseDisc to the Pad datalogger(Android) by USB cable, as
follows:
Click the software icon , enter into the Home page:
Usage of Android Platform
Wired Connection
Click , choose “Bluetooth” , then click “OK”:
13

Click , (for example: current), choose“current”, click“OK”, create
the “Current-Time” coordinate system:
Click , enter the experimental page:
Click , start data acquisition:
14
Choose template , enter experimental platform:
Usage of iOS Platform
Wireless Connection
Before use, make ensure the power is enough!
Starting up the SenseDisc, choose in , slide to open Bluetooth ;
Click , click , choose “Bluetooth”, then click “OK”; other steps
are same with wired connection:
Before use, make ensure the power is enough!
Starting up the SenseDisc, choose in , slide to open Bluetooth ;
Open the software in iPad, enter into the experimental page:
Choose , choose “Bluetooth”in “Setup”:
Click “Bluetooth”, enter the device scan page:
15
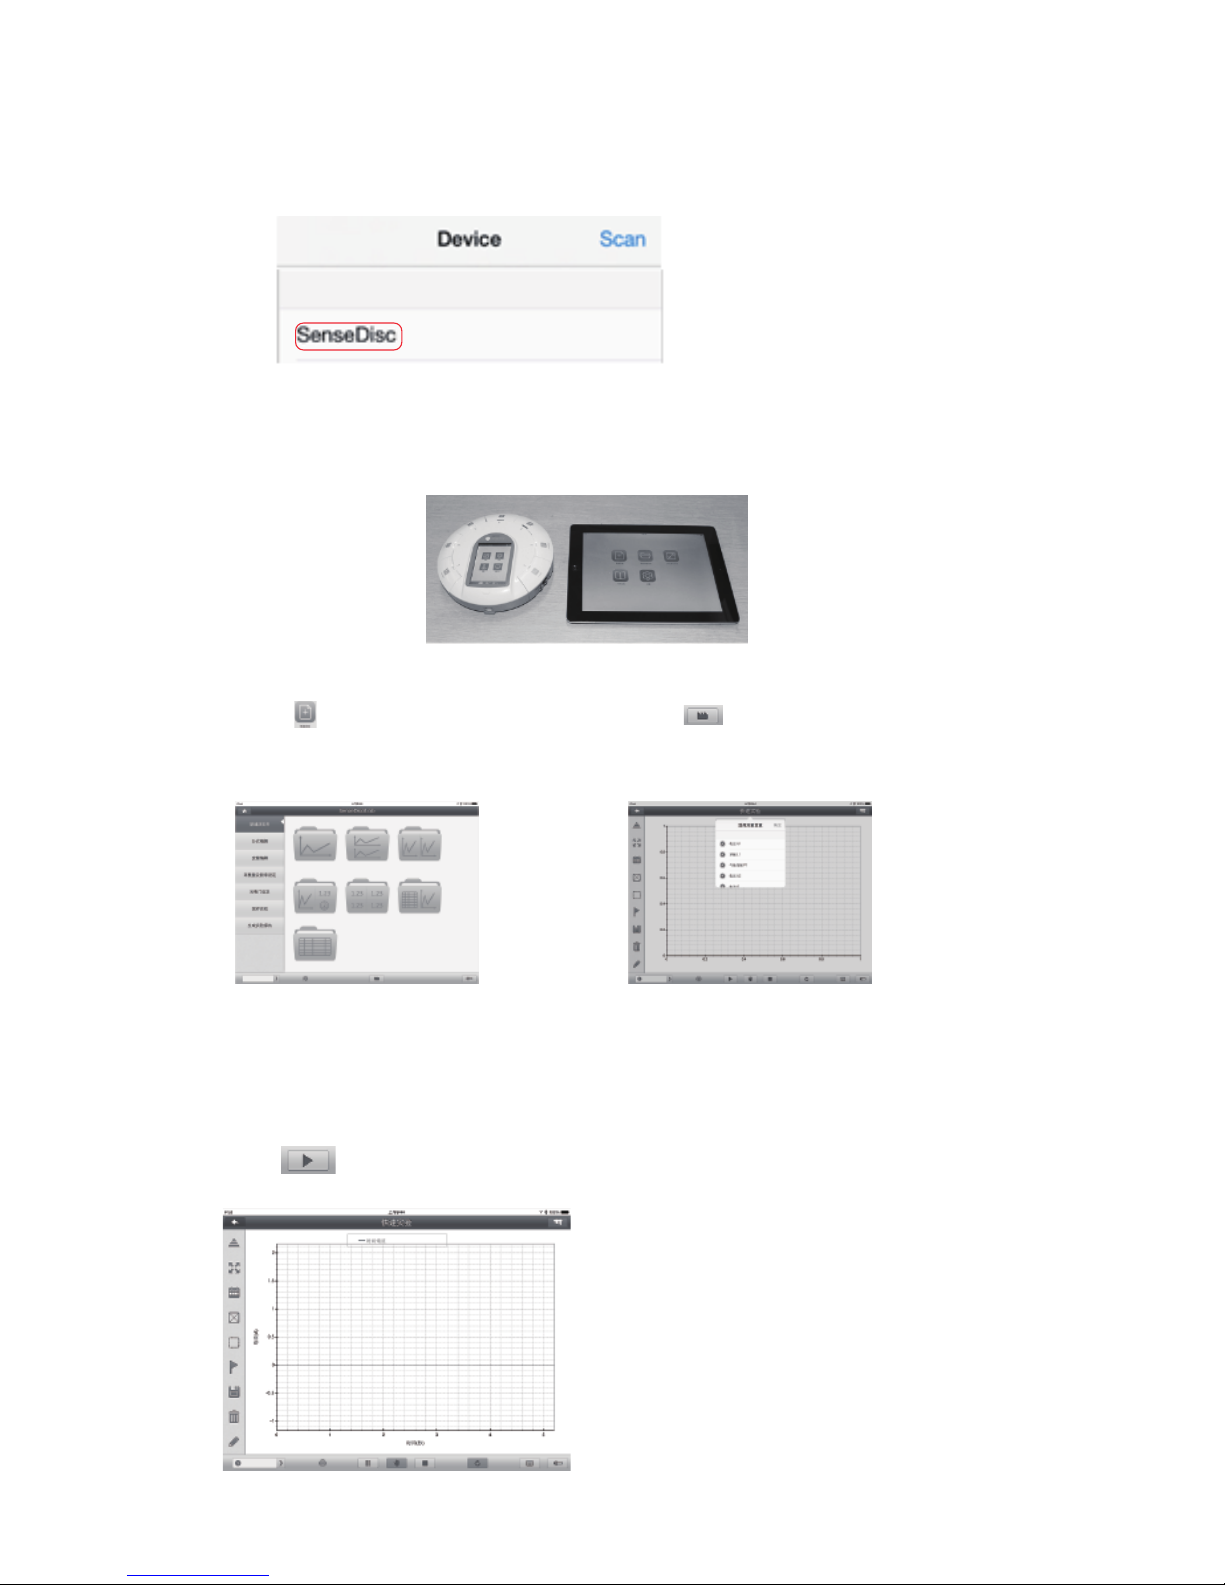
Click“scan”, then click “scan Bluetooth”:
Choose “SenseDisc”, this connection will be created successfully after
prompted “Successful”;
Open , enter into the
experimental page:
Click , enter into the
experimental platform:
For example: current, choose“current”, click“OK”, to create the
“Current-Time” coordinate system,
click to start data acquisition:
16

7
Notes
Clean
Applicable environ ment
Storage
Attentions
Reset
If there have stains on the surface, please clean with wet towel or cloth
to wipe the device;
Do not be immersed in water or wash with detergent.
Storage in dry and shade environment with room temperature;
When storage, make ensure the power is enough.
It is strictly prohibited in the long time exposure under the sun;
It is strictly prohibited to immersion in water and any other liquid;
Do not close to the heat source;
Do not store it in too hot or too cold or moist environment;
Field operation to avoid the following weather conditions: rainy, snow,
hail, heavy fog, strong wind, lightning and etc.
The SenseDisc is apply to -10~70 ℃ and 0~95%RH ( Noncondensation ).
The SenseDisc is equipped with
a reset hole on its reverse side,
insert a fine needle, the system
will immediately reboot.
17

8
Common problems and
their solutions
please make sure the SenseDisc is in charging firstly; then long press
the power button, or press the reset hole to reboot.
check that whether the driver is installed properly, if can not installed
automatically, try to manually install: search the install position of the
software, open the corresponding folder, find the folder which named
"Drive" , open it, find “Setup.exe”, open it, click "install";
When wireless connection, please check the Bluetooth setting of
SenseDisc and external device are turned on.
Can not work
Can not connect with external devices:
18

9
Configure Table of
Sensor Modules
No./Series
Biochem
SD0040
Environ
SD0050
S0001 Voltage
S0005 Current
S0009 Temperature
S0019 Light
S0021 Sound Level
S1024 Heart Rate
S0015 Motion
S0024 Heart Rate
S1002 pH
S1008 Humidity
S0002 mV
S1003 Conductivity
S1005 Dissolved O
S0013 Thermocoup
S0014 Force
S0016 Photogate
S1040 UV
Basic
SD0010
Advance
SD0020
Physics
SD0030
19
2
Sensor Manual
for Basic
Voltage sensor
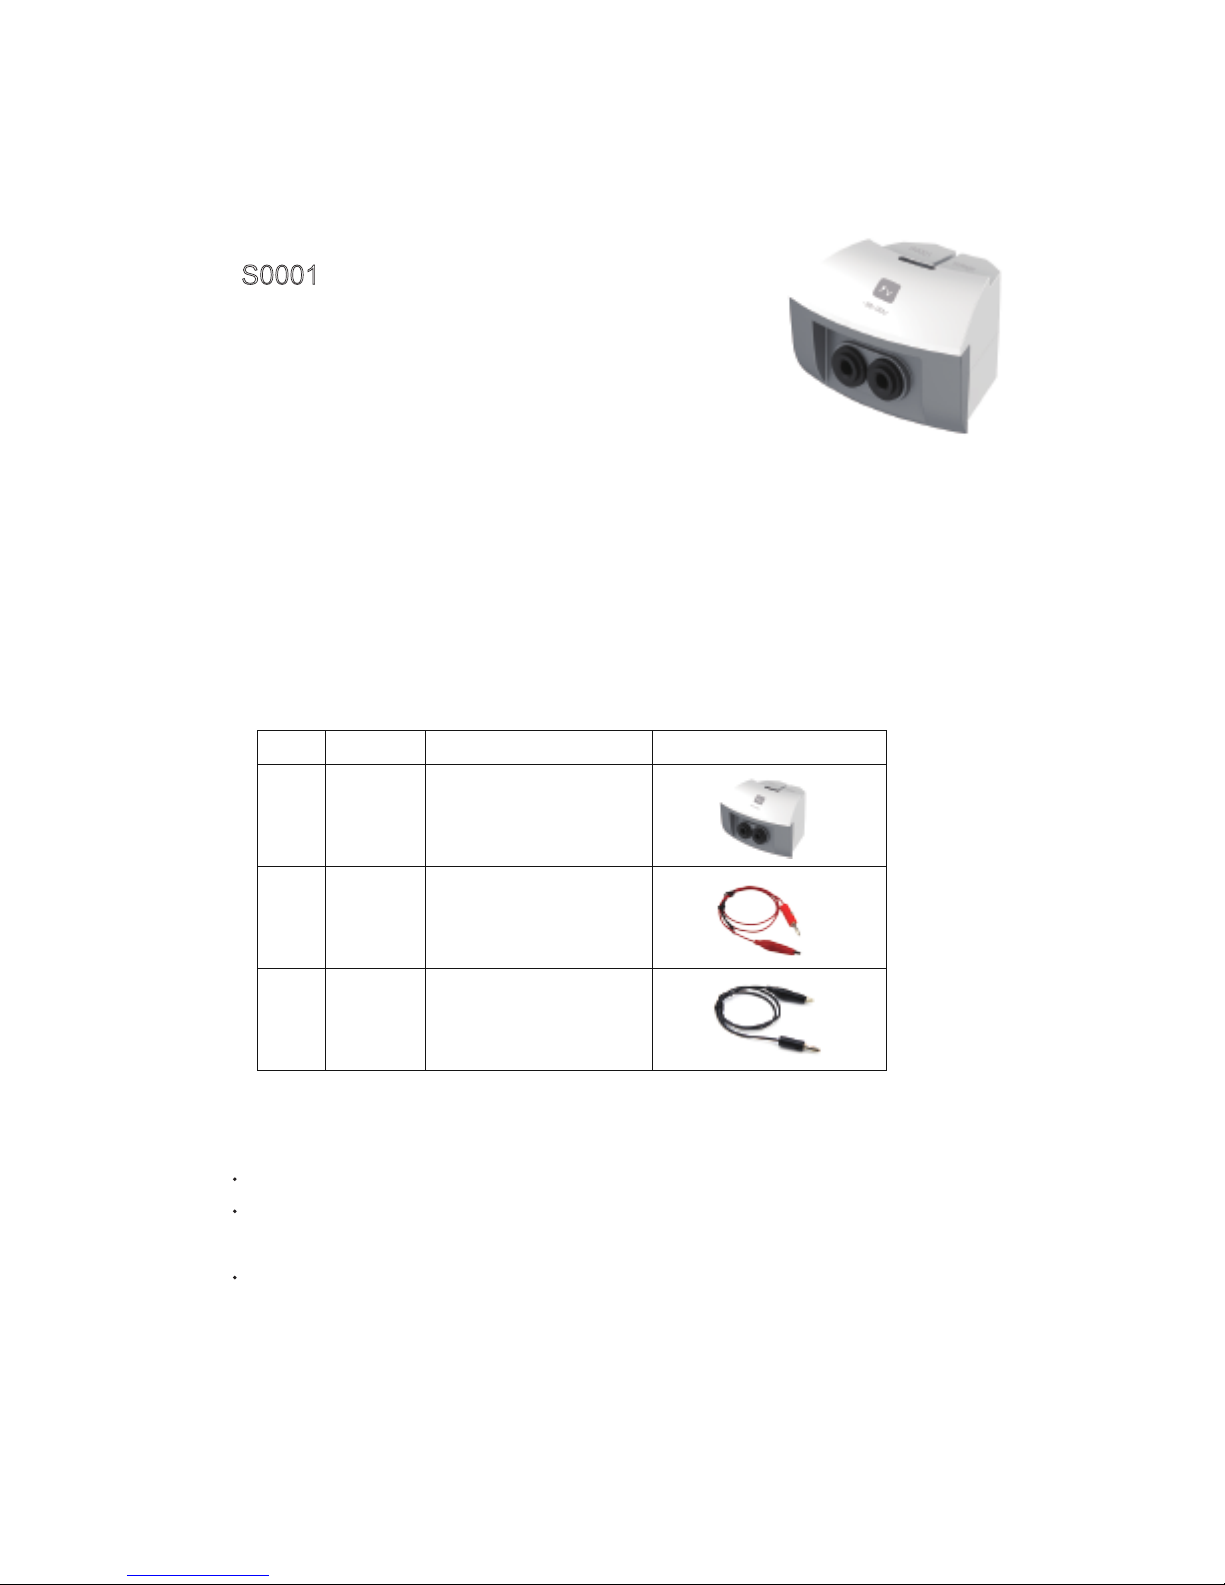
S0001
Range: -30~30V
Accuracy: ±1%
Resolution: 0.02V
Input impedence: 2MΩ
Voltage sensor is used to measure the electric potential difference at
both ends of the electrical equipments or circuits, after the circuit of
voltage sensor transfering the voltage it collects, then it can realize the
measurement. The voltage sensor can be used in the DC circuit and
low-voltage AC circuit.
Component
Usage
No. Type Name Illustration
1
2
3
S0001
Voltage sensor
Red crocodile clip
Black crocodile clip
Connect the voltage sensor into any port of the SensorDisc
Wires of red-black crocodile clip should be inserted into the positive and negative
port of voltage sensor
Red-black crocodile clips of voltage sensor are parallel connected to both ends of
circuit or electrical equipment

Calibration
Typical experiment
Notice:
Case: Measure the EMF of dry battery
Calibrate the voltage sensor before use
Short connected the red-black crocodile clips of voltage sensor
Open ,click ,choose“voltage sensor”,
click“Calibration”,then click“OK”.
Measure the voltage at both ends of small bulb
Build a simple circuit
Measure the electromotive force of dry battery
Voltage sensor should be parallel into the circuit when in usage
Calibration before using voltage sensor
Voltage sensor can not bear the voltage over 250V
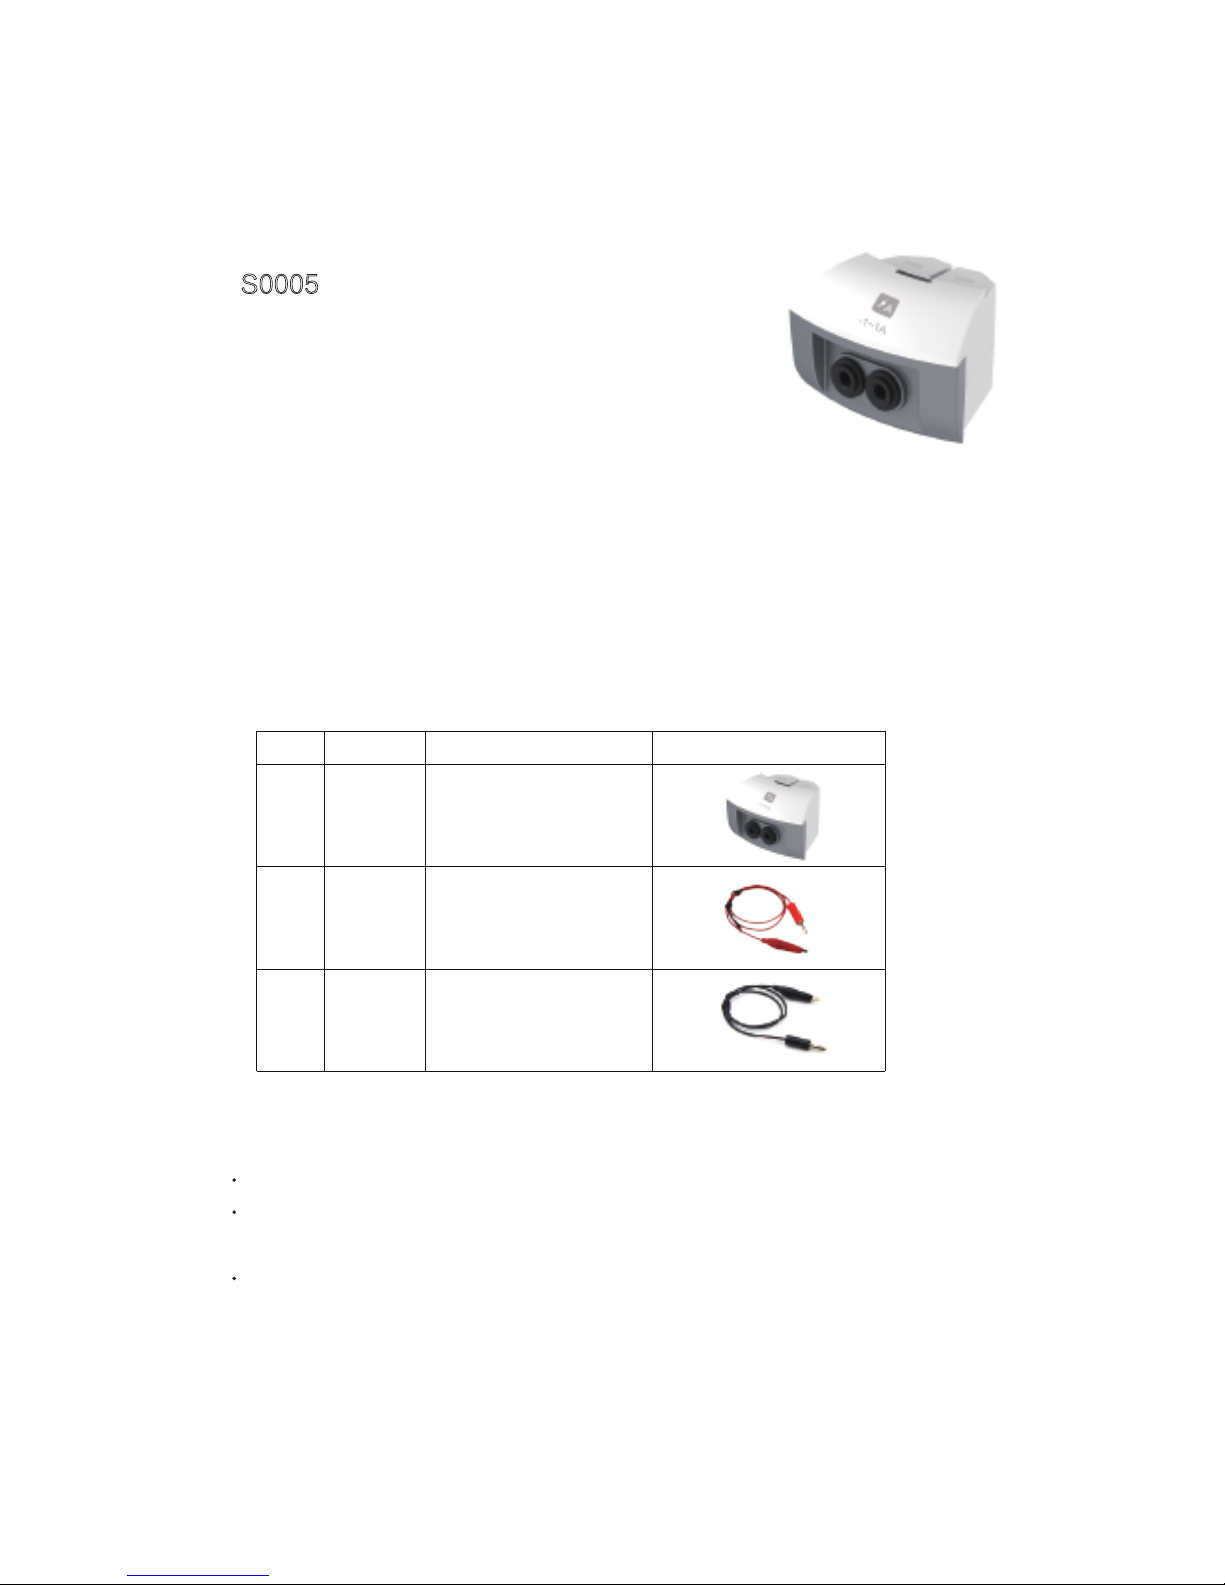
Current sensor
S0005
Range: -1~1A
Accuracy: ±1%
Resolution: 0.001A
Internal resistance: 0.22Ω
Current sensor is used to measure the current in circuit. When current
is passing the sampling resistance, it will form a tiny electric
potential difference at both ends of the resistance; After enlarging the
circuit, it can accurately measure the current in DC circuit or low-voltage AC.
Component
Usage
No. Type Name Illustration
1
2
3
S0005
Current sensor
Red crocodile clip
Black crocodile clip
Connect the current sensor into any port of the SensorDisc
Wires of red-black crocodile clip should be inserted into the positive and negative
port of current sensor
Red-black crocodile clips of current sensor are series connected to both ends of
circuit or electrical equipment

Calibration
Typical experiment
Notice:
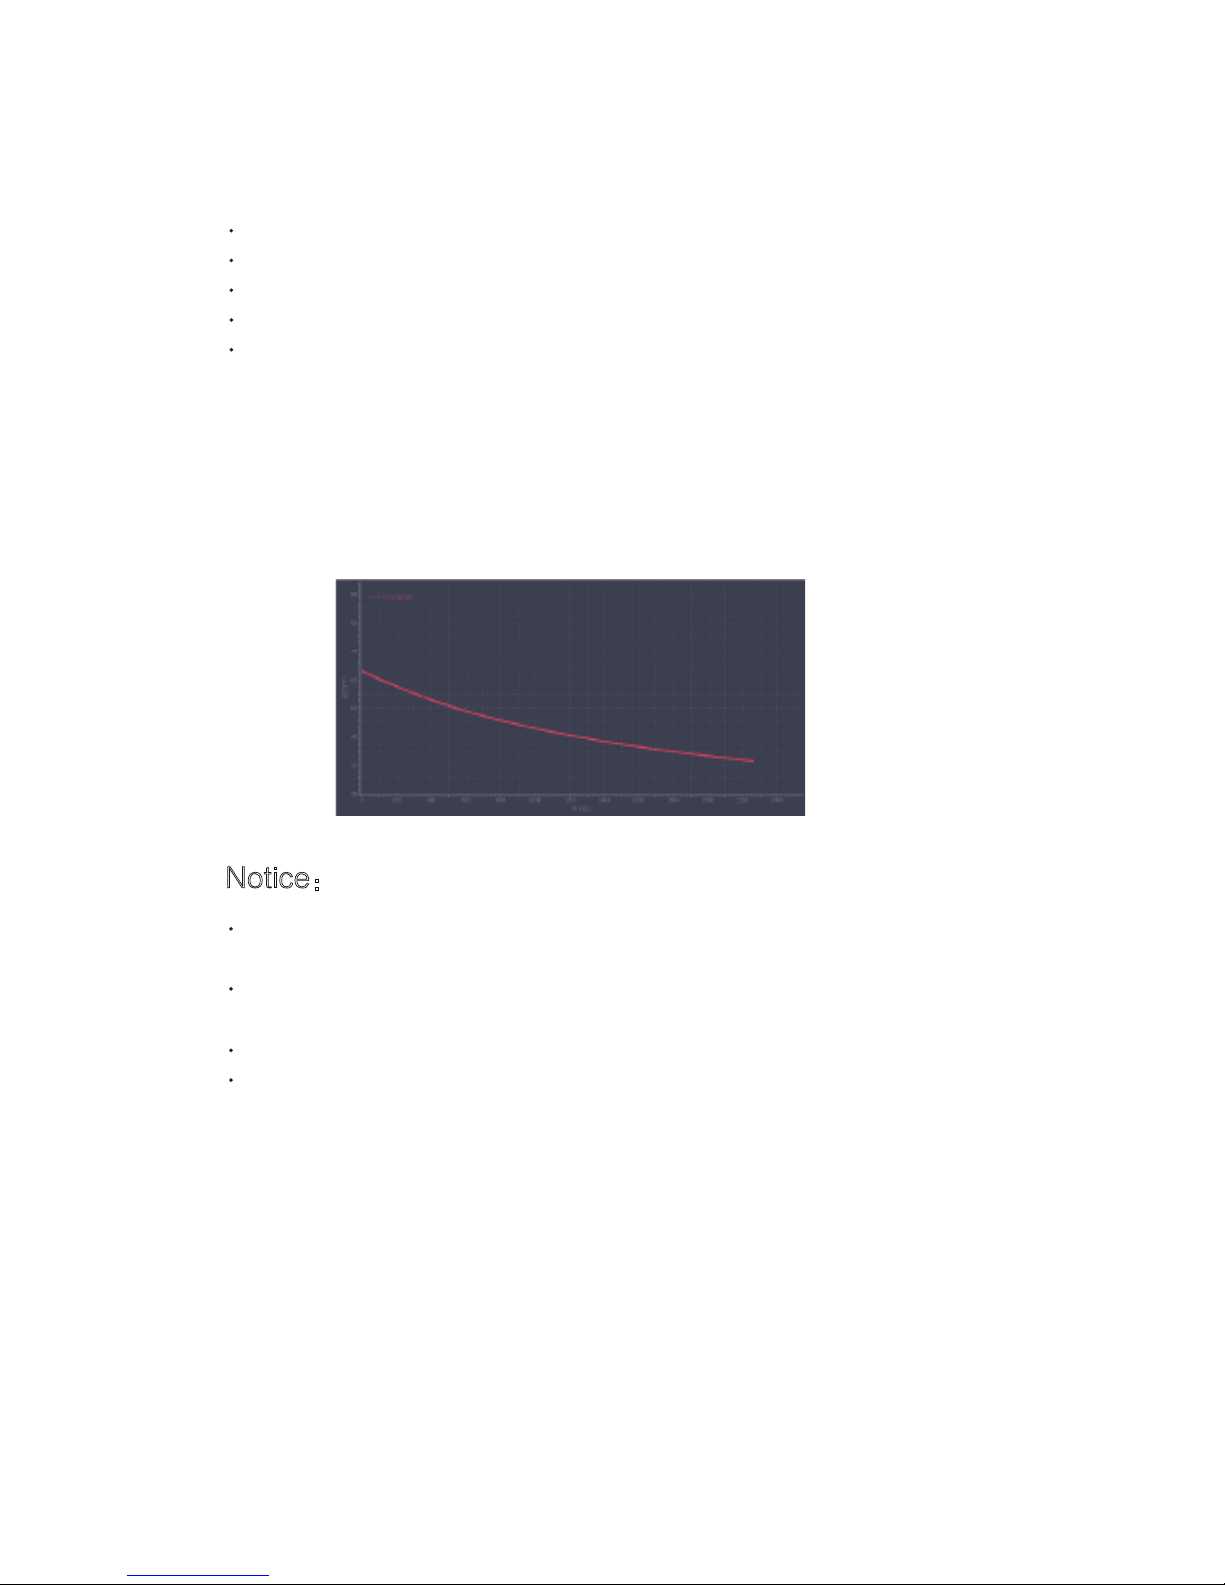
Case: measure the VA characteristic
curve of small bulb
Calibrate the current sensor before use
Short connected the red-black crocodile clips of current sensor
Open ,click ,choose “current sensor”,
click“Calibration”,then click“OK”.
Serial-parallel circuit of resistance
Measure the VA characteristic curve of small bulb
Measure the electrodynamic potential and internal resistance of battery
Ohm's Law
Serial into the circuit when using current sensor
Calibration before using current sensor
Current sensor can not bear the current over 3A
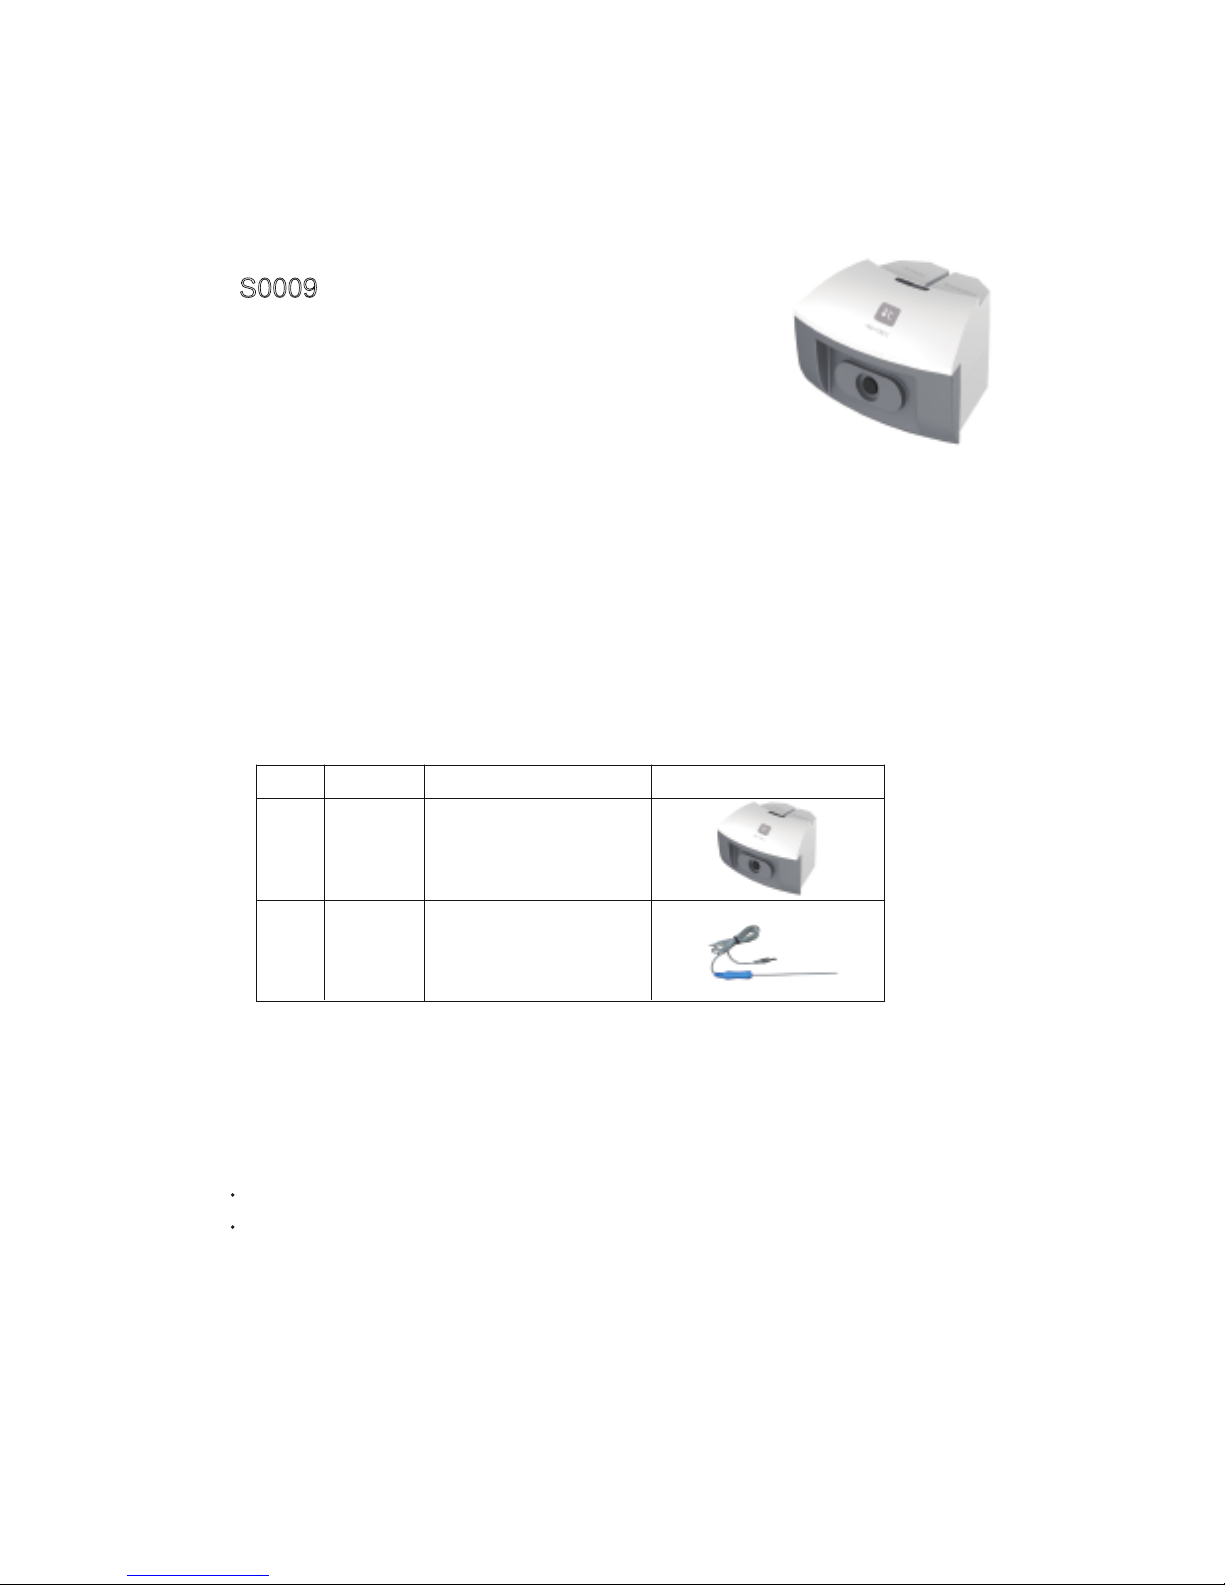
Temperature sensor
S0009
Range: -40~135℃
Accuracy: ±0.6℃
Resolution: 0.1℃
Temperature sensor adopts the NTC electronic temperature sensing
element, when the ambient temperature changes, the NTC resistance
changes accordingly. Normally the temperature needs no zero calibration and with relatively higher stability; therefore, the temperature
sensor is rather popular in the low-middle temperature measurements.
Component
Usage
No. Type Name Illustration
1
2
S0009
Temperature
sensor
Probe
Connect the temperature sensor into any port of the SensorDisc
The probe of sensor insert to the socket of temperature sensor
Typical experiment
Notice:
Case: water cooling
Measuring the temperature of the hot and cold water
Water Cooling
Explore the direction of heat transfer
Explore the endothermic effects of different colors of objects
Converging lens effect
We can't put any part of the sensor on the open flame or heating plate
directly
When measure the temperature of liquid, should avoid the other partially
of sensor immersed in liquid except stainless steel rod
After use, cleaning sensor thoroughly
Don’t over measured range
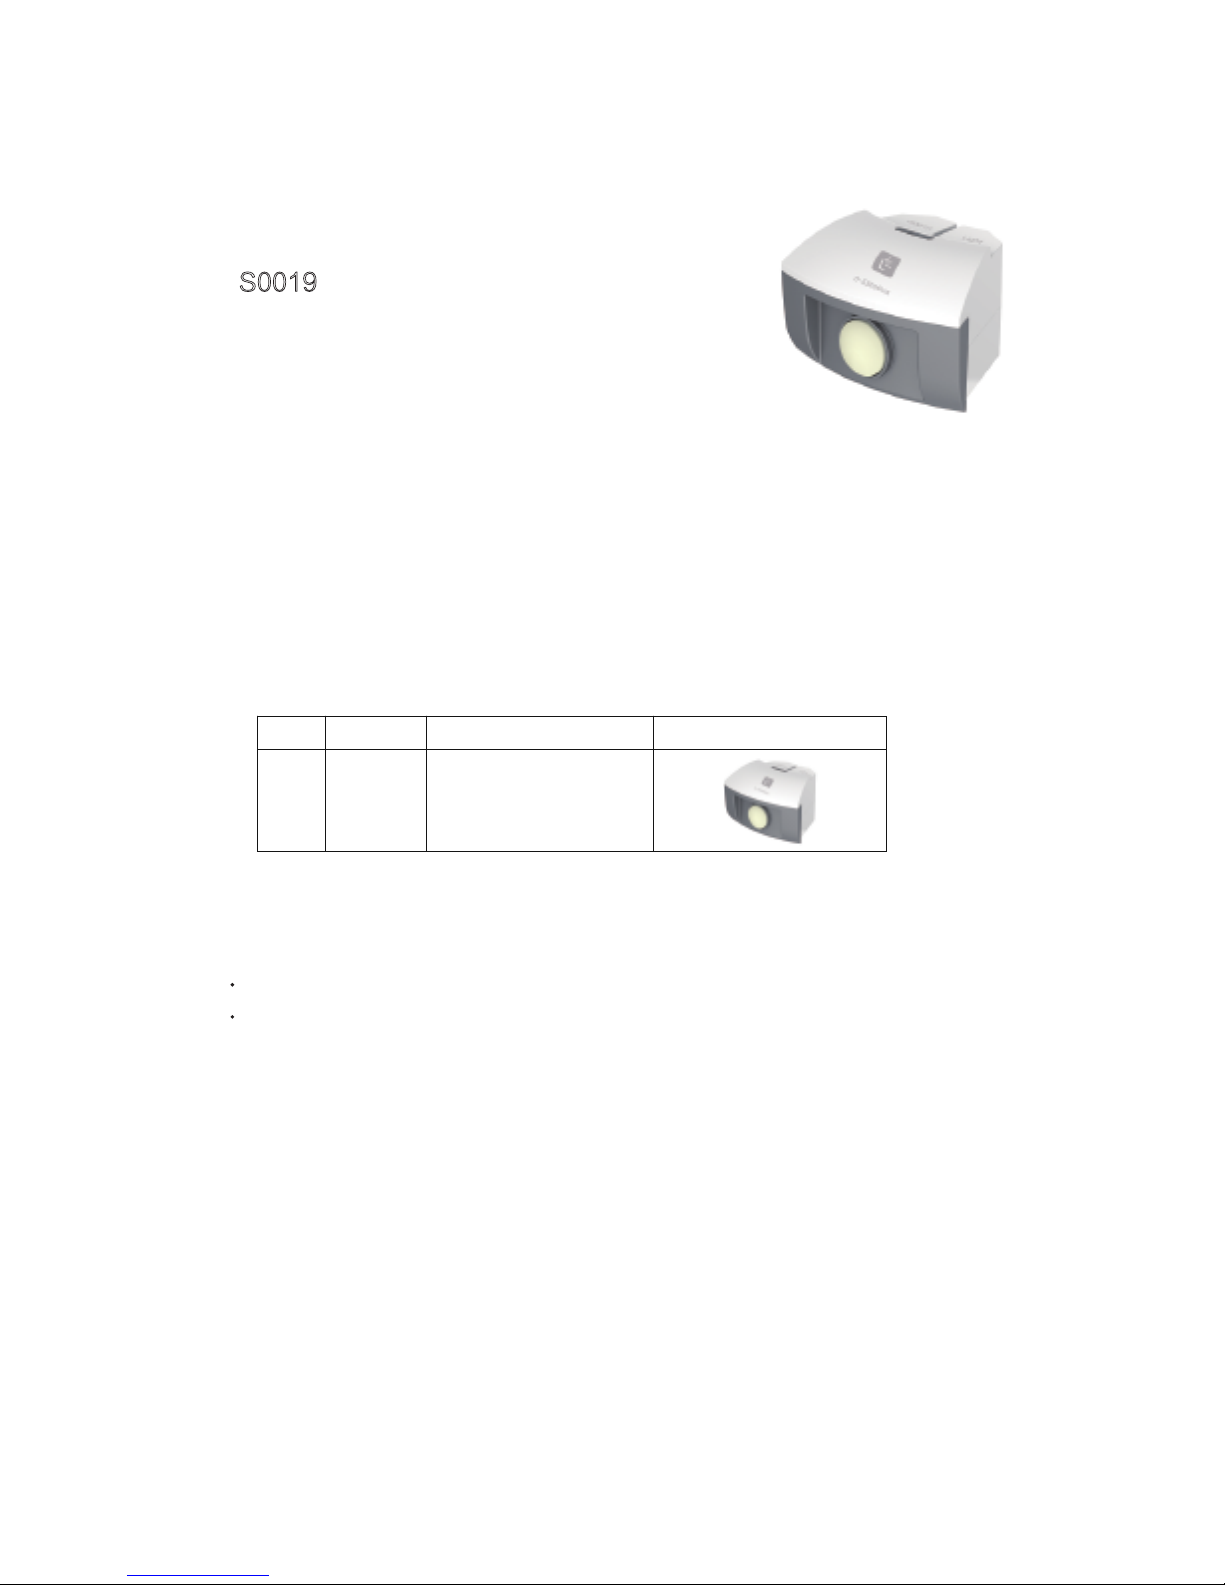
Light sensor
S0019
Range: 0~55000Lux
Accuracy: ±5%
Resolution: 15Lux
Light sensor uses the silicon photoelectric cell as the sensing element;
it can convert the light ntensity into a voltage signal, keeping a direct
proportion. For the sensor, the effective light spectrum is in the range of
380nm to 730nm, it is an ideal intensity sensor for visible light.
Component
Usage
Connect the light sensor into any port of the SensorDisc
The probe of light sensor is located at the front of sensor, when use, pointed the
photosurface at light
No. Type Name Illustration
1
S0019
Light sensor

Typical experiment
Notice:
Case: Measure the light intensity of environment
Explore the effects of light intensity on photosynthesis
Explore the relation between light intensity and distance
Measure the light intensity of environment
When use, always maintain the probe of sensor that facing light source
Don't wear or scratch the receives of probe
 Loading...