


MO’ BASS
OWNER’S MANUAL
SWR • SCOTTSDALE, AZ • USA

Important Safety Instructions ........................................................
Introduction ...................................................................................
Mo’ Bass Features ........................................................................
Mo’ Bass Specifications ................................................................
Getting Started ..............................................................................
Front Panel Features ....................................................................
Rear Panel Features .....................................................................
Internal Features ...........................................................................
Rack Mounting Instructions ..........................................................
Frequently Asked Questions ..........................................................
Signal Path Diagram ....................................................................
Warranty Information ....................................................................
Mode Diagrams ............................................................................
Suggested Settings
SWR MO’BASS
OWNER’S MANUAL
TABLE OF CONTENTS
A
B
C
D
1
2
13
20
20
F1- F2
F2
F3
MD1-MD6
SWR
8860 E. Chaparral Rd. Suite 100, Scottsdale, AZ 85250-2618 USA
PHONE: (480) 596-9690 • FAX: (480) 367-5262
EMAIL: swrcustserve@fenderusa.com
WEB: swrsound.com
© 2001 SWR
Part #320029 • Rev. B • 05/01

IMPORTANT SAFETY INSTRUCTIONS
• CAUTION:TO REDUCE RISK OF ELECTRIC SHOCK, DO NOT REMOVE THE COVER OR BACK.
NO USER-SERVICEABLE PARTS INSIDE. PLEASE REFER TO A QUALIFIED SERVICE TECHNICIAN.
A. Read Instructions: All safety and operation instructions should be read before the product is operated.
B. Retain Instructions: The safety and operating instructions should be retained for future reference.
C. Heed Warnings: All of the warnings on this product and in the operating instructions should be adhered to.
D. Follow Instructions: All operating and use instructions should be followed.
E. Cleaning: Unplug this product from the wall outlet before cleaning. Do not use liquid cleaners or aerosol cleaners. Use a slightly
damp cloth for cleaning.
F. Water and Moisture: Do not use this product near water; for example, near a swimming pool, wet basement, and the like.
G. Accessories: Do not place this product on an unstable cart, stand, tripod, bracket or table. The product may fall, causing serious
injury to a child or adult, and serious damage to the product.
H.Ventilation: Slots and openings in the unit are provided for ventilation and to ensure reliable operation of the product, to protect it from
overheating, thus these openings must not be blocked or covered. This product should not be placed in a built-in installation such as a
bookcase or rack unless proper ventilation is provided or the manufacturer's instructions have been adhered to.
I. Grounding: This product is equipped with a three-wire grounding-type plug, a plug having a third (grounding) pin. This plug will only fit
into a grounding-type power outlet. This is a safety feature. If you are unable to insert the plug into the outlet, contact your electrician to
replace your obsolete outlet. Do not defeat the safety purpose of the grounding-type plug.
J. Power Cord Protection: Power supply cords should be routed so that they are not likely to be walked on or pinched by items placed
upon them, paying particular attention to cords at plugs and the point where they exit the product.
K. Lightning: For added protection of this product during a lightning storm or when it is left unattended and unused for long periods of
time, unplug it from the wall outlet. This will prevent damage to the product due to lightning and power-line surges.
L. Overloading: Do not overload wall outlets or extension cords as this can result in a risk of fire or electric shock.
M. Object and Liquid Entry: Never push objects of any kind into this product through the openings as they may touch dangerous voltage
points or short out par ts that could result in a fire or electric shock. Never spill liquid of any kind on the product.
N. Servicing: Do not attempt to service this product yourself as opening or removing covers may expose you to dangerous voltage or
other hazards. Refer all servicing to qualified service personnel.
O. Damage Requiring Service: Unplug this product from the wall outlet and refer servicing to qualified service personnel under the
following conditions:
1) When the power supply cord has been damaged
2) If liquid has been spilled or objects have fallen into the product
3) If the product has been exposed to rain, water, or other conductive liquids
4) If the product does not operate normally by following the operating instructions
5) If the product has been dropped or damaged in any way
6) When the product exhibits a distinct change in performance.
P. Replacement Parts: When replacement parts are required, be sure the service technician has used replacement par ts specified by the
manufacturer or have the same characteristics as the original part. Unauthorized substitutions may result in fire, electric shock, or other
hazards.
Q. Safety Check: Upon completion of any service or repairs to this product, ask the service technician to perform safety checks to
determine that the product is in proper operating condition.
R. Heat: The product should be situated away from heat sources such as radiators, heat registers, stoves or other products that produce
heat.
A

SWR MO’ BASS • INTRODUCTION
Congratulations on your purchase of the SWR Mo' Bass! You now own one of the most unique products in the history of
musical instrument amplification.
Here at SWR we share your spirit of tonal exploration and willingness to experiment in pursuit of the ultimate goal: finding
equipment that not only does the job for you as a musician, but actually enhances your overall musical experience and contributes to your creative process. The purpose of this Owner's Manual is to help guide you through the process of becoming
familiar with the many features and functions of the Mo' Bass. But before we get into turning knobs, we'd like you to know a
little bit about how the concept of the Mo' Bass came into existence.
In July of 1999, William Morris West III, an engineer/designer of custom-made audio gear for many studio musicians based
in the Nashville area, contacted SWR. He had a vision of a multi-effects unit made specifically for bass guitar, and since
SWR had a reputation in the industry as a manufacturer of top-quality bass guitar amplifiers and speaker cabinets, he saw
an opportunity for both him and the company to work together on bringing his idea to fruition. An appointment was made for
us to demo his working prototype. We wondered just how good it could be. A multi-effects unit tailored for bass?
Well, when "Mo" West showed up and did his demo, we were floored. The effects were all studio-quality ANALOG sounds.
The Tube Overdrive was not of this earth. The Octave Effect (he called it a "SubWave") tracked notes in registers so low it
seemed impossible. The EQ circuit was a thing of beauty, and the Chorus simply sang. By the time we heard the Synth
pumping out sounds straight off of Stevie Wonder's "Songs In The Key Of Life" album, we all knew that the project was a go.
We called it the "Mo' Bass." The name stuck.
But then another vision came to mind. What if we could combine the best of the Mo' Bass with the best of SWR? What if
we made the ultimate bass head - the famous SWR preamp with the patented Aural Enhancer circuitry, the Mo' Bass effects,
and a stereo power amp capable of delivering 400 watts per side? Marr ying the circuitr y of SWR's founder and designer the legendary Steve W. Rabe - with the circuitry of the Mo' Bass would not be an easy chore. But as SWR President/CEO
Daryl Jamison had been saying around the factory for months, "Go big or stay home!" We settled in for the long haul.
The development cycle of the Mo' Bass lasted an entire year. During that time we slaved over every detail possible. Each
individual effect was tweaked until it was as close to perfect as we could get it. Signal routing was a huge issue as we
worked to find the best ways to send clean and dir ty signals to the 1/4" outputs, the XLR outputs, the speaker outputs, the
headphone outputs, you name it. Levels were checked, matched, rechecked and rematched again. An extraordinary effort
was made for the Mo' Bass to look like nothing ever seen before, hence the design of the curved, brushed aluminum front
panel. We wanted it to look like it sounds - awesome!
We ended up with the best of both worlds. Now you own an amplifier that can be as simple or complex as you need it to be.
Run it totally clean into one speaker cabinet for classic SWR sound. Run it into two cabinets and use the chorus. Blast it
into a Megoliath 8x10 with the Overdrive on '10' (or '11' if you're Derek Smalls). Use it in the studio with everything on at
once for sounds never before recorded. Send one signal to a mixing board. Send two. Send three! Split your clean and
dirty signals using the Dual Mode feature. Combine effects. Switch back and forth. Experiment to your heart's content.
But please read the manual first, thoroughly and completely, so that you can realize the practically limitless potential of the
SWR Mo' Bass.
This way we can help you find your voice, your vision, your sound. And it's our privilege as a company to be there with you
along for the ride.
Bryan Beller
Product Development Manager
SWR Sound Corporation
Note: Please take a moment to verify that the following items were included in your SWR Mo’ Bass packaging: AC Cable,
Owner's Manual, Speakon-to-Speakon Speaker Cable, SWR Catalog.
B

MO’ BASS • FRONT PANEL FEATURES
• Dual independent input jacks compatible with both passive and active instruments
• Pre-Amp Volume Control with bi-color (green/red) LED peak clipping indicator
• Variable Limiter/Leveler Control with yellow LED indicator
• Aural Enhancer Control
• Treble Level Control
• Midrange Level Control
• Midrange Frequency Control
• Bass Level Control
• Overdrive "Drive" Control
• Overdrive Level Control
• Subwave Tone Control
• Subwave Mix Control
• Bassynth Filter Control
• Bassynth Resonance Control
• Bassynth Envelope Control
• Bassynth Mix Control
• Mo' EQ Treble Control
• Mo' EQ Midrange Control
• Mo' EQ Bass Control
• Chorus Depth Control
• Chorus Rate Control
• Push switches and unique-colored LED indicators for on/off control of all effects
• Internal Effects Bypass Switch with LED indicator
• Left and Right External Effects Blend Controls
• Dual Mode Switch with LED indicator
• Left and Right Master Volume Controls
• Illuminated Neon Power On/Off Switch
• Stereo Headphones Jack
• Screwholes for Rack Mounting (on chassis in each corner)
MO’ BASS • REAR PANEL FEATURES
• Direct Out 1/4" jack
• Tuner Out 1/4" jack
• Mo' Bass Out 1/4" jack
• Direct Out XLR jack
• Mo' Bass Out XLR jack
• Line/Direct Switch for 1/4" and XLR Direct Out Jacks
• Individual 3-position Pad Switches (0 dB, -10 dB, -20 dB) for both Direct Out and Mo' Bass Out XLR jacks
• Ground/Lift Switch for both Direct Out and Mo' Bass Out XLR jacks
• Stereo Effects Loop (Left and Right Send and Return 1/4" jacks)
• Internal Effects Bypass Footswitch jack
• Filter Sweep Pedal jack
• "Mo' Control" Footswitch jack (shown as "Ft. Sw. In")
• MIDI Out jack
• Stereo/Mono Power Amp Assign Switch
• Two 1/4" and One Speakon Left Speaker Output jacks
• Two 1/4" and One Speakon Right Speaker Output jacks
• One Speakon Bridged/Mono Output jack
• Two Speaker Fuses (3AG, 10 amp fast-blo)
• One Line Fuse (3AG, 10 amp slow-blo)
• AC Power Cord Receptacle
C

MO’ BASS SPECIFICATIONS
Note:
All measurements were taken with a line voltage of 120VAC.
All noise specifications are "unweighted."
All voltages and watts are "RMS."
All measurements taken with tone controls set flat, Aural Enhancer at minimum, all effects disengaged.
Power Ratings (minimum)
Bridge/Mono Mode
900 Watts @ 4 Ohms
650 Watts @ 8 Ohms
440 Watts @ 16 Ohms
(minimum load = 4 Ohms)
Stereo Mode (per side)
600 watts @ 2 Ohms
400 watts @ 4 Ohms
250 watts @ 8 Ohms
150 watts @ 16 Ohms
(minimum load = 2 Ohms)
Frequency Response (Power Amplifier):
-3 dB @ 10Hz to 40kHz
Sensitivity (full output under clipping, 8 ohm load, 100 Hz)
Passive Input Jack: 42 millivolts
Active Input Jack:84 millivolts
Power Amplifier (Effects Return Jack "in"): 6 volts peak-to-peak
Input Impedance
Passive/Active Input: 1 Meg Ohms
Active Input: 47K Ohms
Effects Returns: 27K Ohms
Output Impedance
Effects Sends: 220 Ohms
Tuner Output: 220 Ohms
XLR Balanced Out: 750 Ohms
Signal To Noise Ratio:
-88 dB (<10 millivolts typical)
Equivalent Input Noise:
15 nanovolts per root/hertz
Dimensions (measured from the rack ears back)
19" W x 5 " H x 13" D (the front panel flanges add 1")
Weight: 29 lbs.
D

MO’ BASS - GETTING STARTED
Connecting Your Speaker Cabinets
The Mo' Bass speaker outputs can be run in either stereo or bridged/mono modes by using the stereo/mono selector switch
on the back panel. For most situations the obvious is true: if you plan on using two speaker cabinets, run the Mo' Bass in
stereo. If you plan on using one speaker cabinet, run the Mo' Bass in mono. MAKE SURE that the stereo/mono selector
switch correlates with your desired setup. Also keep in mind that the Mo' Bass delivers 900 watts into one 4 ohm speaker
cabinet in bridge mode. Make sure that your speaker cabinet can handle the power listed in the "Power Ratings" section of
the "Mo' Bass Specifications" section of the manual.
Using One Speaker Cabinet
First, locate the "Speaker Outs" section on the rear panel of the unit. Put the stereo/mono selector switch in the "mono"
position. Connect the Speakon-to-Speakon speaker cable from the "Bridged Output" jack on the Mo' Bass to your speaker
cabinet. You will notice that both the left and right Master Volume controls on the front panel are active and will affect the
overall level even though you are in bridged/mono mode. This is normal. The impedance of your single speaker cabinet
must be no lower than 4 OHMS in bridged/mono mode.
Important: Be sure that your single 8 ohm speaker cabinet can handle at least 650 watts, and that your single 4 ohm
speaker cabinet can handle at least 900 watts. If not, it is safer to run your low-power-rated single speaker cabinet in stereo
mode off of the right speaker output.
Using Two Speaker Cabinets in Stereo Mode
Put the stereo/mono selector switch in the "stereo" position. Connect a speaker cable from either the left 1/4" or Speakon
speaker out jack to one speaker cabinet, then do the same for the right side. The Left and Right Master Volume controls
should correlate to the cabinets on each side.
If the cabinets are the same impedance, the same amount of power will be sent to each enclosure. If the cabinets are
different impedances, more power will flow to the cabinet with the lower impedance, and you should adjust the left and right
Master Volumes to achieve equal levels. Again, make sure to check the power handling capabilities and impedances of the
speaker cabinets you wish to use against the "Power Ratings" section of the "Mo' Bass Specifications" section of the
manual.
Using Two Speaker Cabinets in Bridge/Mono Mode
If you don't want separate output signals routed to different enclosures, and you are using speaker cabinets with input and
output jacks, you can "daisy chain" the enclosures together to achieve full potential of the power amps in bridged/mono
mode. Put the stereo/mono selector switch in the "mono" position. Then connect a speaker cable from the "Bridged Output"
jack on the Mo' Bass to the input jack of your first speaker cabinet. Then, to complete the "daisy chain", connect another
speaker cable from the output jack of your first cabinet to the input jack of your second cabinet. As when using one speaker
cabinet in bridged/mono mode, both Master Volume controls are active.
Important: The minimum total impedance when operating Mo' Bass in bridged/mono mode is 4 Ohms. This means that you
can use two 8 ohms enclosures safely, but when in bridged/mono mode you CANNOT use:
a) two 4 ohm enclosures (2 ohm load)
b) an 8 ohm and a 4 ohm enclosure (2.67 ohm load)
If your system falls into either of the categories above, you should run the Mo' Bass in stereo mode and connect the speaker
cabinets accordingly.
More details are available in the "Speaker Outputs" section of this manual, and we strongly recommend that you read the
entire manual. However, this should be enough information to get you started.
1

Turning On The Unit
Remove the AC cable from the accessory pack and connect it from the amplifier to a standard wall outlet. Make sure that
the Pre-Amp Volume and both Master Volume controls are set to the minimum position. Locate the power switch on the right
side of the front panel and turn the amplifier on. The power switch should then illuminate in red. Upon powering up, don't be
surprised if you hear a small pop. This is absolutely normal. (Eliminating this "power on transient" would require a component called a relay. SWR chose not to incorporate this type of component due to the fact that relays degrade signal quality
and often fail, causing the unit to have no output and requiring a tr ip to a local ser vice center.) Also, the preamp tube will
take approximately 7-10 seconds to warm up before producing signal. This too is normal.
Getting Sound Out Of The Mo' Bass
Plug your instrument into the desired input jack (please refer to "Front Panel Feature Definitions" for more detail). Turn your
instrument's volume up to at least 75% of maximum and slowly adjust the Pre-Amp Volume control.The green LED over the
Pre-Amp Volume control should illuminate every time you play. Keep playing and turning the Pre-Amp Volume control up
until you see the green LED turn red. Then back off on the Pre-Amp Volume about two numbers on the dial. Now turn up
the Master Volume controls to an equal level. You should now hear the sound of your instrument amplified through
the Mo' Bass into your speaker cabinets and the stereo headphones jack. For more detailed information, please read the
entire manual carefully, as the Mo' Bass is an extremely dynamically sensitive unit and the concept of "gain structure" is very
important and will be discussed in great detail.
FRONT PANEL FEATURES
Input Jacks
Both input jacks accept a standard 1/4" phone plug and both inputs can be used at the same time. Since the two inputs are
totally independent, no loss in volume or tone will occur by using two instruments simultaneously. However, the main
applicational use for the two separate input jacks is their difference in level, as the Passive/Active input has five times more
gain than the Active input. In other words, it's not necessarily intended as a "submixer" for two instruments, but no harm will
come from having two instruments plugged in at once. Please read below for more details.
A Word About Gain Stages
One of the most important concepts to keep in mind when using the Mo' Bass is what we mean by "gain stages." Think of
dominoes - when they're lined up in a row, the first one to fall will affect everything behind it. That's how a signal path works,
and everything added along the way contributes to the overall "gain." If the very beginning of the signal path is loaded up
with too much gain, everything behind might not behave the way you might like.
Some people like to use certain effects - especially foot pedals - in front of their amplifier. In the case of the Mo' Bass, it's
important that any pedal have an output close to unity gain in relation to its input. In other words, any pedal that might add a
lot of gain to the signal may be better off in the effects loop than in front of the amplifier.
A signal path will have several "gain stages" in the internal circuitry of the preamp and power amp alone, even before you
start adding effects. Just remember that every time you change something in the signal path, most likely a level will change.
That altered level will then feed the next part of the chain with more or less input signal, which in tur n will multiply every time
the level increases or decreases due to an effect being engaged. And so on, and so on, and so on...
Passive/Active Input Jack
This jack is designed for use with both passive and active instruments. A "passive" instrument (like a standard Jazz bass)
has no built-in preamp and does not use a battery. On the other hand, an "active" bass utilizes a battery-operated preamp
either for gain, tone controls, or both. Although labeled "passive," the Passive/Active input jack will work with all instruments
having a maximum output of less than 1 volt RMS. Some pickups such as EMG, Bar tolini, etc. employ batteries for operation
and will work perfectly using the Passive/Active input jack. Instruments from MTD, Pedulla, Sadowsky, Lakland, Ernie Ball,
Tobias, Modulus Graphite, etc.generally contain active electronics and could also be used in the Passive/Active input.
Just because you have an active bass doesn't mean that you have to use the Active input! Generally speaking, try the
Passive/Active input jack first. If you hear a small amount of distortion and the Pre-Amp Volume clip LED is not turning
red, try using the Active input jack.
2

Active Input Jack
The Active input jack should be used with instruments having a built-in (on board) preamp that will produce signals over 1
volt RMS. This jack will pad the incoming signal -14 dB. Some really "hot" pickups installed in your instrument may find the
Active input more compatible. But it's worth noting that the more complex the waveform originating from your bass guitar,
the tougher time an onboard effect will have in processing that complex signal. In other words, try not to go too crazy with
the onboard EQ of your bass preamp right off the bat. If you are using a KEYBOARD with the Mo' Bass, we have found the
best choice to be the Active input.
Note: Using the Active input with a passive instrument may result in a loss of high-end transients. Players who roll off their
high-end frequencies starting at about 2K - or who prefer a "darker" sound - may find this input more to their liking.
If you hear some distortion with your active bass and are using the Active input jack, CHECK YOUR INSTRUMENT'S
BATTERY! Also, make sure that the Pre-Amp Volume clip LED is not still turning red. Following these instructions can save
you and a service technician a lot of aggravation.
PREAMP CONTROLS
Pre-Amp V olume Control
This control adjusts the volume of the Preamp section. A bi-color (greed/red) LED indicator is located above the control. As
mentioned in the "Getting Started" section, that LED will illuminate green every time you play. If you set the level too high
the green LED will turn red, which indicates that the preamp is clipping. In order to achieve maximum signal-to-noise ratio,
set the Preamp Volume to where the green LED barely turns red upon striking your hardest note. However, this may not be
the optimal setting when using effects, so you may want to back off even further until you're done exploring the levels of all of
the effects on the Mo' Bass.
Note: Even though the Preamp Clip LED turning red indicates that at some point the preamplifier is clipping, no harm is
being done to your amplifier. However, clipping of the power amp can cause damage to your speakers and is not
recommended.
Limiter/Leveler
The Limiter/Leveler circuit is a tube limiter that helps control the dynamic range of the preamp. The Limiter/Leveler Control
sets the "threshold" for the circuit, which is the level at which limiting begins to take effect.The yellow LED above the control
will illuminate, indicating that the Limiter is active.Loss in volume caused by extreme limiting can be overcome by increasing
the levels of the Master Volume controls, as well as various controls for the onboard effects.
When processing a signal to a minor degree, the Limiter/Leveler simply puts a ceiling on the signal and gently suppresses
the peaks, creating a very smooth, even sound. As the signal is processed to a greater degree, the sound becomes more
compressed and the dynamic range of the preamp more limited. Because it uses a tube to accomplish this, the Mo' Bass
Limiter/Leveler has an extremely natural effect on the instrument's signal, much like the classic leveling amplifiers used in
professional studios around the world.
You may want dial in some of the Limiter/Leveler control even though you aren't clipping the preamp. It's a very musical
limiter and can be used in several ways. For clean sounds it can help smooth out rough edges. When used with the
Overdrive, you can achieve some very interesting sounds depending on where the "Drive" control is set. Try different
settings and see what works best for you. The yellow LED may illuminate slightly even when you have the control set at minimum. This is normal, as the Limiter/Leveler is never truly "out" of the circuit.
Note: If the Limiter/Leveler Control is set at maximum and still no limiting effect occurs, the Pre-Amp Volume Control is
probably set too low and should be increased to a desired level.
3

Aural Enhancer
SWR's Aural Enhancer Circuit was developed by SWR Founder Steve Rabe to bring out the fundamental low notes of the bass
guitar, reduce certain frequencies that help mask the fundamentals, and enhance the high end transients.The resulting frequency response should be similar to that used for recording the bass in the studio. This effect becomes more radical as
the control is turned to maximum.The result is a more "transparent" sound, and is especially noticeable when performing the
slap or thumb style technique on the bass guitar.Generally speaking, the Aural Enhancer can be described as a tone
shaping control, as it is a passive R/C network that alters the frequency response throughout the bass spectrum.This preshaping is "blended" into the original signal via the Aural Enhancer Control.Exact frequencies affected are dependent on the
characteristics of the instrument used, though we have found that most users tend to set it at '6' on the dial for optimum effect.
Treble Control
The Treble Control is a shelving-type tone control that cuts or boosts high frequencies up to 10 dB in either direction.
Starting from mid-position ("flat"), turning the Treble Control counter-clockwise cuts the highs, while turning the control
clockwise boosts the highs. The shelving point for this control is about 2 KHz.
Midrange Level and Frequency Controls
These two controls work together to allow you the flexibility of choosing a par ticular midrange frequency to boost or cut.
The Midrange Level Control cuts or boosts (by up to 10 dB) the frequency set by the Midrange Frequency Control. Starting
at mid-position ("flat"), turning the Midrange Level Control counter-clockwise cuts the desired frequency. Turning the
Midrange Level Control clockwise boosts the desired frequency.When the Midrange Level Control is set at mid-position,
turning the frequency control will have no effect on the sound.
In order to find the midrange frequency you wish to boost or cut, try the following:
1. Adjust the Midrange Level Control to either the full boost or cut position.
2. Rotate the Midrange Frequency Control until the desired frequency you wish to cut or boost is found.
3. Adjust the Midrange Level Control to the desired amount of boost or cut.
Some hints from the pros: If you need to "cut through" the band a little more, try boosting 200 to 400 Hz. If you like a more
transparent sound, try cutting 800 Hz. The Midrange Level and Frequency Controls are especially useful in controlling
fretless basses and their inherent qualities.
Bass Control
The Bass Control is a shelving-type tone control that cuts or boosts the low frequencies up to 10 dB in either direction.
Starting from mid-position (flat), turning the control counter-clockwise cuts the bass response, while turning the control clockwise boosts the bass response. Shelving point for this control is about 80 Hz.
A final note on the Preamp Controls: Select each control to your taste, but remember that the more heavy EQ you have on
the front end, the more EQ you will have going into the Mo' Bass effects - sometimes a good thing, sometimes not. As
always, your own musical preferences will come into play.
Preamp T ube
Though not a "control" function of the preamp, you should be aware that the preamp in your SWR Mo' Bass is a tube preamp. The tube is a specially selected 12AX7 and should not require replacement for one to three years, depending on
usage. The tube is also used for another key function in the unit, specifically...
Overdrive
Yes, the Mo' Bass Overdrive is a Tube Overdrive. Just because there's no 50-pound tube power amp in the Mo' Bass
doesn't mean you can't get the sounds of tube-driven distortion! It works off of the very same specially selected 12AX7
preamp tube mentioned above. We've taken extra care to ensure that, unlike most bass distortion units, there is no
significant damage to the fundamental note - specifically in the low end.
Overdrive "Drive" Control
This control determines how heavily the tube overdrive circuit will distort the signal. With the control set at minimum '0',
there will be only the tiniest amount of "dirt" present in the signal path. The higher the knob is set, the dirtier the signal will
get. Fully counter-clockwise ('0') is minimum, while fully clockwise is maximum. Note that the way you attack your strings
will have an effect on the amount of drive as well. Tr y playing both harder and softer with this control set at '3', and you'll see
what we mean when we say that the controls are "dynamically sensitive."
4

Overdrive Level Control
This control determines the volume of the Overdrive circuit, and works in conjunction with the Drive control to help you keep
your levels where you want them when switching back and for th between clean and dir ty sounds. Fully counter-clockwise
('0') is minimum, while fully clockwise is maximum.Be careful when boosting this control beyond '5' on the dial - it will get
really loud when the Drive is also engaged!
Using the Overdrive
Start with the Drive and Level controls low! Now press the Overdrive switch and the red LED should illuminate. If both Drive
and Level controls are set at minimum, there will only be a slight boost in overall level. Try slowly raising the Drive to '5', and
then the Level to '3'. There should now be a noticeable difference between this and the "clean" sound. This is a good reference point to see how much boost and distortion you want out of the Overdrive.
The Drive and Level controls are designed to work together to give you a workable overall level when using the effect. If you
are using heavy amounts of Drive, you may want to reduce the Level to match your clean signal level. If you're only using a
touch of Drive, be sure to increase the Level control to bring you back to unity gain with your clean signal.You can use the
Level control to have your Overdrive effect act as a "boost" as well simply by setting the Level and Drive controls to equal a
higher level than your clean signal. Switch the effect on and off for level comparison.
Engaging the Overdrive reduces the effect of the Preamp EQ (the higher the Drive, the less Preamp EQ will affect the
signal), so you may want to use the Mo' EQ to achieve additional tone flexibility. The Mo' EQ Mid and Treble controls in
particular can greatly affect a heavily overdriven signal. Don't forget to try using the Limiter/Leveler in conjunction with
the Overdrive, especially on sounds with just a touch of dirt to them (low on the Drive and high on the Overdrive Level). And
remember, you can blend in your original "clean" signal by using the Dual Mode function and adjusting the left (clean) and
right (wet) Master Volume controls. Please see the sections marked "Mo' EQ" and "Dual Mode" later in the manual for
more details.
SubWave
The Mo' Bass SubWave is a lightning-quick sub-octave wave engine. In plain terms, it hears the note you play and
immediately generates a signal one octave below it. You may have heard the term "octave pedal" before. You may have
even used one. If so, welcome to the next generation of sub-octave signal processing.
Subwave T one Control
This control is very much like the tone control on a passive bass. It simply cuts high frequencies. When set counterclockwise to the minimum ('0'), it cuts the maximum amount of highs possible. When set clockwise to the maximum position
('10'), it leaves the subwave's high end wide open. Note that this tone control only affects the one-octave-below signal
generated by the SubWave engine. It will not affect your clean bass signal.
Subwave Mix Control
This control allows you to blend your original bass signal with the SubWave signal to suit your musical taste. The midposition of this control is a 50/50 split between clean and sub-octave signals. When set counter-clockwise to the "bass" position, you will hear 100% original bass signal and no SubWave. When set clockwise to the "sub" position, you will hear 100%
SubWave and no original bass signal.
Using The SubWave
For most applications, set the SubWave Tone Control at minimum ('0') and the SubWave Mix Control at the mid-point. Now
press the SubWave switch and the blue LED should illuminate. These settings will give you the most basic "sub-octave"
sound. Now try slowly increasing the SubWave tone control up to '5' on the dial. You will notice that the overall sound is now
more synth-like. This is normal. You can now adjust the Subwave Tone Control to taste.
Note: If you want to hear what the pure SubWave sounds like, try setting the SubWave Tone Control at '10' and the
SubWave Mix Control all the way at "sub." Pretty cool, huh?
Be sure to remember to set the Subwave Mix control back at '0' before disengaging the effect during your experimentation.
Why? Because as we mentioned, when the Mix control is all the way at "sub" there is no "original bass signal" present in
the signal path. The level of the pure SubWave is much lower than the bass guitar signal. So if you switch the SubWave
effect off when the Subwave Mix control is all the way at the Sub position, and your original bass signal has a lot of EQ on
it - and especially if the Overdrive is engaged - you may get a boost in your signal level you weren't expecting!
5

Bassynth
Based on the design of a classic analog synthesizer, this effect generates a sawtooth waveform that can be altered by the
Filter, Resonance or Envelope controls. It then can be blended with the original bass signal using the Mix control. This is the
most dynamically sensitive and complex of all the effects on the Mo' Bass. We strongly recommend that you read the entire
Bassynth section carefully - both the control knob definitions and the guide to using them - so you can get the most out of
this incredibly musical effect.
Bassynth Filter Control
This control allows the user to take away certain overtones that are present in the raw waveform (otherwise known as
"Subtractive Synthesis"). In simple ter ms, it acts like an equalizer for the waveform - taking away treble but not adding bass.
When set counter-clockwise to the minimum position ('0'), the filter is "fully closed" and will subtract as many overtones as
possible.
When set clockwise to the maximum ('10'), the filter is "wide open" and subtracts nothing. In addition to the control knob,
input gain and how you attack your strings are just two of the many things that can affect when the filter opens and closes.
Please refer to the "Using The Bassynth" section for more details.
Bassynth Resonance Control
This function allows a narrow band of frequencies (the resonant peak) on the filter to become relatively more prominent.
Filter resonance is also known as "emphasis" and "Q". It is also referred to in some older instruments as regeneration or
feedback, because feedback was used in the circuit to produce a resonant peak. It produces a very distinctive sound in the
analog filter process, and is an important part of the overall sound produced by the Basssynth.
When set clockwise to the minimum position ('0'), there is no resonant peak present and the frequencies are sent evenly
across the spectrum through the filter. As you increase the knob, the prominent band of frequencies sent through the filter
will narrow and the effect will become more dramatic.Please refer to the "Using The Bassynth" section for more details.
Bassynth Envelope Control
The Envelope Control is a signal-processing device in the Bassynth that controls amplitude over a certain time frame. In notso-technical terms, it gives the sound its shape. The Envelope Control tells when the Bassynth should go up and down in
volume, and the time it should take to go up and down. In addition to the control you have on the knob itself, these
parameters are also in the hands of the player as they can be controlled by the dynamic articulation of the musician through
string attack. This control creates the "wah-wah" type effect.
When set clockwise to the minimum position ('0'), the Envelope will affect the signal as quickly as possible, so quick that it
will have practically no affect at all. As you increase the knob, the Envelope effect will slow down, allowing you to hear the
shift in amplitude. Please refer to the "Using The Bassynth" section for more details.
Bassynth Mix Control
This control allows you to blend your original bass signal with the Bassynth signal to suit your musical taste. The midposition of this control is a 50/50 split between clean and Bassynth signals. When set counter-clockwise to the "bass"
position, you will hear 100% original bass signal and no Bassynth. When set clockwise to the "synth" position, you will hear
100% Bassynth and no original bass signal.
Using The Bassynth
The Mo' Bass Bassynth will react differently to every single user. Factors such as the kind of bass, the EQ of the bass, the
pickup selection on the bass, the technique of the player, the Pre-Amp volume of the Mo' Bass, the control settings of the
Basssynth itself, and the Bassynth Mix control will all come into play. Spend some time with it and become comfortable you'll probably stumble across a sound that we haven't even heard yet. Here at the factory, it happens to us all the time!
The following is a "road map" for getting acquainted with the Mo' Bass Bassynth. For simplicity's sake, we used a Jazz bass
for the following examples.
Start by setting the Pre-Amp Volume on the Mo' Bass to '4'. Set the Filter, Resonance and Envelope Controls to minimum
('0'). Now set the Bassynth Mix Control all the way to "Synth." Press the Bassynth switch and the amber LED should illuminate. Start playing your bass. You should hear practically nothing. Don't panic - this is normal. (continued next page)
6

Using The Bassynth (continued)
Now bring the Filter Control up to '3' on the dial, and play again. You should now star t to hear some sound. Turn the Filter
control further up to '7', and a very obvious "synth" sound should be present. Tr y attacking the strings both harder and
softer. When you play harder, more high frequency should be present. A softer attack will result in a "darker" sound. This
is what we mean when we say that the Bassynth is a highly dynamic effect.
Now let's try the resonance control by setting it to '6' on the dial. When you increase the resonance, the signal will decrease
slightly in overall level because you are taking away certain frequencies upon the initial attack. This is normal. The sound
should now resemble that of a classic synth even more. Tr y experimenting with your string attack again - things about the tone
will change. Try both the Filter and the Resonance controls in various positions...and try not to let time get away from you!
Let's move on to the Envelope Control. First set the Filter control at '2' and the Resonance control at '7'. Now strike an open
note and slowly turn the Envelope Control until you hear a "wah" sound. The harder you play, the more present the "wah"
will become (think "Chameleon" by Herbie Hancock).At this point, all three Bassynth controls are working in harmony and all
will affect each other. For instance, if you open up the Filter too much, the "wah" from the Envelope may go away. If you
close the Filter too much, the Envelope won't have a chance to "wah" anything. How you attack the strings can make all the
difference in the world.
With an active bass, the overall gain structure will be slightly different.You may find you want to back off on the Pre-Amp
Volume of the Mo' Bass preamp to keep the Bassynth from seeing too hot a signal. Also, the tone controls on your active
bass will greatly affect the Bassynth. One particular example: your midrange control may directly affect the sensitivity of the
Envelope control.
You've now got three onboard controls, your bass and your fingers to find new sounds within the Bassynth. Mix and match
at will!
Once you've fully explored the possibilities, try adding the Subwave to the Basssynth. Now both the Subwave and the
Bassynth signals will be affected by the Filter, Resonance and Envelope controls. (It should be noted that when the
SubWave effect is activated, the raw sub waveform is routed to the Bassynth, regardless of where the SubWave Mix and
SubWave Tone Controls are set.)
Want more? Add in the Mo' EQ. Try experimenting with each of the tone controls individually - they'll all do something
unique to the sound of the Bassynth.
Not satisfied yet? Throw the Chorus into the mix. Now try some experimenting.
Once you're feeling comfor table with the Bassynth itself, try blending in the "clean" signal by bringing the Bassynth Mix knob
slowly back towards mid-position. At exactly '3' on the "Synth" side (3:00 PM), the effect will be completely out of phase with
the input and the level will drop dramatically. This is normal and can be used for some really strange sounds. As you move
past the '3' point, level will return to normal and the phasing will stop.
Also try using the Dual Mode function. You may find that you want the Mix control completely on "Synth" and run the unit in
Dual Mode to blend the original signal back in with your stereo Master Volume controls. (Please refer to the "Dual Mode"
section for more details.) There are plenty of creative choices to make, and we encourage you to make them.
Hidden Feature 1: Envelope Follower
For those who want to use the Bassynth as more of a traditional envelope follower - or put more plainly, if you want to slap
and pop through the Bassynth Filter - we've designed a "hidden feature." If you engage the Overdrive while the Bassynth is
on, the filter will see the original bass signal as opposed to the sawtooth wave. Confused? Try this - set the Overdrive
"Drive" Control at minimum and the Overdrive Level Control at around '2'. Then engage the Overdrive and the Bassynth
simultaneously. You should now hear the clean bass signal going through the filter. You may need to readjust your Filter,
Resonance and Envelope levels to achieve maximum effect. Again, how hard you play will have a major affect on the
sound itself.
Hidden Feature 2: Phase-O-Matic
Also, there's no law that says you have to keep the Overdrive "Drive" Control at minimum. Try slowly turning the Drive
Control up while the Basssynth is engaged. It should start sounding pretty nasty! If you set the Bassynth Mix Control at '3'
on the "synth" side of the control while the Overdrive is engaged and roaring, the 180-degree phasing will occur
in ways you never thought possible.
7

Filter Sweep Pedal
Want to get even crazier? We've provided the ability to control the opening and closing of the Bassynth's filter with an
"expression" foot pedal, like the type of pedals commonly used with keyboards. Simply plug the pedal’s STEREO cable into
the "Filter Sweep Pedal" jack on the rear of the Mo' Bass. Set the Filter control to the minimum ('0'). Then str ike a note and
slowly move the pedal back and forth. From one end of the pedal to the other, you should hear the entire range of the filter.
The Filter Sweep Pedal will start at whatever point you preset on the Mo' Bass Filter control (be it '0', '3', '6', etc.) and open
up the filter from that point up to '10'. Remember, just because you have the pedal in the circuit doesn't mean that the
Basssynth won't react to the dynamic sensitivity of your attack - it's still touch-sensitive.
Important: You can use a standard volume pedal for this function, but you will need a special cable called an "insert cable."
Plug the two "mono" ends into your volume pedal's in/out jacks and plug the "stereo" end into the Mo' Bass "Filter Sweep
Pedal" jack.)
There are so many potential combinations of sounds when using the Bassynth in conjunction with the other effects in the
Mo' Bass that even we couldn't pretend to know them all. And even if we did, it's probably best that you discover them for
yourself. Take your time, turn the knobs slowly, and have at it.
Mo' EQ
This EQ is a fundamentally different type of EQ than the one found in the preamp stage of the Mo'Bass. Technically
speaking, the Mo'EQ is a Band Pass-type of EQ, while the Mo' Bass preamp contains semi-parametric and shelving types of
EQ. A Band Pass Filter EQ has a fixed bandwidth, with the cut or boost affecting only the frequencies within the bandwidth
parameter.The bandwidth at the frequencies specified for each tone control is 1 octave.
Mo' EQ Treble Control
The band pass filter on this EQ control is set at 10 kHz. That's pretty high for the typical bass amp. Starting from mid-position ("flat"), turning the Mo' EQ Treble Control counter-clockwise cuts the highs at 10 kHz, while turning the control clockwise
boosts the highs at 10 kHz. Boosting 10kHz will add a subtle, yet sweet "glassy" overtone to the signal.
Mo' EQ Midrange Control
The band pass filter on this EQ control is set at 1.5 kHz. Starting from mid-position ("flat"), turning the Mo' EQ Midrange
Control counter-clockwise cuts the upper mids at 1.5 kHz, while turning the control clockwise boosts the mids at 1.5 kHz.
Cutting 1.5 kHz can help you "scoop" the EQ for a more transparent sound, while boosting it will help accentuate the upper
mids of your tone.
Mo' EQ Bass Control
The band pass filter on this EQ control is set at 40 Hz. That's very low for the typical bass amp. Starting from mid-position
("flat"), turning the Mo' EQ Bass Control counter-clockwise cuts the lows at 40 Hz, while turning the control clockwise boosts
the lows at 40 Hz. Boosting 40 Hz is something you may feel rather than hear...but boy, you'll feel it. We recommend using
some caution when operating this control. It could cause the wrong speaker cabinet to wince in pain and cry for mercy. Turn
the knob slowly, OK?
Using Mo' EQ
Like we've been saying all along, it's better to have certain kinds of EQ post-effects rather than pre-effects. The Mo' EQ was
designed primarily to enhance the characteristics of the onboard effects. To engage the effect, press the Mo' EQ switch and
the green LED should illuminate.
When used in conjunction with the Overdrive, the Mo' EQ Bass Control can help boost low-end along with a boost in gain and
overall level. The Mo' EQ Midrange and Treble Controls can help define and bring to prominence just the right "edge" on your
overdriven signal. It can also produce feedback, which could be a good or bad thing depending on how you feel about it.
The SubWave generates enough extra low-end all by itself for most people, but maybe you really want to shake the house.
Boost the Mo' EQ Bass control while engaging the SubWave and watch the walls rattle. Or, if the bass becomes
overbearing, maybe you actually want to cut a little bit at 40 Hz.
In our opinion, the Mo' EQ is most dramatic when it's when used in conjunction with the Bassynth. Notice how the Bassynth
Resonance Control becomes more dramatic with a liberal dose of the Mo' EQ Treble Control. And how the Bassynth
Envelope and Filter Controls appreciate the presence of a boosted Mo' EQ Midrange Control. As for the way the Bassynth is
affected by the Mo' EQ Bass control, all we can say is stand back, be careful, and turn the knob slowly when boosting. (Your
speaker cabinet will thank you in the morning.) (continued)
8

Using Mo' EQ (continued)
Please note that when the Bassynth Filter and Envelope Controls are "open" and the Resonance Control is at the minimum
position, the level of the Bassynth will be higher than the level of the original bass signal, which is normal. However, when
boosting the Mo' EQ Bass Control while the Bassynth is engaged and in that position, that boost will become very dramatic.
Please exercise caution.
Though designed to be a post-effects EQ, there is no reason why you can't use the Mo' EQ as an additional EQ for clean
sounds. In addition to being a different type of EQ (Band Pass vs. shelving/semi-parametric), the Mo' EQ is centered at
much different frequencies (40 hz, 1.5 kHz, 10kHz) than the preamp EQ (80 Hz, variable 200-800 Hz, 2 kHz). The effect is
more subtle, but it can also be the difference between almost what you want and exactly what you want. Try combining both
and see what's best for you.
Chorus
The Mo' Bass Chorus is a warm, analog, very traditional effect. What most people refer to as a "chorus" is, in truth, a
modulated delay.
Chorus Depth Control
This control determines the amount of chorus applied to the original bass signal. When set at minimum ('0'), the delay is
very short, resulting in a very subtle "phasing" effect. As you increase the knob clockwise, the delay time becomes longer
and causes more of a "doubling" sound, making the effect more dramatic.
Chorus Rate Control
This control determines the speed at which the delay time is modulated.When set at minimum ('0'), the Chorus waveform
grows in amplitude and will take over one whole second to complete. As you increase the knob clockwise, the rate of the
Chorus effect will increase. This control also affects the rate at which the yellow LED indicator "glows."
Using The Chorus
To engage the effect, press the chorus switch and the yellow LED should illuminate and "glow" as mentioned above. For a
simple, warm chorus, try setting the Chorus Depth control at '3' and the Chorus Rate control at '2'. To achieve more of a
tremolo effect, set the Rate very high and the Depth very low. You can get a "fattening" effect without sounding like a chorus
if you set the Depth at '10' and the Rate at '0'. For something really weird, tur n both controls all the way up and look to see if
the aliens have landed yet.
Using the chorus can greatly enhance the use of harmonics, allowing them to "ring out" better and longer. Clean sounds
can become crystal-clear when both the Mo' EQ and the Chorus are engaged. It enhances the Overdrive and the SubWave
in obvious ways. It also simulate a "third oscillator" when used in conjunction with the Bassynth and the SubWave
simultaneously. As with all of the effects on the Mo' Bass, experimentation is encouraged.
A Final Word On The Mo' Bass Preamp And Effects
It's easy to forget that, with all of the bells and whistles on the front panel, you can still easily achieve a great clean bass
tone. You can also get just about any affected sound you want through various combinations of effects, blends and levels.
But it's important to remember that one thing in the signal path can affect something after it, and that gain levels can
have wide-ranging implications for effects as dynamically sensitive as the effects on the Mo' Bass. Do yourself a favor and
take the time to see what happens to your signal level when you engage and disengage effects BEFORE you get to the gig,
or even the rehearsal.
DUAL MODE
Up until this point, you've operated the Mo' Bass in what we call "Single Channel Mode." In Single Channel Mode the
"single" signal starts at the preamp and goes through all of the Mo' Bass effects. The wet-to-dry ratio of those inter nal
effects is determined by the position of the two Mix controls (SubWave Mix and Bassynth Mix) in the signal path of the unit.
After the Chorus section (the last Mo' Bass effect in the chain), the signal then is routed to the power amps. At that point,
the power amps can be run in stereo mode or bridged into a mono-block configuration. In Single Channel Mode, both left
and right power amps - whether bridged mono or not - and their respective speaker outputs will see the same signal. Turn
on an effect and it will come out of both sides (if it's mixed in, of course).Turn the effect off and clean bass will come out
both sides. (continued)
9

Dual Mode (continued)
Dual Mode changes all that. When Dual Mode is engaged, the signal splits in two after the pre-amp. One of the two
signals - we'll call it the "clean" channel - is routed directly from the preamp straight to the LEFT side power amp and the
LEFT set of speaker outputs on the back panel. The other signal - we'll call it the "wet" channel - continues on through the
five Mo'Bass effects and is then routed to the RIGHT side power amp and the RIGHT set of speaker outputs.The Left and
Right Master Volume Controls then become a secondary set of blend controls when creating a sound.
Let's try and simplify this. When in Dual Mode: "Clean/left" refers to the natural sound of your bass (tech talk: AFTER having
been processed by the Preamp and its EQ, but BEFORE the internal effects)."Wet/right" refers to the signal AFTER it has
been processed by the Mo' Bass INTERNAL analog effects.
And yes, Dual Mode is still possible when running the power amp in bridged/mono mode, as both the clean/left and wet/right
channels will sum into the bridged/mono speaker output. At this point the Stereo Master Volume Controls become a "Mix
Master" control.
Perhaps you've noticed that guitar players who are really particular about their tone often carry two amplifiers to a gig - one
for clean sounds, one for dir ty sounds. This is no accident. Keeping a portion of the signal unprocessed at all times has
long been a priority for those players looking for consistency in tone and level when using effects. Bassists have an even
greater imperative to keep it partially "clean" in certain situations-after all, we're the ones holding down the bottom for the
whole band. Dual Mode allows you that option in a more pure fashion than a simple mix control can provide.
Using The Mo' Bass In Dual Mode
Let's try an experiment. First, make sure you have set the Preamp Volume control properly (please refer to the "Pre-Amp
Volume Control) section of the manual for more details). Once this is set correctly, engage the Overdrive with the Overdrive
"Drive" Control at '4' and the Overdrive Level Control at '3'. Now engage the Bassynth with the Filter Control at '2', the
Resonance Control at '6', the Envelope Control at '3' and the Mix Control turned fully clockwise to the "synth" position. Set
both Left and Right Master Volume Controls at an equal position. Now try playing. It should sound pretty wild.
Now push the Dual Mode switch and the red LED should illuminate. Try playing again. There should be more "clean" bass
present than before. Turn the Right Master Volume Control all the way counter-clockwise to the minimum position. You
should now hear only the original "clean" bass signal. Tur n the Right Master Volume Control back up, but now turn the Left
Master Volume Control all the way off. You should now hear only the affected "wet" signal. Finally, turn the Left Master
Volume Control back up to equal the Right. Now push the Dual Mode switch once more to exit the function. The red LED
should turn off and affected signal should again be present on both sides of the power amp.
This function is useful in many obvious ways, but we've come across two examples we want to share with you. The first is in
conjunction with the Bassynth. The Mo' Bass Bassynth is so dynamically sensitive that you may have a hard time
adjusting to the sound itself. You also may not be used to hearing the way a sawtooth wave reacts to finger/string attack (the
initial attack is not as prominent), which could lead you to setting the Bassynth Mix control closer to dead center. But the
Bassynth's effect is most dramatic when the Mix control is set all the way to "synth." So if you want to get some of that
"clean" attack back in the overall sound but you still want the Bassynth to be as "synth-y" as possible, using Dual Mode is a
great way to do it.
The second example is more esoteric but still important. If you've got all of the Mo' Bass effects on at once and you've come
up with some crazy, freakish sound that might be unusable on its own, hit the Dual Mode switch and blend that freaky combination of sounds back in with the clean signal.You never know - it may work after all.
If you are using more than one speaker cabinet (and especially if they contain different speaker configurations) you may
want to remember the fact that, in Dual Mode, the Mo' Bass will send the "wet" channel to the right speaker output while
sending the "clean" channel to the left speaker output. Maybe you want the "clean/left" channel in a 2x10" and the
"wet/right" channel in a single 15". Perhaps you want to the "wet/right" channel sent to a cabinet with a tweeter and the
"clean/left" channel sent to one without a tweeter.Maybe you want the "wet/right" channel in the top cabinet in your stack
and the "clean/left" channel in the bottom cabinet. Make the best choice for your ar tistic needs. (The SWR Megoliath 8x10
is an ideal cabinet for running the Mo' Bass in Dual Mode, as it has separate inputs for both bottom and top 4x10" configurations, one with a tweeter and one without. Just thought we'd mention it.) (continued)
10

Using The Mo' Bass In Dual Mode (Continued)
You may notice a slight decrease in perceived volume when engaging the Dual Mode. This is mostly likely due to a Mo'
Bass effect being louder than the original bass signal. You wouldn't notice this in Single Channel Mode because that same
boosted effect goes to both sides of the power amp. But when you engage the Dual Mode, the "left/clean" side loses that
boost because it no longer contains the effect in its signal path. Therefore the overall level will seem lower. You can fix this
by setting the levels of the effects in question back to unity gain with the original bass signal.
Note: In either Single Channel or Dual Mode, the signals are also routed to the Unbalanced and Balanced Outputs in various ways. Please refer to the Interface Panel section for further information, as the routing can be fairly complex.
Internal Effects ("EFX") Bypass
You can choose to bypass all internal effects by engaging the Internal EFX Bypass switch. Push on the switch and the red
LED should illuminate. Once the Bypass is engaged, none of the Mo' Bass effects will affect the signal, regardless of
whether or not they are engaged. Turning on the Inter nal EFX Bypass switch will not cause the LED's of other Mo' Bass
effects to switch off - it will only stop the effects from reaching the signal path.
The Internal EFX Bypass feature is also footswitchable. Your SWR Mo' Bass comes with a momentary footswitch for this
purpose. Simply connect the footswitch cable to the jack on the rear panel of the Mo' Bass marked "Internal EFX Bypass."
If you plug in the cable while the unit is on, the switch will activate automatically and the red bypass LED will illuminate.
This is normal. Simply switch the Bypass off with either the footswitch or the push-button switch on the front panel. Any normally open momentary switch will work with the Mo' Bass Internal Effects Bypass.
The Internal EFX Bypass feature works in both Single Channel and Dual Mode.When used in Dual Mode, the Bypass will
disengage the effects in the right/wet channel. It will not affect the left/clean channel because, in Dual Mode, there are no
internal effects there to begin with.
External Effects Blend Controls
Believe it or not, there are some effects not available in the Mo' Bass, like reverb and delay. For those who want to take
tweaking to the ultimate level, we've included a Stereo External Effects Loop, complete with Left and Right External Effects
("EFX") Blend Controls. (To avoid confusion, we refer to this loop as "external" to separate it from the five "internal" effects
on the Mo' Bass.)
The Effects Blend circuit is similar to that used on recording consoles, with the effects loop on a "side chain" to the original
bass signal (which at this point in the signal path may or may not be already processed by the Mo' Bass internal effects).
This way you can get the full sound of your instrument in addition to whatever the external effects unit sends back.
Using The External Effects Blend Controls
Most players only use one external effect device, so let's start there. In the simplest configuration, the Mo' Bass is run in
"Single Channel Mode" ("Dual Mode" disengaged). Your input signal - your bass guitar - is a mono signal. But most effects
units are "stereo" in the sense that they accept two independent inputs and send out two independent outputs. So what's
the best way to hook it up?
In order to have exter nal effects returning to both sides of the power amp, connect the Mo' Bass RIGHT Effect Send jack
(located on the rear of the unit) to the external device's input. (Please refer to your device's manual to determine the correct
input.) Then use BOTH (left and right) retur ns on the effect unit and route them to the Left and Right Effects Return jacks on
the Mo' Bass. You can send both the Left and Right Effects Send signals to your external effect device if you wish, but it's
not necessary unless:
a) Your external effects device requires stereo inputs to function properly
b) You plan on using different external effects for each channel in Dual Mode (see below)
Now that your external effects unit is connected to the Mo' Bass, try setting both the Left and Right Exter nal Effects Blend
Controls to '5' on the dial. You should hear a decent blend of external effects with your Mo' Bass signal. With the External
Effects Blend Controls fully counter-clockwise ("dry"), no signal from your effect will be heard. As you turn these controls
clockwise, more of the effect can be heard in the overall sound.When the Blend Controls are fully clockwise ("wet"), no true
or unaffected signal is heard other than what your effects unit provides. If you find that you can't get enough of the external
effects in the signal no matter how high you set the External Effects Blend Controls, try adjusting the levels up
on the external effects unit.
11

Using Dual Mode With An External Effects Unit
Please remember that when "Dual Mode" is engaged, the "clean" channel is always on the LEFT side, and the "wet" channel
is always on the RIGHT.
The key function of Dual Mode is to allow the user separation between "clean" and "wet" sounds. But it also allows for different external signal processing on each channel. In other words, it is possible to utilize two different external effect devices
independently. Simply route the left effect send to one device and return it to the Left Effects Return jack.Then repeat the
process for the right side using a different device. This allows you to process the "clean/left" signal with one effect and the
"wet/right" signal with a different effect.
Many so-called "stereo" external effects devices sum their inputs to a mono signal and then convert the mono signal into
stereo at their outputs. The Mo' Bass External Effects Loop is a TRUE stereo loop. To achieve true stereo effect send and
return, be aware that your external effects device must process signals in TRUE stereo. Otherwise, your left and right effects
returns will process both "clean/left" and "wet/right" signals from the Mo' Bass and the two channels' effects will bleed into
each other.
Stereo Master Volume Controls
The Stereo Master Volume Controls adjust the individual volumes of the internal power amplifiers. For both controls, fully
counter-clockwise ('0') is minimum, while fully clockwise is maximum. As mentioned previously in the "Getting Started"
section of the manual, both controls are active at all times. Whether you're in Single Channel Mode or Dual Mode for the
preamp/effects, or Stereo or Bridged/Mono mode for the power amp, both controls are always independently active.
This is your last chance in the signal path to adjust levels. In addition to setting the overall output level of the entire unit, you
can use the Stereo Master Volume Controls to:
a) Balance two speaker cabinets of different impedance when running in stereo
b) Balance the clean/left and wet/right channels when in Dual Mode, regardless of how you are running the power amps
c) Balance master levels when using two different external effects units in the external loop
For most applications, however, you can set the Left and Right Master Volume Controls at equal levels and adjust to taste for
overall volume.
Stereo Headphones Jack
By inserting a set of stereo headphones into this jack, you can satisfy your urge to play through the Mo' Bass at all hours of
the night without disturbing your neighbors - or even hooking up speaker cabinets.The headphone volume level is adjusted
by the Stereo Master Volume Controls.
We suggest you begin with the Master Volume full off (counterclockwise).Then slowly bring the volume up to your desired
level. If you hear some distortion in your headphones that is not present with the speakers on, turn down the Master Volume
Controls. You're probably exceeding the capability of your headphones and could ruin them. Be especially carefully when
engaging effects that boost level, like Overdrive. The recommended impedance for your headphones is 32 ohms, but results
can differ, as the efficiency ratings of the drivers contained in headphones vary greatly.
Here's a hint: try r unning the Mo' Bass in Dual Mode with some effects engaged while using a nice set of stereo phones. We
like it.
12

REAR PANEL FEATURES
THE INTERFACE PANEL
We call the right-most section of the Mo' Bass back panel the "Interface Panel" because between the unbalanced and
balanced output jacks and various switches available, you can "interface" with just about anything you want. Mixing boards in
a live venue or recording studio, additional power amps or signal processing - the options for what kind of signal you can
send to where are practically limitless.
Here's a rundown of what you get from the various outputs and features, and how the front and back panel controls and
switches affect them while running the unit in its simplest for m: in Single Channel Mode ("Dual Mode" switched off) and with
nothing in the external effects loops.
UNBALANCED OUTS
Tuner Out
This is a direct signal straight off the input buffer, before the first gain stage, pre-everything. No controls will affect it, not
even the "Preamp Volume." This feature is totally isolated from the rest of the Preamp, therefore avoiding the "loading down"
of the instrument which could cause a loss in dynamic range.
To use this feature, plug in a shielded patch cord from the Tuner Out to the INPUT on your tuner.Turn the amplifier on and
you're ready to go.
Direct Out
With the "Line/Direct" switch in the "Direct" position, your signal sees the first tube stage and the limiter. Only the "Preamp
Volume" and "Limiter/Leveler" controls will affect the signal. With the "Line/Direct" switch in the "Line" position, the Direct Out
jack sees ever ything, including the Preamp EQ at all times and Mo' Bass effects when engaged.
Mo' Bass Out
This signal sees "Preamp EQ" at all times and Mo' Bass effects when engaged.
BALANCED OUTS
Direct Out
This output differs slightly from the unbalanced "Direct Out." With the "Line/Direct" switch in the "Direct" position, your signal
sees the first tube stage and the limiter, and only the "Preamp Volume" and "Limiter/Leveler" controls will affect the signal.
With the "Line/Direct" switch in the "Line" position, the signal will see the entire "Preamp" section, including the EQ. Mo'
Bass effects are never present on this jack.The 3-position pad switch (-10dB, 0, -20dB) directly under neath the jack will pad
the signal as indicated.
Mo' Bass Out
Like the unbalanced Mo' Bass out, this signal always sees everything, including the Preamp EQ at all times and Mo' Bass
effects when engaged. The 3-position pad switch (-10dB, 0, -20dB) directly underneath the jack will pad the signal as
indicated.
Ground/Lift Switch
The "Ground/Lift" switch affects the XLR jacks only, and affects both at once. Most often the "Ground" position is correct.
With the switch in the "Ground" position, the ground to pin 1 is engaged. In case of excessive ground noise (most likely
caused by a non-standard wiring of an XLR connection at a mixing console), use the "Lift" position. Moving the switch
to the "Lift" position will interrupt or defeat the ground on pin 1. Pin out for the XLR jacks on the Mo' Bass are as follows:
Pin 1 = ground
Pin 2 = positive
Pin 3 = negative
If a persistent hum exists after trying both positions of the ground lift, there is probably a miswire or bad ground in the feed
lines to the mixing board, or a dirty or miswired A/C socket.
13

3-Position Pad Switches
As mentioned above, each XLR jack has its own independent switch for padding the signal if necessary. The center position
is 0 dB, the left position is -10dB and the right position is -20dB. Front-of-house engineers and mixing consoles usually like
to see -10dB, but some will take up to -20dB and others can take unity gain (0 dB). Make the choice that best suits your
needs.
How Dual Mode Affects The Interface Panel
The Interface section allows a player the ability to send the same type of signal(s) to an external source (mixing board, extra
power amp, etc.) as to his own speaker cabinets. Since "Dual Mode" splits the signal into a "clean" and "wet" channel, we've
taken extra steps to ensure the widest variety of routing two or more signals. So, with that in mind, here's how
engaging "Dual Mode" affects the various functions:
Unbalanced Outs In Dual Mode
Tuner Out
Totally unaffected.
Direct Out
With the "Line/Direct" switch in the "Direct" position, it is unaffected.With the "Line/Direct" switch in the "Line" position, the
signal sees the entire "Preamp" section, including the EQ, but NO MO' BASS EFFECTS. In short, the "Dual Mode" switch
changes the function of this jack when the "Line/Direct" switch is set in the "Line" position.
Mo' Bass Out
Totally unaffected. It sees everything, just as before. So, if you want to run in "Dual Mode" and get the "clean" preamp sound
on one output and the "wet" Mo' Bass effects on the other, simply set the "Line/Direct" switch to "Line", and use the "Direct
Out" for the clean side and the "Mo' Bass Out" for the wet side.
Balanced Outs In Dual Mode
This section is simple in "Dual Mode" - nothing changes. The "Mo' Bass Out" jack still sees everything, and the "Direct Out"
jack sees tube and limiter only with the "Line/Direct" switch in the "Direct" position.However all "Preamp" functions (including
EQ) are present with the switch in the "Line" position. This allows you to send two signals to a mixing board, one always
"clean" ("Direct Out") and one that switches between clean and wet depending on what effects you're running ("Mo' Bass
Out"). Then the engineer can adjust the levels to what's best for the application, and you can adjust your master volumes for
what's best for you in your rig.
How The External Effects Loops Affect The Interface Panel
Some users will want to use external effects devices and route them to a mixing board or externally powered source as well
as the internal Mo' Bass power amps. Make no mistake about it - this gets fancy when dealing with the Interface section.
But for those who dare to care, here's what goes where.We'll say it once again:When Dual Mode is engaged, the "clean"
channel is always on the LEFT side, and the "wet" channel is always on the RIGHT.
Unbalanced Outs
Tuner Out
External effects are never present.
Direct Out
With the "Line/Direct" switch in the "Direct" position, no external effects are present. With the "Line/Direct" switch in the
"Line" position signal from only the LEFT EFX return will be present.
Mo' Bass Out
Signal from only the RIGHT EFX return is present at this output.
14

Balanced Outs
Direct Out
External effects are never present. This is another difference between the balanced (XLR) "Direct Out" jack and the
unbalanced (1/4") "Direct Out" jack.
Mo' Bass Out
Signal from only the RIGHT EFX return is present at this output.
Sending Stereo Externally Processed Signals
When "Dual Mode" is engaged and you have routed both left and right effect sends and returns to an external effects device,
a processed signal is present at both the "clean/left" and the "wet/right" sides of the Mo' Bass.To send a true stereo
externally processed output from the Mo' Bass Interface Panel, use the 1/4" Unbalanced or XLR Balanced "Mo' Bass"
Output for the "wet/right" send. Use only the 1/4" Unbalanced Direct Out with the "Line/Direct" switch in the "Line" position
for the "clean/left" send, as the XLR Balanced Direct Out will NEVER send an externally processed signal.This output is
dedicated to sending an unprocessed signal.
A Final Word On The Mo' Bass Interface Section
This isn't as complicated as it sounds. Most of the head-spinning text listed above was to define some esoteric patching
possibilities and how they might affect the signal present at certain outputs on the Interface Panel. Most often it will be
simple - one or two XLR outputs to a mixing board, and maybe a tuner out. But the information is here if you need it, and
remember - there's no substitute for experimentation and learning by trying all of the possibilities yourself. Before you get to
the gig, call your friend with the mini-studio in his or her bedroom, bring the Mo' Bass over, and find out for yourself what the
Mo' Bass Interface section is capable of. But br ing the manual with you, just in case.
Stereo Effects (EFX) Loop
As noted in the External Effects Blend Controls section of the manual, the Mo' Bass is equipped with a TRUE STEREO
External Effects Loop. You can now use an external effects unit to affect the channel(s) of your choosing (clean/left or
wet/right in Dual Mode; either or both in Single Channel Mode). Please refer to the External Effects Blend Controls section
of the manual for basic connection instructions and operation with the front panel Blend Controls. The information in this
section is meant to supplement that previous section.
Using The Stereo External Effects Loop
The Preamp Volume control acts as the closest thing to an overall effects send level control.The amount of signal present at
the Left and Right Effects Send jacks is governed by the Preamp Volume and various internal effects settings on the front
panel. The signal essentially goes through the entire front panel and heads for the Effects Send jacks just after the
Chorus section. Then the signal retur ns just before the Master section and is blended in to your taste (using the External
Effects Blend Controls).The Stereo Master Volume Controls will NOT affect the level of your Left and Right Effect Sends.
However, the Stereo Master Volume Controls may be used to recover losses in gain caused by some effects units.
If your effects unit is overloading and it does not provide for compensating incoming signals - such as an input volume, or
switches marked +4 dB or -20 dB - you may want to turn down the Preamp Volume control to avoid the overloading. If your
effects unit has input level adjustments, they should be set for either 0 dB or +4 dB.
And, of course, always use high quality shielded patch cables for all connections between the amplifier and your effects
units. Also, it is recommended that they be as short as possible.
A quick reminder: No sound from your external effects device will be heard if the External Effects Blend Controls are in the
full counter-clockwise ("dry") position! This is normal.
15

What Happens When Dual Mode Is Engaged?
Good question. What kind of signal is present at the Left and Right Effects Send jacks when Dual Mode is engaged?
The Left Effects Send jack will now see the "clean/left" channel, which is the entire Preamp section and its EQ, but NO
INTERNAL MO' BASS EFFECTS. In short, the "Dual Mode" switch changes the function of this jack.
The Right Effects Send jack will see the "wet/right" channel, which essentially means that it will not change - it always sees
everything, including the Preamp EQ at all times and Mo' Bass effects when engaged.
Using The Effects Return Jacks As "Power Amp Inputs"
If you wish to use just the internal power amps in the Mo' Bass, the Effects Return jacks can serve as "Power Amp Inputs."
If you have a MONO signal source and want to use just one side of the amp, you can use either the Left or Right Channel. If
you have a STEREO source, plug the left and right outputs into the corresponding Effects Return Jacks.
Remember: The Mo' Bass External Effects Loop is a TRUE STEREO loop. There is no "mono power amp input" jack that
routes your mono signal source to both sides of the amplifier. If you wish to run the Mo' Bass in this fashion, you will need to
split your mono signal source with a 'Y' cord and route the two ends into the Left and Right Effects Return Jacks. Also,
regardless of how you choose to patch this area, BE SURE that the position of the "Power Amp Assign Switch" (stereo or
bridged/mono) matches the way you are running your speaker outputs. Please refer to the "Speaker Outs" section for more
details.
Internal Effects (EFX) Bypass Jack
This is the input jack for the Internal Effects Bypass footswitch, which can be used to bypass any internal Mo' Bass effect
currently engaged. Please refer to the previously mentioned Inter nal Effects Bypass section of the manual for more details.
Filter Sweep Pedal Jack
This is the input jack for controlling the Bassynth Filter Control by means of an "Expression Pedal.” Please refer to the
previously mentioned Using The Bassynth-Filter Sweep Pedal section of the manual for more details.
"Mo' Control" Footswitch Input Jack (Ft. Sw. In) & MIDI Out Jack
This standard DB9 jack connects the "Mo' Control" Footswitch to the Mo' Bass. The "Mo' Control" Footswitch, available as
an accessory to the Mo' Bass beginning in late 2000, will allow the user to perform hands-free control of the various effects.
Individual switches are as follows:
1. Overdrive
2. SubWave
3. Bassynth
4. Mo' EQ
5. Chorus
6. Dual Mode
7. Internal Effects Bypass
8. Preset Group 1
9. Preset Group 2
10. Preset Group 3
11. Preset Group 4
The "Preset Groups" will allow you to store preset combinations of sounds.You could store Overdrive and SubWave on
Preset Group 1, Bassynth and Chorus on Preset Group 2, etc. The levels of each individual effect will be determined by how
the controls for that effect are set at the time you engage the switch.
The "Mo' Control" Footswitch also engages the MIDI Out function. By using the Preset Groups 1-4, you can send simple
MIDI commands (such as program change and bypass) to an exter nal MIDI device. This way you can coordinate
preset groups of Mo' Bass sounds with different exter nal effects and level controls. (For more details, please
refer to the "Mo' Control" manual.)
16

Speaker Output Section (Speaker Outs)
This section of the manual will deal with the proper connection of speaker cabinets to the power amplifiers in the Mo' Bass.
Some of this ground has already been covered in the Getting Started-Connecting Your Speaker Cabinets section in the
beginning of the manual. This is meant to supplement that section and provide information in greater detail, as power amplifiers, impedance and speaker cabinets are all crucial in determining how best to operate your new Mo' Bass.
Power Amp Assign Switch
The position of the Power Amp Assign Switch deter mines the Mo’ Bass power amp mode of operation. If you wish to run
your amplifier in the stereo mode, move the Power Amp Assign Switch to the "Stereo" position. Operation in the
bridged/mono mode is achieved by setting the Power Amp Assign Switch to the "Mono" position. Remember to change the
switch when you change modes of operation!
Choosing Y our Setup
How do you know when to run in stereo and when to run in mono? It depends on three factors:
1.The number of cabinet(s) you wish to use
2.The impedance of the cabinet(s) you wish to use
3.The power handling of the cabinet(s) you wish to use
How Impedance Affects Power Ratings
People often have questions about impedance. What is it? The root of the word "impedance" is the verb "impede", which
means to block or resist.That's what impedance is - resistance to power.
Power amps do not have a pre-deter mined impedance. They deliver power at whatever impedance the speaker cabinet tells
it to. That's why you hear the term "slave amp" - amplifiers only do what they're told. So if someone tells you that they have
a "4 ohm power amp," their terminology and understanding of the concept is way off the mark.
Unlike power amps, every speaker cabinet has a pre-determined impedance rating measured in "ohms." In most cases this
rating is either 4 or 8 ohms (though there may still be some old 2 ohm creakers out there). The higher the impedance of the
speaker cabinet, the more resistance to power it will offer. The lower the resistance of the speaker cabinet, the less
resistance to power it will offer. In other words, HIGHER IMPEDANCE MEANS LESS POWER CAN ENTER THE
SPEAKER CABINET. LOWER IMPEDANCE MEANS MORE POWER CAN ENTER THE SPEAKER CABINET.
You may be thinking that you've found the solution to the universe - just use speaker cabinets with really low impedances
and you can get skull-crushing power out of your amplifier, right? Wrong. There's a catch. Power amps have limits as to
how low an impedance they can drive safely. This is what's known as an amplifier's "Minimum Impedance Rating." If you try
and operate a power amp below its minimum impedance rating, it will give you lots and lots of power for about five minutes...and then overheat, short out and fail completely. In other words, THE LOWER THE OPERATING IMPEDANCE OF
THE AMPLIFIER, THE HOTTER IT WILL GET.
Mo' Bass Power Amplifier Minimum Impedance Ratings
Here's what this means to the power amp in the Mo' Bass. As mentioned previously there are two power amps in the Mo'
Bass, which can be run in stereo mode or bridged into a mono-block configuration. Let's discuss r unning in Stereo Mode
first. The Minimum Impedance Rating of the Mo' Bass in the Stereo Mode is 2 ohms per side. This means that you can
connect:
• One 2 ohm speaker enclosure per side
• Two 4 ohm speaker enclosures per side
• Four 8 ohm speaker enclosures per side
The Minimum Impedance Rating of the Mo' Bass in the Bridge/Mono Mode is 4 ohms. This means that you can connect:
• One 4 ohm speaker to the Bridge/Mono Output
• Two 8 ohm speaker enclosures to the Bridge/Mono Output
• Four 16 ohm speaker enclosures to the Bridge/Mono Output
17

Damage to the power amplifier section of the Mo' Bass may occur if speaker enclosures with total impedances less than the
minimum loads listed above are connected to the speaker output section. The owner's manual that came with your speaker
cabinet should state its total impedance. On SWR speaker enclosures, the total impedance is generally indicated on the
speaker's input panel.
So how do you determine the total impedance of two cabinets hooked up in parallel (parallel means off the same power amp
- either left, right or mono/bridged)? Here's a quick key of the most common setups:
• One 8 ohm enclosure + one 8 ohm enclosure = 4 ohms total impedance
• One 4 ohm enclosure + one 4 ohm enclosure = 2 ohms total impedance
• One 8 ohm enclosure + one 4 ohms enclosure = 2.67 ohms total impedance
Here's another formula:To figure out the total impedance of two or more cabinets of equal value hooked up in parallel, divide
the impedance of one cabinet by the number of cabinets:
• Impedance of one cabinet / number of cabinets = total impedance
(For an even more in-depth discussion of impedance and power rating issues, go to the SWR Website at
www.swrsound.com, click on "Press", then click on "Articles", then click on "Plug and Play - Setup Tips for Amps and
Speakers" - an article by SWR founder Steve Rabe that ran in the August '92 issue of Bass Player Magazine.)
Mo' Bass Power Delivery Capabilities (Power Ratings)
After determining how the number of cabinets you wish to run affects the total operating impedance, you need to take into
account the power handling capabilities of your speaker cabinets as compared to what the Mo' Bass can deliver at that
impedance. Those ratings are as follows:
Bridged/Mono Mode
900 Watts @ 4 Ohms (minimum)
650 Watts @ 8 Ohms
440 Watts @ 16 Ohms
Stereo Mode (per side)
600 watts @ 2 Ohms (minimum)
400 watts @ 4 Ohms
250 watts @ 8 Ohms
150 watts @ 16 Ohms
So if you have two 8 ohm speaker cabinets and you want to run them in stereo, they will each get up to 250 watts of power,
and more during transient peaks. In stereo, optimum performance will be achieved by using a total of 4 ohms per channel.
(When using 2 ohm loads, the amplifier will run hotter than normal and the internal fan will be running most of the time.)
Two 4 ohm cabinets in stereo will each get 400 watts of power. Make sure your speaker cabinets can handle the power!
This is even more crucial in bridged/mono mode. If you want to use one 8 ohm cabinet in bridged/mono mode, it had better
be able to handle up to 650 watts of power. If you want to use two 8 ohm speaker cabinets daisy-chained together in
bridged/mono mode - resulting in a 4 ohm total impedance - the combined power handling of those two cabinet had better
be at least 900 watts. Don't guess or assume that your speaker cabinets can handle the power listed above.Get the specs
and make sure!
Also be aware that when running the Mo' Bass in bridged/mono mode at 4 ohms, you are operating at the maximum
capacity of the power amplifier. With extreme settings on the Preamp Volume and Master Volume controls, you may hear
audible clipping of the power amp. If so, you have exceeded the maximum capacity of the power amp. POWER AMP
CLIPPING CAN CAUSE DAMAGE BOTH TO THE POWER AMP SECTION AND YOUR SPEAKER CABINETS. Either
use the Preamp Limiter/Leveler to help smooth out the peaks, or back off on the Preamp and Master Volume Controls.
18

Remember, it's always better to have a little too much power than just barely enough. If you find yourself constantly wanting
more power than the Mo' Bass provides, either:
a) ask your bandmates to turn down
b) ask the monitor engineer to turn you up
c) (best option) take the time to investigate getting an external power amp and/or additional speaker cabinets to supplement
your system.
Question: Can you safely daisy-chain an 8 ohm speaker cabinet and a 4 ohm speaker cabinet together in bridged/mono
mode? NO, because the resulting total impedance is 2.67 ohms, which is below the 4 ohm minimum impedance rating for
the Mo' Bass in bridged/mono mode.
Note: The frequency response of the Mo' Bass is far greater than usually found in musical instrument amplifiers (10 Hz to
40K Hz). This was engineered in order to give the bass player the same punch and clarity on stage as found in the studio
or concert P.A. systems. Therefore, it is doubly important that you are aware of the impedance and power rating of the
speakers that you intend to use, and that they are compatible with the Mo' Bass. Speakers that have been overdriven are
easy to detect and generally do not fall under manufacturer’s warranty
Left and Right (Stereo) Speaker Output Jacks
There are two 1/4" jacks and one Speakon jack provided for each side of the output section of the Mo' Bass.The Left and
Right speaker jacks are provided for use in the Stereo Mode only.DO NOT use these jacks when the Mo' Bass Power Amp
Assign Switch is in the "Mono" position. Balance between left and right channels can be obtained by using the Stereo
Master Volume Controls located on the front panel. Make sure all speakers are hooked up BEFORE turning on the Mo'
Bass whenever possible. Generally it's a bad idea to plug or unplug your speakers while the unit is on.
Speakon vs. 1/4" Jacks
We have found the Speakon connection to be superior in both stability and amperage conductivity, and so we have provided
Speakon output jacks in addition to the standard 1/4" jack. If using the Speakon output jack, we highly recommend the use
of a Speakon-to-Speakon speaker cable, one of which is supplied with your unit. (All SWR Professional Line speaker
cabinets come equipped with Speakon input jacks.) If your speaker cabinet(s) does not have a Speakon input jack, you
should use the 1/4" output jacks on the Mo' Bass and connect them accordingly. The Speakon jacks are wired "standard"
(+1/-1) and additional Speakon-to-Speakon cables are available through most musical equipment retail outlets.
Bridged Output Speakon Jack
The Speakon jack marked "Bridged Output" located directly below the Power Amp Assign Switch (in the center of the
"Speaker Outs" section) is provided for use in the Bridged/Mono Mode only. A six-foot heavy-duty speaker cable
(Speakon-to-Speakon) is provided with each unit for your convenience. MAKE SURE that the Power Amp Assign Switch is
set to "Mono" when using this jack!
Speaker Cable
Speaker cable should be made of at least 18-gauge wire, and heavier if possible. (The thicker the wire, the lower the gauge,
so 18-gauge is heavier than 20-gauge, 16 gauge is better than 18 gauge, and so on.) DO NOT use instrument cables to
hook up your speakers.This can result in inter mittent power loss, cause the power amp to oscillate and damage itself and/or
your speakers, and render the cables useless for any purpose.
Left and Right Speaker Fuses
The left and right speaker fuses are provided to protect your speakers in the unlikely event of a power amp failure or
incorrect hook-up procedures. Size and rating of the fuses are 3AG, 10 amp, fast-blo.Do not defeat the pur pose of this
feature by using a higher rated fuse. The speaker fuses can open if there is a fault in the speaker cable or even the
speakers themselves.Therefore, it is always wise to carry extra fuses at all times.
Line (Mains) Fuse
The size and rating of the Line Fuse is 3AG, 8 amp, slo-blo. It serves to protect your amplifier's power supply and
transformer from large voltage spikes caused by an external source, and also serves to protect the transformer in the
unlikely event of a power supply failure. NEVER replace this with a fuse of a higher rating as it will void your warranty.
19

A/C Cord Receptacle
This receptacle accepts a standard A/C power cable (supplied with the Mo' Bass), the same kind used with almost all current
musical, professional and household electronic devices. If it does become misplaced, replacement will be easy at almost
any appliance store, supermarket or the like. Make sure the AC cord is plugged firmly into both the amplifier and the wall
socket.If your cord ever becomes frayed or split, don't fool around - replace it immediately.
Note: the rating for the A/C cable is 3 conductor, 10 amperes MINIMUM. If replacement is necessary, or if you wish to buy a
longer cable, look for the rating on the cable and be sure it is at least 10 amps.
Internal Features
Vacuum Tube (Valve)
SWR installs a specially selected 12AX7 dual triode on the motherboard of every Mo' Bass. If this tube needs replacing, we
recommend that you replace it with a similar high quality product. This tube will need replacing only if it becomes noisy or
microphonic (sounds like glass tinkling in the background of certain notes), or completely fails (causing no signal or signal at
very low levels). As mentioned in the "Preamp" section of the manual, it should last one to three years, depending on usage.
Cooling Fan
The Mo' Bass contains a two-speed, thermostatically controlled cooling fan.The fan runs at a slow, "idle" speed at all times
during powered operation.When the temperature of the heatsink reaches 50 degrees centigrade, the fan will automatically
go to "high-speed" and remain at high-speed until the heatsink cools down to approximately 40 degrees centigrade. This
greatly reduces component fatigue and increases reliability.
Make sure all vents are unobstructed when installing your Mo' Bass in a rack case. This will allow for cool air to come in and
hot air to escape.Viewing the Mo' Bass from the front, the right side is the air entr y side, while the left side is the air escape
side.
Note: At low volume levels, the cooling fan in the Mo' Bass may be audible.
Rack Mounting Instructions
To preserve the beauty and reliability of your amplifier, we recommend that you install your amplifier in a rack case.
The Mo' Bass is completely ready to be rack mounted and needs no additional parts or accessories other than the rack
screws and the case itself.
The Mo' Bass takes up three full rack spaces (5").If the rack that you mount the Mo' Bass in requires that the rubber feet on
the bottom of the chassis be removed, please remember to keep the screws handy in case you wish to reattach the rubber
feet at a later date.
The Mo' Bass should be mounted as close to the bottom of the rack case as possible. If you must mount the Mo' Bass
in an area of the rack other than the bottom space, a piece of wood or similar solid material should be installed between
the bottom of the rack case and the bottom of the amplifier to prevent flexing of the amplifier's chassis. Severe or constant
flexing of the chassis can damage the amplifier and is not covered under the warranty.
Please do not forget about your amp after it has been installed in a rack case. Continuous transportation and vibration can
cause screws to become loose, both on the Mo' Bass and with your rack case rails. We recommend that at least once a
month you remove the Mo' Bass from the case and tighten all outside screws (especially the rear mounted screws holding
on the front panel) and wipe off the outside of the chassis with a damp cloth. Then check all the connections in your rack
case and reinstall the unit.
20

A Few Words Concerning Heat
One of the most asked questions about our amplifiers is why they tend to get warmer than other amps. The chassis of your
amplifier can get quite warm during normal usage. This is especially true if you are using a 4 ohm total impedance in the
Bridged mode.This is because a 4 ohm impedance (or 2 ohms per channel in the Stereo mode) introduces the least
efficient condition of the unit (in terms of power drawn from the outlet in relation to power produced in the speakers). The difference in these two figures can be as high as 300 watts. This would be the equivalent of putting a 300 watt light bulb inside
a metal box, which would obviously get quite hot.
Most musical instrument amplifiers on the market today use steel for their chassis, which does not conduct heat as well as
aluminum.The Mo' Bass uses an all aluminum chassis and front panel because it has less impurities than steel, is less
susceptible to rust, and is a better conductor of heat. This results in the chassis acting as an additional heatsink, drawing
heat away from heat-producing components inside and thus extending their life. In this manner, we feel we have produced
a more reliable amplifier, but, at the same time, the outside of the Mo' Bass will get warmer than cases made out of steel.
The one condition you should be aware of is if one or more of the power amplifiers in your unit becomes "over-biased."
This condition can be recognized by turning your amplifier on and letting it sit "idle" (without speakers plugged in and without
playing it). If your unit starts getting hot under these conditions, it may be over-biased. This situation should be attended to
and can be easily remedied in about 15 minutes by a qualified service technician. A power amp can become over-biased
through continuous vibration or by any large jolt received in shipping, etc.
Mode Diagrams
Following the FAQ section (Pages F1 and F2) are several pages of mode diagrams (MD1 through MD6).These diagrams are
provided to give the Mo’Bass user a visual guide to proper connection procedures.Beginning with simple connections (MD1)
and gradually becoming more complex (MD6), these diagrams outline the various connection possibilities available from the
Mo’ Bass.
Suggested Settings
Following the Mode Diagram section (Pages MD1 through MD6) are several pages of Suggested Settings.These are meant
to be used as a starting point only, as we realize that every user will get something completely different out of the Mo' Bass
due to the dynamic sensitivity of the entire unit, especially when combining effects. But, just so you know what kind of
sounds we've been hearing around the factory from various players, we offer these possibilities to try for yourself.
We performed these tests using a standard Jazz bass with the Preamp Volume set at '5' (except where otherwise noted).
Of course, you can try any of these sounds in either Single Channel of Dual Mode, and you can set the Master Volumes
as loud as you want (just so long as your speaker cabinets and your neighbors can handle it). Have fun!
21

MO’ BASS • FREQUENTLY ASKED QUESTIONS
Q: With all this talk of clean and wet sounds, do I need two speaker cabinets to run the Mo' Bass properly?
A: No! You can use one cabinet in either bridged/mono mode (if your speaker cabinet can handle the power) or on one side
in stereo mode.
Q: I can't seem to get a good balance between clean and wet sounds. What's wrong?
A: If you're using the Overdrive, tr y adjusting the Overdrive Level. If you're using the Synth with the resonance below '4', try
boosting the Preamp EQ. You can always engage "Dual Mode" and use the Master Volume controls to mix clean and dir ty
levels as well.
Q: Why are there two EQ sections on the Mo' Bass?
A: The Preamp EQ is the classic SWR EQ, designed to be used for EQ'ing your clean bass signal. The Mo' EQ is designed
as a post-effects EQ. In general, it's better to EQ an effect than apply effects to a heavily EQ'd signal. You can use both
EQ's at the same time if you wish.
Q: What's the difference between Single Channel Mode, Dual Mode, Stereo Mode and Bridged Mono Mode?
A: Single Channel and Dual Mode refer to different modes of operation for the "front end" (preamp and onboard effects),
while Stereo Mode and Bridged/Mono mode refer to different modes of operation for the power amp.
Q: So can you run Single Channel Mode on the "front end" and Stereo Mode on the power amp at the same time?
Or Dual Mode on the "front end" and "Bridged/Mono" mode on the back end at the same time?
A: Yes in both cases! Just make sure you use the proper speaker outputs as referred to in the "Speaker Outs" section of the
manual.
Q: I want to get heavy distortion with the Overdrive and use the SubWave and Bassynth at the same time, but I can't
get any Overdrive signal at all.What's wrong?
A: Make sure the Mix controls on either the SubWave or Bassynth aren't set all the way clockwise - if so, you've blended out
all of the Overdrive signal.
Q: All of these 1/4" and XLR outputs in the Interface section are confusing me. Which output should I use if I just
want to send one signal with everything in it to a mixing board?
A: Use the XLR Mo' Bass Out. (See diagram MD1).
Q: I'm running in Dual Mode and have my clean signal going to one speaker cabinet and my wet signal going to
another speaker cabinet. How can I send the exact same thing to a mixing board?
A: For the wet signal, send a line from the XLR Mo' Bass Out. For the clean signal, send a line from the either Direct Out,
and put the Line/Direct switch in the Line position. (See diagram MD3).
Q: How come the MIDI Out isn't working?
A: The MIDI Out will only engage when the "Mo' Control" footswitch is in use as well.
Q: Why do both Master Volume controls work when I'm running the power amp in bridged/mono mode?
A: Because the "left" and "right" channels go through a "summing" amp just before the speaker out section. This occurs
regardless of what mode you're running the unit in, both on the front end and the power amp.
Q: I want to slap with the Bassynth on, but it sounds like something is clipping or being overloaded no matter what I
do. How can I get that wah-wah-style Envelope Filter sound?
A: Engage the Overdrive while the Bassynth is on, and turn the Overdrive "Drive" control down to almost '0'. Then adjust the
Overdrive Level control to taste. This allows the original bass signal to go through the Bassynth filter, as opposed to the sawtooth wave going through the filter (which doesn't like to see huge peaks in the input signal, such as you get during
slapping).
F1

MO’ BASS • FREQUENTLY ASKED QUESTIONS
Q: Why does the Bassynth Resonance control affect the volume so much?
A: Because when you increase the Resonance control, you're actually narrowing the band of frequencies that are allowed to
pass through the Filter. When you take away frequencies from your signal, it is no longer "full range" - and there is a
perception of volume loss from those missing frequencies. You'll notice that when the Resonance is at minimum, the
Bassynth level may actually be louder than when the effect is disengaged.This is normal.
Q: Will the "Mo' Control" footswitch be able to memorize settings on the Mo' Bass?
A: It will memorize groups of effects, but not actual settings because the Mo' Bass is not a digital device - it's analog. When
a preset group of effects engages, the settings for each control will be wherever the knobs are set at the time.
Q: So how can I store preset levels?
A: By using the MIDI Out function, you can send Presets 1-4 and a bypass to work with the first five presets on your MIDI
device, and then you can program the levels on your MIDI device.
Q: When I run in Dual Mode I seem to lose a little overall level. Why?
A: The effects you're using may be boosting the overall signal level (which you can test by hitting the Internal Effects Bypass
switch). If so, when you engage Dual Mode, you're taking one channel of the unit and dropping its signal back down to the
unaffected level. If you can achieve balance between your clean and wet sounds before using Dual Mode, you should hear
no difference when running in Dual Mode.
Q: When I put the Bassynth Mix control all the way to "Synth", why does the Preamp EQ become inoperable?
A: Because the Bassynth takes its input signal directly from the first input stage of the Mo' Bass, and you've completely
mixed out the original bass signal with the Bassynth Mix control. To achieve additional EQ, either mix some of the original
bass signal back in with the Bassynth Mix control, or use the Mo' EQ.
F2
MO’ BASS • SIGNAL PATH DIAGRAM

LIMITED WARRANTY
The Mo’ Bass from FMIC is warranted to the original consumer purchaser for TWO YEARS from the
date of purchase, against defects in materials and workmanship and provided that it is purchased from
an Authorized SWR Dealer. This warranty applies only to products purchased in the USA or Canada.
This warranty is VOID if the unit has been damaged due to accident, improper handling, installation or
operation, shipping damage, abuse or misuse, unauthorized repair or attempted repair, or if the serial
number has been defaced or removed. FMIC reserves the right to make such determination on the
basis of inspection by an Authorized FMIC Service Center.
All liability for any incidental or consequential damages for breach of any expressed or implied
warranties is disclaimed and excluded herefrom.
Some states do not allow limitations on how long an implied warranty lasts, or the exclusion or
limitation of incidental or consequential damages, so that the above exclusion may not apply to you.
This warranty gives you specific legal rights and you may also have other rights which vary from state
to state.
SHOULD YOUR SWRSHOULD YOUR SWR AMPLIFIER REQUIRE SERVICE OR REPAIR, AMPLIFIER REQUIRE SERVICE OR REPAIR,
PLEASE USE THE FOLLOWING PROCEDURE:PLEASE USE THE FOLLOWING PROCEDURE:
Locate your original receipt showing date of purchase, model and serial number.
1
Determine the closest Authorized FMIC Service Center to your location. The fastest way to get a complete list of
2
Authorized FMIC Service Centers is on the web, at:
http://www.mrgearhead.com/faq/allservice.html
You can also get this information by calling FMIC Consumer Relations at (480) 596-7195.
To receive warranty service, return the complete product to an Authorized FMIC Electronics Service Center, with proof
3
of purchase, during the applicable warranty period. Transportation costs are not included in this Limited Warranty.
Defective products that qualify for coverage under this warranty will be repaired or replaced, at FMIC's discretion, with
4
a like or comparable product, without charge.
For a complete list of Authorized SWR Service Centers, please visit: www.swrsound.com
SWR SWR
8860 E. Chaparral Rd. Suite 100
Sottsdale, AZ 85250-2618 USA
PHONE: (480) 596-9690
FAX: (480) 367-5262
EMAIL: custserve@fenderusa.com
WEB: swrsound.com
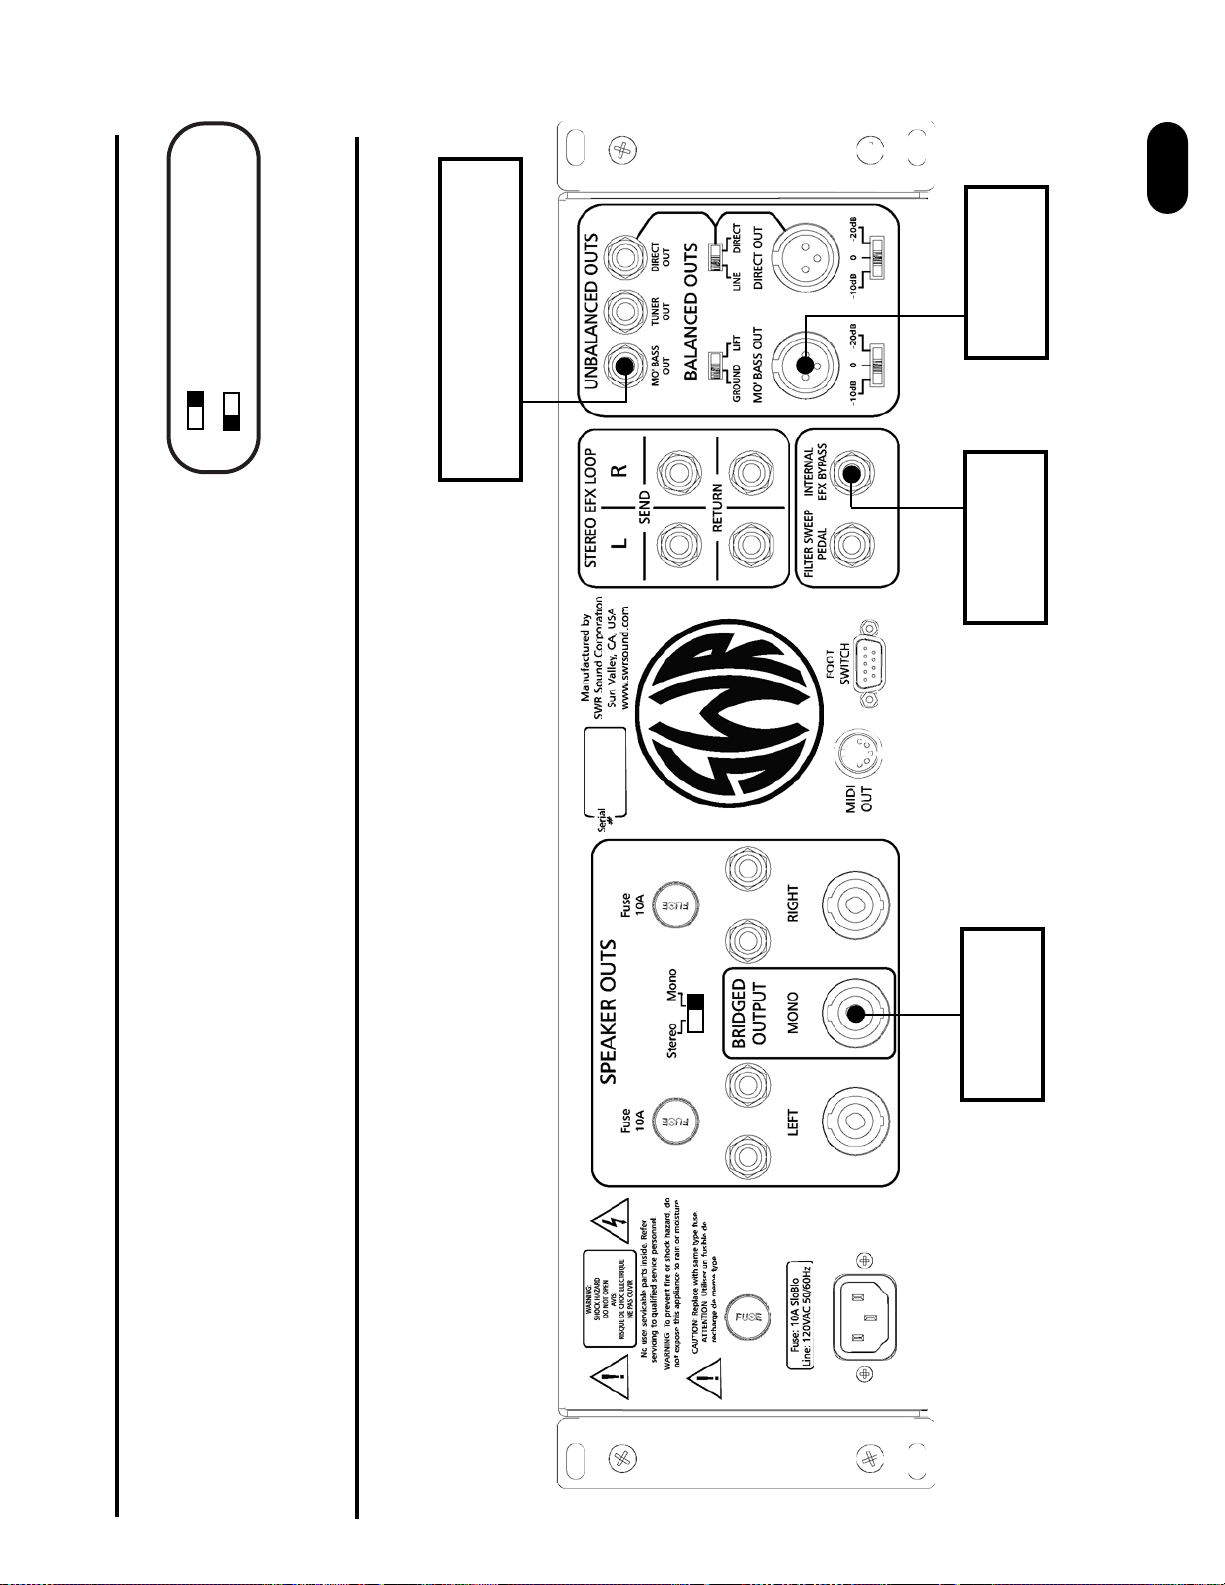
MODE DIAGRAM 1
FRONT END: Single Channel Mode
POWER AMP: Bridged/Mono Mode
SPEAKER CABINETS: One
SIGNALS TO CONSOLE: One
MD1
= BRIDGE/MONO MODE
= STEREO MODE
External Power Amp
(If desired)
Mixing
Console
Internal EFX
Bypass Pedal
Speaker
Cabinet

MODE DIAGRAM 2
FRONT END: Single Channel Mode
POWER AMP: Stereo Mode
SPEAKER CABINETS: Two
SIGNALS TO CONSOLE: One
MD2
= BRIDGE/MONO MODE
= STEREO MODE
External Power Amp
(If desired)
Mixing
Console
Expression
Pedal
Speaker
Cabinet 2
Speaker
Cabinet 1

MODE DIAGRAM 3
FRONT END: Dual Mode
POWER AMP: Stereo Mode
SPEAKER CABINETS: Two
SIGNALS TO CONSOLE: Two (One always clean with preamp EQ • One wet when effects engaged.)
MD3
= BRIDGE/MONO MODE
= STEREO MODE
External Power Amp
(If desired)
Mixing
Console
Volume
Pedal
“Wet” Speaker
Cabinet 2
“Clean” Speaker
Cabinet 1
(clean)
(wet)
Internal EFX
Bypass Pedal
IN
OUT

MODE DIAGRAM 4
FRONT END: Dual Mode
POWER AMP: Bridged/Mono Mode
SPEAKER CABINETS: One or Two
SIGNALS TO CONSOLE: Two (One always direct/clean • One wet when effects engaged.)
MD4
= BRIDGE/MONO MODE
= STEREO MODE
External Power Amp
(If desired)
Mixing
Console
Speaker Cab 2
(8 Ohm)
Speaker Cab 1
(8 Ohm)
Internal EFX
Bypass Pedal
Please Note:
The minimum load that the Mo’ Bass
can drive in Bridge/Mono Mode is
4 ohms total.This means that you
can connect two 8 ohm enclosures
in parallel as pictured.

External Effects Unit
MODE DIAGRAM 5
FRONT END: Single Channel Mode
POWER AMP: Bridged/Mono Mode
SPEAKER CABINETS: One
SIGNALS TO CONSOLE: One (with external effects unit)
MD5
= BRIDGE/MONO MODE
= STEREO MODE
External Power Amp
(If desired)
Mixing
Console
Speaker
Cabinet
Please Note:
The minimum load that the Mo’ Bass
can drive in Bridge/Mono Mode is
4 ohms total.This means that you
can connect one 4 ohm enclosure or
two 8 ohm enclosures in parallel.
Left Out
Right Out
Mono In

MODE DIAGRAM 6
FRONT END: Dual Mode
POWER AMP: Stereo Mode
SPEAKER CABINETS: Two
SIGNALS TO CONSOLE: Two (with two external effects units)
MD6
= BRIDGE/MONO MODE
= STEREO MODE
Effect Unit 1
Mixing Console
Output
Input
Effect Unit 2
Output
Input
“Wet” with
Right FX Loop
“Clean” with
Left FX Loop
1
2
Speaker Cab 2
“Wet” with
Right FX Loop
Speaker Cab 1
“Clean” with
Left FX Loop

THE DINOSAUR
THE DINOSAUR II

IN A MINI-MOOD
MELLOW DRIVE

BOMB DROPPER
COME TOGETHER

ALL SYSTEMS GO!
SWEET SLAP

WEATHER FORECAST 1
WEATHER FORECAST 2
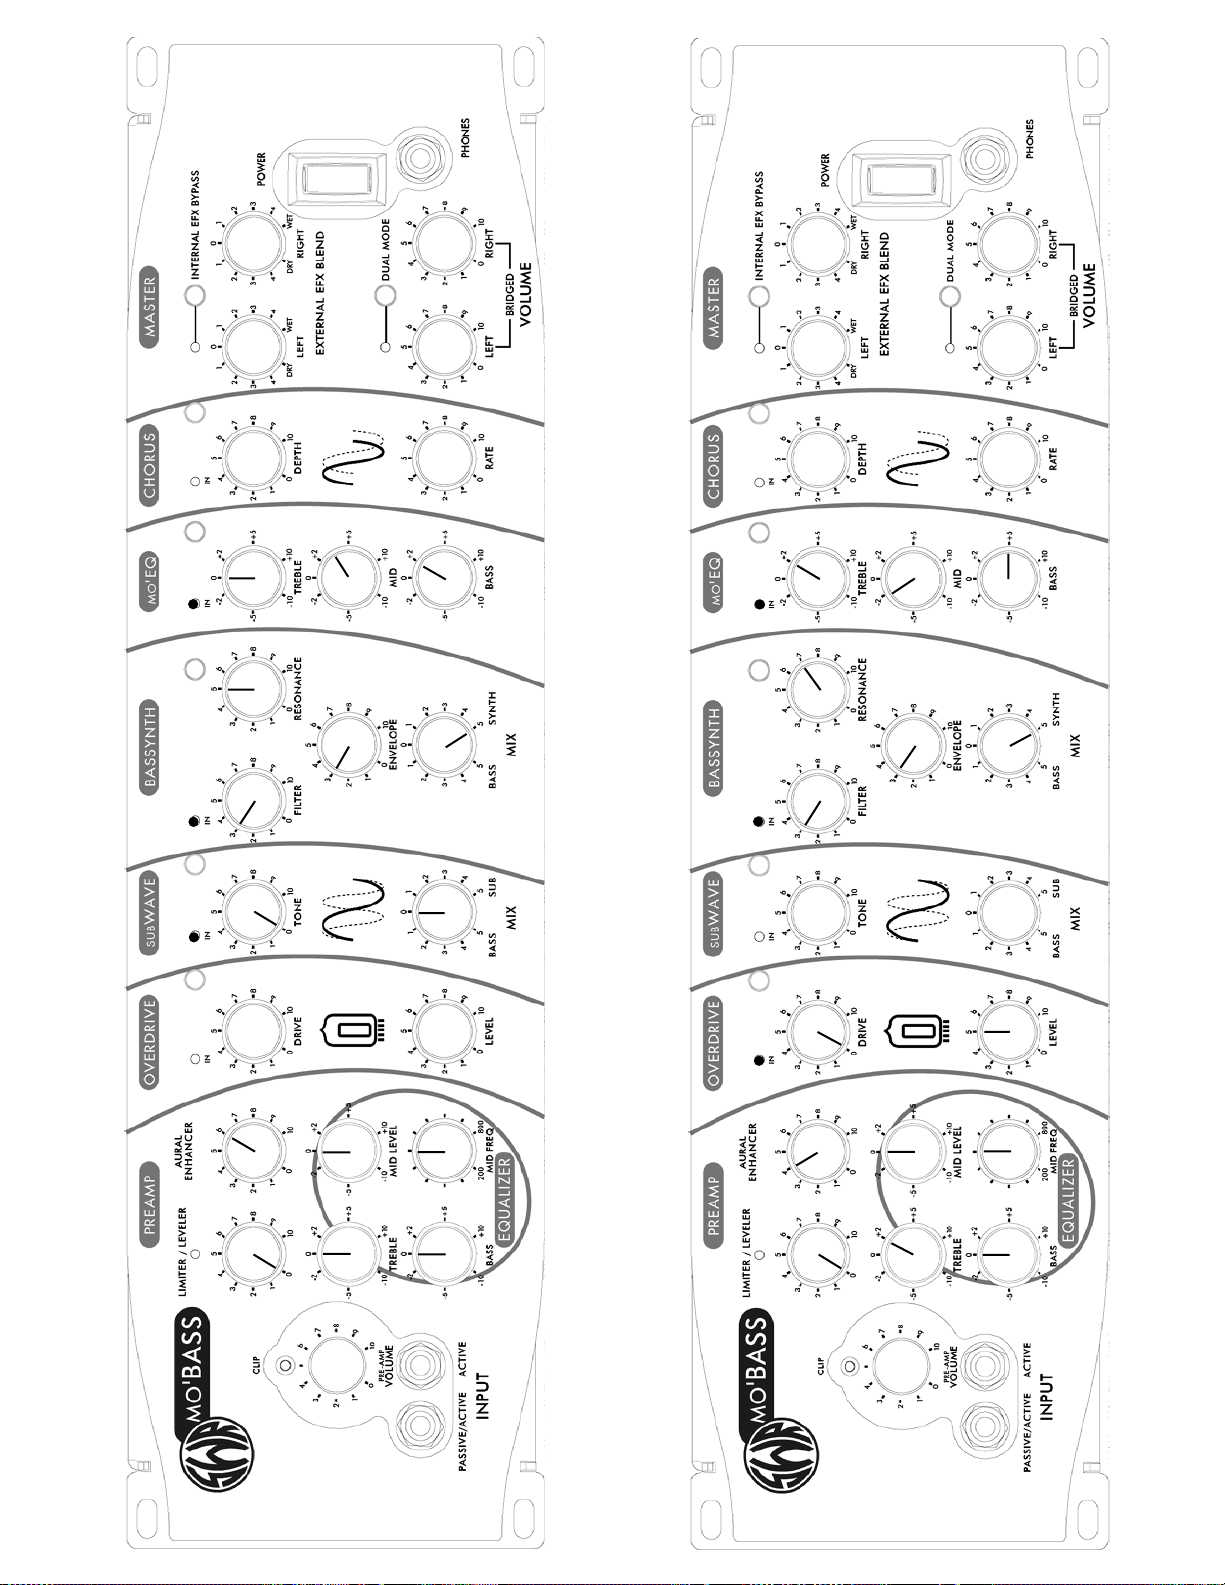
SONGS IN THE KEY OF MO’
CHAMELEON
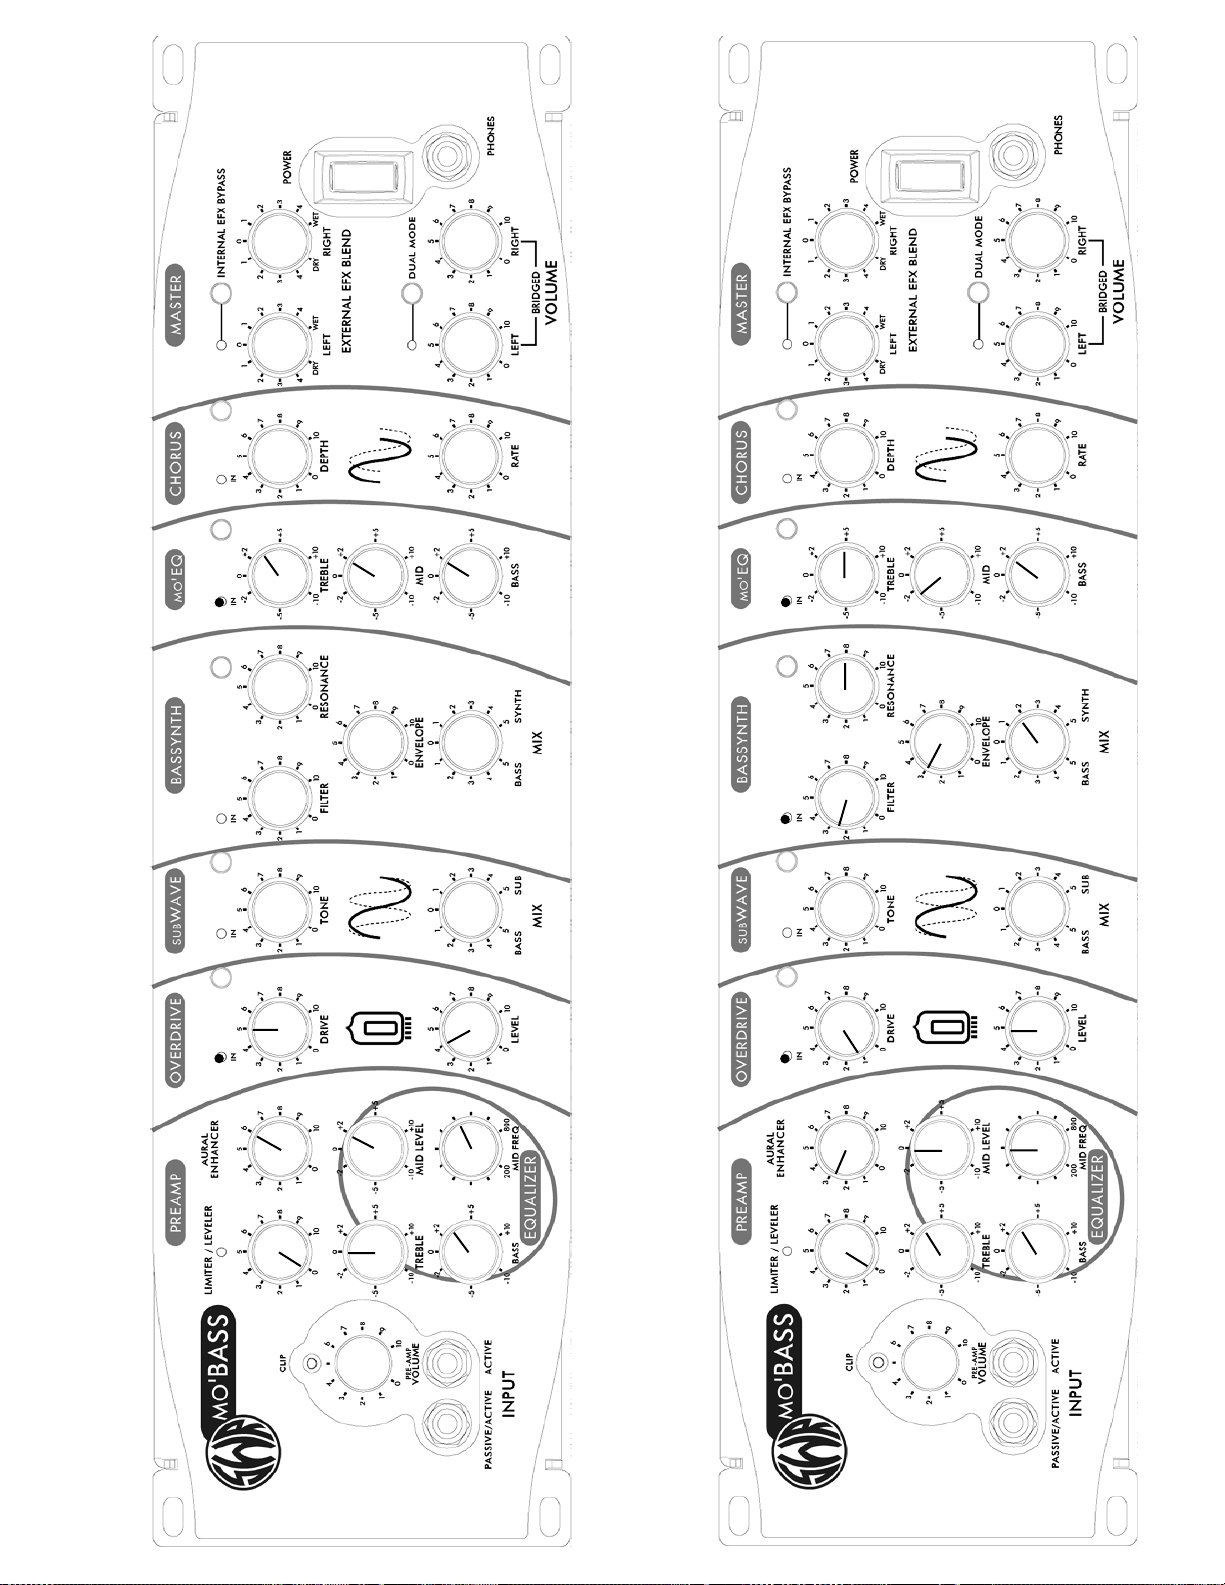
RAGE OVERDRIVE
FOLLOW THE ENVELOPE

TOM SAWYER
VOODOO PRINCESS
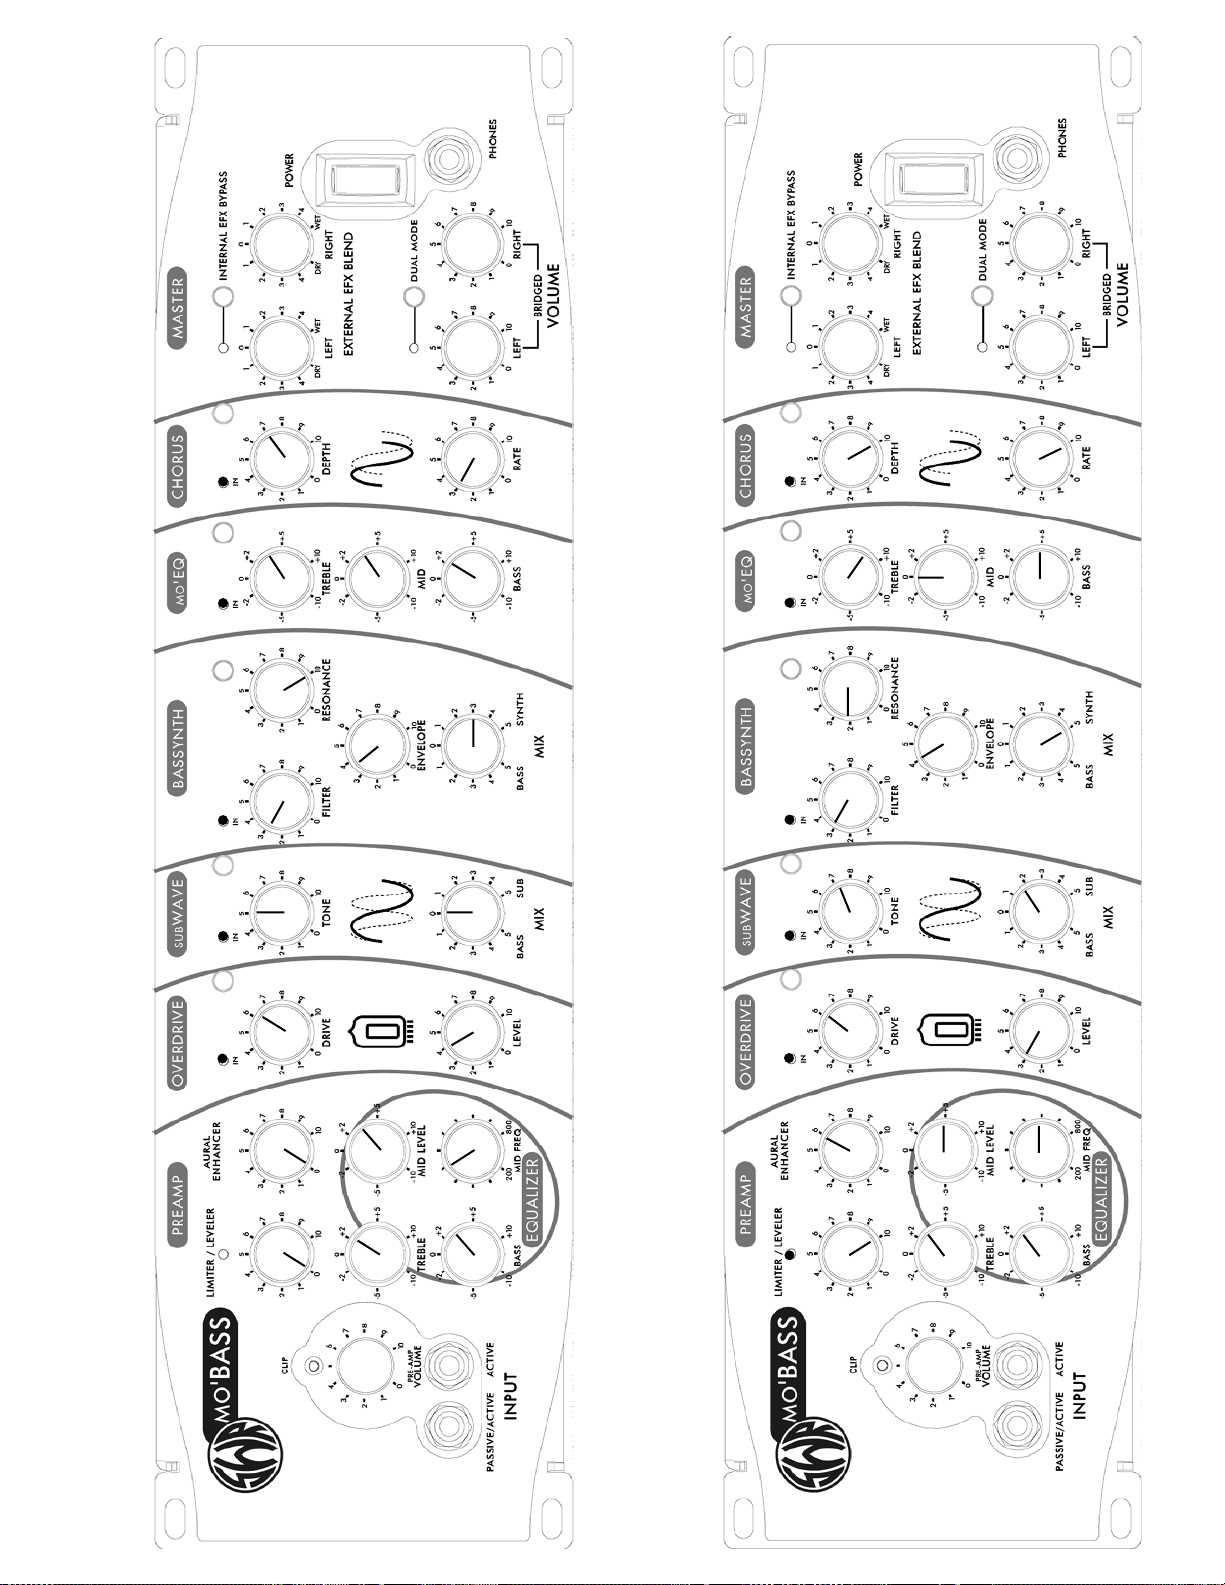
PHASE-O-MATIC
THE ALIENS HAVE LANDED - AND THEY’RE ANGRY
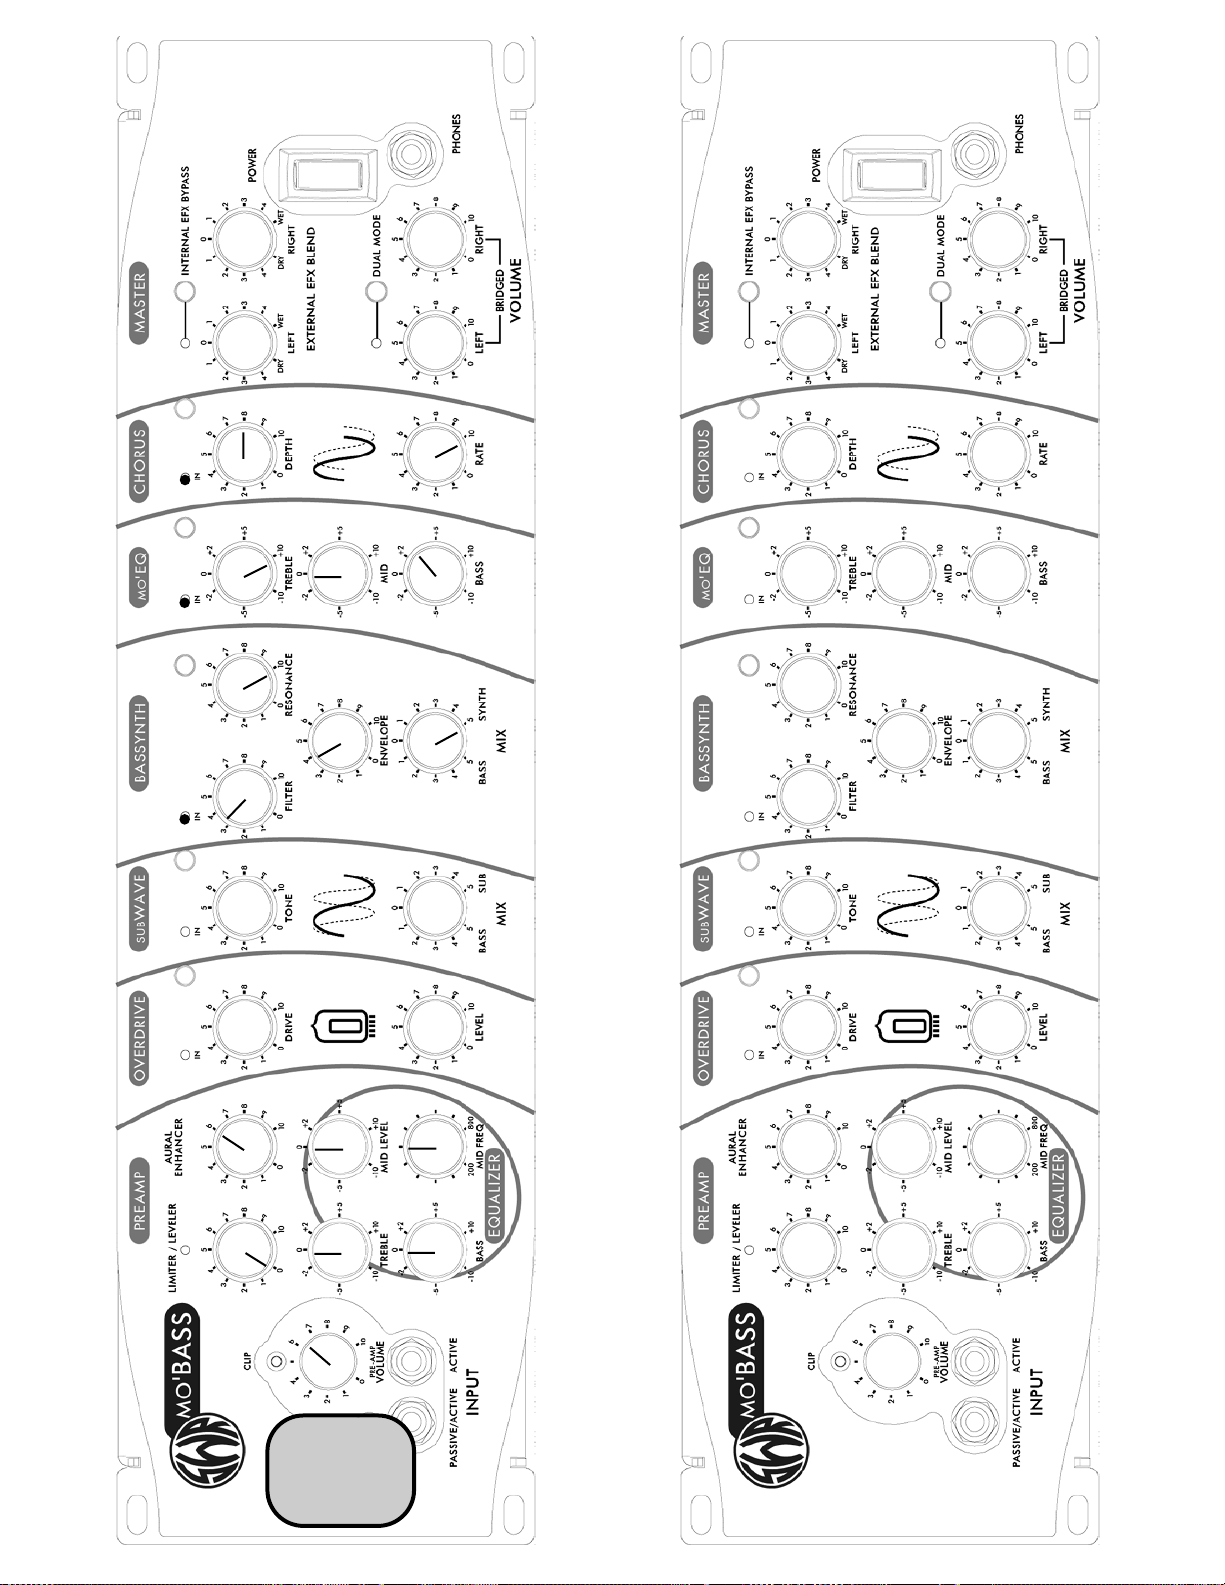
MO’ BASS “ARKESTRA”
CREATE YOUR OWN
Note:
Pre Amp
volume should
be set just prior
to activating the
clip LED for
this setting.
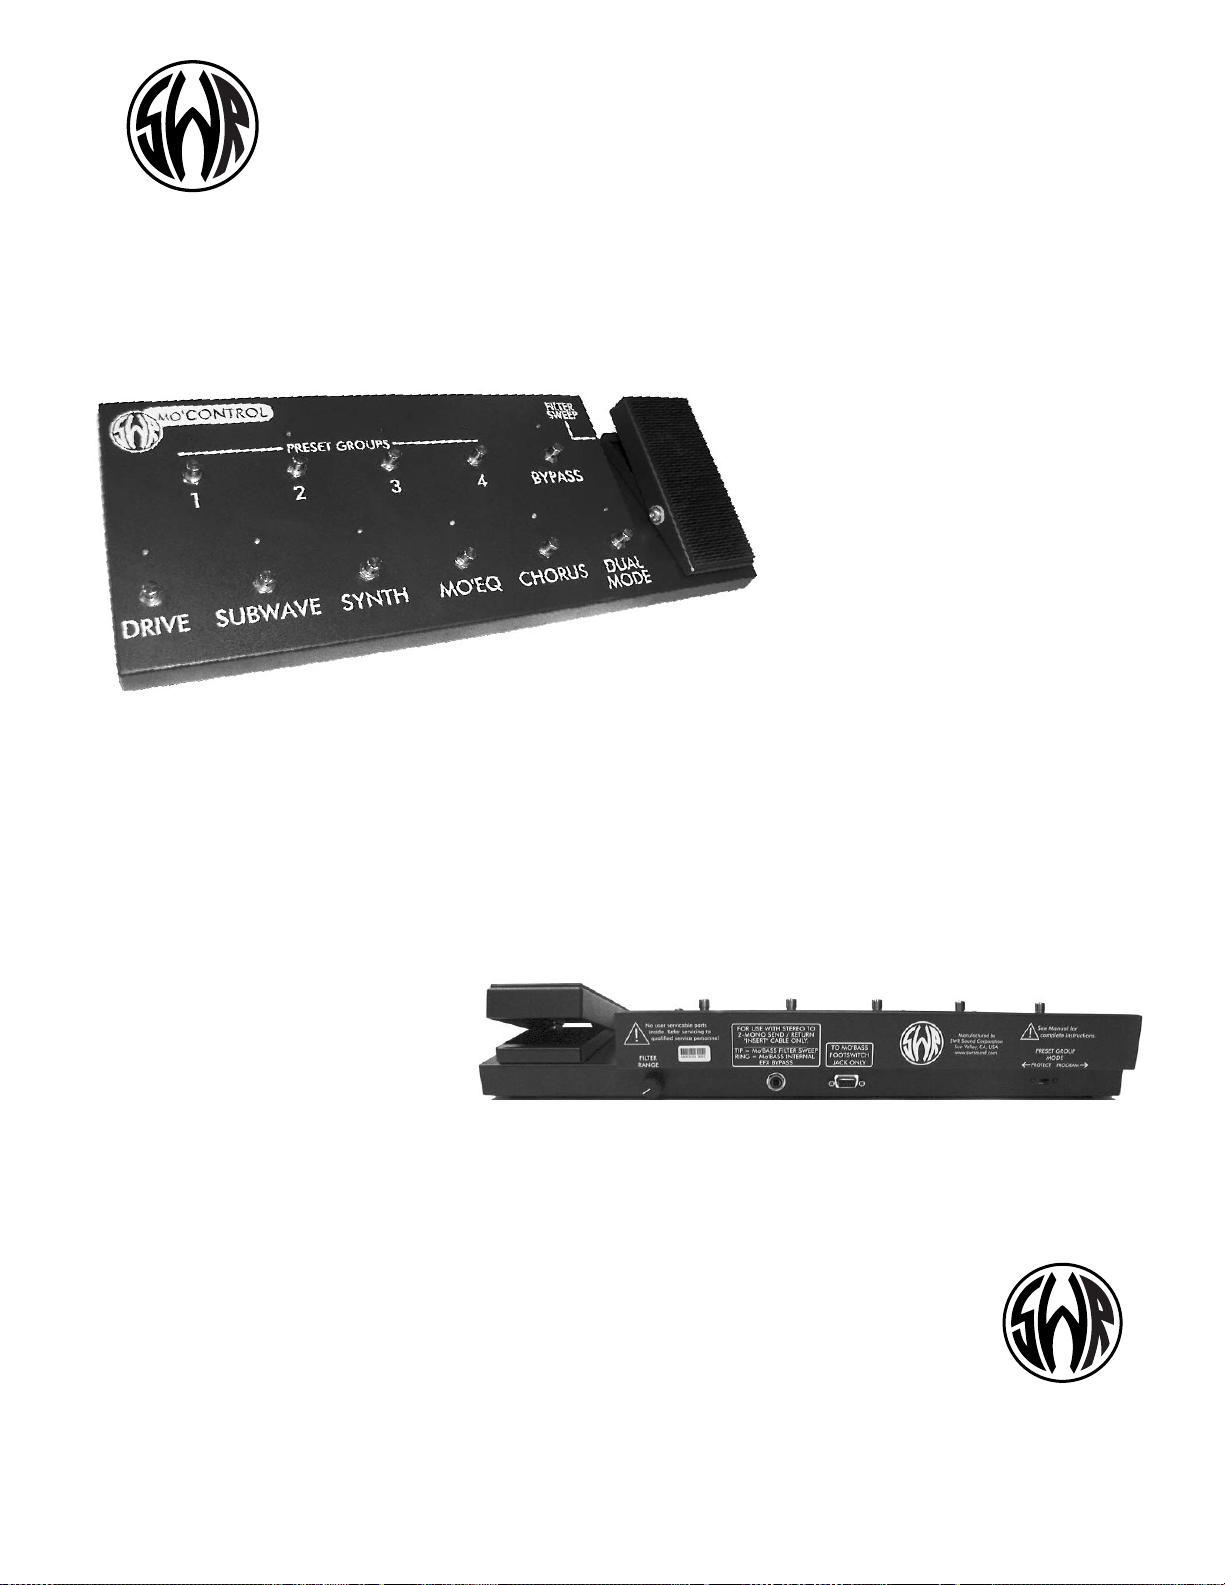
Get MO’ CONTROL...
And Unleash the Power of your SWR Mo’ Bass!
Now that you’ve experienced the brave new world of Mo’ Bass, tap into a
creative universe with the MO’ CONTROL foot pedal. Using Mo’ Control you
can interact intuitively with your Mo’ Bass and discover exciting new ways to
express your unique musical vision.
Mo’ Control is a pedalboard-
style controller that lets the
Mo’ Bass user switch
between various ef fects
and groupings of effects.
There are individual on/off
controls for each effect,
including Drive, SubWave,
Bassynth, Mo' EQ, and Chorus. You can also
activate Dual Mode from Mo’ Control. Four preset banks allow
you to store any combination of Mo’ Bass effects and switch between those
presets. You can also add or subtract any ef fect fr om the cur rently selected
preset group. Mo’ Control’s bypass switch lets you pop back and forth between
your “Mo-Tone” and your naturally clean, unaffected basssound.Finally, at the
right of Mo’ Control is an expression pedal for opening and closing the Bassynth
filter. By using the pedal to manipulate the filter, you’ve got access to tonal
characteristics impossible to find anywhere but on the Mo’ Bass.
Get the most out of your
Mo’ Bass. Stop by your
local SWR bass amplification dealer today, and say:
“I want Mo’ Control!”
For more info on the SWR Mo’ Control, go to:
www.swrsound.com/pages/products/proseries/mocon.html
swrsound.com
 Loading...