

S WR SOUND CORPORATION
LA SERIES
USER GUIDE
SWR SOUND CORPORATION
9130 Glenoaks Blvd.
Sun Valley, CA 91352 USA
PHONE: (818) 253-4797
FAX: (818) 253-4799
EMAIL: suppor t@swrsound.com
WEB: swrsound.com
© 2001 SWR SOUND CORPORATION

INTRODUCTION
Congratulations on your purchase of an SWR LA Series combo amp. You now own what we believe
to be the best-sounding, most affordable bass combo amp available on the market today.
Since 1984, SWR has earned a well-respected reputation for designing and manufacturing high-end
professional bass amplification systems. That famous “SWR sound” is known worldwide, having
made its way to stages of all sizes, from local pubs and clubs all the way up to the world’s biggest
stadium shows and outdoor festivals. You’ve heard the sound of SWR bass amplification on countless recordings, too. Now, that renowned “SWR sound” can be found in what we believe are the
best-sounding, affordable bass combos available today: the SWR LA Series.
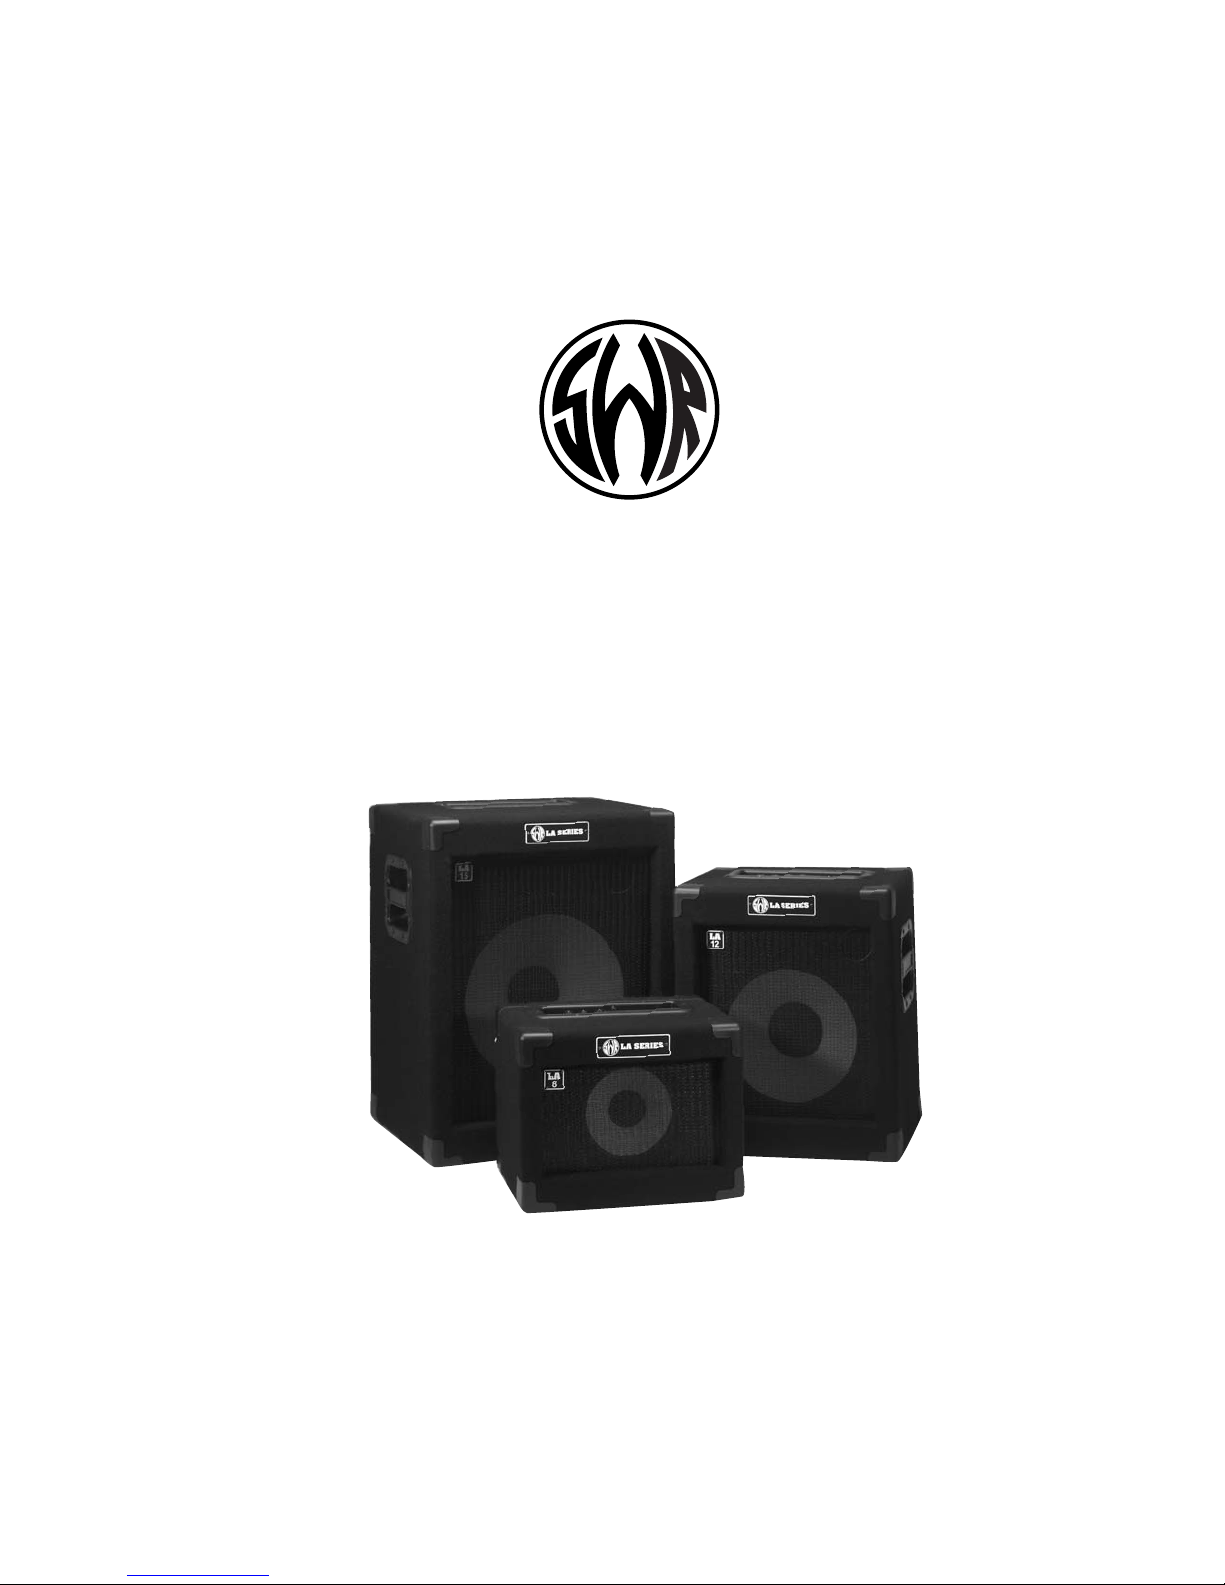
All of the models—LA 8, LA 12 and LA 15—come with a basic SWR preamp designed by company
founder Steve Rabe, easy-to-use tone controls, a tuner out jack, a headphone jack that automatically defeats the speaker system, and a “mix in” jack for practicing along with a CD player. For
beginners, it’s all you need to get you on the road to developing your own musical voice as a
bassist. For experienced players, it’s the renowned SWR package in its most basic form. Try miking it in the studio for a great sound to tape, or use it as an “armchair” practice amp.
Please take the time to read this manual thoroughly and completely so that you can fully realize
the potential of your new LA Series combo amp. And welcome to the world of real bass tone.
SWR Sound Corporation
1
LA 8
LA 15
LA 12

LA SERIES FEATURES
Top
• Input Jack
• Bass Control
• Midrange Control
•Treble Control
•Tuner Out Jack
• Stereo Headphones Jack
•Mix In Jack
• Illuminated On/Off Neon Power Switch
Rear
• Line Fuse (see specs below for ratings)
• A/C Cord Receptacle
LA SERIES SPECIFICATIONS
Weight
LA 8 = 20 lbs.
LA 12 = 36 lbs.
LA 15 = 50 Lbs.
Dimensions
LA 8 = 11"H x 14"W x 11"D
LA 12 = 18"H x 15"W x 13"D
LA 15 = 23"H x 18"W x 16"D
Power Output
LA 8 = 30 watts RMS
LA 12 = 60 watts RMS
LA 15= 100 watts RMS
Tuner Output Impedance (all models)
100 ohms
Mix In Jack Impedance (all models)
22K ohms
Tone Control Center Frequencies
Bass = 80 Hz
Mid = 800 Hz
Treble = 5kHz
2

Speaker Impedance (all models)
8 ohms
Line Fuse Ratings
120 Volt Models:
LA 8 & LA 12 = 2 amp slo-blo
LA 15 = 3 amp slo-blo
230 Volt Models:
LA 8 & LA 12 = 1 amp slo-blo
LA 15 = 1 _ amp slo-blo
GETTING STARTED
Remove the A/C cable from the accessory pack and connect it from the amp’s A/C RECEPTACLE
to a standard wall outlet. Make sure that the VOLUME control is set to the minimum position (fully
counter-clockwise). Locate the POWER SWITCH on the right side of the top panel and turn the
amplifier on. The switch should illuminate in red. Upon powering up, don’t be surprised if you hear
a small pop. This is absolutely normal.
Plug your instrument into the INPUT jack. Turn your instrument’s volume up to at least 75% of
maximum and slowly turn up the amp’s VOLUME control until you reach your desired loudness. If
you turn it up to the maximum (fully clockwise), the tonal quality will most likely decrease. Simply
turn the VOLUME control down until your hear the sound you want. (There is no limiter/compressor
circuit in the LA Series models—hard limiters on small combo amps tend to ruin a good bass
tone.) More information is available in the section marked “Volume Control.”
TOP PANEL FEATURES
Input Jack
This jack accepts a standard 1/4" phone plug as found on standard instrument cables, and can
be used with passive and active basses alike. Be sure to insert the cable plug straight down into
the jack, not from an angle. Also be sure to inser t the cable plug fully into the jack. You should
feel three “latches” as you insert the cable plug, and after the third latch your cable should be
fully inserted. (This is true for all jacks in the LA Series.)
Volume Control
This control is used to set the volume of your LA Series amp. When the knob is fully-counter
clockwise, there should be no sound at all. As you turn the knob clockwise, the sound will gradually become louder.
The optimal setting for the LA Series VOLUME control will depend on what kind of bass you use
and how hard you play the strings of your instrument. There are two kinds of electric basses:
active and passive. An "active" bass contains “active” electronics, requires a batter y for proper
operation, and usually contains EQ controls that can boost a signal significantly. A “passive” bass
3

does not require a batter y, and generally has a lower output than an active bass. (If you don’t
know whether or not your bass is active or passive, check the owner’s manual to make sure.)
Since an active bass has a higher output than a passive bass, the optimal setting for the LA
Series VOLUME control will most likely be lower for active basses than for passive ones. As
always, use your ears to make the best determination.
Tone Controls
The preamp and tone control circuit in all SWR LA Series amps is the same basic circuit featured in
our acclaimed Professional and Workingman’s lines. We’ve condensed many of our “Pro” features
into the circuit… so now the SWR sound is “automatic.”
For each tone control, rotating the knob counter-clockwise from the center “click” position will
reduce (or cut) the level of bass, mid or treble. Rotating the knob clockwise will boost these levels. (See the LA Series Specifications for the center frequencies of these controls.)
The BASS control works in a range that will be useful under most normal conditions. Its musical
use might be thought of as a “fatness” control—it determines the overall “punch” of your instrument. With passive instruments, this will be straightfor ward. With active instruments containing
bass-boost/cut functions, more exploration will be worthwhile. Remember, this control can boost
bass up to 15dB, so adjust it carefully.
The MIDRANGE control operates in a crucial area for most instruments. Many basses (particularly
ones with roundwound strings) can have a very “honky” or nasal sound. Dropping the MIDRANGE
control can go a long way toward smoothing out your tone. We suggest, though, that what sounds
best when you’re listening to your tone by yourself may not be what works best when playing with
other musicians, or along with a CD when practicing. Use your ears to determine what you like best.
The TREBLE control operates in a tonal area that extends through and beyond the usual treble
control range. Over time, we have found this approach to result in a more “musically useful”
treble. Boosting the control will open up the sound of a dull instrument, especially one with dead
strings. However, this is also the range of string rattle, finger slides, pickup clicks, etc. Again, we
recommend you experiment with the control alone with your instrument while finding your tone,
and listen again when playing with other musicians or with a CD.
Tuner Out Jack
This jack allows you to connect an instrument tuner to your LA Series amp without having to
unplug and go back and forth from amp to tuner to amp. Simply plug in a shielded patch cord
from this jack to the INPUT of your tuning device. Turn the amp on and you're ready to go. If you
don’t want to monitor your sound while tuning, turn down the VOLUME control all the way. This jack
also functions as a “preamp out” jack. Simply connect a shielded patch cord from the TUNER OUT
jack to another power amp, or a powered monitor, or even a live mixing board or studio console.
The tone controls WILL affect the signal present at this jack.
Headphones Jack
By inserting a set of STEREO headphones into this jack, you will be able to monitor your sound or
practice without disturbing your neighbors. Once you insert the headphone plug into this jack, the
internal speaker system will automatically shut off.
4

The VOLUME control serves as the control for volume of the headphones as well. We suggest you
begin with the VOLUME control off (fully counter-clockwise), then slowly bring the volume up to your
desired level. If you hear some distortion in your headphones, turn down the VOLUME control.
You’re probably overdriving your headphones and could ruin them through continued use in this
fashion (not to mention damage your ears in the process).
Any impedance stereo headphones will work. However, optimum impedance is 75 ohms.
Note: Do NOT use mono headphones as they could shor t out the system.
Mix In Jack
By using this jack, you can practice along with a CD player or other audio device, or even jam with a
friend. Simply plug the external “source” stereo signal (from a CD player, cassette deck, MiniDisc,
friend’s instrument, etc.) into this jack. The MIX IN jack has a fixed level, so the external source’s
volume control should be used for balancing levels between the two signals. (The LA Series Volume
Control will still work for controlling the level of anything plugged into the LA Series INPUT jack.) The
MIX IN jack will accept either a stereo (most recorded music) or mono (most instruments) signal.
Effects Loop? Well, Yes. Sort Of...
No, there’s nothing marked “Effects Loop” on your LA Series amplifier… but that doesn’t mean
you can’t connect an external effects device to the system in “loop” fashion. Use the TUNER OUT
jack as the “effect send” and route that signal to the input of your effects device. Then route the
output of that effects device back to the MIX IN jack (which acts as the “effect return”) on your LA
Series combo amp. Use the level controls on your effects device to control the amount of effect
blended in with the original signal and—voilá!—you’ve got an effects loop!
REAR PANEL FEATURES
A/C Line (Mains) Fuse
The line fuse can open (blow) due to power surges or high power line transients. This fuse will
also open in the unlikely event of an electronics failure inside your amplifier.
Correct size and rating of the line fuse: 3AG, 3 amp slo-blo for 120V operation, and 1.5 amp
slo-blo for 240V use. DO NOT DEFEAT THE PURPOSE OF THIS FUSE BY USING A HIGHER AMPERAGE RATING. THIS COULD VOID YOUR WARRANTY.
A/C Line Cord Receptacle
Accepts a standard A/C power cable (supplied with the LA Series in the United States), used with
almost all current musical, professional and household electronic devices. We recommend taking
great care when packing up. Put the cable in your instrument case, accessory case, etc. If you
misplace it, replacements can be found at almost any appliance store or supermarket.
Please Note: The rating for this cable is 3-conductor, 18 gauge, 10 amperes. If replacement is
necessary, or if you wish to buy a longer cable, look for the correct rating on the cable.
5
LA SERIESLA SERIES LIMITED WARRANTYLIMITED WARRANTY
The LA SeriesLA Series from SWR Sound Corporation is warranted to the original consumer purchaser for
ONE YEAR from the date of purchase in the USA against defects in materials and workmanship and
provided that it is purchased from an authorized SWR dealer.
This warranty is VOID if the unit has been damaged due to accident, improper handling,
installation or operation, shipping damage, abuse or misuse, unauthorized repair or attempted repair,
or if the serial number has been defaced or removed. SWR Sound Corporation reserves the right to
make such determination on the basis of factory inspection.
All liability for any incidental or consequential damages for breach of any expressed or implied
warranties is disclaimed and excluded herefrom.
Some states do not allow limitations on how long an implied warranty lasts, or the exclusion or
limitation of incidental or consequential damages, so that the above exclusion may not apply to you.
This warranty gives you specific legal rights and you may also have other rights which vary from state
to state.
SHOULD YOUR SWRSHOULD YOUR SWR AMPLIFIER REQUIRE SERVICE OR REPAIR, AMPLIFIER REQUIRE SERVICE OR REPAIR,
PLEASE USE THE FOLLOWING PROCEDURE:PLEASE USE THE FOLLOWING PROCEDURE:
Locate your original receipt showing date of purchase, model and serial number.
1
Determine the closest SWR Authorized Service Center to your location. The fastest way to get a complete list of
2
SWR Authorized Service centers is on the web, at:
http://www.swrsound.com/service/servicecenternetwork.html
You can also get this information by calling the factory at (818) 253- 4797, prompt 3 (service).
In the case where the unit must be shipped, pack your unit carefully (using original packaging whenever possible),
3
and include a copy of your bill of sale. Ship the unit PREPAID to the SWR Authorized Service Center of your choice.
SWR Sound Corporation will provide free repair (parts and labor), or replacement at our option, on units determined
4
to be under warranty. In the case of shipping, the SWR Authorized Service center will return the repaired unit to you
FREIGHT COLLECT.
For a complete list of Authorized SWR
Service Centers, and the latest SWR news,
interviews, and more, check out our web-
SWR SOUND CORPORATION.
9130 Glenoaks Blvd.
Sun Valley, CA 91352 USA
PHONE: (818) 253-4797
EMAIL: support@swrsound.com
site:
swrsound.com
FAX: (818) 253-4799
WEB: swrsound.com
 Loading...